Posts Tagged ‘XP’

Windows XP multicore not detected after CPU update – XP Enable multicore after singlecore install

Friday, April 8th, 2016

windows-xp-add-multicore-with-command-after-multiple-cpu-not-detected
These days it is not common to install Windows XP however for some old unsupproted applications that still work on XP in many countries  in Africa, Asia, Europe and even America. Custom patched Windows XP is still heaveily used for some corporate businesses in accounting and on airports and other government institutions even to these day, I'm aware of Windows still heavily used especially in  Russia, Belarus,Ukraine, Kazakhstan, Armenia, Bulgaria etc.

Hence still there is plenty of softwares designed to work XP the good old Win XP and thus often XP needs to be emulated on VMs though officially not supported any longer  by Microsoft (its Support lifecycle End was for a last time on April 14, 2009).

Now I guess these days I guess nobody doesn't install and use Windows XP on a normal hardware PC Desktop / laptop but XP is continually installed on Virtual machine servers VMWare / VirtualBox.

Hence if you happen to have already migrated or installed some old Windows XP operating systems under VMWare for a corporate clients single core machine (no matter virtual or physical) and the client requires an update of hardware of the Virtual Machine you will be surprised that even though you add a second / third etc. core (new CPUs) the virtual machine hardware and restart the Windows XP installation.

It seems XP is designed to remember the install time CPU model hardware so once the VM and doesn't have a way to update its HAL (Hardware Abstraction Layer) definitions if you install it in Virtualbox thus to make XP recognize the extra added CPU cores it is necessery to do a small hack with a devcon.exe utility downloadable from Microsoft site to do the trick

1. Download the command line devicemanager utility (devcon.exe) from Microsoft Development Network MSDN here.

Note that it will work only if you use the correct version depending whether XP is  (x86/x64) bit install so check it out from My Computer -> Properties.
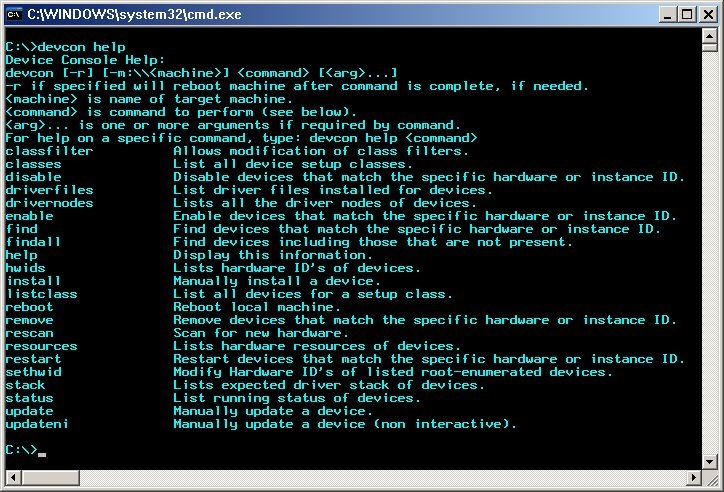
windows-xp-multicore-not-detected-enable-add-multicore-after-singlecore-windows-xp-install-with-devcon-exe

2  Next. Execute the following 2 commands:

    devcon sethwid @ROOT\ACPI_HAL\0000 := +acpiapic_mp !acpiapic_up
    devcon update c:\windows\inf\hal.inf acpiapic_mp

devcon.exe will  let the automatic hardware detection find out the extra CPU (multicores) added.
Wait 'till you get prompted for a reboot.
Be brave Reboot! 🙂

There is pretty much more fun useful things you can do with devcon.exe such as disabling USBs from command line,
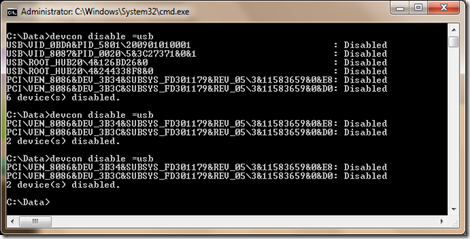
DEVCON-command-DisableUSB_on-windows-xp-7-8-howto

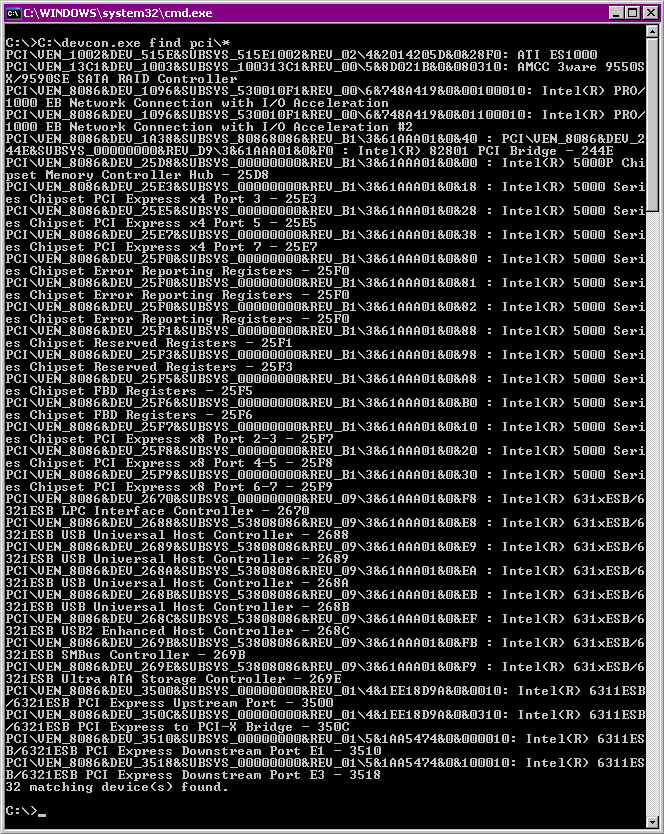
listing your PCI devices and so on:

devcon-windows-command-to-list-pci-devices-on-xp7-win8-win10

You should now see all cores, hooray cores will appear in Task Manager / System Information.

Howto Change MAC address in Linux and Windows 2000, XP and Vista (Mac Spoofing :)

Sunday, September 20th, 2009

MAC stands for (Media Access Control) and stands for the computer physical address in LAN networks.
Ethernet MAC is a six byte number, usually expressed as a twelve digit hexadecimal number.
IPs are translated to Mac via a protocol called ARP (Address Resolution Protocol).
Let’s say Computer with IP 10.10.10.1 wants to send information to another system on the LAN with anIP of 10.10.10.2.
10.10.10.1 will first send broadcast to all stations on the LAN asking who has the address of 10.10.10.2.
Then the box possessing 10.10.10.2 will respond to 10.10.10.2 with it’s MAC address which would be temporary stored
in 10.10.10.2′s ARP’s table in order to make 10.10.10.1 recognize 10.10.10.2 later on.

Host 1 (10.10.10.1): Hello everyone on the LAN (FF:FF:FF:FF:FF:FF), who has the IP 10.10.10.2? My MAC is DE:AB:BE:EF:FF:FE so you can respond back to me.Host 2 (10.10.10.2): Hello DE:AB:BE:EF:FF:FE, I have IP 10.10.10.2 and my MAC address is 1C:43:B6:F8:9B:1E so you can send your IP packets to me.
There are a plenty of reasons that might force to wish for changing your mac. Though I’ll mention only one
1. To get across MAC filtering set on a router. Or in other words to bee able to access your internet withall your computers at home (don’t try them simultaneously!). For example recently a cousin of mine bought a secondnotebook for her daughter.
They desired to be able to access the internet with both the PCs. I contacted the ISPwith a request to add me a second MAC address, just to find that this wasn’t possible with this exact ISP.
Their computer ran dual boot install of a GNU/Linux system as well as Windows Vista, thus I needed to change their existing MACaddress in both Windows and Linux
Here is how I achieved that:
1. In Linux
Really simple:/sbin/ifconfig eth0 hw ether 00:00:00:00:00:00 (substitute here with your desired MAC)/sbin/ifconfig eth0 up
2. On BSD
/sbin/ifconfig xl0 link 00:00:00:AA:AA:AB (subst with MAC here), xl0 is your interface name/sbin/ifconfig xl0 up
3. In Windows XP
There are a couple of ways to go in Windows. The hardest way is to use regedit and to look and substitute some obscure values.
Another a bit easier way is to use either MacMakeUp , Smac or EtherChange
The classic way to change Mac in Windows XP is:
Go to Start->Settings->Control Panel and double click on Network and Dial-up Connectionsa) Right click on the NIC you want to change the MAC address and click on properties.b) Under “General” tab, click on the “Configure” buttonc) Click on “Advanced” tabd) Under “Property section”, you should see an item called “Network Address” or “Locally Administered Address”, click on it.e) On the right side, under “Value”, type in the New MAC address you want to assign to your NIC. Usually this value is entered without the “-” between the MAC address numbers.f) Goto command prompt and type in “ipconfig /all” or “net config rdr” to verify the changes are applied.
4. In Windows Vista
Go to Control Panel -> Network Connections -> Properties (on Connection using …) Configure -> Advanced -> Network Address (Then type your MAC Here)
All the credits for this post go to the article Changing Your MAC Address In Window XP/Vista, Linux And Mac OS X which explains what you read above even more thoroughly.
Most of the information here is originally found in the above article.END—–

Reset Windows (NT, 2000, XP, Vista and Windows 7) password / Reset Windows Forgotten Password / Reset Windows Administrator password

Friday, March 12th, 2010

Recently I was in the Pomorie’s Monastery – St. George .
One layman left his notebook (maybe as a donation) to the monks. However the notebook was protected by both: fingerprint check, as well as administrator password and therefore the notebook was completely unusable and was thrown away with many other unused belongings.
When the abbot of the monastery found out I’m adept with computers, he asked if I can fix up the notebook and somehow remove the password, or reinstall the machine to make it usable.
So here I decided to blog what I undertook to reset the windows password with the hope somebody else could benefit from that as well.

1. Go to Offline NT Password & Registry Editor, Bootdisk / CD website

2. Download the bootable CD image zip archive of Offline NT Password & Registry Editor and burn the iso to a CD using K3b (on Linux), Nero or CDBurnerXP on (Windows).

3. Follow the step by step walkthrough manual (here) to either change Some Windows user password or completely reset administrator or any other user password.

Following the walkthrough literally prooved to be quite succesful for me and I was able to properly reset the administrator password!
So Hooray it works again! The monks can now benefit of the cute Toshiba satellite machine.

Windows 7 change windows behavior like XP How to / Make Windows 7 act like XP

Tuesday, January 21st, 2014

If you haven't worked for a while with Windows (since the days when XP was standard modern OS) you might be amazed that Windows like me. You might feel pretty unconfortable to work with Windows 7's "dock style" taskbar – showing application icons instead of buttons.

dock-style-taskbar-windows-7-screenshot

People who are traditionalist like me would definitely prefer to change this stupid behavior to "Windows Classic". Here is how to do it:

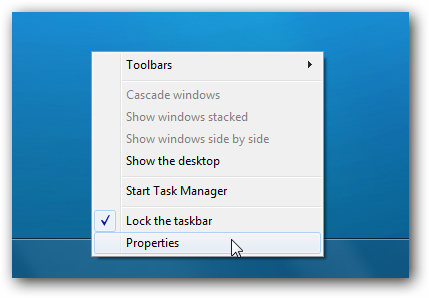
1. Right click on any open area on taskbar and choose Properties

properties-on-empty-taskbar-windows-7-screenshot
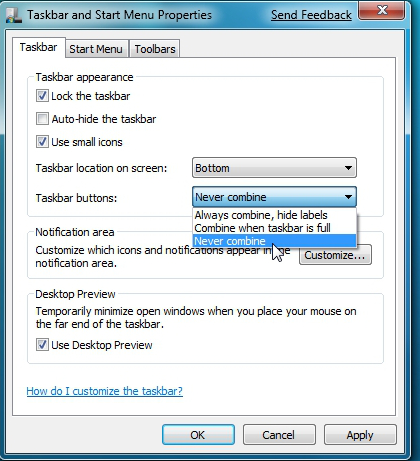
2. From Taskbar -> Taskbar Buttons choose (Never Combine).

Never Combine – option makes every new Window to show as a separate one instead of Grouping the Windows by application.
In some cases choosing (Combine when TaskBar) is full is nice new option, so you might want to check it out for a while and see if you can get used to it.

never_combine_windows-7-make-windows-look-like-XP-and-2000

3. Make Windows Start menu panel look like Windows 2000 (clear up unnecessary mambo-jumbo design)
I very much like simplicity thus I don't like Microsoft's choise to make Start Menu panel look like a Christmas Tree. To revert back:

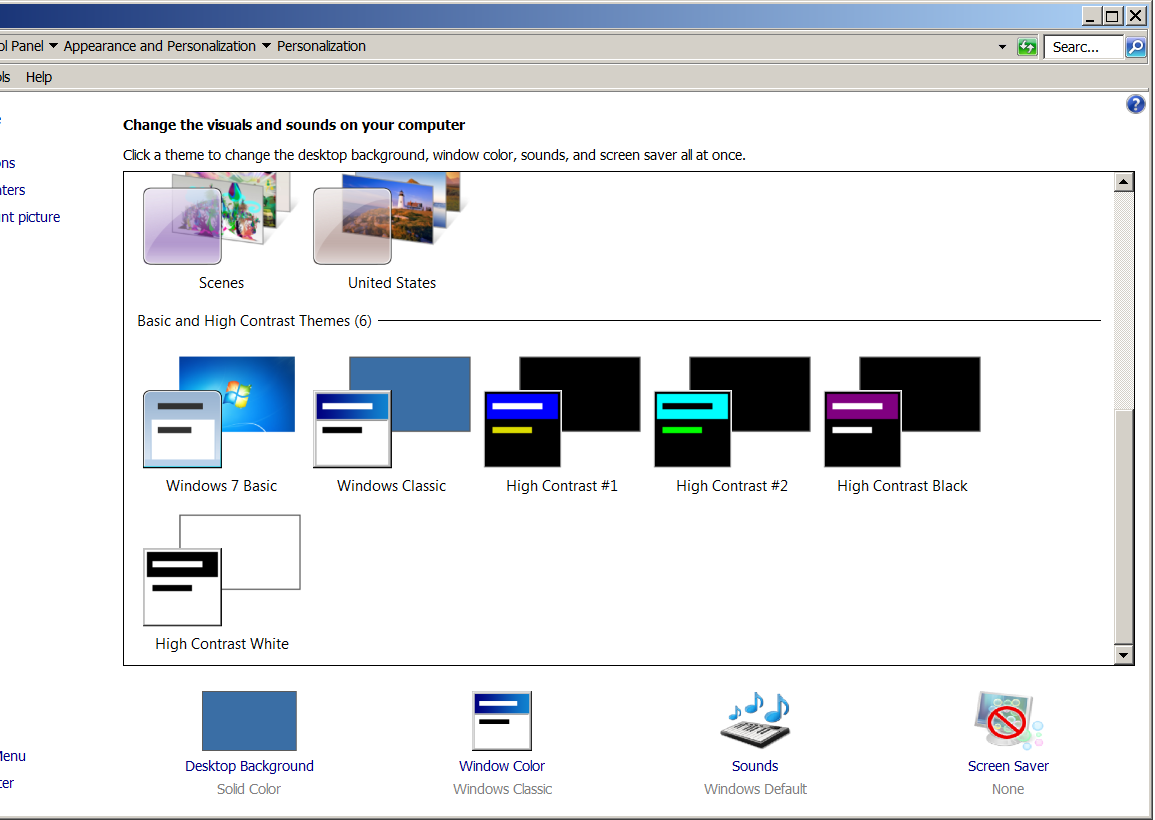
On any empty space on the Desktop press Right Mouse button (Choose Personalize); Scroll down and choose (Windows Classic theme)

windows-personalize-screenshot-windows-classics

That will change Windows to look normal again 🙂

windows-start-menu-screenshot

Cheers 🙂