I've recently noticed one of the qmail SMTP servers I adminster had plenty of logged spammer emails originating from yahoo.com.tw destined to reache some random looking like emails (probably unexisting) again to *@yahoo.com.tw
The spam that is tried by the spammer is probably a bounce spam, since it seems there is no web-form or anything wrong with the qmail server that might be causing the spam troubles. As a result some of the emails from the well configured qmail (holding SPF checks), having a correct existing MX, PTR record and even having configured Domain Keys (DKIM) started being marked, whether emails are sent to *@yahoo.com legit emails.
To deal with the shits, since we don't have any Taiwanese (tw) clients, I dediced to completely prohibit any emails destined to be sent via the mail server to *@yahoo.com.tw. This is done via /var/qmail/control/badmailto qmail control variable;
Here is content of /var/qmail/control/badmailto after banning outgoing emails to yahoo.com.tw;;;
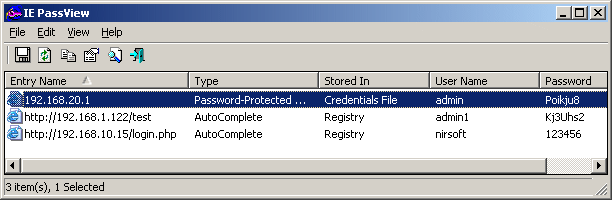
While checking a friend of mine's blog, I've seen a reference to a Windows program capable of revealing stored website passwords.
IE PassView is a small password management utility that reveals the passwords stored by Internet Explorer Web browser, and allows you to delete passwords that you don't need anymore. It supports all versions of Internet Explorer, from version 4.0 and up to 9.0. Ie PassView is quite a good one for crackers, who would like to steal some lame poor Windows IE user facebook,gmail, yahoo etc. passwords 😉 here is a link to IE Passview's download page
What makes JCrawler even better is that it’s open source program.
To install Jcrawler go in the joomla administrator panel:
Extensiosn -> Install/Uninstall
You will see the Install from URL on the bottom, there place the link to the com_jcrawler.zip installation archive, for instance you can place the link of the downloaded copy of com_jcrawler.zip I’ve mirrored on www.pc-freak.net ,by placing it on https://www.pc-freak.net/files/com_jcrawler.zip
The installation will be done in a few seconds and you will hopefully be greated with a Installation Success message.
Last thing to do in order to have the sitemap.xml in your joomla based website generated is to navigate to:
Components -> JCrawler
There a screen will appear where you can customize certain things related to the sitemap.xml generation, I myself used the default options and continued straight to the Start button.
Further on a screen will appear asking you to Submit the newly generated sitemap to; Google, MSN, Ask.com, Moreover and Yahoo , so press the Submit button. That’s all now your joomla website will be equipped with sitemap.xml, enjoy!
I've recently decided to add Comment as OpenID functionality to my wordpress blog. The reasons to do that is that I myself have today created an OpenID account. Already million of people have OpenID account without even knowing. Most major search engines and social websites like Google, Yahoo, Live Journal, Hyves, Blogger, Flicker, MySpace automatically creates an OpenID account for newly registered users. It is up to the user to check with each of the aforementioned providers what is the URL of their OpenID account.
Even though OpenID popularity is steadly rising, I'm sure there are still plenty of users who did not heard, used or noticed OpenID yet.
So What the heck is OpenID? For all those who still haven't heard about it, OpenID is a universal web site login system With just one "unified" OpenID account the user can login to multiple websites with no need to create multiple accounts across each and every different website on the internet. The only requirement for the user to be able to use OpenID is that the website in question to have (support) for OpenID credential and the user to have existing OpenID account.
Therefore using one single OpenID you can sign in as a certain user to multiple websites on the internet with no need for annoying registration process to each and every new website you encounter. Another benefit OpenID gives to the user is that you don't have to memorize or keep notes of a tens or thousands of different login accounts across the many different websites on the net. Using OpenID also saves the user from troubles with forgotten password or username as just one OpenID login is used to login you everywhere.
For WordPress blogging platform the Russian Igor Korolev, has written a wordpress plugin – comments-to-wordpress . This plugin adds support for OpenID authentication in WordPress comments.
Here is how to OpenID to WordPress:
1. Download the comments-with-wordpress plugin and unzipAs of writting of this article latest comments-to-wordpress plugin is ver. 1.4. Download the plugin to blog path directory lets say, /var/www/blog/wp-content/plugins/ and unzip:
Next the plugin has to be Enabled, just like any other wordpress plugin via admin menus:
Plugins -> Inactive -> Comments with OpenID (enable)
Once the plugin is enaabled it is necessery to add some code with a text editor in file /var/www/blog/wp-content/themes/default/comments.php
Small noet to make here: If you're not using the default WordPress theme (like I do), you will have to edit the /themes/your-theme-name/comments.php instead.
Save the comments.php file and you Identification for new comments with OpenID will appear in your wordpress Comments form.
The OpenID plugin will add a number of service OpenIDs to choose between like you can see in my blog's plugin section or the screenshot below:
The URL https://www.google.com/accounts/o8/id is just a sample and showed because I clicked on the Google icon. If you have a Google profile you can check the exact ID and use it as URL there. Simply if your browser is logged in Gmail and you have Google profile. OpenID should work. As you can see the plugin supports a number of services which already support OpenID auth, the list of services can be easily extended by adding minor changes in …/plugins/comments-with-openid/comments-with-openid.php
There is also another wordpress plugin with the openid name – http://wordpress.org/extend/plugins/openid/
Downloading and enabling the other openid plugin also adds support for OpenID login in your http://your-url.com/wp-admin/ login page.
Installing the OpenID plugin is needed especially if you're a blogger blogging on 5 or 10 different topic oriented blogs, once downloading and installing the OpenID plugin will allow you to login across the blog ring without loosing time or bothering to remember different passwords across all the blogs. Here is a screenshot of the /wp-admin wordpress login page with the OpenID wp plugin enabled:
As of time of writting according to http://openid.net/get-an-openid/what-is-openid/'s website there are over 50000 major websites on the net already accepting OpenID login. Of course as every technlogy OpenID is not perfect and along with its convenience in some cases it could impose security hole. OpenID opponents claim under some circumstances OpenID is prone to forgery, XSS (cross site scripting) and XSFR attacks. Everyone who is about to use OpenID should be also aware of the great security risk it impose if one OpenID account gets stolen through sniffing, this could mean multiple websites can be accesses with the one single OpenID by the malicious user and a lot of confidential data owned by the user can be revealed or deleted … With this said I think OpenID is not a recommended login technology for Windows users, as windows is famous for being vulnerable to so many Viruses and Spyware/Malware etc.. With non-free software OSes like MS Windows, the user never cannot for sure if the system is infected, hence using OpenID to transfer credentials over the internet or store an OpenID SSL/(TLS) certificate to identify in websites is TOO DANGEROUS! Hope this article was helpful. Cya
I’ve had two domain names which were pointing to the same website content. As one can read in any SEO guide around this is a really bad practice as search engines things automatically there is a duplicate site content and this has automatically a negative effect on the site pagerank. To deal with situation where multiple domains are pointing to the same websites its suggested by many SEO specialists that a 301 redirect is created from all the domain websites to a single website domain which will open the actual website.
Making the 301 direct domain from the sample domain my-redirect-domain.com to www.mydomain.com can be done with a virtualhost dfefinition in either httpd.conf or with the respective file containing the domain virtualhost definitions: Here is the exact VirtualHost code I use to make a 301 redirect.
After placing the VirtualHost redirect, an apache redirect is required. Further on when a Gooogle or Yahoo Bot visits the website and does any request to my-redirect-domain.com or www.my-redirect-domain.com , they will be redirected with a 301 reuturned code to www.mydomain.com
This kind of redirect however can have a negative impact on the Apache CPU use (performance), especially if the my-redirect-domain.com is high traffic domain. This is because the redirect is done with mod_rewrite.
Therefore it might be better on high traffic domains to create the mod_rewrite redirect by using a vhost like:
The downside of using the Apache 301 redirect capabilities like in the above example is that any passed domain urls like let’s say http://www.my-redirected-domain.com/support/ would not be 301 redirected to http://www.mydomain.com/support/ but instead the redirect will be done straight to http://www.mydomain.com/
I needed a handy way to recover some old data of an expired domain containing a website, with some really imprtant texts. The domains has expired before one year and it was not renewed for the reason that it’s holder was not aware his website was gone. In the meantime somebody registered this domain as a way to generate ads profit from it the website was receiving about 500 to 1000 visitors per day. Now I have the task to recover this website permanently lost from the internet data. I was not able to retrieve anything from the old domain name be contained via google cache, yahoo cache, bing etc. It appears most of the search engines store a cached version of a crawled website for only 34 months. I’ve found also a search engine gigablast which was claimed to store crawled website data for 1 year, but unfortunately gigablast contained not any version of the website I was looking for.Luckily (thanks God) after a bit of head-banging there I found a website that helped me retrieve at least some parts from the old lost website.
The Wayback Machine , guys keeps website info snapshots of most of the domain names on the internet for a couple of years back, here is how wayback machine website describes its own provided services:
The Internet Archive's Wayback Machine puts the history of the World Wide Web at your fingertips.
Another handy feature wayback machine provides is checking out how certain websites looked like a couple of years before, let’s say you want to go back in the past and see how yahoo’s website looked like 2 years ago.
Just go to web.archive.org and type in yahoo and select a 2 years old website snapshot and enjoy 😉
It’s really funny how ridiculous many websites looked like just few years from now 😉
There are plenty of articles, on how to increase search engine ranking in wordpress and I’m sure this article might be not that interesting but still I thought it might be nice to mention about this 3 wordpress plugins Auto-Tags, SEO Slugs and Platinium SEO Pack which will help you increase your traffic.
Let me say a few words for each of the 3 plugins:
1. Auto-tags Below is the description of the plugin directly taken from the plugin website http://wordpress.org/extend/plugins/auto-tag/
This plugin uses the Yahoo.com and tagthe.net APIs to find the most relevant keywords
from the content of your post, and then adds them as tags.
New for version 0.2: an options page allows to choose how many tags are
retrieved from each service The tag adding is fully automatic,
so if you're using a plugin like feedwordpress to display RSS feeds
on your blog as posts, everything will get done as the feed
posts are published. No user intervention necessary!
Here are the installation instructions for auto-tags:
debian:~# cd /var/www/blog/wp-content/plugins
debian:/var/www/wp-content/plugins:# wget https://www.pc-freak.net/files/auto-tag.0.4.6.zip
100%[================================>] 14,325 45.3K/s in 0.3s
In the above example my wordpress installation is in /var/www/blog/ , if your wordpress is installed in another directory location change to the respective directory.
To activate the Plugin go to:
Plugins -> Auto Tags
Press over Activate to activate the plugin.
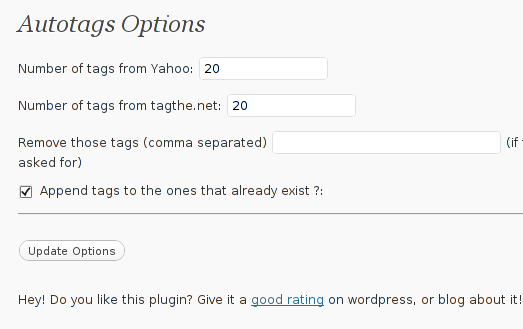
To configure the Auto-tags plugin navigate to:
Settings -> Auto tags plugin
Therein you can configure the number of post tags to be retrieved from Yahoo, tagthe.net. The settings also allows you to disable certain tags you don’t want to appear in your post tags from the field, Remove those tags (comma separated)
The plugin also has an option called Append tags to the ones that already exist which on my wordpress 3.1 installation doesn’t work
After ending up your desired configuration simply press the Update Options button.
Now each time you type a new post in your wordpress blog, a tags related to the post will automatically be included. Based on this tags Search engines will easily find content that relates to your blog tags and thus your page indexing will get better.
The university where I study right now ABS – (Arnhem Business School) does some outbound port filtering. Therefore I couldn’t access my Gmail email through POP3 neither send my emails via the SMTP protocol.
In other words the port numbers 25, 110, 995 and 143 are filtered by the University System Administrator, or whoeverdid built the University network. This I found pretty annoying because I’ve noticed the Teachers who work on their Desktops are able to access their email addressesvia a normal POP3 and SMTP protocols . Of course there is likely a good reason that the university filters the traffic for students accessing internet via their notebooks through the Internal built University wireless network, however as I feel very convenient with checking my mail via Thunderbird (Icedove), it’s really, really irritating to go for a browser each and every time I’d like to check my Gmail.
In that reason an idea come to my mind to get through the SMTP, POP and IMAP protocol access restrictions. The idea is not something brilliant or something too smart, however it prooved to work so I was quite happy with it.
My idea was to simply use my personal Linux router as a jumping off place to access gmail.
To do so first think I did was to scan my Linux router and check which ports are filtered from Arnhem Business School University firewall and which one are allowed to pass traffic.
After a while I have found out that the ports range from 2010 up to 2050 are freely allowing traffic to pass without any firewall restrictions. Thus my next logical step I took was to configure my Linux router to pass by all incoming traffic on ports 2050 and 2060 to Gmail servers for POP3 email accesspop.gmail.com and the other one responsible for sending emails via the SMTP protocol – smtp.gmail.com
In order to fulfill my desired task I first experimented a bit with some iptables nat PREROUTING redirect to destination rules.
However after many tries without success I finally decided to abandom this approach and try with another one.
I’ve remembered that some time ago I’ve used a tiny Linux software called rinetd that makes the port forwardking, redirections a piece of cake
RINETD is really straight forward to install and use on Debian Linux. To make the actual port redirects first you will have to install rinetd
1. Install rinetd
debian-desktop:~# apt-get install rinetd
2. Configure rinetd by editting /etc/rinetd.conf to make the redirects to gmail or any other pop3 mail server host
Open up the /etc/rinetd.conf with your favourite text editor and for a gmail redirect place the lines:
In the above configuration directives the first IP address 83.228.93.76 should be changed and adjusted with your actual Linux router external IP address. The second option 2010 is the port number to accept connections from your host to be redirected to the IP 74.125.65.109 , the last argument is the port number to where you desire to redirect 995. In the above example I’ve used the IP 74.125.65.109 which actually a gmail server IP address I have obtained through resolving smtp.gmail.com and pop.gmail.com
In order to conduct the resolve I issued the commands:
3. Resolve pop.gmail.com and smtp.gmail.com to find out their actual IP addresses, which you will have to use in your port redirect
hipo@debian-desktop:~$ host pop.gmail.com
pop.gmail.com is an alias for gmail-pop.l.google.com.
gmail-pop.l.google.com has address 74.125.43.109
hipo@debian-desktop:~$ host smtp.gmail.com
smtp.gmail.com is an alias for gmail-smtp-msa.l.google.com.
gmail-smtp-msa.l.google.com has address 74.125.43.109
hipo@debian-desktop:~$
All left to be done to have the port redirections active is to run up the rinetd service, to do so issue:
debian-desktop:~# /etc/init.d/rinetd start
That’s all, now go to your Thunderbird, Outlook or any POP3 email client of choice and just change the mail server hosts and ports with your Linux router IP address and ports where you just binded the redirect.Of course the Linux router IP could also be used, if you don’t have a hostname associated with it.
Since some time I’m trying to setup Yahooo Search Field on my nanoblogger without success. I also have difficulties every now and then with escaping source code whenever I decide to drop it in my nanoblogger. Knowing that the official nanoblogger page has the yahoo search next to the google search enabled up and running and considering the fact I couldn’t find any tutorial or instructions online both on nanoblogger’s official webpage as well as to the rest of the searchable internet, I decided to mail Nanoblogger’s author to ask him if he could help me setting up this Yahoo Search Field Plugin as well as ask him what I can do to have a proper code escaping without breaking the blog. I explained that currently I tried a bunch of things without success etc. Below you’ll find my correspondence with Kevin Wood (Nanoblogger’s Author):
Date: Mon, 22 Feb 2010 17:09:58 +0200
From: "G. Georgiev" myemail@gmail.com
User-Agent: Mozilla-Thunderbird 2.0.0.22 (X11/20091109)
To: n1xt3r@fastmail.fm
Subject: 2 questions concerning nanoblogger
Hi man,
First Thanks for the wonderful soft.
I have two questions.
1. Where can I get yahoo.sh script which is
used on http://nanoblogger.sourceforge.net
2. Whenever I try to post codethat needs to be escaped let's say apache
directives an error occurs,
during generation of the blog and I cannot
seem to get the post online
How can I get through that?
Thanks in advance.
Kindest Regards Georgi
Date: Sat, 27 Feb 2010 20:46:34 -0500
From: Kevin Wood kevinw@fastmail.fm
To: "G. Georgiev" myemail@gmail.com
Subject: Re: 2 questions concerning nanoblogger
User-Agent: Mutt/1.5.20 (2009-06-14)
Hi Georgi, Attached is my yahoo.sh plugin. Just drop it in your plugins directory and add $NB_Yahoo to your main_index.htm template. In order to work, it expects that you have BLOG_FEED_URL set in blog.conf.
You should use the markdown.sh plugin to post escaped HTML code. When editing your entry you can add markdown to the FORMAT field. Oh, the markdown plugin requires that you have Markdown installed on your system and you may have to tweak MARKDOWN_CMD and MARKDOWN_OPTS in your blog.conf before it will work. Good luck!


How to add OpenID functionality to WordPress Comments / What is OpenID?
Tuesday, February 14th, 2012I've recently decided to add Comment as OpenID functionality to my wordpress blog. The reasons to do that is that I myself have today created an OpenID account. Already million of people have OpenID account without even knowing. Most major search engines and social websites like Google, Yahoo, Live Journal, Hyves, Blogger, Flicker, MySpace automatically creates an OpenID account for newly registered users.
It is up to the user to check with each of the aforementioned providers what is the URL of their OpenID account.
Even though OpenID popularity is steadly rising, I'm sure there are still plenty of users who did not heard, used or noticed OpenID yet.
So What the heck is OpenID?
For all those who still haven't heard about it, OpenID is a universal web site login system With just one "unified" OpenID account the user can login to multiple websites with no need to create multiple accounts across each and every different website on the internet.
The only requirement for the user to be able to use OpenID is that the website in question to have (support) for OpenID credential and the user to have existing OpenID account.
Therefore using one single OpenID you can sign in as a certain user to multiple websites on the internet with no need for annoying registration process to each and every new website you encounter. Another benefit OpenID gives to the user is that you don't have to memorize or keep notes of a tens or thousands of different login accounts across the many different websites on the net.
Using OpenID also saves the user from troubles with forgotten password or username as just one OpenID login is used to login you everywhere.
For WordPress blogging platform the Russian Igor Korolev, has written a wordpress plugin – comments-to-wordpress . This plugin adds support for OpenID authentication in WordPress comments.
Here is how to OpenID to WordPress:
1. Download the comments-with-wordpress plugin and unzipAs of writting of this article latest comments-to-wordpress plugin is ver. 1.4.
Download the plugin to blog path directory lets say, /var/www/blog/wp-content/plugins/ and unzip:
# cd /var/www/blog/wp-content/plugins

# wget http://downloads.wordpress.org/plugin/comments-with-openid.zip

...

# unzip comments-with-openid.zip

...
I've also done a mirror for download of comments-with-openid 1.4 here
2. Enable Comments with OpenID wp plugin
Next the plugin has to be Enabled, just like any other wordpress plugin via admin menus:
Plugins -> Inactive -> Comments with OpenID (enable)
Once the plugin is enaabled it is necessery to add some code with a text editor in file /var/www/blog/wp-content/themes/default/comments.php
Small noet to make here: If you're not using the default WordPress theme (like I do), you will have to edit the /themes/your-theme-name/comments.php instead.
Inside the file look for the form input fields:
<p> <input type="text" name="author" ....

...

<p> <input type="text" name="email" id="email" ....

...

<p> <input type="text" name="url" id="url" ....

...
Before the html tags code:
Paste the following code:
<?php comments_with_openid(); ?>
Save the comments.php file and you Identification for new comments with OpenID will appear in your wordpress Comments form.
The OpenID plugin will add a number of service OpenIDs to choose between like you can see in my blog's plugin section or the screenshot below:
The URL https://www.google.com/accounts/o8/id is just a sample and showed because I clicked on the Google icon. If you have a Google profile you can check the exact ID and use it as URL there. Simply if your browser is logged in Gmail and you have Google profile. OpenID should work. As you can see the plugin supports a number of services which already support OpenID auth, the list of services can be easily extended by adding minor changes in …/plugins/comments-with-openid/comments-with-openid.php
There is also another wordpress plugin with the openid name – http://wordpress.org/extend/plugins/openid/
Downloading and enabling the other openid plugin also adds support for OpenID login in your http://your-url.com/wp-admin/ login page.
Installing the OpenID plugin is needed especially if you're a blogger blogging on 5 or 10 different topic oriented blogs, once downloading and installing the OpenID plugin will allow you to login across the blog ring without loosing time or bothering to remember different passwords across all the blogs. Here is a screenshot of the /wp-admin wordpress login page with the OpenID wp plugin enabled:
As of time of writting according to http://openid.net/get-an-openid/what-is-openid/'s website there are over 50000 major websites on the net already accepting OpenID login.
Of course as every technlogy OpenID is not perfect and along with its convenience in some cases it could impose security hole. OpenID opponents claim under some circumstances OpenID is prone to forgery, XSS (cross site scripting) and XSFR attacks. Everyone who is about to use OpenID should be also aware of the great security risk it impose if one OpenID account gets stolen through sniffing, this could mean multiple websites can be accesses with the one single OpenID by the malicious user and a lot of confidential data owned by the user can be revealed or deleted …
With this said I think OpenID is not a recommended login technology for Windows users, as windows is famous for being vulnerable to so many Viruses and Spyware/Malware etc..
With non-free software OSes like MS Windows, the user never cannot for sure if the system is infected, hence using OpenID to transfer credentials over the internet or store an OpenID SSL/(TLS) certificate to identify in websites is TOO DANGEROUS!
Hope this article was helpful. Cya
Tags: authentication, Auto, benefit, code, Comment, Draft, file, functionality, google, hyves, igor korolev, Journal, login, login accounts, major search engines, need, openid, password, php, platform, plugin, popularity, quot, Russian, Search, support, tens, text, type, universal web, url, username, wget, what the heck, Wordpress, writting, Yahoo
Posted in System Administration, Web and CMS, Wordpress | 2 Comments »