Haproxy is doing quite a good job in High Availability tasks where traffic towards multiple backend servers has to be redirected based on the available one to sent data from the proxy to.
Lets say haproxy is configured to proxy traffic for App backend machine1 and App backend machine2.
Usually in companies people configure a monitoring like with Icinga or Zabbix / Grafana to keep track on the Application server is always up and running. Sometimes however due to network problems (like burned Network Switch / router or firewall misconfiguration) or even an IP duplicate it might happen that Application server seems to be reporting reachable from some monotoring tool on it but unreachable from Haproxy server -> App backend machine2 but reachable from App backend machine1. And even though haproxy will automatically switch on the traffic from backend machine2 to App machine1. It is a good idea to monitor and be aware that one of the backends is offline from the Haproxy host.
In this article I'll show you how this is possible by using 2 shell scripts and userparameter keys config through the autodiscovery zabbix legacy feature.
Assumably for the setup to work you will need to have as a minimum a Zabbix server installation of version 5.0 or higher.
1. Create the required haproxy_discovery.sh and haproxy_stats.sh scripts
You will have to install the two scripts under some location for example we can put it for more clearness under /etc/zabbix/scripts
[root@haproxy-server1 ]# mkdir /etc/zabbix/scripts
[root@haproxy-server1 scripts]# vim haproxy_discovery.sh
#!/bin/bash
#
# Get list of Frontends and Backends from HAPROXY
# Example: ./haproxy_discovery.sh [/var/lib/haproxy/stats] FRONTEND|BACKEND|SERVERS
# First argument is optional and should be used to set location of your HAPROXY socket
# Second argument is should be either FRONTEND, BACKEND or SERVERS, will default to FRONTEND if not set
#
# !! Make sure the user running this script has Read/Write permissions to that socket !!
#
## haproxy.cfg snippet
# global
# stats socket /var/lib/haproxy/stats mode 666 level adminHAPROXY_SOCK=""/var/run/haproxy/haproxy.sock
[ -n “$1” ] && echo $1 | grep -q ^/ && HAPROXY_SOCK="$(echo $1 | tr -d '\040\011\012\015')"if [[ “$1” =~ (25[0-5]|2[0-4][0-9]|[01]?[0-9][0-9]?)\.(25[0-5]|2[0-4][0-9]|[01]?[0-9][0-9]?)\.(25[0-5]|2[0-4][0-9]|[01]?[0-9][0-9]?)\.(25[0-5]|2[0-4][0-9]|[01]?[0-9][0-9]?):[0-9]{1,5} ]];
then
HAPROXY_STATS_IP="$1"
QUERYING_METHOD="TCP"
fiQUERYING_METHOD="${QUERYING_METHOD:-SOCKET}"
query_stats() {
if [[ ${QUERYING_METHOD} == “SOCKET” ]]; then
echo "show stat" | socat ${HAPROXY_SOCK} stdio 2>/dev/null
elif [[ ${QUERYING_METHOD} == “TCP” ]]; then
echo "show stat" | nc ${HAPROXY_STATS_IP//:/ } 2>/dev/null
fi
}get_stats() {
echo "$(query_stats)" | grep -v "^#"
}[ -n “$2” ] && shift 1
case $1 in
B*) END="BACKEND" ;;
F*) END="FRONTEND" ;;
S*)
for backend in $(get_stats | grep BACKEND | cut -d, -f1 | uniq); do
for server in $(get_stats | grep "^${backend}," | grep -v BACKEND | grep -v FRONTEND | cut -d, -f2); do
serverlist="$serverlist,\n"'\t\t{\n\t\t\t"{#BACKEND_NAME}":"'$backend'",\n\t\t\t"{#SERVER_NAME}":"'$server'"}'
done
done
echo -e '{\n\t"data":[\n’${serverlist#,}’]}'
exit 0
;;
*) END="FRONTEND" ;;
esacfor frontend in $(get_stats | grep "$END" | cut -d, -f1 | uniq); do
felist="$felist,\n"'\t\t{\n\t\t\t"{#'${END}'_NAME}":"'$frontend'"}'
done
echo -e '{\n\t"data":[\n’${felist#,}’]}'
[root@haproxy-server1 scripts]# vim haproxy_stats.sh
#!/bin/bash
set -o pipefailif [[ “$1” = /* ]]
then
HAPROXY_SOCKET="$1"
shift 0
else
if [[ “$1” =~ (25[0-5]|2[0-4][0-9]|[01]?[0-9][0-9]?)\.(25[0-5]|2[0-4][0-9]|[01]?[0-9][0-9]?)\.(25[0-5]|2[0-4][0-9]|[01]?[0-9][0-9]?)\.(25[0-5]|2[0-4][0-9]|[01]?[0-9][0-9]?):[0-9]{1,5} ]];
then
HAPROXY_STATS_IP="$1"
QUERYING_METHOD="TCP"
shift 1
fi
fipxname="$1"
svname="$2"
stat="$3"DEBUG=${DEBUG:-0}
HAPROXY_SOCKET="${HAPROXY_SOCKET:-/var/run/haproxy/haproxy.sock}"
QUERYING_METHOD="${QUERYING_METHOD:-SOCKET}"
CACHE_STATS_FILEPATH="${CACHE_STATS_FILEPATH:-/var/tmp/haproxy_stats.cache}"
CACHE_STATS_EXPIRATION="${CACHE_STATS_EXPIRATION:-1}" # in minutes
CACHE_INFO_FILEPATH="${CACHE_INFO_FILEPATH:-/var/tmp/haproxy_info.cache}" ## unused
CACHE_INFO_EXPIRATION="${CACHE_INFO_EXPIRATION:-1}" # in minutes ## unused
GET_STATS=${GET_STATS:-1} # when you update stats cache outsise of the script
SOCAT_BIN="$(which socat)"
NC_BIN="$(which nc)"
FLOCK_BIN="$(which flock)"
FLOCK_WAIT=15 # maximum number of seconds that "flock" waits for acquiring a lock
FLOCK_SUFFIX='.lock'
CUR_TIMESTAMP="$(date '+%s')"debug() {
[ “${DEBUG}” -eq 1 ] && echo "DEBUG: $@" >&2 || true
}debug "SOCAT_BIN => $SOCAT_BIN"
debug "NC_BIN => $NC_BIN"
debug "FLOCK_BIN => $FLOCK_BIN"
debug "FLOCK_WAIT => $FLOCK_WAIT seconds"
debug "CACHE_FILEPATH => $CACHE_FILEPATH"
debug "CACHE_EXPIRATION => $CACHE_EXPIRATION minutes"
debug "HAPROXY_SOCKET => $HAPROXY_SOCKET"
debug "pxname => $pxname"
debug "svname => $svname"
debug "stat => $stat"# check if socat is available in path
if [ “$GET_STATS” -eq 1 ] && [[ $QUERYING_METHOD == “SOCKET” && -z “$SOCAT_BIN” ]] || [[ $QUERYING_METHOD == “TCP” && -z “$NC_BIN” ]]
then
echo 'ERROR: cannot find socat binary'
exit 126
fi# if we are getting stats:
# check if we can write to stats cache file, if it exists
# or cache file path, if it does not exist
# check if HAPROXY socket is writable
# if we are NOT getting stats:
# check if we can read the stats cache file
if [ “$GET_STATS” -eq 1 ]
then
if [ -e “$CACHE_FILEPATH” ] && [ ! -w “$CACHE_FILEPATH” ]
then
echo 'ERROR: stats cache file exists, but is not writable'
exit 126
elif [ ! -w ${CACHE_FILEPATH%/*} ]
then
echo 'ERROR: stats cache file path is not writable'
exit 126
fi
if [[ $QUERYING_METHOD == “SOCKET” && ! -w $HAPROXY_SOCKET ]]
then
echo "ERROR: haproxy socket is not writable"
exit 126
fi
elif [ ! -r “$CACHE_FILEPATH” ]
then
echo 'ERROR: cannot read stats cache file'
exit 126
fi# index:name:default
MAP="
1:pxname:@
2:svname:@
3:qcur:9999999999
4:qmax:0
5:scur:9999999999
6:smax:0
7:slim:0
8:stot:@
9:bin:9999999999
10:bout:9999999999
11:dreq:9999999999
12:dresp:9999999999
13:ereq:9999999999
14:econ:9999999999
15:eresp:9999999999
16:wretr:9999999999
17:wredis:9999999999
18:status:UNK
19:weight:9999999999
20:act:9999999999
21:bck:9999999999
22:chkfail:9999999999
23:chkdown:9999999999
24:lastchg:9999999999
25:downtime:0
26:qlimit:0
27:pid:@
28:iid:@
29:sid:@
30:throttle:9999999999
31:lbtot:9999999999
32:tracked:9999999999
33:type:9999999999
34:rate:9999999999
35:rate_lim:@
36:rate_max:@
37:check_status:@
38:check_code:@
39:check_duration:9999999999
40:hrsp_1xx:@
41:hrsp_2xx:@
42:hrsp_3xx:@
43:hrsp_4xx:@
44:hrsp_5xx:@
45:hrsp_other:@
46:hanafail:@
47:req_rate:9999999999
48:req_rate_max:@
49:req_tot:9999999999
50:cli_abrt:9999999999
51:srv_abrt:9999999999
52:comp_in:0
53:comp_out:0
54:comp_byp:0
55:comp_rsp:0
56:lastsess:9999999999
57:last_chk:@
58:last_agt:@
59:qtime:0
60:ctime:0
61:rtime:0
62:ttime:0
"_STAT=$(echo -e "$MAP" | grep :${stat}:)
_INDEX=${_STAT%%:*}
_DEFAULT=${_STAT##*:}debug "_STAT => $_STAT"
debug "_INDEX => $_INDEX"
debug "_DEFAULT => $_DEFAULT"# check if requested stat is supported
if [ -z “${_STAT}” ]
then
echo "ERROR: $stat is unsupported"
exit 127
fi# method to retrieve data from haproxy stats
# usage:
# query_stats "show stat"
query_stats() {
if [[ ${QUERYING_METHOD} == “SOCKET” ]]; then
echo $1 | socat ${HAPROXY_SOCKET} stdio 2>/dev/null
elif [[ ${QUERYING_METHOD} == “TCP” ]]; then
echo $1 | nc ${HAPROXY_STATS_IP//:/ } 2>/dev/null
fi
}# a generic cache management function, that relies on 'flock'
check_cache() {
local cache_type="${1}"
local cache_filepath="${2}"
local cache_expiration="${3}"
local cache_filemtime
cache_filemtime=$(stat -c '%Y' "${cache_filepath}" 2> /dev/null)
if [ $((cache_filemtime+60*cache_expiration)) -ge ${CUR_TIMESTAMP} ]
then
debug "${cache_type} file found, results are at most ${cache_expiration} minutes stale.."
elif "${FLOCK_BIN}" –exclusive –wait "${FLOCK_WAIT}" 200
then
cache_filemtime=$(stat -c '%Y' "${cache_filepath}" 2> /dev/null)
if [ $((cache_filemtime+60*cache_expiration)) -ge ${CUR_TIMESTAMP} ]
then
debug "${cache_type} file found, results have just been updated by another process.."
else
debug "no ${cache_type} file found, querying haproxy"
query_stats "show ${cache_type}" > "${cache_filepath}"
fi
fi 200> "${cache_filepath}${FLOCK_SUFFIX}"
}# generate stats cache file if needed
get_stats() {
check_cache 'stat' "${CACHE_STATS_FILEPATH}" ${CACHE_STATS_EXPIRATION}
}# generate info cache file
## unused at the moment
get_info() {
check_cache 'info' "${CACHE_INFO_FILEPATH}" ${CACHE_INFO_EXPIRATION}
}# get requested stat from cache file using INDEX offset defined in MAP
# return default value if stat is ""
get() {
# $1: pxname/svname
local _res="$("${FLOCK_BIN}" –shared –wait "${FLOCK_WAIT}" "${CACHE_STATS_FILEPATH}${FLOCK_SUFFIX}" grep $1 "${CACHE_STATS_FILEPATH}")"
if [ -z “${_res}” ]
then
echo "ERROR: bad $pxname/$svname"
exit 127
fi
_res="$(echo $_res | cut -d, -f ${_INDEX})"
if [ -z “${_res}” ] && [[ “${_DEFAULT}” != “@” ]]
then
echo "${_DEFAULT}"
else
echo "${_res}"
fi
}# not sure why we'd need to split on backslash
# left commented out as an example to override default get() method
# status() {
# get "^${pxname},${svnamem}," $stat | cut -d\ -f1
# }# this allows for overriding default method of getting stats
# name a function by stat name for additional processing, custom returns, etc.
if type get_${stat} >/dev/null 2>&1
then
debug "found custom query function"
get_stats && get_${stat}
else
debug "using default get() method"
get_stats && get "^${pxname},${svname}," ${stat}
fi
! NB ! Substitute in the script /var/run/haproxy/haproxy.sock with your haproxy socket location
You can download the haproxy_stats.sh here and haproxy_discovery.sh here
2. Create the userparameter_haproxy_backend.conf
[root@haproxy-server1 zabbix_agentd.d]# cat userparameter_haproxy_backend.conf
#
# Discovery Rule
## HAProxy Frontend, Backend and Server Discovery rules
UserParameter=haproxy.list.discovery[*],sudo /etc/zabbix/scripts/haproxy_discovery.sh SERVER
UserParameter=haproxy.stats[*],sudo /etc/zabbix/scripts/haproxy_stats.sh $2 $3 $4# support legacy way
UserParameter=haproxy.stat.downtime[*],sudo /etc/zabbix/scripts/haproxy_stats.sh $2 $3 downtime
UserParameter=haproxy.stat.status[*],sudo /etc/zabbix/scripts/haproxy_stats.sh $2 $3 status
UserParameter=haproxy.stat.last_chk[*],sudo /etc/zabbix/scripts/haproxy_stats.sh $2 $3 last_chk
3. Create new simple template for the Application backend Monitoring and link it to monitored host
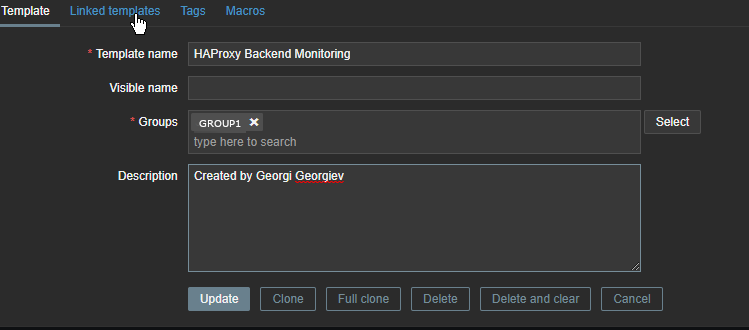

Go to Configuration -> Hosts (find the host) and Link the template to it
4. Restart Zabbix-agent, in while check autodiscovery data is in Zabbix Server
[root@haproxy-server1 ]# systemctl restart zabbix-agent
Check in zabbix the userparameter data arrives, it should not be required to add any Items or Triggers as autodiscovery zabbix feature should automatically create in the server what is required for the data regarding backends to be in.
To view data arrives go to Zabbix config menus:
Configuration -> Hosts -> Hosts: (lookup for the haproxy-server1 hostname)
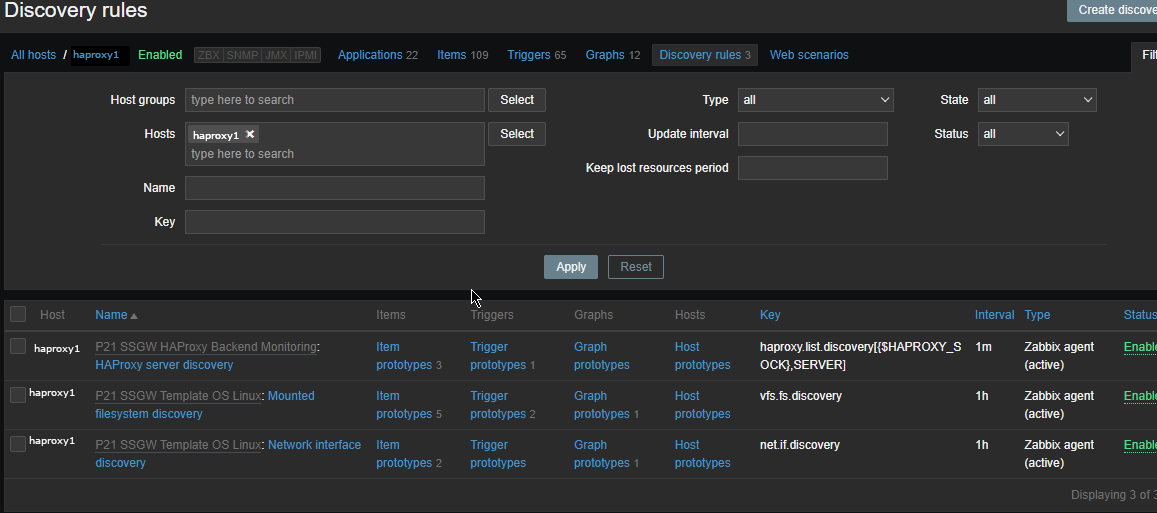
The autodiscovery should have automatically created the following prototypes

Now if you look inside Latest Data for the Host you should find some information like:
HAProxy Backend [backend1] (3 Items)
HAProxy Server [backend-name_APP/server1]: Connection Response
2022-05-13 14:15:04 History
HAProxy Server [backend-name/server2]: Downtime (hh:mm:ss)
2022-05-13 14:13:57 20:30:42 History
HAProxy Server [bk_name-APP/server1]: Status
2022-05-13 14:14:25 Up (1) Graph
ccnrlb01 HAProxy Backend [bk_CCNR_QA_ZVT] (3 Items)
HAProxy Server [bk_name-APP3/server1]: Connection Response
2022-05-13 14:15:05 History
HAProxy Server [bk_name-APP3/server1]: Downtime (hh:mm:ss)
2022-05-13 14:14:00 20:55:20 History
HAProxy Server [bk_name-APP3/server2]: Status
2022-05-13 14:15:08 Up (1)
To make alerting in case if a backend is down which usually you would like only left thing is to configure an Action to deliver alerts to some email address.


