Wed Dec 28 19:42:14 EET 2011
How to install and configure Jabber Server (Ejabberd) on Debian Lenny GNU / Linux
I've recently installed a jabber server on one Debian Lenny server and hence decided to describe my installations steps hoping this would help ppl who would like to run their own jabber server on Debian . After some research of the jabber server softwares available, I decided to install Ejabberd
The reasons I choose Ejabberd is has rich documentation, good community around the project and the project in general looks like one of the best free software jabber servers available presently. Besides that ejabberd doesn't need Apache or MySQL and only depends on erlang programming language.
Here is the exact steps I followed to have installed and configured a running XMPP jabber server.
1. Install Ejabberd with apt
The installation of Ejabberd is standard, e.g.:
debian:~# apt-get --yes install ejabberd
Now as ejabberd is installed, some minor configuration is necessery before the server can be launched:
2. Edit /etc/ejabberd/ejabberd.cfg
Inside I changed the default settings for:
a) Uncomment%%override_acls.. Changed:
%% %% Remove the Access Control Lists before new ones are
added. %% %%override_acls.
to
%%

%% Remove the Access Control Lists before new ones are added.

%%

override_acls.
b) Admin User from:
%% Admin user

{acl, admin, {user, "", "example.com"}}.
to
%% Admin user

{acl, admin, {user, "admin",
"jabber.myserver-host.com"}}.
c) default %% Hostname of example.com to my real hostname:
%% Hostname

{hosts, ["jabber.myserver-host.com"]}.
The rest of the configurations in /etc/ejabberd/ejabberd.cfg can stay like it is, though it is interesting to read it carefully before continuing as, there are some config timings which might prevent the XMPP server from user brute force attacks as well as few other goodies like for example (ICQ, MSN , Yahoo etc.) protocol transports.
3. Add iptables ACCEPT traffic (allow) rules for ports which are used by Ejabberd
The minimum ACCEPT rules to add are:
/sbin/iptables -A INPUT -p tcp -m tcp --dport 22 -j
ACCEPT

/sbin/iptables -A INPUT -p tcp -m tcp --dport 5222 -j ACCEPT

/sbin/iptables -A INPUT -p udp -m udp --dport 5222 -j ACCEPT

/sbin/iptables -A INPUT -p tcp -m tcp --dport 5223 -j ACCEPT

/sbin/iptables -A INPUT -p udp -m udp --dport 5223 -j ACCEPT

/sbin/iptables -A INPUT -p tcp -m tcp --dport 5269 -j ACCEPT

/sbin/iptables -A INPUT -p udp -m udp --dport 5269 -j ACCEPT

/sbin/iptables -A INPUT -p tcp -m tcp --dport 5280 -j ACCEPT

/sbin/iptables -A INPUT -p udp -m udp --dport 5280 -j ACCEPT

/sbin/iptables -A INPUT -p tcp -m tcp --dport 4369 -j ACCEPT

/sbin/iptables -A INPUT -p udp -m udp --dport 4369 -j ACCEPT

/sbin/iptables -A INPUT -p tcp -m tcp --dport 53873 -j
ACCEPT
Of course if there is some specific file which stores iptables rules or some custom firewall these rules has to be added / modified to fit appropriate place or chain.
4. Restart ejabberd via init.d script
debian:~# /etc/init.d/ejabberd restart

Restarting jabber server: ejabberd is not running. Starting
ejabberd.
5. Create ejabberd necessery new user accounts
debian:~# /usr/sbin/ejabberdctl register admin
jabber.myserver-host.com mypasswd1

debian:~# /usr/sbin/ejabberdctl register hipo
jabber.myserver-host.com mypasswd2

debian:~# /usr/sbin/ejabberdctl register newuser
jabber.myserver-host.com mypasswd3

debian:~# /usr/sbin/ejabberdctl register newuser1
jabber.myserver-host.com mypasswd4

...
etc.ejabberdctl ejabberd server client (frontend) has multiple other options and the manual is a good reading.
One helpful use of ejabberdctl is:
debian:~# /usr/sbin/ejabberdctl status

Node ejabberd@debian is started. Status: started

ejabberd is running
ejabberctl can be used also to delete some existent users, for example to delete the newuser1 just added above:
debian:~# /usr/sbin/ejabberdctl unregister newuser
jabber.myserver-host.com
6. Post install web configurations
ejabberd server offers a web interface listening on port 5280, to access the web interface right after it is installed I used URL: http://jabber.myserver-host.com:5280/admin/
To login to http://jabber.myserver-host.com:5280/admin/ you will need to use the admin username previously added in this case:
admin@jabber.myserver-host.com mypasswd1
Anyways in the web interface there is not much of configuration options available for change.
7. Set dns SRV records
I'm using Godaddy 's DNS for my domain so here is a screenshot on the SRV records that needs to be configured on Godaddy:

In the screenshto Target is the Fually qualified domain hostname for the jabber server.
Setting the SRV records for the domain using Godaddy's DNS could take from 24 to 48 hours to propagate the changes among all the global DNS records so be patient.
If instead you use own custom BIND DNS server the records that needs to be added to the respective domain zone file are:
_xmpp-client._tcp 900 IN SRV 5 0 5222
jabber.myserver-host.com.

_xmpp-server._tcp 900 IN SRV 5 0 5269
jabber.myserver-host.com.

_jabber._tcp 900 IN SRV 5 0 5269
jabber.myserver-host.com.
8. Testing if the SRV dns records for domain are correct
debian:~$ nslookup > set type=SRV

> jabber.myserver-host.com

...
If all is fine above nslookup request should return the requested domain SRV records.
9. Debugging issues with ejabberd
Ejabberd log files are located in /var/log/ejabberd , you will have to check the logs in case of any issues with the jabber XMPP server. Here is the three files which log messages from ejabberd:
debian:~$ ls -1 /var/log/ejabberd/

ejabberd.log

erl_crash.dump

sasl.log
I will not get into details on the logs as the best way to find out about them is to read them ;)
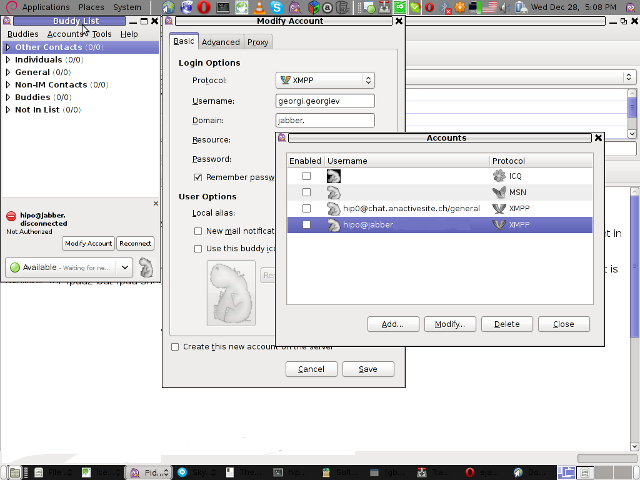
10. Testing ejabberd server with Pidgin
To test if my Jabber server works properly I used Pidgin universal chat client . However there are plenty of other multiplatform jabber clients out there e.g.: Psi , Spark , Gajim etc.
Here is a screenshot of my (Accounts -> Manage Accounts -> Add) XMPP protocol configuration