July 2011 Archives
Sat Jul 30 23:21:34 EEST 2011
How to Split files on Linux FreeBSD, NetBSD and OpenBSD

Did you have the need to sometimes split an SQL extra large files to few pieces in order to be able to later upload it via phpmyadmin?
Did you needed an extra large video or data file to be cut in few pieces in order to transfer it in few pieces over an USB stick?
Or just to give you an another scenario where I sometimes need to have an enormous file let's say 3G split in few pieces, in order to later read it in vim or mcedit .
I sometimes need to achieve this on FreeBSD and Linux hosts thus I thought it will be helpful to somebody to give a very quick tutorial on the way large files can be cut in pieces on Linux and BSD hosts.
GNU/Linux and FreeBSD are equipped with the split command. The purpose of this command is exactly the cutting of a file to a number of pieces.
On Linux the split command comes by default install to the system with the coreutils package on most Debian (deb) based and Redhat based (rpm) distributions, theerefore Linux's version of split is GNU/split since it's part of the GNU Coreutils package. An interesting fact about Linux split is that one of the two programmers who has coded it is Richard Stallman ;)
On BSD Unix split is the AT&T UNIX (BSD) split
In the past splitting files in pieces was much more needed than today, as people used floppy drives to transfer data, though today with the bloom of Internet and the improve of the data carriers transferring even an extra large files from one place to another is a way more trivial task still at many occasions splitting it in pieces is needed.
Even though today splitting file is very rarely required, still there are times when being able to split a file in X number of parts is very much needed.
Maybe the most common use of splitting a file today is necessery when a large SQL file dumps, like let's say 200 MBytes of info database needs to be moved from ane hosting provider to another one.
Many hosting providers does disallow direct access with standard mySQL client programs to the database directly and only allow a user to connect only via phpMyAdmin or some other web interface like Cpanel to improve data into the SQL or PostgreSQL server.
In such times, having knowledge on the Unix split command is a priceless asset.
Even though on Linux and BSD the code for the split command is not identical and GNU/split and BSD/split has some basic differences, the use of split on both of these Unices is identical.
The way to split a file in few pieces using on both Linux and BSD OSes is being done with one and the same command, here is how:
1. Splitting file in size of 40 mb On Linux
linux:~# split -b 40m SQL-Backup-Data.sql SQL-Backup-Data_split
2. Splitting file in size of 40mb on BSD (FreeBSD, OpenBSD, NetBSD)
freebsd# split -b 40m SQL-Backup-Data.sql SQL-Backup-Data_split
The Second argument the split command takes is actually called a prefix, the prefix is used as a basis name for the creation of the newly generated files cut in pieces file based on SQL-Backup-Data.sql.
As I said identical command will split the SQL-Backup-Data.sql files in a couple of parts which of it will be sized 40 megas.
These command will generate few files output like:
freebsd# ls -1 SQL-Backup-Dat*
SQL-Backup-Data.sql

SQL-Backup-Dataa

SQL-Backup-Dataab

SQL-Backup-Dataac

SQL-Backup-Dataad

SQL-Backup-Dataae
As you see the SQL-Backup-Data.sql with size 200MB is being split in four files each of which is sized 40mbytes.
After the files are transfered to another Linux or BSD host, they can easily be again united in the original file with the command:
linux:~# for i in $(ls -1 SQL-Backup-Data_split*); echo $i >> SQL-Backup-Data.sql
Alternatively in most Unices also using cat should be enough to collect back the pieces into the original file, like so:
freebsd# cat SQL-Backup-Data_split* >> SQL-Backup-Data.sql
Enjoy splitting
Fri Jul 29 18:03:04 EEST 2011
Happy System Administrator Day - It's 31 of July again ;)
Happy System Administrator's Day to all Sys Admins, who read my blog regularly! ;)
There are some many mafias around the world, Maybe one day there should be a sysadmin mafia ;)
Cheers! ;)
There are some many mafias around the world, Maybe one day there should be a sysadmin mafia ;)
Cheers! ;)
Fri Jul 29 17:48:19 EEST 2011
How to change MySQL server root password
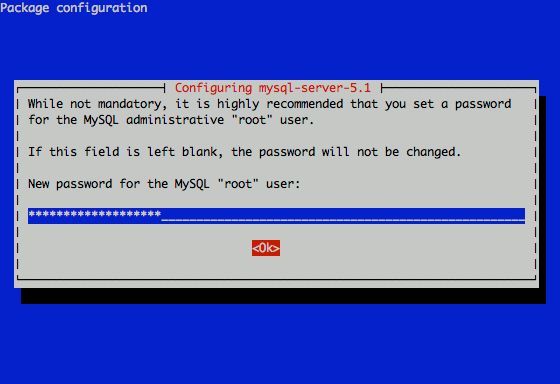
I had to change my mysql root password for one of the servers since during the install I mispasted the password in the MySQL password prompt I needed the pwd to be changed.
Here is how I changed it to my desired one:
linux:~# /usr/bin/mysqladmin -u root -p'OLD_PASSWORD_STRING' password NEW_PASSWORD_STRING

linux:~#
The password gets changed immediately ;)
If a new password has to be set to a passwordless mysql server, the command to be issued is:
linux:~# /usr/bin/mysqladmin -u root password PASSWORD_STRING
Changing the MySQL password is also possible with mysql cli, after connecting to the sql server, though this method is a bit more time consuming. Here is how to do it from mysql console:
mysql> mysql -u root -p

Server version: 5.1.49-3 (Debian)


Copyright (c) 2000, 2010, Oracle and/or its affiliates. All rights reserved.

This software comes with ABSOLUTELY NO WARRANTY. This is free software,

and you are welcome to modify and redistribute it under the GPL v2 license


Type 'help;' or '\h' for help. Type '\c' to clear the current input statement.

mysql> use mysql;

mysql> update user set password=PASSWORD("NEW_PASSWORD") where User='root';
mysql> flush privileges;
Of course it's possible to do change the root pass via phpmyadmin
Cheers ;)
Fri Jul 29 00:31:06 EEST 2011
How to configure manually static IP address on Debian GNU/Linux / How to fix eth0 interface not brought up with error (networking restart is deprecated)
I've recently had to manually assign a static IP address on one of the servers I manage, here is how I did it:
Inside the file I placed:
The broadcast and gateway configuration lines are not obligitory.
dns-nameservers would re-create /etc/resolv.conf file with the nameserver values specified which in these case are Google Public DNS servers and OpenDNS servers.
Very important variable is allow-hotplug eth0
If these variable with eth0 lan interface is omitted or missing (due to some some weird reason), the result would be the output you see from the command below:
Besides the /etc/init.d/networking restart is deprecated because it may not enable again some interfaces ... (warning). , if the allow-hotplug eth0 variable is omitted the eth0 interface would not be brough up on next server boot or via the networking start/stop/restart init script.
My first reaction when I saw the message was that probably I'll have to use invoke-rc.d, e.g.:
However as you see from above's command output, running invoke-rc.d helped neither.
I was quite surprised with the inability to bring my network up for a while with the networking init script.
Interestingly using the command:
was able to succesfully bring up the network interface, whether still invoke-rc.d networking start failed.
After some wondering I finally figured out that the eth0 was not brought up by networking init script, because auto eth0 or allow-hotplug eth0 (which by the way are completely interchangable variables) were missing.
I added allow-hotplug eth0 and afterwards the networking script worked like a charm ;)
debian:~# vim /etc/network/interfaces
Inside the file I placed:
# The primary network interface
allow-hotplug eth0
iface eth0 inet static

	address 192.168.0.2

	netmask 255.255.255.0

	broadcast 192.168.0.0

	gateway 192.168.0.1

	dns-nameservers 8.8.8.8 8.8.4.4 208.67.222.222 208.67.220.220
The broadcast and gateway configuration lines are not obligitory.
dns-nameservers would re-create /etc/resolv.conf file with the nameserver values specified which in these case are Google Public DNS servers and OpenDNS servers.
Very important variable is allow-hotplug eth0
If these variable with eth0 lan interface is omitted or missing (due to some some weird reason), the result would be the output you see from the command below:
debian:~# /etc/init.d/networking restart

Running /etc/init.d/networking restart is deprecated because it may not enable again some interfaces ... (warning).

Reconfiguring network interfaces...
Besides the /etc/init.d/networking restart is deprecated because it may not enable again some interfaces ... (warning). , if the allow-hotplug eth0 variable is omitted the eth0 interface would not be brough up on next server boot or via the networking start/stop/restart init script.
My first reaction when I saw the message was that probably I'll have to use invoke-rc.d, e.g.:
debian:~# invoke-rc.d networking restart

Running invoke-rc.d networking restart is deprecated because it may not enable again some interfaces ... (warning).
However as you see from above's command output, running invoke-rc.d helped neither.
I was quite surprised with the inability to bring my network up for a while with the networking init script.
Interestingly using the command:
debian:~# ifup eth0
was able to succesfully bring up the network interface, whether still invoke-rc.d networking start failed.
After some wondering I finally figured out that the eth0 was not brought up by networking init script, because auto eth0 or allow-hotplug eth0 (which by the way are completely interchangable variables) were missing.
I added allow-hotplug eth0 and afterwards the networking script worked like a charm ;)
Wed Jul 27 20:01:49 EEST 2011
Send message to GNOME on Linux over plain text ssh terminal session
 I just had some fun as, my work day over. I was curious if I can send message directly to a logged in Gnome user on Ubuntu / Debian environment.
After quick investigation I've found gxmessage which is available as deb package for both Debian and Ubuntu.
I installed it and use in the following way:
root@linux:~# apt-get install gxmessage
hipo@linux:~$ ssh root@remotehost.com

hipo@remote-desktop:~$ DISPLAY=:0; XAUTHORITY=~owner_of:0/.Xauthority; export DISPLAY XAUTHORITY

hipo@remote-desktop:~$ gxmessage 'Heya what's up   Wanna have a cake?"
Below you see what pops up on the screen on the remote-desktop Gnome Desktop ;)
Wed Jul 27 18:17:05 EEST 2011
How to block IP address with pf on FreeBSD / NetBSD and OpenBSD
I've noticed some IPs which had a kind of too agressive behaviour towards my Apache webserver and thus decided to filter them out with the Firewall.
As the server is running FreeBSD and my firewall choise is bsd's pf I added the following lines to my /etc/pf.conf to filter up the abiser IP:
table  persist file "/etc/pf.blocked.ip.conf"

EXT_NIC="ml0" # interface connected to internet

block drop in log (all) quick on $EXT_NIC from  to any
echo '123.123.123.123' >> /etc/pf.blocked.ip.conf
As you see I'm adding the malicious IP to /etc/pf.blocked.ip.conf, if I later decide to filter some other IPs I can add them up there and they will be loaded and filtered by pf on next pf restart.
Next I restarted my pf firewall definitions to make the newly added rules in pf.conf to load up.
freebsd# pfctl -d

freebsd# pfctl -e -f /etc/pf.conf
To show all IPs which will be inside the blockips filtering tables, later on I used:
pfctl -t blockips -T show
I can also later use pf to add later on new IPs to be blocked without bothering to restart the firewall with cmd:
freebsd# pfctl -t blockedips -T add 111.222.333.444
Deleting an IP is analogous and can be achieved with:
freebsd# pfctl -t blockedips -T delete 111.222.333.444
There are also logs stored about pf IP blocking as well as the other configured firewall rules in /var/log/pflog file.
Hope this is helpful to somebody.
Tue Jul 26 22:13:53 EEST 2011
How to make pptp VPN connection to use IPMI port (IPKVM / Web KVM) on Debian Linux
If you have used KVM, before you certainly have faced the requirement asked by many Dedicated Server Provider, for establishment of a PPTP (mppe / mppoe) or the so called Microsoft VPN tunnel to be able to later access via the tunnel through a Private IP address the web based Java Applet giving control to the Physical screen, monitor and mouse on the server.
This is pretty handy as sometimes the server is not booting and one needs a further direct access to the server physical Monitor.
Establishing the Microsoft VPN connection on Windows is a pretty trivial task and is easily achieved by navigating to:
However achiving the same task on Linux seemed to be not such a trivial, task and it seems I cannot find anywhere information or precise procedure how to establish the necessery VPN (ptpt) ms encrypted tunnel.
Thanksfully I was able to find a way to do the same tunnel on my Debian Linux, after a bunch of experimentation with the ppp linux command.
To be able to establish the IPMI VPN tunnel, first I had to install a couple of software packages, e.g.:
Further on it was necessery to load up two kernel modules to enable the pptp mppe support:
root@linux:~# modprobe ppp_mppe
root@linux:~# modprobe ppp-deflate
I've also enabled the modules to be loading up during my next Linux boot with /etc/modules to not be bother to load up the same modules after reboot manually:
Another thing I had to do is to enable the require-mppe-128 option in /etc/ppp/options.pptp.
Here is how:
In order to enable debug log for the ppp tunnel I also edited /etc/syslog.conf and included the following configuration inside:
The most important part of course is the command line with ppp command to connect to the remote IP via the VPN tunnel ;), here is how I achieved that:
This command, brings up the ppp interface and makes the tunnel between my IP and the remote VPN target host.
Info about the tunnel could be observed with command:
One more thing before I could finally access the IPMI's web interface via the private IP was to add routing to the private IP address via the tunnel other side IP address:
And tadam! It's done now IPKVM is accessible via http://10.20.1.124 or https://10.20.1.124 web interface. Horay ! :)
This is pretty handy as sometimes the server is not booting and one needs a further direct access to the server physical Monitor.
Establishing the Microsoft VPN connection on Windows is a pretty trivial task and is easily achieved by navigating to:
Properties > Networking (tab) > Select IPv4 > Properties > Advanced > Uncheck "Use default gateway on remote network".
However achiving the same task on Linux seemed to be not such a trivial, task and it seems I cannot find anywhere information or precise procedure how to establish the necessery VPN (ptpt) ms encrypted tunnel.
Thanksfully I was able to find a way to do the same tunnel on my Debian Linux, after a bunch of experimentation with the ppp linux command.
To be able to establish the IPMI VPN tunnel, first I had to install a couple of software packages, e.g.:
root@linux:~# apt-get install ppp pppconfig pppoeconf pptp-linux
Further on it was necessery to load up two kernel modules to enable the pptp mppe support:
root@linux:~# modprobe ppp_mppe
root@linux:~# modprobe ppp-deflate
I've also enabled the modules to be loading up during my next Linux boot with /etc/modules to not be bother to load up the same modules after reboot manually:
root@linux:~# echo ppp_mppe >> /etc/modules

root@linux:~# echo ppp-deflate >> /etc/modules
Another thing I had to do is to enable the require-mppe-128 option in /etc/ppp/options.pptp.
Here is how:
root@linux:~# sed -e 's$#require-mppe-128$require-mppe-128$g' /etc/ppp/options.pptp >> /tmp/options.pptp

root@linux:~# mv /tmp/options.pptp /etc/ppp/options.pptp
In order to enable debug log for the ppp tunnel I also edited /etc/syslog.conf and included the following configuration inside:
root@linux:~# vim /etc/syslog.conf

 *.=debug;\

  news.none;mail.none     -/var/log/debug

 *.=debug;*.=info;\

 *.=debug;*.=info;\

root@linux:~# killall -HUP rsyslogd
The most important part of course is the command line with ppp command to connect to the remote IP via the VPN tunnel ;), here is how I achieved that:
root@linux:~# pppd debug require-mppe pty "pptp ipmiuk2.net --nolaunchpppd" file /etc/ppp/options.pptp user My_Dedi_Isp_Given_Username password The_Isp_Given_Password
This command, brings up the ppp interface and makes the tunnel between my IP and the remote VPN target host.
Info about the tunnel could be observed with command:
ifconfig -a ppp

ppp0      Link encap:Point-to-Point Protocol

  inet addr:10.20.254.32  P-t-P:10.20.0.1  Mask:255.255.255.255

  UP POINTOPOINT RUNNING NOARP MULTICAST  MTU:1496  Metric:1

  RX packets:7 errors:0 dropped:0 overruns:0 frame:0

  TX packets:12 errors:0 dropped:0 overruns:0 carrier:0

  collisions:0 txqueuelen:3

  RX bytes:70 (70.0 B)  TX bytes:672 (672.0 B)
One more thing before I could finally access the IPMI's web interface via the private IP was to add routing to the private IP address via the tunnel other side IP address:
# 10.20.0.1 P-t-P IP address

ip route add 10.20.1.124 via 10.20.0.1;
And tadam! It's done now IPKVM is accessible via http://10.20.1.124 or https://10.20.1.124 web interface. Horay ! :)
Mon Jul 25 14:15:13 EEST 2011
How to record your Skype calls with skype-call-recorder on Debian Linux / Install skype-call-recorder on amd64 Debian squeeze testing/unstable Linux
If you have to use Skype as a mean to call your employers and you do some important talks related work via Skype it might be a good idea to keep a voice logs of Skype peer to peer calls or the conferent ones.
On Windows it's pretty easy to achieve voice skype calls recording as there is a plenty of software. However on Linux I can find only one application called skype-call-recorder
As I'm running Debian Squeeze/Wheeze (testing unstable) on my notebook, I decided to give skype-call-recorder a try:
I'm using a 64 bit release of Debian, so first I tried installing the only available version for Debian which is natively prepared to run on a i386 Debian, however I hoped it will run out as I have emulation support for i386 applications.
Thus I proceeded further downloadded and installed with the force-all dpkg optionskype-call-recorder-debian_0.8_i386.deb
root@noah:~# wget http://pc-freak.net/files/skype-call-recorder-debian_0.8_i386.deb

root@noah:~# dpkg -i --force-all skype-call-recorder-debian_0.8_i386.deb

...
However installing the debian i386 version of skyp-call-recorder seemed to not be starting due to problems with missing /usr/lib/libmp3lame.so.0 and /usr/lib/libaudid3tag.so libraries.
Thus I decided to give a try to the skype-call-recorder amd65 version which is natively aimed to be installed on Ubuntu release 8/9.
root@noah:~# wget http://pc-freak.net/files/skype-call-recorder-ubuntu_0.8_amd64.deb

root@noah:~# dpkg -i skype-call-recorder-ubuntu_0.8_amd64.deb
Installation of skype-call-recorder with this package went smoothly on Debian, the only issue I had with it is that I couldn't easily find/launch the program via Gnome Application menu.
To work around this I immediately edited /usr/local/share/applications/skype-call-recorder.desktop e.g.:
root@noah:~# vim /usr/local/share/applications/skype-call-recorder.desktop
In skype-call-recorder.desktop I substituted the line:
Categories=Utility;TelephonyTools;Recorder;InstantMessaging;Qt;
with
Categories=Application;AudioVideo;Audio;
A consequent quick Gnome logout and login again and now I have the program launchable via the menus:
Application -> Sound and Video -> Skype Call Recorder
The only thing I dislike about Skype Call Recorder is that the program current interface is build based on QT KDE library and thus when I launch it, the program launches a number of KDE related daemones like DCOP which eat my system an extra memory, still I'm happy even though the bit high load I can record the skype voice sessions on my Debian GNU/Linux.
Sun Jul 24 20:56:46 EEST 2011
How to reset a forgotten WORDPRESS blog admin password (via MySQL)
My sister has forgotten the administrator account for her wordpress blog as she did not blogged for a while.
I decided to help her and reset the WORDPRESS blog password to another one.
The easiest way of course in normal circumstances is to use wordpress's Lost your password password reset via email.
However with this blog it seems I used an email address which I forgot so I couldn't really use this as a mean to reset the blog password.
Therefore as I'm addicted to command line I decided to do it straight via connecting to mysql server with mysql cli and change the encrypted password value directly there. Here is how I did it:
1. First I logged in to the mysql server with my root user/pass
2. Then I checked current set user and password for the wp-admin admin user
3. Used a query to reset the current encrypted password you see below shown under the user_pass column
4. I've changed the email set for user_email to which mail is sent, in case of forgotten password again
I've done this to prevent my sister to bother me again, if she forgets her password once again ;)
One important note here is that in step 3 I've used the MD5(); mysql embedded function to generate the MD5 crypted password which is inserted in above's sql query, however the MD5 function is only available in MySQL servers version 5.x, therefore in older releases of MySQL e.g. ver 4.x, one will have to first generate the md5 password with let's say md5sum linux command or bsd's md5 cmd like so:
a. On Linux
b. On FreeBSD
Afterwards the SQL query that can be used with the above generated string to issue on the MySQL 4.x server or earlier versions would be:
That's all now the password is set to the newly generated my_new_wordpress_password_to_reset pass string.
Cheers ;)
I decided to help her and reset the WORDPRESS blog password to another one.
The easiest way of course in normal circumstances is to use wordpress's Lost your password password reset via email.
However with this blog it seems I used an email address which I forgot so I couldn't really use this as a mean to reset the blog password.
Therefore as I'm addicted to command line
I decided to do it straight via connecting to mysql server with mysql cli and change the encrypted password value directly there. Here is how I did it:1. First I logged in to the mysql server with my root user/pass
pcfreak# mysql -u root -p
Enter password:
Your MySQL connection id is 39263
Server version: 5.0.83-log FreeBSD port: mysql-server-5.0.83
Type 'help;' or '\h' for help. Type '\c' to clear the current input statement.
2. Then I checked current set user and password for the wp-admin admin user
mysql> use wordpress1;

mysql>  select * from wp_users where user_login like '%admin%';

+----+------------+--------------+---------------------+-------------+--------------+

| ID | user_login | user_pass | user_nicename | user_email | user_url | user_registered | user_activation_key | user_status | display_name |

+----+------------+------------------------------------+---------------+----------------+----------+---------------------+----

|  1 | admin      | $P$BG9eMoysG8ztywLp25AOpJSkWlRZMu. | admin         | invoke@emailaddress.com |          | 2011-03-10 13:44:26 |
           |           0 | admin        |
+----+------------+------------------------------------+---------------+----------------+----------+---------------------+---

1 row in set (0.25 sec)
3. Used a query to reset the current encrypted password you see below shown under the user_pass column
mysql> UPDATE wp_users SET user_pass= MD5('my_new_wordpress_password_to_reset') where ID = '1';
4. I've changed the email set for user_email to which mail is sent, in case of forgotten password again
I've done this to prevent my sister to bother me again, if she forgets her password once again ;)
mysql> UPDATE wp_users SET user_email='invoke_@abv.bg' where ID = '1';
One important note here is that in step 3 I've used the MD5(); mysql embedded function to generate the MD5 crypted password which is inserted in above's sql query, however the MD5 function is only available in MySQL servers version 5.x, therefore in older releases of MySQL e.g. ver 4.x, one will have to first generate the md5 password with let's say md5sum linux command or bsd's md5 cmd like so:
a. On Linux
hipo@noah:~$ echo 'my_new_wordpress_password_to_reset' | md5sum

f0ed1489e6d9e7eae8b363b1b5e4a864  -
b. On FreeBSD
pcfreak# echo 'my_new_wordpress_password_to_reset' | md5

f0ed1489e6d9e7eae8b363b1b5e4a864
Afterwards the SQL query that can be used with the above generated string to issue on the MySQL 4.x server or earlier versions would be:
mysql> UPDATE wp_users SET user_pass='f0ed1489e6d9e7eae8b363b1b5e4a864' where ID = '1';
That's all now the password is set to the newly generated my_new_wordpress_password_to_reset pass string.
Cheers ;)
Sat Jul 23 17:44:57 EEST 2011
How to reboot remotely Linux server if reboot, shutdown and init commands are not working (/sbin/reboot: Input/output error) - Reboot Linux in emergency using MagicSysRQ kernel sysctl variable

I've been in a situation today, where one Linux server's hard drive SCSI driver or the physical drive is starting to break off where in dmesg kernel log, I can see a lot of errors like:
[178071.998440] sd 0:0:0:0: [sda] Result: hostbyte=DID_BAD_TARGET driverbyte=DRIVER_OK,SUGGEST_OK
[178071.998440] end_request: I/O error, dev sda, sector 89615868
I tried a number of things to remount the hdd which was throwing out errors in read only mode, but almost all commands I typed on the server were either shown as missng or returning an error:
Input/output error
Just ot give you an idea what I mean, here is a paste from the shell:
linux-server:/# vim /etc/fstab

-bash: vim: command not found

linux-server:/# vi /etc/fstab

-bash: vi: command not found

linux-server:/# mcedit /etc/fstab

-bash: /usr/bin/mcedit: Input/output error

linux-server:/# fdisk -l

-bash: /sbin/fdisk: Input/output error
After I've tried all kind of things to try to diagnose the server and all seemed failing, I thought next a reboot might help as on server boot the filesystems will get checked with fsck and fsck might be able to fix (at least temporary) the mess.
I went on and tried to restart the system, and guess what? I got:
/sbin/reboot init Input/output error
I hoped that at least /sbin/shutdown or /sbin/init commands might work out and since I couldn't use the reboot command I tried this two as well just to get once again:
linux-server:/# shutdown -r now

bash: /sbin/shutdown: Input/output error

linux-server:/#  init 6

bash: /sbin/init: Input/output error
You see now the situation was not pinky, it seemed there was no way to reboot the system ...
Moreover the server is located in remote Data Center and I the tech support there is conducting assigned task with the speed of a turtle.
The server had no remote reboot, web front end or anything and thefore I needed desperately a way to be able to restart the machine.
A bit of research on the issue has led me to other people who experienced the /sbin/reboot init Input/output error error mostly caused by servers with failing hard drives as well as due to HDD control driver bugs in the Linux kernel.
As I was looking for another alternative way to reboot my Linux machine in hope this would help. I came across a blog post Rebooting the Magic Way - http://www.linuxjournal.com/content/rebooting-magic-way
As it was suggested in Cory's blog a nice alternative way to restart a Linux machine without using reboot, shutdown or init cmds is through a reboot with the Magic SysRQ key combination
The only condition for the Magic SysRQ key to work is to have enabled the SysRQ - CONFIG_MAGIC_SYSRQ in Kernel compile time.
As of today luckily SysRQ Magic key is compiled and enabled by default in almost all modern day Linux distributions in this numbers Debian, Fedora and their derivative distributions.
To use the sysrq kernel capabilities as a mean to restart the server, it's necessery first to activate the sysrq through sysctl, like so:
linux-server:~# sysctl -w kernel.sysrq=1
kernel.sysrq = 1
I found enabling the kernel.sysrq = 1 permanently in the kernel is also quite a good idea, to achieve that I used:
echo 'kernel.sysrq = 1' >> /etc/sysctl.conf
Next it's wise to use the sync command to sync any opened files on the server as well stopping as much of the server active running services (MySQL, Apache etc.).
linux-server:~# sync
Now to reboot the Linux server, I used the /proc Linux virtual filesystem by issuing:
linux-server:~# echo b > /proc/sysrq-trigger
Using the echo b > /proc/sysrq-trigger simulates a keyboard key press which does invoke the Magic SysRQ kernel capabilities and hence instructs the kernel to immediately reboot the system.
However one should be careful with using the sysrq-trigger because it's not a complete substitute for /sbin/reboot or /sbin/shutdown -r commands.
One major difference between the standard way to reboot via /sbin/reboot is that reboot kills all the running processes on the Linux machine and attempts to unmount all filesystems, before it proceeds to sending the kernel reboot instruction.
Using echo b > /proc/sysrq-trigger, however neither tries to umount mounted filesystems nor tries to kill all processes and sync the filesystem, so on a heavy loaded (SQL data critical) server, its use might create enormous problems and lead to severe data loss!
SO BEWARE be sure you know what you're doing before you proceed using /proc/sysrq-trigger as a way to reboot ;).
Fri Jul 22 20:07:53 EEST 2011
How to find and kill Abusers on OpenVZ Linux hosted Virtual Machines (Few bash scripts to protect OpenVZ CentOS server from script kiddies and easify the daily admin job)
These days, I'm managing a number of OpenVZ Virtual Machine host servers. Therefore constantly I'm facing a lot of problems with users who run shit scripts inside their Linux Virtual Machines.
Commonly user Virtual Servers are used as a launchpad to attack hosts do illegal hacking activities or simply DDoS a host..
The virtual machines users (which by the way run on top of the CentOS OpenVZ Linux) are used to launch a Denial service scripts like kaiten.pl, trinoo, shaft, tfn etc.
As a consequence of their malicious activities, oftenly the Data Centers which colocates the servers are either null routing our server IPs until we suspend the Abusive users, or the servers go simply down because of a server overload or a kernel bug hit as a result of the heavy TCP/IP network traffic or CPU/mem overhead.
Therefore to mitigate this abusive attacks, I've written few bash shell scripts which, saves us a lot of manual check ups and prevents in most cases abusers to run the common DoS and "hacking" script shits which are now in the wild.
The first script I've written is kill_abusers.sh , what the script does is to automatically look up for a number of listed processes and kills them while logging in /var/log/abusers.log about the abusive VM user procs names killed.
I've set this script to run 4 times an hour and it currently saves us a lot of nerves and useless ticket communication with Data Centers (DCs), not to mention that reboot requests (about hanged up servers) has reduced significantly.
Therefore though the scripts simplicity it in general makes the servers run a way more stable than before.
Here is OpenVZ kill/suspend Abusers procs script kill_abusers.sh ready for download
Another script which later on, I've written is doing something similar and still different, it does scan the server hard disk using locate and find commands and tries to identify users which has script kiddies programs in their Virtual machines and therefore are most probably crackers.
The scripts looks up for abusive network scanners, DoS scripts, metasploit framework, ircds etc.
After it registers through scanning the server hdd, it lists only files which are preliminary set in the script to be dangerous, and therefore there execution inside the user VM should not be.
search_for_abusers.sh then logs in a files it's activity as well as the OpenVZ virtual machines user IDs who owns hack related files. Right after it uses nail mailing command to send email to a specified admin email and reports the possible abusers whose VM accounts might need to either be deleted or suspended.
search_for_abusers can be download here
Honestly I truly liked my search_for_abusers.sh script as it became quite nice and I coded it quite quickly.
I'm intending now to put the Search for abusers script on a cronjob on the servers to check periodically and report the IDs of OpenVZ VM Users which are trying illegal activities on the servers.
I guess now our beloved Virtual Machine user script kiddies are in a real trouble ;P
Fri Jul 22 14:43:11 EEST 2011
Installing HTOP on CentOS 5.5 OpenVZ Linux server from source
Lately, I'm basicly using htop's nice colourful advanced Linux top command frontend in almost every server I manage, therefore I've almost abondoned top usage these days and in that reason I wanted to have htop installed on few of the OpenVZ CentOS 5.5 Linux servers at work.
I looked online but unfortunately I couldn't find any rpm pre-built binary packages. The source rpm package I tried to build from dag wieers repository failed as well, so finally I went further and decided to install htop from source
Here is how I did it:
1. Install gcc and glibc-devel prerequired rpm packages
[root@centos ~]# yum install gcc glibc-devel
2. Download htop and compile from source
[root@centos src]# cd /usr/local/src

[root@centos src]# wget "http://sourceforge.net/projects/htop/files/htop/0.9/htop-0.9.tar.gz/download"

Connecting to heanet.dl.sourceforge.net|193.1.193.66|:80... connected.

HTTP request sent, awaiting response... 200 OK

Length: 418767 (409K) [application/x-gzip]

Saving to: "download"


100%[======================================>] 418,767      417K/s   in 1.0s

2011-07-22 13:30:28 (417 KB/s) - "download" saved [418767/418767]


[root@centos src]# mv download htop.tar.gz

[root@centos src]# tar -zxf htop.tar.gz

[root@centos src]# cd htop-0.9

[root@centos htop-0.9]# ./configure && make && make install
make install should install htop to /usr/local/bin/htop
That's all folks! , now my OpenVZ CentOS server is equipped with the nifty htop tool ;)
Thu Jul 21 21:17:32 EEST 2011
How to check if your Linux WebServer is under a DoS attack
There are few commands I usually use to track if my server is possibly under a Denial of Service attack or under Distributed Denial of Service
Sys Admins who still have not experienced the terrible times of being under a DoS attack are happy people for sure ...
1. How to Detect a TCP/IP Denial of Service Attack This are the commands I use to find out if a loaded Linux server is under a heavy DoS attack, one of the most essential one is of course netstat.
To check if a server is under a DoS attack with netstat, it's common to use:
If the output of below command returns a result like 2000 or 3000 connections!, then obviously it's very likely the server is under a DoS attack.
To check all the IPS currently connected to the Apache Webserver and get a very brief statistics on the number of times each of the IPs connected to my server, I use the cmd:
As you could see from the above command output the IP 80.143.207.107 is either connected 221 times to the server or is in state of connecting or disconnecting to the node.
Another possible way to check, if a Linux or BSD server is under a Distributed DoS is with the list open files command lsof
Here is how lsof can be used to list the approximate number of ESTABLISHED connections to port 80.
Another way to get an approximate number of established connections to let's say Apache or LiteSpeed webserver with lsof can be achieved like so:
I find it handy to keep track of above lsof command output every few secs with gnu watch , like so:
2. How to Detect if a Linux server is under an ICMP SMURF attack
ICMP attack is still heavily used, even though it's already old fashioned and there are plenty of other Denial of Service attack types, one of the quickest way to find out if a server is under an ICMP attack is through the command:
As you can see the above one liner in a loop would check for sent and recieved ICMP packets every few seconds, if there are big difference between in the output returned every few secs by above command, then obviously the server is under an ICMP attack and needs to hardened.
3. How to detect a SYN flood with netstat
1032 SYNs per second is quite a high number and except if the server is not serving let's say 5000 user requests per second, therefore as the above output reveals it's very likely the server is under attack, if however I get results like 100/200 SYNs, then obviously there is no SYN flood targetting the machine ;)
Another two netstat command application, which helps determining if a server is under a Denial of Service attacks are:
and
Of course there also some other ways to check the count the IPs who sent SYN to the webserver, for example:
In many cases of course the top or htop can be useful to find, if many processes of a certain type are hanging around.
4. Checking if UDP Denial of Service is targetting the server
The above command will list information concerning possible UDP DoS.
The command can easily be accustomed also to check for both possible TCP and UDP denial of service, like so:
If after getting an IP that has too many connections to the server and is almost certainly a DoS host you would like to filter this IP.
You can use the /sbin/route command to filter it out, using route will probably be a better choice instead of iptables, as iptables would load up the CPU more than simply cutting the route to the server.
Here is how I remove hosts to not be able to route packets to my server:
The above command would null route the access of IP 110.92.0.55 to my server.
Later on to look up for a null routed IP to my host, I use:
Well hopefully this should be enough to give a brief overview on how, one can dig in his server and find if he is under a Distributed Denial of Service, hope it's helpful to somebody out there.
Cheers ;)
Sys Admins who still have not experienced the terrible times of being under a DoS attack are happy people for sure ...
1. How to Detect a TCP/IP Denial of Service Attack This are the commands I use to find out if a loaded Linux server is under a heavy DoS attack, one of the most essential one is of course netstat.
To check if a server is under a DoS attack with netstat, it's common to use:
linux:~# netstat -ntu | awk '{print $5}' | cut -d: -f1 | sort | uniq -c | sort -n|wc -l
If the output of below command returns a result like 2000 or 3000 connections!, then obviously it's very likely the server is under a DoS attack.
To check all the IPS currently connected to the Apache Webserver and get a very brief statistics on the number of times each of the IPs connected to my server, I use the cmd:
linux:~# netstat -ntu | awk '{print $5}' | cut -d: -f1 | sort | uniq -c | sort -n

 221 80.143.207.107
 233 145.53.103.70
 540 82.176.164.36
As you could see from the above command output the IP 80.143.207.107 is either connected 221 times to the server or is in state of connecting or disconnecting to the node.
Another possible way to check, if a Linux or BSD server is under a Distributed DoS is with the list open files command lsof
Here is how lsof can be used to list the approximate number of ESTABLISHED connections to port 80.
linux:~# lsof -i TCP:80

litespeed 241931   nobody   17u  IPv4 18372655       TCP server.pc-freak.net:http (LISTEN)

litespeed 241931   nobody   25u  IPv4 18372659       TCP 85.17.159.89:http (LISTEN)

litespeed 241931   nobody   30u  IPv4 29149647       TCP server.pc-freak.net:http->83.101.6.41:54565 (ESTABLISHED)

litespeed 241931   nobody   33u  IPv4 18372647       TCP 85.17.159.93:http (LISTEN)

litespeed 241931   nobody   34u  IPv4 29137514       TCP server.pc-freak.net:http->83.101.6.41:50885 (ESTABLISHED)

litespeed 241931   nobody   35u  IPv4 29137831       TCP server.pc-freak.net:http->83.101.6.41:52312 (ESTABLISHED)

litespeed 241931   nobody   37w  IPv4 29132085       TCP server.pc-freak.net:http->83.101.6.41:50000 (ESTABLISHED)
Another way to get an approximate number of established connections to let's say Apache or LiteSpeed webserver with lsof can be achieved like so:
linux:~# lsof -i TCP:80 |wc -l

2100
I find it handy to keep track of above lsof command output every few secs with gnu watch , like so:
linux:~# watch "lsof -i TCP:80"
2. How to Detect if a Linux server is under an ICMP SMURF attack
ICMP attack is still heavily used, even though it's already old fashioned and there are plenty of other Denial of Service attack types, one of the quickest way to find out if a server is under an ICMP attack is through the command:
server:~# while :; do netstat -s| grep -i icmp | egrep 'received|sent' ; sleep 1; done

  120026 ICMP messages received

  1769507 ICMP messages sent

  120026 ICMP messages received

  1769507 ICMP messages sent
As you can see the above one liner in a loop would check for sent and recieved ICMP packets every few seconds, if there are big difference between in the output returned every few secs by above command, then obviously the server is under an ICMP attack and needs to hardened.
3. How to detect a SYN flood with netstat
linux:~# netstat -nap | grep SYN | wc -l

1032
1032 SYNs per second is quite a high number and except if the server is not serving let's say 5000 user requests per second, therefore as the above output reveals it's very likely the server is under attack, if however I get results like 100/200 SYNs, then obviously there is no SYN flood targetting the machine ;)
Another two netstat command application, which helps determining if a server is under a Denial of Service attacks are:
server:~# netstat -tuna |wc -l

10012
and
server:~# netstat -tun |wc -l

9606
Of course there also some other ways to check the count the IPs who sent SYN to the webserver, for example:
server:~# netstat -n | grep :80 | grep SYN |wc -l
In many cases of course the top or htop can be useful to find, if many processes of a certain type are hanging around.
4. Checking if UDP Denial of Service is targetting the server
server:~# netstat -nap | grep 'udp' | awk '{print $5}' | cut -d: -f1 | sort |uniq -c |sort -n
The above command will list information concerning possible UDP DoS.
The command can easily be accustomed also to check for both possible TCP and UDP denial of service, like so:
server:~# netstat -nap | grep 'udp\|udp' | awk '{print $5}' | cut -d: -f1 | sort |uniq -c |sort -n

  104 109.161.198.86

  115 112.197.147.216

  129 212.10.160.148

  227 201.13.27.137

  3148 91.121.85.220
If after getting an IP that has too many connections to the server and is almost certainly a DoS host you would like to filter this IP.
You can use the /sbin/route command to filter it out, using route will probably be a better choice instead of iptables, as iptables would load up the CPU more than simply cutting the route to the server.
Here is how I remove hosts to not be able to route packets to my server:
route add 110.92.0.55 reject
The above command would null route the access of IP 110.92.0.55 to my server.
Later on to look up for a null routed IP to my host, I use:
route -n |grep -i 110.92.0.55
Well hopefully this should be enough to give a brief overview on how, one can dig in his server and find if he is under a Distributed Denial of Service, hope it's helpful to somebody out there.
Cheers ;)
Wed Jul 20 22:56:15 EEST 2011
20th of July St. Elijah (Elias) feast in Bulgarian Orthodox Church
It's again 20th of July and we in the Bulgarian Orthodox Church, celebrate the Holy memory of st. Prophet Elijah (Elias
St. Elijah is among the greatest Old Testamental prophets. He lived before the birth of our saviour Jesus Christ in a time when apostacy from true faith was severe.
In Elias's time (few centuries B.C.), there used to be also a severe hunger on the land.
Elias was among the little number of Jews who did continued to honour the True God creator of Heaven and of Earth instead of turning to false religious teachings inspired by demons, like it's the Baal's cult which was widely spread among Jews back in the time.
Because of his faith in the true God, st. Prophet Elijah was hunted by the king's wife Jezabel and he was forced to escape from Bersheeba and went alone in the wilderness and sat down in despondency under a juniper tree.
As he slept, an angel touched him, and said unto him, "Arise and eat; because the journey is too great for thee." He arose and found a cake and a cruse of water. Having partaken of the provision, he went forward on his way for forty days to Horeb, where he took residence in a cave. Here God appeared to him and said, "What dost thou here, Elijah?" In answer to Elijah's despondent words God manifests to him his glory, and then directs him to return to Damascus and anoint Hazael king over the Arameans (Syria), Jehu king over Israel, and Elisha to be prophet in his room (1 Kings 19:13-21; compare 2 Kings 8:7-15; 9:1-10).
Some six years after this he prophecised and warned by God's commandment Ahab and Jezebel of the violent deaths they would die (1 Kings 21:19-24; 22:38)
The reason for the great hunger at this times was the fact that no rain has fallen down to the land for two years, as Elias prayed to God that no rain will be given to the people of Israel until they turn back to their true God.
One of the most notable moments of st. Elias's earhtly living was the great miracle he performed by God's providence which proofed that only the God of Israel is the true God of heaven and earth.
This happened while he was still in desolation on mount Carmel, it came to pass that Elijah met Obadiah, one of king Ahab's officers (the king at that time of Israel).
Obadiah was he sent out at this time to seek for pasturage for the cattle (as the hunger on the land was so severe that even pastures for animals was obscure).
Elias's by God's word bade him go and tell his master that Elijah was there. King Ahab came forth and met Elias and accused him to be the "Trouble of Israel" as, he thought that his lands troubles are because Elias did not turns to Baal as the the king himself and most of the Jews at that time.
It was then proposed by Elias, that sacrifices should be publicly offered (to determine whose God is in control of taking out the hunger - e.g. Elias's God of Israel or Baal to whom has many falsely turned.
, for the purpose of determining whether Baal or the Israelite's God is the one's master of the Universe.
The competition was accepted by Ahab and many of the prophets of Baal gathered together to "beg" his God for a miracle.
Baal's false manu prophets gathered around the sacrifice place and started Begging Baal to send fire and burn the sacrificial altar.
Nomatter how hard they screamed, nothing happened so eventually they started cutting their bodies pouring blood in a hope to catch baal's attention and make him have mercy on them.
As long time passed on and no miracle happened Elias told baal's worshippers to step back from the sacrificial calf on the built altar and ordered some of the king's servants to spill water over the calf (three times).
The water brought was so much that the whole altar trench was over-filled with water.
Then saint Elias begged to God: "Oh Lord, God of Abraham, Isaac and Jacob, please hear me! Let oh God this people recognize that You Lord is God and please oh Lord turn the people's hearts towards you.", he was still praying when fire came down from heaven and burnt the stones, the water in and the trench itself.
When all the gathered people around saw this great miracle of God, they bowed down and confessed the One and only God.
By Elias's order the Baal's false priests has been killed.
After this great miracle, Elias said to Ahab to came back home, before the rain has followed him.
The saint prophet climbed to the mountain top and prayed for a very long time.
After the holy man of God completed his prayers a powerful wind started blowing and the sky has filled with big clouds and a pouring rain come down to the overdried earth.
The king's wife Jezabel, still kept her stubborness and continued severely hunting for st. Elias and even gave a vow to kill him because all her prophets were killed.
But God again was with st. Elias and saved him by warning him to run away in the wilderness.
Elias was in a big sorrow, here because many of the people still continued to honour the false god baal even though all the great heavenly signs.
God however by a great miracles, has once again shown the prophet he should be of a good spirit always and always to trust in God as he even send his Angel to give Elijah food in the desert.
Elias was among the only 7000 of Israelish man who does rejected to venerate the false god Baal.
By God's providence st. Elias had a pupil prophet called Elijah.
The time now drew near when he was to be taken up into heaven (2 Kings 2:1-12). He went down to Gilgal, where there was a school of prophets, and where his successor Elisha, whom he had anointed some years before, resided.
Elisha was distraught by the thought of his master's leaving him, and refused to be parted from him. The two went on and came to Bethel and Jericho, and crossed the Jordan, the waters of which were "divided hither and thither" when smitten with Elijah's mantle.
Upon arriving at the borders of Gilead, which Elijah had left many years before, it "came to pass as they still went on and talked" they were suddenly separated by a chariot and horses of fire; and "Elijah went up by a whirlwind into heaven," Elisha receiving his mantle, which fell from Elijah as he ascended.
Elijah's chosen successor was the prophet Elisha; Elijah designated Elisha as such by leaving his mantle with him (2 Kings 2:13-15), so that his wish for "a double portion" of the older prophet's spirit (2:9)
Later on in New Testamential time it was again st. prophet Elias, who appearance in glory on Mount Tabor and talked with our Saviour Christ at the Son of God's Glorious Transfiguration.
An interesting fact is that Elias and Enoch are the only two people who according to the Holy writtings were taken by God straight to heaven. No other mortal man has been taken that way in flesh.
According to Orthodox Church's tradition, Elias and Enoch will be brought back to earth again by God in the last days of the anti-christ, when they will again testify about our Lord Jesus Christ's being the truth God and will also expose the anti-christ who will falsely pretend as being the true god of Israel and a true saviour of mankind.
Again according to this church history this two prophets at this last days, will be given an enormous power from God, even a power to stop the rain to come down to earth and the power to command the rivers to stop.
Oh Holy Prophet Elias, let God have mercy on us the sinners by your Holy prayers and save us, give us grace and always show us His great mercies.
Amen!
Wed Jul 20 16:16:33 EEST 2011
Sys Admin quick VIM Quick Cheat Sheet ! ;)
Have you, ever thought of refreshing your VIM knowledge obtained back in the days reading the vimtutorial available straight in vim via the:
vimtutor comand?
I asked few vim related question today in #vim in irc freenode and I was referred to the guy the following:

VIM QUICK Tutorial Sheet Picture ! Nice ! Aint't it? :)
vimtutor comand?
I asked few vim related question today in #vim in irc freenode and I was referred to the guy the following:
VIM QUICK Tutorial Sheet Picture !
Nice ! Aint't it? :)Tue Jul 19 11:42:29 EEST 2011
How to install Nvidia GeForce FX 5500 on Ubuntu 11.04
Yesterday I was at a friend of mine who has recently installed Ubuntu 11.04 to his already oldish Desktop computer.
The system was 1.4Ghz (amd) with 512 RAM and some kind of Dell Trinitron 19 inch monitor
Even though he tried hard to make his NVIDIA GeForce FX 5500 's drive to work properly with Ubuntu Natty Narwhal, he just has messed it even more.
As I always like helping people and I'm joyful for people who want to migrate to Linux, I took some time to make his NVIDIA GeForce work with this Ubuntu release.
First I tried to make it work by using some of the official NVIDIA Linux drivers located on nvidia.com following some online tutorial for Ubuntu claiming that it works but actually it didn't, so finally after a bit of experimentation I found a way to make this video card work.
Here is how:
1. Install the following Ubuntu packages
2. Load in the kernel and set to be auto loaded on boot nvidia's driver kernel module nvidia-173
3. Stop temporary (Gnome dipsplay manager) gdm
4. Use nvidia-xconfig to generate a working version of /etc/X11/xorg.conf for Nvidia
nvidia-xconfig will generate new /etc/X11/xorg.conf configuration corresponding to the Nvidia GeForce Fx 5500 and will move the old xorg.conf to xorg.conf.backup.
5. Start the gdm manager to be running again
Now the Xserver will start in a terrible mode of 640x480, probably because Ubuntu was unable to define correct VerticalSync and HorizontalSync for the 19 inch Dell Trinitron monitor or for some other weird reason, to fix this it's quite easy though.
The fix to the NVIDIA GeForce 5500 running in 640x480 mode is done straigh via Gnome menus.
6. Use Gnome's System -> Preferences -> Monitors to set raise up the Xserver resolution
Navigate to Gnome's menus:

Here you will have to select more appropriate resolution and a different refresh rate, which in my case was 1024x768 and further on to store the settings press the Apply button.
One oddity here was that according to the Monitor Preferences the refresh rate was running on 54 Hz which I don't believe was the case as I guess it's some kind of Gnome or Ubuntu bug. I changed the 54 Hz Refresh Rate to 50 Hz as using the 54 Hz refresh rate as the screen had a minor vibrations observable if one takes a thorough look on the screen.
Setting the NVIDIA GeForce 5500 driver to work with 50 Hz Refresh Rate in Gnome loooked like the Windows's 85 Hz RR and looked quite nice so I left it this way.
Finally to test the newly installed driver 3D acceleration I used glxgears.
7. Install glxgears in order to be able to test that 3D acceleration on Nvidia works fine
After installing mesa-utils which nowdays contains glxgears executable one needs to execute the glxgears binary.
Immediately after a window containing the glxgears should popup on the screen, like shown in below screenshot

glxgears showed 3d acceleration works fine as the performance for 3d rendering shown was quite good and therefore 3D acceleration was running fine.
And that was it now the video works like and my friends, can enjoy the fun to have a generally virus Free OS ;)
The system was 1.4Ghz (amd) with 512 RAM and some kind of Dell Trinitron 19 inch monitor
Even though he tried hard to make his NVIDIA GeForce FX 5500 's drive to work properly with Ubuntu Natty Narwhal, he just has messed it even more.
As I always like helping people and I'm joyful for people who want to migrate to Linux, I took some time to make his NVIDIA GeForce work with this Ubuntu release.
First I tried to make it work by using some of the official NVIDIA Linux drivers located on nvidia.com following some online tutorial for Ubuntu claiming that it works but actually it didn't, so finally after a bit of experimentation I found a way to make this video card work.
Here is how:
1. Install the following Ubuntu packages
root@ubuntu:~# apt-get install nouveau-firmware nvidia-173 nvidia-173-kernel-source \

nvidia-cg-toolkit nvidia-common nvidia-current nvidia-glx-173 nvidia-settings

...
2. Load in the kernel and set to be auto loaded on boot nvidia's driver kernel module nvidia-173
root@ubuntu:~# depmod -a;

root@ubutnu:~# modprobe nvidia-173

root@ubuntu:~# echo nvidia-173 >> /etc/modules
3. Stop temporary (Gnome dipsplay manager) gdm
root@ubuntu:~# service gdm stop

...
4. Use nvidia-xconfig to generate a working version of /etc/X11/xorg.conf for Nvidia
root@ubuntu:~# nvidia-xconfig

..
nvidia-xconfig will generate new /etc/X11/xorg.conf configuration corresponding to the Nvidia GeForce Fx 5500 and will move the old xorg.conf to xorg.conf.backup.
5. Start the gdm manager to be running again
root@ubuntu:~# service gdm start

...
Now the Xserver will start in a terrible mode of 640x480, probably because Ubuntu was unable to define correct VerticalSync and HorizontalSync for the 19 inch Dell Trinitron monitor or for some other weird reason, to fix this it's quite easy though.
The fix to the NVIDIA GeForce 5500 running in 640x480 mode is done straigh via Gnome menus.
6. Use Gnome's System -> Preferences -> Monitors to set raise up the Xserver resolution
Navigate to Gnome's menus:
System -> Preferences -> Monitors
Here you will have to select more appropriate resolution and a different refresh rate, which in my case was 1024x768 and further on to store the settings press the Apply button.
One oddity here was that according to the Monitor Preferences the refresh rate was running on 54 Hz which I don't believe was the case as I guess it's some kind of Gnome or Ubuntu bug. I changed the 54 Hz Refresh Rate to 50 Hz as using the 54 Hz refresh rate as the screen had a minor vibrations observable if one takes a thorough look on the screen.
Setting the NVIDIA GeForce 5500 driver to work with 50 Hz Refresh Rate in Gnome loooked like the Windows's 85 Hz RR and looked quite nice so I left it this way.
Finally to test the newly installed driver 3D acceleration I used glxgears.
7. Install glxgears in order to be able to test that 3D acceleration on Nvidia works fine
root@ubuntu:~# apt-get install mesa-utils
After installing mesa-utils which nowdays contains glxgears executable one needs to execute the glxgears binary.
root@ubuntu:~# glxgears
Immediately after a window containing the glxgears should popup on the screen, like shown in below screenshot
glxgears showed 3d acceleration works fine as the performance for 3d rendering shown was quite good and therefore 3D acceleration was running fine.
And that was it now the video works like and my friends, can enjoy the fun to have a generally virus Free OS ;)
Mon Jul 18 18:26:57 EEST 2011
How to add a range of virtual IPs to a CentOS and Fedora Linux server
Recently I had the task to add a range of few IP addresses to as a virtual interface IPs.
The normal way to do that is of course using the all well known ifconfig eth0:0, ifconfig eth0:1 or using a tiny shell script which does it and set it up to run through /etc/rc.local .
However the Redhat guys could omit all this mambo jambo and do it The Redhat way TM by using a standard method documented in CentOS and RHEL documentation.
Here is how:
Now inside ifcfg-eth0-range, open up with a text editor or use the echo command to put inside:
Now save the /etc/sysconfig/network-scripts/ifcfg-eth0-range file and finally restart centos networking via the network script:
That's all now after the network gets reinitialized all the IPs starting with 192.168.1.120 and ending in 192.168.1.250< will get assigned as virtual IPs for eth0 interface
Cheers ;)
The normal way to do that is of course using the all well known ifconfig eth0:0, ifconfig eth0:1 or using a tiny shell script which does it and set it up to run through /etc/rc.local .
However the Redhat guys could omit all this mambo jambo and do it The Redhat way TM
by using a standard method documented in CentOS and RHEL documentation.Here is how:
# go to network-script directory
[root@centos ~]# cd /etc/sysconfig/network-scripts

# create ifcfg-eth0-range (if virtual ips are to be assigned on eth0 lan interface
[root@centos network-scripts]# touch ifcfg-eth0-range
Now inside ifcfg-eth0-range, open up with a text editor or use the echo command to put inside:
IPADDR_START=192.168.1.120

IPADDR_END=192.168.1.250

NETMASK=255.255.255.25

CLONENUM_START=0
Now save the /etc/sysconfig/network-scripts/ifcfg-eth0-range file and finally restart centos networking via the network script:
[root@centos network-scripts]# service network restart
That's all now after the network gets reinitialized all the IPs starting with 192.168.1.120 and ending in 192.168.1.250< will get assigned as virtual IPs for eth0 interface
Cheers ;)
Sun Jul 17 14:20:01 EEST 2011
How to install Skype on 64 bit Ubuntu (amd64) architecture
It seems Skype has troubles installing on 64 bit Ubuntu via Ubuntu's Graphical Package Install manager which in Ubuntu 11.04 is called (Ubuntu Software Center)
During my attempt to take advantage of the nice GUI apt frontend, I encontered the error:
During my attempt to take advantage of the nice GUI apt frontend, I encontered the error:
Wrong Architecture amd64
And Skype install failed, as you see in below's picture (which you might be unable to read since it's stating the error in Bulgarian ;)
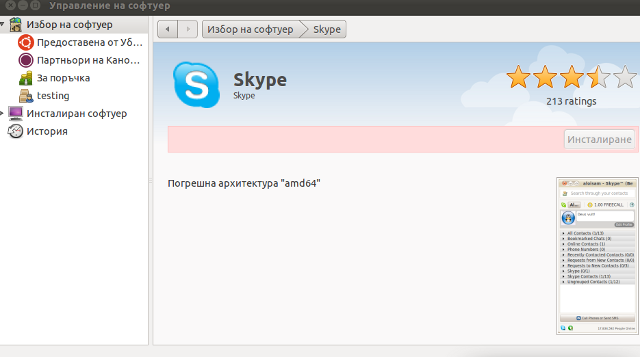
The error is quite understandable, since the Skype deb package which tried to install was built for the i386 architecture.
Since the Software Center was not intelligent enough to work around the issue, I finally fixed it myself using the good old apt-get in terminal, like so:
root@ubuntu:~# aapt-get install skype
...
apt did not even complain that the package had a different architecture for i386 and installed skype without any errors as well Skype worked immediately even though the arthictural difference.
This is probably because even though it's a amd64 Ubuntu it has a kernel module loaded to support i386 binaries ;)
Now my sister can enjoy her skype on the shiny Ubuntu ;)
Sat Jul 16 12:03:58 EEST 2011
How to clear Squid Proxy Cache on Debian and Ubuntu
It was necessery to clean up some squid cache for some proxy users on a Debian host. Until now I've used to run only custom build Squid server on Slackware Linux.
Thus I was curious if Debian guys were smart enough to implement a proxy cache cleaning option as an option to be passed on to squid's init script.
Honestly I was quite suprised squid clear cache option is not there;
squid-cache:~# /etc/init.d/squid3

Usage: /etc/init.d/squid3 {start|stop|reload|force-reload|restart}

squid-cache:/#
As it was not embedded into init script I still hoped, there might be some Debian way to do the proxy cache clearing, so I spend some 10 minutes checking online as well as checked in squid3's manual just to find there is no specific command or Debian accepted way to clean squid's cache.
Since I couldn't find any Debian specific, way I did it the old fashioned way
(deleted directory/file structures in /var/spool/squid3/* and used squid's -z option, to recreate the swap directories.Here is how:
squid-cache:~# /etc/init.d/squid3 stop;

squid-cache:~# rm -Rf /var/spool/squid3/*;

squid-cache:~# squid3 -z; /etc/init.d/squid3 start
Finally I was quite amazed to realize, there was not even a crontab script to periodically clear and re-create proxy cache.
My previous experience with maintaning an office Squid proxy cache has prooved, that periodic cache clean ups are very helpful, especially to resolve issues with cached unreslovable DNS entries in the server.
Clearing up squid cache every week or something, guarantees that failure to resolve certain hosts at certain times would not stay unresolvable like forever ;)
In that manner of thougths, I decided to put the following crontab which will twice a month clear up proxy's cache, to possibly solve some failed squid DNS issues.
squid-cache:~# crontab -u root -l > file; \

echo '00 04 12,26 * * /etc/init.d/squid3 stop; rm -Rf /var/spool/squid3/*; squid3 -z; /etc/init.d/squid3 start >/dev/null 2>&1'  \
>> file; crontab file
Cheers ;)
Fri Jul 15 16:49:00 EEST 2011
How to check Host is up with Nagios for servers with disabled ICMP (ping) protocol
At the company where I administrate some servers, they're running Nagios to keep track of the servers status and instantly report if problems with connectivity to certain servers occurs.
Now one of the servers which had configured UP host checks is up, but because of heavy ICMP denial of service attacks to the servers the ICMP protocol ping is completely disabled.
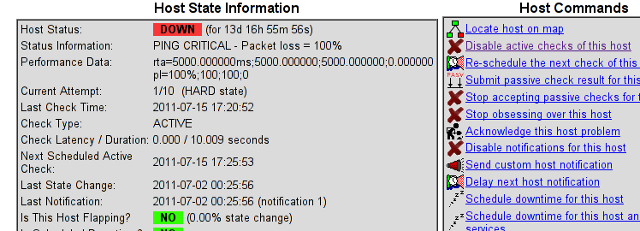
In Nagios this host was constantly showing as DOWN in the usual red color, so nagios reported issue even though all services on the client are running fine.
As this is quite annoying, I checked if Nagios supports host checking without doing the ICMP ping test. It appeared it does through something called in nagios Submit passive check result for host
Enabling the "Submit passive check result for this host" could be done straight from Nagios's web interface (so I don't even have to edit configurations! ;).
Here is how I did it. In Nagios I had to navigate to:
You see my down host which I clicked over showing in red in above pic.
On next Nagios screen I had to select, Disable active checks of this host
and press on the Commit button.
Next following text appears on browser:
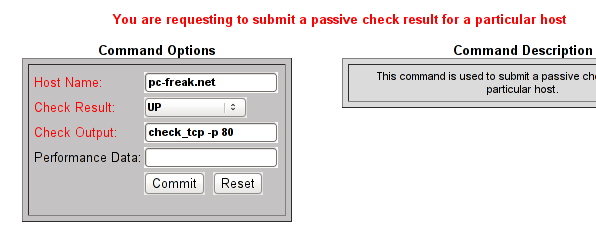
Afterwards I had to click on Submit passive check result for this host and in:
Check Output to type in:
Here is the Screenshot of the Command Options dialog:
That's all now Nagious should start checking the down host by doing a query if the webserver on port 80 is up and running instead of pinging it.
As well as the server is no longer shown in the Nagio's Down host list.
Now one of the servers which had configured UP host checks is up, but because of heavy ICMP denial of service attacks to the servers the ICMP protocol ping is completely disabled.
In Nagios this host was constantly showing as DOWN in the usual red color, so nagios reported issue even though all services on the client are running fine.
As this is quite annoying, I checked if Nagios supports host checking without doing the ICMP ping test. It appeared it does through something called in nagios Submit passive check result for host
Enabling the "Submit passive check result for this host" could be done straight from Nagios's web interface (so I don't even have to edit configurations! ;).
Here is how I did it. In Nagios I had to navigate to:
Hosts -> Click over my host (hosting1) which showed in red as down
You see my down host which I clicked over showing in red in above pic.
On next Nagios screen I had to select, Disable active checks of this host
and press on the Commit button.
Next following text appears on browser:
Your command request was successfully submitted to Nagios for processing.


Note: It may take a while before the command is actually processed.
Afterwards I had to click on Submit passive check result for this host and in:
Check Output to type in:
check_tcp -p 80
Here is the Screenshot of the Command Options dialog:
That's all now Nagious should start checking the down host by doing a query if the webserver on port 80 is up and running instead of pinging it.
As well as the server is no longer shown in the Nagio's Down host list.
Thu Jul 14 15:04:23 EEST 2011
How to load custom Kernel (tun) module in CentOS and RHEL Linux
Just recently it was necessery to load up a tun kernel module on few CentOS Linux servers.
I'm using Debian on daily basis, and everybody that had even little of experience with Debian should already be aware about the existence of the handy:
/etc/modules file.
On Debian to enable a certain kernel module to load up on Linux boot, all necessery is to just place the kernel module name in /etc/modules.
For example loading the tun tunneling kernel module I issue the command:
I wondered if CentOS, also supports /etc/modules as it was necessery now to add this tun module to load up on CentOS's boot.
After a bit of research I've figured out CentOS does not have support for adding modules names in /etc/modules , anyhow after consulting CentOS documentation on http://www.centos.org/docs/5/html/Deployment_Guide-en-US/s1-kernel-modules-persistant.html , I found CentOS and RHEL use /etc/rc.modules instead of Debian's /etc/modules to load up any custom kernel modules not loaded by default during system boot.
Therefore instructing the RHEL Linux to load up my desired tun module in kernel on next boot was as easy as executing:
Now on next boot CentOS will load up the tun module in kernel. Achiving the same module load up is also possible through /etc/rc.local , but it's not recommended way as /etc/rc.local would load up the kernel module after all of the rest init boot scripts complete and therefore will load up the module slightly later, at the final boot stage.
I'm using Debian on daily basis, and everybody that had even little of experience with Debian should already be aware about the existence of the handy:
/etc/modules file.
On Debian to enable a certain kernel module to load up on Linux boot, all necessery is to just place the kernel module name in /etc/modules.
For example loading the tun tunneling kernel module I issue the command:
debian:~# echo tun >> /etc/modules
I wondered if CentOS, also supports /etc/modules as it was necessery now to add this tun module to load up on CentOS's boot.
After a bit of research I've figured out CentOS does not have support for adding modules names in /etc/modules , anyhow after consulting CentOS documentation on http://www.centos.org/docs/5/html/Deployment_Guide-en-US/s1-kernel-modules-persistant.html , I found CentOS and RHEL use /etc/rc.modules instead of Debian's /etc/modules to load up any custom kernel modules not loaded by default during system boot.
Therefore instructing the RHEL Linux to load up my desired tun module in kernel on next boot was as easy as executing:
[root@centos ~]# echo 'modprobe tun' >> /etc/rc.modules

[root@centos ~]# chmod +x /etc/rc.modules
Now on next boot CentOS will load up the tun module in kernel. Achiving the same module load up is also possible through /etc/rc.local , but it's not recommended way as /etc/rc.local would load up the kernel module after all of the rest init boot scripts complete and therefore will load up the module slightly later, at the final boot stage.
Wed Jul 13 21:27:06 EEST 2011
How ot fix Widgets drag and drop not working on Wordpress

My Wordpress blog had an odd problem, all on the blog, worked just fine except the Widgets add new widget drag and drop functionality.
As there was new version of wordpress available I tried updating but this fixed the missing drag and drop widget functionality neither, so finally after a bit of googling and experimentation to follow suggested fixes like using the enable Accessiblity Mode button on top Widgets. Thus the common suggested fix that worked for most of the people who stumbled upon this annoying wordpress bug was to simply nagivate to:
Appearance -> Widgets -> Screen Options -> Enable Accessibility Mode
As for me pressing over the Screen Options was impossible (nothing happened when I pressed over it), finally I've found a hack ;)The hack is quite simple, all I had to do is just pass a variable ?widgets-access=on to the widget.php php script
Therefore the fix to the problem was as follows http://blog.mysite.com/wp-admin/widgets.php?widgets-access=on
And done, FIXED! ;)
Wed Jul 13 14:40:22 EEST 2011
Way to get around" mdadm: /dev/md2 assembled from 1 drive - not enough to start the array."
One server with a broken Raid array was having troubles with it's software raid.
I tried to scan the raid array via a rescue cd like so:
just to be suprised by the message:
mdadm: /dev/md1 assembled from 2 drives - not enough to start the array.
In /proc/mdstat respectively the raid was showing inactive, e.g.:
Respectively trying to activate the software Linux raid array with:
Couldn't be completed because of the same annoying error:
/dev/md1 assembled from 2 drives - not enough to start the array.
Thanksfully finally thanks to some Russian, who posted having same issues reported to be able to active his software RAID with mdadm's --force option.
Thus enabling the problematic RAID 5 array was possible with:
This solution of course is temporary and will have to further check what's wrong with the array, however at least now I can chroot to the server's / directory. ;)
I tried to scan the raid array via a rescue cd like so:
server:~# mdadm --assemble --scan /dev/md1
just to be suprised by the message:
mdadm: /dev/md1 assembled from 2 drives - not enough to start the array.
In /proc/mdstat respectively the raid was showing inactive, e.g.:
server:~# cat /proc/mdstat

Personalities : [raid10] [raid1]

md1 : inactive sda2[0] sdc2[2] sdb2[1]

      12024384 blocks
Respectively trying to activate the software Linux raid array with:
server:~# mdadm -A -s
Couldn't be completed because of the same annoying error:
/dev/md1 assembled from 2 drives - not enough to start the array.
Thanksfully finally thanks to some Russian, who posted having same issues reported to be able to active his software RAID with mdadm's --force option.
Thus enabling the problematic RAID 5 array was possible with:
server:~# mdadm -A -s --force
This solution of course is temporary and will have to further check what's wrong with the array, however at least now I can chroot to the server's / directory. ;)
Tue Jul 12 16:20:33 EEST 2011
How to enable AUTO fsck (ext3, ext4, reiserfs, LVM filesystems) checking on Linux boot through /etc/fstab

Are you an administrator of servers and it happens a server is DOWN.
You request the Data Center to reboot, however suddenly the server fails to boot properly and you have to request for IPKVM or some web java interface to directly access the server physical terminal ...
This is a very normal admin scenario and many people who have worked in the field of remote system administrators (like me), should have experienced that bad times multiple times.
Sadly enough only a insignifant number of administrators try to do their best to reduce this down times to resolve client stuff downtime but prefer spending time playing the ztype! game or watching some porn website ;)
Anyways there are plenty of things like Server Auto Reboot on Crash with software Watchdog etc., that we as sysadmins can do to reduce server downtimes and most of the manual human interactions on server boot time.
In that manner of thougts a very common thing when setting up a new Linux server that many server admins forget or don't know is to enable all the server partition filesystems to be auto fscked during server boot time.
By not enabling the auto filesystem check options in Linux the server filesystems did not automatically scan and fix hard drive partitions for fs innode inconsistencies.
Even though the filesystems are tuned to automatically get checked on every 38 system reboots, still if some kind of filesystem errors are found that require a manual confirmation the boot process is interrupted and the admin ends up with a server which is not reachable remotely via ssh !
For the remote system administrator, this times are a terrible times of waitings, prayers and hopes that the server hardware is fine
as well as being on hold to get a KVM to get into the server manually and enter the necessery input to fsck prompt.Many of this bad times can be completely avoided with a very simple fix through /etc/fstab by enabling all server partitions containing any filesystem to be automatically checked and fixed in case if inconsistencies or errors are found by fsck.ext3, fsck.ext4, fsck.reiserfs etc. commands.
A very typical default /etc/fstab file you will find on many servers should look something like:
/dev/sda8 		/               ext3    errors=remount-ro 0       1

tmpfs                   /dev/shm                tmpfs   defaults        0 0

devpts                  /dev/pts                devpts  gid=5,mode=620  0 0

sysfs                   /sys                    sysfs   defaults        0 0

proc                    /proc                   proc    defaults        0 0

/dev/sda1            	/home                     ext3    defaults        0 0
Notice the line:
/dev/sda1 /home ext3 defaults 0 0
The first column in the example contains the device name, the second one its mount point, third its filesystem type, fourth the mount options, fifth (a number) dump options, and sixth (another number) filesystem check options. Let's take a closer look at this stuff.
The ones which are interesting to enable auto fsck checking and error resolving is provided usually by the last sixth variable (filesystem check option) which in the above example equals 0 .
When the filesystem check option equals 0 this means the auto fsck and repair for the respective filesystem is disabled.
Some time in the past the dump backup option (5th option in the example) was also used but as far as I can understand today it's not that important in modern GNU/Linux distributions.
Now having the above sample crontab in order to enable the fsck file checking on Linux boot for /dev/sda1 , we will need to modify the above line's filesystem check option be 2, e.g. the line would afterwards look like:
/dev/sda1 /home ext3 defaults 0 2
Setting the 2 as an option for filesystem check is necessery for every filesystem which is not mounted as a root filesystem /
In above example /etc/fstab you already see that auto filesystem fsck is enabled for root partition:
/dev/sda8 / ext3 errors=remount-ro 0 1
(notice the 1 in the end of the line)
Finally a modified version of the default sample /etc/fstab which will check the extra /dev/sda1 /home partition would look like so:
/dev/sda8               /               ext3    errors=remount-ro 0       1

tmpfs                   /dev/shm                tmpfs   defaults        0 0

devpts                  /dev/pts                devpts  gid=5,mode=620  0 0

sysfs                   /sys                    sysfs   defaults        0 0

proc                    /proc                   proc    defaults        0 0

/dev/sda1               /home                     ext3    defaults        0 2
Making sure all Linux server partitions has the auto filesystem check option enabled is something absoultely necessery!
Enabling the auto fsck on servers always makes me sleep calmer ;)
Hope it helps your too. :)
Mon Jul 11 18:12:29 EEST 2011
How to check and repair broken MySQL ISAM tables
If you are stuffed with errors in /var/log/mysqld.log similar to:
This is a sure sign something terrible has happened with your mysql database tables that lead to corruption.
Having corrupt table in mysql installation can severely lead to data loss as well as significantly reduce the speed and performance of a MySQL server in this awful times mysqlcheck is the best friend of the administrator, here is how you can check and repair broken tables in MySQL server:
mysql-server:~# mysqlcheck --all-databases -u root -p
chillor_hjbgl.vn_users OK
chillor_lul.mybb_adminlog OK
chillor_lul.mybb_adminoptions OK
chillor_lul.mybb_adminsessions OK
chillor_lul.mybb_adminviews OK
chillor_lul.mybb_announcements OK
...
You will notice the corrupt sql tables will be reported as corrupt by the tool and mysqlcheck will try it's best to recover the corrupt tables.
In most cases this should be enough to recover corrupt tables.
110711 11:00:48 [ERROR] /usr/libexec/mysqld: Incorrect information in file: './anyboots_moncler_spaccio/zen_seo_cache.frm'

110711 11:00:48 [ERROR] /usr/libexec/mysqld: Incorrect information in file: './anyboots_moncler_spaccio/zen_sessions.frm'
This is a sure sign something terrible has happened with your mysql database tables that lead to corruption.
Having corrupt table in mysql installation can severely lead to data loss as well as significantly reduce the speed and performance of a MySQL server in this awful times mysqlcheck is the best friend of the administrator, here is how you can check and repair broken tables in MySQL server:
mysql-server:~# mysqlcheck --all-databases -u root -p
chillor_hjbgl.vn_users OK
chillor_lul.mybb_adminlog OK
chillor_lul.mybb_adminoptions OK
chillor_lul.mybb_adminsessions OK
chillor_lul.mybb_adminviews OK
chillor_lul.mybb_announcements OK
...
You will notice the corrupt sql tables will be reported as corrupt by the tool and mysqlcheck will try it's best to recover the corrupt tables.
In most cases this should be enough to recover corrupt tables.
Sat Jul 9 19:12:34 EEST 2011
How to execute mass commands to Multiple Servers / Establishing passwordless SSH key authentication on 50+ servers

These days, I'm managing many, many servers. The servers are ordered in few groups. Each of the servers in the server groups contains identical hardware, identical Linux distribution as well as identical configuration.
Since managing multiple servers normally, takes a lot of time, applying changes to every single host loosing time in looking for the password is not a a good idea.
Thus I was forced to start managing the servers in a cluster like fashion, by executing commands on a server group using a simple for bash loop etc.
To be able to use this mass execution of course I needed away either to pass on the server group password just once and issue a command on the whole server group or use a passwordless authentication ssh key pair.
Before I switched to using SSH keys to authenticate passwordless, I first tried to use a bit of tools which were claimed to be helpful in the task of executing the same commands to a group of servers. I have tested the tools pssh, sudossh and dsh but none of them was capable of logging in and executing a bunch of commands to the group of remote servers.
I gave my best to make pssh work on Debian and CentOS distributions, but even though all my experiemnts and efforts to make the so much talked about pssh to work were bad!
I've seen also another tool called Cluster SSH which was said to be capable of issuing commands simultaneously on a number of hosts.
Cluster SSH looked promising, however the only problem was it's supposed to run under xterm or some kind of X graphics based terminal and therefore it did not matched my desired.
Finally I got pissed of trying these mostly useless mass command linux server administration tools and decided to come COME BACK TO THE PRIMITIVE ;) and use the good all known, well established method of Passwordless SSH server login with ssh public/private DSA key auth.
Therefore here the problem come to this to generate one single DSA ssh authenticatoin key and replicate/copy it to the whole group of 50 servers.
These task initially seemed quite complex, but with the help of a one liner bash shell script, it seemed to be a piece of cake ;)
To achieve this task, all I had to do is:
a. Generate an SSH key with ssh-keygen command
and
b. Use a one liner shell script to copy the generated id_rsa.pub file, to each server.
and
c. Create a file containig all server IP addresses to pass to the shell script.
Here are the two lines of code you will have to use to achieve these tasks:
1. Generate a DSA ssh key
linux:~# ssh-keygen -t dsa


Generating public/private dsa key pair.

Enter file in which to save the key (/home/hipo/.ssh/id_dsa): y

Enter passphrase (empty for no passphrase):

Enter same passphrase again:

Your identification has been saved in y.

Your public key has been saved in y.pub.

The key fingerprint is:

b0:28:48:a2:60:65:5a:ed:1b:9d:6c:ff:5f:37:03:e3 hipo@pc-freak.net
Here press enter few times and be sure not to fill in any passphrase when asked 'bout it.
2. Create a file containing all server IPs
Just create a file let's say server-list.txt and make sure you include all the server IPs, one per line.
3. Use the following little script to upload the newly generated id_dsa.pub to the server list
linux:~# while read line; do ssh-copy-id -i ~/.ssh/id_dsa.pub root@"$line"; done < server-list.txt
Now you will have to paste the server password for about 50 times (if you have a file with 50 servers), however the good news is it will be just a wait and paste 50 times, if the servers are all configured to have the same root administrator pass (which was the case with me).
So until you do the boring pasting part, you can start up a nice music and enjoy ;)
Cheers ;)
Sat Jul 9 13:46:55 EEST 2011
How to add cron jobs from command line or bash scripts / Add crontab jobs in a script
I'm currently writting a script which is supposed to be adding new crontab jobs and do a bunch of other mambo jambo.
By so far I've been aware of only one way to add a cronjob non-interactively like so:
Though using the | crontab - would work it has one major pitfall, I did completely forgot | crontab - OVERWRITES CURRENT CRONTAB! with the crontab passed by with the echo command.
One must be extremely careful if he decides to use the above example as you might loose your crontab definitions permanently!
Thanksfully it seems there is another way to add crontabs non interactively via a script, as I couldn't find any good blog which explained something different from the classical example with pipe to crontab -, I dropped by in the good old irc.freenode.net to consult the bash gurus there ;)
So I entered irc and asked the question how can I add a crontab via bash shell script without overwritting my old existing crontab definitions less than a minute later one guy with a nickname geirha was kind enough to explain me how to get around the annoying overwridding.
The solution to the ovewrite was expected, first you use crontab to dump current crontab lines to a file and then you append the new cron job as a new record in the file and finally you ask the crontab program to read and insert the crontab definitions from the newly created files.
So here is the exact code one could run inside a script to include new crontab jobs, next to the already present ones:
The above definition as you could read would make the new record of */5 * * * * /root/myscript.sh >/dev/null be added next to the existing crontab scheduled jobs.
Now I'll continue with my scripting, in the mean time I hope this will be of use to someone out there ;)
By so far I've been aware of only one way to add a cronjob non-interactively like so:
linux:~# echo '*/5 * * * * /root/myscript.sh' | crontab -
Though using the | crontab - would work it has one major pitfall, I did completely forgot | crontab - OVERWRITES CURRENT CRONTAB! with the crontab passed by with the echo command.
One must be extremely careful if he decides to use the above example as you might loose your crontab definitions permanently!
Thanksfully it seems there is another way to add crontabs non interactively via a script, as I couldn't find any good blog which explained something different from the classical example with pipe to crontab -, I dropped by in the good old irc.freenode.net to consult the bash gurus there ;)
So I entered irc and asked the question how can I add a crontab via bash shell script without overwritting my old existing crontab definitions less than a minute later one guy with a nickname geirha was kind enough to explain me how to get around the annoying overwridding.
The solution to the ovewrite was expected, first you use crontab to dump current crontab lines to a file and then you append the new cron job as a new record in the file and finally you ask the crontab program to read and insert the crontab definitions from the newly created files.
So here is the exact code one could run inside a script to include new crontab jobs, next to the already present ones:
linux:~# crontab -l > file; echo '*/5 * * * * /root/myscript.sh >/dev/null 2>&1' >> file; crontab file
The above definition as you could read would make the new record of */5 * * * * /root/myscript.sh >/dev/null be added next to the existing crontab scheduled jobs.
Now I'll continue with my scripting, in the mean time I hope this will be of use to someone out there ;)
Fri Jul 8 19:24:02 EEST 2011
How to harden Linux security on kernel sysctl level

Some long time ago I've written an article Optimizing Linux tcp/ip networking
In the article I've examined a number of Linux kernel sysctl variables, which significantly improve the way TCP/IP networking is handled by a non router Linux based servers.
As the time progresses I've been continuing to read materials on blogs and internet sites on various tips and anti Denial of Service rules which one could apply on newly installed hosting (Apache/MySql/Qmail) server to improve webserver responce times and tighten overall security.
In my quest for sysctl I found a few more handy sysctl variables apart from the old ones I incorporate on every Linux server I adminstrate.
The sysctl variables improves the overall network handling efficiency and protects about common SYN/ACK Denial of service attacks.
Here are the extra sysctl variables I started incorporating just recently:
############ IPv4 Sysctl Settings ################

#Enable ExecShield protection (randomize virtual assigned space to protect against many exploits)

kernel.randomize_va_space = 1

#Increase the number of PIDs processes could assign this is very needed especially on more powerful servers

kernel.pid_max = 65536

# Prevent against the common 'syn flood attack'

net.ipv4.tcp_syncookies = 1

# Controls the use of TCP syncookies two is generally a better idea, though you might experiment

#net.ipv4.tcp_syncookies = 1

net.ipv4.tcp_synack_retries = 2

##################################################

#

############## IPv6 Sysctl Settings ################

# Number of Router Solicitations to send until assuming no routers are present.

net.ipv6.conf.default.router_solicitations = 0

# Accept Router Preference in RA? Again not necessery if the server is not a router

net.ipv6.conf.default.accept_ra_rtr_pref = 0

# Learn Prefix Information in Router Advertisement (Unnecessery) for non-routers

net.ipv6.conf.default.accept_ra_pinfo = 0

# disable accept of hop limit settings from other routers (could be used for DoS)

net.ipv6.conf.default.accept_ra_defrtr = 0

# disable ipv6 global unicasts server assignments

net.ipv6.conf.default.autoconf = 0

# neighbor solicitations to send out per address (better if disabled)

net.ipv6.conf.default.dad_transmits = 0

# disable assigning more than 1 address per network interface

net.ipv6.conf.default.max_addresses = 1

#####################################################
To use this settings paste the above sysctl variables in /etc/sysctl.conf and ask sysctl command to read and apply the newly added conf settings:
server:~# sysctl -p

...
Hopefully you should not get errors while applying the sysctl settings, if you get some errors, it's possible some of the variable is differently named (depending on the Linux kernel version) or the Linux distribution on which sysctl's are implemented.
For some convenience I've created unified sysctl variables /etc/sysct.conf containing the newly variables I started implementing to servers with the ones I already exlpained in my previous post Optimizing Linux TCP/IP Networking
Here is the optimized / hardened sysctl.conf file for download
I use this exact sysctl.conf these days on both Linux hosting / VPS / Mail servers etc. as well as on my personal notebook ;)
Here is also the the complete content of above's sysctl.conf file, just in case if somebody wants to directly copy/paste it in his /etc/sysctl.conf
# Sysctl kernel variables to improve network performance and protect against common Denial of Service attacks

# It's possible that not all of the variables are working on all Linux distributions, test to make sure

# Some of the variables might need a slight modification to match server hardware, however in most cases it should be fine

# variables list compiled by hip0

### http://pc-freak.net

#### date 08.07.2011

############ IPv4 Sysctl Kernel Settings ################

net.ipv4.ip_forward = 0

# ( Turn off IP Forwarding )

net.ipv4.conf.default.rp_filter = 1

# ( Control Source route verification )

net.ipv4.conf.default.accept_redirects = 0

# ( Disable ICMP redirects )

net.ipv4.conf.all.accept_redirects = 0

# ( same as above )

net.ipv4.conf.default.accept_source_route = 0

# ( Disable IP source routing )

net.ipv4.conf.all.accept_source_route = 0

# ( - || - )net.ipv4.tcp_fin_timeout = 40

# ( Decrease FIN timeout ) - Useful on busy/high load server

net.ipv4.tcp_keepalive_time = 4000

# ( keepalive tcp timeout )

net.core.rmem_default = 786426

# Receive memory stack size ( a good idea to increase it if your server receives big files )

##net.ipv4.tcp_rmem = "4096 87380 4194304"

net.core.wmem_default = 8388608

#( Reserved Memory per connection )

net.core.wmem_max = 8388608

net.core.optmem_max = 40960

# ( maximum amount of option memory buffers )

# tcp reordering, increase max buckets, increase the amount of backlost

net.ipv4.tcp_max_tw_buckets = 360000

net.ipv4.tcp_reordering = 5

##net.core.hot_list_length = 256

net.core.netdev_max_backlog = 1024

#Enable ExecShield protection (randomize virtual assigned space to protect against many exploits)
kernel.randomize_va_space = 1
#Increase the number of PIDs processes could assign this is very needed especially on more powerful servers
kernel.pid_max = 65536
# Prevent against the common 'syn flood attack'
net.ipv4.tcp_syncookies = 1
# Controls the use of TCP syncookies two is generally a better idea, though you might experiment
#net.ipv4.tcp_syncookies = 1
net.ipv4.tcp_synack_retries = 2
##################################################
#

############## IPv6 Sysctl Settings ################
# Number of Router Solicitations to send until assuming no routers are present.
net.ipv6.conf.default.router_solicitations = 0
# Accept Router Preference in RA? Again not necessery if the server is not a router
net.ipv6.conf.default.accept_ra_rtr_pref = 0
# Learn Prefix Information in Router Advertisement (Unnecessery) for non-routers
net.ipv6.conf.default.accept_ra_pinfo = 0
# disable accept of hop limit settings from other routers (could be used for DoS)
net.ipv6.conf.default.accept_ra_defrtr = 0
# disable ipv6 global unicasts server assignments
net.ipv6.conf.default.autoconf = 0
# neighbor solicitations to send out per address (better if disabled)
net.ipv6.conf.default.dad_transmits = 0
# disable assigning more than 1 address per network interface
net.ipv6.conf.default.max_addresses = 1
#####################################################

# Reboot if kernel panic

kernel.panic = 20
These sysctl settings will tweaken the Linux kernel default network settings performance and you will notice the improvements in website responsiveness immediately in some cases implementing this kernel level goodies will make the server perform better and the system load might decrease even ;)
This optimizations on a kernel level are not only handy for servers, their implementation on Linux Desktop should also have a positive influence on the way the network behaves and could improve significantly the responce times of opening pages in Firefox/Opera/Epiphany Torrent downloads etc.
Hope this kernel tweakenings are helpful to someone.
Cheers ;)
Thu Jul 7 16:30:46 EEST 2011
How to delete entries from routing table on Linux
Every now and then I had to tamper routing tables in Linux and every time I had to do it I forgot how I did it last time so finally I decided to put it on my blog and find how I can delete from Linux routing table easier
Deleting a record from a wrong routing table on Linux is a piece of cake basicly, here is an example:
Let's say this is the routing table and it's incorrect as the routing through the node 169.254.0.0 should not be there.
Here is how the routing through 169.254.0.0 can be deleted:
Now here is the difference after deletion:
If you want to delete the default gateway just use 0.0.0.0, e.g. -net 0.0.0.0 .. in above cmd example.
This would delete default gateway record from routing table which by the way in routing tables is marked with the UG flag.
Cheers ;)
Deleting a record from a wrong routing table on Linux is a piece of cake basicly, here is an example:
linux:~# route -n
Kernel IP routing table

Destination     Gateway         Genmask         Flags Metric Ref    Use Iface

192.168.0.1       0.0.0.0         255.255.255.0   U     0      0        0 eth0

169.254.0.0     0.0.0.0         255.255.0.0     U     0      0        0 eth0

0.0.0.0         192.168.0.1       0.0.0.0         UG    0      0        0 eth0
Let's say this is the routing table and it's incorrect as the routing through the node 169.254.0.0 should not be there.
Here is how the routing through 169.254.0.0 can be deleted:
linux:~# /sbin/route del -net 169.254.0.0 netmask 255.255.0.0
Now here is the difference after deletion:
linux:~# route -n
Kernel IP routing table

Destination     Gateway         Genmask         Flags Metric Ref    Use Iface

192.168.0.1       0.0.0.0         255.255.255.0   U     0      0        0 eth0

0.0.0.0         192.168.0.1       0.0.0.0         UG    0      0        0 eth0
If you want to delete the default gateway just use 0.0.0.0, e.g. -net 0.0.0.0 .. in above cmd example.
This would delete default gateway record from routing table which by the way in routing tables is marked with the UG flag.
Cheers ;)
Thu Jul 7 12:51:08 EEST 2011
How to track (catch) mail server traffic abusers with tcpdump
If you're an administrator of a shared hosting server running mail server on localhost, you've definitely come across to issues with your mail server ip entering into public blacklists like spamhaus's CBL,XBL, PBL etc.
The usual procedure after one's ip gets listed in blacklists is to delist it manually following spamhaus or any other blacklist website's web interface, however often even after delisting yourself from blacklists you get back into them in a couple of hours, since your mail server continues to send a mass amounts of spam.
To track issues like as a system administrator I always use the good old network swiss army of knife tool tcpdump
tcpdump is really precious in tracking all kind of traffic oddities or mail server traffic.
To check if there are oddities with traffic flowing from a mail server on localhost after I login to a mail server with issues I use tcpdump command with following options:
The usual output of it should look something like:
In this example the xxx.xxx.xxx.xxx is the IP address of the hosting server (my mail server) and the other IP is the interaction of my mail server's smtp port 25 with tther machine 212.235.67.205.
If after issuing this command there are tons of repeating address IPs the mail server interacts with this is possible sign of spammers who sent traffic via the mail server.
Of course this is not always the case as sometimes, some clients use to send large newsletters or just some planned advertisements, however in most cases as I said it's a spammer.
To futher get the abuser I check Apache logs and the mail server logs. Also in many cases a spammer can be catched via observing the mail server logs (/var/log/maillog, /var/log/qmail/current or wherever the mail server logs it's interactions).
In the above tcpdump output you can even read some of the information flowing in between mail servers in a very raw form for example in above tcpdump output notice the 250.OK . This is obviously an interaction between the two mail servers where the server running on my hosting server with ip (xxx.xxx.xxx.xxx) sends to the remote mail server the command 250 OK
Hope this article is helpful to somebody ;)
The usual procedure after one's ip gets listed in blacklists is to delist it manually following spamhaus or any other blacklist website's web interface, however often even after delisting yourself from blacklists you get back into them in a couple of hours, since your mail server continues to send a mass amounts of spam.
To track issues like as a system administrator I always use the good old network swiss army of knife tool tcpdump
tcpdump is really precious in tracking all kind of traffic oddities or mail server traffic.
To check if there are oddities with traffic flowing from a mail server on localhost after I login to a mail server with issues I use tcpdump command with following options:
tcpdump -nNxXi eth0 -s 0 proto TCP and host and port 25
The usual output of it should look something like:
root@hosting:/home/hipo/public_html:# tcpdump -nNxXi eth0 -s 0 proto TCP and port 25
tcpdump: verbose output suppressed, use -v or -vv for full protocol decode
listening on eth0, link-type EN10MB (Ethernet), capture size 65535 bytes
11:37:51.692685 IP xxx.xxx.xxx.xxx.smtp > 212.235.67.205.53745: P 2645817175:2645817203(28) ack 31168958 win 7632

	0x0000:  4500 0044 92b4 4000 4006 9ae8 5511 9f4d  E..D..@.@...U..M

	0x0010:  d4eb 43cd 0019 d1f1 9db3 f757 01db 99be  ..C........W....

	0x0020:  5018 1dd0 0d4e 0000 3235 3020 4f4b 2069  P....N..250.OK.i

	0x0030:  643d 3151 656c 3150 2d30 3033 7666 412d  d=1Qel1P-003vfA-

	0x0040:  4730 0d0a                                G0..

11:37:52.175038 IP 212.235.67.205.53745 > xxx.xxx.xxx.xxx.smtp: . ack 28 win 65064

	0x0000:  4500 0028 1bb4 4000 7706 db04 d4eb 43cd  E..(..@.w.....C.

	0x0010:  5511 9f4d d1f1 0019 01db 99be 9db3 f773  U..M...........s

	0x0020:  5010 fe28 a1c8 0000 0000 0000 0000       P..(..........
In this example the xxx.xxx.xxx.xxx is the IP address of the hosting server (my mail server) and the other IP is the interaction of my mail server's smtp port 25 with tther machine 212.235.67.205.
If after issuing this command there are tons of repeating address IPs the mail server interacts with this is possible sign of spammers who sent traffic via the mail server.
Of course this is not always the case as sometimes, some clients use to send large newsletters or just some planned advertisements, however in most cases as I said it's a spammer.
To futher get the abuser I check Apache logs and the mail server logs. Also in many cases a spammer can be catched via observing the mail server logs (/var/log/maillog, /var/log/qmail/current or wherever the mail server logs it's interactions).
In the above tcpdump output you can even read some of the information flowing in between mail servers in a very raw form for example in above tcpdump output notice the 250.OK . This is obviously an interaction between the two mail servers where the server running on my hosting server with ip (xxx.xxx.xxx.xxx) sends to the remote mail server the command 250 OK
Hope this article is helpful to somebody ;)