July 2010 Archives
Sat Jul 31 17:12:43 EEST 2010
How to cancel Godaddy domain privacy (retrieve domainsbyproxy.com account from Goddaddy)
Thanks to
Adam Caudill
I finally managed to find how to remove the domain privacy for a domain registered in Godaddy.
I desperately needed that because otherwise I couldn't issue the Godaddy Domain Certificate bought along with the domain.
By default Godaddy does "protect" the user hiding the domain WHOIS information from preying eyes using the services of DomainsByProxy
Therefore the domain privacy was set to:
In above WHOIS information REGISTERDDOMAIN.COM was actually the name of my REGISTEREDDOMAIN.COM that had Godaddy's Privacy protection enabled.
Anyways I have tried to login to domainsbyproxy.com using my Godaddy credentials, but for my surprise unsuccesfully.
I even contacted Godaddy and they have explained I have to use my domainsbyproxy.com account in order to change the privacy setting, it took me a while until I came across Adam's blog wherein I found the solution, as explained below:
Doing so I have noticed the username and password near the text Select your Domains By Proxy® account (Private Registration account) it was written like Login: 123123123 Personal Name
I've used the login id 123123123 with my Godaddy password in DomainsByProxy Login
Having done that I was able to login! It's a rather strange way to get your DomainsByProxy automatically created account by Godadaddy.
Well I guess it's just one life oddity though in terms of
usability and user convenience I see it as something really crucial
godaddy has to fix ASAP.
though in terms of
usability and user convenience I see it as something really crucial
godaddy has to fix ASAP.
I finally managed to find how to remove the domain privacy for a domain registered in Godaddy.
I desperately needed that because otherwise I couldn't issue the Godaddy Domain Certificate bought along with the domain.
By default Godaddy does "protect" the user hiding the domain WHOIS information from preying eyes using the services of DomainsByProxy
Therefore the domain privacy was set to:
Administrative Contact:

Private, Registration REGISTEREDDOMAIN.COM@domainsbyproxy.com

Domains by Proxy, Inc.

DomainsByProxy.com

15111 N. Hayden Rd., Ste 160, PMB 353

Scottsdale, Arizona 85260

United States

(480) 624-2599 Fax -- (480) 624-2598


Technical Contact:

Private, Registration REGISTEREDDOMAIN.COM@domainsbyproxy.com

Domains by Proxy, Inc.

DomainsByProxy.com

15111 N. Hayden Rd., Ste 160, PMB 353

Scottsdale, Arizona 85260

United States

(480) 624-2599 Fax -- (480) 624-2598
In above WHOIS information REGISTERDDOMAIN.COM was actually the name of my REGISTEREDDOMAIN.COM that had Godaddy's Privacy protection enabled.
Anyways I have tried to login to domainsbyproxy.com using my Godaddy credentials, but for my surprise unsuccesfully.
I even contacted Godaddy and they have explained I have to use my domainsbyproxy.com account in order to change the privacy setting, it took me a while until I came across Adam's blog wherein I found the solution, as explained below:
- Go to the Private Registration Page on GoDaddy’s site (make sure you’re logged in to your GoDaddy account)
- Type in some random characters into the search box
- 3. On the results page, click “Continue to Registration”
- 4. Click “No Thanks” on the ad page
- 5. Scroll down to the section labeled “3. Select Your Domains By Proxy® Account“
Doing so I have noticed the username and password near the text Select your Domains By Proxy® account (Private Registration account) it was written like Login: 123123123 Personal Name
I've used the login id 123123123 with my Godaddy password in DomainsByProxy Login
Having done that I was able to login! It's a rather strange way to get your DomainsByProxy automatically created account by Godadaddy.
Well I guess it's just one life oddity
though in terms of
usability and user convenience I see it as something really crucial
godaddy has to fix ASAP.Fri Jul 30 09:48:00 EEST 2010
Upgrading to latest GeoIP PHP module on Debian Lenny 5 (Install latest GeoIP from pear)
In order to be able to use the geoip
function geoip_time_zone_by_country_and_region I had to
upgrade the default debian lenny version of php5-geoip (1.0.3-1) to
the latest 1.0.7
aviable as a pecl package.
In order to upgrade to the newer php-geoip 1.0.7 I had to first remove the old php5-geoip version installed through debian package manager.
Notice that if you don't do a apache restart after removing the php5-geoip, if your php scripts has something that deals with php geoip then your Apache server is gonna fail until restarted, therefore to omit the failed Apache issues and possible downtimes issue a apache restart before continuing.
thus I issued:
.... But guess what the built failed with an error:
checking for geoip files in default path... not found
To deal with the php geoip compile issue I had to install:
libgeoip-dev - Development files for the GeoIP library
Then again I installed using the pecl interface pecl php pcakage install interface.
Thereafter I had to also include extension=geoip.so in php.ini
In order to upgrade to the newer php-geoip 1.0.7 I had to first remove the old php5-geoip version installed through debian package manager.
debian-server:~# dpkg -r php5-geoip
Notice that if you don't do a apache restart after removing the php5-geoip, if your php scripts has something that deals with php geoip then your Apache server is gonna fail until restarted, therefore to omit the failed Apache issues and possible downtimes issue a apache restart before continuing.
debian-server:~# /etc/init.d/apache2 restart


Then I tried installing the newer php5 geoip
using peclthus I issued:
debian-server:~# pecl install geoip
.... But guess what the built failed with an error:
checking for geoip files in default path... not found
To deal with the php geoip compile issue I had to install:
libgeoip-dev - Development files for the GeoIP library
debian-server:~# apt-get install
libgeoip-dev
Then again I installed using the pecl interface pecl php pcakage install interface.
debian-server:~# pecl install geoip
Thereafter I had to also include extension=geoip.so in php.ini
debian-server:~# echo "extension=geoip.so" >>
/etc/php5/apache2/php.ini


Needless to say for the new geoip module to take effect you need to
restart your Apache webserver.


debian-server:~# /etc/init.d/apache2
restart


Now this will enable the unexisting
geoip_time_zone_by_country_and_region function in the earlier
releases than 1.0.4 of php geoip.

So your geoip_time_zone_by_country_and_region should be
ready to use from your php scripts from now on.
Thu Jul 29 13:14:29 EEST 2010
The greatest tracker (demoscene) composers / Purple Motion, Necros, Skaven
For all of us who yet remember the
Demoscene ,
Purple Motion, Necros and Skaven are absolutely legendary
names.
Their music work contribution for tracked Electronic music, video games music and general development of the IT culture is truly invaluable.
Many younger computer users (I'm 26 now), and probably IT starters would probably never heard about neither Demoscene nor Purple Motion or the other three patriarchs of tracked Electronic music.
This musicians have a special value for people who has ever composed music with Impulse Tracker and the many other programs to compose music from samples.
Purple Motion has his own home page for quite some time now, however I just noticed that he has recently turned his home page to a PHPBB Forum where there is plenty of information about the composer as well as open discission and many questions and answers of people who are interested into the great electronic composer.
The third by significance electronic musician who is probably known by the many old school computer users and musicians is Skaven .
Skaven is part of the Future Crew , for the unknowning Future Crew (link to wikipedia)
- "Future Crew is a now-defunct group of Finnish computer coders and artists who created PC demos and software, active mostly between 1992 and 1994."
You might also consider checking Necros profile in modarchive
There you can find plenty if not all of his works for download and listening. If you really want to completely turn back some memories about the good old times when we used to use DOS environment and to listen the great old MOD, S3M, XM etc. songs with the good old Cubic player which is already available under the free port called Open Cubic Player
A port is even available for most UNIX platforms You can download and install the Linux / Unix port of Cubic player here plus on the below link you will find some brief instructions on how to make it work on Debian, Ubuntu, Redhat, Gentoo and FreeBSD.
Under Debian Lenny, Squeeze/Sid installing opencubicplayer is pretty easy and comes to simple installation via apt-get as follows:
First time I've noticed Cubic player I should admit it was a real joy to know there is already a Unix port since Linux and BSD are my OS choice for almost 10 years already.
I've created a mirror copy of the music prepared in the original format of creation of the 3 composers (Purple Motion, Necros, Skaven) on my personal webserver. Below you find links to the music prepared by the 3 composers.
Download all tracked music by Purple Motion
Download Necros composed music works
Download the songs composed by Skaven
I have few other composers who are very liked by me, their music works can be obtained through my tracked music tiny collection available here
Many of the demos created and works by Jonne Valtonen known under the artistic pseudonim Purple Motion are currently uploaded and available for watching via Youtube - (search) Purple Motion
I'll close this post with a the Award Winning Demos (Second Reality and Panic) which are the most notable produced Computer Simulation Demos of all times created by the collossal Future Crew group.
Second Reality by Future Crew [ Winner Demo of Assembly '93 competition ]
Panic by Future Crew
Their music work contribution for tracked Electronic music, video games music and general development of the IT culture is truly invaluable.
Many younger computer users (I'm 26 now), and probably IT starters would probably never heard about neither Demoscene nor Purple Motion or the other three patriarchs of tracked Electronic music.
This musicians have a special value for people who has ever composed music with Impulse Tracker and the many other programs to compose music from samples.
Purple Motion has his own home page for quite some time now, however I just noticed that he has recently turned his home page to a PHPBB Forum where there is plenty of information about the composer as well as open discission and many questions and answers of people who are interested into the great electronic composer.
The third by significance electronic musician who is probably known by the many old school computer users and musicians is Skaven .
Skaven is part of the Future Crew , for the unknowning Future Crew (link to wikipedia)
- "Future Crew is a now-defunct group of Finnish computer coders and artists who created PC demos and software, active mostly between 1992 and 1994."
You might also consider checking Necros profile in modarchive
There you can find plenty if not all of his works for download and listening. If you really want to completely turn back some memories about the good old times when we used to use DOS environment and to listen the great old MOD, S3M, XM etc. songs with the good old Cubic player which is already available under the free port called Open Cubic Player
A port is even available for most UNIX platforms You can download and install the Linux / Unix port of Cubic player here plus on the below link you will find some brief instructions on how to make it work on Debian, Ubuntu, Redhat, Gentoo and FreeBSD.
Under Debian Lenny, Squeeze/Sid installing opencubicplayer is pretty easy and comes to simple installation via apt-get as follows:
debian-desktop:~# apt-get install
opencubicplayer
First time I've noticed Cubic player I should admit it was a real joy to know there is already a Unix port since Linux and BSD are my OS choice for almost 10 years already.
I've created a mirror copy of the music prepared in the original format of creation of the 3 composers (Purple Motion, Necros, Skaven) on my personal webserver. Below you find links to the music prepared by the 3 composers.
Download all tracked music by Purple Motion
Download Necros composed music works
Download the songs composed by Skaven
I have few other composers who are very liked by me, their music works can be obtained through my tracked music tiny collection available here
Many of the demos created and works by Jonne Valtonen known under the artistic pseudonim Purple Motion are currently uploaded and available for watching via Youtube - (search) Purple Motion
I'll close this post with a the Award Winning Demos (Second Reality and Panic) which are the most notable produced Computer Simulation Demos of all times created by the collossal Future Crew group.
Second Reality by Future Crew [ Winner Demo of Assembly '93 competition ]
Panic by Future Crew
Wed Jul 28 10:41:20 EEST 2010
Fix an extra slash beging added during domain redirect to www with mod_rewrite
I have recently added a redirect
to www forwarding for a domain using mod_rewrite
capabilities.
The exact mod rewrite rules I in my <VirtualHost> used was:
Nevertheless the redirect was okay I have noticed that everytime the redirect has been in move from domain.com to www.domain.com an extra slash has been added included right after the domain, an example of the unwanted behaviour I have encountered is illustrated in the picture below:

A help from a good guy in irc.freenode.net #httpd under the alias jink told me that me that in order to solve the extra slash added to the url I need to modify the rewrite rules to look like the one below:
Thanks God This solved the issues.
The exact mod rewrite rules I in my <VirtualHost> used was:
RewriteEngine On

RewriteCond %{HTTP_HOST} ^pc-freak.net

RewriteRule (.*) http://pc-freak.net/$1
[R=301,L]
Nevertheless the redirect was okay I have noticed that everytime the redirect has been in move from domain.com to www.domain.com an extra slash has been added included right after the domain, an example of the unwanted behaviour I have encountered is illustrated in the picture below:
A help from a good guy in irc.freenode.net #httpd under the alias jink told me that me that in order to solve the extra slash added to the url I need to modify the rewrite rules to look like the one below:
RewriteEngine On

RewriteCond %{HTTP_HOST} ^pc-freak.net

RewriteRule (.*) http://pc-freak.net$1
[R=301,L]
Thanks God This solved the issues.
Tue Jul 27 10:32:50 EEST 2010
How to remove the numbers from a string with PHP
I've recently looked for a way to
remove numbers from a string using what is available in php.
Crawling trough the net first thing I found was using the php code:
Though this is not a bad approach it takes too much code to do a very simple task thus I googled around fod a better solution and found some examples which I used as a basis to come up with exactly what I was looking for, so enough jabberish here is the code to remove all numbers from a string:
Same is also possible using ereg_replace in older < 4.x php releases, though it's completely depreciated now in php 5 >.
There should be plenty of other ways to remove numbers from a variable string, hence any user suggestions are very welcome!
Crawling trough the net first thing I found was using the php code:
<?php

function remove_numbers($string) {

$vowels = array("1", "2", "3", "4", "5", "6", "7", "8", "9", "0", "
");

$string = str_replace($vowels, '', $string);

return $string;

}

$string='This string will have all numbers removed - 213 555
3930';

echo remove_numbers($string);

?>
Though this is not a bad approach it takes too much code to do a very simple task thus I googled around fod a better solution and found some examples which I used as a basis to come up with exactly what I was looking for, so enough jabberish here is the code to remove all numbers from a string:
$string = preg_replace("/[0-9]/", "",
$string);
Same is also possible using ereg_replace in older < 4.x php releases, though it's completely depreciated now in php 5 >.
There should be plenty of other ways to remove numbers from a variable string, hence any user suggestions are very welcome!
Mon Jul 26 13:33:44 EEST 2010
Install grsecurity kernel security from binary package (without kernel recompile) on Debian and Ubuntu
GRsecurity is since long time known
that it is a next generation armouring agains 0 day local kernel
exploits as well as various of other cracker attacks.
Grsecurity is an innovative approach to security utilizing a multi-layered detection, prevention, and containment model. It is licensed under the GNU GPL.
GRSecurity is linux kernel patch which has to be applied to the kernel before compile time. However we've been lucky and somebody has taken the time and care to prepare linux image binary deb packages for Debian and Ubuntu .
Some of the key grsecurity features are :
To install from the http://debian.cr0.org/ grsecurity patched kernel image repository use the following steps:
1. Include in your /etc/apt/sources.list
deb http://ubuntu.cr0.org/repo/ kernel-security/
deb http://debian.cr0.org/repo/ kernel-security/
Directly from the bash command line execute:
2. Add the debian.cr0.org repository gpg key to the trusted repositories key ring
Download the repository's gpg key , check it (it has been signed with the repository owner GPG key )
Thence from to include the gpg key to the trusted repos key issue:
3. Install the linux-image-grsec package itself
Currently to install on my x86_amd64 Debian Squeeze/Sid and possibly on Debian Lenny I've issued:
Now simply restarting your system and choosing the Linux kernel patched with the GRsecurity kernel patch included from Grub should enable you to start using the grsecurity patched kernel.
Though this tutorial is targetting Debian it's very likely that the grsecurity hardened kernel installation on Debian will be analogous.
Grsecurity is an innovative approach to security utilizing a multi-layered detection, prevention, and containment model. It is licensed under the GNU GPL.
GRSecurity is linux kernel patch which has to be applied to the kernel before compile time. However we've been lucky and somebody has taken the time and care to prepare linux image binary deb packages for Debian and Ubuntu .
Some of the key grsecurity features are :
- An intelligent and robust Role-Based Access Control (RBAC) system that can generate least privilege policies for your entire system with no configuration
- Change root (chroot) hardening
- /tmp race prevention
- Prevention of arbitrary code execution, regardless of the technique used (stack smashing, heap corruption, etc)
- Prevention of arbitrary code execution in the kernel
- Reduction of the risk of sensitive information being leaked by arbitrary-read kernel bugs
- A restriction that allows a user to only view his/her processes
- Security alerts and audits that contain the IP address of the person causing the alert
To install from the http://debian.cr0.org/ grsecurity patched kernel image repository use the following steps:
1. Include in your /etc/apt/sources.list
deb http://ubuntu.cr0.org/repo/ kernel-security/
deb http://debian.cr0.org/repo/ kernel-security/
Directly from the bash command line execute:
debian:~# echo "deb http://ubuntu.cr0.org/repo/
kernel-security/" >> /etc/apt/sources.list

debian:~# echo "deb http://debian.cr0.org/repo/ kernel-security/"
>> /etc/apt/sources.list
2. Add the debian.cr0.org repository gpg key to the trusted repositories key ring
Download the repository's gpg key , check it (it has been signed with the repository owner GPG key )
Thence from to include the gpg key to the trusted repos key issue:
debian:~# apt-key add kernel-security.asc
3. Install the linux-image-grsec package itself
Currently to install on my x86_amd64 Debian Squeeze/Sid and possibly on Debian Lenny I've issued:
debian:~# apt-get install
linux-image-2.6.32.15-1-grsec
Now simply restarting your system and choosing the Linux kernel patched with the GRsecurity kernel patch included from Grub should enable you to start using the grsecurity patched kernel.
Though this tutorial is targetting Debian it's very likely that the grsecurity hardened kernel installation on Debian will be analogous.
Sun Jul 25 13:01:10 EEST 2010
Install Google Chrome Web Browser Chrome on 32 and 64 bit Debian Lenny and Squeeze/Sid Linux
I've decided to write a short post on
how to install in a quick manner Google Chrome on Debian
GNU/Linux.
There are few reasons why you would consider installing Chrome, however the most obvious one is is the browser speed.
I should admit the browsing experience with Chrome looks and feels far better compared to Iceweasel (e.g. Firefox) on Debian.
It could be that web loading speed performance with Epiphany or Opera is similar to Chrome in terms of velocity, apart from the faster browser experience with Google Chrome, I've seen reports online that sometimes Google Chrome behaves better when it comes to multimedia audio and video streams online.
Another thing I notice in Google Chrome is that it's generally much lighter and loads the base browser times faster than Iceweasel.
The most accurate way to install Chrome on Debian Linux is using Google Linux repositories
So to install add to your /etc/apt/sources.list the following google linux repo
e.g.
Then update your repositories list with apt-get:
Next choose your google chrome preferred release between the available (beta, stable and unstrable) version.
I've chose to install the Google Chrome stable release apt-getting it like shown below
Now the google chrome will be ready to use to start using it either start it up from the Gnome / KDE Menus or exec the command:
So far so good, you will have now a gnome browser, however what is really irritating is the default behaviour of the chrome install by default it tampers with the default browser configured for my whole Linux desktop system in other words it automatically links:
/etc/alternatives/gnome-www-browser to -> /usr/bin/google-chrome as well as,
/etc/alternatives/x-www-browser to -> /usr/bin/google-chrome
Well I wasn't happy with that unwarranted install behaviour of Google Chrome therefore I decided to reverse my default Gnome and System Browser back to Epiphany.
First I removed the links to /usr/bin/google-chrome
There are few reasons why you would consider installing Chrome, however the most obvious one is is the browser speed.
I should admit the browsing experience with Chrome looks and feels far better compared to Iceweasel (e.g. Firefox) on Debian.
It could be that web loading speed performance with Epiphany or Opera is similar to Chrome in terms of velocity, apart from the faster browser experience with Google Chrome, I've seen reports online that sometimes Google Chrome behaves better when it comes to multimedia audio and video streams online.
Another thing I notice in Google Chrome is that it's generally much lighter and loads the base browser times faster than Iceweasel.
The most accurate way to install Chrome on Debian Linux is using Google Linux repositories
So to install add to your /etc/apt/sources.list the following google linux repo
# Google software repository

deb http://dl.google.com/linux/deb/ stable non-free
main
e.g.
debian-deskop:~# echo "deb http://dl.google.com/linux/deb/
stable non-free main" >>
/etc/apt/sources.list
Then update your repositories list with apt-get:
debian-desktop:~# apt-get update
Next choose your google chrome preferred release between the available (beta, stable and unstrable) version.
I've chose to install the Google Chrome stable release apt-getting it like shown below
debian-desktop:~# apt-get install
google-chrome-stable
Now the google chrome will be ready to use to start using it either start it up from the Gnome / KDE Menus or exec the command:
debian-desktop:~$ google-chrome
So far so good, you will have now a gnome browser, however what is really irritating is the default behaviour of the chrome install by default it tampers with the default browser configured for my whole Linux desktop system in other words it automatically links:
/etc/alternatives/gnome-www-browser to -> /usr/bin/google-chrome as well as,
/etc/alternatives/x-www-browser to -> /usr/bin/google-chrome
Well I wasn't happy with that unwarranted install behaviour of Google Chrome therefore I decided to reverse my default Gnome and System Browser back to Epiphany.
First I removed the links to /usr/bin/google-chrome
debian-desktop:~# rm -f
/etc/alternatives/gnome-www-browser

debian-desktop:~# rm -f /etc/alternatives/x-www-browser


And thereafter I linked it back to Epiphany


debian-desktop:~# ln -sf /usr/bin/epiphany
/etc/alternatives/gnome-www-browser

debian-desktop:~# ln -sf /usr/bin/epiphany
/etc/alternatives/x-www-browser
Sat Jul 24 18:01:32 EEST 2010
How layman should address the Orthodox Spiritual Clergy according to their Church Rank

His Beautitude Patriarch Maxim - Patriarch of the Bulgarian Orthodox Church
While browsing online I have came across an interesting page which explains the Clergy Etiquette accepted in the Orthodox Christian Church
Since the reading could seem too long for the lazy ones I'll try to synthesize some of the proper appeals to the priesthood and the clergy.
1. Greeting a Priest a Deacon or their wives
If we have to address a Deacon or a Priest we should use the the title "Father". The Priest's wife is addressed differently according to the Orthodox Church nationality she belongs to.
In the Greek Orthodox Church, she is called Presbytera , in Russian Orthodox Church she is called Matushka in Serbian Orthodox Church priest's life is called "Papadiya" in Bulgarian Orthodox Church respectively Priest or Deacon's life is called "Popadyia" :), in Ukrainian Orthodox Church Prist life is called Panimatushka
The wife of a Deacon is called "Diakonisa" (derives from Greek).
2. How to properly greet a Bishop, Metropolitan or a monastery Abbot
We should properly address Metropolitans and Bishops with the title "Your Grace". Though all Bishops (including Patriarchs) are equal in the Orthodox Church, they do have a different administrative duties and honours that accrue to their rank in that sense.
Here it's important to mention that if a Bishop who has a suffragan or assistant Bishop, Metropolitan or Archibishop) should be addressed "Your Beautitude".
The Abbot of a monastery is addressed as "The Very Reverend Abbot," whether he holds Priestly rank or not and whether or not he is an Archimandrite by rank.
3. How to address a Patriarch of an National Orthodox Church
"Your Beatitude" is the proper title for Patriarchs (except for the Ecumenical Patriarch in Constantinople, who is addressed as "Your Al Holiness").
4. How to address a Deacon
Deacons in the Orthodox Church are addressed as "The Reverend Deacon," if they are married Deacons. If they are Deacons who are also monks, they are addressed as "The Reverend Hierodeacon."
5. How to address to Monk
All male monastics in the Orthodox Church are called "Father," whether they hold the Priesthood or not, and are formally addressed as "Monk (name)," if they do not have a Priestly rank. If they are of Priestly rank, they are formally addressed as "Hieromonk" or "Hierodeacon".
6. How to properly address a Num or an Abbess
Women monastics are formally addressed as "Nun (name)" or "Rasophore-nun (name)," etc., and the Abbess of a convent is addressed as "The Very Reverend Abbess." Though traditions for informal address vary, in most places, Rasophore nuns are called "Sister," while any monastic above the rank of Rasophore is called "Mother." Novices are addressed as "Sister."
7. How to request a blessing from a Priest, A Bishop Archibishop, Hieromonk a Metropolitan or a Patriarch
When we approach near an Orthodox Priest, a Bishop, Archibishop a Hieromonk an Abbot a Metropolitan or Patriarch the right order of things is to come near the person then bow down until touching the floor with our right hand, then place our right hand over the left (palms upward), and say: Bless Father or Bless Your Grace or Bless Your Eminance , herein as you see after the Bless phrase we should include the Church rank of the blessing Clergyman.
The Priest, Metropolitap, Bishop, Patriarch etc. then answers gives us a blessing with a words similar to:
"May the Lord bless you," or "May God bless you.
It's interesting to explain that whenever a Bishop, Archibishop a Metropolitan or a Patriarch Blesses us he forms the The Sign of the Cross and places his right hand in our hands.
Receiving his spiritual blessing, we then kiss the blessing one's hand.
We do this as a reverence for his Apostolic Office or Priesthood rank (if priest) and as a sign of our humility to Christ and his Church order.
More importantly, however, since both hold the Holy Mysteries in their hands during the Divine Liturgy, we show respect to the Holy Eucharist when we kiss their hands.
In fact, Saint John Chrysostomos once said that if one were to meet an Orthodox Priest walking along with an Angel, that he should greet the Priest first and kiss his hand, since that hand has touched the Body and Blood of our Lord. For this latter reason, we do not normally kiss the hand of a Deacon.
When we take leave of a Priest or Bishop, we should again ask for a blessing, just as we did when we first greeted him.
When the Priest or Bishop blesses us, he forms his fingers to represent the Christogram "ICXC" a traditional abbreviation of the Greek words for "Jesus Christ" (i.e., the first and last letters of each of the words "IHCOYC XRICTOC").
Besides that it's not proper for us laymen to address a monk with the title "Brother", this is a traditional latin custom and is not correct according to Orthodox Church tradition.
Here an important moment to note is that it's not correct to address a Priest, Bishop, Metropolitan patriarch with his family name.
They should be addressed with their first names like for instance: "Bishop John of San Francisco").
Its also important to explain that in many Slavonic Orthodox Churches we use to call the Bishops or Metropolitans with the title "Vladika", which literally translated to English means "Master".
8. How to Greet a Clergy on the Telephone
Whenever you speak to Orthodox clergy of Priestly rank on the telephone, you should always begin your conversation by asking for a blessing: "Father, bless." When speaking with a Bishop, you should say "Bless, Despota" (Greek) or "Bless Vladika" (Slavonic). It's also appropriate to say "Bless Your Grace" or "Bless your Eminance".
Again before ending the concersation with the cleric you should ask for a blessing once again.
9. Proper form to address a Clergy in a Letter
When we write to a clergyman (and, by custom, monastics), we should open our letter with the greeting, "Bless, Father."
At the end of the letter, it is customary to close with the following line: "Kissing your right hand...."
It is not appropriate to invoke a blessing on a clergyman, as many do: "May God bless you." Not only does this show a certain spiritual arrogance before the image of the cleric, but laymen do not have the Grace of the Priesthood and the prerogative to bless in their stead.
Even a Priest properly introduces his letters with the words, "The blessing of the Lord" or "May God bless you," rather than offering his own blessing.
Though he can do the latter, humility prevails in his behavior,too. Needless to say, when a clergyman writes to his ecclesiastical superior, he should ask for a blessing and not bestow one.
Fri Jul 23 13:51:01 EEST 2010
Few Iceweasel (Firefox) Web Development goodies
I'm trying to enter into web dev this
days and I felt obliged to share with you about 3 interesting
plugins for (Iceweasel) in Debian or Firefox if you're running
Linux or some other OS platform. The DOM Inspector ,
Error Console and HTML Validator Plugin are an
absolutely must have ones if you're into a serious web dev.
Herein I'll write a short review to each of the nice FF plugins to get you a slight idea about them:
DOM Inspector
The DOM Inspector (also known as DOMi) is a developer tool used to inspect, browse, and edit the Document Object Model of documents - usually web pages or XUL windows. The DOM hierarchy can be navigated using a two-paned window that allows for a variety of different views on the document and all nodes within.
To proceed downloading the plugin use the following dom inspector download link
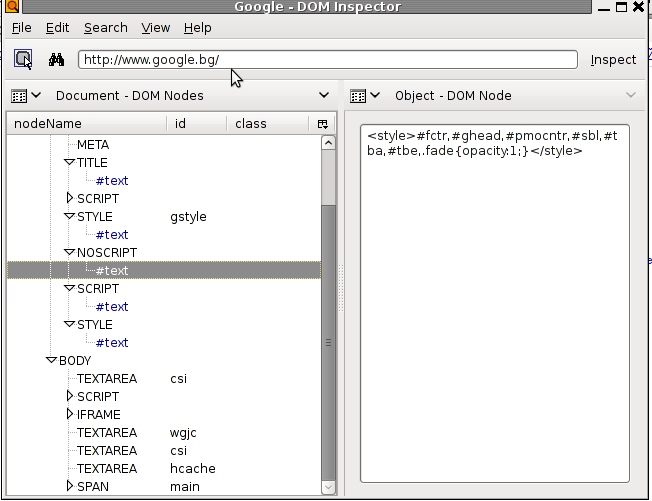
Here is how your DOM inspector would look like.
You see as you click a node in the DOM Inspector, the element in the page is highlighted so you can easily track down layout issues and CSS problems.
It's an interesting fact that DOM Inpector is also available as a plugin for Thunderbird
It's use on Thunderbird is similar to the Browser use e.g. as taken from DOM Inspector's thunderbird plugin download page:
DOM INspector - "Inspect the DOM of HTML, XUL, and XML pages, including the mail chrome."
To install DOM Inspector on Debian's Iceweasel Firefox fork, use:
It's worthy to mention the Error Console which is a fundamental part of the DOM Inspector
The error console allows you to view real-time javascript errors and bad CSS declarations. This is a VERY handy little feature. You can open the Error Console in Firefox by selecting the 'Tools' > 'Error Console' menu. Once opened, you'll probably want to hit 'Clear' and then refresh the page you're checking for javascript and CSS errors.
To add the dom inspector extension to Thunderbird or as the fork is called in Debian (Iceape), execute the following command:
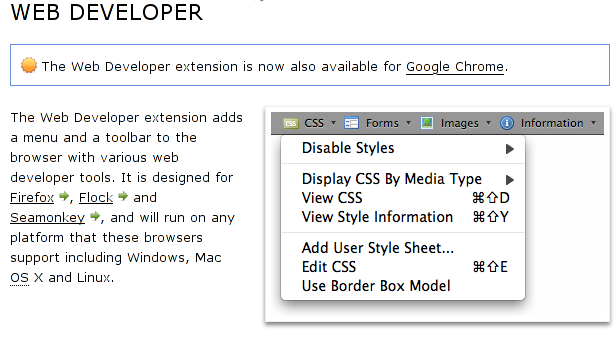
2. Another completely mandatory plugin for a Web Developer this days is the Web Developer add-on plugin
This plugins has many goodies a web dev could benefit, some of the nice features it supports are:
the ability to modify and clear cookies and cache, display form details, disable enable css styles, disable page colors and tons of more handy stuff.
- Installing the Web Developer plugin on Debian again is a piece of cake with apt.
There you go after restarting Iceweasel another bar field will appear in your browser, from there you can customize the web dev actions you would like to perform.
Here is a quick glimpse on the Web Developer plugin:
Besides that I suggest you check my older post which explains the importance for a website to be w3c compliant
Herein I'll write a short review to each of the nice FF plugins to get you a slight idea about them:
DOM Inspector
The DOM Inspector (also known as DOMi) is a developer tool used to inspect, browse, and edit the Document Object Model of documents - usually web pages or XUL windows. The DOM hierarchy can be navigated using a two-paned window that allows for a variety of different views on the document and all nodes within.
To proceed downloading the plugin use the following dom inspector download link
Here is how your DOM inspector would look like.
You see as you click a node in the DOM Inspector, the element in the page is highlighted so you can easily track down layout issues and CSS problems.
It's an interesting fact that DOM Inpector is also available as a plugin for Thunderbird
It's use on Thunderbird is similar to the Browser use e.g. as taken from DOM Inspector's thunderbird plugin download page:
DOM INspector - "Inspect the DOM of HTML, XUL, and XML pages, including the mail chrome."
To install DOM Inspector on Debian's Iceweasel Firefox fork, use:
debian-notebook:~# apt-get install
iceweasel-dom-inspector
It's worthy to mention the Error Console which is a fundamental part of the DOM Inspector
The error console allows you to view real-time javascript errors and bad CSS declarations. This is a VERY handy little feature. You can open the Error Console in Firefox by selecting the 'Tools' > 'Error Console' menu. Once opened, you'll probably want to hit 'Clear' and then refresh the page you're checking for javascript and CSS errors.
To add the dom inspector extension to Thunderbird or as the fork is called in Debian (Iceape), execute the following command:
debian-notebook:~# apt-get install
iceape-dom-inspector
2. Another completely mandatory plugin for a Web Developer this days is the Web Developer add-on plugin
This plugins has many goodies a web dev could benefit, some of the nice features it supports are:
the ability to modify and clear cookies and cache, display form details, disable enable css styles, disable page colors and tons of more handy stuff.
- Installing the Web Developer plugin on Debian again is a piece of cake with apt.
debian-notebook:~# apt-get install
iceweasel-webdeveloper
There you go after restarting Iceweasel another bar field will appear in your browser, from there you can customize the web dev actions you would like to perform.
Here is a quick glimpse on the Web Developer plugin:
Besides that I suggest you check my older post which explains the importance for a website to be w3c compliant
Wed Jul 21 11:06:06 EEST 2010
How to solve (work around) an /etc/init.d/iptables failed issues caused by iptables Unknown error 18446744073709551615 on CentOS 5.5 Final
Today I have encountered an oddity on
CentOS release 5.5 (Final). The problem consisted in the
iptables firewall not loading it's rules.
After a bit of debugging I've found out that the whole issue was caused by a failure for /sbin/iptables-save to read the /etc/sysconfig/iptables stored iptables rules.
I've reviewed all the rules in the /etc/sysconfig/iptables and all of them appeared to be absolutely syntax correct, however since the iptables-restore command parser failed to load on a line after which was contaned the following iptables rules:
Which had to deal with the server SYN Flood Protection I've decided to attempt to issue the iptables rules directly from the command line like so:
Executing the above iptables lines I was unpleasently surprised by the error:
iptables: Unknown error 18446744073709551615
Googling for the error led me to many discussions none of which has suggested a concrete reasons that causes the issue, so I finally decided to experiment on my own in order to find the solution.
By the way it's imporant to mention that I have encounted the iptables: Unknown error 18446744073709551615 problem on a CentoS 5.5 (Final running kernel version:
What is even more interesting is that another CentOS server running a kernel version:
is executing the above anti SYN flood iptables rules absolutely correctly.
Well I have to admit this is quite ODD. I have checked a module by module all modules related to iptables to assure myself that the error iptables: Unknown error 18446744073709551615 is not caused by a missing iptables related module on the server.
However all the iptables modules which was loaded on the server which was able to properly execute the iptables command without errors were loaded on the server where the error persisted.
Finally I've decided to completely remove the iptables anti-flood lines:
And substitute my ANTI SYN FLOOD protection rules in /etc/sysconfig/iptables with the following iptable rules:
The above iptables rules to protect against SYN FLOODS worked like a charm a simple restart of the firewall loaded the firewall with the new substituted rules.
After a bit of debugging I've found out that the whole issue was caused by a failure for /sbin/iptables-save to read the /etc/sysconfig/iptables stored iptables rules.
I've reviewed all the rules in the /etc/sysconfig/iptables and all of them appeared to be absolutely syntax correct, however since the iptables-restore command parser failed to load on a line after which was contaned the following iptables rules:
-A RH-Firewall-1-INPUT -m state --state NEW -p tcp -m tcp
--syn -m recent --name synflood --set

-A RH-Firewall-1-INPUT -m state --state NEW -p tcp -m tcp --syn -m
recent --name synflood --update --seconds 1 --hitcount 100 -j
DROP
Which had to deal with the server SYN Flood Protection I've decided to attempt to issue the iptables rules directly from the command line like so:
[root@centos-server ~]# iptables -A INPUT -m state --state
NEW -p tcp -m tcp --syn -m recent --name synflood --set

[root@centos-server ~]# iptables -A INPUT -m state --state NEW -p
tcp -m tcp --syn -m recent --name synflood --update --seconds 1
--hitcount 100 -j DROP
Executing the above iptables lines I was unpleasently surprised by the error:
iptables: Unknown error 18446744073709551615
Googling for the error led me to many discussions none of which has suggested a concrete reasons that causes the issue, so I finally decided to experiment on my own in order to find the solution.
By the way it's imporant to mention that I have encounted the iptables: Unknown error 18446744073709551615 problem on a CentoS 5.5 (Final running kernel version:
Linux centos-server 2.6.18-194.3.1.el5 #1 SMP Thu May 13
13:08:30 EDT 2010 x86_64 x86_64 x86_64 GNU/Linux
What is even more interesting is that another CentOS server running a kernel version:
Linux centos-server1 2.6.18-128.7.1.el5 #1 SMP Mon Aug 24
08:21:56 EDT 2009 x86_64 x86_64 x86_64 GNU/Linux
is executing the above anti SYN flood iptables rules absolutely correctly.
Well I have to admit this is quite ODD. I have checked a module by module all modules related to iptables to assure myself that the error iptables: Unknown error 18446744073709551615 is not caused by a missing iptables related module on the server.
However all the iptables modules which was loaded on the server which was able to properly execute the iptables command without errors were loaded on the server where the error persisted.
Finally I've decided to completely remove the iptables anti-flood lines:
-A RH-Firewall-1-INPUT -m state --state NEW -p tcp -m tcp
--syn -m recent --name synflood --set

-A RH-Firewall-1-INPUT -m state --state NEW -p tcp -m tcp --syn -m
recent --name synflood --update --seconds 1 --hitcount 100 -j
DROP
And substitute my ANTI SYN FLOOD protection rules in /etc/sysconfig/iptables with the following iptable rules:
-N syn-flood

-A INPUT -i eth0 -p tcp --syn -j syn-flood

-A syn-flood -m limit --limit 1/s --limit-burst 4 -j RETURN

-A syn-flood -j DROP
The above iptables rules to protect against SYN FLOODS worked like a charm a simple restart of the firewall loaded the firewall with the new substituted rules.
[root@centos-server ~]# /etc/init.d/iptables restart Flushing
firewall rules: [ OK ]

Setting chains to policy ACCEPT: filter [ OK ]

Unloading iptables modules: [ OK ]

Applying iptables firewall rules: [ OK ]

Loading additional iptables modules: ip_conntrack_netbios_n[ OK
]
Tue Jul 20 22:51:34 EEST 2010
The Glorious Prophet Elijah (Elias) feast in the Orthodox Church - St. Elijah's day

It's the feast of the glorious prophet Elijah in the Orthodox Church. Every year on the 20-th of June we do celebrate the feast whether we commemorate in short the glorious life of the prophet with which the mercyful God has bestowed the prophet.
Elijah is actually considered the greatest old testament prophet before the coming of our Lord and Saviour Jesus Christ.
St. Prophet Elias is among the two people who did not died but was taken to heaven, the first one that has not faced physical death but by God's mercy because of his great righteousness has been taken to heaven is Enoch.
The whole short version of saint Elijah's life is availabe for reading here
Elijah is very famous for his God inspired "contest" against the Baal Prophets whether he has shown the idolaters who the real Living God is.
Here are a few interesting extracts from the Saint's Living:
During these two years a famine prevailed in the land. At the close of this period of retirement and of preparation for his work, Elijah met Obadiah, one of Ahab's officers, whom he had sent out to seek for pasturage for the cattle, and bade him go and tell his master that Elijah was there. The king came and met Elijah, and reproached him as the "troubler of Israel." It was then proposed that sacrifices should be publicly offered, for the purpose of determining whether Baal or the Israelite God was the true God. This was done on Mount Carmel; the result was that a miracle took place convincing those watching that Baal was false and that the Israelite God was real. The prophets of Baal were then put to death by the order of Elijah.
Another very notable moment (and marvelous God's manifestation in Elijah's life) is his Glorious take into haven by God Almighty.

God taking Elijah to heaven in a whirlwind by a chariot and horses of fire.
Read the short revised version below:
The time now drew near when he was to be taken up into heaven (2 Kings 2:1-12). He went down to Gilgal, where there was a school of prophets, and where his successor Elisha, whom he had anointed some years before, resided. Elisha was distraught by the thought of his master's leaving him, and refused to be parted from him. The two went on and came to Bethel and Jericho, and crossed the Jordan, the waters of which were "divided hither and thither" when smitten with Elijah's mantle. Upon arriving at the borders of Gilead, which Elijah had left many years before, it "came to pass as they still went on and talked" they were suddenly separated by a chariot and horses of fire; and "Elijah went up by a whirlwind into heaven," Elisha receiving his mantle, which fell from Elijah as he ascended. Elijah's chosen successor was the prophet Elisha; Elijah designated Elisha as such by leaving his mantle with him (2 Kings 2:13-15), so that his wish for "a double portion" of the older prophet's spirit (2:9), an allusion to the preference shown the first-born son in the division of the father's estate (Deuteronomy 21:17), had been fulfilled.
Tue Jul 20 14:51:58 EEST 2010
How to redirect certain pages to https using Zend Framework, how to properly add redirects to the default Zend Framework (ZF) .htaccess file
Most Zend Framework users and
consuers would admint that Using Zend Framework is quite handy for
creating large long term projects in PHP.
However probably almost every starter with ZF like me would face enormous problems before he understand how to manage properly mod_rewrite based custom redirects in Zend Framework.
Recently I had a task to create a ZF mod_rewrite custom redirect , the task consisted in that some specific urls passed to the webserver had to be forwarded to another SSL protected (https) locations
An example of what I had to do is for instance you need to redirect all your incoming requests to a page login section like let's say http://www.yourpage.com/login/ to https://www.yourpage.com/login/
There is plenty of mod rewrite examples and documents writtin which are able to achieve the up-mentioned rewrite rule, yet trying to apply them putting a mod_rewrite redirect rules in Zend's default .htaccess failed to create the desired redirect.
Some of the tutorials on the subject of URL rewritting with mod_rewrite I've read and tried without success was:
Redirecting URLs with Apache's mod_rewrite
.htaccess tricks and tips .. part two: url rewritting with mod rewrite
mod_rewrite, a beginner's guide (with examples
Using Apache's RewriteEngine to redirect requests to other URLS and to https:// apache htaccess rewrite rules make redirection loop
After an overall time of 4 hours or so and many failed tries I finally was able to determine why none of the straight ways to url redirect http:// to https:// urls worked. By default my installed zend framework .htaccess had the following content
I have tried to edit the below rules adding new mod_rewrite RewriteCond(itions) and RewriteRule(s) after the RewriteCond %{REQUEST_FILENAME} -d code.
Like so:
Nevertheless the rewriterules to achieve the desired url rewrite included after the RewriteEngine On I used I received a 404 errors instead of the expected results.
I realized that it's very likely the default zf rules being loaded in the .htaccess are standing the way of the other rules and some kind of interference occurs.
Therefore subsequently I decided to change the order of the mod rewrite rules e.g. to look like in the .htaccess code I present below:
And oh Good heavens that piece of code finally worked and the http to https redirect for the web site folder http://mywebsite.com/login/* started being forwarded to https://mywebsite.com/login/*
However probably almost every starter with ZF like me would face enormous problems before he understand how to manage properly mod_rewrite based custom redirects in Zend Framework.
Recently I had a task to create a ZF mod_rewrite custom redirect , the task consisted in that some specific urls passed to the webserver had to be forwarded to another SSL protected (https) locations
An example of what I had to do is for instance you need to redirect all your incoming requests to a page login section like let's say http://www.yourpage.com/login/ to https://www.yourpage.com/login/
There is plenty of mod rewrite examples and documents writtin which are able to achieve the up-mentioned rewrite rule, yet trying to apply them putting a mod_rewrite redirect rules in Zend's default .htaccess failed to create the desired redirect.
Some of the tutorials on the subject of URL rewritting with mod_rewrite I've read and tried without success was:
Redirecting URLs with Apache's mod_rewrite
.htaccess tricks and tips .. part two: url rewritting with mod rewrite
mod_rewrite, a beginner's guide (with examples
Using Apache's RewriteEngine to redirect requests to other URLS and to https:// apache htaccess rewrite rules make redirection loop
After an overall time of 4 hours or so and many failed tries I finally was able to determine why none of the straight ways to url redirect http:// to https:// urls worked. By default my installed zend framework .htaccess had the following content
SetEnv APPLICATION_ENV development


RewriteEngine On

RewriteCond %{REQUEST_FILENAME} -s [OR]

RewriteCond %{REQUEST_FILENAME} -l [OR]

RewriteCond %{REQUEST_FILENAME} -d


RewriteRule ^.*$ - [NC,L]

RewriteRule ^.*$ index.php [NC,L]
I have tried to edit the below rules adding new mod_rewrite RewriteCond(itions) and RewriteRule(s) after the RewriteCond %{REQUEST_FILENAME} -d code.
Like so:
SetEnv APPLICATION_ENV development


RewriteEngine On

RewriteCond %{REQUEST_FILENAME} -s [OR]

RewriteCond %{REQUEST_FILENAME} -l [OR]

RewriteCond %{REQUEST_FILENAME} -d


RewriteCond %{HTTPS} !=on

RewriteRule ^login(.*) https://%{SERVER_NAME}/login$1 [R,L]

RewriteRule ^.*$ - [NC,L]

RewriteRule ^.*$ index.php [NC,L]
Nevertheless the rewriterules to achieve the desired url rewrite included after the RewriteEngine On I used I received a 404 errors instead of the expected results.
I realized that it's very likely the default zf rules being loaded in the .htaccess are standing the way of the other rules and some kind of interference occurs.
Therefore subsequently I decided to change the order of the mod rewrite rules e.g. to look like in the .htaccess code I present below:
SetEnv APPLICATION_ENV development


RewriteEngine On

RewriteCond %{HTTPS} !=on

RewriteRule ^login(.*) https://%{SERVER_NAME}/login$1 [R,L]


RewriteCond %{REQUEST_FILENAME} -s [OR]

RewriteCond %{REQUEST_FILENAME} -l [OR]

RewriteCond %{REQUEST_FILENAME} -d


RewriteRule ^.*$ - [NC,L]

RewriteRule ^.*$ index.php [NC,L]
And oh Good heavens that piece of code finally worked and the http to https redirect for the web site folder http://mywebsite.com/login/* started being forwarded to https://mywebsite.com/login/*
Mon Jul 19 15:45:57 EEST 2010
How to Redirect to www with (301 redirect) using mod_rewrite for a better web site SEO
For a better website SEO it's
recommended that you think of rewritting all your incoming
http://yourdomain.com to http://www.yourdomain.com. That way you
will escape from having a duplicate webpage content.
Still many websites online are not aware that having their website content available twice whenever accessing both http://yourdomain.com and http://www.yourdomain.com is a terrible practice since it's very likely that (Google, MSN, Bing) Web Crawlers will crawl and try to index the content of the website, seing that the content is twice available, they will rank the website as a website with a duplicate content and th at will have a direct influence on the overall site pagerank
One of the possible ways to redirect your incoming requests to yourdomain.com to go to www.yourdomain.com is via a mod rewrite ru le within your .htaccess file
For the rule to work make sure that the <Directory> for the VirtualHost of your website has in it included the Apache directives
AllowOverride All
As you assure yourself mod rewrite is correctly enabled for your domain then edit your .htaccess and place in it:
Of course you will have to replace the pc-freak.net domain in above example with the your custom domain name.
Now all your incoming Apache requests for domain pc-freak.net will be automatically using the 301 Redirect
Here it is important to explain that the 301 redirect is the most efficient and Search Engine Friendly redirect option for a webpage r edirect.
The code "301" is interpreted by the web crawlers as "moved permanently". In other words the content of the previous website is moved permanent ly to the one where the redirect leads.
Of course there are many other possible ways to implement the 301 redirect, however using mod_rewrite potential is probably the most efficient one for a dynamic site content.
Still many websites online are not aware that having their website content available twice whenever accessing both http://yourdomain.com and http://www.yourdomain.com is a terrible practice since it's very likely that (Google, MSN, Bing) Web Crawlers will crawl and try to index the content of the website, seing that the content is twice available, they will rank the website as a website with a duplicate content and th at will have a direct influence on the overall site pagerank
One of the possible ways to redirect your incoming requests to yourdomain.com to go to www.yourdomain.com is via a mod rewrite ru le within your .htaccess file
For the rule to work make sure that the <Directory> for the VirtualHost of your website has in it included the Apache directives
AllowOverride All
As you assure yourself mod rewrite is correctly enabled for your domain then edit your .htaccess and place in it:
RewriteEngine On RewriteCond %{HTTP_HOST} ^pc-freak.net
RewriteRule (.*) http://pc-freak.net/$1 [R=301,L]
Of course you will have to replace the pc-freak.net domain in above example with the your custom domain name.
Now all your incoming Apache requests for domain pc-freak.net will be automatically using the 301 Redirect
Here it is important to explain that the 301 redirect is the most efficient and Search Engine Friendly redirect option for a webpage r edirect.
The code "301" is interpreted by the web crawlers as "moved permanently". In other words the content of the previous website is moved permanent ly to the one where the redirect leads.
Of course there are many other possible ways to implement the 301 redirect, however using mod_rewrite potential is probably the most efficient one for a dynamic site content.
Sun Jul 18 23:01:21 EEST 2010
How to make sure your Linux system users won't hide or delete their .bash_history / Securing .bash_history file
If you're running multi user login
Linux system, you have probably realized that there are some clever
users that prefer to prevent their command line executed commands
to be logged in .bash_history.
To achieve that they use a number of generally known methodologist to prevent the Linux system from logging into their $HOME/.bash_history file (of course if running bash as a default user shell).
This though nice for the user is a real nightmare for the sysadmin, since he could't keep track of all system command events executed by users. For instance sometimes an unprivilegd user might be responsible for executing a malicious code which crashes or breaks your server.
This is especially unpleasent, because you will find your system crashed and if it's not some of the system services that causes the issue you won't even be able to identify which of all the users is the malicious user account and respectively the code excecuted which fail the system to the ground.
In this post I will try to tell you a basic ways that some malevolent users might use to hide their bash history from the system administrator.
I will also discuss a few possible ways to assure your users .bash_history keeps intact and possibly the commands executed by your users gets logged in in their.
The most basic way that even an unexperienced shell user will apply if he wants to prevent his .bash_history from sys admins review would be of directly wiping out the .bash_history file from his login account or alternatively emptying it with commands like:
In order to prevent this type of attack against cleaning the .bash_history you can use the chattr command.
To counter attack this type of history tossing method you can set your malicious-user .bash_history's file the (append only flag) with chattr like so:
It's also recommended that the immunable flag is placed to the file ~/.profile in user home
It would be probably also nice to take a look at all chattr command attributes since the command is like swiss army knife for the Linux admin:
Here is all available flags that can be passed to chattr
It's also nice that setting the "append only" flag in to the user .bash_history file prevents the user to link the .bash_history file to /dev/null like so:
However this will just make your .bash_history append only, so the user trying to execute cat /dev/null > .bash_history won't be able to truncate the content of .bash_history.
Unfortunately he will yet be able to delete the file with rm so this type of securing your .bash_history file from being overwritten is does not completely guarantee you that user commands will get logged.
Also in order to prevent user to play tricks and escape the .bash_history logging by changing the default bash shell variables for HISTFILE an d HISTFILESIZE, exporting them either to a different file location or a null file size.
You have to put the following bash variables to be loaded in /etc/bash.bashrc or in /etc/profile
everytime a user logs in to your Linux system the bash commands above will be set.
The above tip is directly taken from Securing debian howto which by the way is quite an interesting and nice reading for system administrators :)
If you want to apply an append only attribute to all user .bash_history to all your existing Linux server system users assuming the default users directory is /home in bash you can execute the following 1 liner shell code:
Though the above steps will stop some of the users to voluntary clean their .bash_history history files it won't a 100% guaranttee that a good cracker won't be able to come up with a way to get around the imposed .bash_history security measures.
One possible way to get around the user command history prevention restrictions for a user is to simply using another shell from the ones available on the system:
Here is an example:
csh shell logs by default to the file .history
Also as far as I know it should be possible for a user to simply delete the .bash_history file overwritting all the .bash_history keep up attempts up-shown.
If you need a complete statistics about accounting you'd better take a look at The GNU Accounting Utilities
In Debian the GNU Accounting Utilities are available as a package called acct, so installation of acct on Debian is as simple as:
I won't get into much details about acct and would probably take a look at it in my future posts.
For complete .bash_history delete prevention maybe the best practice is to useg grsecurity (grsec)
Hopefully this article is gonna be a step further in tightening up your Server or Desktop Linux based system security and will also give you some insight on .bash_history files .
To achieve that they use a number of generally known methodologist to prevent the Linux system from logging into their $HOME/.bash_history file (of course if running bash as a default user shell).
This though nice for the user is a real nightmare for the sysadmin, since he could't keep track of all system command events executed by users. For instance sometimes an unprivilegd user might be responsible for executing a malicious code which crashes or breaks your server.
This is especially unpleasent, because you will find your system crashed and if it's not some of the system services that causes the issue you won't even be able to identify which of all the users is the malicious user account and respectively the code excecuted which fail the system to the ground.
In this post I will try to tell you a basic ways that some malevolent users might use to hide their bash history from the system administrator.
I will also discuss a few possible ways to assure your users .bash_history keeps intact and possibly the commands executed by your users gets logged in in their.
The most basic way that even an unexperienced shell user will apply if he wants to prevent his .bash_history from sys admins review would be of directly wiping out the .bash_history file from his login account or alternatively emptying it with commands like:
malicious-user@server:~$ rm -f. bash_history

or malicious-user@server:~# cat /dev/null >
~/.bash_history
In order to prevent this type of attack against cleaning the .bash_history you can use the chattr command.
To counter attack this type of history tossing method you can set your malicious-user .bash_history's file the (append only flag) with chattr like so:
root@server:~# cd /home/malicious-user/

root@server:~# chattr +a .bash_history
It's also recommended that the immunable flag is placed to the file ~/.profile in user home
root@server:~# chattr +i ~/.profile
It would be probably also nice to take a look at all chattr command attributes since the command is like swiss army knife for the Linux admin:
Here is all available flags that can be passed to chattr
append only (a)

compressed (c)

don~@~Yt update atime (A)

synchronous directory updates (D)

synchronous updates (S)

data journalling (j)

no dump (d)

top of directory hierarchy (T)

no tail-merging (t)

secure deletion (s)

undeletable (u)

immutable (i)
It's also nice that setting the "append only" flag in to the user .bash_history file prevents the user to link the .bash_history file to /dev/null like so:
malicious-user@server:~$ ln -sf /dev/null
~/.bash_history

ln: cannot remove `.bash_history': Operation not permitted


malicious-user@server:~$ echo > .bash_history

bash: .bash_history: Operation not permitted
However this will just make your .bash_history append only, so the user trying to execute cat /dev/null > .bash_history won't be able to truncate the content of .bash_history.
Unfortunately he will yet be able to delete the file with rm so this type of securing your .bash_history file from being overwritten is does not completely guarantee you that user commands will get logged.
Also in order to prevent user to play tricks and escape the .bash_history logging by changing the default bash shell variables for HISTFILE an d HISTFILESIZE, exporting them either to a different file location or a null file size.
You have to put the following bash variables to be loaded in /etc/bash.bashrc or in /etc/profile
# #Prevent unset of histfile, /etc/profile

HISTFILE=~/.bash_history HISTSIZE=10000 HISTFILESIZE=999999 # Don't
let the users enter commands that are ignored # in the history file
HISTIGNORE="" HISTCONTROL="" readonly HISTFILE readonly HISTSIZE
readonly HISTFILESIZE readonly HISTIGNORE readonly HISTCONTROL
export HISTFILE HISTSIZE HISTFILESIZE HISTIGNORE
HISTCONTROL
everytime a user logs in to your Linux system the bash commands above will be set.
The above tip is directly taken from Securing debian howto which by the way is quite an interesting and nice reading for system administrators :)
If you want to apply an append only attribute to all user .bash_history to all your existing Linux server system users assuming the default users directory is /home in bash you can execute the following 1 liner shell code:
#Set .bash_history as attr +a

2. find /home/ -maxdepth 3|grep -i bash_history|while read line; do
chattr +a "$line"; done
Though the above steps will stop some of the users to voluntary clean their .bash_history history files it won't a 100% guaranttee that a good cracker won't be able to come up with a way to get around the imposed .bash_history security measures.
One possible way to get around the user command history prevention restrictions for a user is to simply using another shell from the ones available on the system:
Here is an example:
malicious-user:~$ /bin/csh malicious-user:~>csh shell logs by default to the file .history
Also as far as I know it should be possible for a user to simply delete the .bash_history file overwritting all the .bash_history keep up attempts up-shown.
If you need a complete statistics about accounting you'd better take a look at The GNU Accounting Utilities
In Debian the GNU Accounting Utilities are available as a package called acct, so installation of acct on Debian is as simple as:
debian:~# apt-get install acct
I won't get into much details about acct and would probably take a look at it in my future posts.
For complete .bash_history delete prevention maybe the best practice is to useg grsecurity (grsec)
Hopefully this article is gonna be a step further in tightening up your Server or Desktop Linux based system security and will also give you some insight on .bash_history files
.Sat Jul 17 19:07:05 EEST 2010
Redirect http URL folder to https e.g. redirect (http://example.com to https://www.example.com) with mod_rewrite
There is a quick way to achieve a a
full url redirect from a normal unencrypted HTTP request to a
SSL crypted HTTPS
This is achieved through mod_rewrite using the RedirectMatch directive.
For instance let's say we'd like to redirect http://pc-freak.net/blog to https://pc-freak.net/blog.
We simply put in our .htacess file the following rule:
Of course this rule assumes that the current working directory where the .htacess file is stored is the main domain directory e.g. / .
However this kind of redirect is a way inflexible so for more complex redirect, you might want to take a look at mod rewrite's RedirectMatch directive.
For instance if you inted to redirect all urls (http://pc-freak.net/blog/something/asdf/etc.) which as you see includes the string blog/somestring/asdf/etc. to (https://pc-freak.net/blog/something/asdf/etc then you might use some htaccess RedirectMatch rule like:
Hopefully your redirect from the http protocol to https protocol with mod_rewrite rule should be completed.
Also consider that the Redirect directive which by the way is an Apache directive should be faster to process requests, so everywhere you can I recommend using instead of RedirectMatch which calls the external Apache mod_rewrite and will probably be times slower.
This is achieved through mod_rewrite using the RedirectMatch directive.
For instance let's say we'd like to redirect http://pc-freak.net/blog to https://pc-freak.net/blog.
We simply put in our .htacess file the following rule:
Redirect permanent /blog
https://www.cadiabank.com/login
Of course this rule assumes that the current working directory where the .htacess file is stored is the main domain directory e.g. / .
However this kind of redirect is a way inflexible so for more complex redirect, you might want to take a look at mod rewrite's RedirectMatch directive.
For instance if you inted to redirect all urls (http://pc-freak.net/blog/something/asdf/etc.) which as you see includes the string blog/somestring/asdf/etc. to (https://pc-freak.net/blog/something/asdf/etc then you might use some htaccess RedirectMatch rule like:
RedirectMatch permanent ^/blog/(.*)$
https://pc-freak.net.net$1

or

RedirectMatch permanent ^/blog/(.*)$
https://pc-freak.net.net/$1
Hopefully your redirect from the http protocol to https protocol with mod_rewrite rule should be completed.
Also consider that the Redirect directive which by the way is an Apache directive should be faster to process requests, so everywhere you can I recommend using instead of RedirectMatch which calls the external Apache mod_rewrite and will probably be times slower.
Fri Jul 16 12:41:49 EEST 2010
Create a license agreement accept form checkout field within a Subform with Zend Framework
After numerous of experiments because
I had some issues caused by "bug" in Zend Framework
Zend_Form_Element_Checkbox which prevents a selected checkbox
to be submitted I finally was able to create a working
Zend_Form_Element_Checkbox, below you will see the exact code of
the working code which I create within a subform and does the trick
of an Accept Agreement checkbox field which is a perfect
suit for a Registration Form being prepared with ZF.
I have to express my thanks to a bunch of guys who gave me big help in irc.freenode.net in #zftalk - which by the way is the official Zend Framework IRC Channel.
The guy that helped the most was with a nickname Bittarman thanks man!
The solution to the * Value is required and can't be empty error message which appeared all the time nomatter if the form checkbox is selected or not was through using the Zend_Form_Element_Checkbox options:
'uncheckedvalue' => ''
and
'checkedvalue' => '1'
there is also a separate Zend Methods to be used like so:
This stupidity took me like 2 hours of googling and testing ... finally though the above solution worked for me it appeared like non-working because my Iceweasel browser has cached the webpage ... If you still can't solve the issue using the above solution, cleanse your browser cache!
$risk_statement_full = 'something';

$accept_disclaimerOptions='I accept';

$accept_disclaimer = new Zend_Form_SubForm();

$accept_disclaimer>addElements(array(


$disclaimer = new Zend_Form_Element_Checkbox('accept_disclaimer',
array(

'label' > "$risk_statement_full",

'description' > $accept_disclaimerOptions,

'uncheckedvalue' > '',

'checkedvalue' > '1',

'value' > 1,

'required' > true,


)),


));
I have to express my thanks to a bunch of guys who gave me big help in irc.freenode.net in #zftalk - which by the way is the official Zend Framework IRC Channel.
The guy that helped the most was with a nickname Bittarman thanks man!
The solution to the * Value is required and can't be empty error message which appeared all the time nomatter if the form checkbox is selected or not was through using the Zend_Form_Element_Checkbox options:
'uncheckedvalue' => ''
and
'checkedvalue' => '1'
there is also a separate Zend Methods to be used like so:
$disclaimer>setCheckedValue('');
$disclaimer&t;setUnchedkValue('');
This stupidity took me like 2 hours of googling and testing ... finally though the above solution worked for me it appeared like non-working because my Iceweasel browser has cached the webpage ... If you still can't solve the issue using the above solution, cleanse your browser cache!
Thu Jul 15 15:40:26 EEST 2010
How to check to which package an installed file belongs in Debian, Ubuntu, Redhat, CentOS and FreeBSD
Every now and then every system
administrator has to determine to which installed package a certain
file belongs.
This small article is about to give some few basics which will help you to achieve the task on Linux and Unix/BSD operating system.
Often times whenever we administrate a system we are required to list the content of a certain installed package below you will see a very basic ways to determine which file belongs to which package on Linux and BSD as well as how to list a file content on a few different *nix based operating systems. Of course there are numerous ways to achieve this operation so this examples are definitly not the only ones:
1. Determining a file belongs to which (.deb) package on Debian Linux
- The straight way to determine a file belongs to which package is:
- Let's say you would like to check every installed package on your Debian or Ubuntu Linux for a file name related to a certain file or binary. To do so on this distros you might use apt-file (by default not included in debian and ubuntu), so install it and use it to find out a binary is adherent to which package.
- A good possible tip if you're on a Debian or Ubuntu Linux is to list a certain package directly from the packages repository, e.g. without having it installed locally on your Linux.
This is done through:
- Another possible way to find out which package a file belongs is via dlocate . Dlocate is probably be the tool of choice if you won't to automate the process of finding to which package a file belongs in a shell script or smth.
Here is dlocate's description
uses GNU locate to greatly speed up finding out which package a file belongs to (i.e. a very fast dpkg -S). many other uses, including options to view all files in a package, calculate disk space used, view and check md5sums, list man pages, etc.
Debian and Ubuntu are not bundled by default with it so you will have to install it separately.
Let's say you would like to check where does the awk binary belongs, issue:
- Now sometimes you will have to list the content of a package binary, in Debian this is easily done with:
2. Here is also how o check which binary belongs to which package on FreeBSD here
- Also you might need to list a binary package content in FreeBSD, here is how:
2. To check a package belongs to which package on Fedora, Redhat, CentOS with rpm
Below command is above to show you all files which are contained in the sample package mysql-5.0.77-4.el5_5.3
This small article is about to give some few basics which will help you to achieve the task on Linux and Unix/BSD operating system.
Often times whenever we administrate a system we are required to list the content of a certain installed package below you will see a very basic ways to determine which file belongs to which package on Linux and BSD as well as how to list a file content on a few different *nix based operating systems. Of course there are numerous ways to achieve this operation so this examples are definitly not the only ones:
1. Determining a file belongs to which (.deb) package on Debian Linux
- The straight way to determine a file belongs to which package is:
debian:~# dpkg -S coreutils: /bin/ls
- Let's say you would like to check every installed package on your Debian or Ubuntu Linux for a file name related to a certain file or binary. To do so on this distros you might use apt-file (by default not included in debian and ubuntu), so install it and use it to find out a binary is adherent to which package.
ubuntu:~# apt-get install apt-file

ubuntu:~# apt-get update


ubuntu:~# apt-file search cfdisk

dahb-html:
/usr/share/doc/dahb-html/html/bilder/betrieb/cfdisk.png

doc-linux-html:
/usr/share/doc/HOWTO/en-html/IBM7248-HOWTO/cfdisk.html

gnu-fdisk: /sbin/cfdisk

gnu-fdisk: /usr/share/info/cfdisk.info.gz

gnu-fdisk: /usr/share/man/man8/cfdisk.8.gz

manpages-fr-extra: /usr/share/man/fr/man8/cfdisk.8.gz

manpages-ja: /usr/share/man/ja/man8/cfdisk.8.gz

mtd-utils: /usr/sbin/docfdisk

util-linux: /sbin/cfdisk

util-linux: /usr/share/doc/util-linux/README.cfdisk

util-linux: /usr/share/man/man8/cfdisk.8.gz
- A good possible tip if you're on a Debian or Ubuntu Linux is to list a certain package directly from the packages repository, e.g. without having it installed locally on your Linux.
This is done through:
debian:~# apt-file list fail2ban

fail2ban: etc/default/fail2ban

fail2ban: etc/fail2ban/action.d/hostsdeny.conf

fail2ban: etc/fail2ban/action.d/ipfw.conf

fail2ban: etc/fail2ban/action.d/iptables.conf

fail2ban: etc/fail2ban/action.d/iptables-multiport.conf

...
- Another possible way to find out which package a file belongs is via dlocate . Dlocate is probably be the tool of choice if you won't to automate the process of finding to which package a file belongs in a shell script or smth.
Here is dlocate's description
uses GNU locate to greatly speed up finding out which package a file belongs to (i.e. a very fast dpkg -S). many other uses, including options to view all files in a package, calculate disk space used, view and check md5sums, list man pages, etc.
Debian and Ubuntu are not bundled by default with it so you will have to install it separately.
ubuntu:~# apt-get install dlocate
Let's say you would like to check where does the awk binary belongs, issue:
ubuntu:~# dlocate -S /usr/bin/fdisk

testdisk:
/usr/share/doc/testdisk/html/microsoft_fdisk_de.html

testdisk:
/usr/share/doc/testdisk/html/microsoft_fdisk_fr.html

testdisk:
/usr/share/doc/testdisk/html/fdisk_de_microsoft.html

testdisk: /usr/share/doc/testdisk/html/microsoft_fdisk.html

util-linux: /sbin/sfdisk

util-linux: /sbin/cfdisk

util-linux: /sbin/fdisk

util-linux: /usr/share/man/man8/cfdisk.8.gz

util-linux: /usr/share/man/man8/sfdisk.8.gz

util-linux: /usr/share/man/man8/fdisk.8.gz

util-linux: /usr/share/doc/util-linux/README.cfdisk

util-linux: /usr/share/doc/util-linux/README.fdisk.gz

util-linux:
/usr/share/doc/util-linux/examples/sfdisk.examples.gz
- Now sometimes you will have to list the content of a package binary, in Debian this is easily done with:
debian:~# dpkg -L bsdgames

...

var/games/bsdgames/hack

/var/games/bsdgames/hack/save

/var/games/bsdgames/sail

/usr/share/man/man6/teachgammon.6.gz

/usr/share/man/man6/rot13.6.gz

/usr/share/man/man6/snscore.6.gz

/usr/share/man/man6/morse.6.gz

/usr/share/man/man6/cfscores.6.gz

/usr/share/man/man6/ppt.6.gz

...
2. Here is also how o check which binary belongs to which package on FreeBSD here
freebsd# pkg_info -W /usr/local/bin/moon-buggy

/usr/local/bin/moon-buggy was installed by package
moon-buggy-1.0.51_1
- Also you might need to list a binary package content in FreeBSD, here is how:
freebsd# pkg_info -L bsdtris-1.1

Information for bsdtris-1.1:


Files:

/usr/local/man/man6/bsdtris.6.gz

/usr/local/bin/bsdtris
2. To check a package belongs to which package on Fedora, Redhat, CentOS with rpm
[root@centos]# rpm -qf /bin/ls
coreutils-5.97-23.el5_4.2
Below command is above to show you all files which are contained in the sample package mysql-5.0.77-4.el5_5.3
[root@centos]# rpm -ql
mysql-5.0.77-4.el5_5.3
Wed Jul 14 17:46:54 EEST 2010
Install Google Sitemap Generator beta1 on Debian x86_64 Lenny GNU/Linux
Did you look up a good quick way to
have an automatically generated sitemaps on a number of
websites?
If you do as I have, then what you're looking for is probably Google Sitemap Generator .
Though the software is yet in beta stage it looks promising and could be used to automatically generated sitemaps for your websites using the access logs of each of the websites as a basis for the links to be included in your sitemap.xml and from thence to sitemap.xml.gz
I decided to explain about my hurdles and pains throughout installing and configuring Google Sitemap Generator.
Since officially there is no explanation on how to install Google Sitemap Genreator beta1 on Debian Lenny Linux andpossibly some other Debian based distributions like Ubuntu.
So here is the exactly how I installed googlesitemapgenerator
1. Download the sitemap_linux beta for x86_64 if you're running an amd64 server architecture as I am :
- Be sure to be running with a super user, otherwise the install won't proceed
2. Untar the archive
3. Launch the google sitemap generator installer script
Next few you will be required to answer few trivial questions.
What is the location of the Apache binary or control script? [/usr/sbin/apache2]/usr/sbin/apache2ctl
Can't determine Group directive for Apache./usr/sbin/apache2ctl is not a supported Apache binary or control script.Do you want to enter a different location for the Apache binary or control script? [Y/n]
This warning is about to prevent you of properly installing the google sitemap generator on Debian Lenny or Debian Testing / Unstable Linux.
- To get around the issue and continuing with the installation, you will have to edit google sitemap generator install.sh script
Therein set or change the following variables in install.sh:
For your convenience I've also provided the working copy of google sitemap generator install.sh you can just download the install.sh and overwrite the original install.sh bundled with google sitemap generator beta1.
Further on start it up again and answer the required questions, from thence the install should succeed.
Afterwards be sure to enable port 8181 in your firewall, otherwise you won't be able to access "googlesitemap generator web interface".
Thereon to access google sitemap generator web interface and configure it for which domain names I desire to generate sitemaps as well as some other data relating the automated sitemap generations for my websites I pointed my IceWeasel browser to:
http://my-server.net:8181
Instead of a the nice login interface of google sitemap generator I faced:
Remote access is denied.
Make sure https is used if you want to access Google Sitemap Generator from remote IP. You can go to help center for how to enable https.
If you are on local machine, make sure you are not using proxy.
After some research online I was able to enable the remote access to Google Sitemap Generator web interface, I achieved that following the prescriptions in:
googlesitemapgenerator's documentation Enable Google sitemap generator remote access
I have enabled the remote access to googlesitemapgenerator on Debian Lenny Linux via the command:
- Now access again the Google Sitemap Generator web interface, I'm convinced you will love it, since it's heavily "google unified".
I suggest you also take a look at a nice similar article to this one called Easy Google Sitemap Generation with SitemapGen
Hopefully this article is about to shed you some further light on how googlesitemapgenerator works and will help you to better understand Google's program's web interface.
If you do as I have, then what you're looking for is probably Google Sitemap Generator .
Though the software is yet in beta stage it looks promising and could be used to automatically generated sitemaps for your websites using the access logs of each of the websites as a basis for the links to be included in your sitemap.xml and from thence to sitemap.xml.gz
I decided to explain about my hurdles and pains throughout installing and configuring Google Sitemap Generator.
Since officially there is no explanation on how to install Google Sitemap Genreator beta1 on Debian Lenny Linux andpossibly some other Debian based distributions like Ubuntu.
So here is the exactly how I installed googlesitemapgenerator
1. Download the sitemap_linux beta for x86_64 if you're running an amd64 server architecture as I am :
- Be sure to be running with a super user, otherwise the install won't proceed
linux-server:~# wget
http://googlesitemapgenerator.googlecode.com/files/sitemap_linux-x86_64-beta1-20091231.tar.gz
2. Untar the archive
linux-server:~# tar -zxvf
sitemap_linux-x86_64-beta1-20091231.tar.gz

drwxrwxrwx maoyq/eng 0 2009-12-31 01:24 sitemap-install/

-rwxrwxrwx maoyq/eng 5530 2009-12-31 01:24
sitemap-install/apache.sh

-rwxrwxrwx maoyq/eng 1218 2009-12-31 01:24
sitemap-install/autostart.sh

-rwxrwxrwx maoyq/eng 1145 2009-12-31 01:24
sitemap-install/google-sitemap-generator-ctl

...


linux-server:~# mv sitemap-install/ /usr/local/src

linux-server:~# cd
/usr/local/src/sitemap-install/
3. Launch the google sitemap generator installer script
linux-server:/usr/local/src# ./install.sh
Next few you will be required to answer few trivial questions.
************************************************************


Welcome to Google Sitemap Generator (Beta)!


For more information, please visit:

http://code.google.com/p/googlesitemapgenerator/

************************************************************

PRIVACY WARNINGAny Sitemap information that you send to Google,
including Sitemaps created

using the Sitemap Generator, should be consistent with commitments
you make to

your users in your site's privacy policy. If your site contains or
generates

URLs that contain user information, you must filter the user
information out of

the data that you send to Google. Instructions for filtering such
information

can be found in the Sitemap Generator configuration
instructions.


In addition, you must add language to your privacy policy
substantially similar

to the following: "This site uses a tool that collects your
requests for pages and passes elements of them to search engines to
assist them in indexing this site. We control the configuration of
the tool and are responsible for any information sent to the search
engines."

The product Terms of Service follows.
..............................


now press q


Do you agree with the Terms of Service? [N/y]
y
This installation updates the
Apache configuration file. To find that file,the installer needs
the location of the Apache binary (httpd) or controlscript
(apachectl). The binary or control script that you specify
mustsupport the -V option.What is the location of the Apache binary or control script? [/usr/sbin/apache2]/usr/sbin/apache2ctl
Can't determine Group directive for Apache./usr/sbin/apache2ctl is not a supported Apache binary or control script.Do you want to enter a different location for the Apache binary or control script? [Y/n]
This warning is about to prevent you of properly installing the google sitemap generator on Debian Lenny or Debian Testing / Unstable Linux.
- To get around the issue and continuing with the installation, you will have to edit google sitemap generator install.sh script
Therein set or change the following variables in install.sh:
HTTPD_CONF="/etc/apache2/apache2.conf"

arg_apache_binary="/usr/sbin/apache2"

arg_apache_group="www-data"

arg_apache_conf="/etc/apache2/apache2.conf"

arg_apache_ctl="/usr/sbin/apache2ctl"
For your convenience I've also provided the working copy of google sitemap generator install.sh you can just download the install.sh and overwrite the original install.sh bundled with google sitemap generator beta1.
Further on start it up again and answer the required questions, from thence the install should succeed.
Afterwards be sure to enable port 8181 in your firewall, otherwise you won't be able to access "googlesitemap generator web interface".
Thereon to access google sitemap generator web interface and configure it for which domain names I desire to generate sitemaps as well as some other data relating the automated sitemap generations for my websites I pointed my IceWeasel browser to:
http://my-server.net:8181
Instead of a the nice login interface of google sitemap generator I faced:
Remote access is denied.
Make sure https is used if you want to access Google Sitemap Generator from remote IP. You can go to help center for how to enable https.
If you are on local machine, make sure you are not using proxy.
After some research online I was able to enable the remote access to Google Sitemap Generator web interface, I achieved that following the prescriptions in:
googlesitemapgenerator's documentation Enable Google sitemap generator remote access
I have enabled the remote access to googlesitemapgenerator on Debian Lenny Linux via the command:
linux-server:~#
/usr/local/google-sitemap-generator/bin/sitemap-daemon remote_admin
enable
- Now access again the Google Sitemap Generator web interface, I'm convinced you will love it, since it's heavily "google unified".
I suggest you also take a look at a nice similar article to this one called Easy Google Sitemap Generation with SitemapGen
Hopefully this article is about to shed you some further light on how googlesitemapgenerator works and will help you to better understand Google's program's web interface.
Tue Jul 13 13:22:31 EEST 2010
A year has passed without our beloved friend Nikolay Paskalev (Shanar)
A whole sad year has passed without
our beloved friend and brother in Christ, Nikolay Paskalev.

Nikolay Paskalev - Shanar also known under the pseudonim (LunarStill)
Recently some of the people who loved or knew Niki in his earth life, gathered together to remember him.
The people who attended were no more than 10, quite modest as the whole earthly life of Niki ...
Nick as I used to call me often was a big fan of computers, technology, all kind of SCI-FI movies.
A true IT Geek an unique close friend. He was also a notable joker, he always knew how to make somebody laugh.
I also remember his wild fantasies and his sharp mind. Niki was also a Christian and we every now and then talked about our faith and hope in God, he was also a great and glorious gamer !
He spend some two years time or even more playing World of Warcraft
He also loved to drink beer every now and then and was absolutely crazy about popcorns :)
I sometimes regret that I didn't took more of my personal time to spend with him.
His sudden departure was a big and unexpected loss for all of us who loved him and still loves him, though I believe now he is in a better place in Heaven with God.
Let all of us his friends and relatives remember his memory and his gracious light he has shed on all of us while he was on earth.
Let us who know him pray to God that the Lord Jesus Christ has mercy on Nikolay's soul and grant him rest and eternal bliss in the Kingdon of Heaven.
Will be seing you again someday dear Niki! :(
Mon Jul 12 14:03:04 EEST 2010
What causes the "421 Cannot connect to SMTP server" error and a quick work around
A colleague of mine has encounters
errors like:
An unknown error has occurred. Account: 'mail.different.bg', Server: 'mail.different.bg', Protocol: SMTP, Server Response: '421 Cannot connect to SMTP server 212.70.124.241 (212.70.124.241:25), connect error 10060', Port: 25, Secure(SSL): No, Server Error: 421, Error Number: 0x800CCC67
while he was trying to send some emails with his Outlook Express mail client on his desktop computer running Windows XP, since he is not too much computer literate he contacted me for help on what is causing the error and how he can get through the issue and send the prepared emails to the destinations ASAP.
After I have asked him a few questions necessary to better understand the status of the problem and where does it originated I have come to the conclusion that it's very likely that his outgoing SMTP port (25) outgoing TCP/IP traffic passing through the Internet Service Provider is filtered.
When the 421 Cannot connect to SMTP server problem occured, he was actually in his parents house provided with an internet connection through a BTC ADSL see BTC (Vivacom)'s ADSL page for reference
I have instructed my friend to try connecting to the SMTP (25) port of the questionable email server using window's telnet client i order to check if my assumption that the outoging SMTP 25 port traffic is filtered.
I instructed him to issue a command like which is so common this days and it's not news to the Sysadmins out there:
This prooved my theory that the 421 Cannot connect to SMTP server was caused by a filtered traffic on the outgoing network STMP port (25).
Some Internet Providers out there has that annoying practice of filtering the outgoing SMTP connections, because they couldn't deal with infected Windows computers who start acting as a SPAM networks in another more clever way, however I should admit this is pretty dumb, since it creates numerous problems to the end user like in this particular case.
The temporary work around for him that I suggested was to use the mail server Webmail Interface before he moves back with his notebook back to his ISP at home which doesn't include such a foolish way to filter spammers.
An unknown error has occurred. Account: 'mail.different.bg', Server: 'mail.different.bg', Protocol: SMTP, Server Response: '421 Cannot connect to SMTP server 212.70.124.241 (212.70.124.241:25), connect error 10060', Port: 25, Secure(SSL): No, Server Error: 421, Error Number: 0x800CCC67
while he was trying to send some emails with his Outlook Express mail client on his desktop computer running Windows XP, since he is not too much computer literate he contacted me for help on what is causing the error and how he can get through the issue and send the prepared emails to the destinations ASAP.
After I have asked him a few questions necessary to better understand the status of the problem and where does it originated I have come to the conclusion that it's very likely that his outgoing SMTP port (25) outgoing TCP/IP traffic passing through the Internet Service Provider is filtered.
When the 421 Cannot connect to SMTP server problem occured, he was actually in his parents house provided with an internet connection through a BTC ADSL see BTC (Vivacom)'s ADSL page for reference
I have instructed my friend to try connecting to the SMTP (25) port of the questionable email server using window's telnet client i order to check if my assumption that the outoging SMTP 25 port traffic is filtered.
I instructed him to issue a command like which is so common this days and it's not news to the Sysadmins out there:
cmd> telnet mail.server.net 25This prooved my theory that the 421 Cannot connect to SMTP server was caused by a filtered traffic on the outgoing network STMP port (25).
Some Internet Providers out there has that annoying practice of filtering the outgoing SMTP connections, because they couldn't deal with infected Windows computers who start acting as a SPAM networks in another more clever way, however I should admit this is pretty dumb, since it creates numerous problems to the end user like in this particular case.
The temporary work around for him that I suggested was to use the mail server Webmail Interface before he moves back with his notebook back to his ISP at home which doesn't include such a foolish way to filter spammers.
Sun Jul 11 15:29:11 EEST 2010
Install Denyhosts on FreeBSD 7.2 to prevent SSH brute force attacks
In order to protect brute force
attacks on FreeBSD you might use denyhosts.
It's easy and light to configure than fail2ban or blockhosts for which I've blogged earlier.
Denyhosts is using /etc/hosts.allow to add it's failed logins filtering, and fortunately you won't need to do any changes to your firewall.
To install denyhosts quickly on FreeBSD you need to follow the below steps literally:
1. Install Denyhosts using pkg_add or ports
Having the above instructions in mind to finalize the installation, you will have to issue.
Furthermore edit /usr/local/etc/denyhosts.conf and make sure in it you edit the variables HOSTS_DENY and BLOCK_SERVICE :
The two variables should be set to the values like the shown below:
Thereafter edit /etc/hosts.allow and include the directives:
This should have completed denyhosts configuration, and we need to further create the /etc/hosts.evil file.
It's easy and light to configure than fail2ban or blockhosts for which I've blogged earlier.
Denyhosts is using /etc/hosts.allow to add it's failed logins filtering, and fortunately you won't need to do any changes to your firewall.
To install denyhosts quickly on FreeBSD you need to follow the below steps literally:
1. Install Denyhosts using pkg_add or ports
freebsd#
cd /usr/ports/security/denyhosts freebsd# make && make
install clean
You will have to follow the installation
steps provided after the denyhosts install is completed. I post
them here for clarity:----------------------------------------------------------------
To run denyhosts from startup, add denyhosts_enable="YES"
in your /etc/rc.conf.
Configiration options can be found in
%%PREFIX%%/etc/denyhosts.conf
-------------------------------------------------------------------
In order to proper working of denyhosts
1. edit your /etc/hosts.allow file and add:
sshd : /etc/hosts.deniedssh : deny
sshd : ALL : allow
2. issue the following command if /etc/hosts.deniedssh does not
exist yet
touch /etc/hosts.deniedssh
-------------------------------------------------------------------
Warning:
syslogd should ideally be run with the -c option; this will ensure
that
denyhosts notices multiple repeated login attempts.
To do this, add syslogd_flags="-c" to /etc/rc.conf
-------------------------------------------------------------------
Having the above instructions in mind to finalize the installation, you will have to issue.
freebsd# echo 'denyhosts_enable="YES"' >>
/etc/rc.conf

freebsd# echo 'syslogd_flags="-c"' >>
/etc/rc.conf
Furthermore edit /usr/local/etc/denyhosts.conf and make sure in it you edit the variables HOSTS_DENY and BLOCK_SERVICE :
The two variables should be set to the values like the shown below:
HOSTS_DENY = /etc/hosts.evil

BLOCK_SERVICE =
Thereafter edit /etc/hosts.allow and include the directives:
sshd: /etc/hosts.evil: deny

sshd: ALL : allow
This should have completed denyhosts configuration, and we need to further create the /etc/hosts.evil file.
freebsd# touch /etc/hosts.evil


All necessary left is to, Launch the denyhosts service python init
script and restart the syslogd.

Next after denyhosts will start blocking up incorrect SSH
logins


- So let's restart syslog and start denyhosts freebsd#
/etc/rc.d/syslogd restart

freebsd# /usr/local/etc/rc.d/denyhosts start


Now script kiddies would have some hard time breaking in to your
server guessing your user password with a large words dictinary, if
they try to break they will be soon filtered by the hosts.deny
rules added by denyhosts.


It's important to say as you can also see from the
denyhosts.conf file that denyhosts readds new ips to the
file with ips to include in hosts.deny every 30 seconds.


Cheers now! :)
Sat Jul 10 18:40:37 EEST 2010
Preventing brute force attacks with Fail2ban, Denyhosts and BlockHosts / Ban ips that cause multiple authentication errors
Do you have a lot of authentication
errors in your /var/log/messages file that look like:
Are you attacked often by Script Kiddies (pseudo hackers) trying to brute forcely get access to your SSH , FTP or E- mail POP3 Account?
Does viewing your /var/log/auth.log and /var/log/messages are filled in with few hundreds of failed logins originating from di fferent hosts on the SSH, FTP and Mail services?
It's almost impossible that you haven't!
Almost everybody who owns a home router running some kind of home crafted unix bsd or linux based unix distribution has probably encou ntered brute force attacks in his most essential services (SSH, FTP, POP3).
Most of this authentication attacks are using the so called Brute, Force Method atta ck and are albeit trying to break into your system probing with various dictionary based common login names and passwords.
The common user names so often probed for are: root , toor , admin , john , mike and so on and so on ..
To deal with this brute force authorization break attacks, many methodologists were invented. Most of which implemented by a number of software programs written to adequately deal with the problem.
The most popular programs I found that resolve issues with authentication break in attempts are:
1. fail2ban
- Fail2Ban is an intrusion prevention framework written in the Python
Fail2ban is able to protect against intursion attempts over the protocols FTP, SSH, SFTP and POP3, HTTP (Apache), Kerberos, MTAs. Mailservers, VPN and probably even more.
Likewise fail2ban seems to be becoming the de-facto standard proram against brute force attacks
2. DenyHosts
- DenyHosts is a script intended to be run by Linux system administrators to help thwart SSH server attacks (also known as dictionary based att acks and brute force attacks).
Though Denyhosts is a superb piece of software according to the user feedbacks I've red online, it has currently only support for the SSH proto col.
A good thorough article On how to use DenyHosts to prevent SSH Dictionary Login attacks is availabl e here
3. Blockhosts
- Blockhosts is a script that checks how many failure attempts are available in your Linux Server log files and whenever a certain amount of fa iled attempts are reached, blockhosts is also able to: use /etc/hosts.allow file, set-up null-routing for the intruder source host address or by setting up iptables deny rules to drop packets from the intruder host
Blockhosts is written in Python so if you intend to use it make sure you have an installed and workable python interpreter version 2.3 or highe r.
Blockhosts is also able to both block up brute force attacks to the SSH as well the FTP network services.
A good article on Brute Force Protection with BlockHosts on Debian Linux is found here
After I have reviewed all of the up three mentioned brute force authentication failure brute force prevention applications, I decided to go with fail2ban since it looked like the most promising and the most supported one.
A good quick and dirty article on How to setup fail2ban to refuse brute-force attacks is here - the article is described on how to set up fail2ban to ban brute force probers through /etc/hosts.deny
Another good worthy to take a look at article about Preventing Brute Force Attacks with Fail2ban on Debian Etch can be red here
Here is how to install fail2ban on Debian Lenny Linux, I issued:
Before you proceed further in order to configure fail2ban to properly work with your services of choice please edit:
/etc/fail2ban/jail.conf
Next I started the fail2ban daemon.
I also tried to include in fail2ban support for vpopmail as described in official fail2ban's page wiki
Well it didn't work out though I spend some time trying to figure out to figure out why it's not working I eventually couldn't, it would be my pleasure if some of my readers suggests a good article on how to enable vpopmail pop3 email logins to be checked for mass login failures with fail2ban.
In some cases the support for proftpd which is included by default with fail2ban also refused to work correctly and often times a completely legit FTP logged in users were banned by fail2ban which was pretty annoying. I didn't really spend much time to look for what was causing the problem but anyways if somebody has stuck on the same issue, please share about the solution.
Since I couldn't make fail2ban to work with proftpd because of the improper ip filtering of a completely regular FTP logged in users during some FTP file list operations, I decided to completely disable fail2ban's proftpd support to do so I changed in /etc/fail2ban/jail.conf
To:
Regardless the installation path taken, if you choose to install fail2ban, I suggest you remove the fail2ban POSSIBLE BREAK-IN ATTEMPT preventing
doing so would prevent a legitimate hosts which are lacking a correct PTR record (also called in sys-admin jargon back resolving) from being erroneously (wrongly) denied by fail2ban.
To disable the possible break in checks in fail2ban on Linux hosts open all files located in /etc/fail2ban/filter.d/ directory one by one and comment out anywhere you see the line:
To look like:
On most of Fedora and CentOS (Redhat RPM based Linux distributions ), fail2ban is also really easy to install and should be directly available through yum package manager
In order to install fail2ban on CentOS release 5.5 (Final) all you need to execute is:
To install and configure fail2ban on FreeBSD 7.2 with pf (packet filter firewall):
First you need to install the fail2ban FreeBSD port:
....
creating /var/run/fail2ban
running install_egg_info
Writing /usr/local/lib/python2.6/site-packages/fail2ban-0.8.4-py2.6.egg-info
Please do not forget to update your configuration files.
They are in /usr/local/etc/fail2ban/.
===> Installing rc.d startup script(s)
===> Registering installation for py26-fail2ban-0.8.4
===> Cleaning for py26-fail2ban-0.8.4
Furthermore it will be necessery to configure within your firewall filter rules a table where fail2ban would automatically include new rules if some of the failure logins events configured within fail2ban configuration files occurs.
For a users which prefer to use freebsd pf (packet filter) you will have to need few custom lines to fail2ban and to /etc/pf.conf files in order to have fail2ban up and running on your BSD.
In /usr/local/etc/fail2ban/jail.conf you will need to include the following fail2ban configuration options:
Likewise in /usr/local/etc/fail2ban/action.d/pf.conf it's necessary to include:
Also you will have to include in your /etc/pf.conf the following rules which will create a new fail2ban table in firewall where fail2ban will insert it's deny rules.
Thereafter to configure fail2ban on FreeBSD hosts, you should include in /usr/local/etc/fail2ban/jail.conf at least the following code:
Inside /etc/pf.conf in the appropriate place you should add:
Where EXT_NIC or $ext_if should be your external interface variable defined in pf.conf
To test your new pf.conf definitions with included support for fail2ban issue the command:
If you get a message like:
/etc/pf.conf:20: Rules must be in order: options, normalization, queueing, translation, filtering
while testing your integrity of pf rules. This is a sure sign that you have misplaced the <fail2ban> filter rules shown a bit upwards
Furthermore you will have to flush and reload the pf firewall rules (nat, filter, queue, state, info, table), before fail2ban is ready to go on BSD
To do so use the command:
Let us also not forget to set it to run automatically on system login via the /etc/rc.conf bsd boot system
Lastly we will also have to manually start up fail2ban
Also I suggest you take a look on the down further nice articles on how to install and configure fail2ban on FreeBSD:
FreeBSD SSH port Security 1 wifh fail2ban
FreeBSD SSH port Security 2 with fail2ban
FreeBSD SSH port Security 3 with fail2ban
Until recently there are no publicly known security threats with fail2ban, however bear in mind that using fail2ban could also be a security hole if there are some errors in the program log parser.
Jul 10 16:01:00 pcfreak sshd[3381]: error: PAM:
authentication error for illegal user kadilack from
219.143.202.186

Jul 10 16:03:57 pcfreak sshd[3384]: error: PAM: authentication
error for illegal user porsche from 116.55.226.131

Jul 10 16:08:52 pcfreak sshd[3418]: error: PAM: authentication
error for illegal user windows from 212.254.218.162

Jul 10 16:13:09 pcfreak sshd[3469]: error: PAM: authentication
error for illegal user xp from 210.21.208.238
Are you attacked often by Script Kiddies (pseudo hackers) trying to brute forcely get access to your SSH , FTP or E- mail POP3 Account?
Does viewing your /var/log/auth.log and /var/log/messages are filled in with few hundreds of failed logins originating from di fferent hosts on the SSH, FTP and Mail services?
It's almost impossible that you haven't!
Almost everybody who owns a home router running some kind of home crafted unix bsd or linux based unix distribution has probably encou ntered brute force attacks in his most essential services (SSH, FTP, POP3).
Most of this authentication attacks are using the so called Brute, Force Method atta ck and are albeit trying to break into your system probing with various dictionary based common login names and passwords.
The common user names so often probed for are: root , toor , admin , john , mike and so on and so on ..
To deal with this brute force authorization break attacks, many methodologists were invented. Most of which implemented by a number of software programs written to adequately deal with the problem.
The most popular programs I found that resolve issues with authentication break in attempts are:
1. fail2ban
- Fail2Ban is an intrusion prevention framework written in the Python
Fail2ban is able to protect against intursion attempts over the protocols FTP, SSH, SFTP and POP3, HTTP (Apache), Kerberos, MTAs. Mailservers, VPN and probably even more.
Likewise fail2ban seems to be becoming the de-facto standard proram against brute force attacks
2. DenyHosts
- DenyHosts is a script intended to be run by Linux system administrators to help thwart SSH server attacks (also known as dictionary based att acks and brute force attacks).
Though Denyhosts is a superb piece of software according to the user feedbacks I've red online, it has currently only support for the SSH proto col.
A good thorough article On how to use DenyHosts to prevent SSH Dictionary Login attacks is availabl e here
3. Blockhosts
- Blockhosts is a script that checks how many failure attempts are available in your Linux Server log files and whenever a certain amount of fa iled attempts are reached, blockhosts is also able to: use /etc/hosts.allow file, set-up null-routing for the intruder source host address or by setting up iptables deny rules to drop packets from the intruder host
Blockhosts is written in Python so if you intend to use it make sure you have an installed and workable python interpreter version 2.3 or highe r.
Blockhosts is also able to both block up brute force attacks to the SSH as well the FTP network services.
A good article on Brute Force Protection with BlockHosts on Debian Linux is found here
After I have reviewed all of the up three mentioned brute force authentication failure brute force prevention applications, I decided to go with fail2ban since it looked like the most promising and the most supported one.
A good quick and dirty article on How to setup fail2ban to refuse brute-force attacks is here - the article is described on how to set up fail2ban to ban brute force probers through /etc/hosts.deny
Another good worthy to take a look at article about Preventing Brute Force Attacks with Fail2ban on Debian Etch can be red here
Here is how to install fail2ban on Debian Lenny Linux, I issued:
debian-server:~# apt-get install fail2ban
Before you proceed further in order to configure fail2ban to properly work with your services of choice please edit:
/etc/fail2ban/jail.conf
Next I started the fail2ban daemon.
debian-server:~# /etc/init.d/fail2ban
start
I also tried to include in fail2ban support for vpopmail as described in official fail2ban's page wiki
Well it didn't work out though I spend some time trying to figure out to figure out why it's not working I eventually couldn't, it would be my pleasure if some of my readers suggests a good article on how to enable vpopmail pop3 email logins to be checked for mass login failures with fail2ban.
In some cases the support for proftpd which is included by default with fail2ban also refused to work correctly and often times a completely legit FTP logged in users were banned by fail2ban which was pretty annoying. I didn't really spend much time to look for what was causing the problem but anyways if somebody has stuck on the same issue, please share about the solution.
Since I couldn't make fail2ban to work with proftpd because of the improper ip filtering of a completely regular FTP logged in users during some FTP file list operations, I decided to completely disable fail2ban's proftpd support to do so I changed in /etc/fail2ban/jail.conf
[proftpd]


enabled = true

port = ftp,ftp-data,ftps,ftps-data

filter = proftpd

logpath = /var/log/proftpd/proftpd.log

maxretry = 6
To:
[proftpd]


enabled = false

port = ftp,ftp-data,ftps,ftps-data

filter = proftpd

logpath = /var/log/proftpd/proftpd.log

maxretry = 6
Regardless the installation path taken, if you choose to install fail2ban, I suggest you remove the fail2ban POSSIBLE BREAK-IN ATTEMPT preventing
doing so would prevent a legitimate hosts which are lacking a correct PTR record (also called in sys-admin jargon back resolving) from being erroneously (wrongly) denied by fail2ban.
To disable the possible break in checks in fail2ban on Linux hosts open all files located in /etc/fail2ban/filter.d/ directory one by one and comment out anywhere you see the line:
^%(__prefix_line)sAddress <HOST> .* POSSIBLE BREAK-IN
ATTEMPT\s*$
To look like:
# ^%(__prefix_line)sAddress <HOST> .* POSSIBLE BREAK-IN
ATTEMPT\s*$
On most of Fedora and CentOS (Redhat RPM based Linux distributions ), fail2ban is also really easy to install and should be directly available through yum package manager
In order to install fail2ban on CentOS release 5.5 (Final) all you need to execute is:
[root@centos-server: fail2ban]# yum install
fail2ban
To install and configure fail2ban on FreeBSD 7.2 with pf (packet filter firewall):
freebsd# uname -a;

FreeBSD pcfreak 7.2-RELEASE-p4 FreeBSD 7.2-RELEASE-p4 #0: Fri Oct 2
12:21:39 UTC 2009
root@i386-builder.daemonology.net:/usr/obj/usr/src/sys/GENERIC
i386
First you need to install the fail2ban FreeBSD port:
freebsd# cd /usr/ports/security/py-fail2ban

freebsd# make install clean
....
creating /var/run/fail2ban
running install_egg_info
Writing /usr/local/lib/python2.6/site-packages/fail2ban-0.8.4-py2.6.egg-info
Please do not forget to update your configuration files.
They are in /usr/local/etc/fail2ban/.
===> Installing rc.d startup script(s)
===> Registering installation for py26-fail2ban-0.8.4
===> Cleaning for py26-fail2ban-0.8.4
Furthermore it will be necessery to configure within your firewall filter rules a table where fail2ban would automatically include new rules if some of the failure logins events configured within fail2ban configuration files occurs.
For a users which prefer to use freebsd pf (packet filter) you will have to need few custom lines to fail2ban and to /etc/pf.conf files in order to have fail2ban up and running on your BSD.
In /usr/local/etc/fail2ban/jail.conf you will need to include the following fail2ban configuration options:
# PF jail


[ssh-pf]


enabled = true

filter = sshd

action = pf

sendmail-whois[name=SSH, dest=email at domain.com]

logpath = /var/log/auth.log
Likewise in /usr/local/etc/fail2ban/action.d/pf.conf it's necessary to include:
[Definition]


actionstart =

actionstop =

actioncheck =

actionban = pfctl -t fail2ban -T add <ip>

actionunban = pfctl -t fail2ban -T delete `pfctl -t fail2ban -T
show 2>/dev/null | grep <ip>`


[Init]


port = ssh

localhost = 127.0.0.1
Also you will have to include in your /etc/pf.conf the following rules which will create a new fail2ban table in firewall where fail2ban will insert it's deny rules.
table <fail2ban> persist block in on $ext_if from
<fail2ban>
Thereafter to configure fail2ban on FreeBSD hosts, you should include in /usr/local/etc/fail2ban/jail.conf at least the following code:
[ssh-pf]

# this checks if fail2ban jail is switched on and it combines the
filter.d/sshd.conf with action.d/pf.conf

enabled = true

filter = sshd

action = pf

logpath = /var/log/auth.log

maxretry = 5


[ssh-ddos]

# this check if fail2ban-jail is switched on and it combines the
filter.d/sshd-ddos.conf with action.d/pf.conf

enabled = true

filter = sshd-ddos

action = pf

logpath = /var/log/auth.log

maxretry = 3
Inside /etc/pf.conf in the appropriate place you should add:
## FILTER RULES

table <fail2ban> persist

block in on $EXT_NIC from <fail2ban>
Where EXT_NIC or $ext_if should be your external interface variable defined in pf.conf
To test your new pf.conf definitions with included support for fail2ban issue the command:
freebsd# pfctl -nvf /etc/pf.confIf you get a message like:
/etc/pf.conf:20: Rules must be in order: options, normalization, queueing, translation, filtering
while testing your integrity of pf rules. This is a sure sign that you have misplaced the <fail2ban> filter rules shown a bit upwards
Furthermore you will have to flush and reload the pf firewall rules (nat, filter, queue, state, info, table), before fail2ban is ready to go on BSD
To do so use the command:
pfctl -Fa -f /etc/pf.conf
Let us also not forget to set it to run automatically on system login via the /etc/rc.conf bsd boot system
freebsd# echo 'fail2ban_enable="YES"' >>
/etc/rc.conf
Lastly we will also have to manually start up fail2ban
freebsd# /usr/local/etc/fail2ban start
Also I suggest you take a look on the down further nice articles on how to install and configure fail2ban on FreeBSD:
FreeBSD SSH port Security 1 wifh fail2ban
FreeBSD SSH port Security 2 with fail2ban
FreeBSD SSH port Security 3 with fail2ban
Until recently there are no publicly known security threats with fail2ban, however bear in mind that using fail2ban could also be a security hole if there are some errors in the program log parser.
Fri Jul 9 11:43:09 EEST 2010
How to Install, Setup and Test GeOIP support in PHP on Apache2 in Debian Lenny Linux
I've recently was required to install
PHP GeOIP on one of the Linux servers I do maintain here is
how I did it:
1. Install support for GeoIP
- Luckily though on Debian Linux there is a bundled deb package, so installation is trivial and clean.
2. Furthermore it's necessery to grasp geoip's city database
- Extract the gz file to prepare it for use by PHP GeoIP:
- Move the GeoLiteCity.dat file to /usr/share/GeoIP like so:
Now in order for the new geoip database to be red by PHP GeoIP we need to restart the Apache Webserver.
3. It's also recommendable to update periodically the Geo IP GeoLiteCity.dat database in order to be always up-to-date with the latest IP location information provided out there, to do so I've created a 3 liner that does the job.
To start using the geoip_update.sh download it from here and set it to execute via cron.
That's all now PHP GeoIP database will be updated once a month on day 01 at 02:00 a.m.
Now in order to check if your PHP GeoIP is ready to go and used by php scripts.
Create a new sample script, let's say check_php_geoip.php and put in it:
Place the script somewhere under your Apache document root and invoke it via a browser, if it executes correctly you should get an output similar to:
1. Install support for GeoIP
- Luckily though on Debian Linux there is a bundled deb package, so installation is trivial and clean.
debian-server:~# apt-get install
php5-geoip
2. Furthermore it's necessery to grasp geoip's city database
debian-server:~# wget
http://geolite.maxmind.com/download/geoip/database/GeoLiteCity.dat.gz
- Extract the gz file to prepare it for use by PHP GeoIP:
debian-server:~# /bin/gunzip
GeoLiteCity.dat.gz
- Move the GeoLiteCity.dat file to /usr/share/GeoIP like so:
debian-server:~# mv GeoLiteCity.dat
/usr/share/GeoIP
Now in order for the new geoip database to be red by PHP GeoIP we need to restart the Apache Webserver.
debian-server:~# /etc/init.d/apache2
restart
3. It's also recommendable to update periodically the Geo IP GeoLiteCity.dat database in order to be always up-to-date with the latest IP location information provided out there, to do so I've created a 3 liner that does the job.
To start using the geoip_update.sh download it from here and set it to execute via cron.
debian-server:~# cd /usr/sbin;

debian-server:~# wget
http://pc-freak.net/bshscr/geoip_update.sh

debian-server:~# echo "02 00 1 * * /usr/sbin/geoip_update.sh
>/dev/null 2>&1" | crontab -
That's all now PHP GeoIP database will be updated once a month on day 01 at 02:00 a.m.
Now in order to check if your PHP GeoIP is ready to go and used by php scripts.
Create a new sample script, let's say check_php_geoip.php and put in it:
<php

print_r(geoip_record_by_name('php.net'));

>
Place the script somewhere under your Apache document root and invoke it via a browser, if it executes correctly you should get an output similar to:
Array ( [country_code] => BG [country_code3] => BGR
[country_name] => Bulgaria [region] => 40 [city] => Dobric
[postal_code] => [latitude] => 43.5666999817 [longitude]
=> 27.8332996368 [dma_code] => 0 [area_code] => 0
)
Thu Jul 8 15:03:13 EEST 2010
How to add a new user to Webmin from shell via (bash,sh)
You might search for a way to add a
new user to your Webmin without bothering using the Webmin user
interface or you simply prefer using shell for adding the new user
to Webmin just like I do.
1.In order to manually add a new user to webmin you will have to edit webmin's /etc/webmin/miniserv.users which is the default miniserv.uesrs location in many Linux distributions, however in FreeBSD or other BSDs the miniserv.users file location would probably be /usr/share/etc/webmin/ or /usr/share/webmin/etc , anyways if you are adding the new user manually open the file and copy paste the line:
root:12ZWQKVLjpihs:0
to a new line, where you will have to modify the line substituting root with newusername , like so:
newusername:12ZWQKVLjpihs:0
Afterwards you will have to also edit the file /etc/webmin/webmin.acl and likewise copy paste the definitions allowing access to all recources to the root user which in webmin.acl by default are:
In my case I wanted to add to the newly created newuser only acl privileges for user crontab modification and htaccess-passwd creation thus I have included in the webmin.acl file only:
You will also be required to change the new user webmin password to some password of your choice, to attain that in Debian Linux execute:
On Fedora and other RPM (Redhat based linux distros) the webmin changepass.pl user password change script is located in /usr/libexec/webmin/changepass.pl therefore if you're about to change the password for the new user on Fedora and alike, type:
In the above change password exapmles you need to substitute newusername with the user chosen to be the new username as explained earlier in the post.
Finally in order for the newly added user with the respectively configured permissions to start working in Webmin, you will have to reload the webmdaemon. In most linux distributions (including Debian), to restart webmin you will have to issue:
However if you're looking for a bit more automated way instead of manually editting the miniserv.users and webmin.acl files.
2. Herein is a tiny shell script I've written which facilitates the new webmin user creation under a console / terminal / shell
I have written webmin-new-user.sh just for fun, and it could be greatly improved, so don't expect too much from it it doesn't do any checks on the input given to the script, so be sure to pass a correct input as required from the dialogs in order to be able to use the script to add new users to your webmin from bash or any other unix shell.
The script is written to work with Debian on Fedora and other rpm based distributions as well as BSD a minor tunings within the script might be necessary to make the script work.
Please leave feedback on the script if it is of any use to you :)
1.In order to manually add a new user to webmin you will have to edit webmin's /etc/webmin/miniserv.users which is the default miniserv.uesrs location in many Linux distributions, however in FreeBSD or other BSDs the miniserv.users file location would probably be /usr/share/etc/webmin/ or /usr/share/webmin/etc , anyways if you are adding the new user manually open the file and copy paste the line:
root:12ZWQKVLjpihs:0
to a new line, where you will have to modify the line substituting root with newusername , like so:
newusername:12ZWQKVLjpihs:0
Afterwards you will have to also edit the file /etc/webmin/webmin.acl and likewise copy paste the definitions allowing access to all recources to the root user which in webmin.acl by default are:
root: acl adsl-client apache at backup-config bacula-backup
bandwidth bind8 burner cfengine change-user cluster-copy
cluster-cron cluster-passwd cluster-shell cluster-software
cluster-useradmin cluster-usermin cluster-webmin cpan cron custom
dfsadmin dhcpd dnsadmin dovecot exim exports fdisk fetchmail file
filter firewall frox fsdump grub heartbeat htaccess-htpasswd idmapd
inetd init inittab ipfilter ipfw ipsec jabber krb5 ldap-client
ldap-server ldap-useradmin lilo logrotate lpadmin lvm mailboxes
mailcap majordomo man mon mount mysql net nis openslp
package-updates pam pap passwd phpini postfix postgresql ppp-client
pptp-client pptp-server procmail proc proftpd pserver qmailadmin
quota raid samba sarg sendmail sentry servers shell shorewall
smart-status smf software spam squid sshd status stunnel syslog
syslog-ng system-status tcpwrappers telnet time tunnel updown
useradmin usermin vgetty webalizer webminlog webmin wuftpd
xinetd
In my case I wanted to add to the newly created newuser only acl privileges for user crontab modification and htaccess-passwd creation thus I have included in the webmin.acl file only:
newuser: cron webmin htaccess-passwd
You will also be required to change the new user webmin password to some password of your choice, to attain that in Debian Linux execute:
debian:~# /usr/share/webmin/changepass.pl /etc/webmin
newusername type_your_password
On Fedora and other RPM (Redhat based linux distros) the webmin changepass.pl user password change script is located in /usr/libexec/webmin/changepass.pl therefore if you're about to change the password for the new user on Fedora and alike, type:
fedora:~# /usr/libexec/webmin/changepass.pl /etc/webmin/
newusername your_password
In the above change password exapmles you need to substitute newusername with the user chosen to be the new username as explained earlier in the post.
Finally in order for the newly added user with the respectively configured permissions to start working in Webmin, you will have to reload the webmdaemon. In most linux distributions (including Debian), to restart webmin you will have to issue:
linux-shell:~# /etc/init.d/webmin restart
However if you're looking for a bit more automated way instead of manually editting the miniserv.users and webmin.acl files.
2. Herein is a tiny shell script I've written which facilitates the new webmin user creation under a console / terminal / shell
I have written webmin-new-user.sh just for fun, and it could be greatly improved, so don't expect too much from it it doesn't do any checks on the input given to the script, so be sure to pass a correct input as required from the dialogs in order to be able to use the script to add new users to your webmin from bash or any other unix shell.
The script is written to work with Debian on Fedora and other rpm based distributions as well as BSD a minor tunings within the script might be necessary to make the script work.
Please leave feedback on the script if it is of any use to you :)
Wed Jul 7 13:23:27 EEST 2010
How to fix / Resolve Wordpress Blog /comments/feed/ redirect loop
I have recently figured out that
accessing http://pc-freak.net/blog/comments/feed/ would end up
in a Redirect Loop I'm using feedburner to manage my
blog feeds so I assume this redirect loop is probably caused by the
use of feedburner
Since this kind of redirect loop is definitely not professional and has a negative influence on search engine indexing (the SEO), I have played a bit until I finally found a way to resolve the /comments/feed/ redirect loop.
In order to resolve the redirect loop issue it appeared to be really easy.
To fix the issue Navigate to:
Therein add a Source URL to redirect to a Target URL:
For instance:
Press the Add Redirection button to confirm the redirection.
That's all your problems with feeds redirect loop while the /comments/feed/ url is accessed should be resolved.
Since this kind of redirect loop is definitely not professional and has a negative influence on search engine indexing (the SEO), I have played a bit until I finally found a way to resolve the /comments/feed/ redirect loop.
In order to resolve the redirect loop issue it appeared to be really easy.
To fix the issue Navigate to:
Tools -> Redirection
Therein add a Source URL to redirect to a Target URL:
For instance:
Source URL: http://pc-freak.net/blog/comments/feed/


Target URL: http://pc-freak.net/blog/feed/
Press the Add Redirection button to confirm the redirection.
That's all your problems with feeds redirect loop while the /comments/feed/ url is accessed should be resolved.
Tue Jul 6 10:09:16 EEST 2010
Recover/Restore unbootable GRUB boot loader on Debian Testing GNU/Linux using Linux LiveCD (Debian Install CD1)
I've recently broke my grub
untentianally while whiping out one of my disk partitions who was
prepared to run a hackintosh.
Thus yesterday while switching on my notebook I was unpleasently surprised with an error Grub Error 17 and the boot process was hanging before it would even get to grub's OS select menu.
That was nasty and gave me a big headache, since I wasn't even sure if my partitions are still present.
What made things even worse that I haven't created any backups preliminary to prepare for an emergency!
Thus restoring my system was absolutely compulsory at any cost.
In recovering the my grub boot manager I have used as a basis of my recovery an article called How to install Grub from a live Ubuntu cd
Though the article is quite comprehensive, it's written a bit foolish, probably because it targets Ubuntu novice users :)
Another interesting article that gave me a hand during solving my issues was HOWTO: install grub with a chroot
Anyways, My first unsuccessful attempt was following a mix of the aforementioned articles and desperately trying to chroot to my mounted unbootable partition in order to be able to rewrite the grub loader in my MBR.
The error that slap me in my face during chroot was:
chroot: cannot execute /bin/sh : exec format error
Ghh Terrible ... After reasoning on the shitty error I came to the conclusion that probably the livecd I'm trying to chroot to my debian linux partition is probably using a different incompatible version of glibc , if that kind of logic is true I concluded that it's most likely that the glibc on my Linux system is newer (I came to that assumption because I was booting from livecds (Elive, Live CentOS as well Sabayon Linux, which were burnt about two years ago).
To proof my guesses I decided to try using Debian testing Squeeze/Sid install cd . That is the time to mention that I'm running Debian testing/unstable under the code name (Squeeze / Sid).
I downloaded the Debian testing amd64 last built image from here burnt it to a cd on another pc.
And booted it to my notebook, I wasn't completely sure if the Install CD would have all the necessary recovery tools that I would need to rebuilt my grub but eventually it happened that the debian install cd1 has everything necessary for emergency situations like this one.
After I booted from the newly burned Debian install cd I followed the following recovery route to be able to recovery my system back to normal.It took me a while until I come with the steps described here, but I won't get into details for brevity
1. Make new dir where you intend to mount your Linux partition and mount /proc, /dev, /dev/pts filesystems and the partition itself
Change /dev/sda8 in the above example commands with your partition name and number.
2. chroot to the mounted partition in order to be able to use your filesystem, exactly like you normally use it when you're using your Linux partition
Hopefully now you should be in locked in your filesystem and use your Linux non-bootable system as usual.
Being able to access your /boot/grub directory I suggest you first check that everything inside:
/boot/grub/menu.lst is well defined and there are no problems with the paths to the Linux partitions.
Next issue the following commands which will hopefully recover your broken grub boot loader.
The second command find /boot/grub/stage1 should provide you with your partitions range e.g. it should return something like:
root (hd0,7)
Nevertheless in my case instead of the expected root (hd0,7) , I was returned
/boot/grub/stage1 not found
Useless to say this is uncool :)
As a normal reaction I tried experimenting in order to fix the mess. Logically enough I tried to reinstall grub using the
To check if that would fix my grub issues I restarted my notebook. Well now grub menu appeared with some error generated by splashy
Trying to boot any of the setup Linux kernels was failing with some kind of error where the root file system was trying to be loaded from /root directory instead of the normal / because of that neither /proc /dev and /sys filesystems was unable to be mounted and the boot process was interrupting in some kind of rescue mode similar to busybox, though it was a was less flexible than a normal busybox shell.
To solve that shitty issue I once again booted with the Debian Testing (Sid / Squeeze ) Install CD1 and used the commands displayed above to mount my linux partition.
Next I reinstalled the following packages:
Here the grub reinstall actually required me to install the new grub generation 2 (version 2)
It was also necessary to remove the splashy
As well as to grep through all my /etc/ and look for a /dev/sda6 and substitute it with my changed partition name /dev/sda8
One major thing where I substituted /dev/sda6 to my actual linux partition now with a name /dev/sda8 was in:
initramfs-tools/conf.d/resume The kernel reinstall and consequently (update) does offered me to substitute my normal /dev/sda* content in my /etc/fstab to some UUIDS like UUID=ba6058da-37f8-4065-854b-e3d0a874fb4e
Including this UUIDs and restarting now rendered my system completely unbootable ... So I booted once again from the debian install cd .. arrgh and removed the UUID new included lines in
/etc/fstab and left the good old declarations.
After rebooting the system now my system booted once again! Hooray! All my data and everything is completely intact now Thanks God! :)
Thus yesterday while switching on my notebook I was unpleasently surprised with an error Grub Error 17 and the boot process was hanging before it would even get to grub's OS select menu.
That was nasty and gave me a big headache, since I wasn't even sure if my partitions are still present.
What made things even worse that I haven't created any backups preliminary to prepare for an emergency!
Thus restoring my system was absolutely compulsory at any cost.
In recovering the my grub boot manager I have used as a basis of my recovery an article called How to install Grub from a live Ubuntu cd
Though the article is quite comprehensive, it's written a bit foolish, probably because it targets Ubuntu novice users :)
Another interesting article that gave me a hand during solving my issues was HOWTO: install grub with a chroot
Anyways, My first unsuccessful attempt was following a mix of the aforementioned articles and desperately trying to chroot to my mounted unbootable partition in order to be able to rewrite the grub loader in my MBR.
The error that slap me in my face during chroot was:
chroot: cannot execute /bin/sh : exec format error
Ghh Terrible ... After reasoning on the shitty error I came to the conclusion that probably the livecd I'm trying to chroot to my debian linux partition is probably using a different incompatible version of glibc , if that kind of logic is true I concluded that it's most likely that the glibc on my Linux system is newer (I came to that assumption because I was booting from livecds (Elive, Live CentOS as well Sabayon Linux, which were burnt about two years ago).
To proof my guesses I decided to try using Debian testing Squeeze/Sid install cd . That is the time to mention that I'm running Debian testing/unstable under the code name (Squeeze / Sid).
I downloaded the Debian testing amd64 last built image from here burnt it to a cd on another pc.
And booted it to my notebook, I wasn't completely sure if the Install CD would have all the necessary recovery tools that I would need to rebuilt my grub but eventually it happened that the debian install cd1 has everything necessary for emergency situations like this one.
After I booted from the newly burned Debian install cd I followed the following recovery route to be able to recovery my system back to normal.It took me a while until I come with the steps described here, but I won't get into details for brevity
1. Make new dir where you intend to mount your Linux partition and mount /proc, /dev, /dev/pts filesystems and the partition itself
noah:~# mkdir /mnt/root

noah:~# mount -t ext3 /dev/sda8 /mnt/root

noah:~# mount -o bind /dev /mnt/root/dev

noah:~# mount devpts /dev/pts -t devpts
Change /dev/sda8 in the above example commands with your partition name and number.
2. chroot to the mounted partition in order to be able to use your filesystem, exactly like you normally use it when you're using your Linux partition
noah:~# chroot /mnt/root /bin/bashHopefully now you should be in locked in your filesystem and use your Linux non-bootable system as usual.
Being able to access your /boot/grub directory I suggest you first check that everything inside:
/boot/grub/menu.lst is well defined and there are no problems with the paths to the Linux partitions.
Next issue the following commands which will hopefully recover your broken grub boot loader.
noah:~# grub

noah:~# find /boot/grub/stage1
The second command find /boot/grub/stage1 should provide you with your partitions range e.g. it should return something like:
root (hd0,7)
Nevertheless in my case instead of the expected root (hd0,7) , I was returned
/boot/grub/stage1 not found
Useless to say this is uncool :)
As a normal reaction I tried experimenting in order to fix the mess. Logically enough I tried to reinstall grub using the
noah:~# grub-install --root-directory=/boot /dev/sda

noah:~# update-grub
To check if that would fix my grub issues I restarted my notebook. Well now grub menu appeared with some error generated by splashy
Trying to boot any of the setup Linux kernels was failing with some kind of error where the root file system was trying to be loaded from /root directory instead of the normal / because of that neither /proc /dev and /sys filesystems was unable to be mounted and the boot process was interrupting in some kind of rescue mode similar to busybox, though it was a was less flexible than a normal busybox shell.
To solve that shitty issue I once again booted with the Debian Testing (Sid / Squeeze ) Install CD1 and used the commands displayed above to mount my linux partition.
Next I reinstalled the following packages:
noah:~# apt-get update

noah:~# apt-get install --reinstall linux-image-amd64 uswsusp
hibernate grub grub-common initramfs-tools
Here the grub reinstall actually required me to install the new grub generation 2 (version 2)
It was also necessary to remove the splashy
noah:~# apt-get remove splashy
As well as to grep through all my /etc/ and look for a /dev/sda6 and substitute it with my changed partition name /dev/sda8
One major thing where I substituted /dev/sda6 to my actual linux partition now with a name /dev/sda8 was in:
initramfs-tools/conf.d/resume The kernel reinstall and consequently (update) does offered me to substitute my normal /dev/sda* content in my /etc/fstab to some UUIDS like UUID=ba6058da-37f8-4065-854b-e3d0a874fb4e
Including this UUIDs and restarting now rendered my system completely unbootable ... So I booted once again from the debian install cd .. arrgh
and removed the UUID new included lines in
/etc/fstab and left the good old declarations.After rebooting the system now my system booted once again! Hooray! All my data and everything is completely intact now Thanks God! :)
Mon Jul 5 14:38:20 EEST 2010
Create SVN (Subversion) web statistics on Debian Lenny Linux with mpy-svn-stats and svnstats.sh
I've recently desired to have a
visualized statistics on how many commits, imports, people who
commit into subversion's repositories, graphs showing up the most
active comitters, commits into the all subversion repositories
grouped by month, week etc.
This kind of valuable information can give you insight, on a projects code life cycle. It can also help you to find out who takes most active participation into a certain project code development etc. and therefore could play a vital role in finding out about the work efficiency within your IT company or IT department.
There are plenty of softwares that can generate you some shiny statistics on how often and by whom are commits into your repositories as well as general statistics concerning your repositories accessibility.
Some of the projects suggested by most Linux users online, who had to resolve the same task e.g. (find some decent software to generate them good statistics on the svn use.) are:
1. statsvn
Here is a description on what statsvn is directly taken from its website:
StatSVN retrieves information from a Subversion repository and generates various tables and charts describing the project development, e.g.
StatSVN looks really promising, however what I find personally repulsive about it is that it depends on a Sun Java virtual machine
I have a bad taste for third party software that depends on java and therefore the software uses an XML dump generated from svn log --xml -v path/to/repos > svn-logfile.xml after which it's necessary to pass the generated svn-logfile.xml file to statsvn, for instance:
statsvn [options] svn-logfile.xml path/to/repos
though a debian of statsvn is available and packaged for Debian in /usr/share/doc/statsvn/README.Debian we read:
What I understood from statsvn documentation is that jtreemap is absolutely necessary in order to have a running statsvn, regardless if you have or you don't have a java vm installed.
To take a general idea on what kind of Repo Roadmap does svnstat generates with jtreemap check out the following link
Since jtreemap is not available prepackaged for Debian I decided not to use svnstats though it looked quite superb.
Some further research on the kind of softwares available online able to generate me some statistics from cvs or subversion source repositories led me to,
2. svnplot
svnplot stroke me with it's perfect looking many graphics generated on the Lines of Code commited, contribution of different authors to the repository, File count, avarage commit file sizes, common activity, author commit activity etc. etc.
I think tt's worthy to check out some example statistics about a sample repository statistics generated by svnplot to get a better idea what to expect if you choose to install it on your server.
Even though svnplot looked also promising It wasn't actually my choice because I think it's not really mature enough as a software, the second reason which hold me back from installing it on my debian server was that I find it too much as a work in progress still.
Since neither svnstast nor svnplot didn't well match my expectation and lacked a debian package I finally choose:
3. mpy svn stats as a solution to generate and graph information about svn usage
There are few reasons I finally took svn-mpy-stats to be the solution of choice.
1. It is available as a package in Debian Linux and easily installable via apt-get
2. It is written in Python and therefore doesn't require a java virtual machine or some extra cosmetics to make it work 3. It's really simple and straight forward to configure and already tested and reported that it works well in Debian GNU/Linux
So here is the few simple steps I took to install mpy-svn-stats on Debian Lenny (in Debian Sid / Squeeze I suppose the procedure would be analogous.
- Install mpy-svn-stats via apt-get or aptitude
Run it for your svn repository with a command like:
In the above command substitute /var/www/svnstats/ and /var/svn-repos/repository_name with a directory of choice where you like to generate the html statistics for the svn usage as well as the full path and name of your repository.
Of course it's a good idea to make mpy-svn-stats run periodically with for instance crontab or at or any other unix task cheduler available for your Linux system.
So far so good. You have probably already noticed that it's rather inconvenient because you have to execute mpy-svn-stats command to each of your svn repositories individually.
This is absolute madness if your company is creating new svn source repository projects often, like let's say everyday, because you will have to generate statistics for each of the repositories either manually or add new repositories manually to a script which will be later invoked by a crontab rule.
To get around this constrain, I've come up with a tiny shell script svnstats.sh which takes care for everything on it's own.
It automatically will loop in your main subversion repositories directory through all the sub-repositories and generate individual html statistics in a separate automatically created directory by the script.
So to make your life easier and automate the process of generating stats with mpy-svn-stats consider downloading svnstats.sh and installing it as a separate rule like so:
Include therein the following:
Now everyday at 05:20 your mpy-svn-stats will generate a nice graphs and statistics for your subversion repository usage in /var/www/svstats, if you consider generating the data into a different location consider editting the head of mpy-svn-stats svnstats.sh script and change according to your likings.
Now let's create an Alias in Apache to enable the (mpy-svn-stats generated by svnstats.sh) to be visualized via web:
- Edit VirtualHost configuration file of choice and put there, something like:
Lastly it might be a good idea to use htaccess to protect your url with a password, afterwards you can enjoy your mpy svn statistics.
This kind of valuable information can give you insight, on a projects code life cycle. It can also help you to find out who takes most active participation into a certain project code development etc. and therefore could play a vital role in finding out about the work efficiency within your IT company or IT department.
There are plenty of softwares that can generate you some shiny statistics on how often and by whom are commits into your repositories as well as general statistics concerning your repositories accessibility.
Some of the projects suggested by most Linux users online, who had to resolve the same task e.g. (find some decent software to generate them good statistics on the svn use.) are:
1. statsvn
Here is a description on what statsvn is directly taken from its website:
StatSVN retrieves information from a Subversion repository and generates various tables and charts describing the project development, e.g.
StatSVN looks really promising, however what I find personally repulsive about it is that it depends on a Sun Java virtual machine
I have a bad taste for third party software that depends on java and therefore the software uses an XML dump generated from svn log --xml -v path/to/repos > svn-logfile.xml after which it's necessary to pass the generated svn-logfile.xml file to statsvn, for instance:
statsvn [options] svn-logfile.xml path/to/repos
though a debian of statsvn is available and packaged for Debian in /usr/share/doc/statsvn/README.Debian we read:
Notes to Debian users:


* the jtreemap-based report has been disabled as jtreemap is
currently

not packaged for Debian, and Debian cannot ship the applet
without

its sources (not included in statsvn's sources).


-- Vincent Fourmond >fourmond@debian.org<, Tue, 4 Mar 2008
21:14:14 +0100
What I understood from statsvn documentation is that jtreemap is absolutely necessary in order to have a running statsvn, regardless if you have or you don't have a java vm installed.
To take a general idea on what kind of Repo Roadmap does svnstat generates with jtreemap check out the following link
Since jtreemap is not available prepackaged for Debian I decided not to use svnstats though it looked quite superb.
Some further research on the kind of softwares available online able to generate me some statistics from cvs or subversion source repositories led me to,
2. svnplot
svnplot stroke me with it's perfect looking many graphics generated on the Lines of Code commited, contribution of different authors to the repository, File count, avarage commit file sizes, common activity, author commit activity etc. etc.
I think tt's worthy to check out some example statistics about a sample repository statistics generated by svnplot to get a better idea what to expect if you choose to install it on your server.
Even though svnplot looked also promising It wasn't actually my choice because I think it's not really mature enough as a software, the second reason which hold me back from installing it on my debian server was that I find it too much as a work in progress still.
Since neither svnstast nor svnplot didn't well match my expectation and lacked a debian package I finally choose:
3. mpy svn stats as a solution to generate and graph information about svn usage
There are few reasons I finally took svn-mpy-stats to be the solution of choice.
1. It is available as a package in Debian Linux and easily installable via apt-get
2. It is written in Python and therefore doesn't require a java virtual machine or some extra cosmetics to make it work 3. It's really simple and straight forward to configure and already tested and reported that it works well in Debian GNU/Linux
So here is the few simple steps I took to install mpy-svn-stats on Debian Lenny (in Debian Sid / Squeeze I suppose the procedure would be analogous.
- Install mpy-svn-stats via apt-get or aptitude
debian-server:~# apt-get install
mpy-svn-stats
Run it for your svn repository with a command like:
debian-server:~# mkdir /var/www/svnstats

/usr/bin/mpy-svn-stats -o /var/www/svnstats/
file:///var/svn-repos/repository_name
In the above command substitute /var/www/svnstats/ and /var/svn-repos/repository_name with a directory of choice where you like to generate the html statistics for the svn usage as well as the full path and name of your repository.
Of course it's a good idea to make mpy-svn-stats run periodically with for instance crontab or at or any other unix task cheduler available for your Linux system.
So far so good. You have probably already noticed that it's rather inconvenient because you have to execute mpy-svn-stats command to each of your svn repositories individually.
This is absolute madness if your company is creating new svn source repository projects often, like let's say everyday, because you will have to generate statistics for each of the repositories either manually or add new repositories manually to a script which will be later invoked by a crontab rule.
To get around this constrain, I've come up with a tiny shell script svnstats.sh which takes care for everything on it's own.
It automatically will loop in your main subversion repositories directory through all the sub-repositories and generate individual html statistics in a separate automatically created directory by the script.
So to make your life easier and automate the process of generating stats with mpy-svn-stats consider downloading svnstats.sh and installing it as a separate rule like so:
debian-server:~# crontab -u root -e
Include therein the following:
# generate svn statistics everyday in 05:20 a.m. 20 5 * * *
/usr/sbin/svnstats.sh >/dev/null >>&1
Now everyday at 05:20 your mpy-svn-stats will generate a nice graphs and statistics for your subversion repository usage in /var/www/svstats, if you consider generating the data into a different location consider editting the head of mpy-svn-stats svnstats.sh script and change according to your likings.
Now let's create an Alias in Apache to enable the (mpy-svn-stats generated by svnstats.sh) to be visualized via web:
- Edit VirtualHost configuration file of choice and put there, something like:
Alias /svnstats/ /var/www/svnstats/Lastly it might be a good idea to use htaccess to protect your url with a password, afterwards you can enjoy your mpy svn statistics.
Mon Jul 5 00:03:15 EEST 2010
Clean cache in eaccelerator on Linux
I've recently had to clean the task
to clean up some eaccelerator php cache.
To manage that directly frm php I had to use the eaccelerator_clean() function
There is also another function which could be directly invoked from within a php script called:
eaccelerator_info()
I suggest you also take a look at eaccelerator documentation which deals with cleaning and showing info about eaccelerator's cache .
Bare in mind that you will be required to set the eaccelerator.allowed_admin_path = directive within your php.ini in order to start using:
eaccelerator.allowed_admin_path should point to some path from wherein scripts will be allowed to include the aforementioned 2 functions.
Another possible way to cleanse your eaccelerator cache is directly via deleting the Eaccelerator stored files on the server hard disk
To do so you will have to issue a command similar to:
You might need to substitute /var/cache/eaccelerator to the directory where you have configured eaccelerator to store it's cache.
In order to find out which directory is configured for eaccelerator cache dir on Debian Linux, issue the command:
On many other distributions it's very probable that the php.ini file is located in /etc/php.ini so if you want to check the eacelerator.cache.dir location on other Linux distrubutions consider using:
or
To manage that directly frm php I had to use the eaccelerator_clean() function
There is also another function which could be directly invoked from within a php script called:
eaccelerator_info()
I suggest you also take a look at eaccelerator documentation which deals with cleaning and showing info about eaccelerator's cache .
Bare in mind that you will be required to set the eaccelerator.allowed_admin_path = directive within your php.ini in order to start using:
eaccelerator_clean()

and

eaccelerator_info()
eaccelerator.allowed_admin_path should point to some path from wherein scripts will be allowed to include the aforementioned 2 functions.
Another possible way to cleanse your eaccelerator cache is directly via deleting the Eaccelerator stored files on the server hard disk
To do so you will have to issue a command similar to:
debian-server:~# rm -rf
/var/cache/eaccelerator/*;
You might need to substitute /var/cache/eaccelerator to the directory where you have configured eaccelerator to store it's cache.
In order to find out which directory is configured for eaccelerator cache dir on Debian Linux, issue the command:
debian-server:~# grep -i eaccelerator.cache.dir
/etc/php5/apache2/php.ini

eaccelerator.cache_dir="/var/cache/eaccelerator"
On many other distributions it's very probable that the php.ini file is located in /etc/php.ini so if you want to check the eacelerator.cache.dir location on other Linux distrubutions consider using:
linux:/root# grep -i eaccelerator.cache.dir
/etc/php.ini
or
Sat Jul 3 19:02:25 EEST 2010
Fix adobe flash player on Debian amd64 Squeeze/Sid (testing) to work again
My adobe flash player 10.0 on my
Debian running on top of amd64 suddenly stopped working. I have
noticed the problem yesterday attempting to open youtube the youtube video player written
in flash showed me a blank page and a message appeared that I
should upgrade my flash player to adobe flash player 10.1
My firest try to fix it was through a reinstall of my current installed flashplugin-nonfree with:
This command returned an output like:
Check http://wiki.debian.org/FlashPlayer for instructions
So I followed the suggestion, directly to the Debian Testing 'Squeeze' amd64 section
Therein it's explained that currently the pointed solution is not supported by Adobe but anyways it would work.
To make it work the necessary steps to be followed are:
1. Install fakeroot bintuils nspluginwrapper and ia32-libs
2. Download and run this script with a non privileged user:
http://people.debian.org/~bartm/flashplugin-nonfree/ia32-libs-workaround-499043-squeeze.sh
3. Install the generated package ia32-libs-workaround-499043_0.0.1+squeeze1_amd64.deb by the previously executed ia32-libs-workaround-499043-squeeze.sh
4. Download and install the new version of flashplugin-nonfree
That shoud resolve the issues with flash videos on Linux noah 2.6.32-5-amd64 #1 SMP Tue Jun 1 04:34:03 UTC 2010 x86_64 GNU/Linux and other Debian Squeeze / Sid GNU Linux amd64 work statations.
Enjoy your flash player working once again :)
My firest try to fix it was through a reinstall of my current installed flashplugin-nonfree with:
noah:~# apt-get install --reinstall
flashplugin-nonfree
This command returned an output like:
Check http://wiki.debian.org/FlashPlayer for instructions
So I followed the suggestion, directly to the Debian Testing 'Squeeze' amd64 section
Therein it's explained that currently the pointed solution is not supported by Adobe but anyways it would work.
To make it work the necessary steps to be followed are:
1. Install fakeroot bintuils nspluginwrapper and ia32-libs
noah:~# apt-get install fakeroot binutils nspluginwrapper
ia32-libs
2. Download and run this script with a non privileged user:
http://people.debian.org/~bartm/flashplugin-nonfree/ia32-libs-workaround-499043-squeeze.sh
noah:~# su hipo

noah:~$ sh
ia32-libs-workaround-499043-squeeze.sh
3. Install the generated package ia32-libs-workaround-499043_0.0.1+squeeze1_amd64.deb by the previously executed ia32-libs-workaround-499043-squeeze.sh
noah:~# dpkg -i
ia32-libs-workaround-499043_0.0.1+squeeze1_amd64.deb
4. Download and install the new version of flashplugin-nonfree
noah:~# wget
http://people.debian.org/~bartm/flashplugin-nonfree/flashplugin-nonfree_10.1.53.64.1_amd64.deb


noah:~# dpkg -i
flashplugin-nonfree_10.1.53.64.1_amd64.deb
That shoud resolve the issues with flash videos on Linux noah 2.6.32-5-amd64 #1 SMP Tue Jun 1 04:34:03 UTC 2010 x86_64 GNU/Linux and other Debian Squeeze / Sid GNU Linux amd64 work statations.
Enjoy your flash player working once again :)
Fri Jul 2 14:02:57 EEST 2010
July morning (1-st of July) on Bulgarian Krapets Beach
I've spend the 30th of Jule night
against 1 of July on Krapets
(Krapec) beach which is located nearby the Krapets small
Bulgarian village. The beach there is really wonderful, many people
has been gathered together most of them my hometown Dobrich.
The occasion for the event is the cyclical "celebration" of the rising sun reoccuring every year on July the 1st.
It's really interesting fact that this hippy celebration is being celebrated only in Bulgaria. The initial beginning of the holiday probably originate to some ancient paganism or worship dedicated to the Sun God.
In modern times the celebration of 1-st of July has started its celebration somewhere during communism in Bulgaria and was probably a silent protest showing up the young people's negative attitude towards the communism's suppress on their freedom.
The July morning is also widely related to the famous rock / hippy band Uriah Heep band and to the hippies movements from the 1960s and 1970s.
On July morning many people take their close people or relatives and go to some of the numerous preferrably wild place located near the Black Sea to spend a night on a Tent.
Usually people pick up some music instruments: guitars, bongo drums wooden pipes etc. and go for a feast of heavy eating and drinking near the sea beach.
Most of the participants in the celebration spend the night "in vigil" waiting for the first rays of the Sun rejoicing with the Sunrise.
Most of the people attending the July Morning celebrities are from the underground music movements, rockers, rock fans, metal heads, punks, alternatives or people into heavy music.
However many other ordinary people like me who want to have a Tent night with friends on the beach also attend.
Though July morning is a nice occasion to get together with friends and meet new people, its really displeasing that many people who attend the sea beach on the "The July" do it with an intenting to finish the night blind drunk.
Some people who attend also act like real "barbarians", for instance they scream hysterically and act uncivillized after they get really drunk :)
You can further read about the celebration in Bulgaria of the rising Sun on July the 1st in wikipedia
As a Christian I do not adhere to the die hard July Mornings admirers, neither I like the idea of people greating each other on the July 1st Morning with a "Happy July Morning" greeting.
Anyways in below video you will see some pictures grasps from July Mornings fans and the Uriah's Heep July Morning so famous and attached song to the July Mornings celebrations with the notable name July Morning
For a better idea on how does July morning look like if you're going on a vacation to Bulgaria, I suggest you spend a July Morning Night near the sea shore and see for yourself :)