April 2010 Archives
Fri Apr 30 19:26:22 EEST 2010
Checking your website for broken Links on Linux with linkchecker and htcheck / How to find broken links on your website
Have you wondered how could you check
your website for broken links? Cause I did!
You might wonder why should I care so hard about the broken links?
Well it's simple broken links on your webpage will have an influence on how Google indexes your website, and how often does it bother to crawl on your website in other words, having a eagly eye on your broken links interface is a vital for every self respecting web developer, as well as for system administrators.
From a web development perspective, it's important that your website have as less 404 error pages possible since that is important for Webpages W3C Compliancy.
On other hand if you're a SEO Specialist, having as less broken links on your domains is vital for Google Pageranking, Yahoo, Live.com, Altavista, Yandex etc, as well as for general Good Search Engine Indexing.
Having said all that you should already feel the topic is really interesting. I believe not many people has wrote stuff about it online.
That's why I decided to share with you a possible way on how to track your broken web domain for broken pages on the Linux and possibly other Unix compatible architectures.
There are plenty of tools available that could be used for finding out the broken links on your website using Linux operating system.
I used apt-get in order to look for a link checker software for Linux
The 2 error link reporting tools I used were:
1. linkchecker
and
2. Htcheck
I'll evaluate both of the tools and will share with you my impressions of the two really valuable, broken link checking tools for Linux.
Let me begin with a short introduction on what you could expect from the linkchecker broken links (error 404) links.
Here are the linkchecker Features recursive and multithreaded checking
output in colored or normal text, HTML, SQL, CSV, XML or a sitemap graph in different formats
HTTP/1.1, HTTPS, FTP, mailto:, news:, nntp:, Telnet and local file links support
restriction of link checking with regular expression filters for URLs
proxy support
username/password authorization for HTTP and FTP and Telnet
honors robots.txt exclusion protocol
Cookie support
HTML and CSS syntax check
Antivirus check
a command line interface
a GUI client interface
a (Fast)CGI web interface (requires HTTP server)
Luckily linchecker has a Debian package port so installing it comes as easily as executing:
However at the present moment on Debian Sid (Testing/Unstable) linkchecker-gui is missing some dependencies with libqt and python
so I was not able to install and test the Graphic User Interface for Linkchecker . Anyways here is a screenshot of the linkchecker GUI interface in order to give you a glipmse on what to expect if you succeed in installing it on Mac OS X or some other operating system.
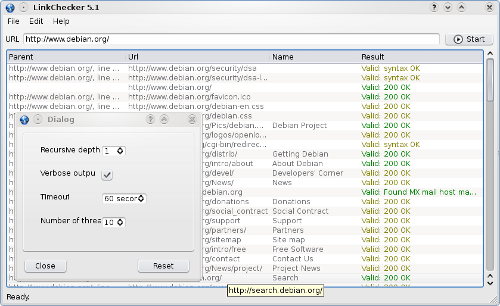
Using linkchecker's command line interface is really straight forward you just have too invoke the linkchecker command and pipe it too the tee shell command
Here is how:
Though it's simplicity to use from a first look checking the manual of linkchecker reveals quite many interesting usage parameters, so be sure also to take a look at the manual.
Of course it might be wise to combine linkchecker with some bash scripting in order to pereodically review your website or websites for broken links.
I intend to do that in the coming days so if I write some script that uses linkchecker and facilitates the search for a broken links I'll post it on the blog.
Having said all that linkchecker goody, let me proceed further to Htcheck
HtCheck is really wondeful and it in a certain sense better than linkchecker, because it offers some extra possibilities like for instance generation of reports which could be stored in MySQL and could be visualized any time via a web browser.
Here is a descrition extracted from HtCheck's website:
ht://Check is more than a link checker. It is a console application written for Linux systems in C++ and derived from ht://Dig.
It can retrieve information through HTTP/1.1 and store the information in a MySQL database, and it is particularly suitable for
small Internet domains or Intranet.
Its purpose is to help a webmaster manage one or more related sites: after a "crawl", ht://Check gives back very useful summaries
and reports, including broken links, anchors not found, content-types and HTTP status codes summaries, etc.
From version 1.2.3, ht://Check also performs accessibility checks in accordance with the principles of the University of Toronto's
Open Accessibility Checks (OAC) project, allowing users to discover site-wide barriers like images without proper alternatives,
missing titles, etc.
ht://Check can also be used for Web structure analysis, as it stores information regarding links between HTML documents.
I have to admit this htcheck-php is really handy! To use the extra php web interface to htcheck you'll need the htcheck-php package installed.
To install both htcheck and it's web interface on Debian you'll need to issue the command:
Now there are few more things to do before you could start using htcheck.
You'll need to edit /etc/htcheck/htcheck.conf
There you will need to change at least the start_url variable.
Another necessery thing will be to use phpmyadmin or the console mysql client in order to create the required htcheck username and password and grant some relevant permissions to the htcheck user in MySQL.
Yet if you try to execute the htcheck binary (which by the way is written in C) to generate you will experience a problem with connecting to mysql's database and you will most likely get the error message.
That really pissed me off but anyways you're lucky that I got it for you.
This whole issue is well documented in htcheck's installation notes which you can read here
If you're lazy reading the whole document just skip and read The Htcheck MySQL Connection Settings part
The solutions to the above pointed htcheck problem, where htcheck could not connect to the database is easily solvable, by creating a .my.cnf file in your home directory e.g. ~/ .
Let's say you're running with a root user the htcheck, all you need to do is edit /root/.my.cnf and place in it:
That's it now issue again the htcheck command again, so that it could create the proper "htcheck" database (created by default) and store crawl your website for broken links and generate and store the reports in your MySQL server.
In the above example the "-i" option passed to htcheck will take care for "htcheck"'s database to be rebuilt, that's necessery especially if you made any changes in /etc/htcheck/htcheck.conf after the first time you have invoked on htcheck and you'd like the new configuration changes to reflected in the generated reports in MySQL.
However if you run the htcheck tool for a first time, you can start it without the "-i" flag.
In order to configure htcheck's web reporting interface to be properly show website crawling statistics you'll have also to edit /etc/htcheck/global.inc.php and set the username and password variables according to the ones you have previously choose while creating the htcheck's MySQL username and password.
As a last step before you could use the htcheck's Web gui interface through your browser is to either configure a virtualhost for htcheck in your Apache configuration or simply make an Apache Alias from your Apache configuration, on Debian, you'll have to edit /etc/apache2/apache2.conf
Place the following Apache Alias in order to be able to access your htcheck's statistics from your default configured Apache domain name.
In order to load the new Apache configurations as usual you'll need an Apache WebServer restart
Here you can take a quick look what to expect from Htcheck's PHP Web Error 404 reporting interface on a Debian GNU/Linux System:

Now Enjoy htcheck neat Error page discover tool and it's web statistics interface!
You might wonder why should I care so hard about the broken links?
Well it's simple broken links on your webpage will have an influence on how Google indexes your website, and how often does it bother to crawl on your website in other words, having a eagly eye on your broken links interface is a vital for every self respecting web developer, as well as for system administrators.
From a web development perspective, it's important that your website have as less 404 error pages possible since that is important for Webpages W3C Compliancy.
On other hand if you're a SEO Specialist, having as less broken links on your domains is vital for Google Pageranking, Yahoo, Live.com, Altavista, Yandex etc, as well as for general Good Search Engine Indexing.
Having said all that you should already feel the topic is really interesting. I believe not many people has wrote stuff about it online.
That's why I decided to share with you a possible way on how to track your broken web domain for broken pages on the Linux and possibly other Unix compatible architectures.
There are plenty of tools available that could be used for finding out the broken links on your website using Linux operating system.
I used apt-get in order to look for a link checker software for Linux
noah:/home/hipo/Desktop# apt-cache search 'link check'

htcheck-php - Simple php interface to database generated by
ht://Check

htcheck - Utility for checking web site for dead/external
links

linkchecker - check websites and HTML documents for broken
links

linklint - A fast link checker and web site maintenance
tool
The 2 error link reporting tools I used were:
1. linkchecker
and
2. Htcheck
I'll evaluate both of the tools and will share with you my impressions of the two really valuable, broken link checking tools for Linux.
Let me begin with a short introduction on what you could expect from the linkchecker broken links (error 404) links.
Here are the linkchecker Features recursive and multithreaded checking
output in colored or normal text, HTML, SQL, CSV, XML or a sitemap graph in different formats
HTTP/1.1, HTTPS, FTP, mailto:, news:, nntp:, Telnet and local file links support
restriction of link checking with regular expression filters for URLs
proxy support
username/password authorization for HTTP and FTP and Telnet
honors robots.txt exclusion protocol
Cookie support
HTML and CSS syntax check
Antivirus check
a command line interface
a GUI client interface
a (Fast)CGI web interface (requires HTTP server)
Luckily linchecker has a Debian package port so installing it comes as easily as executing:
root@noah:~# apt-get install linkchecker
linkchecker-gui
However at the present moment on Debian Sid (Testing/Unstable) linkchecker-gui is missing some dependencies with libqt and python
so I was not able to install and test the Graphic User Interface for Linkchecker . Anyways here is a screenshot of the linkchecker GUI interface in order to give you a glipmse on what to expect if you succeed in installing it on Mac OS X or some other operating system.
Using linkchecker's command line interface is really straight forward you just have too invoke the linkchecker command and pipe it too the tee shell command
Here is how:
root@noah:~# linkcheker http://pc-freak.net/ | tee -a
pc-freak.net-broken-links-linkchecker.log
Though it's simplicity to use from a first look checking the manual of linkchecker reveals quite many interesting usage parameters, so be sure also to take a look at the manual.
Of course it might be wise to combine linkchecker with some bash scripting in order to pereodically review your website or websites for broken links.
I intend to do that in the coming days so if I write some script that uses linkchecker and facilitates the search for a broken links I'll post it on the blog.
Having said all that linkchecker goody, let me proceed further to Htcheck
HtCheck is really wondeful and it in a certain sense better than linkchecker, because it offers some extra possibilities like for instance generation of reports which could be stored in MySQL and could be visualized any time via a web browser.
Here is a descrition extracted from HtCheck's website:
ht://Check is more than a link checker. It is a console application written for Linux systems in C++ and derived from ht://Dig.
It can retrieve information through HTTP/1.1 and store the information in a MySQL database, and it is particularly suitable for
small Internet domains or Intranet.
Its purpose is to help a webmaster manage one or more related sites: after a "crawl", ht://Check gives back very useful summaries
and reports, including broken links, anchors not found, content-types and HTTP status codes summaries, etc.
From version 1.2.3, ht://Check also performs accessibility checks in accordance with the principles of the University of Toronto's
Open Accessibility Checks (OAC) project, allowing users to discover site-wide barriers like images without proper alternatives,
missing titles, etc.
ht://Check can also be used for Web structure analysis, as it stores information regarding links between HTML documents.
I have to admit this htcheck-php is really handy! To use the extra php web interface to htcheck you'll need the htcheck-php package installed.
To install both htcheck and it's web interface on Debian you'll need to issue the command:
root@noah:~# apt-get install htcheck htcheck-php
Now there are few more things to do before you could start using htcheck.
You'll need to edit /etc/htcheck/htcheck.conf
There you will need to change at least the start_url variable.
Another necessery thing will be to use phpmyadmin or the console mysql client in order to create the required htcheck username and password and grant some relevant permissions to the htcheck user in MySQL.
Yet if you try to execute the htcheck binary (which by the way is written in C) to generate you will experience a problem with connecting to mysql's database and you will most likely get the error message.
noah:/home/hipo# htcheck

Error (1045): Access denied for user 'root'@'localhost' (using
password: NO)

! htcheck: Database error
That really pissed me off but anyways you're lucky that I got it for you.
This whole issue is well documented in htcheck's installation notes which you can read here
If you're lazy reading the whole document just skip and read The Htcheck MySQL Connection Settings part
The solutions to the above pointed htcheck problem, where htcheck could not connect to the database is easily solvable, by creating a .my.cnf file in your home directory e.g. ~/ .
Let's say you're running with a root user the htcheck, all you need to do is edit /root/.my.cnf and place in it:
[client]

host=127.0.0.1

user=htcheck

password=yoursqlpassword
That's it now issue again the htcheck command again, so that it could create the proper "htcheck" database (created by default) and store crawl your website for broken links and generate and store the reports in your MySQL server.
root@noah:~# htcheck -i
In the above example the "-i" option passed to htcheck will take care for "htcheck"'s database to be rebuilt, that's necessery especially if you made any changes in /etc/htcheck/htcheck.conf after the first time you have invoked on htcheck and you'd like the new configuration changes to reflected in the generated reports in MySQL.
However if you run the htcheck tool for a first time, you can start it without the "-i" flag.
In order to configure htcheck's web reporting interface to be properly show website crawling statistics you'll have also to edit /etc/htcheck/global.inc.php and set the username and password variables according to the ones you have previously choose while creating the htcheck's MySQL username and password.
As a last step before you could use the htcheck's Web gui interface through your browser is to either configure a virtualhost for htcheck in your Apache configuration or simply make an Apache Alias from your Apache configuration, on Debian, you'll have to edit /etc/apache2/apache2.conf
Place the following Apache Alias in order to be able to access your htcheck's statistics from your default configured Apache domain name.
Alias /usr/share/htcheck/php/ /htcheck/
In order to load the new Apache configurations as usual you'll need an Apache WebServer restart
root@noah:~# /etc/init.d/apache2 restart
Here you can take a quick look what to expect from Htcheck's PHP Web Error 404 reporting interface on a Debian GNU/Linux System:
Now Enjoy htcheck neat Error page discover tool and it's web statistics interface!
Thu Apr 29 16:38:09 EEST 2010
Nessus 2.2.10 "scan stops incomplete with remote host is dead message" on Debian Sid / How to resolve the Nessus not scanning issues on Debian Sid(Testing/unstable)
I haven't used my nessus installation
which seemed to be hanging around since more than a year.
I have no memory which exactly was the last case I used Nessus in order to conduct some automated general Security testing of Linux and Windows servers. However when I launched the nessus client and logged in to the Nessusd server and attempted to scan a host, I experienced an issue, whether scan was terminated in just about 3 seconds time.
I checked nessusd's log file /var/log/nessus/nessusd.messages and found messages claiming, some file nessus plugin rules file dependencies were missing. The whole list of the file dependencies which caused my nessusd misbehaving you can read in nessusd.messages
In order to check this issues I had to select the tick Enable Dependencies at runtime in my Nessus Plugins tab
This solved the dependencies issues, however the nessus scanner was completing it's scan in just a few seconds once again.
This time checking the nessus log file doesn't provided me with any meaningful information on what could be causing Nessus refusals to scan the node's security.
A search in Google pointed me to the following forum which suggested a solution to the problems with nessus misbehaves.
The solution is really simple, somehow the whole scanning issues are caused by two Ticks in Nessus client program interface:
To solve the issues go to Nessus Client in Prefs. tab and uncheck the Do a TCP ping and Do an ICMP ping that will solve the issue for you.
Anyways before I can proceed to that first It was necessery for me to add a new user to it and start the nessus service.
Here is how I achieved that:
root@noah:~# nessus-adduser

Now you will have to answer to a few questions:


Add a new nessusd user

----------------------


Login : baklava

Authentication (pass/cert) [pass] :

Login password :

Login password (again) :


User rules

---------- nessusd has a rules system which allows you to restrict
the hosts

that baklava has the right to test. For instance, you may
want

him to be able to scan his own host only.


Please see the nessus-adduser(8) man page for the rules
syntax

.

Enter the rules for this user, and hit ctrl-D once you are done
:

(the user can have an empty rules set)


Login : baklava

Password : ***********

DN :

Rules :


Is that ok ? (y/n) [y]


All you need to fill from the above fill in fields is is the
Login and Login Password

After you have filled that you have to press ctrl-D as the text
instructs you.

On the "Is that ok field" just answer y and continue to
bringing up the Nessus Network server.

Before you bring up the nessus daemon listening for connections
from the nessus client, you'll have to provide the server with a
well configured nessusd.conf

I decided to share with you my nessusd.conf file in order to make
your file a bit easier on that.

Download the
copy of nessusd.conf here and place it in:

/etc/nessusd/ directory on your Linux
system.

root@noah:~# /etc/init.d/nessusd start


Now I simply launched the nessus client program
and started the scan. Thanksfully now Nessus worked like a charm !
:)
Wed Apr 28 22:02:51 EEST 2010
Opening DICOM File Format images in Debian Testing/Unstable with MRICRON
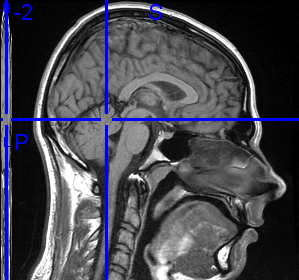
Digital Imaging and Communications in Medicine is a well established standard for handling storing, printing and transmitting information in medical imaging.
I've recently been through a RMI Scan
The image in the beginning of the blog post is actually the RMI scan of my brain :)!
The Doctors which took participation in the Magnetic Resonance Examination gave me a whole CD with pictures of my brain in the DICOM file format. Though the CD I was provided with included a Windows version of a program called Dicom Viewer I didn't have a way to open the DICOM file format on my Debian Linux
A quick research in Google indicated that happily the DICOM file format is able to be opened also in GNU/Linux
There are few options if you'd like to open the file format on Linux.
The easiest one seemed through the KDE's Kradview DICOM opening application. Kradview is quite simple, it is created for just one purpose opening DICOM file format on Linux, nothing more or less. So don't expect too much!
Kradview didn't have a precompiled package for the Debian Linux distrubution, that's why if you indend to use this software on Debian Linux you'll have to compile it from source as explained on Kradview's website Install instructions
I am naturally a Gnome user and therefore Kradview was not something that fits my Gnome taste. Trying to compile it on my gnome ended with the nasty compile time error:
checking for Qt... configure: error: Qt (>= Qt 3.0)
(headers and libraries) not found. Please check your installation!
For more details about this problem, look at the end of
config.log.
Definitely not cool, thefore I was forced
to look for some alternatives to Kradview which will either be
easily compiled and installed from source on Debian or even better
will be prepackaged in the debian's deb file format.A quick search led me to the Debian's Neuro Science Repository!

Truly I never suspected Debian is SO BIG! This guys even have a separate repository for neuro science, that's wild seriously!
Quick look through Debia's neuro science repository led me to a nifty software called MRICron

MRICron is a package which includes few gui based executables which are capable of:
magnetic resonance image conversion, viewing and analysis
quite cool!
There was even a package for sid which good suited me since my Desktop is running on top of Debian Testing Unstable.
I used the Following repository link to download the Debian Sid testing/unstable MRICron package
I'm running a 64 bit debian (amd64) therefore I needed to download and install the 64 bit release of MRICron.
Here is how I did it:
hipo@noah:~# wget
http://neuro.debian.net/debian/pool/main/m/mricron/mricron-data_0.20100422.1~dfsg.1-1~sid.nd1_all.deb


hipo@noah:~# wget
http://neuro.debian.net/debian/pool/main/m/mricron/mricron_0.20100422.1~dfsg.1-1~sid.nd1_amd64.deb
Then I used Debian's dpkg to install the packages, as you can see down:
hipo@noah:~# dpkg -i
mricron-data_0.20100422.1~dfsg.1-1~sid.nd1_all.deb

hipo@noah:~# dpkg -i
mricron_0.20100422.1~dfsg.1-1~sid.nd1_amd64.deb
I was lucky that I had all the dependcy packages required by mricron-data and the mricron debian sid packages. And the two ones installed "in a blink of an eye without no further issues".
As I already had the mricron installed I had to invoke from command line the:
hipo@noah:~# /usr/bin/dcm2niigui
I used the dcm2niigui selecting the DICOM medical imaging data files to convert them to the Nifty file format (*.nii)
Next I used the
hipoa@noah:~#
/usr/bin/mricron
to open the converted DICOM format files to the Nifty Format. I won't sink into details about how to use the two forementioned problems since their user interface is quite self-explanatory.
The results from the RMI scan examinations prooved my fears that I could be suffering a severe brian damage completely groundless.
Praise the Lord for that!
In another post I'll sink into details on what kind of thought tortures I've been through before the RMI examination showed I don't have problems with my brian.
Here is one more wondeful looking picture from above taken by the RMI machine during the RMI examinations.

I'm really happy that Linux is developing day by day and that I could see the DICOM pictures of my brain even on a free software platform as Linux is!
Wed Apr 28 12:42:29 EEST 2010
How to resolve network issues with Java 6 JRE on Debian / Java proxy spawn on Debian sid not working by default - A Small tip on running WebScarab and Paros local Proxy on Debian's Java
In an attempt to use Paros Proxy and WebScarab
on Debian I faced a shitty issues with Java's Networking.
Neither of the forementioned Security Applications's Local Proxy to be spawned by the Java server won't work.
I assured my self there is nothing running on the ports 8080 on which the two Java applications attempted to run their local proxy server.
Being sure that nothing is listening on the 8080 port. I suspected that there is something wrong with Debian's Java networking.
A quick search in Google pointed me to the Debian.Net's forums where the issue was described as serious proxy error after updates .
The error that was returned by the ParosProxy Server on my Desktop Debian can be reviewed below:
All a man can grasp from the Error is that there is something wrong with running the Paros Proxy server.
So far so good since the last release of Paros Proxy originates back to the year 2006 and it's not really supported this days at first I thought this could be causing the error.
By the way the paros proxy is available via the debian packaging system. So I use the packaged version of paros to install the Debian packaged version of Paros Proxy issue the cmd:
In that manner of thoughts I decided to try out the newer more modern HTTP and HTTPS Security Analysing Application WebScarab
I followed the start up instructions on WebScarab's Website in order to run the application.
It was really simple. All I had to do is download the webscarab-current.zip which of the time of writting this post is webscarab-20100414-0036 and then launch the Java Debian Virtual machine.
However though my hopes that WebScarab's local Proxy server will be running fine I was unpleasently suprised by the error which shown below:
Ain't pretty heh?! ... Even nasty !
However I was lucky to find the solution in some 20 minutes, so hopefully it took you less to find this post.
The solution to the above Proxy Spawn Error with Paros and Webscarab on Debian Lenny's Java 6 Sun Server is really simple and it comes to this:
Neither of the forementioned Security Applications's Local Proxy to be spawned by the Java server won't work.
I assured my self there is nothing running on the ports 8080 on which the two Java applications attempted to run their local proxy server.
Being sure that nothing is listening on the 8080 port. I suspected that there is something wrong with Debian's Java networking.
A quick search in Google pointed me to the Debian.Net's forums where the issue was described as serious proxy error after updates .
The error that was returned by the ParosProxy Server on my Desktop Debian can be reviewed below:
hipo@noah:~/paros$
/usr/lib/jvm/java-6-sun-1.6.0.17/jre/bin/java -jar paros.jar

file:/home/hipo/paros/paros.jar

file:/home/hipo/paros/paros.jar

java.net.SocketException: Invalid argument

at java.net.PlainSocketImpl.socketBind(Native Method)

at java.net.PlainSocketImpl.bind(PlainSocketImpl.java:365)

at java.net.ServerSocket.bind(ServerSocket.java:319)

at java.net.ServerSocket.<init>(ServerSocket.java:185)

at
org.parosproxy.paros.core.proxy.ProxyServer.createServerSocket(Unknown
Source)

at org.parosproxy.paros.core.proxy.ProxyServer.startServer(Unknown
Source)

at org.parosproxy.paros.control.Proxy.startServer(Unknown
Source)

at org.parosproxy.paros.control.Control.init(Unknown Source)

at org.parosproxy.paros.control.Control.<init>(Unknown
Source)

at
org.parosproxy.paros.control.Control.initSingletonWithView(Unknown
Source)

at org.parosproxy.paros.Paros.runGUI(Unknown Source)

at org.parosproxy.paros.Paros.run(Unknown Source)

at org.parosproxy.paros.Paros.main(Unknown
Source)
All a man can grasp from the Error is that there is something wrong with running the Paros Proxy server.
So far so good since the last release of Paros Proxy originates back to the year 2006 and it's not really supported this days at first I thought this could be causing the error.
By the way the paros proxy is available via the debian packaging system. So I use the packaged version of paros to install the Debian packaged version of Paros Proxy issue the cmd:
root@noah:~# apt-get install paros
In that manner of thoughts I decided to try out the newer more modern HTTP and HTTPS Security Analysing Application WebScarab
I followed the start up instructions on WebScarab's Website in order to run the application.
It was really simple. All I had to do is download the webscarab-current.zip which of the time of writting this post is webscarab-20100414-0036 and then launch the Java Debian Virtual machine.
However though my hopes that WebScarab's local Proxy server will be running fine I was unpleasently suprised by the error which shown below:
hipo@noah:~/webscarab-20100414-0036$ java -jar
webscarab.jar

Help set not found

11:43:36 main(Proxy.parseListenerConfig): No proxies
configured!?

11:43:39 Proxy(Proxy.run): Unable to start listener
127.0.0.1:8008
Ain't pretty heh?! ... Even nasty !
However I was lucky to find the solution in some 20 minutes, so hopefully it took you less to find this post.
The solution to the above Proxy Spawn Error with Paros and Webscarab on Debian Lenny's Java 6 Sun Server is really simple and it comes to this:
1. edit /etc/sysctl.d/bindv6only.conf and change the
value


net.ipv6.bindv6only = 1

# to

net.ipv6.bindv6only = 0


2. Restart procps


root@noah:/home/hipo/webscarab-20100414-0036# invoke-rc.d
procps restart


Now launch once again either Paros Proxy or Webscarab, the Local
Proxy Server by each of them will bind to either port 8008
(WebScarab) or port 8008 (Paros Proxy).
Tue Apr 27 22:17:05 EEST 2010
Protecting Debian Lenny against Slowloris Denial of Service attack with mod_antiloris
I've written in my previous posts
some possible ways to protect against slowloris on Debian with the
mod_qos module.
For more on mod_qos see here
This solution to the denial of service attack against which probably at least 40 percents of the Apache webservers online are still vulnerable is not really applicable on 64 bit Debian GNU Linux.
I installed the mod-qos on a Debian Linux running an amd64 bit kernel and used the Apache server with this module for just a few days on a newly configured productive Linux server running mostly some PHP applications based on top of Zend Framework .
At first all looked fine, the mod-qos was up and running and defending the Apache Webserver from the nasty slowloris DoS attack, however at a certain point.
The PHP application developers reported that Apache is crashing while executing some of the PHP codes developed by the programmers team.
After quick examination of the Apache error logs I realized the Apache crashes are caused by misbehaving behavior of the mod-qos module.
Realizing that mod_qos is creating the Apache segfaults on the amd64 architecture I abandoned the idea of using it and after a some time spend in researching what can I use as a substitute to protect against the Slowloris DoS attack I found the mod_antiloris.
Mod_antiloris is a tiny Apache module dedicated only as a work around (fix) for Apache against the Slowloris denial of service.
Though the package is officially included as a package for Debian Sid and is in the testing/unstable Debian repositories.
It's still not available via official Debian repositories in Lenny, neither through Debian Lenny backports.
Therefore the only way to install this In my humble view compulsory module to guarantee some security against modern Denial of Service Attacks, you will need to compile the module from source.
So here is how to install the mod_antiloris module on Debian Lenny via source:
1. Download and untar (unarchive) the mod_antiloris
2. Install necessery header files and Apache development programs necessery for the compilation of mod_antiloris
3. Compile the mod_antiloris module
4. Create necessery configuration files and Enable the mod_antiloris module in Apache
5. Restart the Apache WebServer
6. Use the slowloris.pl Denial of Service tool to ensure yourself Apache is Secured by mod_antiloris and no longer vulnerable to the slowloris attack
Open an SSH connection to some free shell with a a text browser lynx or links or some other Linux system you have access to or use some proxy to test if your WebServer is responding while the above attack is taking action.
In case if after the test your webserver opens normally your hosted webpages then congrats you're secure!
You can sleep well at night with less worries about Denial of Service attacks :)
For more on mod_qos see here
This solution to the denial of service attack against which probably at least 40 percents of the Apache webservers online are still vulnerable is not really applicable on 64 bit Debian GNU Linux.
I installed the mod-qos on a Debian Linux running an amd64 bit kernel and used the Apache server with this module for just a few days on a newly configured productive Linux server running mostly some PHP applications based on top of Zend Framework .
At first all looked fine, the mod-qos was up and running and defending the Apache Webserver from the nasty slowloris DoS attack, however at a certain point.
The PHP application developers reported that Apache is crashing while executing some of the PHP codes developed by the programmers team.
After quick examination of the Apache error logs I realized the Apache crashes are caused by misbehaving behavior of the mod-qos module.
Realizing that mod_qos is creating the Apache segfaults on the amd64 architecture I abandoned the idea of using it and after a some time spend in researching what can I use as a substitute to protect against the Slowloris DoS attack I found the mod_antiloris.
Mod_antiloris is a tiny Apache module dedicated only as a work around (fix) for Apache against the Slowloris denial of service.
Though the package is officially included as a package for Debian Sid and is in the testing/unstable Debian repositories.
It's still not available via official Debian repositories in Lenny, neither through Debian Lenny backports.
Therefore the only way to install this In my humble view compulsory module to guarantee some security against modern Denial of Service Attacks, you will need to compile the module from source.
So here is how to install the mod_antiloris module on Debian Lenny via source:
1. Download and untar (unarchive) the mod_antiloris
debian-server:~# wget
ftp://ftp.monshouwer.eu/pub/linux/mod_antiloris/mod_antiloris-0.4.tar.bz2


debian-server:~# tar -jxvvf mod_antiloris-0.4.tar.bz2

debian-server:~# cd mod_antiloris-0.4/
2. Install necessery header files and Apache development programs necessery for the compilation of mod_antiloris
debian-server:~# apt-get install gcc
apache2-threaded-dev
3. Compile the mod_antiloris module
debian-server:~# /usr/bin/apxs2 -i -c
mod_antiloris.c
4. Create necessery configuration files and Enable the mod_antiloris module in Apache
debian-server:~# echo "LoadModule antiloris_module
/usr/lib/apache2/modules/mod_antiloris.so" >
/etc/apache2/mods-available/antiloris.load

debian-server:~# a2enmod antiloris

Enabling module antiloris.

Run '/etc/init.d/apache2 restart' to activate new
configuration!
5. Restart the Apache WebServer
debian-server~:~# /etc/init.d/apache2 restart6. Use the slowloris.pl Denial of Service tool to ensure yourself Apache is Secured by mod_antiloris and no longer vulnerable to the slowloris attack
debian-server:~# perl slowloris.pl -dns yourdomainname.com
-port 80 -timeout 1 -num 200 -cache
Open an SSH connection to some free shell with a a text browser lynx or links or some other Linux system you have access to or use some proxy to test if your WebServer is responding while the above attack is taking action.
In case if after the test your webserver opens normally your hosted webpages then congrats you're secure!
You can sleep well at night with less worries about Denial of Service attacks :)
Mon Apr 26 12:26:34 EEST 2010
Tightening PHP Security on Apache 2.2 with ModSecurity2 on Debian Lenny Linux
In this article you'll learn how I
easily installed and configured the ModSecurity 2 on a Debian Lenny
system.
First let me give you a few introductionary words to modsecurity, what is it and why it's a good idea to install and use it on your Apache Webserver.
ModSecurity is an Apache module that provides intrusion detection and prevention for web applications. It aims at shielding web applications from known and unknown attacks, such as SQL injection attacks, cross-site scripting, path traversal attacks, etc.
As you can see from ModSecurity's description it's a priceless module add on to Apache that is able to protect your PHP Applications and Apache server from a huge number of hacker attacks undertook against your Online Web Application or Webserver.
The only thing I don't like about this module is that it is actually a 3rd party module (e.g. not officially part of Apache). Some time ago I remember there was even an exploit for one of the versions of the module.
So in some cases the ModSecurity could also pose a security risk, so beware!
However if you know what you're doing and you keep a regular track of security news on some major security websites, that shouldn't be a concern for you.
Now let's proceed to the install of the ModSecurity module itself.
The install is a piece of cake on Debian though you'll be required to use the Debian Lenny backports
Here is the install of the module step by step:
1. First add the gpg key of the backports repository to your install
2. Install the libapache-mod-security package from the backports Debian Lenny repository
Now as a last step of the install ModSeccurity install procedure you have to add some configuration directives to Apache and restart the server afterwards.
- Open your /etc/apache2/apache2.conf and place in it the following configurations
The ModSecurity2 module would be properly installed and configured as an Apache module.
3.All left is to restart Apache in order the new module and configurations to take effect.
Don't forget to check the apache conf file for errors before restarting the Apache with the above command for that to happen issue the command:
If all is fine you should get as an output:
Syntax OK
4. Next to find out if the Apache ModSecurity2 module is enabled and already used by Apache as a mean of protection you,
you might want to check if the log files modsec_audit.log and modsec_debug.log files has grown and does feed a new content.
If they're growing and you see messages concerning the operation of the ModSecurity2 Apache module that's a sure sign all is fine.
5. As we have the Mod Security Apache module configured on our Debian Server, now we will need to apply some ModSecurity Core Rules .
In short ModSecurity Core Rules are some critical protection rules against attacks across almost every web architecture.
Another really neat thing about Core Rules (CRS) for ModSecurity is that they are written with a performance in mind.
So enabling this filter rules won't be a too heavy load for your Apache server.
Here is how to install the core rules:
6. Download latest ModSecurity Code Rules
Download them from the following Code Rule url
At the time of writting this article the latest code rules are version modsecurity-crs_2.0.6.tar.gz
To download and install this rules issue some commands like:
Besides physically storing the unarchived modsecirity-crs in your /etc/apache2 it's also necessery to add to your Apache Ifmodule mod_security.c block of code the following two lines:
Thus ultimately the configuration concerning ModSecurity in your Apache Server configuration should look like the following:
Once again you have to check if everything is fine with Apache configurations with:
If it's showing once again an OK status. Then you're ready to restart the Webserver.
One example goodness of setting up the ModSecurity + the Core rule sets are that after the above described installation is fully functional.
ModSecurity will be able to track if somebody tries to execute PHP Shell on your server .
ModSecurity will catch, log and block (forbid) requests to r99.txt, r59, safe0ver and possibly other hacked modifications of the php shell script
That's it! Now Enjoy your tightened Apache Security and Hopefully catch the script kiddie trying to h4x0r yoU :)
First let me give you a few introductionary words to modsecurity, what is it and why it's a good idea to install and use it on your Apache Webserver.
ModSecurity is an Apache module that provides intrusion detection and prevention for web applications. It aims at shielding web applications from known and unknown attacks, such as SQL injection attacks, cross-site scripting, path traversal attacks, etc.
As you can see from ModSecurity's description it's a priceless module add on to Apache that is able to protect your PHP Applications and Apache server from a huge number of hacker attacks undertook against your Online Web Application or Webserver.
The only thing I don't like about this module is that it is actually a 3rd party module (e.g. not officially part of Apache). Some time ago I remember there was even an exploit for one of the versions of the module.
So in some cases the ModSecurity could also pose a security risk, so beware!
However if you know what you're doing and you keep a regular track of security news on some major security websites, that shouldn't be a concern for you.
Now let's proceed to the install of the ModSecurity module itself.
The install is a piece of cake on Debian though you'll be required to use the Debian Lenny backports
Here is the install of the module step by step:
1. First add the gpg key of the backports repository to your install
debian-server:~# gpg --keyserver pgp.mit.edu --recv-keys
C514AF8E4BA401C3

# another possible way to add the repository as the website
describes is through the command

debian-server:~# wget -O - http://backports.org/debian/archive.key
| apt-key add -
2. Install the libapache-mod-security package from the backports Debian Lenny repository
debian-server~:~# apt-get -t lenny-backports install
libapache2-mod-security2
Now as a last step of the install ModSeccurity install procedure you have to add some configuration directives to Apache and restart the server afterwards.
- Open your /etc/apache2/apache2.conf and place in it the following configurations
<IfModule mod_security2.c>

# Basic configuration options

SecRuleEngine On

SecRequestBodyAccess On

SecResponseBodyAccess Off


# Handling of file uploads

# TODO Choose a folder private to Apache.

# SecUploadDir /opt/apache-frontend/tmp/

SecUploadKeepFiles Off


# Debug log

SecDebugLog /var/log/apache2/modsec_debug.log

SecDebugLogLevel 0


# Serial audit log

SecAuditEngine RelevantOnly

SecAuditLogRelevantStatus ^5

SecAuditLogParts ABIFHZ

SecAuditLogType Serial

SecAuditLog /var/log/apache2/modsec_audit.log


# Maximum request body size we will

# accept for buffering

SecRequestBodyLimit 131072


# Store up to 128 KB in memory SecRequestBodyInMemoryLimit
131072

# Buffer response bodies of up to # 512 KB in length
SecResponseBodyLimit 524288

</IfModule>
The ModSecurity2 module would be properly installed and configured as an Apache module.
3.All left is to restart Apache in order the new module and configurations to take effect.
debian-server:~# /etc/init.d/apache
restart
Don't forget to check the apache conf file for errors before restarting the Apache with the above command for that to happen issue the command:
debian-server:~# apache2ctl -t
If all is fine you should get as an output:
Syntax OK
4. Next to find out if the Apache ModSecurity2 module is enabled and already used by Apache as a mean of protection you,
you might want to check if the log files modsec_audit.log and modsec_debug.log files has grown and does feed a new content.
If they're growing and you see messages concerning the operation of the ModSecurity2 Apache module that's a sure sign all is fine.
5. As we have the Mod Security Apache module configured on our Debian Server, now we will need to apply some ModSecurity Core Rules .
In short ModSecurity Core Rules are some critical protection rules against attacks across almost every web architecture.
Another really neat thing about Core Rules (CRS) for ModSecurity is that they are written with a performance in mind.
So enabling this filter rules won't be a too heavy load for your Apache server.
Here is how to install the core rules:
6. Download latest ModSecurity Code Rules
Download them from the following Code Rule url
At the time of writting this article the latest code rules are version modsecurity-crs_2.0.6.tar.gz
To download and install this rules issue some commands like:
debian-server:~# wget
http://sourceforge.net/projects/mod-security/files/modsecurity-crs/0-CURRENT/modsecurity-crs_2.0.6.tar.gz/download


debian-server:~# cp -rpf ~/modsecurity-crs_2.0.6.tar.gz
/etc/apache2/

debian-server:~# cd /etc/apache2/; tar -zxvvf
modsecurity-crs_2.0.6.tar.gz
Besides physically storing the unarchived modsecirity-crs in your /etc/apache2 it's also necessery to add to your Apache Ifmodule mod_security.c block of code the following two lines:
Include /etc/apache2/modsecurity-crs_2.0.6/*.conf

Include
/etc/apache2/modsecurity-crs_2.0.6/base_rules/*.conf
Thus ultimately the configuration concerning ModSecurity in your Apache Server configuration should look like the following:
<IfModule mod_security2.c>

# Basic configuration options

SecRuleEngine On

SecRequestBodyAccess On

SecResponseBodyAccess Off


# Handling of file uploads

# TODO Choose a folder private to Apache.

# SecUploadDir /opt/apache-frontend/tmp/

SecUploadKeepFiles Off


# Debug log

SecDebugLog /var/log/apache2/modsec_debug.log

SecDebugLogLevel 0


# Serial audit log

SecAuditEngine RelevantOnly

SecAuditLogRelevantStatus ^5

SecAuditLogParts ABIFHZ

SecAuditLogType Serial

SecAuditLog /var/log/apache2/modsec_audit.log


# Maximum request body size we will

# accept for buffering

SecRequestBodyLimit 131072


# Store up to 128 KB in memory

SecRequestBodyInMemoryLimit 131072

SecRequestBodyInMemoryLimit 131072


# Buffer response bodies of up to

# 512 KB in length

SecResponseBodyLimit 524288

Include /etc/apache2/modsecurity-crs_2.0.6/*.conf

Include /etc/apache2/modsecurity-crs_2.0.6/base_rules/*.conf

</Ifmodule>
Once again you have to check if everything is fine with Apache configurations with:
debian-server:~# apache2ctl -t
If it's showing once again an OK status. Then you're ready to restart the Webserver.
debian-server:~# /etc/init.d/apache2
restart
One example goodness of setting up the ModSecurity + the Core rule sets are that after the above described installation is fully functional.
ModSecurity will be able to track if somebody tries to execute PHP Shell on your server .
ModSecurity will catch, log and block (forbid) requests to r99.txt, r59, safe0ver and possibly other hacked modifications of the php shell script
That's it! Now Enjoy your tightened Apache Security and Hopefully catch the script kiddie trying to h4x0r yoU :)
Sun Apr 25 16:52:13 EEST 2010
Using PHP Spike Security Audit Tool on large source trees / Fixing issues with PHP Spike Security Audit (Fatal Error: Allowed memory size exhausted)
Whilst Running the PHP Spike Security
Audit Tool to audit a php source files directory containing large
number of PHP files,like let's say 700+ php files produces the
following error:
It's obvious that php spike is written in a way that all audited php files are stored in memory before being processed.
Therefore the larger amount of php source code targeted to be audited by the Spike Security PHP Audit tool the highter the amount of necessery memory by the spike security audit php script.
For that reason it's necessery to increase the allowed amount of memory that the php CLI (Command Line Interface) can consume.
The default value for memory limit on the PHP5 precompiled binary on Debian Lenny is 16 MB. This value is really low and needs to be increased in order to be able to run the spike PHP Sec Audit on directories with many php scripts.
There are basicly two ways to achieve that:
1. Edit /etc/php5/apache2/php.ini on Debian Linux
And Increase the value:
Increasing the memory_limit from the php.ini configuration is not really wise since that will lessen your security. So use this only if you know what you're doing.
2. Or the other possibility to get around the error message is increase the memory_limit value via the PHP Spike Source Security Audit script
That is by the way, the better choise IMHO. If you go that way edit your run.php script bunled with the spike_phpSecAudit archive and there make sure you insert on the second line:
Fatal error: Allowed memory size of
67108864 bytes exhausted (tried to allocate 71 bytes) in
/usr/local/spike_phpSecAudit_0.27/util/TokenUtils.php on line
85
It's obvious that php spike is written in a way that all audited php files are stored in memory before being processed.
Therefore the larger amount of php source code targeted to be audited by the Spike Security PHP Audit tool the highter the amount of necessery memory by the spike security audit php script.
For that reason it's necessery to increase the allowed amount of memory that the php CLI (Command Line Interface) can consume.
The default value for memory limit on the PHP5 precompiled binary on Debian Lenny is 16 MB. This value is really low and needs to be increased in order to be able to run the spike PHP Sec Audit on directories with many php scripts.
There are basicly two ways to achieve that:
1. Edit /etc/php5/apache2/php.ini on Debian Linux
And Increase the value:
memory_limit = 200M
Increasing the memory_limit from the php.ini configuration is not really wise since that will lessen your security. So use this only if you know what you're doing.
2. Or the other possibility to get around the error message is increase the memory_limit value via the PHP Spike Source Security Audit script
That is by the way, the better choise IMHO. If you go that way edit your run.php script bunled with the spike_phpSecAudit archive and there make sure you insert on the second line:
ini_set('memory_limit', '200M');Sat Apr 24 17:10:19 EEST 2010
Generating Static Source Code Auditing reports with Spike PHP Security Audit Tool
I'm conducting a PHP Audit on a
server in relation to that one of the audit criterias I follow is a
Static PHP Source Code Auditing of the php files source code
located physically on the Linux server.
Auditing a tons of source code manually is a kind of impossible task, therefore I needed a quick way to at least partly automate or fully automate the PHP applications source code.
A quick search in Google pointed me to a php application tool - Spike Security Audit .
This small application PHP written app is quite handy. It is able to either check a certain php source code file for WARNINGS or ERRORS or do a complete security source code analysis of a bunch of PHP files in a directory including all the other php source files in subdirectories.
After executed the PHP Security Audit Tool generates a nice source code analysis report in html that can easily be later observed with some Browser.
The use of the tool is pretty straight forward, all you have to do is download it from Spikeforge - the project's official webpage and unzip it e.g.
Then you have to invoke the run.php with the php cli, that you need to have installed first.
If you don't have the php cli yet please install it with the command:
Now you have to execute the run.php script bundled with the spike php security audit program source code.
As you can see the spike php security audit has only few command line options and they're quite easily understandable.
However in my case I had to audit a couple of directories which contained source code.
I also wanted the generated reports to be cyclic, on let's say per daily basis cause I wanted to have the PHP applicaiton analysis generated on a daily basis.
In that reason I decided to write a small shell script that would aid the usage of php spike audit, I've called the script code-analysis.sh
The usage of the Automation source code analysis script for PHP Spike Audit can be downloaded here
The script has a few configuration options that you might need to modify before you can put it to execute on a crontab.
This are:
After you have prepared the code-analysis.sh script with your custom likings, you can now put it to be executed periodically using crontab or some other unix system scheduler of choice.
To do that edit your root crontab.
and put in it.
Now hopefully you can edit your /etc/apache2/apache2.conf or your httpd.conf depending on your linux or unix architecture and make a Alias like:
Now your php source code analysis from the php spike audit tool will be generated daily.
You will be able to access them via web using http://yourdomain.com/code-analysis/
That way, you can review your php source code written or changed in your php applications on daily basis and you can a way easily track your coding mistakes, as well as track for possible security issues in your code.
For the sake of security I've also decided to protect the /code-analysis Apache directory with a password using the following .htaccess file:
If you decide to protect yours as well you have to also generate the .htpasswd file using the following command:
You will be asked for a password. The code-analysis.sh script will also take care to generate an html file for you including links to reports to all the php source code audited directories reports.
Now accessing http://yourdomain.com/code-analysis/ will give you shiny look to the php source applications generated reports .
Auditing a tons of source code manually is a kind of impossible task, therefore I needed a quick way to at least partly automate or fully automate the PHP applications source code.
A quick search in Google pointed me to a php application tool - Spike Security Audit .
This small application PHP written app is quite handy. It is able to either check a certain php source code file for WARNINGS or ERRORS or do a complete security source code analysis of a bunch of PHP files in a directory including all the other php source files in subdirectories.
After executed the PHP Security Audit Tool generates a nice source code analysis report in html that can easily be later observed with some Browser.
The use of the tool is pretty straight forward, all you have to do is download it from Spikeforge - the project's official webpage and unzip it e.g.
debian-server:~# wget
http://developer.spikesource.com/frs/download.php/136/spike_phpSecAudit_0.27.zip


debian-server:~# unzip
spike_phpSecAudit_0.27.zip
Then you have to invoke the run.php with the php cli, that you need to have installed first.
If you don't have the php cli yet please install it with the command:
debian-server:~# apt-get install php5-cli
Now you have to execute the run.php script bundled with the spike php security audit program source code.
debian-server:~# php run.php


Please specify a source directory/file using --src option.


Usage run.php options


Options:

--src Root of the source directory tree or a file.

--exclude [Optional] A directory or file that needs to be
excluded.

--format [Optional] Output format (html/text). Defaults to
'html'.

--outdir [Optional] Report Directory. Defaults to
'./style-report'.

--help Display this usage information.
As you can see the spike php security audit has only few command line options and they're quite easily understandable.
However in my case I had to audit a couple of directories which contained source code.
I also wanted the generated reports to be cyclic, on let's say per daily basis cause I wanted to have the PHP applicaiton analysis generated on a daily basis.
In that reason I decided to write a small shell script that would aid the usage of php spike audit, I've called the script code-analysis.sh
The usage of the Automation source code analysis script for PHP Spike Audit can be downloaded here
The script has a few configuration options that you might need to modify before you can put it to execute on a crontab.
This are:
# Specify your domain name on which php spike audit reports
will be accessed domain_name='yourdomainname.com';

# put here the location where phpspike run.php execute is
located

spike_phpsec=/usr/local/spike_phpSecAudit_0.27/run.php;

# specify here which will be the directory where the php source
code analysis reports will be stored by php spike

log_dir=/root/code-analysis/;

# in that part you have to specify the physical location of the php
cli it's located by default in /usr/bin/php on Debian GNU
Linux.

php_bin=/usr/bin/php;

# the directory below should be set to a directory where the
reports that will be visible from the webserver will be
stored

www_dir=/var/www/code-analysis;


# in the variables


directory[1]='/home/source-code1/'; ..

directory[2]=''; ..


# you should configure the directories containing php source code
to be audited by the php spike audit tool.
After you have prepared the code-analysis.sh script with your custom likings, you can now put it to be executed periodically using crontab or some other unix system scheduler of choice.
To do that edit your root crontab.
crontab -u root -e
and put in it.
# code analysis results

05 3 * * * /usr/local/bin/code-analysis.sh >/dev/null
2>&1
Now hopefully you can edit your /etc/apache2/apache2.conf or your httpd.conf depending on your linux or unix architecture and make a Alias like:
Alias /code-analysis
"/var/www/code-analysis"
Now your php source code analysis from the php spike audit tool will be generated daily.
You will be able to access them via web using http://yourdomain.com/code-analysis/
That way, you can review your php source code written or changed in your php applications on daily basis and you can a way easily track your coding mistakes, as well as track for possible security issues in your code.
For the sake of security I've also decided to protect the /code-analysis Apache directory with a password using the following .htaccess file:
AuthUserFile /var/www/code-analysis/.htpasswd AuthGroupFile
/dev/null

AuthName "Login to access PHP Source Code Analysis"

AuthType Basic


< Limit GET >

require valid-user

< /Limit >
If you decide to protect yours as well you have to also generate the .htpasswd file using the following command:
debian-server:~# htpasswd -c /var/www/code-analysis/.htpasswd
admin
You will be asked for a password. The code-analysis.sh script will also take care to generate an html file for you including links to reports to all the php source code audited directories reports.
Now accessing http://yourdomain.com/code-analysis/ will give you shiny look to the php source applications generated reports .
Fri Apr 23 15:46:43 EEST 2010
Disable PHP Expose / Disable PHP Credits page showing up with including some.php?=PHPB8B5F2A0-3C92-11d3-A3A9-4C7B08C10000 variable to a PHP powered WebServer
Many people are not aware that by
default PHP 5 has enabled variable in the php.ini file which
allows a third party person to query PHP for a few
hard coded variables which displays various infos on PHP.
Some of the infos displayed are:
PHP Credits
To see that request in your browser to a PHP powered webserver.
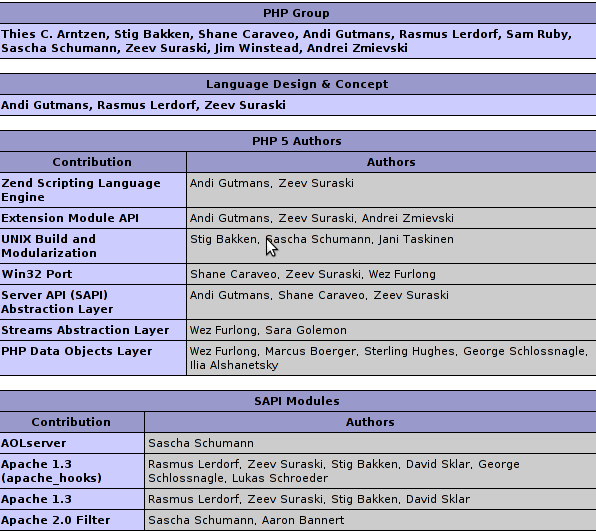
This would reveal you the PHP version number + the PHP authors who took active part in the development of the current PHP release.
That could be even counted as a non-critical security flaw since it reveals PHP version and many companies nowadays prefers that the technology backing up their websites stays private.
Some other hard coded variables that can be requested to a PHP enabled server are:


This simple method could be another security threat if you're a security freak. It will reveal your Webserver is running PHP with Zend2 Framework extension enabled.

This last one reveals again the PHP logo a bit jagged.
Be aware that this 4 are enabled by default in php.ini on PHP version 5.x.
Therefore from a security standpoint as well as to show off your professionalism you can disable it simply by editing your php.ini and changing the variable expose_php = Off . To do that quickly on Debian running Apache 2.2.x from the command line issue the commands:
That's it now the annoying information concerning PHP Credits, PHP Logos, and PHP Zend Framework Logos won't be exposed any more for pranksters.
Historically speaking in PHP version 4. There were are 3 really funny pictures hard coded into the PHP library. If you're running PHP and you want to check them out you have to do a request to your server like the one below:
The following funny pictures should appear right away :)


Now take some time and test the hidden requests on your PHP powered servers :)
Some of the infos displayed are:
PHP Credits
To see that request in your browser to a PHP powered webserver.
http://domainname.com/some.php?=PHPB8B5F2A0-3C92-11d3-A3A9-4C7B08C10000
This would reveal you the PHP version number + the PHP authors who took active part in the development of the current PHP release.
That could be even counted as a non-critical security flaw since it reveals PHP version and many companies nowadays prefers that the technology backing up their websites stays private.
Some other hard coded variables that can be requested to a PHP enabled server are:
http://domainname.com/some.php?=PHPE9568F34-D428-11d2-A769-00AA001ACF42
This will show you that the Apache Server or the
questionable Server is configured to server PHP pages.http://domainname.com/some.php?=PHPE9568F35-D428-11d2-A769-00AA001ACF42
This simple method could be another security threat if you're a security freak. It will reveal your Webserver is running PHP with Zend2 Framework extension enabled.
http://domainname.com/some.php?=PHPE9568F36-D428-11d2-A769-00AA001ACF42
This last one reveals again the PHP logo a bit jagged.
Be aware that this 4 are enabled by default in php.ini on PHP version 5.x.
Therefore from a security standpoint as well as to show off your professionalism you can disable it simply by editing your php.ini and changing the variable expose_php = Off . To do that quickly on Debian running Apache 2.2.x from the command line issue the commands:
debian-server:~# sed -e "s#expose_php = On#expose_php =
Off#g" /etc/php5/apache2/php.ini >
/etc/php5/apache2/php.ini.1;

debian-server:~# mv /etc/php5/apache2/php.ini.1
/etc/php5/apache2/php.ini
That's it now the annoying information concerning PHP Credits, PHP Logos, and PHP Zend Framework Logos won't be exposed any more for pranksters.
Historically speaking in PHP version 4. There were are 3 really funny pictures hard coded into the PHP library. If you're running PHP and you want to check them out you have to do a request to your server like the one below:
http://domainname.com/?=PHPE9568F36-D428-11d2-A769-00AA001ACF42
The following funny pictures should appear right away :)
Now take some time and test the hidden requests on your PHP powered servers :)
Thu Apr 22 14:01:25 EEST 2010
Disable Apache HTTP TRACE method to improve Apache security
I'm doing a security web audit on a
server. To get more accurate data about the current Linux powered
server security Level.
I'm intending to combine both automated scannings with softwares like Paros Proxy , Nessus , nmap as well as some more modern day web server scanners like:
Nikto . By the last mentioned Nikto is not something brand new, but it's partly based on a on older web sever scanner called Whisker which nowadays is a depreceated piece of software though for it's time it was a real buzz.
Anyways the audit I'm into is not the major topic of this post.
During some of the scans with the softwares forementioned I was warned by the security scanners that the HTTP TRACE on the webserver is enabled and this could possibly pose a security threat.
At first I had absolutely no idea what is HTTP TRACE and after some reading online I got it. It's really simple and let me save you some time in Googling in researching.
What HTTP TRACE is is simply an integrated ECHO like service in the Apache server.
The Nikto web security scanner has identified that the Apache server I was auditing has an enabled HTTP TRACE method and warned that this could pose a security risk on the server.
At first I thought nikto is wrong and it's reporting a false positive. However after checking out my Apache for HTTP TRACE method I realized the security scanner is right.
I wondered how such a tiny thing as HTTP TRACE could introduce a security threat and after reconsidering the issue I understood that having it enabled on the Webserver could be beneficial for an attacker if he tries to exercise Denial of Service or Distributed Denial of Service on the Apache Webserver.
So having that in mind I should confess the security scanners are right to point the HTTP TRACE as a possible security leak.
Here is an example on how to check your webserver if HTTP TRACE is enabled.
If after the check you receive some HTTP TRACE output which is like the one above, then positively HTTP TRACE is enabled on your Apache and for security reasons it's best to disable it.
There are two ways to do that:
1. You can either use a mod rewrite rule like the following and put it in your httpd.conf,apache2.conf (on Debian) or as an .htaccess file rules:
However note that this method is a real performance killer since, each and every request to the server will pass through the mod rewrite rule chain.
2. Or use the TraceEnable off Apache directive which is available on Apache 1.3.34 and on All Apache Servers versions 2.0.55 or higher.
The TraceEnable off Apache directive is also working on Apache 2.2.x including the current stable Debian Apache (2.2.9-10+lenny7).
Take in mind that in my case as I disired to disable the HTTP TRACE on a Debian server putting TraceEnable Off in /etc/apache2/apache2.conf didn't disabled the HTTP TRACE for the Apache server.
To be able to disable it I had to edit my /etc/apache2/sites-enabled/000-default and put the TraceEnable Off variable in it.
If you want to make sure Apache HTTP TRACE method after using one of the forementioned methods for disabling it.
You should once again execute:
That's all, now your Apache should be a bit more secure than before!
I'm intending to combine both automated scannings with softwares like Paros Proxy , Nessus , nmap as well as some more modern day web server scanners like:
Nikto . By the last mentioned Nikto is not something brand new, but it's partly based on a on older web sever scanner called Whisker which nowadays is a depreceated piece of software though for it's time it was a real buzz.
Anyways the audit I'm into is not the major topic of this post.
During some of the scans with the softwares forementioned I was warned by the security scanners that the HTTP TRACE on the webserver is enabled and this could possibly pose a security threat.
At first I had absolutely no idea what is HTTP TRACE and after some reading online I got it. It's really simple and let me save you some time in Googling in researching.
What HTTP TRACE is is simply an integrated ECHO like service in the Apache server.
The Nikto web security scanner has identified that the Apache server I was auditing has an enabled HTTP TRACE method and warned that this could pose a security risk on the server.
At first I thought nikto is wrong and it's reporting a false positive. However after checking out my Apache for HTTP TRACE method I realized the security scanner is right.
I wondered how such a tiny thing as HTTP TRACE could introduce a security threat and after reconsidering the issue I understood that having it enabled on the Webserver could be beneficial for an attacker if he tries to exercise Denial of Service or Distributed Denial of Service on the Apache Webserver.
So having that in mind I should confess the security scanners are right to point the HTTP TRACE as a possible security leak.
Here is an example on how to check your webserver if HTTP TRACE is enabled.
debian-server:~# telnet 127.0.0.1 80

Trying 127.0.0.1...

Connected to 127.0.0.1.

Escape character is '^]'.

TRACE / HTTP/1.1

Host: 127.0.0.1

Here Press ENTER twice!


HTTP/1.1 200 OK

Date: Thu, 22 Apr 2010 10:36:58 GMT

Server: Apache

Connection: close

Content-Type: message/http


TRACE / HTTP/1.0

Host: 127.0.0.1


Connection closed by foreign host.
If after the check you receive some HTTP TRACE output which is like the one above, then positively HTTP TRACE is enabled on your Apache and for security reasons it's best to disable it.
There are two ways to do that:
1. You can either use a mod rewrite rule like the following and put it in your httpd.conf,apache2.conf (on Debian) or as an .htaccess file rules:
RewriteEngine On

RewriteCond %{REQUEST_METHOD} ^TRACE

RewriteRule .* - [F]
However note that this method is a real performance killer since, each and every request to the server will pass through the mod rewrite rule chain.
2. Or use the TraceEnable off Apache directive which is available on Apache 1.3.34 and on All Apache Servers versions 2.0.55 or higher.
The TraceEnable off Apache directive is also working on Apache 2.2.x including the current stable Debian Apache (2.2.9-10+lenny7).
Take in mind that in my case as I disired to disable the HTTP TRACE on a Debian server putting TraceEnable Off in /etc/apache2/apache2.conf didn't disabled the HTTP TRACE for the Apache server.
To be able to disable it I had to edit my /etc/apache2/sites-enabled/000-default and put the TraceEnable Off variable in it.
If you want to make sure Apache HTTP TRACE method after using one of the forementioned methods for disabling it.
You should once again execute:
debian-server:~# telnet cadia 80 Trying 127.0.0.1...

Connected to cadia.

Escape character is '^]'.

TRACE / HTTP/1.1

Host: 127.0.0.1

Press Enter Twice!
You should then receive a responce from Apache
like:HTTP/1.1 405 Method Not Allowed
Date: Thu, 22 Apr 2010 10:52:09 GMT
Server: Apache
Allow:
Vary: Accept-Encoding
Content-Length: 223
Content-Type: text/html; charset=iso-8859-1
Method Not Allowed
The requested method TRACE is not allowed for the URL
That's all, now your Apache should be a bit more secure than before!
Wed Apr 21 19:27:54 EEST 2010
Installing qmailanalog-web on Debian Lenny, Access Qmail server statistics from the Web with qmailanalog front end (qmailanalog-web)
As I've mentioned in one of my
previous posts isoqlog is not generating statistics therefore I
needed something else with which I can see statistics online.
Qmailanalog's statistics provide with quite a good and accurate data, however it's text based and therefore it's not really flexible. In the meantime when I was browsing I stumbled on a program called qmailanalog-web .
This piece os software is pretty simple, though really usable. It's just a web interface through a cgi which can be used to get the various statistics provided from the qmailanalog qmail log analysis software.
The software seems abandoned for many years, I even couldn't find an archive of it online.
After playing some time with it I was able to bring it up and I succesfully configured qmailanalog-web to be accessed as a cgi script.
It took me quite a lot of time, the Software includes two basic documentation files one is called INSTALL and the other FGA (Frequently Given Answers) :).
Since the software is quite handy after installed on the server and provides with many useful qmail statistics, I decided to write a small installer that will automate the install process a bit and will make the life of people who desire to install it further on a way easier.
For some clarity I also decided to archive the qmailanalog-web package and mirror it here
In the archive you will also find a 4 liner script called import_old-qmail-logs.sh.
The qmailanalog-web could be considered a substitute for isoqlog and qmailalizer functionality, though it's not so pretty, it's still really useful!
But please don't expect too much from qmailanalog-web. Just in case if you wonder how does it looks like, here is a screenshot of the software.
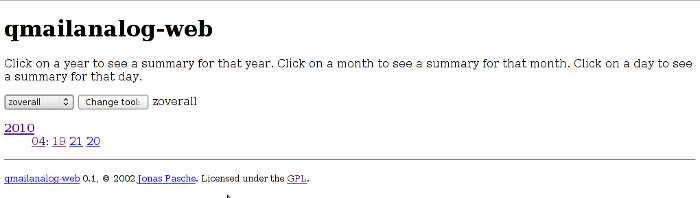
Actually qmailanalog web is a frontend to the 20 qmailanalog console tools. After you select the qmailanalog tool the qmailanalog web interface provides you with an option to see the statistics generated from the corresponding qmailanalog console tool.
Though it lacks the eye candy of Isoqlog and Qmail Scanner Statistics, it's not a bad substitute to Isoqlog and Qmail Scanner Statistics! :)
Qmailanalog's statistics provide with quite a good and accurate data, however it's text based and therefore it's not really flexible. In the meantime when I was browsing I stumbled on a program called qmailanalog-web .
This piece os software is pretty simple, though really usable. It's just a web interface through a cgi which can be used to get the various statistics provided from the qmailanalog qmail log analysis software.
The software seems abandoned for many years, I even couldn't find an archive of it online.
After playing some time with it I was able to bring it up and I succesfully configured qmailanalog-web to be accessed as a cgi script.
It took me quite a lot of time, the Software includes two basic documentation files one is called INSTALL and the other FGA (Frequently Given Answers) :).
Since the software is quite handy after installed on the server and provides with many useful qmail statistics, I decided to write a small installer that will automate the install process a bit and will make the life of people who desire to install it further on a way easier.
For some clarity I also decided to archive the qmailanalog-web package and mirror it here
In the archive you will also find a 4 liner script called import_old-qmail-logs.sh.
The qmailanalog-web could be considered a substitute for isoqlog and qmailalizer functionality, though it's not so pretty, it's still really useful!
But please don't expect too much from qmailanalog-web. Just in case if you wonder how does it looks like, here is a screenshot of the software.
Actually qmailanalog web is a frontend to the 20 qmailanalog console tools. After you select the qmailanalog tool the qmailanalog web interface provides you with an option to see the statistics generated from the corresponding qmailanalog console tool.
Though it lacks the eye candy of Isoqlog and Qmail Scanner Statistics, it's not a bad substitute to Isoqlog and Qmail Scanner Statistics! :)
Tue Apr 20 15:09:23 EEST 2010
Installing qmailanalog and Generating daily qmail statistics with (qmail-stats.py) on Debian Lenny / Daily qmail statististics notification via email
Finding a decent software to generate
daily qmail statistics is a really tough job this days. Before time
I always used either qmailalizer or isoqlog.
Presently qmailalizer is completely abondoned piece of software and I cannot force it to work on 64 bit architecture. Isoqlog is another story, it's supposed to work with qmailrocks, however my qmail installation is based on Bill's Linux Qmail Toaster and for some strange reason it's generating empty statistics. It could be that isoqlog is not generating statistics because the log files's feed to be processed is not enough. Anyways still I cannot figure out the reason why I cannot make work Isoqlog with the Qmail Toaster.
I needed a way to however at least have an overview statistics of what is happening inside qmail. Of course qmailmrtg which is explained how to be installed in my previous post is providing with some overall information, though the information acquired through it is too general.
I've spend some enormous time searching for something that could inform me on various qmail statistics based on the qmail logs, before I could find and tweak the qmail-stats.py report script to become usable with qmailanalog
In the meantime It was necessery for me to investigate into qmailanalog and install it on the Debian system.
Initially I instlaled the qmailanalog from source, latest current source release can be obtained via D.J. Bernstein's qmaialanlog download page
You won't be able to compile the qmailanalog piece of code in debian until substitute in the source file: error.h the line:
After the above change your source should succesfully compile.
Right after I compile it I realized there is a debian source package installer called:
qmailanalog-installer
So on Debian to install qmailanalog all I had to do was:
Now as I already have qmailanalog properly installed on Debian I decided to test it with a script called qmail-logs.sh
You can download the qmail-logs.sh script from here
Here I quote what exactly is written in the qmail-logs.sh header in order to provide you with a general idea what the script does.
After executing the script I realized the script is not working properly because of some errors issued by scripts included within the qmailanalog package.
The faced problems and their solution with the qmailanalog: zsenders, zsuccesses, zfailures, zrecipients, zfailures and zrhosts scripts I've reported as a Debian bugs The qmailanalog bug report I've submitted can be seen here
The whole problem with qmailanalog scripts on Debian is that the "gnu more" binary arguments passed during the script operations are not correct and needs to be fixed.
Similar issues and their solution is explained in Qmailrocks Forums threads
After fixing the issues with qmailanalog I tried once again the qmail-logs.sh script, this time some of the functions provided by the script prooved working however some of them weren't okay still.
Therefore I took some more time searching on the internet and I've found on a mailing list the qmail-stats.py script which worked like a charm with a minor modifications.
In order to have the qmail-stats.py working you need the tai64nfrac binary. You can download the latest current version of tai64nfrac on tai64nfrac's website
Installation of tai64nfrac is pretty straight forward and comes to the following:
After the install you should have the tai64nfrac in /usr/local/bin/tai64nfrac
Now let's go back to the qmail-stats.py script. I've mirrored the qmail-stats.py script the qmail-stats.py script can be downloaded here
The script reports statistics on Qmail Logs following criterias:
Overall Email Server Statistics
Failure Statistics (Reasons for Failure)
Deferrals Statistics (Reasons for Deferrals)
Top Ten Senders Statistics
Top Ten Recipients Statistics
To make the script working all you have to edit in the script is the LOGFILE_PATH the rest is preconfigured by me already in the version of qmail-stats.py which is provided for download above.
If you choose to compile the qmailanalog from source you might also need to change the CMDS options, which includes the directory locations and commands from qmailanalog.
Now if you want to have the reports generated from qmail-stats.py, you have to setup the qmail-stats.py to be running via the cron daemon.
To do so open your root crontab and put in it:
Now you should have the qmail-stats.py mailed to you every day at 01:05 early in the morning! :)
Presently qmailalizer is completely abondoned piece of software and I cannot force it to work on 64 bit architecture. Isoqlog is another story, it's supposed to work with qmailrocks, however my qmail installation is based on Bill's Linux Qmail Toaster and for some strange reason it's generating empty statistics. It could be that isoqlog is not generating statistics because the log files's feed to be processed is not enough. Anyways still I cannot figure out the reason why I cannot make work Isoqlog with the Qmail Toaster.
I needed a way to however at least have an overview statistics of what is happening inside qmail. Of course qmailmrtg which is explained how to be installed in my previous post is providing with some overall information, though the information acquired through it is too general.
I've spend some enormous time searching for something that could inform me on various qmail statistics based on the qmail logs, before I could find and tweak the qmail-stats.py report script to become usable with qmailanalog
In the meantime It was necessery for me to investigate into qmailanalog and install it on the Debian system.
Initially I instlaled the qmailanalog from source, latest current source release can be obtained via D.J. Bernstein's qmaialanlog download page
You won't be able to compile the qmailanalog piece of code in debian until substitute in the source file: error.h the line:
extern int errno;


with #include <errno.h>
After the above change your source should succesfully compile.
Right after I compile it I realized there is a debian source package installer called:
qmailanalog-installer
So on Debian to install qmailanalog all I had to do was:
debian-server:~# apt-get install qmailanalog-installer

debian-server:~# /usr/bin/build-qmailanalog
Now as I already have qmailanalog properly installed on Debian I decided to test it with a script called qmail-logs.sh
You can download the qmail-logs.sh script from here
Here I quote what exactly is written in the qmail-logs.sh header in order to provide you with a general idea what the script does.
## Purpose:

## Wrapper for qmailanalog scripts. Will analyze qmail
multilog

## files for deferrals, failures, overall statistics, or
convert

## them to sendmail-style logs.
After executing the script I realized the script is not working properly because of some errors issued by scripts included within the qmailanalog package.
The faced problems and their solution with the qmailanalog: zsenders, zsuccesses, zfailures, zrecipients, zfailures and zrhosts scripts I've reported as a Debian bugs The qmailanalog bug report I've submitted can be seen here
The whole problem with qmailanalog scripts on Debian is that the "gnu more" binary arguments passed during the script operations are not correct and needs to be fixed.
Similar issues and their solution is explained in Qmailrocks Forums threads
After fixing the issues with qmailanalog I tried once again the qmail-logs.sh script, this time some of the functions provided by the script prooved working however some of them weren't okay still.
Therefore I took some more time searching on the internet and I've found on a mailing list the qmail-stats.py script which worked like a charm with a minor modifications.
In order to have the qmail-stats.py working you need the tai64nfrac binary. You can download the latest current version of tai64nfrac on tai64nfrac's website
Installation of tai64nfrac is pretty straight forward and comes to the following:
debian-server:~# wget
http://archives.eyrie.org/software/system/tai64nfrac-1.4.tar.gz


debian-server:~# tar -zxvf tai64nfrac-1.4.tar.gz

debian-server:~# cd tai64nfrac-1.4

debian-server:~# make

debian-esrver:~# make install
After the install you should have the tai64nfrac in /usr/local/bin/tai64nfrac
Now let's go back to the qmail-stats.py script. I've mirrored the qmail-stats.py script the qmail-stats.py script can be downloaded here
The script reports statistics on Qmail Logs following criterias:
Overall Email Server Statistics
Failure Statistics (Reasons for Failure)
Deferrals Statistics (Reasons for Deferrals)
Top Ten Senders Statistics
Top Ten Recipients Statistics
To make the script working all you have to edit in the script is the LOGFILE_PATH the rest is preconfigured by me already in the version of qmail-stats.py which is provided for download above.
If you choose to compile the qmailanalog from source you might also need to change the CMDS options, which includes the directory locations and commands from qmailanalog.
Now if you want to have the reports generated from qmail-stats.py, you have to setup the qmail-stats.py to be running via the cron daemon.
To do so open your root crontab and put in it:
# report daily qmail statistics 05 01 * * *
/usr/local/bin/qmail-stats.py | mail -s "Qmail Daily Statistics for
$(date)" admin@domain.com
Now you should have the qmail-stats.py mailed to you every day at 01:05 early in the morning! :)
Mon Apr 19 15:45:09 EEST 2010
Installing qmailmrtg (qmail graph statistics on qmail activity) on Debian Lenny
1. First it's necessery to have
the mrtg debian package installed.
If it's not installed then we have to install it:
If it's not installed then we have to install it:
debian-server:~# apt-get install mrtg


2. Second download the qmailmrtg source binary

To download the latest current source release of qmailmrtg
execute:


debian-server:~# wget
http://www.inter7.com/qmailmrtg7/qmailmrtg7-4.2.tar.gz


It's a pity qmailmrtg is not available for download via debian
repositories.


3. Third download the qmail.mrtg.cfg configuration
file


debian-server~# wget
http://pc-freak.net/files/qmail.mrtg.cfg


Now you have to put the file somewhere, usually it's best to put it
in the /etc/ directory.

Make sure the file is existing in /etc/qmail.mrtg.cfg


4. Set proper file permissions according to the user you indent
to execute qmailmrtg as

I personally execute it as root user, if you intend to do so
as well set a permissions to

/etc/qmail.mrtg.cfg of 700.

In order to do that issue the command:


debian-server:~# chmod 700
/etc/qmail.mrtg.cfg


5. You will now need to modify the qmail.mrtg.cfg according to
your needs

There you have to set a proper location where the qmailmrtg shall
generate it's html data files.

I use the /var/www/qmailmrtg qmailmrtg log file
location. If you will do so as well you have to create the
directory.


6. Create qmailmrtg html log files directory


debian-server:~# mkdir /var/log/qmailmrtg


6. Now all left is to set a proper cron line to periodically
invoke qmailmrtg in order to generate qmail activity
statistics.


Before we add the desired root's crontab instructions we have to
open the crontab for edit, using the command.


debian-server:~# crontab -u root -e


I personally use and recommend the following line as a line to be
added to root's crontab.


0-55/5 * * * * env LANG=C /usr/bin/mrtg /etc/qmail.mrtg.cfg
> /dev/null


7. Last step is to make sure Apache's configuration contains
lines that will enable you to access the qmail activity
statistics.


The quickest way to do that in Debian running Apache 2.2 is to edit
/etc/apache2/apache2.conf and add a directory Alias as
follows


Alias /qmailmrtg/ "/var/www/qmailmrtg/"


Now after Apache restart /etc/init.d/apache2
restart

You should be now able to access the qmail mrtg qmail log
statistics through your Apache's default configured host.

For instance, assuming your default configured Apache host is
domain.com. You'll be able to reach the qmailmrtg statistics
through an url like:


http://domain.com/qmailmrtg/


After I verified and ensured myself qmail mrtg is working correctly
after all the above explained steps partook I wasn't happy with
some headlines in the index.html and the html tile of
qmailmrtg,

so as a last step I manually edited the
/var/www/qmailmrtg/index.html to attune it to my
likings.


Here is a screenshot of the qmailmrtg web statistics in
action.
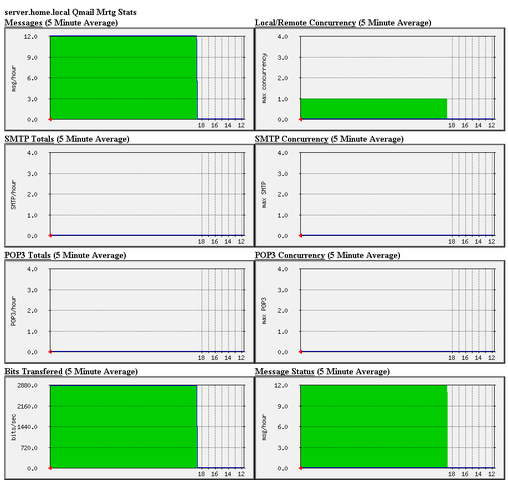
Sat Apr 17 21:01:46 EEST 2010
Add email commit notification to Subversion (SVN) / Setting up Subversion email notification with custom Subject
Ever wondered how to set up email
notification with specific subject for a Subversion Project? I bet
you did.
I was demanded today to conduct that in order to achieve it, here is what I did on a Debian Lenny server.
1. Copy your post-commit.tmpl to post-commit
2. Open post-commit and put in it:
The "-s" specifies the subject you'd like to have to your e-mail notification.
That's it if you have properly configured mail server at localhost. Then your email notification following each of the commits revisions should start poping up to your email.
I was demanded today to conduct that in order to achieve it, here is what I did on a Debian Lenny server.
1. Copy your post-commit.tmpl to post-commit
cp -rpf /var/svn-repos/your_repository/hooks/post-commit.tmpl
/var/svn-repos/your_repository/hooks/post-commit;
2. Open post-commit and put in it:
/usr/share/subversion/hook-scripts/commit-email.pl -s "TEST"
$REPOS $REV email_name@email.com
email_nam1@email.com
The "-s" specifies the subject you'd like to have to your e-mail notification.
That's it if you have properly configured mail server at localhost. Then your email notification following each of the commits revisions should start poping up to your email.
Fri Apr 16 20:53:05 EEST 2010
How to redirect http to https (port 80 to 443) with Apache 2.2 on Debian Lenny
If you're about to configure a
redirect of http to https, just like I was required to on a Debian
server. You'll probably wonder how to achieve that just, just like
I wondered today.
There are plenty of ways to solve the task, first thing that poped up on my mind was to use PHP redirect, however I rethinked over it and reconsidered that using php redirect is too heavy for the server in terms of performance.
This way though it's quick and easily achievable would execute the php code
Therefore I considered on to achieve the task on Apache level.
After a quick research on google I find the quick solution.
The whole solution comes to adding two lines of code to either your VirtualHost or the apache2.conf (on Debian) or httpd.conf or any name your Linux or FreeBSD distrubtion users for the Apache configuration file.
That's all now just restart Apache.
There are plenty of ways to solve the task, first thing that poped up on my mind was to use PHP redirect, however I rethinked over it and reconsidered that using php redirect is too heavy for the server in terms of performance.
This way though it's quick and easily achievable would execute the php code
header('Location: https://domain.com/index.html');
each time accessed, this on a loaded server will create a real
performance issues.Therefore I considered on to achieve the task on Apache level.
After a quick research on google I find the quick solution.
The whole solution comes to adding two lines of code to either your VirtualHost or the apache2.conf (on Debian) or httpd.conf or any name your Linux or FreeBSD distrubtion users for the Apache configuration file.
Redirect permanent / https://domain.com/
That's all now just restart Apache.
debian-server:~# /etc/init.d/apache2 restart
There you go your http to https redirect should be now in
action.Wed Apr 14 18:08:44 EEST 2010
Join .vob (DVD Video Media) files together / Create a joint .vob file from 5 separate .vob files in Windows
A friend of mine questioned me in
Skype, "How can he joint together" five DVD Video Media files on
Windows XP.
I thought that's a nice task and a straight forward too. As a command line guy the first line that poped up
in my mind was to do it through the good old command line (cmd).
After testing this "a bit" strange way to do it actually it prooved working.
So I decided to share it here in case if somebody out there is looking to join together a number of files in one
joint file.
My way to achieve the joint together vob files task was to:
1. Rename all of the 5 vob files
Rename the questionable Video Media files (vob) files to a file names as:
1.vob, 2.vob, 3.vob, 4.vob, 5.vob ...
etc. 2. Copy all the 1.vob 2.vob 3.vob 4.vob 5.vob to your Windows Desktop
3. Use the following Windows commands in Windows Command line (cmd.exe) to join together the five or more files
First open your Windows command line:
As you will have your windows command line opened now execute in the command line window:
Now your new_file.vob should e a joint version of the 5 others and you should have a whole
video file.
By the way it's an interesting fact worthy to mention that VOB files are VOB files are MPEG2 files with MUXED AUDIO.
which in simple terms means that the audio and video are stored together in the same track.
There is also another more "civilized" way to achieve the file joint between the few VOB files through a program found online called Squared5
The program is capable of even further help you with the joining of the vob files by giving you an opportunity to convert the DVD Video Media to other popular formats like for instance the MPEG1 or to AVI
Here is a quote directly taken from the square5's website:
The square5 file jointer and converter software is available both for Windows and Mac.
Happy jointing :)
I thought that's a nice task and a straight forward too. As a command line guy the first line that poped up
in my mind was to do it through the good old command line (cmd).
After testing this "a bit" strange way to do it actually it prooved working.
So I decided to share it here in case if somebody out there is looking to join together a number of files in one
joint file.
My way to achieve the joint together vob files task was to:
1. Rename all of the 5 vob files
Rename the questionable Video Media files (vob) files to a file names as:
1.vob, 2.vob, 3.vob, 4.vob, 5.vob ...
etc. 2. Copy all the 1.vob 2.vob 3.vob 4.vob 5.vob to your Windows Desktop
3. Use the following Windows commands in Windows Command line (cmd.exe) to join together the five or more files
First open your Windows command line:
Open:

Windows -> Start -> Run

Now in the Run box enter

cmd.exe
As you will have your windows command line opened now execute in the command line window:
cd Desktop

type 1.vob 2.vob 3.vob 4.vob 5.vob >> new_file.vob
Now your new_file.vob should e a joint version of the 5 others and you should have a whole
video file.
By the way it's an interesting fact worthy to mention that VOB files are VOB files are MPEG2 files with MUXED AUDIO.
which in simple terms means that the audio and video are stored together in the same track.
There is also another more "civilized" way to achieve the file joint between the few VOB files through a program found online called Squared5
The program is capable of even further help you with the joining of the vob files by giving you an opportunity to convert the DVD Video Media to other popular formats like for instance the MPEG1 or to AVI
Here is a quote directly taken from the square5's website:
MPEG Streamclip is a powerful free video converter, player,
editor for Mac and Windows. It can play

many movie files, not only MPEGs; it can convert MPEG files between
muxed/demuxed formats for

authoring; it can encode movies to many formats, including iPod; it
can cut, trim and join movies.

MPEG Streamclip can also download videos from YouTube and Google by
entering the page URL.
The square5 file jointer and converter software is available both for Windows and Mac.
Happy jointing :)
Tue Apr 13 19:55:22 EEST 2010
Some of the most important Symbols for Orthodox Christians in The Eastern Orthodox Church - Symbols in the Eastern Orthodox Christian Faith (Eastern Orthodox Symbolism) and Christian Symbolism in the Roman Catholic Church (Symbolism in Western Catholicism)
Yesterday, while browsing randomly I
came across an interesting webpage. The website is created by
Catholics with the idea to better explain the Catholic religion and
Symbolism.
Though as an Orthodox Christian my Catholic towards Roman Catholicism is only scientific, it's really interesting to see the common symbolism. Many of the Roman Catholic Symbols are equal symbol with the one we nowadays use in the orthodox church.
I presume this common symbolism between Orthodox and Roman Catholic church, has stayed the same from the time before the one and Only Holy Apostolic Church has split unto two.
To find out more about Roman Catholic symbolism please see the following links I've mirrored the information from Fisheater's website which is a great website targeting Roman Catholic layman. Everytihng on the website is explained in a simple everyday language without too much terminology which makes it a great resource for Roman Catholic Christians. It's really a strange and interesting fact let's call it a "co-incidence" that the inverted cross (upside-down) cross, also called "Peter's cross" on which saint Peter reached his martyrdom is also a symbol of Papacy .
It's a popular fact that nowadays Satanist use this cross for their "Black Masses" (Satanic Masses).
Here I'll share only the most notable Christian Symbolism which is also used in the Orthodox Church, Many of this symbolism was always bothering me while in Churches or Monasteries and was always pushing me to more and more questions without answers.
Since I don't have a theologian education and many of us the ordinary layman's in the church doesn't have the theologian education I hope this orthodox Christian symbolism shared here and it's meanings will be of a good interest to you.

Lamb
Lamb: symbol of Christ as the Paschal Lamb and also a symbol for Christians (as Christ is our Shepherd and Peter was told to feed His sheep).
This symbol is also presented in Bulgaria on the little yellow book they sell in our Bulgarian Orthodox Churches.
This tiny book contains the Divine Liturgy compiled by God's inspiration by st. John Chrysostom
If you're coming from an Catholic Background and you hold interest for Orthodox Christianity, as historically East Orthodox Christianity Symbol of Faith as well as basic doctrines were kept untouched, you might consider reading online here The Divine Liturgy by St. John Chrysostom
It's really important to say that the Divine Liturgy by St. John Chrysostom is the "backbone" of the church life, since it's the main and most served Liturgy in the eastern Orthodox Churches around the world.

Dove: symbol of the The Holy Spirit and used especially in representations of our Lord's Baptism and the Pentecost. It is also used to recall Noe's dove, a harbinger of hope.

"Chi-Rho" or "sigla": the letters "X" and "P," representing the first letters of the title "Christos," were eventually put together to form this symbol for Christ ("Chi" is pronounced "Kie"). It is this form of the Cross that the Emperor of Byzantia Constantine saw in his vision along with the Greek words, TOUTO NIKA, and which mean "in this sign thou shalt conquer.

"thau" or "tau": the T-shaped cross is mentioned in the Old Testament and is seen as a foreshadowing of the Cross of Christ.
Ezechiel 9:4:
"And the Lord said to him: Go through the midst of the city, through the midst of
Jerusalem: and mark Thau upon the foreheads of the men that sigh, and
mourn for all the abominations that are committed in the midst thereof."
I've noticed that the tau_cross is often worn by Orthodox Monks as "a badge" on their clothes somewhere in the right of their chest
The Greek Orthodox Cross This symbol is one of the earliest Christian symbols which emerged right after Christ's resurrection.
The Greek Cross has all fours members the same shape and form (crux quadrata) and usually suggests the Christian church rather than a symbol of Christ's suffering.

Jerusalem Cross: also called the "Crusaders' Cross," it is made up of 5 Greek Crosses which are said to symbolize a) the 5 Wounds of Christ; and/or b) the 4 Gospels and the 4 corners of the earth (the 4 smaller crosses) and Christ Himself (the large Cross). This Cross was a common symbol used during the wars against Islamic aggression. (see less stylized version at right)

Baptismal Cross: consisting of the Greek Cross with the Greek letter "X", the first initial of the title "Christ," this Cross is a symbol of regeneration, hence, its association with Baptism. Usually the Orthodox priest dress is decorated with a sign like this.

The Scarlet red Egg:
Church tradition has it that St. Mary Magdalen went to Rome and met with the Emperor Tiberius to tell him about the Resurrection of Jesus. She held out an egg to him as a symbol of this, and he scoffed, saying that a man could no more rise from the dead than that egg that she held could turn scarlet. The egg turned deep red in her hands, and this is the origin of Easter eggs, and the reason why Mary Magdalen is often portrayed holding a scarlet egg.

Ichtus (Ichthys) - The Fish:
Fish: the fish -- ever-watchful with its unblinking eyes -- was one of the most important symbols of Christ to the early Christians. In Greek, the phrase, "Jesus Christ, Son of God Savior," is "Iesous Christos Theou Yios Soter." The first letters of each of these Greek words, when put together, spell "ichthys," the Greek word for "fish" (ICQUS ). This symbol can be seen in the Sacraments Chapel of the Catacombs of St. Callistus. Because of the story of the miracle of the loaves and fishes, the fish symbolized, too, the Eucharist (see stylized fish symbol at right).

The Alpha-Omega symbol
Alpha, the first letter of the Greek alphabet, and Omega, the last letter of the Greek alphabet, became a symbol for Christ due to His being called "the First and the Last." The roots of symbolizing these attributes of God go back further, all the way to the Old Testament where, in Exodus 34:6, God is said to be "full of Goodness and Truth." The Hebrew spelling of the word "Truth" consists of the 3 letters "Aleph," "Mem," and "Thaw" -- and because "Aleph" and "Thaw" are the first and last letters of the Hebrew alphabet, the ancients saw mystical relevance in God's being referred to as "Truth." At any rate, the Greek Alpha and Omega as a symbol for Christ has been found in the Catacombs, Christian signet rings, post-Constantine coins, and the frescoes and mosaics of ancient churches.

The "IC XC Nika":
comes from Ancient Greek and was a widespread ancient Christian Symbol which is nowadays still present in the Eastern Orthodox Churches. IC XC Nika literally translated to english means "IC XC = Jesus Christ, NIKA = Glory to". In other words translated to modern english IC XC NIKA means Glory be to Jesus Christ!

The Holy Eucharist vessels used by Orthodox Priests This is the cup of salvation as also called during the Divine Liturgy each time, the Wine and the Blood that the priest prepares in that Holy Cup is transformed by The Holy Spirit into a veracious flesh and blood of our Lord Jesus Christ.

The byzantine coat of arms
is an ancient Christian symbol used in the early Byzantine Church, nowadays it can be observed only in the Orthodox Churches.
It symbolizes the power of the Byzantian empire under the guidance of the the Holy Lord and the Gospel Truths.

The Orthodox Bishop Crown is only worn by Bishops in the Orthodox Church. This crown indicates the Bishop's Church and spiritual (rank) and dignity.

Byzantine Orthodox or Russian Orthodox Cross
Is used most often by Eastern Catholics and Russian Orthodox, this Cross is the Byzantine Cross with the footrest at a diagonal. This slant is said to represent one of a few things:
- the footrest wrenched loose from the Christ's writhing in intense physical suffering; lower side representing "down," the fate of sinners, while the elevated side represents Heaven;
- the lower side represents the bad thief (known to us as Gestas through the apocryphal "Acts of Pilate" ("Gospel of Nicodemus") while the elevated side to Christ's right represents the thief who would be with Him in Paradise (St. Dismas);
- the "X" shape of the slanted "footrest" against the post symbolizes the cross on which St. Andrew was crucified.

The Megaloschema is a dress worn by schimonks. This monk rank is actually the highest possible rank an orthodox Christian monk can achieve. The symbolism on the dress is a brief form of:
IC XC (IECOYC XPICTOC) "Jesus Christ"
IC XC NIKA ("IECOYC XPICTOC NIKA") meaning: "Jesus Christ is Victorious"
The letters below IC XC Nika has a meaning - The Light of Christ shines on all X. X. X. X. - means "Christ bestows grace on Christians"
The 4 Omega signs is a symbol for: Vision of God Divine wonder
Then the T. K. P. G - Means "The Place of the Skull becomes Paradise" The text placed in the lowest translated to English is "Adam - The First Man"
and also is a symbol for the Place of the Skull (Golgotha).
In the Orthodox Church and the Church fathers teaches us that Golgotha or the Place of the Skull is the Place where the first man (Adam) was buried. And by God's divine providence coincides with the place where our Saviour Jesus Christ was crucified.
Orthodox Bishop dress / robe
This dress is only worn by Orthodox Christian Bishops.
The Cross with four lights emitating near the center of the cross This cross is actually used in more modern times as a Christian Orthodox symbol, The four lights coming out of the cross are added,
as the gospels speak that Christ is the Sun of righteousness
I've had quite a long time trying to figure out why exactly this cross is made with this 4 lights. It was a real joy when one time a priest told me the meaning.
It's interesting fact that most of the Roman Catholic's crosses nowdays have the four lights radiating from Christ's Crucifix or the Cross symbolizing the Crucifix.
This is all I will say for symbolism for now. I hope this Christian symbolism will shed some light on the matters of Symbolism in both the Orthodox and the Catholoic eastern Church. I'll be glad if somebody out there more literate on the subject comment on my post and correct me if I'm wrong with smething.
Though as an Orthodox Christian my Catholic towards Roman Catholicism is only scientific, it's really interesting to see the common symbolism. Many of the Roman Catholic Symbols are equal symbol with the one we nowadays use in the orthodox church.
I presume this common symbolism between Orthodox and Roman Catholic church, has stayed the same from the time before the one and Only Holy Apostolic Church has split unto two.
To find out more about Roman Catholic symbolism please see the following links I've mirrored the information from Fisheater's website which is a great website targeting Roman Catholic layman. Everytihng on the website is explained in a simple everyday language without too much terminology which makes it a great resource for Roman Catholic Christians. It's really a strange and interesting fact let's call it a "co-incidence" that the inverted cross (upside-down) cross, also called "Peter's cross" on which saint Peter reached his martyrdom is also a symbol of Papacy .
It's a popular fact that nowadays Satanist use this cross for their "Black Masses" (Satanic Masses).
Here I'll share only the most notable Christian Symbolism which is also used in the Orthodox Church, Many of this symbolism was always bothering me while in Churches or Monasteries and was always pushing me to more and more questions without answers.
Since I don't have a theologian education and many of us the ordinary layman's in the church doesn't have the theologian education I hope this orthodox Christian symbolism shared here and it's meanings will be of a good interest to you.
Lamb
Lamb: symbol of Christ as the Paschal Lamb and also a symbol for Christians (as Christ is our Shepherd and Peter was told to feed His sheep).
This symbol is also presented in Bulgaria on the little yellow book they sell in our Bulgarian Orthodox Churches.
This tiny book contains the Divine Liturgy compiled by God's inspiration by st. John Chrysostom
If you're coming from an Catholic Background and you hold interest for Orthodox Christianity, as historically East Orthodox Christianity Symbol of Faith as well as basic doctrines were kept untouched, you might consider reading online here The Divine Liturgy by St. John Chrysostom
It's really important to say that the Divine Liturgy by St. John Chrysostom is the "backbone" of the church life, since it's the main and most served Liturgy in the eastern Orthodox Churches around the world.
Dove: symbol of the The Holy Spirit and used especially in representations of our Lord's Baptism and the Pentecost. It is also used to recall Noe's dove, a harbinger of hope.
"Chi-Rho" or "sigla": the letters "X" and "P," representing the first letters of the title "Christos," were eventually put together to form this symbol for Christ ("Chi" is pronounced "Kie"). It is this form of the Cross that the Emperor of Byzantia Constantine saw in his vision along with the Greek words, TOUTO NIKA, and which mean "in this sign thou shalt conquer.
"thau" or "tau": the T-shaped cross is mentioned in the Old Testament and is seen as a foreshadowing of the Cross of Christ.
Ezechiel 9:4:
"And the Lord said to him: Go through the midst of the city, through the midst of
Jerusalem: and mark Thau upon the foreheads of the men that sigh, and
mourn for all the abominations that are committed in the midst thereof."
I've noticed that the tau_cross is often worn by Orthodox Monks as "a badge" on their clothes somewhere in the right of their chest
The Greek Orthodox Cross This symbol is one of the earliest Christian symbols which emerged right after Christ's resurrection.
The Greek Cross has all fours members the same shape and form (crux quadrata) and usually suggests the Christian church rather than a symbol of Christ's suffering.
Jerusalem Cross: also called the "Crusaders' Cross," it is made up of 5 Greek Crosses which are said to symbolize a) the 5 Wounds of Christ; and/or b) the 4 Gospels and the 4 corners of the earth (the 4 smaller crosses) and Christ Himself (the large Cross). This Cross was a common symbol used during the wars against Islamic aggression. (see less stylized version at right)
Baptismal Cross: consisting of the Greek Cross with the Greek letter "X", the first initial of the title "Christ," this Cross is a symbol of regeneration, hence, its association with Baptism. Usually the Orthodox priest dress is decorated with a sign like this.
The Scarlet red Egg:
Church tradition has it that St. Mary Magdalen went to Rome and met with the Emperor Tiberius to tell him about the Resurrection of Jesus. She held out an egg to him as a symbol of this, and he scoffed, saying that a man could no more rise from the dead than that egg that she held could turn scarlet. The egg turned deep red in her hands, and this is the origin of Easter eggs, and the reason why Mary Magdalen is often portrayed holding a scarlet egg.
Ichtus (Ichthys) - The Fish:
Fish: the fish -- ever-watchful with its unblinking eyes -- was one of the most important symbols of Christ to the early Christians. In Greek, the phrase, "Jesus Christ, Son of God Savior," is "Iesous Christos Theou Yios Soter." The first letters of each of these Greek words, when put together, spell "ichthys," the Greek word for "fish" (ICQUS ). This symbol can be seen in the Sacraments Chapel of the Catacombs of St. Callistus. Because of the story of the miracle of the loaves and fishes, the fish symbolized, too, the Eucharist (see stylized fish symbol at right).
The Alpha-Omega symbol
Alpha, the first letter of the Greek alphabet, and Omega, the last letter of the Greek alphabet, became a symbol for Christ due to His being called "the First and the Last." The roots of symbolizing these attributes of God go back further, all the way to the Old Testament where, in Exodus 34:6, God is said to be "full of Goodness and Truth." The Hebrew spelling of the word "Truth" consists of the 3 letters "Aleph," "Mem," and "Thaw" -- and because "Aleph" and "Thaw" are the first and last letters of the Hebrew alphabet, the ancients saw mystical relevance in God's being referred to as "Truth." At any rate, the Greek Alpha and Omega as a symbol for Christ has been found in the Catacombs, Christian signet rings, post-Constantine coins, and the frescoes and mosaics of ancient churches.
The "IC XC Nika":
comes from Ancient Greek and was a widespread ancient Christian Symbol which is nowadays still present in the Eastern Orthodox Churches. IC XC Nika literally translated to english means "IC XC = Jesus Christ, NIKA = Glory to". In other words translated to modern english IC XC NIKA means Glory be to Jesus Christ!
The Holy Eucharist vessels used by Orthodox Priests This is the cup of salvation as also called during the Divine Liturgy each time, the Wine and the Blood that the priest prepares in that Holy Cup is transformed by The Holy Spirit into a veracious flesh and blood of our Lord Jesus Christ.
The byzantine coat of arms
is an ancient Christian symbol used in the early Byzantine Church, nowadays it can be observed only in the Orthodox Churches.
It symbolizes the power of the Byzantian empire under the guidance of the the Holy Lord and the Gospel Truths.
The Orthodox Bishop Crown is only worn by Bishops in the Orthodox Church. This crown indicates the Bishop's Church and spiritual (rank) and dignity.
Byzantine Orthodox or Russian Orthodox Cross
Is used most often by Eastern Catholics and Russian Orthodox, this Cross is the Byzantine Cross with the footrest at a diagonal. This slant is said to represent one of a few things:
- the footrest wrenched loose from the Christ's writhing in intense physical suffering; lower side representing "down," the fate of sinners, while the elevated side represents Heaven;
- the lower side represents the bad thief (known to us as Gestas through the apocryphal "Acts of Pilate" ("Gospel of Nicodemus") while the elevated side to Christ's right represents the thief who would be with Him in Paradise (St. Dismas);
- the "X" shape of the slanted "footrest" against the post symbolizes the cross on which St. Andrew was crucified.
The Megaloschema is a dress worn by schimonks. This monk rank is actually the highest possible rank an orthodox Christian monk can achieve. The symbolism on the dress is a brief form of:
IC XC (IECOYC XPICTOC) "Jesus Christ"
IC XC NIKA ("IECOYC XPICTOC NIKA") meaning: "Jesus Christ is Victorious"
The letters below IC XC Nika has a meaning - The Light of Christ shines on all X. X. X. X. - means "Christ bestows grace on Christians"
The 4 Omega signs is a symbol for: Vision of God Divine wonder
Then the T. K. P. G - Means "The Place of the Skull becomes Paradise" The text placed in the lowest translated to English is "Adam - The First Man"
and also is a symbol for the Place of the Skull (Golgotha).
In the Orthodox Church and the Church fathers teaches us that Golgotha or the Place of the Skull is the Place where the first man (Adam) was buried. And by God's divine providence coincides with the place where our Saviour Jesus Christ was crucified.
Orthodox Bishop dress / robe
This dress is only worn by Orthodox Christian Bishops.
The Cross with four lights emitating near the center of the cross This cross is actually used in more modern times as a Christian Orthodox symbol, The four lights coming out of the cross are added,
as the gospels speak that Christ is the Sun of righteousness
I've had quite a long time trying to figure out why exactly this cross is made with this 4 lights. It was a real joy when one time a priest told me the meaning.
It's interesting fact that most of the Roman Catholic's crosses nowdays have the four lights radiating from Christ's Crucifix or the Cross symbolizing the Crucifix.
This is all I will say for symbolism for now. I hope this Christian symbolism will shed some light on the matters of Symbolism in both the Orthodox and the Catholoic eastern Church. I'll be glad if somebody out there more literate on the subject comment on my post and correct me if I'm wrong with smething.
Mon Apr 12 15:55:44 EEST 2010
Awstats cannot process /var/log/apache2/access.log file by default / Awstats cannot open Apache server log file on Debian by default and how to fix that
By default the permissions of
/var/log/apache2/ are as shown below:
This is quite restrictive, awstats runs by default with the www-data user which is actually the user name used by Apache webserver on Debian platform.
Therefore Awstats cannot swith to the /var/log/apache2/ directory and consequently cannot process the apache access.log file which by the way again has restrictive permissions as you can see below:
Thus it's necessery to work out the default Debian restrictive permissions to the Apache webserver logs to "allow" Awstats to be able to access the log files and consequently generate it's statistics.
To do that you have to allow all users to have a read access over both /var/log/apache2/access.log and /var/log/apache2/error.log otherwise you will receiver errors like:
So now to let's set some permissions to allow the www-data user to be able to access /var/log/apache2.
First way to do that is via executing:
This however from a security stand point is a complete bull-shit, that way everybody that has a physical ssh account on the server will be able to read your /var/log/apache2/.
Therefore you might try something else like for example:
Even if you do that, if /var/log/apache2/access.log and /var/log/apache2/error.log is the only log files on your webserver soon the permissions will broke once again, after the periodical logrotate is executed via the cron daemon.
To get around this annoyance you have to edit your /etc/logrotate.d/apache2 conf file and change substitute:
Well that's all, all left is to wait that the awstats is executed one more time through crond.
If you want to modify something to the way awstats is invoked via cron you have to edit:
Now hopefully your awstats should work just perfectly fine :)
drwxr-x--- 2 root adm 4096 Mar 21 14:18
/var/log/apache2/
This is quite restrictive, awstats runs by default with the www-data user which is actually the user name used by Apache webserver on Debian platform.
Therefore Awstats cannot swith to the /var/log/apache2/ directory and consequently cannot process the apache access.log file which by the way again has restrictive permissions as you can see below:
-rw-r----- 1 root adm 0 Sep 23 2009
access.log
Thus it's necessery to work out the default Debian restrictive permissions to the Apache webserver logs to "allow" Awstats to be able to access the log files and consequently generate it's statistics.
To do that you have to allow all users to have a read access over both /var/log/apache2/access.log and /var/log/apache2/error.log otherwise you will receiver errors like:
debian:~# sudo -u www-data /usr/bin/perl
/usr/lib/cgi-bin/awstats.pl -update -config=mydomain.org


Create/Update database for config
"/etc/awstats/awstats.mydomain.org.conf" by AWStats version 6.7
(build 1.892)

From data in log file "/var/log/apache2/access.log"...

Error: Couldn't open server log file "/var/log/apache2/access.log"
: Permission denied

Setup ('/etc/awstats/awstats.mydomain.org.conf' file web server or
permissions) may be wrong.

Check config file permissions and AWStats documentation (in 'docs'
directory).

debian:~#
So now to let's set some permissions to allow the www-data user to be able to access /var/log/apache2.
First way to do that is via executing:
debian:~# chmod 755 -R /var/log/apache2/*This however from a security stand point is a complete bull-shit, that way everybody that has a physical ssh account on the server will be able to read your /var/log/apache2/.
Therefore you might try something else like for example:
debian:~# chown 754 /var/log/apache2

After which you have to change the permissions for
/var/log/apache2/access.log and /var/log/apache2/error.log
to:

debian:~# chown 644 /var/log/apache2/access.log
/var/log/apache2/error.log
Even if you do that, if /var/log/apache2/access.log and /var/log/apache2/error.log is the only log files on your webserver soon the permissions will broke once again, after the periodical logrotate is executed via the cron daemon.
To get around this annoyance you have to edit your /etc/logrotate.d/apache2 conf file and change substitute:
create 640 root adm

with

create 644 root adm
Well that's all, all left is to wait that the awstats is executed one more time through crond.
If you want to modify something to the way awstats is invoked via cron you have to edit:
/etc/cron.d/awstatsNow hopefully your awstats should work just perfectly fine :)
Mon Apr 12 00:11:08 EEST 2010
Optimize, check and repair tables in MySQL, howto improve work with tables in MySQL
There are few quick tips that helps
if some unexpected downtime of your SQL server occurs.
Even though nowdays this won't happen too often with servers running with a good ups, sometimes even administrator errors can cause problems with your mysql tables.
If your MySQL server refuses to start, it's quite probable that you're experiencing a problem with a broken table or tables in MySQL.
Therefore you need to go through all your mysql databases and check the consistency of your MyISAM or Innodb tables, ofcourse accordingly to your MySQL database types.
To check a certain table for consistency with MySQL after you select the database, you have to execute:
If the above command after presumably executed with all your databases and there consequent tables reports, everytime OK then your MySQL crashes are not caused by table incosistencies.
However if instead of OK the CHECK TABLE reports Corruptthen you have a broken table and you have to fix it as soon as possible, in order to be able to bring up to life the MySQL server once again.
Here is an example of a broken table after a CHECK REPAIR searchindex; :
To fix the CORRUPTED or BROKEN table as also known you have to issue the command:
Depending on your table size after a while, if everything is going fine you should see something like:
Be aware that sometimes in order to fix a broken table you have to use the MySQL repair extended function.
Expect The EXTENDED REPAIR function option to take a much more time, even sometimes with large databases with million of records it could take hours, especially if the MySQL server is serving other client requests as well.
This terrible siutation sometimes occurs because of mysql locks, though I believe locks are probably a topic of another post.
Hopefully after issuing that the table in MySQL would properly repair and your MySQL will begin starting up with the rc script once again.
Apart from crashes and table repairs there are few nice things concerning MySQL that are doing me good every now and then.
I'm talking about the MySQL functions:
ANALYZE TABLE and OPTIMIZE TABLE
ANALYZE TABLE does synchronization of the information concerning the variables within tables that has a INDEX key settled according to the database to which they belong.
In other simply words, executing ANALYZE TABLE to your database tables every now and then and that would probably help in speeding up the code executed in the SQL that has JOINS involved.
The second one OPTIMIZE TABLE is natively supported with MyISAM SQL database types, and secondary supported with Innodb, where the Optimize with Innodb is done in a non-traditional way.
When invoked to process an Innodb table OPTIMIZE TABLE does use ALTER TABLE to achieve an Innodb table optimization.
In practice what the optimize table does is defragmentation of the table unto which it's executed.
A quick example of the optimize table is for instance:
In order to find out which tables need to be defragmented or in other words needs optimize table you have to issue the cmd:
Even though nowdays this won't happen too often with servers running with a good ups, sometimes even administrator errors can cause problems with your mysql tables.
If your MySQL server refuses to start, it's quite probable that you're experiencing a problem with a broken table or tables in MySQL.
Therefore you need to go through all your mysql databases and check the consistency of your MyISAM or Innodb tables, ofcourse accordingly to your MySQL database types.
To check a certain table for consistency with MySQL after you select the database, you have to execute:
mysql$ CHECK TABLE your_table_name;
If the above command after presumably executed with all your databases and there consequent tables reports, everytime OK then your MySQL crashes are not caused by table incosistencies.
However if instead of OK the CHECK TABLE reports Corruptthen you have a broken table and you have to fix it as soon as possible, in order to be able to bring up to life the MySQL server once again.
Here is an example of a broken table after a CHECK REPAIR searchindex; :
+------------------+-------+----------+------------------------------------+


| Table | Op | Msg_type | Msg_text |

+------------------+-------+----------+------------------------------------+


| test.searchindex | check | error | Key in wrong position at page
4096 |

| test.searchindex | check | error | Corrupt |

+------------------+-------+----------+------------------------------------+
To fix the CORRUPTED or BROKEN table as also known you have to issue the command:
mysql$ REPAIR TABLE yourtable_name;
Depending on your table size after a while, if everything is going fine you should see something like:
+------------------+--------+----------+----------+

| Table | Op | Msg_type | Msg_text |

+------------------+--------+----------+----------+

| test.searchindex | repair | status | OK |

+------------------+--------+----------+----------+

1 row in set (0.08 sec)
Be aware that sometimes in order to fix a broken table you have to use the MySQL repair extended function.
Expect The EXTENDED REPAIR function option to take a much more time, even sometimes with large databases with million of records it could take hours, especially if the MySQL server is serving other client requests as well.
This terrible siutation sometimes occurs because of mysql locks, though I believe locks are probably a topic of another post.
Hopefully after issuing that the table in MySQL would properly repair and your MySQL will begin starting up with the rc script once again.
Apart from crashes and table repairs there are few nice things concerning MySQL that are doing me good every now and then.
I'm talking about the MySQL functions:
ANALYZE TABLE and OPTIMIZE TABLE
ANALYZE TABLE does synchronization of the information concerning the variables within tables that has a INDEX key settled according to the database to which they belong.
In other simply words, executing ANALYZE TABLE to your database tables every now and then and that would probably help in speeding up the code executed in the SQL that has JOINS involved.
The second one OPTIMIZE TABLE is natively supported with MyISAM SQL database types, and secondary supported with Innodb, where the Optimize with Innodb is done in a non-traditional way.
When invoked to process an Innodb table OPTIMIZE TABLE does use ALTER TABLE to achieve an Innodb table optimization.
In practice what the optimize table does is defragmentation of the table unto which it's executed.
A quick example of the optimize table is for instance:
OPTIMIZE TABLE your_table_name;
In order to find out which tables need to be defragmented or in other words needs optimize table you have to issue the cmd:
show table status where Data_free!=0;


Note that you have to issue this command on each of your
databases;

Just because this is so boring you can of course use my
script check_optimize_sql.sh which will quickly loop through
all the databases and show you which tables need to be
optimized.


I've written also a second shell script that loops through all
MySQL databases and lists all databases and sub tables that
requires optimize and further on proceeds optimizing to
download the script check_and_optimize_sql_tables.sh click
here

Happy optimizing :)
Posted by hip0 |
Permanent link
Mon Apr 12 01:06:49 EEST 2010
Password Protecting single file with
htaccess password / Securing single exetubale in Apache with
password through htaccess
I have a running awstats
installation and needed a way to protect the cgi-bin statistics
with a password. Thanksfully there is a way to achieve that through
the Apache. To secure your let's say awstats.pl or any other
/cgi-bin/ executable with a password here is what you need to
do:


First make sure you have:

Allowoverride All directive enabled in your Apache
Directory permissions for the /cgi-bin/.


Next you will need to create an .htaccess file in your /cgi-bin/
directory . The file should contain something close to:


<FilesMatch "awstats.pl">

AuthName "Login Required"

AuthType Basic

AuthUserFile /var/www/awstats/.htpasswd

require valid-user

</FilesMatch>


Note that you need to paste the Filesmismatch in a proper syntax
otherwise that won't work, I quote it without the less than and
greater than signs intentionally :)

The above example presumes that you have created the
.htpasswd in /var/www/awstats/.

To create this file issue the command:


debian:~# htpasswd -c /var/www/awstats/.htpasswd
admin


That's all now your awstats installation or any other executable
specified in FileMatch would be created with a
password.
Fri Apr 9 17:42:41 EEST 2010
Generate Awstats Statistics from multiple Apache logs / Generate Awstats statistics for multiple domain names / Automatically configure awstats to show reports for multiple domain names
I've created a small shellscript that allows the administrator to build log statistics for multiple domain names.
You can download the script to generate statistics from multiple log files awstats_generate_multiple_sites.sh from here .
The usage of the script is quite self explanatory. You have to follow the instructions in the commented head of the script.
After you have properly configured the script all you have to do is set it to be executed via crontab.
Again in the script head I've included information with an example on how to add it to a crontab. The script takes all subdirectories from /var/log/apache2 assuming that each of the subdirectories contains access.log and error.log file names.
It generates a number of configuration files to be later red by awstats and after finishing, invokes awstats to generate the statistics from the previously generated awstats domain configuration files.
Finally the script generates an html files with links to each of the domains for whom awstats has generated statistics.
The idea for the script hit me, before a week time, after I've red an article which explains how to achieve something similar to what the script does manually.
You can read the article configuring multiple awstats for multiple domain on dreamhost here . I believe the script can be quite useful to the administrators out there who are looking for a quick way to generate awstats statistics from their many domain log files.
Cheers! :)
Fri Apr 9 13:48:14 EEST 2010
Enable Rsyslog and Syslog cron events logging in /var/log/cron.log on Debian Lenny
By default Debian doesn't log it's
cron events in a separate log file.
All the cron events got logged along with all the other syslog events configured by default in either syslog or rsyslog.
So you end up with a /var/log/syslog which includes many versatile messages. That's really unpleasent if you want to keep track of your cron events separately.
I always change this behaviour while configuring new servers or Desktop systems running Debian.
Therefore I decided to share here what I do to enable separate cron logging. The logged cron events would go to var/log/cron.log.
As a starter please make sure you have the file /var/log/cron.log existing on your filesystem tree, if you have it not then please create it:
To configure your crond to log to /var/log/cron.log on a system running syslogd all you have to do is edit /etc/syslog.conf and either include the line:
or simply uncomment the same line already laying commented in the syslog.conf.
If you're using the enhanced version of syslogd for Linux (Rsyslog) the code syntax that is necessery to be included is absolutely identical.
Again you have to include:
in /etc/rsyslog.conf or uncomment the line shown above in /etc/rsyslog.conf.
Now last step to do is to reload syslogd or rsyslogd.
With syslogd running on your system execute:
With rsyslogd as a default system logger:
Now you should have your crond logging to the separate /var/log/cron.log, wish you happy cron.log reading :)
All the cron events got logged along with all the other syslog events configured by default in either syslog or rsyslog.
So you end up with a /var/log/syslog which includes many versatile messages. That's really unpleasent if you want to keep track of your cron events separately.
I always change this behaviour while configuring new servers or Desktop systems running Debian.
Therefore I decided to share here what I do to enable separate cron logging. The logged cron events would go to var/log/cron.log.
As a starter please make sure you have the file /var/log/cron.log existing on your filesystem tree, if you have it not then please create it:
debian:~# touch /var/log/cron.log
To configure your crond to log to /var/log/cron.log on a system running syslogd all you have to do is edit /etc/syslog.conf and either include the line:
cron.* /var/log/cron.log
or simply uncomment the same line already laying commented in the syslog.conf.
If you're using the enhanced version of syslogd for Linux (Rsyslog) the code syntax that is necessery to be included is absolutely identical.
Again you have to include:
cron.* /var/log/cron.login /etc/rsyslog.conf or uncomment the line shown above in /etc/rsyslog.conf.
Now last step to do is to reload syslogd or rsyslogd.
With syslogd running on your system execute:
debian:~# killall -HUP syslogd
With rsyslogd as a default system logger:
debian:~# killall -HUP rsyslogd
Now you should have your crond logging to the separate /var/log/cron.log, wish you happy cron.log reading :)
Thu Apr 8 19:38:49 EEST 2010
The Name of The Rose (Der Name der Rose) - 1986 Movie

A week ago, I've watched the The Name of The Rose or as originally entitled (Der Name der Rose).
The movie was recommended to my by a friend, stressing out that the movie has to deal more or less with Christianity topics in general and Catholicism in general.
Though the movie plot is based on Umberto Eco's novel, and he as an author is not among my favourite authors.
The movie is definitely worth seeing, if you're Christian.
It's also an interesting fact that the movie includes some celebrities like:
Sean Connery and Christian Slater . The whole story revolves around a mystery that emerged in Medieval Abbey in Italy.
For some strange reason, few suicides occur among monks.
That completely puzzles the monk, so the monks in the brotherhood decide to invite a monk who is famous for his good skills in solving mysteries.
The investigating monk (William of Baskerville) arrives at the abbey with his young disciple.
It's interesting that William of Baskerville is a bit more thinker than a believer, so he refuses to accept the idea of the Abbot that the Devil is crawling the abbey and causes the suicides and misfortunes in the abbey.
After some deep investigation he comes to some conclusion and finds out that all the dead monks in the abbey has a black mark on their right hand finger as well as on their tongue.
This drives him to the idea that the monks were probably poisened.
A notable figure in the Movie is the Abbot who is an old monk whose possesing a vision/image of a prophet.
The old abbot is strongly against the logical approach in solving mysteries and completely trusts in God's providence.
Monk William of Baskerville as being a logical nature enters in a dispute with the abbot, where they blazingly argue if the monks should laugh or not, should they be allowed to read books with text including laughter or life parody or not.
The abbot is firmly against the idea of the enlightenment of man through books and believes the Christian Monk enlightenment should be achieved mostly through experience in prayer thank in Books.
As the movie progress since the killings in the monastery continue without any solution, the Catholic church sends the Holy Inquisition to solve the mystery.
The inquisition makes the situation even worse and the mystery deepens even further on.
Eventually it turns out that this Abbey actually, has a secret passage leading to one of the largest libraries of it's time.
The library holds thousands and thousand of books including many laughter books. As the abbot finds out about the discovery, he falls out in holy fear that the laughter books can emerge and be copied and multipled many times.
Opening the humour and laughter genry for the whole Church world as well for the laymen.
The superannuated monk realizes that this book transperancy could underneath the Church authority among people and therefore decides to burn the library putting on fire as he puts on fire the whole monastery tower containing the textbooks.
In the meantine the inquisition doesn't sleep and judges for a burning at the stake 3 people.
Among which are two monks, who the inquisition classifies as schismatics and a young village girl, who is captured in the monastery right before one of the monstreous monks attempts to rape her.
The girl is innocent as she is completely illiterate and doesn't have a clear idea on sin e.g. on what is right and what is wrong.
However at the end of the movie the girl, rightously survives by the Grace of the Virgin Mary, while the two dissenter monks are burnt out.
The movie touches one major theme in Christianity which is quite present even today, even though it's probably out of question among Orthodox Christians.
It discusses the problem should we Christians read many spiritual books to drawn closer to God or should we achieve our holiness in concentrating on prayer.
It deals with the problem which is poisoning many christians today.
Should we base our lifes on science or should we completely consider science fallacy most of the time?
The movie stand point is the same as mine as well as in the Orthodox Church.
While it tells the story it shows that, actually at the end everything is in God's hands, but however it presents that human factor is also important.
In other words I believe the movie teaches that, We should be moderate in all we do! and keep our faith while moderately evaluating our surrounding world.
Of course ultimately we should place our faith in our God and humble ourselves before him, but we shouldn't act as a madman and we should also consider the logic which was also created by God in the beginning.
Wed Apr 7 16:47:16 EEST 2010
Howto delete multiple files in Linux and FreeBSD / How to deal with "Argument list too long" error while deleting many files in directory
Linux has some Limitations on the
number of files you can delete within a directory, therefore if you
try to delete let's say 100000 files with a quarantine mails from
spamassassin.
In that case you are about to face an error Argument list too long . The amount of files you can delete in Linux is tied with something specified by a file:
/usr/include/linux/limits.h
This limitation is a limitation caused by kernel_limits. In order to check the limitation on your Linux distribution, you have to execute the command:
You should receive a result on most Linux distrubutions similar to:
#define ARG_MAX 131072 /* # bytes of args + environ for exec() */
The 131072 is actually a default limitation on Debian GNU/Linux as well. The reason for the error is that the the maximum number (in bytes) of the arguments to a command could be equal max to the ARG_MAX defined in the limits.h.
For instance rm -f * in a directory with 40000 fileswould be evaluted as rm -f file1 file2 file3 ... file40000. Therefore at a certain point the maximum limitation of 131072 bytes long for arguments or 128KB is about to be reached and then the command let's say ls * would refuse to list the files in the directory showing up the annoying Argument list too long error.
There are a couple of ways to deal with that unpleasant situation.
1. You can use the linux find command to delete the files, you have to execute after changing dir (cd) to the directory where the multiple files are located:
For instance execute the command:
3. In FreeBSD to get around the "Argument list too long" problem", in bash shell you have to execute:
4. Another possible way is to increase the ARG_MAX value in limits.h though this approach in my personal belief could have a negative impact on some productive servers, therefore it's not a recommended.
Yet if you desire to do so simply edit /usr/include/linux/limits.h and change the ARG_MAX to your value of choice.
In that case you are about to face an error Argument list too long . The amount of files you can delete in Linux is tied with something specified by a file:
/usr/include/linux/limits.h
This limitation is a limitation caused by kernel_limits. In order to check the limitation on your Linux distribution, you have to execute the command:
egrep ARG_MAX /usr/include/linux/limits.h
You should receive a result on most Linux distrubutions similar to:
#define ARG_MAX 131072 /* # bytes of args + environ for exec() */
The 131072 is actually a default limitation on Debian GNU/Linux as well. The reason for the error is that the the maximum number (in bytes) of the arguments to a command could be equal max to the ARG_MAX defined in the limits.h.
For instance rm -f * in a directory with 40000 fileswould be evaluted as rm -f file1 file2 file3 ... file40000. Therefore at a certain point the maximum limitation of 131072 bytes long for arguments or 128KB is about to be reached and then the command let's say ls * would refuse to list the files in the directory showing up the annoying Argument list too long error.
There are a couple of ways to deal with that unpleasant situation.
1. You can use the linux find command to delete the files, you have to execute after changing dir (cd) to the directory where the multiple files are located:
find . -exec rm -fr {} \;
2. Second approach to
the problem is passing the xargs command to find
.For instance execute the command:
find . -name "*" -print | xargs rm
3. In FreeBSD to get around the "Argument list too long" problem", in bash shell you have to execute:
for files in *.*; do rm -f $files; done
4. Another possible way is to increase the ARG_MAX value in limits.h though this approach in my personal belief could have a negative impact on some productive servers, therefore it's not a recommended.
Yet if you desire to do so simply edit /usr/include/linux/limits.h and change the ARG_MAX to your value of choice.
Wed Apr 7 15:47:00 EEST 2010
Howto delete empty directories in GNU /Linux with find linux command
Ever wondered how you can delete all
the empty directories in Linux?
I bet you did, there are many ways to achieve that in GNU/Linux, however here is one way you might go:
First it is probably a good idea to list the empty directories and examine the empty directories before you take the next step and execute a command to delete them:
Now after you take a close look in the directories, next step to partake is delete the directories.
Be aware that in the above examples, the first one would list all directories in your current directory in which you
execute the command, the second example will delete all the empty directories starting from your current directory unto the deepest located empty directory in the directory tree.
I bet you did, there are many ways to achieve that in GNU/Linux, however here is one way you might go:
First it is probably a good idea to list the empty directories and examine the empty directories before you take the next step and execute a command to delete them:
find . -depth -type d -empty
Now after you take a close look in the directories, next step to partake is delete the directories.
find . -depth -type d empty -exec rmdir {}
\;
Be aware that in the above examples, the first one would list all directories in your current directory in which you
execute the command, the second example will delete all the empty directories starting from your current directory unto the deepest located empty directory in the directory tree.
Sun Apr 4 16:42:51 EEST 2010
Christ is Risen! - Truly he is Risen! Hristos Voskrese! Voistinu Voskrese!

Christ is risen from the dead, trampling on death by death, and on those in the tombs bestowing life.Christ is Risen!Indeed He is Risen!
Check out the Paschal Greeting which is common to be pronounced as a hello greetin the Eastern Orthodox Church.
Also widely common practice in Bulgaria during The day of the Glorious Resurrection of our Lord and Saviour Jesus Christ!
Sat Apr 3 20:32:22 EEST 2010
Today it's Holy Saturday or the Great Sabbath day (The day in which Jesus Christ rested physically in the tomb) right before the Lord's Resurrection
It's Holy
Friday . It's the day in which our Lord and Saviour Jesus
Christ's dead body was resting in the "tomb" as the Gospels from
the New Testament teaches.
Today we in the Orthodox Church held a late Church service to honour for a last time the Lord's death holding the deep spiritual grief for his betrayal and death on the cross.
We also wait with expectancy the Son of God's resurrection which as the Holy Scriptures teaches has been found Risen! by the Our Holy Virgin Mary and Mary Magdalene.
We at are on about to enter the joyous part of the year. The time of miracles and great Divine Grace.
The Son of God is Dead but yet he should rise again as he has already resurrect some 20 centuries earlier.
We are about to be enlighten once again with his Never ending holy Light, through the Church service to be held this night.
In Bulgaria the Church service usually starts about 23:30 and usually continues until 02:30 early in the Morning.
We also have the practice to pick up the burning light from the priest's candle in the Church and bring it home.
We believe this transfers God's grace in both our hearts, mind soul as well as our homes. This is being done as we expect that God blesses us with this act with a good spiritual and physical health.
It's also important to note that on this day each year the the Holy Fire comes down from heaven in the Jerusalem Temple Church (The Holy Sepulchre) and lights up the Jerusalem's Orthodox Patriarch (High Priest)'s Candle.
This is undoubtfully a miracle that proofs the truthfulness of the Orthodox Faith. This also proofs that our Orthodox Faith Church as well as tradition is the puriest Christian faith available for us the Christians of this age!
This Holy Fire after is usually distributed among the Orthodox Christian Churches around the world using planes with candles burning with the the Holy Fire.
The fire is being brouhgt to Bulgarian Orthodox Church from Jerusalem through a plane, right after it descends from Heaven and is being distributed to the Major cities, towns and villages.
Then we the normal church layman can benefit from the fire, lighting up our candles from this Holy Fire and in that find God's Grace both by God and in God (The Holy Trinity).
Here is a link to the Video of the Holy Fire Ceremony from Jerusalem 2010.
So Thanks and Glory to our Holy God for his great miracle! Glory be to our Holy Lord (The Father, The Son and the Holy Spirit) now and unto ages of Ages! Amen.
Fri Apr 2 20:13:07 EEST 2010
Some Helpful Subversion (SVN) general repository managing commands when you have to deal with Subversion on Debian Lenny servers
When I started with subversion it was
a bit chaotic for me to grasp the subversion repository software
basics.
Since I know there are many other people like me who are a novice into suversion I decided to post few of the
life saving (vital) subversion commands, I learned and use quite often this days.
This post should be considered as a very very overview of subversion commands. For more information please check, The subversion red-bean book here .
So here we go:
1. First To create repository after installing subversion you need to execute something similar to:
In the above example /path/to/repos is actually the path to where you store the svn repositories, and repo is actually the repository name.
By the way note that by default svnadmin would create the repository in the fsfs database format, even if you skip the,
fsfs option. 2. Let's say you want to import some code into the newly created repository located in /path/to/repo via the local filesystem.
Here is how:
In the forementioned example the, -m and the following text: "importing directory in svn over local filesystem" is for description of the importing data,
the ~/directory_to_import/ is the directory you prefer to import into the local repository, the code left,
files:///path/to/repo/trunk specifies that you want to import the data into the repository subdirectory "trunk".
Then again let's assume that you want to achieve a file import into a newly created repository through ssh + the apache mod_dav_svn
It's pretty easy the above should be changed to:
Now as we have imported our program source code into the repository, next it's important to checkout the code to have a current copy of the source code.
3. To checkout code already existing in some repository in your subversion server via (svn+ssh) protocol, you need to execute some command similar to:
Here again as a first protocol argument (svn+ssh://) it's necessery to enter path/to/repos/repo/trunk and as a second argument to gsvn (the subversion command line client interface) we put ~/checkout_into_directory/ , it's a nice idea to to create the checkout_into_directory beforehead.
Now if we have to checkout the code after we've been logged in the system and the repository database is locally stored on the same server as we are, we have to execute:
Take a note that in the example above I use the root user but possibly you would choose a non-privileged user, therefore you should have properly set both physical user account permissons on the subversion repository database (e.g. chown your /path/to/repos/repo/ and put your local user into the proper /etc/groups).
Another truly precious command that you will probably need to use on daily and hourly basis would probably be:
4. The listing of repository content cmd, in order to do that while locally logged on the server with the svn repository execute:
I believe the above command is self-explanatory enough, in case if you plan to do file listing within the svn repository over (ssh+svn) here is how:
Again, I won't take the time to explain since the logic in the syntax is equal to the one exhibited beforehead.
5. Another handy thing to do with your subversion repository content after checkout is the subversion source repository update
the svn update The checkout will enable you to always synchronize your ~/checkout_into_directory to the latest stable version of the code within your svn repository.
So after the first checkout it would be good idea to use svn update and update your repository project source tree.
So here is how:
So now as I have shown most basic operations with subversion, Lest important to show you is
6. How to delete source from a repository in subversion.
In order to delete some part from your subversion repository project source from the local filesystem use:
This command would completely erradidacate some_directory from your example repo. Yet if you desire to delete a file specify a file instead of the some_directory
Now to accomplish the same delete operation via (svn+ssh) execute something like:
Once again I won't bother to explain the above example code, cause I believe it's clear enough for everybody to understand.
7. To reverse your project code to some stable release of your source code existing in the repository you should use something like:
8. To commit code with changes in your subversion repository use a command like:
The svn command line interface is also capable of svn copy and svn rename in order to either,
copy or rename commited source, however I won't get into details on that just experiment and you'll quickly master them.
9. Now one last thing I'm gonna tell you about is the subversion svn info command and svn status . This really useful command should be used to check information on your source tree after you have either checked it out or have used svn update to have the latest copy of it. This is an absolute necessity.
Here is how to check the information assigned about the version release and some other useful info for your source tree.
Yet another useful one on project status is:
Since I know there are many other people like me who are a novice into suversion I decided to post few of the
life saving (vital) subversion commands, I learned and use quite often this days.
This post should be considered as a very very overview of subversion commands. For more information please check, The subversion red-bean book here .
So here we go:
1. First To create repository after installing subversion you need to execute something similar to:
debian-server:~# svnadmin create --fs-type fsfs
/path/to/repos/repo
In the above example /path/to/repos is actually the path to where you store the svn repositories, and repo is actually the repository name.
By the way note that by default svnadmin would create the repository in the fsfs database format, even if you skip the,
fsfs option. 2. Let's say you want to import some code into the newly created repository located in /path/to/repo via the local filesystem.
Here is how:
# imports in the subversion repository debian-server:~# svn
import -m "importing directory in svn over local filesystem"
\

~/directory_to_import/ files:///path/to/repos/repo/trunk
In the forementioned example the, -m and the following text: "importing directory in svn over local filesystem" is for description of the importing data,
the ~/directory_to_import/ is the directory you prefer to import into the local repository, the code left,
files:///path/to/repo/trunk specifies that you want to import the data into the repository subdirectory "trunk".
Then again let's assume that you want to achieve a file import into a newly created repository through ssh + the apache mod_dav_svn
It's pretty easy the above should be changed to:
debian-server:~# svn import -m "importing directory in svn
over mod_dav_svn e.g. (svn+ssh)" \

~/directory_to_import/
svn+ssh://user@host/path/to/repos/repo/trunk
of course
it preliminary that you input a proper user and host or
ip address as you have previously configured the mod_dav_svn,
then again svn+ssh specifies the protocol type.Now as we have imported our program source code into the repository, next it's important to checkout the code to have a current copy of the source code.
3. To checkout code already existing in some repository in your subversion server via (svn+ssh) protocol, you need to execute some command similar to:
debian-server:~# svn co
svn+ssh://user@host/path/to/repos/repo/trunk
~/checkout_into_directory/
Here again as a first protocol argument (svn+ssh://) it's necessery to enter path/to/repos/repo/trunk and as a second argument to gsvn (the subversion command line client interface) we put ~/checkout_into_directory/ , it's a nice idea to to create the checkout_into_directory beforehead.
Now if we have to checkout the code after we've been logged in the system and the repository database is locally stored on the same server as we are, we have to execute:
debian-server:~# svn co files://path/to/repos/repo/trunk
~/checkout_into_directory/
Take a note that in the example above I use the root user but possibly you would choose a non-privileged user, therefore you should have properly set both physical user account permissons on the subversion repository database (e.g. chown your /path/to/repos/repo/ and put your local user into the proper /etc/groups).
Another truly precious command that you will probably need to use on daily and hourly basis would probably be:
4. The listing of repository content cmd, in order to do that while locally logged on the server with the svn repository execute:
debian-server:~# svn list
file:///path/to/repos/repo/trunk
I believe the above command is self-explanatory enough, in case if you plan to do file listing within the svn repository over (ssh+svn) here is how:
debian-server:~# svn list --verbose
svn+ssh://user@host/path/to/repos/repo/trunk
Again, I won't take the time to explain since the logic in the syntax is equal to the one exhibited beforehead.
5. Another handy thing to do with your subversion repository content after checkout is the subversion source repository update
the svn update The checkout will enable you to always synchronize your ~/checkout_into_directory to the latest stable version of the code within your svn repository.
So after the first checkout it would be good idea to use svn update and update your repository project source tree.
So here is how:
debian-server:~# svn update
~/checkout_into_directory/
So now as I have shown most basic operations with subversion, Lest important to show you is
6. How to delete source from a repository in subversion.
In order to delete some part from your subversion repository project source from the local filesystem use:
debian-server:~# svn delete
files:///path/to/repos/repo/track/some_directory
This command would completely erradidacate some_directory from your example repo. Yet if you desire to delete a file specify a file instead of the some_directory
Now to accomplish the same delete operation via (svn+ssh) execute something like:
debian-server:~# svn delete
svn+ssh://user@host/path/to/repos/repo/track/some_directory
Once again I won't bother to explain the above example code, cause I believe it's clear enough for everybody to understand.
7. To reverse your project code to some stable release of your source code existing in the repository you should use something like:
debian-serve~:# svn checkout -r 4
files:///path/to/repos/repo/trunk

This would checkout the project source to it's 4th release from the
repository: repo
8. To commit code with changes in your subversion repository use a command like:
debian-server:~# svn commit -m "Some description text"
some_directory/
The svn command line interface is also capable of svn copy and svn rename in order to either,
copy or rename commited source, however I won't get into details on that just experiment and you'll quickly master them.
9. Now one last thing I'm gonna tell you about is the subversion svn info command and svn status . This really useful command should be used to check information on your source tree after you have either checked it out or have used svn update to have the latest copy of it. This is an absolute necessity.
Here is how to check the information assigned about the version release and some other useful info for your source tree.
debian-server:~# svn info ~/check_into_directory

or you might type svn info without arguments as well

debian-server:~# svn info
Yet another useful one on project status is:
debian-server:~# svn status
Thu Apr 1 17:38:44 EEST 2010
Fix to a problem with Varnish Cache not showing Apache's .htm files extension on FreeBSD
I'm running my Apache server behind a
Varnish Cache server. At most of the time all works okay, however
today I've noticed a significant problem.
The problem consists in the fact that whenever I have directory listing enabled for some directory and I have dropped some .htm files, the htm files wouldn't open as a proper html but instead the following message appears on click over some of the htm files:.
Here is also a screenshot of the error You have choosen to open ... which is a: PHTML file:
At the beginning I though the error is caused by Apache and it was kind of weird since Apache my Apache serves a bunch of .html files without any issues.
It took me a while to realize that actually the problem is caused by the Varnish Cache server.
I digged my head into Varnish configuration, in hope to find something mentioned in the documentation but I couldn't find anything meaningful there.
So after a while I decided to start experimenting with Apache.
Invoking the files directly on the port where I have Apache listening prooved me that Apache doesn't have any problems with passing the .htm files content with a proper Application Type.
But anyways since I couldn't find nothing in Varnish documentation, I've tried changing some stuff into my Apache configuration until finally I solved it!
The whole issue got solved by simply adding the following line in my Apache configuration file httpd.conf in my case on my FreeBSD
A simple Apache and Varnish restart and Hoooray, It Works again! :D
The problem consists in the fact that whenever I have directory listing enabled for some directory and I have dropped some .htm files, the htm files wouldn't open as a proper html but instead the following message appears on click over some of the htm files:.
You have choosen to open 1.htm

which is a: PTHML file

from: http://myurl.com/

What should firefox do with this file?

(*) Open With (Browse ...)

( ) Save File ...
Here is also a screenshot of the error You have choosen to open ... which is a: PHTML file:
At the beginning I though the error is caused by Apache and it was kind of weird since Apache my Apache serves a bunch of .html files without any issues.
It took me a while to realize that actually the problem is caused by the Varnish Cache server.
I digged my head into Varnish configuration, in hope to find something mentioned in the documentation but I couldn't find anything meaningful there.
So after a while I decided to start experimenting with Apache.
Invoking the files directly on the port where I have Apache listening prooved me that Apache doesn't have any problems with passing the .htm files content with a proper Application Type.
But anyways since I couldn't find nothing in Varnish documentation, I've tried changing some stuff into my Apache configuration until finally I solved it!
The whole issue got solved by simply adding the following line in my Apache configuration file httpd.conf in my case on my FreeBSD
AddHandler application/x-httpd-php .htm .html
.phtml
A simple Apache and Varnish restart and Hoooray, It Works again! :D
Thu Apr 1 15:40:35 EEST 2010
Today is the Maundy Thursday
Today on Maundy Thursday(The
Thursda of Mysteries) , we the Orthodox Chrsitians, celebrate
one of the greatest Christian feasts.
It's the day in which we commemorate the Passion, Death and Resurrection of our Lord and Saviour Jesus Christ.
Tomorrow this great day is followed by the "Good Friday" or the day in which we commemorate the crucifixion of the saviour and his death on the Calvary.
Today we at the Bulgarian Church as an Orthodox Christians honour the greatness of the Holy Eucharist that our Lord has bequethed us.
It's a common practice in the Bulgarian Orthodox Church on that day that believing orthodox Christians receive the sacraments.
Let us be vigilant and honour the Son of God's Holy Supper, Death and Resurrection in this day of grief and with spiritual sorrow remember and confess our sins, with deep realization for our unworthiness to be with the our Lord Jesus Christ.