October 2011 Archives
Sun Oct 30 00:01:14 EEST 2011
How to set a crontab to execute commands on a seconds time interval on GNU / Linux and FreeBSD
Have you ever been in need to
execute some commands scheduled via a crontab, every let's say 5
seconds?, naturally this is not possible with crontab, however
adding a small shell script to loop and execute a command or
commands every 5 seconds and setting it up to execute once in a
minute through crontab makes this possible.
Here is an example shell script that does execute commands every 5 seconds:
This script will issue a sleep every 5 seconds and execute the two commands defined as $command1_to_exec and $command2_to_exec
Copy paste the script to a file or fetch exec_every_5_secs_cmds.sh from here
The script can easily be modified to execute on any seconds interval delay, the record to put on cron to use with this script should look something like:
Where of course /path/to/exec_every_5_secs_cmds.sh needs to be modified to a proper script name and path location.
Another way to do the on a number of seconds program / command schedule without using cron at all is setting up an endless loop to run/refresh via /etc/inittab with a number of predefined commands inside. An example endless loop script to run via inittab would look something like:
To run the above sample never ending script using inittab, one needs to add to the end of inittab, some line like:
A quick way to add the line from consone would be with echo:
Of course the proper paths, should be put in:
Then to load up the newly added inittab line, inittab needs to be reloaded with cmd:
Here is an example shell script that does execute commands every 5 seconds:
#!/bin/bash command1_to_exec='/bin/ls';
command2_to_exec='/bin/pwd'; for i in $(echo 1 2 3 4 5 6 7 8 9 10
11); do sleep 5; $command1_to_exec; $command2_to_exec;
done
This script will issue a sleep every 5 seconds and execute the two commands defined as $command1_to_exec and $command2_to_exec
Copy paste the script to a file or fetch exec_every_5_secs_cmds.sh from here
The script can easily be modified to execute on any seconds interval delay, the record to put on cron to use with this script should look something like:
# echo '* * * * * /path/to/exec_every_5_secs_cmds.sh' |
crontab -
Where of course /path/to/exec_every_5_secs_cmds.sh needs to be modified to a proper script name and path location.
Another way to do the on a number of seconds program / command schedule without using cron at all is setting up an endless loop to run/refresh via /etc/inittab with a number of predefined commands inside. An example endless loop script to run via inittab would look something like:
while [ 1 ]; do

/bin/ls

sleep 5;

done
To run the above sample never ending script using inittab, one needs to add to the end of inittab, some line like:
mine:234:respawn:/path/to/script_name.sh
A quick way to add the line from consone would be with echo:
echo 'mine:234:respawn:/path/to/script' >>
/etc/inittab
Of course the proper paths, should be put in:
Then to load up the newly added inittab line, inittab needs to be reloaded with cmd:
# init q
Fri Oct 28 16:20:50 EEST 2011
Cause and solution for Qmail sent error "Requested action aborted: error in processing Server replied: 451 qq temporary problem (#4.3.0)"
One of the qmail servers I
manage today has started returning strange errors in Squirrel
webmail and via POP3/IMAP connections with Thunderbird.
What was rather strange is if the email doesn't contain a link to a webpage or and attachment, e.g. mail consists of just plain text the mail was sent properly, if not however it failed to sent with an error message of:
Requested action aborted: error in processing Server replied: 451 qq temporary problem (#4.3.0)
After looking up in the logs and some quick search in Google, I come across some online threads reporting that the whole issues are caused by malfunction of the qmail-scanner.pl (script checking mail for viruses).
After a close examination on what is happening I found out /usr/sbin/clamd was not running at all?!
Then I remembered a bit earlier I applied some updates on the server with apt-get update && apt-get upgrade , some of the packages which were updated were exactly clamav-daemon and clamav-freshclam .
Hence, the reason for the error:
was pretty obvious qmail-scanner.pl which is using the clamd daemon to check incoming and outgoing mail for viruses failed to respond, so any mail which contained any content which needed to go through clamd for a check and returned back to qmail-scanner.pl did not make it and therefore qmail returned the weird error message.
Apparently for some reason apparently the earlier update of clamav-daemon failed to properly restart, the init script /etc/init.d/clamav-daemon .
Following fix was very simple all I had to do is launch clamav-daemon again:
Afterwards the error is gone and all mails worked just fine ;)
What was rather strange is if the email doesn't contain a link to a webpage or and attachment, e.g. mail consists of just plain text the mail was sent properly, if not however it failed to sent with an error message of:
Requested action aborted: error in processing Server replied: 451 qq temporary problem (#4.3.0)
After looking up in the logs and some quick search in Google, I come across some online threads reporting that the whole issues are caused by malfunction of the qmail-scanner.pl (script checking mail for viruses).
After a close examination on what is happening I found out /usr/sbin/clamd was not running at all?!
Then I remembered a bit earlier I applied some updates on the server with apt-get update && apt-get upgrade , some of the packages which were updated were exactly clamav-daemon and clamav-freshclam .
Hence, the reason for the error:
451 qq temporary problem (#4.3.0)was pretty obvious qmail-scanner.pl which is using the clamd daemon to check incoming and outgoing mail for viruses failed to respond, so any mail which contained any content which needed to go through clamd for a check and returned back to qmail-scanner.pl did not make it and therefore qmail returned the weird error message.
Apparently for some reason apparently the earlier update of clamav-daemon failed to properly restart, the init script /etc/init.d/clamav-daemon .
Following fix was very simple all I had to do is launch clamav-daemon again:
linux:~# /etc/inid.d/clamav-daemon restart
Afterwards the error is gone and all mails worked just fine ;)
Fri Oct 28 13:48:46 EEST 2011
How to Screenshot single Windows on GNU / Linux GNOME Desktop
Every now and then I have to
screenshot particular windows positioned on the screen on my
GNOME Desktop envronment
Recently I was happy to find there is a very easy way to do this with the default Screenshotting program that is bundled with gnome gnome-screenshot
To screenshot a particular window using gnome-screenshot , its quite easy all one has to do is point the mouse cursor to the window he wants to snapshot and press:
Here is a screenshot, I've taken of my gnome-terminal using the above command:
One can do it also via the command line using the /usr/bin/gnome-screenshot , by pressing Alt + F2 to invoke the run application and type in:
Recently I was happy to find there is a very easy way to do this with the default Screenshotting program that is bundled with gnome gnome-screenshot
To screenshot a particular window using gnome-screenshot , its quite easy all one has to do is point the mouse cursor to the window he wants to snapshot and press:
Alt + PrtScr (Print Screen)
Here is a screenshot, I've taken of my gnome-terminal using the above command:
One can do it also via the command line using the /usr/bin/gnome-screenshot , by pressing Alt + F2 to invoke the run application and type in:
/usr/bin/gnome-screenshot -wThu Oct 27 18:06:52 EEST 2011
How to protect Munin Web statistics with password on GNU / Linux
I just installed munin to
track in web the performance of few Debian servers. I've configured
munin to open via a Virtualhosts in Apache. As its always
wise to protect any statistics data about the server from the
unwanted possible security violators, I decided to protect Munin
with Apache .htaccess.
The munin htmldir output dir is configured to be in /var/www/munin, hence I protected my munin with password by:
1. Creating .htaccess file in /var/www/munin with following content
2. Creating /etc/apache2/.munin_htpasswd with htpasswd (htaccess password generator cmd)
Another important thing I had to do is set my VirtualHost file to be configured with AllowOverride All , if AllowOverride All is missing the .htaccess and .htpasswd are not red at all.
Afterwards munin is protected with password, and when my virtualdomain where munin lays e.g. http://munin.mydomain.com is accessed the .htpasswd password dialog pops up ;)
The munin htmldir output dir is configured to be in /var/www/munin, hence I protected my munin with password by:
1. Creating .htaccess file in /var/www/munin with following content
AuthUserFile /etc/apache2/.munin_htpasswd

AuthGroupFile /dev/null

AuthName EnterPassword

AuthType Basic


require user admin
2. Creating /etc/apache2/.munin_htpasswd with htpasswd (htaccess password generator cmd)
debian:/var/www/munin# htpasswd -c
/etc/apache2/.munin_htpasswd admin

New password:

Re-type new password:

Adding password for user admin
Another important thing I had to do is set my VirtualHost file to be configured with AllowOverride All , if AllowOverride All is missing the .htaccess and .htpasswd are not red at all.
Afterwards munin is protected with password, and when my virtualdomain where munin lays e.g. http://munin.mydomain.com is accessed the .htpasswd password dialog pops up ;)
Thu Oct 27 11:42:27 EEST 2011
How to fix multiple instance music streams with sound card (Intel 82801I ICH9 Family) alsa sound problems on Ubuntu 11.04 GNU / Linux
The Ubuntu Linux installed previously on Acer ASPIRE 5736Z on my sisters notebook works quite fine. However today she complained about an issue with her sound. The explanation of the problem she faced is:
When she plays a movie file and pauses it and then switches to a music player, suddenly the notebook sound disappears completely until she restarts all the running problems using the sound server. The Acer Aspire is used with a GNOME Desktop, hence my bet was the issues are most probably caused by some kind of mess happening inside Pulseaudio or the way Alsa loaded kernel drivers handles the multiple sound channel streams.
I'm using GNU / Linux for more than 11 years now and I have faced the same sound issues so many times, so when I heard about the problem I thought its pretty normal.
Anyways, what was really irritating in these situation is that when her laptop sound disappears all videos with a video or sound files which are to be played by Mozilla Firefox Browser or Chrome are also gone.
This causes big issues, especially taking in consideration the fact that she had no idea about computers and is a GUI Desktop user, who have no idea how to restart the pulseaudio server to fix the problem etc.
As a good brother, I took the time to check about the issues related to the specific model of Audio Module Hardware / Sound Card, first I checked the exact model of audio the Acer Aspire 5736Z is equipped with:
stanimiraaaa@Ubuntu-Aspire-5736Z:~$ lspci |grep -i
audio

00:1b.0 Audio device: Intel Corporation 82801I (ICH9 Family) HD
Audio Controller (rev 03)
I checked about any reported other users issues on the net and I found a user somewhere (lost the link), complaining he is experiencing the same sound oddities on his Acer ASPIRE
The fix he suggested is actually quite simple and comes to adding a simple line to /etc/modprobe.d/alsa-base.conf :
stabunura@Ubuntu-Aspire-5736Z:~$ sudo su -

[sudo] password for stanimiraaaa:

root@Ubuntu-Aspire-5736Z:~# echo 'options snd_hda_intel model=auto'
>> /etc/modprobe.d/alsa-base.conf
Next I restartarted to make the new settings take, affect. Its also possible to do it without restart, by unloading and loading the alsa module but I'm a lazy kind of person and the machine is notable unimportant so why should I bother ;)
One important note here is that I removed also an .asoundrc file, that I created some long time ago and this file might have been creating also some sound issues, the content of ~/.asoundrc, before I delete it in her home user, was like so:
stabunura@Ubuntu-Aspire-5736Z:~$ cat ~/.asoundrc

pcm.!default {

type hw

card 1

device 0

}

ctl.!default { type hw

card 1

device 0

}
Doing this minor changes to the Ubuntu system erradicated the sound problems and now the sound with simultaneous sound streams works just perfect! Thx God ;)
Wed Oct 26 20:31:18 EEST 2011
John McCarthy Creator, The Father of Modern Artificial Intelligence and Lisp programming language craetor passed away at 84

Yesterday night, one more Computer Genius - John McCarthy has passed away at the age of 84.
John McCarthy is mostly famous for the creation of Lisp Programming language, which was probably the most used programming language in the short past. There are plenty of corporate old iron hardwares which still run programs written in Lisp. Lisp is the language in which Richard Stallman has created his so famous EMACS text editor for GNU.
Computer Technology students, should have studied certainly Lisp in the form of Lisp Scheme.
Lisp is the the second oldest high level programming language only to be predeceded by Fortran .
Lisp gave birth to the so called Macro programming languages
and was invented by McCarthy in 1958, while he was in Massachusetts MIT university.
What is so important about Lisp is that it is de-facto the first language in the world which was written to be suitable for AI (Artificial Intelligence) researches. There is plenty of interesting information about Lisp as well as a number of forks and variations circulating for almost all the existing major operating systems nowdays.
Besides LISP creation McCarthy was in the first team who did a the first Remote Computer Chess game. The game played was among USSR and US scientists, where the moves were transferred by telegraph.
In 1972 MCCarthy was awarded with the Turing Award - (Today probably the most prestigious award for incredible technology achievements in the world).
McCarth's home website had a lot of great papers on programming languages, mathematical theory of computation and most importantly philosophical words and notes on Artificial Intelligence
His site has a lot of his essays as well as his personal views on the world and predictions (foreseen probabilities by him) on the world future.
McCarthy had even written a short Sci-Fi story which's aim was to explore the question, whether robots should have simulated emotions.

John McCarthy is among the brightest computer genius who ever live on this planet as well as a true "icon" for a computer hacker. The news for his death is quite shocking especially after the sudden death of the creator of C programming Language and UNIX Denis Ritchie , and a week earlier the pass of Steve Jobs
It seems like no coincidence, that the brightest computer minds are departuring this life, probably God is taking them one by one just like he gave them the gifts to invent and revolutionize the technology we use today.
Surely McCarthy has left a huge landmark on technology and his name will be in the books for the generations to come.
Wed Oct 26 19:15:00 EEST 2011
How to work around STARTTLS Qmail Thunderbird / Outlook mail sending (error) issues
After configuring a new
Qmail+POP3+IMAP with vpopmail install based on Thibs
QmailRocks I faced some issues with configuring mail accounts
in Mozilla Thunderbird. The problem is also present in
Microsoft Outlook Express as some colleagues working on
Windows reported they can't configure there email accounts in
Outlook either.
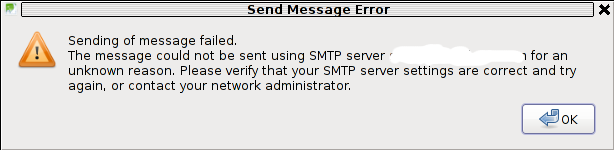
The issue was like this, the mail server is running fine, and I can send without issues directly from the server shell with mail command, however in Thunderbird I could only fetch the messages via POP3 or IMAP, whever I give a try to send one I got the error:
Here is a screenshot preseting the issue, taken from my Thunderbird:
The reason for this error is an automatic setting that is being configured in Thunderbird in New Account Creation time:
Thunderbird queries the mail server and asks for the type of encryptions available for both POP3 and SMTP MX primary host.
Seeing that it supports STARTTLS data transfer encryption mail protocol for both POP3 / IMAP, Thunderbirds auto configuration does place STARTTLS to be used with SMTP and POP3
The incorrect setting which is being automatically filled in can be checked in following these Thunderbird menus:
If the configured mail account MX server is let's say mail.exampledomain.com one needs to Edit the settings for this SMTP auto configured domains and he will see some example settings like the one shown in the below screenshot:
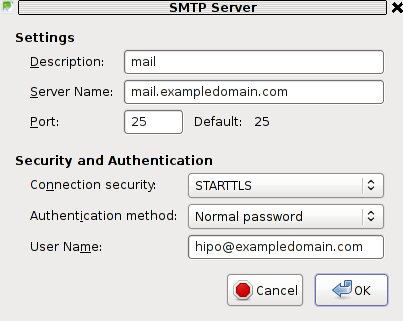
You can see from above's screenshot that the auto configured Connection Security setting is improperly set to: STARTTLS. Usually STARTTLS should be working on SMTP port 25, however it seems the problem consists in the fact that the MAIL FROM and RCPT TO is sent in incorrec time (ain't sure if its before or after the encryption).
Therefore the consequence of this failure to use STARTTLS being detected as the correct encryption type for SMTP lead that the new configured mail server clients were unable tot properly connect and send emails via the SMTP listening server on port 25.
I give a try and changing the Connection Security:STARTTLS to Connection SecuritySSL/TLS immediately resolved the SMTP sending issues. Therefore as I found out the SMTP server is working just fine configured to use my QMAIL on port 465 with Connection Security: SSL/TLS and hence to work around the SMTP sending issues, decided to completely disable the STARTTLS encryption to be reported as a supported encryption by qmail-smtpd
On Thibs QmailRocks and some other Qmail installstions based more or less on qmail.jms1.net service damemontools scripts, this can be done by simply changing a line:
to
The qmail start up scripts which these change has to be done if one has configured a mail server based on QmailRocks Thibs updated tutorial are:
1. /service/qmail-smtpd
2. /service/qmail-smtpdssl
A quick way to do the DENY_TLS=0 to DENY_TLS=1 changes via sed is like this:
After the correct modifications, of course as usual a qmail restart is required, e.g.:
Making this changes, irradicated the sending issues. It's best practice that the account which had issues with sending before is deleted and recreated from scratch.
Hope this helps somebody out there who encounters the same issue. Cheers ;)
The issue was like this, the mail server is running fine, and I can send without issues directly from the server shell with mail command, however in Thunderbird I could only fetch the messages via POP3 or IMAP, whever I give a try to send one I got the error:
Sending of Message Failed

The message could not be sent using SMTP server for an

unknown reason. Please verify that SMTP server settings are correct
and try

again, or contact your network
administrator
Here is a screenshot preseting the issue, taken from my Thunderbird:
The reason for this error is an automatic setting that is being configured in Thunderbird in New Account Creation time:
Thunderbird queries the mail server and asks for the type of encryptions available for both POP3 and SMTP MX primary host.
Seeing that it supports STARTTLS data transfer encryption mail protocol for both POP3 / IMAP, Thunderbirds auto configuration does place STARTTLS to be used with SMTP and POP3
The incorrect setting which is being automatically filled in can be checked in following these Thunderbird menus:
Edit -> Account Settings -> Outgoing Server
(SMTP)
If the configured mail account MX server is let's say mail.exampledomain.com one needs to Edit the settings for this SMTP auto configured domains and he will see some example settings like the one shown in the below screenshot:
You can see from above's screenshot that the auto configured Connection Security setting is improperly set to: STARTTLS. Usually STARTTLS should be working on SMTP port 25, however it seems the problem consists in the fact that the MAIL FROM and RCPT TO is sent in incorrec time (ain't sure if its before or after the encryption).
Therefore the consequence of this failure to use STARTTLS being detected as the correct encryption type for SMTP lead that the new configured mail server clients were unable tot properly connect and send emails via the SMTP listening server on port 25.
I give a try and changing the Connection Security:STARTTLS to Connection SecuritySSL/TLS immediately resolved the SMTP sending issues. Therefore as I found out the SMTP server is working just fine configured to use my QMAIL on port 465 with Connection Security: SSL/TLS and hence to work around the SMTP sending issues, decided to completely disable the STARTTLS encryption to be reported as a supported encryption by qmail-smtpd
On Thibs QmailRocks and some other Qmail installstions based more or less on qmail.jms1.net service damemontools scripts, this can be done by simply changing a line:
DENY_TLS=0
to
DENY_TLS=1
The qmail start up scripts which these change has to be done if one has configured a mail server based on QmailRocks Thibs updated tutorial are:
1. /service/qmail-smtpd
2. /service/qmail-smtpdssl
A quick way to do the DENY_TLS=0 to DENY_TLS=1 changes via sed is like this:
qmail# sed -e 's#DENY_TLS=0#DENY_TLS=1#g'
/service/qmail-smtpd/run >> /tmp/qmail-smtpd-run; qmail# sed
-e 's#DENY_TLS=0#DENY_TLS=1#g' /service/qmail-smtpdssl/run >>
/tmp/qmail-smtpdssl-run; qmail# mv /tmp/qmail-smtpd-run
/service/qmail-smtpd/run

qmail# mv /tmp/qmail-smtpdssl-run
/service/qmail-smtpdssl/run
After the correct modifications, of course as usual a qmail restart is required, e.g.:
qmail# qmailctl restart

...
Making this changes, irradicated the sending issues. It's best practice that the account which had issues with sending before is deleted and recreated from scratch.
Hope this helps somebody out there who encounters the same issue. Cheers ;)
Tue Oct 25 15:40:22 EEST 2011
How to add a new MySQL user to have INSERT,UPDATE,DELETE (full table) permissions to a Database
I needed to add a newly created MySQL
user with no access to any database with no special permissions
(user is created from phpmyadmin) with some permissions to a
specific database which is used for the operation of a website,
here are the MySQL CLI client commands I issued to make it
work:
Where in the Example Sql_User_DB is my example database to which the user is granted access and my sample user is Sql_User .
mysql> GRANT ALL ON Sql_User_DB.* TO
Sql_User@localhost;

mysql> FLUSH PRIVILEGES;
Where in the Example Sql_User_DB is my example database to which the user is granted access and my sample user is Sql_User .
Tue Oct 25 10:58:02 EEST 2011
How to get rid of "PHP Warning: PHP Startup: Unable to load dynamic library '/usr/lib/php5/20090626/suhosin.so'" on Debian GNU / Linux
After a recent new Debian Squeeze
Apache+PHP server install and moving a website from another
server host running on CentOS 5.7 Linux server, some of the
PHP scripts running via crontab started displaying the
following annoying PHP Warnings :
debian:~# php /home/website/www/cron/update.php
PHP Warning: PHP Startup: Unable to load dynamic library '/usr/lib/php5/20090626/suhosin.so' - /usr/lib/php5/20090626/suhosin.so: cannot open shared object file: No such file or directory in Unknown on line 0
Obviously the error revealed that PHP cli is not happy that, I've previously removes the suhosin php5-suhosin module from the system.
I wouldn't have removed php5-suhosin if sometimes it doesn't produced some odd experiences with the Apache webserver.
To fix the PHP Warning, I used first grep to see, where exactly the suhosin module gets included in debian's php.ini config files.
Yeah that's right Debian has three php.ini php config files. One for the php cli - /usr/bin/php, another for the Apache webserver loaded php library - /usr/lib/apache2/modules/libphp5.so and one for Apache's cgi module - /usr/lib/apache2/modules/mod_fcgid.so .
I was too lazy to edit all the above found declarations trying to include the suhosin module in PHP, hence I remembered that probably all this obsolete suhosin module declaration are still present because probably the php5-suhosin package is still not purged from the system.
A quick check with dpkg , further strenthened my assumption as the php5-suhosin module was still hanging around as an (rc - remove candidate);
Hence to remove the obsolete package config and directories completely out of the system and hence solve the PHP Warning I used dpkg --purge, like so:
Further on to make sure the PHP Warning is solved I did the cron php script another go and it produced no longer errors:
debian:~# php /home/website/www/cron/update.php
PHP Warning: PHP Startup: Unable to load dynamic library '/usr/lib/php5/20090626/suhosin.so' - /usr/lib/php5/20090626/suhosin.so: cannot open shared object file: No such file or directory in Unknown on line 0
Obviously the error revealed that PHP cli is not happy that, I've previously removes the suhosin php5-suhosin module from the system.
I wouldn't have removed php5-suhosin if sometimes it doesn't produced some odd experiences with the Apache webserver.
To fix the PHP Warning, I used first grep to see, where exactly the suhosin module gets included in debian's php.ini config files.
debian:~# cd /etc/php5

debian:/etc/php5# grep -rli suhosin *

apache2/conf.d/suhosin.ini

cgi/conf.d/suhosin.ini

cli/conf.d/suhosin.ini

conf.d/suhosin.ini
Yeah that's right Debian has three php.ini php config files. One for the php cli - /usr/bin/php, another for the Apache webserver loaded php library - /usr/lib/apache2/modules/libphp5.so and one for Apache's cgi module - /usr/lib/apache2/modules/mod_fcgid.so .
I was too lazy to edit all the above found declarations trying to include the suhosin module in PHP, hence I remembered that probably all this obsolete suhosin module declaration are still present because probably the php5-suhosin package is still not purged from the system.
A quick check with dpkg , further strenthened my assumption as the php5-suhosin module was still hanging around as an (rc - remove candidate);
debian:~# dpkg -l |grep -i suhosin

rc php5-suhosin 0.9.32.1-1 advanced protection module for
php5
Hence to remove the obsolete package config and directories completely out of the system and hence solve the PHP Warning I used dpkg --purge, like so:
debian:~# dpkg --purge php5-suhosin

(Reading database ... 76048 files and directories currently
installed.)

Removing php5-suhosin ...

Purging configuration files for php5-suhosin ...

Processing triggers for libapache2-mod-php5 ...

Reloading web server config: apache2.
Further on to make sure the PHP Warning is solved I did the cron php script another go and it produced no longer errors:
debian:~# php /home/website/www/cron/update.php

debian:~#Mon Oct 24 13:09:53 EEST 2011
How to link Wordpress Post or Page Title to external URL website address
I needed to link a new created
Wordpress Post to external web page address. So when one clicks
over the created post he opens an external website.
I've googled around to see how this can be achieved and found ordpress external links plugin
I gave a go of the plugin, but pitily I couldn't make it work. I decided to try some other methods and after some time I tried another approach. I used the HTML >a href=""< My Post Title </a> as a title and it appeared this simple method prooved working ;)
Here is a small screenshot, from wordpress Add New Post dialog
By the way the information online I've found on how this the external link creation for a Page or a Post is made was quite obscure and messy. i wonder why there is no clear explanation on the direct a href link creation, especially since Wordpress is a de-facto standard for a blogging platform and nowdays powers up so many websites engines around the world.
Sun Oct 23 19:30:51 EEST 2011
Watch Star Wars in Ascii via a telnet connection! :)
By accident, I've come across
Towel.blinkenlight.nl! You might be wondering what is
so special with it?  Well some crazy guy seems to have recreated a whole Star
Wars movie in ascii art!!! ;)
Well some crazy guy seems to have recreated a whole Star
Wars movie in ascii art!!! ;)
To kill some time and enjoy some great ascii telnet to towel.blinkenlight.nl with a telnet client (movie shows great also even using a regular Windows telnet client).
As I'm a great ascii fan I enjoy a lot, hope more people will take the time to watch the re-created Star Wars Movie in ASCII !. I'm eager to see if someone knows of any similar kind of movies, demos or all kind of stuff streamed via telnet :)
To give you an idea on what you will see by telnetting to towel.blinenlight.nl, here is a short chop video:
Well some crazy guy seems to have recreated a whole Star
Wars movie in ascii art!!! ;)To kill some time and enjoy some great ascii telnet to towel.blinkenlight.nl with a telnet client (movie shows great also even using a regular Windows telnet client).
As I'm a great ascii fan I enjoy a lot, hope more people will take the time to watch the re-created Star Wars Movie in ASCII !. I'm eager to see if someone knows of any similar kind of movies, demos or all kind of stuff streamed via telnet :)
To give you an idea on what you will see by telnetting to towel.blinenlight.nl, here is a short chop video:
Fri Oct 21 15:46:18 EEST 2011
How to convert UTF-8 encoding files to Windows CP1251 on GNU / Linux
I needed to convert a file which had
a Bulgarian text written in UTF-8 encoding to Windows CP1251 in
order to fix a website encoding problems after a move of the
website from one physical server to another.
I tried first with enca - ( detects and convert encoding of text files from one encoding to another).
The exact way I tried to convert was:
I reached for some help in irc.freenode.net, #varnalab channel and Alex Kuklin helped me, giving me an example command line to do the conversion.
iconv winedows to cp1251 conversion line, he pointed to me was:
Further on I adapted Alex's example to convert my utf8_encoded_file.php encoded Bulgarian characted to CP1251 and used the following commands to convert and create backups of my original UTF8 file:
I tried first with enca - ( detects and convert encoding of text files from one encoding to another).
The exact way I tried to convert was:
linux:~# enca -L bg
/home/site/www/includes/utf8_encoded_file.php

...
Unfortunately this attempt to conver was
unsucesfully, and the second logical guess was to use iconv
- Convert encoding of given files from one encoding to another to
do the utf8 to cp1251 conversion.I reached for some help in irc.freenode.net, #varnalab channel and Alex Kuklin helped me, giving me an example command line to do the conversion.
iconv winedows to cp1251 conversion line, he pointed to me was:
linux:~# iconv -f utf8 -t cp1251 < in >
out
Further on I adapted Alex's example to convert my utf8_encoded_file.php encoded Bulgarian characted to CP1251 and used the following commands to convert and create backups of my original UTF8 file:
linux:~# cd /home/site/www/includes

linux:/home/site/www/includes# iconv -f utf8 -t cp1251 <
utf8_encoded_file.php in > utf8_encoded_file.php.cp1251

linux:/home/site/www/includes# mv utf8_encoded_file.php
utf8_encoded_file.php.bak

linux:/home/site/www/includes# mv utf8_encoded_file.php.cp1251
utf8_encoded_file.php
Thu Oct 20 23:02:06 EEST 2011
How to migrate vpopmail multiple servers (mail accounts) to single vpopmail (qmail) install
I needed to migrate
vpopmail/domains multiple directories stored on 2 servers to
a single vpopmail install.
Merging the two vpopmails user Maildir/ stored accounts actually actually was quite simple, though it needed a bit of tweaks.
Here is how I migrated the two vpopmail installations to reside on the one vpopmail mail storage.
1. I used tar to archive the two vpopmail installations on the two different
First I logged in with root over ssh on the first node, e.g.:
Then logged in on the second machine:
I used ionice -c 3 which instructs the tar archive of vpopmail directory to be created using idle (sparing the hard disk) from I/O overheads.
Sometimes not using ionice especially the case where hundreds of mail domains exist in domains/ could overload the server and stop the qmail and even sometimes ssh from properly responding for a very long periods as well as delaying the work of the mail server and failure to accept some user connections to pop3 or smtp protocols. I found out about the exisnte of ionice command just recently, reading some blog online. The command is absolute "must use", always when have to archive directories with tens of thousands of files and subdirectories. It's also nice in general, also on some copy or move operations on GNU / Linux, ionice is truly great.
Anyways after a while I had my both archives on both servers existing, so I used sftp (one can use scp as well) to transfer the archives to the newly configured qmail + vpopmail installation.
2. Use sftp or scp to copy the archives to the new configured vpopmail server
Again on both servers I had to execute, sftp I prefer sftp as I love being interactive on the shell ;)
Once again the same commands has to be issued on the second vpomail server, where the second domains/ mail accounts archive was just made:
Now as both of the archives are uploaded, next step is to login to the root@my-vpopmail-server-host.com server, where the two archives were just uploaded:
Next on, the second vpopmail2_$(date +%Y%m%d).tar.gz is untarred:
3. Unarchive the uploaded vpopmail*.tar.gz archives
Now, if the two archives are properly tarred and no errors are returned (that was my case thx God).
4. Use a shell script to generate a script, to later change all user emails passwords on the my-vpopmail-server-host.com
The next thing which has to be done is that all email accounts with passwords are recreated with vpopmail's /home/vpopmail/bin/vpasswd command. Even though the domains are existing with the respective vpasswd and vpasswd.cdb in each mailbox on the new server my-vpopmail-server-host still the mailboxes were not visible by vpopmail. To make all the mailboxes with the correct passwords be responding on the new vpopmail connections via IMAP and POP3 mail fetch protocols, I wrote a small script which does change the passwords of all mailboxes just transferred from the two servers to my-vpopmail-server-host
The script is very simple and actually is not too automated, but at least it works. I've called my script to dump all the user passwords for all the vpopmail filesystem existing mail domains dump_vpopmail_mail_passwords.sh
To use the script its necessery that the script is downloaded on both the vpopmail mail servers from which domains/ directory is migrated, e.g.:
Same procedure goes on the second vpopmail server qmail-server2:
5. Upload the change_mail_accounts_pwds.sh shell script created on the two qmail mail servers to dump_vpopmail_mail_passwords.sh
Again I used sftp to upload the two change_mail_account_pwds.sh bash scripts:
6. Execute change_mail_account_pwds1.sh and change_mail_account_pwds2.sh on my-vpopmail-server-host.com
On the 3rd server where the two vpopmail domains are migrated my-vpopmail-server-host.com , from /home/vpopmail invoke the above two scripts:
Merging the two vpopmails user Maildir/ stored accounts actually actually was quite simple, though it needed a bit of tweaks.
Here is how I migrated the two vpopmail installations to reside on the one vpopmail mail storage.
1. I used tar to archive the two vpopmail installations on the two different
First I logged in with root over ssh on the first node, e.g.:
qmail-server1:~# cd /home/vpopmail/

qmail-server1:/home/vpopmail# ionice -c 3 tar -czvf
vpopmail1_$(date +%Y%m%d).tar.gz domains/

...
Then logged in on the second machine:
qmail-server2:~# cd /home/vpopmail

qmail-server2:/home/vpopmail# ionice -c 3 tar -czvf
vpopmail2_$(date +%Y%m%d).tar.gz domains/
I used ionice -c 3 which instructs the tar archive of vpopmail directory to be created using idle (sparing the hard disk) from I/O overheads.
Sometimes not using ionice especially the case where hundreds of mail domains exist in domains/ could overload the server and stop the qmail and even sometimes ssh from properly responding for a very long periods as well as delaying the work of the mail server and failure to accept some user connections to pop3 or smtp protocols. I found out about the exisnte of ionice command just recently, reading some blog online. The command is absolute "must use", always when have to archive directories with tens of thousands of files and subdirectories. It's also nice in general, also on some copy or move operations on GNU / Linux, ionice is truly great.
Anyways after a while I had my both archives on both servers existing, so I used sftp (one can use scp as well) to transfer the archives to the newly configured qmail + vpopmail installation.
2. Use sftp or scp to copy the archives to the new configured vpopmail server
Again on both servers I had to execute, sftp I prefer sftp as I love being interactive on the shell ;)
qmail-server1:/home/vpopmail# sftp
root@my-vpopmail-server-host.com

Password:

Connected to my-vpopmail-server-host.com.

sftp> cd /home/vpopmail

sftp> put vpopmail1_$(date +%Y%m%d).tar.gz

...

sftp> exit
Once again the same commands has to be issued on the second vpomail server, where the second domains/ mail accounts archive was just made:
qmail-server2:/home/vpopmail# sftp
root@my-vpopmail-server-host.com

Password:

Connected to my-vpopmail-server-host.com.

sftp> cd /home/vpopmail

sftp> put vpopmail2_$(date +%Y%m%d).tar.gz

...

sftp> exit
Now as both of the archives are uploaded, next step is to login to the root@my-vpopmail-server-host.com server, where the two archives were just uploaded:
qmail-server1:/var/domains# ssh
root@my-vpopmail-server-host.com

my-vpopmal-server-host:~# cd /home/vpopmail
my-vpopmail-server-host:/home/vpopmail# tar -zxvf vpopmail1_$(date
+%Y%m%d).tar.gz domains/

...
Next on, the second vpopmail2_$(date +%Y%m%d).tar.gz is untarred:
3. Unarchive the uploaded vpopmail*.tar.gz archives
my-vpopmail-server-host:/home/vpopmail# tar -zxvf
vpopmail2_$(date +%Y%m%d).tar.gz domains/

...
Now, if the two archives are properly tarred and no errors are returned (that was my case thx God).
4. Use a shell script to generate a script, to later change all user emails passwords on the my-vpopmail-server-host.com
The next thing which has to be done is that all email accounts with passwords are recreated with vpopmail's /home/vpopmail/bin/vpasswd command. Even though the domains are existing with the respective vpasswd and vpasswd.cdb in each mailbox on the new server my-vpopmail-server-host still the mailboxes were not visible by vpopmail. To make all the mailboxes with the correct passwords be responding on the new vpopmail connections via IMAP and POP3 mail fetch protocols, I wrote a small script which does change the passwords of all mailboxes just transferred from the two servers to my-vpopmail-server-host
The script is very simple and actually is not too automated, but at least it works. I've called my script to dump all the user passwords for all the vpopmail filesystem existing mail domains dump_vpopmail_mail_passwords.sh
To use the script its necessery that the script is downloaded on both the vpopmail mail servers from which domains/ directory is migrated, e.g.:
qmail-server1:/home/vpopmail# wget
http://pc-freak.net/bshscr/dump_vpopmail_mail_passwords.sh


...

qmail-server1:/home/vpopmail# sh dump_vpopmail_mail_passwords.sh
>> change_mail_account_pwds.sh
Same procedure goes on the second vpopmail server qmail-server2:
qmail-server2:/home/vpopmail# wget
http://pc-freak.net/bshscr/dump_vpopmail_mail_passwords.sh


...

qmail-server2:/home/vpopmail# sh dump_vpopmail_mail_passwords.sh
>> change_mail_account_pwds.sh
5. Upload the change_mail_accounts_pwds.sh shell script created on the two qmail mail servers to dump_vpopmail_mail_passwords.sh
Again I used sftp to upload the two change_mail_account_pwds.sh bash scripts:
qmail-server1:/home/vpopmail# sftp
root@my-vpopmail-server-host.com

Password:

Connected to my-vpopmail-server-host.com.

sftp> put change_mail_account_pwds.sh
change_mail_account_pwds1.sh

...

sftp> exit
sftp>qmail-serve2:/home/vpopmail# sftp
root@my-vpopmail-server-host.com
Password:
Connected to my-vpopmail-server-host.com.
sftp> put change_mail_account_pwds.sh
change_mail_account_pwds2.sh
...
sftp> exit
6. Execute change_mail_account_pwds1.sh and change_mail_account_pwds2.sh on my-vpopmail-server-host.com
On the 3rd server where the two vpopmail domains are migrated my-vpopmail-server-host.com , from /home/vpopmail invoke the above two scripts:
root@my-vpopmail-server-host.com:/home/vpopmail# sh
change_mail_account_pwds1.sh

root@my-vpopmail-server-host.com:/home/vpopmail# sh
change_mail_account_pwds2.sh


The two scripts will contain list with all the two migrated
vpopmail user mail addresses in a format similar to:


vpasswd mail_account@mail-domain.com password1

vpasswd mail_account1@mail-domain.com some_password

vpasswd mail_accountX@mail-domain.com other_password

etc..


After following this steps, all the mail accounts (or most of them
;)) should be merged from the two servers on the new configured
vpopmail on my-vpopmail-server-host.com host.


The up-described procedure could be literally followed with
migratingm any number of vpopmail /home/vpopmail/domains
user email accounts.


If it has to be mass deployed based, its coparatively easy even to
write an automated script to do the various aforementioned steps
without any user interaction.


I've seen also some other explanations on how to migrate
qmail.jsm1.net , but honestly was too lazy to read them, so
I just came up with the ways described here.

One important note to make here is always to make backups, this
steps worked for me but I can't guarantee this migration tutorial
will work at all. I hope this helps somebody out there. Cheers
;)
Wed Oct 19 11:37:53 EEST 2011
How to get rid of Debian and Ubuntu GNU / Linux obsolete configuration files and system directories
I've been using Debian GNU /
Linux on my Thinkpad laptop for almost 3 years and half.
Initially the Debian version which I had installed was a stable
Debian Lenny. As I was mostly dissatisfied of the old versions of
the programs, I migrated to testing / unstable
Testing / unstables shipped program versions were a bit better but still back in the day I wanted to get advantage of the latest program versions so for a while I switched to unstable .
Later I regretted for this bad idea, after the migration to Unstable, it was too buggy to run on a notebook one uses for everyday work.
Then to revert back to a bit stable I downgraded to testing unstable again.
When Debian launched Debian Squeeze I set in my /etc/apt/sources.list file software repositories to be the one for the stable Debian Squeeze.
As you can see, I've done quite a lot of "experiments" and "excersises". Many packages were installed, then removed, some became obsolete with time others I just temporary installed out of curiosity. Anyways as a result I ended up with many packages uninstalled / removed , which still kept some of their directory structres and configurations on the machine.
Today, I decided to check how many of these obsolete packages are still present in dpkg database and I was shocked to find out 412 debs were still in my package database! To check the number I used cmd:
Considering the tremendous number of packs waiting to be purged, I decided to get rid of this old and already unnecessery files for the sake of clarity, besides that removing the old already uninstalled packages removes old configuration files, readmes, directories and frees some little space and therefore frees some inodes ;)
Before proceeding to remove them, I carefully reviewed and all the package names which I was about to completely purge in order to make sure there is no package with a configuration files I might need in future:
First line will just print out what will be purged with dpkg , so after I checked it out I used the second one to purge all the RC packs.
Testing / unstables shipped program versions were a bit better but still back in the day I wanted to get advantage of the latest program versions so for a while I switched to unstable .
Later I regretted for this bad idea, after the migration to Unstable, it was too buggy to run on a notebook one uses for everyday work.
Then to revert back to a bit stable I downgraded to testing unstable again.
When Debian launched Debian Squeeze I set in my /etc/apt/sources.list file software repositories to be the one for the stable Debian Squeeze.
As you can see, I've done quite a lot of "experiments" and "excersises". Many packages were installed, then removed, some became obsolete with time others I just temporary installed out of curiosity. Anyways as a result I ended up with many packages uninstalled / removed , which still kept some of their directory structres and configurations on the machine.
Today, I decided to check how many of these obsolete packages are still present in dpkg database and I was shocked to find out 412 debs were still in my package database! To check the number I used cmd:
root@noah:~# dpkg -l | grep -i '^rc\s.*$'|wc -lConsidering the tremendous number of packs waiting to be purged, I decided to get rid of this old and already unnecessery files for the sake of clarity, besides that removing the old already uninstalled packages removes old configuration files, readmes, directories and frees some little space and therefore frees some inodes ;)
Before proceeding to remove them, I carefully reviewed and all the package names which I was about to completely purge in order to make sure there is no package with a configuration files I might need in future:
root@noah:~# dpkg -l |grep -i '^rc\s.*$'

...
After reviewing all the deb packages possessing
the rc - (remove candidate) flag, I used the following bash
one liners to remove the obsolete deb packages:root@noah:~# for i in $(dpkg -l |grep -i '^rc\s.*$'|awk '{
print $2 }'); do echo dpkg --purge $i done ...
root@noah:~# for i in $(dpkg -l |grep -i '^rc\s.*$'|awk '{ print $2
}'); do dpkg --purge $i doneFirst line will just print out what will be purged with dpkg , so after I checked it out I used the second one to purge all the RC packs.
Tue Oct 18 13:57:44 EEST 2011
Fix to mail forwarding error "Received-SPF: none
(domain.com: domain at maildomain does not designate permitted
sender hosts)
I'm
Configuring a new Exim server to relay / forward mail via a remote
Qmail SMTP server
Even though I configured properly the exim to forward via my relaying mail server with host mail.domain.com, still the mail forwarding from the Exim -> Qmail failed to work out with an error:
I pondered for a while on what might be causing this "mysterous" error just to realize I forgot to add the IP address of my Exim mail server in the Qmail relay server
To solve the error I had to add in /etc/tcp.smtp on my Qmail server a record for my Exim server IP address xx.xx.xx.xx, like so:
The QS_SPAMASSASSIN="0" as you might have guessed instructs Qmail not to check the received mails originating from IP xx.xx.xx.xx with spamassassin.
Finally on the Qmail server to load up the new tcp.smtp settings I had to rebuild /etc/tcp.smtp.cdb and restart qmail :
- reload qmail cdb
Even though I configured properly the exim to forward via my relaying mail server with host mail.domain.com, still the mail forwarding from the Exim -> Qmail failed to work out with an error:
Fix to mail forwarding error "Received-SPF: none
(domain.com: domain at maildomain does not designate permitted
sender hosts)
I pondered for a while on what might be causing this "mysterous" error just to realize I forgot to add the IP address of my Exim mail server in the Qmail relay server
To solve the error I had to add in /etc/tcp.smtp on my Qmail server a record for my Exim server IP address xx.xx.xx.xx, like so:
debian-server:~# echo
'xx.xx.xx.xx:allow,RELAYCLIENT="",QS_SPAMASSASSIN="0"' >>
/etc/tcp.smtp
The QS_SPAMASSASSIN="0" as you might have guessed instructs Qmail not to check the received mails originating from IP xx.xx.xx.xx with spamassassin.
Finally on the Qmail server to load up the new tcp.smtp settings I had to rebuild /etc/tcp.smtp.cdb and restart qmail :
- reload qmail cdb
linux-server:/var/qmail# qmailctl cdb

Reloaded /etc/tcp.smtp.

- restart qmail


linux-server:/var/qmail# qmailctl restart

Restarting qmail:

* Stopping qmail-smtpdssl.

* Stopping qmail-smtpd.

* Sending qmail-send SIGTERM and restarting.

* Restarting qmail-smtpd.

* Restarting qmail-smtpdssl.


This solved the issue and now mails are forwarded without problems
via the Qmail SMTPD.Mon Oct 17 20:07:58 EEST 2011
How to change localhost hostname name on GNU / Linux
Often when some of my companies, I'm
employed with rents dedicated GNU / Linux servers co-located
in data centers,
usually the local hostname is configured while the system is being installed, therefore many times when we forget to tell the Dedicated provider what kind of hostname, we're intending to use they came up with some kind of hostname which is randomly set based on the dedicated provider's company name or a server ID number. Cosenquently the machine hostname assigned due to company local server numbering policy.
Hence after one logs in to the newly purchased server with over SSH protocol, then we end up with a hostname like for example:
This hostname naming, often doesn't make much sense for the services running on the server and doesn't have nothing to do to the provided internet services by the server, however its really important for me to orientate myself which server I have logged to. Therefore one of the first things I do while configuring a new server is to change the local server assigned hostname .
Besides having the hostname shown by the shell prompt, there is a quick command to print out the Fully Qualified Domain hostname, by issuing:
The Universal GNU / Linux way which works on almost all Linux distributions to change the configured hostname goes like this:
Edit /etc/hosts . A default /etc/hosts file looks something like:
On the second line which assigns the hostname for the loopback IP address 127.0.0.1 , you see the identifier for the local hostname:
To change that to a custom local hostname of choice, the line should be modified to look like:
On some GNU / Linux distributions the line 127.0.1.1 might be completely absent, this is the case with for example CentOS and Fedora and many other distros
On these Gnu / Linux distributions the /etc/hosts might looks like:
Alas on Fedora and CentOS and other distros to set the localhost hostname, one more line should be added to /etc/hosts . The line to add looks like so:
After modification and adding the custom hostname name there the file should look something like:
After including correct records in /etc/hosts , next the hostname command is used to change the localhost name configured to show as a machine name on user ssh login:
Further to check that the new hostname is set for all ssh sessions incoming to the ssh server from now on the hostname command is used without arguments:
Even though now the hostname is changed to CustomHostName still, the hostname for the current opened ssh session is keeping the old hostname:
To see the hostname change in your shell prompt you will have to logout and login again to the system.
Here its good to mention the Linux kernel has a variable kernel.hostname, which can be used to set the local machine hostname. Actually the hostname command automatically set the kernel.hostname kernel variable.
If of course one want to change the kernel var directly without using the hostname command, this can be achieved with sysctl, e.g.:
On Debian GNU / Linux the way to change the hostname there is a "debian way" approach:
Debian has a file /etc/hostname , which is there just for the sake of configuring the system hostname. During system boot process Debian reads /etc/hostname file and sets the machine hostname to the word inside. The /etc/hostname file is being red and configured by Debian's /etc/init.d/hostname.sh shell script.
Therefore after changing the hostname in Debian by editting /etc/honstmame , the /etc/init.d/hostname.sh needs to be invoked for the new hostname to be set system wide, like so;
Just like with other GNU / Linux distributions for the new hostname to be active on the current shell a logout and login via ssh is necessery again.
With Fedora, CentOS and other Redhat based distributions the "proper" way to change the hostname is:
a. change the /etc/hosts way described above in the aticle.
b. Edit /etc/sysconfig/network file and write inside the new custom hostname.
After HOSTNAME value is set to the new desired hostname and file is saved, the network script should be invoke with restart argument:
Since the system hostname is being configured usually, with the rest of server configurations on system boot, after setting the desired hostname it is a good idea to have a system reboot. This will guarantee that all running daemons will read the newly set hostname:
E.g.:
On next boot the hostname should be set to whatever you put as a custom hostname.
usually the local hostname is configured while the system is being installed, therefore many times when we forget to tell the Dedicated provider what kind of hostname, we're intending to use they came up with some kind of hostname which is randomly set based on the dedicated provider's company name or a server ID number. Cosenquently the machine hostname assigned due to company local server numbering policy.
Hence after one logs in to the newly purchased server with over SSH protocol, then we end up with a hostname like for example:
server56663:~#
This hostname naming, often doesn't make much sense for the services running on the server and doesn't have nothing to do to the provided internet services by the server, however its really important for me to orientate myself which server I have logged to. Therefore one of the first things I do while configuring a new server is to change the local server assigned hostname .
Besides having the hostname shown by the shell prompt, there is a quick command to print out the Fully Qualified Domain hostname, by issuing:
>server56663:~# hostname --fqdn

server56663.dedicompany.com
The Universal GNU / Linux way which works on almost all Linux distributions to change the configured hostname goes like this:
Edit /etc/hosts . A default /etc/hosts file looks something like:
server56663:~# cat /etc/hosts 127.0.0.1 localhost.localdomain
localhost

127.0.1.1 server56663.dedicompany.com server56663

# The following lines are desirable for IPv6 capable hosts

::1 ip6-localhost ip6-loopback

fe00::0 ip6-localnet

ff00::0 ip6-mcastprefix

ff02::1 ip6-allnodes

ff02::2 ip6-allrouters
On the second line which assigns the hostname for the loopback IP address 127.0.0.1 , you see the identifier for the local hostname:
127.0.1.1 server56663.dedicompany.com
server56663
To change that to a custom local hostname of choice, the line should be modified to look like:
127.0.1.1 CustomHostName server56663.dedicompany.com
server56663
On some GNU / Linux distributions the line 127.0.1.1 might be completely absent, this is the case with for example CentOS and Fedora and many other distros
On these Gnu / Linux distributions the /etc/hosts might looks like:
# Do not remove the following line, or various programs #
that require network functionality will fail. 127.0.0.1
localhost.localdomain localhost
Alas on Fedora and CentOS and other distros to set the localhost hostname, one more line should be added to /etc/hosts . The line to add looks like so:
123.123.123.123 CustomHostName
After modification and adding the custom hostname name there the file should look something like:
[root@centos ~]# cat /etc/hosts 127.0.0.1 localhost localhost
123.123.123.123 CustomHostName
After including correct records in /etc/hosts , next the hostname command is used to change the localhost name configured to show as a machine name on user ssh login:
server56663:~# hostname CustomHostName

server56663:~#
Further to check that the new hostname is set for all ssh sessions incoming to the ssh server from now on the hostname command is used without arguments:
server56663:~# hostname

CustomHostName
Even though now the hostname is changed to CustomHostName still, the hostname for the current opened ssh session is keeping the old hostname:
server56663:~# hostname

server56663
To see the hostname change in your shell prompt you will have to logout and login again to the system.
Here its good to mention the Linux kernel has a variable kernel.hostname, which can be used to set the local machine hostname. Actually the hostname command automatically set the kernel.hostname kernel variable.
If of course one want to change the kernel var directly without using the hostname command, this can be achieved with sysctl, e.g.:
server56663:~# sysctl
kernel.hostname=CustomHostName
On Debian GNU / Linux the way to change the hostname there is a "debian way" approach:
Debian has a file /etc/hostname , which is there just for the sake of configuring the system hostname. During system boot process Debian reads /etc/hostname file and sets the machine hostname to the word inside. The /etc/hostname file is being red and configured by Debian's /etc/init.d/hostname.sh shell script.
Therefore after changing the hostname in Debian by editting /etc/honstmame , the /etc/init.d/hostname.sh needs to be invoked for the new hostname to be set system wide, like so;
server56663:~# /etc/init.d/hostname.sh
Just like with other GNU / Linux distributions for the new hostname to be active on the current shell a logout and login via ssh is necessery again.
With Fedora, CentOS and other Redhat based distributions the "proper" way to change the hostname is:
a. change the /etc/hosts way described above in the aticle.
b. Edit /etc/sysconfig/network file and write inside the new custom hostname.
[root@centos ~]# grep -i hostname
/etc/sysconfig/network

HOSTNAME=localhost.localdomain
After HOSTNAME value is set to the new desired hostname and file is saved, the network script should be invoke with restart argument:
[root@centos ~]# /etc/init.d/network restart
One
more thing to consider always when changing a hostname is that some
of the system services are using the configured local machine
hostname, and hence need to be restarted also from a active shell
where the new hostname is already set and active.Since the system hostname is being configured usually, with the rest of server configurations on system boot, after setting the desired hostname it is a good idea to have a system reboot. This will guarantee that all running daemons will read the newly set hostname:
E.g.:
server56663:~# shutdown -r now
On next boot the hostname should be set to whatever you put as a custom hostname.
Sat Oct 15 08:51:09 EEST 2011
Fix of "Unable to allocate memory for pool." PHP error messages
Since some time, I don't know exactly
where, after some updates of my Wordpress running on a small
server with FreeBSD 7.2. I've started getting a lot of Apache
crashes. Often the wordpress scripts stopped working completely and
I got only empty pages when trying to process the wordpress blog in
a browser.
After a bunch of reading online, I've figured out that the cause might be PHP APC stands for Alternative PHP Cache .
I was not sure if the PHP running on the server had an APC configured at all so I used a phpinfo(); script to figure out if I had it loaded. I saw the APC among the loaded to show off in the list of loaded php modules, so this further led me to the idea the APC could be really causing the unexpected troubles.
Thus first I decided to disable the APC on a Virtualhost level for the domain where the crashing wordpress was hosted, to do I placed in the VirtualHost section in the Apache configuration /usr/local/etc/apache2/httpd.conf the following config directive:
These get me rid of the multiple errors:
PHP Warning: require_once() [function.require-once]: Unable to allocate memory for pool. in /usr/local/www/data-dist/blog/wp-content/plugins/tweet-old-post/top-admin.php on line 6
which constantly were re-occuring in php_error.log:
Further after evaluating all the websites hosted on the server and making sure none of which was really depending on APC , I've disabled the APC completely for PHP. To do so I issued:
Similarly on GNU/Linux to disable globally APC from PHP only the correct location to php.ini should be provided on Debian this is /etc/php5/apache2/php.ini .
After a bunch of reading online, I've figured out that the cause might be PHP APC stands for Alternative PHP Cache .
I was not sure if the PHP running on the server had an APC configured at all so I used a phpinfo(); script to figure out if I had it loaded. I saw the APC among the loaded to show off in the list of loaded php modules, so this further led me to the idea the APC could be really causing the unexpected troubles.
Thus first I decided to disable the APC on a Virtualhost level for the domain where the crashing wordpress was hosted, to do I placed in the VirtualHost section in the Apache configuration /usr/local/etc/apache2/httpd.conf the following config directive:
php_flag apc.cache_by_default Off
These get me rid of the multiple errors:
PHP Warning: require_once() [function.require-once]: Unable to allocate memory for pool. in /usr/local/www/data-dist/blog/wp-content/plugins/tweet-old-post/top-admin.php on line 6
which constantly were re-occuring in php_error.log:
Further after evaluating all the websites hosted on the server and making sure none of which was really depending on APC , I've disabled the APC completely for PHP. To do so I issued:
echo 'apc.enabled = 0' >>
/usr/local/etc/php.ini
Similarly on GNU/Linux to disable globally APC from PHP only the correct location to php.ini should be provided on Debian this is /etc/php5/apache2/php.ini .
Fri Oct 14 13:20:47 EEST 2011
How to fix "sslserver: fatal: unable to load certificate" Qmail error on GNU / Linux
After setupping a brand new Qmail
installation following the QmailRocks Thibs Qmail Debian install
guide , I've come across unexpected re-occuring error message
in /var/log/qmail/qmail-smtpdssl/ , here is the
message:
I was completely puzzled initially by the error as the sertificate file /var/qmail/control/servercert.pem was an existing and properly self generated one. Besides that qmail daemontools init script /service/qmail-smtpd/run was loading the file just fine, where the same file failed to get loaded when sslserver command with the cert argument was invoked via /service/qmail-smtpdssl/run
It took me quite a while to thoroughfully investigate on what's wrong with the new qmail install. Thanksfully after almost an hour of puzzling I found it out and I was feeling as a complete moron to find that the all issues was caused by incorrect permissions of the /var/qmail/control/servercert.pem file.
Here are the incorrect permissions the file possessed:
To fix up the error I had to allow all users to have reading permissions over servercert.pem , e.g.:
After adding all users readable bit on servercert.pem the file permissions are like so:
Consequently I did a qmail restart to make sure the new readable servercert.pem will get loaded from the respective init script:
Now the annoying sslserver: fatal: unable to load certificate message is no more and all works fine, Hooray! ;)
@400000004e9807b10d8bdb7c command-line: exec sslserver -e -vR
-l my-mailserver-domain.com -c 30 -u 89 -g 89 \

-x /etc/tcp.smtp.cdb 0 465 rblsmtpd -r zen.spamhaus.org -r
dnsbl.njabl.org -r dnsbl.sorbs.net -r bl.spamcop.net qmail-smtpd
\

my-mailserver-domain.com /home/vpopmail/bin/vchkpw /bin/true
2>&1

@400000004e9807b10dae2ca4 sslserver: fatal: unable to load
certificate
I was completely puzzled initially by the error as the sertificate file /var/qmail/control/servercert.pem was an existing and properly self generated one. Besides that qmail daemontools init script /service/qmail-smtpd/run was loading the file just fine, where the same file failed to get loaded when sslserver command with the cert argument was invoked via /service/qmail-smtpdssl/run
It took me quite a while to thoroughfully investigate on what's wrong with the new qmail install. Thanksfully after almost an hour of puzzling I found it out and I was feeling as a complete moron to find that the all issues was caused by incorrect permissions of the /var/qmail/control/servercert.pem file.
Here are the incorrect permissions the file possessed:
linux:~# ls -al /var/qmail/control/servercert.pem -rw-------
1 qmaild qmail 2311 2011-10-12 13:21
/var/qmail/control/servercert.pem
To fix up the error I had to allow all users to have reading permissions over servercert.pem , e.g.:
linux:~# chmod a+r
/var/qmail/control/servercert.pem
After adding all users readable bit on servercert.pem the file permissions are like so:
linux:~# ls -al /var/qmail/control/servercert.pem

-rw-r--r-- 1 qmaild qmail 2311 2011-10-12 13:21
/var/qmail/control/servercert.pem
Consequently I did a qmail restart to make sure the new readable servercert.pem will get loaded from the respective init script:
linux:~# qmailctl restart

* Stopping qmail-smtpdssl.

* Stopping qmail-smtpd.

* Sending qmail-send SIGTERM and restarting.

* Restarting qmail-smtpd.

* Restarting qmail-smtpdssl.
Now the annoying sslserver: fatal: unable to load certificate message is no more and all works fine, Hooray! ;)
Thu Oct 13 10:04:19 EEST 2011
Dennis Ritchie passed away R.I.P. Dennis

I just read the lwn.net - Linux Weekly news 's website the very sad news that one of the greatest modern day computer heroes Dennis MacAlistair Ritchie after a long illness has passed away in his home.
The original notification for this grieving news are on Rob Pike's Google Plus wall , this is the original message:
Rob Pike - 1:02 AM - Public

I just heard that, after a long illness, Dennis Ritchie (dmr) died
at home this weekend. I have no more information.

I trust there are people here who will appreciate the reach of his
contributions and mourn his passing appropriately.

He was a quiet and mostly private man, but he was also my friend,
colleague, and collaborator, and the world has lost a truly great
mind.
For all those who haven't heard about Dennis Ritchie , he was a computer scientist who developed the C Programming language and had an immeasurable influence on all kind of Modern programming.
Dennis worked on the development of Unix's predecessor Multics as well as with Ken Thompson worked together in Bell Labs and are practically the fathers of UNIX.
Unix the Seventh Edition source code has later become the basis for the early UNIX BSD distributions. Among the most important technical contributions Dennis has done is the introduction of a Streams mechanism - pipes - (as called today in GNU/Linux and BSD and other unices).
Ritchie's C Language creation on top of Ken Thompson's B Programming language has been standartized and become the de-facto standard for almost every modern existing OS around.
Moreover dmr has been among the co-creators of Plan 9 Operating system (which is currently open-source distributed) as well as coded a few bits for the Inferno OS which today is known under the code name Vita Nuova
dmr (the hacker nickname of Dennis) lines up across the most notable computer hackers of all times. He received U.S. national Medal of Technology in 1999 from president Bill Clinton for his contributions to co-inventing the UNIX operating system and the creation of C Language

To sum it up DMR is just an "icon" in the computer geek world and his memory will surely live forever in the hacker undeground and computer geek culture.

A few quotes dmr is so famous with:
"I am not now, nor have I ever been, a member of the
demigodic party."

"Usenet is a strange place."

"UNIX is very simple, it just needs a genius to understand its
simplicity."

"C is quirky, flawed, and an enormous success."

"We really didn't buy it thinking we'd have this enormous
investment."
Here is also a short video telling a few words of UNIX history and showing Dennis Ritchie in his UNIX development years:
Farewell Denis! See you in Hacker's paradise ;)
Tue Oct 11 13:09:49 EEST 2011
How to mount directory in memory on GNU / Linux and FreeBSD / Mount directory in RAM memory to increase performance on Linux and BSD
One of the websites hosted on a
server I currently manage has a cache directory which doesn't take
much space but tens of thousands of tiny files. Each second a dozen
of files are created in the cache dir. Hence using a hard disk
directory puts some serious load on the server consequence of the
many fopen and fclose HDD I/O
operations.
To get through the problem, the solution was obvious use a directory which stores its information in memory.
There are of course other benefits of using a memory to store data in as we all know as access to RAM is so many times faster.
GNU/Linux is equipped with a tmpfs since kernel version 2.4.x, primary usage of tmpfs file system across many G / Linux distributious is the /tmp directory.
Some general tmpfs information about tmpfs is explained in mount's manual e.g.: man mount, a good other reading is the tmpfs kernel documentation file
An implementation of tmpfs is /dev/shm .
/dev/shm is a standard memory device used among Linuces, its actually an ordinary directory one can list with ls . /dev/shm is used as a "virtual directory" memory space. Below is an output of /dev/shm from my notebook, one can see few files stored in memory which belong to the pulse audio linux architecture:
To measure the size of /dev/shm across different Linux distriubtions one can use the usual df cmd, e.g.:
Above I show a df -h /dev/shm output from a CentOS server equipped with 32 GB of memory, as you can see CentOS has reserved half of the size of the system memory (16GB) for the purposes of creating files in memory through /dev/shm. The memory is dynamically assigned, so if its not use the assigned memory by it can still be used for the purposes of the services running (which by the way is very nice).
Accoring to what, I've read in wikipedia about tmpfs, tmpfs defaults in Linux to half of the system physical memory.
However I've noticed Debian Linux hosts usually reserve less memory for /dev/shm, on my personal notebook Debian /dev/shm is only 1 Giga, where on a Debian running server, Debian automatically has set it to the humble 2GB. Setting less by the way as with the Debian example, is a rather good idea since not many desktop or server applications are written to get actively advantage of the virtual /dev/shm directory.
One can directly drop files in /dev/shm which will immediately be stored in memory, and after a system reboot the files will disappear.
Let's say you zip archive file, testing.zip and you like to store the file in memory to do so, just copy the file in /dev/shm.
You don't even need to be root to copy files in the "virtual memory directory". This is a reason many crackers (script kiddies), are storing their cracking tools in /dev/shm ;)
A rather funny scenario, I've witness before is when you list /dev/shm on some Linux server and suddenly you see a tons of brute forcing tools and all kind of "hack" related stuff belonging to some system user. Sometimes even this malicious script tools belong to the root user...
Now as I've said a few words on how linux's tmpfs works here is how to mount a directory which cache content will be stored in volatile memory:
As you can see the above command will dynamically assign a tmpfs directory taking up from the system RAM mem which could expand up to 3GB within the system memory.
Of course before mounting, its necessery to create the /var/www/site/cache and set proper permissions in the above example I use /var/www/site/cache with a default permissions of 755 which is owned by the use with which the Apache server is running, e.g.:
Using a tmpfs is very handy and have many advantages, however one should be very careful with the data stored inside a tmpfs dir resource, all data will be lost in case of sudden system restart as the data is stored in the memory.
One other problems one might expect with tmpfs would be if the assigned virtual disk space gets filled with data. It never happened to me but, I've red online some stories that in the past this led to system crashes, today as the dox I've checked prescribed overfilling it will start swapping make the system terribly sluggish and eventually afred depleting the reserver swap space will start killing processes.
Using tmpfs as a cache directory is very useful on servers running Apache+PHP/Perl/Python/Ruby etc. as it can be used for stroring script generated temorary data.
Using a tmpfs can signifantly decrease server i/o created disk overheads.
Some other application I can think of though, I haven't tested it would be if tmpfs mounted directory is used to store scripting executable files, copied after restart. Executing the script reading it directly from the "virtual directory" could for sure have very good impact especially on huge websites.
One common service which takes advantage of the elegancy of tmpfs nowdays almost all modern GNU/Linux has is udevd - The Linux dynamic device management. By the way (man udev) is a very good and must read manual especially for Linux novices to get a good basic idea on how /dev/ mamagement occurs via udev.
To make permenant directory contained in memory on Linux the /etc/fstab file should be used.
In order to mount permanently a directory as a memory device of a size of 3GB with 0755 permissions in /var/www/site/cache, as shown in the earlier example, one can use the command:
This will assure the directory stored in memory would be recreated on next boot.
Nowdays the use of tmpfs is constantly growing, I've seen it to be used as a way to substitute ordinary disk based /tmp with a tmpfs directory contained in memory in Cloud Linux OS.
The applications of tmpfs is pretty much to the imagination of the one who wants to get advantage of it. For sure using tmpfs will be seen by the Linux GUI programs.
Going to FreeBSD and the BSD world, tmpfs is also available, however it is still considered a bit experimental. To get use of tmpfs to gain some performance, one should first enable it via bsd's /etc/rc.conf:
Mounting a directory permanently using tmpfs persmanently it again is doable via /etc/fstab to add a new directory inside memory with tmpfs: is done with adding:
The native equivallent of tmpfs in FreeBSD is called mdmfs.
As I said it is slower than tmpfs but rock solid.
To mount a 4gigabyte size mdmfs "ram directory" on BSD from csh:
Mounting a directory permanently using tmpfs persmanently it again is doable via /etc/fstab to add a new directory inside memory with tmpfs: is done with adding:
In huge corporations like Google and Yahoo tmpfs is certanly used a lot as this technology can dramatically can improve access times to information. I'm curious to know for some good ways to get use of tmpfs to improve efficiency.
If someone has some readings or has some idea please shar with me ;)
To get through the problem, the solution was obvious use a directory which stores its information in memory.
There are of course other benefits of using a memory to store data in as we all know as access to RAM is so many times faster.
GNU/Linux is equipped with a tmpfs since kernel version 2.4.x, primary usage of tmpfs file system across many G / Linux distributious is the /tmp directory.
Some general tmpfs information about tmpfs is explained in mount's manual e.g.: man mount, a good other reading is the tmpfs kernel documentation file
An implementation of tmpfs is /dev/shm .
/dev/shm is a standard memory device used among Linuces, its actually an ordinary directory one can list with ls . /dev/shm is used as a "virtual directory" memory space. Below is an output of /dev/shm from my notebook, one can see few files stored in memory which belong to the pulse audio linux architecture:
linux:~$ ls -al /dev/shm

ls -al /dev/shm/ total 7608 drwxrwxrwt 2 root root 160 Oct 10 18:05
.

drwxr-xr-x 16 root root 3500 Oct 10 10:57 ..

p-w------- 1 root root 0 Oct 10 10:57 acpi_fakekey

-r-------- 1 hipo hipo 67108904 Oct 10 17:20
pulse-shm-2067018443

-r-------- 1 hipo hipo 67108904 Oct 10 10:59
pulse-shm-2840042043

-r-------- 1 hipo hipo 67108904 Oct 10 10:59
pulse-shm-3215031142

-r-------- 1 hipo hipo 67108904 Oct 10 18:05
pulse-shm-4157723670

-r-------- 1 hipo hipo 67108904 Oct 10 18:06
pulse-shm-702872358
To measure the size of /dev/shm across different Linux distriubtions one can use the usual df cmd, e.g.:
[root@centos: ~]$ df -h /dev/shm

Filesystem Size Used Avail Use% Mounted on

tmpfs 16G 0 16G 0% /dev/shm
Above I show a df -h /dev/shm output from a CentOS server equipped with 32 GB of memory, as you can see CentOS has reserved half of the size of the system memory (16GB) for the purposes of creating files in memory through /dev/shm. The memory is dynamically assigned, so if its not use the assigned memory by it can still be used for the purposes of the services running (which by the way is very nice).
Accoring to what, I've read in wikipedia about tmpfs, tmpfs defaults in Linux to half of the system physical memory.
However I've noticed Debian Linux hosts usually reserve less memory for /dev/shm, on my personal notebook Debian /dev/shm is only 1 Giga, where on a Debian running server, Debian automatically has set it to the humble 2GB. Setting less by the way as with the Debian example, is a rather good idea since not many desktop or server applications are written to get actively advantage of the virtual /dev/shm directory.
One can directly drop files in /dev/shm which will immediately be stored in memory, and after a system reboot the files will disappear.
Let's say you zip archive file, testing.zip and you like to store the file in memory to do so, just copy the file in /dev/shm.
linux:~$ cp -rpf testing.zip /dev/shm
You don't even need to be root to copy files in the "virtual memory directory". This is a reason many crackers (script kiddies), are storing their cracking tools in /dev/shm ;)
A rather funny scenario, I've witness before is when you list /dev/shm on some Linux server and suddenly you see a tons of brute forcing tools and all kind of "hack" related stuff belonging to some system user. Sometimes even this malicious script tools belong to the root user...
Now as I've said a few words on how linux's tmpfs works here is how to mount a directory which cache content will be stored in volatile memory:
linux:~# mount -t tmpfs -o size=3G,mode=0755 tmpfs
/var/www/site/cache
As you can see the above command will dynamically assign a tmpfs directory taking up from the system RAM mem which could expand up to 3GB within the system memory.
Of course before mounting, its necessery to create the /var/www/site/cache and set proper permissions in the above example I use /var/www/site/cache with a default permissions of 755 which is owned by the use with which the Apache server is running, e.g.:
linux:~# mkdir -p /var/www/site/cache

linux:~# chown -R www-data:www-data /var/www/site/cache

linux:~# chmod -R 755 /var/www/site/cache
Using a tmpfs is very handy and have many advantages, however one should be very careful with the data stored inside a tmpfs dir resource, all data will be lost in case of sudden system restart as the data is stored in the memory.
One other problems one might expect with tmpfs would be if the assigned virtual disk space gets filled with data. It never happened to me but, I've red online some stories that in the past this led to system crashes, today as the dox I've checked prescribed overfilling it will start swapping make the system terribly sluggish and eventually afred depleting the reserver swap space will start killing processes.
Using tmpfs as a cache directory is very useful on servers running Apache+PHP/Perl/Python/Ruby etc. as it can be used for stroring script generated temorary data.
Using a tmpfs can signifantly decrease server i/o created disk overheads.
Some other application I can think of though, I haven't tested it would be if tmpfs mounted directory is used to store scripting executable files, copied after restart. Executing the script reading it directly from the "virtual directory" could for sure have very good impact especially on huge websites.
One common service which takes advantage of the elegancy of tmpfs nowdays almost all modern GNU/Linux has is udevd - The Linux dynamic device management. By the way (man udev) is a very good and must read manual especially for Linux novices to get a good basic idea on how /dev/ mamagement occurs via udev.
To make permenant directory contained in memory on Linux the /etc/fstab file should be used.
In order to mount permanently a directory as a memory device of a size of 3GB with 0755 permissions in /var/www/site/cache, as shown in the earlier example, one can use the command:
linux:~# echo 'tmpfs /var/www/site/cache/ tmpfs
size=3G,mode=0755 0 0' >> /etc/fstab
This will assure the directory stored in memory would be recreated on next boot.
Nowdays the use of tmpfs is constantly growing, I've seen it to be used as a way to substitute ordinary disk based /tmp with a tmpfs directory contained in memory in Cloud Linux OS.
The applications of tmpfs is pretty much to the imagination of the one who wants to get advantage of it. For sure using tmpfs will be seen by the Linux GUI programs.
Going to FreeBSD and the BSD world, tmpfs is also available, however it is still considered a bit experimental. To get use of tmpfs to gain some performance, one should first enable it via bsd's /etc/rc.conf:
freebsd# echo 'tmpfs_load="YES"' >>
/etc/rc.conf
Mounting a directory permanently using tmpfs persmanently it again is doable via /etc/fstab to add a new directory inside memory with tmpfs: is done with adding:
freebsd# echo 'tmpfs /var/www/site/cache tmpfs rw 0 0'
>> /etc/fstab
The native equivallent of tmpfs in FreeBSD is called mdmfs.
As I said it is slower than tmpfs but rock solid.
To mount a 4gigabyte size mdmfs "ram directory" on BSD from csh:
freebsd# mdmfs -s 4g md
/var/www/site/cache
Mounting a directory permanently using tmpfs persmanently it again is doable via /etc/fstab to add a new directory inside memory with tmpfs: is done with adding:
freebsd# echo 'md /var/www/site/cache mfs rw,-s4G 2 0'
>> /etc/fstab
There are some reports of users
who presumable use it to increase the ports / kernel compile times,
but I haven't tried it yet so I don't know for sureIn huge corporations like Google and Yahoo tmpfs is certanly used a lot as this technology can dramatically can improve access times to information. I'm curious to know for some good ways to get use of tmpfs to improve efficiency.
If someone has some readings or has some idea please shar with me ;)
Sat Oct 8 20:19:36 EEST 2011
Triumph of the Nerds - A documentary about the rise of Personal Computers

Triumph of the Nerds is 3 parts documentary movie on how the Personal Computer was developed. The movie features interviews with Steve Jobs, Bill Gates, Steve Ballmer, Allan Paul and many other IT veterans who played key roles for the development of the Personal Computer ,
The movie is an interesting watching for people interested into Information Technology and gives some minor insights on the starred interviewed people and their life philosophy. It was interesting times back then and it seems many of the guys who could participate in the PCs were very lucky, where others who made key developments which are de-facto standards today went into history without much being remembered.
Now the trends which these man set in world's development is not nice. Even though PC brough a lot of fun in our every lives it suddenly started taking over our privacy and made the humanity divided.
The movie is a story of a man motivated by greed arrogancy and exploitation. Even though the movie has historical value it doesn't even mention about Free Software Richard Stallman and the free software movement.
The movie talks about the development of CP/M the predecessor of Quick and Dirty DOS (QDOS), MS-DOS Windows 1,2,3, Windows 95 etc.
It also tries to picture the events around the raise and fall of IBM and OS/2.
The most notable parts for me in the movie are the showing off of some old computer hardware and Mainframe servers as well as the quick explanation on how Mainframes irons predecessed the PC. Another interesting moment in the movie is displaying Steve Jobs demonstrating the Xerox's Alto graphical interface. Talking about Jobs it was quite shocking for the world his sudden death just 3 days ago so (R.I.P).
The movie author Robert X. Cringery stress out in the movie the great struggle between the so called "the blue Elephant" IBM and the just emerging early Microsoft Corporation
Triumph of the Nerds slightly mentions Digital Equipment Corporation / DEC or COMPAQ as later known. DEC is company less known in todays world which had historically great impact on computer market, so its a pity the movie part mentioning DEC is so short.
What the movie misses is to aforemention About's Digital Equipment VMS operating system known under the code name OpenVMS. OpenVMS even of today is believed by many to be the most secure Operating System ever developed.
The movie part that talks about DEC is the second part of movie it shows a nice COMPAQ portable computer.
One should admit COMPAQ portable Computer is a really trendy for its time, Also the way it sticks the keyboard to the screen does remind seriously the opening and closing of a modern laptop ;)
The movie includes some interesting, so called crash courses where the movie author gives some insight on elementary computing, so for those new to informatix the movie will surely be educative as well, though for a UNIX gurus this elementary computing scenes will look kinda ridiculous ;)
One serious flaw with this movie is the complete lack of interviews with Richard Stallman and the importance of Free Software for the development of modern PC and the influence of the free software culture on todays latest Macintosh and PC developments.
A related movie which probably most IT geeks already know / seen is Pirates of the Sillicon Valley
, hence large chunk of Triumph of the Nerds gives another point of view on the ideas and stories presented in Triumph of the Nerds
Triumph of the Nerds brings back some good memories of the glorious PC computer past for all of us who had been a DR-DOS/MS-DOS and Windows 3.11 / 95 users.
Fri Oct 7 00:00:54 EEST 2011
How to crack password protected rar and 7z files on GNU / Linux

RarCrack is able to crack rar and 7z archive files protected by password on Linux.
The program is currently at release version 0.2, so its far from perfection, but at least it can break rars.
RarCrack is currently installable on most Linux distributions only from source, to install on a random Linux distro, download and make && make install . RarCrack's official site is here, I've mirrored the current version of RarCrack for download here . To install rarcrack from source using the mirrored version:
linux:~# wget
http://pc-freak.net/files/rarcrack-0.2.tar.bz2

...

linux:~# tar -jxvvf rarcrack-0.2.tar.bz2

linux:~# cd rarcrack-0.2

linux:~/rarcrack-0.2# make

...

linux:~/rarcrack-0.2# make install

...
On FreeBSD, rarcrack is available and installable via the ports tree, to install on FreeBSD:
freebsd# cd /usr/ports/security/rarcrack

freebsd# make && make install

...
To use RarCrack to crack rar, zip or 7z archive file:
freebsd% rarcrack rar_file_protected_with_password.rar --type
rar
The argument --type rar is optional, in most archives RarCrack should detect the archive automatically. The --type option could also take the arguments of rar and 7z .
I've created a sample rar file protected with password linux_then_and_now.png.rar . The archive linux_then_and_now.png contains a graphic file illustrating the linux growth in use in computers, mobiles and servers. linux_then_and_now.png.rar is protected with the sample password parola
RarCrack also supports threads (a simultaneous instance spawned copies of the program). Using threads speeds up the process of cracking and thus using the --threads is generally a good idea. Hence a good way to use rarcrack with the --threads option is:
freebsd% rarcrack linux_then_and_now.png.rar --threads 8
--type rar

RarCrack! 0.2 by David Zoltan Kedves (kedazo@gmail.com)

INFO: the specified archive type: rar

INFO: cracking linux_then_and_now.png.rar, status file:
linux_then_and_now.png.rar.xml

Probing: '0i' [24 pwds/sec]

Probing: '1v' [25 pwds/sec]
RarCrack's source archive also comes with three sample archive files (rar, 7z and zip) protected with passwords for the sake of testing the tool.
One downside of RarCrack is its extremely slow in breaking the passwords on my Lenovo notebook - dual core 1.8ghz with 2g ram it was able to brute force only 20-25 passwords per second.
This means cracking a normal password of 6 symbols will take at least 5 hours.
RarCrack is also said to support cracking zip passwords, but my tests to crack password protected zip file did not bring good results and even one of the tests ended with a segmentation fault.
To test how rarcrack performs with password protected zip files and hence compare if it is superior or inferior to fcrackzip, I used the fcrackzip's sample pass protected zip noradi.zip
hipo@noah:~$ rarcrack --threads 8 noradi.zip --type zip

2 by David Zoltan Kedves (kedazo@gmail.com)

INFO: the specified archive type: zip

INFO: cracking noradi.zip, status file: noradi.zip.xml

Probing: 'hP' [386 pwds/sec]

Probing: 'At' [385 pwds/sec]

Probing: 'ST' [380 pwds/sec]
As you can see in above's command output, the zip password cracking rate of approximately 380 passwords per second is a bit quicker, but still slower than fcrackzip.
RarCrack seg faults if cracking a pass protected zip is passed on without specifying the --type zip command arguments:
linux:~$ rarcrack --threads 8 noradi.zip

RarCrack! 0.2 by David Zoltan Kedves (kedazo@gmail.com)

Segmentation fault
While talking about cracking protected rar and zip archives with password, its worthy to mention creating a password protected archive with Gnome Desktop on Linux and FreeBSD is very easy.
To create the password protected archive in Gnome graphic environment:
a. Point the cursor to the file you want to archive with password
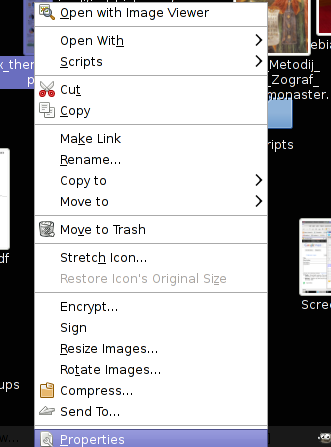
b. Press on Other Options and fill in the password in the pwd dialog
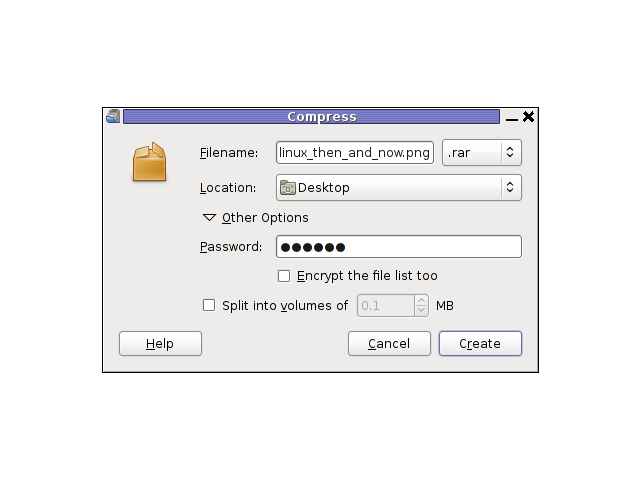
I think as of time of writting, no GUI frontend interface for neither RarCrack or FcrackZip is available. Lets hope some good guy from the community will take the time to write extension for Gnome to allow us to crack rar and zip from a nice GUI interface.
Wed Oct 5 16:05:26 EEST 2011
Cracking zip protected password files on GNU/Linux and FreeBSD
Its not very common, but sometimes it
happens you have to crack some downloaded file from
thepiratebay.com or some other big torrent tracker. An
example scenario would be downloading a huge words dictionary (a
rainbow table) dictionary etc., which was protected by the author
with a password and zipped.
Fortunately Mark Lehmann developed a software called fcrackzip which is capable of brute forcing zip protected file passwords straight on UNIX like operating systems (GNU/Linux, FreeBSD).
fcrackzip is available from package repositories on Debian and Ubuntu Linuces to install via apt:
fcrackzip is also available on FreeBSD via the ports tree and can be installed with:
On Debian it's worthy to have a quick look on the README file:
Cracking the noradi.zip password protected sample file on my dual core 1.8 ghz box with 2gb, it took 30 seconds.
Of course the sample set password for noradi.zip is pretty trivial and with more complex passwords, sometimes cracking the password can take up to 30 minutes or an hour and it all depends on the specific case, but at least now we the free software users have a new tool in the growing arsenal of free software programs ;)
Here are the options passed on to the above fcrackzip command:
-u - Try to decompress with the detected possible archive passwords using unzip (This is necessery to precisely find the archive password, otherwise it will just print out a number of possible matching archive passwords and you have to try each of the passwords one by one. Note that this option depends on a working unzip version installed.)
-c a - include all charsets to be tried with the generated passwords
-b - Select brute force mode - Tries all possible combinations of letters specified
-p aaaaaa - init-password string (Look up for a password between the password length 6 characters long)
FCrackZip is partly written in assembler and thus is generally works fast, to reduce the CPU load fcrackzip will put on the processor its also capable of using external words dictionary file by passing it the option:
-D - The file should be in a format one word per line and be preliminary alphabetically sorted with let's say sort
Also fcrackzip supports parallel file brute force, for example if you have 10 zip files protected with passwords it can paralelly try to brute force the pwds.
As of time of writting frackzip reached version 1.0 and seems to be pretty stable. Happy cracking.
Just to make sure fcrackzip's source is not lost somewhere in the line in the long future to come, I've created a fcrackzip download mirror here
Fortunately Mark Lehmann developed a software called fcrackzip which is capable of brute forcing zip protected file passwords straight on UNIX like operating systems (GNU/Linux, FreeBSD).
fcrackzip is available from package repositories on Debian and Ubuntu Linuces to install via apt:
linux:~# apt-get install frackzip

...
fcrackzip is also available on FreeBSD via the ports tree and can be installed with:
freebsd# cd /usr/ports/security/fcrackzip

freebsd# make install cleam
On Debian it's worthy to have a quick look on the README file:
linux:~# cat /usr/share/doc/fcrackzip/README See
fcrackzip.txt (which is derived from the manpage), or
fcrackzip.html


There is a web page with more information at

http://lehmann.home.ml.org/fcrackzip.html or

http://www.goof.com/pcg/marc/fcrackzip.html


A sample password-protected .zip file is included as "noradi.zip".
It's

password has 6 lower case characters, and fcrackzip will find it
(and a

number of false positives) with


fcrackzip -b -c a -p aaaaaa ./noradi.zip


which will take between one and thirty minutes on typical
machines.


To find out which of these passwords is the right one either try
them out

or use the --use-unzip option.


Marc
Cracking the noradi.zip password protected sample file on my dual core 1.8 ghz box with 2gb, it took 30 seconds.
linux:~# time fcrackzip -u -b -c a -p aaaaaa noradi.zip


PASSWORD FOUND!!!!: pw == noradi


real 0m29.627s

user 0m29.530s

sys 0m0.064s
Of course the sample set password for noradi.zip is pretty trivial and with more complex passwords, sometimes cracking the password can take up to 30 minutes or an hour and it all depends on the specific case, but at least now we the free software users have a new tool in the growing arsenal of free software programs ;)
Here are the options passed on to the above fcrackzip command:
-u - Try to decompress with the detected possible archive passwords using unzip (This is necessery to precisely find the archive password, otherwise it will just print out a number of possible matching archive passwords and you have to try each of the passwords one by one. Note that this option depends on a working unzip version installed.)
-c a - include all charsets to be tried with the generated passwords
-b - Select brute force mode - Tries all possible combinations of letters specified
-p aaaaaa - init-password string (Look up for a password between the password length 6 characters long)
FCrackZip is partly written in assembler and thus is generally works fast, to reduce the CPU load fcrackzip will put on the processor its also capable of using external words dictionary file by passing it the option:
-D - The file should be in a format one word per line and be preliminary alphabetically sorted with let's say sort
Also fcrackzip supports parallel file brute force, for example if you have 10 zip files protected with passwords it can paralelly try to brute force the pwds.
As of time of writting frackzip reached version 1.0 and seems to be pretty stable. Happy cracking.
Just to make sure fcrackzip's source is not lost somewhere in the line in the long future to come, I've created a fcrackzip download mirror here
Tue Oct 4 14:01:41 EEST 2011
Monitor General Server / Desktop system health in console on Linux
saidar is a text based ncurses
program to display live statistics about general system
health.
It displays in one refreshable screen (similar to top) statistics about server state of:
CPU, Load, Memory, Swap, Network, I/O disk operations
Besides that saidar supports a ncurses console colors, which makes it more funny to look at.
Saidar extracts the statistics for system state based on libgstrap cross platform statistics library about pc system health.
On Debian, Ubuntu, Fedora, CentOS Linuxes saider is available for install straight from distribution repositories.
On Debian and Ubuntu saidar is installed with cmd:
On CentOS and Fedora saidar is bundled as a part of statgrab-tools rpm package.
Installing it on 64 bit CentOS with yum is with command:
Saidar is also available on FreeBSD as a part of the /usr/ports/devel/libgstrab, hence to use on my FreeBSD I had to install the libgstrab port:
Here is saidar running on my Desktop Debian on Thinkpad in color output:

I've seen many people, who use various shell scripts to output system monitoring information, this scripts however are often written to just run without efficiency in mind and they put some let's say 1% extra load on the system CPU. This is not the case with saidar which is written in C and hence the program is optimized well for what it does.
It displays in one refreshable screen (similar to top) statistics about server state of:
CPU, Load, Memory, Swap, Network, I/O disk operations
Besides that saidar supports a ncurses console colors, which makes it more funny to look at.
Saidar extracts the statistics for system state based on libgstrap cross platform statistics library about pc system health.
On Debian, Ubuntu, Fedora, CentOS Linuxes saider is available for install straight from distribution repositories.
On Debian and Ubuntu saidar is installed with cmd:
debian:~# apt-get install saidar

...
On CentOS and Fedora saidar is bundled as a part of statgrab-tools rpm package.
Installing it on 64 bit CentOS with yum is with command:
[root@centos ~]# yum install
statgrab-tools.x86_64
Saidar is also available on FreeBSD as a part of the /usr/ports/devel/libgstrab, hence to use on my FreeBSD I had to install the libgstrab port:
freebsd# cd /usr/ports/devel/libstatgrab

freebsd# make install clean
Here is saidar running on my Desktop Debian on Thinkpad in color output:
debian:~# saidar -c
I've seen many people, who use various shell scripts to output system monitoring information, this scripts however are often written to just run without efficiency in mind and they put some let's say 1% extra load on the system CPU. This is not the case with saidar which is written in C and hence the program is optimized well for what it does.
Mon Oct 3 17:17:37 EEST 2011
Develop your children intellect with Gcompris high quality educational software on GNU / Linux, Windows and Mac OS X

Gcompris is a great piece of software to educate children in the age interval of 2 to 10 years old.
Gcompris is a tool of educative and funny interactive computer applications many of which has a form of games.

Gcompris is teaching the children on the following fields of knowledge:
- understand the computer - keyboard, mouse etc.
- Algebra - Summing up numbers, enumarations, table memory, mirror image etc.
- Science - The Canal lock, the water cycle, how a submarine works, elementary electric simulation
- Geography - Find out about country locations, Place the country on the map
- Games - Learn how to play chess, improve memory and memorization, sudoku etc.
- Reading - Learning to read fluent, reading practice
- Learn to proerply tell time, solve puzzle games and learn famous paintings, basic cartoon making, vector drawing

All the funny activities Gcompris educative kid tool offers 100+. Gcompris is in active development so with time more and more activities gets added.
Gcompris is a Free Software and among with its native GNU / Linux support it has ports for Windows and Mac OS X
The Free Software nature of Gcompris gives possibility to be easily adapted and further developed! Its really funny not only for kids, but even for adults. If you had a stressy day and you want to relax in a childish way and feel like a kid again, give it a try and you will be amazed how much light and happiness this computer program can bless you with ;)
Many of Gcompris activities has a little cute penguins and in general its capable of introducing the kids to the nice concept of the free software.
As a free software Gcompris is really great as among the rest of the so popular free software freedoms: to distribute and modify the software it comes absolutely free of charge (in money terms). This is great news for parents who are growing their kids in the "developing world", the so called 2nd and 3rd world as well is a good alternative to the many available paid costly application and games aiming at kids brain development.

The name Gcompris is also known in free software realm under the name I GOT IT . Gcompris has currently Sound and text support for 33 Country Languages, here is a completele list of languages currently supported:
Arabic, Asturian, Bulgarian, Breton, Czech, Danish, German, Greek, English, Esperanto, Spanish, Basque, Finnish, French, Hebrew, Indian, Hungarian, Indonesian, Italian, Indian, Norwegian, Dutch, Norwegian, Punjabi, Portuguese, Portuguese, Russian, Somali, Serbian, Swedish, Turkish, Urdu, Chinese
Some of the languages supported still does not have a 100% translation but partially translated as its a question of time that enough translators are found to make the translations for all available major languages. The only 100% completed trasnlation as of time of writting is in French, Slovenian and Spanish
Gcompris is already included in almost all available moderm GNU / Linux distributions. A packaged version of it is part of Fedora, Debian and Ubuntu.

For all those parents who wish to educate their children on Fedora Linux install it with the GUI installer or yum with cmd:
[root@fedora ~]# yum install gcompris

...
On Debian and Ubuntu Gcompris is installable via apt from repos:
debian:~# apt-get install gcompris

...
To add a text and sound translation to Gcompris its also necessery to install the relevant gcompris-sound distribution package, for example to add the sound translations for my native Bulgarian language I had to install the package gcompris-sound-bg, e.g.:
debian:~# apt-get install gcompris-sound-bg

...
Gcompris is developed to use the Gnome's GTK and is a perfect match for Linux users who already run a Gnome Desktop on their PCs.
Most of Gcompris versions should run without much hassle on Mac OS X and Windows so all mommies and daddies on Windows or Mac can install it and use it to educate their kids ;)
Here are few more screenshots of Gcompris


To sum it up, if you want to make your children smarter or you're bored to death and you need to have some rest by going back to your childhood years try gcompris
Mon Oct 3 14:40:06 EEST 2011
How to add multi language support to wordpress with qTranslate
Lately, I have to deal with some wordpress based installs in big part of my working time. One of the wordpress sites needed to have added a multi language support.
My first research in Google pointed me to WPML Multilingual CMS The Wordpress Multilingual Plugin
WPML Multilingual CMS looks nice and easy to use but unfortunately its paid, the company couldn't afford to pay for the plugin so I looked forward online for a free alternative and stumbled upon QTranslate
QTranslate is free and very easy to install. Its installed the wordpress classic way and the installation went smoothly, e.g.:
1. Download and unzip QTranslate
# cd /var/www/blog/wp-content/plugins

/var/www/blog/wp-content/plugins# wget
http://downloads.wordpress.org/plugin/qtranslate.2.5.24.zip

...

/var/www/blog/wp-content/plugins# unzip qtranslate.2.5.24.zip

...
Just for fun and in case the plugin disappears in future, a mirror of Qtranslate 2.5.24 is found here
2. Enable QTranslate from wordpress admin
Plugins -> Inactive -> qTranslate
(Activate)
After activating the plugin, there is a Settings button from which qTranslate's various plugin parameteres can be tuned.
In my case my site had to support both English and Arabic, so from the settings I added support for Arabic translation to the wordpress install.
Adding Arabic is done in the following way:
a. From the Language Management (qTranslate Configuration) from the Languages menu and the Languages (Add Languages) I had to choose a language code (in my case a language code of ar - for Arabic). Next I had to choose the Arabic flag from the follow up flag list.
In next text box Name , again I had to fill Arabic, for Locale en_US.UTF-8
The following Date Format and Time Format text boxes are optional so I left them blank.
To complete the process of adding the Arabic as a new language wordpress should support I pressed the Add Language button and the Arabic got added as a second language.
Afterwards the Arabic was added as second language, on the bottom of the left wordpress menu pane a button allowing a switch between English, Arabic appeared (see below screenshot):
Finally to make Arabic appear as a second language of choice on the website I added it as a Widget in the Widgets menu from the AWidgets menu:
Appearance -> Widgets
In widgets I added qTranslate Language Chooser to the Sidebar without putting any kind of Title for qtranslate widget .
I found it most helpful to choose the Text and Image as an option on how to display the Language switching in the wp.