November 2011 Archives
Tue Nov 29 15:07:18 EET 2011
How to start a process in background and keep it running after the console / terminal is closed on Linux and FreeBSD
The classical way to keep a process running in background after log out of a shell is using screen
Anyways using screen is not the only way to detach a running process , GNU / Linux and BSDs (Free, Open, Net BSDs) had a command nohup which aim is to run a command immune to hangups, with output to a non-tty
Let's say one wants to keep track (log) constantly ICMP traffic to a certain host with ping command on a UNIX server / desktop which doesn't have the screen manager ... terminal emulation program installed. Achieving this task is possible with nohup cmd by backgrounding the ping process, like so:
Afterwards even after closing up the opened ssh session or console (tty) / terminal (pts) on which the ping process is background nohup prevents the ping to be sent kill SIGNAL so the process continues running in the background.
Later on to check in real time the statistics of the continuous ICMP ping requests tail, less, or cat can be used for example watching the tail:
I'm using Linux / BSD for quite a lot of time and never before put in use the nohup cmd I guess there are more ppl who never heard of this handy UNIX basic command. Hope I'm not the only one who never heard about it and its useful knowledge to someone out. Cheers ;)
Anyways using screen is not the only way to detach a running process , GNU / Linux and BSDs (Free, Open, Net BSDs) had a command nohup which aim is to run a command immune to hangups, with output to a non-tty
Let's say one wants to keep track (log) constantly ICMP traffic to a certain host with ping command on a UNIX server / desktop which doesn't have the screen manager ... terminal emulation program installed. Achieving this task is possible with nohup cmd by backgrounding the ping process, like so:
guoi@host:~$  nohup ping google.com >ping.log &
[1] 45931
hipo@host:~$ nohup: ignoring input and redirecting stderr to stdout
Afterwards even after closing up the opened ssh session or console (tty) / terminal (pts) on which the ping process is background nohup prevents the ping to be sent kill SIGNAL so the process continues running in the background.
Later on to check in real time the statistics of the continuous ICMP ping requests tail, less, or cat can be used for example watching the tail:
hipo@host:~$ tail -f ping.log

64 bytes from fx-in-f106.1e100.net (74.125.39.106): icmp_req=562 ttl=51 time=44.0 ms

64 bytes from fx-in-f106.1e100.net (74.125.39.106): icmp_req=563 ttl=51 time=43.8 ms

64 bytes from fx-in-f106.1e100.net (74.125.39.106): icmp_req=564 ttl=51 time=43.3 ms

64 bytes from fx-in-f106.1e100.net (74.125.39.106): icmp_req=565 ttl=51 time=43.1 ms

64 bytes from fx-in-f106.1e100.net (74.125.39.106): icmp_req=566 ttl=51 time=43.4 ms

64 bytes from fx-in-f106.1e100.net (74.125.39.106): icmp_req=567 ttl=51 time=43.6 ms
I'm using Linux / BSD for quite a lot of time and never before put in use the nohup cmd I guess there are more ppl who never heard of this handy UNIX basic command. Hope I'm not the only one who never heard about it and its useful knowledge to someone out. Cheers ;)
Tue Nov 29 13:55:25 EET 2011
Convert Windows / MS-DOS end of line characters (CR/LF) to UNIX (LF) with sed
I guess everyone has ended up with problems into a script files written under Windows using some text editor which incorrectly placed into the end of lines Windows (\r\n) end of lines instead of the UNIX (\r).
Those who have have already take advantage of the nice tiny utility dos2unix which is capable of convert the Windows end of lines to UNIX. However some older UNIXes, like SunOS or HP-UX does not have the dos2unix utility into the list of packages one can install or even if its possible to install dos2unix it takes quite a hassle.
In that cases its good to say convertion of end of lines can be done without using external end programs by simply using UNIX sed .
The way to remove the incorrect Windows ^M (as seen in unix text editors) is by using the sed one liner:
server# sed 's/.$//' file-with-wrong-windows-eol.txt > file-with-fixed-unix-eol.txt
Mon Nov 28 16:46:07 EET 2011
How to check any filesystem for bad blocks using GNU / Linux or FreeBSD with dd

Have you looked for a universal physical check up tool to check up any filesystem type existing on your hard drive partitions?
I did! andwas more than happy to just recently find out that the small UNIX program dd is capable to check any file system which is red by the Linux or *BSD kernel.
I'll give an example, I have few partitions on my laptop computer with linux ext3 filesystem and NTFS partition.
My partitions looks like so:
noah:/home/hipo# fdisk -l

Disk /dev/sda: 160.0 GB, 160041885696 bytes

255 heads, 63 sectors/track, 19457 cylinders

Units = cylinders of 16065 * 512 = 8225280 bytes

Sector size (logical/physical): 512 bytes / 512 bytes

I/O size (minimum/optimal): 512 bytes / 512 bytes

Disk identifier: 0x2d92834c

   Device Boot      Start         End      Blocks   Id  System

   /dev/sda1               1         721     5786624   27  Unknown

   Partition 1 does not end on cylinder boundary.

   /dev/sda2   *         721        9839    73237024    7  HPFS/NTFS

   /dev/sda3            9839       19457    77263200    5  Extended

   /dev/sda5            9839       12474    21167968+  83  Linux

   /dev/sda6           12474       16407    31593208+  83  Linux

   /dev/sda7           16407       16650     1950448+  82  Linux swap / Solaris

   /dev/sda8           16650       19457    22551448+  83  Linux
For all those unfamiliar with dd - dd - convert and copy a file this tiny program is capable of copying data from (if) input file to an output file as in UNIX , the basic philosophy is that everything is a file partitions themselves are also files.
The most common use of dd is to make image copies of a partition with any type of filesystem on it and move it to another system
Looking from a Windows user perspective dd is the command line Norton Ghost equivalent for Linux and BSD systems.
The classic way dd is used to copy let's say my /dev/sda1 partition to another hard drive /dev/hdc1 is by cmds:
noah:/home/hipo# dd if=/dev/sda1 of=/dev/hdc1 bs=16065b
Even though the basic use of dd is to copy files, its flexibility allows a "trick" through which dd can be used to check any partition readable by the operating system kernel for bad blocks
In order to check any of the partitions listed, let's say the one listed with filesystem HPFS/NTFS on /dev/sda2 using dd
noah:/home/hipo# dd if=/dev/sda2 of=/dev/null bs=1M
As you can see the of (output file) for dd is set to /dev/null in order to prevent dd to write out any output red by /dev/sda2 partition. bs=1M instructs dd to read from /dev/sda2 by chunks of 1 Megabyte in order to accelerate the speed of checking the whole drive.
Decreasing the bs=1M to less will take more time but will make the bad block checking be more precise.
Anyhow in most cases bs of 1 Megabyte will be a good value.
After some minutes (depending on the partition size), dd if, of operations outputs a statistics informing on how dd operations went.
Hence ff some of the blocks on the partition failed to be red by dd this will be shown in the final stats on its operation completion.
The drive, I'm checking does not have any bad blocks and dd statistics for my checked partition does not show any hard drive bad block problems:
71520+1 records in

71520+1 records out

74994712576 bytes (75 GB) copied, 1964.75 s, 38.2 MB/s
The statistics is quite self explanatory my partition of s size 75 GB was scanned for 1964 seconds roughly 32 minutes 46 seconds. The number of records red and written are 71520+1 e.g. (records in / records out). This means that all the records were properly red and wrote to /dev/null and therefore no BAD blocks on my NTFS partition ;)
Sat Nov 26 17:36:45 EET 2011
How to create ssh tunnels / ssh tunneling
SSH tunneling allows to send and receive traffic using a dedicated port. Using an ssh traffic can have many reasons one most common usage reason is to protect the traffic from a host to a remote server or to access port numbers which are by other means blocked by firewall, e.g.: (get around firewall filtering)
SSH tunneling works only with TCP traffic. The way to make ssh tunnel is with cmds:
This command will make ssh to bind a port on localhost of the host host:/root# machine to the host desthost:destport (destination host : destinationport). Important to say deshost is the host destination visible from the remote-server.net therefore if the connection is originating from remote-server.net this means desthost will be localhost.
Mutiple ssh tunnels to multiple ports using the above example commands is possible. Here is one example of ssh tunneling
Let's say its necessery to access an FTP port (21) and an http port (80), listening on remote-server.net In that case desthost will be localhost , we can use locally the port (8080) insetad of 80, so it will be no necessery to make the ssh tunnel with root (admin privileges). After the ssh session gets opened both services will be accessible on the local ports.
That's all enjoy ;)
SSH tunneling works only with TCP traffic. The way to make ssh tunnel is with cmds:
host:/root# ssh -L localhost:deshost:destport username@remote-server.net

host:/root# ssh -R restport:desthost:localport username@remote-server.net

host:/root# ssh -X username@remote-server.net
This command will make ssh to bind a port on localhost of the host host:/root# machine to the host desthost:destport (destination host : destinationport). Important to say deshost is the host destination visible from the remote-server.net therefore if the connection is originating from remote-server.net this means desthost will be localhost.
Mutiple ssh tunnels to multiple ports using the above example commands is possible. Here is one example of ssh tunneling
Let's say its necessery to access an FTP port (21) and an http port (80), listening on remote-server.net In that case desthost will be localhost , we can use locally the port (8080) insetad of 80, so it will be no necessery to make the ssh tunnel with root (admin privileges). After the ssh session gets opened both services will be accessible on the local ports.
host:/home/user$ ssh -L 21:localhost:21 -L 8080:localhost:80 user@remote-server.net
That's all enjoy ;)
Fri Nov 25 17:13:16 EET 2011
How to encrypt files with GPG and OpenSSL on GNU / Linux
I have just recently found out that it is possible to use openssl to encrypt files to tighten your security.
Why would I want to encrypt files? Well very simple, I have plain text files where I write down my passwords for servers or account logins for services I use on the internet.
Before this very day I use gpg to encrypt and decrypt my sensitive information files and archives. The way to encrypt files with GPG is very simple, here is an example:
server:~# ls -al test.txt

-rw-r--r-- 1 root root 12 Nov 25 16:50 test.txt

server:~# gpg -c test.txt > test.txt.gpg

Enter passphrase:

Repeat passphrase:
Typing twice the same password produces the encrypted file test.txt.gpg . In order to later decrypt the gpg password protected file I use cmd:
server:~#  gpg -d test.txt.gpg >test.txt

Enter passphrase:

Repeat passphrase:

gpg: CAST5 encrypted data

gpg: encrypted with 1 passphrase

gpg: WARNING: message was not integrity protected
As one can see from above output by default gpg uses the CAST5 algorithm to encrypt the data. For all those curious on what kind of encryption does CAST5 provide and where the CAST5 origins are, in short CAST5 is a GNU invented cryptographic algorithm, the short description of the algorithm is as follows:
"...a DES-like Substitution-Permutation Network (SPN) cryptosystem which appears to have good resistance to differential cryptanalysis, linear cryptanalysis, and related-key cryptanalysis. This cipher also possesses a number of other desirable cryptographic properties, including avalanche, Strict Avalanche Criterion (SAC), Bit Independence Criterion (BIC), no complementation property, and an absence of weak and semi-weak keys."
Anyways, for all those who trust more the DES128 encryption as an encryption algorithm to keep your data secret, the openssl command tool provides another mean to encrypt sensitive data.
To encrypt a file using the openssl's DES encryption capabilities:
server:~# openssl des -salt -in test.txt -out test.txt.des

enter des-cbc encryption password:

Verifying - enter des-cbc encryption password:
As you can see to encrypt with the DES-CBC its necessery to type twice the secret password "salt" keyword which will be used as an encryption key.
To decrypt later on the DES encrypted file the cmd is:
server:~# openssl des -d -salt -in file.des -out file
In order to encrypt a whole directory earlier compressed with tar zip:
server:~# tar -czf - directory | openssl des -salt -out directory.tar.gz.des
Where directory is the name of directory which will be tarred and crypted.
To later decrypt with openssl the above encrypted tar.gz.des file:
server:~# openssl des -d -salt -in directory.tar.gzdes | tar -x
Fri Nov 25 13:15:55 EET 2011
How to renew IP address, Routing and flush DNS cache on Windows XP / Vista / 7
There are two handy Windows commands which can be used to renew IP address or flush prior cached DNS records which often create problems with resolving hosts.
1. To renew the IP address (fetch address from DHCP server)
In above cmd ipconfig /release will de-assign the IP address configured on all Windows LAN and Wireless interfaces, whether ipconfig /renew will send request for IP address to the DNS server.
To unassign and assign again IP address from DHCP server only for a particular LAN or WLAN card:
2. Adding specific routing to Windows
Windows has a Route command similar by syntax to Linux's route command.
To add routing via a specific predefined IP addresses on Windows the commands should be something like:
The second one adds 192.168.41.254 as a default gateway for all outbound traffic from the Windows host.
To make permanent routing -p switch is used.
3. To clear Windows DNS cache (flush DNS cached records)
This will clear all IP records corresponding to hostnames previously cached on the Windows host. Using ipconfig /flushdns is especially handy when IP address for a specific DNS host is changed. Flushing the Windows DNS cache can save us a lot of waiting before the domain example.com starts resolving to the new IP address let's say 1.2.3.4 instead of the old one 2.2.2.2
1. To renew the IP address (fetch address from DHCP server)
C:\> ipconfig /release

C:\> ipconfig /renew
In above cmd ipconfig /release will de-assign the IP address configured on all Windows LAN and Wireless interfaces, whether ipconfig /renew will send request for IP address to the DNS server.
To unassign and assign again IP address from DHCP server only for a particular LAN or WLAN card:
C:\> ipconfig /release LAN

C:\> ipconfig /renew LAN

C:\> ipconfig /release WLAN

C:\> ipconfig /renew WLAN
2. Adding specific routing to Windows
Windows has a Route command similar by syntax to Linux's route command.
To add routing via a specific predefined IP addresses on Windows the commands should be something like:
C:> Route add 192.168.40.0 mask 255.255.255.0 192.168.41.253

C:> Route add 0.0.0.0 mask 0.0.0.0 192.168.41.254
The first command adds IP 192.168.40.0 in the network of 255 hosts to be routed via 192.168.41.253 The second one adds 192.168.41.254 as a default gateway for all outbound traffic from the Windows host.
To make permanent routing -p switch is used.
3. To clear Windows DNS cache (flush DNS cached records)
C:\> ipconfig /flushdns
This will clear all IP records corresponding to hostnames previously cached on the Windows host. Using ipconfig /flushdns is especially handy when IP address for a specific DNS host is changed. Flushing the Windows DNS cache can save us a lot of waiting before the domain example.com starts resolving to the new IP address let's say 1.2.3.4 instead of the old one 2.2.2.2
Thu Nov 24 13:55:56 EET 2011
Easy way to look for irregularities and problems in log files / Facilitate log Reading and debug system log files on GNU / Linux and FreeBSD
As a System Administrator I need to check daily the log files produced on various GNU / Linux distributions or FreeBSD. This can sometimes take too much time if the old fashioned way using the normal system tools cat, less and tail etc. is used.
Reading logs one by one eats too much of my time and often as logs are reviewed in a hurry some crucial system irregularities, failed ssh or POP3 / Imap logins, filling disk spaces etc. are missed.
Therefore I decided to implement automated log parsing programs which will summary and give me an overview (helicopter view) on what were the system activities from the previous day (24h) until the moment I logged the system and issued the log analyzer program.
There are plenty of programs available out there that does "wide scale" log analysis, however there are two applications which on most GNU / Linux and BSD systems had become a de-facto standard programs to scan system log files for interesting lines.
These are:
-
1. logwatch - system log analyzer and reporter
-
2. logcheck - program to scan system log files for interesting lines
1. logwatch is by default installed on most of the Redhat based Linux systems (Fedora, RHEL, CentOS etc.). On Debian distributions and as far as I know (Ubuntu) and the other deb based distros logwatch is not installed by default. Most of the servers I manage these days are running Debian GNU / Linux so, to use logwatch I needed to install it from the available repository package, e.g.:
debian:~# apt-get install logwatch

...
logwatch is written in perl and with some big files to analyze, parsing them might take hell a lot of time. It does use a bunch of configuration scripts which defines how logwatch should read and parse the various services logwatch support by default. These conf scripts are also easily extensible, so if one has to analyze some undefined service in the conf files he can easily come up with a new conf script that will support the service/daemon of choice. Using logwatch is very easy, to get an overview about server system activity invoke the logwatch command:
debian:~# logwatch

 ################### Logwatch 7.3.6+cvs20080702-debian (07/02/08) ####################

         Processing Initiated: Thu Nov 24 05:22:07 2011

         Date Range Processed: yesterday

	        ( 2011-Nov-23 )

                 Period is day.

         Detail Level of Output: 0

         Type of Output/Format: stdout / text

         Logfiles for Host: debian

 ##################################################################


--------------------- dpkg status changes Begin ------------------------


Upgraded:

     libfreetype6 2.3.7-2+lenny7 => 2.3.7-2+lenny8

     libfreetype6-dev 2.3.7-2+lenny7 => 2.3.7-2+lenny8


---------------------- dpkg status changes End -------------------------


--------------------- httpd Begin ------------------------


Requests with error response codes

       400 Bad Request

       HTTP/1.1: 2 Time(s)

       admin/scripts/setup.php: 2 Time(s)

       401 Unauthorized

...

...

---------------------- vpopmail End -------------------------


--------------------- Disk Space Begin ------------------------


    Filesystem            Size  Used Avail Use% Mounted on

    /dev/md0              222G   58G  154G  28% /


---------------------- Disk Space End -------------------------


###################### Logwatch End #########################
The execution might take up from 10 to 20 seconds up to 10 or 20 minutes depending on the log files size and the CPU / RAM hardware on the machine where /var/log/... logs will be analyzed.
logwatch output can be easily mailed to a custom mail address using a crontab if the server runs a properly configured SMTP server. Using a cron like:
00 5 * * * /usr/sbin/logwatch | mail -s "$(hostname) log files for $(date)"
Here is time to make a note that logwatch is ported also to FreeBSD and is available from BSD's port tree, from a port with path:
/usr/ports/security/logcheck
2. logcheck is another handy program, which does very similar job to logwatch . The "interesting" information it returns is a bit less than compared to logwatch
The good thing about logcheck is that by default it is made to mail every 1 hour a brief data summary which might be of an interest to the sys admin.
Logcheck is available for install on RedHat distros via yum and has existing package for Debian as well as a port for FreeBSD under the port location /usr/ports/security/logcheck
To install on logcheck on Debian:
debian:~# apt-get install logcheck

...
After installation I found it wise to change the default mailing time from each and every hour to just once per day to prevent my email from overfilling with "useless" mails.
This is done by editting the default cron tab installed by the package located in /etc/cron.d/logcheck
The default file looks like so:
# /etc/cron.d/logcheck: crontab entries for the logcheck package

PATH=/usr/local/sbin:/usr/local/bin:/sbin:/bin:/usr/sbin:/usr/bin

MAILTO=root

@reboot         logcheck    if [ -x /usr/sbin/logcheck ]; then nice -n10 /usr/sbin/logcheck -R; fi

2 * * * *       logcheck    if [ -x /usr/sbin/logcheck ]; then nice -n10 /usr/sbin/logcheck; fi

# EOF
To change it run only once per day its content should looks something like:
# /etc/cron.d/logcheck: crontab entries for the logcheck package

PATH=/usr/local/sbin:/usr/local/bin:/sbin:/bin:/usr/sbin:/usr/bin

MAILTO=root

@reboot         logcheck    if [ -x /usr/sbin/logcheck ]; then nice -n10 /usr/sbin/logcheck -R; fi

2 5 * * *       logcheck    if [ -x /usr/sbin/logcheck ]; then nice -n10 /usr/sbin/logcheck; fi

# EOF
Altering it that way the log summary interesting info analysis will be sent on mail every day in 05:02 a.m.
Changing the default email logcheck will ship its log analyzer report emails on deb based distros is done via editting the file:
/etc/logcheck/logcheck.conf
And changing the SENDMAILTO="" variable to point to the appropriate admin email email addr.
Wed Nov 23 16:56:12 EET 2011
How to fix Windows Vista / Windows 7 can not open drive C with explorer error: "This file does not have a program associated with it for performing this action. Create an association in the Set Associations control panel."
One of my friends Windows 7 started returning errors while trying to open from My Computer the local Windows C, D and E drives.
This error appeared immediately, after malware and registry fix up programs were run on the PC. The exact programs that lead his PC into the state of returning an error:
This file does not have a program associated with it for performing this action. Create an association in the Set Associations control panel

are:
This two programs by the way are doing quite a good job on fixing Windows XP and Windows Vista PCs which were cleaned up earlier with Malware Bytes and Avira , however it seems they're not 100% still compatible with the Windows 7 registry database or some uncleaned malware or virus on the PC has post-messed up the registry file associations. As its always the case with Windows you don't have a clear idea what's going ...
Anyways as said the PC was in a bad situation, where neither Windows Explorer nor in any mean the disk drives can be cannot be opened / red and hence it was necessery for a quick way to revert back the default Windows file association registry settings After some quick research online, I've found an archive containing default Windows registry values for file associations
Therefore to revert back all Windows 7 file extensions from Windows install time, I had to download the file All_Default_File_Extensions.zip , extract the archive with WinZip or WinRar and run each of archive contained .reg extension files. The .reg files had to be run with Administrator account. It takes a while and its a bit irritating until all of the .reg files are run and all the file association default Windows settings are reverted back but thankfully in the end the C drive opening error:
This file does not have a program associated with it for performing this action ... is resolved. Cheers ;)
This error appeared immediately, after malware and registry fix up programs were run on the PC. The exact programs that lead his PC into the state of returning an error:
This file does not have a program associated with it for performing this action. Create an association in the Set Associations control panel
are:
- a-squared
- Registry Booster
This two programs by the way are doing quite a good job on fixing Windows XP and Windows Vista PCs which were cleaned up earlier with Malware Bytes and Avira , however it seems they're not 100% still compatible with the Windows 7 registry database or some uncleaned malware or virus on the PC has post-messed up the registry file associations. As its always the case with Windows you don't have a clear idea what's going ...
Anyways as said the PC was in a bad situation, where neither Windows Explorer nor in any mean the disk drives can be cannot be opened / red and hence it was necessery for a quick way to revert back the default Windows file association registry settings After some quick research online, I've found an archive containing default Windows registry values for file associations
Therefore to revert back all Windows 7 file extensions from Windows install time, I had to download the file All_Default_File_Extensions.zip , extract the archive with WinZip or WinRar and run each of archive contained .reg extension files. The .reg files had to be run with Administrator account. It takes a while and its a bit irritating until all of the .reg files are run and all the file association default Windows settings are reverted back but thankfully in the end the C drive opening error:
This file does not have a program associated with it for performing this action ... is resolved. Cheers ;)
Wed Nov 23 11:51:57 EET 2011
How to hide and unhide (show) Administrator User on Windows Vista and Windows 7
I needed to show the Administrator user on one Windows 7 install.
Achieving this is done through command prompt - cmd.exe where the command prompt with the exclusive option of Run as Administrator .

The exact command that unhides the Administrator user so further on on next windows login screen one sees Administrator user ready for use is:
Unhiding Administrator user is always handy whether one needs to do some bunch of operations with Super User. After finishing all my required tasks with administrator I reverted back and hid the Administrator user once again like so:
This commands also works fine on Vista and presumably on Windows XP.
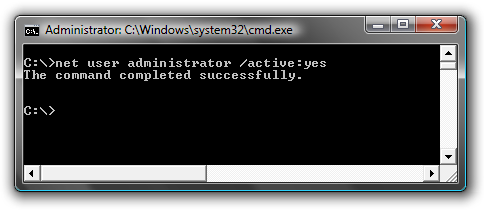
Achieving this is done through command prompt - cmd.exe where the command prompt with the exclusive option of Run as Administrator .
The exact command that unhides the Administrator user so further on on next windows login screen one sees Administrator user ready for use is:
C:\> net user administrator /active:yes
Unhiding Administrator user is always handy whether one needs to do some bunch of operations with Super User. After finishing all my required tasks with administrator I reverted back and hid the Administrator user once again like so:
C:> net user administrator /active:no
This commands also works fine on Vista and presumably on Windows XP.
Tue Nov 22 17:10:31 EET 2011
Star Trek (2009) - The Future Begins short movie feedback

Yesterday I watched Star Trek (2009) , the movie was recommended to me by a friend as a worthy one to be seen even for people who are not fans of Sci-Fi
I'm a fan of sci-fi but lately I'm not that keen as in the short past. So I thought let's see if this movie is worthy from the perspective of an ex-sci-fi maniac ;)
I should also say that I was a bit skeptical in the beginning as I've never been a big fan ot Star Trek , neither too much impressed by Star Wars
To sum it up the movie is a nice enjoyable one to take up 2 hours on watching good visual effects and human stories. There is an evil guy like with most sci-fi movies. Which prankly is a funny one ;)
The general movie plot is not much, neither its easy to grasp some of the moments of the movie, but this should be part of the cyberpunk part of it I guess.
Generally I enjoyed the movie and I would recommend it to my dear readers to have a look if they're bored and they want to have 2 hrs of enjoyment ;)
Tue Nov 22 15:50:33 EET 2011
Where does Debian GNU / Linux Apache + PHP stores session files?
In order to debug some PHP session problems on Debian, I needed to check the count of existing session files.
When PHP is compiled from source usually, by default sessions are stored in /tmp directory, however this is not the case on Debian.
Debian's PHP session directory is different, there the sessions are stored in the directory:
I've discovered the session directory location by reading Debian's cron shell script, which delete session files on every 30 minutes.
Here is the file content:
To check the amount of existing PHP opened session files:
When PHP is compiled from source usually, by default sessions are stored in /tmp directory, however this is not the case on Debian.
Debian's PHP session directory is different, there the sessions are stored in the directory:
/var/lib/php5
I've discovered the session directory location by reading Debian's cron shell script, which delete session files on every 30 minutes.
Here is the file content:
debian~# cat /etc/cron.d/php5

# /etc/cron.d/php5: crontab fragment for php5

#  This purges session files older than X, where X is defined in seconds

#  as the largest value of session.gc_maxlifetime from all your php.ini

#  files, or 24 minutes if not defined.  See /usr/lib/php5/maxlifetime


# Look for and purge old sessions every 30 minutes

09,39 *     * * *     root   [ -x /usr/lib/php5/maxlifetime ] && \

[ -d /var/lib/php5 ] && find /var/lib/php5/ -type f -cmin +$(/usr/lib/php5/maxlifetime) -delete
To check the amount of existing PHP opened session files:
debian:~# ls -1 /var/lib/php5|wc -l

14049
Mon Nov 21 18:54:56 EET 2011
Using rsync to copy / synchronize files or backups between Linux / BSD / Unix servers
Many of us have already taken advantage of the powerful Rsync proggie, however I'm quite sure there are still people who never used rsync to transfer files between servers.. That's why I came with this small post to possibly introduce rsync to my blog readers.
Why Rsync and not Scp or SFTP? Well Rsync is designed from the start for large files transfer and optimized to do the file copying job really efficient. Some tests with scp against rsync will clearly show rsync's superiority.
Rsync is also handy to contiue copying of half copied files or backups and thus in many cases saves bandwidth and machine hdd i/o operations.
The most simple way to use rsync is:
server:~# rsync -avz -e ssh remoteuser@remotehost:/remote/directory /local/directory/
Where remoteuser@remotehost -- is the the username and hostname of remote server to copy files to.
/remote/directory -- is the directory where the rsync copied files should be stored
/local/directory -- is the local directory from which files will be copied to remote directory
If not a preliminary passwordless ssh key (RSA / DSA) authentication is configured on remote server, the above command will prompt for a password otherwise the rsync will start doing the transfer.
If one needs to have a RSA or DSA (public / private key) passwordless SSH key authentication , a RSA key first should be generated and copied over to the remote server, like so:
server:~# ssh-keygen -t dsa

...

server:~# ssh-copy-id -i ~/.ssh/id_dsa.pub root@remotehost

...
That's all folks, enjoy rsyncing ;)
Mon Nov 21 14:35:00 EET 2011
Fix vnstat error "eth0: Not enough data available yet." on Debian GNU / Linux
After installing vnstat to keep an eye on server IN and OUT traffic on a Debian Squeeze server. I used the usual:
debian:~# vnstat -u -i eth0
In order to generate the initial database for the ethernet interface used by vnstat to generate its statistics.
However even though /var/lib/vnstat/eth0 got generated with above command statistics were not further generated and trying to check them with command:
debian:~# vnstat --days
Returned the error message:
eth0: Not enough data available yet.
To solve the eth0: Not enough data available yet. message I tried completely removing vnstat package by purging the package e.g.:
debian:~# apt-get --yes remove vnstat

...

debian:~# dpkg --purge vnstat

...
Even though dpkg --purge was invoked /var/lib/vnstat/ refused to be removed since it contained vnstat's db file eth0
Therefore I deleted by hand before installing again vnstat:
debian:~# rm -rf /var/lib/vnstat/
Tried installing once again vnstat "from scratch":
debian:~# apt-get install vnstat

...
After that I tried regenerating the vnstat db file eth0 once again with vnstat -u -i eth0 , hoping this should fix the error but it was no go and after that the error:
debian:~# vnstat --hours

eth0: Not enough data available yet.
persisted.
I checked in Debian bugs mailing lists and I found, some people complaining about the same issue with some suggsetions on how the error can be work arouned, anyways none of the suggestions worked for me.
Being irritated I further removed / purged once again vnstat and decided to give it a try by installing vnstat from source
As of time of writting this article, the latest stable vnstat version is 1.11 .
Therefore to install vnstat from source I issued:
debian:~# cd /usr/local/src

debian:/usr/local/src# wget http://humdi.net/vnstat/vnstat-1.11.tar.gz

...

debian:/usr/local/src# tar -zxvvf vnstat-1.11.tar.gz

debian:/usr/local/src# cd vnstat-1.11

debian:/usr/local/src/vnstat-1.11# make & make all & make install

debian:/usr/local/src/vnstat-1.11# cp examples/vnstat.cron /etc/cron.d/vnstat

debian:/usr/local/src/vnstat-1.11# vnstat -u -i eth0

Error: Unable to read database "/var/lib/vnstat/eth0".

Info: -> A new database has been created.
As a last step I put on root crontab to execute:
debian:~# crontab -u root -e
*/5 * * * * /usr/bin/vnstat -u >/dev/null 2>&1
This line updated vnstat db eth0 database, every 5 minutes. After the manual source install vnstat works, just fine ;)
Sat Nov 19 23:15:35 EET 2011
iGenius - How Steve Jobs changed the World (documentary) movie
I'm watching iGenius - How Steve Jobs changed the World movie. I heard about a movie from Alex a friend of mine who said this movie sheds some light on history of Apple Computers Inc, Macintosh and the great significance of Steve Jobs work as a manager and visionary to change the world for good.
The world has suddenly been astonished by Steve Jobs sudden death so surely the interest about him is tremendously up.
I do respect Jobs as under his leading the computer industry has received some innovations, still I don't agree with many of the movie aspects which turn Apple and the consequent company products IPhone, Ipad, Ipod etc. into a mega hype products.
I'm being honest to myself and I should say many of the innovations they did are not something too much, but just a product which popularized or minituarized some older invented technology.
The product quality of Apple in the past is a fact so one cannot argue with this however with recent years I wouldn't say the company quality is so much supreme as presented in the movie.
What I don't understand why is Jobs receiving so much praise and recognition but rarely somebody could show his bad sides as well. We've been again manipulatively mislead that he is a mega genius or like an angel on earth. However the achievements of Apple and the mass production and involvement of the field of marketing which lies basicly and makes profits based on great deceptions of Jobs doesn't make Jobs to a super hero.
As an enterpreneur and businessman his achievements are unquestionable but for many years now the reality of business is sad and a honest man could rarely be found to be dealing with business.
Usually the people who like dirt, lies and fame are into business. Most of the times these are people who are ready to kill in the name of Public Recognition and Success.
Jobs has been said to be a Buddhist according to what I've red in Wikipedia. If that is true its rather strange to me on fruits his buddhist faith produced.
I don't believe that any rational man who observes nowdays technology and how it is used doesn't see the great harm technology did us and is continuously pushing us down.
Buddhist teachings in my view teach on helping the neighbor educating and giving up things for free. Apple products however are not giving anything for free, yes some of them do education.
Therefore in my view the philosophy of apple and its application is not really fitting up to helping the neigbor as they don't come free of charge like the free software does.
Apple products actually enslaved their users, all of apple products are nowdays connected to Apple's Inc.
Mega Corporation IStore or they report somehow to apple during updates or purchases more or less about users likings or behaviours.
This obviously doesn't respect users freedom and makes Apple an example of a company that doesn't respect completely the user natural right of freedom and privacy.
To sum it up iGenius - Or How Steve Jobs changed the World is a highly manipulative movie just like most of the movies or books dedicated to super heroes are.
Steve Jobs was lucky to get this recognition and status in life, however this doesn't make him too much different from all of us. He just used to be in the right time in the right place and achieved what he did explicitly by God's mercy.
As a known fact Jobs was an Orphan and as we can see from many life examples God helps and has helped many orphans to have a good lives eventually.
Also I'm quite curious if Steve Jobs success was just a fruit of his good fortune or there were just too many circles of people behind him (Jewish or Masonry) possessing big fortunes who found it practical to sponsor his (??) products and ideas seeing a lot of potential to keep the world under siege through technology.
Nomatter what the complete true behind Jobs and his achievements are, he is still an inspirational person and an "icon" in the field of IT. Even I'm a bit Jealous on his overall achievements.
Anyways for people who want to loose some approximately 42:00 minutes on a hype Jobs praise movie and see some of apple's products and pictures of Jobs and Apple / Macintosh products the movie is a good choice ;)
Fri Nov 18 18:09:11 EET 2011
Free Software Songs and Videos Collection - (Anthem of Free Software) various interpretations

I've gathered a collection of 15 Audio and Video songs dedicated to the Free Software / Open Source movement . All of the songs are based on the The Free Software Song Anthem written by Richard Mathew Stallman in the year 1991. The motive of the song is a Traditional Bulgarian song called Sadi Moma Bqla Loza - translated to bulgarian to something like Maid is Planting white Vines
The original Free Software Song symbolizes all free software and the Free Software Movement and GNU and is in the Bulgarian unique / specific folk rhythm of 7 / 8 beats .
Most of the songs which I post hereby could also be found and downloaded from GNU's official Free Software Song page
However some of the songs were only available from Youtube in the non-free format Flash Video (flv) . Hence, since the songs were dedicated to Free Software and apparently were being spread in a non-free format they either was missing any licensing or licensed under GFDL - free music / art GNU like license.
To fix up this irragularity and add some freedom in terms of audio format of spreading, I've downloaded them and used ffmpeg2theora to convert the songs to the Free / Open Standard format Ogg Vorbis
I'm quite sure that many people, who use Ubuntu or Linux Mint are pretty much unfamiliar with the Free Software Songs existence, also many people most likely have never heard the Free Software Songs or even those who heard it have rarely heard more than 2 or 3 of the song variations.
Hereby, I'm sure many people who are lovers of Free Software will highly benefit and get inspired to continue in the Free Software by listening to these post shared little Free Software Song Collection .
The covers of the Original version publicly sang by Richard Stallman are in different musical genres, some of the song performances are in Folklore, played on Piano other covers are performed by musical bands in pop / punk en popular music styles, there are one person performances, cheerful christmas like soundings, 8 bit free software song, Metal free software variations etc. In the collection I've included also few other nice songs which are propaganda on free software, even though not a cover of the Free Software Song , I found them myself worthy to be included in the collection..:
Herein you can download or listen all the Free Software Songs version (Enjoyment is guaranteed!
 ):
):I've also prepared a bundle containing all the 15 Free Software Songs which you can download from here
Enjoy the nice music! Don't forget to share it with everyone you could among with educating the people how important it is to value their freedom in this age of technological human enslavement ;)
Thu Nov 17 17:49:33 EET 2011
How to convert AVI, MP4, FLV (flash video) and other non-free video encoded formats to Free Video format encoding OGV (Ogg Vorbis / Theora) on GNU / Linux and FreeBSD
I was looking for a way to convert some Video and Sound files, downloaded from Youtube (mostly things dedicated to free software) and as far as I looked online unfortunately these pieces of nice music and tutorials are not available for download anywhere else or at least not available for download in some of the Open / Free Format (OGG Vorbis or OGV (OGG / Theora Video).
When it comes to convertion between different formats, always the first things that I think of is ffmpeg or mencoder , however I was not sure if some of this tools are doing the trick so I did a quick research online if there is some specialised console or GUI program that can do the convertions between MP4, FLV etc. to OGV.
In less than 10 minutes I found a threat mentioning about ffmpeg2theora - A Simple Convertor to create Ogg Theora files
As I'm running Debian GNU / Linux, I installed ffmpeg2theora straight via apt, according to some reports online ffmpeg2theora cmd convertion tool is also available straight from repositories on Ubuntu as well.
On FreeBSD there is a port /usr/ports/multimedia/ffmpeg2theora available for install. Of course FFmpeg2Theora can be installed from source on other Linux distributions that might be missing a pre-built binary.
Using ffmpeg2theora to convert some kind of non-free video format is very simple, though the tool provides quite a numerous options for all those who want to have some customization for the video to be converted.
To convert the flash file "The Gnu Song.flv" for example to The Gnu Song.flv , I invoked ffmpeg2theora like this:
The conversion took few minutes of time, as my machine is not ultra powerful and apparently the conversion to OGV format is not too quick but the good news is it works.
After the conversion was completed I used ogginfo to check the information about the recent converted file The Gnu Song.flv , below you see the file info ogginfo returns
ogginfo is a part of a package installed under the name vorbis-tools, vorbis tools also contains a few other helpful tools, whether operations with OGV or OGG file formats are at hand, the complete binaries vorbis-tools contains on Debian as of time of writting this post is:
ogg123 is a player for ogg files, however as far as I've tested it it doesn't work too well. And just to compare ogg audio files were played just nice using the play command.
oggenc is used to encode ogg audio file, based on a stream haneded to it from other audio encoded stream (let's say mp3). Hence oggenc can be used to convert mp3 files to ogg audio files , like so:
oggdec is used to convert to wav files or raw PCM audio, whether;
vcut is used to cut ogg video file on parts.
vorbiscomment and vorbistagedit is used to edit information on already existing ogg audio files
There is also a GUI programmer for people who doesn't want to bother with writting on the command line called oggconvert . OggConvert is written for GNOME and uses GTK gnome library, here is how the program looks like:

When it comes to convertion between different formats, always the first things that I think of is ffmpeg or mencoder , however I was not sure if some of this tools are doing the trick so I did a quick research online if there is some specialised console or GUI program that can do the convertions between MP4, FLV etc. to OGV.
In less than 10 minutes I found a threat mentioning about ffmpeg2theora - A Simple Convertor to create Ogg Theora files
As I'm running Debian GNU / Linux, I installed ffmpeg2theora straight via apt, according to some reports online ffmpeg2theora cmd convertion tool is also available straight from repositories on Ubuntu as well.
On FreeBSD there is a port /usr/ports/multimedia/ffmpeg2theora available for install. Of course FFmpeg2Theora can be installed from source on other Linux distributions that might be missing a pre-built binary.
Using ffmpeg2theora to convert some kind of non-free video format is very simple, though the tool provides quite a numerous options for all those who want to have some customization for the video to be converted.
To convert the flash file "The Gnu Song.flv" for example to The Gnu Song.flv , I invoked ffmpeg2theora like this:
debian:~# ffmpeg2theora "The Gnu Song.flv"

...
The conversion took few minutes of time, as my machine is not ultra powerful and apparently the conversion to OGV format is not too quick but the good news is it works.
After the conversion was completed I used ogginfo to check the information about the recent converted file The Gnu Song.flv , below you see the file info ogginfo returns
debian:~# ogginfo The\ Gnu\ Song.ogv

 Processing file "The Gnu Song.ogv"...


 New logical stream (#1, serial: 5d65413f): type skeleton

 New logical stream (#2, serial: 0570412d): type theora

 New logical stream (#3, serial: 7e679651): type vorbis

 Theora headers parsed for stream 2, information follows...

 Version: 3.2.1

 Vendor: Xiph.Org libtheora 1.1 20090822 (Thusnelda)

 Width: 320

 Height: 240

 Total image: 320 by 240, crop offset (0, 0)

 Framerate 25/1 (25.00 fps)

 Aspect ratio undefined

 Colourspace: Rec. ITU-R BT.470-6 Systems B and G (PAL)

 Pixel format 4:2:0

 Target bitrate: 0 kbps

 Nominal quality setting (0-63): 32

 User comments section follows...

 	ENCODER=ffmpeg2theora-0.24

	Vorbis headers parsed for stream 3, information follows...

	Version: 0

	Vendor: Xiph.Org libVorbis I 20101101 (Schaufenugget)

	Channels: 1

	Rate: 22050

	Nominal bitrate: 30.444000 kb/s

	Upper bitrate not set

	Lower bitrate not set

	User comments section follows...

	ENCODER=ffmpeg2theora-0.24

	Logical stream 1 ended

	Theora stream 2:

	Total data length: 1525324 bytes

	Playback length: 2m:41.360s

	Average bitrate: 75.623401 kb/s

	Logical stream 2 ended

	Vorbis stream 3:

	Total data length: 646729 bytes

	Playback length: 2m:41.384s

	Average bitrate: 32.059041 kb/s
ogginfo is a part of a package installed under the name vorbis-tools, vorbis tools also contains a few other helpful tools, whether operations with OGV or OGG file formats are at hand, the complete binaries vorbis-tools contains on Debian as of time of writting this post is:
/usr/bin/ogg123

/usr/bin/oggenc

/usr/bin/oggdec

/usr/bin/ogginfo

/usr/bin/vcut

/usr/bin/vorbiscomment

/usr/bin/vorbistagedit
ogg123 is a player for ogg files, however as far as I've tested it it doesn't work too well. And just to compare ogg audio files were played just nice using the play command.
oggenc is used to encode ogg audio file, based on a stream haneded to it from other audio encoded stream (let's say mp3). Hence oggenc can be used to convert mp3 files to ogg audio files , like so:
debian:~# mpg321 input.mp3 -w - | oggenc -o output.ogg -
oggdec is used to convert to wav files or raw PCM audio, whether;
vcut is used to cut ogg video file on parts.
vorbiscomment and vorbistagedit is used to edit information on already existing ogg audio files
There is also a GUI programmer for people who doesn't want to bother with writting on the command line called oggconvert . OggConvert is written for GNOME and uses GTK gnome library, here is how the program looks like:
Wed Nov 16 17:59:14 EET 2011
How to install display and audio drivers on motherboard Asus P5B-Plus with video ATI Radeon HD 2600 XT on Windows XP
I re-installed one PC with Windows XP which was refusing to boot. The PC had a hardware of:
Motherboard: Asus P5B-Plus
Video Adapter: ATI Radeon HD 2600 XT
Sound card / Sound Blaster:
Ethernet card: Attansic L1 Gigabit Ethernet 10/100/1000Base-T Controller
It took me like 1 hour of search on the Internet and looking through forum threads and sites to properly install all the hardware. In hope to help someone out there looking to install the hardware Window drivers on ATI RAdeon HD 2600 XT, I've made a small archive of all the drivers necessery to make the Video card , Sound Card and Ethernet be properly installed and operating.
Here is download link to all the drivers for ATI Radeon HD 2600 XT to run smoothly on Windows XP
Installation of the drivers on Windows is pretty straight forward download the ATI Radeon HD 2600 XT archive extract and install each one of the files contained in the archive. A few restarts will also be necessery after some of the installed drivers to make the drivers work.
ATI Catalyst (included in the archive) will install the Video drivers for the Radeon XT 2600, whether AD1988AB_Audio_V6585_XpVistaWin7 and 11-11_xp32-64_hdmiaudio will install the Audio drivers. Attansic_L1_Lan_V1737907_V10560011159 contained in the archive needs to be extracted and installed to make the Attensic L1 Gigabit ethernet to show up as installed hardware in Windows device manager.
Hope this post will save some time to ppl looking to install the same drivers on XP ;)
Cheers ;)
Mon Nov 14 14:46:12 EET 2011
How to copy CD or DVD on GNU/Linux and FreeBSD using console or terminal

These days more and more people start to forget the g* / Linux old times when we used to copy CDs from console using dd in conjunction with mkisofs .
Therefore to bring some good memories back of the glorious console times I decided to come up with this little post.
To copy a CD or DVD the first thing one should do is to make an image copy of the present inserted CD into the CD-drive with dd :
1. Make copy of the CD/DVD image using dd
# dd if=/dev/cdrom of=/tmp/mycd.iso bs=2048 conv=notrunc
/dev/cdrom is the location of the cdrom device, on many Linuces including (Debian) /dev/cdrom is just a link to the /dev/ which corresponds to the CD drive. Note on FreeBSD the location for the CD Drive is /dev/acd0
/tmp/mycd.iso instructs dd CD image creation to be placed in /tmp/ directory.
bs argument instructs it about the byte size portions by which the content of the CD-Drive inserted CD will be read. bs value of 2048 is actually only 2KB per dd read, increasing this value will decrease the time required for the CD image to be extracted.
2. Prepare CD image file to be ready for burning
After dd completes the image copy operation, next to prepare the extracted image / ISO to be ready for burning mkisofs is used:
# mkisofs -J -L -r -V TITLE -o /tmp/imagefile.iso /tmp/mycd.iso
The -J option makes the CD compatible for Pcs running Microsoft Windows. The -V TITLE option should be changed to whatever title the new CD should have, -r will add up status bar for the mkisofs operation.
-r is passed to create specific file permissions on the newly created CD, -o specifies the location where mkisofs will produce its file based on the CD image /tmp/mycd.iso .
3. Burning the mkisofs image file to a CD/DVD on GNU / Linux
linux:~# cdrecord -scanbus

linux:~# cdrecord dev=1,0,0 /tmp/imagefile.iso
If all wents okay with cdrecord operation, after a while the CD should be ready.
4. Burning the mkisofs image file to CD on FreeBSD
freebsd# burncd -f /dev/acd0 data /tmp/imagefile.iso fixate
Sat Nov 12 15:49:32 EET 2011
How rescue unbootable Windows PC, Windows files through files Network copy to remote server shared Folder using Hirens Boot CD
I'm rescuing some files from one unbootable Windows XP using a livecd with Hirens Boot CD 13
In order to rescue the three NTFS Windows partitions files, I mounted them after booting a Mini Linux from Hirens Boot CD.
Mounting NTFS using Hirens BootCD went quite smoothly to mount the 3 partitions I used cmds:
After the three NTFS file partitions are mounted I used smbclient to list all the available Network Shares on the remote Network Samba Shares Server which by the way possessed the NETBIOS name of SERVER ;)
Further on to mount the //SERVER/D network samba drive - (the location where I wanted to transfer the files from the above 3 mounted partitions):
Where the IP 192.168.0.100 is actually the local network IP address of the //SERVER win smb machine.
Afterwards I used mc to copy all the files I needed to rescue from all the 3 above mentioned win partitions to the mounted //SERVER/D
In order to rescue the three NTFS Windows partitions files, I mounted them after booting a Mini Linux from Hirens Boot CD.
Mounting NTFS using Hirens BootCD went quite smoothly to mount the 3 partitions I used cmds:
# mount /dev/sda1 /mnt/sda1

# mount /dev/sda2 /mnt/sda2

# mount /dev/sdb1 /mnt/sdb1
After the three NTFS file partitions are mounted I used smbclient to list all the available Network Shares on the remote Network Samba Shares Server which by the way possessed the NETBIOS name of SERVER ;)
# smbclient -L //SERVER/

Enter root's password:

Domain=[SERVER] OS=[Windows 7 Ultimate 7600] Server=[Windows 7 Ultimate 6.1]


Sharename       Type      Comment

---------       ----      -------

!!!MUSIC        Disk

ADMIN$          Disk      Remote Admin

C$              Disk      Default share

Canon Inkjet S9000 (Copy 2) Printer   Canon Inkjet S9000 (Copy 2)

D$              Disk      Default share

Domain=[SERVER] OS=[Windows 7 Ultimate 7600] Server=[Windows 7 Ultimate 6.1]

Server               Comment

---------            -------

Workgroup            Master

---------            -------
Further on to mount the //SERVER/D network samba drive - (the location where I wanted to transfer the files from the above 3 mounted partitions):
# mkdir /mnt/D

# mount //192.168.0.100/D /mnt/D

#
Where the IP 192.168.0.100 is actually the local network IP address of the //SERVER win smb machine.
Afterwards I used mc to copy all the files I needed to rescue from all the 3 above mentioned win partitions to the mounted //SERVER/D
Thu Nov 10 01:29:04 EET 2011
The Notebook a nice romance movie worthy to see

As I a person who values highly love between man and woman and believes in true love between man and woman under God's providence I really enjoyed The Notebook and I recommend it to everyone out there looking for true love.
The movie gives a good example that one can experience great love. This is a fresh breath for me as I'm surrounded by dozens of people who does concentrate too much about the fleshly pleasure and forget that the essence of love is not in the flesh but in the love between man and woman's spirit and soul.
The Notebook is a record of one true love story between a man and wife who went through love, hate long time separation, regret broken heart, loss of path in life, fading love and then after a long time of being away of each other burning love again.
It tells the story of a man and wife who loved so much that they get old together a story of true dedication and lasting love. Watch the movie you will certainly not regret it.
Tue Nov 8 18:45:43 EET 2011
Hello I'm Mr. GNU. Let's make your business go free!

Did you ever think, the tons of money your business has spend paying for buggy and unreliable non-free software?
Having problems with your Windows Network, being tortured by Viruses, a failure after windows upgrade, unexpected system crashes? Don't worry MR. GNU will help you to change your business go free ;))
Mon Nov 7 17:33:15 EET 2011
How to make wicd systray to appear in GNOME on Ubuntu 11.10 / How to fix missing wicd network manager systray on Ubuntu
After upgrading my sis's notebook from Ubuntu 11.04 to Ubuntu 11.10 on her Acer Aspire 5736Z the default gnome wireless network manager started behaving oddly.
The Network Manager did not show any networks, even though the network drivers showed that are loaded properly on the Linux host and using the normal commands like iwlist or iwconfig I could list and see the networks and even connect to a network.
As my sister is not a console geek like me it was necessery of course to have an easy way to connect herself to the Internet with nice GUI application. I personally love WICD Network Manager and as the default gnome manager was misbehaving I immediately installed her wicd.
With wicd , the wireless networks were properly listed and there was no connection issues to the wireless networks, however the wicd system tray was missing and hence everytime she wanted to connect to a wireless network, she had to keep wicd-client running active in the Dock or run it manually every time on connect, when she had to change her physical location and connect to another wireless network.
This of course is quite unhandy and gives her a bad image of Linux and I definitely want to make her love free software and GNU / Linux. Thus I want to give her a GNU / Linux she will be easy to use.
To make her more satisfied with her Ubuntu I googled around to see what causes the wicd systray to be missing after some research online I found out, its probably due to either wicd bug or some kind of interface changes in unity newer versions of Ubuntu. Some people online suggested a fix via changing values in gconf-editor but this work around by changing the values in gconf-editor:
I tried this suggested fix which was reported to work on Ubuntu 11.04 but the gconf registry suggested pathway was missing at all so this solution did not worked.
I further read some other suggested solution using wicd-client by invoking it with two args like so:
This proposed solution did not worked either, then I found in one of the Ubuntu bugs reports, a little shell script (add-wicd-to-whitelist.sh) that changes some values in gconf so I proceeded downloaded and give it a try:
For my surprise running the script doesn't immediately changed nothing and wicd wireless connectivity indicator was still missing from the tray.
I thought it might need to reload gnome so I give it a restart and HOORAY! after the restart the WICD connected wireless strength show up, like you can see in the screenshot below ;)

Now hope this fix will, help out there experiencing the same issues to work around his wireless network connectivity issues Cheers.
The Network Manager did not show any networks, even though the network drivers showed that are loaded properly on the Linux host and using the normal commands like iwlist or iwconfig I could list and see the networks and even connect to a network.
As my sister is not a console geek like me it was necessery of course to have an easy way to connect herself to the Internet with nice GUI application. I personally love WICD Network Manager and as the default gnome manager was misbehaving I immediately installed her wicd.
With wicd , the wireless networks were properly listed and there was no connection issues to the wireless networks, however the wicd system tray was missing and hence everytime she wanted to connect to a wireless network, she had to keep wicd-client running active in the Dock or run it manually every time on connect, when she had to change her physical location and connect to another wireless network.
This of course is quite unhandy and gives her a bad image of Linux and I definitely want to make her love free software and GNU / Linux. Thus I want to give her a GNU / Linux she will be easy to use.
To make her more satisfied with her Ubuntu I googled around to see what causes the wicd systray to be missing after some research online I found out, its probably due to either wicd bug or some kind of interface changes in unity newer versions of Ubuntu. Some people online suggested a fix via changing values in gconf-editor but this work around by changing the values in gconf-editor:
'desktop' -> 'unity' -> 'panel'
I tried this suggested fix which was reported to work on Ubuntu 11.04 but the gconf registry suggested pathway was missing at all so this solution did not worked.
I further read some other suggested solution using wicd-client by invoking it with two args like so:
stanimira@ubuntu:~$ wicd-client -n &

...
stanimira@ubuntu:~$ wicd-client -a &
This proposed solution did not worked either, then I found in one of the Ubuntu bugs reports, a little shell script (add-wicd-to-whitelist.sh) that changes some values in gconf so I proceeded downloaded and give it a try:
stanimira@ubuntu:~$ wget http://pc-freak.net/files/add-wicd-to-whitelist.sh

...

stanimira@ubuntu:~$ sh add-wicd-to-whitelist.sh

...
For my surprise running the script doesn't immediately changed nothing and wicd wireless connectivity indicator was still missing from the tray.
I thought it might need to reload gnome so I give it a restart and HOORAY! after the restart the WICD connected wireless strength show up, like you can see in the screenshot below ;)
Now hope this fix will, help out there experiencing the same issues to work around his wireless network connectivity issues
Cheers.Wed Nov 2 16:29:59 EET 2011
How to connect to WiFi network using console or terminal on GNU / Linux
Sometimes its useful to connect to Wireless Networks using console . The reasons for that might be many, one possible reason is to be able to debug, Wireless connection failures or simply omit the use of the many available GUI wifi connection programs.
As a first step before connecting in terminal is to look up for the wifi networks available for connection, this is done with cmd:
To just list the ESSID s of the wifi networks:
1. Connecting to Open Wireless Network
Now from the above output it is clear 6 wifi networks are available for connection. The default wifi network from the list is an Open network (e.g. without pass). To connect to it I use cmd:
After connected to configure IP, Gateway and DNS from a DHCP server running on the WIFI router, dhclient cmd is used:
2. Connecting to WEP 64bit / 128bit encrypted network
To connect to WPA or WPA2 encrypted network its necessery to have installed wpasupplicant package. The name of the package might vary in different distributions on Debian and Ubuntu, the name of the package is wpasupplicant, on Fedora, CentOS and RHEL the package that has to be in is wpa_supplicant :
After having installed the wpa_supplicant to connect to the network with ESSID name magdanoz , wpa_passphrase is used first:
As you see in above command the secret password key is generated printed on the screen and then added to /etc/wpa_supplicant.conf , necessery to establish the wireless connection with wpa_supplicant with cmd:
-d wext instructs wpa_supplicant to use (Linux wireless extension driver).
-B tells wpa_supplicant to background the connection to prevent the wireless connection to drop off, if the console / terminal from which it is launched gets closed.
In case of succesful connection with wpa_supplicant , once again IP, Gateway and DNS is configured fetching the settings from the wifi hotspot dhcp server:
General information about the wireless network and info related to the established connection can be obtained with /usr/bin/iwconfig :
To configure the exact channel over which the wireless connection will be established again is done with iwconfig, for instance to configure wlan0 wifi connection established to be on wifi channel 7:
By default iwconfig is set to automatically set the channel based on connected network ESSID , if the channel is modified to some specific number to revert it back use:
As a first step before connecting in terminal is to look up for the wifi networks available for connection, this is done with cmd:
linux:~# iwlist wlan0 scanning

wlan0     Scan completed :

          Cell 01 - Address: 00:24:01:90:8F:38

                    Channel:7

                    Frequency:2.442 GHz (Channel 7)

                    Quality=70/70  Signal level=-39 dBm

                    Encryption key:on

                    ESSID:"magdanoz"

                    Bit Rates:1 Mb/s; 2 Mb/s; 5.5 Mb/s; 11 Mb/s

                    Bit Rates:6 Mb/s; 9 Mb/s; 12 Mb/s; 48 Mb/s; 18 Mb/s

                              24 Mb/s; 36 Mb/s; 54 Mb/s

                    Mode:Master

                    Extra:tsf=000000034f5c786b

                    Extra: Last beacon: 68ms ago

                    IE: Unknown: 00086D616764616E6F7A

                    IE: Unknown: 010482848B96

                    IE: Unknown: 030107

                    IE: Unknown: 32080C1218602430486C

                    IE: Unknown: CC0700CC020000018A

                    IE: Unknown: CC0700CC0300000100

                    IE: WPA Version 1

                        Group Cipher : TKIP

                        Pairwise Ciphers (2) : TKIP CCMP

                        Authentication Suites (1) : PSK

                    IE: IEEE 802.11i/WPA2 Version 1

                        Group Cipher : TKIP

                        Pairwise Ciphers (2) : TKIP CCMP

                        Authentication Suites (1) : PSK

          Cell 02 - Address: 00:1E:2A:60:5E:DC

                    Channel:1

...
To just list the ESSID s of the wifi networks:
linux:~# iwlist wlan0 scanning|grep -i 'essid'

                   ESSID:"magdanoz"

                   ESSID:"default"

                   ESSID:"todorov"

                   ESSID:"BTC-ADSL"

                   ESSID:"Zahari"

                   ESSID:"Drago"
1. Connecting to Open Wireless Network
Now from the above output it is clear 6 wifi networks are available for connection. The default wifi network from the list is an Open network (e.g. without pass). To connect to it I use cmd:
linux:~# /sbin/iwconfig wlan0 essid 'default'

linux:~# /sbin/iwconfig wlan0 key open
After connected to configure IP, Gateway and DNS from a DHCP server running on the WIFI router, dhclient cmd is used:
linux:~# /sbin/dhclient wlan0
2. Connecting to WEP 64bit / 128bit encrypted network
linux:~# /sbin/iwconfig wlan0 key 1234-5678-9101-1213
3. Connecting to WPA / WPA2 encrypted wifi network To connect to WPA or WPA2 encrypted network its necessery to have installed wpasupplicant package. The name of the package might vary in different distributions on Debian and Ubuntu, the name of the package is wpasupplicant, on Fedora, CentOS and RHEL the package that has to be in is wpa_supplicant :
After having installed the wpa_supplicant to connect to the network with ESSID name magdanoz , wpa_passphrase is used first:
linux:~# /usr/bin/wpa_passphrase magdanoz Secret_Wifi_Password | tee -a /etc/wpa_supplicant.conf

network={

	ssid="magdanoz"

	#psk="Secret_Wifi_Password"

	psk=6f7590250c4496ff7bf8dd25199ac3bb5a614d4bc069975aa884bcf084da73bc

}
As you see in above command the secret password key is generated printed on the screen and then added to /etc/wpa_supplicant.conf , necessery to establish the wireless connection with wpa_supplicant with cmd:
linux:~# /sbin/wpa_supplicant wpa_supplicant -d wext -i wlan0 -c /etc/wpa_supplicant.conf -B
-d wext instructs wpa_supplicant to use (Linux wireless extension driver).
-B tells wpa_supplicant to background the connection to prevent the wireless connection to drop off, if the console / terminal from which it is launched gets closed.
In case of succesful connection with wpa_supplicant , once again IP, Gateway and DNS is configured fetching the settings from the wifi hotspot dhcp server:
linux:~# /sbin/dhclient wlan0
General information about the wireless network and info related to the established connection can be obtained with /usr/bin/iwconfig :
linux:~# /sbin/iwconfig

lo        no wireless extensions.

eth0      no wireless extensions.

wlan0     IEEE 802.11abg  ESSID:"magdanoz"

          Mode:Managed  Frequency:2.442 GHz  Access Point: 00:24:00:90:8F:38

          Bit Rate=54 Mb/s   Tx-Power=15 dBm

          Retry  long limit:7   RTS thr:off   Fragment thr:off

          Encryption key:off

          Power Management:off

          Link Quality=70/70  Signal level=-39 dBm

          Rx invalid nwid:0  Rx invalid crypt:0  Rx invalid frag:0

          Tx excessive retries:0  Invalid misc:0   Missed beacon:0
To configure the exact channel over which the wireless connection will be established again is done with iwconfig, for instance to configure wlan0 wifi connection established to be on wifi channel 7:
linux:~# /sbin/iwconfig wlan0 channel 11
By default iwconfig is set to automatically set the channel based on connected network ESSID , if the channel is modified to some specific number to revert it back use:
linux:~# /sbin/iwconfig wlan0 channel auto
Tue Nov 1 15:46:32 EET 2011
How to exclude sorbs.net for a particular IP address in Qmail Mail server install / Fix to Thunderbird mail sent error (Exploitable Server See: http://www.sorbs.net/lookup.shtml?xx.xx.xx.xx) error
In the office, some of my colleagues has started receiving error messages, while trying to send mail with Thunderbird and Outlook Express
The exact error they handed to me reads like this:
Here is also a screenshot, I've been sent via Skype with the error poping up on a Thunderbird installed on Windows host.

Typing the url http://www.sorbs.net/lookup?xx.xx.xx.xx lead me to sorbs.net to a page saying that the IP address of the mail client which is trying to send mail is blacklisted . This is not strange at all condireng that many of the office computers are running Windows and periodically get infected with Viruses and Spyware which does sent a number of Unsolicated Mail (SPAM).
The sorbs.net record for the IP seems to be an old one, since at the present time the office network was reported to be clear from malicious SMTP traffic.
The error sorbs.net disallowing the mail clients to send from the office continued for already 3 days, so something had to be done.
We asked the ISP to change the blacklisted IP address of xx.xx.xx.xx , to another one but they said it will take some time and they can't do it in a good timely matter, hence to make mail sending work again with POP3 and IMAP protocols from the blacklisted IPs I had to set in the Qmail install to not check the xx.xx.xx.xx IP against mail blacklisting databases.
On qmail install disabling an IP check in RBLSMTPD is done through editting /etc/tcp.smtp and following recreate of /etc/tcp.smtp.cdb - red by qmailctl script start.
The exact line I put in the end of /etc/tcp.smtp to disable the RBLSMTPD check is:
Further on to recreate /etc/tcp.smtp.cdb and reload the new cdb db records:
Onwards, the sorbs.net IP blacklist issue was solved and all office computers from xx.xx.xx.xx succeeded in sending mails via SMTP.
The exact error they handed to me reads like this:
An error occured while sending mail. The mail server responded: Exploitable Server See:

http://www.sorbs.net/lookup?xx.xx.xx.xx. Please check the message recipient
Here is also a screenshot, I've been sent via Skype with the error poping up on a Thunderbird installed on Windows host.
Typing the url http://www.sorbs.net/lookup?xx.xx.xx.xx lead me to sorbs.net to a page saying that the IP address of the mail client which is trying to send mail is blacklisted . This is not strange at all condireng that many of the office computers are running Windows and periodically get infected with Viruses and Spyware which does sent a number of Unsolicated Mail (SPAM).
The sorbs.net record for the IP seems to be an old one, since at the present time the office network was reported to be clear from malicious SMTP traffic.
The error sorbs.net disallowing the mail clients to send from the office continued for already 3 days, so something had to be done.
We asked the ISP to change the blacklisted IP address of xx.xx.xx.xx , to another one but they said it will take some time and they can't do it in a good timely matter, hence to make mail sending work again with POP3 and IMAP protocols from the blacklisted IPs I had to set in the Qmail install to not check the xx.xx.xx.xx IP against mail blacklisting databases.
On qmail install disabling an IP check in RBLSMTPD is done through editting /etc/tcp.smtp and following recreate of /etc/tcp.smtp.cdb - red by qmailctl script start.
The exact line I put in the end of /etc/tcp.smtp to disable the RBLSMTPD check is:
xx.xx.xx.xx:allow,RBLSMTPD="",RELAYCLIENT="",QS_SPAMASSASSIN="0"
Further on to recreate /etc/tcp.smtp.cdb and reload the new cdb db records:
qmail:~# qmailctl cdb

qmail:~# qmailctl restart

...
Onwards, the sorbs.net IP blacklist issue was solved and all office computers from xx.xx.xx.xx succeeded in sending mails via SMTP.
Tue Nov 1 14:55:36 EET 2011
List and get rid of obsolete program core dump files and completely disable core files on FreeBSD
My FreeBSD router has started running out of space, I looked for ways to clean up some space. So I remembered some programs are generating core files while they crash. Some of these files are really huge and ban be from 1Mb to > 1G.
I used find to first list all my produced core files starting from root directory (/) , like so:
Having a list of my core files with the respective core file size and after reviewing, I deleted one by one the cores which were there just taking up space.
It's a wise idea that core dumps file generation on program crash is completely disabled, however I forgot to disable cores, so I had plenty of the cores - (crash files which are handy for debug purposes and fixing the bug that caused the crash).
Further on I used an /etc/rc.conf - dumpdev=NO , variable which instructs the kernel to not generate core files on program crash:
Next, to make dumpdev=NO , take affect I rebooted the server:
There is a way to instruct every server running daemon to know about the newly set <> dumpdev=NO by restarting each of the services with their init scripts individually, but I was too lazy to do that.
I used find to first list all my produced core files starting from root directory (/) , like so:
find / -name core -exec du -hsc {} \;

....
Having a list of my core files with the respective core file size and after reviewing, I deleted one by one the cores which were there just taking up space.
It's a wise idea that core dumps file generation on program crash is completely disabled, however I forgot to disable cores, so I had plenty of the cores - (crash files which are handy for debug purposes and fixing the bug that caused the crash).
Further on I used an /etc/rc.conf - dumpdev=NO , variable which instructs the kernel to not generate core files on program crash:
freebsd# echo 'dumpdev=NO' >> /etc/rc.conf
Next, to make dumpdev=NO , take affect I rebooted the server:
freebsd# shutdown -r now

...
There is a way to instruct every server running daemon to know about the newly set <> dumpdev=NO by restarting each of the services with their init scripts individually, but I was too lazy to do that.