January 2012 Archives
Mon Jan 30 11:07:14 EET 2012
KRaptor a Raptor free software (open source) arcade game clone for GNU / Linux
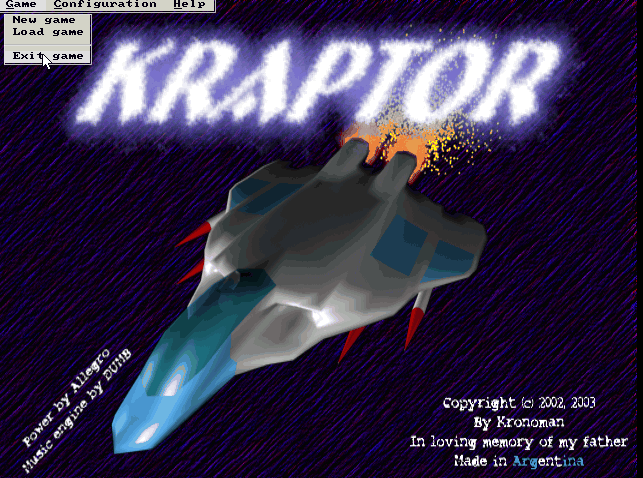
Kraptor is another Raptor Shadow of Death free software, open source clone arcade game for GNU/Linux, DOS and Windows (98, XP etc.).
 The game is not under active development anymore since 2004. Kraptor features a powerful engine for creating quickly 2D shooter games, so the game should be a good learning curve for people interested into creation of arcade game shooter games.
The game just like Rafkill is built upon DUMB sound engine.
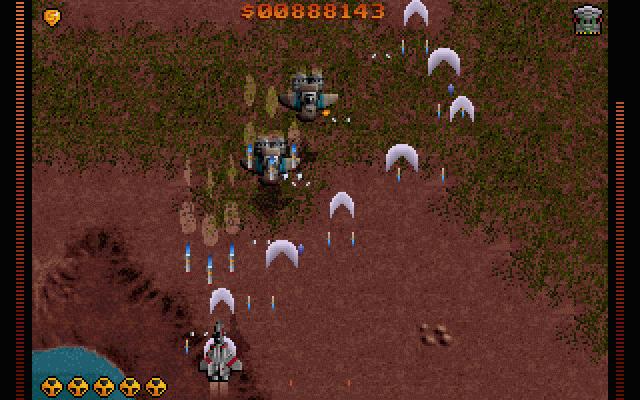
The game intro is quite entertaining
 The intro plays one by one the text:
Near Future:

Blobalization

Imperalizm

Corporations

Megalomaniacs

Money and Power. Slaves of the New Millenium!

After years of oppression, the slaved people of the world have raised against their masters. You, has a mercenary  pilot,  has  been

contacted by the popular rebellion to fight against the forces of oppression.
In the morning, you jump into your cockpit and start up the engines. It's time to get airborne and start the attack. Get ready to
scramble the scum hired by the masters. Murder for freedom is the only way, you're on a mission, don't defraud us...
Like Rafkill, Kraptor is one man masterpiece created by a free software Argentinean geek known under the Kronoman artistic pseudonim. The game is really incredible for a one man work ... a true masterpiece.
The game is licensed under MIT License.
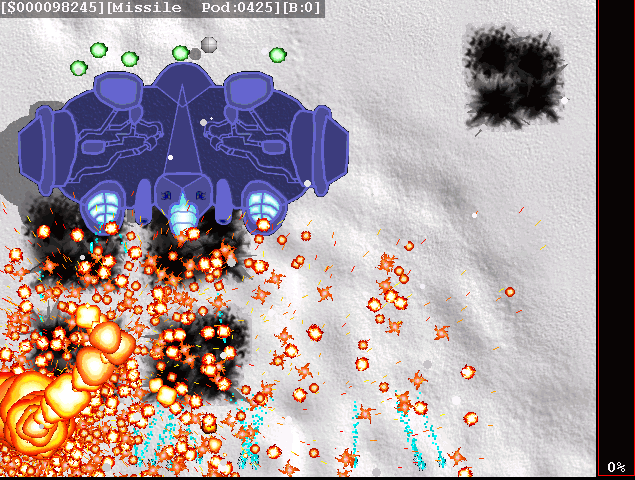
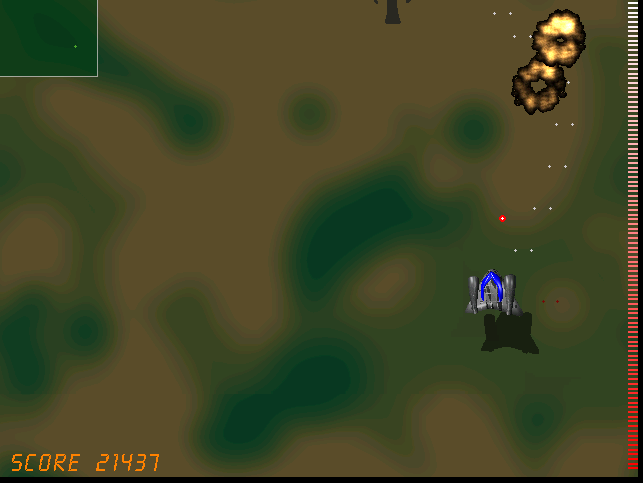
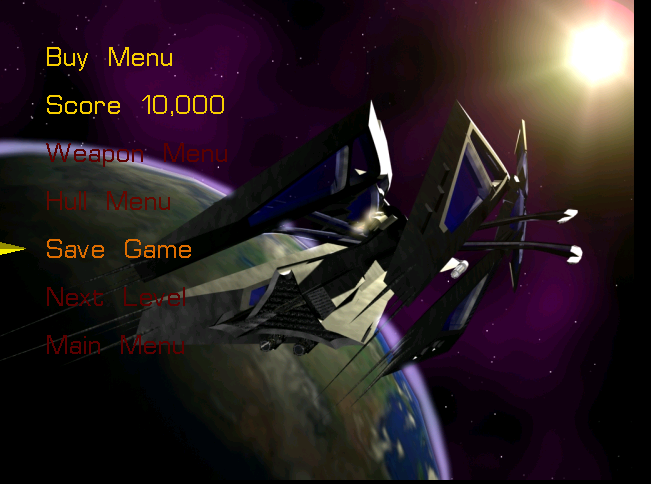
Even though Kraptor is older game than Rafkill, the design is more resembling the original Raptor game. The game music is high quality stereo. Besides that music and fx sound effects are quite awesome. After each level you have a Raptor like weapons "blackmarket", where you can buy new weapons, recharge ship energy, upgrade ship etc.
The blackmarket implementation part of the game is probably the worst moment in the game along with the game menus (in my view).
Talking about graphics Kraptor supports really high number of resolutions ranging from 320x240 to 1280x1024! 640x480 is the standard resolution in which the game is running.
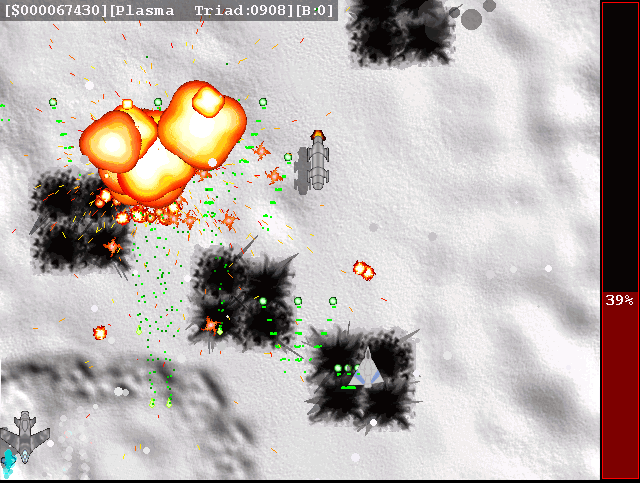
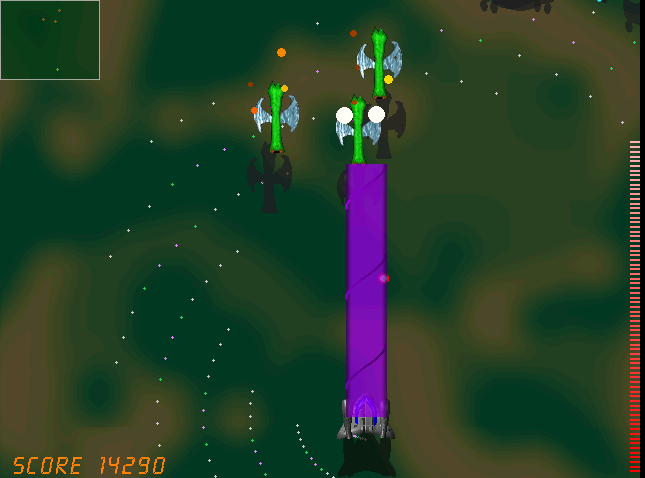
Something I really like in the game is the number of multiple weapons your ship uses during play. Even if played in Easy mode it is taught.
There are game Saves after each level, so thanksfully you don't have to start again from zero once death.
At the end of each level there is a huge bad BOSS you have to destroy ;).
Installing Kraptor on Debian / Ubuntu and deb derivatives is with:
debian:~# apt-get install kraptor

On most rpm based Linux distributions, you can install the game by converting the deb package to rpm with alien or by building from source from Kraptor's sourceforge page
Its interesting the game name e.g. Kraptor is also a death / grind metal band name, (Maybe Kronoman is metalhead big fan of Kraptor and that's how he came up with the playful name. For all the old school game addicts there is the joystick support. I've tested it with my Genius analogous joystick and it works fine.
The game is lacking .desktop gnome definition and after once installed it only appears through Debian (section) GNOME menus and not in Applications -> Games :
<
Applications -> Debian -> Games -&act; Action -&t; Kraptor
Just like Rafkill on Debian the game exacutable binary is located in /usr/games/kraptor . Also like with the Rafkill case when launched the game has troubles with choppy sound and music caused by the stupid buggy! pulseaudio
Analogously like with Rafkill's case, the work around to the problematic music en sound is to use a little bash shell script like:
#!/bin/bash

pulseaudio -k;

/usr/games/kraptor

pulseaudio --start;
You can dowload Kraptor fix sound issues wrapper here
To install it on your Debian / Ubuntu and hence make the game sound play good issue with root:
debian:~# cd /usr/bin

debian:/usr/bin# wget http://pc-freak.net/bshscr/kraptor.wrapper.sh

...

debian:/usr/bin:# chmod +x kraptor.wrapper.sh
Sat Jan 28 10:32:25 EET 2012
RafKill Raptor Free Software (Open Source) clone for GNU/Linux
I've earlier blogged on playing Apogee's Raptor Shadows of Death arcade on GNU / Linux with dosbox
All the old school raptor addicts will be interested to hear Kazzmir (Jon Rafkind) a free software devotee developer has created a small game resembling many aspects of the original Raptor arcade game.
The game is called Rafkill and is aimed to be a sort of Raptor like fork/clone.
Originally the game was also named Raptor like the DOS game, however in year 2006 it was changed to current Rafkill in order to avoid legal issues with Apogee's Raptor.
The game is not anymore in active development, the latest Rafkill release is from January 2007, anyhow even for the 2012 it is pretty entertaining. The sound and music are on a good level for a Linux / BSD shoot'em'up free software game . The graphics are not of a top quality and are too childish, but this is normal, since the game is just one man masterpiece.
Rafkill is developed in C/C++ programming language, the game music engine it uses is called DUMB (Dynamic Universal Bibliotheque). By the way DUMB library is used for music engine in many Linux arcade games. DUMB allows the Linux game developer to develop his game and play a music files within different game levels in "tracked" formats like mod, s3m, xm etc.
The game is available in compiled form for almost all existent GNU/Linux distributions, as well as one can easily port it as it is open source.
To install Rafkill on Debian, Ubuntu, Xubuntu and Linux Mint en other Debian based distros
Installing on Fedora and other rpm based is with yum
Once rafkill is installed, in order to start it on Debian the only way is using the rafkill (/usr/bin/rafkill) command. It appears the deb package maintainer did not wrote a gnome launcher file like for example /usr/share/applications/rafkill.desktop
Just to explain for all the GNOME noobs, the .desktop files are a description file GNOME reads in order to understand where exactly to place certain application in the (Gnome Applications, Places, System ...) menu panel.
Even though it miss the .desktop, it is launchable via Applications menu under the Debian section e.g. to open it from the GNOME menus you will have to navigate to:
This "shortcut" to launch the game is quite long and hard to remember thus it is handy to directly launch it via xterm:

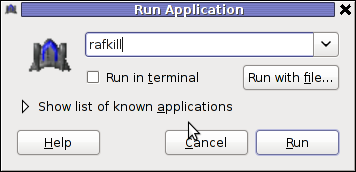
or by pressing ALT+F2 and typing rafkill :
Starting the game I got some really ugly choppy music / sound issues.
My guess was the fizzling sounds were caused by some bug with the sound portions streamed through pulseaudio sound system.
To test if my presume is correct, stopped pulseaudio and launched rafkill once again:
This way the game was counting on ALSA to process sound en the sound was playing perfectly fine.
I solved this problem through small wrapper shell script. The script did kill pulseaudio before launching rafkill and that way solve gchoppy sound issues, once the game execution is over the script starts pulseaudio again in order to prevent all other applications working with pulseaudio.
Finally, I've placed the executable script in /usr/bin/rafkill :
Here is the script:
You can download rafkill.wrapper.sh here
Or write in root terminal:
Interesting in Ubuntu Linux, rafkill music is okay and I suppose the bug is also solved in newer Linux distributions based on Ubuntu. Probably the Debian Squeeze pulseaudio (0.9.21-4) package version has a bug or smth..
After the change the game music will be playing fine and the game experience is cooler. The game is hard to play. Its really nice the game has game Saves, so once you die you don't have to start from level 1.
Enjoy ;)
All the old school raptor addicts will be interested to hear Kazzmir (Jon Rafkind) a free software devotee developer has created a small game resembling many aspects of the original Raptor arcade game.
The game is called Rafkill and is aimed to be a sort of Raptor like fork/clone.
Originally the game was also named Raptor like the DOS game, however in year 2006 it was changed to current Rafkill in order to avoid legal issues with Apogee's Raptor.
The game is not anymore in active development, the latest Rafkill release is from January 2007, anyhow even for the 2012 it is pretty entertaining. The sound and music are on a good level for a Linux / BSD shoot'em'up free software game . The graphics are not of a top quality and are too childish, but this is normal, since the game is just one man masterpiece.
Rafkill is developed in C/C++ programming language, the game music engine it uses is called DUMB (Dynamic Universal Bibliotheque). By the way DUMB library is used for music engine in many Linux arcade games. DUMB allows the Linux game developer to develop his game and play a music files within different game levels in "tracked" formats like mod, s3m, xm etc.
The game is available in compiled form for almost all existent GNU/Linux distributions, as well as one can easily port it as it is open source.
To install Rafkill on Debian, Ubuntu, Xubuntu and Linux Mint en other Debian based distros
root@debian:~# apt-get install rafkill
Installing on Fedora and other rpm based is with yum
debian:~# apt-get install rafkill

...
Once rafkill is installed, in order to start it on Debian the only way is using the rafkill (/usr/bin/rafkill) command. It appears the deb package maintainer did not wrote a gnome launcher file like for example /usr/share/applications/rafkill.desktop
Just to explain for all the GNOME noobs, the .desktop files are a description file GNOME reads in order to understand where exactly to place certain application in the (Gnome Applications, Places, System ...) menu panel.
Even though it miss the .desktop, it is launchable via Applications menu under the Debian section e.g. to open it from the GNOME menus you will have to navigate to:
Applications -> Debian -> Games -> Action -> Rafkill
This "shortcut" to launch the game is quite long and hard to remember thus it is handy to directly launch it via xterm:
hipo@debian:~$ rafkill
or by pressing ALT+F2 and typing rafkill :
Starting the game I got some really ugly choppy music / sound issues.
My guess was the fizzling sounds were caused by some bug with the sound portions streamed through pulseaudio sound system.
To test if my presume is correct, stopped pulseaudio and launched rafkill once again:
hipo@debian:~$ pulseaudio -k

hipo@debian:~$ rafkill
This way the game was counting on ALSA to process sound en the sound was playing perfectly fine.
I solved this problem through small wrapper shell script. The script did kill pulseaudio before launching rafkill and that way solve gchoppy sound issues, once the game execution is over the script starts pulseaudio again in order to prevent all other applications working with pulseaudio.
Finally, I've placed the executable script in /usr/bin/rafkill :
Here is the script:
#!/bin/bash

pulseaudio --kill

/usr/games/rafkill

pulseaudio --start
You can download rafkill.wrapper.sh here
Or write in root terminal:
debian:~# cd /usr/bin

debian:/usr/bin:# wget http://pc-freak.net/bshscr/rafkill.wrapper.sh

debian:/usr/bin:# mv http://pc-freak.net/bshscr/rafkill.wrapper.sh rafkill

debian:/usr/bin:# chmod +x rafkill
Interesting in Ubuntu Linux, rafkill music is okay and I suppose the bug is also solved in newer Linux distributions based on Ubuntu. Probably the Debian Squeeze pulseaudio (0.9.21-4) package version has a bug or smth..
After the change the game music will be playing fine and the game experience is cooler. The game is hard to play. Its really nice the game has game Saves, so once you die you don't have to start from level 1.
Enjoy ;)
Fri Jan 27 10:21:22 EET 2012
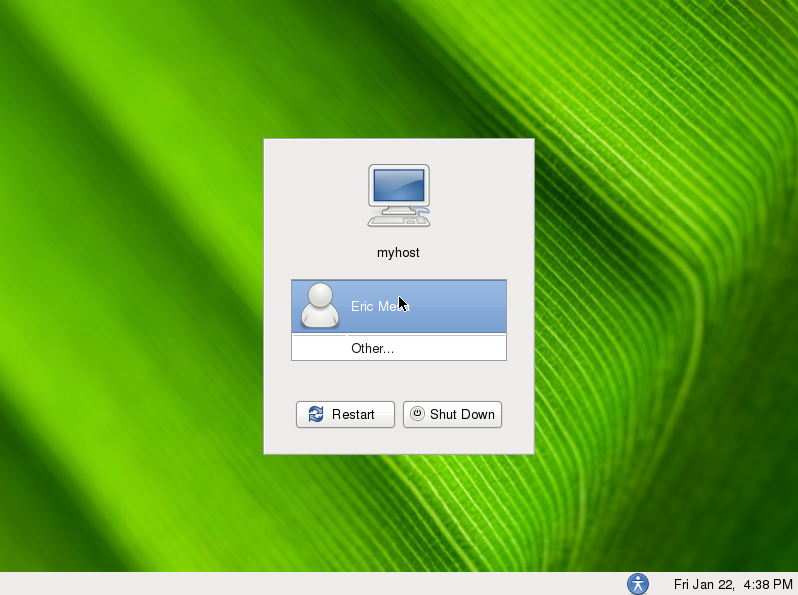
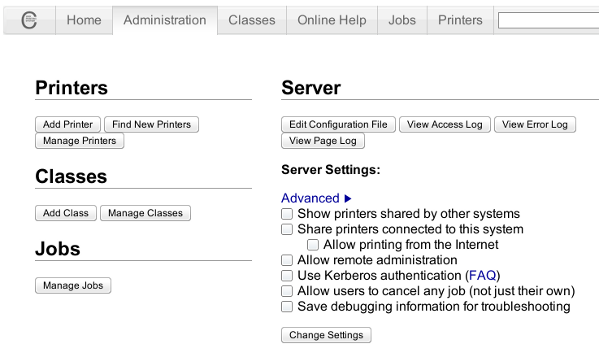
How to make Debian GNU / Linux Squeeze (GNOME) GDM to show avatar graphical icons login
By default latest Debian GDM does not provide an automatic way to login using user AVATARS (like Windows does).
This is pretty strange, especially if you compare to Ubuntu and many other Linux distributions which already has support for AVATAR login via GDM
The reason for this is that currently Debian is shipped with old version of gdm2 and this gdm version does not have support for clickable login avatars.
Debian looks by default like this:

Thanksfully this non-user friendly GNOME login screen behaviour can be changed by simply installing gdm3
This will remove the old gdm installed package as well as fast-user-switch-applet and install the gdm3.
Having installed the gdm3 with configured a background will look like so:
I was quite stunned that gdm3< does not have included support for themes . As far as I've spoken with some ppl in irc.freenode #gnome the reason for this oddity is it crashed a lot when a theme is configred.
By default the gdm2 themes are provided by a package called gdm-themes, since gdm3 does not support themes (yet), the package gdm3-themes is missing.
This is pretty strange, especially if you compare to Ubuntu and many other Linux distributions which already has support for AVATAR login via GDM
The reason for this is that currently Debian is shipped with old version of gdm2 and this gdm version does not have support for clickable login avatars.
Debian looks by default like this:
Thanksfully this non-user friendly GNOME login screen behaviour can be changed by simply installing gdm3
root@debian:~# apt-get --yes install gdm3

...
This will remove the old gdm installed package as well as fast-user-switch-applet and install the gdm3.
Having installed the gdm3 with configured a background will look like so:
I was quite stunned that gdm3< does not have included support for themes . As far as I've spoken with some ppl in irc.freenode #gnome the reason for this oddity is it crashed a lot when a theme is configred.
By default the gdm2 themes are provided by a package called gdm-themes, since gdm3 does not support themes (yet), the package gdm3-themes is missing.
Thu Jan 26 09:24:16 EET 2012
How to enable Automatic login in GNOME GDM 2 on GNU / Linux
I needed to enable automatic passwordless login in my Debian GNU/Linux ...
GNOME and GDM desktop environments developed a lot through the last few years, achieving these simple task was doable only through gdm manual configurations. Nowdays creatiion of user to login without any password is easy via easy to use GUI program.
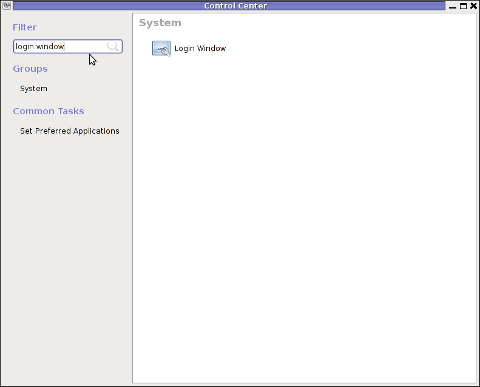
In this article I'll explain, few ways to enable automatic login in GNOME The quickest way is to navigate in GNOMEs gnome-control-center -> Login Window submenu
To do so launch gnome-control-center - press (ALT+F2) keys and type in gnome-control-center, or launch via command line in gnome-terminal or xterm:
While inside the control center find en launch the Login Window as in the screenshot below:
Login Window configuration can be also done directly by launching gdmsetup from command line e.g.:
gdmsetup will further pop up a window asking to type in the root password to allow you to customize, how gdm will deal with user logins.
For who might not know gnome well architecture, gdmsetup is part of the gdm (Gnome Display Manager) package and is the default login program used to login the end user in most of the modern Linux based distributions as well as BSDs. gdm logins the users on many of the free software OS desktop environments like GNOME, LXDE, XFCE... Just to name a few of the many Linuces counting on GDM to handle the user logins: Ubuntu, Xubuntu, Fedora, Debian, Linux Mint, OpenSUSE etc.
Once the Login Windows Prefences appears go to the Security tab.
As you can see in the screenshot, what you can do with gdmsetup it is pretty self-explanatory:
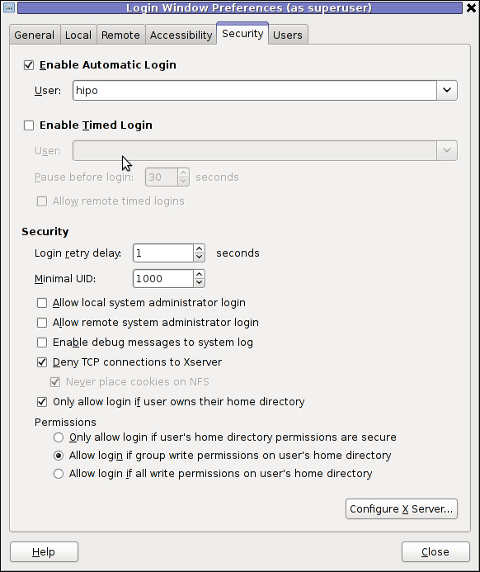
The two options of interests for user authorization without pass are:
a. Enable Automatic Login
To enable: - put a tick on Enable Automatic Login
- from user dropdown menu, choose the user which has to be configured
b. Enable Timed Login
Enable Automatic Login lets the user login without any user password input, immediately after the configured username is typed in (if gdm is with type username prompt).
In case where the usernames are represented by Avatars, (like its in most user friendly Linux distributions), once clicked avatar the user is logged in.
When Enable Timed Login is ticked and a username is choosen or typed, instead of immediately logging the user on click or username input, the user logging is delayed with a number of set seconds .
Enabling the Automatic and / or Timed Login is doable also using few simple configurations directives in /etc/gdm/custom.conf. In many distros /etc/gdm/custom.conf will be not existing and hence the file has to be created.
To enable delayed autologin without password for a user using gdm config:
Create the file with a text editor ( vim, joe, nano )whatever your favourity and place inside:
The above gdm config vars can also be placed inside /etc/gdm/gdm.conf but for the sake of clarity its better if custom.conf is used.
If you don't want to bother with a text editor copy paste inside any terminal lets say mlterm :
echo '[daemon]' >> /etc/gdm/custom.conf
echo 'TimedLoginEnable=true' >> /etc/gdm/custom.conf
echo 'TimedLogin=hipo' >> /etc/gdm/custom.conf
echo 'TimedLoginDelay=30' >> /etc/gdm/custom.conf
To enable auto-login for a user on a first PC boot in /etc/gdm/custom.conf put:
An auto login can also be done by using the TimedLoginDelay gdm config directive by putting insetad of the previous code a code like:
Where hipo is my desired username that will autolog, and as you see the LoginDelay is 0 (e.g. no gdm login delay)
I attempted to also allow autologin for several users with some cinfigurations like:
as well as configurations like:
In gdm3, the location of GDM config files should be /etc/gdm3/ directory, anyways the configurations directives should be working just like in gdm2
After any configuration changes to gdm.conf or custom.conf to load the new settings in gdm a gdm daemon restart is necessery with cmd:
Note that, weirdly not using the gdm init script and trying to kill -HUP $(pidof gdm) / killall -9 gdm will not make gdm to load its new configurations. So always restart via /etc/init.d/gdm restart after gdm conf change.
Another alternative method to achieve login without a password input is by creating a passwordless user account on the system. This method is not recommended though, especially for machines with real IP addresses visible from the Internet (with lets say enabled) SSHD access.
Using a passwordless system account can expose the system to a severe security risk!!! Anyways, for systems not running telnet/sshd or any other system remote access service creating a user without an empty password might be not such a bad idea.
To make a user auto login without any password input /etc/shadow file (storing all user account information) needs an edit.
This is an example user entry taken from /etc/shadow:
test:$6$OPdvXArZ$ktujC6bBh9JNaCz8E9v61yNeWcJHqQiuNk8eBzevcwcIl8KFvQzJ6aBCvVpIs0Lf5MAbHjjqftUeN9crWUfxs.:15275:0:99999:7::: Now to make the test user login directly without any pass input, one can just remove his encrypted password string. After the change the user line in /etc/shadow, should be:
test::15275:0:99999:7:::
If the user is created just from scratch e.g. (a new user) that needs to login passwordless in GDM, create it without password:
To sum it up the good thing about the remove password hash method to auto login a user is that it will allow user or users login across all Display Managers (not only GDM specific).
The bad side is it is very insecure and therefore in most times a really bad practice.
I guess the described ways to login without password in Gdm on FreeBSD should similar, unfortunately right now I have not access to BSD running desktop to test it. If someone has tested it and can confirm it works it will be great to drop a comment.
GNOME and GDM desktop environments developed a lot through the last few years, achieving these simple task was doable only through gdm manual configurations. Nowdays creatiion of user to login without any password is easy via easy to use GUI program.
In this article I'll explain, few ways to enable automatic login in GNOME The quickest way is to navigate in GNOMEs gnome-control-center -> Login Window submenu
To do so launch gnome-control-center - press (ALT+F2) keys and type in gnome-control-center, or launch via command line in gnome-terminal or xterm:
hipo@debian:~$ gnome-control-center
While inside the control center find en launch the Login Window as in the screenshot below:
Login Window configuration can be also done directly by launching gdmsetup from command line e.g.:
hipo@debian:~$ /usr/sbin/gdmsetup

...
gdmsetup will further pop up a window asking to type in the root password to allow you to customize, how gdm will deal with user logins.
For who might not know gnome well architecture, gdmsetup is part of the gdm (Gnome Display Manager) package and is the default login program used to login the end user in most of the modern Linux based distributions as well as BSDs. gdm logins the users on many of the free software OS desktop environments like GNOME, LXDE, XFCE... Just to name a few of the many Linuces counting on GDM to handle the user logins: Ubuntu, Xubuntu, Fedora, Debian, Linux Mint, OpenSUSE etc.
Once the Login Windows Prefences appears go to the Security tab.
As you can see in the screenshot, what you can do with gdmsetup it is pretty self-explanatory:
The two options of interests for user authorization without pass are:
a. Enable Automatic Login
To enable: - put a tick on Enable Automatic Login
- from user dropdown menu, choose the user which has to be configured
b. Enable Timed Login
Enable Automatic Login lets the user login without any user password input, immediately after the configured username is typed in (if gdm is with type username prompt).
In case where the usernames are represented by Avatars, (like its in most user friendly Linux distributions), once clicked avatar the user is logged in.
When Enable Timed Login is ticked and a username is choosen or typed, instead of immediately logging the user on click or username input, the user logging is delayed with a number of set seconds .
Enabling the Automatic and / or Timed Login is doable also using few simple configurations directives in /etc/gdm/custom.conf. In many distros /etc/gdm/custom.conf will be not existing and hence the file has to be created.
To enable delayed autologin without password for a user using gdm config:
Create the file with a text editor ( vim, joe, nano )whatever your favourity and place inside:
[daemon]

TimedLoginEnable=true

TimedLogin=hipo

TimedLoginDelay=30
The above gdm config vars can also be placed inside /etc/gdm/gdm.conf but for the sake of clarity its better if custom.conf is used.
If you don't want to bother with a text editor copy paste inside any terminal lets say mlterm :
echo '[daemon]' >> /etc/gdm/custom.conf
echo 'TimedLoginEnable=true' >> /etc/gdm/custom.conf
echo 'TimedLogin=hipo' >> /etc/gdm/custom.conf
echo 'TimedLoginDelay=30' >> /etc/gdm/custom.conf
To enable auto-login for a user on a first PC boot in /etc/gdm/custom.conf put:
[daemon]

AutomaticLoginEnable=true

AutomaticLogin=hipo
An auto login can also be done by using the TimedLoginDelay gdm config directive by putting insetad of the previous code a code like:
[daemon]

TimedLoginEnable=true

TimedLogin=hipo

TimedLoginDelay=0
Where hipo is my desired username that will autolog, and as you see the LoginDelay is 0 (e.g. no gdm login delay)
I attempted to also allow autologin for several users with some cinfigurations like:
[daemon]

AutomaticLoginEnable=true

AutomaticLogin=hipo

AutomaticLogin=other-username
as well as configurations like:
[daemon]

TimedLoginEnable=true

TimedLogin=hipo

TimedLogin=other-username

TimedLoginDelay=0
In gdm3, the location of GDM config files should be /etc/gdm3/ directory, anyways the configurations directives should be working just like in gdm2
After any configuration changes to gdm.conf or custom.conf to load the new settings in gdm a gdm daemon restart is necessery with cmd:
root@debian:~# /etc/init.d/gdm restart

...
Note that, weirdly not using the gdm init script and trying to kill -HUP $(pidof gdm) / killall -9 gdm will not make gdm to load its new configurations. So always restart via /etc/init.d/gdm restart after gdm conf change.
Another alternative method to achieve login without a password input is by creating a passwordless user account on the system. This method is not recommended though, especially for machines with real IP addresses visible from the Internet (with lets say enabled) SSHD access.
Using a passwordless system account can expose the system to a severe security risk!!! Anyways, for systems not running telnet/sshd or any other system remote access service creating a user without an empty password might be not such a bad idea.
To make a user auto login without any password input /etc/shadow file (storing all user account information) needs an edit.
This is an example user entry taken from /etc/shadow:
test:$6$OPdvXArZ$ktujC6bBh9JNaCz8E9v61yNeWcJHqQiuNk8eBzevcwcIl8KFvQzJ6aBCvVpIs0Lf5MAbHjjqftUeN9crWUfxs.:15275:0:99999:7::: Now to make the test user login directly without any pass input, one can just remove his encrypted password string. After the change the user line in /etc/shadow, should be:
test::15275:0:99999:7:::
If the user is created just from scratch e.g. (a new user) that needs to login passwordless in GDM, create it without password:
root@debian:~# adduser -d newusername
To sum it up the good thing about the remove password hash method to auto login a user is that it will allow user or users login across all Display Managers (not only GDM specific).
The bad side is it is very insecure and therefore in most times a really bad practice.
I guess the described ways to login without password in Gdm on FreeBSD should similar, unfortunately right now I have not access to BSD running desktop to test it. If someone has tested it and can confirm it works it will be great to drop a comment.
Wed Jan 25 09:17:23 EET 2012
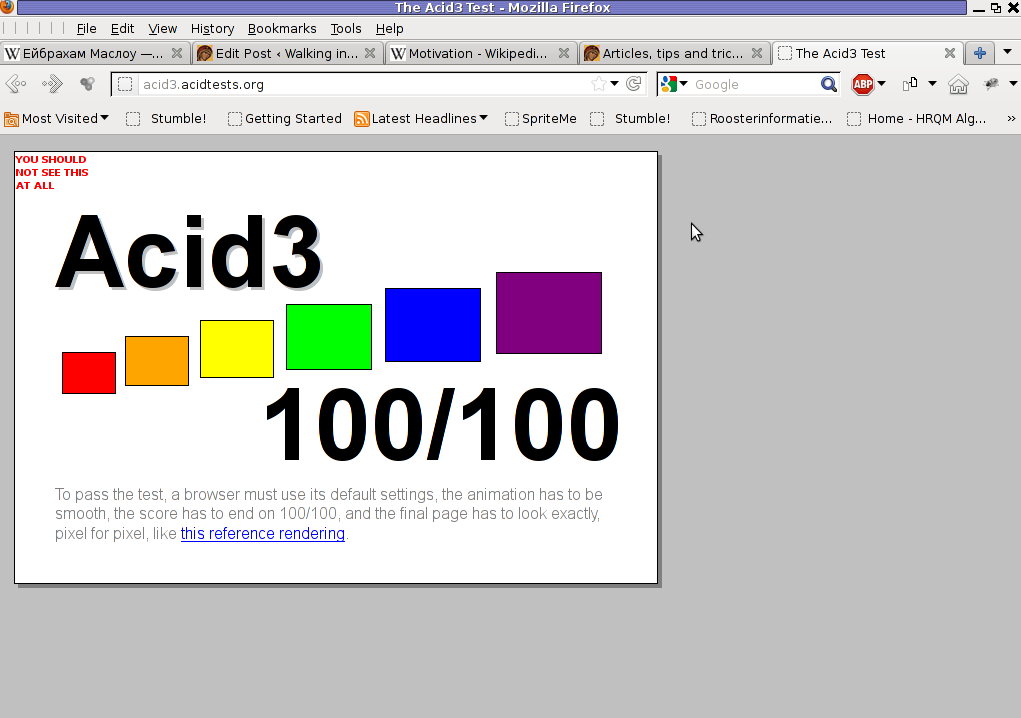
Test your web browser compatability with Acid3 test
Acid3 Test is a group of browser compitability tests. Acid3 test is a good indicator on how Web ready is your browser.
Acidtest is part of the web standards project. Latest Firefox 9.0.1 passes the test on 100% (100/100).
I've tried it with Epiphany and it scored only 67/100, still I'm using Epiphany on daily basis and I'm quite happy with it.
The tests involved are testing browser for:

The Acid3 test is written itself in Javascript. It consists of 6 testing "stages" (buckets) upon which the browser tested is evaluated.
Each of the test is represented visually by a rectangle. If the a test stage is passed you see a new rectangle appearing in the tested browser.
In wikipedia, there is a thorough list with web browsers by type and engine and the level of support for the Acid3 test.
The test is of great use if you're web developer.
Acidtest is part of the web standards project. Latest Firefox 9.0.1 passes the test on 100% (100/100).
I've tried it with Epiphany and it scored only 67/100, still I'm using Epiphany on daily basis and I'm quite happy with it.
The tests involved are testing browser for:
- DOM
- DOM2
- Checks on HTML tables and forms browser rendering
- SVG compitability testing
- DOM1 and DOM2 compitability
- Various ECMA Script Javascript compitability tests
- Unicode (UTF-16 and UTF-8) browser compitability
- XHML, SMIL, CSS, HTML compitability
- Content-type image/png, text plain etc.
The Acid3 test is written itself in Javascript. It consists of 6 testing "stages" (buckets) upon which the browser tested is evaluated.
Each of the test is represented visually by a rectangle. If the a test stage is passed you see a new rectangle appearing in the tested browser.
In wikipedia, there is a thorough list with web browsers by type and engine and the level of support for the Acid3 test.
The test is of great use if you're web developer.
Tue Jan 24 08:35:55 EET 2012
Installing Linux on old hardware PC. Few thoughs on Puppy and Xubuntu Linux
I needed a G/Linux distribution that will work fine on an old PC with hardware configuration:
I've read a lot on the internet and come to the conclusion I have basicly two popular Linux distros as option to install on archaic x86 hardware:
I first give Puppy Linux a try. It worked quite nice, but the interface was too old school and the desktop felt like a bit out-dated.
Besides that many of the Puppy Linux shipped programs were not a mainstream programs available across most of the other Linux distributions.
Many of the programs shipped with Puppy are great, but more suitable for a computer geek than for a Windows accustomed GUI user.
My opinion on Puppy (from what I've seen) is that its great distro for old school hardcore Linux users.
Anyways its not suitable for absolutely "uniniated" users who encounter Linux for a first time.
Secondly I installed Xubuntu. Most of the archaic hardware on the PC was detected during install time (a pleasently surprise).
Xubunto works fast and Xfce menus opens "light fast" as on the old 800Mhz pc with 512 mem of ram. Generally the GUI worked quick and responsive.
To conclude I liked Xubuntu a lot and I strongly recommend it to anyone who want to quickly roll on Linux on an old PC.

What impressed me most is the minimalistic look & feel and simplicity.
I'm sure Debian will be working great on old hardware as well, however configuring it will be hell a lot of work. Thus I think Xubuntu is a good choice for people who want save some time in obscure configurations and easily have a neat Linux ready for desktop use.
guest@xubuntu-desktop:~$ grep -i cpu /proc/cpuinfo; free -m; df -h
cpu family : 6
cpu MHz : 797.613
total used free shared buffers cached
Mem: 497 470 26 0 35 259
-/+ buffers/cache: 176 321
Swap: 1454 10 1444
File System Size Used Free % Mounted on
/dev/sda1 37G 4,3G 31G 13% /
I've read a lot on the internet and come to the conclusion I have basicly two popular Linux distros as option to install on archaic x86 hardware:
 1. Puppy Linux

 2. Xubuntu Linux
I first give Puppy Linux a try. It worked quite nice, but the interface was too old school and the desktop felt like a bit out-dated.
Besides that many of the Puppy Linux shipped programs were not a mainstream programs available across most of the other Linux distributions.
Many of the programs shipped with Puppy are great, but more suitable for a computer geek than for a Windows accustomed GUI user.
My opinion on Puppy (from what I've seen) is that its great distro for old school hardcore Linux users.
Anyways its not suitable for absolutely "uniniated" users who encounter Linux for a first time.
Secondly I installed Xubuntu. Most of the archaic hardware on the PC was detected during install time (a pleasently surprise).
Xubunto works fast and Xfce menus opens "light fast" as on the old 800Mhz pc with 512 mem of ram. Generally the GUI worked quick and responsive.
To conclude I liked Xubuntu a lot and I strongly recommend it to anyone who want to quickly roll on Linux on an old PC.
What impressed me most is the minimalistic look & feel and simplicity.
I'm sure Debian will be working great on old hardware as well, however configuring it will be hell a lot of work. Thus I think Xubuntu is a good choice for people who want save some time in obscure configurations and easily have a neat Linux ready for desktop use.
Mon Jan 23 17:35:50 EET 2012
Fix audioCD play problems with VLC on GNU Linux - How to play Audio CDs on GNU/Linux and FreeBSD
I've not played audio CD for ages. Anyways I had to set up one computer with Linux just recently and one of the requirements was to be able to play audiocds.
I was surprised that actually a was having issue with such as simple tasks.
Here is how i come with this article.
If you encounter errors playing Audio CDs on any Linux distro in VLC or other players, you might need to apply the following fix.
I'm not sure if this packages are required, anyways having them installed is a good idea especially on computers which will have to support as much multimedia as possible.
Trying to play a CD with VLC the result was not nice, you see in the picture above the error that poped up while trying it with VLC:

Due to wrong configuration of the play device VLC will be looking to read the audio cd from.
To succesfully play the audiocd invoke VLC command with a cdda///dev/sr0 argument like so:
To permanently fix the error you will have to edit ~/.config/vlc/vlcrc :
Inside ~/.config/vlc/vlcrc find the lines:
Substitute the above line with:
Next find the line:
Change the above line with:
If dvd= and vcd is set to a different unreadable characters delete them and substitute with /dev/sr0 . I've experienced this on Xubuntu Linux with a Bulgarian localization (probably the bug can be seen in other Linuxes when GNOME is installed in Russian, Chineese and other UTF-8 languages.
The strange error can be observed also in other players when the localization is set to someone's native language ...
Alternative solution is to install and use rhythmbox instead of VLC.
Other program to play audio CDs called workman , you will have to get used to the interface which uses gtk1 and therefore obsolete. Putting aside the ugly interface it works ;)
I was surprised that actually a
Here is how i come with this article.
If you encounter errors playing Audio CDs on any Linux distro in VLC or other players, you might need to apply the following fix.
root@xubuntu-desktop:~# apt-get install xubuntu-restricted-extras

...

root@xubuntu-desktop:~# apt-get install ubuntu-restricted-extras

...
I'm not sure if this packages are required, anyways having them installed is a good idea especially on computers which will have to support as much multimedia as possible.
Trying to play a CD with VLC the result was not nice, you see in the picture above the error that poped up while trying it with VLC:
Due to wrong configuration of the play device VLC will be looking to read the audio cd from.
To succesfully play the audiocd invoke VLC command with a cdda///dev/sr0 argument like so:
hipo@xubuntu-desktop:~$ vlc cdda:///dev/sr0

...
To permanently fix the error you will have to edit ~/.config/vlc/vlcrc :
Inside ~/.config/vlc/vlcrc find the lines:
dvd=/dev/cdrom
Substitute the above line with:
dvd=/dev/sr0
Next find the line:
vcd=/dev/cdrom
Change the above line with:
vcd=/dev/sr0
Due to a bug in generating vlcrc , the dvd= might be set also to other messy unreadable characters (different from /dev/cdrom). This can also be the reason why it fails to properly read the disc.If dvd= and vcd is set to a different unreadable characters delete them and substitute with /dev/sr0 . I've experienced this on Xubuntu Linux with a Bulgarian localization (probably the bug can be seen in other Linuxes when GNOME is installed in Russian, Chineese and other UTF-8 languages.
The strange error can be observed also in other players when the localization is set to someone's native language ...
Alternative solution is to install and use rhythmbox instead of VLC.
Other program to play audio CDs called workman , you will have to get used to the interface which uses gtk1 and therefore obsolete. Putting aside the ugly interface it works ;)
Mon Jan 23 17:27:33 EET 2012
How to work around hang up issues with gnome keyboard layout switcher in GNOME 2
Every now and then my gnome keyboard layout switcher hangs. When my keyboard switcher hangs I can't switch between my two defined languages English and my native Bulgarian
The hang up of the language switcher is makes switching between my two defined languages impossible until I logoff and login again or kill the current GNOME session with CTRL+ALT+BACKSPACE.
Sometimes logging off again is not necessery so I have to logoff and login to GNOME few times until finally the gnome keyboard layout switcher reacts to an issued change language via Alt+Shift or by clicking on it.
Unfortunately the gnome keyboard layout switcher is not available as a process so there is no way to simply kill -HUP the process responsible for it.
Just until today I couldn't find a way how to restart the gnome keyboard layout switcher when it hangs.
Now today I finally found a way to restart it without restarting the whole gnome session or killing completely the Xorg server.
To "fix" up the keyboard switcher when its not responding, I had to issue in gnome-terminal or via ALT+F2:
As you can see in the screenshot below, one has to press the Move Up button to switch the default order of languages. Once this is done the keyboard layout switcher starts working again. Once working I just used the move up once again to revert back my default language order as it used to be.
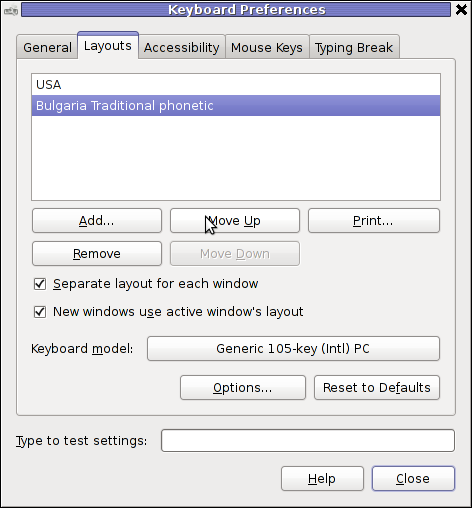
I'm not sure what exactly is causing the GNOME 2 keyboard layout switcher to hang (when it does), my guess is it is due to some kind of version incompitability between gnome versions or configurations specific to my computer. In the past I was running Debian Testing/Unstable and then downgraded back to Debian stable, probably this is the reason of the language switcher hangs.
The hang up of the language switcher is makes switching between my two defined languages impossible until I logoff and login again or kill the current GNOME session with CTRL+ALT+BACKSPACE.
Sometimes logging off again is not necessery so I have to logoff and login to GNOME few times until finally the gnome keyboard layout switcher reacts to an issued change language via Alt+Shift or by clicking on it.
Unfortunately the gnome keyboard layout switcher is not available as a process so there is no way to simply kill -HUP the process responsible for it.
Just until today I couldn't find a way how to restart the gnome keyboard layout switcher when it hangs.
Now today I finally found a way to restart it without restarting the whole gnome session or killing completely the Xorg server.
To "fix" up the keyboard switcher when its not responding, I had to issue in gnome-terminal or via ALT+F2:
hipo@noah:~$ gnome-keyboard-properties
As you can see in the screenshot below, one has to press the Move Up button to switch the default order of languages. Once this is done the keyboard layout switcher starts working again. Once working I just used the move up once again to revert back my default language order as it used to be.
I'm not sure what exactly is causing the GNOME 2 keyboard layout switcher to hang (when it does), my guess is it is due to some kind of version incompitability between gnome versions or configurations specific to my computer. In the past I was running Debian Testing/Unstable and then downgraded back to Debian stable, probably this is the reason of the language switcher hangs.
Sun Jan 22 22:18:28 EET 2012
Non-free Packages to install to make Ubuntu Linux Multimedia ready / Post packages to Install after Ubuntu new installation
1. Add Medibuntu package repository
After that VLC will be ready to play DVDs for some programs which was compiled without DVD, source rebuilt is required.
If DVDs hang you might need to set a Region Code with regionset:
3. Install non-free codecs
4. Install Chromium ffmpeg nonfree codecs
5. Install w32codecs / w64codecs
Depending on the Ubuntu Linux installation architecture 32/64 bit install w32codecs or w64codecs
For 32 bit (x86) Ubuntu install w32codecs:
For 64 bit arch Ubuntu:
6. Install ubuntu-restricted-extras meta package
7. Install cheese for webcam picture/video snapshotting
8. Install GIMP, Inkscape, xsane,sane, shotwell etc.
9. Install multimedia Sound & Video utilities
Install Subtitle editor, video editiking , sound editing, mp3 player, iso mounters, DVD/CD Burners
10. Install CD / DVD RIP tools
12. Install Non-Free Flash Player
Unfortunately Gnash is not yet production ready and crashes in many websites ...
13. Install Archive / Unarchive management programs
15. Install VirtualBox and QEmu
This should be enough to use Ubuntu normally for multimedia Desktop just as MS Windows for most of the daily activities.
Am I missing some important program?
root@ubuntu:~# wget --output-document=/etc/apt/sources.list.d/medibuntu.list \

http://www.medibuntu.org/sources.list.d/$(lsb_release -cs).list \

&& sudo apt-get --quiet update \

&& sudo apt-get --yes --quiet --allow-unauthenticated install medibuntu-keyring \

&& sudo apt-get --quiet update
2. Enable Ubuntu to play Restricted DVD
root@ubuntu:~# apt-get install --yes libdvdread4

...

root@ubuntu:~# /usr/share/doc/libdvdread4/install-css.sh
After that VLC will be ready to play DVDs for some programs which was compiled without DVD, source rebuilt is required.
If DVDs hang you might need to set a Region Code with regionset:
# regionset
3. Install non-free codecs
root@ubuntu:~# apt-get install non-free-codecs
4. Install Chromium ffmpeg nonfree codecs
root@ubuntu:~# apt-get install chromium

root@ubuntu:~# apt-get install chromium-codecs-ffmpeg-nonfree
5. Install w32codecs / w64codecs
Depending on the Ubuntu Linux installation architecture 32/64 bit install w32codecs or w64codecs
For 32 bit (x86) Ubuntu install w32codecs:
root@ubuntu:~# apt-get install w32codecs
For 64 bit arch Ubuntu:
root@ubuntu:~# apt-get install w64codecs
6. Install ubuntu-restricted-extras meta package
root@ubuntu:~# apt-get install ubuntu-restricted-extras
7. Install cheese for webcam picture/video snapshotting
root@ubuntu:~# apt-get install cheese
8. Install GIMP, Inkscape, xsane,sane, shotwell etc.
root@ubuntu:~# apt-get --yes install sane xsane gimp inkscape gimp-data-extras gimp-plugin-registry \

blender gcolor2 showtwell bluefish kompozer
9. Install multimedia Sound & Video utilities
Install Subtitle editor, video editiking , sound editing, mp3 player, iso mounters, DVD/CD Burners
root@ubuntu:~# apt-get install rhythmbox banshee smplayer mplayer \

realplayer audacity brasero jokosher istanbuk gtk-recordMyDesktop \
acetoneisohexedit furiusisomount winff fala audacious dvdstyler lives hydrogen

subtitleeditor gnome-subtitles electricsheep k3b
10. Install CD / DVD RIP tools
root@ubuntu:~# apt-get install acidrip sound-juicer ogmrip thoggen
11. Install chat messanger programs, Browsers, mail pop3 clients, torrent, emulators, ftp clients etc.
apt-get install seamonkey thunderbird transmission transmission-gtk gbgoffice kbedic \

pidgin openoffice.org gxine mozilla-plugin-vlc wine dosbox samba filezilla amsn ntp \
epiphany-browser ntpdate desktop-webmail alltray chmsee gftp xchat-gnome ghex \
gnome-genius bleachbit arista
12. Install Non-Free Flash Player
Unfortunately Gnash is not yet production ready and crashes in many websites ...
root@ubuntu:~# apt-get install flashplugin-nonfree flashplugin-nonfree-extrasound swfdec-gnome
13. Install Archive / Unarchive management programs
root@ubuntu:~# apt-get install unace unrar zip unzip p7zip-full p7zip-rar sharutils rar uudeview \

mpack lha arj cabextract file-roller
15. Install VirtualBox and QEmu
root@ubuntu:~# apt-get install qemu-launcher qemu-kvm-extras virtualbox virtualbox-ose \

virtualbox-ose-guest-dkms virtualbox-ose-guest-dkms
This should be enough to use Ubuntu normally for multimedia Desktop just as MS Windows for most of the daily activities.
Am I missing some important program?
Sun Jan 22 18:57:11 EET 2012
How to play Audio music CDs in GNU/Linux and Free/Net/Open BSDs
If you still have some old dusty CDs left on the CD shelf, its quite cool to give it a ride in a rainy morning.
As I enjoy working in console so much, I thought it might be interesting to share how music audio CDs can be listened in plain text mode console.
For all console / terminal geeks Linux and BSDs can be equipped with a number of text/console audio cd console players.
There are plenty of free software console cd audio players on the net, however I found cdplay , cdcd and dcd to be the most popular ones.
On Debian and Ubuntu G*/Linuces cdplay and cdcd are installable via apt. To install cdtool:
cdtool package, contains a number of commands enabling you to listen/stop/shuffle/eject/get info about cd audio volumes. cdtool provides the following binaries:
Install cdcd on Debian and alike by typing:
cdcd has shell like interface the most basic use of it is with:
To play audiocds in console on FreeBSD , a command tool dcd is available and installable through ports.
To install it issue:
dcd is also available for Linux but on most GNU/Linuxes it has to be built from source.
Lets say you'd like to Play the 5th song from audio CD:
dcd has plenty of great arguments, to get some fun with it check the man page.
Another program that can be used to play audio CDs on both Linux and BSDs is the "classical" mplayer .
To play AUDIO CD with mplayer the command line to use is:
The argument -cache 5000 has to be passed to to work around choppy sound (if for example audio playback interruptions every few milliseconds).
For people who are keen on ncurses (Midnight Commander) like command line interfaces you might enjoy Herrie - a minimalistic music player that supports plenty of sound formats, including audiocds.
Herrie is available for Debian and most deb based modern distros via apt, e.g.:
Posted by hip0 | Permanent link
As I enjoy working in console so much, I thought it might be interesting to share how music audio CDs can be listened in plain text mode console.
For all console / terminal geeks Linux and BSDs can be equipped with a number of text/console audio cd console players.
There are plenty of free software console cd audio players on the net, however I found cdplay , cdcd and dcd to be the most popular ones.
On Debian and Ubuntu G*/Linuces cdplay and cdcd are installable via apt. To install cdtool:
root@xubuntu-desktop:~# apt-get install cdtool

...
cdtool package, contains a number of commands enabling you to listen/stop/shuffle/eject/get info about cd audio volumes. cdtool provides the following binaries:
cdeject

cdclose,br />
cdir

cdinfo

cdpause

cdplay

cdstop

cdvolume

cdshuffle
Install cdcd on Debian and alike by typing:
root@xubuntu-desktop:~# apt-get install cdcd

...
cdcd has shell like interface the most basic use of it is with:
root@xubuntu-desktop:~# cdcd

cdcd> play
To play audiocds in console on FreeBSD , a command tool dcd is available and installable through ports.
To install it issue:
root@freebsd# cd /usr/ports/audio/dcd

root@freebsd# make install clean

...
dcd is also available for Linux but on most GNU/Linuxes it has to be built from source.
Lets say you'd like to Play the 5th song from audio CD:
freebsd# dcd 5
dcd has plenty of great arguments, to get some fun with it check the man page.
Another program that can be used to play audio CDs on both Linux and BSDs is the "classical" mplayer .
To play AUDIO CD with mplayer the command line to use is:
root@debian:~# mplayer -cdrom-device /dev/sr0 cdda:// -cache 5000

...
The argument -cache 5000 has to be passed to to work around choppy sound (if for example audio playback interruptions every few milliseconds).
For people who are keen on ncurses (Midnight Commander) like command line interfaces you might enjoy Herrie - a minimalistic music player that supports plenty of sound formats, including audiocds.
Herrie is available for Debian and most deb based modern distros via apt, e.g.:
root@xubuntu-desktop:~# apt-get install herrie

...
Posted by hip0 | Permanent link
Sun Jan 22 11:53:23 EET 2012
How to restore accidently removed Gnome volume control in GNOME in GNU / Linux
Accidently I've removed the Gnome Volume Control while trying to remove an applet nearby from the GNOME main menu panel. Unfortunately in GNOME 2, I couldn't find a way to to return back (restore) Gnome Volume Control to the main panel. After a bit of pondering, I've managed to find a way.
Here is how I managed to restore it back:
1. Navigate to:
Adding the gnome-volume-control-applet will launch it every time a new gnome session (with the same user) is initiated. On next gnome login you will see the icon to appear again in the notification area. Cheers ;)
Here is how I managed to restore it back:
1. Navigate to:
System > Preference > Startup Applications
2. Click on Add, then add and type the following:
 Name: Volume control

 Command: gnome-volume-control-applet

 Comment: Launch volume control applet
Adding the gnome-volume-control-applet will launch it every time a new gnome session (with the same user) is initiated. On next gnome login you will see the icon to appear again in the notification area. Cheers ;)
Fri Jan 20 22:41:10 EET 2012
How to install GNOME 2 desktop environment on Xubuntu / Substitute Xubuntu's XFCE desktop manager with GNOME
XFCE in Xubuntu looks quite nice, the developers of Xubuntu made it look and work really well.
Anyways XFCE was lacking many of the features that GNOME offers (among which the most important one in that case was creating Icons on the desktop).
Even though creation of XFCE icons on the desktop has ways to be done, this is quite a complex process and its complete un-interactive. Besides that I could not find a way to add programs to XFce's main menus (as icons).
Therefore Xubuntu's Xfce is not suitable gui envorinment for Linux novice who had no knowledge on Linux commands and stuffs.
On the other hand I've seen many users coming from Windows world to Linux to have cope approximately well with GNOME.
Therefore I decided to subsitute Xubuntu's XFCE with GNOME
I used apt-get to install GNOME desktop environment like so:
Now simply logout from Xfce and on the GDM login screen I had to choose GNOME Hence I used apt-get to install GNOME desktop environment on Xubuntu like so:
Now simply logout from Xfce and on the GDM login screen I had to choose GNOME and I can use the way more user friendly and easy to customize GNOME 2.
Anyways XFCE was lacking many of the features that GNOME offers (among which the most important one in that case was creating Icons on the desktop).
Even though creation of XFCE icons on the desktop has ways to be done, this is quite a complex process and its complete un-interactive. Besides that I could not find a way to add programs to XFce's main menus (as icons).
Therefore Xubuntu's Xfce is not suitable gui envorinment for Linux novice who had no knowledge on Linux commands and stuffs.
On the other hand I've seen many users coming from Windows world to Linux to have cope approximately well with GNOME.
Therefore I decided to subsitute Xubuntu's XFCE with GNOME
I used apt-get to install GNOME desktop environment like so:
root@xubuntu-desktop:~# apt-get install --yes gnome-desktop-environment

...
Now simply logout from Xfce and on the GDM login screen I had to choose GNOME Hence I used apt-get to install GNOME desktop environment on Xubuntu like so:
root@xubuntu-desktop:~# apt-get install --yes gnome-desktop-environment

...
Now simply logout from Xfce and on the GDM login screen I had to choose GNOME and I can use the way more user friendly and easy to customize GNOME 2.
Fri Jan 20 13:35:14 EET 2012
How to fix "Out of Range" resolution problems with NVIDIA Riva TNT2 Model 64/Model 64Pro with BENQ FP61E
Today I had a task to change an old CRT Monitor to LCD BENQ Model FP61E on a computer running Microsoft Windows XP SP3.
Changing phyiscally the monitors and restarting the computer to load with the new BENQ monitor ended up with the LCD Monitor showing a blank screen with error:
Out of Range
making the computer completely unusable.
Thanksfully in Windows Safe Mode the monitor was able to display the screen properly, so I had an option to operate somehow on the pc
My guess was that the Out of Range monitor problems were caused by an incorrect (monitor unsupported resolution).
Therefore what I tried as a fix to make it work was:
1. Enter Windows Safe Mode and change (lower the resolution) to 640x480, and restart the PC.
Unfortunately using this classical way to fix such issues failed... so I thought of some options.
2. Disable the video card NVIDIA Riva TNT2 Model 64 driver and check if this will make any difference.
I come up with the idea the Out of Range LCD issues might be caused by the Video card driver cause I've noticed in safe mode a standard VESA like VGA Driver shipped with Windows worked just fine.
To Disable the currently loaded NVIDIA Riva TNT2 Model 64/ Model 64Pro I used:
Clicking on Display Adapters the NVIDIA Riva TNT2 Model 64 appears using the option menu on it one can choose to disable the driver.
Further on restart Windows, to test if the XP will load properly with disabled NVidia video drivers.
Onwards it was clear the whole Out of Range issues were caused by some kind of conflict between the LCD BENQ FP61E Monitor and the NVIDIA Riva TNT2 Model 64
Often latest video drivers solves hardware incompitability issues and fix many bugs, upgrading the driver to latest is always a good idea.
3. Therefore I Upgraded the NVIDIA Riva TNT2 64 driver (using Safe Mode) to the latest available from Nvidia's official site.
Weirdly Upgrading NVidia Riva TNT2 drivers to the latest did not fix the Out of Range blank screen error.
After a bit of thinking on what to do to make the Monitor work fine with the Nvidia driver, I thought of completely uninstalling the Nvidia drivers and installing them again might be a fix.
In my previous experience with Windows at many occasions, uninstalling a driver failing to properly work and installing it again with a working version was a good fix.
4. Uninstall the NVIDIA Riva TNT2 Model and Install the latest driver.
Uninstalling and Installing the Video driver had to be done in Windows Safe Mode again, in normal mode the windows was not displaying anything.
After The driver installation program completes the installation it requires a restart. After the restart the Video driver gets loaded fine and Windows loaded up in Normal mode as usual ;)
Changing phyiscally the monitors and restarting the computer to load with the new BENQ monitor ended up with the LCD Monitor showing a blank screen with error:
Out of Range
making the computer completely unusable.
Thanksfully in Windows Safe Mode the monitor was able to display the screen properly, so I had an option to operate somehow on the pc
My guess was that the Out of Range monitor problems were caused by an incorrect (monitor unsupported resolution).
Therefore what I tried as a fix to make it work was:
1. Enter Windows Safe Mode and change (lower the resolution) to 640x480, and restart the PC.
Unfortunately using this classical way to fix such issues failed... so I thought of some options.
2. Disable the video card NVIDIA Riva TNT2 Model 64 driver and check if this will make any difference.
I come up with the idea the Out of Range LCD issues might be caused by the Video card driver cause I've noticed in safe mode a standard VESA like VGA Driver shipped with Windows worked just fine.
To Disable the currently loaded NVIDIA Riva TNT2 Model 64/ Model 64Pro I used:
System -> Device Manager -> Hardware (Tab) -> Display Adapters
Clicking on Display Adapters the NVIDIA Riva TNT2 Model 64 appears using the option menu on it one can choose to disable the driver.
Further on restart Windows, to test if the XP will load properly with disabled NVidia video drivers.
Onwards it was clear the whole Out of Range issues were caused by some kind of conflict between the LCD BENQ FP61E Monitor and the NVIDIA Riva TNT2 Model 64
Often latest video drivers solves hardware incompitability issues and fix many bugs, upgrading the driver to latest is always a good idea.
3. Therefore I Upgraded the NVIDIA Riva TNT2 64 driver (using Safe Mode) to the latest available from Nvidia's official site.
Weirdly Upgrading NVidia Riva TNT2 drivers to the latest did not fix the Out of Range blank screen error.
After a bit of thinking on what to do to make the Monitor work fine with the Nvidia driver, I thought of completely uninstalling the Nvidia drivers and installing them again might be a fix.
In my previous experience with Windows at many occasions, uninstalling a driver failing to properly work and installing it again with a working version was a good fix.
4. Uninstall the NVIDIA Riva TNT2 Model and Install the latest driver.
Uninstalling and Installing the Video driver had to be done in Windows Safe Mode again, in normal mode the windows was not displaying anything.
After The driver installation program completes the installation it requires a restart. After the restart the Video driver gets loaded fine and Windows loaded up in Normal mode as usual ;)
Thu Jan 19 16:52:22 EET 2012
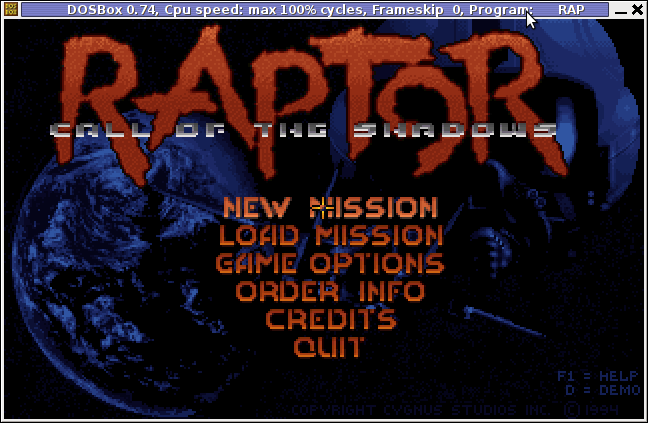
Download and Play Apogee's Raptor (Call of the Shadows) DOS arcade game on GNU / Linux and BSD* with dosbox / Few words on Apogee and Shareware
Since its early days dosbox has elolved a lot. For all those who haven't heard of dosbox, it is x86 Free Software Linux / FreeBSD DOS emulator
DosBox supports, almost all the game classics we used top lay in oldschool times when DOS (Disk Operating System ) version was running on top of most personal computer.
The most spread versions of DOS people used to use on their PCs were Novell (DR-DOS) more rarely used, and MS-DOS (The Microsoft DOS ver.).
I'm sometimes being sentimental about the past so I remembered for Raptor - Call of the Shadows !
Having a bit of experience with DOSBox to run few DOS games I've decided to give a try with dosbox.
First I have to dig for this shareware, since this game is part of the sharewares, nowdays a binary version of it is freely distributed on the net.
Finding the game however took me about 10 minutes, as most of the download links for Raptor, were either dead or required some kind of registration. After a bit of look I found it on an old torrent with few seeders and succeded downloading.
For the convenience of people who would like to download run the Raptor arcade classic game check here
Nicely Raptor works out of the box directly launched with dosbox emulator.
Dosbox has packages for most Linux distributions.
I personally used it on my Debian Linux so installed via apt:
The game works without any dosbox hacks, just download, unarchive and launch with dosbox:
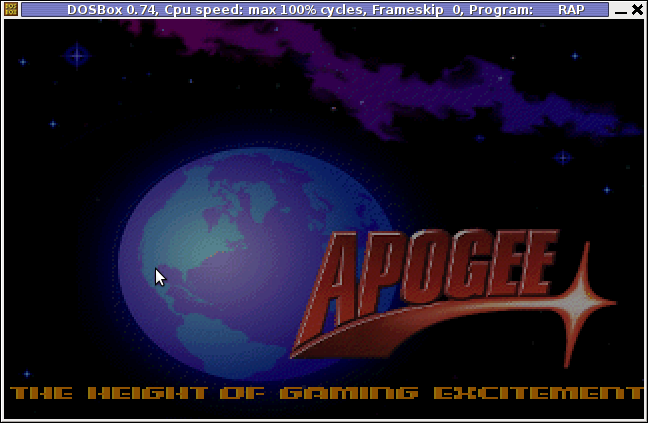
People like me who lived in that glorious times when DOS was a standard for a desktop operating system pretty much like MS Windows is today, certainly remember the awesome games produced by Apogee Software a company later known as 3D Realms
Apogee until this very day remain one of the greatest game creation companies in history of games. 3D Realms played a crucial role in development of PC game industry as well as has a great santimental value to probably million of old school arcade game addicts.
They can be ben undoubtedly can be praised for having created some of the most awesome arcade games for all times.
Some of the early hit games they created you probably know, few of the titles are:
Apogee was also notable for being a company to had established the so spread mostly during the late 80s up to the early years of the second millenium.
ShareWare model of distribution is an interesting phenomenon, that co-relates more or less with the ideas of Free Software.
The idea of ShareWare games was games are distributed for Free and the end customer (gamer) is asked to pay for a game only if he likes it.
Some of the shareware published games was available for free download and play, however the game was only bundled with only a number of game levels to unlock the rest of the game levels you had to play some money.
The shareware games produced were then freely published and shared via dial up access BBS nodes (A text based Bulletin Board System similar to nowdays Forums).
BBS has historically been the major way of sharing knowledge and exchanging ideas and opinions preceding the massive rise of the WEB.
Today most computer users would probably even haven't heard about BBS, if you like to have a general idea on how BBSes seemed to look dahmer.vistech.net .
ShareWare started to loose speed with the decline of BBS and the emergence of Free Software.
Anyways some of the conceptual ideas of ShareWare found its way in "Open Source & Free Software", and commercial companies like RedHat and SuSE
DosBox supports, almost all the game classics we used top lay in oldschool times when DOS (Disk Operating System ) version was running on top of most personal computer.
The most spread versions of DOS people used to use on their PCs were Novell (DR-DOS) more rarely used, and MS-DOS (The Microsoft DOS ver.).
I'm sometimes being sentimental about the past so I remembered for Raptor - Call of the Shadows !
Having a bit of experience with DOSBox to run few DOS games I've decided to give a try with dosbox.
First I have to dig for this shareware, since this game is part of the sharewares, nowdays a binary version of it is freely distributed on the net.
Finding the game however took me about 10 minutes, as most of the download links for Raptor, were either dead or required some kind of registration. After a bit of look I found it on an old torrent with few seeders and succeded downloading.
For the convenience of people who would like to download run the Raptor arcade classic game check here
Nicely Raptor works out of the box directly launched with dosbox emulator.
Dosbox has packages for most Linux distributions.
I personally used it on my Debian Linux so installed via apt:
debian:~# apt-get install dosbox

...
The game works without any dosbox hacks, just download, unarchive and launch with dosbox:
hipo@debian:~$ wget http://pc-freak.net/files/Raptor_Call_of_The_Shadows_Apogee_arcade.tar.gz
...

hipo@debian:~$ tar -zxvf Raptor_Call_of_The_Shadows_Apogee_arcade.tar.gz

...

hipo@debian:~$ cd Raptor/

hipo@debian:/home/hipo/Raptor$ dosbox rap.exe
People like me
who lived in that glorious times when DOS was a standard for a desktop operating system pretty much like MS Windows is today, certainly remember the awesome games produced by Apogee Software a company later known as 3D RealmsApogee until this very day remain one of the greatest game creation companies in history of games. 3D Realms played a crucial role in development of PC game industry as well as has a great santimental value to probably million of old school arcade game addicts.
They can be ben undoubtedly can be praised for having created some of the most awesome arcade games for all times.
Some of the early hit games they created you probably know, few of the titles are:
- Duke Nukem I, II
- Arctic Adventure
- Monster Bash
- Stargunner
- Commander Keen series
- Wolfenstein 3D
- Blake Stone
- Terminal Velocity (Terminal Reality)
- Shadow Warrior
- Death Rally
- Blood
Apogee was also notable for being a company to had established the so spread mostly during the late 80s up to the early years of the second millenium.
ShareWare model of distribution is an interesting phenomenon, that co-relates more or less with the ideas of Free Software.
The idea of ShareWare games was games are distributed for Free and the end customer (gamer) is asked to pay for a game only if he likes it.
Some of the shareware published games was available for free download and play, however the game was only bundled with only a number of game levels to unlock the rest of the game levels you had to play some money.
The shareware games produced were then freely published and shared via dial up access BBS nodes (A text based Bulletin Board System similar to nowdays Forums).
BBS has historically been the major way of sharing knowledge and exchanging ideas and opinions preceding the massive rise of the WEB.
Today most computer users would probably even haven't heard about BBS, if you like to have a general idea on how BBSes seemed to look dahmer.vistech.net .
ShareWare started to loose speed with the decline of BBS and the emergence of Free Software.
Anyways some of the conceptual ideas of ShareWare found its way in "Open Source & Free Software", and commercial companies like RedHat and SuSE
Tue Jan 17 22:43:09 EET 2012
How to install Samsung ML-2010 (ML-2010P) Mono Laser Printer on Xubuntu GNU/Linux
I had to make one old Samsung ML-2010P Laser Printer work on Xubuntu Linux . I've had some issues in installing it, I couldn't fine any step by step tutorial online, on how the printer can be made work fine on Linux. Therefore I took the time to experiment and see if I could make it work. Since the printer is old, not much people are interested any more in making the printer operational on Linux, hence I couldn't find too much relevant posts and sites on the net, anyways thanks God after a bit of pondering I finally succeeded to make the Samsung ML-2010P printer to print on Linux.
This are the exact steps one has to follow to make this old bunch of hardware to play nice on Linux:
1. use lsusb to list the printer model
You see the printer reports as Samsung Electronics Co., Ltd ML-2010P Mono Laser Printer
2. Install cups printing service required packages
3. Install foomatic packages
4. Install hpijs hplip printconfand other packages necesssery for proper printer operation
P.S. Some of the packages I list might already have been installed as a dependency to another package, as I'm writting this article few days after I've succeeded installing the printer, I don't remember the exact install order.
5. Install splix (SPL Driver for Unix)
Here is a quote taken from Spix's project website:
" SpliX is a set of CUPS printer drivers for SPL (Samsung Printer Language) printers.
If you have a such printer, you need to download and use SpliX. Moreover you will find documentation about this proprietary language.
"
For more information on splix, check on Splix SPL driver for UNIX website http://splix.ap2c.org/
You can check on the projects website the Samsung ML 2010 Printer is marked as Working
Next step is to configure the Printer
6. Go to Cups interface on localhost in browser and Add the Samsung printer.
Use Firefox, SeaMonkey or any browser of choice to configure CUPS:
Type in the browser:
Next a password prompt will appear asking for a user/pass. The user/pass you have to use is the same as the password of the user account you're logged on with.
Click on the Add Printer button and choose to add the Samsung ML-2010.
Then restart the CUP Service (cupsd) to make it load the new settings:
Now give the printer a try in printing some page in SeaMonkey, Chrome or Firefox (the quickest way is through pressing CTRL + P )
Following this steps, I've managed to run the printer on Xubuntu Linux, though the same steps if followed should most probably make the Samsnung ML 2010 play nice with other Linux distributions with a little or no adjustments.
I'll be glad to hear if someone succeeded in making the printer work on other distributions, if so please drop me a comment.
That's all folks! Enjoy printing ;)
1. use lsusb to list the printer model
root@linux:~# lsusb |grep -i samsung

Bus 001 Device 003: ID 04e8:326c Samsung Electronics Co., Ltd ML-2010P Mono Laser Printer
You see the printer reports as Samsung Electronics Co., Ltd ML-2010P Mono Laser Printer
2. Install cups printing service required packages
root@linux:~# apt-get install cups cups-bsd cups-client cups-common

root@linux:~# apt-get install cups-driver-gutenprint ghostscript-cups

root@linux:~# apt-get install python-cups python-cupshelpers
3. Install foomatic packages
root@linux:~# apt-get install foomatic-db foomatic-db-engine foomatic-db-gutenprint

root@linux:~# apt-get install foomatic-filters python-foomatic
4. Install hpijs hplip printconfand other packages necesssery for proper printer operation
root@linux:~# apt-get install hpijs hplip hplip-data ijsgutenprint

root@linux:~# apt-get install min12xxw openprinting-pdds printconf foo2zjs
P.S. Some of the packages I list might already have been installed as a dependency to another package, as I'm writting this article few days after I've succeeded installing the printer, I don't remember the exact install order.
5. Install splix (SPL Driver for Unix)
Here is a quote taken from Spix's project website:
" SpliX is a set of CUPS printer drivers for SPL (Samsung Printer Language) printers.
If you have a such printer, you need to download and use SpliX. Moreover you will find documentation about this proprietary language.
"
root@linux:~# apt-get install splix
For more information on splix, check on Splix SPL driver for UNIX website http://splix.ap2c.org/
You can check on the projects website the Samsung ML 2010 Printer is marked as Working
Next step is to configure the Printer
6. Go to Cups interface on localhost in browser and Add the Samsung printer.
Use Firefox, SeaMonkey or any browser of choice to configure CUPS:
Type in the browser:
http://localhost:631
Next a password prompt will appear asking for a user/pass. The user/pass you have to use is the same as the password of the user account you're logged on with.
Click on the Add Printer button and choose to add the Samsung ML-2010.
Then restart the CUP Service (cupsd) to make it load the new settings:
root@linux:~# /etc/init.d/cups restart
Now give the printer a try in printing some page in SeaMonkey, Chrome or Firefox (the quickest way is through pressing CTRL + P )
Following this steps, I've managed to run the printer on Xubuntu Linux, though the same steps if followed should most probably make the Samsnung ML 2010 play nice with other Linux distributions with a little or no adjustments.
I'll be glad to hear if someone succeeded in making the printer work on other distributions, if so please drop me a comment.
That's all folks! Enjoy printing ;)
Tue Jan 17 12:12:52 EET 2012
How to enable VirtualBox Windows XP FullScreen with VboxGuestAdditions.iso on Ubuntu 11.10 Linux
Right after installing Windows XP inside VirtualBox, I've found out everything works fine except the screen. Even though pressing (Right CTRL + F) was changing the Windows XP running window to FullScreen the XP screen was taking only a part of the whole screen area, where almost half of the screen was visible as simply staying blank.
A bit of research and I found the issue is caused by missing VirtualBoxGuestAdditions .
VBoxAdditions is a package which should be installed inside the VirtualBox by navigating to Devices -> Install Guest Additions
Virtualbox offers a download of a VboxGuestAdditions_4.1.2_Ubuntu.iso from url;
http://dlc.sun.edgesuite.net/virtualbox/4.1.2_Ubuntu/VBoxGuestAdditions_4.1.2_Ubuntu.iso, anyways this download fails since the URL is currently unavailable.
To fix this two ways are possible:
1. Download VBoxGuestAdditions.iso from here and put it in directory /usr/share/virtualbox , e.g.:
2. Download and install virtualbox-guest-additions-iso_4.1.2-1_all.deb
Next to enable and install guest additions once again use menus:
Devices -> Install Guest Additions

The screen to appear next will be similar to:
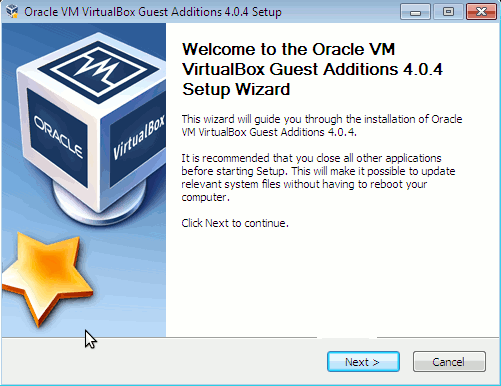
Further on follow the few dialogs to complete the installations and integration of Guest Additions and restart the Virtual machine and hooray the Windows will appear in Full screen in VirtualBox ! ;)
A bit of research and I found the issue is caused by missing VirtualBoxGuestAdditions .
VBoxAdditions is a package which should be installed inside the VirtualBox by navigating to Devices -> Install Guest Additions
Virtualbox offers a download of a VboxGuestAdditions_4.1.2_Ubuntu.iso from url;
http://dlc.sun.edgesuite.net/virtualbox/4.1.2_Ubuntu/VBoxGuestAdditions_4.1.2_Ubuntu.iso, anyways this download fails since the URL is currently unavailable.
To fix this two ways are possible:
1. Download VBoxGuestAdditions.iso from here and put it in directory /usr/share/virtualbox , e.g.:
root@ubuntu:~# cd /usr/share/virtualbox

root@ubuntu:/usr/share/virtualbox# wget http://pc-freak.net/files/VBoxGuestAdditions.iso

...
2. Download and install virtualbox-guest-additions-iso_4.1.2-1_all.deb
root@ubuntu:~# wget http://pc-freak.net/files/virtualbox-guest-additions-iso_4.1.2-1_all.deb

...

root@ubuntu:~# dpkg -i virtualbox-guest-additions-iso_4.1.2-1_all.deb

...
Next to enable and install guest additions once again use menus:
Devices -> Install Guest Additions
The screen to appear next will be similar to:
Further on follow the few dialogs to complete the installations and integration of Guest Additions and restart the Virtual machine and hooray the Windows will appear in Full screen in VirtualBox ! ;)
Mon Jan 16 21:50:45 EET 2012
How to install VirtualBox Virtual Machine for Windows XP on Ubuntu Linux (11.10)
My beloved sister was complaining games were failing to properly be played with wine emulator , therefore I decided to be kind and help her by installing a Windows XP to run inside a Virtual Machine.
My previous install experiments with running MS Windows XP on Linux was on Debian using QEMU virtualmachine emulator.
However as Qemu is a bit less interactive and slower virtualmachine for running Windows (though I prefer it for being completely free software), this time I decided to install the Windows OS with Virtualbox.
My hope was using VirtualBox would be a way easier but I was wrong... I've faced few troubles and I thought many people who initially try to install Virtualbox VM to run Windows on Ubuntu and other Debian based Linux distros will probably experience the same problems as mine, so here is how this article was born.
Here is what I did to have a VirtualBox OS emulator to run Windows XP SP2 on Ubuntu 11.10 Linux
1. Install Virtualbox required packages with apt
If you prefer more GUI or lazy to type commands, the Software Package Manager can also be used to straight install the same packages.
virtualbox-dkms virtualbox-guest-dkms packages are the two which are absolutely necessery in order to enable VirtualBox to support installing Microsoft Windows XP. DKMS modules are also necessery to be able to emulate some other proprietary (non-free) operating systems.
The DKMS packages provide a source for building Vbox guest (OS) additional kernel modules. They also require the kernel source to be install otherwise they fail to compile.
Failing to build the DKMS modules will give you error every time you try to create new VirtualMachine container for installing a fresh Windows XP.
The error happens if the two packages do not properly build the vboxdrv extra Vbox kernel module while the Windows XP installer is loaded from a CD or ISO. The error to pop up is:
Kernel driver not installed (rc=-1908)
The VirtualBox Linux kernel driver (vboxdrv) is either not loaded or there is a permission problem with /dev/vboxdrv. Please reinstall the kernel module by executing
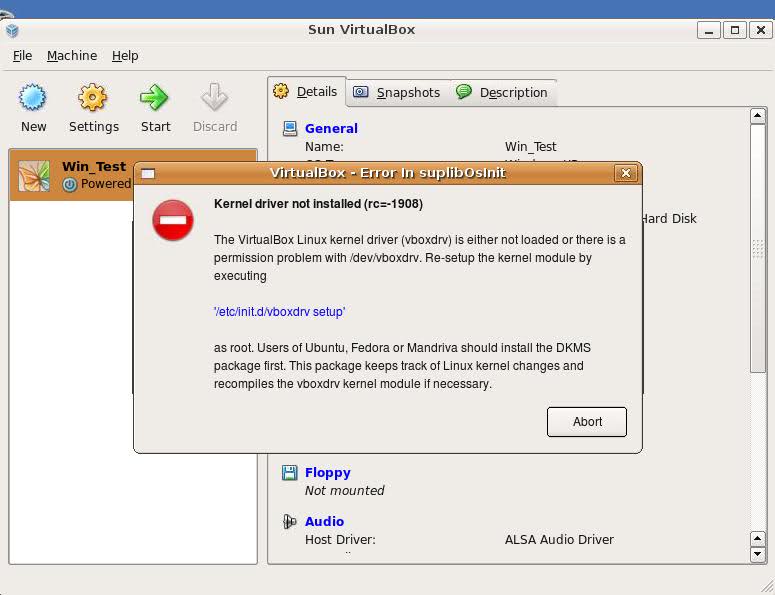
To fix the error:
2. Install latest Kernel source that corresponds to your current kernel version
Next its necessery to rebuild the DKMS modules using dpkg-reconfigure:
3. Rebuild VirtualBox DKMS deb packages
Hopefully the copilation of vboxdrv kernel module should complete succesfully.
To test if all is fine just load the module:
4. Load vboxdrv virtualbox kernel module
If you get some error during loading, this means vboxdrv failed to properly compile, try read thoroughfully what the error is and fix it) ;).
As a next step the vboxdrv has to be set to load on every system boot.
5. Set vboxdrv to load on every Ubuntu boot
I am not sure if this step is required, it could be /etc/init.d/virtualbox init script automatically loads the module, anyways putting it to load on boot would do no harm, so better do it.
That's all now, you can launch VirtualBox and use the New button to initiate a new Virtual Machine, I will skip explaining how to do the configurations for a Windows XP as most of the configurations offered by default would simply work without any tampering.
After booting the Windows XP installer I simply followed the usual steps to install Windows and all went smoothly.
Below you see a screenshot showing the installed Windows XP Virtualbox saved VM session. The screenshot letters are in Bulgarian as my sisters default lanaguage for Ubuntu is bulgarian ;)
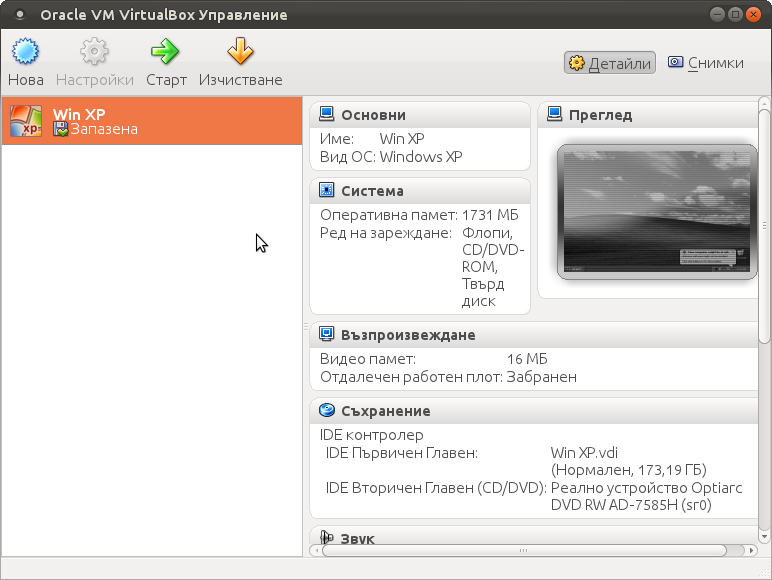
I hope this article helps someone out there. Please drop me a comment if you experience any troubles with it. Cya :)
However as Qemu is a bit less interactive and slower virtualmachine for running Windows (though I prefer it for being completely free software), this time I decided to install the Windows OS with Virtualbox.
My hope was using VirtualBox would be a way easier but I was wrong... I've faced few troubles and I thought many people who initially try to install Virtualbox VM to run Windows on Ubuntu and other Debian based Linux distros will probably experience the same problems as mine, so here is how this article was born.
Here is what I did to have a VirtualBox OS emulator to run Windows XP SP2 on Ubuntu 11.10 Linux
1. Install Virtualbox required packages with apt
root@ubuntu:~# apt-get install virtualbox virtualbox-dkms virtualbox-guest-dkms \

virtualbox-ose-dkms virtualbox-guest-utils virtualbox-guest-x11

...
If you prefer more GUI or lazy to type commands, the Software Package Manager can also be used to straight install the same packages.
virtualbox-dkms virtualbox-guest-dkms packages are the two which are absolutely necessery in order to enable VirtualBox to support installing Microsoft Windows XP. DKMS modules are also necessery to be able to emulate some other proprietary (non-free) operating systems.
The DKMS packages provide a source for building Vbox guest (OS) additional kernel modules. They also require the kernel source to be install otherwise they fail to compile.
Failing to build the DKMS modules will give you error every time you try to create new VirtualMachine container for installing a fresh Windows XP.
The error happens if the two packages do not properly build the vboxdrv extra Vbox kernel module while the Windows XP installer is loaded from a CD or ISO. The error to pop up is:
Kernel driver not installed (rc=-1908)
The VirtualBox Linux kernel driver (vboxdrv) is either not loaded or there is a permission problem with /dev/vboxdrv. Please reinstall the kernel module by executing
To fix the error:
2. Install latest Kernel source that corresponds to your current kernel version
root@ubuntu:~# apt-get install linux-headers-`uname -r`

...
Next its necessery to rebuild the DKMS modules using dpkg-reconfigure:
3. Rebuild VirtualBox DKMS deb packages
root@ubuntu:~# dpkg-reconfigure virtualbox-dkms

...

root@ubuntu:~# dpkg-reconfigure virtualbox-guest-dkms

...

root@ubuntu:~# dpkg-reconfigure virtualbox-ose-dkms

...
Hopefully the copilation of vboxdrv kernel module should complete succesfully.
To test if all is fine just load the module:
4. Load vboxdrv virtualbox kernel module
root@ubuntu:~# modprobe vboxdrv

root@ubuntu:~#
If you get some error during loading, this means vboxdrv failed to properly compile, try read thoroughfully what the error is and fix it) ;).
As a next step the vboxdrv has to be set to load on every system boot.
5. Set vboxdrv to load on every Ubuntu boot
root@ubuntu:~# echo 'vboxdrv' >> /etc/modules
I am not sure if this step is required, it could be /etc/init.d/virtualbox init script automatically loads the module, anyways putting it to load on boot would do no harm, so better do it.
That's all now, you can launch VirtualBox and use the New button to initiate a new Virtual Machine, I will skip explaining how to do the configurations for a Windows XP as most of the configurations offered by default would simply work without any tampering.
After booting the Windows XP installer I simply followed the usual steps to install Windows and all went smoothly.
Below you see a screenshot showing the installed Windows XP Virtualbox saved VM session. The screenshot letters are in Bulgarian as my sisters default lanaguage for Ubuntu is bulgarian ;)
I hope this article helps someone out there. Please drop me a comment if you experience any troubles with it. Cya :)
Mon Jan 16 16:00:30 EET 2012
Can you believe this Animal really exists - OLM !!! ;)

No this is not Aliens, like monster character!
It is a real existing creature that even up to this day lives on earth.

I though OLM is a joke, but actually its real. IT lives in Slovenian Mountain caves ;)

Looking at the Olm one can be stunned on the great diversity of God's creation.
Olm even shines ;)
Mon Jan 16 11:09:11 EET 2012
How to set applications (programs) Autorun on XFCE in Xubuntu Linux
I needed to set TeamViewer to autorun, each and every startup on one Xubuntu Linux
Xubuntu is running by default with Xfce 4 . Xfce is a sort of a very liteweight GNOME like graphical environment.
In Gnome the way that is through invoking the gnome-session-manager .
In Xfce the command is almost analogous doing changes is done by running:
Further on simply use the Add button to add applications to load each time user (opens xfce session) / logs in.
Cheers ;)
Xubuntu is running by default with Xfce 4 . Xfce is a sort of a very liteweight GNOME like graphical environment.
In Gnome the way that is through invoking the gnome-session-manager .
In Xfce the command is almost analogous doing changes is done by running:
user@xubuntu:~$ xfce4-session-manager
Further on simply use the Add button to add applications to load each time user (opens xfce session) / logs in.
Cheers ;)
Sun Jan 15 22:22:42 EET 2012
How to enable Ctrl+Alt+Backspace in Ubuntu 11.10 (Oneiric Ocelot) Linux
My sister, experience some programs running with wine (Windows Emulator) to crash on her Ubuntu 11.10.
As she is quite new with Linux, she has no idea about the existence of CTRL ALT BACKSPACE key combination to restart a hanged GNOME, KDE by directly killing the Xorg server.
I felt obliged to explain her it is better to use CTRL ALT BACKSPACE X kill switch instead of restarting the whole Linux kernel (which basiclly is working) and that it is just the display keeping blacnk.
Pressing the would kill Xorg and therefore all applicatins previously running on top of it will die. In Ubuntu Xorg is configured to run via gdm, so once killed it will automatically reload the GDM (Gnome Display Manager).
I was about to explain her that its better she use CTRL+ALT+BACKSPACE instead of restarting the whole system but suddenly I realized this is not working.
In UBUNTU 11.10 and I guess in all UBUNTU's after 9.04 CTRL ALT BACKSPACE is substituted with the key switch combination ALT PRINTSCREEN K, I've explained her about that.
This change is actually a change implied by most Linux distributions nowdas and is some kind of change in Xorg newer versions...
To enable back the CTRL + ALT + BACKSPACE , I've issued cmd:
An alternative way to set setxkbmap -option terminate:ctrl_alt_bksp to run on Ubuntu user login is by setting it as a startup application using;
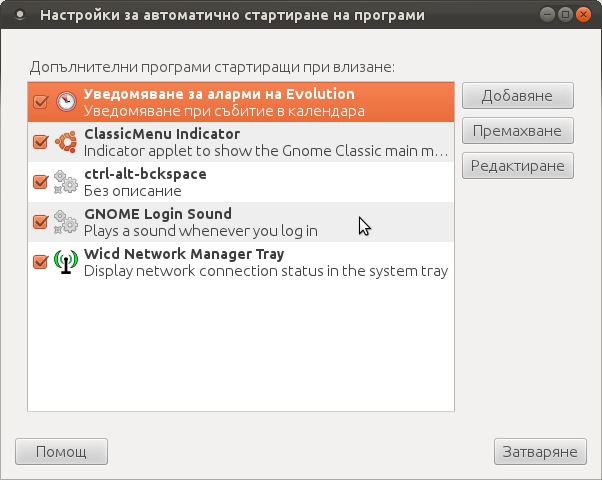
Press the Add button and type in the box to appear;
Reverting the Xserver kill switch back to the classical Ctrl+Alt+Backspace should also be running fine on older Ubuntu Linuces - 11.04, 10.10, 10.04 etc.
As she is quite new with Linux, she has no idea about the existence of CTRL ALT BACKSPACE key combination to restart a hanged GNOME, KDE by directly killing the Xorg server.
I felt obliged to explain her it is better to use CTRL ALT BACKSPACE X kill switch instead of restarting the whole Linux kernel (which basiclly is working) and that it is just the display keeping blacnk.
Pressing the would kill Xorg and therefore all applicatins previously running on top of it will die. In Ubuntu Xorg is configured to run via gdm, so once killed it will automatically reload the GDM (Gnome Display Manager).
I was about to explain her that its better she use CTRL+ALT+BACKSPACE instead of restarting the whole system but suddenly I realized this is not working.
In UBUNTU 11.10 and I guess in all UBUNTU's after 9.04 CTRL ALT BACKSPACE is substituted with the key switch combination ALT PRINTSCREEN K, I've explained her about that.
This change is actually a change implied by most Linux distributions nowdas and is some kind of change in Xorg newer versions...
To enable back the CTRL + ALT + BACKSPACE , I've issued cmd:
stanimira@ubuntu~:$ echo' setxkbmap -option terminate:ctrl_alt_bksp' >> ~/.xinitrc
An alternative way to set setxkbmap -option terminate:ctrl_alt_bksp to run on Ubuntu user login is by setting it as a startup application using;
stanimira@ubuntu:~$ gnome-session-properties
Press the Add button and type in the box to appear;
Name: setxkbmap

Command: setxkbmap -option terminate:ctrl_alt_bksp

Comment: setxkbmap
Reverting the Xserver kill switch back to the classical Ctrl+Alt+Backspace should also be running fine on older Ubuntu Linuces - 11.04, 10.10, 10.04 etc.
Sat Jan 14 19:02:04 EET 2012
How to mount ISO image files in Graphical Environment (GUI) on Ubuntu and Debian GNU/Linux
Mounting ISO files in Linux is easy with mount cmd, however remembering the exact command one has to issue is a hard task because mounting ISO files is not a common task.
Mounting ISO files directly by clicking on the ISO file is very nice, especially for lazy people uninitiated with the command line ;)
Besides that I'm sure many Windows users are curious if there is an equivallent program to DaemonTools for Linux / BSD*?
The answer to this question is YES!
There are two major programs which can be used as a DaemonTools substitute on Linux:
These are FuriousISOMount and AcetoneISO
AcetoneISO is more known and I've used it some long time ago and if I'm correct it used to be one of the first ISO Mount GUI programs for Linux. There is a project called GMount-ISO / (GMountISO) which of the time of writting this article seems to be dead (at least I couldn't find the source code).
Luckily FuriousISOMount and AcetoneISO are pretty easy to install and either one of the two is nowdays existing in most Linux distributions.
Probably the programs can also be easily run on BSD platform also quite easily using bsd linux emulation.
If someone has tried something to mount GUIs in Free/Net/OpenBSD, I'll be interesting to hear how?
1. Mount ISO files GUI in GNOME with Furius ISO Mount
FuriousISOMount is a simple Gtk+ interface to mount -t iso9660 -o loop command.
To start using the program on Debian / Ubuntu install with apt;
...
To access the program in GNOME after install use;
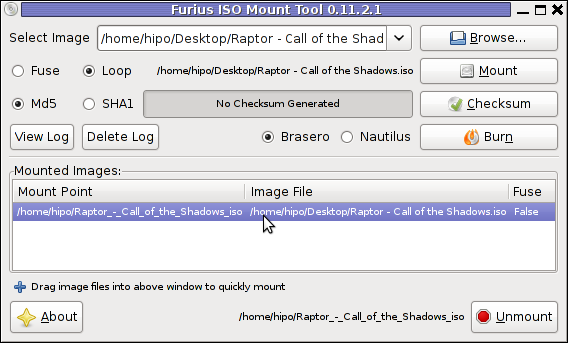
After the program is installed to associate the (.iso) ISO files, to permanently be opened with furiusisomount roll over the .iso file and choose Open With -> Other Application -> (Use a custom command) -> furiusisomount
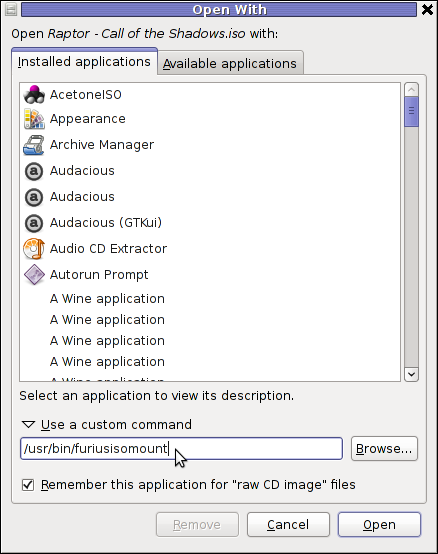
2. Mount ISO Files in KDE Graphical Environment with AcetoneISO
AcetoneISO is build on top of KDE's QT library and isway more feature rich than furiousisomount.
Installing AcetoneISO Ubuntu and Debian is done with:
AcetoneISO supports:
Complete list of the rich functionality AcetoneISO offers is to be found on http://www.acetoneteam.org/viewpage.php?page_id=6
To start the program via the GNOME menus use;
Mounting ISO files directly by clicking on the ISO file is very nice, especially for lazy people uninitiated with the command line ;)
Besides that I'm sure many Windows users are curious if there is an equivallent program to DaemonTools for Linux / BSD*?
The answer to this question is YES!
There are two major programs which can be used as a DaemonTools substitute on Linux:
These are FuriousISOMount and AcetoneISO
AcetoneISO is more known and I've used it some long time ago and if I'm correct it used to be one of the first ISO Mount GUI programs for Linux. There is a project called GMount-ISO / (GMountISO) which of the time of writting this article seems to be dead (at least I couldn't find the source code).
Luckily FuriousISOMount and AcetoneISO are pretty easy to install and either one of the two is nowdays existing in most Linux distributions.
Probably the programs can also be easily run on BSD platform also quite easily using bsd linux emulation.
If someone has tried something to mount GUIs in Free/Net/OpenBSD, I'll be interesting to hear how?
1. Mount ISO files GUI in GNOME with Furius ISO Mount
FuriousISOMount is a simple Gtk+ interface to mount -t iso9660 -o loop command.
To start using the program on Debian / Ubuntu install with apt;
debian:~# apt-get install furiusisomount

The following extra packages will be installed:

  fuseiso fuseiso9660 libumlib0

The following NEW packages will be installed:

    furiusisomount fuseiso fuseiso9660 libumlib0
...
To access the program in GNOME after install use;
Applications -> Accessories -> Furious ISO Mount
After the program is installed to associate the (.iso) ISO files, to permanently be opened with furiusisomount roll over the .iso file and choose Open With -> Other Application -> (Use a custom command) -> furiusisomount
2. Mount ISO Files in KDE Graphical Environment with AcetoneISO
AcetoneISO is build on top of KDE's QT library and isway more feature rich than furiousisomount.
Installing AcetoneISO Ubuntu and Debian is done with:
debian:~# apt-get install acetoneiso

The following NEW packages will be installed:

  acetoneiso gnupg-agent gnupg2 libksba8 pinentry-gtk2 pinentry-qt4

  0 upgraded, 6 newly installed, 0 to remove and 35 not upgraded.

  Need to get 3,963 kB of archives.

  After this operation, 8,974 kB of additional disk space will be used.

...
AcetoneISO supports:
- conversion between different ISO formats
- burn images to disc
- split ISO image volumes
- encrypt images
- extract password protected files
Complete list of the rich functionality AcetoneISO offers is to be found on http://www.acetoneteam.org/viewpage.php?page_id=6
To start the program via the GNOME menus use;
Applications -> Accessories -> Sound & Video -> AcetoneISO

I personally don't like  AcetoneISO  as I'm not a KDE user and I see the functionality this program offers as to rich and mostly unnecessery for the simple purpose of mounting an ISO.


 3. Mount ISO image files using the mount command


If you're a console guy and still prefer mounting ISO with the mount command instead of using fancy gui stuff use:


# mount -t iso9660 -o loop /home/binary/someiso.iso /home/username/Iso_Directory_Name
Fri Jan 13 18:54:10 EET 2012
How to take multiple screenshots with scrot and ImageMagick import commands in terminal on GNU / Linux and FreeBSD
scrot and import are two commands, which can be used to take screenshot in terminal on Linux and FreeBSD:
To use scrot cmd to take screenshots on Ubuntu and Debian the scrot package has to be installed:
scrot should also be available on most other Linux distributions in the main repositories, I'll be glad to hear if someone has used it on Fedora, SUSE etc.
On FreeBSD, there is a port called scrot , to install on FreeBSD:
Scrot has plenty of nice arguments one can use to make a screenshot. Maybe the most handy one in my view is after a preliminary set delay before screenshot is taken.
To take screenshot with it after lets say 5 seconds delay before the screenshot:
To put an year, month and day and year followed by screen resolution with scrot :
Another way to take a screenshot of screen with command is by using ImageMagick's - import image manipulation package.
To take screenshot of the current screen via terminal using import , type in xterm, gnome-termina or Gnome's Run Application (ALT+F2)
To make import command to save the taken screenshot in a format (minute:hour:day:month:year)i :
Taking a delayed screenshot is also possible via The GIMP via menus File -> Create -> Screenshot
Now here is an interesting question, what if I would like to take periodic screenshots of what I do on my Desktop to take random movie scenes from a movie I watch with totem or vlc??
This task is quite easily achiavable with a little bash shell script, I wrote:
This script will take screenshot automatically to Screenshots/ directory every (1 min - 60 seconds)
You can also my downloads take_screenshot_every_60_secs_import.sh here
To use take_screenshot_every_60_secs_import.sh just issue the script inside xterm or gnome-terminal, after that simply use your computer as you normally would.
The script will take snapshots every minute and store all taken screenshots in Screenshots dir.
If you prefer to use scrot to take automatically the screenshots every lets say 5 minutes, you can use a script like:
You can fetch take_screenshot_every_60_secs_scrot.sh here
The script using scrot is better in terms of efficiency, the system load scrot will put on your machine will be less.
Using some of this scripts will be handy if you need screenshots to Movies, Programs and favourite Free Software games.
Hope this is educative to someone ;)
To use scrot cmd to take screenshots on Ubuntu and Debian the scrot package has to be installed:
noah:~# apt-get install scrot

...
scrot should also be available on most other Linux distributions in the main repositories, I'll be glad to hear if someone has used it on Fedora, SUSE etc.
On FreeBSD, there is a port called scrot , to install on FreeBSD:
freebsd# cd /usr/ports/graphics/scrot

freebsd# make install clean

...
Scrot has plenty of nice arguments one can use to make a screenshot. Maybe the most handy one in my view is after a preliminary set delay before screenshot is taken.
To take screenshot with it after lets say 5 seconds delay before the screenshot:
hipo@noah:~/Desktop$ scrot -t 20 -d 5
To put an year, month and day and year followed by screen resolution with scrot :
hipo@noah:~$ scrot '%Y-%m-%d_$wx$h.png'
Another way to take a screenshot of screen with command is by using ImageMagick's - import image manipulation package.
To take screenshot of the current screen via terminal using import , type in xterm, gnome-termina or Gnome's Run Application (ALT+F2)
hipo@noah:~$ import -window root ScreenShot.png
To make import command to save the taken screenshot in a format (minute:hour:day:month:year)i :
hipo@noah:~$ import -window root $screenshot_dir/screenshot-$(date +%M_%k_%d_%m_%Y|sed -e 's/^ *//').png
Taking a delayed screenshot is also possible via The GIMP via menus File -> Create -> Screenshot
Now here is an interesting question, what if I would like to take periodic screenshots of what I do on my Desktop to take random movie scenes from a movie I watch with totem or vlc??
This task is quite easily achiavable with a little bash shell script, I wrote:
screenshot_dir='Screenshots';

seconds='60';

if [ ! -d "$screenshot_dir" ]; then

mkdir $screenshot_dir;

fi

while [ 1 ]; do

sleep $seconds;

(import -window root $screenshot_dir/screenshot-$(date +%M_%k_%d_%m_%Y|sed -e 's/^ *//').png) &

done
This script will take screenshot automatically to Screenshots/ directory every (1 min - 60 seconds)
You can also my downloads take_screenshot_every_60_secs_import.sh here
To use take_screenshot_every_60_secs_import.sh just issue the script inside xterm or gnome-terminal, after that simply use your computer as you normally would.
The script will take snapshots every minute and store all taken screenshots in Screenshots dir.
If you prefer to use scrot to take automatically the screenshots every lets say 5 minutes, you can use a script like:
screenshot_dir='Screenshots';

# 300 secs (5 mins)
seconds='300';

if [ ! -d "$screenshot_dir" ]; then

mkdir $screenshot_dir;

fi

while [ 1 ]; do

sleep $seconds;

(scrot $screenshot_dir/'%Y-%m-%d_$wx$h.png') &

done
You can fetch take_screenshot_every_60_secs_scrot.sh here
The script using scrot is better in terms of efficiency, the system load scrot will put on your machine will be less.
Using some of this scripts will be handy if you need screenshots to Movies, Programs and favourite Free Software games.
Hope this is educative to someone ;)
Thu Jan 12 19:05:09 EET 2012
The Legend of the Christmas Tree and Why do we put Christmas trees at home in Christmas time? :)
in Christmas? 

Christmas has just passed away. As a Christian I was curious what is the reason in so many Christian countries, we decorate Pine trees and I did a quick research on the topic. In this small article, I'll present my findings:
Observing the Christmas Pine Tree tradition has been quite ancient and probably according to many sources dates back to the XIIth century.
The first written records of a Christmas tree are of an anonymous Frenchman who visited Strasbourg, Germany in 1601. His description of the decoratd pine tree says like "wafers and golden sugar-twists (Barley sugar), roses cut out of many-colored paper, apples, gold foil and sweets."
Later in the 1800s, the local German Christmas pine tree tradition was spread across America by German emmigrants.
In UK the Pine tree decorating tradition appeard in 1841, where a royalty (Prince Albert) decorated his castle (Winston Castle). A little later after the Queen Victoria adopted the pine tree, United Kingdom citizens started to decorate pine trees for themselves, folliwng the highly regarded Queen.
Usually the pine tree has historically been decorated with gifts as well as an Bright star is put atop.
The meaning behind this is absolutely symbolic.
One of the Christian interpretations for the Christmas tree is that it represents the same Cross (tree) on which Christ was crucifixed.
Then after Christ's resurrection because of (or through that) tree the humanity received by the Lord big spiritual blessings, the gifts decorating the Fir point to that, where the tree itself is a symbol of Salvation that came from the Cross.
The Fir is decorated with lights to represent the joy and the lights of Christmas, the star atop the tree is a reminder of the Star that rised in the East during the night of Christ's birth as we read in the gospels.
Decorating Pine trees is commonly observed mostly in Roman Catholic Church and often followed by some protestant denominations and less used in Orthodox Church (though this is changing nowdays).
In Eastern Europe, the Christmas tree appeared quite late and the whole concept was unknown in the Orthodox Christian countries, just until the end of the 19th century.
With the recent globalization the tree was silenty adopted in almost all parts in the world, including even communist countries and even sometimes in muslim ones.

Unfortunately, the relation between the Fir tree and our Christian faith is little known today and with the years to come it will be less and less associated with Christianity.
Here are few interesting legends which I found explaining, some of the possible roots of the Christmas tree decoration:
1. Legend of the Pine Tree Saving the Holy Family
When the Holy family was pursued by Herod's soldiers, many plants offered to provide them with shelter.
One such plant was the Pine tree. With Mary too weary to travel any longer, the family stopped at the edge of a forest to rest.
A gnarled old Pine which had grown hollow with the years invited them to rest within its trunk.
Then, it closed its branches down upon them, keeping the family safe until the soldiers had passed.
Upon leaving, the Christ Child blessed the Pine and the imprint of his tiny hand was left forever in the tree's fruit... the Pine cone.
If a cone is cut lengthwise, the hand may still be seen.
2. Pine tree and Easter Legend

There is a legend that pine trees "know" when it's Easter.
The pine trees start their new growth in the weeks before Easter.
If you look at the tops of the pine trees two weeks before Easter you'll see the yellow shoots.
As the days get closer to Easter Sunday, the tallest shoot will branch off and form a cross.
By the time Easter Sunday comes around, you will see that most of the pine trees will have small yellow crosses on all of the tallest shoots.
This really happens we live where there are lots of pines,
and each year this actually happens, it is amazing to watch,
and the process of the new growth appears as crosses on the ends
of each branch.
I've not personally observed that, but according to people who live in pine tree forest areas this is a fact.
3. Legend about M. Luther and the Pine tree
Martin Luther, founder of the Protestant religion, was taking a stroll through the woods late one night.
The sky was clear and many stars were shining through the branches of the trees,
giving the impression of twinkling lights.
Luther was so captivated and inspired by the beautiful brilliance of the sight
that he cut down a small evergreen and brought it home.
He recreated the stars by placing candles upon the tree's branches to imitate
their radiance and presented it to his children.
This story explains why, the pine tree become so wide spread initially in the "western world", as it gives some connection between the Pine tree and Protestant Christianity.
4. The Children Legend of the Fir Tree (Kids Story)
On the night of the Christ Child's birth, all living creatures, both flora and fauna, traveled to Bethlehem bearing gifts.
The Olive tree, for example, brought its fruit and the Palm tree its dates.
But the little Fir tree had no gift and was so tired that it was unable to resist when the larger trees pushed it into the background and hid it from view.
But then, a nearby Angel took pity and commanded a cluster of stars to descend and rest upon its delicate boughs.
When the Baby Jesus beheld this lovely lighted tree, he smiled and blessed it,
declaring henceforth that Fir trees should always be filled with lights at
Christmastime to please little children.
When Christianity first came to Northern Europe, three personages representing
virtues were dispatched from Heaven to place lights on the original Christmas tree.
These personages were Faith, Hope and Charity.
Their search was long, since they were required to find a tree as high as hope, as great as love and as sweet as charity.
In addition, the tree had to bear the sign of the cross on every bough.
Their search finally ended in the forests of the North where they found the Fir.
Lit by the radiance of the stars, it became the first Christmas tree.
The triangular design of the Fir has also been usedto describe the Holy Trinity of God the Father, The Son and The Holy Spirit.
Eventually, converts began to revere the Fir as God's Tree...as they had once revered the Oak.
By the Twelfth Century it was being hung, upside-down, from ceilings at Christmastime
in Central Europe, as a symbol of Christianity.
5. The Paradise Tree Legend
A very old and delightful European custom centers around decorating a Fir tree with apples and small white wafers which represents the Holy Eucharist.
These wafers were later replaced by small pieces of pastry cut into the shapes of stars, angels, hearts, flowers and bells.
Eventually additional pastries were introduced bearing the shapes of men, birds, roosters and other animals.
During the middle Ages, around the Eleventh century, religious theater was born.
One of the most popular plays ...
The German mystery play concerned Adam and Eve and their fall and expulsion from the Garden of Eden, represented by a Fir tree hung with apples.
This tree was symbolic of both the Tree of Life and the Tree of Discernment of Good and Evil, which stood in the center of Paradise.
The play ended with the prophecy of a coming Saviour. For this reason, it was often enacted during Advent.
The one piece of scenery, the "Paradeisbaum" or "Paradise Tree" become a popular object and was often set up in churches.
Eventually it also found its way in private homes and became symbol of the Saviour.
Since the tree was representative not only to Paradise and the fall of man, but also the premise of salvation.
It was hung not merely with apples, but with bread of wafers (Holy Eucharist) and often sweet to represent the sweetness of redemption.
In some areas of Bavaria, fir branches and little trees decorated with lights, apples and tinsel are still called "Paradeis".
According to some other Christian legends, it was a Fir tree that grew as the Tree of Life in the Garden of Eden.
When Eve plucked its fruit, the foliage and flowers shrank to nothing but needles.
Only on the night of Nativity would the Fir tree bloom again a moment marked perhaps by the Christmas tree we Christians use.
Of course these are just legends and as with every legend there is plenty of romantism included.
Nevertheless I consider most legends similar to proverbs contain deep truth and contain truthful facts. Moreover knowing the legends of our forefathers connect us to who and what we are and from antropological point of view is precious knowledge, we should try to sustain and spread to our children.
Christmas has just passed away. As a Christian I was curious what is the reason in so many Christian countries, we decorate Pine trees and I did a quick research on the topic. In this small article, I'll present my findings:
Observing the Christmas Pine Tree tradition has been quite ancient and probably according to many sources dates back to the XIIth century.
The first written records of a Christmas tree are of an anonymous Frenchman who visited Strasbourg, Germany in 1601. His description of the decoratd pine tree says like "wafers and golden sugar-twists (Barley sugar), roses cut out of many-colored paper, apples, gold foil and sweets."
Later in the 1800s, the local German Christmas pine tree tradition was spread across America by German emmigrants.
In UK the Pine tree decorating tradition appeard in 1841, where a royalty (Prince Albert) decorated his castle (Winston Castle). A little later after the Queen Victoria adopted the pine tree, United Kingdom citizens started to decorate pine trees for themselves, folliwng the highly regarded Queen.
Usually the pine tree has historically been decorated with gifts as well as an Bright star is put atop.
The meaning behind this is absolutely symbolic.
One of the Christian interpretations for the Christmas tree is that it represents the same Cross (tree) on which Christ was crucifixed.
Then after Christ's resurrection because of (or through that) tree the humanity received by the Lord big spiritual blessings, the gifts decorating the Fir point to that, where the tree itself is a symbol of Salvation that came from the Cross.
The Fir is decorated with lights to represent the joy and the lights of Christmas, the star atop the tree is a reminder of the Star that rised in the East during the night of Christ's birth as we read in the gospels.
Decorating Pine trees is commonly observed mostly in Roman Catholic Church and often followed by some protestant denominations and less used in Orthodox Church (though this is changing nowdays).
In Eastern Europe, the Christmas tree appeared quite late and the whole concept was unknown in the Orthodox Christian countries, just until the end of the 19th century.
With the recent globalization the tree was silenty adopted in almost all parts in the world, including even communist countries and even sometimes in muslim ones.
Unfortunately, the relation between the Fir tree and our Christian faith is little known today and with the years to come it will be less and less associated with Christianity.
Here are few interesting legends which I found explaining, some of the possible roots of the Christmas tree decoration:
1. Legend of the Pine Tree Saving the Holy Family
When the Holy family was pursued by Herod's soldiers, many plants offered to provide them with shelter.
One such plant was the Pine tree. With Mary too weary to travel any longer, the family stopped at the edge of a forest to rest.
A gnarled old Pine which had grown hollow with the years invited them to rest within its trunk.
Then, it closed its branches down upon them, keeping the family safe until the soldiers had passed.
Upon leaving, the Christ Child blessed the Pine and the imprint of his tiny hand was left forever in the tree's fruit... the Pine cone.
If a cone is cut lengthwise, the hand may still be seen.
2. Pine tree and Easter Legend
There is a legend that pine trees "know" when it's Easter.
The pine trees start their new growth in the weeks before Easter.
If you look at the tops of the pine trees two weeks before Easter you'll see the yellow shoots.
As the days get closer to Easter Sunday, the tallest shoot will branch off and form a cross.
By the time Easter Sunday comes around, you will see that most of the pine trees will have small yellow crosses on all of the tallest shoots.
This really happens we live where there are lots of pines,
and each year this actually happens, it is amazing to watch,
and the process of the new growth appears as crosses on the ends
of each branch.
I've not personally observed that, but according to people who live in pine tree forest areas this is a fact.
3. Legend about M. Luther and the Pine tree
Martin Luther, founder of the Protestant religion, was taking a stroll through the woods late one night.
The sky was clear and many stars were shining through the branches of the trees,
giving the impression of twinkling lights.
Luther was so captivated and inspired by the beautiful brilliance of the sight
that he cut down a small evergreen and brought it home.
He recreated the stars by placing candles upon the tree's branches to imitate
their radiance and presented it to his children.
This story explains why, the pine tree become so wide spread initially in the "western world", as it gives some connection between the Pine tree and Protestant Christianity.
4. The Children Legend of the Fir Tree (Kids Story)
On the night of the Christ Child's birth, all living creatures, both flora and fauna, traveled to Bethlehem bearing gifts.
The Olive tree, for example, brought its fruit and the Palm tree its dates.
But the little Fir tree had no gift and was so tired that it was unable to resist when the larger trees pushed it into the background and hid it from view.
But then, a nearby Angel took pity and commanded a cluster of stars to descend and rest upon its delicate boughs.
When the Baby Jesus beheld this lovely lighted tree, he smiled and blessed it,
declaring henceforth that Fir trees should always be filled with lights at
Christmastime to please little children.
When Christianity first came to Northern Europe, three personages representing
virtues were dispatched from Heaven to place lights on the original Christmas tree.
These personages were Faith, Hope and Charity.
Their search was long, since they were required to find a tree as high as hope, as great as love and as sweet as charity.
In addition, the tree had to bear the sign of the cross on every bough.
Their search finally ended in the forests of the North where they found the Fir.
Lit by the radiance of the stars, it became the first Christmas tree.
The triangular design of the Fir has also been usedto describe the Holy Trinity of God the Father, The Son and The Holy Spirit.
Eventually, converts began to revere the Fir as God's Tree...as they had once revered the Oak.
By the Twelfth Century it was being hung, upside-down, from ceilings at Christmastime
in Central Europe, as a symbol of Christianity.
5. The Paradise Tree Legend
A very old and delightful European custom centers around decorating a Fir tree with apples and small white wafers which represents the Holy Eucharist.
These wafers were later replaced by small pieces of pastry cut into the shapes of stars, angels, hearts, flowers and bells.
Eventually additional pastries were introduced bearing the shapes of men, birds, roosters and other animals.
During the middle Ages, around the Eleventh century, religious theater was born.
One of the most popular plays ...
The German mystery play concerned Adam and Eve and their fall and expulsion from the Garden of Eden, represented by a Fir tree hung with apples.
This tree was symbolic of both the Tree of Life and the Tree of Discernment of Good and Evil, which stood in the center of Paradise.
The play ended with the prophecy of a coming Saviour. For this reason, it was often enacted during Advent.
The one piece of scenery, the "Paradeisbaum" or "Paradise Tree" become a popular object and was often set up in churches.
Eventually it also found its way in private homes and became symbol of the Saviour.
Since the tree was representative not only to Paradise and the fall of man, but also the premise of salvation.
It was hung not merely with apples, but with bread of wafers (Holy Eucharist) and often sweet to represent the sweetness of redemption.
In some areas of Bavaria, fir branches and little trees decorated with lights, apples and tinsel are still called "Paradeis".
According to some other Christian legends, it was a Fir tree that grew as the Tree of Life in the Garden of Eden.
When Eve plucked its fruit, the foliage and flowers shrank to nothing but needles.
Only on the night of Nativity would the Fir tree bloom again a moment marked perhaps by the Christmas tree we Christians use.
Of course these are just legends and as with every legend there is plenty of romantism included.
Nevertheless I consider most legends similar to proverbs contain deep truth and contain truthful facts. Moreover knowing the legends of our forefathers connect us to who and what we are and from antropological point of view is precious knowledge, we should try to sustain and spread to our children.
Wed Jan 11 18:18:20 EET 2012
How to solve ALSA sound problems with old Linux programs and games depending on (OSS)'s /dev/dsp / fix wine games and pulseaudio problems - My few thoughts on OSS and ALSA
I remember GNU / Linux, 11 years from now, times when ALSA was not standardly shipped with Linux.
Back then ALSA still lacked good support for many SoundCards and was still a "baby project".
In that time what we used to have sound on Linux was OSS - Open Sound System. OSS emerged right after the first ever Linux sound system VoxWare (formerly known as the Linux Sound Driver).
Back in those days OSS was used for multimedia support on both GNU / Linux and BSD based free OSes. It was few years later when I heard and used ALSA for a fist time and it wasn't really a love from first sigth.
One can easily find out by the name ALSA it is a system especially built for the Linux kernel and that's one of the reasosn why *BSD systems has their custom separate sound system.
There is plenty of reasons why OSS was substituted with ALSA. Main reason was its commercial like license, OSS wasn't completely "open source" GPLed (free software), there was resctions on use of OSS for commercial goals.
With its emerge ALSA started to push away OSS slowly. Somewhere in 2003, alsa has officially entered the Linux kernel source and until 2005 it was the default standard for all GNU / Linux operating systems.
As of time of writting ALSA has become the only sound system to have support for multiple sound card devices for Linux.
My experiences with ALSA, however ain't so nice if I take a look in my past experiences.
Since the very beginning of using ALSA, I had plenty of troubles with configuring properly my sound card not to mention, even after configuring it the MIDI support was not there.
Besides all the troubles main problems were stemming from the many applications still written to use OSS as sound system and hence with those sound was impossible with ALSA. The most problematic thing about apps written with OSS in mind was all of them tried to stream sound via /dev/dsp (OSS Digital Sound Processor), since alsa did not used /dev/dsp those programs was soundless.
On the other hand OSS was creating issues as well, one severe problem with OSS was the inability to stream multiple sounds simultaneously, because each sound stream required to pass voice through /dev/dsp and usually there was only one /dev/dsp.
The message;
/dev/dsp: Device or resource busy
and the proceeding irritation that used to annoy us in the early GNU / Linux days had of course some raw workarounds hacks but generally the workaround did not fix problems always.
Introduction of alsa free us from /dev/dsp issues but on the other handy has created a whole ocean of new BIG problems ...
ALSA has modular structure and this imposes a great problem nowdays. The modular architecture is generally a good idea, however the way this was implemented within ALSA is far away from clear and easy to understand by the end user and therefore makes it very unintuitive and obscure.
Alsa misses simplicity which somehow was partially in the days of OSS. Thinking over the general situation with Linux multimedia nowdays, I believe it was exactly ALSA Project responsible for the so delayed mass Desktop Linux adoption.
Many long year standing Linux users had certainly had the alsa troubles during new system installs (correct me if I'm wrong).
The only fix to multiple soundcard initialization problems was to download alsa source and compile from source and hence made it hard and discouraging for people giving Linux a try.
This kind of ALSA "brokenness" pattern continues even to this very day (in Debian) Linux and probably building the alsa system from source is among the good practices to have a functional Linux sound system...
With all said the historic reason why ALSA was not quickly adopted and still is not a preferred default system for many applications ported to Free Software OSes by commercial company vendors is clear. Its simply not working out of the box ...
Hope some ALSA developers will read this post work on changing the crazy structure of ALSA over complexity. ALSA needs automate way to solve issues with itself, the configuration should be more trivial and unified if Linux has to become more attractive for Desktop adoption.
Anyways, after the few words of history and indicating my pesonal observations on ALSA. I will proceed and explain few things on how ALSA can be configured to support and play nice with OSS dependant programs as well some basic explanations on common incompatibility between esd and pulseaudio and how this can be fixed;.
To assure nowdays OSS API built programs and games would work with Alsa its necessery to have installed;
ALSA wrapper for OSS applications
On Debian, Ubuntu, Fedora and most Linux distributions the Alsa OSS compatability layer comes under a (deb / rpm) package named alsa-oss
To install OSS compatability on Debian, Ubuntu and the like Debian based distributions issue:
On Fedora and other rpm based distributions install is with:
[root@fedora ~]# yum install alsa-oss alsaplayer-oss
...
alsa-oss provides with a command called aoss that should be used to work around some issues with old applications still depending on OSS:
Using aoss is helpful especially in situations if you have to run programs which deal with MIDI and others which somehow want to use /dev/dsp
There is also alternative way to enable alsa native support for MIDI and OSS by loading 3 kernel modules:
Note! The three modules has to be separately build using kernel source at most cases and does not come with most Linux distributions, so on many installations (including my current), they will be missing. If for you they load properly or you have customly build them add them also to load on system boot, like so:
The Linux sound situation becomes even more messy when ESD enters the scene. Many of the novice new Linux users certainly don't remember (Enlightened Sound Daemon) . ESD historically preceded PulseAudio . Hence it will be good to mention ESD was used for few years in GNOME and in around 2006-2007 it was substituted by PulseAudio.
Many applications, however who was ported or written for Linux especially (the proprietary ported ones) was already built to work with ESD and even though newer GNOME releases was fully using pulseaudio, this (non free software apps and games) were still depending on ESD.
The situation was partially fixed by creation of module for pulseaudio which added emulation support for esd . This was done by a module library for pulseaudio called libprotocol-esound.so
The package for almost all Linux distributions which does the esd emulation via pulse is pulseaudio-esound-compat . In latest Fedora Linux pulseaudio-esound-compat is installed by default.
In Debian and other Linux distributions it might need to be installed via apt with;
pulseaudio-esound-compat solves some of the ESD app incompability but not always ...
Handy tool also worthy to mention in solving PulseAudio, OSS incompatibility issues is padsp
padsp is helpful in solving obsolete issues with OSS applications (trying to access /dev/dsp) and therefore unable to communicate with Pulseaudio
padsp - is a PulseAudio OSS Wrapper.
An example where padsp is helpful is in case of /dev/dsp errors like:
Another common problem with sound on Linux is when running windows applications (running windows games with wine).
Quite often sound fails to work since wine tries to directly communicate with alsa and fails because alsa sound channel is taken by pulseaudio.
To workaround wine issues with pulseaudio, one of the solutions is to temporary stop pulseaudio, before running the wine emulated application:
Later on when the windows wine emulation is completed, pulseaudio has to be started once again in order to make Pulseaudio applications produce sound again, e.g. one has to issue:
This script was reported by many people as fix to problems with wine games failing to play sounds and music, anyhow I personally prefer using the stop / start pulseaudio method.
I just hope one days this (OSS, ALSA, esd, Pulseaudio) mess will be over! In the mean time I hope my suggested work arounds helps someone. If someone has a better more unified script or solution please share in comments
Back then ALSA still lacked good support for many SoundCards and was still a "baby project".
In that time what we used to have sound on Linux was OSS - Open Sound System. OSS emerged right after the first ever Linux sound system VoxWare (formerly known as the Linux Sound Driver).
Back in those days OSS was used for multimedia support on both GNU / Linux and BSD based free OSes. It was few years later when I heard and used ALSA for a fist time and it wasn't really a love from first sigth.
One can easily find out by the name ALSA it is a system especially built for the Linux kernel and that's one of the reasosn why *BSD systems has their custom separate sound system.
There is plenty of reasons why OSS was substituted with ALSA. Main reason was its commercial like license, OSS wasn't completely "open source" GPLed (free software), there was resctions on use of OSS for commercial goals.
With its emerge ALSA started to push away OSS slowly. Somewhere in 2003, alsa has officially entered the Linux kernel source and until 2005 it was the default standard for all GNU / Linux operating systems.
As of time of writting ALSA has become the only sound system to have support for multiple sound card devices for Linux.
My experiences with ALSA, however ain't so nice if I take a look in my past experiences.
Since the very beginning of using ALSA, I had plenty of troubles with configuring properly my sound card not to mention, even after configuring it the MIDI support was not there.
Besides all the troubles main problems were stemming from the many applications still written to use OSS as sound system and hence with those sound was impossible with ALSA. The most problematic thing about apps written with OSS in mind was all of them tried to stream sound via /dev/dsp (OSS Digital Sound Processor), since alsa did not used /dev/dsp those programs was soundless.
On the other hand OSS was creating issues as well, one severe problem with OSS was the inability to stream multiple sounds simultaneously, because each sound stream required to pass voice through /dev/dsp and usually there was only one /dev/dsp.
The message;
/dev/dsp: Device or resource busy
and the proceeding irritation that used to annoy us in the early GNU / Linux days had of course some raw workarounds hacks but generally the workaround did not fix problems always.
Introduction of alsa free us from /dev/dsp issues but on the other handy has created a whole ocean of new BIG problems ...
ALSA has modular structure and this imposes a great problem nowdays. The modular architecture is generally a good idea, however the way this was implemented within ALSA is far away from clear and easy to understand by the end user and therefore makes it very unintuitive and obscure.
Alsa misses simplicity which somehow was partially in the days of OSS. Thinking over the general situation with Linux multimedia nowdays, I believe it was exactly ALSA Project responsible for the so delayed mass Desktop Linux adoption.
Many long year standing Linux users had certainly had the alsa troubles during new system installs (correct me if I'm wrong).
The only fix to multiple soundcard initialization problems was to download alsa source and compile from source and hence made it hard and discouraging for people giving Linux a try.
This kind of ALSA "brokenness" pattern continues even to this very day (in Debian) Linux and probably building the alsa system from source is among the good practices to have a functional Linux sound system...
With all said the historic reason why ALSA was not quickly adopted and still is not a preferred default system for many applications ported to Free Software OSes by commercial company vendors is clear. Its simply not working out of the box ...
Hope some ALSA developers will read this post work on changing the crazy structure of ALSA over complexity. ALSA needs automate way to solve issues with itself, the configuration should be more trivial and unified if Linux has to become more attractive for Desktop adoption.
Anyways, after the few words of history and indicating my pesonal observations on ALSA. I will proceed and explain few things on how ALSA can be configured to support and play nice with OSS dependant programs as well some basic explanations on common incompatibility between esd and pulseaudio and how this can be fixed;.
To assure nowdays OSS API built programs and games would work with Alsa its necessery to have installed;
ALSA wrapper for OSS applications
On Debian, Ubuntu, Fedora and most Linux distributions the Alsa OSS compatability layer comes under a (deb / rpm) package named alsa-oss
To install OSS compatability on Debian, Ubuntu and the like Debian based distributions issue:
debian:~# apt-get install alsa-oss alsaplayer-oss

...
On Fedora and other rpm based distributions install is with:
[root@fedora ~]# yum install alsa-oss alsaplayer-oss
...
alsa-oss provides with a command called aoss that should be used to work around some issues with old applications still depending on OSS:
hipo@debian:~$ aoss programName
Using aoss is helpful especially in situations if you have to run programs which deal with MIDI and others which somehow want to use /dev/dsp
There is also alternative way to enable alsa native support for MIDI and OSS by loading 3 kernel modules:
debian:~# modprobe snd-seq-oss

debian:~# modprobe snd-pcm-oss

debian:~# modprobe snd-mixer-oss
Note! The three modules has to be separately build using kernel source at most cases and does not come with most Linux distributions, so on many installations (including my current), they will be missing. If for you they load properly or you have customly build them add them also to load on system boot, like so:
echo 'snd-seq-oss' >> /etc/modules

echo 'snd-pcm-oss' >> /etc/modules

echo 'snd-mixer-oss' >> /etc/modules
The Linux sound situation becomes even more messy when ESD enters the scene. Many of the novice new Linux users certainly don't remember (Enlightened Sound Daemon) . ESD historically preceded PulseAudio . Hence it will be good to mention ESD was used for few years in GNOME and in around 2006-2007 it was substituted by PulseAudio.
Many applications, however who was ported or written for Linux especially (the proprietary ported ones) was already built to work with ESD and even though newer GNOME releases was fully using pulseaudio, this (non free software apps and games) were still depending on ESD.
The situation was partially fixed by creation of module for pulseaudio which added emulation support for esd . This was done by a module library for pulseaudio called libprotocol-esound.so
The package for almost all Linux distributions which does the esd emulation via pulse is pulseaudio-esound-compat . In latest Fedora Linux pulseaudio-esound-compat is installed by default.
In Debian and other Linux distributions it might need to be installed via apt with;
debian:~# apt-get install pulseaudio-esound-compat

...
pulseaudio-esound-compat solves some of the ESD app incompability but not always ...
Handy tool also worthy to mention in solving PulseAudio, OSS incompatibility issues is padsp
padsp is helpful in solving obsolete issues with OSS applications (trying to access /dev/dsp) and therefore unable to communicate with Pulseaudio
padsp - is a PulseAudio OSS Wrapper.
An example where padsp is helpful is in case of /dev/dsp errors like:
/dev/dsp: Device or resource busy

Could not open /dev/dsp
Another common problem with sound on Linux is when running windows applications (running windows games with wine).
Quite often sound fails to work since wine tries to directly communicate with alsa and fails because alsa sound channel is taken by pulseaudio.
To workaround wine issues with pulseaudio, one of the solutions is to temporary stop pulseaudio, before running the wine emulated application:
hipo@debian:~$ pulseaudio --kill
Later on when the windows wine emulation is completed, pulseaudio has to be started once again in order to make Pulseaudio applications produce sound again, e.g. one has to issue:
hipo@debian:~$ pulseaudio --start
Alternative way to workaround wine sound issues is by using a script to kill pulseaudio every second. Here is fix_pulseaudio_wine_sound_probs.sh scriptThis script was reported by many people as fix to problems with wine games failing to play sounds and music, anyhow I personally prefer using the stop / start pulseaudio method.
I just hope one days this (OSS, ALSA, esd, Pulseaudio) mess will be over! In the mean time I hope my suggested work arounds helps someone. If someone has a better more unified script or solution please share in comments
Wed Jan 11 12:31:56 EET 2012
Solve ALSA audio and mic issues on Lenovo Thinkpads on Debian and Ubuntu Linux
Since I've blogged about my recent skype issues. I've played a lot with pulseaudio, alsa, alsa-oss to experimented a lot until I figured out why Skype was failing to properly delivery sound and record via my embedded laptop mic.
Anyways, while researching on the cause of my Thinkpad r61 mic issues, I've red a bunch of blog posts by people experiencing microphone oddities with Lenovo Thinkpads
Throughout the search I come across one very good article, which explained that in many cases the Thinkpad sound problems are caused by the snd-hda-intel alsa kernel module. snd-hda-intel fails to automatically set proper sb model type argument during Linux install when the soundcard is initialized with some argument like options snd-hda-intel model=auto
Hence, the suggested fix which should resolve this on many Thinkpad notebooks is up to passing the right module argument:
To fix its neceessery to edit /etc/modprobe.d/alsa-base.conf .
Find the line in the file starting with:
options snd-hda-intel model=
and substitute with:
options snd-hda-intel model=thinkpad
Finally a restart of Advaned Linux Sound Architecture (alsa) is required:
At most cases just restarting the alsa via its init script is not enough, since the ssnd-hda-intel kernel module is already in use by some program or something, so its best to do a reboot to make sure the module is loaded with the neew model=thinkpad argument.
My exact laptop exact sound card model is:
After changing the module and using alsamixer and aumix to make sure mic is unmuted and its volume is high enough, mic sound rec works fine.
Anyways, while researching on the cause of my Thinkpad r61 mic issues, I've red a bunch of blog posts by people experiencing microphone oddities with Lenovo Thinkpads
Throughout the search I come across one very good article, which explained that in many cases the Thinkpad sound problems are caused by the snd-hda-intel alsa kernel module. snd-hda-intel fails to automatically set proper sb model type argument during Linux install when the soundcard is initialized with some argument like options snd-hda-intel model=auto
Hence, the suggested fix which should resolve this on many Thinkpad notebooks is up to passing the right module argument:
To fix its neceessery to edit /etc/modprobe.d/alsa-base.conf .
debian:~# vim /etc/modprobe.d/alsa-base.conf
Find the line in the file starting with:
options snd-hda-intel model=
and substitute with:
options snd-hda-intel model=thinkpad
Finally a restart of Advaned Linux Sound Architecture (alsa) is required:
debian:~# /etc/init.d/alsa restart

...
At most cases just restarting the alsa via its init script is not enough, since the ssnd-hda-intel kernel module is already in use by some program or something, so its best to do a reboot to make sure the module is loaded with the neew model=thinkpad argument.
My exact laptop exact sound card model is:
debian:~# lspci |grep -i audio

00:1b.0 Audio device: Intel Corporation 82801H (ICH8 Family) HD Audio Controller (rev 03)
After changing the module and using alsamixer and aumix to make sure mic is unmuted and its volume is high enough, mic sound rec works fine.
Tue Jan 10 17:43:36 EET 2012
How to fix Pulseaudio and Skype crappy sound glitches, choppy sound and crackling on Debian GNU / Linux
I've experienced plenty of problems with Pulseaudio and Skype output sound hell crappy. This stupid proprietary program Skype is a total crap ... Anyways again thanks to ArchLinux's wiki, I've used the two mentioned steps to fix all this Skype in / out problems ...
1. Fix problems with Glitches, voice skips and crackling In file /etc/pulse/default.pa its necessery to substitute the line;
with
2. Resolve Choppy sound in (Pulseaudio) -> Skype
In /etc/pulse/daemon.conf two lines has to be also substituted:
Should become;
3. Change /etc/default/pulseaudio to allow dynamic module loading
It is a good idea to the default settings from DISALLOW_MODULE_LOADING=1 to DISALLOW_MODULE_LOADING=0 . This step is not required and I'm not sure if it has some influence on solving sound in / out problems with Skype but I believe it can be helpful in some cases..
So in /etc/default/pulseaudio Substitute:
to;
4. Restart PulseAudio server
After the line is changed and substituted a restart of PulseAudio is required. For PulseAudio server restart a gnome session logout is necessery. Just LogOff logged Gnome user and issue cmd:
This will kill any left pulseaudio server previous instances.
1. Fix problems with Glitches, voice skips and crackling In file /etc/pulse/default.pa its necessery to substitute the line;
load-module module-udev-detect
with
load-module module-udev-detect tsched=0
2. Resolve Choppy sound in (Pulseaudio) -> Skype
In /etc/pulse/daemon.conf two lines has to be also substituted:
; default-sample-rate = 44100
Should become;
default-sample-rate = 48000
3. Change /etc/default/pulseaudio to allow dynamic module loading
It is a good idea to the default settings from DISALLOW_MODULE_LOADING=1 to DISALLOW_MODULE_LOADING=0 . This step is not required and I'm not sure if it has some influence on solving sound in / out problems with Skype but I believe it can be helpful in some cases..
So in /etc/default/pulseaudio Substitute:
DISALLOW_MODULE_LOADING=1
to;
DISALLOW_MODULE_LOADING=0
4. Restart PulseAudio server
After the line is changed and substituted a restart of PulseAudio is required. For PulseAudio server restart a gnome session logout is necessery. Just LogOff logged Gnome user and issue cmd:
debian:~# pkill pulseaudio
This will kill any left pulseaudio server previous instances.
Tue Jan 10 17:10:45 EET 2012
Problems with Skype microphone on Thinkpad R61i with Debian Linux again and fix
Once again, I experienced Skype microphone issues!!! Its getting really annoying, since almost randomly I get issues. Skype is a terrible program and depending on a proprietary thing like Skype is a real pain in the ass.
This time it was totally strange as there was no way to record any voice inside Skype Call while testing with (Echo / Sound Test Service)
After a lot of puzzling and getting a bit angry I found this time the issues are caused by some settings which somehow changed in GNOME Sound Preferences microphone to mute:

You see on above screeshot that somehow the stupid thing get mutted :|
After unmuting and restarting Skype, the microphone started working in Skype again ...
This time it was totally strange as there was no way to record any voice inside Skype Call while testing with (Echo / Sound Test Service)
After a lot of puzzling and getting a bit angry I found this time the issues are caused by some settings which somehow changed in GNOME Sound Preferences microphone to mute:
You see on above screeshot that somehow the stupid thing get mutted :|
After unmuting and restarting Skype, the microphone started working in Skype again ...
Mon Jan 9 19:55:11 EET 2012
Use rsync to copy from files from destination host to source host (rsync reverse copy) / few words on rsync
I've recently had to set up a backup system to synchronize backup archive files between two remote servers and as I do usually with this situation I just set up a crontab job to periodically execute rsync to copy data from source server to the destination server . Copying SRC to DEST is the default behaviour rsync uses, however in this case I had to copy from the destination server to the source server host (in other words sync files the reversely.
The usual way to copy with rsync via SSH (from SRC to DEST) is using a cmd line like:
Where the xxx.xxx.xxx.xxx is my remote server IP with which files are synched.
According to rsync manual, the proposed docs SYNOPSIS is in the format;
Local: rsync [OPTION...] SRC... [DEST
Obviusly the default way to use rsync is to copy source to destination which I used until now, but in this case I had to the other way around and copy files from a destination host to the source server. It was logical that swapping the SRC and DEST would complete my required task. Anyways I consulted with some rsync gurus in irc.freenode.net , just to make sure it is proper to just swap the SRC, DEST arguments.
I was told this is possible, so I swapped args;
Surprisingly this worked Anyways I was adviced by by a good guy nick named scheel , that putting -e ssh to command line is generally unnecessery except if there is no some uncommon used SSH port over which the data is transferred. An example case in which -e 'ssh is necessery would be if transferring via lets say SSH port 1234;
In all other cases omitting '-e ssh' is better as '-e ssh' is rsync default. Therefore my final swapped line I put in cron to copy from a destinatio to source host with rsync looked like so:
The usual way to copy with rsync via SSH (from SRC to DEST) is using a cmd line like:
debian:~$ /usr/bin/rsync -avz -e ssh backup-user@xxx.xxx.xxx.xxx:/home/backup-user/my-directory .
Where the xxx.xxx.xxx.xxx is my remote server IP with which files are synched.
According to rsync manual, the proposed docs SYNOPSIS is in the format;
Local: rsync [OPTION...] SRC... [DEST
Obviusly the default way to use rsync is to copy source to destination which I used until now, but in this case I had to the other way around and copy files from a destination host to the source server. It was logical that swapping the SRC and DEST would complete my required task. Anyways I consulted with some rsync gurus in irc.freenode.net , just to make sure it is proper to just swap the SRC, DEST arguments.
I was told this is possible, so I swapped args;
debian:~$ /usr/bin/rsync -avz -e ssh . backup-user@xxx.xxx.xxx.xxx:/home/backup-user/my-directory

...
Surprisingly this worked
Anyways I was adviced by by a good guy nick named scheel , that putting -e ssh to command line is generally unnecessery except if there is no some uncommon used SSH port over which the data is transferred. An example case in which -e 'ssh is necessery would be if transferring via lets say SSH port 1234;
rsync -avz -e 'ssh -p1234' /source user@host:/dest
In all other cases omitting '-e ssh' is better as '-e ssh' is rsync default. Therefore my final swapped line I put in cron to copy from a destinatio to source host with rsync looked like so:
05 03 2 * * /usr/bin/ionice -c 3 /usr/bin/rsync -avz my-directory backup-user@xxx.xxx.xxx.xxx:/home/backup-user/ >/dev/null 2>&1
Sat Jan 7 23:24:49 EET 2012
Fix to GNOME Pulseaudio server crappy sound on Debian GNU / Linux - PulseAudio Debian Workaround
I've faced some issues with crappy sound in some of the games I'm playing on my Debian . Also I ometimes, have issues with sound while watching movies with VLC or Totem... Sound issues with Skype are also seldomly occuring during skype calls etc. etc.
Recently I've realized many of this crappy sound issues origins from PulseAudio - the sound server GNOME desktop env uses to manage all sound just before passing it through ALSA.
I've found on the internet many suggested ways on how to workaround these issues. Many of the things suggested as workarounds, however was outdated and referred to old versions of GNOME / Pulseaudio and therefore was unusable on my Debian 6 Squeeze....
What I found most helpful is fixes and workarounds for pulseaudio list compiled by people in the Fedora community on fedorasolved.org's website - http://fedorasolved.org/Members/fenris02/pulseaudio-fixes-and-workarounds
Some of the fixes and work arounds suggeted on the above link, I have already applied, others was not applicable for Debian.
Anyways the things which I found most important and I believe many people who runs Debian need to implement from the list to solve pulseaudio crappy sound issues is concluded in the below 5 steps.
1. Install few packages related to pulseaudio
2. Edit ~/.asoundrc and include
pcm.pulse { type pulse }
ctl.pulse { type pulse }
Quickest way is by issuing:
3. Change in the pulseaudio server configuration file ( /etc/pulse/daemon.conf ):
Look up for the lines:
Substitute this two lines with:
4. Enable Simultaneous Output in PulseAudio preferences
Navigate to the GNOME menus:
Choose the "Simultaneous Output" tab and select:
Add virtual output device for simultaneous output on all local sound cards
5. Log Off Gnome and restart PulseAudio
To load the new changed settings in /etc/pulse/daemon.conf restart of pulseaudio server is required, right after a Logoff from the current opened gnome session;
To do so LogOff with the trivial:
Login as root in console;
Press CTRL+ALT+F1, login with root and issue:
N.B.; In some cases it might be necessery to do some adjustments are made in gstreamer properties , to change settings there launch:
Tampering with gstreamer-properties used to fix for me some problems with ALSA and PulseAudio in the past, so it might be worthy to check it out and experiment a bit with it as well.
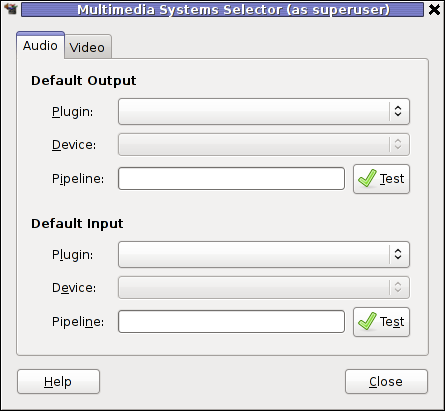
Now many of the crappy sound games or applications should start working just fine. Enjoy ;)
Recently I've realized many of this crappy sound issues origins from PulseAudio - the sound server GNOME desktop env uses to manage all sound just before passing it through ALSA.
I've found on the internet many suggested ways on how to workaround these issues. Many of the things suggested as workarounds, however was outdated and referred to old versions of GNOME / Pulseaudio and therefore was unusable on my Debian 6 Squeeze....
What I found most helpful is fixes and workarounds for pulseaudio list compiled by people in the Fedora community on fedorasolved.org's website - http://fedorasolved.org/Members/fenris02/pulseaudio-fixes-and-workarounds
Some of the fixes and work arounds suggeted on the above link, I have already applied, others was not applicable for Debian.
Anyways the things which I found most important and I believe many people who runs Debian need to implement from the list to solve pulseaudio crappy sound issues is concluded in the below 5 steps.
1. Install few packages related to pulseaudio
apt-get install paman padevchooser paprefs pulseaudio pulseaudio-esound-compat pulseaudio-module-x11 pulseaudio-module-zeroconf pulseaudio-utils
2. Edit ~/.asoundrc and include
pcm.pulse { type pulse }
ctl.pulse { type pulse }
Quickest way is by issuing:
echo 'pcm.pulse { type pulse }' >> ~/.asoundrc

echo 'ctl.pulse { type pulse }' >> ~/.asoundrc
3. Change in the pulseaudio server configuration file ( /etc/pulse/daemon.conf ):
debian:~# vim /etc/pulse/daemon.conf
Look up for the lines:
; default-fragments = 4

; default-fragment-size-msec = 25
Substitute this two lines with:
default-fragments = 8

default-fragment-size-msec = 5
4. Enable Simultaneous Output in PulseAudio preferences
Navigate to the GNOME menus:
System -> PulseAudio Preferences
Choose the "Simultaneous Output" tab and select:
Add virtual output device for simultaneous output on all local sound cards
5. Log Off Gnome and restart PulseAudio
To load the new changed settings in /etc/pulse/daemon.conf restart of pulseaudio server is required, right after a Logoff from the current opened gnome session;
To do so LogOff with the trivial:
System -> Log Out
Login as root in console;
Press CTRL+ALT+F1, login with root and issue:
debian:~# /etc/init.d/pulseaudio restart

...
N.B.; In some cases it might be necessery to do some adjustments are made in gstreamer properties , to change settings there launch:
Tampering with gstreamer-properties used to fix for me some problems with ALSA and PulseAudio in the past, so it might be worthy to check it out and experiment a bit with it as well.
debian:~$ gstreamer-properties
Now many of the crappy sound games or applications should start working just fine. Enjoy ;)
Sat Jan 7 22:41:08 EET 2012
How to add repository manually from command line in Ubuntu Linux
I'm on a way trying to install Free Mega Games Pack and I'm facing troubles in following the instructions to add a the latest development wine version described on http://www.winehq.org/download/ubuntu
The guys from WineHQ has to update the wine install instructions, since the instructions are targetting older versions of Ubuntu which are not compatible with newer Ubuntus which comes natively with Unity
In order to complete the step in adding the WineHQ Ubuntu PPA development repository my only way was to add it using command line.
Here is how:
Similarly adding a PPA repository on Debian is also possible by using a little shell script add-apt-repository.sh . add-apt-repository.sh simulates what ubuntu's apt-add-repositry python script does.
It is educative to mention PPA stands for (Personal package Archive) and the difference between normal repository and PPA is mainly in the fact that PPA repositories makes a package distributed by the repository like the native Ubuntu packages issued by Canonical.
Once for example a new version of a file is placed in PPA deb package repository, the newer package will be automatically installed to the system using it.
The guys from WineHQ has to update the wine install instructions, since the instructions are targetting older versions of Ubuntu which are not compatible with newer Ubuntus which comes natively with Unity
In order to complete the step in adding the WineHQ Ubuntu PPA development repository my only way was to add it using command line.
Here is how:
root@ubuntu:~#  apt-add-repository ppa:ubuntu-wine/ppa

You are about to add the following PPA to your system:

 Latest official WineHQ releases

  Welcome to the Wine Team PPA.  Here you can get the latest available Wine betas for every supported version of Ubuntu.  This PPA is managed by Scott Ritchie, and is a replacement for the WineHQ budgetdedicated.com repository used for Jaunty and earlier.

   More info: https://launchpad.net/~ubuntu-wine/+archive/ppa

   Press [ENTER] to continue or ctrl-c to cancel adding it

   Executing: gpg --ignore-time-conflict --no-options --no-default-keyring --secret-keyring /tmp/tmp.bvo21sFWKG --trustdb-name /etc/apt/trustdb.gpg --keyring /etc/apt/trusted.gpg --primary-keyring /etc/apt/trusted.gpg --keyserver hkp://keyserver.ubuntu.com:80/ --recv 883E8688397576B6C509DF495A9A06AEF9CB8DB0

   gpg: requesting key F9CB8DB0 from hkp server keyserver.ubuntu.com

   gpg: key F9CB8DB0: public key "Launchpad PPA for Ubuntu Wine Team" imported

   gpg: no ultimately trusted keys found

   gpg: Total number processed: 1

   gpg:               imported: 1  (RSA: 1)
Similarly adding a PPA repository on Debian is also possible by using a little shell script add-apt-repository.sh . add-apt-repository.sh simulates what ubuntu's apt-add-repositry python script does.
It is educative to mention PPA stands for (Personal package Archive) and the difference between normal repository and PPA is mainly in the fact that PPA repositories makes a package distributed by the repository like the native Ubuntu packages issued by Canonical.
Once for example a new version of a file is placed in PPA deb package repository, the newer package will be automatically installed to the system using it.