March 2011 Archives
Thu Mar 31 21:01:42 EEST 2011
Upgrade Ubuntu from 9.04 to latest Ubuntu
Updating a version of Ubuntu version
9.04 to the latest stable release is actually very simple and
BORING.
It takes some long time and a lot of clicking, however eventually, the upgrade to the latest Ubuntu will be at hand.
The whole upgrade philosophy to Upgrade an outdated Ubuntu distribution to the newest supported stable Ubuntu release is in a consequentual number of release to release upgrades.
Let's say you're running Ubuntu 9.04 (Jaunty Jackalope and) you want to upgrade to Ubuntu 11.10 TLS
then you will have to to the following step by step upgrades;
Upgrade Ubuntu from;
Now let's start upgrading ...
1. Upgrade Ubuntu 9.04 to Ubuntu 9.10
Press Alt+F2 and type:
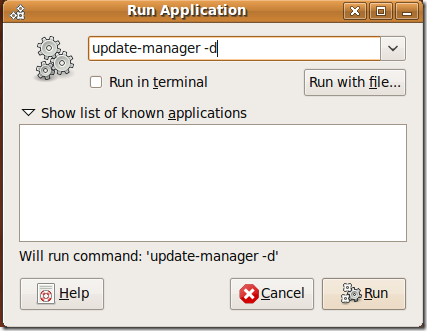
Press the Run Button afterwards to launch the command.
You will be prompted for your Linux administrator password, so type it in.
Next the command will launch the Update Manager . The update manager will show you all the available updates.
The Update Manager will show you the update options, it should say something like:
New distribution release '9.10' is available
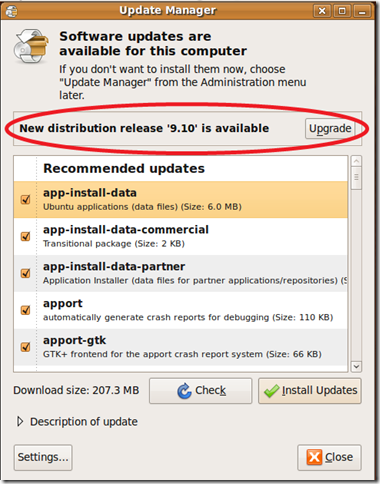
Click Over the Update button and wait.
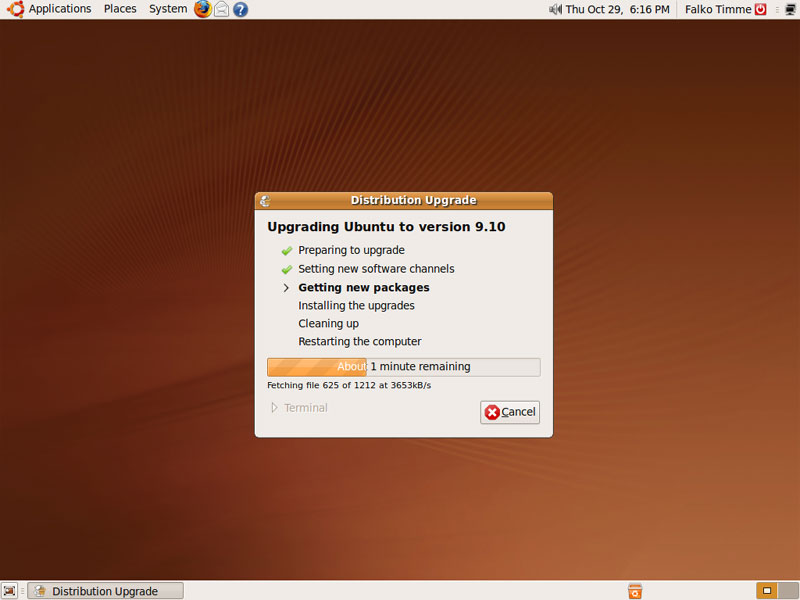
The Ubuntu update will went by by few steps:
You will see further on a screen reading "Support for some applications ended", on that screen simply press the Close button.
Further on you will be prompted with a windows reading:
Do you want to start the upgrade? You have to click over Start Upgrade button to finally begin with the upgrade process.
Now a prompt window will appearing asking you to reboot the system, when the prompt appears click over:
Restart Now
After the upgrade the new release of Ubuntu 9.10 will start booting up, and you will see a screen similar to the picture below:

Now as you have updated from Ubuntu 9.04 next step is to upgrade to Ubuntu 10.04
Now guess what you will have to upgrade the trivial quick update procedures once again.
Once again launch the Ubuntu Update Manager
Now guess what you will have to upgrade the trivial quick update procedures once again.
Once again launch the Ubuntu Update Manager
Now follow the above described procedure with update-manager -d
After repeating the few trivial steps you will have Ubuntu 10.04 LTS on your Desktop
Further on complete the trivial update steps with the update-manager to update to Ubuntu release 10.10 (Maverick Meerkat).
After having succesfully upgraded to version 10.10, now repeat the boring update procedures described in the beginning of the article to update to Ubuntu 11.04
Now as you should be with Ubuntu 11.04, upgrade once again with update-manager to Ubuntu 11.04 (Natty Narwhal).
And ast a last, once again with the update-manager -d update following the instructions to Ubuntu 11.10.
I'm pretty sure this is one of my most boring articles ever ...
It's interesting fact that I learn once from a friend of mine about the Ubuntu distribution. The Ubuntu distribution has it's versioning based on months and year whether a version is out for instance Ubuntu 9.04 means this Ubuntu release is released on (Month 04 (April), year 2009)), Ubuntu 11.10 Means this distribution is released in (year 2011, month 10 (October)).
It takes some long time and a lot of clicking, however eventually, the upgrade to the latest Ubuntu will be at hand.
The whole upgrade philosophy to Upgrade an outdated Ubuntu distribution to the newest supported stable Ubuntu release is in a consequentual number of release to release upgrades.
Let's say you're running Ubuntu 9.04 (Jaunty Jackalope and) you want to upgrade to Ubuntu 11.10 TLS
then you will have to to the following step by step upgrades;
Upgrade Ubuntu from;
- Ubuntu 9.04 to Ubuntu 9.10
- Ubuntu 9.10 to Ubuntu 10.04
- Ubuntu 10.04 to Ubuntu 10.10
- Ubuntu 10.10 to Ubuntu 11.04
- Ubuntu 11.04 to Ubuntu 11.11
Now let's start upgrading ...
1. Upgrade Ubuntu 9.04 to Ubuntu 9.10
Press Alt+F2 and type:
update-manager -d
Press the Run Button afterwards to launch the command.
You will be prompted for your Linux administrator password, so type it in.
Next the command will launch the Update Manager . The update manager will show you all the available updates.
The Update Manager will show you the update options, it should say something like:
New distribution release '9.10' is available
Click Over the Update button and wait.
The Ubuntu update will went by by few steps:
1. Preparing Updates

2. Setting new software channels

3. Getting new packages

4. Installing the updates

5. Cleaning up

6. Restarting the computer
You will see further on a screen reading "Support for some applications ended", on that screen simply press the Close button.
Further on you will be prompted with a windows reading:
Do you want to start the upgrade? You have to click over Start Upgrade button to finally begin with the upgrade process.
Now a prompt window will appearing asking you to reboot the system, when the prompt appears click over:
Restart Now
After the upgrade the new release of Ubuntu 9.10 will start booting up, and you will see a screen similar to the picture below:
Now as you have updated from Ubuntu 9.04 next step is to upgrade to Ubuntu 10.04
Now guess what you will have to upgrade the trivial quick update procedures once again.
Once again launch the Ubuntu Update Manager
System -> Administration -> Update
Manager
Now as you have updated from Ubuntu 9.04 next step is to
upgrade to Ubuntu 10.04 (LTS - Lucid Lynx)Now guess what you will have to upgrade the trivial quick update procedures once again.
Once again launch the Ubuntu Update Manager
System -> Administration -> Update
Manager
Now follow the above described procedure with update-manager -d
After repeating the few trivial steps you will have Ubuntu 10.04 LTS on your Desktop
Further on complete the trivial update steps with the update-manager to update to Ubuntu release 10.10 (Maverick Meerkat).
After having succesfully upgraded to version 10.10, now repeat the boring update procedures described in the beginning of the article to update to Ubuntu 11.04
Now as you should be with Ubuntu 11.04, upgrade once again with update-manager to Ubuntu 11.04 (Natty Narwhal).
And ast a last, once again with the update-manager -d update following the instructions to Ubuntu 11.10.
I'm pretty sure this is one of my most boring articles ever ...
It's interesting fact that I learn once from a friend of mine about the Ubuntu distribution. The Ubuntu distribution has it's versioning based on months and year whether a version is out for instance Ubuntu 9.04 means this Ubuntu release is released on (Month 04 (April), year 2009)), Ubuntu 11.10 Means this distribution is released in (year 2011, month 10 (October)).
Thu Mar 31 18:31:06 EEST 2011
My 17 years old first in line Cousin Stanislav died in a motorcycle accident :|
Yesterday about 14:08, my beloved
cousin Stanislav Valentinov Velikov has passed a way
silently in a motorcycle accident.
It's really terrible, I've been told today by my relatives and it was quite hard to believe it.
My impressions from Stanislav was that he was a very kind good and shiny boy. Like most of us the sinners he had a deadly passion Motorcycles
I haven't seen Stanislav for already about 2.5 years, which was my personal fault not to keep a close contact with such a close relative.
Last time I saw him, he was almost a child and now just few years later he is gone. I've just came by from his home, where all the relatives friends, grandfathers, grandmathers and all that loved him and now him when he was still among the living are gothered.
What is even more painful is the ridiculous way he has passed away. Stani as we used to call him was driving his new Honda motorcycle and was driving nearby a traffic lights on a street "San Stefano" here in Dobrich, a taxi driver was trying to do a manoeuvre right after he had left his last customers.
Of course as it often happens in Bulgaria the taxi driver was doing the manouver against the set rules, (he was doing a backward maneuver) on a street crossroad (located nearby the big supermarket Billa).
Stanislav was coming through the traffic lights in a high speed (it's not clearly known whta speed) and was driving the professional motorcycle without a a proper driving license, as he was 17 he only had a driving license for moped vehicle.
It appears the stupid taxi driver was doing his irresponsible law breaking maneuver right in the moment when Stanislav was driving the road.
As my cousin saw the taxi driver he got probably scared (presumably) tried to use the breaks to prevent crashing the taxi driver and he loose the motorcycle holders.
He jumped over the motorcycle and hit and broke his neck :| It's a terrible story really. What is even more terrible that the taxi driver was an ex-policeman and was one of the responsible sides for the deadly accident which costed the life of my cousin.
What can I say Bulgaria is really an insane country, even though I'm not a big wester fan I should say such an accidents are not that common in the Western World as the law is more observed there.
I've heard from my grandfather and grandmother that Stanislav was really gifted in technics especially in repairing motorcycles, moped vehicles etc.
Stanislav is still a pupil in the nearby Mathematics High School "Ivan Vazov". Before his unexpected death my cousin was planning to get her girlfriend and get a ride to Varna where he was supposedly going to spend the school break and see my other cousin Desislav ...
I've been to Stani's home and saw his lifeless body and it's really striking, he is so young his death is causing an enormous trace and pain in me and my family.
Now my family is lessing itself with a one more good and decent person. Stanislav is a victim of this cruel age. I remember since his childhood that he was very pationate about computer games with motorcycles and cars.
His deadly passion then went on into the real world, he first got a moped, then a professional motorcycle. He violated the law taking the bad example of the many computer games which preach uncontrolled high speed, adrenalin and living on the edge.
But my beloved cousin Stanislav as he was still a teen was not the one to be blamed, the real responsible ones are our parents who doesn't educate is in the tradition and spirit of the faith of our fathers Orthodox Christianity
I've heard from my relatives that now the taxi driver probably want even be hold responsible, as he is an ex-cop and he has many friends still working in the police. Friends who would proof the taxi driver innocent!
We had a small talk with my sister today about the direct influence of the movies and the computer games on the computer psyche.
I believe my cousin is not responsibe for his tragedic death as he was just following an implanted route in his mind by the multiple games and violent movies he has been a fan of.
Stani is just another victim of this cruel age ... As I saw him laying in the coffin I was thinking how short our live is. We work we bye we sell but we never know when our time we will come.
What makes my cousin's death even bigger trady is my uncles death (his father) who died just a few years ago ...
I pray that our merciful God the Holy Trinity has mercy on Stanislav's (newly presented) soul and would be merciful on him and receive him in paradise ...
Wed Mar 30 20:39:01 EEST 2011
Howto Remove (delist) your mail server IP from Hotmail, Live.com and MSN mail server blacklist
One of the mail servers I'm
administrating has problems deliving emails to addresses at
@Hotmail.com, @live.com and @msn.com.
That's quite irritating especially when all of the other major mail servers, Yahoo Mail, Gmail etc. do accept my qmail server messages in their Inbox.
Every email that is addressed to for example hotmail.com is returned back to my sender folder with the message:
Right after my mail server delivery problems were reported by one of my colleagues, the first step I took was check if my mailserver is listed in some of the major email blacklist databases on the address: http://www.mxtoolbox.com/blacklists.aspx
By opening the above url in a browser and putting a server IP, I was unpleasently notified that my mail server let's call it with the fiction name mail.server.com is existing in the Spamcannibal blacklist dabase . Spamcannibal as most of the blacklist databases.
To completely reassure myself my server host IP is in spamcannibal, I've used spacannibal's website whois on the urlhttp://www.spamcannibal.org/cannibal.cgi.
Of course this proofed one more time I'm listed in spamcannibal... Thanksfully spamcannibal has a contact form which can be used to delist an IP address from their blacklist right from their website.
After a day of waiting my server IP was removed from spamcannibal blacklist and therefore using the mxtoolbox.com's website mail server blacklist checker I've assured myself the mail server is no longer in the most notable spam blacklist on the net.
SI've gave another try to deliver an email to my hotmail mail account myaccount@hotmail.com . The mail delivery was unsuccesful again, the qmail failure notice daemon returned my sent email to my myaccount@hotmail.com once again with the error of:
The situation by so far was that I knew for sure my qmail mail server IP is not listed in major spam black lists, but still i couldn't say for sure that there was no minor blacklist where my ip figurates, neither I was completely sure about the exact requirements microsoft expects from my mail server.
Some of the presumed reasons which could think of could be the cause the hotmail mail delivery failure errors were as follows:
1. My mail server IP had no correct A domain name record or a PTR record
2. My mail server was missing a correct SPF record
3. My dedicated server ISP has some blacklisted dedicated server IPs which belong to the same IP range as the mail server
I've walked through each of the 3 expected reasons that might cause the failure but it appeared that my mail server was configured to fullfil each of the 3 aforementioned requirements.
To assure myself each of the failure reasons were untrue I issued the commands:
Also I used the kitterman.com's SPF Query Validation tool located on http://www.kitterman.com/spf/validate.html to make sure my mail server SPF record is correct.
Another way to check if a mail server SPF records are correct is by sending a test email to for gmail.com and check in the email headers.
(To check the email headers in Thunderbird you can press ctrl+U)
When the email source appears look for the field Received-SPF: pass (google.com:....
If the field says pass this means your mail server SPF is fine, if it reads uknown or something different this means it's not fine.
Next you will have to call your ISP and have a tech conversation with the tech support.
As nothing of the above assumed possible failure was checked and I was sure the email server is not affected by them
Further on logically enough I've pointed my browser to the http://mail.live.com/mail/troubleshooting.aspx#errors which which was prescribed in the reject email returned from hotmail's mail server.
On that URL I red the meaning of the Remote host said: 550 SC-001 , Here is what it says:
Ain't helpful is it??! Well I think Microsoft has a tradition of unhelpful manuals and documentation since the yearly days so that hotmail mail server error code explanation wasn't that unexpected ;)
As I was out of ideas, I joined irc.freenode.net and asked for help in #exim irc channel.
Thanksfull there was a guy with an alias cannonball who gave me a good hints which I followed.
First he suggested that I see and join Microsoft's (Smart Network Data Services) they're located on https://postmaster.live.com/snds/index.aspx
Thanksfully the Smart Network Data Services could be accessed with my hotmail mail account, credentials, but after logging in to give me a real access to the site content I had to confirm, I'm a legit person and provide an legit email address where I can receive the confirmation.
As this went by in the https://postmaster.live.com/snds/addnetwork.aspx I had to use the buttons Requert Access, View IP Status and View Data to check the status of my mail server IP address 1.2.3.4
After all this struggle in 1. Requesting Access to my IP, View IP Status and View Data I finally found out the guess what unexpected fact that Microsoft's mail servers has blacklisted my mail server IP Address!, How unexpected was that, heh ?!
So to sum up all this effort of registering in Microsoft SNDS gave me not any further clue on what I can change in my qmail mail server installation to make the user emails deliver to @hotmail.com.
After a bunch of investigation on the net, I've found another post which discussess issues with the 550 SC-001 error reason for a failed mail server deliveries to microsoft mail services.
Thanks God the post I've found pointed out that Microsoft has an Eform for delisting / removing spam black listed mail server IPs not able to deliver to hotmail and live.com
Click over the link above and you will be pointed to Microsoft's annoying Eform for IP removal from their spam blacklist
The form needs to be filled and after that you can start praying to God to be merciful and push up Microsoft to have a good will and remove your IP from their mail spam blacklists.
The form filling takes about 20 minutes, there are plenty of information you will have to fill in the form but try to be as concrete as possible!
All the form fields are with (*) - asterisk and therefore are a required fields. After I filled up the irritating form, I've faced the horror of Microsoft's Captcha!!!
Honestly I haven't seen a more bad captcha in my life, I can't read anything on it, neither I can perceive what word or number it is nor I can grasp whether the captcha shown letter is lower or capital... it's really a terrible CAPTCHA I tell you! so beware and try to put all your patience in while filling it in.
What made it even worser this damend Microsoft's IP removal form was the fact that it doesn't work at all with Opera and Epiphany browsers.
I tried initially to use Epiphany and Opera to post the shitty form but it was no go, it could not post!!!
Thank you Microsoft for making your form a platform incompatible, I know you're really good in that!
I finally launched IceWeasel (Firefox) and filled in the boring form once again and Thanks God this time it was properly posted as you read below:
Print the page? I guess Microsoft are not very green company as they
suggest you to print it out ? ;)
I guess Microsoft are not very green company as they
suggest you to print it out ? ;)
Now I'm stuck into waiting and hoping that my removal request will be regarded and in a couple of days of time I'll either hear a word from Microsoft's tech support or directly get unbanned from their spam black list.... Pfuuu
That's quite irritating especially when all of the other major mail servers, Yahoo Mail, Gmail etc. do accept my qmail server messages in their Inbox.
Every email that is addressed to for example hotmail.com is returned back to my sender folder with the message:
Remote host said: 550 SC-001 Unfortunately, messages from
83.170.105.141 weren't

sent. Please contact your Internet service provider since part of
their network is

on our block list. You can also refer your provider to

http://mail.live.com/mail/troubleshooting.aspx#errors.
Right after my mail server delivery problems were reported by one of my colleagues, the first step I took was check if my mailserver is listed in some of the major email blacklist databases on the address: http://www.mxtoolbox.com/blacklists.aspx
By opening the above url in a browser and putting a server IP, I was unpleasently notified that my mail server let's call it with the fiction name mail.server.com is existing in the Spamcannibal blacklist dabase . Spamcannibal as most of the blacklist databases.
To completely reassure myself my server host IP is in spamcannibal, I've used spacannibal's website whois on the urlhttp://www.spamcannibal.org/cannibal.cgi.
Of course this proofed one more time I'm listed in spamcannibal... Thanksfully spamcannibal has a contact form which can be used to delist an IP address from their blacklist right from their website.
After a day of waiting my server IP was removed from spamcannibal blacklist and therefore using the mxtoolbox.com's website mail server blacklist checker I've assured myself the mail server is no longer in the most notable spam blacklist on the net.
SI've gave another try to deliver an email to my hotmail mail account myaccount@hotmail.com . The mail delivery was unsuccesful again, the qmail failure notice daemon returned my sent email to my myaccount@hotmail.com once again with the error of:
Hi. This is the qmail-send program at mail.server.com.

I'm afraid I wasn't able to deliver your message to the following
addresses.

This is a permanent error; I've given up. Sorry it didn't work
out.


<myaccount@hotmail.com>:

Connected to 65.55.92.136 but sender was rejected.

Remote host said: 550 SC-001 Unfortunately, messages from
83.170.105.141 weren't

sent. Please contact your Internet service provider since part of
their network is

on our block list. You can also refer your provider to

http://mail.live.com/mail/troubleshooting.aspx#errors.


--- Below this line is a copy of the message.

....
The situation by so far was that I knew for sure my qmail mail server IP is not listed in major spam black lists, but still i couldn't say for sure that there was no minor blacklist where my ip figurates, neither I was completely sure about the exact requirements microsoft expects from my mail server.
Some of the presumed reasons which could think of could be the cause the hotmail mail delivery failure errors were as follows:
1. My mail server IP had no correct A domain name record or a PTR record
2. My mail server was missing a correct SPF record
3. My dedicated server ISP has some blacklisted dedicated server IPs which belong to the same IP range as the mail server
I've walked through each of the 3 expected reasons that might cause the failure but it appeared that my mail server was configured to fullfil each of the 3 aforementioned requirements.
To assure myself each of the failure reasons were untrue I issued the commands:
linux:~# host mail.server.com

mail.server.com has address 1.2.3.4

linux:~# host 1.2.3.4

1.2.3.4.in-addr.arpa domain name pointer mail.server.com.

linux:~# host -t TXT mail.server.com

mail.server.com descriptive text "v=spf1 mx ptr mx:server.com
mx:mail.server.com mx:mail2.server.com -all"
Also I used the kitterman.com's SPF Query Validation tool located on http://www.kitterman.com/spf/validate.html to make sure my mail server SPF record is correct.
Another way to check if a mail server SPF records are correct is by sending a test email to for gmail.com and check in the email headers.
(To check the email headers in Thunderbird you can press ctrl+U)
When the email source appears look for the field Received-SPF: pass (google.com:....
If the field says pass this means your mail server SPF is fine, if it reads uknown or something different this means it's not fine.
Next you will have to call your ISP and have a tech conversation with the tech support.
As nothing of the above assumed possible failure was checked and I was sure the email server is not affected by them
Further on logically enough I've pointed my browser to the http://mail.live.com/mail/troubleshooting.aspx#errors which which was prescribed in the reject email returned from hotmail's mail server.
On that URL I red the meaning of the Remote host said: 550 SC-001 , Here is what it says:
550 SC-001 Mail rejected by Windows Live Hotmail for policy
reasons.

Reasons for rejection may be related to content with spam-like
characteristics

or IP/domain reputation. If you are not an email/network admin
please contact

your Email/Internet Service Provider for help.
Ain't helpful is it??! Well I think Microsoft has a tradition of unhelpful manuals and documentation since the yearly days so that hotmail mail server error code explanation wasn't that unexpected ;)
As I was out of ideas, I joined irc.freenode.net and asked for help in #exim irc channel.
Thanksfull there was a guy with an alias cannonball who gave me a good hints which I followed.
First he suggested that I see and join Microsoft's (Smart Network Data Services) they're located on https://postmaster.live.com/snds/index.aspx
Thanksfully the Smart Network Data Services could be accessed with my hotmail mail account, credentials, but after logging in to give me a real access to the site content I had to confirm, I'm a legit person and provide an legit email address where I can receive the confirmation.
As this went by in the https://postmaster.live.com/snds/addnetwork.aspx I had to use the buttons Requert Access, View IP Status and View Data to check the status of my mail server IP address 1.2.3.4
After all this struggle in 1. Requesting Access to my IP, View IP Status and View Data I finally found out the guess what unexpected fact that Microsoft's mail servers has blacklisted my mail server IP Address!, How unexpected was that, heh ?!
So to sum up all this effort of registering in Microsoft SNDS gave me not any further clue on what I can change in my qmail mail server installation to make the user emails deliver to @hotmail.com.
After a bunch of investigation on the net, I've found another post which discussess issues with the 550 SC-001 error reason for a failed mail server deliveries to microsoft mail services.
Thanks God the post I've found pointed out that Microsoft has an Eform for delisting / removing spam black listed mail server IPs not able to deliver to hotmail and live.com
Click over the link above and you will be pointed to Microsoft's annoying Eform for IP removal from their spam blacklist
The form needs to be filled and after that you can start praying to God to be merciful and push up Microsoft to have a good will and remove your IP from their mail spam blacklists.
The form filling takes about 20 minutes, there are plenty of information you will have to fill in the form but try to be as concrete as possible!
All the form fields are with (*) - asterisk and therefore are a required fields. After I filled up the irritating form, I've faced the horror of Microsoft's Captcha!!!
Honestly I haven't seen a more bad captcha in my life, I can't read anything on it, neither I can perceive what word or number it is nor I can grasp whether the captcha shown letter is lower or capital... it's really a terrible CAPTCHA I tell you! so beware and try to put all your patience in while filling it in.
What made it even worser this damend Microsoft's IP removal form was the fact that it doesn't work at all with Opera and Epiphany browsers.
I tried initially to use Epiphany and Opera to post the shitty form but it was no go, it could not post!!!
Thank you Microsoft for making your form a platform incompatible, I know you're really good in that!
I finally launched IceWeasel (Firefox) and filled in the boring form once again and Thanks God this time it was properly posted as you read below:
Sender Information for Hotmail Delivery

E-mail SupportE-mail Support

Thank you for submitting your issue to Support.


Your Support Ticket Number:1151722088

For reference, please print this page or write down your support
ticket number. Use this number when communicating with Support
about this issue.

To make sure that you can receive a reply from Microsoft, add the
"microsoft.com" domain to your e-mail "safe list". If you do not
receive a response in your "inbox" within 24 hours, check your
"bulk mail" or "junk mail" folders.
Print the page?
I guess Microsoft are not very green company as they
suggest you to print it out ? ;)Now I'm stuck into waiting and hoping that my removal request will be regarded and in a couple of days of time I'll either hear a word from Microsoft's tech support or directly get unbanned from their spam black list.... Pfuuu
Wed Mar 30 16:31:11 EEST 2011
How to list and exclude table names from a database in MySQL (exclude table names from an show tables in MySQL) by using information_schema
Listing all table names from a
MySQL database is a very easy and trivial task that every sql or
system administrator out there is aware of.
However excluding certain table names from a whole list of tables belonging to a database is not that commonly used and therefore I believe many people have no clue how to do it when they have to.
Today for one of my sql backup scripts it was necessary that certain tables from a database to be excluded from the whole list of tables for a database I'm backupping.
My example database has the sample name exampledatabase and usually I do list all the table contents from that database with the well known command:
However as my desire was to exclude certain tables from the list (preferrably with a certain SQL query) I had to ask around in irc.freenode.net for some hints on a ways to achieve my exclude table goals.
I was adviced by some people in #mysql that what I need to achieve my goal is the information_schema mysql structure, which is available since MySQL version 5.0.
After a bit of look around in the information_schema and the respective documentation on mysql.com, thanksfully I could comprehend the idea behind the information_schema, though to be honest the first time I saw the documentation it was completly foggy on how to use this information_schema;
It seems using the information_schema is very easy and is not much different from your normal queries syntax used to do trivial operations in the mysql server.
If you wonder just like I did what is mysql's information_schema go and use the information_schema database (which I believe is a virtual database that is stored in the system memory).
For instance:
To get a general view on what each of the tables in the information_schema database contains I used the normal SELECT command for example
I used the limit clause in order to prevent being overfilled with data, where I could still see the table fields name to get general and few lines of the table to get an idea what kind of information the TABLES table contains.
If you haven't got any ecperience with using the information_schema I would advice you do follow my example select and look around through all the listed tables in the information_schema database
That will also give you a few hints about the exact way the MySQL works and comprehends it's contained data structures.
In short information_schema virtual database and it's existing tables provides a very thorough information and if you're an SQL admin you certainly want to look over it every now and then.
A bit of playing with it lead me to a command which is actually a good substitute for the normal SHOW TABLES; mysql command.
To achieve a SHOW TABLES from exampledatabase via the information_schema info structure you can for example issue:
Now as I've said a few words about information_schema let me go back to the main topic of this small article, which is How to exclude table names from a SHOW tables list
Here is how exclude a number of tables from a complete list of tables belonging to a database:
In this example the above mysql command will list all the tables content belonging to exampledatabase and instruct the MySQL server not to list the table names with names mysql_table1_to_exlude_from_list, mysql_table2_to_exclude_from_list, table3_to_exclude
If you need to exclude more tables from your mysql table listing just add some more tables after the ...'table3_to_exclude', 'new_table4_to_exclude','etc..');
Of course this example can easily be adopted to a MySQL backup script which requires the exclusion of certain tables from a backed up database.
An example on how you can use the above table exclude command straight from the bash shell would be:
Now this little bash one-liner can easily be customized to a backup script to create backups of a certain databases with a certain tables (e.g. with excluded number of tables) from the backup.
It's seriously a pity that by default the mysqldump command does not have an option for a certain tables exclude while making a database dump.
I've saw the mysqldump exclude option, being suggested somewhere online as a future feature of mysqldump, I've also seen it being reported in the mysql.com's bug database, I truly hope in the upcoming releases we will see the exclude option to appear as a possible mysqldump argument.
However excluding certain table names from a whole list of tables belonging to a database is not that commonly used and therefore I believe many people have no clue how to do it when they have to.
Today for one of my sql backup scripts it was necessary that certain tables from a database to be excluded from the whole list of tables for a database I'm backupping.
My example database has the sample name exampledatabase and usually I do list all the table contents from that database with the well known command:
mysql> SHOW tables from
exampledatabase;
However as my desire was to exclude certain tables from the list (preferrably with a certain SQL query) I had to ask around in irc.freenode.net for some hints on a ways to achieve my exclude table goals.
I was adviced by some people in #mysql that what I need to achieve my goal is the information_schema mysql structure, which is available since MySQL version 5.0.
After a bit of look around in the information_schema and the respective documentation on mysql.com, thanksfully I could comprehend the idea behind the information_schema, though to be honest the first time I saw the documentation it was completly foggy on how to use this information_schema;
It seems using the information_schema is very easy and is not much different from your normal queries syntax used to do trivial operations in the mysql server.
If you wonder just like I did what is mysql's information_schema go and use the information_schema database (which I believe is a virtual database that is stored in the system memory).
For instance:
mysql> use information_schema;

Database changed

mysql> show tables

+---------------------------------------+

| Tables_in_information_schema |

+---------------------------------------+

| CHARACTER_SETS |

| COLLATIONS |

| COLLATION_CHARACTER_SET_APPLICABILITY |

| COLUMNS |

| COLUMN_PRIVILEGES |

| KEY_COLUMN_USAGE |

| PROFILING |

| ROUTINES |

| SCHEMATA |

| SCHEMA_PRIVILEGES |

| STATISTICS |

| TABLES |

| TABLE_CONSTRAINTS |

| TABLE_PRIVILEGES |

| TRIGGERS |

| USER_PRIVILEGES |

| VIEWS |

+---------------------------------------+

17 rows in set (0.00 sec)
To get a general view on what each of the tables in the information_schema database contains I used the normal SELECT command for example
mysql> select * from TABLES limit 10;
I used the limit clause in order to prevent being overfilled with data, where I could still see the table fields name to get general and few lines of the table to get an idea what kind of information the TABLES table contains.
If you haven't got any ecperience with using the information_schema I would advice you do follow my example select and look around through all the listed tables in the information_schema database
That will also give you a few hints about the exact way the MySQL works and comprehends it's contained data structures.
In short information_schema virtual database and it's existing tables provides a very thorough information and if you're an SQL admin you certainly want to look over it every now and then.
A bit of playing with it lead me to a command which is actually a good substitute for the normal SHOW TABLES; mysql command.
To achieve a SHOW TABLES from exampledatabase via the information_schema info structure you can for example issue:
select TABLE_NAME from TABLES where
TABLE_SCHEMA='exampledatabase';
Now as I've said a few words about information_schema let me go back to the main topic of this small article, which is How to exclude table names from a SHOW tables list
Here is how exclude a number of tables from a complete list of tables belonging to a database:
select TABLE_NAME from TABLES where
TABLE_SCHEMA='exampledatabase' \

AND TABLE_NAME not in \

('mysql_table1_to_exlude_from_list',
'mysql_table2_to_exclude_from_list',
'table3_to_exclude');
In this example the above mysql command will list all the tables content belonging to exampledatabase and instruct the MySQL server not to list the table names with names mysql_table1_to_exlude_from_list, mysql_table2_to_exclude_from_list, table3_to_exclude
If you need to exclude more tables from your mysql table listing just add some more tables after the ...'table3_to_exclude', 'new_table4_to_exclude','etc..');
Of course this example can easily be adopted to a MySQL backup script which requires the exclusion of certain tables from a backed up database.
An example on how you can use the above table exclude command straight from the bash shell would be:
debian:~# echo "use information_schema; select TABLE_NAME
from TABLES where \

TABLE_SCHEMA='exampledatabase' AND TABLE_NAME not in \

('mysql_table1_to_exlude_from_list',
'mysql_table2_to_exclude_from_list', 'table3_to_exclude',);"
\

| mysql -u root -p
Now this little bash one-liner can easily be customized to a backup script to create backups of a certain databases with a certain tables (e.g. with excluded number of tables) from the backup.
It's seriously a pity that by default the mysqldump command does not have an option for a certain tables exclude while making a database dump.
I've saw the mysqldump exclude option, being suggested somewhere online as a future feature of mysqldump, I've also seen it being reported in the mysql.com's bug database, I truly hope in the upcoming releases we will see the exclude option to appear as a possible mysqldump argument.
Tue Mar 29 22:08:11 EEST 2011
Speed up your DNS resolve if your Internet Service Provider DNS servers fail or resolve slowly / Privacy concerns of public DNS servicesuse
In my experience with many network
Internet Service Providers by so far I've encountered a lot
of DNS oddities and therefore surfing (web) and mail
slowness.
It's sometimes very irritating especially in cases, when I use my internet over Wireless public or university wireless networks.
In principle many of the Wireless routers which distribute the internet especially in organizations are badly configured and the slowness with DNS resolvings is an absolute classic.
If you haven't encountered that slowness in opening web pages when connected from your University's canteen, whether it's fill with people for the lunch break, then I should say you're really lucky!
My personal experience with this bad configured devices DNS services has been quite negative and every now and then I use to set and use public DNS servers like OpenDNS and Google DNS
Very often when I connect to a wireless network with my notebook running Debian Linux and the internet is too slow in opening pages I automatically set the Google or OpenDNS servers as a default DNS IP resolving servers.
1. DNS IP addresses of Google Public DNS are:
2. OpenDNS Public DNS servers has the IP addresses of:
I do set up and use the upper public DNS services addresses via the commands:
3. Set and use Google Public DNS services on my Linux
I first create backu pof my resolv.conf under the name resolv.conf.orig just to make sure I can revert back to my old DNSes if I need them at some point.
If you prefer to use the OpenDNS services for some let's say privacy reasons, you do it in the same manner as in the above commands, you only change the IP addresses. 4. Configure and use the OpenDNS public DNS services
Of course using Public DNS services has it's disadvantages over the domain resolving speed up advantage.
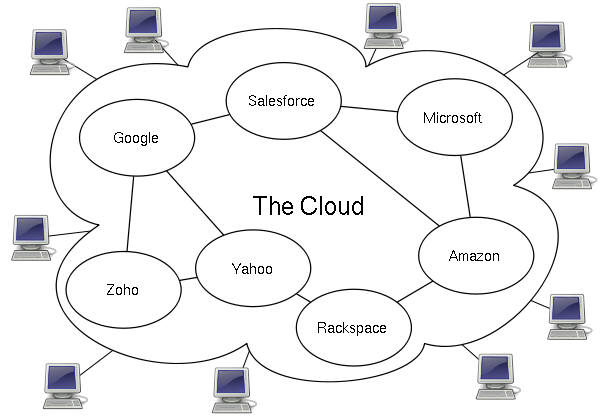
One major issue is that Public DNS services are running on a top of a cloud and if you have red my previous article Cloud Computing a possible threat to users privacy and system administrator employment you might be agaist the idea of using a services which are powered by cloud.
The other primary concern is related to your SECURITY and a PRIVACY by using Public DNS networks, you risk that your Public DNS provider might use some DNS spoof techniques to mislead you and resolve you common domain names which usually resolve to let's say 1.1.1.1 to let's say 1.5.5.10
Even though this kind of practices on a side of a public DNS provider is not a likely scenario the possible implications of Public DNS providers using DNS forgery to fool you about domain names locations is a very serious issue.
As public DNS providers does contain again the good old philosophy of cloud computing embedded in themselves and they strive to become some kind of a standard which people might vote to adopt and use, the future implications of a wide adoption of Public DNS servers might be a terrible thing on internet users privacy!!!
Just think about a future scenario where we users of the Internet are forced to use a number of public DNS servers in order to use the Internet!
Usually a very huge companies are possessing the Public DNS services and do pay for the tech equipment required for building up the cluster clouds which provide the DNS services and therefore, if in the short future public DNS becomes a fashion and (God forbid!) a standard which shifts up the regular ISP DNS servers to resolve domains to IPs then it will be terrible.
The corporations which does own the Public DNS service/s might have a direct control over filtering and censoling information posted on any website on the internet.
Even worser if the world decides to adopt public DNS services somewhere in the future this means that large corporations owning the open dns cluster or clusters will be able to check each and every resolving made by any user on the net.
If you think closely such an information possessed by a company is not the best thing we want.
So let me close up this article, I'm not a fan and an evangelist who preaches the use of Public DNS services. Right on Contrary I do honestly hate the idea behind public DNS.
Nevertheless apart from my personal opinion I'm a practical person and using the public DNS servers every now and then when this will accelerate my access to the internet is still an option I do enjoy.
Maybe it's time for a free software project (a tor like), which will provide users with an OpenDNS alternative which will run on hobbyist computers around the globe (just like with tor).
What's rather funny is that the loud name OpenDNS is a big lie in reality OpenDNS is not opened it's a company owned closed source service ;)
It's sometimes very irritating especially in cases, when I use my internet over Wireless public or university wireless networks.
In principle many of the Wireless routers which distribute the internet especially in organizations are badly configured and the slowness with DNS resolvings is an absolute classic.
If you haven't encountered that slowness in opening web pages when connected from your University's canteen, whether it's fill with people for the lunch break, then I should say you're really lucky!
My personal experience with this bad configured devices DNS services has been quite negative and every now and then I use to set and use public DNS servers like OpenDNS and Google DNS
Very often when I connect to a wireless network with my notebook running Debian Linux and the internet is too slow in opening pages I automatically set the Google or OpenDNS servers as a default DNS IP resolving servers.
1. DNS IP addresses of Google Public DNS are:
8.8.8.7

and

8.8.8.8
2. OpenDNS Public DNS servers has the IP addresses of:
208.67.222.222

208.67.222.220
I do set up and use the upper public DNS services addresses via the commands:
3. Set and use Google Public DNS services on my Linux
debian:~# cp -rpf /etc/resolv.conf
/etc/resolv.conf.orig

debian:~# echo "nameserver 8.8.8.7\n nameserver 8.8.8.8 \n" >
/etc/resolv.conf;
I first create backu pof my resolv.conf under the name resolv.conf.orig just to make sure I can revert back to my old DNSes if I need them at some point.
If you prefer to use the OpenDNS services for some let's say privacy reasons, you do it in the same manner as in the above commands, you only change the IP addresses. 4. Configure and use the OpenDNS public DNS services
debian:~# cp -rpf /etc/resolv.conf
/etc/resolv.conf.orig

debian:~# echo "nameserver 208.67.222.222\n nameserver
208.67.222.220 \n" > /etc/resolv.conf;
Of course using Public DNS services has it's disadvantages over the domain resolving speed up advantage.
One major issue is that Public DNS services are running on a top of a cloud and if you have red my previous article Cloud Computing a possible threat to users privacy and system administrator employment you might be agaist the idea of using a services which are powered by cloud.
The other primary concern is related to your SECURITY and a PRIVACY by using Public DNS networks, you risk that your Public DNS provider might use some DNS spoof techniques to mislead you and resolve you common domain names which usually resolve to let's say 1.1.1.1 to let's say 1.5.5.10
Even though this kind of practices on a side of a public DNS provider is not a likely scenario the possible implications of Public DNS providers using DNS forgery to fool you about domain names locations is a very serious issue.
As public DNS providers does contain again the good old philosophy of cloud computing embedded in themselves and they strive to become some kind of a standard which people might vote to adopt and use, the future implications of a wide adoption of Public DNS servers might be a terrible thing on internet users privacy!!!
Just think about a future scenario where we users of the Internet are forced to use a number of public DNS servers in order to use the Internet!
Usually a very huge companies are possessing the Public DNS services and do pay for the tech equipment required for building up the cluster clouds which provide the DNS services and therefore, if in the short future public DNS becomes a fashion and (God forbid!) a standard which shifts up the regular ISP DNS servers to resolve domains to IPs then it will be terrible.
The corporations which does own the Public DNS service/s might have a direct control over filtering and censoling information posted on any website on the internet.
Even worser if the world decides to adopt public DNS services somewhere in the future this means that large corporations owning the open dns cluster or clusters will be able to check each and every resolving made by any user on the net.
If you think closely such an information possessed by a company is not the best thing we want.
So let me close up this article, I'm not a fan and an evangelist who preaches the use of Public DNS services. Right on Contrary I do honestly hate the idea behind public DNS.
Nevertheless apart from my personal opinion I'm a practical person and using the public DNS servers every now and then when this will accelerate my access to the internet is still an option I do enjoy.
Maybe it's time for a free software project (a tor like), which will provide users with an OpenDNS alternative which will run on hobbyist computers around the globe (just like with tor).
What's rather funny is that the loud name OpenDNS is a big lie in reality OpenDNS is not opened it's a company owned closed source service ;)
Tue Mar 29 19:34:33 EEST 2011
How to install and configure Canon Pixma iP3300 printer for color printing on Ubuntu and Debian Linux
I've recently was asked by my cousin
to install and configure her Canon Pixma iP3300 on Ubuntu Linux
version 9.10 (Karmic) since the printer was not initialized
properly by default.
After a bit of investigation and experimentation, I finally found the way to install and configure the Canon Pixma iP3300
Here is a step by step howto for all those who are suffering with the same annoying issue:
1. Install some preliminary deb packages
2. Create a new canon directory
3. Download the libraries and printer drivers in rpm (required by linux's cups printing system
I've made a mirror of the packages, as it was a bit hard to find the packages, i hope mirroring them will guarantee the packages won't suddenly disappear from the net.
I've mirrored a whole bunch of linux drivers which are for various Canon printers
However the files which are necessary for making the Pixma ip3300 to work out on Ubuntu or Debian are:
In some cases on an AMD64 (64 bit Linux architecture), you might also need the file:
After a bit of investigation and experimentation, I finally found the way to install and configure the Canon Pixma iP3300
Here is a step by step howto for all those who are suffering with the same annoying issue:
1. Install some preliminary deb packages
ubuntu:~# apt-get update

ubuntu:~# apt-get install alien libxml++1.0-dev libpng12-0
libpng12-dev libgtk1.2 libgtk1.2-common
2. Create a new canon directory
ubuntu:~# mkdir canon
3. Download the libraries and printer drivers in rpm (required by linux's cups printing system
I've made a mirror of the packages, as it was a bit hard to find the packages, i hope mirroring them will guarantee the packages won't suddenly disappear from the net.
I've mirrored a whole bunch of linux drivers which are for various Canon printers
However the files which are necessary for making the Pixma ip3300 to work out on Ubuntu or Debian are:
- cnijfilter-common-2.70-1.i386.rpm
- cnijfilter-ip3300-2.70-1.i386.rpm
In some cases on an AMD64 (64 bit Linux architecture), you might also need the file:
- cnijfilter-common-2.70-1.src.rpm
-
To straight download the ip3300 necessary files in the just created directory canon in step 2 issue the cmd:
ubuntu:~# cd canon

ubuntu:/canon# wget
http://pc-freak.net/files/canon-linux-drivers/cnijfilter-common-2.70-1.i386.rpm


...

ubuntu:/canon# wget
http://pc-freak.net/files/canon-linux-drivers/cnijfilter-common-2.70-1.src.rpm


...

ubuntu:/canon# wget
http://pc-freak.net/files/canon-linux-drivers/cnijfilter-ip3300-2.70-1.i386.rpm


...
As you have seen in step 1, we have installed the alien tool which will be used to convert the rpm packages to .tgz (tar.gz) files.
The reason why I'm converting to .tgz instead of directly converting to .deb package is that two of the files are built for the i386 architecture, the ubuntu where I wanted to install them has installed an amd64 version of Ubuntu (a 64bit release of Ubuntu).
As the Ubuntu is amd64 version whether I try to convert the .rpm files to .deb packages like so:
ubuntu:/canon# alien --to-deb
cnijfilter-common-2.70-1.i386.rpm
I get the error:
cnijfilter-common-2.70-1.i386.rpm is for architecture i386 ; the package cannot be built on this system
As I said earlier to get around this issue, 4. Use alien to convert my .rpm to .tgz :
ubuntu:~# alien --to-tgz cnijfilter-common-2.70-1.i386.rpm
cnijfilter-common-2.70-1.src.rpm cnijfilter-common-2.70.tgz

cnijfilter-common-2.70.tgz generated

ubuntu:~# alien --to-tgz cnijfilter-ip3300-2.70-1.i386.rpm

cnijfilter-ip3300-2.70.tgz generated
5. Untar the .tgz cnijfilter archives
ubuntu:/canon# tar -zxvf cnijfilter-ip3300-2.70.tgz

...

ubuntu:/canon# tar -zxvvf cnijfilter-common-2.70.tgz

....
The above files unarchive will extract you a directory called usr/ , now you will need to manually copy the files from this directory to the correct locations, here are the commands to issue to do that:
6. Copy extracted drivers to correct locations
ubuntu:/canon# cd usr

ubuntu:/canon/usr# cp -rpf lib/* /usr/lib

ubuntu:/canon/usr# cp -rpf local/* /usr/local/

ubuntu:/canon/usr# cp -rpf local/bin/* /usr/bin/

ubuntu:/canon/usr# cp -rpf local/share/*
/usr/share/
7. Create symbolink links to libtiff and libpng as a fix up
ubuntu:/canon/usr# ln -s /usr/lib/libtiff.so.4 /usr/lib/libtiff.so.38. Make the Ubuntu be aware of the newly installed libraries
ubuntu:/canon/usr# ln -s /usr/lib/libpng.so /usr/lib/libpng.so.3
ubuntu:/canon/usr# ln -s /usr/lib/libtiff.so.2 /usr/lib/libtiff.so.1
ubuntu:/canon/usr# ldconfig
9. Restart the cups printing server
ubuntu:/canon/usr# /etc/init.d/cups restart

* Restarting Common Unix Printing System: cupsd
So far so good by now, your Ubuntu or Debian system should be able to initilize your Canon Pixma iP3300 , next step is to configure your printer to be able to print correctly in color mode.
What I did straight after my correct installation was to test the printer. The tests went fine with printing black and white or (Greyscale), however whether I tried to test printing in color mode, my printed images and colors were completely distorted!
It took me a bit of try/fails until I succeeded with the printer to print in colors.
There are few settings which has to be tuned right after install to make the Pixma iP3300 print in color on Linux
Here are the few things which I had to tune from System -> Administration > Printing
10. Configure in Administration -> Printing the following options
Change the default set resolution for the printer from Automatic which is the printer default to:
Resolution: 300x300DPI
By the default the Pixma ip3300 will try to print out with the highest resolution possible 600x600DPI, however the Linux drivers doesn't seem to support this resolution, if the 600x600DPI resolution is used the result is the distorted color picture print outs.
Further on configure the Color Model option:
Color Model: RGB Color or

Color Model: CMYK
Now your Canon Pixma iP3300 printer should be printing fine both in black and white and in color on your Ubuntu/Debian Linux.
I believe this little install tutorial should be working just fine for all kind of Debian Linux direvatives ;)
Enjoy printing and don't forget Print as less as possible, Save a Tree! ;)
Mon Mar 28 13:59:32 EEST 2011
Cloud Computing a possible threat to users privacy and system administrator employment
If you're employed into an IT branch an IT hobbyist or a tech, geek you should have certainly heard about the latest trend in Internet and Networking technologies the so called Cloud Computing
Most of the articles available in newspapers and online have seriously praised and put the hopes for a better future through cloud computing.
But is really the cloud computing as good as promised? I seriously doubt that.
Let's think about it what is a cloud? It's a cluster of computers which are connected to work as one.
No person can precisely say where exactly on the cluster cloud a stored information is located (even the administrator!)
The data stored on the cluster is a property of a few single organizations let's say microsoft, amazon etc., so we as users no longer have a physical possession of our data (in case if we use the cloud).
On the other hand the number of system administrators that are needed for an administration of a huge cluster is dramatically decreased, the every day system administrator, who needs to check a few webservers and a mail server on daily basis, cache web data with a squid proxy cache or just restart a server will be no longer necessary.
Therefore about few million of peoples would have to loose their jobs, the people necessary to administrate a cluster will be probably no more than few thousands as the clouds are so high that no more than few clouds will exist on the net.
The idea behind the cluster is that we the users store retrieve our desktops and boot our operating system from the cluster.
Even loading a simple webpage will have to retrieve it's data from the cluster.
Therefore it looks like in the future the cloud computing and the internet are about to become one and the same thing. The internet might become a single super cluster where all users would connect with their user ids and do have full access to the information inside.
Technologies like OpenID are trying to make the user identification uniform, I assume a similar uniform user identication will be used in the future in a super cloud where everybody, where entering inside will have access to his/her data and will have the option to access any other data online.
The desire of humans and business for transperancy would probably end up in one day, where people will want to share every single bit of information.
Even though it looks very cool for a sci-fi movie, it's seriously scary!
Cloud computing expenses as they're really high would be affordable only for a multi-national corporations like Google and Microsoft
Therefore small and middle IT business (network building, expanding, network and server system integration etc.) would gradually collapse and die.
This are only a few small tiny bit of concerns but in reality the problems that cloud computing might create are a way more severe.
We the people should think seriously and try to oppose cloud computing, while we still can! It might be even a good idea if a special legislation that is aming at limiting cloud computing can be integrated and used only inside the boundary of a prescribed limitations.
Institutions like the European Parliament should be more concerned about the issues which the use of cloud computing will bring, EU legislation should very soon be voted and bounding contracts stop clouds from expanding and taking over the middle size IT business.
Mon Mar 28 12:18:00 EEST 2011
How to set password on a mysql server without a password via mysql command line interface
Many Linux distributions's offered
MySQL server comes without a set default password, in practice you
can freely login to the mysql server on a plain mysql server
installation on Debian, Ubuntu or Fedora by simply
issuing:
Pressing enter will straight let you in the mysql server. The same kind of behaviour is also probably true on BSD based and many other Unixes which have pre-installed or the option to install a new mysql server.
I remember in my past that I've even seen a productive mysql servers on a servers running CMS based websites which doesn't have a root password set.
Some administrators doesn't take the time to think about the implications of the no password mysql installation and therefore being in a hurry simply let the server without an administrator password.
This is very common for the most lame and uneducated ones. Many novice system administrators think that by installing a phpmyadmin and configuring a password on it's web interface is equal to setting up the mysql server (daemon) a password.
Thus for all this the uneducated ones and for all those who already have noticed that their newly installed mysql server doesn't have a password set I've decided to give an example how a new mysql server password can be set or how an existing mysql server pass can be changed to a new one
To make any password manipulations usually the mysql-client package does provide a very handy instrument called mysqladmin , mysqladmin has many possibilities among which is creating a new mysql server admin (root) password or changing a previously set mysql server password to a new one
1. Here is how you can set a new MySQL server password:
2. If you need to change an already existing mysql password you need to provide just one more argument to mysqladmin:
Whether the Enter password: field appears you will be required to fill in the original mysql server root password after which the password will be changed to the above string passed in to the mysqladmin command line 'YOURasdfdsaNEWasddsaPASSWORD_HERE'
That's all now you have either set a new password for the mysql server or have already changed your previous one.
linux:~# mysql -u root

Enter password:
Pressing enter will straight let you in the mysql server. The same kind of behaviour is also probably true on BSD based and many other Unixes which have pre-installed or the option to install a new mysql server.
I remember in my past that I've even seen a productive mysql servers on a servers running CMS based websites which doesn't have a root password set.
Some administrators doesn't take the time to think about the implications of the no password mysql installation and therefore being in a hurry simply let the server without an administrator password.
This is very common for the most lame and uneducated ones. Many novice system administrators think that by installing a phpmyadmin and configuring a password on it's web interface is equal to setting up the mysql server (daemon) a password.
Thus for all this the uneducated ones and for all those who already have noticed that their newly installed mysql server doesn't have a password set I've decided to give an example how a new mysql server password can be set or how an existing mysql server pass can be changed to a new one
To make any password manipulations usually the mysql-client package does provide a very handy instrument called mysqladmin , mysqladmin has many possibilities among which is creating a new mysql server admin (root) password or changing a previously set mysql server password to a new one
1. Here is how you can set a new MySQL server password:
mysqladmin -u root 'password'
YOURasddsaPASSWORDjqweHERE
2. If you need to change an already existing mysql password you need to provide just one more argument to mysqladmin:
mysqladmin -u root 'password'
YOURasdfdsaNEWasddsaPASSWORD_HERE -p Enter
password:
Whether the Enter password: field appears you will be required to fill in the original mysql server root password after which the password will be changed to the above string passed in to the mysqladmin command line 'YOURasdfdsaNEWasddsaPASSWORD_HERE'
That's all now you have either set a new password for the mysql server or have already changed your previous one.
Sun Mar 27 14:51:34 EEST 2011
The Exaltation of the Precious and Life-creating Cross day in the Bulgarian Orthodox Church
Today, we celebrate the exaltation
of the precious and life-creating(giving) Cross day in the
Bulgarian Orthodox Church
The feast is extraordinary holy and beautiful, the priest brings the life-giving cross from the Altar and brings the Crucifixion cross on a table in the center of the Church.
While the priest's crossing the temple with the precious life-giving cross in a small metal dish raising the cross over his heads, he sing the so called Troparion of the cross as you can read below:
Save, O Lord, Thy people, and bless Thine inheritance,
granting unto the faithful victory over adversaries, and by the
power of Thy Cross, do Thou preserve Thy commonwealth


Further on the song,"Before Thy Cross, we bow down in worship, O
Master, and Thy holy Resurrection we glorify" is sang three
times.


The priest blesses all the present clergy and layman in the the
Church and leaves the life-giving cross for veneration.

Then we all the layman do line-up kiss and bow infront of the cross
which brought salvation to us Christians and opened us the doors
Christ.


As far as my understanding goes (though I'm not a competent
person), today's exaltation of the cross is minor feast and is
different from the day of the so called Universal Exaltation of
the Precious and Life-creating cross


The feast by God's grace is one of the very blessed ones in the
orthodox church and thus is an enormous joy for all us the orthodox
christians.

Next to kissing the layman in the church are also offered to take a
small branch of basil (a symbol of royalty) and better said as
another blessing.
Posted by hip0 |
Permanent link
Sat Mar 26 17:42:51 EET 2011
Why Open Social Networks like facebook and
twitter are a big EVIL!
We all have seen the boom in
the social networking in the last years.
Friend's (find a person to fuck networks) like facebook has
been booming for already 5+ years, professional business networks
like Linkedin and xing are becoming an absolute
requirement for everybody that has to be a player in the business
realm.
Moving forward the list is endless orkut , my opera ,
twitter , flickr you name it ..
What is the big lie about social networks? The Social word.
There is anything else but social in this networks.
You make an account join a network and start exploring a dead
binary data in form of picture music, irc chat, or play games alone
or with others. The amount of time you spend in front of a computer
screen an ipod, iphone, ipad or IFUCK!  gradually
increases.
gradually
increases.
People are starting to become an electronic zoombies, live
interactions like a simple game of football outside, chess
tournament a simple coffee or tea with friends is starting to
become an extraordinary thing.
People share more and more, it's important to share the best of you
it's important to create a false image of yourself in let's say
facebook , it's generally important for most people to look
good on their uploaded pics to smile and share everything they do
in real life.
In practice if you have signed up in any social network and do
actively post your information you're building an online very
thorough dossier (record) of everything you do.
Your online record that large computer software and manifacturers
like Microsoft and Google does most probably already own a
tremendous record of who you're what you do, why you do it and how
you do it!
What makes it even worse it's voluntary you're transperant, you
share your thoughts you create new identity, you hide under a new
avatar to build just one big lie identity.
How it comes that people knows each other that well that they could
share themselves that much? Maybe I ask too much, but it's a
fact.
How can go into creating new identities, if are not even aware of
what our own identity is.
Have you felt that bad feeling, when you see a lot of morons in
facebook posing like a great and glorious people?
The rule in the social networks is the more dumb you're the better,
be opened, share everything, share your soul ...
All I describe is a enormous breach of privacy and the consequences
for the real life interactions of people are really
destructive.
We are so social on the internet today, that the internet has
become our second home, maybe our first one? Maybe we live in the
virtual reality? Where all this meaningless insanity would end
up?
And what is even worser about social networks is that they're all
about money, it's also true for the internet, even though it
started as a promising and good intention, when business entered
they turned it into a dead place for business.
The fun of the old computer glorious days is no more. Computers and
the coproduced technologies are being used inefficient increative
and binding.
We don't even have control over the social networks, it's all a
large database filled with information about millions of people
around the globe owned by a business company.
The more people interact with technology and the more pseudo social
they become, they're all becoming in an inexistent imaginary place
that constantly reshapes and takes forms.
The old sanity we all had is lost somewhere in the days
...
Posted by hip0 |
Permanent link
Sat Mar 26 12:53:18 EET 2011
Setting script to be executed before and
after (suspend and resume) in hibernate on Debian
Squeeze
I'm using a script called
/usr/sbin/restart_trackpoint.sh to restart periodically my
R61 Thinkpad trackpoint device.

Without this script my trackpoint often hanges and as a side effect
causes my whole Gnome desktop to disfunction.

This happens every now and then and it's deadly irritating
...


I've noticed that the problem where my thinkpad trackpoint breaks
happens most often after my notebook system resume/suspend
hibernate functions are in use


I do use the linux hibernate via /usr/sbin/hibernate
almost every time I decide to stop my laptop and therefore the
hibernate function is something I do use on daily basis.

When suddenly as a consequence of the hibernations the trackpoint
problems appeared, I've realized that I need a way to place my
/usr/sbin/restart_trackpoint.sh script to be executed
everytime my system comes from a previous hibernate (e.g.
restores).


The documentation of hibernate was not too much clear to me but
after some experiments and thanks to something I read on
help.ubuntu.com I finally found how to achieve my desired
task.


For other people which might have a requirement to set a script to
be issued on hibernate suspend or hibernate restore here is
how it can be done on Debian Squeeze and in testing/untsable


1. Create new file in
/usr/lib/pm-utils/sleep.d/100resume


debian:~# vim
/usr/lib/pm-utils/sleep.d/100resume


2.Place in it for instance the script:


#!/bin/sh

##

## 100resume

##


case $1 in

suspend)

## COMMANDS THAT YOU WISH TO RUN BEFORE SUSPEND

#COMMAND1

echo "Suspeding ...";

;;

resume)

## COMMANDS THAT YOU WISH TO RUN AFTER RESUME

/usr/sbin/restart_trackpoint.sh

;;

hibernate)

## COMMANDS THAT YOU WISH TO RUN BEFORE HIBERNATE

#COMMAND3

echo "Hibernating ...";

;;

thaw)

## COMMANDS THAT YOU WISH TO RUN AFTER RESUME FROM SUSPEND TO
DISK

#COMMAND4

;;

esac


Now you might need to modify the above script's each of the
sections to determine what kind of commands you would like to
execute before resume) and hibernate)

When you're done with the file, 3.make it executable


debian:~# chmod +x
/usr/lib/pm-utils/sleep.d/100resume


4. Test if your script works with hibernate's resume and
restore


debian:~# /usr/sbin/hibernate


After the hibernate completes, launch the power on pc button and
checkout if the system instructions defined in 100resume are
being applied.
Fri Mar 25 18:45:36 EET 2011
Granting regular system user with permissions to restart system services (/etc/init.d/ daemons) on Debian Linux via sudo
If you're a system administrator, you
have certainly have faced the task to allow a regular system user
without system root permissions to be able to restart some of the
system services, every now and then.
This case is very often encountered, if you have to work with a group of programmers who need to restart certain daemon services either that directly are related to some of your programmers.
An example case would be a java programmer/s, who runs code on a tomcat or resin server. Another possible scenario which I just encountered is a php programmer, who needs to experiment with nginx rewrite rules.
Another scenario, where you have to grant access to stop, start or restart functions of some init scripts like let's say /etc/init.d/mysql or /etc/init.d/apache would be if you have to work in a team with other system administrators or some unix tech support guy (second system admin) etc.
The cases in which you might need to enpower an otherwise regular user BSD/Linux system account with extra administrator (root) permissions are multiple, however what is important is how you can do this when suddenly you need to complete this task.
There are quite a lot of things written on the topic and I remember that the first time I had to add a regular Linux system accounts to have an extra permissions only tosome system binaries was a real pain in the ass.
It took me a lot of searching online reading forums and asking in irc.freenode.net until I got the solution, but thanksfully finally I got it.
Therefore I found it might be interesting to my readers to find out how this trivial but very helpful task can be achieved on Linux and BSD and possibly other UNIX server or desktop installs.
The key to the whole set task resides in the is in the handy Linux tool Sudo that I believe every system administrator out there is aware of.
Even the sudo tool debian package description indicates that it's the exact tool one needs to allow certain user to execute commands as root. Here is sudo's description:
Using sudo to complete the set task, on a first glimpse looks really complex, however it appears to achieve allowing a regular user to execute as root is pretty simple.
To give you an idea how you can achieve the task I'll give a simple scenario.
Let's assume you need to add the Linux system users with login names: ivan and testuser to be able to restart your Apache,MySQL and Nginx servers via the services respective init scripts.
Here is how to achieve it:
1. First you need to have the sudo package installed
If you already have the package then simply skip step 1 and proceed further.
2. Edit /etc/sudoers with your favourite text editor and find the text
3. After the text insert the code:
That's all now the normal system users with non-root permissions ivan and testuser will be allowed to restart your Debian Linux Apache, MySQL and Nginx services.
4. Now let's test your if your users can properly restart the 3 services with the testuser
As you can see in the above commands execution output now my testuser which is a non-root user is able to use some of my services which require administrator permissions.
Now if you need to add some more services which require root permissions, simply place some more code in the /etc/sudoers let's assume you need to put the example service which binary is to be found in /usr/sbin/example , you will have to place in your /etc/sudoers
This case is very often encountered, if you have to work with a group of programmers who need to restart certain daemon services either that directly are related to some of your programmers.
An example case would be a java programmer/s, who runs code on a tomcat or resin server. Another possible scenario which I just encountered is a php programmer, who needs to experiment with nginx rewrite rules.
Another scenario, where you have to grant access to stop, start or restart functions of some init scripts like let's say /etc/init.d/mysql or /etc/init.d/apache would be if you have to work in a team with other system administrators or some unix tech support guy (second system admin) etc.
The cases in which you might need to enpower an otherwise regular user BSD/Linux system account with extra administrator (root) permissions are multiple, however what is important is how you can do this when suddenly you need to complete this task.
There are quite a lot of things written on the topic and I remember that the first time I had to add a regular Linux system accounts to have an extra permissions only tosome system binaries was a real pain in the ass.
It took me a lot of searching online reading forums and asking in irc.freenode.net until I got the solution, but thanksfully finally I got it.
Therefore I found it might be interesting to my readers to find out how this trivial but very helpful task can be achieved on Linux and BSD and possibly other UNIX server or desktop installs.
The key to the whole set task resides in the is in the handy Linux tool Sudo that I believe every system administrator out there is aware of.
Even the sudo tool debian package description indicates that it's the exact tool one needs to allow certain user to execute commands as root. Here is sudo's description:
Sudo (superuser do) allows a system

administrator to give certain users (or

groups of users) the ability to run some

(or all) commands as root or another user

while logging the commands and arguments.
Using sudo to complete the set task, on a first glimpse looks really complex, however it appears to achieve allowing a regular user to execute as root is pretty simple.
To give you an idea how you can achieve the task I'll give a simple scenario.
Let's assume you need to add the Linux system users with login names: ivan and testuser to be able to restart your Apache,MySQL and Nginx servers via the services respective init scripts.
Here is how to achieve it:
1. First you need to have the sudo package installed
debian:~# apt-get install sudo
If you already have the package then simply skip step 1 and proceed further.
2. Edit /etc/sudoers with your favourite text editor and find the text
root ALL=(ALL) ALL
3. After the text insert the code:
Cmnd_Alias APACHE = /etc/init.d/apache2

User_Alias APACHEUSERS = ivan, testuser

APACHEUSERS ALL = NOPASSWD : APACHE


Cmnd_Alias MYSQL = /etc/init.d/mysql

User_Alias NGINXUSERS = ivan, testuser

MYSQLUSERS ALL = NOPASSWD : NGINX


Cmnd_Alias NGINX = /etc/init.d/nginx

User_Alias NGINXUSERS = soccerfame, hipo

NGINXUSERS ALL = NOPASSWD : NGINX
That's all now the normal system users with non-root permissions ivan and testuser will be allowed to restart your Debian Linux Apache, MySQL and Nginx services.
4. Now let's test your if your users can properly restart the 3 services with the testuser
debian:~# su testuser

testuser@debian:~$ id

uid=1001(testuser) gid=1001(testuser) groups=1001(testuser)


testuser@debian:~$ sudo /etc/init.d/nginx restart

Restarting nginx: nginx.

testuser@debian:~$ sudo /etc/init.d/apache2 restart

Restarting web server: apache2 ... waiting .

testuser@debian:~$ sudo /etc/init.d/mysql restart

Stopping MySQL database server: mysqld.

Starting MySQL database server: mysqld.

Checking for corrupt, not cleanly closed and upgrade needing
tables..
As you can see in the above commands execution output now my testuser which is a non-root user is able to use some of my services which require administrator permissions.
Now if you need to add some more services which require root permissions, simply place some more code in the /etc/sudoers let's assume you need to put the example service which binary is to be found in /usr/sbin/example , you will have to place in your /etc/sudoers
Cmnd_Alias EXAMPLE = /usr/sbin/example

User_Alias EXAMPLEXUSERS = ivan, testuser

MYSQLUSERS ALL = NOPASSWD : EXAMPLE
Fri Mar 25 15:18:26 EET 2011
The Annunciation of Christ's conceive to The Blessed Theotokos (The Mother of God)

Today we fete the Annunciation of Christ's conceive of Virgin Mary in the Bulgarian Orthodox Church. The Annunciation is one of the 9 greatest Christian feasts in memoriam of the living the death and the resurrection of our Lord Jesus Christ and the Blessed Mother of God (Virgin Mary).
The Annunciation feast is being celebrated in the realm of all Orthodox Christian Churches (nation-wide).
The date on which the feast is celebrated in the bulgarian orthodox church is different every single year and depends on the Great Lent's yearly schedule according to the (Julian Calendar, Revised Julian Calendar and Gregorian Calendar).
On this date we do commemorate the announcement by the Archangel Gabriel to Vigin Mary that she would become the mother of our Lord Jesus Christ!
Here is what we read in the Bible about the Archangel's going to the Theotokos and Virgin mary's immeasurable humbleness:
26 In the sixth month of Elizabeth's pregnancy, God sent the angel Gabriel to Nazareth, a town in Galilee,
27 to a virgin pledged to be married to a man named Joseph, a descendant of David. The virgin's name was Mary.
28 The angel went to her and said, Greetings, you who are highly favored! The Lord is with you.
29 Mary was greatly troubled at his words and wondered what kind of greeting this might be.
30 But the angel said to her, Do not be afraid, Mary; you have found favor with God.
31 You will conceive and give birth to a son, and you are to call him Jesus.
32 He will be great and will be called the Son of the Most High. The Lord God will give him the throne of his father David,
33 and he will reign over Jacob's descendants forever; his kingdom will never end.
34 How will this be, Mary asked the angel, since I am a virgin?
35 The angel answered, The Holy Spirit will come on you, and the power of the Most High will overshadow you. So the holy one to be born will be called[b] the Son of God.
36 Even Elizabeth your relative is going to have a child in her old age, and she who was said to be unable to conceive is in her sixth month.
37 For no word from God will ever fail.
38 I am the Lord's servant, Mary answered. May your word to me be fulfilled. Then the angel left her.
The living of the blessed mother of God (our shroud and hope) from it's early days is distinguished from the Church's tradition as extremely rightous.
At the time of this great God's mercy on us the sinners, mother mary is already engaged for the widowed elder Joseph.
Simply speaking the Annunciation is the first salvation light shed by the all merciful God on us.
Mother Mary believed the Angel's words and humbly answered "May your word to me be fulfilled.", - she believed the Archangel's words.
It's interesting fact that the Archangel's name Gabriel meanining from Jewish is (God-Man), which is another prophecy for the nature which our Lord and saviour Jesus Christ will possess.
The feast of the Annunciation is one of the two days during the fasting time before Eastern (The Resurrection of Christ), when we the Church members (churh layman and clergy) are allowed to eat Fish food
An interesting fact about the Annunciation feast day is that the Divine Liturgy of the Annunciation is the only celebration of the Eucharistic liturgy of Saint John Chrysostom allowed on a weekday of Great Lent.
Here is the Hymn sang by church singer (The Troparion):
Troparion

Today is the beginning of our salvation,

The revelation of the eternal mystery!

The Son of God becomes the Son of the Virgin

As Gabriel announces the coming of Grace.

Together with him let us cry to the Theotokos:

Rejoice, O Full of Grace,

The Lord is with You!


O Victorious Leader of Triumphant Hosts!

We, your servants, delivered from evil, sing our grateful thanks to
you, O Theotokos!

As you possess invincible might, set us free from every
calamity

So that we may sing: Rejoice, O unwedded Bride!
Kontaktion

Today is the prelude of joy for the universe!

Let us anticipate the feast and celebrate with exultation:

Gabriel is on his way to announce the glad tidings to the
Virgin;

He is ready to cry out in fear and wonder:

Rejoice, O Full of Grace, the Lord is with You!


Kontakion


You are the beginning of salvation for all of us on earth, Virgin
Mother of God.

For the great Archangel Gabriel, God's minister,

Was sent from heaven to stand before you to bring you joy:

Therefore, we all cry to you: Rejoice, O unwedded
Bride.
Let us all be glad and give thanks to The Holy Trinity for his great mercy and ask the Blessed Theotokos to pray his Son and our God Jesus Christ to save us and grant us eternal life in heaven.
Oh Mother of God, Most Blessed of all eartly creatures pray your Son and our Lord to have mercy on us the sinners!
Thu Mar 24 16:34:24 EET 2011
How to remove "Comments Closed" to appear on your home and pages on Wordpress blog / Removing "Comments Closed" message to appear in wordpress
I'm currently configuring one
wordpress based installation to serve as a mini website for old
fashined furniture.
By so far I was able to close the comments on the wordpress Pages but still face huge difficulties with making the wordpress installation to looes it's blog a like, look and feel and look a bit like a normal website.
The major issue I faced was with removing the irritating message Comments Closed which was appearing right after my post on my Home configured wordpress page.
It took me some readings online and some experimentation until I got the solution, to make the life easier of other people who face the Comments Closed can't remove issue here is how I scraped the message out:
1. Go to your wordpress install directory and look for the wp-content/themes directory inside it select the theme which you have selected as a default for your wordpress via the admin page.
I assume you're using the default template and thus switch to the directory wp-content/themes/default , e.g.:
wp-host:~# cd
/var/www/wordpress/wp-content/themes/default

2. Inside the theme directory look up all your files for
records like:


Comments Closed


wp-host:/var/www/wordpress/wp-content/themes/default:~# grep
-rli 'Comments Closed' *

archive.php de_DE.mo es_ES.mo fr_FR.mo index.php it_IT.mo page.php
ru_RU.mo search.php single.php


As you can see in the output there are few php files which seems to
include the Comments Closed text inside them, therefore our
files of interest which needs modifications are: archive.php,
index.php, page.php, search.php and single.php


3. Open up each of the aforementioned php files and look in each
one of them for:


comments_popup_link([ some code ]);


When you stumble on the comments_popup_link function one
line before the function opening php code with <php
starts insert the code:


<?php if('open' == $post-<comment_status) :
?>


At the end of the <?php comments_popup_link([ some code
]);?> code on the next line fill in the code:


<?php endif;?>


4. Do the step 3 for all your found php files which include the
comments_popup_link function. That's it now your "Comments
Closed" message will disappear all your wordpress posts and the
wordpress install would start looking more like a
website.
Thu Mar 24 13:34:38 EET 2011
DOOM 1, DOOM 2, DOOM 3 game wad files for download / Playing Doom on Debian Linux via FreeDoom open source doom engine

Every now and then as an ex-gamer I do remember the good glorious times of the DooM oldschool 3d shooter game.
As a Linux user I do have the option to play Doom 1 and Doom 2 straight using the GPLed version of the game called FreeDoom
FreeDoom comes with a custom wad file called freedoom.wad which is a considerably good remake of the doom game, but still I don't find so funny and bringing memories as the original game.
Thus in order to experience the original doom game play, levels and sound on my Linux, I need to use the original doom wad files
The DooM original wad files are already an abandonware and nowdays it's a bit hard to be found. Still the wad files for the games are available for download on some major torrent trackers like piratebay but it takes time to find them therefore I decided to publicly share the Doom 1, Doom 2 and Doom 3 wad files to be easier for me to later put and play them on Linux and BSD operating systems, on the other hand I do think this files might be useful for many other oldschool DooM fans out there.
Here are the files for download:
1. Download doom 1, doom 2 and doom 3 wad files + extra of plutonia wad and tnt wad rar archive
2. Download Doom1.wad file
3. Download Doom2.wad file
4. Download Doom3.wad file
5. Download Doom Plutonia.wad
6. Download Doom Tnt.wad
On my Debian Linux with the freedoom package in order to play the Doom1 or Doom2 wad files it's necessary to download and place the doom1.wad or doom2.wad files into the directory /usr/share/games/doom
It's important that the WAD files names does not contain capital letters (e.g. the files need to be placed with file names doom1.wad and doom2.wad)
The FreeDoom port package in Debian Lenny and Squeeze is available to be installed easily through apt like so:
debian:~# apt-get install freedoom
Enjoy the nice oldschool game ;)
Wed Mar 23 17:11:32 EET 2011
Check out Jude The Obscure - an oldschool friends cool Indyrock Band
An oldschool friends band had
released their band Jude The
ObScure website
I know Nikola (the drummer) of the band for quite some time and had a deep old friendship from the old times.
Back in the day he was creating music (writting music) in a band called Solitute - an old bulgarian band from the late years of last century (year 1998-2003), in that past years I was still in my youth and it was quite an inspiring thing to be on a concert in Dobrich's Youth House (Mladezhki Dom), some concerts were also organized in city schools and even sometimes in the city center.
Jude the Obscure 's band guitarist (Milen) is also a good friend from the past he even was schoolmate in the same study class as I was.
I remember Milen has this profound attraction to guitars since he was maybe 12 years old. Nikola is playing the drums also from around his thirteens.
Now just a year about I've heard that still Nikola and Milen are making music together in a band which has quickly changed a couple of band names.
Nikola and Milen had a number of recorded songs by so far and they currently play together in the band with the artistic name Jude The Obscure .
The genre of their music (Indyrock) is quite an unusual like the band and is quickly increasing the number of fans in the underground scene.
I'm very pleased by the nice songs they have bundled together, presently the website offers for direct play 6 of their recorded band songs.
Two of the band songs comes also with a nice videos you can watch straight from my blog below:
Jude The Obscure - Make us proud
Jude the Obscure - Live in Sofia Oct 2010
What is even better is that the produced music by Jude the Obscure is available freely under the Creative Commons Attribution-NonCommercial-ShareAlike 3.0 Unported License, which means we can freely distribute the songs without any copyright breaches ;)
I hope the band will very soon put together an album I can enjoy :)
Wed Mar 23 12:07:01 EET 2011
How to install nginx webserver from source on Debian Linux / Install Latest Nginx on Debian
If you're running a large website
consisting of a mixture of php scripts, images and html. You
probably have noticed that using just one Apache server to serve
all the content is not that efficient
Each Apache child (I assume you're using Apache mpm prefork consumes approximately (20MB), this means that each client connection would consume 20 mb of your server memory.
This as you can imagine is truly a suicide in terms of memory. Each request for a picture, css or simple html file would ask Apache to fork another process and will consume (20mb of extra memory form your server mem capacity)!.
Taking in consideration all this notes and the need for some efficiency here, the administrator should normally think about dividing the processing of the so called static content from the dynamic content served on the server.
Apache is really a nice webserver software but with all the loaded modules to serve dynamic content, for instance php, cgi, python etc., it's becoming not the best solution for handling a (css, javascript, html, flv, avi, mov etc. files).
Even a plain Apache server installation without (libphp, mod_rewrite mod deflate etc.) is still not dealing efficiently enough with the aforementioned static files content
Here comes the question if Apache is not that quick and efficient in serving static files, what then? The answer is caching webserver! By caching the regular static content files, your website visitors will benefit by experiencing shorter webserver responce files in downloading static contents and therefore will generally hasten your website and improve the end user's experience.
There are plenty of caching servers out there, some are a proprietary software and some are free software.
However the three most popular servers out there for static file content serving are:
In this article as you should have already found out by the article title I'll discuss Nginx
You might ask why exactly Nginx and not some of the other twos, well simply cause Squid is too complicated to configure and on the other hand does provide lower performance than Nginx. On the other hand Varnish is also a good solution for static file webserver, but I believe it is not tested enough. However I should mention that my experience with testing varnish on my own home router is quite good by so far.
If you're further interested into varhisn cache I would suggest you checkout www.varhisn-cache.org .
Now as I have said a few words about squid and varhisn let's proceed to the essence of the article and say few words about nginx
Here is a quote describing nginx in a short and good manner directly extracted from nginx.com
nginx [engine x] is a HTTP and reverse proxy server, as well as a mail proxy server written by Igor Sysoev. It has been running for more than five years on many heavily loaded Russian sites including Rambler (RamblerMedia.com). According to Netcraft nginx served or proxied 4.70% busiest sites in April 2010. Here are some of success stories: FastMail.FM, Wordpress.com.
By default nginx is available ready to be installed in Debian via apt-get, however sadly enough the version available for install is pretty much outdated as of time of writting the nginx debian version in lenny's deb package repositories is 0.6.32-3+lenny3
This version was release about 2 years ago and is currently completely outdated, therefore I found it is not a good idea to use this old and probably slower release of nginx and I jumped further to install my nginx from source:
Nginx source installation actually is very simple on Linux platforms.
1. As a first step in order to be able to succeed with the install from source make sure your system you have installed the packages:
2. Secondly download latest nginx source code tarball
Check out on http://nginx.com/download the latest stable release of nginx and further issue the commands below:
3.Unarchive nginx source code
The nginx server requirements for me wasn't any special so I proceeded and used the nginx ./configure script which is found in nginx-0.9.6
4. Compline nginx server
The last lines printed by the nginx configure script are actually the major interesting ones for administration purposes the default complation options in my case were:
If you want to setup nginx server to support ssl (https) and for instance install nginx to a different server path you can use some ./configure configuration options, for instance:
./configure --sbin-path=/usr/local/sbin --with-http_ssl_module
Now before you can start the nginx server, you should also set up the nginx init script;
5. Download and set a ready to use script with cmd:
6. Configure Nginx
Nginx is a really easy and simple server, just like the Russians, Simple but good!
By the way it's interesting to mention nginx has been coded by a Russian, so it's robust and hard as a rock as all the other Russian creations :)
Nginx configuration files in a default install as the one in my case are to be found in /usr/local/nginx/conf
In the nginx/conf directory you're about to find the following list of files which concern nginx server configurations:
The .default files are just a copy of the ones without the .default extension and contain the default respective file directives.
In my case I'm not using fastcgi to serve perl or php scripts via nginx so I don't need to configure the fastcgi.conf and fastcgi_params files, the scgi_params and uwsgi_params conf files are actually files which contain nginx configuration directives concerning the use of nginx to process SSI (Server Side Include) scripts and therefore I skip configuring the SSI conf files.
koi-utf and koi-win are two files which usually you don't need to configure and aims the nginx server to support the UTF-8 character encoding and the mime.types conf is a file which has a number of mime types the nginx server will know how to handle.
Therefore after all being said the only file which needs to configured is nginx.conf
7. Edit /usr/local/nginx/conf/nginx.conf
Therein you will find the following default configuration:
In the default configuration above you need to modify only the above block of code as follows:
Change the yoursitedomain.com and /var/www/yoursitedomain.com/html with your directory and website destinations.
8. Start nginx server with nginx init script
This should bring up the nginx server, if something is miss configured you will notice also some error messages, as you can see in my case in above init script output, thanksfully there are no error messages.
Note that you can also start nginx directly via invoking /usr/local/nginx/sbin/nginx binary
To check if the nginx server has properly started from the command line type:
Another way to check if the web browser is ready to serve your website file conten,t you can directly access your website by pointing your browser to with http://yoursitedomain.com/, you should get your either your custom index.html file or the default nginx greeting Welcome to nginx
9. Add nginx server to start up during system boot up
That's all now you have up and running nginx and your static file serving will require you much less system resources, than with Apache.
Hope this article was helpful to somebody, feedback on it is very welcome!
}
Each Apache child (I assume you're using Apache mpm prefork consumes approximately (20MB), this means that each client connection would consume 20 mb of your server memory.
This as you can imagine is truly a suicide in terms of memory. Each request for a picture, css or simple html file would ask Apache to fork another process and will consume (20mb of extra memory form your server mem capacity)!.
Taking in consideration all this notes and the need for some efficiency here, the administrator should normally think about dividing the processing of the so called static content from the dynamic content served on the server.
Apache is really a nice webserver software but with all the loaded modules to serve dynamic content, for instance php, cgi, python etc., it's becoming not the best solution for handling a (css, javascript, html, flv, avi, mov etc. files).
Even a plain Apache server installation without (libphp, mod_rewrite mod deflate etc.) is still not dealing efficiently enough with the aforementioned static files content
Here comes the question if Apache is not that quick and efficient in serving static files, what then? The answer is caching webserver! By caching the regular static content files, your website visitors will benefit by experiencing shorter webserver responce files in downloading static contents and therefore will generally hasten your website and improve the end user's experience.
There are plenty of caching servers out there, some are a proprietary software and some are free software.
However the three most popular servers out there for static file content serving are:
- Squid,
- Varnish
- Nginx
In this article as you should have already found out by the article title I'll discuss Nginx
You might ask why exactly Nginx and not some of the other twos, well simply cause Squid is too complicated to configure and on the other hand does provide lower performance than Nginx. On the other hand Varnish is also a good solution for static file webserver, but I believe it is not tested enough. However I should mention that my experience with testing varnish on my own home router is quite good by so far.
If you're further interested into varhisn cache I would suggest you checkout www.varhisn-cache.org .
Now as I have said a few words about squid and varhisn let's proceed to the essence of the article and say few words about nginx
Here is a quote describing nginx in a short and good manner directly extracted from nginx.com
nginx [engine x] is a HTTP and reverse proxy server, as well as a mail proxy server written by Igor Sysoev. It has been running for more than five years on many heavily loaded Russian sites including Rambler (RamblerMedia.com). According to Netcraft nginx served or proxied 4.70% busiest sites in April 2010. Here are some of success stories: FastMail.FM, Wordpress.com.
By default nginx is available ready to be installed in Debian via apt-get, however sadly enough the version available for install is pretty much outdated as of time of writting the nginx debian version in lenny's deb package repositories is 0.6.32-3+lenny3
This version was release about 2 years ago and is currently completely outdated, therefore I found it is not a good idea to use this old and probably slower release of nginx and I jumped further to install my nginx from source:
Nginx source installation actually is very simple on Linux platforms.
1. As a first step in order to be able to succeed with the install from source make sure your system you have installed the packages:
debian:~# apt-get install libpcre3 libpcre3-dev libpcrecpp0
libssl-dev zlib1g-dev build-essential
2. Secondly download latest nginx source code tarball
Check out on http://nginx.com/download the latest stable release of nginx and further issue the commands below:
debian:~# cd /usr/local/src

debian:/usr/local/src# wget
http://nginx.org/download/nginx-0.9.6.tar.gz
3.Unarchive nginx source code
debian:/usr/local/src#tar -zxvvf nginx-0.9.6.tar.gz

...
The nginx server requirements for me wasn't any special so I proceeded and used the nginx ./configure script which is found in nginx-0.9.6
4. Compline nginx server
debian:/usr/local/src# cd
nginx-0.9.6

debian:/usr/local/src/nginx-0.9.6# ./configure

+ Linux 2.6.26-2-amd64 x86_64

checking for C compiler ... found

+ using GNU C compiler

+ gcc version: 4.3.2 (Debian 4.3.2-1.1)

checking for gcc -pipe switch ... found

...

...
The last lines printed by the nginx configure script are actually the major interesting ones for administration purposes the default complation options in my case were:
Configuration summary

+ using system PCRE library

+ OpenSSL library is not used

+ md5: using system crypto library

+ sha1 library is not used

+ using system zlib library


nginx path prefix: "/usr/local/nginx"

nginx binary file: "/usr/local/nginx/sbin/nginx"

nginx configuration prefix: "/usr/local/nginx/conf"

nginx configuration file: "/usr/local/nginx/conf/nginx.conf"

nginx pid file: "/usr/local/nginx/logs/nginx.pid"

nginx error log file: "/usr/local/nginx/logs/error.log"

nginx http access log file:
"/usr/local/nginx/logs/access.log"

nginx http client request body temporary files:
"client_body_temp"

nginx http proxy temporary files: "proxy_temp"

nginx http fastcgi temporary files: "fastcgi_temp"

nginx http uwsgi temporary files: "uwsgi_temp"

nginx http scgi temporary files: "scgi_temp"
If you want to setup nginx server to support ssl (https) and for instance install nginx to a different server path you can use some ./configure configuration options, for instance:
./configure --sbin-path=/usr/local/sbin --with-http_ssl_module
Now before you can start the nginx server, you should also set up the nginx init script;
5. Download and set a ready to use script with cmd:
debian:~# cd /etc/init.d

debian:/etc/init.d# wget
http://pc-freak.net/files/nginx-init-script

debian:/etc/init.d# mv nginx-init-script nginx

debian:/etc/init.d# chmod +x nginx
6. Configure Nginx
Nginx is a really easy and simple server, just like the Russians, Simple but good!
By the way it's interesting to mention nginx has been coded by a Russian, so it's robust and hard as a rock as all the other Russian creations :)
Nginx configuration files in a default install as the one in my case are to be found in /usr/local/nginx/conf
In the nginx/conf directory you're about to find the following list of files which concern nginx server configurations:
deiban:/usr/local/nginx:~# ls -1

fastcgi.conf

fastcgi.conf.default

fastcgi_params

fastcgi_params.default

koi-utf

koi-win

mime.types

mime.types.default

nginx.conf

nginx.conf.default

scgi_params

scgi_params.default

uwsgi_params

uwsgi_params.default

win-utf
The .default files are just a copy of the ones without the .default extension and contain the default respective file directives.
In my case I'm not using fastcgi to serve perl or php scripts via nginx so I don't need to configure the fastcgi.conf and fastcgi_params files, the scgi_params and uwsgi_params conf files are actually files which contain nginx configuration directives concerning the use of nginx to process SSI (Server Side Include) scripts and therefore I skip configuring the SSI conf files.
koi-utf and koi-win are two files which usually you don't need to configure and aims the nginx server to support the UTF-8 character encoding and the mime.types conf is a file which has a number of mime types the nginx server will know how to handle.
Therefore after all being said the only file which needs to configured is nginx.conf
7. Edit /usr/local/nginx/conf/nginx.conf
debian:/usr/local/nginx:# vim
/usr/local/nginx/conf/nginx.conf
Therein you will find the following default configuration:
#gzip on;


server {

listen 80;

server_name localhost;


#charset koi8-r;


#access_log logs/host.access.log main;


location / {

root html;

index index.html index.htm;

}

#error_page 404 /404.html;


# redirect server error pages to the static page /50x.html

#

error_page 500 502 503 504 /50x.html;

location = /50x.html {

root html;

}
In the default configuration above you need to modify only the above block of code as follows:
server {

listen 80;

server_name yoursitedomain.com;


#charset koi8-r;


#access_log logs/access.log main;


location / {

root /var/www/yoursitedomain.com/html;

index index.html index.htm;

}
Change the yoursitedomain.com and /var/www/yoursitedomain.com/html with your directory and website destinations.
8. Start nginx server with nginx init script
debian:/usr/local/nginx:# /etc/init.d/nginx start

Starting nginx:
This should bring up the nginx server, if something is miss configured you will notice also some error messages, as you can see in my case in above init script output, thanksfully there are no error messages.
Note that you can also start nginx directly via invoking /usr/local/nginx/sbin/nginx binary
To check if the nginx server has properly started from the command line type:
debian:/usr/local/nginx:~# ps ax|grep -i nginx|grep -v
grep

9424 ? Ss 0:00 nginx: master process
/usr/local/nginx/sbin/nginx

9425 ? S 0:00 nginx: worker process
Another way to check if the web browser is ready to serve your website file conten,t you can directly access your website by pointing your browser to with http://yoursitedomain.com/, you should get your either your custom index.html file or the default nginx greeting Welcome to nginx
9. Add nginx server to start up during system boot up
debian:/usr/local/nginx:# /usr/sbin/update-rc.d -f nginx
defaults
That's all now you have up and running nginx and your static file serving will require you much less system resources, than with Apache.
Hope this article was helpful to somebody, feedback on it is very welcome!
}
Tue Mar 22 19:34:43 EET 2011
How to add Search field back to Thunderbird / Icedove 3.0
After my last package upgrade from
Debian Testing/Unstable to Debian Squeeze, my Icedove (e.g.
Thunderbird) got also updated.
The new version which substituted the last one is 3.0.11.
Immediately after installation I was offered to migrate the way my Thunderbird looks, whether the new look wasn't very intuitive to me and therefore I decided to stick back to the old Thunderbird versions interface.
As I've closed the Migration Assistant, after selecting to use the old settings, a bit laters I suddenly realized my Thunderbird Search bar has disappeared!
That's a big shit especially, when I take the fact that I have about 5 mailboxes configured and I do regular searches for some data which I need in my mailboxes.
I did a lot of searching online for a solution to the issue, but it doesn't helps at all, even I took the time to ask in irc.mozilla.org , #thunderbird but noone there answered my question.
I therefore came to the good old method of try and fail. After a bunch of digging through the Thunderbird menus I accidently found a way to restore back my Search bar field.
Here is how;
As the newer versions of Thunderbird is equipped with The Thunderbird Migration Assistant , the migration assistant provides you with few configurable options which can help you move on your thunderbird interface to the newer look and feel (as I earlier said).
What is interesting here that the so called New Toolbar options when disabled does suddenly also remove the mail client's Search interface.
Therefore to fix my missing Thunderbird search bar, here is what I did:
1. Click over:
2. From the migration assitant go and click over use new toolbar
Now thanks God the Thunderbird Message Search will appear back in Icedove's toolbar.
The new version which substituted the last one is 3.0.11.
Immediately after installation I was offered to migrate the way my Thunderbird looks, whether the new look wasn't very intuitive to me and therefore I decided to stick back to the old Thunderbird versions interface.
As I've closed the Migration Assistant, after selecting to use the old settings, a bit laters I suddenly realized my Thunderbird Search bar has disappeared!
That's a big shit especially, when I take the fact that I have about 5 mailboxes configured and I do regular searches for some data which I need in my mailboxes.
I did a lot of searching online for a solution to the issue, but it doesn't helps at all, even I took the time to ask in irc.mozilla.org , #thunderbird but noone there answered my question.
I therefore came to the good old method of try and fail. After a bunch of digging through the Thunderbird menus I accidently found a way to restore back my Search bar field.
Here is how;
As the newer versions of Thunderbird is equipped with The Thunderbird Migration Assistant , the migration assistant provides you with few configurable options which can help you move on your thunderbird interface to the newer look and feel (as I earlier said).
What is interesting here that the so called New Toolbar options when disabled does suddenly also remove the mail client's Search interface.
Therefore to fix my missing Thunderbird search bar, here is what I did:
1. Click over:
Help -> Migration Assistant
2. From the migration assitant go and click over use new toolbar
Navigation Assistant -> use new toolbar
Now thanks God the Thunderbird Message Search will appear back in Icedove's toolbar.
Tue Mar 22 17:39:34 EET 2011
Fixing error: "net.ipv4.netfilter.ip_conntrack_tcp_timeout_syn_recv" is an unknown key on Debian Linux
If you're trying to tune up
your:
in /etc/sysctl.conf and you come across the error messages;
whether you're executing:
in order to make the net.ipv4.netfilter.* values to be set as a kernel values to iptables, you need to modify your /etc/modules file and add the nf_conntrack_ftp in it, here is how:
Now to make the new settings be reloaded issue the command:
Now the values will be properly set and you will see no longer the is an unknown key error messages like so:
net.ipv4.netfilter.ip_conntrack_tcp_timeout_syn_recv = 30
net.ipv4.netfilter.ip_conntrack_tcp_timeout_time_wait = 30
net.ipv4.netfilter.ip_conntrack_tcp_timeout_fin_wait = 30
net.ipv4.netfilter.ip_conntrack_max = 1048576
in /etc/sysctl.conf and you come across the error messages;
"net.ipv4.netfilter.ip_conntrack_tcp_timeout_syn_recv" is an
unknown key

"net.ipv4.netfilter.ip_conntrack_tcp_timeout_time_wait" is an
unknown key

"net.ipv4.netfilter.ip_conntrack_tcp_timeout_fin_wait" is an
unknown key

"net.ipv4.netfilter.ip_conntrack_max" is an unknown
key
whether you're executing:
debian:~# sysctl -p
in order to make the net.ipv4.netfilter.* values to be set as a kernel values to iptables, you need to modify your /etc/modules file and add the nf_conntrack_ftp in it, here is how:
echo 'nf_conntrack_ftp' >>
/etc/modules
Now to make the new settings be reloaded issue the command:
debian:~# sysctl -p
Now the values will be properly set and you will see no longer the is an unknown key error messages like so:
net.ipv4.netfilter.ip_conntrack_tcp_timeout_syn_recv =
30

net.ipv4.netfilter.ip_conntrack_tcp_timeout_time_wait = 30

net.ipv4.netfilter.ip_conntrack_tcp_timeout_fin_wait = 30

net.ipv4.netfilter.ip_conntrack_max = 1048576
Mon Mar 21 16:37:06 EET 2011
Solving "Cannot redeclare show_subscription_checkbox() (previously declared in .. wp-content/plugins/subscribe-to-comments/subscribe-to-comments.php"
I'm trying to install
subscribe-to-comments wordpress plugin in order to make my
users to easily set a tick and receive new emails if somebody
replies to their comments in my blog. Pitily downloading and trying
to install the subscribe-to-comments wordpress plugin was
failing after it's activation with an error message:
I did my best to edit the subscribe-to-comments.php to fix up the fatal error but it was no go, so after a bunch of research I've found out somebody created a new version of the plugin under the name subscribe-to-comments-reloaded .
I've proceeded and gave a try to subscribe-to-comments-reloaded as a substitute to the old broken subscribe-to-comments .
Enabling the subscribe-to-commets-reloaded worked out of the box and the plugin now works perfectly fine and even better is enabling all the functionaity of the subscribe-to-comments
Cheers :)
PHP Fatal error: Cannot redeclare
show_subscription_checkbox() (previously declared in
/var/www/blog/wp-content/plugins/subscribe-to-comments/subscribe-to-comments.php:12)
in /var/www/blog/wp-content/plugins/subscribe-to-comments.php on
line 58"
I did my best to edit the subscribe-to-comments.php to fix up the fatal error but it was no go, so after a bunch of research I've found out somebody created a new version of the plugin under the name subscribe-to-comments-reloaded .
I've proceeded and gave a try to subscribe-to-comments-reloaded as a substitute to the old broken subscribe-to-comments .
Enabling the subscribe-to-commets-reloaded worked out of the box and the plugin now works perfectly fine and even better is enabling all the functionaity of the subscribe-to-comments
Cheers :)
Posted by | Permanent link
Mon Mar 21 14:17:12 EET 2011
ShareThis a wordpress plugin to easify your blog post sharing on social networks
etworks For a few days now, I'm
looking through my blog and checking how can I improve the way it
to be more convenient for my readers.
By so far I've been using the Share On Facebook wordpress plugin and custom build twitter button as the only aims to share my blog posts online.
As nowdays people are using more and more diversified networks and facebook adn twitter are not the only social places on the net, I found it would be handy if I have a bit more options for sharing my blog info online.
After a quick google search I stumbled upon a wordpress plugin which was created with the goal of sharing articles to most of the major social networks and websites.
I hope this plugin will have improve my blog's usability and in the same time allow my readers to easily share the articles which appealed to them.
The plugin in question is called ShareThis and can be straight found in the repository of wordpress extensions on wordpress.org's website.
The supported shares by the Share-This plugin are as follows:
The Share-This wp plugin is able to place automatically it's share buttons on the top of your blog posts and pages, it could be also easily customized to look a bit different from what it's by default.
Here is a screenshot on how the plugin looks after it is installed and configured on a wordpress powered blog;

The Share-This extensions version which I have gave a try is 4.0.4 and it appeared to work correctly on my wordpress installation ver. 3.1.
Even though officially on the plugin website it's being stated that the plugin is compatible up to a wordpress ver. 3.0.5 it worked just fine on my 3.1 ;)
So it's a good news for users of the latest wordpress releases that the plugin should work like a charm.
In order to install and configure the plugin I've followed literally the plugin installation instructions:
1. Download and unzip the ShareThis extension
After it's succesfully extracted, next step is to,
2. Login to your wordpress administration and enable it
From the admin panel go to;
3. Configure the ShareThis plugin before you Activate it
By so far I've been using the Share On Facebook wordpress plugin and custom build twitter button as the only aims to share my blog posts online.
As nowdays people are using more and more diversified networks and facebook adn twitter are not the only social places on the net, I found it would be handy if I have a bit more options for sharing my blog info online.
After a quick google search I stumbled upon a wordpress plugin which was created with the goal of sharing articles to most of the major social networks and websites.
I hope this plugin will have improve my blog's usability and in the same time allow my readers to easily share the articles which appealed to them.
The plugin in question is called ShareThis and can be straight found in the repository of wordpress extensions on wordpress.org's website.
The supported shares by the Share-This plugin are as follows:
1. Share on Facebook

2. Share on Twitter

3. Share on Google Buzz

4. Share on Blogger.com

5. Share in Digg

6. Share in AIM Share

7. Share in Stumbleupon

8. Share on Microsoft Messanger
The Share-This wp plugin is able to place automatically it's share buttons on the top of your blog posts and pages, it could be also easily customized to look a bit different from what it's by default.
Here is a screenshot on how the plugin looks after it is installed and configured on a wordpress powered blog;
The Share-This extensions version which I have gave a try is 4.0.4 and it appeared to work correctly on my wordpress installation ver. 3.1.
Even though officially on the plugin website it's being stated that the plugin is compatible up to a wordpress ver. 3.0.5 it worked just fine on my 3.1 ;)
So it's a good news for users of the latest wordpress releases that the plugin should work like a charm.
In order to install and configure the plugin I've followed literally the plugin installation instructions:
1. Download and unzip the ShareThis extension
linux:/var/www/blog# wget
http://downloads.wordpress.org/plugin/share-this.zip

linux:/var/www/blog# cd wp-content/plugins

linux:/var/www/blog/wp-content/plugins# unzip share-this.zip

...
After it's succesfully extracted, next step is to,
2. Login to your wordpress administration and enable it
From the admin panel go to;
Plugins -> Inactive -> ShareThis
3. Configure the ShareThis plugin before you Activate it
Press the:


Plugins -> Inactive -> ShareThis -> Configuration
options are here


Choose your desired plugin options and press the Update
ShareThis Options button.


4. Activate the Share-This extensions


Plugins -> Inactive -> ShareThis ->
Activate


Whoohoo now your blog installation is equipped with the trendy
Share-This buttons and your users will be able easily to share
online their favourite posts.

Apart from it's user usefulness I believe the ShareThis wp
button should also be a very good choice in terms of SEO! as it
will possibly attract some more users to your blog from the users
that might take the step to use the ShareThis button and share on
the major social networks.

Having in mind the versatile usefullness of the plugin I think
every serious blogger should think about installing and using the
nice plugin.


I'm quite curious if the plugin will have effect on my blog
attendance, if I'm right my blog's visitors should leap in the
coming weeks.

Let's wait and see :)
Sun Mar 20 18:26:41 EET 2011
Increase your wordpress blog subscribers with (What Would Set Godin Do [WWSGD]) (Possibly, Maybe?)
I'm running my blog
pc-freak.net/blog for almost two years. Though beforehand I
used to use the nanoblogger as my primary blog and this wordpress
blog was just an experiment. Since almost a year and a bit more
I've copmletely migrated to wordpress blogging platform.
I would say that I'm quite an active blogger and most of the days of the year I blog at least one post.
By so far I have blogged 715 times and my blog is starting to become massive, less that the amount of my blog subscribers is staying to the shocking number of 5 .
I believe my blog content is not that boring that for about a year and a half time just 5 people would get interested into receiving RSS notification whether I put online a new blog post.
As I took some time to consider what might be the cause I came to the conclusion that my current set up for blog RSS subscription via the Add-To-Any wordpress plugin is not that intuitive, and users needs to click at least 3 times before they could have added themselves as a new subscriber.
Therefore logically enough I needed a quick and easy way to improve my current situation with subscribers and increase the current critically low number of subscribers to a bit better one (let's say few subscribers per week or month).
I took the time to research online about what kind of options do I have in my situation for an easy and silly way to install some kind of wordpress plugin which will have positive effect on my subscriptions.
After a while of useless googling, thankfully I came across something that looks promising for my set task.
The plugin which is supposed to do the trick is called What Would Seth Godin Do or as it's shortly abbreviated WWSGD ;)
The plugin's idea is actually very simple, if a new user comes across my wordpress powered blog, he is recognized as a referrer who is accessing the blog for a first time and therefore offered the option to subscribe in two intuitive simple clicks.
The offered default user message which could easily be changed via the What Would Set Godin Do options reads as follows:
If a visitor visits your webpage 5 times, the message will automatically disappear from the screen.
The WWSGD plugin allows you to choose where do you want to position the RSS above shown text (e.g. you can set the text location to appear before or after your posts). It also gives some options to play with the plugin css styling via the configuration.
I just installed the plugin and it will take a while until I find out if it will provide my blog with some more subsribers but anyhow the plugin idea is good so I hope it will work out.
Here is a quick few liners which describes how to install the WWSGD plugin on your wordpress
1. Download the plugin What Would Set Godin Do plugin in your blog wp-content/plugins directory I've made a mirror copy of the plugin so you can choose either to download it directly from wordpress extensions website.
I would say that I'm quite an active blogger and most of the days of the year I blog at least one post.
By so far I have blogged 715 times and my blog is starting to become massive, less that the amount of my blog subscribers is staying to the shocking number of 5 .
I believe my blog content is not that boring that for about a year and a half time just 5 people would get interested into receiving RSS notification whether I put online a new blog post.
As I took some time to consider what might be the cause I came to the conclusion that my current set up for blog RSS subscription via the Add-To-Any wordpress plugin is not that intuitive, and users needs to click at least 3 times before they could have added themselves as a new subscriber.
Therefore logically enough I needed a quick and easy way to improve my current situation with subscribers and increase the current critically low number of subscribers to a bit better one (let's say few subscribers per week or month).
I took the time to research online about what kind of options do I have in my situation for an easy and silly way to install some kind of wordpress plugin which will have positive effect on my subscriptions.
After a while of useless googling, thankfully I came across something that looks promising for my set task.
The plugin which is supposed to do the trick is called What Would Seth Godin Do or as it's shortly abbreviated WWSGD ;)
The plugin's idea is actually very simple, if a new user comes across my wordpress powered blog, he is recognized as a referrer who is accessing the blog for a first time and therefore offered the option to subscribe in two intuitive simple clicks.
The offered default user message which could easily be changed via the What Would Set Godin Do options reads as follows:
If you're new here, you may want to subscribe to my RSS feed.
Thanks for visiting!
If a visitor visits your webpage 5 times, the message will automatically disappear from the screen.
The WWSGD plugin allows you to choose where do you want to position the RSS above shown text (e.g. you can set the text location to appear before or after your posts). It also gives some options to play with the plugin css styling via the configuration.
I just installed the plugin and it will take a while until I find out if it will provide my blog with some more subsribers but anyhow the plugin idea is good so I hope it will work out.
Here is a quick few liners which describes how to install the WWSGD plugin on your wordpress
1. Download the plugin What Would Set Godin Do plugin in your blog wp-content/plugins directory I've made a mirror copy of the plugin so you can choose either to download it directly from wordpress extensions website.
linux:~# cd /var/www/blog/wp-content/plugins

linux:~# wget what-would-seth-godin-do.zip

...

linux:~# unzip what-would-seth-godin-do.zip

2. Login to wordpress administrator and go to;


Plugins -> Active


Look over the list of your installed wordpress plugins and find and
enable the WWSGD plugin


3. Configure the WWSGD extension

Navigate to


Settings -> WWSGD


There set the options which fits you well. The WWSGD wordpress
plugin works fine on my just updated wordpress 3.1 install even
though it's intitially prepared to run on older versions of
wordpress.


Note that the What Would Set Godin Do extension will require
you to have your browser cookies enabled in order to be able to
distinguish between old and new site visitors.


Will the plugin really boost up my blog subscribers, I don't know!
Only time will tell. I'll be glad if somebody already has
experience with the plugin and can share if he has a positive
results in increseing the count of blog subscribers.

I'll be testing it and further comment back if the plugin is really
useful in fulfilling my goal of increasing my blog
subscriptions.

Feedback on any others who tried my article to install and set the
plugin will be very much appreciated!
Sat Mar 19 17:56:14 EET 2011
Install (Compile) PHP5 from deb source to increase php performance on Debian Lenny Linux / Install php from source the debian way
If you're looking for one further way
to increase your Apache+PHP performance. You should definitely
think about recompiling the lib php from the php's source
code.
Building from source your php library is a great way to decrease your php scripts execution time and therefore increase the responce time of your webserver server.
Recompiling will speed up your websites and make the user feel more interactivity when using them.
Of course there are two ways to go to compile a php library on your node. One is to install it directly downloading the latest source from php.net which if you're on a Debian Linux platform is not recommended and the other method is to use the debian provided source bundled package (e.g. deb package) - the recommended one
As I prefer to do my system installs the straight debian way I choose the path to build and install the php library from a previously prepared version with build scripts for Debian, (e.g. to compile and install the php library from source the debian way.)
Here is exactly what commands you need to issue to properly build a php library from the php sources;
First you need to install the pre-requirement packages which will be further necessary for the php library compliation;
1. Install the build-essential debhelper and fakeroot through apt
If you have the above 3 packages already installed you can skip further to the next step.
2. Use apt-get to fetch all the required libraries and programs necessary for the php compilation
The build-dep apt option causes apt-get to install/remove packages in an attempt to satisfy the build dependencies for a source package.
3. Download the php5 source code with apt-get
After the completion of apt-get source php5, you should have the php5 programming language source code, stored in /usr/src;
The files which should reside in /usr/src are:
apt-get source php5 command will also extract the php from php5_5.2.6.dfsg.1.orig.tar.gz and apply the php5_5.2.6.dfsg.1-1+lenny9.diff.gz patch file.
4.cd to the php directory;
5. Now let's compile the php library the debian way
Now go and make yourself a coffee and have a cigarette if you're a smoker. In about 10/20 minutes (depending on your computer CPU) your php should have been built.
You should have the php packages now built, if you get any error messages, don't blame me. Blame Microsoft! :)
6. Switch back one directory back
You should have the following debian packages built and ready to be installed;
7. Install the newly built php libraries
Now if you need something to be configured in the way your apache interprets php scripts go and edit your /etc/php5/apache2/php.ini
Now as you should have installed and configured your libapache2-mod-php5 from source, the last thing to do before you can benefit from the improved performance is to restart apache.
8. Restart Apache server
I hope my article is helpful to somebody. If it works for you or it doesn't give me your feedback ;)
Building from source your php library is a great way to decrease your php scripts execution time and therefore increase the responce time of your webserver server.
Recompiling will speed up your websites and make the user feel more interactivity when using them.
Of course there are two ways to go to compile a php library on your node. One is to install it directly downloading the latest source from php.net which if you're on a Debian Linux platform is not recommended and the other method is to use the debian provided source bundled package (e.g. deb package) - the recommended one
As I prefer to do my system installs the straight debian way I choose the path to build and install the php library from a previously prepared version with build scripts for Debian, (e.g. to compile and install the php library from source the debian way.)
Here is exactly what commands you need to issue to properly build a php library from the php sources;
First you need to install the pre-requirement packages which will be further necessary for the php library compliation;
1. Install the build-essential debhelper and fakeroot through apt
debian:~# apt-get install build-essential debhelper
fakeroot
If you have the above 3 packages already installed you can skip further to the next step.
2. Use apt-get to fetch all the required libraries and programs necessary for the php compilation
debian:~# apt-get build-dep php5
The build-dep apt option causes apt-get to install/remove packages in an attempt to satisfy the build dependencies for a source package.
3. Download the php5 source code with apt-get
debian:~# cd /usr/src/

debian:~# apt-get source php5
After the completion of apt-get source php5, you should have the php5 programming language source code, stored in /usr/src;
The files which should reside in /usr/src are:
php5_5.2.6.dfsg.1-1+lenny9.diff.gz

php5_5.2.6.dfsg.1-1+lenny9.dsc

php5_5.2.6.dfsg.1.orig.tar.gz
apt-get source php5 command will also extract the php from php5_5.2.6.dfsg.1.orig.tar.gz and apply the php5_5.2.6.dfsg.1-1+lenny9.diff.gz patch file.
4.cd to the php directory;
debian:~# cd php5-5.2.6.dfsg.1/
5. Now let's compile the php library the debian way
debian:~# dpkg-buildpackage -rfakeroot

....
Now go and make yourself a coffee and have a cigarette if you're a smoker. In about 10/20 minutes (depending on your computer CPU) your php should have been built.
You should have the php packages now built, if you get any error messages, don't blame me. Blame Microsoft! :)
6. Switch back one directory back
debian:~# cd ../
You should have the following debian packages built and ready to be installed;
libapache2-mod-php5_5.2.6.dfsg.1-1+lenny9_amd64.deb

libapache2-mod-php5filter_5.2.6.dfsg.1-1+lenny9_amd64.deb

php5_5.2.6.dfsg.1-1+lenny9_all.deb

php5-cgi_5.2.6.dfsg.1-1+lenny9_amd64.deb

php5-cli_5.2.6.dfsg.1-1+lenny9_amd64.deb

php5-common_5.2.6.dfsg.1-1+lenny9_amd64.deb

php5-curl_5.2.6.dfsg.1-1+lenny9_amd64.deb

php5-dbg_5.2.6.dfsg.1-1+lenny9_amd64.deb

php5-dev_5.2.6.dfsg.1-1+lenny9_amd64.deb

php5-gd_5.2.6.dfsg.1-1+lenny9_amd64.deb

php5-gmp_5.2.6.dfsg.1-1+lenny9_amd64.deb

php5-imap_5.2.6.dfsg.1-1+lenny9_amd64.deb

php5-interbase_5.2.6.dfsg.1-1+lenny9_amd64.deb

php5-ldap_5.2.6.dfsg.1-1+lenny9_amd64.deb

php5-mcrypt_5.2.6.dfsg.1-1+lenny9_amd64.deb

php5-mhash_5.2.6.dfsg.1-1+lenny9_amd64.deb

php5-mysql_5.2.6.dfsg.1-1+lenny9_amd64.deb

php5-odbc_5.2.6.dfsg.1-1+lenny9_amd64.deb

php5-pgsql_5.2.6.dfsg.1-1+lenny9_amd64.deb

php5-pspell_5.2.6.dfsg.1-1+lenny9_amd64.deb

php5-recode_5.2.6.dfsg.1-1+lenny9_amd64.deb

php5-snmp_5.2.6.dfsg.1-1+lenny9_amd64.deb

php5-sqlite_5.2.6.dfsg.1-1+lenny9_amd64.deb

php5-sybase_5.2.6.dfsg.1-1+lenny9_amd64.deb

php5-tidy_5.2.6.dfsg.1-1+lenny9_amd64.deb

php5-xmlrpc_5.2.6.dfsg.1-1+lenny9_amd64.deb

php5-xsl_5.2.6.dfsg.1-1+lenny9_amd64.deb

php-pear_5.2.6.dfsg.1-1+lenny9_all.deb
7. Install the newly built php libraries
debian:/usr/src# for i in *.deb; do dpkg -i $i;
done
Now if you need something to be configured in the way your apache interprets php scripts go and edit your /etc/php5/apache2/php.ini
Now as you should have installed and configured your libapache2-mod-php5 from source, the last thing to do before you can benefit from the improved performance is to restart apache.
8. Restart Apache server
debian:~# /etc/init.d/apache2 restart
I hope my article is helpful to somebody. If it works for you or it doesn't give me your feedback ;)
Sat Mar 19 15:47:21 EET 2011
Howto add adsense ads to Elgg user blog/s
I wanted to add google adsense
on my Elgg powered
experimental social network mockateacher.com
There are plenty of ways described which enables a user to add a google adsense code to elgg, however none of the ones I've red online worked for me for my elgg site user blog section
One of the promising ways to add the adsense code to all sections of an elgg enpowered website is described to be achieved through Elgg Google Adverts in the spotlight plugin.
I gave this suggested method for adsense inclusion to elgg by installing and setting it up but it worked not.
There was a blog which described a procedure which gaves a possibility the adsense code to be embedded on every user dashboard's right widget right below the elgg's Edit Page
This method seems to work but wasn't exactly enabling me to place google advertisements only on the elgg's blogs and therefore was useless to me.
Thus I played a bit with the files in the mod/blog located under the elgg's install root directory and hooray I found out a way to add my adsense code to my elgg user blog section.
Here is how:
1. Edit the file mod/blog/views/default/blog/object/blog.php
In the file look for the line:
This is located nearbly line 51 in the file on my elgg version 1.7.7, with latest available blog plugin at this time, on prior version this might be located on different line.
After this line just place your Adsense code obtained from your Adsense Google account and you're done.
The google adsense advertisements will start appearing in the head of your elgg's users blog pages ;)
There are plenty of ways described which enables a user to add a google adsense code to elgg, however none of the ones I've red online worked for me for my elgg site user blog section
One of the promising ways to add the adsense code to all sections of an elgg enpowered website is described to be achieved through Elgg Google Adverts in the spotlight plugin.
I gave this suggested method for adsense inclusion to elgg by installing and setting it up but it worked not.
There was a blog which described a procedure which gaves a possibility the adsense code to be embedded on every user dashboard's right widget right below the elgg's Edit Page
This method seems to work but wasn't exactly enabling me to place google advertisements only on the elgg's blogs and therefore was useless to me.
Thus I played a bit with the files in the mod/blog located under the elgg's install root directory and hooray I found out a way to add my adsense code to my elgg user blog section.
Here is how:
1. Edit the file mod/blog/views/default/blog/object/blog.php
In the file look for the line:
<div class="blog_post">
This is located nearbly line 51 in the file on my elgg version 1.7.7, with latest available blog plugin at this time, on prior version this might be located on different line.
After this line just place your Adsense code obtained from your Adsense Google account and you're done.
The google adsense advertisements will start appearing in the head of your elgg's users blog pages ;)
Fri Mar 18 22:27:42 EET 2011
Tracking graphically MySQL and Apache performance in web with Munin on Debian
Munin is great software for
surveillance software for your MySQL, Apache, Qmail, Postfix
and many other of the classical daemon services which most of the
Linux, BSD servers online are running on.
1. Munin on Debian Linux is really easy to be installed and comes to executing:
2. Link /var/www/munin/ to some VirtualHost or ServerHost
For instance if your munin is to be placed on the domain pc-freak.net.net which has the DocumentRoot of /var/www
1. Munin on Debian Linux is really easy to be installed and comes to executing:
debian:~# apt-get install munin munin-node
munin-plugins-extra
2. Link /var/www/munin/ to some VirtualHost or ServerHost
For instance if your munin is to be placed on the domain pc-freak.net.net which has the DocumentRoot of /var/www
debian:~# cd /var/www

debian:/var/www# ln -sf /var/www/munin munin
3.
Restart Apache;debian:~# /etc/init.d/apache2 restart
Now to access the newly installed munin point your favorite browser
to:
http://pc-freak.net/munin/
Posted by hip0 |
Permanent link
Fri Mar 18 14:50:13 EET 2011
Speeding up Apache through
apache2-mpm-worker and php5-cgi on Debian / How to improve Apache
performance and decrease server memory consumption
By default most Apache running
Linux servers on the Internet are configured to use with the mpm
prefork apache module
Historically prefork apache module is the predecessor of the
worker module therefore it's believed to be a way more
tested and reliable, if you need a critical reliable webserver
configuration.
However from my experience by so far with the Apache MPM
Worker I can boldly say that many of the rumors concerning the
unreliabity of apache2-mpm-worker are just myths.
The old way Apache handles connections e.g. the mod prefork
is the well known way that high amount of the daemons on Linux and
BSD are still realying on.
When prefork is a used by Apache, every new TCP/IP connection
arriving at your Linux server on the Apache configured port let's
say on port 80 is being served by Apache in a way that the
Apache process (mother process) parent does fork a new
Apache parent copy in order to serve the new request.
Thus by using the prefork Apache needs to fork new process (if it
doesn't have already an empty forked one waiting for connections)
and serve the HTTP request of the new client, after the request of
the client is completed the newly forked Apache usually dies (even
though it again depends on the way the Apache server is configured
via the Apache configuration - apache2.conf / httpd.conf
etc.).
Now you can imagine how slow and memory consuming it is that all
the time the parent Apache process spawns new processes, kills old
ones etc. in order to fulfill the client requests.
Now just to compare the Apace mpm prefork does not use the
old forking way, but relies on a few Apache processes which handles
all the requests without constantly being destroyed and recreated
like with the prefork module.
This saves operations and system resources, threaded programming
has already been proven to be more efficient way to handle tasks
and is heavily adopted in GUI programming for instance in Microsoft
Windows, Mac OS X, Linux Gnome, KDE etc.
There is plenty of information and statistical data which compares
Apache running with prefork and respectively worker
modules online.
As the goal of this article is not to went in depths with this kind
of information I would not say more on it but let you explore
online a bit more about them in case if you're interested.
The purpose of this article is to explain in short how to
substitute the Apache2-MPM-Prefork and how your server performance
could benefit out of the use of Apache2-MPM-Worker.
On Debian the default Apache process serving module in Apache
1.3x,Apache 2.0x and 2.2x is prefork thus the installation of
apache2-mpm-worker is not "a standard way" to install Apache
Deciding to swith from the default Debian apache-mpm-prefork to
apache-mpm-worker is quite a serious and responsible decision and
in some cases might cause troubles, if you have decided to follow
my article be sure to consider all the possible negative
consequences of switching to the apache worker !
Now after having said a bunch of info which might be not necessary
with the experienced system admin I'll continue on with the steps
to install the apache2-mpm-worker.
1. Install the apache2-mpm-worker
debian:~# apt-get install apache2-mpm-worker php5-cgi
Reading state information... Done The following packages were
automatically installed and are no longer required: The following
packages will be REMOVED apache2-mpm-prefork libapache2-mod-php5
The following NEW packages will be installed apache2-mpm-worker 0
upgraded, 1 newly installed, 2 to remove and 46 not upgraded. Need
to get 0B/259kB of archives. After this operation, 6193kB disk
space will be freed.
As you can notice in below's text confirmation which will appear
you will have to remove the apache2-mpm-prefork and the
apache2-mpm-worker modules before you can proceed to install
the apache2-mpm-prefork.
You might ask yourself if I remove my installed libphp how
would I be able to use my Apache with my PHP based websites? And
why does the apt package manager requires the
libapache2-mod-php5 to get removed.
The explanation is simple apache2-mpm-worker is not thread
safe, in other words scripts which does use the php fork();
function would not work correctly with the Apache worker module and
will probably be leading to PHP and Apache crashes.
Therefore in order to install the apache mod worker it's necessary
that no libapache2-mod-php5 is existent on the system.
In order to have a PHP installed on the server again you will have
to use the php5-cgi deb package, this is the reason in the
above apt-get command I'm also requesting apt to install the
php5-cgi package next to apache2-mpm-worker.
2. Enable the cgi and cgid apache modules
debian:~# a2enmod cgi
debian:~# a2enmod cgid
3. Activate the mod_actions apache modules
debian:~# cd /etc/apache2/mods-enabled
debian:~# ln -sf ../mods-available/actions.load
debian:~# ln -sf ../mods-available/actions.conf
4. Add configuration options in order to enable mod worker to
use the newly installed php5-cgi
Edit /etc/apache2/mods-available/actions.conf vim, mcedit or
nano (e.g. your editor of choice and add inside:
<IfModule mod_actions.c>
Action application/x-httpd-php /cgi-bin/php5
</IfModule>
After completing all the above instructions, you might also need to
edit your /etc/apache2/apache2.conf to tune up, how your
Apache mpm worker will serve client requests.
Configuring the <IfModule mpm_worker_module> in
apache2.conf is necessary to optimize your newly installed
mpm_worker module for performance.
5. Configure the mod_worker_module in apache2.conf One
example configuration for the mod worker is:
<IfModule mpm_worker_module>
StartServers 2
MaxClients 150
MinSpareThreads 25
MaxSpareThreads 75
ThreadsPerChild 25
MaxRequestsPerChild 0
</IfModule>
Consider the fact that this configuration is just a sample and it's
in no means configured for serving Apache requests for high load
Apache servers and you need to further play with the values to have
a good results on your server.
6. Check that all is fine with your Apache configurations and no
syntax errors are encountered
debian:~# /usr/sbin/apache2ctl -t
Syntax OK
If you get something different from Syntax OK track the
error and fix it before you're ready to restart the Apache
server.
7. Now restart the Apache server
debian:~# /etc/init.d/apache2 restart
All should run fine and hopefully your PHP scripts should be
interpreted just fine through the php5-cgi instead of the
libapache2-mod-php5.
Using the /usr/bin/php5-cgi will increase with some
percentage your server CPU load but on other hand will drasticly
decrease the Webserver memory consumption.
That's quite logical because the libapache2-mod-hp5 is loaded once
during apache server whether a new instance of /usr/bin/php5-cgi is
invoked during each of Apache requests via the mod worker.
There is one serious security flow coming with php5-cgi, DoS
against a server processing scripts through php5-cgi is much easier
to be achieved.
An example for a denial attack which could affect a website running
with mod worker and php5-cgi, could be simulated from a simple user
with a web browser which holds up the f5 or ctrl + r browser
page refresh buttons.
In that case whenever php5-cgi is used the CPU load would rise
drastic, one possible solution to this denial of service issues is
by installing and using libapache2-mod-evasive like
so:
8. Install libapache2-mod-evasive
debian:~# apt-get install
libapache2-mod-evasive
The Apache mod evasive module is a nice apache module to minimize
HTTP DoS and brute force attacks.
Now with mod worker through the php5-cgi, your apache should start
serving requests more efficiently than before.
For some performance reasons some might even want to try out the
fastcgi with the worker to boost the Apache performance but
as I have never tried that I can't say how reliable a a mod worker
with a fastcgi would be.
N.B. ! If you have some specific php configurations within
/etc/php5/apache2/php.ini you will have to set them also in
/etc/php5/cgi/php.ini before you proceed with the above
instructions to install Apache otherwise your PHP scripts might not
work as expected.
Mod worker is also capable to work with the standard mod
php5 Apache module, but if you decide to go this route you will
have to recompile your PHP lib manually from source as in Debian
this option is not possible with the default php
library.
Thu Mar 17 14:28:47 EET 2011
How to fix PHP "Fatal error: Call to undefined function bcmod()" and "Fatal error: Call to undefined function bcdiv()" on FreeBSD
After some php updates on my
7.2-RELEASE-p4, my lessnmore suddenly stopped
working with the following error messages:
A bit of investigation has led me to the root of the problem which was a missing php5-bcmath php extension to solve the error messages and get back my lessnmore shortener to normal I had to issue:
Fatal error: Call to undefined function bcmod()

Fatal error: Call to undefined function bcdiv()
A bit of investigation has led me to the root of the problem which was a missing php5-bcmath php extension to solve the error messages and get back my lessnmore shortener to normal I had to issue:
freebsd# cd /usr/ports/math/php52-bcmath

freebsd# make install clean
Hooray it works all now
again, Hallelujah!Thu Mar 17 13:51:39 EET 2011
Monitoring multi core / (multiple CPUs) servers with top, tload and on Linux
The default GNU / Linux top
command does allow to see statistics on servers and systems with
multiple CPUs.
This is quite beneficial especially on Linux systems which are not equipped with htop which does show statistics to the multiple-core system load.
To examine the multiple CPUs statistics with the default top command available on every Linux system and part of the procps - /proc file system utilities
1. Start top:
When the top system load statistics screen starts up refreshing,
2. press simply 1
You will notice all your system cpus to show up in the top head:
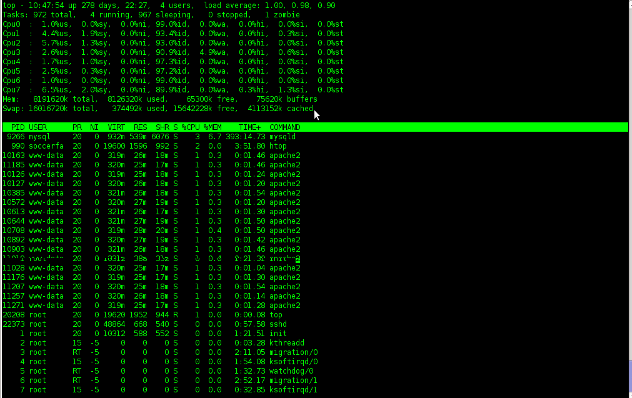
As I have started talking about top, a very useful way to use top to track processes which are causing a system high loads is:
This command will run top in batch mode interactively and will show you statistics about the most crucial processes which does cause a server load, look over the output and you will get an idea about what is causing you server troubles.
Moreover if you're a Linux console freak as me you will also probably want to take a look at tload
tload command is a part of the procps - /proc file system utilities and as you can read in the tload manual tload - graphic representation of system load average
Here is a picture to give you an idea on the console output of tload :
Another tool that you might find very usefel is slabtop it's again a part of the procps linux package.
slabtop - displays a listing of the top caches sorted by one of the listed sort criteria., in most of the cases the slabtop kernel cache monitoring tool won't be necessary for the regular administrator, however on some servers it might help up to the administrator to resolve performance issues which are caused by the kernel as a bottleneck.
slabtop is also used as a tool by kernel developers to write and debug the Linux kernel.
This is quite beneficial especially on Linux systems which are not equipped with htop which does show statistics to the multiple-core system load.
To examine the multiple CPUs statistics with the default top command available on every Linux system and part of the procps - /proc file system utilities
1. Start top:
linux:~# top
When the top system load statistics screen starts up refreshing,
2. press simply 1
You will notice all your system cpus to show up in the top head:
As I have started talking about top, a very useful way to use top to track processes which are causing a system high loads is:
linux:~# top -b -i
This command will run top in batch mode interactively and will show you statistics about the most crucial processes which does cause a server load, look over the output and you will get an idea about what is causing you server troubles.
Moreover if you're a Linux console freak as me you will also probably want to take a look at tload
tload command is a part of the procps - /proc file system utilities and as you can read in the tload manual tload - graphic representation of system load average
Here is a picture to give you an idea on the console output of tload :
Another tool that you might find very usefel is slabtop it's again a part of the procps linux package.
slabtop - displays a listing of the top caches sorted by one of the listed sort criteria., in most of the cases the slabtop kernel cache monitoring tool won't be necessary for the regular administrator, however on some servers it might help up to the administrator to resolve performance issues which are caused by the kernel as a bottleneck.
slabtop is also used as a tool by kernel developers to write and debug the Linux kernel.
Wed Mar 16 20:44:46 EET 2011
How to fix php "Uncaught exception 'PDOException' with message 'could not find driver'" on FreeBSD
After some upgrades of PHP, My Less'n More URL suddenly
stopped working with an error:
After a bit of investigation I've figured out the error is caused by a missing php5-pdo and php5-pdo_mysql
Of course if you're using php52 you will need to install respectively the ports php52-pdo and php5-pdo_mysql :
To resolve the issues issue the commands:
Uncaught exception 'PDOException' with message 'could not
find driver'
After a bit of investigation I've figured out the error is caused by a missing php5-pdo and php5-pdo_mysql
Of course if you're using php52 you will need to install respectively the ports php52-pdo and php5-pdo_mysql :
To resolve the issues issue the commands:
freebsd# cd /usr/ports/databases/php5-pdo

freebsd# make install clean

freebsd# cd /usr/ports/databases/php5-pdo_mysql
Wed Mar 16 18:07:20 EET 2011
How to fix configure: error: gd library not found.. please install libgd during webalizer port make on FreeBSD
I've done a couple of updates these
days on my tiny FreeBSD server system. I've updated Apache and PHP
to version:
As a requirement for the php5-5.3.5 update it was necessary that I update a number of modules the whole list of php modules which I've updated can be seen in my previous blog post named core dump after PHP5 and php5-extensions recompile (rebuild) from ports on FreeBSD - cause and solution
Some further updates I've done manually on the BSD in order to be able to properly compile my support libgd in Apache and PHP were in the system ports:
One night after all the updates I've realized my installed version of webalizer was not showing / generating properly the images of the webalizer daily generated statistics via cron.
Logically to fix that it was necessary that the /usr/ports/www/webalizer port to be rebuilt through make install clean
I've jumped on and executed the well known:
What was strange was that the gd-2.0.35_7,1 port was properly installed and therefore I could see no reason for the webalizer build failure.
I've spend about an two hours to look online in forums about somebody who got the same error with no luck.
As I couldn't find anything that could help me up online, I've decided to drop by the good old irc.freenod.net ##freebsd channel to ask for help.
Luckily enough the guy with a nickname Mystique has suggested a solution of using the freebsdportmaster in order to solve the gdlib issues.
He suggested something might be broken with my gd-2.0.35_7,1 - gdlib install and adviced me to rebuild the gdlib port with:
Anyways what I did was a bit different I used his postmaster . suggestion but applyed it directly for the webalizer port with:
All worked like a charm and just about few minutes later my webalizer was compiled fine and working with the gdlib support, e.g. showing me the webalizer statistical data pictures ;)
pcfreak# pkg_info |grep -i php5-5; pkg_info |grep -i
apache-2.0.64

php5-5.3.5 PHP Scripting Language

apache-2.0.64 Version 2.0.x of Apache web server with prefork
MPM.
As a requirement for the php5-5.3.5 update it was necessary that I update a number of modules the whole list of php modules which I've updated can be seen in my previous blog post named core dump after PHP5 and php5-extensions recompile (rebuild) from ports on FreeBSD - cause and solution
Some further updates I've done manually on the BSD in order to be able to properly compile my support libgd in Apache and PHP were in the system ports:
pcfreak# pkg_info |grep -i gd-

gd-2.0.35_7,1 A graphics library for fast creation of images

php5-gd-5.3.5 The gd shared extension for php
One night after all the updates I've realized my installed version of webalizer was not showing / generating properly the images of the webalizer daily generated statistics via cron.
Logically to fix that it was necessary that the /usr/ports/www/webalizer port to be rebuilt through make install clean
I've jumped on and executed the well known:
freebsd# cd /usr/ports/www/webalizer;

freebsd# make install clean

The download compile of the webalizer started as expected but just
in a couple of seconds it failed with:


ecking for main in -lgd... no configure: error: gd
library not found.. please install libgd
What was strange was that the gd-2.0.35_7,1 port was properly installed and therefore I could see no reason for the webalizer build failure.
I've spend about an two hours to look online in forums about somebody who got the same error with no luck.
As I couldn't find anything that could help me up online, I've decided to drop by the good old irc.freenod.net ##freebsd channel to ask for help.
Luckily enough the guy with a nickname Mystique has suggested a solution of using the freebsdportmaster in order to solve the gdlib issues.
He suggested something might be broken with my gd-2.0.35_7,1 - gdlib install and adviced me to rebuild the gdlib port with:
freebsd# cd /usr/ports/graphics/gd

freebsd# portmaster .
Anyways what I did was a bit different I used his postmaster . suggestion but applyed it directly for the webalizer port with:
freebsd# cd /usr/ports/www/webalizer

freebsd# portmaster .
All worked like a charm and just about few minutes later my webalizer was compiled fine and working with the gdlib support, e.g. showing me the webalizer statistical data pictures ;)