I am using Oracle VirtualBox virtual machine to experiment with things before I deploy them on my servers. Recently I installed Debian 9 in a hurry (without much taking attention on the configuration options during VM machine creation) and the negative results of my lack of attention came quickly as my Linux Virtualbox guest OS just ran of space a little time after I have installed a Debian Stretch 9 OS into the virtual machine ..
I didn't realized immediately the "No free disk space" error was there because, after installing a few sets of Debian packages (Exim MTA – exim4-damon-heavy .. related etc.) immediately, shutdown the Virtual Machine running (even of this very moment) on my Thinkpad T420 notebook and went to bed.
This morning I switched on the PC booted my notebook and launched the VM to do another set of experiments inside it, however it seemed it failed to load all services printed in text on Linux boot and the GDM3 Greater never appearead on screen- for those who don't know GDM3 is Linux Graphical environment Authentication / Login program.

I have tried a VirtualBox VM Restart, hoping that the cause of my problems might be VMachine bug (as I'm running the latest stable version of VirtualBox (Virtualbox 5.2) taken from VBox Linux download page . On Next boot weirdly the OS booted until the GDM greater but inputting the password did not load into GNOME but kept repeatedly asking for password.
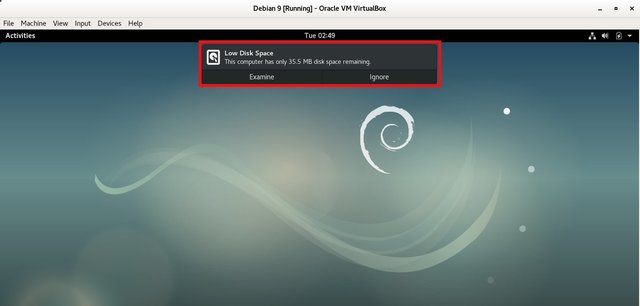
After another VM restart (shutdown + re-boot), I could eventually login but I got a Low disk space error like in below screenshot
So how to fix the Virtual Debian Install Low Disk Space?
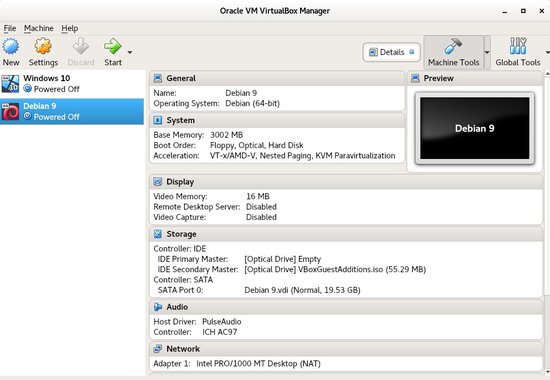
As of today September 4 2018 the way to extend the hard disk, that was prepared originally for the Virtual Machine install you need to give a check inside your Linux home (~/) directory under Virtualbox VMs find the folder that is equivallent to the Virtual Machine (whose Hard Disk Drive) you would like to extend, do a ls command check to identify the exact name of the VDI – [Virtual Desktop Infrastructure] file (in my case, that's is Debian 9.vdi) and use VboxManage modifyhd options command like shown below to resize VM HDD to more gigabytes
1. Resize the Virtualbox VM .VDI file using command line
root@jericho:/home/hipo/VirtualBox VMs/Debian 9# VBoxManage modifyhd 'Debian 9.vdi' –resize 40000
0%…10%…20%…30%…40%…50%…60%…70%…80%…90%…100%
As you see I am resizing my Hard Drive for this Virtual Machine to 40000 = (40 Gigabytes), if you have need / more disk space you might want to set something like 100000 (100GB).
2. Resizing .VDI file (Virtual Machine) using VirtualBox GUI
Click on Global Tools button (located leftside upper side on the screen
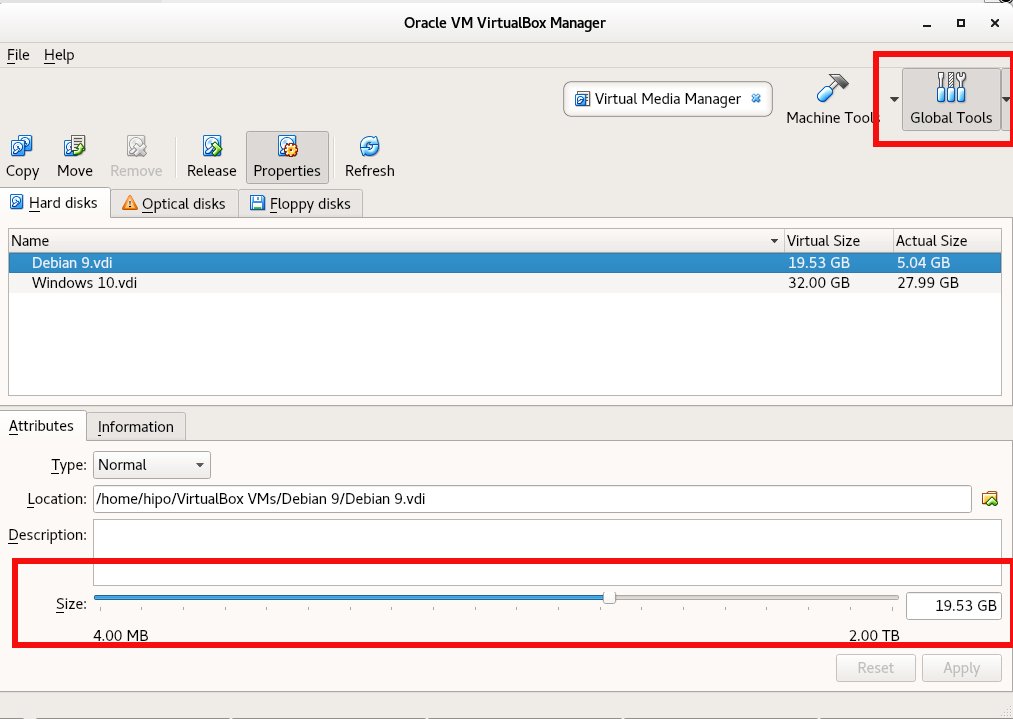
Drag the bar Size: to the Hard Drive partition size you want it to be …
So far so good, now the image file is resized but the GNU / Linux partition is still being small, so we need to also do repartitioning, once booted into the VM in order to stretch the HDD size to 40 Gigas.
Next install and use gparted Linux tool to add the free space to your root partition, use the gparted
Inside the VM instal the tool with:
Inside virtualmachine's in gnome-terminal / xterm etc. depending on the graphical environment used do install with apt-get:
debian:# apt-get install –yes gparted
…
debian~:# gparted
Notice that gparted has to be ran as a root superuser.
Run GParted and create new EXT3 filesystem that is 10GB (the size of the new created partition).
If you have installed Debian to place all partitions under / (root directory /dev/sda1) then the fresh new partition to create should be
/dev/sda3, anyways just look closely in EXT3 and in your case if the partiition is named differently create according to proper partition /dev/ naming.
I'll not run into details on how to create the partition with GParted as the program interface is very self-explanatory, the only thing is to apply the update to create partition and the ext3 filesystem, that's being done
with a green tick:
Next step is to check with fdisk whether, we have ext3 properly created filesystem as we've done already with GPARTED:
Once we have the partition created with EXT3 filesystem, we're ready to move /usr temporary to other folder, I use usually /root for the move but you can create anywhere a new folder for that and move to there.
To move to /root directory run again in terminal:
debian:~# mv /usr /root
debian:~# mkdir /usr
Note that during the move operations, your Desktop icons will become without (with broken) pictures and the default Debian background picture is to disappear, that's because the GUI environment will soon realize /usr/ libraries that're periodically reloaded in memory are missing and will be unable to reload them as it does in a cycle.
That should take a few minutes, so grab a coffee or if you're a smoker (hope not as smoking kills  ), in 5 / 10 minutes time depending on your computer / server configuration, it will be over, so we're ready to create new /usr dir and mount the new partition:
debian:~# mount /dev/sda3 /usr
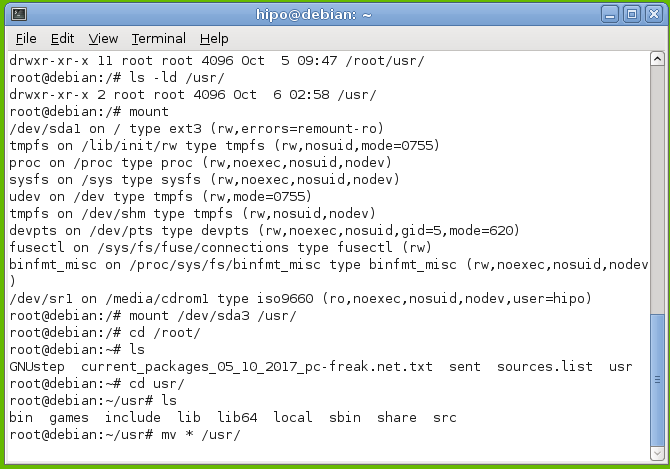
Now we check with mount command whether mount is fine:
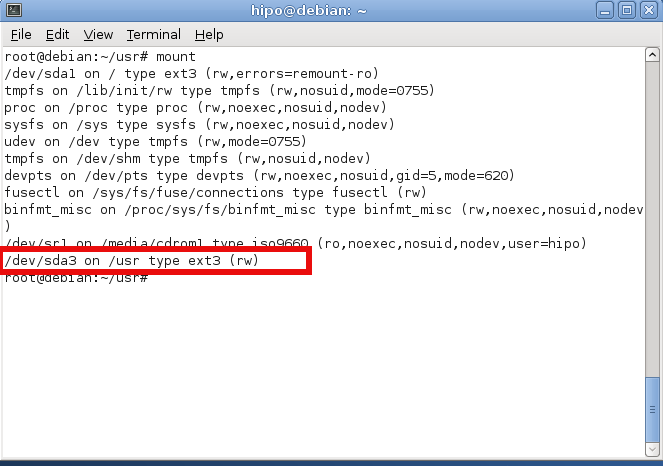
Now /dev/sda3 is mounted under /usr and we have to move back /root/usr directory content back to the newly mounted /usr so we run command:
debian:~# mv /root/usr/* /usr/*
Finally we need to create proper records for the new partition inside /etc/fstab (fstab –FileSystem Tab file – the file which describes instructs the Linux OS what partition to boot where, what)


More helpful Articles

Tags: howto, linux guest vm resize, linux vdi disk, resize guest, VirtualBox, virtualbox extend linux partion


