Posts Tagged ‘make’

How to Install and Use auditd for System Security Auditing on Linux

Thursday, September 25th, 2025

System auditing is essential for monitoring user activity, detecting unauthorized access, and ensuring compliance with security standards. On Linux, the Audit Daemon (auditd) provides powerful auditing capabilities for logging system events and actions.

This short article will walk you through installing, configuring, and using auditd to monitor your Linux system.

What is auditd?

auditd is the user-space component of the Linux Auditing System. It logs system calls, file access, user activity, and more — offering administrators a clear trail of what’s happening on the system.


1. Installing auditd

The auditd package is available by default in most major Linux distributions.

 On Debian/Ubuntu

# apt update
# apt install auditd audispd-plugins

 On CentOS/RHEL/Fedora

# yum install audit

After installation, start and enable the audit daemon

# systemctl start auditd

# systemctl enable auditd

Check its status

# systemctl status auditd

2. Setting Audit Rules

Once auditd is running, you need to define rules that tell it what to monitor.

Example: Monitor changes to /etc/passwd

# auditctl -w /etc/passwd -p rwxa -k passwd_monitor

Explanation:

  • -w /etc/passwd: Watch this file. When the file is accessed, the watcher will generate events.
  • -p rwxa: Monitor read, write, execute, and attribute changes
  • -k passwd_monitor: Assign a custom key name to identify logs. Later on, we could search for this (arbitrary) passwd string to identify events tagged with this key.

List active rules:

# auditctl -l

3. Common auditd Rules for Security Monitoring

Here are some common and useful auditd rules you can use to monitor system activity and enhance Linux system security. These rules are typically added to the /etc/audit/rules.d/audit.rules or /etc/audit/audit.rules file, depending on your system.

a. Monitor Access to /etc/passwd and /etc/shadow
 

-w /etc/passwd -p wa -k passwd_changes
-w /etc/shadow -p wa -k shadow_changes

  • Monitors read/write/attribute changes to password files.

b. Monitor sudoers file and directory
 

-w /etc/sudoers -p wa -k sudoers
-w /etc/sudoers.d/ -p wa -k sudoers

  • Tracks any change to sudo configuration files.

c. Monitor Use of chmod, chown, and passwd
 

-a always,exit -F arch=b64 -S chmod -S fchmod -S fchmodat -k perm_mod
-a always,exit -F arch=b64 -S chown -S fchown -S fchownat -k perm_mod
-a always,exit -F arch=b64 -S passwd -k passwd_changes

  • Watches permission and ownership changes.

d. Monitor User and Group Modifications

-w /etc/group -p wa -k group_mod
-w /etc/gshadow -p wa -k gshadow_mod
-w /etc/security/opasswd -p wa -k opasswd_mod

  • Catches user/group-related config changes.

e. Track Logins, Logouts, and Session Initiation

-w /var/log/lastlog -p wa -k logins
-w /var/run/faillock/ -p wa -k failed_login
-w /var/log/faillog -p wa -k faillog

  • Tracks login attempts and failures.

f. Monitor auditd Configuration Changes

-w /etc/audit/ -p wa -k auditconfig
-w /etc/audit/audit.rules -p wa -k auditrules

  • Watches changes to auditd configuration and rules.

g. Detect Changes to System Binaries

-w /bin/ -p wa -k bin_changes
-w /sbin/ -p wa -k sbin_changes
-w /usr/bin/ -p wa -k usr_bin_changes
-w /usr/sbin/ -p wa -k usr_sbin_changes

  • Ensures core binaries aren't tampered with.

h. Track Kernel Module Loading and Unloading

-a always,exit -F arch=b64 -S init_module -S delete_module -k kernel_mod

  • Detects dynamic kernel-level changes.

l. Monitor File Deletions

-a always,exit -F arch=b64 -S unlink -S unlinkat -S rename -S renameat -k delete

  • Tracks when files are removed or renamed.

m. Track Privilege Escalation via setuid/setgid

-a always,exit -F arch=b64 -S setuid -S setgid -k priv_esc

  • Helps detect changes in user or group privileges.

n. Track Usage of Dangerous Binaries (e.g., su, sudo, netcat)

-w /usr/bin/su -p x -k su_usage
-w /usr/bin/sudo -p x -k sudo_usage
-w /bin/nc -p x -k netcat_usage

  • Useful for catching potentially malicious command usage.

o. Monitor Cron Jobs

-w /etc/cron.allow -p wa -k cron_allow
-w /etc/cron.deny -p wa -k cron_deny
-w /etc/cron.d/ -p wa -k cron_d
-w /etc/crontab -p wa -k crontab
-w /var/spool/cron/ -p wa -k user_crontabs

  • Alerts on cron job creation/modification.

p. Track Changes to /etc/hosts and DNS Settings

-w /etc/hosts -p wa -k etc_hosts
-w /etc/resolv.conf -p wa -k resolv_conf

  • Monitors potential redirection or DNS manipulation.

q. Monitor Mounting and Unmounting of Filesystems

-a always,exit -F arch=b64 -S mount -S umount2 -k mounts

  • Useful for detecting USB or external drive activity.

r. Track Execution of New Programs

-a always,exit -F arch=b64 -S execve -k exec

  • Captures command execution (can generate a lot of logs).
     

A complete list of rules you can get from the hardening.rules auditd file place it under /etc/audit/rules.d/hardening.rules
and reload auditd to load the configurations.

Tips

  • Use ausearch -k <key> to search audit logs for matching rule.
  • Use auditctl -l to list active rules.
  • Use augenrules –load after editing rules in /etc/audit/rules.d/.


4. Reading Audit Logs

Audit logs events are stored in:

/var/log/audit/audit.log

By default, the location, this can be changed through /etc/auditd/auditd.conf

View recent entries:
 

# tail -f /var/log/audit/audit.log

Search by key:
 

# ausearch -k passwd_monitor

Generate a summary report:

# aureport -f

# aureport


Example: Show all user logins / IPs :

# aureport -au


5. Making Audit Rules Persistent

Rules added with auditctl are not persistent and will be lost on reboot. To make them permanent:

Edit the audit rules configuration:

# vim /etc/audit/rules.d/audit.rules

Add your rules, for example:

-w /etc/passwd -p rwxa -k passwd_monitor

Apply the rules:

# augenrules –load

7. Some use case examples of auditd in auditing Linux servers by sysadmins / security experts
 

Below are real-world, practical examples where auditd is actively used by sysadmins, security teams, or compliance officers to detect suspicious activity, meet compliance requirements, or conduct forensic investigations.

a. Detect Unauthorized Access to /etc/shadow

Use Case: Someone tries to read or modify password hashes.

Audit Rule:

-w /etc/shadow -p wa -k shadow_watch

Real-World Trigger:

sudo cat /etc/shadow

Check Logs:
 

# ausearch -k shadow_watch -i

Real Output:
 

type=SYSCALL msg=audit(09/18/2025 14:02:45.123:1078):

  syscall=openat

  exe="/usr/bin/cat"

  success=yes

  path="/etc/shadow"

  key="shadow_watch"

b. Detect Use of chmod to Make Files Executable

Use Case: Attacker tries to make a script executable (e.g., malware).

Audit Rule:

-a always,exit -F arch=b64 -S chmod -k chmod_detect

Real-World Trigger:
 

 # chmod +x /tmp/evil_script.sh

Check Logs:

# ausearch -k chmod_detect -i

c. Monitor Execution of nc (Netcat)

Use Case: Netcat is often used for reverse shells or unauthorized network comms.

Audit Rule:
 

-w /bin/nc -p x -k netcat_usage
 

Real-World Trigger:

nc -lvp 4444

Log Entry:

type=EXECVE msg=audit(09/18/2025 14:35:45.456:1123):

  argc=3 a0="nc" a1="-lvp" a2="4444"

  key="netcat_usage"


d. Alert on Kernel Module Insertion
 

Use Case: Attacker loads rootkit or malicious kernel module.

Audit Rule:

-a always,exit -F arch=b64 -S init_module -S delete_module -k kernel_mod

Real-World Trigger:

# insmod myrootkit.ko

Audit Log:
 

type=SYSCALL msg=audit(09/18/2025 15:00:13.100:1155):

  syscall=init_module

  exe="/sbin/insmod"

  key="kernel_mod"

e. Watch for Unexpected sudo Usage

Use Case: Unusual use of sudo might indicate privilege escalation.

Audit Rule:

-w /usr/bin/sudo -p x -k sudo_watch

Real-World Trigger:

sudo whoami

View Log:
 

# ausearch -k sudo_watch -i


f. Monitor Cron Job Modification

Use Case: Attacker schedules persistence via cron.

Audit Rule:

-w /etc/crontab -p wa -k cron_mod

Real-World Trigger:
 

echo "@reboot /tmp/backdoor" >> /etc/crontab

Logs:
 

type=SYSCALL msg=audit(09/18/2025 15:05:45.789:1188):

  syscall=open

  path="/etc/crontab"

  key="cron_mod"

g. Detect File Deletion or Renaming
 

Use Case: Attacker removes logs or evidence.

Audit Rule:

-a always,exit -F arch=b64 -S unlink -S unlinkat -S rename -S renameat -k file_delete

Real-World Trigger:

# rm -f /var/log/syslog

Logs:
 

type=SYSCALL msg=audit(09/18/2025 15:10:33.987:1210):

  syscall=unlink

  path="/var/log/syslog"

  key="file_delete"


h. Detect Script or Malware Execution
 

Use Case: Capture any executed command.

Audit Rule:
 

-a always,exit -F arch=b64 -S execve -k exec

Real-World Trigger:

/tmp/myscript.sh

Log View:

# ausearch -k exec -i | grep /tmp/myscript.sh

l. Detect Manual Changes to /etc/hosts

Use Case: DNS hijacking or phishing setup.

Audit Rule:

-w /etc/hosts -p wa -k etc_hosts

Real-World Trigger:
 

# echo "1.2.3.4 google.com" >> /etc/hosts

Logs:

type=SYSCALL msg=audit(09/18/2025 15:20:11.444:1234):

  path="/etc/hosts"

  syscall=open

  key="etc_hosts"


8. Enable Immutable Mode (if necessery)

For enhanced security, you can make audit rules immutable, preventing any changes until reboot:

# auditctl -e 2


To make this setting persistent, add the following to the end of /etc/audit/rules.d/audit.rules:

-e 2


Common Use Cases

Here are a few more examples of what you can monitor:

Monitor all sudo usage:

# auditctl -w /var/log/auth.log -p wa -k sudo_monitor


Monitor a directory for file access:

# auditctl -w /home/username/important_dir -p rwxa -k dir_watch

Audit execution of a specific command (e.g., rm):

# auditctl -a always,exit -F arch=b64 -S unlink,unlinkat -k delete_cmd

(Adjust arch=b64 to arch=b32 if on 32-bit system.)

9. Managing the Audit Log Size

Audit logs can grow large over time. To manage log rotation and size, edit:
 

# vim /etc/audit/auditd.conf

Set log rotation options like:

max_log_file = 8

num_logs = 5

Then restart auditd:
 

# systemctl restart auditd

Conclusion

The Linux Audit Daemon (auditd) is a powerful tool to track system activity, enhance security, and meet compliance requirements. With just a few configuration steps, you can monitor critical files, user actions, and system behavior in real time.


References

  • man auditd
  • man auditctl
  • Linux Audit Wiki


Fix Update KB5060999 Not Installing On Windows 11 Version 23H2/22H2 / Fix windows Update failed

Thursday, July 24th, 2025

fix-Update-KB5060999-Not_Installing_On_Windows_11_Version_23H2_22H2-howto-update-screenshot


Recently I've stumbled across a very annoying issue on my work Laptop. Suddenly windows stopped being upadted it took me really long time of hours of researching to find out how to resolve the error:

Fix Update KB5060999 Not Installing On Windows 11 Version 23H2/22H2 / Fix windows Update failed

After a lot of catch / tries I can manage to Find a fix Thanks God! 

Here are the few steps I took to resolve it, first I've taken all the steps pointed at the Complete Guide Windows Problems it took really long time but even thouigh I did not manage to resolve the issue it give a lot of understanding on different ways of how windows components stick together and how to debug and solve errors if such ones occurs. Thus I warmly recommend it to anyone working as HelpDesk support admin within corporation or if you are a Windows specialist who makes a living from resolving weird unexpected Windows errors for some little money.

Once I went through a lot of underwater stones and nothing word finally  I managed to solve it by following these concrete steps:

1. Check logs and find error message / problems in CBS.log

C:\> notepad c:\windows\Logs\CBS\CBS.log

The root of the issue I found there as a repeating error messages is:

"InternalOpenPackage failed for Package_for_KB3025096~31bf3856ad364e35~amd64~~6.4.1.0 [HRESULT = 0x800f0805 – CBS_E_INVALID_PACKAGE]"


2. Download from Windows catalog the Update


windows11.0-kb5049624-x64-ndp481_6990e824379adc100fd7895adb30e692697381d7.msu to C:\User\myuser\Downloads

3. Use Winrar or 7Zip to extract the msu in local Directory

E.g.open Administrator command line cmd.exe extract  in lets say in \Users\Username\Downloads\
windows11.0-kb5049624-x64-ndp481_6990e824379adc100fd7895adb30e692697381d7

C:\Users/a768839/Downloads/windows11.0-kb5049624-x64-ndp481_6990e824379adc100fd7895adb30e692697381d7 > dir
WSUSSCAN.cab             

4. Remove old package existing on the Windows 11 OS with the same name using DISM tool with /online /remove-package options

C:\Users\myuser\Downloads\windows11.0-kb5049624-x64-ndp481_6990e824379adc100fd7895adb30e692697381d7>DISM /online /remove-package /packagepath:C:\Users\a768839\Downloads\windows11.0-kb5049624-x64-ndp481_6990e824379adc100fd7895adb30e692697381d7\Windows11.0-KB5049624-x64-NDP481.cab                                                                                                                                                                    Deployment Image Servicing and Management tool                                                                                                                                                                                                                                            Version: 10.0.22621.2792                                                                                                                                                                                                                                                                                                                                           Image Version: 10.0.22631.5335                                                                                                                                                                                                                                                                                                                 Processing 1 of 1 – Removing package Package_for_DotNetRollup_481~31bf3856ad364e35~amd64~~10.0.9294.1                                                                                                                                                                                     [==========================100.0%================]                                                                                                                                                                                                                            
 The operation completed successfully.      

                                                                                                                                                                                                                                              5. Use DISM /online /add-package to manually insatall  windows11.0-kb5049624-x64-ndp481_6990e824379adc100fd7895adb30e692697381d7\Windows11.0-KB5049624-x64-NDP481.cab   
                                             

  Assuming you have already downloaded previously and exctracted the .msu file and you have the .cab file at hand run again as cmd.exe Admin                                                                                                                                                                                       

C:\Users\myuser\Downloads\windows11.0-kb5049624-x64-ndp481_6990e824379adc100fd7895adb30e692697381d7>DISM /online /add-package /packagepath:C:\Users\a768839\Downloads\windows11.0-kb5049624-x64-ndp481_6990e824379adc100fd7895adb30e692697381d7\Windows11.0-KB5049624-x64-NDP481.cab                                                                                                                                                                                           Deployment Image Servicing and Management tool                                                                                                                                                                                                                                            Version: 10.0.22621.2792                                                                                                                                                                                                                                                                                                                                                Image Version: 10.0.22631.5335                                                                                                                                                                                                                                                                                                                  Processing 1 of 1 – Adding package Package_for_DotNetRollup_481~31bf3856ad364e35~amd64~~10.0.9294.1                                                                                                                                                                                       [==========================100.0%==========================]                                                                                                                                                                                                                              The operation completed successfully.    


The idea to remove and install the failing package found in the CBS.log was initially found on                                                                   
 http://datadump.ru/windows-update-error-800f0831/
 

6. Force a Windows chkdsk (Check disk on next restart) to make sure no physical hard drive or some other inode Windows Filesystem errors are there

Within same Admin cmd.exe

C:\Users\myuser\> chkdsk /f C:\


Once command executes reboot the PC and wait for the chkdsk scan to complete and PC to Boot as usual

7. Stop / start wuauserv and do sfc /scannow to refresh some Windows update components

Run following set of commands within Admin cmd

C:\> net stop wuauserv
C:\> command prompt in admin mode
C:\>  dism /online /cleanup-image /startcomponentcleanup
C:\>  sfc /scannow
C:\> restart
C:\> sfc /scannow
C:\> net start wuauserv

8. Download Manually failing update from Windows catalog download site:

As of time of writting this article the URL to download is https://catalog.update.microsoft.com/Search.aspx?q=KB5049624%20%20

C:\Users\myuser\Downloads> dir *.msu
windows11.0-kb5060999-x64_99e39c1cf8a8976d9b3313efb38069876c417f70.msu

9. Run Manually again failing Update from command line

Run cmd as Administrator and exec the file:

C:\Users\myuser\Downloads\windows11.0-kb5060999-x64_99e39c1cf8a8976d9b3313efb38069876c417f70.msu

Wait for the install to complete The computer will need to restart

10. Resync the device to the Computer Domain (mandatory step) only if your PC is part of large organizational Domain

Open Microsoft Store / Company Portal and Sync the device (if necessery)

Settings -> Sync

11. Force the PC to sync itself with remote Global Domain policies (mandatory only if PC is part of Domain)

C:\Users\myuser> gpupdate /force
C:\Users\myuser> repadmin /showrepl

Wait for Synchronization and wait for some time for computer compliancy to get back to normal (Computer compliancy might not be an issue if this is a Personal Windows installation) but for computers part of Larger Windows Domains, where a Domain policy requires a compliancy to set of rules)

To come up with this guide and better understand what is going on to resolve it I have to thank my colleague Eduard for assisting me to read the CBS.log and analyze it and also the following forum thread reading explaining what causes the mysterious windows update Update KB5060999 Not Installing On Windows 11 Version 23H2/22H2 to fail.
 

Zabbix Power Shell PS1 script to write zero or one if string is matched inside log file

Monday, December 2nd, 2024

How to Install and Configure Zabbix Server and Client on Rocky Linux 9 -  Cộng Đồng Linux

At work we had setup zabbix log file processing for few servers for a service that is doing a Monitoring Health Checks for a a special application via an encrypted strong encrypted tunnel. The app based on the check reports whether the remote side has processed data or not.
As me and my team are not maintainers of the zabbix-server where the zabbix-agents are sending the data, there is a multiple content of data being sent in simply "" empty strings via a zabbix Item setup. Those empty strings however gets stored in the zabbix-server database and since this check is made frequently about 500 hundred records of empty string lines are being written to the zabbix server, we got complaint by the zabbix adminsitrators, that we have to correct our Monitoring setup to not flood the zabbix-server.

Since zabbix cannot catch up the "" empty string and we cannot supress the string from being written in the Item, we needed a way to change the monitoring so that the configured Application check returns 1 (on error) and 0 (on success).

Zabbix even though advanced has a strange when zabbix log[] function, e.g. 

log[/path/to/log,,,,skip]

log function, used to analyze a log file and cut out last or first lines of a file simmilar to UNIX's  head and tail over log files this is described in the zabbix log file monitoring here . If a string is matched it can return string 1, but if nothing gets matched the result is empty string "" and this empty string cannot be used in a way to analyze the data with Item is used.

There is plenty of discussions online for this weird behavior and many people do offer different approaches to solve the strange situation, but as we have tried with our colleagues sys admins  none of those really worked out.

Thus we decided to use the classical way to work around, e.g. to simply use a powershell script that would check a number of lines inside a provided log file analyze if a string gets found and print out value of "1" if the string is matched or "0" "if not and this PS1 script to be set to run via a standard zabbix userparameter script.

This worked well, as all of us are mainly managing Linux systems, and we don't have enough knowledge on powershell we have used our internal Aartificial Intelligence (AI) clone tool to LibreChat – A free and open source ChatGPT clone.

LibreChat includes OpenAI's models, but also others — both open-source and closed-source — and its website promises "seamless integration" with AI services from OpenAI, Azure, Anthropic, and Google — as well as GPT-4, Gemini Vision, and many others. ("Every AI in one place," explains LibreChat's home page.) Plugins even let you make requests to DALL-E or Stable Diffusion for image generations. (LibreChat also offers a database that tracks "conversation state" — making it possible to switch to a different AI model in mid-conversation…)

$logfile = "C:\path\to\your\logfile.log"
$searchString = "-1"
 
# Get the last 140 lines
$lines = Get-Content $logfile -Tail 140
 
# Filter lines containing the search string
$found = $lines | Where-Object { $_ -match [regex]::Escape($searchString) }
 
# Output found lines or 0 if none were found
if ($found) {
    $found | ForEach-Object { $_ }
} else {
    Write-Host 0
}

You can download and the return_zero_or_one-if-string-matches-in-log-powershell.ps1 script here

How to make 27 inch monitor to work on 2560×1440 with Virtualbox Linux

Wednesday, October 4th, 2023

make-virtualbox-with-linux-work-on-2k-2560x1440-howto

I've bought a new "second hand" refurbished EIZO Flexscan Monitor EV2760 S1 K1 awesome monitor re from Kvant Serviz a company reseller of Second Hand electronics that is located on the territy of Bulgarian Academy of Sciences (BAN / BAS) and was created by BAS people originally for the BAS people and am pretty happy with it for doing my daily job as system administrator, especially as the monitor has been used on very short screen time for only 256 use hours (which is less than a year of full-use time), whether EIZO does guarantee their monitors to be able to serve up to 5 Full years monitor use time.

For those who deals with Graphics such as Designers and people into art working with Computers knows EIZO brand Monitors for quite some time now and it seems as much of those people are using Windows or Macintoshes, these monitors have been mainly created to work optimally with Windows / Mac computers on a higher resolution.
My work PC that is Dell Latitude 5510 with its HDMI cable has been running perfect with The EIZO with Windows 10, however as I'm using a Virtualbox virutal machines with CentOS Linux, the VM does not automatically detected the highest resolution 2K that this monitors supports 2560×1440 at 60 Hz is the best one can use to get more things fit into the screen and hopefully also good for the Eyes, the Ecoview shoulk also be a good idea for the eyes, as the Ecoview by EIZO tries to adjust the monitor brightness to lower levels according to the light in the room to try to minimize the eye strain on the eyes. The Ecoview mode is a little bit I guess like the famous BENQ's monitors Eye care. 
I'm talking about all this Displays specifics as I spend quite a lot of time to learn the very basics about monitors as my old old 24 Inch EIZO Monitor Flexscan model 2436W started to wear off with time and doesn't support HDMI cable input, so I had to use a special. cable connector that modifies the signal from HDMI to DVI (and I'm not sure how this really effects the eyes), plus the DVI quality is said to be a little bit worse than HDMI as far as I read a bit on the topic online.

Well anyways currently I'm a happy owner of the EIZO EV2760 Monitor which has a full set of inputs of:

  • 27" In-Plane Switching (IPS) Panel
  • DisplayPort | HDMI | DVI-D | 3.5mm Audio
  • 2560 x 1440 Native Resolution
  • 1000:1 Typical Contrast Ratio
     

I've tried to make the monitor work with Linux and my first assumption from what I've read was that I have to reinstall the Guess Addition Tools on the Virtualbox with additing the Guest Addition Tools via the Vbox GUI interface:

Devices -> Insert Guest Additions CD Image

virtualbox-resolutions-screenshot

But got an error that the Guest additions tools iso is missing
So eventually resolved it by remounting and reinstalling the guest addition tools with the following set of commands:

[root@localhost test]# yum install perl gcc dkms kernel-devel kernel-headers make bzip2
[root@localhost test]# cd /mnt/cdrom/
[root@localhost cdrom]# ls
AUTORUN.INF  runasroot.sh                       VBoxSolarisAdditions.pkg
autorun.sh   TRANS.TBL                          VBoxWindowsAdditions-amd64.exe
cert         VBoxDarwinAdditions.pkg            VBoxWindowsAdditions.exe
NT3x         VBoxDarwinAdditionsUninstall.tool  VBoxWindowsAdditions-x86.exe
OS2          VBoxLinuxAdditions.run


[root@localhost cdrom]# ./VBoxLinuxAdditions.run 

Verifying archive integrity… All good.
Uncompressing VirtualBox 6.1.34 Guest Additions for Linux……..
VirtualBox Guest Additions installer
Removing installed version 6.1.34 of VirtualBox Guest Additions…
Copying additional installer modules …
Installing additional modules …
VirtualBox Guest Additions: Starting.
VirtualBox Guest Additions: Building the VirtualBox Guest Additions kernel
modules.  This may take a while.
VirtualBox Guest Additions: To build modules for other installed kernels, run
VirtualBox Guest Additions:   /sbin/rcvboxadd quicksetup <version>
VirtualBox Guest Additions: or
VirtualBox Guest Additions:   /sbin/rcvboxadd quicksetup all
VirtualBox Guest Additions: Building the modules for kernel
3.10.0-1160.80.1.el7.x86_64.
ERROR: Can't map '//etc/selinux/targeted/policy/policy.31':  Invalid argument

ERROR: Unable to open policy //etc/selinux/targeted/policy/policy.31.
libsemanage.semanage_read_policydb: Error while reading kernel policy from /etc/selinux/targeted/active/policy.kern. (No such file or directory).
OSError: No such file or directory
VirtualBox Guest Additions: Running kernel modules will not be replaced until
the system is restarted


The solution to that was to reinstal the security policy-target was necessery

[root@localhost test]# yum install selinux-policy-targeted –reinstall


And of course rerun the reinstall of Guest addition tools up to the latest

[root@localhost cdrom]# ./VBoxLinuxAdditions.run 

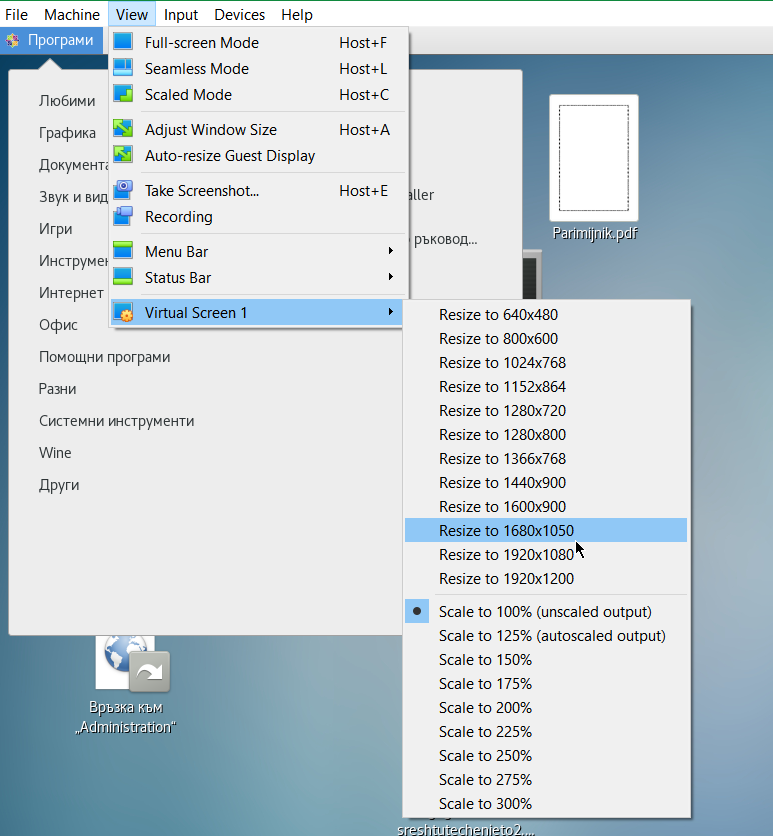
Unfortunately that doesn't make it resolve it and even shutting down the VM machine and reloading it again with Raised Video Memory for the simulated hardware from settings from 16 MB to 128MB for the VM does not give the option from the Virtualbox interface to set the resolution from
 

View -> Virtual Screen 1 (Resize to 1920×1200)

to any higher than that.

After a bit of googling I found some newer monitors doesn't seem to be seen by xrandr command and few extra commands with xrandr need to be run to make the 2K resolution 2560×1440@60 Herzes work under the Linux virtual machine.

These are the extra xranrd command that make it happen

# xrandr –newmode "2560x1440_60.00" 311.83  2560 2744 3024 3488  1440 1441 1444 1490  -HSync +Vsync
# xrandr –addmode Virtual1 2560x1440_60.00
# xrandr –output Virtual1 –mode "2560x1440_60.00"

As this kind of settings needs to be rerun on next time the Virtual Machine runs it is a good idea to place the commands in a tiny shell script:

[test@localhost ~]$ cat xrandr-set-resolution-to-2560×1440.sh 
#!/bin/bash
xrandr –newmode "2560x1440_60.00" 311.83  2560 2744 3024 3488  1440 1441 1444 1490  -HSync +Vsync
xrandr –addmode Virtual1 2560x1440_60.00
xrandr –output Virtual1 –mode "2560x1440_60.00"


You can Download  the xrandr-set-resolution-to-2560×1440.sh script from here

Once the commands are run, to make it affect the Virtualbox, you can simply put it in FullScreen mode via


View -> Full-Screen Mode (can be teriggered from keyboard by pressing Right CTRL + F) together

[test@localhost ~]$ xrandr –addmode Virtual1 2560x1440_60.00
[test@localhost ~]$ xrandr –output Virtual1 –mode "2560x1440_60.00"
[test@localhost ~]$ xrandr 
Screen 0: minimum 1 x 1, current 2560 x 1440, maximum 8192 x 8192
Virtual1 connected primary 2560×1440+0+0 (normal left inverted right x axis y axis) 0mm x 0mm
   1920×1200     60.00 +  59.88  
   2560×1600     59.99  
   1920×1440     60.00  
   1856×1392     60.00  
   1792×1344     60.00  
   1600×1200     60.00  
   1680×1050     59.95  
   1400×1050     59.98  
   1280×1024     60.02  
   1440×900      59.89  
   1280×960      60.00  
   1360×768      60.02  
   1280×800      59.81  
   1152×864      75.00  
   1280×768      59.87  
   1024×768      60.00  
   800×600       60.32  
   640×480       59.94  
   2560x1440_60.00  60.00* 
Virtual2 disconnected (normal left inverted right x axis y axis)
Virtual3 disconnected (normal left inverted right x axis y axis)
Virtual4 disconnected (normal left inverted right x axis y axis)
Virtual5 disconnected (normal left inverted right x axis y axis)
Virtual6 disconnected (normal left inverted right x axis y axis)
Virtual7 disconnected (normal left inverted right x axis y axis)
Virtual8 disconnected (normal left inverted right x axis y axis)

Tadadadam ! That's all folks, enjoy having your 27 Inch monitor running at 2560×1440 @ 60 Hz 🙂


Saint martyr Angel of Lerina – a Bulgarian saint confessor and the Day of Saint Archangel Michael and of all Angels Archangels and Heavenly Powers

Wednesday, November 9th, 2022

saint_archangel_Michaill_Joanikij_papa_Vitanov_1820_Trjavna_Bulgaria

Saint Archangel Michael (Church of Saint  Archangel Michael Tryavna, Bulgaria) iconographer Yoanikij Papavitanov

On 8th of November in the Bulgarian Orthodox Church, we celebrate the day to remember the gathering of Archangel Michael with all the Angels Archangels, Cherubims and heavenly powers that have kept loyal to the Holy Trinity God – The Father, The Son, and The Holy Spirit.
The same arch-angels and powers who could do what they want and were created in the beginning of time after God as a helper Spirits to God and man.

The same angels are also supporting the whole universe with their deeds of love. They sustain the waters, make the wind blow, the clouds to move and give rain, the earth to give its fruits, possess and give wisdom or transfer secret messages from God to man when sent.

Others do protect all Christians and people from the evils of the fallen-agels who choose to misobey the True God Christ and follow the master of the evil spirits whose place is in the burning Gehenah and whose time is running out. 

They help the woman in birth-pain (like my sister Stanimira whose time to give birth is approaching), the make the organism of man to function properly. Or give the physics to make the stars shine on heaven, the Planet and heavenly bodies to move. Each and every place and Country and Church has its own guardian angels. And they're of a Big multitude the Church fathers says a lot about the Angels and many is still unknown and will be revealed in the that everyone will stand on the Judgement day in front of God and sees the Heaven and Hell realities and will stumble in fear seeing the gloriness of the archangels and cherubs (burning out of Love for God and man) made in a likeness of the Holy God.

The orthodox Church sticks clearly to the teaching of so called saint Dyonisious the Areopagites (often called in the Theology Pseudo Dyonisious), who was one of the important apostles of Christ, Athenian judge at the Areopagus Court in Athens, who lived in the first century. A convert to Christianity, he is venerated as a saint by multiple denominations.


The writings of Saint Dionysius the Areopagite hold great significance for the Orthodox Church. Four books of his have survived to the present day:


On the Celestial Hierarchy, On the Ecclesiastical Hierarchy, On the Names of God, On Mystical Theology

In additional, there are ten letters to various people.

The book On the Celestial Hierarchies was written actually in one of the countries of Western Europe, where Saint Dionysius was preaching. In it he speaks of the Christian teaching about the angelic world. The angelic (or Celestial-Heavenly) hierarchy comprises the nine angelic Ranks:

  • Seraphim
  • Cherubim
  • Thrones
  • Dominions
  • Powers
  • Authorities
  • Principalities
  • Archangels
  • Angels


The account of the Synaxis of the Bodiless Powers of Heaven is located under November 8.

saint-Agatangel-Bitolski-Bulgarian-saint-icon

The purpose of the divinely-established Angelic Hierarchy is the ascent towards godliness through purification, enlightenment and perfection. The highest ranks are bearers of divine light and divine life for the lower ranks. And not only are the sentient, bodiless angelic hosts included in the spiritual light-bearing hierarchy, but also the human race, created anew and sanctified in the Church of Christ.

There is too much to be said about Angels, Archangels, through the years from ancient times, they can heal and help, and grant special powers to man and many, many more. There were innumerable heresies who have over-deified heavenly powers, especially gnostics and that is a well known fact. For those who want to read about Angels, and their hierarchy there is a lot ot read and learn, angels has helped the saints in their hardship in fight with evilness, there is really a lot about this for those who want to further learn. 

But what is less known is here in today's relatively small country of Bulgaria, we have a local saint Angel of Lerina who is born in Bulgarian family and stems from a Bulgarian village. As his endeveour and confession of his love for Christ and the Church was enormous he has suffered martyrdom for Christ in the 17th century during the times Bulgaria was enslaved by the Ottoman Turks. Thus as there is not much written about saint Angel Lerinski (Lerina), I dedicated this small article in glory of his memory. The article is also in memoriam of my grand-grand-grand Father who was also named Angel himself, perhaps in glory of Saint Angel of Lerina.

The Life of Saint Angel of Lerina


Saint-Angel-Agathangel-of-Lerina-orthodox-icon

Saint New Martyr Angel of Lerina (Bitolski) – picture source Wikipedia

All the sources about the holy martyr Angel of Lerinsky that we have reached cite the story of Saint Paisius of Hilendar as the main source for the life of the new martyr, called Angel or Agathangel. This is what St. Paisius writes about him in the History of Slavonic Bulgaria":
           "In 1750, in Bitol, where the Turkish and Macedonian Pasha sits, the Turks tortured and beheaded a young man, handsome in face and stature, for the Christian faith. Many forced and tormented him to renounce Christ, but he wisely and courageously denounced their godless faith. The Bishop of Bitola recorded many of his answers, described his sufferings in Greek. And God showed a great sign over his powers. His name was Angel from the village of Lerin. This holy martyr Angel shone in our time in the Bulgarian land."
          The Bulgarian Orthodox Church honors the holy new martyr on November 8, the feast of the holy Archangels. Probably the veneration of the saint in our church dates from the time when he was martyred, because his martyrdom was described by Saint Paisius of Hilendar immediately after it happened, since Saint Paisius was his contemporary.

          Greek information about the new martyr Angel Lerinski appeared only in recent years.

In the electronic version of "Οι Νεομάρτυρες της Булгариас" (New Martyrs Bulgarian) Αρχιμανδρίτου του Οικουμενικού Θρόνου Θωμά Ανδρέου Ιεροκήρυκος Ιεράς Μητροπόλεως Ελευθερουπόλεως (Archimandrite of the Ecumenical See Thomas Andreu, Preacher of the Eleftheroupolis Holy Metropolis), Kavala, 2011, p.88, we read :

         "Another case of a new martyr of Greek origin is that of Angel (or Agatangel) from today's Florina (in Bulgarian Lerin). The 2009 calendar of the Holy Metropolis of Florin, Prespa and Eordei honors this new martyr, who was martyred in the monastery of Pelagonia (now Bitola, Macedonia) on February 17, 1727*. The book "History of Slavonic Bulgaria" by Paisiy Hilendarski talks about the martyrdom of the new martyr ("his name was Angel or Agatangel and he was from the village of Florina")

Saint-Agatangel_Bitolski-Greek-icon

…..
          Little is known about the new martyr. We know that he was born in 1732 in Florina, in the sanjak (prefecture) of Bitola (Monastery). When he grew up, he became a tall and handsome young man. At the age of 18, the Turks tried to convert him to Islam, but Angel – although very young – did not succumb to the temptations and then bravely accepted martyrdom. In his book Paisius Hilendarski mentions that: "In 1750 in the monastery… the Turks tortured and slaughtered a handsome young man because of his Christian faith… His name was Angel and he was from the village of Florina" His testimony in the monastery was attended by the local Greek metropolitan, who described his courage and the intelligent and logical answers he gave in court. Due to the fact that he condemned the Muslim faith with particular wisdom and courage, he was beheaded when he was only 18 years old in 1750. The Bulgarian Orthodox Church honors his memory on November 8, during the Feast of the Archangels…."

          Additional information about the holy new martyr Angel Lerinsky can be found on one of Florina's sites (http://agiospanteleimonas-florina.blogspot.com/2010/06/blog-post_8186.html.)


          The Metropolitan of Florini, Prespa and Eordaia, Theoclitus, addresses the citizens on the occasion of the decision to start the veneration of the holy martyr Agathangel of Florina (June, 2010):

          "With special feelings of joy, emotion, holy contentment and reverence, I turn to you, the blessed children of the Greek Macedonian land, to become participants in the great spiritual joy experienced by our local Church for the first official celebration of the memory of the holy new martyr Agathangel in the seat of our metropolis Florina. It is already known to all of you. that the holy new martyr Agathangel, martyred in the Pelagonian monastery, originated from Florina, is our fellow citizen. At an early age he left Florina and went to Vutelion of Byzantium, to the monastery, seeking better living conditions. There, exercising the profession of shoemaker, he soon distinguished himself by his honesty and his diligence. …. But what distinguished him from the young people of his time was the pure and firm faith he had in Christ and in His "orthodox church". He loved Christ more than anything else in his life. No other love could "steal" the love that Agathangel had in his heart for Christ, he loved Him simply, purely, with all his heart, with all his strength, he loved Him as his poor parents and his blessed ancestors loved Him.
         

Along with the love for Christ, the saint had love for his homeland, conquered Macedonia. Almost four hundred years of slavery count the long-suffering "Greek Macedonians".
The Turkish conquerors treated them with cruelty. Sometimes with flattery, sometimes with threats, sometimes with violence, they try to make them change their faith. To deny Christ. To renounce the Orthodox faith and become Muslims.
And whoever renounces his faith renounces his homeland.

          Agathangel's heart was troubled by the fact that several of his fellow Roman Christians did not withstand the temptations or the violence, denying Christ and the country. His brave heart rebelled. He could not bear the Orthodox faith to be dishonored. For this, when during the three-day Bairam, which is celebrated after Ramadan, the forced conversion of the Orthodox increased, this young boy, not yet twenty years old, went to Constantinople, where he received a Sultan's firman, which forbade the forced conversion in the area of ​​Pelagonia.

On his return to the Monastery, the saint was arrested by those outraged by the Turkish Sultan's decision, and after cruel torture, he was beheaded on February 17, 1727.

           In a meeting we held in the Holy Metropolis, in which, in addition to the Metropolitan, the Honorable Prefect of Florini Mr. Ioannis Voskopoulas, the Mayor of Florini Mr. Stefanos Papanastasiou, the President of TEDC of N. Florinis, Mr. Dimitrios Iliadis, and the President of the monasteries of N. Florinis, Mr. Theodoros Vosdou, decided to jointly hold events in honor of the holy new martyr Agathangel…”

* 1727 is mentioned as the year of the martyrdom of St. Angel Lerinski in some sources, and sometimes it is mentioned together with 1750, in the same source. This discrepancy in the years of the martyrdom leaves the doubt that different martyrs are being talked about.


For this reason, we cannot say exactly whether the reliquary with the relics – the holy head of the new martyr Agathangel in the Kykkos monastery in Cyprus, which contains the same description of his life, but the date February 17, 1727 is indicated, refers to the same martyr, for which speaks Saint Paisius of Hilendar.

Create simple proxy http server with netcat ( nc ) based tiny shell script

Tuesday, January 26th, 2021

use-Netcat_proxy-picture

The need of proxy server is inevitable nowadays especially if you have servers located in a paranoid security environments. Where virtually all is being passed through some kind of a proxy server. In my work we have recently started a  CentOS Linux release 7.9.2009 on HP Proliant DL360e Gen8 (host named rhel-testing).

HP DL360e are quite old nowadays but since we have spare servers and we can refurnish them to use as a local testing internal server Hypervisor it is okay for us. The machine is attached to a Rack that is connected to a Secured Deimilitarized Zone LAN (DMZ Network) which is so much filtered that even simple access to the local company homebrew RPM repository is not accessible from the machine.
Thus to set and remove software from the machine we needed a way to make yum repositories be available, and it seems the only way was to use a proxy server (situated on another accessible server which we use as a jump host to access the testing machine).

Since opening additional firewall request was a time consuming non-sense and the machine is just for testing purposes, we had to come with a solution where we can somehow access a Local repository RPM storage server http://rpm-package-server-repo.com/ for which we have a separate /etc/yum.repos.d/custom-rpms.repo definition file created.

This is why we needed a simplistic way to run a proxy but as we did not have the easy way to install privoxy / squid / haproxy or apache webserver configured as a proxy (to install one of those of relatively giant piece of software need to copy many rpm packages and manually satisfy dependencies), we looked for a simplistic way to run a proxy server on jump-host machine host A.

A note to make here is jump-host that was about to serve as a proxy  had already HTTP access towards the RPM repositories http://rpm-package-server-repo.com and could normally fetch packages with curl or wget via it …

For to create a simple proxy server out of nothing, I've googled a bit thinking that it should be possible either with BASH's TCP/IP capabilities or some other small C written tool compiled as a static binary, just to find out that netcat swiss army knife as a proxy server bash script is capable of doing the trick.

Jump host machine which was about to be used as a proxy server for http traffic did not have enabled access to tcp/port 8888 (port's firewall policies were prohibiting access to it).Since 8888 was the port targetted to run the proxy to allow TCP/IP port 8888 accessibility from the testing RHEL machine towards jump host, we had to issue first on jump host:

[root@jump-host: ~ ]# firewall-cmd –permanent –zone=public –add-port=8888/tcp

To run the script once placed under /root/tcp-proxy.sh on jump-host we had to run a never ending loop in a GNU screen session to make sure it runs forever:

Original tcp-proxy.sh script used taken from above article is:
 

#!/bin/sh -e


if [ $# != 3 ]
then
    echo "usage: $0 <src-port> <dst-host> <dst-port>"
    exit 0
fi

TMP=`mktemp -d`
BACK=$TMP/pipe.back
SENT=$TMP/pipe.sent
RCVD=$TMP/pipe.rcvd
trap 'rm -rf "$TMP"' EXIT
mkfifo -m 0600 "$BACK" "$SENT" "$RCVD"
sed 's/^/ => /' <"$SENT" &
sed 's/^/<=  /' <"$RCVD" &
nc -l -p "$1" <"$BACK" | tee "$SENT" | nc "$2" "$3" | tee "$RCVD" >"$BACK"


Above tcp-proxy.sh script you can download here.

I've tested the script one time and it worked, the script syntax is:

 [root@jump-host: ~ ]#  sh tcp-proxy.sh
usage: tcp-proxy.sh <src-port> <dst-host> <dst-port>


To make it work for one time connection I've run it as so:


 [root@jump-host: ~ ]# sh tcp-proxy.sh 8888 rpm-package-server-repo.com 80


To make the script work all the time I had to use one small one liner infinite bash loop which goes like this:

[root@jump-host: ~ ]#  while [ 1 ]; do sh tcp-proxy.sh 8888 rpm-package-server-repo.com 80; done​

On rhel-testing we had to configure for yum and all applications to use a proxy temporary via
 

[root@rhel-tresting: ~ ]# export http_proxy=jump-host_machine_accessibleIP:8888


And then use the normal yum check-update && yum update to apply to rhel-testing machine latest RPM package security updates.

The nice stuff about the tcp-proxy.sh with netcat in a inifite loop is you will see the binary copy of traffic flowing on the script which will make you feel like in those notorious Hackers movies ! 🙂

The stupid stuff is that sometimes some connections and RPM database updates or RPMs could be cancelled due to some kind of network issues.

To make the connection issues that are occuring to the improvised proxy server go away we finally used a slightly modified version from the original netcat script, which read like this.
 

#!/bin/sh -e


if [ $# != 3 ]
then
    echo "usage: $0 <src-port> <dst-host> <dst-port>"
        exit 0
        fi

        TMP=`mktemp -d`
        BACK=$TMP/pipe.back
        SENT=$TMP/pipe.sent
        RCVD=$TMP/pipe.rcvd
        trap 'rm -rf "$TMP"' EXIT
        mkfifo -m 0600 "$BACK" "$SENT" "$RCVD"
        sed 's/^/ => /' <"$SENT" &
        sed 's/^/<=  /' <"$RCVD" &
        nc –proxy-type http -l -p "$1" <"$BACK" | tee "$SENT" | nc "$2" "$3" | tee "$RCVD" >"$BACK"


Modified version tcp-proxy1.sh with –proxy-type http argument passed to netcat script u can download here.

With –proxy-type http yum check-update works normal just like with any normal fully functional http_proxy configured.

Next step wasto make the configuration permanent you can either add to /root/.bashrc or /etc/bashrc (if you need the setting to be system wide for every user that logged in to Linux system).

[root@rhel-tresting: ~ ]#  echo "http_proxy=http://jump-host_machine_accessibleIP:8888/" > /etc/environment


If you need to set the new built netcat TCP proxy only for yum package update tool include proxy only in /etc/yum.conf:

[root@rhel-tresting: ~ ]# vi /etc/yum.conf
proxy=http_proxy=http://jump-host_machine_accessibleIP:8888/


That's all now you have a proxy out of nothing with just a simple netcat enjoy.

Start Stop Restart Microsoft IIS Webserver from command line and GUI

Thursday, April 17th, 2014

start-stop-restart-microsoft-iis-howto-iis-server-logo
For a decomissioning project just recently I had the task to stop Microsoft IIS  on Windows Server system.
If you have been into security for a while you know well how many vulnerabilities Microsoft (Internet Information Server) Webserver used to be. Nowadays things with IIS are better but anyways it is better not to use it if possible …

Nomatter what the rason if you need to make IIS stop serving web pages here is how to do it via command line:

At Windows Command Prompt, type:

net stop WAS

If the command returns error message to stop it type:

net stop W3SVC

stop-microsoft-IIS-webservice
Just in case you have to start it again run:

net start W3SVC

start-restart-IIS-webserver-screenshot

For those who prefer to do it from GUI interface, launch services.msc command from Windows Run:

> services.msc

services-msc-stop-microsoft-iis-webserver

In list of services lookup for
IIS Admin Service and HTTP SSL
a) (Click over it with right mouse button -> Properties)
b) Set Startup type to Manual
c) Click Stop Button

You're done now IIS is stopped to make sure it is stopped you can run from cmd.exe:

telnet localhost 80

when not working you should get 'Could not open connection to the host. on port 80: Connection failed' like shown up in screenshot.

Deny DHCP Address by MAC on Linux

Thursday, October 8th, 2020

Deny DHCP addresses by MAC ignore MAC to not be DHCPD leased on GNU / Linux howto

I have not blogged for a long time due to being on a few weeks vacation and being in home with a small cute baby. However as a hardcore and a bit of dumb System administrator, I have spend some of my vacation and   worked on bringing up the the www.pc-freak.net and the other Websites hosted as a high availvailability ones living on a 2 Webservers running on a Master to Master MySQL Replication backend database, this is oll hosted on  servers, set to run as a round robin DNS hosts on 2 servers one old Lenove ThinkCentre Edge71 as well as a brand new real Lenovo server Lenovo ThinkServer SD350 with 24 CPUs and a 32 GB of RAM
To assure Internet Connectivity is having a good degree of connectivity and ensure websites hosted on both machines is not going to die if one of the 2 pair configured Fiber Optics Internet Providers Bergon.NET has some Issues, I've rented another Internet Provider Line is set bought from the VIVACOM Mobile Fiber Internet provider – that is a 1 Gigabit Fiber Optics Line.
Next to that to guarantee there is no Database, Webserver, MailServer, Memcached and other running services did not hit downtimes due to Electricity power outage, two Powerful Uninterruptable Power Supplies (UPS)  FPS Fortron devices are connected to the servers each of which that could keep the machine and the connected switches and Servers for up to 1 Hour.

The machines are configured to use dhcpd to distributed IP addresses and the Main Node is set to distribute IPs, however as there is a local LAN network with more of a personal Work PCs, Wireless Devices and Testing Computers and few Virtual machines in the Network and the IPs are being distributed in a consequential manner via a ISC DHCP server.

As always to make everything work properly hence, I had again some a bit weird non-standard requirement to make some of the computers within the Network with Static IP addresses and the others to have their IPs received via the DHCP (Dynamic Host Configuration Protocol) and add some filter for some of the Machine MAC Addresses which are configured to have a static IP addresses to prevent the DHCP (daemon) server to automatically reassign IPs to this machines.

After a bit of googling and pondering I've done it and some of the machines, therefore to save others the efforts to look around How to set Certain Computers / Servers Network Card MAC (Interfaces) MAC Addresses  configured on the LAN network to use Static IPs and instruct the DHCP server to ingnore any broadcast IP addresses leases – if they're to be destined to a set of IGNORED MAcs, I came up with this small article.

Here is the DHCP server /etc/dhcpd/dhcpd.conf from my Debian GNU / Linux (Buster) 10.4


option domain-name "pcfreak.lan";
option domain-name-servers 8.8.8.8, 8.8.4.4, 208.67.222.222, 208.67.220.220;
max-lease-time 891200;
authoritative;
class "black-hole" {
    match substring (hardware, 1, 6);
    ignore booting;
}
subclass "black-hole" 18:45:91:c3:d9:00;
subclass "black-hole" 70:e2:81:13:44:11;
subclass "black-hole" 70:e2:81:13:44:12;
subclass "black-hole" 00:16:3f:53:5d:11;
subclass "black-hole" 18:45:9b:c6:d9:00;
subclass "black-hole" 16:45:93:c3:d9:09;
subclass "black-hole" 16:45:94:c3:d9:0d;/etc/dhcpd/dhcpd.conf
subclass "black-hole" 60:67:21:3c:20:ec;
subclass "black-hole" 60:67:20:5c:20:ed;
subclass "black-hole" 00:16:3e:0f:48:04;
subclass "black-hole" 00:16:3e:3a:f4:fc;
subclass "black-hole" 50:d4:f5:13:e8:ba;
subclass "black-hole" 50:d4:f5:13:e8:bb;
subnet 192.168.0.0 netmask 255.255.255.0 {
        option routers                  192.168.0.1;
        option subnet-mask              255.255.255.0;
}
host think-server {
        hardware ethernet 70:e2:85:13:44:12;
        fixed-address 192.168.0.200;
}
default-lease-time 691200;
max-lease-time 891200;
log-facility local7;

To spend you copy paste efforts a file with Deny DHCP Address by Mac Linux configuration is here
/home/hipo/info
Of course I have dumped the MAC Addresses to omit a data leaking but I guess the idea behind the MAC ADDR ignore is quite clear

The main configuration doing the trick to ignore a certain MAC ALenovo ThinkServer SD350ddresses that are reachable on the Connected hardware switch on the device is like so:

class "black-hole" {
    match substring (hardware, 1, 6);
    ignore booting;
}
subclass "black-hole" 18:45:91:c3:d9:00;


The Deny DHCP Address by MAC is described on isc.org distribution lists here but it seems the documentation on the topic on how to Deny / IGNORE DHCP Addresses by MAC Address on Linux has been quite obscure and limited online.

As you can see in above config the time via which an IP is freed up and a new IP lease is done from the server is severely maximized as often DHCP servers do use a max-lease-time like 1 hour (3600) seconds:, the reason for increasing the lease time to be to like 10 days time is that the IPs in my network change very rarely so it is a waste of CPU cycles to do a frequent lease.

default-lease-time 691200;
max-lease-time 891200;


As you see to Guarantee resolving works always as expected I have configured – Google Public DNS and OpenDNS IPs

option domain-name-servers 8.8.8.8, 8.8.4.4, 208.67.222.222, 208.67.220.220;


One hint to make is, after setting up all my desired config in the standard config location /etc/dhcp/dhcpd.conf it is always good idea to test configuration before reloading the running dhcpd process.


root@pcfreak: ~# /usr/sbin/dhcpd -t
Internet Systems Consortium DHCP Server 4.4.1
Copyright 2004-2018 Internet Systems Consortium.
All rights reserved.
For info, please visit https://www.isc.org/software/dhcp/
Config file: /etc/dhcp/dhcpd.conf
Database file: /va/home/hipo/infor/lib/dhcp/dhcpd.leases
PID file: /var/run/dhcpd.pid
 

That's all folks with this sample config the IPs under subclass "black-hole", which are a local LAN Static IP Addresses will never be offered leasess anymore from the ISC DHCP.
Hope this stuff helps someone, enjoy and in case if you need a colocation of a server or a website hosting for a really cheap price on this new set High Availlability up described machines open an inquiry on https://web.www.pc-freak.net.


Rsync copy files with root privileges between servers with root superuser account disabled

Tuesday, December 3rd, 2019


rsync-copy-files-between-two-servers-with-root-privileges-with-root-superuser-account-disabled

Sometimes on servers that follow high security standards in companies following PCI Security (Payment Card Data Security) standards it is necessery to have a very weird configurations on servers,to be able to do trivial things such as syncing files between servers with root privileges in a weird manners.This is the case for example if due to security policies you have disabled root user logins via ssh server and you still need to synchronize files in directories such as lets say /etc , /usr/local/etc/ /var/ with root:root user and group belongings.

Disabling root user logins in sshd is controlled by a variable in /etc/ssh/sshd_config that on most default Linux OS
installations is switched on, e.g. 

grep -i permitrootlogin /etc/ssh/sshd_config
PermitRootLogin yes


Many corporations use Vulnerability Scanners such as Qualys are always having in their list of remote server scan for SSH Port 22 to turn have the PermitRootLogin stopped with:


PermitRootLogin no


In this article, I'll explain a scenario where we have synchronization between 2 or more servers Server A / Server B, whatever number of servers that have already turned off this value, but still need to
synchronize traditionally owned and allowed to write directories only by root superuser, here is 4 easy steps to acheive it.


1. Add rsyncuser to Source Server (Server A) and Destination (Server B)


a. Execute on Src Host:


groupadd rsyncuser
useradd -g 1000 -c 'Rsync user to sync files as root src_host' -d /home/rsyncuser -m rsyncuser


b. Execute on Dst Host:


groupadd rsyncuser
useradd -g 1000 -c 'Rsync user to sync files dst_host' -d /home/rsyncuser -m rsyncuser


2. Generate RSA SSH Key pair to be used for passwordless authentication


a. On Src Host
 

su – rsyncuser

ssh-keygen -t rsa -b 4096


b. Check .ssh/ generated key pairs and make sure the directory content look like.


[rsyncuser@src-host .ssh]$ cd ~/.ssh/;  ls -1

id_rsa
id_rsa.pub
known_hosts


3. Copy id_rsa.pub to Destination host server under authorized_keys


scp ~/.ssh/id_rsa.pub  rsyncuser@dst-host:~/.ssh/authorized_keys


Next fix permissions of authorized_keys file for rsyncuser as anyone who have access to that file (that exists as a user account) on the system
could steal the key and use it to run rsync commands and overwrite remotely files, like overwrite /etc/passwd /etc/shadow files with his custom crafted credentials
and hence hack you 🙂
 

Hence, On Destionation Host Server B fix permissions with:
 

su – rsyncuser; chmod 0600 ~/.ssh/authorized_keys
[rsyncuser@dst-host ~]$


An alternative way for the lazy sysadmins is to use the ssh-copy-id command


$ ssh-copy-id rsyncuser@192.168.0.180
/usr/bin/ssh-copy-id: INFO: Source of key(s) to be installed: "/root/.ssh/id_rsa.pub"
/usr/bin/ssh-copy-id: INFO: attempting to log in with the new key(s), to filter out any that are already installed
/usr/bin/ssh-copy-id: INFO: 1 key(s) remain to be installed — if you are prompted now it is to install the new keys
root@192.168.0.180's password: 


For improved security here to restrict rsyncuser to be able to run only specific command such as very specific script instead of being able to run any command it is good to use little known command= option
once creating the authorized_keys


4. Test ssh passwordless authentication works correctly


For that Run as a normal ssh from rsyncuser

On Src Host


[rsyncuser@src-host ~]$ ssh rsyncuser@dst-host


Perhaps here is time that for those who, think enabling a passwordless authentication is not enough secure and prefer to authorize rsyncuser via a password red from a secured file take a look in my prior article how to login to remote server with password provided from command line as a script argument / Running same commands on many servers 

5. Enable rsync in sudoers to be able to execute as root superuser (copy files as root)


For this step you will need to have sudo package installed on the Linux server.

Then, Execute once logged in as root on Destionation Server (Server B)


[root@dst-host ~]# grep 'rsyncuser ALL' /etc/sudoers|wc -l || echo ‘rsyncuser ALL=NOPASSWD:/usr/bin/rsync’ >> /etc/sudoers


Note that using rsync with a ALL=NOPASSWD in /etc/sudoers could pose a high security risk for the system as anyone authorized to run as rsyncuser is able to overwrite and
respectivle nullify important files on Destionation Host Server B and hence easily mess the system, even shell script bugs could produce a mess, thus perhaps a better solution to the problem
to copy files with root privileges with the root account disabled is to rsync as normal user somewhere on Dst_host and use some kind of additional script running on Dst_host via lets say cron job and
will copy gently files on selective basis.

Perhaps, even a better solution would be if instead of granting ALL=NOPASSWD:/usr/bin/rsync in /etc/sudoers is to do ALL=NOPASSWD:/usr/local/bin/some_copy_script.sh
that will get triggered, once the files are copied with a regular rsyncuser acct.


6. Test rsync passwordless authentication copy with superuser works


Do some simple copy, lets say copy files on Encrypted tunnel configurations located under some directory in /etc/stunnel on Server A to /etc/stunnel on Server B

The general command to test is like so:
 

rsync -aPz -e 'ssh' '–rsync-path=sudo rsync' /var/log rsyncuser@$dst_host:/root/tmp/


This will copy /var/log files to /root/tmp, you will get a success messages for the copy and the files will be at destination folder if succesful.


On Src_Host run:


[rsyncuser@src-host ~]$ dst=FQDN-DST-HOST; user=rsyncuser; src_dir=/etc/stunnel; dst_dir=/root/tmp;  rsync -aP -e 'ssh' '–rsync-path=sudo rsync' $src_dir  $rsyncuser@$dst:$dst_dir;


7. Copying files with root credentials via script


The simlest file to use to copy a bunch of predefined files  is best to be handled by some shell script, the most simple version of it, could look something like this.
 

#!/bin/bash
# On server1 use something like this
# On server2 dst server
# add in /etc/sudoers
# rsyncuser ALL=NOPASSWD:/usr/bin/rsync

user='rsyncuser';

dst_dir="/root/tmp";
dst_host='$dst_host';
src[1]="/etc/hosts.deny";
src[2]="/etc/sysctl.conf";
src[3]="/etc/samhainrc";
src[4]="/etc/pki/tls/";
src[5]="/usr/local/bin/";


for i in $(echo ${src[@]}); do
rsync -aPvz –delete –dry-run -e 'ssh' '–rsync-path=sudo rsync' "$i" $rsyncuser@$dst_host:$dst_dir"$i";
done


In above script as you can see, we define a bunch of files that will be copied in bash array and then run a loop to take each of them and copy to testination dir.
A very sample version of the script rsync_with_superuser-while-root_account_prohibited.sh 
 

Conclusion


Lets do short overview on what we have done here. First Created rsyncuser on SRC Server A and DST Server B, set up the key pair on both copied the keys to make passwordless login possible,
set-up rsync to be able to write as root on Dst_Host / testing all the setup and pinpointing a small script that can be used as a backbone to develop something more complex
to sync backups or keep system configurations identicatial – for example if you have doubts that some user might by mistake change a config etc.
In short it was pointed the security downsides of using rsync NOPASSWD via /etc/sudoers and few ideas given that could be used to work on if you target even higher
PCI standards.


Fix FTP active connection issues “Cannot create a data connection: No route to host” on ProFTPD Linux dedicated server

Tuesday, October 1st, 2019

proftpd-linux-logo

Earlier I've blogged about an encounter problem that prevented Active mode FTP connections on CentOS
As I'm working for a client building a brand new dedicated server purchased from Contabo Dedi Host provider on a freshly installed Debian 10 GNU / Linux, I've had to configure a new FTP server, since some time I prefer to use Proftpd instead of VSFTPD because in my opinion it is more lightweight and hence better choice for a small UNIX server setups. During this once again I've encounted the same ACTIVE FTP not working from FTP server to FTP client host machine. But before shortly explaining, the fix I find worthy to explain briefly what is ACTIVE / PASSIVE FTP connection.


1. What is ACTIVE / PASSIVE FTP connection?
 

Whether in active mode, the client specifies which client-side port the data channel has been opened and the server starts the connection. Or in other words the default FTP client communication for historical reasons is in ACTIVE MODE. E.g.
Client once connected to Server tells the server to open extra port or ports locally via which the overall FTP data transfer will be occuring. In the early days of networking when FTP protocol was developed security was not of such a big concern and usually Networks did not have firewalls at all and the FTP DATA transfer host machine was running just a single FTP-server and nothing more in this, early days when FTP was not even used over the Internet and FTP DATA transfers happened on local networks, this was not a problem at all.

In passive mode, the server decides which server-side port the client should connect to. Then the client starts the connection to the specified port.

But with the ever increasing complexity of Internet / Networks and the ever tightening firewalls due to viruses and worms that are trying to own and exploit networks creating unnecessery bulk loads this has changed …

active-passive-ftp-explained-diagram
 

2. Installing and configure ProFTPD server Public ServerName

I've installed the server with the common cmd:


apt –yes install proftpd


And the only configuration changed in default configuration file /etc/proftpd/proftpd.conf  was
ServerName          "Debian"

I do this in new FTP setups for the logical reason to prevent the multiple FTP Vulnerability Scan script kiddie Crawlers to know the exact OS version of the server, so this was changed to:


ServerName "MyServerHostname"


Though this is the bad security through obscurity practice doing so is a good practice.
 

3. Create iptable firewall rules to allow ACTIVE FTP mode


But anyways, next step was to configure the firewall to be allowed to communicate on TCP PORT 21 and 20 to incoming source ports range 1024:65535 (to enable ACTIVE FTP) on firewal level with iptables on INPUT and OUTPUT chain rules, like this:


iptables -A INPUT -p tcp –sport 1024:65535 -d 0/0 –dport 21 -m state –state NEW,ESTABLISHED -j ACCEPT
iptables -A INPUT -p tcp -s 0/0 –sport 1024:65535 -d 0/0 –dport 20 -m state –state NEW,ESTABLISHED -j ACCEPT
iptables -A OUTPUT -p tcp -s 0/0 –sport 21 -d 0/0 –dport 1024:65535 -m state –state ESTABLISHED -j ACCEPT
iptables -A OUTPUT -p tcp -s 0/0 –sport 20 -d 0/0 –dport 1024:65535 -m state –state ESTABLISHED,RELATED -j ACCEPT


Talking about Active and Passive FTP connections perhaps for novice Linux users it might be worthy to say few words on Active and Passive FTP connections

Once firewall has enabled FTP Active / Passive connections is on and FTP server is listening, to test all is properly configured check iptable rules and FTP listener:
 

/sbin/iptables -L INPUT |grep ftp
ACCEPT     tcp  —  anywhere             anywhere             tcp spts:1024:65535 dpt:ftp state NEW,ESTABLISHED
ACCEPT     tcp  —  anywhere             anywhere             tcp spts:1024:65535 dpt:ftp-data state NEW,ESTABLISHED
ACCEPT     tcp  —  anywhere             anywhere             tcp dpt:ftp
ACCEPT     tcp  —  anywhere             anywhere             tcp dpt:ftp-data

netstat -l | grep "ftp"
tcp6       0      0 [::]:ftp                [::]:*                  LISTEN    


4. Loading nf_nat_ftp module and net.netfilter.nf_conntrack_helper (for backward compitability)


Next step of course was to add the necessery modules nf_nat_ftp nf_conntrack_sane that makes FTP to properly forward ports with respective Firewall states on any of above source ports which are usually allowed by firewalls, note that the range of ports given 1024:65535 might be too much liberal for paranoid sysadmins and in many cases if ports are not filtered, if you are a security freak you can use some smaller range such as 60000-65535.


Here is time to say for sysadmins who haven't recently had a task to configure a new (unecrypted) File Transfer Server as today Secure FTP is almost alltime used for file transfers for the sake of security might be puzzled to find out the old Linux kernel ip_conntrack_ftp which was the standard module used to make FTP Active connections work is substituted nowadays with  nf_nat_ftp and nf_conntrack_sane.

To make the 2 modules permanently loaded on next boot on Debian Linux they have to be added to /etc/modules

Here is how sample /etc/modules that loads the modules on next system boot looks like

cat /etc/modules
# /etc/modules: kernel modules to load at boot time.
#
# This file contains the names of kernel modules that should be loaded
# at boot time, one per line. Lines beginning with "#" are ignored.
softdog
nf_nat_ftp
nf_conntrack_sane


Next to say is that in newer Linux kernels 3.x / 4.x / 5.x the nf_nat_ftp and nf_conntrack-sane behaviour changed so  simply loading the modules would not work and if you do the stupidity to test it with some FTP client (I used gFTP / ncftp from my Linux desktop ) you are about to get FTP No route to host errors like:


Cannot create a data connection: No route to host


cannot-create-a-data-connection-no-route-to-host-linux-error-howto-fix


Sometimes, instead of No route to host error the error FTP client might return is:


227 entering passive mode FTP connect connection timed out error


To make the nf_nat_ftp module on newer Linux kernels hence you have to enable backwards compatibility Kernel variable


/proc/sys/net/netfilter/nf_conntrack_helper


echo 1 > /proc/sys/net/netfilter/nf_conntrack_helper


To make it permanent if you have enabled /etc/rc.local legacy one single file boot place as I do on servers – for how to enable rc.local on newer Linuxes check here

or alternatively add it to load via sysctl

sysctl -w net.netfilter.nf_conntrack_helper=1

And to make change permanent (e.g. be loaded on next boot)

echo 'net.netfilter.nf_conntrack_helper=1' >> /etc/sysctl.conf


5. Enable PassivePorts in ProFTPD or PassivePortRange in PureFTPD


Last but not least open /etc/proftpd/proftpd.conf find PassivePorts config value (commented by default) and besides it add the following line:


PassivePorts 60000 65534


Just for information if instead of ProFTPd you experience the error on PureFTPD the configuration value to set in /etc/pure-ftpd.conf is:
 

PassivePortRange 30000 35000


That's all folks, give the ncftp / lftp / filezilla or whatever FTP client you prefer and test it the FTP client should be able to talk as expected to remote server in ACTIVE FTP mode (and the auto passive mode) will be not triggered anymore, nor you will get a strange errors and failure to connect in FTP clients as gftp.

Cheers 🙂