Posts Tagged ‘time’

Debugging routing and network issues on Linux common approaches. A step by step guide to find out why routing or network service fails

Thursday, November 30th, 2023

For system administrators having a Network issue is among the Hell-ish stuff that can happen every now and then. That is especially true in Heterogenous / Hybrid and complicated Network topologies (with missing well crafted documentation), that were build without an initial overview "on the fly".
Such a networking connectivity or routing issues are faced by every novice, mid or even expert system administrators as the Company's Network IT environments are becoming more and more complicated day by day.

When the "Disaster" of being unable to connect two servers or at times  home laptops / PCs to see each other even though on the Physical layer / Transport Layer (Hardware such as external Switches / Routers / Repeaters / Cabling etc.) is Present machines are connected and everything on the 1 Physical Layer from OSI layears is present happens, then it is time to Debug it with some software tools and methods.

To each operating system the tools and methods to test networking connection and routings is a bit different but generally speaking most concepts are pretty much the same across different types of operating systems (Linux ditros / OpenBSD / FreeBSD / Mac OS / Android / iOS / HP-UX / IBM AIX / DOS / Windows etc.).

Debugging network issues across separate operating systems has its variations but in this specific (ideas) are much close to this article. As the goal at that guide will be to point out how to debug network issues on Linux, in future if I have the time or need to debug other OS-es from Linux, I'll try to put an article on how to debug Network issues on Windows when have some time to do it.

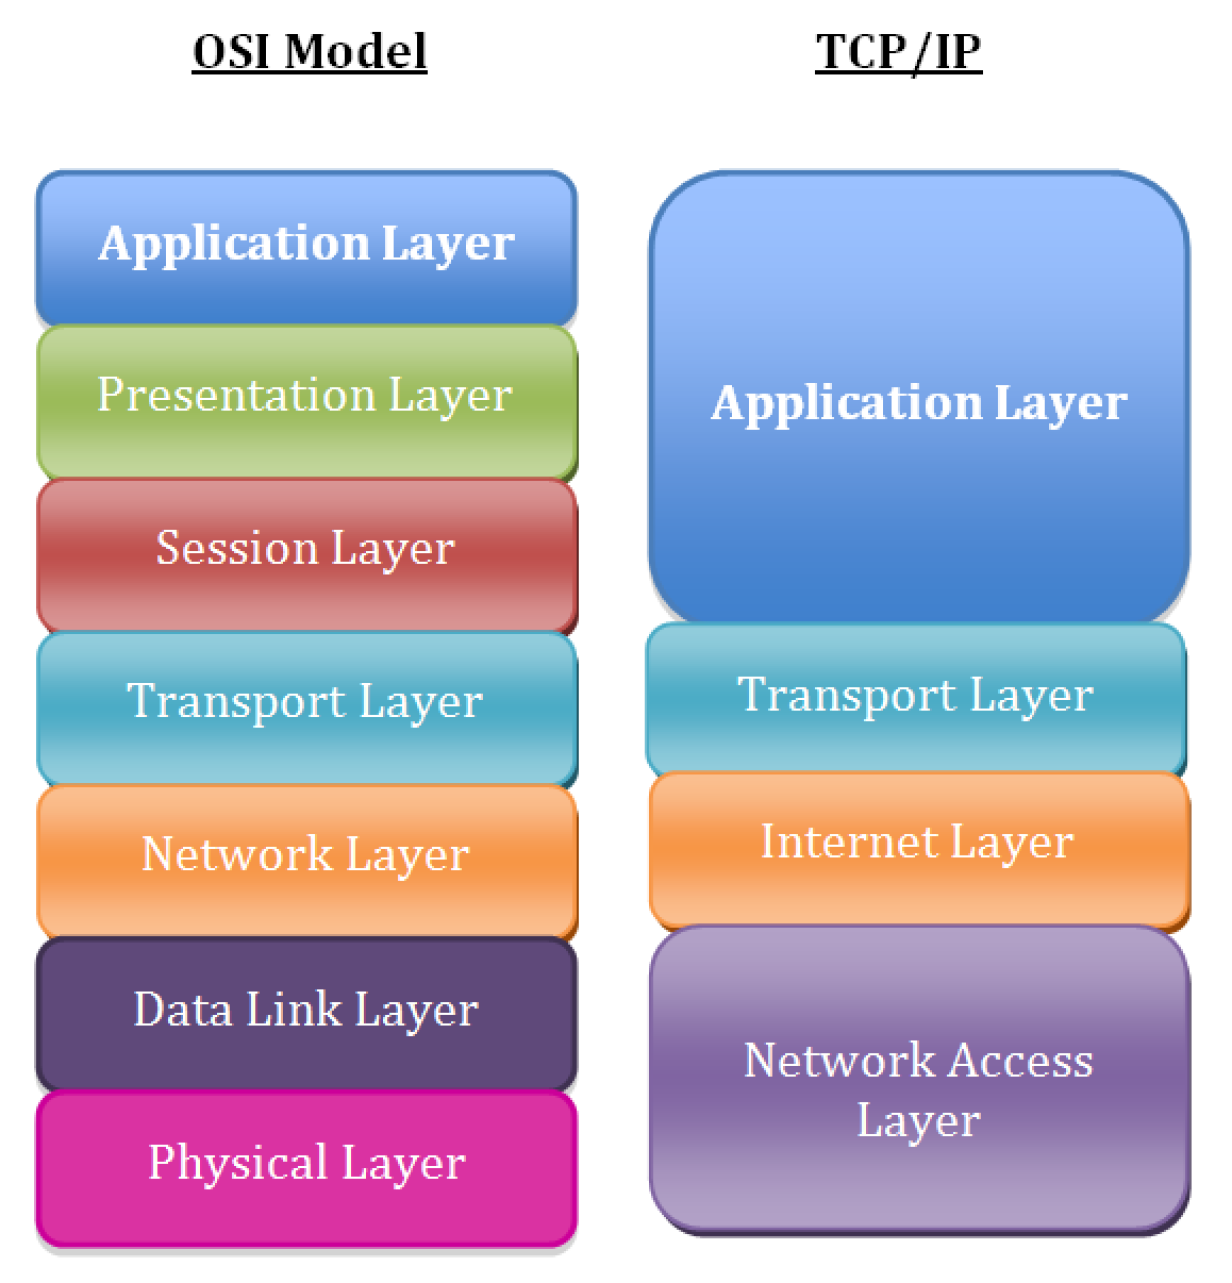
Consider to look for the issue following the basic TCP / IP OSI Level model, every system administrator should have idea about it already, it is part of most basic networking courses such as Cisco's CCNA

TCPIP_OSI_model-networking-levels

1. Check what is the Link status of the Interface with ethtool
 

root@freak:~# ethtool eno1
Settings for eno1:
    Supported ports: [ TP ]
    Supported link modes:   10baseT/Half 10baseT/Full
                            100baseT/Half 100baseT/Full
                            1000baseT/Full
    Supported pause frame use: Symmetric
    Supports auto-negotiation: Yes
    Supported FEC modes: Not reported
    Advertised link modes:  10baseT/Half 10baseT/Full
                            100baseT/Half 100baseT/Full
                            1000baseT/Full
    Advertised pause frame use: Symmetric
    Advertised auto-negotiation: Yes
    Advertised FEC modes: Not reported
    Speed: 100Mb/s
    Duplex: Full
    Auto-negotiation: on
    Port: Twisted Pair
    PHYAD: 1
    Transceiver: internal
    MDI-X: on (auto)
    Supports Wake-on: pumbg
    Wake-on: g
        Current message level: 0x00000007 (7)
                               drv probe link
    Link detected: yes


root@freak:~# ethtool eno2
Settings for eno2:
    Supported ports: [ TP ]
    Supported link modes:   10baseT/Half 10baseT/Full
                            100baseT/Half 100baseT/Full
                            1000baseT/Full
    Supported pause frame use: Symmetric
    Supports auto-negotiation: Yes
    Supported FEC modes: Not reported
    Advertised link modes:  10baseT/Half 10baseT/Full
                            100baseT/Half 100baseT/Full
                            1000baseT/Full
    Advertised pause frame use: Symmetric
    Advertised auto-negotiation: Yes
    Advertised FEC modes: Not reported
    Speed: 1000Mb/s
    Duplex: Full
    Auto-negotiation: on
    Port: Twisted Pair
    PHYAD: 1
    Transceiver: internal
    MDI-X: on (auto)
    Supports Wake-on: pumbg
    Wake-on: g
        Current message level: 0x00000007 (7)
                               drv probe link
    Link detected: yes


For example lets check only if Cable of Network card is plugged in and detected to have a network connection to remote node or switch and show the connection speed on which the 'autoneg on' (autonegiation option) of the LAN card has detected the network exat maximum speed:

root@pcfreak:~# ethtool eth0|grep -i 'link detected'; ethtool eth0 |grep 'Speed: '
    Link detected: yes
    Speed: 100Mb/s


1. Check ip command network configuration output

root@freak:~# ip addr show
1: lo: <LOOPBACK,UP,LOWER_UP> mtu 65536 qdisc noqueue state UNKNOWN group default qlen 1000
    link/loopback 00:00:00:00:00:00 brd 00:00:00:00:00:00
    inet 127.0.0.1/8 scope host lo
       valid_lft forever preferred_lft forever
2: eno1: <BROADCAST,MULTICAST,UP,LOWER_UP> mtu 1500 qdisc mq master xenbr0 state UP group default qlen 1000
    link/ether 70:e2:84:13:44:15 brd ff:ff:ff:ff:ff:ff
    altname enp7s0
3: eno2: <BROADCAST,MULTICAST,UP,LOWER_UP> mtu 1500 qdisc mq master xenbr1 state UP group default qlen 1000
    link/ether 70:e2:84:13:44:17 brd ff:ff:ff:ff:ff:ff
    altname enp8s0
4: xenbr0: <BROADCAST,MULTICAST,UP,LOWER_UP> mtu 1500 qdisc noqueue state UP group default qlen 1000
    link/ether 70:e2:84:13:44:13 brd ff:ff:ff:ff:ff:ff
    inet 192.168.1.7/24 brd 192.168.1.255 scope global dynamic xenbr0
       valid_lft 7361188sec preferred_lft 7361188sec
5: xenbr1: <BROADCAST,MULTICAST,UP,LOWER_UP> mtu 1500 qdisc noqueue state UP group default qlen 1000
    link/ether 70:e2:84:13:44:15 brd ff:ff:ff:ff:ff:ff
    inet 192.168.0.5/24 brd 192.168.0.255 scope global dynamic xenbr1
       valid_lft 536138sec preferred_lft 536138sec
10: vif2.0: <BROADCAST,MULTICAST,UP,LOWER_UP> mtu 1500 qdisc mq master xenbr0 state UP group default qlen 2000
    link/ether fe:ff:ff:ff:ff:ff brd ff:ff:ff:ff:ff:ff
11: vif2.1: <BROADCAST,MULTICAST,UP,LOWER_UP> mtu 1500 qdisc mq master xenbr1 state UP group default qlen 2000
    link/ether fe:ff:ff:ff:ff:ff brd ff:ff:ff:ff:ff:ff
12: vif3.0: <BROADCAST,MULTICAST,UP,LOWER_UP> mtu 1500 qdisc mq master xenbr0 state UP group default qlen 2000
    link/ether fe:ff:ff:ff:ff:ff brd ff:ff:ff:ff:ff:ff
13: vif3.1: <BROADCAST,MULTICAST,UP,LOWER_UP> mtu 1500 qdisc mq master xenbr1 state UP group default qlen 2000
    link/ether fe:ff:ff:ff:ff:ff brd ff:ff:ff:ff:ff:ff
14: vif4.0: <BROADCAST,MULTICAST,UP,LOWER_UP> mtu 1500 qdisc mq master xenbr0 state UP group default qlen 2000
    link/ether fe:ff:ff:ff:ff:ff brd ff:ff:ff:ff:ff:ff
15: vif4.1: <BROADCAST,MULTICAST,UP,LOWER_UP> mtu 1500 qdisc mq master xenbr1 state UP group default qlen 2000
    link/ether fe:ff:ff:ff:ff:ff brd ff:ff:ff:ff:ff:ff
16: vif5.0: <BROADCAST,MULTICAST,UP,LOWER_UP> mtu 1500 qdisc mq master xenbr0 state UP group default qlen 2000
    link/ether fe:ff:ff:ff:ff:ff brd ff:ff:ff:ff:ff:ff
17: vif5.1: <BROADCAST,MULTICAST,UP,LOWER_UP> mtu 1500 qdisc mq master xenbr1 state UP group default qlen 2000
    link/ether fe:ff:ff:ff:ff:ff brd ff:ff:ff:ff:ff:ff
18: vif6.0: <BROADCAST,MULTICAST,UP,LOWER_UP> mtu 1500 qdisc mq master xenbr0 state UP group default qlen 2000
    link/ether fe:ff:ff:ff:ff:ff brd ff:ff:ff:ff:ff:ff
19: vif6.1: <BROADCAST,MULTICAST,UP,LOWER_UP> mtu 1500 qdisc mq master xenbr0 state UP group default qlen 2000
    link/ether fe:ff:ff:ff:ff:ff brd ff:ff:ff:ff:ff:ff
30: vif17.0: <BROADCAST,MULTICAST,UP,LOWER_UP> mtu 1500 qdisc mq master xenbr0 state UP group default qlen 2000
    link/ether fe:ff:ff:ff:ff:ff brd ff:ff:ff:ff:ff:ff
31: vif17.1: <BROADCAST,MULTICAST,UP,LOWER_UP> mtu 1500 qdisc mq master xenbr1 state UP group default qlen 2000
    link/ether fe:ff:ff:ff:ff:ff brd ff:ff:ff:ff:ff:ff
34: vif21.0: <BROADCAST,MULTICAST,UP,LOWER_UP> mtu 1500 qdisc mq master xenbr0 state UP group default qlen 2000
    link/ether fe:ff:ff:ff:ff:ff brd ff:ff:ff:ff:ff:ff
35: vif21.1: <BROADCAST,MULTICAST,UP,LOWER_UP> mtu 1500 qdisc mq master xenbr1 state UP group default qlen 2000
    link/ether fe:ff:ff:ff:ff:ff brd ff:ff:ff:ff:ff:ff
48: vif25.0-emu: <BROADCAST,MULTICAST,UP,LOWER_UP> mtu 1500 qdisc pfifo_fast master xenbr0 state UNKNOWN group default qlen 1000
    link/ether fe:ff:ff:ff:ff:ff brd ff:ff:ff:ff:ff:ff
49: vif25.1-emu: <BROADCAST,MULTICAST,UP,LOWER_UP> mtu 1500 qdisc pfifo_fast master xenbr1 state UNKNOWN group default qlen 1000
    link/ether fe:ff:ff:ff:ff:ff brd ff:ff:ff:ff:ff:ff
50: vif25.0: <NO-CARRIER,BROADCAST,MULTICAST,UP> mtu 1500 qdisc mq master xenbr0 state DOWN group default qlen 2000
    link/ether fe:ff:ff:ff:ff:ff brd ff:ff:ff:ff:ff:ff
51: vif25.1: <NO-CARRIER,BROADCAST,MULTICAST,UP> mtu 1500 qdisc mq master xenbr1 state DOWN group default qlen 2000
    link/ether fe:ff:ff:ff:ff:ff brd ff:ff:ff:ff:ff:ff
118: vif47.0-emu: <BROADCAST,MULTICAST,UP,LOWER_UP> mtu 1500 qdisc pfifo_fast master xenbr0 state UNKNOWN group default qlen 1000
    link/ether fe:ff:ff:ff:ff:ff brd ff:ff:ff:ff:ff:ff
119: vif47.1-emu: <BROADCAST,MULTICAST,UP,LOWER_UP> mtu 1500 qdisc pfifo_fast master xenbr1 state UNKNOWN group default qlen 1000
    link/ether fe:ff:ff:ff:ff:ff brd ff:ff:ff:ff:ff:ff
120: vif47.0: <NO-CARRIER,BROADCAST,MULTICAST,UP> mtu 1500 qdisc mq master xenbr0 state DOWN group default qlen 2000
    link/ether fe:ff:ff:ff:ff:ff brd ff:ff:ff:ff:ff:ff
121: vif47.1: <NO-CARRIER,BROADCAST,MULTICAST,UP> mtu 1500 qdisc mq master xenbr1 state DOWN group default qlen 2000
    link/ether fe:ff:ff:ff:ff:ff brd ff:ff:ff:ff:ff:ff
root@freak:~# 

ip a s (is a also a shortcut command alias) you can enjoy if you have to deal with ip command frequently.

2. Check the status of the interfaces

Old fashioned way is to just do:

/sbin/ifconfig


root@freak:~# ifconfig 
eno1: flags=4163<UP,BROADCAST,RUNNING,MULTICAST>  mtu 1500
        ether 70:e2:84:13:44:15  txqueuelen 1000  (Ethernet)
        RX packets 52366502  bytes 10622469320 (9.8 GiB)
        RX errors 0  dropped 0  overruns 0  frame 0
        TX packets 242622195  bytes 274688121244 (255.8 GiB)
        TX errors 0  dropped 0 overruns 0  carrier 0  collisions 0
        device memory 0xfb200000-fb27ffff  

eno2: flags=4163<UP,BROADCAST,RUNNING,MULTICAST>  mtu 1500
        ether 70:e2:84:13:44:17  txqueuelen 1000  (Ethernet)
        RX packets 220995454  bytes 269698276095 (251.1 GiB)
        RX errors 0  dropped 7  overruns 0  frame 0
        TX packets 192319925  bytes 166233773782 (154.8 GiB)
        TX errors 0  dropped 0 overruns 0  carrier 0  collisions 0
        device memory 0xfb100000-fb17ffff  

lo: flags=73<UP,LOOPBACK,RUNNING>  mtu 65536
        inet 127.0.0.1  netmask 255.0.0.0
        loop  txqueuelen 1000  (Local Loopback)
        RX packets 2553  bytes 147410 (143.9 KiB)
        RX errors 0  dropped 0  overruns 0  frame 0
        TX packets 2553  bytes 147410 (143.9 KiB)
        TX errors 0  dropped 0 overruns 0  carrier 0  collisions 0

vif17.0: flags=4163<UP,BROADCAST,RUNNING,MULTICAST>  mtu 1500
        ether fe:ff:ff:ff:ff:ff  txqueuelen 2000  (Ethernet)
        RX packets 14517375  bytes 133226551792 (124.0 GiB)
        RX errors 0  dropped 0  overruns 0  frame 0
        TX packets 139688950  bytes 145111993017 (135.1 GiB)
        TX errors 0  dropped 0 overruns 0  carrier 0  collisions 0

vif17.1: flags=4163<UP,BROADCAST,RUNNING,MULTICAST>  mtu 1500
        ether fe:ff:ff:ff:ff:ff  txqueuelen 2000  (Ethernet)
        RX packets 86113294  bytes 156944058681 (146.1 GiB)
        RX errors 0  dropped 0  overruns 0  frame 0
        TX packets 181513904  bytes 267892940821 (249.4 GiB)
        TX errors 0  dropped 0 overruns 0  carrier 0  collisions 0

vif2.0: flags=4163<UP,BROADCAST,RUNNING,MULTICAST>  mtu 1500
        ether fe:ff:ff:ff:ff:ff  txqueuelen 2000  (Ethernet)
        RX packets 1521875  bytes 88282472 (84.1 MiB)
        RX errors 0  dropped 0  overruns 0  frame 0
        TX packets 152691174  bytes 278372314505 (259.2 GiB)
        TX errors 0  dropped 3 overruns 0  carrier 0  collisions 0

vif2.1: flags=4163<UP,BROADCAST,RUNNING,MULTICAST>  mtu 1500
        ether fe:ff:ff:ff:ff:ff  txqueuelen 2000  (Ethernet)
        RX packets 454915  bytes 81069760 (77.3 MiB)
        RX errors 0  dropped 0  overruns 0  frame 0
        TX packets 266953989  bytes 425692364876 (396.4 GiB)
        TX errors 0  dropped 26 overruns 0  carrier 0  collisions 0

vif21.0: flags=4163<UP,BROADCAST,RUNNING,MULTICAST>  mtu 1500
        ether fe:ff:ff:ff:ff:ff  txqueuelen 2000  (Ethernet)
        RX packets 20043711  bytes 1283926794 (1.1 GiB)
        RX errors 0  dropped 0  overruns 0  frame 0
        TX packets 141580485  bytes 277396881113 (258.3 GiB)
        TX errors 0  dropped 3 overruns 0  carrier 0  collisions 0

vif21.1: flags=4163<UP,BROADCAST,RUNNING,MULTICAST>  mtu 1500
        ether fe:ff:ff:ff:ff:ff  txqueuelen 2000  (Ethernet)
        RX packets 73004  bytes 3802174 (3.6 MiB)
        RX errors 0  dropped 0  overruns 0  frame 0
        TX packets 267151006  bytes 425621892663 (396.3 GiB)
        TX errors 0  dropped 14 overruns 0  carrier 0  collisions 0

vif25.0: flags=4099<UP,BROADCAST,MULTICAST>  mtu 1500
        ether fe:ff:ff:ff:ff:ff  txqueuelen 2000  (Ethernet)
        RX packets 0  bytes 0 (0.0 B)
        RX errors 0  dropped 0  overruns 0  frame 0
        TX packets 0  bytes 0 (0.0 B)
        TX errors 0  dropped 0 overruns 0  carrier 0  collisions 0

vif25.1: flags=4099<UP,BROADCAST,MULTICAST>  mtu 1500
        ether fe:ff:ff:ff:ff:ff  txqueuelen 2000  (Ethernet)
        RX packets 0  bytes 0 (0.0 B)
        RX errors 0  dropped 0  overruns 0  frame 0
        TX packets 0  bytes 0 (0.0 B)
        TX errors 0  dropped 0 overruns 0  carrier 0  collisions 0

vif25.0-emu: flags=4163<UP,BROADCAST,RUNNING,MULTICAST>  mtu 1500
        ether fe:ff:ff:ff:ff:ff  txqueuelen 1000  (Ethernet)
        RX packets 2736348  bytes 295661367 (281.9 MiB)
        RX errors 0  dropped 0  overruns 0  frame 0
        TX packets 260385509  bytes 265751226663 (247.5 GiB)
        TX errors 0  dropped 200 overruns 0  carrier 0  collisions 0

vif25.1-emu: flags=4163<UP,BROADCAST,RUNNING,MULTICAST>  mtu 1500
        ether fe:ff:ff:ff:ff:ff  txqueuelen 1000  (Ethernet)
        RX packets 145387  bytes 36011655 (34.3 MiB)
        RX errors 0  dropped 0  overruns 0  frame 0
        TX packets 370314760  bytes 394725961081 (367.6 GiB)
        TX errors 0  dropped 0 overruns 0  carrier 0  collisions 0

vif3.0: flags=4163<UP,BROADCAST,RUNNING,MULTICAST>  mtu 1500
        ether fe:ff:ff:ff:ff:ff  txqueuelen 2000  (Ethernet)
        RX packets 55382861  bytes 130042280927 (121.1 GiB)
        RX errors 0  dropped 0  overruns 0  frame 0
        TX packets 99040097  bytes 147929196318 (137.7 GiB)
        TX errors 0  dropped 1 overruns 0  carrier 0  collisions 0

vif3.1: flags=4163<UP,BROADCAST,RUNNING,MULTICAST>  mtu 1500
        ether fe:ff:ff:ff:ff:ff  txqueuelen 2000  (Ethernet)
        RX packets 5132631  bytes 295493762 (281.8 MiB)
        RX errors 0  dropped 0  overruns 0  frame 0
        TX packets 262314199  bytes 425416945203 (396.2 GiB)
        TX errors 0  dropped 16 overruns 0  carrier 0  collisions 0

vif4.0: flags=4163<UP,BROADCAST,RUNNING,MULTICAST>  mtu 1500
        ether fe:ff:ff:ff:ff:ff  txqueuelen 2000  (Ethernet)
        RX packets 4902015  bytes 615387539 (586.8 MiB)
        RX errors 0  dropped 0  overruns 0  frame 0
        TX packets 149342891  bytes 277802504143 (258.7 GiB)
        TX errors 0  dropped 1 overruns 0  carrier 0  collisions 0

vif4.1: flags=4163<UP,BROADCAST,RUNNING,MULTICAST>  mtu 1500
        ether fe:ff:ff:ff:ff:ff  txqueuelen 2000  (Ethernet)
        RX packets 276927  bytes 30720101 (29.2 MiB)
        RX errors 0  dropped 0  overruns 0  frame 0
        TX packets 267132395  bytes 425745668273 (396.5 GiB)
        TX errors 0  dropped 14 overruns 0  carrier 0  collisions 0

vif47.0: flags=4099<UP,BROADCAST,MULTICAST>  mtu 1500
        ether fe:ff:ff:ff:ff:ff  txqueuelen 2000  (Ethernet)
        RX packets 0  bytes 0 (0.0 B)
        RX errors 0  dropped 0  overruns 0  frame 0
        TX packets 0  bytes 0 (0.0 B)
        TX errors 0  dropped 0 overruns 0  carrier 0  collisions 0

vif47.1: flags=4099<UP,BROADCAST,MULTICAST>  mtu 1500
        ether fe:ff:ff:ff:ff:ff  txqueuelen 2000  (Ethernet)
        RX packets 0  bytes 0 (0.0 B)
        RX errors 0  dropped 0  overruns 0  frame 0
        TX packets 0  bytes 0 (0.0 B)
        TX errors 0  dropped 0 overruns 0  carrier 0  collisions 0

vif47.0-emu: flags=4163<UP,BROADCAST,RUNNING,MULTICAST>  mtu 1500
        ether fe:ff:ff:ff:ff:ff  txqueuelen 1000  (Ethernet)
        RX packets 208745  bytes 20096596 (19.1 MiB)
        RX errors 0  dropped 0  overruns 0  frame 0
        TX packets 110905731  bytes 110723486135 (103.1 GiB)
        TX errors 0  dropped 0 overruns 0  carrier 0  collisions 0

vif47.1-emu: flags=4163<UP,BROADCAST,RUNNING,MULTICAST>  mtu 1500
        ether fe:ff:ff:ff:ff:ff  txqueuelen 1000  (Ethernet)
        RX packets 140517  bytes 14596061 (13.9 MiB)
        RX errors 0  dropped 0  overruns 0  frame 0
        TX packets 150831959  bytes 162931572456 (151.7 GiB)
        TX errors 0  dropped 0 overruns 0  carrier 0  collisions 0

vif5.0: flags=4163<UP,BROADCAST,RUNNING,MULTICAST>  mtu 1500
        ether fe:ff:ff:ff:ff:ff  txqueuelen 2000  (Ethernet)
        RX packets 2030528  bytes 363988589 (347.1 MiB)
        RX errors 0  dropped 0  overruns 0  frame 0
        TX packets 152264264  bytes 278131541781 (259.0 GiB)
        TX errors 0  dropped 1 overruns 0  carrier 0  collisions 0

vif5.1: flags=4163<UP,BROADCAST,RUNNING,MULTICAST>  mtu 1500
        ether fe:ff:ff:ff:ff:ff  txqueuelen 2000  (Ethernet)
        RX packets 4169244  bytes 1045889687 (997.4 MiB)
        RX errors 0  dropped 0  overruns 0  frame 0
        TX packets 263561100  bytes 424894400987 (395.7 GiB)
        TX errors 0  dropped 7 overruns 0  carrier 0  collisions 0

vif6.0: flags=4163<UP,BROADCAST,RUNNING,MULTICAST>  mtu 1500
        ether fe:ff:ff:ff:ff:ff  txqueuelen 2000  (Ethernet)
        RX packets 300242  bytes 16210963 (15.4 MiB)
        RX errors 0  dropped 0  overruns 0  frame 0
        TX packets 153909576  bytes 278461295620 (259.3 GiB)
        TX errors 0  dropped 2 overruns 0  carrier 0  collisions 0

vif6.1: flags=4163<UP,BROADCAST,RUNNING,MULTICAST>  mtu 1500
        ether fe:ff:ff:ff:ff:ff  txqueuelen 2000  (Ethernet)
        RX packets 43  bytes 1932 (1.8 KiB)
        RX errors 0  dropped 0  overruns 0  frame 0
        TX packets 154205631  bytes 278481298141 (259.3 GiB)
        TX errors 0  dropped 2 overruns 0  carrier 0  collisions 0

xenbr0: flags=4163<UP,BROADCAST,RUNNING,MULTICAST>  mtu 1500
        inet 192.168.1.8  netmask 255.255.255.0  broadcast 192.168.1.255
        ether 70:e2:84:13:44:11  txqueuelen 1000  (Ethernet)
        RX packets 13689902  bytes 923464162 (880.6 MiB)
        RX errors 0  dropped 0  overruns 0  frame 0
        TX packets 12072932  bytes 1307055530 (1.2 GiB)
        TX errors 0  dropped 0 overruns 0  carrier 0  collisions 0

xenbr1: flags=4163<UP,BROADCAST,RUNNING,MULTICAST>  mtu 1500
        inet 192.168.0.3  netmask 255.255.255.0  broadcast 192.168.0.255
        ether 70:e2:84:13:44:12  txqueuelen 1000  (Ethernet)
        RX packets 626995  bytes 180026901 (171.6 MiB)
        RX errors 0  dropped 0  overruns 0  frame 0
        TX packets 12815  bytes 942092 (920.0 KiB)
        TX errors 0  dropped 0 overruns 0  carrier 0  collisions 0


root@freak:~# ifconfig        
eno1: flags=4163<UP,BROADCAST,RUNNING,MULTICAST>  mtu 1500
        ether 70:e2:84:13:44:11  txqueuelen 1000  (Ethernet)
        RX packets 52373358  bytes 10623034427 (9.8 GiB)
        RX errors 0  dropped 0  overruns 0  frame 0
        TX packets 242660000  bytes 274734018669 (255.8 GiB)
        TX errors 0  dropped 0 overruns 0  carrier 0  collisions 0
        device memory 0xfb200000-fb27ffff  

eno2: flags=4163<UP,BROADCAST,RUNNING,MULTICAST>  mtu 1500
        ether 70:e2:84:13:44:12  txqueuelen 1000  (Ethernet)
        RX packets 221197892  bytes 269978137472 (251.4 GiB)
        RX errors 0  dropped 7  overruns 0  frame 0
        TX packets 192573206  bytes 166491370299 (155.0 GiB)
        TX errors 0  dropped 0 overruns 0  carrier 0  collisions 0
        device memory 0xfb100000-fb17ffff  

lo: flags=73<UP,LOOPBACK,RUNNING>  mtu 65536
        inet 127.0.0.1  netmask 255.0.0.0
        loop  txqueuelen 1000  (Local Loopback)
        RX packets 2553  bytes 147410 (143.9 KiB)
        RX errors 0  dropped 0  overruns 0  frame 0
        TX packets 2553  bytes 147410 (143.9 KiB)
        TX errors 0  dropped 0 overruns 0  carrier 0  collisions 0

vif17.0: flags=4163<UP,BROADCAST,RUNNING,MULTICAST>  mtu 1500
        ether fe:ff:ff:ff:ff:ff  txqueuelen 2000  (Ethernet)
        RX packets 14519247  bytes 133248290251 (124.0 GiB)
        RX errors 0  dropped 0  overruns 0  frame 0
        TX packets 139708738  bytes 145135168676 (135.1 GiB)
        TX errors 0  dropped 0 overruns 0  carrier 0  collisions 0

vif17.1: flags=4163<UP,BROADCAST,RUNNING,MULTICAST>  mtu 1500
        ether fe:ff:ff:ff:ff:ff  txqueuelen 2000  (Ethernet)
        RX packets 86206104  bytes 157189755115 (146.3 GiB)
        RX errors 0  dropped 0  overruns 0  frame 0
        TX packets 181685983  bytes 268170806613 (249.7 GiB)
        TX errors 0  dropped 0 overruns 0  carrier 0  collisions 0

vif2.0: flags=4163<UP,BROADCAST,RUNNING,MULTICAST>  mtu 1500
        ether fe:ff:ff:ff:ff:ff  txqueuelen 2000  (Ethernet)
        RX packets 1522072  bytes 88293701 (84.2 MiB)
        RX errors 0  dropped 0  overruns 0  frame 0
        TX packets 152712638  bytes 278417240910 (259.2 GiB)
        TX errors 0  dropped 3 overruns 0  carrier 0  collisions 0

vif2.1: flags=4163<UP,BROADCAST,RUNNING,MULTICAST>  mtu 1500
        ether fe:ff:ff:ff:ff:ff  txqueuelen 2000  (Ethernet)
        RX packets 454933  bytes 81071616 (77.3 MiB)
        RX errors 0  dropped 0  overruns 0  frame 0
        TX packets 267218860  bytes 426217224334 (396.9 GiB)
        TX errors 0  dropped 26 overruns 0  carrier 0  collisions 0

vif21.0: flags=4163<UP,BROADCAST,RUNNING,MULTICAST>  mtu 1500
        ether fe:ff:ff:ff:ff:ff  txqueuelen 2000  (Ethernet)
        RX packets 20045530  bytes 1284038375 (1.1 GiB)
        RX errors 0  dropped 0  overruns 0  frame 0
        TX packets 141601066  bytes 277441739746 (258.3 GiB)
        TX errors 0  dropped 3 overruns 0  carrier 0  collisions 0

vif21.1: flags=4163<UP,BROADCAST,RUNNING,MULTICAST>  mtu 1500
        ether fe:ff:ff:ff:ff:ff  txqueuelen 2000  (Ethernet)
        RX packets 73010  bytes 3802474 (3.6 MiB)
        RX errors 0  dropped 0  overruns 0  frame 0
        TX packets 267415889  bytes 426146753845 (396.8 GiB)
        TX errors 0  dropped 14 overruns 0  carrier 0  collisions 0

vif25.0: flags=4099<UP,BROADCAST,MULTICAST>  mtu 1500
        ether fe:ff:ff:ff:ff:ff  txqueuelen 2000  (Ethernet)
        RX packets 0  bytes 0 (0.0 B)
        RX errors 0  dropped 0  overruns 0  frame 0
        TX packets 0  bytes 0 (0.0 B)
        TX errors 0  dropped 0 overruns 0  carrier 0  collisions 0

vif25.1: flags=4099<UP,BROADCAST,MULTICAST>  mtu 1500
        ether fe:ff:ff:ff:ff:ff  txqueuelen 2000  (Ethernet)
        RX packets 0  bytes 0 (0.0 B)
        RX errors 0  dropped 0  overruns 0  frame 0
        TX packets 0  bytes 0 (0.0 B)
        TX errors 0  dropped 0 overruns 0  carrier 0  collisions 0

vif25.0-emu: flags=4163<UP,BROADCAST,RUNNING,MULTICAST>  mtu 1500
        ether fe:ff:ff:ff:ff:ff  txqueuelen 1000  (Ethernet)
        RX packets 2736576  bytes 295678097 (281.9 MiB)
        RX errors 0  dropped 0  overruns 0  frame 0
        TX packets 260429831  bytes 265797660906 (247.5 GiB)
        TX errors 0  dropped 200 overruns 0  carrier 0  collisions 0

vif25.1-emu: flags=4163<UP,BROADCAST,RUNNING,MULTICAST>  mtu 1500
        ether fe:ff:ff:ff:ff:ff  txqueuelen 1000  (Ethernet)
        RX packets 145425  bytes 36018716 (34.3 MiB)
        RX errors 0  dropped 0  overruns 0  frame 0
        TX packets 370770440  bytes 395263409640 (368.1 GiB)
        TX errors 0  dropped 0 overruns 0  carrier 0  collisions 0

vif3.0: flags=4163<UP,BROADCAST,RUNNING,MULTICAST>  mtu 1500
        ether fe:ff:ff:ff:ff:ff  txqueuelen 2000  (Ethernet)
        RX packets 55392503  bytes 130064444520 (121.1 GiB)
        RX errors 0  dropped 0  overruns 0  frame 0
        TX packets 99052116  bytes 147951838129 (137.7 GiB)
        TX errors 0  dropped 1 overruns 0  carrier 0  collisions 0

vif3.1: flags=4163<UP,BROADCAST,RUNNING,MULTICAST>  mtu 1500
        ether fe:ff:ff:ff:ff:ff  txqueuelen 2000  (Ethernet)
        RX packets 5133054  bytes 295517366 (281.8 MiB)
        RX errors 0  dropped 0  overruns 0  frame 0
        TX packets 262578665  bytes 425941777243 (396.6 GiB)
        TX errors 0  dropped 16 overruns 0  carrier 0  collisions 0

vif4.0: flags=4163<UP,BROADCAST,RUNNING,MULTICAST>  mtu 1500
        ether fe:ff:ff:ff:ff:ff  txqueuelen 2000  (Ethernet)
        RX packets 4902949  bytes 615496460 (586.9 MiB)
        RX errors 0  dropped 0  overruns 0  frame 0
        TX packets 149363618  bytes 277847322538 (258.7 GiB)
        TX errors 0  dropped 1 overruns 0  carrier 0  collisions 0

vif4.1: flags=4163<UP,BROADCAST,RUNNING,MULTICAST>  mtu 1500
        ether fe:ff:ff:ff:ff:ff  txqueuelen 2000  (Ethernet)
        RX packets 276943  bytes 30721141 (29.2 MiB)
        RX errors 0  dropped 0  overruns 0  frame 0
        TX packets 267397268  bytes 426270528575 (396.9 GiB)
        TX errors 0  dropped 14 overruns 0  carrier 0  collisions 0

vif47.0: flags=4099<UP,BROADCAST,MULTICAST>  mtu 1500
        ether fe:ff:ff:ff:ff:ff  txqueuelen 2000  (Ethernet)
        RX packets 0  bytes 0 (0.0 B)
        RX errors 0  dropped 0  overruns 0  frame 0
        TX packets 0  bytes 0 (0.0 B)
        TX errors 0  dropped 0 overruns 0  carrier 0  collisions 0

vif47.1: flags=4099<UP,BROADCAST,MULTICAST>  mtu 1500
        ether fe:ff:ff:ff:ff:ff  txqueuelen 2000  (Ethernet)
        RX packets 0  bytes 0 (0.0 B)
        RX errors 0  dropped 0  overruns 0  frame 0
        TX packets 0  bytes 0 (0.0 B)
        TX errors 0  dropped 0 overruns 0  carrier 0  collisions 0

vif47.0-emu: flags=4163<UP,BROADCAST,RUNNING,MULTICAST>  mtu 1500
        ether fe:ff:ff:ff:ff:ff  txqueuelen 1000  (Ethernet)
        RX packets 208790  bytes 20100733 (19.1 MiB)
        RX errors 0  dropped 0  overruns 0  frame 0
        TX packets 110950236  bytes 110769932971 (103.1 GiB)
        TX errors 0  dropped 0 overruns 0  carrier 0  collisions 0

vif47.1-emu: flags=4163<UP,BROADCAST,RUNNING,MULTICAST>  mtu 1500
        ether fe:ff:ff:ff:ff:ff  txqueuelen 1000  (Ethernet)
        RX packets 140551  bytes 14599509 (13.9 MiB)
        RX errors 0  dropped 0  overruns 0  frame 0
        TX packets 151287643  bytes 163469024604 (152.2 GiB)
        TX errors 0  dropped 0 overruns 0  carrier 0  collisions 0

vif5.0: flags=4163<UP,BROADCAST,RUNNING,MULTICAST>  mtu 1500
        ether fe:ff:ff:ff:ff:ff  txqueuelen 2000  (Ethernet)
        RX packets 2030676  bytes 363997181 (347.1 MiB)
        RX errors 0  dropped 0  overruns 0  frame 0
        TX packets 152285777  bytes 278176471509 (259.0 GiB)
        TX errors 0  dropped 1 overruns 0  carrier 0  collisions 0

vif5.1: flags=4163<UP,BROADCAST,RUNNING,MULTICAST>  mtu 1500
        ether fe:ff:ff:ff:ff:ff  txqueuelen 2000  (Ethernet)
        RX packets 4169387  bytes 1045898303 (997.4 MiB)
        RX errors 0  dropped 0  overruns 0  frame 0
        TX packets 263825846  bytes 425419251935 (396.2 GiB)
        TX errors 0  dropped 7 overruns 0  carrier 0  collisions 0

vif6.0: flags=4163<UP,BROADCAST,RUNNING,MULTICAST>  mtu 1500
        ether fe:ff:ff:ff:ff:ff  txqueuelen 2000  (Ethernet)
        RX packets 300266  bytes 16212271 (15.4 MiB)
        RX errors 0  dropped 0  overruns 0  frame 0
        TX packets 153931212  bytes 278506234302 (259.3 GiB)
        TX errors 0  dropped 2 overruns 0  carrier 0  collisions 0

vif6.1: flags=4163<UP,BROADCAST,RUNNING,MULTICAST>  mtu 1500
        ether fe:ff:ff:ff:ff:ff  txqueuelen 2000  (Ethernet)
        RX packets 43  bytes 1932 (1.8 KiB)
        RX errors 0  dropped 0  overruns 0  frame 0
        TX packets 154227291  bytes 278526238467 (259.3 GiB)
        TX errors 0  dropped 2 overruns 0  carrier 0  collisions 0

xenbr0: flags=4163<UP,BROADCAST,RUNNING,MULTICAST>  mtu 1500
        inet 192.168.1.8  netmask 255.255.255.0  broadcast 192.168.1.255
        ether 70:e2:84:13:44:11  txqueuelen 1000  (Ethernet)
        RX packets 13690768  bytes 923520126 (880.7 MiB)
        RX errors 0  dropped 0  overruns 0  frame 0
        TX packets 12073667  bytes 1307127765 (1.2 GiB)
        TX errors 0  dropped 0 overruns 0  carrier 0  collisions 0

xenbr1: flags=4163<UP,BROADCAST,RUNNING,MULTICAST>  mtu 1500
        inet 192.168.0.3  netmask 255.255.255.0  broadcast 192.168.0.255
        ether 70:e2:84:13:44:12  txqueuelen 1000  (Ethernet)
        RX packets 627010  bytes 180028847 (171.6 MiB)
        RX errors 0  dropped 0  overruns 0  frame 0
        TX packets 12815  bytes 942092 (920.0 KiB)
        TX errors 0  dropped 0 overruns 0  carrier 0  collisions 0


To see ethernet interfaces that seem up and then do a ifconfig -a to check whether some interfaces are down (e.g. not shown in the simple ifconfig list).
/sbin/ifconfig -a

! Please note that some virtual IP configurations might not appear and noly be visible in an (ip addr show) command.


3. Check iproute2 for special rt_tables (Routing Tables) rules
 

By default Linux distributions does not have any additional rules in /etc/iproute2/rt_tables however some Linux router machines, needs to have a multiple Gateways. Perhaps the most elegant way to do multiple routings with Linux is to use iproute2's routing tables rt_tables.

Here is example of an OpenXEN system that has 2 Internet providers attached and routes different traffic via


root@freak:~# cat /etc/iproute2/rt_tables
#
# reserved values
#
255    local
254    main
253    default

100    INET1
200     INET2
0    unspec
#
# local
#
#1    inr.ruhep


root@freak:~# ip rule list
0:    from all lookup local
32762:    from all to 192.168.1.8 lookup INET2
32763:    from 192.168.1.8 lookup INET2
32764:    from all to 192.168.0.3 lookup INET1
32765:    from 192.168.0.3 lookup INET1
32766:    from all lookup main
32767:    from all lookup default
root@freak:~# 
 

4. Using ip route get to find out traffic route (path)

root@freak:~# ip route get 192.168.0.1
192.168.0.1 via 192.168.0.1 dev xenbr1 src 192.168.0.3 uid 0 
    cache 


root@freak:~# /sbin/route -n
Kernel IP routing table
Destination     Gateway         Genmask         Flags Metric Ref    Use Iface
0.0.0.0         192.168.1.1     0.0.0.0         UG    0      0        0 xenbr0
192.168.0.0     192.168.0.1     255.255.255.0   UG    0      0        0 xenbr1
192.168.0.0     0.0.0.0         255.255.255.0   U     0      0        0 xenbr1
192.168.1.0     0.0.0.0         255.255.255.0   U     0      0        0 xenbr0
root@freak:~# 

root@freak:~# ip route show
default via 192.168.1.1 dev xenbr0 
192.168.0.0/24 via 192.168.0.1 dev xenbr1 
192.168.0.0/24 dev xenbr1 proto kernel scope link src 192.168.0.3 
192.168.1.0/24 dev xenbr0 proto kernel scope link src 192.168.1.8 


If you find that gateway is missing you might want to add it with:

root@freak:~#  ip route add default via 192.168.5.1

If you need to add a speicic network IP range via separate gateways, you can use commands like:

To add routing for 192.168.0.1/24 / 192.168.1.1/24 via 192.168.0.1 and 192.168.1.1

# /sbin/route add -net 192.168.1.0 netmask 255.255.255.0 gw 192.168.1.1 dev eth1
# /sbin/route add -net 192.168.0.0 netmask 255.255.255.0 gw 192.168.0.1 dev eth1


If you need to delete a configured wrong route with ip command

# ip route del 192.168.1.0/24 via 0.0.0.0 dev eth1
# ip route del 192.168.0.0/24 via 0.0.0.0 dev eth1

5. Use ping (ICMP protocol) the Destionation IP
 

root@freak:~# ping -c 3 192.168.0.1
PING 192.168.0.1 (192.168.0.1) 56(84) bytes of data.
64 bytes from 192.168.0.1: icmp_seq=1 ttl=64 time=0.219 ms
64 bytes from 192.168.0.1: icmp_seq=2 ttl=64 time=0.295 ms
64 bytes from 192.168.0.1: icmp_seq=3 ttl=64 time=0.270 ms

— 192.168.0.1 ping statistics —
3 packets transmitted, 3 received, 0% packet loss, time 2048ms
rtt min/avg/max/mdev = 0.219/0.261/0.295/0.031 ms
root@freak:~# ping -c 3 192.168.0.39
PING 192.168.0.39 (192.168.0.39) 56(84) bytes of data.
From 192.168.1.80: icmp_seq=2 Redirect Host(New nexthop: 192.168.0.39)
From 192.168.1.80: icmp_seq=3 Redirect Host(New nexthop: 192.168.0.39)
From 192.168.1.80 icmp_seq=1 Destination Host Unreachable


— 192.168.0.39 ping statistics —
3 packets transmitted, 0 received, +1 errors, 100% packet loss, time 2039ms
pipe 3


Note that sometimes you might get 100% traffic loss but still have connection to the destionation in case if the ICMP protocol is filtered for security.

However if you get something like Network is unreachable that is usually an indicator of some routing problem or wrongly configured network netmask.

root@freak:~# ping 192.168.0.5
ping: connect: Network is unreachable

Test network with different packet size. To send 8972 bytes of payload in a Ethernet frame without fragmentation, the following command can be used:

root@pcfreak:~# ping -s 8972 -M do -c 4 freak
PING xen (192.168.1.8) 8972(9000) bytes of data.
ping: local error: message too long, mtu=1500
^C
— xen ping statistics —
3 packets transmitted, 0 received, +3 errors, 100% packet loss, time 2037ms

root@pcfreak:~# 


 -M pmtudisc_opt
           Select Path MTU Discovery strategy.  pmtudisc_option may be either do (prohibit fragmentation, even local one), want (do PMTU discovery, fragment locally when packet size is
           large), or dont (do not set DF flag).


root@pcfreak:~# ping -s 8972 -M want -c 4 freak
PING xen (192.168.1.8) 8972(9000) bytes of data.
8980 bytes from xen (192.168.1.5): icmp_seq=1 ttl=64 time=2.18 ms
8980 bytes from xen (192.168.1.5): icmp_seq=2 ttl=64 time=1.90 ms
8980 bytes from xen (192.168.1.5): icmp_seq=3 ttl=64 time=2.10 ms
^C
— xen ping statistics —
3 packets transmitted, 3 received, 0% packet loss, time 2002ms
rtt min/avg/max/mdev = 1.901/2.059/2.178/0.116 ms

root@pcfreak:~# 

  • -M do: prohibit fragmentation
  • -s 8972 8972 bytes of data
  • ICMP header: 8 bytes
  • IP header: 20 bytes (usually, it can be higher)
  • 8980 bytes of bytes is the IP payload
     

These commands can be used to capture for MTU (maximum transmition units) related issues between hosts that are preventing for hosts to properly send traffic between themselves.
A common issue for Linux hosts to be unable to see each other on the same network is caused by Jumbo Frames (MTU 9000) packets enabled on one of the sides and MTU of 1500 on the other side.
Thus it is always a good idea to thoroughully look up all configured MTUs for all LAN Devices on each server.

6. Check traceroute path to host

If there is no PING but ip route get shows routing is properly configured and the routes existing in the Linux machine routing tables, next step is to check the output of traceroute / tracepath / mtr


raceroute to 192.168.0.1 (192.168.0.1), 30 hops max, 60 byte packets
 1  pcfreak (192.168.0.1)  0.263 ms  0.166 ms  0.119 ms
root@freak:~# tracepath 192.168.1.1
 1?: [LOCALHOST]                      pmtu 1500
 1:  vivacom-gigabit-router                                0.925ms reached
 1:  vivacom-gigabit-router                                0.835ms reached
     Resume: pmtu 1500 hops 1 back 1 


It might be useful to get a frequent output of the command (especially on Linux hosts) where mtr command is not installed with:


root@freak:~# watch -n 0.1 traceroute 192.168.0.1


root@freak:~# traceroute -4 google.com
traceroute to google.com (172.217.17.110), 30 hops max, 60 byte packets
 1  vivacom-gigabit-router (192.168.1.1)  0.657 ms  1.280 ms  1.647 ms
 2  213.91.190.130 (213.91.190.130)  7.983 ms  8.168 ms  8.097 ms
 3  * * *
 4  * * *
 5  212-39-66-222.ip.btc-net.bg (212.39.66.222)  16.613 ms  16.336 ms  17.151 ms
 6  * * *
 7  142.251.92.65 (142.251.92.65)  18.808 ms  13.246 ms 209.85.254.242 (209.85.254.242)  15.541 ms
 8  142.251.92.3 (142.251.92.3)  14.223 ms 142.251.227.251 (142.251.227.251)  14.507 ms 142.251.92.3 (142.251.92.3)  15.328 ms
 9  ams15s29-in-f14.1e100.net (172.217.17.110)  14.097 ms  14.909 ms 142.251.242.230 (142.251.242.230)  13.481 ms
root@freak:~# 

If you have MTR then you can get plenty of useful additional information such as the Network HOP name or the Country location of the HOP.


To get HOP name:


root@freak:~# mtr -z google.com


To get info on where (which Country) exactly network HOP is located physically:

root@freak:~# mtr -y 2 google.com


7. Check iptables INPUT / FORWARD / OUTPUT rules are messing with something
 

# iptables -L -n 

# iptables -t nat -L -n


Ideally you would not have any firewall

# iptables -L -n 

Chain INPUT (policy ACCEPT)
target     prot opt source               destination         

Chain FORWARD (policy ACCEPT)
target     prot opt source               destination         

Chain OUTPUT (policy ACCEPT)
target     prot opt source               destination         

# iptables -t nat -L -n
Chain PREROUTING (policy ACCEPT)
target     prot opt source               destination         

Chain INPUT (policy ACCEPT)
target     prot opt source               destination         

Chain OUTPUT (policy ACCEPT)
target     prot opt source               destination         

Chain POSTROUTING (policy ACCEPT)
target     prot opt source               destination         


In case if something like firewalld is enabled as a default serviceto provide some modern Linux firewall as Ubuntu and Redhat / CentOS / Fedoras has it often turned on as a service stop and disable the service

# systemctl stop firewalld

# systemctl disable firewalld


8. Debug for any possible MAC address duplicates
 

root@pcfrxen:~# arp -an
? (192.168.1.33) at 00:16:3e:59:96:9e [ether] on eth0
? (192.168.1.1) at 18:45:93:c6:d8:00 [ether] on eth1
? (192.168.0.1) at 8c:89:a5:f2:e8:d9 [ether] on eth1
? (192.168.1.1) at 18:45:93:c6:d8:00 [ether] on eth0
? (192.168.1.11) at 7c:0a:3f:89:b6:fa [ether] on eth1
? (192.168.1.17) at <incomplete> on eth0
? (192.168.1.37) at 00:16:3e:ea:05:ce [ether] on eth0
? (192.168.1.80) at 8c:89:a5:f2:e7:d8 [ether] on eth0
? (192.168.1.11) at 7c:0a:3f:89:a5:fa [ether] on eth0
? (192.168.1.30) at 00:16:3e:bb:46:45 [ether] on eth1
? (192.168.0.210) at 00:16:3e:68:d9:55 [ether] on eth1
? (192.168.1.30) at 00:16:3e:bb:46:45 [ether] on eth0
? (192.168.1.18) at 00:16:3e:0d:40:05 [ether] on eth1
? (192.168.0.211) at 00:16:3e:4d:41:05 [ether] on eth1
? (192.168.1.35) at 00:16:3e:d1:8f:77 [ether] on eth0
? (192.168.1.18) at 00:16:3e:0d:43:05 [ether] on eth0
? (192.168.1.28) at 00:16:3e:04:12:1c [ether] on eth1
? (192.168.0.3) at 70:e2:84:13:43:12 [ether] on eth1
? (192.168.0.208) at 00:16:3e:51:de:9c [ether] on eth1
? (192.168.0.241) at 00:16:3e:0d:48:06 [ether] on eth1
? (192.168.1.28) at 00:16:3e:04:12:1c [ether] on eth0
? (192.168.1.33) at 00:16:3e:59:97:8e [ether] on eth1
? (192.168.0.241) at 00:16:3e:0d:45:06 [ether] on eth0
? (192.168.0.209) at 00:16:3e:5c:df:96 [ether] on eth1

root@pcfrxen:~# ip neigh show
192.168.1.33 dev eth0 lladdr 00:16:3e:59:96:9e REACHABLE
192.168.1.1 dev eth1 lladdr 18:45:93:c6:d8:00 STALE
192.168.0.1 dev eth1 lladdr 8c:89:a5:f2:e8:d9 REACHABLE
192.168.1.1 dev eth0 lladdr 18:45:93:c6:d9:01 REACHABLE
192.168.1.11 dev eth1 lladdr 7c:0a:3f:89:a6:fb STALE
192.168.1.17 dev eth0  FAILED
192.168.1.37 dev eth0 lladdr 00:16:3e:ea:06:ce STALE
192.168.1.80 dev eth0 lladdr 8c:89:a5:f2:e8:d9 REACHABLE
192.168.1.11 dev eth0 lladdr 7c:0a:3f:89:a7:fa STALE
192.168.1.30 dev eth1 lladdr 00:16:3e:bb:45:46 STALE
192.168.0.210 dev eth1 lladdr 00:16:3e:68:d8:56 REACHABLE
192.168.1.30 dev eth0 lladdr 00:16:3e:bb:45:46 STALE
192.168.1.18 dev eth1 lladdr 00:16:3e:0d:48:04 STALE
192.168.0.211 dev eth1 lladdr 00:16:3e:4d:40:04 STALE
192.168.1.35 dev eth0 lladdr 00:16:3e:d2:8f:76 STALE
192.168.1.18 dev eth0 lladdr 00:16:3e:0d:48:06 STALE
192.168.1.28 dev eth1 lladdr 00:16:3e:04:11:2c STALE
192.168.0.3 dev eth1 lladdr 70:e2:84:13:44:13 STALE
192.168.0.208 dev eth1 lladdr 00:16:3e:51:de:9c REACHABLE
192.168.0.241 dev eth1 lladdr 00:16:3e:0d:48:07 STALE
192.168.1.28 dev eth0 lladdr 00:16:3e:04:12:1c REACHABLE
192.168.1.33 dev eth1 lladdr 00:16:3e:59:96:9e STALE
192.168.0.241 dev eth0 lladdr 00:16:3e:0d:49:06 STALE
192.168.0.209 dev eth1 lladdr 00:16:3e:5c:dd:97 STALE
root@pcfrxen:~# 


9. Check out with netstat / ss for any irregularities such as high amount of error of faulty ICMP / TCP / UDP network packs


For example check out the netstat network stack output

# netstat -s


root@pcfrxen:~# netstat -s
Ip:
    Forwarding: 2
    440044929 total packets received
    1032 with invalid addresses
    0 forwarded
    0 incoming packets discarded
    439988902 incoming packets delivered
    396161852 requests sent out
    3 outgoing packets dropped
    100 dropped because of missing route
Icmp:
    1025 ICMP messages received
    540 input ICMP message failed
    ICMP input histogram:
        destination unreachable: 1014
        timeout in transit: 11
    519 ICMP messages sent
    0 ICMP messages failed
    ICMP output histogram:
        destination unreachable: 519
IcmpMsg:
        InType3: 1014
        InType11: 11
        OutType3: 519
Tcp:
    1077237 active connection openings
    1070510 passive connection openings
    1398236 failed connection attempts
    111345 connection resets received
    83 connections established
    438293250 segments received
    508143650 segments sent out
    42567 segments retransmitted
    546 bad segments received
    329039 resets sent
Udp:
    1661295 packets received
    278 packets to unknown port received
    0 packet receive errors
    1545720 packets sent
    0 receive buffer errors
    0 send buffer errors
    IgnoredMulti: 33046
UdpLite:
TcpExt:
    1 invalid SYN cookies received
    1398196 resets received for embryonic SYN_RECV sockets
    1737473 packets pruned from receive queue because of socket buffer overrun
    1118775 TCP sockets finished time wait in fast timer
    638 time wait sockets recycled by time stamp
    656 packetes rejected in established connections because of timestamp
    2218959 delayed acks sent
    2330 delayed acks further delayed because of locked socket
    Quick ack mode was activated 7172 times
    271799723 packet headers predicted
    14917420 acknowledgments not containing data payload received
    171078735 predicted acknowledgments
    52 times recovered from packet loss due to fast retransmit
    TCPSackRecovery: 337
    Detected reordering 1551 times using SACK
    Detected reordering 1501 times using reno fast retransmit
    Detected reordering 61 times using time stamp
    9 congestion windows fully recovered without slow start
    38 congestion windows partially recovered using Hoe heuristic
    TCPDSACKUndo: 241
    104 congestion windows recovered without slow start after partial ack
    TCPLostRetransmit: 11550
    1 timeouts after reno fast retransmit
    TCPSackFailures: 13
    3772 fast retransmits
    2 retransmits in slow start
    TCPTimeouts: 24104
    TCPLossProbes: 101748
    TCPLossProbeRecovery: 134
    TCPSackRecoveryFail: 3
    128989224 packets collapsed in receive queue due to low socket buffer
    TCPBacklogCoalesce: 715034
    TCPDSACKOldSent: 7168
    TCPDSACKOfoSent: 341
    TCPDSACKRecv: 16612
    150689 connections reset due to unexpected data
    27063 connections reset due to early user close
    17 connections aborted due to timeout
    TCPDSACKIgnoredOld: 158
    TCPDSACKIgnoredNoUndo: 13514
    TCPSpuriousRTOs: 9
    TCPSackMerged: 1191
    TCPSackShiftFallback: 1011
    TCPDeferAcceptDrop: 699473
    TCPRcvCoalesce: 3311764
    TCPOFOQueue: 14289375
    TCPOFOMerge: 356
    TCPChallengeACK: 621
    TCPSYNChallenge: 621
    TCPSpuriousRtxHostQueues: 4
    TCPAutoCorking: 1605205
    TCPFromZeroWindowAdv: 132380
    TCPToZeroWindowAdv: 132441
    TCPWantZeroWindowAdv: 1445495
    TCPSynRetrans: 23652
    TCPOrigDataSent: 388992604
    TCPHystartTrainDetect: 69089
    TCPHystartTrainCwnd: 3264904
    TCPHystartDelayDetect: 4
    TCPHystartDelayCwnd: 128
    TCPACKSkippedPAWS: 3
    TCPACKSkippedSeq: 2001
    TCPACKSkippedChallenge: 2
    TCPWinProbe: 123043
    TCPKeepAlive: 4389
    TCPDelivered: 389507445
    TCPAckCompressed: 7343781
    TcpTimeoutRehash: 23311
    TcpDuplicateDataRehash: 8
    TCPDSACKRecvSegs: 17335
IpExt:
    InMcastPkts: 145100
    OutMcastPkts: 9429
    InBcastPkts: 18226
    InOctets: 722933727848
    OutOctets: 759502627470
    InMcastOctets: 58227095
    OutMcastOctets: 3284379
    InBcastOctets: 1756918
    InNoECTPkts: 440286946
    InECT0Pkts: 936


  • List all listening established connections to host

# netstat -ltne

  • List all UDP / TCP connections

# netstat -ltua

or if you prefer to do it with the newer and more comprehensive tool ss:
 

  • List all listening TCP connections 

# ss -lt

  • List all listening UDP connections 

# ss -ua

  • Display statistics about recent connections

root@pcfrxen:~# ss -s
Total: 329
TCP:   896 (estab 70, closed 769, orphaned 0, timewait 767)

Transport Total     IP        IPv6
RAW      0         0         0        
UDP      40        36        4        
TCP      127       118       9        
INET      167       154       13       
FRAG      0         0         0 

  • If you need to debug some specific sport or dport filter out the connection you need by port number

# ss -at '( dport = :22 or sport = :22 )'


Debug for any possible issues with ICMP unreachable but ports reachable with NMAP / telnet / Netcat
 

# nc 192.168.0.1 -vz

root@pcfrxen:/ # nc 192.168.0.1 80 -vz
pcfreak [192.168.0.1] 80 (http) open


root@pcfrxen:/ # nc 192.168.0.1 5555 -vz
pcfreak [192.168.0.1] 5555 (?) : Connection refused


root@pcfrxen:/# telnet 192.168.0.1 3128
Trying 192.168.0.1…
Connected to 192.168.0.1.
Escape character is '^]'.
^]
telnet> quit
Connection closed.


root@pcfrxen:/# nmap -sS -P0 192.168.0.1 -p 443 -O
Starting Nmap 7.80 ( https://nmap.org ) at 2023-11-27 19:51 EET
Nmap scan report for pcfreak (192.168.0.1)
Host is up (0.00036s latency).

PORT    STATE SERVICE
443/tcp open  https
MAC Address: 8C:89:A5:F2:E8:D8 (Micro-Star INT'L)
Warning: OSScan results may be unreliable because we could not find at least 1 open and 1 closed port
Aggressive OS guesses: Linux 3.11 (96%), Linux 3.1 (95%), Linux 3.2 (95%), AXIS 210A or 211 Network Camera (Linux 2.6.17) (94%), Linux 2.6.32 (94%), Linux 3.10 (94%), Linux 2.6.18 (93%), Linux 3.2 – 4.9 (93%), ASUS RT-N56U WAP (Linux 3.4) (93%), Linux 3.16 (93%)
No exact OS matches for host (test conditions non-ideal).
Network Distance: 1 hop

OS detection performed. Please report any incorrect results at https://nmap.org/submit/ .
Nmap done: 1 IP address (1 host up) scanned in 6.24 seconds
root@pcfrxen:/# 

10. Add static MAC address to Ethernet Interface (if you find a MAC address being wrongly assigned to interface)

Sometimes problems with network unrechability between hosts is caused by wrongly defined MAC addresses on a Switch that did not correspond correctly to the ones assigned on the Linux host.
The easiest resolution here if you don't have access to Switch in work environment is to reassign the default MAC addresses of interfaces to proper MAC addresses, expected by remote router.


root@pcfrxen:/#  ​/sbin/ifconfig eth2 hw ether 8c:89:a5:f2:e8:d6

root@pcfrxen:/#  /sbin/ifconfig eth1 hw ether 8c:89:a5:f2:e8:d5


root@pcfrxen:/#  ifconfig eth0|grep -i ether
        ether 8c:89:a5:f2:e8:d6 txqueuelen 1000  (Ethernet)


11. Check for Network Address Translation (NAT) misconfigurations

If you do use some NAT-ing between Linux host and the remote Network Device you cannot reach, make sure IP Forwarding is enabled (i.e. /etc/sysctl.conf was not mistakenly overwritten by a script or admin for whatever reason).
 

root@server:~# sysctl net.ipv4.ip_forward
net.ipv4.ip_forward = 1
root@server:~# sysctl net.ipv4.conf.all.forwarding
net.ipv4.conf.all.forwarding = 1

root@server:~# sysctl net.ipv6.conf.all.forwarding
net.ipv6.conf.all.forwarding = 0

12. Check for Resolving DNS irregularities with /etc/resolv.conf


If network connectivity is okay on TCP / IP , UDP Level but problems with DNS of course, check what you have configured inside /etc/resolv.conf

And if use newer Linux distributions and have resolving managed by systemd check status of resolvectl
 

root@server:~# cat /etc/resolv.conf
# Dynamic resolv.conf(5) file for glibc resolver(3) generated by resolvconf(8)
#     DO NOT EDIT THIS FILE BY HAND — YOUR CHANGES WILL BE OVERWRITTEN
# 127.0.0.53 is the systemd-resolved stub resolver.
# run "resolvectl status" to see details about the actual nameservers.

nameserver 127.0.0.1
search pc-freak.net
domain pc-freak.net
nameserver 8.8.8.8
nameserver 8.8.4.4
nameserver 109.104.195.2
nameserver 109.104.195.1
nameserver 208.67.222.222
nameserver 208.67.220.220
options timeout:2 rotate

root@pcfreak:~# 


root@server:~# resolvectl status
Global
       Protocols: -LLMNR -mDNS -DNSOverTLS DNSSEC=no/unsupported
resolv.conf mode: stub

Link 2 (ens3)
    Current Scopes: DNS
         Protocols: +DefaultRoute +LLMNR -mDNS -DNSOverTLS DNSSEC=no/unsupported
Current DNS Server: 192.168.5.1
       DNS Servers: 192.168.5.1


  As seen see, the systemd-resolved service is used to provide domain names resolution and we can modify its configuration file /etc/systemd/resolved.conf to add the DNS server – the following line is set (two DNS servers’ addresses are added):

For example …

DNS=8.8.8.8 

13. Fix problems with wrongly configured Network Speed between hosts

It is not uncommon to have a Switch between two Linux hosts that is set to communicate on a certain maximum amount of Speed but a Linux host is set to communicate or lesser or more of Speed, this might create network issues so in such cases make sure either you use the Auto Negitionation network feature
or set both sides to be communicating on the same amount of network speed.

To turn on auto negotiation for ether interface 

# ethtool -s eth1 speed 1000 duplex full autoneg on


For example to set a Linux network interface to communicate on 1 Gigabit speed and switch off autonegotiation off.

# ethtool -s eth1 speed 1000 duplex full autoneg off

14. Check arp and icmp traffic with tcpdump

On both sides where the IPs can't see each other we can run a tcpdump to check the ARP and ICMP traffic flowing between the hosts.
 

# tcpdump -i eth1 arp or icmp

cpdump: verbose output suppressed, use -v[v]… for full protocol decode
listening on eth1, link-type EN10MB (Ethernet), snapshot length 262144 bytes
15:29:07.001841 IP freak-eth1 > pcfr_hware_local_ip: ICMP echo request, id 13348, seq 65, length 64
15:29:07.001887 IP pcfr_hware_local_ip > freak-eth1: ICMP echo reply, id 13348, seq 65, length 64
15:29:07.598413 ARP, Request who-has pcfr_hware_local_ip tell zabbix-server, length 46
15:29:07.598425 ARP, Reply pcfr_hware_local_ip is-at 8c:89:a5:f2:e8:d8 (oui Unknown), length 28
15:29:07.633055 ARP, Request who-has freak_vivacom_auto_assigned_dhcp_ip tell 192.168.1.1, length 46
15:29:08.025824 IP freak-eth1 > pcfr_hware_local_ip: ICMP echo request, id 13348, seq 66, length 64
15:29:08.025864 IP pcfr_hware_local_ip > freak-eth1: ICMP echo reply, id 13348, seq 66, length 64


# tcpdump -i eth1 -vvv


If you want to sniff for TCP protocol and specific port and look up for DATA transfered for SMTP you can use something like:


# tcpdump -nNxXi eth0 -s 0 proto TCP and port 25​


If you need a bit more thorough explanation on what it would do check out my previous article How to catch / track mail server traffic abusers with tcpdump
 

15. Debugging network bridge issues

Having bridge network interface is another brink where things could go totally wrong.
If you have network bridges configured, check out what is the status of the bridge.
 

root@freak:/etc/network# brctl show
bridge name    bridge id        STP enabled    interfaces
xenbr0        8000.70e284134411    yes        eno1
                            vif1.0
                            vif10.0
                            vif16.0
                            vif16.0-emu
                            vif2.0
                            vif3.0
                            vif4.0
                            vif5.0
                            vif6.0
                            vif9.0
                            vif9.0-emu
xenbr1        8000.70e284134412    yes        eno2
                            vif1.1
                            vif10.1
                            vif16.1
                            vif16.1-emu
                            vif2.1
                            vif3.1
                            vif4.1
                            vif5.1
                            vif6.1
                            vif9.1
                            vif9.1-emu


Check out any configurations such as /etc/sysconfig/network-scripts/ifcfg-* are not misconfigured if on Redhat / CentOS / Fedora.
Or if on Debian / Ubuntu and other deb based Linuxes look up for /etc/network/interfaces config problems that might be causing the bridge to misbehave.

For example one bridge network issue, I've experienced recently is related to bridge_ports variable configured as bridge_ports all.
This was causing the second bridge xenbr1 to be unable to see another local network that was directly connected with a cable to it.

The fix was bridge_ports none. Finding out this trivial issue caused by a restored network config from old backup took me days to debug.
As everything seemed on a network level to be perfect just like in Physical layer, same way and on Software level, routings were okay.

Checked everything multiple times and did not see anything irregular. ping was missing and hosts cannot see each other even though having the right netmask and
network configuration in place.

Below is my /etc/network/interfaces configuration with the correct bridge_ports none changed.

root@freak:/etc/network# cat /etc/network/interfaces
auto lo
iface lo inet loopback
 

auto eno1
allow-hotplug eno1
iface eno1 inet manual
dns-nameservers 127.0.0.1 8.8.8.8 8.8.4.4 207.67.222.222 208.67.220.220
auto eno2
allow-hotplug eno2
iface eno2 inet manual
dns-nameservers 127.0.0.1 8.8.8.8 8.8.4.4 207.67.222.222 208.67.220.220

auto xenbr0
allow-hotplug xenbr0
 # Bridge setup
# fetching dhcp ip from 192.168.1.20 (vivacom fiber optics router) routing traffic via 1Gigabit network
 iface xenbr0 inet dhcp
    hwaddress ether 70:e2:84:13:44:11
#    address 192.168.1.5/22
    address 192.168.1.5
    netmask 255.255.252.0
    # address 192.168.1.8 if dhcp takes from vivacom dhcpd
    bridge_ports eno1
    gateway 192.168.1.20
    bridge_stp on
    bridge_waitport 0
    bridge_fd 0
    bridge_ports none
    dns-nameservers 8.8.8.8 8.8.4.4

auto xenbr1
# fetching dhcp ip from pc-freak.net (192.168.0.1) bergon.net routing traffic through it
allow-hotplug xenbr1
 iface xenbr1 inet dhcp
    hwaddress ether 70:e2:84:13:44:11
##    address 192.168.0.3/22
    address 192.168.0.8
    netmask 255.255.252.0
   # address 192.168.0.8 if dhcp takes from vivacom dhcpd (currently mac deleted from vivacom router)
   # address 192.168.0.9 if dhcp takes from pc-freak.net hware host
#    hwaddress ether 70:e2:84:13:44:13
    gateway 192.168.0.1
    bridge_ports eno2
    bridge_stp on
    bridge_waitport 0
    bridge_fd 0
    bridge_ports none
    dns-nameservers 8.8.8.8 8.8.4.4
root@freak:/etc/network# 


root@freak:/etc/network# brctl showstp xenbr0
xenbr0
 bridge id        8000.70e284134411
 designated root    8000.70e284134411
 root port           0            path cost           0
 max age          20.00            bridge max age          20.00
 hello time           2.00            bridge hello time       2.00
 forward delay          15.00            bridge forward delay      15.00
 ageing time           0.00
 hello timer           1.31            tcn timer           0.00
 topology change timer       0.00            gc timer           0.00
 flags            


eno1 (1)
 port id        8001            state             forwarding
 designated root    8000.70e284134411    path cost          19
 designated bridge    8000.70e284134411    message age timer       0.00
 designated port    8001            forward delay timer       0.00
 designated cost       0            hold timer           0.31
 flags            

vif1.0 (2)
 port id        8002            state             forwarding
 designated root    8000.70e284134411    path cost         100
 designated bridge    8000.70e284134411    message age timer       0.00
 designated port    8002            forward delay timer       0.00
 designated cost       0            hold timer           0.31
 flags            

vif10.0 (12)
 port id        800c            state             forwarding
 designated root    8000.70e284134411    path cost         100
 designated bridge    8000.70e284134411    message age timer       0.00
 designated port    800c            forward delay timer       0.00
 designated cost       0            hold timer           0.31
 flags            

vif16.0 (13)
 port id        800d            state               disabled
 designated root    8000.70e284134411    path cost         100
 designated bridge    8000.70e284134411    message age timer       0.00
 designated port    800d            forward delay timer       0.00
 designated cost       0            hold timer           0.00
 flags            

vif16.0-emu (14)
 port id        800e            state             forwarding
 designated root    8000.70e284134411    path cost         100
 designated bridge    8000.70e284134411    message age timer       0.00
 designated port    800e            forward delay timer       0.00
 designated cost       0            hold timer           0.31
 flags            

vif2.0 (4)
 port id        8004            state             forwarding
 designated root    8000.70e284134411    path cost         100
 designated bridge    8000.70e284134411    message age timer       0.00
 designated port    8004            forward delay timer       0.00
 designated cost       0            hold timer           0.31
 flags            

vif3.0 (5)
 port id        8005            state             forwarding
 designated root    8000.70e284134411    path cost         100
 designated bridge    8000.70e284134411    message age timer       0.00
 designated port    8005            forward delay timer       0.00
 designated cost       0            hold timer           0.31
 flags            

vif4.0 (3)
 port id        8003            state             forwarding
 designated root    8000.70e284134411    path cost         100
 designated bridge    8000.70e284134411    message age timer       0.00
 designated port    8003            forward delay timer       0.00
 designated cost       0            hold timer           0.31
 flags            

vif5.0 (6)
 port id        8006            state             forwarding
 designated root    8000.70e284134411    path cost         100
 designated bridge    8000.70e284134411    message age timer       0.00
 designated port    8006            forward delay timer       0.00
 designated cost       0            hold timer           0.31
 flags            

vif6.0 (7)
 port id        8007            state             forwarding
 designated root    8000.70e284134411    path cost         100
 designated bridge    8000.70e284134411    message age timer       0.00
 designated port    8007            forward delay timer       0.00
 designated cost       0            hold timer           0.31
 flags            

vif9.0 (10)
 port id        800a            state               disabled
 designated root    8000.70e284134411    path cost         100
 designated bridge    8000.70e284134411    message age timer       0.00
 designated port    800a            forward delay timer       0.00
 designated cost       0            hold timer           0.00
 flags            

vif9.0-emu (11)
 port id        800b            state             forwarding
 designated root    8000.70e284134411    path cost         100
 designated bridge    8000.70e284134411    message age timer       0.00
 designated port    800b            forward delay timer       0.00
 designated cost       0            hold timer           0.31
 flags            

root@freak:/etc/network# 


Sum it up

We have learned how to debug various routing issues, how to add and remote default gateways, check network reachability with ICMP protocol with ping, traceroute as well check for DNS issues and given some hints how to resolve DNS misconfigurations.
We also learned how to check the configured Network interfaces certain settings and resolve issues caused by Network sides max Speed misconfigurations as well how to track and resolve communication issues caused by wrongly configured MAC addresses.
Further more learned on how to do a basic port and protocol debugging of state of Network packets with netstat and nc and check problems related to iptables Firewall and IP Forwarding misconfigurations.
Finally we learned some basic usage of tcpdump on how to track arp and MAC traffic and look up for a specific TCP / UDP protocol  and its contained data.
There is certainly things this article is missing as the topic of debugging network connectivity issues on Linux is a whole ocean, especially as the complexity of Linux has grown dramatically these days.
I gues it is worthy to mention that unable to see remote network could be caused by wrong VLAN configurations on Linux or even buggy switches and router devices, due to hardware or software,
but I hope this article at least covers the very basics of network debugging and Linux. 

Enjojy 🙂

Linux extending life time for a damaged hard drive server tricks on a live server. Force fcsk on next reboot.Read-only file system error solutions

Friday, February 17th, 2023

linux-extending-life-time-for-a-damaged-hard-drive-server-tricks-can-not-read-superblock-linux-force-fsck-on-next-reboot

In our daily work as system administrators we have some very old Legacy systems running Clustered High Availability proxies using CRM (Cluster Resource Manager) and some legacy systems still using Heartbeat to manage the cluster instead of the newer and modern Corosync variant.

The HA cluster is only 2 nodes Linux machine and running the obscure already long time unsupported version of Redhat 5.11 (Ootpa) who was officially became stable distant year 1998 (yeath the years were good) and whose EOL (End of Life) has been reached long time ago and the OS is no longer supported, however for about 14 years the machines has been running perfectly fine until one of the Cluster nodes managed by ocf::heartbeat:IPAddr2 , that is  /etc/ha.d/resource.d/IPAddr2 shell script. Yeah for the newbies Heartbeat Application Cluster in Linux does work like that it uses a number of extendable pair of shell scripts written for different kind of Network / Web / Mail / SQL or whatever services HA management.

The first node configured however, started failing due to some errors like:
 

EXT3-fs error (device dm-1): ext3_journal_start_sb: Detected aborted journal
sd 0:2:0:0: rejecting I/O to offline device
Aborting journal on device sda1.
sd 0:2:0:0: rejecting I/O to offline device
printk: 159 messages suppressed.
Buffer I/O error on device sda1, logical block 526
lost page write due to I/O error on sda1
sd 0:2:0:0: rejecting I/O to offline device
ext3_abort called.
EXT3-fs error (device sda1): ext3_journal_start_sb: Detected aborted journal
Remounting filesystem read-only
sd 0:2:0:0: rejecting I/O to offline device
megaraid_sas: FW was restarted successfully, initiating next stage…
megaraid_sas: HBA recovery state machine, state 2 starting…
megasas: Waiting for FW to come to ready state
megasas: FW in FAULT state!!
FW state [-268435456] hasn't changed in 180 secs
megaraid_sas: out: controller is not in ready state
megasas: waiting_for_outstanding: after issue OCR. 
megasas: waiting_for_outstanding: before issue OCR. FW state = f0000000
megaraid_sas: pending commands remain even after reset handling. megasas[0]: Dumping Frame Phys Address of all pending cmds in FW
megasas[0]: Total OS Pending cmds : 0 megasas[0]: 64 bit SGLs were sent to FW
megasas[0]: Pending OS cmds in FW :

The result out of that was a frequently the filesystem of the machine got re-mounted as Read Only and of course that is
quite bad if you have a running processess of haproxy that should be able to be living their and take up some Web traffic
for high availability and you run all the traffic only on the 2nd pair of machine.

This of course was a clear sign for a failing disks or some hit bad blocks regions or as the messages indicates, some
problem with system hardware or Raid SAS Array.

The physical raid on the system, just like rest of the hardware is very old stuff as well.

[root@haproxy_lb_node1 ~]# lspci |grep -i RAI
01:00.0 RAID bus controller: LSI Logic / Symbios Logic MegaRAID SAS 2108 [Liberator] (rev 05)

The produced errors not only made the machine to auto-mount its root / filesystem in Read-Only mode but besides has most
likely made the machine to automatically reboot every few days or few times every day in a raw.

The second Load Balancer node2 did operated perfectly, and we thought that we might just keep the broken machine in that half running
and inconsistent state for few weeks until we have built the new machines with Pre-Installed new haproxy cluster with modern
RedHat Linux 8.6 distribution, but since we have to follow SLAs (Service Line Agreements) with Customers and the end services behind the
High Availability (HA) Haproxy cluster were at danger … 

We as sysadmins had the task to make our best to try to stabilize the unstable node with disk errors for the system to servive
and be able to normally serve traffic (if node2 that is in a separate Data center fails due to a hardware or electricity issues etc.)
.

Here is few steps we took, that has hopefully improved the situation.

1. Make backups of most important files of high importance

Always before doing anything with a broken system, prepare backup of the most important files, if that is a cluster that should be a backup of the cluster configurations (if you don't have already ones) backup of /etc/hosts / backup of any important services configs /etc/haproxy/haproxy.cfg /etc/postfix/postfix.cfg (like it was my case), preferrably backup of whole /etc/  any important files from /root/ or /home/users* directories backup of at leasts latest logs from /var/log etc.
 

2. Clear up all unnecessery services scripts from the server

Any additional Softwares / Services and integrity checking tools (daemons) / scripts and cron jobs, were immediately stopped and wheter unused removed.

E.g. we had moved through /etc/cron* to check what's there,

# ls -ld /etc/cron.*
drwx—— 2 root root 4096 Feb  7 18:13 /etc/cron.d
drwxr-xr-x 2 root root 4096 Feb  7 17:59 /etc/cron.daily
-rw-r–r– 1 root root    0 Jul 20  2010 /etc/cron.deny
drwxr-xr-x 2 root root 4096 Jan  9  2013 /etc/cron.hourly
drwxr-xr-x 2 root root 4096 Jan  9  2013 /etc/cron.monthly
drwxr-xr-x 2 root root 4096 Aug 26  2015 /etc/cron.weekly


And like well professional butchers removed everything unnecessery that could trigger any extra unnecessery disk read / writes to HDD.

E.g. just create

# mkdir -p /root/etc_old/{/etc/cron.d,\
/etc/cron.daily,/etc/cron.hourly,/etc/cron.monthly\
,/etc/cron.weekly}


And moved all unnecessery cron job scripts like:

1. nmon (old school network / memory / hard disk console tool for monitoring and tuning server parameters)
2. clamscan / freshclam crons
3. mlocate (the script that is taking care for periodic run of updatedb command to keep the locate command to easily search
for files inside the DB to put less read operations on disk in case if you need to find file (e.g. prevent yourself to everytime
run cmd like: find / . -iname '*whatever_you_look_for*'
4. cups cron jobs
5. logwatch cron
6. rkhunter stuff
7. logrotate (yes we stopped even logrotation trigger job as we found the server was crashing sometimes at the same time when
the lograte job to rotate logs inside /var/log/* was running perhaps leading to a hit of the I/O read error (bad blocks).


Also inspected the Administrator user root cron job for any unwated scripts and stopped two report bash scripts that were part of the PCI tightened Security procedures.
Therein found script responsible to periodically report the list of installed packages and if they have not changed, as well a script to periodically report via email the list of
/etc/{passwd,/etc/shadow} created users, used to historically keep an eye on the list of users and easily see if someone
has created new users on the machine. Those were enabled via /var/spool/cron/root cron jobs, in other cases, on other machines if it happens for you
it is a good idea to check out all the existing user cron jobs and stop anything that might be putting Read / Write extra heat pressure on machine attached the Hard drives.

# ls -al /var/spool/cron/
total 20
drwx——  2 root root 4096 Nov 13  2015 .
drwxr-xr-x 12 root root 4096 May 11  2011 ..
-rw——-  1 root root  133 Nov 13  2015 root


3. Clear up old log files and any files unnecessery

Under /var/log and /home /var/tmp /var/spool/tmp immediately try to clear up the old log files.
From my past experience this has many times made the FS file inodes that are storing on a unbroken part (good blocks) of the hard drive and
ready to be reused by newly written rsyslog / syslogd services spitted files.

!!! Note that during the removal of some files you might hit a files stored on a bad blocks that might lead to a unexpected system reboot.

But that's okay, don't worry most likely after a hard reset by a technician in the Datacenter the machine will boot again and you can enjoy
removing remaining still files to send them to the heaven for old files.


4. Trigger an automatic system file system check with fsck on next boot

The standard way to force a Linux to aumatically recheck its Root filesystem is to simply create the /forcefsck to root partition or any other secondary disk partition you would like to check.

# touch /forcefsck

# reboot


However at some occasions you might be unable to do it because, the / (root fs) has been remounted in ReadOnly mode, yackes …

Luckily old Linux distibutions like this RHEL 5.1, has a way to force a filesystem check after reboot fsck and identify any
unknown bad-blocks and hopefully succceed in isolating them, so you don't hit into the same auto-reboots if the hard drive or Software / Hardware RAID
is not in terrible state
, you can use an option built in in /sbin/shutdown command the '-F'

   -F     Force fsck on reboot.


Hence to make the machine reboot and trigger immediately fsck:

# shutdown -rF now


Just In case you wonder why to reboot before check the Filesystem. Well simply because you need to have them unmounted before you check.

In that specific case this produced so far a good result and the machine booted just fine and we crossed the fingers and prayed that the machine would work flawlessly in the coming few weeks, before we finalize the configuration of the substitute machines, where this old infrastructure will be migrated to a new built cluster with new Haproxy and Corosync / Pacemaker Cluster on a brand new RHEL.

NB! On newer machines this won't work however as shutdown command has been stripped off this option because no SystemV (SystemInit) or Upstart and not on SystemD newer services architecture.
 

5. Hints on checking the hard drives with fsck

If you happen to be able to have physical access to the remote Hardare machine via a TTY[1-9] Console, that's even better and is the standard way to do it but with this specific case we had no easy way to get access to the Physical server console.

It is even better to go there and via either via connected Monitor (Display) or KVM Switch (Those who hear KVM switch first time this is a great device in server rooms to connect multiple monitors to same Monitor Display), it is better to use a some of the multitude of options to choose from for USB Distro Linux recovery OS versions or a CDROM / DVD on older machines like this with the Redhat's recovery mode rolled on.
After mounting the partition simply check each of the disks
e.g. :

# fsck -y /dev/sdb
# fsck -y /dev/sdc

Or if you want to not waste time and look for each hard drive but directly check all the ones that are attached and known by Linux distro via /etc/fstab definition run:

# fsck -AR

If necessery and you have a mixture of filesystems for example EXT3 , EXT4 , REISERFS you can tell it to omit some filesystem, for example ext3, like that:

# fsck -AR -t noext3 -y


To skip fsck on mounted partitions with fsck:

# fsck -M /dev/sdb


One remark to make here on fsck is usually fsck to complete its job on various filesystem it uses other external component binaries usually stored in /sbin/fsck*

ls -al /sbin/fsck*
-rwxr-xr-x 1 root root  55576 20 яну 2022 /sbin/fsck*
-rwxr-xr-x 1 root root  43272 20 яну 2022 /sbin/fsck.cramfs*
lrwxrwxrwx 1 root root      9  4 юли 2020 /sbin/fsck.exfat -> exfatfsck*
lrwxrwxrwx 1 root root      6  7 юни 2021 /sbin/fsck.ext2 -> e2fsck*
lrwxrwxrwx 1 root root      6  7 юни 2021 /sbin/fsck.ext3 -> e2fsck*
lrwxrwxrwx 1 root root      6  7 юни 2021 /sbin/fsck.ext4 -> e2fsck*
-rwxr-xr-x 1 root root  84208  8 фев 2021 /sbin/fsck.fat*
-rwxr-xr-x 2 root root 393040 30 ное 2009 /sbin/fsck.jfs*
-rwxr-xr-x 1 root root 125184 20 яну 2022 /sbin/fsck.minix*
lrwxrwxrwx 1 root root      8  8 фев 2021 /sbin/fsck.msdos -> fsck.fat*
-rwxr-xr-x 1 root root    333 16 дек 2021 /sbin/fsck.nfs*
lrwxrwxrwx 1 root root      8  8 фев 2021 /sbin/fsck.vfat -> fsck.fat*


6. Using tune2fs to  adjust tunable filesystem parameters on ext2/ext3/ext4 filesystems (few examples)

a) To check whether really the filesystem was checked on boot time or check a random filesystem on the server for its last check up date with fsck:

#  tune2fs -l /dev/sda1 | grep checked
Last checked:             Wed Apr 17 11:04:44 2019

On some distributions like old Debian and Ubuntu, it is even possible to enable fsck to log its operations during check on reboot via changing the verbosity from NO to YES:

# sed -i "s/#VERBOSE=no/VERBOSE=yes/" /etc/default/rcS


If you're having the issues on old Debian Linuxes  and not on RHEL  it is possible to;

b) Enable all fsck repairs automatic on boot

by running via:
 

# sed -i "s/FSCKFIX=no/FSCKFIX=yes/" /etc/default/rcS


c) Forcing fcsk check on for server attached Hard Drive Partitions with tune2fs

# tune2fs -c 1 /dev/sdXY

Note that:
tune2fs can force a fsck on each reboot for EXT4, EXT3 and EXT2 filesystems only.

tune2fs can trigger a forced fsck on every reboot using the -c (max-mount-counts) option.
This option sets the number of mounts after which the filesystem will be checked, so setting it to 1 will run fsck each time the computer boots.
Setting it to -1 or 0 resets this (the number of times the filesystem is mounted will be disregarded by e2fsck and the kernel).


 For example you could:

d) Set fsck to run a filesystem check every 30 boots, by using -c 30 
 

# tune2fs -c 30 /dev/sdXY


e) Checking whether a Hard Drive has been really checked on the boot


#  tune2fs -l /dev/sda1 | grep checked
Last checked:             Wed Apr 17 11:04:44 2019


e) Check when was the last time the file system /dev/sdX was checked:
 

# tune2fs -l /dev/sdX | grep Last\ c
Last checked:             Thu Jan 12 20:28:34 2017


f) Check how many times our /dev/sdX filesystem was mounted

# tune2fs -l /dev/sdX | grep Mount
Mount count:              157

g) Check how many mounts are allowed to pass before filesystem check is forced
 

# tune2fs -l /dev/sdX | grep Max
Maximum mount count:      -1


7. Repairing disk / partitions via GRUB fsck.mode and fsck.repair kernel module options

It is also possible to force a fsck.repair on boot via GRUB, but that usually is not an option someone would like as the machine might fail too boot if it hards to repair hardly, however in difficult situations with failing disks temporary enabling it is good idea.

This can be done by including for grub initial config

GRUB_CMDLINE_LINUX_DEFAULT="quiet splash fsck.mode=force fsck.repair=yes"

fsck.mode=force – will force a fsck each time a system boot and keeping that value enabled for a long time inside GRUB is stupid for servers as

sometimes booting could be severely prolonged because of the checks especially with servers with many or slow old hard drives.

fsck.repair=yes – will make the fsck try to repair if it finds bad blocks when checking (be absolutely sure you know, what you're doing if passing this options)

The options can be also set via editing the GRUB boot screen, if you have physical access to the server and don't want to reload the grub loader and possibly make the machine unbootable on next boot.
 

8. Few more details on how /etc/fstab disk fsck check parameters values for Systemd Linux machines works

The "proper" way on systemd (if we can talk about proper way on Linux) to runs fsck for each filesystem that has a fsck is to pass number greater than 0 set in
/etc/fstab (last column in /etc/fstab), so make sure you edit your /etc/fstab if that's not the case.

The root partition should be set to 1 (first to be checked), while other partitions you want to be checked should be set to 2.

Example /etc/fstab:
 

# /etc/fstab: static file system information.

/dev/sda1  /      ext4  errors=remount-ro  0  1
/dev/sda5  /home  ext4  defaults           0  2

The values you can put here as a second number meaning is as follows:
0 – disabled, that is do not check filesystem
1 – partition with this PASS value has a higher priority and is checked first. This value is usually set to the root / partition
2 – partitions with this PASS value will be checked last

a) Check the produced log out of fsck

Unfortunately on the older versions of Linux distros with SystemV fsck log output might be not generated except on the physical console so if you have a kind of duplicator device physical tty on the display port of the server, you might capture some bad block reports or fixed errors messages, but if you don't you might just cross the fingers and hope that anything found FS irregularities was recovered.

On systemd Linux machines the fsck log should be produced either in /run/initramfs/fsck.log or some other location depending on the Linux distro and you should be able to see something from fsck inside /var/log/* logs:

# grep -rli fsck /var/log/*


Close it up

Having a system with failing disk is a really one of the worst sysadmin nightmares to get. The good news is that most of the cases we're prepared with some working backup or some work around stuff like the few steps explained to mitigate the amount of Read / Writes to hard disks on the failing machine HDDs. If the failing disk is a primary Linux filesystem all becomes even worse as every next reboot, you have no guarantee, whether the kernel / initrd or some of the other system components required to run the Core Linux system won't break up the normal boot. Thus one side changes on the hard drives is a risky business on ther other side, if you're in a situation where you have a mirror system or the failing system is just a Linux server installed without a Cluster pair, then this is not a big deal as you can guarantee at least one of the nodes still up, unning and serving. Still doing too much of operations with HDD is always a danger so the steps described, though in most cases leading to improvement on how the system behaves, the system should be considered totally unreliable and closely monitored not only by some monitoring stuff like Zabbix / Prometheus whatever but regularly check the systems state via normal SSH logins. It is important if you have some important datas or logs on the system that are not synchronized to a system node to copy them before doing any of the described operations. After all minimal is backuped, proceed to clear up everything that might be cleared up and still the machine to continue providing most of its functionalities, trigger fsck automatic HDD check on next reboot, reboot, check what is going on and monitor the machine from there on.

Hopefully the few described steps, has helped some sysadmin. There is plenty of things which I've described that might go wrong, even following the described steps, might not help if the machines Storage Drives / SAS / SSD has too much of a damage. But as said in most cases following this few steps would improve the machine state.

Wish you the best of luck!


Saint Luke of Odrin, a Glorious Bulgarian XVI century Christ martyr who publicly refuted Islam, feast day 23 of March

Wednesday, March 23rd, 2022

Saint_Lukas-of-Odrin-Adreanopolis-icon-Bulgarian-martyr-saint-of-ottoman-time

Holy Reverend Martyr Luka (the bulgarian name for Luke) was born in city of today's Edirne ( Odrin ) formerly known as Adreanopolis to pious Bulgarian parents – Atanas and Dominica. After the early death of his father, his mother gave him to a rich merchant from (Zagor) today's city Stara Zagora in Bulgaria, who treated him like a son.
The merchant once went to Russia, taking 13-year-old Luka with him.
On his return he stopped in Constantinople.

There Luca quarreled with a turk and started beating him. Then the enraged Turks captured him and wanted to kill him.
The frightened Luke shouted: "Let me go! I will convert to Islam!"

The turk immediately took him in and forced him to renounce Christ and convert to Islam, which the young boy did out of fear.
But after the fear passed, Luke became frightened by his action, lost his joy, and began to repent bitterly.

He reported himself to his batismal father (have to say at that time the importance of the God-father was very enormous much more than today). 
His father tried to release him with the help of the Russian ambassador.
But the evil turk, instead of freeing the boy, tied his hands and forcibly circumcised him.

After some time, Luca managed to escape from this Turkish home where he was forced to work as being counted a member of Islamic community and introduced himself to the Russian ambassador, who in attempt to save him from his slavery, sent him to the cities of Smyrna and Tire.
There Luke became seriously ill and, fearing death, called a Christian priest.
After hearing his confession, the priest advised him to retire to Mount Athos and repent there under the guidance of virtuous men.
After his recovery, he actually followed the advice of the clergyman and entered the Iviron  Athos Monastery, where he was restored to his Christian faith through the sacrament of Holy Anointing.

Saint_Loukas-Mytilene-confessor-Christian-martyr-who-denounced-Islam-neomartyr

Saint Luka of Odrin ( Adreanopolis ), the saint is well known in Greece as Saint Luke of Mytiliny (Mytilene a main city
in Lesbos Island Greece)

From there he moved to the Stavronikita Monastery, where he received a monastic vow.
But the enemy of human salvation did not give him peace.
Continuously Driven by temptations, he fled from one monastery to another. He went to the  Bulgarian "Zografski" ( Zographou ) monastery (from where he returned to the world, but failed to calm down, came to Mount Athos again) and then consequentlially to  Xyropotamou, Koutloumousiou  ( Kutlumush ), Saint John's Scyte, Grigoriou (Grigoriat), Saint. Anna Scyte.

Saint_Loukas of-Odrin-Adrianople-icon

Thinking about why he has no peace during all this time, but always moving from place to place, he came to the conclusion that this is a punishment from God for his denial of the Christian faith.

So he came up with the idea of ​​martyrdom (as a mean to redeem his sin) and shared it with some clergy: no one dared to recommend a martyrdom to him because of his youth.
But in the end, seeing his unwavering determination, the priest Ananias gave him a cell rule in preparation for martyrdom for Christ. Then the clergyman Visarion cut his hair in a Great Schema " μεγαλόσχημος" monastic vows and went with him to the island of Mytilene (today in Greece).

After partaking in the Holy Mysteries of Christ, St. Luke dressed as a Turk and went to the Qadi (Judge – qadis have been an institution in cities in Turkish empire pretty much like today's Courts).

He told allegorically how he was forcibly converted to Islam, openly renounced ungodly Islam and professed the Christian faith in the following way:

He went beforte the kadi and asked him in loud voice,

"Is it just for me to be deceived, a child like myself?"

The kadi asked,
"And who deceived you?"

Luka responded,

"Someone deceive me, giving me a badge of islam [meaning circumcision."

The kadi then asked to see the badge. But when Luke went to open his clothing, those
present in the courthouse finally understood what he meant and shouted for him to stop.

Luka then said,

"Being a young child of thirteen, I was deceived by you
and I came over to your religion, not being able to discern
the truth from falsehood. I therefore remained
with what is false and a lie for some time because I
understood your religion was not true, but false.
And he whom you call a prophet is not a prophet but a
deceiver and a mythmaker, and he has deceived all of
you and you believed him . Having therefore been
informed that your religion is darknes, I reject
it before you and I confess my former Christian faith
which is true light. I believe and worship a true God,
my Lord Jesus Christ who will come to judge all
the world, the living and the ded, and who will render to
each according to his works. If you do not believe in
HIm. as I do, you will all be damned."


The kadi further asked Luka where he is from and he said he has came to this place by ship from Russia as Russia has been considered the only country protectorof Orthodox Christians in the empire and
wanting to protect his relatives and the Church hierarchy in the Empire from from further beating or destructions of Churches and arrests of Orthodox Priests and clergy within the empire by the turks.

He further asked:
"Where are you staying?"

"Nowhere. I did not stop anywhere, but came straight here."

The kadi turned to the others in court and said,

"He is crazy. See if he recognized his own shoes."

Luka turned and immediately rushed to find his shoes and showed them
to the kadi and said,

"I am not crazy, as you say. Here are my shoes. I brought them in Constantinople."

The kadi said,
"I am sorry for you son.
If you do not listen to me,
you will suffer many torments, many of which
you have not even heard. So think well."

Luka replied:

"I have already though on all the torments which you
can inflict on me, and I have come. So, whatever you
plan to do to me, do it quickly, without delay, and be
assured that I am clean and blameless and I will not deny
my faith. I am an Orthodox Christian and I will die an
Orthodox Christian. I worship Christ and it is Christ
whom I desire. I confess him here where I once
denied Him in ignorance and I proclaim Him with true knowledge."

All-Bulgariasn-saints-Church-service-icon-Vsi_Bylgarski_svetii_sluzhba
All Bulgarian Saints icon, Christ in Glory surrounded by
Bulgarian saints – below Christ throne – Saint King Boris the Baptizer
and Saint Patriarch Euthimius, the monastery on the Bottom Rila Monastery
The first by importance and Largest Monastery in Bulgaria, Saint Loukas of Adreanopolis
is also commemorated on this date too

Neither the caresses and promises of the Muslims nor the threats of torture could shake the hard young man in his determination to die for Christ. The Turks beat him severely and threw him in prison, shackling his legs. At that time all the churches were praying for the martyr.
The Metropolitan of the island and the Elder Visarion managed beseech to send him to prison the Holy Mysteries of Christ for the last communion.
Finally, the judge saw Luke's unwavering firmness and sentenced him to death by hanging.
When the executioner hoped for the noose around his neck, he said,
"Confess Muhammad, our great prophet, and we will let you go!"

The Holy Martyr replied,

"I believe in my Lord Jesus Christ and I worship Him alone!"

St. Luke was hanged on March 23, 1802 at the age of 16.

The holy body of the martyr remained hanging on the gallows for three days, but during all this time it remained white and beautiful, emitting an unusual fragrance.
After three days, the Turks tied a large stone around his neck and his body was thrown into the depths of the sea, but instead of sinking, it remained with the stone on the water surface. When night came, the Christians found him on the shore and handed him over to the earth with due honors. The other clothes of the Venerable Martyr received healing power and by touching them the sick received healing.


Let by the Holy Prayers of Saint Luka of Odrin, God quickly grant all People worldwide more peace, love, hope, faith and wisdom that are so desperately needed today !

Text on the living of the saint  extracted from:
1.  Lives of the Saints. Ed. † Bishop Parthenius (Levkijski) of Lefkada, archim. Dr. Athanasius (Bonchev). Synodal Publishing House, Sofia, 1991
2. Witness for Christ: Orthodox Christian Neomartyrs of the Ottoman Period 1437 – 1860 by Nomikos Michael Vaporis p. 252-257


Defining multiple short Server Hostname aliases via SSH config files and defining multiple ssh options for it, Use passwordless authentication via public keys

Thursday, September 16th, 2021

using-ssh-host-acronym-aliases-ssh-client-explained-openssh-logo

In case you have to access multiple servers from your terminal client such as gnome-terminal, kterminal (if on Linux) or something such as mobaxterm + cygwin (if on Windows) with an opens ssh client (ssh command). There is a nifty trick to save time and keyboard typing through creating shortcuts aliases by adding few definitions inside your $HOME/.ssh/config ( ~/.ssh/config ) for your local non root user or even make the configuration system wide (for all existing local /etc/passwd users) via /etc/ssh/ssh_config.
By adding a pseudonym alias for each server it makes sysadmin life much easier as you don't have to type in each time the FQDN (Fully Qualified Domain Name) hostname of remote accessed Linux / Unix / BSD / Mac OS or even Windows sshd ready hosts accessible via remote TCP/IP port 22.


1. Adding local user remote server pointer aliases via ~/.ssh/config


The file ~/.ssh/config is read by the ssh client part of the openssh-client (Linux OS package) on each invokement of the client, and besides defining a pseudonym for the hosts you like to save you time when accessing remote host and hence increase your productivity. Moreover you can also define various other nice options through it to define specifics of remote ssh session for each desired host such as remote host default SSH port (for example if your OpenSSHD is configured to run on non-standard SSH port as lets say 2022 instead of default port TCP 22 for some reason, e.g. security through obscurity etc.).


The general syntax of .ssh/config file si simplistic, it goes like this:
 

Host MACHNE_HOSTNAME

SSH_OPTION1 value1
SSH_OPTION1 value1 value2
SSH_OPTION2 value1 value2


Host MACHNE_HOSTNAME

SSH_OPTION value
SSH_OPTION1 value1 value2

  • Another understood syntax if you prefer to not have empty whitespaces is to use ( = )
    between the parameter name and values.

Host MACHINE_HOSTNAME
SSH_config=value
SSH_config1=value1 value2

  • All empty lines and lines starting with the hash shebang sign ( # ) would be ignored.
  • All values are case-sensitive, but parameter names are not.

If you have never so far used the $HOME/.ssh/config you would have to create the file and set the proper permissions to it like so:

mkdir -p $HOME/.ssh
chmod 0700 $HOME/.ssh


Below are examples taken from my .ssh/config configuration for all subdomains for my pcfreak.org domain


# Ask for password for every subdomain under pc-freak.net for security
Host *.pcfreak.org
user hipopo
passwordauthentication yes
StrictHostKeyChecking no

# ssh public Key authentication automatic login
Host www1.pc-freak.net
user hipopo
Port 22
passwordauthentication no
StrictHostKeyChecking no

UserKnownHostsFile /dev/null

Host haproxy2
    Hostname 213.91.190.233
    User root
    Port 2218
    PubkeyAuthentication yes
    IdentityFile ~/.ssh/haproxy2.pub    
    StrictHostKeyChecking no
    LogLevel INFO     

Host pcfrxenweb
    Hostname 83.228.93.76
    User root
    Port 2218

    PubkeyAuthentication yes
    IdentityFile ~/.ssh/pcfrxenweb.key    
    StrictHostKeyChecking no

Host pcfreak-sf
    Hostname 91.92.15.51
    User root
    Port 2209
    PreferredAuthentications password
    StrictHostKeyChecking no

    Compression yes


As you can see from above configuration the Hostname could be referring either to IP address or to Hostname.

Now to connect to defined IP 91.92.15.51 you can simply refer to its alias

$ ssh pcfreak-sf -v

and you end up into the machine ssh on port 2209 and you will be prompted for a password.

$ ssh pcfrxenweb -v


would lead to IP 83.228.93.76 SSH on Port 2218 and will use the defined public key for a passwordless login and will save you the password typing each time.

Above ssh command is a short alias you can further use instead of every time typing:

$ ssh -i ~/.ssh/pcfrxenweb.key -p 2218 root@83.228.93.76

There is another nifty trick worthy to mention, if you have a defined hostname such as the above config haproxy2 to use a certain variables, but you would like to override some option for example you don't want to connet by default with User root, but some other local account, lets say ssh as devuser@haproxy2 you can type:

$ ssh -o "User=dev" devuser

StrictHostKeyChecking no

– variable will instruct the ssh to not check if the finger print of remote host has changed. Usually this finger print check sum changes in case if for example for some reason the opensshd gets updated or the default /etc/ssh/ssh_host_dsa_key /etc/ssh/sshd_host_dsa_* files have changed due to some reason.
Of course you should use this option only if you tend to access your remote host via a secured VPN or local network, otherwise the Host Key change could be an indicator someone is trying to intercept your ssh session.


Compression yes


– variable  enables compression of connection saves few bits was useful in the old modem telephone lines but still could save you few bits
It is also possible to define a full range of IP addresses to be accessed with one single public rsa / dsa key

Below .ssh/config
 

Host 192.168.5.?
     Hostname 192.168.2.18
     User admin
     IdentityFile ~/.ssh/id_ed25519.pub


Would instruct each host attemted to be reached in the IP range of 192.168.2.1-254 to be automatically reachable by default with ssh client with admin user and the respective ed25519.pub key.
 

$ ssh 192.168.1.[1-254] -v


2. Adding ssh client options system wide for all existing local or remote LDAP login users


The way to add any Host block is absolutely the same as with a default user except you need to add the configuration to /etc/ssh/ssh_config. Here is a confiugaration from mine Latest Debian Linux

$ cat /etc/ssh/ssh_config

# This is the ssh client system-wide configuration file.  See
# ssh_config(5) for more information.  This file provides defaults for
# users, and the values can be changed in per-user configuration files
# or on the command line.

# Configuration data is parsed as follows:
#  1. command line options
#  2. user-specific file
#  3. system-wide file
# Any configuration value is only changed the first time it is set.
# Thus, host-specific definitions should be at the beginning of the
# configuration file, and defaults at the end.

# Site-wide defaults for some commonly used options.  For a comprehensive
# list of available options, their meanings and defaults, please see the
# ssh_config(5) man page.

Host *
#   ForwardAgent no
#   ForwardX11 no
#   ForwardX11Trusted yes
#   PasswordAuthentication yes
#   HostbasedAuthentication no
#   GSSAPIAuthentication no
#   GSSAPIDelegateCredentials no
#   GSSAPIKeyExchange no
#   GSSAPITrustDNS no
#   BatchMode no
#   CheckHostIP yes
#   AddressFamily any
#   ConnectTimeout 0
#   StrictHostKeyChecking ask
#   IdentityFile ~/.ssh/id_rsa
#   IdentityFile ~/.ssh/id_dsa
#   IdentityFile ~/.ssh/id_ecdsa
#   IdentityFile ~/.ssh/id_ed25519
#   Port 22
#   Protocol 2
#   Ciphers aes128-ctr,aes192-ctr,aes256-ctr,aes128-cbc,3des-cbc
#   MACs hmac-md5,hmac-sha1,umac-64@openssh.com
#   EscapeChar ~
#   Tunnel no
#   TunnelDevice any:any
#   PermitLocalCommand no
#   VisualHostKey no
#   ProxyCommand ssh -q -W %h:%p gateway.example.com
#   RekeyLimit 1G 1h
    SendEnv LANG LC_*
    HashKnownHosts yes
    GSSAPIAuthentication yes

As you can see pretty much can be enabled by default such as the forwarding of the Authentication agent option ( -A ) option, necessery for some Company server environments to be anbled. So if you have to connect to remote host with enabled Agent Forwarding instead of typing

ssh -A user@remotehostname


To enable Agent Forwarding instead of

ssh -X user@remotehostname


Simply uncomment and set to yes
 

ForwardX11 yes
ForwardX11Trusted yes


Just simply uncomment above's config ForwardAgent no

As you can see ssh could do pretty much, you can configure enable SSH Tunneling or run via a Proxy with the ProxyCommand (If it is the first time you hear about ProxyCommand I warmly recommend you check my previous article – How to pass SSH traffic through a secured Corporate Proxy Server with corkscrew).

Sometimes for a defines hostname, due to changes on remote server ssh configuration, SSH encryption type or a host key removal you might end up with issues connecting, therefore to override all the previously defined options inside .ssh/config by ignoring the configuration with -F /dev/null

$ ssh -F /dev/null user@freak -v


What we learned ?

To sum it up In this article, we have learned how to easify the stressed sysadmin life, by adding Aliases with certain port numbering and configurations for different remote SSH administrated Linux / Unix, hosts via local ~/.ssh/config or global wide /etc/ssh/ssh_config configuration options, as well as how already applied configuration from ~/.ssh/config affecting each user ssh command execution, could be overriden.

VIM Project (VI Improvied IDE Editor extension to facilitate web development with vi enhanced editor

Wednesday, August 25th, 2010

I use VIM as an editor of choice for many years already.
Yet it's until recently I use it for a PHP ZF (Zend Framework) web development.

Few days ago I've blogged How to configure vimrc for a php syntax highlightning (A Nicely pre-configured vimrc to imrpove the daily text editing experience

This enhancements significantly improves the overall PHP code editing with VIM. However I felt something is yet missing because I didn't have the power and functunality of a complete IDE like for instance The Eclipse IDE

I was pretty sure that VIM has to have a way to be used in a similar fashion to a fully functional IDE and looked around the net to find for any VIM plugins that will add vim an IDE like coding interface.

I then come accross a vim plugin called VIM Prokject : Organize/Navigate projects of files (like IDE/buffer explorer)

The latest VIM Project as of time of writting is 1.4.1 and I've mirrored it here

The installation of the VIM Project VIM extension is pretty straight forward to install it and start using it on your PC issue commands:

1. Install the project VIM add-on

debian:~$ wget https://www.pc-freak.net/files/project-1.4.1.tar.gz
debian:~$ mv project-1.4.1.tar.gz ~/.vim/
debian:~$ cd ~/.vim/
debian:~$ tar -zxvvf project-1.4.1.tar.gz

2. Load the plugin

Launch your vim editor and type : Project(without the space between : and P)
You will further see a screen like:

vim project entry screen

3. You will have to press C within the Project window to load a new project

Then you will have to type a directory to use to load a project sources files from:

vim project enter file source directory screen

You will be prompted with to type a project name like in the screenshot below:

vim project load test project

4. Next you will have to type a CD (Current Dir) parameter
To see more about the CD parameter consult vim project documentation by typing in main vim pane :help project

The appearing screen will be something like:

vim project extension cd parameter screen

5. Thereafter you will have to type a file filter

File filter is necessary and will instruct the vim project plugin to load all files with the specified extension within vim project pane window

You will experience a screen like:


vim project plugin file filter screen

Following will be a short interval in which all specified files by the filter type will get loaded in VIM project pane and your Zend Framework, PHP or any other source files will be listed in a directory tree structure like in the picture shown below:

vim project successful loaded project screen

6. Saving loaded project hierarchy state

In order to save a state of a loaded project within the VIM project window pane you will have to type in vim, let's say:

:saveas .projects/someproject

Later on to load back the saved project state you will have to type in vim :r .projects/someproject

You will now have almost fully functional development IDE on top of your simple vim text editor.

You can navigate within the Project files loaded with the Project extension pane easily and select a file you would like to open up, whenever a source file is opened and you work on it to switch in between the Project file listing pane and the opened source code file you will have to type twice CTRL+w or in vim language C-w

To even further sophisticate your web development in PHP with vim you can add within your ~/.vimrc file the following two lines:

" run file with PHP CLI (CTRL-M)
:autocmd FileType php noremap <C-M> :w!<CR>:!/usr/bin/php %<CR>
" PHP parser check (CTRL-L)
:autocmd FileType php noremap <C-L> :!/usr/bin/php -l %>CR>

In the above vim configuration directovies the " character is a comment line and the autocmd is actually vim declarations.
The first :autocmd … declaration will instruct vim to execute your current opened php source file with the php cli interpreter whenever a key press of CTRL+M (C-m) occurs.

The second :autocmd … will add to your vim a shortcut, so whenever a CTRL+L (C-l) key combination is pressed VIM editor will check your current edited source file for syntax errors.
Therefore this will enable you to very easily periodically check if your file syntax is correct.

Well this things were really helpful to me, so I hope they will be profitable for you as well.
Cheers 🙂

Vodka! :)

Wednesday, September 12th, 2007

Yesterday I drinked 200 gr. of Vodka yesterday Night, it was pretty refreshing for me but I got drunk a little.I'm smoking again … Things are going bad in my life recently. I have health issues. And I intend to go to doctor today.Yesterday I went to the polyclinic but my personal Dr. Nikolay  was not there (I was angry, I went to doctor once in years and he is not there) so I'll try again today. I had pains somewhere around the stomach. At least at work things are going smoothly at least God hears my prayers about this. I'm very confused and I have completely no idea what to do with my life. Yesterday I was out with Lily and Kiril on the fountain. The previous day Nomen, I, Yavor, Kiro and Bino went to the "Kobaklyka" (a woody place which is close to Dobrich.) Well that's most of what's happening lately with my life. I wrote a little script to make that nautilus to get restarted if it starts burning the cpu. It's a dumb script (the bad thing is that I'm loosing form scripting, Well I don't script much lately). Here is the script http://pcfreak.d-bg.net/bshscr/restart_nautilus.sh https://www.pc-freak.net/bshscr/restart_nautilus.sh. The days before the 4 days weekend, I hat to spend a lot of time on one of the servers fighting with Spammers. Hate spammers really! I ended removing bounce messages at all for one of the domains, which fixed the bounce spam method spammers use (btw qmail's chkuser seems to not work properly for some reason) … Also I started watching Stargate – SG1. First I thought it's a stupid sci-fi serial. But after the first serie I now think it has it's good moments :]. Also I had something like a Mortification Day going on during Monday. The whole day I listened to Mortification (The first Christian Death Metal Band). I Liked much the "Hammer of God" album. In the evening Sabin (Bino) came home and we watched some Mortification videos at Youtube. Right now I listen again to "Ever – Idyll" a pretty great song. And yeah I keep listening to ChristianIndustrial.net a lot, a great radio. Try it if you haven't!END—–

Saint Petka Paraskeva of Bulgaria of Epivates Thracia (famous as St. Petka of Tarnovo) feast day 14 October

Friday, October 16th, 2020


Sveta-Petka-Paraskeva-Bylgarska-Balkanska-Epivatska

The inhabitants of Thracia are of a great and royal origin and due to recent historical studies, Thracians have been one of the most developed nations for its time they're developments and achievements especially in crafts such as vessel creation even up to day are perhaps the most unique.
It is still unknown of the exact technology used to create such a elegant and precise vessels. A little is known of the Thracians society as they have reached their bloom in a high speed and the place of the later Roman Empire province Thracia has been in a place where it was destroyed to the ground and robbed at multiple times eradicating unique piece of one of the best created ever forms of art.
Territories of Thrakia has been geographically today located in Southeast Europe, now split among Bulgaria, Greece, and Turkey, which is bounded by the Balkan Mountains to the north, the Aegean Sea to the south, and the Black Sea to the east.

Thrace_and_Thracians-present-day_state_borderlines-picture

Territy of Thracia shown on a contemporary European (Balkans Maps)

World-famous-Thracian-Treasury-picture-1

One of the most famous piece of such art is the World Famous Thracian's Treasuary.

World-famous-Thracian-Treasury-picture

The thrakians Empire and civillization has its bloom from 5th – 4th century before Christ era (B.C.). 
Saint Petka of Epivates region Thrakia was of a Bulgarian origin and lived much later in Xth – XI-th century A.D in Thracia. It is known she was of Bulgarian origin (her mother and father was of Bulgarian origin.) of the first generations who has received in 9-th century Baptism, in the times of the Baptism of Bulgaria conducted by the Apostle equal Saint King Boris I the Baptizer of Bulgaria in year 864 AD.  Thracians as an ancient and a blessed nation in craftship and arts was among the nations who received baptism on a good 'soil', as the seed of beauty and goodness has already been in their civillization.
 

The short Living of Saint Petka of Bulgaria (of Epivates)


Out of this Christian atmosphere has rised Saint Petka also known as (Parashkeva). Saint Petka name means literally translated Friday and due to being born in Thracia on today territory of Balkans she is been venerated highly not only in Bulgaria but across all Orthodox Christians nations on the Balkans – Bulgarians, Romanians, Serbs, Greeks, Macedonians. Due to that Saint Petka is also famous as "Saint Petka of The Bulkans".
Saint Petka could be therefore heard to be called often Petka of Serbs (of Belgrade), Saint Petka of Moldova (of Iași), Mother Paraskeva / ParashkevaParascheva the New, Parascheva the Young, Ancient Greek: Ὁσία Παρασκευὴ ἡ Ἐπιβατινή, Greek: Οσία Παρασκευή η Επιβατινή ή Νέα, Romanian: Cuvioasa Parascheva, Bulgarian / Serbian : Света Петка / Sveta Petka or Петка Параскева / Petka Paraskeva, Paraskeva Pyatnitsa, Parascheva of Tirnovo).

The first information about her living is found in a local educated person (writter) which as of the time were too little and writter  in Greek in short. It did not follow the Church cannons and due to that by an order of Patriarch of Constantinople Nikolas IV Musalon of Constantinople deacon Vaslik has described in a more well systemized way her living, the Greek original unfortunately is now lost. At the time of writting her biography, she has been mostly popular in the realms of Byzantine Empire Thracia.

Bulgarian-Empire-under-King-Ivan-Asen-II-map-1917

The Bulgarian Empire during the reign of Ivan Asen II. Atlas of Dimitar Rizov year 1917

Since the time of King Ivan Asen II a new biogprahy of saint has been written in Bulgarian which included narration of the transfer of her holy relics to Medieval Capital of Bulgaria Tarnovo. However peak and the key towards the immerse veneration to St. Petka that is evident to this very date has played the biography written by last Bulgarian Patriarch also a saint – st. Euthymius of Tarnovo. in year 1385 AD short before the fall under Turkish Slavery of Bulgaria in y. 1393.

Saint Patriarch Eutymious was the last person who in 1393 has actively parcipated in the protection of the fortified Tarnovo and see with his eyes the fall down of the city (by treachery).

When asked by the terrified people 'To whom do you leave us holy father, when the Turkish were taking him away?' He replied heart tearingly 'To the Holy Trinity The Father, The Son and The Holy Trinity our God I leave you and to the most Blessed Mother of God Theotokos now and For Eternity !!!'

Saint-Patriarch-Eutymious-the-last-Blessing-picture-sveti_Evtimij_seten_blagoslov

Saint Patriarch Eutymius (Evtimij) blessing the people in Medieval Bulgarian city Tarnovo for a last time before the Turkish took him away for imprisonment
Picture source Pravoslavieto.com

St Euthymius of Tarnovo work is one of the most unique bibliographies and a precious piece of medieval literature it is innovative for its time and spectacular, emotion rich creation, who become famous far before the borders of Bulgaria in the whole Slavonic world of that time, especially in todays territory of ex soviet countries Romania, Moldova, Ukraine and even far Russia.

Saint_Patriarch-Eutymius-last-bulgarian-patriarch-before-Turkish-Slavery

Saint Patriarch Eutymious of Bulgaria
Picture source Pravoslavieto.com

The veneration of Saint Petka of Bulgaria as a protector of family and a warm prayerer for all those who venerate her in this country has slowly spread in the coming centuries by pupils of St. Euthymius of Tarnovo who according to some historians whose works came to us in the form of the a bit more standardized Church Slavonic used in the Eastern Orthodox Churches as a fruit of the works of St. Euthymus.

The Living of Saint Petka Parashkeva

Sveta_Petka-Bylgarska-Balkanska-holy-icon

Saint Petka Parashkeva Picture source Pravoslavieto.com

Tropion 4-th voice

 Desertous and silent living you loved after Christ your groom, diligently you ran to and his good yoke you took in your younghood,
with the Sign of the Cross against the thought enemies you have manly armed, with fasting feats and prayer and with tear drops the coals of passions extinguished oh highly famed Paraskevo. And now in the Heavenly halls with the wise virgins you stay in front of Christ, pray for us who venerate your holy remembrance.

Kontakion, voice 6

Let us piusly sung our reverend  mother Saint Petka, because by living the corruptable in live, received the imperishable in eternity, becoming holy intercessor for all in trouble and exhausting from the evils of life. For the reason she received from God imperishable fame, glory and grace to be a wonder worker.

Sveta-Petka-Zakrilnica-Bylgarska-Saint_Petka-Protectress-of-Bulgarian-lands

NB ! St. Petka of Epivates has not to be confused with Saint Petka (from Inokia who lived in 303 AD venerated on 28 of October) or  St Petka the Roman (feast day 26 July).

St. Petka's  has been born in city of Epivates in Byzantium (today city called Selim Pasha nearby Odrin's Aegian City) in 10-th Century from a famous and respectful family, her father Nikita has been very rich landowner.

She lived in the second part of X-th century. According to hear living by Patriarch Eutymious, her smaller brother Eutymious who become a monk has been a Metropolitan of Maditos for 40 years and in year (989 – 996) died aged 81 and is shortly after canonized as saint, his younger sister St. Paraskeva passed away after him in the new 11-th century and is aged at least 85 in the time of passing in the city of Kallikrateia. 

The living continues that near the age of 10 year old she heard in a Christian temple a voice by Jesus Christ himself in resemblance to Saint Apostle Paul and said the Evangelical New Testamental words:
"Whoever wants to walk after me, let him deny himself, to take his cross and follow me !".

The unexpected vision convinced the young Paraskeva to immediately exchange her new clothes to a beggers to leave all her belongings to the poor and live a silent living similarto begger for a time in work and prayer, though she did not leave her parents home. On a few occasions all she had worked for has been distributed to the poor.

Sveta-Petka-Bylgarska-Balkanska

Greek typical depiction of Saint Petka of Epivates

When her parents died, her brother as already a monk and Bishop. St. Petka leave her house and travelled to Constanople and received a nun tonsure and as a nun she lived for 5 years near the deserted Church of the "Protection of the Virgin Mary" in the capital suburb of Heraklia. She travelled to the Holy lands visiting Jerusalem and Church of Holy Sepulchre.
Following the example of the blessed famed Saint Mary of Egypt, she lived in Jordan's desert many years till eldership.

Feeling and foreseeing her death, she travelled back through Constantinople to city of Epivates. Settle near the Church "Holy Apostles", where after 2 years of living in deep prayer and fasting labours living in solitary in holiness passed away silently to Christ in heavenly life. Compassionate Christians immediately buried her body of the nun outside of the city walls as a foreigner. A shortly after numerous miracles started happening on her grave.

St_Petka-Parashkeva-Epivatska-Klisura_Monastery_Holy_Icon

Saint Petka Parashkeva Bulgarian Icon from Klisura Monastery located nearby Sofia Bulgaria

In 1230 King Ivan Asen II the most powerful South-eastern European ruler demanded from the the Knights of the Crusaders to submit him her holy relics who are found still in Tracian city Kaliakratea ruled at that time by the Holy Latin Empire. King Ivan Asen II together with the patriach Joachim the first receives her holy relics with honor and settles her incorruptabilities into the newly creates Church in honour of herself St. Petka behind Tsarevets Fortress. Saint Petka became from that point considered as a protectress of the city, the throne and the country.
Her holy relics arrived from Kallikrateia in Tarnovo, the Capital of Second Bulgarian Empire in year 1230 AD, she has been thus called Paraskeva of Tarnovo and has been venerated as a protectress of the Tarnovo city the Bulgarian nation and the country. The attitude towards Saint Petka Tarnovska as a protectress of Bulgarian nation and contry is been clearly seen by the mention in the Bulgarian and International acts (documents) and manuscripts of that XII – XII century.

Saint_Petka-Epivatska-Bylgarska-Romanian-in-Iashi-Romania-veneration-of-romanian-monks

Romanian Monks and Priests venerate the holy relics of Saint Petka of Epivates in Iashi Romania

In subsequent years, St. Petka Paraskevi’s holy relics were transferred to various churches in the region.

In 1393 due to the fall of Bulgarian capital to save them her holy relics were transferred to fortress of Bdin today city of Vidin Bulgaria, but 3 years later 1396 Vidin's fortress also fall under the ungodly yatagan of  the muslim enslaver and to protect the relics they were again transferred to Belgrade, specifically the Ružica Church. When Belgrade fell to Ottoman forces in 1521, the relics were transferred to Constantinople. In 1641, the relics were transferred to Trei Ierarhi Monastery, in Iaşi, Moldavia (nowadays, eastern part of Romania). In 1888, they were transferred to the Metropolitan Cathedral of Iaşi.

Since 1888 they are kept in Romanian city of Iaşi and are a target of pilgrims from all around Romania, Bulgaria and other Orthodox Christian countries of the Balkans. For the day her memory is remembered in the Romanian Church usually about 200 000 people mostly from Romania and others travel to Iaşi's Cathedral in the Trei Ierarhi Monastery (Three Hierarchs – saint John Crysostom, St. Basilius the Great and St. Gregory the Great) of the  for a blessing and to beg the saint for her families, personal issues, curings especially of eye diseases

A severe drought in 1946-47 affected Moldavia, adding to the misery left by the war. Metropolitan Justinian Marina permitted the first procession featuring the coffin containing the relics of Saint Paraskevi, kept at Iaşi since then. The relics wended their way through the drought-deserted villages of Iaşi, Vaslui, Roman, Bacău, Putna, Neamţ, Baia and Botoşani Counties. The offerings collected on this occasion were distributed, based on Metropolitan Justinian's decisions, to orphans, widows, invalids, school cafeterias, churches under construction, and to monasteries in order to feed the sick, and old or feeble monks.

In the historical document with Venezia as of (year 1347), King Ivan Alexander of Bulgaria swears in the name of most holy considered matters, the document says – quote "in the name of God, The Most Holy Theotokos, The Holy Cross and The Most Holy Paraskeva of Tarnovo".

 
Since Second Bulgarian Kingdom, St. Petka has been venerated as a main patroness and protector of Bulgarian nation and country, protectress of countries of Moldova, Romania and Bulgarian cities of Veliko Tarnovo, Gabrovo and Troyan.

In Bulgaria it is an old tradition to name our childs in favour of Saint Petka, my grand-grand mother God Forgive us has also been called Parashkeva in favor of Saint Petka.

Holy Mother Petka Paraskeva (Parashkevo) Pray the Lord Jesus Christ to have mercy on All us the sinners !

How to check version of most used mail servers Postfix / Qmail / Exim / Sendmail

Wednesday, October 14th, 2020

How to check version of a Linux host's installed Mail server?

Most used mail servers Postfix / Qmail / Exim / Sendmail and usually you have to do a dpkg -l / rpm -qa or whatever package manager to get the package version. But sometimes the package is built to have a different naming convention from the actual installed MTA.

As recently I had to check on a Linux host what kind of version was the installed and used one to the SMTP, below is how to find conrete versions of Postfix / Qmail / Exim / Sendmail.
If none of the 4 is installed and something more cryptic like ssmtp is installed if another one is installed perhaps the best way would be to check with lsof -i :25 command and see  what process has binded and listens on TCP port 25.

mail-server-lsof-linux-screenshot-qmail-vpopmail


1. How to check Postfix exact mail server version

mail-server-exim-check-lsof-screenshot

Once you can find Postfix is the Network listening MTA, you might think you can simply use postfix -v however, but no …
Unlike many other applications, Postfix has no -v or –versions switch. But you can get the version information easily by using the postconf command as shown below:

root@server :~# postconf mail_version

postfix-show-version-postconf-linux

Other approach is to dump all postfix configuration settings (this is useful to get more info on how postfix is configured) and explicitly grep for the version.
 How to check version of a Linux host's installeded webserver?

root@server :~# postconf -d | grep mail_version


2. How to check Exim MTA running version ?

root@exim-mail :/ # exim -bV
Exim version 4.72 #1 built 13-Jul-2010 21:54:55
Copyright (c) University of Cambridge, 1995 – 2007
Berkeley DB: Sleepycat Software: Berkeley DB 4.3.29: (September 19, 2009)
Support for: crypteq iconv() Perl OpenSSL move_frozen_messages Content_Scanning DKIM Old_Demime
Lookups: lsearch wildlsearch nwildlsearch iplsearch cdb dbm dbmnz
Authenticators: cram_md5 plaintext spa
Routers: accept dnslookup ipliteral manualroute queryprogram redirect
Transports: appendfile/maildir/mailstore/mbx autoreply lmtp pipe smtp
Size of off_t: 8
OpenSSL compile-time version: OpenSSL 0.9.8e-fips-rhel5 01 Jul 2008
OpenSSL runtime version: OpenSSL 0.9.8e-fips-rhel5 01 Jul 2008
Configuration file is /etc/exim.conf

how-to-get-exim-version-on-gnu-linux-screenshot


3. How to check Sendmail Mail Transport Agent exact Mail version ?

Though sendmail is rarely used this days and it usually works mostly on obsolete old scrap hosts
or in some old fashioned conservative organizations such as Banks and Payment services providers, you might need to invertise it, just like the configuration m4 format complexity with its annoying macros, getting the version is also not straight forward:

# sendmail -d0.4 -bv root | grep Version
Version 8.14.4

Above commands should be working on most Linux distributions such as Debian / Ubuntu / Fedora / CentOS / SuSE and other Linux derivatives
 

4. How to check Qmail MTA version?

This is a bit of complicated question, as Qmail's base has not been significantly changed for years.
The latest published qmail package is qmail-1.03.tar.gz.  1.03 was released in 1998, Qmail is famous for its unbreakable security. The author of qmail  Daniel J. Bernstein is famous for writting Qmail to make the work installation and configuration of SMTP simple as of the time of writting sendmail was the defacto standard and sendmail was hard to configure.
Also sendmail was famous for a set of Security holes that got a lot of Sendmail MTA's on the Net got hacked. Thus the QMAIL was written as a more security-aware mail transport agent.

In contrast to sendmail, qmail has a modular architecture composed of mutually untrusting components; for instance, the SMTP listener component of qmail runs with different credentials from the queue manager or the SMTP sender. qmail was also implemented with a security-aware replacement to the C standard library, and as a result has not been vulnerable to stack and heap overflows, format string attacks, or temporary file race conditions.

The core qmail package has not been updated for many years. New features were initially provided by third party patches, from which the most important at the time were brought together in a single meta-patch set called netqmail.

The current version of netqmail is at 1.06 netqmail-1.06.tar.gz as of year 2020.

One possible way to get some info about installed qmail or components is to use the documentation look up command apropos

qmail:~# apropos qmail


or check the manual or at worst check for the installation source files that the person that installed the qmail used 🙂

A fun fact about qmail few might know is D. Bernstein offered in 1997 a US$500 reward for the first person to publish a verifiable security hole in the latest version of the software, for many years till 2005 no hole was found security researcher Georgi Guninski found an integer overflow in qmail. On 64-bit platforms, in default configurations with sufficient virtual memory, the delivery of huge amounts of data to certain qmail components may allow remote code execution. Bernstein disputes that this is a practical attack, arguing that no real-world deployment of qmail would be susceptible. Configuration of resource limits for qmail components mitigates the vulnerability.

On November 1, 2007, Bernstein raised the reward to US$1000. At a slide presentation the following day, Bernstein stated that there were 4 "known bugs" in the ten-year-old qmail-1.03, none of which were "security holes." He characterized the bug found by Guninski as a "potential overflow of an unchecked counter." "Fortunately, counter growth was limited by memory and thus by configuration, but this was pure luck.

5. Quick way to check the type of Mail server installed on Debian based Linux that doesn't have telnet installed


As you know simple telnet localhost 25 or a simple ps -ef could reveal at most times general information on the installed server. However there is another way to do it using package manager. by using embedded bash shell type type command like so:
 

# type -p sendmail |
xargs dpkg -S

type-x-bash-command-to-find-out-email-server-version-on-linux

Another hacky way to check whether exim, postfix or sendmail SMTP is installed is with:

hipo@freak:~$ echo $(man sendmail)| grep "exim"|wc -l
1
hipo@freak:~$ echo $(man sendmail)| grep "postfix"|wc -l
0
hipo@freak:~$ echo $(man sendmail)| grep "sendmail"|wc -l
0

I guess there are nice hacks and ways to get versions, so if you're aware of any please share with me.
Enjoy !

Deny DHCP Address by MAC on Linux

Thursday, October 8th, 2020

Deny DHCP addresses by MAC ignore MAC to not be DHCPD leased on GNU / Linux howto

I have not blogged for a long time due to being on a few weeks vacation and being in home with a small cute baby. However as a hardcore and a bit of dumb System administrator, I have spend some of my vacation and   worked on bringing up the the www.pc-freak.net and the other Websites hosted as a high availvailability ones living on a 2 Webservers running on a Master to Master MySQL Replication backend database, this is oll hosted on  servers, set to run as a round robin DNS hosts on 2 servers one old Lenove ThinkCentre Edge71 as well as a brand new real Lenovo server Lenovo ThinkServer SD350 with 24 CPUs and a 32 GB of RAM
To assure Internet Connectivity is having a good degree of connectivity and ensure websites hosted on both machines is not going to die if one of the 2 pair configured Fiber Optics Internet Providers Bergon.NET has some Issues, I've rented another Internet Provider Line is set bought from the VIVACOM Mobile Fiber Internet provider – that is a 1 Gigabit Fiber Optics Line.
Next to that to guarantee there is no Database, Webserver, MailServer, Memcached and other running services did not hit downtimes due to Electricity power outage, two Powerful Uninterruptable Power Supplies (UPS)  FPS Fortron devices are connected to the servers each of which that could keep the machine and the connected switches and Servers for up to 1 Hour.

The machines are configured to use dhcpd to distributed IP addresses and the Main Node is set to distribute IPs, however as there is a local LAN network with more of a personal Work PCs, Wireless Devices and Testing Computers and few Virtual machines in the Network and the IPs are being distributed in a consequential manner via a ISC DHCP server.

As always to make everything work properly hence, I had again some a bit weird non-standard requirement to make some of the computers within the Network with Static IP addresses and the others to have their IPs received via the DHCP (Dynamic Host Configuration Protocol) and add some filter for some of the Machine MAC Addresses which are configured to have a static IP addresses to prevent the DHCP (daemon) server to automatically reassign IPs to this machines.

After a bit of googling and pondering I've done it and some of the machines, therefore to save others the efforts to look around How to set Certain Computers / Servers Network Card MAC (Interfaces) MAC Addresses  configured on the LAN network to use Static IPs and instruct the DHCP server to ingnore any broadcast IP addresses leases – if they're to be destined to a set of IGNORED MAcs, I came up with this small article.

Here is the DHCP server /etc/dhcpd/dhcpd.conf from my Debian GNU / Linux (Buster) 10.4


option domain-name "pcfreak.lan";
option domain-name-servers 8.8.8.8, 8.8.4.4, 208.67.222.222, 208.67.220.220;
max-lease-time 891200;
authoritative;
class "black-hole" {
    match substring (hardware, 1, 6);
    ignore booting;
}
subclass "black-hole" 18:45:91:c3:d9:00;
subclass "black-hole" 70:e2:81:13:44:11;
subclass "black-hole" 70:e2:81:13:44:12;
subclass "black-hole" 00:16:3f:53:5d:11;
subclass "black-hole" 18:45:9b:c6:d9:00;
subclass "black-hole" 16:45:93:c3:d9:09;
subclass "black-hole" 16:45:94:c3:d9:0d;/etc/dhcpd/dhcpd.conf
subclass "black-hole" 60:67:21:3c:20:ec;
subclass "black-hole" 60:67:20:5c:20:ed;
subclass "black-hole" 00:16:3e:0f:48:04;
subclass "black-hole" 00:16:3e:3a:f4:fc;
subclass "black-hole" 50:d4:f5:13:e8:ba;
subclass "black-hole" 50:d4:f5:13:e8:bb;
subnet 192.168.0.0 netmask 255.255.255.0 {
        option routers                  192.168.0.1;
        option subnet-mask              255.255.255.0;
}
host think-server {
        hardware ethernet 70:e2:85:13:44:12;
        fixed-address 192.168.0.200;
}
default-lease-time 691200;
max-lease-time 891200;
log-facility local7;

To spend you copy paste efforts a file with Deny DHCP Address by Mac Linux configuration is here
/home/hipo/info
Of course I have dumped the MAC Addresses to omit a data leaking but I guess the idea behind the MAC ADDR ignore is quite clear

The main configuration doing the trick to ignore a certain MAC ALenovo ThinkServer SD350ddresses that are reachable on the Connected hardware switch on the device is like so:

class "black-hole" {
    match substring (hardware, 1, 6);
    ignore booting;
}
subclass "black-hole" 18:45:91:c3:d9:00;


The Deny DHCP Address by MAC is described on isc.org distribution lists here but it seems the documentation on the topic on how to Deny / IGNORE DHCP Addresses by MAC Address on Linux has been quite obscure and limited online.

As you can see in above config the time via which an IP is freed up and a new IP lease is done from the server is severely maximized as often DHCP servers do use a max-lease-time like 1 hour (3600) seconds:, the reason for increasing the lease time to be to like 10 days time is that the IPs in my network change very rarely so it is a waste of CPU cycles to do a frequent lease.

default-lease-time 691200;
max-lease-time 891200;


As you see to Guarantee resolving works always as expected I have configured – Google Public DNS and OpenDNS IPs

option domain-name-servers 8.8.8.8, 8.8.4.4, 208.67.222.222, 208.67.220.220;


One hint to make is, after setting up all my desired config in the standard config location /etc/dhcp/dhcpd.conf it is always good idea to test configuration before reloading the running dhcpd process.


root@pcfreak: ~# /usr/sbin/dhcpd -t
Internet Systems Consortium DHCP Server 4.4.1
Copyright 2004-2018 Internet Systems Consortium.
All rights reserved.
For info, please visit https://www.isc.org/software/dhcp/
Config file: /etc/dhcp/dhcpd.conf
Database file: /va/home/hipo/infor/lib/dhcp/dhcpd.leases
PID file: /var/run/dhcpd.pid
 

That's all folks with this sample config the IPs under subclass "black-hole", which are a local LAN Static IP Addresses will never be offered leasess anymore from the ISC DHCP.
Hope this stuff helps someone, enjoy and in case if you need a colocation of a server or a website hosting for a really cheap price on this new set High Availlability up described machines open an inquiry on https://web.www.pc-freak.net.


A quick and easy way to install Social Network on Linux/BSD System with Elgg

Monday, March 14th, 2011

elgg-blue-logo
I'm experimenting this days with Elgg – An Open Source Free Software GPLed Social Network which enables users to quickly create Communities.

Elgg is really easy to install and all it requires is a Linux/BSD or Windows system with PHP, MySQL and Apache installed.

Elgg is provided with dozens of nice plugins which for a short time enables individual to create fully operational Social Network like facebook.

Many people nowdays use facebook without realizing how bad facebook is how it breaks their privacy.
Facebook is actually a spy network, it stores data and pictures, likings and user behaviour of million of users around the world.
This needs to be stopped somehow, maybe if people start using the free software networks like elgg to build a mini-community which has profound interests in a certain spheres of work, life and amusement.
The evil empire of facebook will slowly start to loose it's position and the small projects networks based on Elgg and the other Free Software Social Networks which are currently available will start to rise up.
I'm currently really a novice into Elgg but I'm more convinced that the guys who develop it and contribute to it in terms of handy plugins have done really a great job.

It's ultra easy even for non professional middle level user to setup himself an Elgg install.
The installation procedure is not much harder than a simple wordpress blog or joomla based website install.
The installation of elgg takes no more than 10 to 20 minutes, the plugin installation and setup time further could take few days but in the end you have a full featured Social Network! This is really amazing.
The installation of new plugins in elgg is also fool proof / easy all you have to do to equip a newly installed elgg with plugins is to go to it's root directory and look for the mod directory. The new plugins which needs to be installed, could be directly downloaded and saved via links, elinks, lynx or even wget to the elgg installation directory.

Most of the elgg plugins comes in a form of zip files so after being installed simply executing:

server:/home/elgg/mysocialnetwork/mod# unzip walltowall.zip
....

The above cmd will for example unzip the WallToWall elgg plugin and the plugin will be further ready to be enabled via the administrator user set upped during your elgg installation.

The configurations of elgg are being accomplished via:

Administration -> Tool Administration

I should I'm still experimenting with Elgg social, until this very moment I've installed the following elgg plugins:

aaudio
akismet
artfolio
blog
bookmarks
buddytalk
captcha
categories
chat
crontrigger
custom_index
custom_profile_fields
default_widgets
diagnostics
elgg-ebuddy
embed
embedvideo
emoticons
externalpages
family
fbconnect
file
file_tree
flyers
forum
friend_request
friends
garbagecollector
groups
htmlawed
invitations
invitefriends
izap_videos
kaltura_video
lastfm
likes
logbrowser
logrotate
lucygames
members
messageboard
messages
milockergames_frameme
noscript_message
notifications
pages
polls
profile
reportedcontent
resume
river_comments
riverdashboard
riverfaces
search
siteaccess
tagcloud
theme_simpleneutral
thewire
tidypics
tidypicsExt
tinymce
twitter
twitterservice
user_contact_list
uservalidationbyemail
walltowall
weather
wp1
zaudio

One very handy feature I truly enjoy about Elgg is that it gives every user an own blog which or in other words when somebody registers in Elgg, he automatically gets a personal blog! How cool this is Yeash 😉
The Elgg photo upload plugin is also another interesting story. The photo plugin is a way better from my first impressions than facebook's buggy upload client.
Elgg also uses heavily jquery for it's various operations and the user experience feels very interactive.

Of course as with all free software things are not perfect some of the elgg plugins or (mods) as they are called are not working.
For example I couldn't make by so far the weather plugin which is supposed to report the weather.

Maybe some tweakening of the not working plugins will easily make them working. What is really important is that the Elgg basis system looks and seems to work really good and enpowers the user with a social network alternatives to the ugly facebook.

In order to experiment with Elgg and I've established a small social network targetting at University College and School Students called MockATeacher – mockateacher.com>/i>. The idea behind is to help students in their report writting by providing them with a place where they can meet other students and share files.

Some other aspects I've planned for MockATeacher is to build a small community of people who would like to share about idiot teachers, teacher stupid sayings as well as to mock the idiotic type of education that we and our children are up to in this age.
Just to close up, if you're looking for some time to spend in experimenting in an enjoyable way you definitely need to install elgg and play with it 😉