Posts Tagged ‘system’

Enable Debian Linux automatic updates to keep latest OS Patches / Security Up to Date

Monday, January 13th, 2025

Enable Debian Linux automatic updates to keep latest OS Patches / Security Up to Date

Debian: Entenda a Importância Para o Mundo GNU/LINUX

I'm not a big fan of automatism on GNU / Linux as often using automatic updates could totally mess things especially with a complex and a bit chatic OS-es like is Linux nowadays. 
Nevertheless as Security is becoming more and more of a problem especially the browser security, having a scheduled way to apply updates like every normal modern Windows and MAC OS as an option is becoming essential to have a fully manageble Operating system.

As I use Debian GNU / Linux for desktop for my own personal computer and I have already a lot of Debian servers, whose OS minor level and package version maintenance takes up too big chunk of my time (a time I could dedicated to more useful activities). Thus I found it worthy at some cases to trigger Debian's way to keep the OS and security at a present level, the so called Debian "unattended upgrades".

In this article, I'll explain how to install and Enable Automatic (" Unattended " ) Updates on Debian, with the hope that other Debian users might start benefiting from it.
 

Pros of  enabling automatic updates, are:

  • Debian OS Stay secure without constant monitoring.
  • You Save much time by letting your system handle updates.
  • Presumably Enjoying more peace of mind, knowing your system is more protected.

Cons of enabling automatic updates:

  • Some exotic and bad maintained packages (might break after the update)
  • Customizations made on the OS /etc/sysctl.conf or any other very custom server configs might disappear or not work after the update
  • At worst scenario (a very rare but possible case) OS might fail to boot after update 🙂

Regular security updates patch vulnerabilities that could otherwise be exploited by attackers, which is especially important for servers and systems exposed to the internet, where threats evolve constantly.

1. Update Debian System to latest

Before applying automatic updates making any changes, run apt to update package lists and upgrade any outdated packages,to have automatic updates for a smooth configuration process.

# apt update && apt upgrade -y

2. Install the Unattended-Upgrades deb Package 

# apt install unattended-upgrades -y

Reading package lists… Done
Building dependency tree… Done
Reading state information… Done
The following additional packages will be installed:
  distro-info-data gir1.2-glib-2.0 iso-codes libgirepository-1.0-1 lsb-release python-apt-common python3-apt python3-dbus python3-distro-info python3-gi
Suggested packages:
  isoquery python-apt-doc python-dbus-doc needrestart powermgmt-base
The following NEW packages will be installed:
  distro-info-data gir1.2-glib-2.0 iso-codes libgirepository-1.0-1 lsb-release python-apt-common python3-apt python3-dbus python3-distro-info python3-gi unattended-upgrades
0 upgraded, 11 newly installed, 0 to remove and 0 not upgraded.
Need to get 3,786 kB of archives.
After this operation, 24.4 MB of additional disk space will be used.
Do you want to continue? [Y/n]


# apt install apt-listchanges
Reading package lists… Done
Building dependency tree… Done
Reading state information… Done
The following package was automatically installed and is no longer required:
  linux-image-5.10.0-30-amd64
Use 'apt autoremove' to remove it.
The following additional packages will be installed:
  python3-debconf
The following NEW packages will be installed:
  apt-listchanges python3-debconf
0 upgraded, 2 newly installed, 0 to remove and 0 not upgraded.
Need to get 137 kB of archives.
After this operation, 452 kB of additional disk space will be used.
Do you want to continue? [Y/n]
Get:1 http://deb.debian.org/debian bookworm/main amd64 python3-debconf all 1.5.82 [3,980 B]
Get:2 http://deb.debian.org/debian bookworm/main amd64 apt-listchanges all 3.24 [133 kB]
Fetched 137 kB in 0s (292 kB/s)
Preconfiguring packages …
Deferring configuration of apt-listchanges until /usr/bin/python3
and python's debconf module are available
Selecting previously unselected package python3-debconf.
(Reading database … 84582 files and directories currently installed.)
Preparing to unpack …/python3-debconf_1.5.82_all.deb …
Unpacking python3-debconf (1.5.82) …
Selecting previously unselected package apt-listchanges.
Preparing to unpack …/apt-listchanges_3.24_all.deb …
Unpacking apt-listchanges (3.24) …
Setting up python3-debconf (1.5.82) …
Setting up apt-listchanges (3.24) …

Creating config file /etc/apt/listchanges.conf with new version


Example config for apt-listchanges would be like:

# vim /etc/apt/listchanges.conf
[apt]
frontend=pager
email_address=root
confirm=0
save_seen=/var/lib/apt/listchanges.db
which=both

3. Enable Automatic unattended upgrades

Once installed, enable automatic updates with the following command, which will prompt asking if you want to enable automatic updates. Select Yes and press Enter, which will confirm that the unattended-upgrades service is active and ready to manage updates for you.

# dpkg-reconfigure unattended-upgrades

Configure-Unattended-Upgrades-on-Debian_Linux-dpkg-reconfigure-screenshot

Or non-interactively by running command:

# echo unattended-upgrades unattended-upgrades/enable_auto_updates boolean true | debconf-set-selections
dpkg-reconfigure -f noninteractive unattended-upgrades


4. Set the Schedule for Automatic Updates on Debian

By default, unattended-upgrades runs daily, to verify or modify the schedule, check the systemd timer:

# sudo systemctl status apt-daily.timer
# sudo systemctl status apt-daily-upgrade.timer
# systemctl edit apt-daily-upgrade.timer

Current apt-daily.timer config as of Debian 12 (bookworm) is as follows

root@haproxy2:/etc/apt/apt.conf.d# cat  /lib/systemd/system/apt-daily.timer
[Unit]
Description=Daily apt download activities

[Timer]
OnCalendar=*-*-* 6,18:00
RandomizedDelaySec=12h
Persistent=true

[Install]
WantedBy=timers.target
root@haproxy2:/etc/apt/apt.conf.d#


# systemctl edit apt-daily-upgrade.timer

[Timer]
OnCalendar=
OnCalendar=03:00
RandomizedDelaySec=0


At Line  num 2 above is needed to reset (empty) the default value shown below in line  num 5.
Line 4 is needed to prevent any random delays coming from the defaults.


Now both timers should be active, if not, activate them with:

# systemctl enable –now apt-daily.timer
# systemctl enable –now apt-daily-upgrade.timer


These timers ensure that updates are checked and applied regularly, without manual intervention.

5.Test one time Automatic Updates on Debian works

To ensure everything is working, simulate an unattended upgrade with a dry run:

# unattended-upgrade –dry-run


You can monitor automatic updates by checking the logs.

# less /var/log/unattended-upgrades/unattended-upgrades.log

Log shows details of installed updates and any issues that occurred. Reviewing logs periodically can help you ensure that updates are being applied correctly and troubleshoot any problems.

6. Advanced Configuration Options

If you’re a power user or managing multiple systems, you might want to explore these additional settings in the configuration file:

# vim /etc/apt/apt.conf.d/50unattended-upgrades


Configure unattended-upgrades to send you an email whenever updates are installed.

Unattended-Upgrade::Mail "your-email-address@email-address.com";


Enable automatic reboots after kernel updates
by adding the line:

Unattended-Upgrade::Automatic-Reboot "true";

To schedule reboots after package upgrade is applied  at a specific time:

Unattended-Upgrade::Automatic-Reboot-Time "02:00";

Specify packages you don’t want to be updated by editing the Unattended-Upgrade::Package-Blacklist section in the configuration file.


Here is alternative way to configure the unattended upgrade, by using apt configuration options:

# vim /etc/apt/apt.conf.d/02periodic

// Control parameters for cron jobs by /etc/cron.daily/apt-compat //


// Enable the update/upgrade script (0=disable)
APT::Periodic::Enable "1";


// Do "apt-get update" automatically every n-days (0=disable)
APT::Periodic::Update-Package-Lists "1";


// Do "apt-get upgrade –download-only" every n-days (0=disable)
APT::Periodic::Download-Upgradeable-Packages "1";


// Run the "unattended-upgrade" security upgrade script
// every n-days (0=disabled)
// Requires the package "unattended-upgrades" and will write
// a log in /var/log/unattended-upgrades
APT::Periodic::Unattended-Upgrade "1";


// Do "apt-get autoclean" every n-days (0=disable)
APT::Periodic::AutocleanInterval "21";


// Send report mail to root
//     0:  no report             (or null string)
//     1:  progress report       (actually any string)
//     2:  + command outputs     (remove -qq, remove 2>/dev/null, add -d)
//     3:  + trace on
APT::Periodic::Verbose "2";

If you have to simultaneously update multiple machines and you're on a limited connection line, configure download limits if you’re on a metered connection by setting options in /etc/apt/apt.conf.d/20auto-upgrades.

7. Stop Automatic Unattended Upgrade

Under some circumstances if it happens the unattended upgrades are no longer required and you want to revert back to manual package updates, to disable the updates you have to disable the unattended-upgrades service

# systemctl stop unattended-upgrades


8.  Stop an ongoing apt deb package set of updates applied on Debian server

Perhaps not often, but it might be you have run an automated upgrade and this has broke a server system or a service and for that reason you would like to stop the upcoming upgrade (some of whose might have started on other servers) immediately, to do so, the easiest way (not always safe thogh) is to kill the unattended-upgrades daemon.
 

# pkill –signal SIGKILL unattended-upgrades


Note that this a very brutal way to kill it and that might lead to some broken package update, that you might have to later fix manually.

If you have the unattended-upgrade process running on the OS in the process list backgrounded and you want to stop the being on the fly upgrade on the system more safely for the system, you can stop and cancel the ongoing apt upgrade  it by running the ncurses prompt interface, through dpkg-reconfigure

# dpkg-reconfigure unattended-upgrades


Then just select No, press Enter. In my case, this has promptly stopped the ongoing unattended upgrade that seemed blocked (at least as promptly as the hardware seemed to allow 🙂 ).

If you want to disable it for future, so it doesn't automatically gets enabled on next manual update, by some update script disable service as well.
 

# systemctl disable unattended-upgrades


Close up

That’s all ! Now, your Debian system will automatically handle security updates, keeping your system secure without you having to do a thing.
The same guide should be good for most Deb based distributions such as Ubuntu / Mint and there rest of other Debian derivative OS-es.
You’ve now set up a reliable way to ensure your system stays protected from vulnerabilities, but anyways it is a good practice to always login and check what the update has done to the system, otherwise expect the unexpected. 

The Church Rejoices + Daniil Metropolitan of Vidin chosen and Enthroned as Head of Bulgarian Orthodox Church. Dostoin / Axios !

Wednesday, July 3rd, 2024

The Church Rejoices + Daniil Metropolitan of Vidin chosen and Enthroned as Head of Bulgarian Orthodox Church. Dostoin / Axios !

Patriarch_Daniil-the-new-canonically-and-officially-elected-Patriarch-of-Bulgaria-and-Metropolitan-of-Sofia

Metropolitan Daniil is our Officially and canonically elected Patriarch of Bulgaria and Metropolitan of Sofia (the choice was made in a complex selection system) during a Church national Assembly on 30th of June 2024.

The whole Church rejoices as a dark cloud was over the Church as people were scared, un-worthy patriarch might be selected.

The procedure of selection of new patriarch depends on matching, certain criterias for the candidate.

According to the Ustav of Bulgarian Orthodox Church (Establishment Law document, Church established rules statues)

New Patriarch Candidate should match following criterias:

  • To have been on a cathedra as metropolitan and have governed a diocese for at least 5 years
  • To be not be younger than 50 years of age (should be 50+ years old).
  • To be distinguished within the Church to have right thoughts on the Orthodox faith and the exact observance of church order and laws.
  • To enjoy a good and honorable name both before the people and before the government of the country

Procedure for electing a patriarch

On 20th of June of 2024, after internal voting in the Holy Synod, following the Church statuses, after 42 turns of votes of individually each Bishop and Metropolitan voting for his favorite, the 3 candidates for patriarch were emitted.

1. In the first round, the candidate who collected 2/3 of the votes of the voters present wins
2. If this does not happen, a second round is reached with the two candidates who received the most votes in the first round
3. In the second round, the candidate with a simple majority wins.

The results out of the elections on the Patriarchical choice National Church assembly results were as so:

Three Patriarchical Candidates


Three-candidates-for-Patriarch-na-Bulgaria-as-of-20-June-2024.
 

Name Candidate 1st voting 2nd voting
Daniil Metropolitan Vidinsky 51 votes 69 votes
Grigoriy Metropolitan Vrachanski 64 votes 66 votes
Gavriil Metropolitan Lovchanski 19 vote does not qualify


Patriarch Daniel (Bulgarian: Патриарх Даниил, romanized: Patriarh Daniil) has received his monk name after Saint Daniil the Stylite, one of the most notable Stylites in the Church history.

Early life and Education

Secular name Atanas Trendafilov Nikolov (Bulgarian: Атанас Трендафилов Николов; born 2 March 1972) in a town of Smolyan. He was born in a good and healthy family, his father Trendafil Nikolov is born in a small village near Smolyan (Kremene) and served as a police officer, his mother Zlatka Nikolova used to be a  teacher in the field of Informatics in Economy scohol in Smolyan.

He completed his primary and secondary education in his hometown and later served in the military. In 1996, he began studying English Philology at Sofia University, but being grown in the spirit of love for history and the motherland Bulgaria, he soon found out field of Philosophy does not provide enough to match his wide interests in history of the world and history of Bulgaria. Being touched by Gods love and having a desire to learn more about Christianity and his homeland orthodox christianity and learn more about philosophy but from the perspective of the Orthodoxy obviously guided by Gods provide, the following year during the hard years of national financial catastrophe and church schism in 1997 he transferred to the Faculty of Theology of the same university Saint Kliment Ohridski

In 1997 he also become candidate for monk novice in the notorious monastery of Hadji Dimovo (in honour of Saint Great Martyr George)  which was at that time of Spiritual Leadership of Metropolitan Natanail of Nevrokop, where he graduated in 2002 and which was one of the best monasteries capable of giving a solid basis for true and high standard spiritual life.

Becoming a Monk

On August 7, 1999, he was ordained a monk by him and the next day he was ordained as a hierodeacon. On July 21, 2004, he was sent for obedience to the Nativity of the Virgin Monastery (Rojenski Monastery) in Rozhen, and on November 27, he was ordained a hieromonk by his diocesan bishop.
On June 1, 2006, he was elevated to the rank of archimandrite.

Daniil-as-vicar-Bishop-of-Metropolitan-Joseph-of-America-of-Bulgarian-Orthodox-Church


Recognized as exceptional choosen person and Levereged to a Bishop by metropolitan Natanail Nevrokopski
Note: Nevrokov Eparchy is the eparchy in which Saint John of Rila Monastery belongs to, Metropolitan Natanail was among the most loved person in Bulgarian Church

On January 20, 2008, he was ordained as a Bishop with the title of Dragovitski and was appointed vicar of the Metropolitan of Neurokop Natanail

Nevrokopski-Metropolitan-Natanail
Metropolitan Nathanail Nevrokopsky (titled as the consience of the Bulgarian Church)

His ordination was carried out by Patriarch Maxim (the previous patriarch before Patriarch Neofit) in collaboration with Metropolitans + Ioanikiy of Sliven, + Dometian Vidinsky, + Kyril Metropolitan of Varna and Veliko Preslav, Grigoriy of Velikoturnovsky, Neofit of Rusensky, Natanail of Nevrokopsky, Gavriil Lovchansky and bishops Evlogius of Adrianople, Abbot of the Rila Monastery, Naum Stobiyski at that time Chief Secretary of The Holy Synod, Theodosius of Devol, Constantine of Marcianopol and John of Znepol (currently Metropolitan of Varna and Veliko Preslav chosen after decease of Metr. Kiril).

Hadji Dimovski monastery become also famous also for being the spiritual school for  Metropolitan Serafim of Nevrokop (chosen after's Metropolitan Natanail Nevrokopsky pass away to Christ).

On 15 June 2010, Daniel was appointed vicar of the diocese in the US, Canada and Australia of the Bulgarian Patriarchate. On 2 December 2011, the Holy Synod "took note of the letter from Metropolitan Joseph of the USA, Canada and Australia, notifying that permission had been received from the American emigration authorities to fulfill the obedience assigned by the Holy Synod to Bishop Daniel of Dragovitski who can already leave and take on responsibilities, as metropolitan vicar of the USA, Canada and Australia".
He was considered the most likely successor to Metropolitan Joseph of America (Bosakov).

Served as vicar bishop in the American, Canadian and Australian dioceses from 2011 until February 4, 2018 (for 7 years).
He was chosen to become the Metropolitan of Vidin (after the decease of Metr. Dometian) from February 4, 2018 to June 30, 2024.

In December 2018, Metropolitan Daniel condemned the Unification Council in Kyiv, calling it uncanonical. In his opinion, the actions of Patriarch Bartholomew are non-canonical, since he encroached on someone else's canonical territory.

Daniil is the originator of the introduction of religious education in the Bulgarian school and for many years worked for it to be included as a subject in the curricula.

On 21 July 2004, Daniel was sent for obedience to the Rozhen Monastery of the Nativity of the Blessed Virgin Mary. On 27 November of the same year he was ordained hieromonk by his diocesan bishop. On 1 June 2006, he was elevated to the rank of archimandrite. On 20 January 2008, he was consecrated Bishop of Dragovitia and vicar of the diocese of Nevrokop diocese.

Metropolitan of Vidin 4 February 2018 – 30 June 2024

Metropolitan-Daniil-in-times-as-a-Metropolitan-of-Vidin

On 4 February 2018, he was elected by the Synod to the post of Metropolitan of Vidin. Vidin was the last city that fall under the Ottoman hordes, and perhaps his zeal for truthfulness and orthodoxy and the Bulgarian nation was the reason Gods providence in that hard times to have chosen him to be head of this small but historically rich and important eparchy.

In December 2018, Metropolitan Daniel condemned the Unification Council in Kyiv, calling it uncanonical. In his opinion (based on Church Canons of Ecumenical Councils), the actions of Patriarch Bartholomew are non-canonical, since he encroached on someone else's canonical territory.

https://pc-freak.net/images/Patriarch-Daniil-Bartholomeow-patriarch-of_Constantinople-guest-on-patriarhical-enthronement

Perhaps for the Ecumenical Patriarch Bartholomew, the selection by the Gods providence for Daniil to be the next patriarch of Bulgaria, was quite a shock as the expected patriarch to choose was Gregory who if chosen should have been titled Gregory the II-nd as we already had a patriarch with this name , during the Second Bulgarian Kingdom  (saying this by memory), but mans thoughts are very different from Gods thoughts as the Holy scriptures says.

After the death of the former Patriarch of the Bulgarian Orthodox Church Neophyte in March 2024 and respective mourning period, then Metropolitan of Vidin, Daniel was one of the three shortlisted candidates to ocuppy the patriach position together with Metropolitan Gregory of Vratsa and Metropolitan Arsenius of Sliven.[7] On 30 June 2024, at the patriarchal electoral Church-People's Council in Sofia, Metropolitan Daniel was elected the new Patriarch of Bulgaria, Metropolitan of Sofia.

Patrirach-Daniil-of-Bulgaria-Blessing-soon-after-his-selection
Picture of Patriarch Daniil Blessing, right after his selection and his "radiation" with Patriarchal Ensignias, the Patriarchical Wand stick, The Cross, Panagias …

Daniil-Metropolitan-of-Sofia-and-Patriarch-of-Bulgaria

Pre-selected moments of the enthronization of new Bulgarian Patriarch Daniil of Bulgaria by Sonya Ankova

Currently he is the canonical 4th Patriarch of the new History of the Bulgarian  Orthodox Church, currently serving as Patriarch of All Bulgaria since June 30 !

His choosing and Enthroning was surprise for many influential people in the history and was just another proof the Church of Bulgaria is Governed by Jesus Christ and the selection was made by the Holy Spirit of God itself !


Daniil the New Bulgarian Patrhiarch, the Forth Patriarch by Bulgarian National TV (BNT) Chapter I

Lets all say Достоин / Axios !!!, just like many has proclaimed during the official introduction of Daniil as Patriarch with a special enthronization Ceremony.
The selection day 30 of June this year was by God's providence on the Sunday of All Saints, this year this day coincided also with the Assembly of All Holy Apostles day commemoration dedicated to All Apostles of Christ (the 12, the 70th of desciples and the rest of rings of desciples  of Christ who have done apostolic mission sent by him). The Assembly of Apostles feast is always celebrated  in the Church always 1 day after the Great feast of Saint Apostle Peter and Apostle Paul's day. 
The day after on the day the first Holy Liturgy was served by tradition by the new Patriarch and it was the Summer Feast of Saint Cosmo and Damianos  and  one of the 3 major feasts of Saint John of Rila (The Return of the Holy Relics of Saint John of Rila into Bulgaria) .

Patriarch Daniil  is the youngest patriarch of Bulgaria in our history of the Bulgarian Church, currently aged 51, since its establishment in year 870 (1154 years ago) and a lot of hope by many, that his Church rulership will be mostly beneficial for the whole Church and nation and will raise up the confidence and self-esteem of the nation, and shed light on the nation and attract more of the youth, that is living a life away from the Church even though baptized,  back in the Church.

Lets pray and wish the new Patriarch Daniil, a lot of increasement of Health, Love and Faith for everyone and Wisdom to guide the flock of Christ through the hardships of current turmoiled times of desperation and confusion as well as good health to serve as a Patriarch for Many Years !

For Many and Blessed Years his Holiness Patriarch of Daniil ! Metropolitan of Sofia and Patriarch of All Bulgaria !

Linux extending life time for a damaged hard drive server tricks on a live server. Force fcsk on next reboot.Read-only file system error solutions

Friday, February 17th, 2023

linux-extending-life-time-for-a-damaged-hard-drive-server-tricks-can-not-read-superblock-linux-force-fsck-on-next-reboot

In our daily work as system administrators we have some very old Legacy systems running Clustered High Availability proxies using CRM (Cluster Resource Manager) and some legacy systems still using Heartbeat to manage the cluster instead of the newer and modern Corosync variant.

The HA cluster is only 2 nodes Linux machine and running the obscure already long time unsupported version of Redhat 5.11 (Ootpa) who was officially became stable distant year 1998 (yeath the years were good) and whose EOL (End of Life) has been reached long time ago and the OS is no longer supported, however for about 14 years the machines has been running perfectly fine until one of the Cluster nodes managed by ocf::heartbeat:IPAddr2 , that is  /etc/ha.d/resource.d/IPAddr2 shell script. Yeah for the newbies Heartbeat Application Cluster in Linux does work like that it uses a number of extendable pair of shell scripts written for different kind of Network / Web / Mail / SQL or whatever services HA management.

The first node configured however, started failing due to some errors like:
 

EXT3-fs error (device dm-1): ext3_journal_start_sb: Detected aborted journal
sd 0:2:0:0: rejecting I/O to offline device
Aborting journal on device sda1.
sd 0:2:0:0: rejecting I/O to offline device
printk: 159 messages suppressed.
Buffer I/O error on device sda1, logical block 526
lost page write due to I/O error on sda1
sd 0:2:0:0: rejecting I/O to offline device
ext3_abort called.
EXT3-fs error (device sda1): ext3_journal_start_sb: Detected aborted journal
Remounting filesystem read-only
sd 0:2:0:0: rejecting I/O to offline device
megaraid_sas: FW was restarted successfully, initiating next stage…
megaraid_sas: HBA recovery state machine, state 2 starting…
megasas: Waiting for FW to come to ready state
megasas: FW in FAULT state!!
FW state [-268435456] hasn't changed in 180 secs
megaraid_sas: out: controller is not in ready state
megasas: waiting_for_outstanding: after issue OCR. 
megasas: waiting_for_outstanding: before issue OCR. FW state = f0000000
megaraid_sas: pending commands remain even after reset handling. megasas[0]: Dumping Frame Phys Address of all pending cmds in FW
megasas[0]: Total OS Pending cmds : 0 megasas[0]: 64 bit SGLs were sent to FW
megasas[0]: Pending OS cmds in FW :

The result out of that was a frequently the filesystem of the machine got re-mounted as Read Only and of course that is
quite bad if you have a running processess of haproxy that should be able to be living their and take up some Web traffic
for high availability and you run all the traffic only on the 2nd pair of machine.

This of course was a clear sign for a failing disks or some hit bad blocks regions or as the messages indicates, some
problem with system hardware or Raid SAS Array.

The physical raid on the system, just like rest of the hardware is very old stuff as well.

[root@haproxy_lb_node1 ~]# lspci |grep -i RAI
01:00.0 RAID bus controller: LSI Logic / Symbios Logic MegaRAID SAS 2108 [Liberator] (rev 05)

The produced errors not only made the machine to auto-mount its root / filesystem in Read-Only mode but besides has most
likely made the machine to automatically reboot every few days or few times every day in a raw.

The second Load Balancer node2 did operated perfectly, and we thought that we might just keep the broken machine in that half running
and inconsistent state for few weeks until we have built the new machines with Pre-Installed new haproxy cluster with modern
RedHat Linux 8.6 distribution, but since we have to follow SLAs (Service Line Agreements) with Customers and the end services behind the
High Availability (HA) Haproxy cluster were at danger … 

We as sysadmins had the task to make our best to try to stabilize the unstable node with disk errors for the system to servive
and be able to normally serve traffic (if node2 that is in a separate Data center fails due to a hardware or electricity issues etc.)
.

Here is few steps we took, that has hopefully improved the situation.

1. Make backups of most important files of high importance

Always before doing anything with a broken system, prepare backup of the most important files, if that is a cluster that should be a backup of the cluster configurations (if you don't have already ones) backup of /etc/hosts / backup of any important services configs /etc/haproxy/haproxy.cfg /etc/postfix/postfix.cfg (like it was my case), preferrably backup of whole /etc/  any important files from /root/ or /home/users* directories backup of at leasts latest logs from /var/log etc.
 

2. Clear up all unnecessery services scripts from the server

Any additional Softwares / Services and integrity checking tools (daemons) / scripts and cron jobs, were immediately stopped and wheter unused removed.

E.g. we had moved through /etc/cron* to check what's there,

# ls -ld /etc/cron.*
drwx—— 2 root root 4096 Feb  7 18:13 /etc/cron.d
drwxr-xr-x 2 root root 4096 Feb  7 17:59 /etc/cron.daily
-rw-r–r– 1 root root    0 Jul 20  2010 /etc/cron.deny
drwxr-xr-x 2 root root 4096 Jan  9  2013 /etc/cron.hourly
drwxr-xr-x 2 root root 4096 Jan  9  2013 /etc/cron.monthly
drwxr-xr-x 2 root root 4096 Aug 26  2015 /etc/cron.weekly


And like well professional butchers removed everything unnecessery that could trigger any extra unnecessery disk read / writes to HDD.

E.g. just create

# mkdir -p /root/etc_old/{/etc/cron.d,\
/etc/cron.daily,/etc/cron.hourly,/etc/cron.monthly\
,/etc/cron.weekly}


And moved all unnecessery cron job scripts like:

1. nmon (old school network / memory / hard disk console tool for monitoring and tuning server parameters)
2. clamscan / freshclam crons
3. mlocate (the script that is taking care for periodic run of updatedb command to keep the locate command to easily search
for files inside the DB to put less read operations on disk in case if you need to find file (e.g. prevent yourself to everytime
run cmd like: find / . -iname '*whatever_you_look_for*'
4. cups cron jobs
5. logwatch cron
6. rkhunter stuff
7. logrotate (yes we stopped even logrotation trigger job as we found the server was crashing sometimes at the same time when
the lograte job to rotate logs inside /var/log/* was running perhaps leading to a hit of the I/O read error (bad blocks).


Also inspected the Administrator user root cron job for any unwated scripts and stopped two report bash scripts that were part of the PCI tightened Security procedures.
Therein found script responsible to periodically report the list of installed packages and if they have not changed, as well a script to periodically report via email the list of
/etc/{passwd,/etc/shadow} created users, used to historically keep an eye on the list of users and easily see if someone
has created new users on the machine. Those were enabled via /var/spool/cron/root cron jobs, in other cases, on other machines if it happens for you
it is a good idea to check out all the existing user cron jobs and stop anything that might be putting Read / Write extra heat pressure on machine attached the Hard drives.

# ls -al /var/spool/cron/
total 20
drwx——  2 root root 4096 Nov 13  2015 .
drwxr-xr-x 12 root root 4096 May 11  2011 ..
-rw——-  1 root root  133 Nov 13  2015 root


3. Clear up old log files and any files unnecessery

Under /var/log and /home /var/tmp /var/spool/tmp immediately try to clear up the old log files.
From my past experience this has many times made the FS file inodes that are storing on a unbroken part (good blocks) of the hard drive and
ready to be reused by newly written rsyslog / syslogd services spitted files.

!!! Note that during the removal of some files you might hit a files stored on a bad blocks that might lead to a unexpected system reboot.

But that's okay, don't worry most likely after a hard reset by a technician in the Datacenter the machine will boot again and you can enjoy
removing remaining still files to send them to the heaven for old files.


4. Trigger an automatic system file system check with fsck on next boot

The standard way to force a Linux to aumatically recheck its Root filesystem is to simply create the /forcefsck to root partition or any other secondary disk partition you would like to check.

# touch /forcefsck

# reboot


However at some occasions you might be unable to do it because, the / (root fs) has been remounted in ReadOnly mode, yackes …

Luckily old Linux distibutions like this RHEL 5.1, has a way to force a filesystem check after reboot fsck and identify any
unknown bad-blocks and hopefully succceed in isolating them, so you don't hit into the same auto-reboots if the hard drive or Software / Hardware RAID
is not in terrible state
, you can use an option built in in /sbin/shutdown command the '-F'

   -F     Force fsck on reboot.


Hence to make the machine reboot and trigger immediately fsck:

# shutdown -rF now


Just In case you wonder why to reboot before check the Filesystem. Well simply because you need to have them unmounted before you check.

In that specific case this produced so far a good result and the machine booted just fine and we crossed the fingers and prayed that the machine would work flawlessly in the coming few weeks, before we finalize the configuration of the substitute machines, where this old infrastructure will be migrated to a new built cluster with new Haproxy and Corosync / Pacemaker Cluster on a brand new RHEL.

NB! On newer machines this won't work however as shutdown command has been stripped off this option because no SystemV (SystemInit) or Upstart and not on SystemD newer services architecture.
 

5. Hints on checking the hard drives with fsck

If you happen to be able to have physical access to the remote Hardare machine via a TTY[1-9] Console, that's even better and is the standard way to do it but with this specific case we had no easy way to get access to the Physical server console.

It is even better to go there and via either via connected Monitor (Display) or KVM Switch (Those who hear KVM switch first time this is a great device in server rooms to connect multiple monitors to same Monitor Display), it is better to use a some of the multitude of options to choose from for USB Distro Linux recovery OS versions or a CDROM / DVD on older machines like this with the Redhat's recovery mode rolled on.
After mounting the partition simply check each of the disks
e.g. :

# fsck -y /dev/sdb
# fsck -y /dev/sdc

Or if you want to not waste time and look for each hard drive but directly check all the ones that are attached and known by Linux distro via /etc/fstab definition run:

# fsck -AR

If necessery and you have a mixture of filesystems for example EXT3 , EXT4 , REISERFS you can tell it to omit some filesystem, for example ext3, like that:

# fsck -AR -t noext3 -y


To skip fsck on mounted partitions with fsck:

# fsck -M /dev/sdb


One remark to make here on fsck is usually fsck to complete its job on various filesystem it uses other external component binaries usually stored in /sbin/fsck*

ls -al /sbin/fsck*
-rwxr-xr-x 1 root root  55576 20 яну 2022 /sbin/fsck*
-rwxr-xr-x 1 root root  43272 20 яну 2022 /sbin/fsck.cramfs*
lrwxrwxrwx 1 root root      9  4 юли 2020 /sbin/fsck.exfat -> exfatfsck*
lrwxrwxrwx 1 root root      6  7 юни 2021 /sbin/fsck.ext2 -> e2fsck*
lrwxrwxrwx 1 root root      6  7 юни 2021 /sbin/fsck.ext3 -> e2fsck*
lrwxrwxrwx 1 root root      6  7 юни 2021 /sbin/fsck.ext4 -> e2fsck*
-rwxr-xr-x 1 root root  84208  8 фев 2021 /sbin/fsck.fat*
-rwxr-xr-x 2 root root 393040 30 ное 2009 /sbin/fsck.jfs*
-rwxr-xr-x 1 root root 125184 20 яну 2022 /sbin/fsck.minix*
lrwxrwxrwx 1 root root      8  8 фев 2021 /sbin/fsck.msdos -> fsck.fat*
-rwxr-xr-x 1 root root    333 16 дек 2021 /sbin/fsck.nfs*
lrwxrwxrwx 1 root root      8  8 фев 2021 /sbin/fsck.vfat -> fsck.fat*


6. Using tune2fs to  adjust tunable filesystem parameters on ext2/ext3/ext4 filesystems (few examples)

a) To check whether really the filesystem was checked on boot time or check a random filesystem on the server for its last check up date with fsck:

#  tune2fs -l /dev/sda1 | grep checked
Last checked:             Wed Apr 17 11:04:44 2019

On some distributions like old Debian and Ubuntu, it is even possible to enable fsck to log its operations during check on reboot via changing the verbosity from NO to YES:

# sed -i "s/#VERBOSE=no/VERBOSE=yes/" /etc/default/rcS


If you're having the issues on old Debian Linuxes  and not on RHEL  it is possible to;

b) Enable all fsck repairs automatic on boot

by running via:
 

# sed -i "s/FSCKFIX=no/FSCKFIX=yes/" /etc/default/rcS


c) Forcing fcsk check on for server attached Hard Drive Partitions with tune2fs

# tune2fs -c 1 /dev/sdXY

Note that:
tune2fs can force a fsck on each reboot for EXT4, EXT3 and EXT2 filesystems only.

tune2fs can trigger a forced fsck on every reboot using the -c (max-mount-counts) option.
This option sets the number of mounts after which the filesystem will be checked, so setting it to 1 will run fsck each time the computer boots.
Setting it to -1 or 0 resets this (the number of times the filesystem is mounted will be disregarded by e2fsck and the kernel).


 For example you could:

d) Set fsck to run a filesystem check every 30 boots, by using -c 30 
 

# tune2fs -c 30 /dev/sdXY


e) Checking whether a Hard Drive has been really checked on the boot


#  tune2fs -l /dev/sda1 | grep checked
Last checked:             Wed Apr 17 11:04:44 2019


e) Check when was the last time the file system /dev/sdX was checked:
 

# tune2fs -l /dev/sdX | grep Last\ c
Last checked:             Thu Jan 12 20:28:34 2017


f) Check how many times our /dev/sdX filesystem was mounted

# tune2fs -l /dev/sdX | grep Mount
Mount count:              157

g) Check how many mounts are allowed to pass before filesystem check is forced
 

# tune2fs -l /dev/sdX | grep Max
Maximum mount count:      -1


7. Repairing disk / partitions via GRUB fsck.mode and fsck.repair kernel module options

It is also possible to force a fsck.repair on boot via GRUB, but that usually is not an option someone would like as the machine might fail too boot if it hards to repair hardly, however in difficult situations with failing disks temporary enabling it is good idea.

This can be done by including for grub initial config

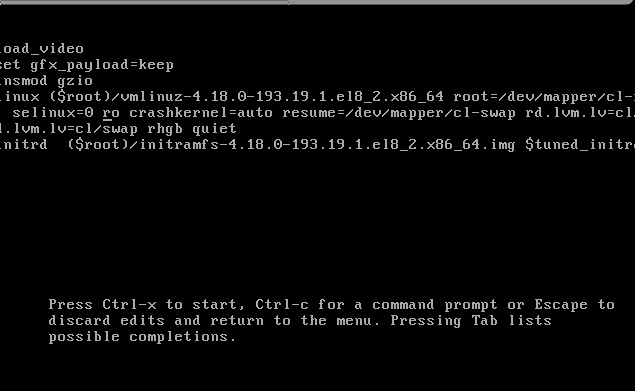
GRUB_CMDLINE_LINUX_DEFAULT="quiet splash fsck.mode=force fsck.repair=yes"

fsck.mode=force – will force a fsck each time a system boot and keeping that value enabled for a long time inside GRUB is stupid for servers as

sometimes booting could be severely prolonged because of the checks especially with servers with many or slow old hard drives.

fsck.repair=yes – will make the fsck try to repair if it finds bad blocks when checking (be absolutely sure you know, what you're doing if passing this options)

The options can be also set via editing the GRUB boot screen, if you have physical access to the server and don't want to reload the grub loader and possibly make the machine unbootable on next boot.
 

8. Few more details on how /etc/fstab disk fsck check parameters values for Systemd Linux machines works

The "proper" way on systemd (if we can talk about proper way on Linux) to runs fsck for each filesystem that has a fsck is to pass number greater than 0 set in
/etc/fstab (last column in /etc/fstab), so make sure you edit your /etc/fstab if that's not the case.

The root partition should be set to 1 (first to be checked), while other partitions you want to be checked should be set to 2.

Example /etc/fstab:
 

# /etc/fstab: static file system information.

/dev/sda1  /      ext4  errors=remount-ro  0  1
/dev/sda5  /home  ext4  defaults           0  2

The values you can put here as a second number meaning is as follows:
0 – disabled, that is do not check filesystem
1 – partition with this PASS value has a higher priority and is checked first. This value is usually set to the root / partition
2 – partitions with this PASS value will be checked last

a) Check the produced log out of fsck

Unfortunately on the older versions of Linux distros with SystemV fsck log output might be not generated except on the physical console so if you have a kind of duplicator device physical tty on the display port of the server, you might capture some bad block reports or fixed errors messages, but if you don't you might just cross the fingers and hope that anything found FS irregularities was recovered.

On systemd Linux machines the fsck log should be produced either in /run/initramfs/fsck.log or some other location depending on the Linux distro and you should be able to see something from fsck inside /var/log/* logs:

# grep -rli fsck /var/log/*


Close it up

Having a system with failing disk is a really one of the worst sysadmin nightmares to get. The good news is that most of the cases we're prepared with some working backup or some work around stuff like the few steps explained to mitigate the amount of Read / Writes to hard disks on the failing machine HDDs. If the failing disk is a primary Linux filesystem all becomes even worse as every next reboot, you have no guarantee, whether the kernel / initrd or some of the other system components required to run the Core Linux system won't break up the normal boot. Thus one side changes on the hard drives is a risky business on ther other side, if you're in a situation where you have a mirror system or the failing system is just a Linux server installed without a Cluster pair, then this is not a big deal as you can guarantee at least one of the nodes still up, unning and serving. Still doing too much of operations with HDD is always a danger so the steps described, though in most cases leading to improvement on how the system behaves, the system should be considered totally unreliable and closely monitored not only by some monitoring stuff like Zabbix / Prometheus whatever but regularly check the systems state via normal SSH logins. It is important if you have some important datas or logs on the system that are not synchronized to a system node to copy them before doing any of the described operations. After all minimal is backuped, proceed to clear up everything that might be cleared up and still the machine to continue providing most of its functionalities, trigger fsck automatic HDD check on next reboot, reboot, check what is going on and monitor the machine from there on.

Hopefully the few described steps, has helped some sysadmin. There is plenty of things which I've described that might go wrong, even following the described steps, might not help if the machines Storage Drives / SAS / SSD has too much of a damage. But as said in most cases following this few steps would improve the machine state.

Wish you the best of luck!


CentOS disable SELinux permanently or one time on grub Linux kernel boot time

Saturday, July 24th, 2021

selinux-artistic-penguin-logo-protect-data


1. Office 365 cloud connected computer and a VirtualBox hosted machine with SELINUX preventing it to boot

At my job we're in process of migrating my old Lenovo Laptop Thinkpad model L560 Laptop to Dell Latitude 5510 wiith Intel Core i5 vPro CPU and 256 Gb SSD Hard Drive.  The new laptops are generally fiine though they're not even a middle class computers and generally I prefer thinkpads. The sad thing out of this is our employee decided to migrate to Office 365 (again perhaps another stupid managerial decision out of an excel sheet wtih a balance to save some money … 

As you can imagine Office 365 is not really PCI Standards compliant and not secure since our data is stored in Microsoft cloud and theoretically Microsoft has and owns our data or could wipe loose the data if they want to. The other obvious security downside I've noticed with the new "Secure PCI complaint laptop" is the initial PC login screen which by default offers fingerprint authentication or the even worse  and even less secure face recognition, but obviosly everyhing becomes more and more crazy and people become less and less cautious for security if that would save money or centralize the data … In the name of security we completely waste security that is very dubious paradox I don't really understand but anyways, enough rant back to the main topic of this article is how to and I had to disable selinux?

As part of Migration I've used Microsoft OneDrive to copy old files from the Thinkpad to the Latitude (as on the old machine USB's are forbidden and I cannot copy over wiith a siimple USB driive, as well as II have no right to open the laptop and copy data from the Hard driive, and even if we had this right without breaking up some crazy company policy that will not be possible as the hard drive data on old laptop is encrypted, the funny thing is that the new laptop data comes encrypted and there is no something out of the box as BitDefender or McAffee incryption (once again, obviously our data security is a victim of some managarial decisions) …
 

2. OneDrive copy problems unable to sync some of the copied files to Onedrive


Anyways as the Old Laptop's security is quite paranoid and we're like Fort Nox, only port 80 and port 443 connections to the internet can be initiated to get around this harsh restrictions it was as simple to use a Virtualbox Virtual Machine. So on old laptop I've installed a CentOS 7 image which I used so far and I used one drive to copy my vbox .vdi image on the new laptop work machine.

The first head buml was the .vdi which seems to be prohibited to be copied to OneDrive, so to work around this I had to rename the origianl CentOS7.vdi to CentOS7.vdi-renamed on old laptop and once the data is in one drive copy my Vitualbox VM/ directory from one drive to the Dell Latitude machine and rename the .vdi-named towards .vdi as well as import it from the latest installed VirtualBox on the new machine.
 

3. Disable SELINUX from initial grub boot


So far so good but as usual happens with miigrations I've struck towards another blocker, the VM image once initiated to boot from Virtualbox badly crashed with some complains that selinux cannot be loaded.
Realizing CentOS 7 has the more or less meaningless Selinux, I've took the opportunity to disable SeLinux.

To do so I've booted the Kernel with Selinux disabled from GRUB2 loader prompt before Kernel and OS Userland boots.


I thought I need to type the information on the source in grub. What I did is very simple, on the Linux GRUB boot screen I've pressed

'e' keyboard letter

that brought the grub boot loader into edit mode.

Then I had to add selinux=0 on the edited selected kernel version, as shown in below screenshot:

selinux-disable-from-grub.png

Next to boot the Linux VM without Selinux enabled one time,  just had to press together

Ctrl+X then add selinux=0 on the edited selected kernel version, that should be added as shown in the screenshot somewhere after the line of
root=/dev/mapper/….

4. Permanently Disable Selinux on CentOS 7


Once I managed to boot Virtual Machine properly with Oracle Virtualbox, to permanently disabled selinux I had to:


Once booted into CentOS, to check the status of selinux run:


# sestatus
Copy
SELinux status:                 enabled
SELinuxfs mount:                /sys/fs/selinux
SELinux root directory:         /etc/selinux
Loaded policy name:             targeted
Current mode:                   enforcing
Mode from config file:          enforcing
Policy MLS status:              enabled
Policy deny_unknown status:     allowed
Max kernel policy version:      31


5. Disable SELinux one time with setenforce command


You can temporarily change the SELinux mode from targeted to permissive with the following command:


# setenforce 0


Next o permanently disable SELinux on your CentOS 7 next time the system boots, Open the /etc/selinux/config file and set the SELINUX mod parameter to disabled.

On CentOS 7 you can  edit the kernel parameters in /etc/default/grub (in the GRUB_CMDLINE_LINUX= key) and set selinux=0 so on next VM / PC boot we boot with a SELINUX disabled for example add   RUB_CMDLINE_LINUX=selinux=0 to the file then you have to regenerate your Grub config like this:
 

# grub2-mkconfig -o /etc/grub2.cfg
# grub2-mkconfig -o /etc/grub2-efi.cfg


Further on to disable SeLinux on OS level edit /etc/selinux
 

Default /etc/selinux/config with selinux enabled should look like so:

# This file controls the state of SELinux on the system.
# SELINUX= can take one of these three values:
#       enforcing – SELinux security policy is enforced.
#       permissive – SELinux prints warnings instead of enforcing.
#       disabled – No SELinux policy is loaded.
SELINUX=enforcing
# SELINUXTYPE= can take one of these two values:
#       targeted – Targeted processes are protected,
#       mls – Multi Level Security protection.
SELINUXTYPE=targeted


To disable SeLinux modify the file to be something like:

# This file controls the state of SELinux on the system.
# SELINUX= can take one of these three values:
#       enforcing – SELinux security policy is enforced.
#       permissive – SELinux prints warnings instead of enforcing.
#       disabled – No SELinux policy is loaded.
SELINUX=disabled
# SELINUXTYPE= can take one of these two values:
#       targeted – Targeted processes are protected,
#       mls – Multi Level Security protection.
SELINUXTYPE=targeted

6. Check SELINUX status is disabled

# sestatus

SELinux status:                 disabled

So in this article shottly was explained shortly the fake security adopted by using Microsoft Cloud environment Offiice 365, my faced OneDrive copy issues (which prevented even my old laptop Virtual Machine to boot properly and the handy trick to rename the file that is unwilling to get copied from old PC towards m$ OneDrive as well as the grub trick to disable Selinux permanently from grub2.

Configure rsyslog buffering on Linux to avoid message lost to Central Logging server

Wednesday, January 13th, 2021

rsyslog-Centralized-Logging-System-using-Rsyslog_logo

1. Rsyslog Buffering

One of the best practice about logs management is to send syslog to a central server. However, a logging system should be capable of avoiding message loss in situations where the server is not reachable. To do so, unsent data needs to be buffered at the client when central server is not available. You might have recently noticed that many servers forwarding logs messages to a central server do not have buffering functionalities activated. Thus I strongly advise you to have look to this documentation to know how to check your configuration: http://www.rsyslog.com/doc/rsyslog_reliable_forwarding.html

Rsyslog buffering with TCP/UDP configured

In rsyslog, every action runs on its own queue and each queue can be set to buffer data if the action is not ready. Of course, you must be able to detect that "the action is not ready", which means the remote server is offline. This can be detected with plain TCP syslog and RELP, but not with UDP. So you need to use either of the two. In this howto, we use plain TCP syslog.

– Version requirement

Please note that we are using rsyslog-specific features. The are required on the client, but not on the server. So the client system must run rsyslog (at least version 3.12.0), while on the server another syslogd may be running, as long as it supports plain tcp syslog.

How To Setup rsyslog buffering on Linux

First, you need to create a working directory for rsyslog. This is where it stores its queue files (should need arise). You may use any location on your local system. Next, you need to do is instruct rsyslog to use a disk queue and then configure your action. There is nothing else to do. With the following simple config file, you forward anything you receive to a remote server and have buffering applied automatically when it goes down. This must be done on the client machine.

# Example:
# $ModLoad imuxsock             # local message reception
# $WorkDirectory /rsyslog/work  # default location for work (spool) files
# $ActionQueueType LinkedList   # use asynchronous processing
# $ActionQueueFileName srvrfwd  # set file name, also enables disk mode
# $ActionResumeRetryCount -1    # infinite retries on insert failure
# $ActionQueueSaveOnShutdown on # save in-memory data if rsyslog shuts down
# *.*       @@server:port

Backup entire Live Linux Operating System bit by bit with dd, partimage, partclone clonezilla

Thursday, January 7th, 2021


dd-create-server-hard-drive-identical-mirror-data-copy-backups

This is an old stuff that we UNIX / Linux sysadmins use frequently when we need to migrate operating system from a certain older machine server to another newer one.
However I decided to blog it as it an interesting to know to a new grown junior sysadmins.

To Create a bit to bit data backup with dd command,
the following command is used to create a backup with dd, which takes the entire data content (including partition table etc.) with it:

dd if = / dev / [hard disk 1] of = / dev / [hard disk 2] bs = 512 conv = noerror, sync


For explanation:


"if" stands for the hard drive to be read from.
"of" stands for the hard drive to be written to.
Important! if and of must not be interchanged under any circumstances! In the worst case, the data on the disk to be read will otherwise be irrevocably overwritten!

"bs = 512" defines the block size. The value can be increased (which in turn increases the speed of the backup), but you should be sure that the file system to be backed up does not contain any errors. If you were to use block size 64k, for example, the speed of the backup is increased considerably – but if read errors occur within this block, the entire data block that dd has written contains unusable data. Therefore, when choosing the block size, you should always weigh data integrity and time against each other.
"noerror" tells dd to continue the backup in case of errors. Without this option, dd would stop the backup by default.
"sync" commands dd to replace the unreadable blocks with zeros in the event of errors in order to keep the data offset synchronous.
When performing a backup (as with other things that a longer period can take advantage of, it is always recommended (if you SSH is logged in and no direct access to a real Shell), the process either for CTRL + followed from bg to the background (can later be brought back to the foreground with fg ) or to use virtual session managers such as screen or byobu before executing the command.This prevents the process from dying if the SSH session is unintentionally terminated and you have to start over.

Of course there are plenty of other ways to make a mirror backup  cloneof a hard disk to lets say migrate to a new data center  using easier to use tools with (ncurses) Text menu interfaces to avoid bothering a complex typing on the console.
One such tool is Partclon:

Partclone-screenshot,_partclone-linux-create-mirror-disk-backups

PartClone cloning in action

Another text menu interface data cloning Linux tool commonly used by sysadms is partimage

Partimage-linux-screenshot

Most sysadmins however prefer to use Clonezilla when something more cozy is required to do a bit to bit data copy.
Tthere is even a Live Linux CD distribution for that.

Clonezilla can mirror most types of filesystems and partiontions and could be used not only for UNIX / Linux / BSD filesystems Live OS data (backups) (EXT3 / EXT4 / XFS / ZFS etc)  migrations, but also for old NT4 Windows server partitions. One useful application of Clonezilla i can think of is if you want to configure or restore a whole office of Windows computers running on the same clean version of Windows and same hardware configurations PCs, after a Virus or trojan has striked it. By using it you can clone from a central well configured Windows release with the surrounding applications to all machines for up to an hour with Clonezilla and you can even do it over a network.

How to check Microsoft IIS webserver version

Monday, July 21st, 2014

If you have to tune some weirdly behaviour Microsoft IIS (Internet Information Services) webserver, the first thing to do is to collect information about the system you're dealing with – get version of installed Windows and check what kind of IIS version is running on the Windows server?

To get the version of installed Windows on the system you just logged in, the quickest way I use is:
 

Start -> My Computer (right mouse button) Properties

check-windows-server-version-screenshot-windows-2003-r2

Run regedit from cmd.exe and go and check value of registry value:


HKEY_LOCAL_MACHINE\SOFTWARE\MicrosoftInetStp\VersionString


check-iis-webserver-version-with-windows-registry-screenshot

As you can see in screenshot in this particular case it is IIS version 6.0.

An alternative way to check the IIS version in some cases (if IIS version return is not disabled) is to telnet to webserver:

telnet your-webserver 80


Once connected Send:

HEAD / HTTP/1.0


Also on some Windows versions it is possible to check IIS webserver version from Internet Information Services Management Cosnole:

To check IIS version from IIS Manager:

Start (button) -> Control Panel -> Administrative Tools -> "Internet Information Services" IIS Manager

From IIS Manager go to:

Help -> About Microsoft Management Console


Here is a list with most common IIS version output you will get depending on the version of Windows server:


Windows NT 3.51 1.0
Windows NT 4 2.0-4.0
Windows Server 2000 5.0
Windows XP Professional 5.1
Windows Server 2003 6.0
Windows Vista 7.0
Windows Server 2008 7.0
Windows Server 2008 R2 7.5
Windows 7 7.5
Windows Server 2012 8.0
Windows 8 8.0
Windows Server 2012 R2 8.5
Windows 8.1 8.5

If you have only an upload FTP access to a Folder served by IIS Webserver – i.e. no access to the Win server running IIS, you can also grasp the IIS version with following .ASP code:
 

<%
response.write(Request.ServerVariables("SERVER_SOFTWARE"))
%>


Save the file as anyfile.asp somewhere in IIS docroot and invoke it in browser.

Remove old unused kernels and cleanup orphaned packages on CentOS / RHEL/ Fedora and Debian Linux

Friday, October 23rd, 2020

remove-old-unused-kernel-on-centos-redhat-rhel-fedora-linux-howto-delete-orphaned-packages

If you administer CentOS 7 / CentOS  8 bunch of servers it is very likely after one of the scheduled Patch days every 6 months or so, you end up with a multiple Linux OS kernels installed on the system.
In normal situation on a freshly installed CentOS machine only one rpm package is installed on the system with the kernel release shipped with CentOS / RHEL / Fedora distro:
The reason to remove the old unused kernels is very simple, you don't want to have a messy installation and after some of the updates to boot up in a revert back old kernel or if you're pedantic to simply save few megas of space.
Some people choose to have more than one kernel just to make sure, if the new installed one doesn't boot, after a restart from ILO / IDRAC remote console interface you can select to boot the proper kernel. I agree having the old kernel before the system *kernel* upgrade as backup recovery is a good thing but this is a good thing to the point the system gets booted after reboot (you know we sysadmins usually after each major system package upgrade), we like to reboot the system warmly praying and hoping it will boot up next time 🙂
 

1. Remove CentOS last XX kernels from the OS

Of course removal of old kernels could be managed by a simple

yum remove kernel


yum-kernel-remove-centos-linux

One more than one kernel is present you can hence leave only lets say the last 2 installed kernel on the CentOS host (some people prefer to have only one) but just for the sake of having a backup kernel I like more to have last two kernels installed present, to do so run package-cleanup which is contained in yum-utils rpm package CentOS – this is CentOS / Redhat ( RHEL) specific command.
 

[root@centos ~ ]:# package-cleanup –oldkernels –count=2

package-cleanup-centos-linux-screenshot-1

–count=number argument – tells how many from the  latest version kernels to get removed.

Note if you don't have the package-cleanup command install yum-utils package:

[root@centos ~ :]#  yum install -y yum-utils

cleanup-old-kernels-linux-leave-only-set-of-2-kernels-active-on-centos-rhel-fedora


2. RemoveOld kernels from Fedora Linux – leave only the latest 3 installed

This is done with dnf by setting the –-latest-limit arg to negative value to how many last kernels want to keep

[root@fedora ~ ]:# dnf remove $(dnf repoquery –installonly –latest-limit=-3 -q)


3. Set how many kernels you want to be present on system all the time after package upgrades

It is possible to tell CentOS / RHEL / Fedora's on how many kernels show be kept installed on the system, the default configured on Operating system install time is to keep the last 5 installed kernel on the OS. This is controlled from installonly_limit=5 value that is usually as of year 2020 RPM based distributions found under /etc/yum.conf (on CentOS / RHEL) and in /etc/dnf/dnf.conf (in Fedora) configuration file and sets the desired number of kernels present on system after issuing commands yum upgrade / dnf upgrade –refresh etc.
The minimum number to give to  installonly_limit is 2.
 

4. Remove orphan rpm packages from server

The next thing to do is to check the installed orphan packages to see if we can safely remove them; by orphaned packages we mean all packages which no longer serve a purpose of package dependencies.
Orphan packages are packages who left over from some old dependencies that are no longer needed on the system but just take up space and impose a possible security risk as some of them might end up with time with a public well known and hacked CVE vulnearbility.

Let me try to explain this concept with a quick example: package A is depended on package B, thus, in order to install package A the package B must also be installed. Once the package A is removed the package B might still be installed, hence the package B is now orphaned package.
Here’s how we can safely see the orphan packages we do have on our system:

[root@centos ~ :]#  package-cleanup –quiet –leaves –exclude-bin

And here’s how we can delete them:

[root@centos ~ :]# package-cleanup –quiet –leaves –exclude-bin | xargs yum remove -y


The above commands should be launched multiple times, because the packages deleted with the first batch could create additional orphan packages, and so on: be sure to perform these tasks until no orphan packages appear anymore after the first package-cleanup command.


5. Delete Old Kernels and keep only last three ones on Debian / Ubuntu Linux

To do the same on a debian based distribution there is a command is provided by a deb package byobu, if you want to clean up old kernels on Debians :

$ sudo purge-old-kernels –keep 3


That's all folks enjoy ! 🙂


How to check if shared library is loaded in AIX OS – Fix missing libreadline.so.7

Thursday, February 20th, 2020

ibm-aix-logo1

I've had to find out whether an externally Linux library is installed  on AIX system and whether something is not using it.
The returned errors was like so:


# gpg –export -a

Could not load program gpg:
Dependent module /opt/custom/lib/libreadline.a(libreadline.so.7) could not be loaded.
Member libreadline.so.7 is not found in archive


After a bit of investigation, I found that gpg was failing cause it linked to older version of libreadline.so.6, the workaround was to just substitute the newer version of libreadline.so.7 over the original installed one.

Thus I had a plan to first find out whether this libreadline.a is loaded and recognized by AIX UNIX first and second find out whether some of the running processes is not using that library.
I've come across this interesting IBM official documenation that describes pretty good insights on how to determine whether a shared library  is currently loaded on the system. which mentions the genkld command that is doing
exactly what I needed.

In short:
genkld – creates a list that is printed to the console that shows all loaded shared libraries

genkld-screenshot-aix-unix

Next I used lsof (list open files) command to check whether there is in real time opened libraries by any of the running programs on the system.

After not finding anything and was sure the library is neither loaded as a system library in AIX nor it is used by any of the currently running AIX processes, I was sure I could proceed to safely overwrite libreadline.a (libreadline.so.6) with libreadline.a with (libreadline.so.7).

The result of that is again a normally running gpg as ldd command shows the binary is again normally linked to its dependend system libraries.
 

aix# ldd /usr/bin/gpg
/usr/bin/gpg needs:
         /usr/lib/threads/libc.a(shr.o)
         /usr/lib/libpthreads.a(shr_comm.o)
         /usr/lib/libpthreads.a(shr_xpg5.o)
         /opt/freeware/lib/libintl.a(libintl.so.1)
         /opt/freeware/lib/libreadline.a(libreadline.so.7)
         /opt/freeware/lib/libiconv.a(libiconv.so.2)
         /opt/freeware/lib/libz.a(libz.so.1)
         /opt/freeware/lib/libbz2.a(libbz2.so.1)
         /unix
         /usr/lib/libcrypt.a(shr.o)
         /opt/freeware/lib/libiconv.a(shr4.o)
         /usr/lib/libcurses.a(shr42.o)


# gpg –version
gpg (GnuPG) 1.4.22
Copyright (C) 2015 Free Software Foundation, Inc.
License GPLv3+: GNU GPL version 3 or later <http://gnu.org/licenses/gpl.html>
This is free software: you are free to change and redistribute it.
There is NO WARRANTY, to the extent permitted by law.


Home: ~/.gnupg
Supported algorithms:
Pubkey: RSA, RSA-E, RSA-S, ELG-E, DSA
Cipher: IDEA, 3DES, CAST5, BLOWFISH, AES, AES192, AES256, TWOFISH,
        CAMELLIA128, CAMELLIA192, CAMELLIA256
Hash: MD5, SHA1, RIPEMD160, SHA256, SHA384, SHA512, SHA224
Compression: Uncompressed, ZIP, ZLIB, BZIP2


Rsync copy files with root privileges between servers with root superuser account disabled

Tuesday, December 3rd, 2019


rsync-copy-files-between-two-servers-with-root-privileges-with-root-superuser-account-disabled

Sometimes on servers that follow high security standards in companies following PCI Security (Payment Card Data Security) standards it is necessery to have a very weird configurations on servers,to be able to do trivial things such as syncing files between servers with root privileges in a weird manners.This is the case for example if due to security policies you have disabled root user logins via ssh server and you still need to synchronize files in directories such as lets say /etc , /usr/local/etc/ /var/ with root:root user and group belongings.

Disabling root user logins in sshd is controlled by a variable in /etc/ssh/sshd_config that on most default Linux OS
installations is switched on, e.g. 

grep -i permitrootlogin /etc/ssh/sshd_config
PermitRootLogin yes


Many corporations use Vulnerability Scanners such as Qualys are always having in their list of remote server scan for SSH Port 22 to turn have the PermitRootLogin stopped with:


PermitRootLogin no


In this article, I'll explain a scenario where we have synchronization between 2 or more servers Server A / Server B, whatever number of servers that have already turned off this value, but still need to
synchronize traditionally owned and allowed to write directories only by root superuser, here is 4 easy steps to acheive it.


1. Add rsyncuser to Source Server (Server A) and Destination (Server B)


a. Execute on Src Host:


groupadd rsyncuser
useradd -g 1000 -c 'Rsync user to sync files as root src_host' -d /home/rsyncuser -m rsyncuser


b. Execute on Dst Host:


groupadd rsyncuser
useradd -g 1000 -c 'Rsync user to sync files dst_host' -d /home/rsyncuser -m rsyncuser


2. Generate RSA SSH Key pair to be used for passwordless authentication


a. On Src Host
 

su – rsyncuser

ssh-keygen -t rsa -b 4096


b. Check .ssh/ generated key pairs and make sure the directory content look like.


[rsyncuser@src-host .ssh]$ cd ~/.ssh/;  ls -1

id_rsa
id_rsa.pub
known_hosts


3. Copy id_rsa.pub to Destination host server under authorized_keys


scp ~/.ssh/id_rsa.pub  rsyncuser@dst-host:~/.ssh/authorized_keys


Next fix permissions of authorized_keys file for rsyncuser as anyone who have access to that file (that exists as a user account) on the system
could steal the key and use it to run rsync commands and overwrite remotely files, like overwrite /etc/passwd /etc/shadow files with his custom crafted credentials
and hence hack you 🙂
 

Hence, On Destionation Host Server B fix permissions with:
 

su – rsyncuser; chmod 0600 ~/.ssh/authorized_keys
[rsyncuser@dst-host ~]$


An alternative way for the lazy sysadmins is to use the ssh-copy-id command


$ ssh-copy-id rsyncuser@192.168.0.180
/usr/bin/ssh-copy-id: INFO: Source of key(s) to be installed: "/root/.ssh/id_rsa.pub"
/usr/bin/ssh-copy-id: INFO: attempting to log in with the new key(s), to filter out any that are already installed
/usr/bin/ssh-copy-id: INFO: 1 key(s) remain to be installed — if you are prompted now it is to install the new keys
root@192.168.0.180's password: 


For improved security here to restrict rsyncuser to be able to run only specific command such as very specific script instead of being able to run any command it is good to use little known command= option
once creating the authorized_keys


4. Test ssh passwordless authentication works correctly


For that Run as a normal ssh from rsyncuser

On Src Host


[rsyncuser@src-host ~]$ ssh rsyncuser@dst-host


Perhaps here is time that for those who, think enabling a passwordless authentication is not enough secure and prefer to authorize rsyncuser via a password red from a secured file take a look in my prior article how to login to remote server with password provided from command line as a script argument / Running same commands on many servers 

5. Enable rsync in sudoers to be able to execute as root superuser (copy files as root)


For this step you will need to have sudo package installed on the Linux server.

Then, Execute once logged in as root on Destionation Server (Server B)


[root@dst-host ~]# grep 'rsyncuser ALL' /etc/sudoers|wc -l || echo ‘rsyncuser ALL=NOPASSWD:/usr/bin/rsync’ >> /etc/sudoers


Note that using rsync with a ALL=NOPASSWD in /etc/sudoers could pose a high security risk for the system as anyone authorized to run as rsyncuser is able to overwrite and
respectivle nullify important files on Destionation Host Server B and hence easily mess the system, even shell script bugs could produce a mess, thus perhaps a better solution to the problem
to copy files with root privileges with the root account disabled is to rsync as normal user somewhere on Dst_host and use some kind of additional script running on Dst_host via lets say cron job and
will copy gently files on selective basis.

Perhaps, even a better solution would be if instead of granting ALL=NOPASSWD:/usr/bin/rsync in /etc/sudoers is to do ALL=NOPASSWD:/usr/local/bin/some_copy_script.sh
that will get triggered, once the files are copied with a regular rsyncuser acct.


6. Test rsync passwordless authentication copy with superuser works


Do some simple copy, lets say copy files on Encrypted tunnel configurations located under some directory in /etc/stunnel on Server A to /etc/stunnel on Server B

The general command to test is like so:
 

rsync -aPz -e 'ssh' '–rsync-path=sudo rsync' /var/log rsyncuser@$dst_host:/root/tmp/


This will copy /var/log files to /root/tmp, you will get a success messages for the copy and the files will be at destination folder if succesful.


On Src_Host run:


[rsyncuser@src-host ~]$ dst=FQDN-DST-HOST; user=rsyncuser; src_dir=/etc/stunnel; dst_dir=/root/tmp;  rsync -aP -e 'ssh' '–rsync-path=sudo rsync' $src_dir  $rsyncuser@$dst:$dst_dir;


7. Copying files with root credentials via script


The simlest file to use to copy a bunch of predefined files  is best to be handled by some shell script, the most simple version of it, could look something like this.
 

#!/bin/bash
# On server1 use something like this
# On server2 dst server
# add in /etc/sudoers
# rsyncuser ALL=NOPASSWD:/usr/bin/rsync

user='rsyncuser';

dst_dir="/root/tmp";
dst_host='$dst_host';
src[1]="/etc/hosts.deny";
src[2]="/etc/sysctl.conf";
src[3]="/etc/samhainrc";
src[4]="/etc/pki/tls/";
src[5]="/usr/local/bin/";


for i in $(echo ${src[@]}); do
rsync -aPvz –delete –dry-run -e 'ssh' '–rsync-path=sudo rsync' "$i" $rsyncuser@$dst_host:$dst_dir"$i";
done


In above script as you can see, we define a bunch of files that will be copied in bash array and then run a loop to take each of them and copy to testination dir.
A very sample version of the script rsync_with_superuser-while-root_account_prohibited.sh 
 

Conclusion


Lets do short overview on what we have done here. First Created rsyncuser on SRC Server A and DST Server B, set up the key pair on both copied the keys to make passwordless login possible,
set-up rsync to be able to write as root on Dst_Host / testing all the setup and pinpointing a small script that can be used as a backbone to develop something more complex
to sync backups or keep system configurations identicatial – for example if you have doubts that some user might by mistake change a config etc.
In short it was pointed the security downsides of using rsync NOPASSWD via /etc/sudoers and few ideas given that could be used to work on if you target even higher
PCI standards.