Posts Tagged ‘software’
Friday, March 18th, 2016 
If you're into IT industry even if you don't like installing frequently Windows or you're completely Linux / BSD user, you will certainly have a lot of friends which will want help from you to re-install or fix their Windows 7 / 8 / 10 OS. At least this is the case with me every year, I'm kinda of obliged to install fresh windowses on new bought friends or relatives notebooks / desktop PCs.
Of course according to for whom the new Windows OS installed the preferrences of necessery software varies, however more or less there is sort of standard list of Windows Software which is used daily by most of Avarage Computer user, such as:
Not to forget a good candidate from the list to install on new fresh windows Installation candidates are:
- Winrar
- PeaZIP
- WinZip
- GreenShot (to be able to easily screenshot stuff and save pictures locally and to the cloud)
- AnyDesk (non free but very functional alternative to TeamViewer) to be able to remotely access remote PC
- TightVNC
- ITunes / Spotify (for people who have also iPhone smart phone)
- DropBox or pCloud (to have some extra cloud free space)
- FBReader (for those reading a lot of books in different formats)
- Rufus – Rufus is an efficient and lightweight tool to create bootable USB drives. It helps you to create BIOS or UEFI bootable devices. It helps you to create Windows TO Go drives. It provides support for various disk, format, and partition.
- Recuva is a data recovery software for Windows 10 (non free)
- EaseUS (for specific backup / restore data purposes but unfortunately (non free)
- For designers
- Adobe Photoshop
- Adobe Illustrator
- f.lux – to control brightness of screen and potentially Save your eyes
- ImDisk virtual Disk Driver
- KeePass / PasswordSafe – to Securely store your passwords
- Putty / MobaXterm / SecureCRT / mPutty (for system administrators and programmers that has to deal with Linux / UNIX)
I tend to install on New Windows installs and thus I have more or less systematized the process.
I try to usually stick to free software where possible for each of the above categories as a Free Software enthusiast and luckily nowadays there is a lot of non-priprietary or at least free as in beer software available out there.
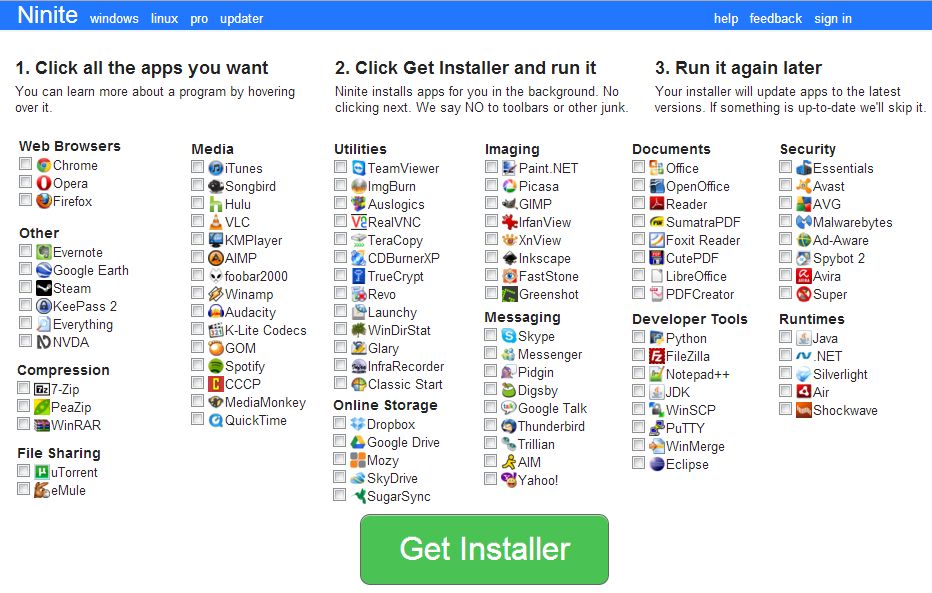
For Windows sysadmins or College and other public institutions networks including multiple of Windows Computers which are not inside a domain and also for people in computer repair shops where daily dozens of windows pre-installs or a set of software Automatic updates are necessery make sure to take a look at Ninite
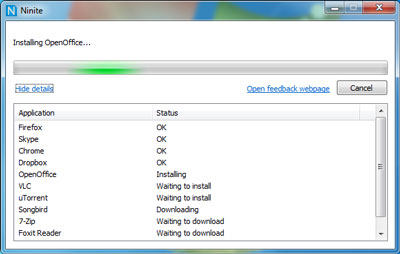
As official website introduces Ninite:
Ninite – Install and Update All Your Programs at Once
Of course as Ninite is used by organizations as NASA, Harvard Medical School etc. it is likely the tool might reports your installed list of Windows software and various other Win PC statistical data to Ninite developers and most likely NSA, but this probably doesn't much matter as this is probably by the moment you choose to have installed a Windows OS on your PC.
For Windows System Administrators managing small and middle sized network PCs that are not inside a Domain Controller, Ninite could definitely save hours and at cases even days of boring install and maintainance work. HP Enterprise or HP Inc. Employees or ex-employees would definitely love Ninite, because what Ninite does is pretty much like the well known HP Internal Tool PC COE.
Ninite could also prepare an installer containing multiple applications based on the choice on Ninite's website, so that's also a great thing especially if you need to deploy a different type of Users PCs (Scientific / Gamers / Working etc.)
Perhaps there are also other useful things to install on a new fresh Windows installations, if you're using something I'm missing let me know in comments.
Tags: Archiving Unarchiving Zip Rar Software, case, Chat, com, common, course, daily, data, directory, dozens, Eclipse, fix, free software, inside, installed, list, look, lot, matter, multiple, necessery, New Windows, notebooks, official, OS, Pc, possible, process, public institutions, remote desktop, software, sort, standard, system administrators, things, various, website, Windows, windows computers, windows software, www
Posted in Everyday Life, Remote System Administration, System Administration, Various, Windows | 1 Comment »
Thursday, April 30th, 2020 
I'm part of a SysAdmin Team that is partially doing some minor Zabbix imrovements on a custom corporate installed Zabbix in an ongoing project to substitute the previous HP OpenView monitoring for a bunch of Legacy Linux hosts.
As one of the necessery checks to have is regarding system Hardware, the task was to invent some simplistic way to monitor hardware with the Zabbix Monitoring tool. Monitoring Bare Metal servers hardware of HP / Dell / Fujituse etc. servers in Linux usually is done with a third party software provided by the Hardware vendor. But as this requires an additional services to run and sometimes is not desired. It was interesting to find out some alternative Linux native ways to do the System hardware monitoring.
Monitoring statistics from the system hardware components can be obtained directly from the server components with ipmi / ipmitool (for more info on it check my previous article Reset and Manage intelligent Platform Management remote board article).
With ipmi hardware health info could be received straight from the ILO / IDRAC / HPMI of the server. However as often the Admin-Lan of the server is in a seperate DMZ secured network and available via only a certain set of routed IPs, ipmitool can't be used.
So what are the other options to use to implement Linux Server Hardware Monitoring?
The tools to use are perhaps many but I know of two which gives you most of the information you ever need to have a prelimitary hardware damage warning system before the crash, these are:
1. smartmontools (smartd)
Smartd is part of smartmontools package which contains two utility programs (smartctl and smartd) to control and monitor storage systems using the Self-Monitoring, Analysis and Reporting Technology system (SMART) built into most modern ATA/SATA, SCSI/SAS and NVMe disks.
Disk monitoring is handled by a special service the package provides called smartd that does query the Hard Drives periodically aiming to find a warning signs of hardware failures.
The downside of smartd use is that it implies a little bit of extra load on Hard Drive read / writes and if misconfigured could reduce the the Hard disk life time.
linux:~# /usr/sbin/smartctl -a /dev/sdb2
smartctl 6.6 2017-11-05 r4594 [x86_64-linux-4.19.0-5-amd64] (local build)
Copyright (C) 2002-17, Bruce Allen, Christian Franke, www.smartmontools.org
=== START OF INFORMATION SECTION ===
Device Model: KINGSTON SA400S37240G
Serial Number: 50026B768340AA31
LU WWN Device Id: 5 0026b7 68340aa31
Firmware Version: S1Z40102
User Capacity: 240,057,409,536 bytes [240 GB]
Sector Size: 512 bytes logical/physical
Rotation Rate: Solid State Device
Device is: Not in smartctl database [for details use: -P showall]
ATA Version is: ACS-3 T13/2161-D revision 4
SATA Version is: SATA 3.2, 6.0 Gb/s (current: 3.0 Gb/s)
Local Time is: Thu Apr 30 14:05:01 2020 EEST
SMART support is: Available – device has SMART capability.
SMART support is: Enabled
=== START OF READ SMART DATA SECTION ===
SMART overall-health self-assessment test result: PASSED
General SMART Values:
Offline data collection status: (0x00) Offline data collection activity
was never started.
Auto Offline Data Collection: Disabled.
Self-test execution status: ( 0) The previous self-test routine completed
without error or no self-test has ever
been run.
Total time to complete Offline
data collection: ( 120) seconds.
Offline data collection
capabilities: (0x11) SMART execute Offline immediate.
No Auto Offline data collection support.
Suspend Offline collection upon new
command.
No Offline surface scan supported.
Self-test supported.
No Conveyance Self-test supported.
No Selective Self-test supported.
SMART capabilities: (0x0002) Does not save SMART data before
entering power-saving mode.
Supports SMART auto save timer.
Error logging capability: (0x01) Error logging supported.
General Purpose Logging supported.
Short self-test routine
recommended polling time: ( 2) minutes.
Extended self-test routine
recommended polling time: ( 10) minutes.
SMART Attributes Data Structure revision number: 1
Vendor Specific SMART Attributes with Thresholds:
ID# ATTRIBUTE_NAME FLAG VALUE WORST THRESH TYPE UPDATED WHEN_FAILED RAW_VALUE
1 Raw_Read_Error_Rate 0x0032 100 100 000 Old_age Always – 100
9 Power_On_Hours 0x0032 100 100 000 Old_age Always – 2820
12 Power_Cycle_Count 0x0032 100 100 000 Old_age Always – 21
148 Unknown_Attribute 0x0000 100 100 000 Old_age Offline – 0
149 Unknown_Attribute 0x0000 100 100 000 Old_age Offline – 0
167 Unknown_Attribute 0x0000 100 100 000 Old_age Offline – 0
168 Unknown_Attribute 0x0012 100 100 000 Old_age Always – 0
169 Unknown_Attribute 0x0000 100 100 000 Old_age Offline – 0
170 Unknown_Attribute 0x0000 100 100 010 Old_age Offline – 0
172 Unknown_Attribute 0x0032 100 100 000 Old_age Always – 0
173 Unknown_Attribute 0x0000 100 100 000 Old_age Offline – 0
181 Program_Fail_Cnt_Total 0x0032 100 100 000 Old_age Always – 0
182 Erase_Fail_Count_Total 0x0000 100 100 000 Old_age Offline – 0
187 Reported_Uncorrect 0x0032 100 100 000 Old_age Always – 0
192 Power-Off_Retract_Count 0x0012 100 100 000 Old_age Always – 16
194 Temperature_Celsius 0x0022 034 052 000 Old_age Always – 34 (Min/Max 19/52)
196 Reallocated_Event_Count 0x0032 100 100 000 Old_age Always – 0
199 UDMA_CRC_Error_Count 0x0032 100 100 000 Old_age Always – 0
218 Unknown_Attribute 0x0032 100 100 000 Old_age Always – 0
231 Temperature_Celsius 0x0000 097 097 000 Old_age Offline – 97
233 Media_Wearout_Indicator 0x0032 100 100 000 Old_age Always – 2104
241 Total_LBAs_Written 0x0032 100 100 000 Old_age Always – 1857
242 Total_LBAs_Read 0x0032 100 100 000 Old_age Always – 1141
244 Unknown_Attribute 0x0000 100 100 000 Old_age Offline – 32
245 Unknown_Attribute 0x0000 100 100 000 Old_age Offline – 107
246 Unknown_Attribute 0x0000 100 100 000 Old_age Offline – 15940
SMART Error Log Version: 1
No Errors Logged
SMART Self-test log structure revision number 1
No self-tests have been logged. [To run self-tests, use: smartctl -t]
Selective Self-tests/Logging not supported
2. hddtemp
Usually if smartd is used it is useful to also use hddtemp which relies on smartd data.
The hddtemp program monitors and reports the temperature of PATA, SATA
or SCSI hard drives by reading Self-Monitoring Analysis and Reporting
Technology (S.M.A.R.T.) information on drives that support this feature.
linux:~# /usr/sbin/hddtemp /dev/sda1
/dev/sda1: Hitachi HDS721050CLA360: 31°C
linux:~# /usr/sbin/hddtemp /dev/sdc6
/dev/sdc6: KINGSTON SV300S37A120G: 25°C
linux:~# /usr/sbin/hddtemp /dev/sdb2
/dev/sdb2: KINGSTON SA400S37240G: 34°C
linux:~# /usr/sbin/hddtemp /dev/sdd1
/dev/sdd1: WD Elements 10B8: S.M.A.R.T. not available
3. lm-sensors / i2c-tools
Lm-sensors is a hardware health monitoring package for Linux. It allows you
to access information from temperature, voltage, and fan speed sensors.
i2c-tools was historically bundled in the same package as lm_sensors but has been seperated cause not all hardware monitoring chips are I2C devices, and not all I2C devices are hardware monitoring chips.
The most basic use of lm-sensors is with the sensors command
linux:~# sensors
i350bb-pci-0600
Adapter: PCI adapter
loc1: +55.0 C (high = +120.0 C, crit = +110.0 C)
coretemp-isa-0000
Adapter: ISA adapter
Physical id 0: +28.0 C (high = +78.0 C, crit = +88.0 C)
Core 0: +26.0 C (high = +78.0 C, crit = +88.0 C)
Core 1: +28.0 C (high = +78.0 C, crit = +88.0 C)
Core 2: +28.0 C (high = +78.0 C, crit = +88.0 C)
Core 3: +28.0 C (high = +78.0 C, crit = +88.0 C)
On CentOS Linux useful tool is also lm_sensors-sensord.x86_64 – A Daemon that periodically logs sensor readings to syslog or a round-robin database, and warns of sensor alarms.
In Debian Linux there is also the psensors-server (an HTTP server providing JSON Web service which can be used by GTK+ Application to remotely monitor sensors) useful for developers
psesors-server
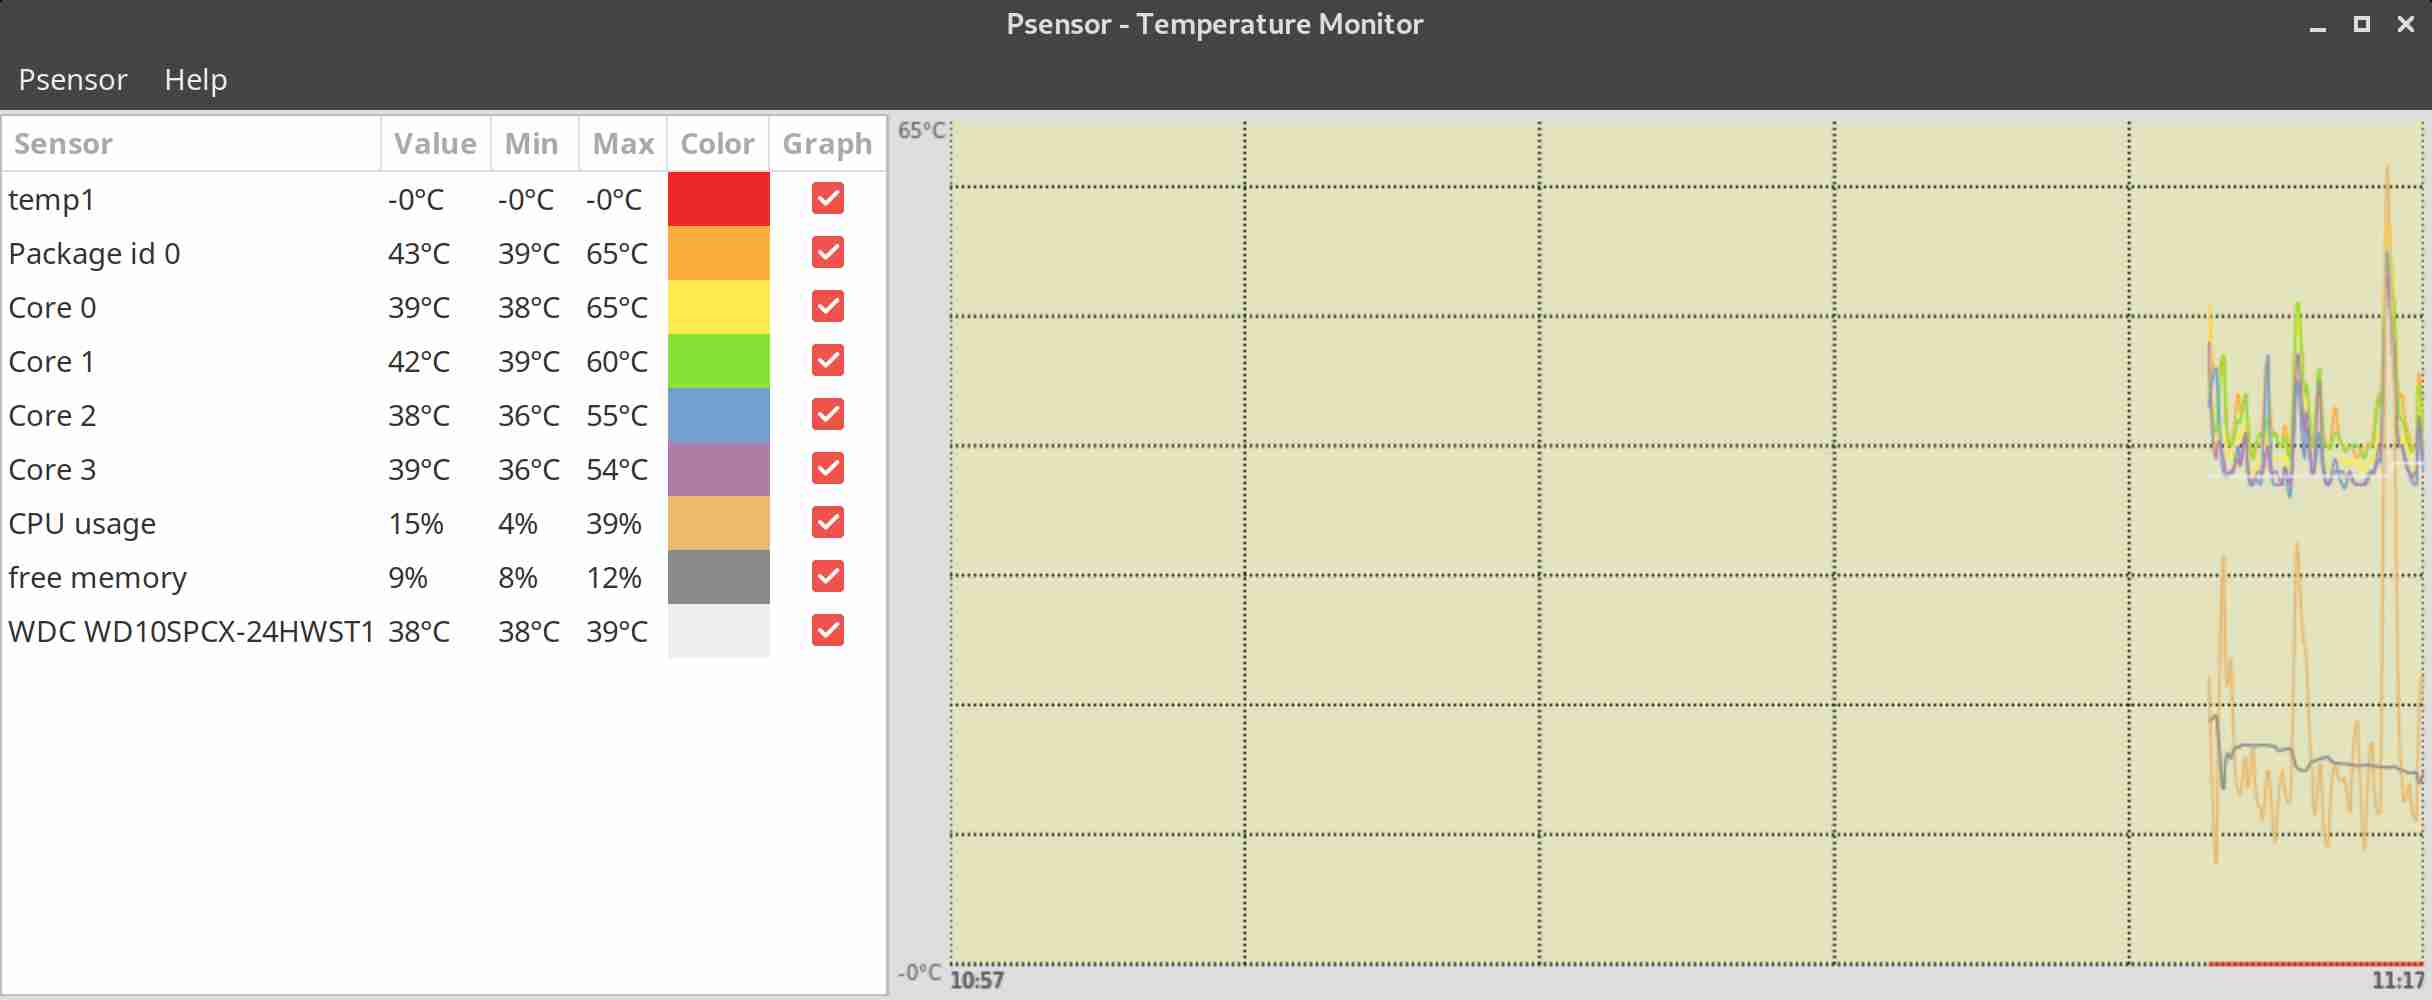
If you have a Xserver installed on the Server accessed with Xclient or via VNC though quite rare,
You can use xsensors or Psensor – a GTK+ (Widget Toolkit for creating Graphical User Interface) application software.
With this 3 tools it is pretty easy to script one liners and use the Zabbix UserParameters functionality to send hardware report data to a Company's Zabbix Sserver, though Zabbix has already some templates to do so in my case, I couldn't import this templates cause I don't have Zabbix Super-Admin credentials, thus to work around that a sample work around is use script to monitor for higher and critical considered temperature.
Here is a tiny sample script I came up in 1 min time it can be used to used as 1 liner UserParameter and built upon something more complex.
SENSORS_HIGH=`sensors | awk '{ print $6 }'| grep '^+' | uniq`;
SENSORS_CRIT=`sensors | awk '{ print $9 }'| grep '^+' | uniq`; ;SENSORS_STAT=`sensors|grep -E 'Core\s' | awk '{ print $1" "$2" "$3 }' | grep "$SENSORS_HIGH|$SENSORS_CRIT"`;
if [ ! -z $SENSORS_STAT ]; then
echo 'Temperature HIGH';
else
echo 'Sensors OK';
fi
Of course there is much more sophisticated stuff to use for monitoring out there
Below script can be easily adapted and use on other Monitoring Platforms such as Nagios / Munin / Cacti / Icinga and there are plenty of paid solutions, but for anyone that wants to develop something from scratch just like me I hope this
article will be a good short introduction.
If you know some other Linux hardware monitoring tools, please share.
Tags: Adapter, around, Auto Offline Data Collection Disabled, awk, CPU, data, developers, Disk, Extended, firmware version, hard drives, hardware, hardware health, health, information, ISA, linux?, Monitoring, Monitoring Linux, nagios, package, pci, script, sensors, Short, software, system hardware, temperature, zabbix, Zabbix Userparameter
Posted in Linux, Monitoring, System Administration | 1 Comment »
Monday, March 14th, 2011 
I'm experimenting this days with Elgg – An Open Source Free Software GPLed Social Network which enables users to quickly create Communities.
Elgg is really easy to install and all it requires is a Linux/BSD or Windows system with PHP, MySQL and Apache installed.
Elgg is provided with dozens of nice plugins which for a short time enables individual to create fully operational Social Network like facebook.
Many people nowdays use facebook without realizing how bad facebook is how it breaks their privacy.
Facebook is actually a spy network, it stores data and pictures, likings and user behaviour of million of users around the world.
This needs to be stopped somehow, maybe if people start using the free software networks like elgg to build a mini-community which has profound interests in a certain spheres of work, life and amusement.
The evil empire of facebook will slowly start to loose it's position and the small projects networks based on Elgg and the other Free Software Social Networks which are currently available will start to rise up.
I'm currently really a novice into Elgg but I'm more convinced that the guys who develop it and contribute to it in terms of handy plugins have done really a great job.
It's ultra easy even for non professional middle level user to setup himself an Elgg install.
The installation procedure is not much harder than a simple wordpress blog or joomla based website install.
The installation of elgg takes no more than 10 to 20 minutes, the plugin installation and setup time further could take few days but in the end you have a full featured Social Network! This is really amazing.
The installation of new plugins in elgg is also fool proof / easy all you have to do to equip a newly installed elgg with plugins is to go to it's root directory and look for the mod directory. The new plugins which needs to be installed, could be directly downloaded and saved via links, elinks, lynx or even wget to the elgg installation directory.
Most of the elgg plugins comes in a form of zip files so after being installed simply executing:
server:/home/elgg/mysocialnetwork/mod# unzip walltowall.zip

....
The above cmd will for example unzip the WallToWall elgg plugin and the plugin will be further ready to be enabled via the administrator user set upped during your elgg installation.
The configurations of elgg are being accomplished via:
Administration -> Tool Administration
I should I'm still experimenting with Elgg social, until this very moment I've installed the following elgg plugins:
aaudio

akismet

artfolio

blog

bookmarks

buddytalk

captcha

categories

chat

crontrigger

custom_index

custom_profile_fields

default_widgets

diagnostics

elgg-ebuddy

embed

embedvideo

emoticons

externalpages

family

fbconnect

file

file_tree

flyers

forum

friend_request

friends

garbagecollector

groups

htmlawed

invitations

invitefriends

izap_videos

kaltura_video

lastfm

likes

logbrowser

logrotate

lucygames

members

messageboard

messages

milockergames_frameme

noscript_message

notifications

pages

polls

profile

reportedcontent

resume

river_comments

riverdashboard

riverfaces

search

siteaccess

tagcloud

theme_simpleneutral

thewire

tidypics

tidypicsExt

tinymce

twitter

twitterservice

user_contact_list

uservalidationbyemail

walltowall

weather

wp1

zaudio
One very handy feature I truly enjoy about Elgg is that it gives every user an own blog which or in other words when somebody registers in Elgg, he automatically gets a personal blog! How cool this is Yeash 😉
The Elgg photo upload plugin is also another interesting story. The photo plugin is a way better from my first impressions than facebook's buggy upload client.
Elgg also uses heavily jquery for it's various operations and the user experience feels very interactive.
Of course as with all free software things are not perfect some of the elgg plugins or (mods) as they are called are not working.
For example I couldn't make by so far the weather plugin which is supposed to report the weather.
Maybe some tweakening of the not working plugins will easily make them working. What is really important is that the Elgg basis system looks and seems to work really good and enpowers the user with a social network alternatives to the ugly facebook.
In order to experiment with Elgg and I've established a small social network targetting at University College and School Students called MockATeacher – mockateacher.com>/i>. The idea behind is to help students in their report writting by providing them with a place where they can meet other students and share files.
Some other aspects I've planned for MockATeacher is to build a small community of people who would like to share about idiot teachers, teacher stupid sayings as well as to mock the idiotic type of education that we and our children are up to in this age.
Just to close up, if you're looking for some time to spend in experimenting in an enjoyable way you definitely need to install elgg and play with it 😉
Tags: BSD, bsd system, custom, dozens, elgg, evil empire, facebook, fool, fool proof, Free, free software networks, GPLed, installation, level, likings, Lynx, mod, novice, Open, php mysql, plugin, plugin installation, Privacy, root, root directory, setup time, short time, social networks, software, spheres, spy, spy network, time, unzip, weather, which enables users, windows system, wordpress blog, work, working
Posted in Entertainment, Everyday Life, Joomla, Linux, Various, Web and CMS | 2 Comments »
Wednesday, October 5th, 2011 
Its not very common, but sometimes it happens you have to crack some downloaded file from thepiratebay.com or some other big torrent tracker. An example scenario would be downloading a huge words dictionary (a rainbow tables) dictionary etc., which was protected by the author with a password and zipped.
Fortunately Mark Lehmann developed a software called fcrackzip which is capable of brute forcing zip protected file passwords straight on UNIX like operating systems (GNU/Linux, FreeBSD).
fcrackzip is available from package repositories on Debian and Ubuntu Linuces to install via apt:
linux:~# apt-get install frackzip

...
fcrackzip is also available on FreeBSD via the ports tree and can be installed with:
freebsd# cd /usr/ports/security/fcrackzip

freebsd# make install cleam
On Debian it's worthy to have a quick look on the README file:
linux:~# cat /usr/share/doc/fcrackzip/READMESee fcrackzip.txt (which is derived from the manpage), or fcrackzip.html
There is a web page with more information at
http://lehmann.home.ml.org/fcrackzip.html or
http://www.goof.com/pcg/marc/fcrackzip.html
A sample password-protected .zip file is included as "noradi.zip". It's
password has 6 lower case characters, and fcrackzip will find it (and a
number of false positives) with
fcrackzip -b -c a -p aaaaaa ./noradi.zip
which will take between one and thirty minutes on typical machines.
To find out which of these passwords is the right one either try them out
or use the –use-unzip option.
Marc
Cracking the noradi.zip password protected sample file on my dual core 1.8 ghz box with 2gb, it took 30 seconds.
linux:~# time fcrackzip -u -b -c a -p aaaaaa noradi.zip
PASSWORD FOUND!!!!: pw == noradi
real 0m29.627s
user 0m29.530s
sys 0m0.064s
Of course the sample set password for noradi.zip is pretty trivial and with more complex passwords, sometimes cracking the password can take up to 30 minutes or an hour and it all depends on the specific case, but at least now we the free software users have a new tool in the growing arsenal of free software programs 😉
Here are the options passed on to the above fcrackzip command:
-u – Try to decompress with the detected possible archive passwords using unzip (This is necessery to precisely find the archive password, otherwise it will just print out a number of possible matching archive passwords and you have to try each of the passwords one by one. Note that this option depends on a working unzip version installed.)
-c a – include all charsets to be tried with the generated passwords
-b – Select brute force mode – Tries all possible combinations of letters specified
-p aaaaaa – init-password string (Look up for a password between the password length 6 characters long)
FCrackZip is partly written in assembler and thus is generally works fast, to reduce the CPU load fcrackzip will put on the processor its also capable of using external words dictionary file by passing it the option:
-D – The file should be in a format one word per line and be preliminary alphabetically sorted with let's say sort
Also fcrackzip supports parallel file brute force, for example if you have 10 zip files protected with passwords it can paralelly try to brute force the pwds.
As of time of writting frackzip reached version 1.0 and seems to be pretty stable. Happy cracking.
Just to make sure fcrackzip's source is not lost somewhere in the line in the long future to come, I've created a fcrackzip download mirror here
Tags: brute, case characters, com, downloaded file, dual core, example scenario, false positives, fcrackzip, file, file linux, frackzip, gnu linux, goof, htmlThere, information, lehmann, linux freebsd, linux?, lower case, manpage, number, option, outor, package, page, password, pcg, quot, README, readme file, READMESee, repositories, right, softw, software, spassword, TABLE, time, torrent tracker, tree, Ubuntu, withfcrackzip, words dictionary, zip file, zippassword
Posted in Computer Security, Hacks, System Administration | 1 Comment »
Thursday, April 14th, 2016 
While browsing today and looking for software to clean up all the spy software from my corporate HP laptop, I've come across an interesting tool called Decrap which aims at removing Bloatware from a Windows PC / notebook (mirrored here because original software site was down)
So what is Bloatware ?
The term Bloatware (also called jokingly crapware) is term is the one that was coined to describe, the default pre-installed software that comes to you together with Windows pre-installed OS by the hardware manufacturer.
I'm sure anyone who bought brand new branded PC or laptop over the last 10 years have already suffered the unwanted and unnecessery
bunch of software that comes pre-installed freeware programs aiming to help you in your daily work but in reality just slowing down your PC
and showing annoying popups or at best keeping useless in Windows system apptray.
Let me give you an example:
Cleanup (Remove) common ASUS, HP, Dell default installed unneded (Bloatware) software
Many users may want to uninstall ASUS Crapware software such as ASUS Tutor, ASUS LifeFrame3, ASUS WebStorage and ASUSVibe.
Like Asus, HP computers often come preloaded with useless software from factory, example for this is HP Customer Service enhancements, HP Update, HP Total Care Setup and ProtectSmart.
If you buy Dell PC notebook soon you'll discover that there are several preloaded software (often unnecessery software) such as Dell Stage, Dell Digital Delivery and Dell DataSafe.
Toshiba computers and notebooks contain pre-loeaded "crapware" software from Toshiba.
Just to mention a few of those: Toshiba Disc Creator, Toshiba ReelTime, Service Station, Bulletin Board and Toshiba Assist.
Often there are fingerprint reader programs, Wi-Fi connection managers, Bluetooth managers, Audio Management sofware and other third party vendor software which tend to be not working as good as others softwares from third vendor, so Decrap is to help you to identify and remove these too in a easy GUI manner.
Non-experienced Computer users often leave the bloatware to hang around for even years and only if some relative that is an IT involved person / sysadmin / Even once you're aware that the Bloatware is on the system the ordinary user is hard to remove it as he is scared not to break the system.
Besides that fften this bloatware just soft comes so much integrated into Windows that removing it costs hours of tries and research online on
all the Bloatware components and even then could mislead you so you break the PC. programmer etc. comes home of such users finds out about the happily existing of the useless software on the notebook.
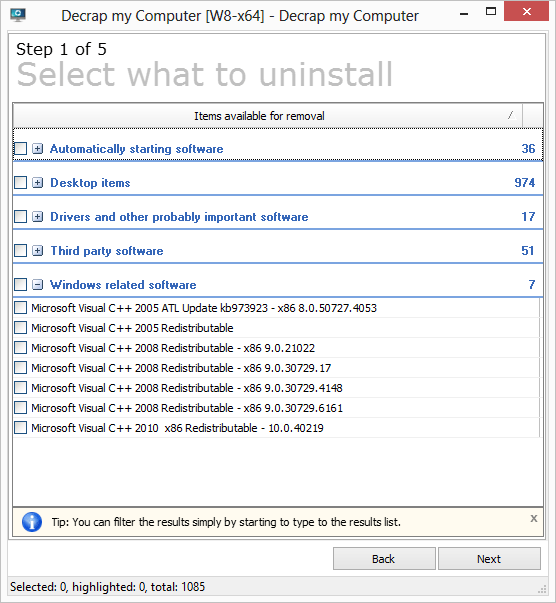
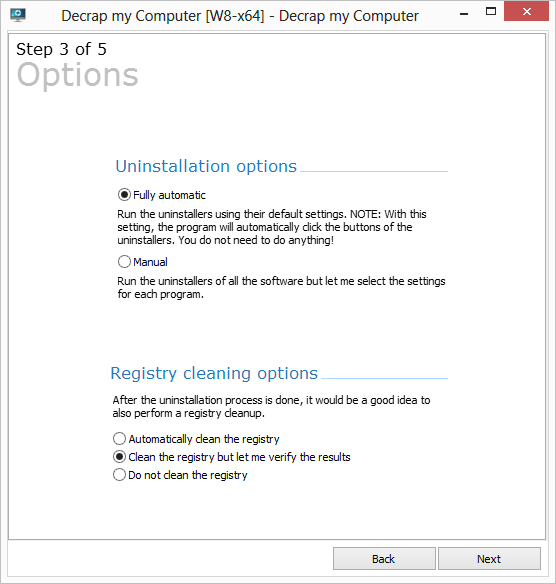
So here is Decrap My Computer coming at place aiming to help to remove the unnecessery Hardware vendor software in few easy (Click, Click, Click Next ..) steps.
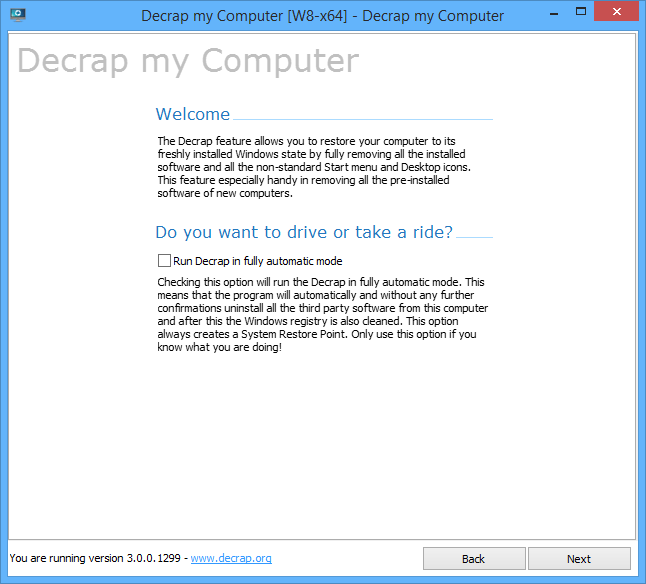
Then decrap does silently all the complex operations and suggestions to make the HP, Dell, Asus, Toshiba manufacturer prebundled software to be stopped and uninstalled.
Decrap My Computer is a freeware, lightweight and easy to use and lets you safely remove crapware and bloatware, or any software, from any Windows PC.
Even for Old computers, Decrap comes handy for the unexperienced avarage user who used his laptop with this useless default vendors programs silently killing the performance respectively user experience for years.
Using Decrap is quite intuitive PC is scanned for Bloatware and then after a backup Windows Restore Point is offered you're offered to review and Uninstall the unwanted softwares. There is also an automatic mode but those one still could be a bit dangerous, so use the automatic mode only on multiple machines with the same model / brand notebooks that comes prebundled with same sofware after testing and confirming the automatic mode on 1 initial machine will not break up some needed functionality.
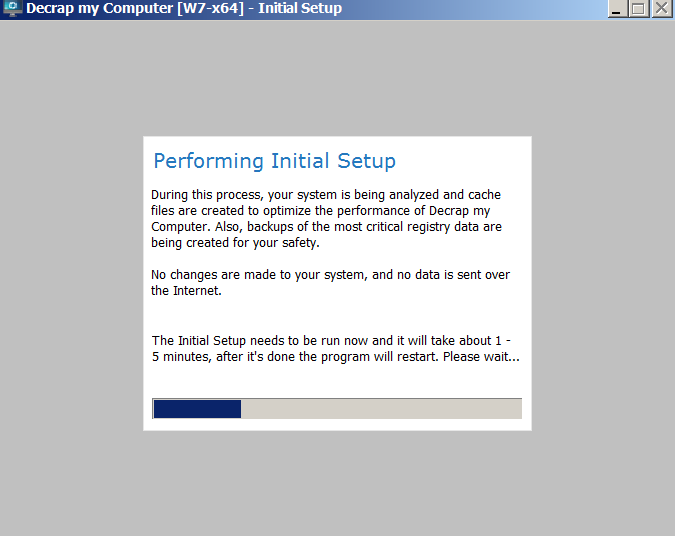
Here is few screenshots of the tool in action:

Another good alternative (since decrap seems to be not maintained anymore) as I just leardned from Natasha Myles (thanks for pointing me about the broken link to decrap website) is SpeedUpPC more on speeding up old PC or laptop is her article
Tags: Asus, Asus Toshiba, break, clean up new bought pc from bundled software, cleanup new and old laptop from hardware vendor software, default, delete crap software from new bought pc, help, hp, Pc, remove default installed acer soft, remove default installed asus soft, remove default installed dell soft, remove default installed hp soft, software, system, tool, uninstall unecessery software on new laptop, Windows Restore Point, working
Posted in Everyday Life, Performance Tuning, Windows | No Comments »
Wednesday, July 4th, 2012 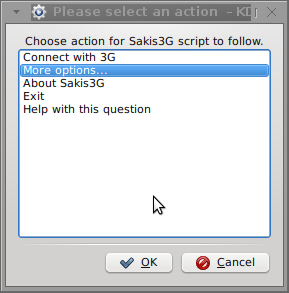
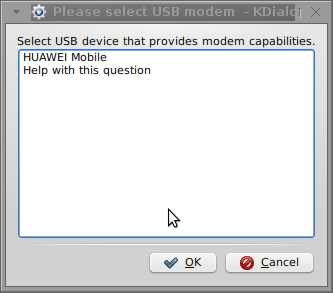
I've been given a HUAWEI Mobile Broadband E173 USB 3g model. The USB modem contains a flash USB Storage segment storing a little install program dedicated to make the modem work fine on Microsoft Windows XP / Vista / 7 and probably other M$ OSes. I'm a long time DebianGNU / Linux user and as a free software enthusiast I ofcourse wanted to be able to use Vivacom's 3G USB Modem on my Linux powered notebook.
Thanksfully as I've red on Vivacom's website the modem supports Linux OS 🙂
For those unaware in Bulgaria there are currently 3 major GSM network providers providing 3G internet this are;;;
- VIVACOM – The ex Government ran national company BTC (Bulgarian Telecommunication Company)
- M-Tel – The first GSM network provider that entered Bulgaria around year 1995
- GLOBUL – The 3rd and last GSM mobile and net provider entered last and not so much used by Bulgarians today
Until today I had no experience in running any 3G modems on Linux, neither I had used the 3 networks 3G internet to determine which one is best, however I've been given for temporal use a VIVACOM 3G internet modem today so I proceeded to try installing it on my Debian host.
My Linux system is a bit strangely configured as I use wicd network connection manager -( wicd-gtk ) to manage wireless and LAN connections instead of the standard installed GNOME network manager – available through package ( network-manager-gnome ).
The reason I use wicd is not that it is so much better than GNOME network manger but rather for historical reasons because few years past I had impression it works better in connecting me to wireless networks. Another reason why I choosed wicd back then was the nice looking stats …
I tried plugging in the Vivacom USB 3G modem stick and checked in wicd to see if I can see a possibility to connect to the mobile opeartor 3G network but unfortunately nothing appeared.
Though the 3G adsl modem was unavailable straing in wicd, checking about it in the list of attached USB devices I could see it detected, e.g.:
noah:~# lsusb |grep -i huawei

Bus 001 Device 007: ID 12d1:1c05 Huawei Technologies Co., Ltd.
This was at least a good sign pointing me to the thoughts that the modem is probably gonna work.
I did a quick Google search to see if other people succeded running the device on a Linux host and came across a few blog posts in Bulgarian explaining a "success story" on Ubuntu Linux through using a tweakened shell script – sakis3g. For more on how the script works and script download check out Sakis3g
Here is a quote from sakis3g's website describing the script:
It automagically setups your USB or Bluetooth™ modem, and may even detect operator settings.
You should try it when anything else fails!
Sakis3g has different versions designed for for plenty of spacific hware architectures i.e. for (i386, amd64, armv4t, armv5t).
There is also a version of the script which by the way contains a combination of bash shell scripting instruction and some binary exec data.
To run sakis3g on my laptop I did:
1. Download sakis3g
My notebook architecture is 64 bit so I download and used the amd64 version of the script;;;
hipo@noah:~$ mkdir sakis3g

hipo@noah:~$ cd sakis3g

hipo@noah:~/sakis3g$ wget http://www.sakis3g.org/versions/latest/amd64/sakis3g.gz
I've made also a mirror of sakis3g i386, 64 bit and all architecture the mirrors just in case it disappears in future. The mirror versions of sakis3g are here:
a. sakis3g i386 b. sakis3g amd64 c. sakis3g all architectures source
2. Unarchive and make it executable
After downloading it as it is in gzip I had to do the usual de-gzipping and making the file executable;;;
hipo@noah:~/sakis3g$ /bin/gzip -d sakis3g.gz

hipo@noah:~/sakis3g$ chmod +x sakis3g
The script is then ready to run by either clicking twice on it or (as I prefer for debugging reasons to run it in terminal):
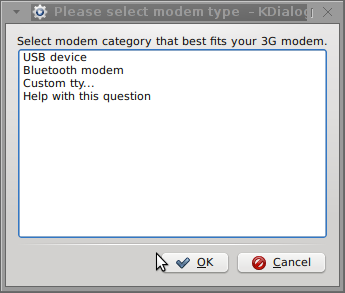
hipo@noah:~$ ./sakis3g
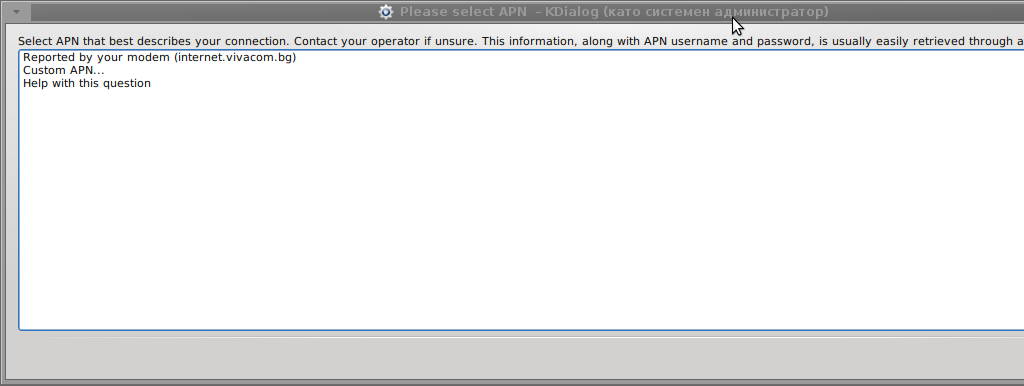
Something that I have wondered a bit was the dialog where I had to fill in some data of some variable APN abbreviation for – (Access Point Name)
The APN host for VIVACOM mobile internet is;;;
APN: internet.vivacom.bg
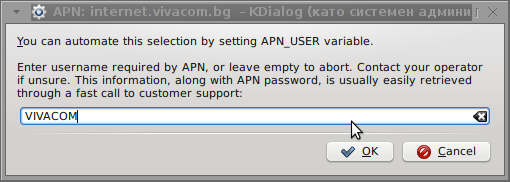
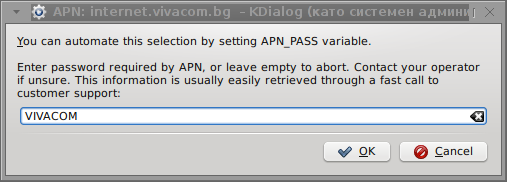
I've used the Windows configuration progrma to gather also the following data that I thought might be important for configuring the 3G adsl modem on the Linux host;;;
Auth: *99#

User: VIVACOM

pass: VIVACOM
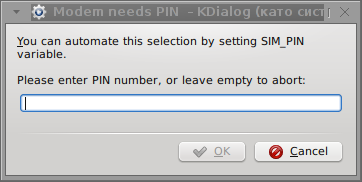
Here are all the configuration screenshots I've taken from sakis3g and all the data that I filled in.
Next the following tiny window appeared on screen:
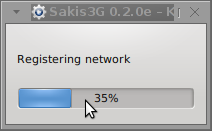
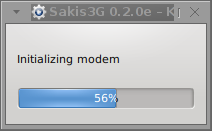

Well that's all folks, now sakis3g succesfully connected to the I_net via an (PPP) VPN connection tunnel here is data from ifconfig command showing the succesful 3G connection to VIVACOM;;;
noah:~# /sbin/ifconfig ppp0

ppp0 Link encap:Point-to-Point Protocol

inet addr:10.58.146.232 P-t-P:10.64.64.64 Mask:255.255.255.255

UP POINTOPOINT RUNNING NOARP MULTICAST MTU:1500 Metric:1

RX packets:2066 errors:1 dropped:0 overruns:0 frame:0

TX packets:1609 errors:0 dropped:0 overruns:0 carrier:0

collisions:0 txqueuelen:3

RX bytes:2232058 (2.1 MiB) TX bytes:341693 (333.6 KiB)
The internet via the 3G connection is not blazing fast but good enough to check your mail or read some webpages. VIVACOM currently has different (traffic limited packages) for their 3G internet, I'm not sure which package exactly is the 3G USB stick modem but probably the "quick" internet connection that is now would slow down once the traffic limit is reached …
Hope this post helps someone to configure 3G internet on VIVACOM in Debian and Ubuntu Linux. Though I've tested sakis3g on Debian it should work with no hassles on any other GNU Linux distribution that has bash installed.
Tags: adsl modem, architecture, Auto, bulgarians, configure, connection, DebianGNU, download, Draft, Flash, flash usb, free software enthusiast, Gnome, GSM, gsm network, gzip, host, internet modem, lan connections, linux system, m tel, manager, microsoft windows, Mobile, modem work, modems, nbsp, network provider, network providers, Point, quot, reason, segment, Shell, software, telecommunication company, time, Ubuntu, usb internet, usb modem, wicd, wireless networks, work
Posted in Linux, Linux and FreeBSD Desktop, Various | 3 Comments »
Friday, November 2nd, 2007 
Here the story a cousin of my father has called me to help them to buy a laptop. We have checked different types of laptops in TechnoMarket and TechnoPolis, Vali and Bergon. In vali we asked about GPS devices (a device only connecting with a Satellite, which needs software to be used). I asked the seller in Vali is there a chance if the Holux GPS to work with Linux.He said he have no idea I'm citing his words "Only a few people use Linux today" :). Also the Computer sellers in TechnoMarket weren't much of a competent, I myself also didn't have enough experience with Laptops. Before everything began I asked God to guide me in the choice. We choose to take a Toshiba Sattelite L40 12G or something like this. The machine is a pretty neat one (2G of ram, Intel video, 120 SATA Disk). I gave the suggestion to install Linux on the laptop and spend money of the Operating System (because they would need the laptop when they travel out of the country, buying furniture to resell and they don't want to have illegal software. There was an international warranty issue. The sellers in Technomarket didn't have data is the laptop with International warranty later we understood that there is international warranty of 1 year. We bought the laptop I successfully installed Ubuntu and a ton of useful software. Today I have installed qemu qemu-launcher and qemulator. Ubuntu seems to work pretty flawlessly. The idea in the beginning was to buy a flash memory and install a windows on it because they needed also to have Windows to install a TBI Credit (SmartInfo) program. I tried Windows XP/2000/XP Small but all them required a minimum of 2G of hard disk space to install (!) pretty annoying and this wasn't possible because the flash memory we had was only a 1G one. In the end I ended installing the Windows on the HDD. Thanks to God everything seems to go on in a good way. Thanks Lord! 🙂 The only thing that's left to do is install the Wireless card properly under Linux and Windows.Glory be to God The Father, The Son and The Holy Spirit! Now and Forever and Ever. Amen!END—–
Tags: beginning, furniture, hdd, Linux, memory, software, Ubuntu on Laptop, warranty, Windows, work
Posted in Linux, Linux and FreeBSD Desktop, Linux on Laptops | No Comments »
Friday, November 2nd, 2012 
A friend of mine today ask me if I have clue if it is possible to track his home computer Consumption with some piece of Software?
The question is quite interesting, since I run a home server with Linux and it would have been nice if I can exactly track how much electricity per month it consumes
Now knowing, the answer I first checked online for some kind of software and all I can find something that does something similar but all can find is powertop.
Though powertop is nice Linux tool to keep an eye which program on PC consumes most from overall consumed electricity and order the programs and modules based on electricity consumption it is not providing information on overall electricity consumption.
As the topic seem to be some interesting, I've decided to ask in irc.freenode.net #deiban
Here is a paste from irssi channel log:
17:21 < hipodilski> hi any idea, how can I find how much electricity a server conmuses per month
17:21 < hipodilski> is there some some kind of software
17:21 -!- digdilem [~digdilem@plague.digdilem.org] has joined #debian
17:22 < babilen> hipodilski: I would recommend an electricity meter rather than software
17:22 -!- tommy_e [~tommy@81.27.221.202] has quit [Ping timeout: 260 seconds]
17:22 < jelly-home> watt meters ftw
17:22 -!- msx [~msx@190.194.114.10] has joined #debian
17:22 -!- blackshirt [~najwa@103.3.223.5] has left #debian []
17:23 < hipodilski> yes but i don't have electricity metter, if there is software it would be interesting to try it
17:23 -!- badiane [~gdurand@D8FF67fa.cst.lightpath.net] has quit [Remote host closed the connection]
17:23 < xand> hipodilski: no, you need a hardware device.
17:23 < jelly-home> now everything can be solved in software, hipodilski
17:23 < jelly-home> not*
17:23 < jelly-home> dammit
17:23 < xand> unless you have a very fancy PSU, software can't find that out
17:23 < babilen> jelly-home: hehe, nice typo !
17:23 < vacuous> hipodilski yes
17:24 < HelloShitty> nsadmin, are you out of ideas for me?
17:24 < vacuous> there's various devices that do it
17:24 -!- firecode [~irc@unaffiliated/firecode] has joined #debian
17:24 < vacuous> you can either get a killawat which are highly innacurate but it might give you a clue
17:24 < vacuous> and they're very cheap too
17:25 < vacuous> you can get a device which measures your entire houses electric, then you just turn off all the appliances and run the
server only
17:25 -!- trysten [~trysten@37-251-103-145.FTTH.ispfabriek.nl] has quit [Quit: be back]
17:25 * babilen likes that approach
17:25 < babilen> But this is getting a bit too off-topic. Maybe hipodilski wants to take it to #debian-offtopic
17:25 < vacuous> or you can keep all fridges on, check what the reading is and then negate that from the total
17:25 < hipodilski> yes thanks 🙂
The answer makes it clear right of time of writing this post there is no software for Linux or BSD that keeps track electricity consumption daily or monthly
I've googled to see what is Kill-A-Watt hardware? and found fuzzy named device Kill-A-Watt for sale on ThinkGeek's website for the not so expensive 24.99$
To use Kill-A-Watt device is to be connected inside the power plug and then PC or Server has to be plugged into Kill-A-Watt dev. I've red also (while researching) many Intelligent UPS devs has support for keeping log of discharged energy, so just buying a good UPS with web administrator or even a cheap one providing statistical information of UPS use via serial port should be another alternative to track ur server consumption.
Tags: BSD, clue, consumption, electricity, find out server ups capacity, How to, kind, Linux, Pc, PSU, server electricity consumption, software, something, ups, website
Posted in Linux, Linux and FreeBSD Desktop, System Administration | No Comments »
Friday, March 17th, 2017 
If you're Windows user like me with a Linux / FreeBSD / OpenBSD / NetBSD – a dedicated Unix user and end up working for financial reasons in some TOP 100 Fortune companies (CSC, SAP, IBM, Hewlett Packard,Enterprise, Oracle) etc. and forced for business purposes (cause some programs such as Skype for Business Desktop Share does not run fine on Unix like and thus you have to work notebook pre-installed with Windows 7 / 8 or 10 but you're so accustomed to customizations already from UNIX environments and you would like to create yourself the Windows to resemble Linux and probably customize much of how Windows behaves by default.
Here is what I personally did on my work Windows 7 Enterprise on my HP Elitebook notebook to give myself the extra things I'm used to my Debian Linux Desktop.
1. Downloaded and instaled standard gnome-terminal xterm like immediately (E.g. check MobaXterm great alternative to Putty),
2. Changed cutomize Windows 7 appearance to be more like classical Windows XP, change Windows 8 / 10 start menu appearance to be more like in classic Windows 2000
3. Installed following bunch of softwares
- VIM Text Editor for Windows
- Thunderbird Mail Client
- OpenVPN client
- Oracle VM Virtualbox
- Opera
- Mozilla Firefox
- Password Safe
- Ext2FS / Ext3FS (support programs)
- F.lux (to auto adjust screen brightness day and night for better sleep)
- install ActivePerl for Windows
- Install GNUWin Tools (and perhaps most importantly)
- CygWin, (to provide Windows with most needed console Linux tools), Clink.
- WinSCP
- Swish (to be able to remotely mount your Linux partitions and see them as local Windows drives)
- dosbox (to play some of the good old Dos games :))
- Windirstat (to easily check the size of complete directory and subdirectories)
- SpaceSniffer (to be able to see which directory or files are taking the most space on the system)
Along with all above goodies here is also some good software I find essential for every web developer / system administrator / network administrator or java, C, php pprogrammer out there that's using Windows as his Desktop platrofm.
Another thing I prefer on Windows 7 when used as workstation is to change the default Windows 7 LogonUI screen background as well check out how here
Perhaps there is plenty of other goodprograms to install on Windows to make it feel even more like a Linux / Unix Desktop host, if you happen to somehow stuck to this article and you've migrated from Llinux / BSD desktop to Windows for work purposes please share with me any other goodies you happen to use that is from *Unix.
Tags: cause, check, directory, goodies, network administrator, screen brightness, size, software, some useful programs for windows if coming from linux, tips migrate linux to windows desktop, unix like good software for windows, web developer, Windows
Posted in Curious Facts, Everyday Life, Various, Windows | 1 Comment »
Friday, January 20th, 2017 
How to unlock Unlock Mtel locked Mobile Phone ZTE Blade 3 IMEI 866643012872768
Thanks to this little forum after a very thoroughful research on the topic howto unlock my ZTE Blade 3
in Russian Google.ru / United Stated Google.US and UK Google.Co.Uk I've figured out a number of ways recommended
I've lost some time watching also few videos illustrating howto unlock the phone for other non MTEL mobile operators with
some third party cracker software which seemed like a good way to infect your PC with spyware for example
videos:
Direct Unlock ZTE BLADE 3 & ZTE RACER 3 – YouTube
Unlock ZTE Blade 3, Blade V & Blade Q Mini – YouTube
there are a number of ways and paid software that could do various non-conventional things like unlock the phone for example:
GB Key
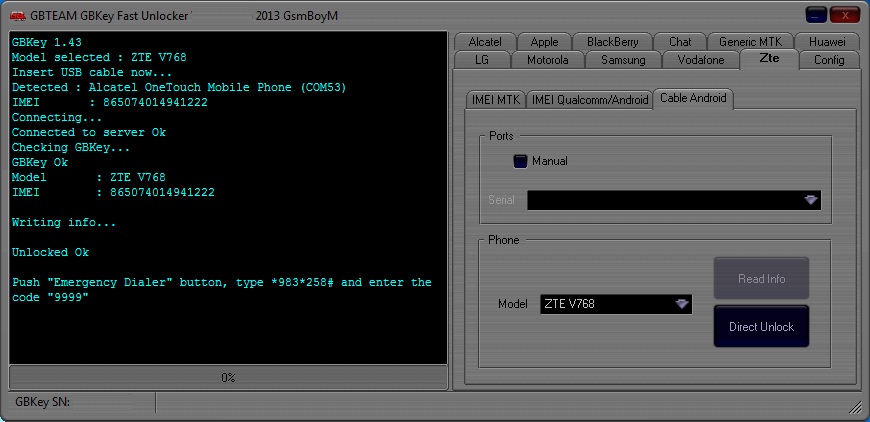
Here is description of GB Key
You can Call it UNLIMITED – Direct Unlocker, Code Calculator, Code Reader, is fast, easy to use, encrypted, more than 200 models supported and most of it is it's UNLIMITED use. Updates come on regular basis with addition to new models and features.
Supported Models
More than 500 supported models from mobile phones to modems and growing.
Currently supports around 260 MEPs & more than 9500 PRDs (and growing..) .
FREE & UNLIMITED: Huawei, Huawei Modem, BlackBerry, Alcatel MTK, Alcatel U7, Alcatel Modem, LG, Samsung Swift, Samsung 3G, ZTE Qcom-Android, ZTE MTK, and many many more..
There is also a number of services online that offer remote paid services to Unlock any smart phone remotely by paying with a card and providing the IMEI.
I guess this services either use Android Emulator with manually setting the respective IMEI of the phone and then uses some software (box) as they call it to generate the code using the respective algorithm. etc.
However as I didn't wanted to spend money on something on such non-sense I digged a little bit more and I found out that according to Bulgarian Legislation encoding a sold mobile phone by the mobile operator is already illegal and all mobile operators in Bulgaria (that used some kind of encoding software to prevent a bought phone from them to be used with another mobile operator should provide openly the mobile phone codes freely).
As MTEL had to fit the new wall they made a small online generator Database with Unlock codes for all prior sold mobiles encoded.
I've used the URL (using my website access previosuly freely registered on website in order to track and send free SMS-es in MTEL and check out my mobile phone money balance spent in inbound and inbound calls etc.)
https://www.mtel.bg/unlock-phone
and found out my mobile ZTE according to the imey:
5803701350365278 ZTE Blade III Поставете карта на друг оператор в телефона и директно ще Ви бъде изискан отключващият код.
Just switched on my ZTE Blade 3 phone and inserted the code and got a message it is wrong but immediately I phone able to connect to Telenor (the ex Globul Mobile operator ) Mobile network Voila! 🙂 Hope this helps small article helps someone else too. Enjoy !
I
Tags: How to, howto, Howto to Unlock Mtel locked Mobile Phone ZTE Blade 3 IMEI 866643012872768 to connect to Telenor and Vivacom mobile networks in Bulgaria, IMEI, mobile phone, money, number, online, software, third party, website
Posted in Computer Security, Curious Facts, Mobile Phone Apps & Games, Various | No Comments »


