Posts Tagged ‘How to’

How to install and use WSL 2 Windows native Linux emulation Debian and Ubuntu Linux on Windows 10 / Windows 11

Thursday, October 31st, 2024

start-with-wsl-windows-emulation-linux-install-and-use-easily-linux-and-windows-together-with-no-external-software-tux-penguin-logo

WSL (Windows Subsystem for Linux) is perhaps relatively rarely known to the old school sys admins rats who usually use stuff like QEMU / KVM for Windows or Virtualbox / VMWare for Host machine.
However most people most lileky heard but never used or heard about the native (container like) virtualization WSL which was introduced in Windows 10 and Windows 11  as an attempt from Microsoft to improve the interoperability between Windows and Linux.
WSL version 1 and ver 2 allows Microsoft Windows for using a Linux environment without the need for a separate virtual machine.

In Windows 10, it is existing in Windows 10 Professional version can be installed either by joining the Windows Insider program or manually via Microsoft Store or Winget.
Hence perhaps you don't know that WSL virtualization can be used by those who want to mix Linux and Windows or for example get an advantages against dual-boot (installing Linux and Windows on the same computer).
Even better most significant WSL pros is you can literally running both systems at the same time without the need to run or stop every software that’s running and reboot to another system.

Procedure to set up a WSL is simple and similar to setting up a real Linux OS, therefore this guide can also be used as a reference to Linux setup.The specifications of WSL setup procedure are mainly in Install WSL and then setup any packages you would like to use for example if you want to be able to access remotely the WSL emulated Debian / Ubuntu or other of the installable distros via OpenSSH server.

1. Requirements to install and use WSL Linux emulation

To have the wsl subsystem used on Windows 10 or Windows 11 requirements:

You must be running Windows 10 version 2004 and higher (Build 19041 and higher) or Windows 11 to use the commands below. If you are on earlier versions please see the manual install page.

2. List available installable Linux distributions
 

WSL subsystem has ported only a certain set of Linux distributions, so if you need a very specific and unique Linux distribution, you would perhaps need to use Hyper-V virtualization or Virtualbox / VMWare.
However for people like me who are mainly using Debian GNU / Linux on daily basis as well as some OracleLinux admins / SUSE it is a perfect solution.

PS C:\Windows\System32\WindowsPowerShell\v1.0> wsl –list –online
The following is a list of valid distributions that can be installed.
Install using 'wsl.exe –install <Distro>'.

NAME                            FRIENDLY NAME
Ubuntu                          Ubuntu
Debian                          Debian GNU/Linux
kali-linux                      Kali Linux Rolling
Ubuntu-18.04                    Ubuntu 18.04 LTS
Ubuntu-20.04                    Ubuntu 20.04 LTS
Ubuntu-22.04                    Ubuntu 22.04 LTS
Ubuntu-24.04                    Ubuntu 24.04 LTS
OracleLinux_7_9                 Oracle Linux 7.9
OracleLinux_8_7                 Oracle Linux 8.7
OracleLinux_9_1                 Oracle Linux 9.1
openSUSE-Leap-15.6              openSUSE Leap 15.6
SUSE-Linux-Enterprise-15-SP5    SUSE Linux Enterprise 15 SP5
SUSE-Linux-Enterprise-15-SP6    SUSE Linux Enterprise 15 SP6
openSUSE-Tumbleweed             openSUSE Tumbleweed


3. Install Linux distribution for a first time

PS C:\Windows\System32\WindowsPowerShell\v1.0> wsl –install

wsl2-windows-virtualization-install-virtual-machine-debian1

The default Linux distribution that will get installed inside WLS Virtlualization is Ubuntu.

4. Install Debian GNU / Linux distribution as a second distro


PS C:\Windows\System32\WindowsPowerShell\v1.0> wsl –install Debian

windows-wsl-linux-emulation/wsl2-windows-virtualization-install-virtual-machine-debian3

That second installed distro would make Debian now the default one to boot by WSL.

To run the fresh installed Debian GNU / Linux distribution, run only wsl command with no arguments.

# wsl


PS C:\Windows\System32\WindowsPowerShell\v1.0> wsl –set-version Debian 2
For information on key differences with WSL 2 please visit https://aka.ms/wsl2
Conversion in progress, this may take a few minutes.
The distribution is already the requested version.
Error code: Wsl/Service/WSL_E_VM_MODE_INVALID_STATE
PS C:\Windows\System32\WindowsPowerShell\v1.0> wsl –set-version 2
There is no distribution with the supplied name.
Error code: Wsl/Service/WSL_E_DISTRO_NOT_FOUND
PS C:\Windows\System32\WindowsPowerShell\v1.0>

Simply pressting CTRL + D from the actively running WSL emulated Linux (that is pretty much like a native Windows docker container if we have to compare to Linux) would stop the VM.
 

5. List runnable / installed VM Linux distributions
 

To list the available runnable Linux VMs on your Windows  status on Windows Subsystem for Linux:

PS C:\Windows\System32\WindowsPowerShell\v1.0> wsl –list –verbose
  NAME      STATE           VERSION
* Debian    Stopped         2
  Ubuntu    Stopped         2

PS C:\Windows\System32\WindowsPowerShell\v1.0>


6. Run and check recent installed Linux distribution version

wsl2-windows-virtualization-install-virtual-machine-debian4

To run the newly install Debian Virtualized Linux (which as you can see is the default set distribution to run by WSL virtualization) simply type 

PS C:\Windows\System32\WindowsPowerShell\v1.0> wsl

hipo@PC2LP3:/mnt/c/Windows/System32/WindowsPowerShell/v1.0$hipo@WL-2SLPWL3:/mnt/c/Windows/System32/WindowsPowerShell/v1.0$ cd ~
hipo@PC2LP3:~$


hipo@PC2LP3:~$ cat /etc/os-release
PRETTY_NAME="Debian GNU/Linux 12 (bookworm)"
NAME="Debian GNU/Linux"
VERSION_ID="12"
VERSION="12 (bookworm)"
VERSION_CODENAME=bookworm
ID=debian
HOME_URL="https://www.debian.org/"
SUPPORT_URL="https://www.debian.org/support"
BUG_REPORT_URL="https://bugs.debian.org/"
hipo@WL-2SLPWL3:~$


7. Update the Debian distribuion packages to latest available

hipo@PC2LP3:~$ sudo su – root
hipo@PC2LP3:~# apt update –fix-missing


8. Install openssh server to be able to connect to the WSL hosted Virtual Machine

hipo@PC2LP3:/home/hipo# apt install openssh-server –yes


windows-wsl-linux-emulation


root@PC2LP3:/home/hipo# systemctl start openssh-server telnet
System has not been booted with systemd as init system (PID 1). Can't operate.
Failed to connect to bus: Host is down
root@WL-2SLPWL3:/home/hipo# /etc/init.d/ssh start
Starting OpenBSD Secure Shell server: sshd.
root@WL-2SLPWL3:/home/hipo# ps -ef|grep -i ssh
root        30     9  0 18:19 ?        00:00:00 sshd: /usr/sbin/sshd [listener] 0 of 10-100 startups
root        32    15  0 18:20 pts/1    00:00:00 grep -i ssh


windows-wsl-linux-emulation

By default a fresh new installed VM would have a process list like below:

root@PC2LP3:/home/hipo# ps axuwef


wsl2-windows-virtualization-install-virtual-machine-debian7

To be able to have ifconfig and a number of other network tools it is useful to install net-tools package

root@PC2LP3:/home/hipo# apt install net-tools –yes

root@PC2LP3:/home/hipo# /sbin/ifconfig

Once the WSL VM and OpenSSHD is run you can try to telnet or ssh to the VM locally or remotely.

root@PC2LP3:/home/hipo# telnet localhost 22
Trying 127.0.0.1…
Connected to localhost.
Escape character is '^]'.
SSH-2.0-OpenSSH_9.2p1 Debian-2+deb12u3

9. Run commands directly from Windows command line or Powershell
 

You can also use the powershell to run commands via the virtualized Linux environment using simple syntax

# wsl [cmd-to-run]

PS C:\Windows\System32\WindowsPowerShell\v1.0> wsl ls /
bin   dev  home  lib    lost+found  mnt  proc  run   srv  tmp  var
boot  etc  init  lib64  media       opt  root  sbin  sys  usr
PS C:\Windows\System32\WindowsPowerShell\v1.0> wsl ps -ef
UID        PID  PPID  C STIME TTY          TIME CMD
root         1     0  0 18:07 hvc0     00:00:00 /init
root         5     1  0 18:07 hvc0     00:00:00 plan9 –control-socket 5 –log-level 4 –server-fd 6 –pipe-fd 8 –log-t
root         8     1  0 18:07 ?        00:00:00 /init
root         9     8  0 18:07 ?        00:00:00 /init
hipo        10     9  0 18:07 pts/0    00:00:00 ps -ef

PS C:\Windows\System32\WindowsPowerShell\v1.0>

10. Enable systemd on Linux distribution in WSL 2

Once you boot into the WSL installed distro shell edit /etc/wsl.conf:

$ vim /etc/wsl.conf

[boot]
systemd=true

11. Setting extra useful variables to boot the WSL emulated Linux VM 
 

root@debian-wsl:/home/hipo# cat /etc/wsl.conf
[boot]
systemd=true

# Automatically mount Windows drive when the distribution is launched
[automount]

# Set to true will automount fixed drives (C:/ or D:/) with DrvFs under the root directory set above. Set to false means drives won't be mounted automatically, but need to be mounted manually or with fstab.
enabled = true

# Sets the directory where fixed drives will be automatically mounted. This example changes the mount location, so your C-drive would be /c, rather than the default /mnt/c.
root = /

# DrvFs-specific options can be specified.
options = "metadata,uid=1003,gid=1003,umask=077,fmask=11,case=off"

# Sets the `/etc/fstab` file to be processed when a WSL distribution is launched.
mountFsTab = true

# Network host settings that enable the DNS server used by WSL 2. This example changes the hostname, sets generateHosts to false, preventing WSL from the default behavior of auto-generating /etc/hosts, and sets generateResolvConf to false, preventing WSL from auto-generating /etc/resolv.conf, so that you can create your own (ie. nameserver 1.1.1.1).
[network]
hostname = debian-wsl
generateHosts = true
generateResolvConf = true

# Set whether WSL supports interop processes like launching Windows apps and adding path variables. Setting these to false will block the launch of Windows processes and block adding $PATH environment variables.
[interop]
enabled = false
appendWindowsPath = false

# Set the user when launching a distribution with WSL.
[user]
default = hipo

# Set a command to run when a new WSL instance launches. This example starts the Docker container service.
#[boot]
#command = service docker start

root@debian-wsl:/home/hipo#

To learn about on Advanced settings configuration in WSL check out official Microsoft documentation here

12. Shutting down a running emulated Linux VM

If you have run a WSL VM and you want to shut it down do:

# wsl shutdown


If you at a point want to delete / uninstall the installed distribution you can do

# wsl –terminate Distro_Name
# wsl –uninstall Distro_Name


Or you if you want to do a cleanup of the stored files inside the installed distribution (if you have stored files), do:

# wsl –unregister Distro_Name


For more in depth details check out the manual
 

PS C:\Windows\System32\WindowsPowerShell\v1.0> wsl –help
Copyright (c) Microsoft Corporation. All rights reserved.
For privacy information about this product please visit https://aka.ms/privacy.

Usage: wsl.exe [Argument] [Options…] [CommandLine]

Arguments for running Linux binaries:

    If no command line is provided, wsl.exe launches the default shell.

    –exec, -e <CommandLine>
        Execute the specified command without using the default Linux shell.

    –shell-type <standard|login|none>
        Execute the specified command with the provided shell type.

    —
        Pass the remaining command line as-is.

Options:
    –cd <Directory>
        Sets the specified directory as the current working directory.
        If ~ is used the Linux user's home path will be used. If the path begins
        with a / character, it will be interpreted as an absolute Linux path.
        Otherwise, the value must be an absolute Windows path.

    –distribution, -d <Distro>
        Run the specified distribution.

    –user, -u <UserName>
        Run as the specified user.

    –system
        Launches a shell for the system distribution.

Arguments for managing Windows Subsystem for Linux:

    –help
        Display usage information.

    –debug-shell
        Open a WSL2 debug shell for diagnostics purposes.

    –install [Distro] [Options…]
        Install a Windows Subsystem for Linux distribution.
        For a list of valid distributions, use 'wsl.exe –list –online'.

        Options:
            –no-launch, -n
                Do not launch the distribution after install.

            –web-download
                Download the distribution from the internet instead of the Microsoft Store.

            –no-distribution
                Only install the required optional components, does not install a distribution.

            –enable-wsl1
                Enable WSL1 support.

    –manage <Distro> <Options…>
        Changes distro specific options.

        Options:
            –move <Location>
                Move the distribution to a new location.

            –set-sparse, -s <true|false>
                Set the vhdx of distro to be sparse, allowing disk space to be automatically reclaimed.

    –mount <Disk>
        Attaches and mounts a physical or virtual disk in all WSL 2 distributions.

        Options:
            –vhd
                Specifies that <Disk> refers to a virtual hard disk.

            –bare
                Attach the disk to WSL2, but don't mount it.

            –name <Name>
                Mount the disk using a custom name for the mountpoint.

            –type <Type>
                Filesystem to use when mounting a disk, if not specified defaults to ext4.

            –options <Options>
                Additional mount options.

            –partition <Index>
                Index of the partition to mount, if not specified defaults to the whole disk.

    –set-default-version <Version>
        Changes the default install version for new distributions.

    –shutdown
        Immediately terminates all running distributions and the WSL 2
        lightweight utility virtual machine.

    –status
        Show the status of Windows Subsystem for Linux.

    –unmount [Disk]
        Unmounts and detaches a disk from all WSL2 distributions.
        Unmounts and detaches all disks if called without argument.

    –uninstall
        Uninstalls the Windows Subsystem for Linux package from this machine.

    –update
        Update the Windows Subsystem for Linux package.

        Options:
            –pre-release
                Download a pre-release version if available.

    –version, -v
        Display version information.

Arguments for managing distributions in Windows Subsystem for Linux:

    –export <Distro> <FileName> [Options]
        Exports the distribution to a tar file.
        The filename can be – for stdout.

        Options:
            –vhd
                Specifies that the distribution should be exported as a .vhdx file.

    –import <Distro> <InstallLocation> <FileName> [Options]
        Imports the specified tar file as a new distribution.
        The filename can be – for stdin.

        Options:
            –version <Version>
                Specifies the version to use for the new distribution.

            –vhd
                Specifies that the provided file is a .vhdx file, not a tar file.
                This operation makes a copy of the .vhdx file at the specified install location.

    –import-in-place <Distro> <FileName>
        Imports the specified .vhdx file as a new distribution.
        This virtual hard disk must be formatted with the ext4 filesystem type.

    –list, -l [Options]
        Lists distributions.

        Options:
            –all
                List all distributions, including distributions that are
                currently being installed or uninstalled.

            –running
                List only distributions that are currently running.

            –quiet, -q
                Only show distribution names.

            –verbose, -v
                Show detailed information about all distributions.

            –online, -o
                Displays a list of available distributions for install with 'wsl.exe –install'.

    –set-default, -s <Distro>
        Sets the distribution as the default.

    –set-version <Distro> <Version>
        Changes the version of the specified distribution.

    –terminate, -t <Distro>
        Terminates the specified distribution.

    –unregister <Distro>
        Unregisters the distribution and deletes the root filesystem.
PS C:\Windows\System32\WindowsPowerShell\v1.0>

Once wsl is installed you can run it directly from Windows start menu, by searching for the name of the distribution you would like to run for example to run my Debian WSL running emulator::

Sum it up

What was shown up is how to run in parallel virtualized Linux distribution on Windows 10 and Windows 11 and how to install update to latest and run opensshd server to be able to ssh into the WSL Linux virtual machine remotely.
.Also i've shown you, How to test ssh is reachable and how to stop / start or destroy and cleanup any stored files for  VM if necessery, as well as how to apply some extra advanced configurations to boot VM for.

Using WSL is not the best virtualization ever but anyways it is an alternative for people employed in Domain attached Windows PCs part of Big Corporations, where VirtualBox use is blocked / prohibited and you still need to experiment or develop Shell scripts or software on Python / Perl / Ruby on Linux before you  do stuff on the PreProd or Production Linux host.

That's all folks, Enjoy ! 🙂
 

How to split large files in Windows via split command line and File Archive GUI tool easily

Tuesday, October 22nd, 2024

Moving around a very large files especially Virtualbox Virtual Machines or other VM formats between Windows host and OneDrive might be a problem due to either Azure Cloud configured limitations, or other reasons that your company Domain Administrator has configured, thus if you have to migrate your old Hardware Laptop PC Windows 10 to a newer faster better Harware / Better Performance Notebook Computer with Windows 11 and you still want to keep and move your old large files in this short and trivial article, will explain how.

The topic is easily and most of novice sysadmins should have already be faced to bump into something like this but anyways i found useful to mention about Git for Windows, as it is really useful too thus wrote this small article.

The moved huge files, in my case an experimental Virtual Machines Images which I needed to somehow migrate on the new Freshly installed Windows laptop, the Large files were 40 / 80 etc. Gigabytes or whatever large amount of files from your PC to the Cloud Onedrive and of course the most straight forward thing i tried was to simply add the file for inclusion into the Onedrive storage (via OneDrive tool setup interface), however this file, failed due to OneDrive Cloud file format security limitations or Antivirus solutions configured to filter out the large file copying or even a prohibition to be able to include any kind of Virtual Machines ISOs straight into the cloud.

With this big files comes the question:

How to copy the Virtual Machines from your Old Hardware Laptop to the Cloud (without being able to use an external SSD Hard Drive or a USB SSD Flash drive, due to Domain policy configured for your windows to be unable to copy to externally connected Drive but only to read from such.) ?
 

Here are few sample approaches to do it both from command line (useful if you have to repeat the process or script it and deploy to multiple hosts) or for single hosts via an Archiver tool:


1. Using split command Git for Windows (Bash) MINGW64 shell 

Download Git for Windows – https://git-scm.com/download install it and you will get the MINGW64 bash for Windows executable.

Run it either invoke bash command from command line or trigger Windows Run command prompt (Windows button + R) and type full path to executable
 

C:\Program Files\Git\git-bash.exe


Git-for-Windows-bash-for-windows-MINGW64-windows-11-screenshot

Use the integrated program split and to cut it into pieces use:


# split MyVeryLargeFileVM.vdi -b 800m


To split the .VDI virtualbox file to lets say 5 Gigabite pieces:

# split MyVeryLargeFile.vdi -b 5g

The output files will be named pieces will be named as in a normal UNIX / GNU split command in the format and each piece of 5GB will be named like:

xaa
xab
xac
xad

If you want to get a more meaningful name for the spilitted files you can set a generated split file prefix with suffixes to be 5 digits long:

# split MyVeryLargeFile.vdi MyVeryLargeFileVM-parts_ -b 5g -d -a 5

  • the -d flag for using numerical suffixes (instead of default aa, ab, ac, etc…),
  • and the option -a 5 to tell it I want the suffixes to be 5 digits long:

2. Split large files by Archiving them with Winrar (ShareWare) tool

If you have already Winrar installed and you don't want to bother with too much typing from the command line, You can use good old WinRAR as a file splitter/joiner as well.

To split a file into smaller files, select "Store" as the compression method and enter the desired value (bytes) into "Split to volumes" box.
This way you can have split files named as filename.part1.rar, filename.part2.rar, etc.

WinRAR_cut-split-large-files-into-pieces-screenshot-Windows

3. Split files with 7-Zip (FreeWare)

Assuming you have the 7-Zip installed on the PC, you can do the archiving of the Big file to a smaller pieces one, you can create the splitted file from 7Zip interfaces menus:

7zip-file-split-files-into-multiple-pieces-windows-screenshot

Or directly cut the single file into multiple volumes, directly from Windows Explorer by Selecting the file and using fall down menus :
7zip-creation-of-multiple-parts-file-from-single-one-screenshot-Windows

7-zip-split-huge-files-to-lower-parts-set-volume-size

Sum it up what learned ? 

What we learned is how to cut large files into multiple single consequential ones for easy copy between Network sides, via both Git 4 Windows and manual copy paste of parted multiple files to OneDrive / DropBox / pCloud or Google Drive.
There is a plenty of other approaches to take as there is also file GUI tools, besides using GNU Win / Gnu Tools for Windows or Cygwin / Gsplit GUI tool  or some kind of the many Archiver toolsavailable for Windows, another option to split the large files is to use a bunch of PowerShell and Batch scripts written that can help you do the file split for both binaries files or Text files. but i'll stop here as I believe that is pretty much enough for most basic needs.


How to filter an IP, and IP range or domain to access to access service with /etc/hosts.allow /etc/hosts.deny , filtering Network range to sshd tcp port 22 through sshd service

Tuesday, June 4th, 2024

how-to-allow-and-deny-services-without-firewall-on-linux-logo-picture-tux

If you want to filter a range of IPs to be able to or unable to access a TCP port service because someone is trying to brute force you from the network or just because you don't want a connected LAN IPs to have access to your server for whatever security reasons. The simplest way you can do IP and IP range restrictions to allow or disable access towards a Linux server via defining allow or prohibition rules in  /etc/hosts.allow and /etc/hosts.deny.

This files are there and useful since the beginning of UNIX OS-es and has been widely used on Linux in the past and rarely known by people nowadays.


The hosts.allow and hosts.deny files could be used on a Linux system to deny connection attempts from one or more IP addresses, hostnames, or domains. 
/etc/hosts.allow and /etc/hosts.deny are just a plain text configuration file with a rather simple syntax, that can be used for decades to allow or filter IPs without applying a special firewall rules like iptables locally.
It can work with any TCP wrapped service on your system. The hosts.deny file is used in conjunction with hosts.allow to determine whether a connection attempt gets accepted or denied.

In this small tutorial, you will see an example of the hosts.allow file and how to use it to allow or deny connections to IPs or networks, as well as how a simple prohibition to access SSH service only via specific IP network can be done.

For full understanding of hosts.allow / hosts.deny file, check the manuals man hosts.allow , man hosts.deny, man hosts_options, man hosts_options.

root@pcfreak:~# apropos hosts|grep -iE '^hosts.*'
hosts.equiv (5)      – list of hosts and users that are granted "trusted" r command access to your system
hosts (5)            – static table lookup for hostnames
hosts.allow (5)      – format of host access control files
hosts.deny (5)       – format of host access control files
hosts_access (5)     – format of host access control files
hosts_options (5)    – host access control language extensions

General hosts.allow / hosts.deny syntax

The /etc/hosts.allow and /etc/hosts.deny understood syntax form is: 

service : host/network

Each value is separated by a colon :

You can also supply an option, but this is not as common. We will cover some other niche choices below. More options can be added if necessary, with each one separated by another colon.

service : host/network [:

The following line would allow all traffic to the sshd service. ALL is used as a wildcard.

sshd : ALL

Few examples to allow access to SSH Daemon from IPv4 and IPv6
This line would allow connections from all hosts on the 10.11 network. Connections from all other hosts can then be denied by the hosts.deny file. This type of configuration would work as intended since the allow line precedes our corresponding deny line in the other file, thus will be triggered first.

sshd : 10.11


Accept connections from a particular IPv4 and IPv6 address
 

sshd : 10.10.136.241
sshd : [2a02:2143:88f1:5c00:9991:9daa:b580:aee2]


Rather than using IPs, you can also specify hostnames to accept or deny connections from.

sshd : some.host


Accept connections from all hosts using the main domain .pc-freak.net domain name.

sshd : .pc-freak.net

You can also use a wildcard for both the service and the host/network field. This will accept all connections to any service. This would make all other rules (including those in hosts.deny) irrelevant, as all connections will be accepted by this rule before they have a chance to be denied.

ALL : ALL

The EXCEPT operator can be used to create an exception in an otherwise all allowing rule. 
For example, this rule would allow all connections from the .pc-freak.net domain name, except for one sub-domain org.pc-freak.net

sshd : .pc-freak.net EXCEPT org.pc-freak.net


Allow connectivity towards SSH TCP port 22 for all IP / hosts except for certain IPs and domains
 

To control connectivity towards sshd service via allow hosts  /etc/hosts.allow for all except a bad.host and a certain IP range:


sshd : ALL : allow
sshd : bad.host : deny
sshd : 85.5.1. : deny (1)


Disable access to all remote services to the network

Lets say if you're running the Linux as  desktop station and you want to disable access to any local services running on TCP ports

If you want to be paranoid and disable all remote access to server to any IP network, you can do it with:

# echo "ALL: ALL" >/etc/hosts.deny


Completely allow access to a certain running TCP port service on server
 

To allow completely access to a service
 

service_name : ALL : allow

Allow access for a a range of IPs subnet

You can also specifcy the IP netmask range to allow, like this:

ALL : 192.168.0.0/255.255.254.0


Allow access to all server network services for a domain except for a certain domain
 

Enable access to ALL running server services listening on TCP port except for domain

ALL : .example.com EXCEPT skiddie-attacker.example-domain.com


Allow access to al services except to a service for a local port range via hosts.allow

Here is example onw how to use hosts.allow file to allow connections all running server services except access to VSFTP, coming from Local LAN IPs with netmask /24 (e.g. from the 192.168.0.x.):

ALL EXCEPT vsftpd : 192.168.0


Filtering IPs and IP Ranges from within /usr/sbin/sshd openssh service via /etc/ssh/sshd_config (allow and disable access to concrete IPs trying to brute force you)


Lets say however, you don't want to do the filtering of openssh connections via hosts.allow / hosts.deny but rather on a SSH Service level, this can be done with the following /etc/ssh/sshd_config configuration.

# vim /etc/ssh/sshd_config

Match Address *,!192.168.1.0/24
    ForceCommand /bin/false

For more on the use of Match Address check documentation with man 5 sshd_config


To re-load the opensshd config

# systemctl restart sshd


Of course manually filtering villains is a tedious task and ultimately to save yourself time and inconvenience to regullary look up within /var/log/security or /var/log/messages (depending on the Linux distribution) and the configuration for SSHD to login imposters you would prefer to use fail2ban (if you're not familiar with fail2ban check out my previous article on how to easily Stop ssh bruteforce authentication attempt Attacks with fail2ban or if you want to use the Linux native way check out the article how to prevent SSH and FTP bruteforce attacks with IPtables.

How to view WIFI Passwords for Profile from command line with netsh on Windows 10

Wednesday, May 29th, 2024

how-to-find-out-your-wifi-password-on-windows-10

The common way, if you have connected to a Wireless Network Access Point and saved the password in Windows is to view the password via Windows GUI interface, via menus following few easy steps:

1. Settings -> Network and Internet -> Network and Sharing Center

network-and-sharing-center
2. Click on (Wifi Network name) for which you need password and 
3. In View your active networks section

select-wifi
4. When the Wi-Fi network status window opens, click Wireless Properties

wireless-properties
5. Move to the Security Tab and check the checkbox, next to "Show Characters" to view the network password.

show-wifi-password-windows-10
 

Nevertheless as a system administrator you might have wondered, how you can easily review in plain text Saved Wireless Networks Wi-FI passwords, without using the Graphical Interface via a direct command line cmd.exe?
Such thing is helpful on maintaining multiple Windows 10 hosts, especially if you have a telnet or SSH remote administration enabled or you have a domain of PCs.
To do so open cmd.exe command prompt and run:

C:\Users> netsh

netsh>wlan show profile

Profiles on interface Wi-Fi:

Group policy profiles (read only)
———————————

User profiles
————-
All User Profile : WIFI_Pofile-name
All User Profile: Hotel stage 2
All User Profile: Home Wifi
All User Profile: HP_Custom

Now lets review the clear text password of the profile from netsh console:

netsh>wlan show profile "WIFI_Pofile-name" key=clear

Profile WIFI_Pofile-name on interface Wi-Fi:
===================================================

Applied: All User Profile

Profile information
——————-
Version : 1
Type : Wireless LAN
Name : WIFI_Pofile-name
Control options :
Connection mode : Connect automatically
Network broadcast : Connect only if this network is broadcasting
AutoSwitch : Do not switch to other networks
MAC Randomization : Disabled

Connectivity settings
———————
Number of SSIDs : 1
SSID name : "WIFI_Pofile-name"
Network type : Infrastructure
Radio type : [ Any Radio Type ]
Vendor extension : Not present

Security settings
—————–
Authentication : WPA2-Personal
Cipher : CCMP
Authentication : WPA2-Personal
Cipher : GCMP
Security key : Present
Key Content : Very-secret-password-for-WIFI-plain-text

TADADAM !

We see the password key text Saved WIFI Passwords plain text !

Note that sometimes, if you have a Hidden Wifi Network the command to use to reveal the plain text password with netsh would be:

C:\Users> netsh wlan show profile "name=SSID hidden WiFi Net" key=clear


This trick is very much used today by "hackers" e.g. script kiddies, who break up into others windows.
It is also useful if you want to have a quick way to review plain text passwords for WIFI accounts with organization, lets say if you're a security expert and doing some kind of periodic Security audits within a corporation on multiple Domain attached computers.

Thanks to Martin Petrov (Amridikon) for his trick as I've learned first time from his blog https://mpetrov.net, which is full of many computer geek goodies stuff.

Of course this approach can be easily scripted with a short PowerShell script:
 

netsh wlan show profile |
    Select-String '(?<=All User Profile\s+:\s).+' |
    ForEach-Object {
        $wlan = $_.Matches.Value
        $passw = netsh wlan show profile $wlan key=clear |
            Select-String '(?<=Key Content\s+:\s).+'

        [pscustomobject]@{
            Name     = $wlan
            Password = $passw.Matches.Value
        }
    }


If you need the script View-all-wifi-passwords-plaintext-windows10.ps1 to reuse it download it from here.
 

Windows-WiFi-PasswordRevealer-ScreenShot
There is also some freeware tools online which can help you reveal passwords, saving you any typing, that might be useful if you want to delegate the task to a non-sysadmin user, you can simply point him and ask him to install a GUI Win tool like Wifi Password revealer (that makes showing plain text passwords piece of cake) and let user reveal his passwords for himself, if needs the password to share it to a colleague 🙂
That's all folks, Happy hacking !

How to run multiple processes in parallel with xargs

Wednesday, May 29th, 2024

In our company there is a legacy application which developers run in multiple consoles launching its in intedependent components together in different consoles by simply running each component, the question comes then how this can be scripted so no waste of people is done to manually run the different componets from different parallel consoles. To achive the run in parallel of the multiple programs in parallel and background it with xargs and eval (integrated bash command) in Linux from a single script you can use a simple one liner like in the example.

#run in parallel
xargs -P <n> allows you to run <n> commands in parallel.
time xargs -P 3 -I {} sh -c 'eval "$1"' – {} <<'EOF'
program1; sleep 1; echo 1
program2 ; sleep 2; echo 2
program3; sleep 3; echo 3
echo 4
EOF

You can attune the delay up to the exact requirements or completely remove it and the multi run script is ready, enjoy.

How to count number of ESTABLISHED state TCP connections to a Windows server

Wednesday, March 13th, 2024

count-netstat-established-connections-on-windows-server-howto-windows-logo-debug-network-issues-windows

Even if you have the background of a Linux system administrator, sooner or later you will have have to deal with some Windows hosts, thus i'll blog in this article shortly on how the established TCP if it happens you will have to administarte a Windows hosts or help a windows sysadmin noobie 🙂

In Linux it is pretty easy to check the number of established conenctions, because of the wonderful command wc (word count). with a simple command like:
 

$ netstat -etna |wc -l


Then you will get the number of active TCP connections to the machine and based on that you can get an idea on how busy the server is.

But what if you have to deal with lets say a Microsoft Windows 2012 /2019 / 2020 or 2022 Server, assuming you logged in as Administrator and you see the machine is quite loaded and runs multiple Native Windows Administrator common services such as IIS / Active directory Failover Clustering, Proxy server etc.
How can you identify the established number of connections via a simple command in cmd.exe?

1.Count ESTABLISHED TCP connections from Windows Command Line

Here is the answer, simply use netstat native windows command and combine it with find, like that and use the /i (ignores the case of characters when searching the string) /c (count lines containing the string) options

C:\Windows\system32>netstat -p TCP -n|  find /i "ESTABLISHED" /c
1268

Voila, here are number of established connections, only 1268 that is relatively low.
However if you manage Windows servers, and you get some kind of hang ups as part of the monitoring, it is a good idea to setup a script based on this simple command for at least Windows Task Scheduler (the equivallent of Linux's crond service) to log for Peaks in Established connections to see whether Server crashes are not related to High Rise in established connections.
Even better if company uses Zabbix / Nagios, OpenNMS or other  old legacy monitoring stuff like Joschyd even as of today 2024 used in some big of the TOP IT companies such as SAP (they were still using it about 4 years ago for their SAP HANA Cloud), you can set the script to run and do a Monitoring template or Alerting rules to draw you graphs and Trigger Alerts if your connections hits a peak, then you at least might know your Windows server is under a "Hackers" Denial of Service attack or there is something happening on the network, like Cisco Network Infrastructure Switch flappings or whatever.

Perhaps an example script you can use if you decide to implement the little nestat established connection checks Monitoring in Zabbix is the one i've writen about in the previous article "Calculate established connection from IP address with shell script and log to zabbix graphic".

2. Few Useful netstat options for the Windows system admin
 

C:\Windows\System32> netstat -bona


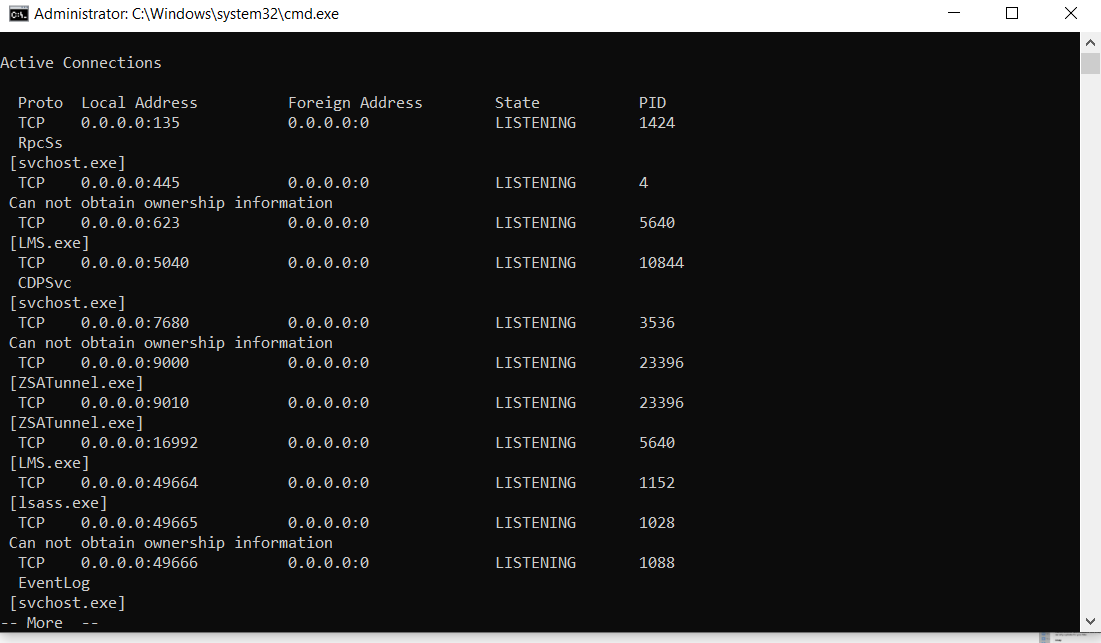
netstat-useful-arguments-for-the-windows-system-administrator

Cmd.exe will lists executable files, local and external IP addresses and ports, and the state in list form. You immediately see which programs have created connections or are listening so that you can find offenders quickly.

b – displays the executable involved in  creating the connection.
o – displays the owning process ID.
n – displays address and port numbers.
a – displays all connections and listening ports.

As you can see in the screenshot, by using netstat -bona you get which process has binded to which local address and the Process ID PID of it, that is pretty useful in debugging stuff.

3. Use a Third Party GUI tool to debug more interactively connection issues

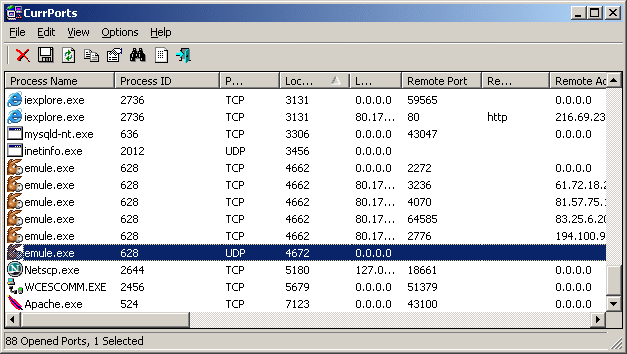
If you need to keep an eye in interactive mode, sometimes if there are issues CurrPorts tool can be of a great help

currports-windows-network-connections-diagnosis-cports

CurrPorts Tool own Description

CurrPorts is network monitoring software that displays the list of all currently opened TCP/IP and UDP ports on your local computer. For each port in the list, information about the process that opened the port is also displayed, including the process name, full path of the process, version information of the process (product name, file description, and so on), the time that the process was created, and the user that created it.
In addition, CurrPorts allows you to close unwanted TCP connections, kill the process that opened the ports, and save the TCP/UDP ports information to HTML file , XML file, or to tab-delimited text file.
CurrPorts also automatically mark with pink color suspicious TCP/UDP ports owned by unidentified applications (Applications without version information and icons).

Sum it up

What we learned is how to calculate number of established TCP connections from command line, useful for scripting, how you can use netstat to display the process ID and Process name that relates to a used Local / Remote TCP connections, and how eventually you can use this to connect it to some monitoring tool to periodically report High Peaks with TCP established connections (usually an indicator of servere system issues).
 

How to do a port redirect to localhost service with socat or ncat commands to open temporary access to service not seen on the network

Friday, February 23rd, 2024

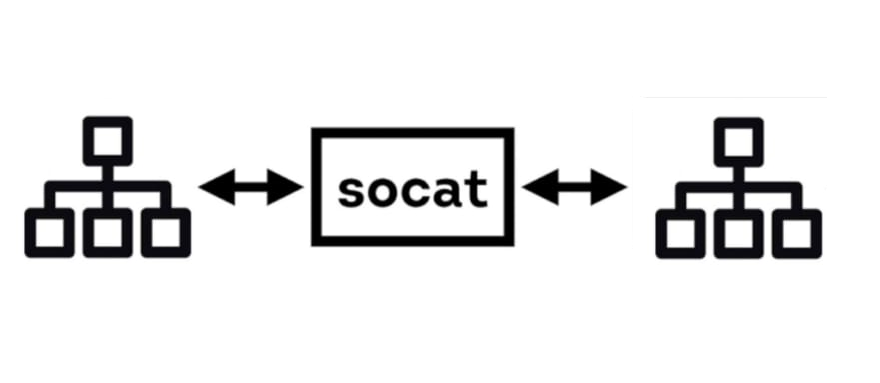
socat-simple-redirect-tcp-port-on-linux-bsd-logo

You know sometimes it is necessery to easily and temporary redirect network TCP ports to be able to be accessible from Internal DMZ-ed Network via some Local Network IP connection or if the computer system is Internet based and has an external "'real" Internet Class A / B address to be reachable directly from the internet via lets say a modern Internet browser such as Mozilla Firefox / Google Chrome Browser etc.

Such things are easy to be done with iptables if you need to do the IP redirect permanent with Firewall rule changes on Linux router with iptables.
One way to create a TCP port redirect using firewall would include few iptable rules  like for example:

1. Redirect port traffic from external TCP port source to internal one

# iptables -t nat -I PREROUTING -p tcp –dport 10000 -j REDIRECT –to-ports 80
# iptables -t nat -I OUTPUT -p tcp -o lo –dport 10000 -j REDIRECT –to-ports 80
# iptables -t nat -A OUTPUT -o lo -d 127.0.0.1 -p tcp –dport 80 -j DNAT  –to-destination 192.168.0.50:10000
# iptables -t nat -I OUTPUT –source 0/0 –destination 0/0 -p tcp –dport 80 -j REDIRECT –to-ports 10000


Then you will have 192.168.00.50:10000 listener (assuming that the IP is already configured on some of the host network interface, plugged in to the network).

 But as messing up with the firewall is not the best thing to do especially, if you need to just temporary redirect external listener port to a service configured on the server to only run on TCP port on loopback address 127.0.0.1, you can do it instead with another script or command for simplicy.

One simple way to do a port redirect on the fly on GNU / Linux or FreeBSD / OpenBSD is with socat command.

Lets say you have a running statistics of a web server Apache / Nginx / Haproxy frontend / backend statistics or whatever kind of web TCP service on port 80 on your server and this interface is on purpose configured to be reachable only on localhost interface port 80, so you can either access it by creating an ssh tunnel towards the service on 127.0.0.1 or by accessing it by redirecting the traffic towards another external TCP port, lets say 10000.

Here is how you can achieve

2. Redirect Local network accessible IP on all configured Server network interfaces port 10000 to 127.0.0.1 TCP 80 with socat

# socat tcp-l:10000,fork,reuseaddr tcp:127.0.0.1:80

If you need to access later the redirected port in a Browser, pick up the machine first configured IP and open it in a browser (assuming there is no firewall filter prohibiting access to redirected port).

root@pcfreak:~# ifconfig eth0
eth0: flags=4163<UP,BROADCAST,RUNNING,MULTICAST>  mtu 1500
        inet 109.104.212.130  netmask 255.255.255.0  broadcast 109.104.212.255
        ether 91:f8:51:03:75:e5  txqueuelen 1000  (Ethernet)
        RX packets 652945510  bytes 598369753019 (557.2 GiB)
        RX errors 0  dropped 10541  overruns 0  frame 0
        TX packets 619726615  bytes 630209829226 (586.9 GiB)
        TX errors 0  dropped 0 overruns 0  carrier 0  collisions 0

Then in a browser open http://102.104.212.130 or https://102.104.212.130 (depending on if remote service has SSL encryption enabled or not) and you're done, the configured listener Server service should pop-up on the screen.

3. Redirect IP Traffic from External IP to Localhost loopback interface with netcat ( ncat ) swiss army knife hackers and sysadmins tool

If you need to redirect lets say TCP / IP port 8000 to Port a server local binded service on TCP 80 with ncat, instead of socat (if lets say socat is not pre-installed on the machine), you can do it by simply running those two commands:

[root@server ~]# mkfifo svr1_to_svr2
[root@server ~]# ncat -vk -l 8000 < svr1_to_svr2 | ncat 127.0.0.1 80 > svr1_to_svr2
Ncat: Version 7.92 ( https://nmap.org/ncat )
Ncat: Listening on 0.0.0.0:10000
Ncat: Connection from 10.10.258.39.
Ncat: Connection from 10.10.258.39:51813.
Ncat: Connection from 10.10.258.39.
Ncat: Connection from 10.10.258.39:23179.


I you don't care to log what is going on the background of connection and you simply want to background the process with a one liner command you can achive that with:


[root@server /tmp]# cd tmp; mkfifo svr1_to_svr2; (ncat -vk -l 8000 < svr1_to_svr2 | ncat 127.0.0.1 80 > svr1_to_svr2 &)
 

Then you can open the Internal Machine Port 80 TCP service on 8000 in a browser as usual.

For those who want a bit of more sophisticated proxy like script I would suggest you take a look at using netcat and a few lines of shell script loop, that can simulate a raw and very primitive proxy with netcat this is exampled in my previous article Create simple proxy server with netcat ( nc ) based utility.

Hope this article is helpful to anyone, there is plenty of other ways to do a port redirect with lets say perl, python and perhaps other micro tools. If you know of one liners or small scripts, that do it please share in comments, so we can learn from each other ! 

Enjoy ! 🙂
 

How to run SSH server Mac OS X and set it to auto boot on Mac Book system start

Monday, February 5th, 2024

mac os X

How to run SSH Server on Mac OS X to administrate remotely your MAC OS to access remote MacBook Air or Mac OS 

Linux / UNIX users know it is pretty easy to run OpenSSH server on old Linux SystemV releases

it is done with cmd:

# /etc/init.d/sshd start


On newer Linux distros where systemd is the standard it is done wtih:

# systemctl start ssh.service

To enable ssh service on boot on systemd distros

# systemctl enable ssh.service


To enable SSH access on Mac OS X this is done wtih a simple command

To check the status of SSH server being on or OFF, either connect with netcat to TCP port 22, which is usually installed by default on most MAC OS-es or run:

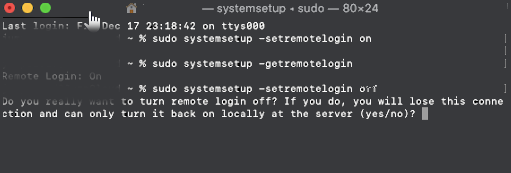
# systemsetup -getremotelogin

To start and enable SSH service on Mac OS X run:

# systemsetup -setremotelogin on 


If you later need to turn off the SSH service

# systemsetup -setremotelogin off

Actually systemsetup command can do pretty much on MAC OS X and it is worthy to take a look at it, if you're running a MAC PC or Mac Book laptop.

systemsetup can set the current date, change time server host, set computer name (hostname) and much more.

sh-3.2# systemsetup -help

systemsetup Help Information
————————————-
Usage: systemsetup -getdate
        Display current date.

Usage: systemsetup -setdate <mm:dd:yy>
        Set current date to <mm:dd:yy>.

Usage: systemsetup -gettime
        Display current time.

Usage: systemsetup -settime <hh:mm:ss>
        Set current time to <hh:mm:ss>.

Usage: systemsetup -gettimezone
        Display current time zone.

Usage: systemsetup -settimezone <timezone>
        Set current time zone to <timezone>. Use "-listtimezones" to list time zones.

Usage: systemsetup -listtimezones
        List time zones supported by this machine.

Usage: systemsetup -getusingnetworktime
        Display whether network time is on or off.

Usage: systemsetup -setusingnetworktime <on off>
        Set using network time to either <on> or <off>.

Usage: systemsetup -getnetworktimeserver
        Display network time server.

Usage: systemsetup -setnetworktimeserver <timeserver>
        Set network time server to <timeserver>.

Usage: systemsetup -getsleep
        Display amount of idle time until computer, display and hard disk sleep.

Usage: systemsetup -setsleep <minutes>
        Set amount of idle time until computer, display and hard disk sleep to <minutes>.
        Specify "Never" or "Off" for never.

Usage: systemsetup -getcomputersleep
        Display amount of idle time until computer sleeps.

Usage: systemsetup -setcomputersleep <minutes>
        Set amount of idle time until compputer sleeps to <minutes>.
        Specify "Never" or "Off" for never.

Usage: systemsetup -getdisplaysleep
        Display amount of idle time until display sleeps.

Usage: systemsetup -setdisplaysleep <minutes>
        Set amount of idle time until display sleeps to <minutes>.
        Specify "Never" or "Off" for never.

Usage: systemsetup -getharddisksleep
        Display amount of idle time until hard disk sleeps.

Usage: systemsetup -setharddisksleep <minutes>
        Set amount of idle time until hard disk sleeps to <minutes>.
        Specify "Never" or "Off" for never.

Usage: systemsetup -getwakeonmodem
        Display whether wake on modem is on or off.

Usage: systemsetup -setwakeonmodem <on off>
        Set wake on modem to either <on> or <off>.

Usage: systemsetup -getwakeonnetworkaccess
        Display whether wake on network access is on or off.

Usage: systemsetup -setwakeonnetworkaccess <on off>
        Set wake on network access to either <on> or <off>.

Usage: systemsetup -getrestartpowerfailure
        Display whether restart on power failure is on or off.

Usage: systemsetup -setrestartpowerfailure <on off>
        Set restart on power failure to either <on> or <off>.

Usage: systemsetup -getrestartfreeze
        Display whether restart on freeze is on or off.

Usage: systemsetup -setrestartfreeze <on off>
        Set restart on freeze to either <on> or <off>.

Usage: systemsetup -getallowpowerbuttontosleepcomputer
        Display whether the power button is able to sleep the computer.

Usage: systemsetup -setallowpowerbuttontosleepcomputer <on off>
        Enable or disable whether the power button can sleep the computer.

Usage: systemsetup -getremotelogin
        Display whether remote login is on or off.

Usage: systemsetup -setremotelogin <on off>
        Set remote login to either <on> or <off>. Use "systemsetup -f -setremotelogin off" to suppress prompting when turning remote login off.

Usage: systemsetup -getremoteappleevents
        Display whether remote apple events are on or off.

Usage: systemsetup -setremoteappleevents <on off>
        Set remote apple events to either <on> or <off>.

Usage: systemsetup -getcomputername
        Display computer name.

Usage: systemsetup -setcomputername <computername>
        Set computer name to <computername>.

Usage: systemsetup -getlocalsubnetname
        Display local subnet name.

Usage: systemsetup -setlocalsubnetname <name>
        Set local subnet name to <name>.

Usage: systemsetup -getstartupdisk
        Display current startup disk.

Usage: systemsetup -setstartupdisk <disk>
        Set current startup disk to <disk>.

Usage: systemsetup -liststartupdisks
        List startup disks on this machine.

Usage: systemsetup -getwaitforstartupafterpowerfailure
        Get the number of seconds after which the computer will start up after a power failure.

Usage: systemsetup -setwaitforstartupafterpowerfailure <seconds>
        Set the number of seconds after which the computer will start up after a power failure. The <seconds> value must be a multiple of 30 seconds.

Usage: systemsetup -getdisablekeyboardwhenenclosurelockisengaged
        Get whether or not the keyboard should be disabled when the X Serve enclosure lock is engaged.

Usage: systemsetup -setdisablekeyboardwhenenclosurelockisengaged <yes no>
        Set whether or not the keyboard should be disabled when the X Serve enclosure lock is engaged.

Usage: systemsetup -version
        Display version of systemsetup tool.

Usage: systemsetup -help
        Display help.

Usage: systemsetup -printCommands
        Display commands.


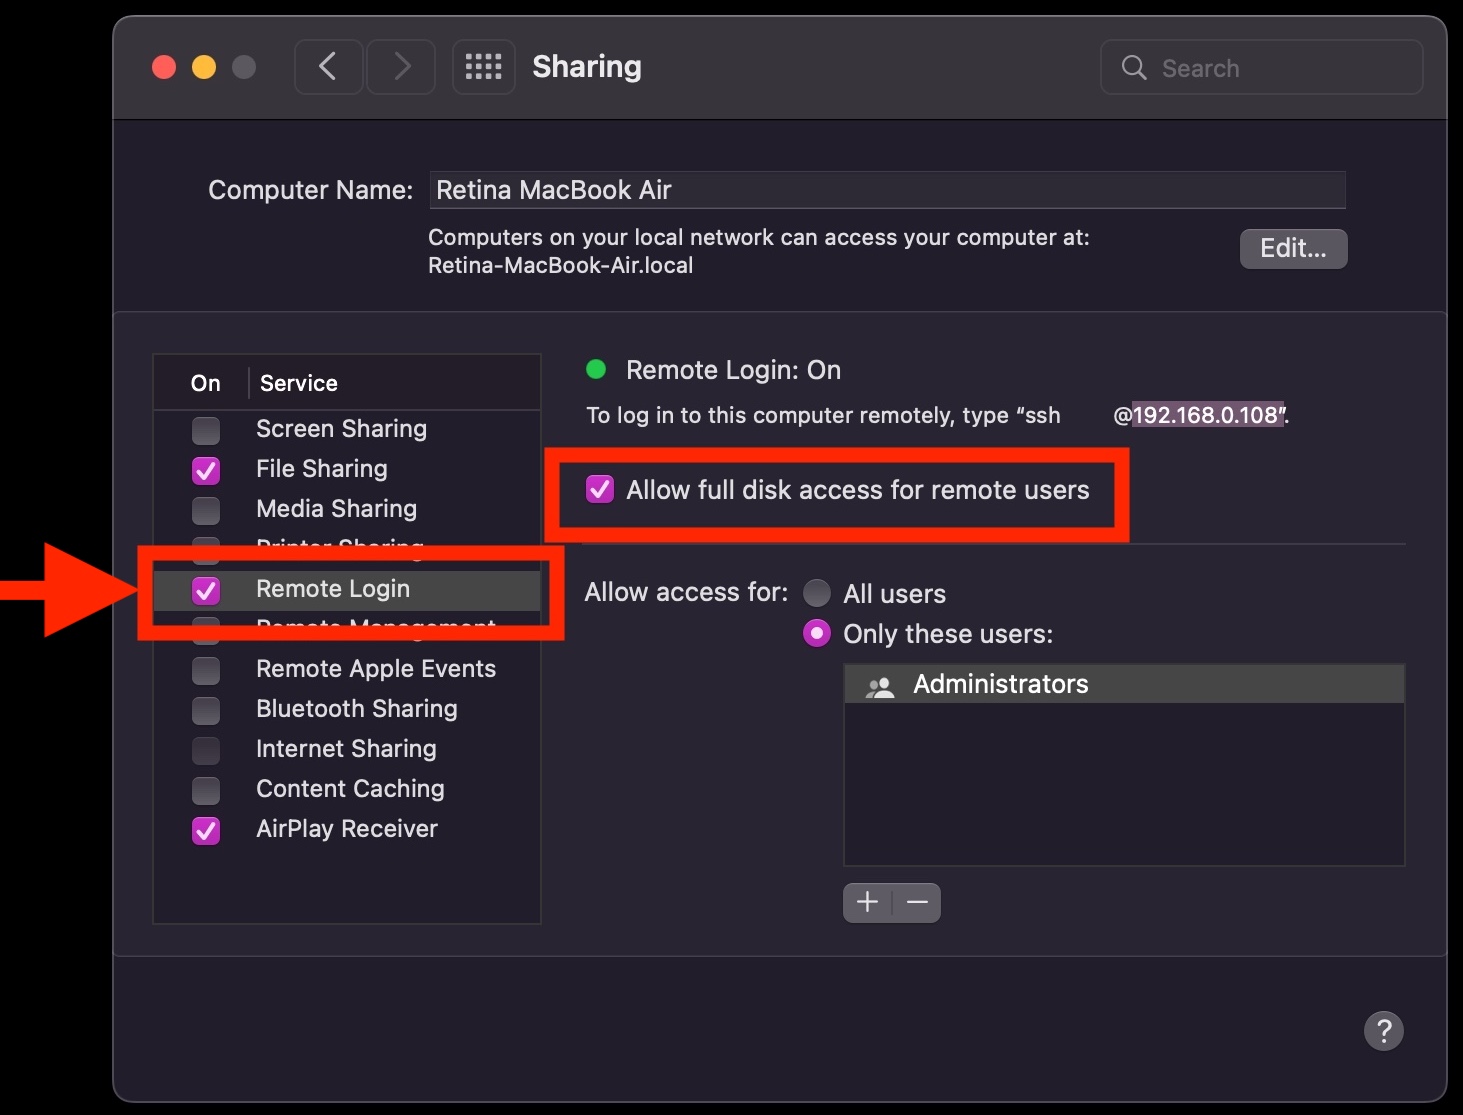
Enabling SSH in Mac OS X computers can be done also from Graphical interface for the lazy ones.

enable-ssh-mac-remote-login-from-mac-OS-X-gui

How to turn On or Off Screen Reader ORCA on Linux Desktop enabled by mistype or a kid smash on the keyboard

Wednesday, November 22nd, 2023

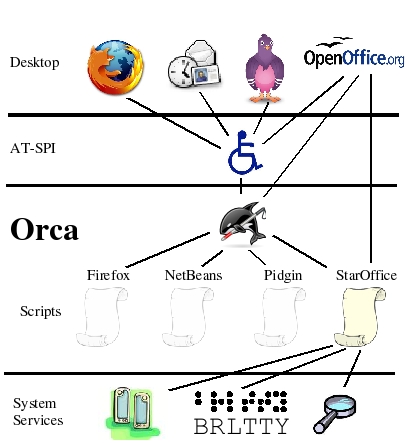
orca-screen-reader-communication-services-logo

For those who type quite fast and use Microsoft Windows, its quite common to start the annoying NARRATOR (Windows Speaking Program) by accidently due to mistyping pressing together Windows key + Control + Enter.
This enables Narrator to read stuff on the screen here and there and to turn it off you just have to either Lock the Windows Computer and press again Windows key + Control + Enter to TURN OFF NARRATOR.

Linux does not have a Narrator but have also embedded Eye impairment Assistive Technology called ORCA.

Orca works with applications and toolkits that support the Assistive Technology Service Provider Interface (AT-SPI), which is the primary assistive technology infrastructure for Linux and Solaris. Applications and toolkits supporting the AT-SPI include the GNOME Gtk+ toolkit, the Java platform's Swing toolkit, LibreOffice, Gecko, and WebKitGtk. AT-SPI support for the KDE Qt toolkit is being pursued.

ORCA is nowadays installed and integrated into many if not most Linux distributions out there. Enabling ORCA is not such a common thing on Linux,so today I got quite puzzled once I came back to the computer, leaving the 3.7 months kid near the Keyboard and finding out that I've enabled aloud screen reader that is reading what is every Window / Menu / Program or object I select with the mouse on my Linux MATE Desktop home GUI environment running on top of Debian Linux.

After a quick look up in Google on what exactly is the Linux program that is reading my screen I came across ORCA, which seem to be visible also as running in my process list:

hipo@jeremiah:~/Downloads$ ps -ef|grep -i orca
hipo     1068376    7960 17 18:48 tty2     00:00:01 orca

After a quick check online I found out that,

To start (Turn On ) Orca Screen Reader using the keyboard:

Windows logo button (Super Key) key + Alt + S 

Of course, it is possible to shut off the annoying reader by simply killing it with:

kill -9 orca


Ubuntu users, could start Orca using a mouse and keyboard:

Open the Activities overview and start typing Accessibility.

Click Accessibility to open the panel.

Select thez to open it.

Switch the Screen Reader switch to on.

Problem solved now Screen Reader on Linux is disabled, maybe it is time to disable Orca key press ability to prevent the kid from enabling it again since I don't need it actively thanksfully. with

xmodmap -e 'keycode <value>='

or simply removing the orca package with apt:

# apt remove orca