Archive for the ‘Linux Backup tools’ Category

Linux script to periodically log enabled systemctl services, configured network IPs and routings, server established connections and iptables firewall rules

Tuesday, January 25th, 2022

bash-script-command-line-script-logo

For those who are running some kind of server be it virtual or physical, where multiple people or many systemins have access, sometimes it could be quite a mess as someone due to miscommunication or whatever could change something on the configured Network Ethernet interfaces, or configured routing tables, or simply issue an update which might change the set of automatically set to run systemctl services due to update. Such changes on a Linux server Operating system often can remain unnoticed and could cause quite a harm. Even when the change is noticed the logical question occurs what was the previous network route on the server or what kind of network was configured on Ethernet interface ethX etc. 
Problems like the described where, pretty common in many public Private Clouds or VMWare / XEN based Hypervisors that host multiple  Virtual machines, for that reason I've developed a small script which is pretty dumb on the first glimpse but mostly useful as it keeps historical records of such important information.
 

#!/bin/sh
# script to show configured services on system, configured IPs, netstat state and network routes
# Script to be used during CentOS and Redhat Enterprise Linux RPM package updates with yum

output_file=network_ip_routes_services_status;
ddate=$(date '+%Y-%m-%d_%H-%M-%S');
iptables=$(which iptables);
if [ ! -d /root/logs/ ]; then
mkdir /root/logs/;
fi

echo "STARTED: $(date '+%Y-%m-%d_%H-%M-%S'):" | tee -a /root/logs/$output_file-$(hostname)-$ddate.log
echo -e "# systemctl list-unit-files\n" | tee -a /root/logs/$output_file-$(hostname)-$ddate.log
systemctl list-unit-files –type=service | grep enabled | tee -a /root/logs/$output_file-$(hostname)-$ddate.log
echo -e '# systemctl | grep ".service" | grep "running"\n' | tee -a /root/logs/$output_file-$(hostname)-$ddate.log
systemctl | grep ".service" | grep "running" | tee -a /root/logs/$output_file-$(hostname)-$ddate.log
echo -e "# netstat -tulpn\n" | tee -a /root/logs/$output_file-$(hostname)-$ddate.log
netstat -tulpn | tee -a /root/logs/$output_file-$(hostname)-$ddate.log
echo -e "# netstat -r\n" | tee -a /root/logs/$output_file-$(hostname)-$ddate.log
netstat -r | tee -a /root/logs/$output_file-$(hostname)-$ddate.log
echo -e "# ip a s\n" | tee -a /root/logs/$output_file-$(hostname)-$ddate.log
ip a s | tee -a /root/logs/$output_file-$(hostname)-$ddate.log
echo -e "# /sbin/route -n\n" | tee -a /root/logs/$output_file-$(hostname)-$ddate.log
/sbin/route -n | tee -a /root/logs/$output_file-$(hostname)-$ddate.log
echo -e "# $iptables -L -n\n" | tee -a /root/logs/$output_file-$(hostname)-$ddate.log
echo -e "# $iptables -t nat -L" | tee -a /root/logs/$output_file-$(hostname)-$ddate.log
$iptables -L -n | tee -a /root/logs/$output_file-$(hostname)-$ddate.log
$iptables -t nat -L | tee -a /root/logs/$output_file-$(hostname)-$ddate.log
echo "ENDED $(date '+%Y-%m-%d_%H-%M-%S'):" | tee -a /root/logs/$output_file-$(hostname)-$ddate.log


Script produces its logs inside  /root/logs/network_ip_routes_services_status*hostname*currentdate*.log, put the script inside /root/ or wherever you like.

To keep an eye how network routing or ip configuration or firewall changed or there was a peak with the established connections towards daemons running on host (lets say requiring a machine upgrade), I've set the script to run as usually via cron job at the end of the predefined cron job tasks, like so:

# crontab -u root -e
# periodic dump and log network routing tables, netstat and systemctl list-unit-files
*/1 01 01,25 * * /root/show_running_services_netstat_ips_route1.sh 2>&1 >/dev/null

You can download a copy of show_running_services_netstat_ips_route1.sh script here.
The script is written without much of efficiency on mind, as you can see the with the multiple tee -a and for critical hosts it might be a good idea to rewrite it to use '>>' OPERAND instead, anyhows as most machines today are pretty powerful it doesn't really matter much.

Of course today such a script is quite archaic, as most big corporations are using much more complex monitoring software such as Zabbix, Prometheus or if some kind of Elastic Search is used Kibana etc. but for a basic needs and even for a double checking and comparing with other more advanced monitoring tools  (in case if monitoring tools  database gets damaged or temporary down until backupped), still I think such an oldschool simple monitoring script can be of use.

A good addition to that if you use a central logging server is to set another cron to periodically synchronize produced /root/logs/* to somewhere, here is how to do it with simple rsync (considering your host is configured to login with a user without password with ssh key authentication).

# HOSTNAME=$(hostname); rsync -axHv –ignore-existing -e 'ssh -p 22' /bashscripts/  -q -i –out-format="%t %f %b" –log-file=/var/log/rsync_sync_jobs.log –info=progress2 root@BACKUP_SERVER_HOST:/$(HOSTNAME)-logs/

Once something strange occurs with the machine, like the machine needs to be rebuild

I would be glad to hear if some of my readers uses some useful script which I can adopt myself. Cheers  🙂

Backup entire Live Linux Operating System bit by bit with dd, partimage, partclone clonezilla

Thursday, January 7th, 2021


dd-create-server-hard-drive-identical-mirror-data-copy-backups

This is an old stuff that we UNIX / Linux sysadmins use frequently when we need to migrate operating system from a certain older machine server to another newer one.
However I decided to blog it as it an interesting to know to a new grown junior sysadmins.

To Create a bit to bit data backup with dd command,
the following command is used to create a backup with dd, which takes the entire data content (including partition table etc.) with it:

dd if = / dev / [hard disk 1] of = / dev / [hard disk 2] bs = 512 conv = noerror, sync


For explanation:


"if" stands for the hard drive to be read from.
"of" stands for the hard drive to be written to.
Important! if and of must not be interchanged under any circumstances! In the worst case, the data on the disk to be read will otherwise be irrevocably overwritten!

"bs = 512" defines the block size. The value can be increased (which in turn increases the speed of the backup), but you should be sure that the file system to be backed up does not contain any errors. If you were to use block size 64k, for example, the speed of the backup is increased considerably – but if read errors occur within this block, the entire data block that dd has written contains unusable data. Therefore, when choosing the block size, you should always weigh data integrity and time against each other.
"noerror" tells dd to continue the backup in case of errors. Without this option, dd would stop the backup by default.
"sync" commands dd to replace the unreadable blocks with zeros in the event of errors in order to keep the data offset synchronous.
When performing a backup (as with other things that a longer period can take advantage of, it is always recommended (if you SSH is logged in and no direct access to a real Shell), the process either for CTRL + followed from bg to the background (can later be brought back to the foreground with fg ) or to use virtual session managers such as screen or byobu before executing the command.This prevents the process from dying if the SSH session is unintentionally terminated and you have to start over.

Of course there are plenty of other ways to make a mirror backup  cloneof a hard disk to lets say migrate to a new data center  using easier to use tools with (ncurses) Text menu interfaces to avoid bothering a complex typing on the console.
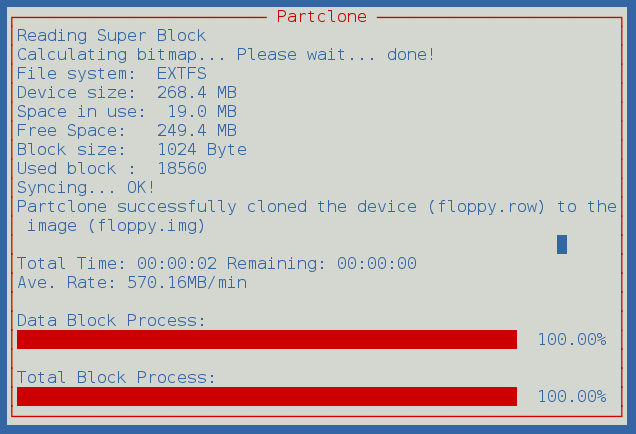
One such tool is Partclon:

Partclone-screenshot,_partclone-linux-create-mirror-disk-backups

PartClone cloning in action

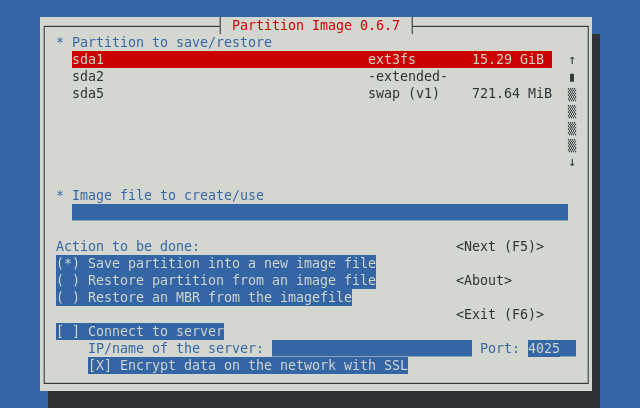
Another text menu interface data cloning Linux tool commonly used by sysadms is partimage

Partimage-linux-screenshot

Most sysadmins however prefer to use Clonezilla when something more cozy is required to do a bit to bit data copy.
Tthere is even a Live Linux CD distribution for that.

Clonezilla can mirror most types of filesystems and partiontions and could be used not only for UNIX / Linux / BSD filesystems Live OS data (backups) (EXT3 / EXT4 / XFS / ZFS etc)  migrations, but also for old NT4 Windows server partitions. One useful application of Clonezilla i can think of is if you want to configure or restore a whole office of Windows computers running on the same clean version of Windows and same hardware configurations PCs, after a Virus or trojan has striked it. By using it you can clone from a central well configured Windows release with the surrounding applications to all machines for up to an hour with Clonezilla and you can even do it over a network.

Howto Upgrade IBM Spectrum Protect Backup Client TSM 7.X to 8.1.8, Update Tivoli 8.1.8 to 8.1.11 on CentOS and Redhat Linux

Thursday, December 3rd, 2020


IBM-spectrum-protect-backup-logo-tivoli-tsm-logo

Having another day of a system administrator boredom, we had a task to upgrade some Tivoli TSM Backup clients running on a 20+ machines powered by CentOS and RHEL Linux to prepare the systems to be on the latest patched IBM Spectrum Backup client version available from IBM. For the task of patching I've used a central server where, I've initially downloaded the provided TSM client binaries archives. From this machine, we have copied TivSM*.tar to each and every system that needs to be patched and then patched. The task is not too complex as the running TSM in the machines are all at the same version and all running a recent patched version of Linux. Hence to make sure all works as expected we have tested TSM is upgraded from 7.X.X to 8.X.X on one machine and then test 8.1.8 to 8.1.11 upgrade on another one. Once having confirmed that Backups works as expected after upgrade. We have proceeded to do it massively on each of the rest 20+ hosts.
Below article's goal is to help some lazy sysadmin with the task to prepare an TSM Backup upgrade procedure to standartize TSM Upgrade, which as many of the IBM's softwares is very specific and its upgrade requires, a bit of manual work and extra cautious as there seems to be no easy way (or at least I don't know it), to do the upgrade by simply adding an RPM repository and doing, something like yum install tivsm*.


0. Check if there is at least 2G free of space

According to documentation the minimum space you need to a functional install without having it half installed or filling up your filesystem is 2 Gigabytes of Free Memory on a filesystem where the .tar and rpms will be living.

Thus check what is the situation with your filesystem where you wills store the .tar archice and extract .RPM files / install the RPM files.

# df -h

1. Download the correct tarball with 8.1 Client

On one central machine you would need to download the Tivoli you can do that via wget / curl / lynx whatever is at hand on the Linux server.

As of time of writting this article TSM's 8.1.11 location is at
URL:

http://public.dhe.ibm.com/storage/tivoli-storage-management/maintenance/client/v8r1/Linux/LinuxX86/BA/v8111/

I've made a local download mirror of Tivoli TSM 8.1.11 here.
In case you need to install IBM Spectrum Backup Client to a PCI secured environment to a DMZ-ed LAN network from a work PC you can Download it first from your local PC and via Citrix client upload program or WinSCP upload it to a central replication host from where you will later copy to each of the other server nodes that needs to be upgraded.

Lets Copy archive to all Server hosts where you want it later installed, using a small hack

Assuming you already have an Excel document or a Plain text document with all the IPs of the affected hosts where you will need to get TSM upgraded. Extract this data and from it create a plain text file /home/user/hosts.txt containing all the machine IPs lined up separated with carriage return separations (\n), so you can loop over each one and use scp to send the files.

– Replicate Tivoli tar to all machine hosts where you want to get IBM Spectrum installed or upgraded.
Do it with a loop like this:

# for i in $(cat hosts.txt); do scp 8.1.11.0-TIV-TSMBAC-LinuxX86.tar user@$i:/home/user/; done

 Copy to a Copy buffer temporary your server password assuming all your passwords to each machine are identical and paste your login user pass for each host to initiate transfer
 

2. SSH to each of the Machine hosts IPs

Once you login to the host you want to upgrade
Go to your user $HOME /home/user and create files where we'll temporary store Tivoli archive files and extract RPMs

[root@linux-server user]# mkdir -p ~/tsm/TSM_BCK/
[root@linux-server user]# mv 8.1.11.0-TIV-TSMBAC-LinuxX86.tar ~/tsm
[root@linux-server user]# cd tsm
[root@linux-server user]# tar -xvvf 8.1.11.0-TIV-TSMBAC-LinuxX86.tar
gskcrypt64-8.0.55.17.linux.x86_64.rpm
GSKit.pub.pgp
gskssl64-8.0.55.17.linux.x86_64.rpm
README_api.htm
README.htm
RPM-GPG-KEY-ibmpkg
TIVsm-API64.x86_64.rpm
TIVsm-APIcit.x86_64.rpm
TIVsm-BAcit.x86_64.rpm
TIVsm-BAhdw.x86_64.rpm
TIVsm-BA.x86_64.rpm
TIVsm-filepath-source.tar.gz
TIVsm-JBB.x86_64.rpm
TIVsm-WEBGUI.x86_64.rpm
update.txt

3. Create backup of old backup files

It is always a good idea to keep old backup files

[root@linux-server tsm]# cp -av /opt/tivoli/tsm/client/ba/bin/dsm.opt ~/tsm/TSM_BCK/dsm.opt_bak_$(date +'%Y_%M_%H')
[root@linux-server tsm]# cp -av /opt/tivoli/tsm/client/ba/bin/dsm.sys ~/tsm/TSM_BCK/dsm.sys_bak_$(date +'%Y_%M_%H')

[root@linux-server tsm]# [[ -f /etc/adsm/TSM.PWD ]] && cp -av /etc/adsm/TSM.PWD ~/TSM_BCK/ || echo 'file doesnt exist'

/etc/adsm/TSM.PWD this file is only there as legacy for TSM it contained encrypted passwords inver 7 for updates. In TSM v.8 encryption file is not there as new mechanism for sensitive data was introduced.
Be aware that from Tivoli 8.X it will return error
exist'

!! Note – if dsm.opt , dsm.sys files are on different locations – please use correct full path locations !!

4. Stop  dsmcad – TSM Service daemon

[root@linux-server tsm]# systemctl stop dsmcad

5. Locate and deinstall all old Clients

Depending on the version to upgrade if you're upgrading from TSM version 7 to 8, you will get output like.

[root@linux-server tsm]# rpm -qa | grep 'TIVsm-'
TIVsm-BA-7.1.6-2.x86_64
TIVsm-API64-7.1.6-2.x86_64

If you're one of this paranoid admins you can remove TIVsm packs  one by one.

[root@linux-server tsm]# rpm -e TIVsm-BA-7.1.6-2.x86_64
[root@linux-server tsm]# rpm -e TIVsm-API64-7.1.6-2.x86_64

Instead if upgrading from version 8.1.8 to 8.1.11 due to the Security CVE advisory recently published by IBM e.g. (IBM Runtime Vulnerability affects IBM Spectrum Backup archive Client) and  vulnerability in Apache Commons Log4J affecting IBM Spectrum Protect Backup Archive Client.

[root@linux-server tsm]# rpm -qa | grep 'TIVsm-'
TIVsm-API64-8.1.8-0.x86_64
TIVsm-BA-8.1.8-0.x86_64

Assuming you're not scared of a bit automation you can straight do it with below one liner too 🙂

# rpm -e $(rpm -qa | grep TIVsm)

[root@linux-server tsm]# rpm -qa | grep gsk
[root@linux-server tsm]# rpm -e gskcrypt64 gskssl64

6. Check uninstallation success:

[root@linux-server tsm]# rpm -qa | grep TIVsm
[root@linux-server tsm]# rpm -qa | grep gsk

Here you should an Empty output, if packages are not on the system, e.g. Empty output is good output ! 🙂

7. Install new client IBM Spectrum Client (Tivoli Storage Manager) and lib dependencies

[root@linux-server tsm]# rpm -ivh gskcrypt64-8.0.55.4.linux.x86_64.rpm
[root@linux-server tsm]# rpm -ivh gskssl64-8.0.55.4.linux.x86_64.rpm

 If you're lazy to type you can do as well

[root@linux-server tsm]# rpm -Uvh gsk*

Next step is to install main Tivoli SM components the the API files and BA (The Backup Archive Client)

[root@linux-server tsm]# rpm -ivh TIVsm-API64.x86_64.rpm
[root@linux-server tsm]# rpm -ivh TIVsm-BA.x86_64.rpm

If you have to do it on multiple servers and you do it manually following a guide like this, you might instead want to install them with one liner.

[root@linux-server tsm]# rpm -ivh TIVsm-API64.x86_64.rpm TIVsm-BA.x86_64.rpm

There are some Not mandatory "Common Inventory Technology" components (at some cases if you're using the API install it we did not need that), just for the sake if you need them on your servers due to backup architecture, install also below commented rpm files.

## rpm -ivh TIVsm-APIcit.x86_64.rpm

## rpm -ivh TIVsm-BAcit.x86_64.rpm

These packages not needed only for operation WebGUI TSM GUI management, (JBB) Journal Based Backup, BAhdw (the ONTAP library)


— TIVsm-WEBGUI.x86_64.rpm
— TIVsm-JBB.x86_64.rpm
— TIVsm-BAhdw.x86_64.rpm

8. Start and enable dsmcad service

[root@linux-server tsm]# systemctl stop dsmcad

You will get

##Warning: dsmcad.service changed on disk. Run 'systemctl daemon-reload' to reload units.

[root@linux-server tsm]# systemctl daemon-reload

[root@linux-server tsm]# systemctl start dsmcad


## enable dsmcad – it is disabled by default after install

[root@linux-server ~]# systemctl enable dsmcad

[root@linux-server tsm]# systemctl status dsmcad

9. Check dmscad service is really running

Once enabled IBM TSM will spawn a process in the bacground dmscad if it started properly you should have the process backgrounded.

[root@linux-server tsm]# ps -ef|grep -i dsm|grep -v grep
root      2881     1  0 18:05 ?        00:00:01 /usr/bin/dsmcad

If process is not there there might be some library or something not at place preventing the process to start …

10. Check DSMCAD /var/tsm logs for errors

After having dsmcad process enabled and running in background

[root@linux-server tsm]# grep -i Version /var/tsm/sched.log|tail -1
12/03/2020 18:06:29   Server Version 8, Release 1, Level 10.000


[root@linux-server tsm]# cat /var/tsm/dsmerror.log

To see the current TSM configuration files we can  grep out comments *

[root@linux-server tsm]# grep -v '*' /opt/tivoli/tsm/client/ba/bin/dsm.sys

Example Configuration of the agent:
—————————————————-
   *TSM SERVER NODE Location
   Servername           tsm_server
   COMMmethod           TCPip
   TCPPort              1400
   TCPServeraddress     tsmserver2.backuphost.com
   NodeName             NODE.SERVER-TO-BACKUP-HOSTNAME.COM
   Passwordaccess       generate
   SCHEDLOGNAME         /var/tsm/sched.log
   SCHEDLOGRETENTION    21 D
   SCHEDMODE            POLLING
   MANAGEDServices      schedule
   ERRORLOGNAME         /var/tsm/dsmerror.log
   ERRORLOGRETENTION    30 D
   INCLEXCL             /opt/tivoli/tsm/client/ba/bin/inclexcl.tsm

11. Remove tsm install directory tar ball and rpms to save space on system

The current version of Tivoli service manager is 586 Megabytes.

[root@linux-server tsm]# du -hsc 8.1.11.0-TIV-TSMBAC-LinuxX86.tar
586M    8.1.11.0-TIV-TSMBAC-LinuxX86.tar

Some systems are on purpose configured to have less space under their /home directory,
hence it is a good idea to clear up unnecessery files after completion.

Lets get rid of all the IBM Spectrum archive source files and the rest of RPMs used for installation.

[root@linux-server tsm]# rm -rf ~/tsm/{*.tar,*.rpm,*.gpg,*.htm,*.txt}

12. Check backups are really created on the configured remote Central backup server

To make sure after the upgrade the backups are continuously created and properly stored on the IBM Tivoly remote central backup server, either manually initiate a backup or wait for lets say a day and run dsmc client to show all created backups from previous day. To make sure you'll not get empty output you can on purpose modify some file by simply opening it and writting over without chaning anything e.g. modify your ~/.bashrc or ~/.bash_profile

## List all backups for '/' root directory from -fromdate='DD/MM/YY'

[root@linux-server tsm]# dsmc
Protect>
IBM Spectrum Protect
Command Line Backup-Archive Client Interface
  Client Version 8, Release 1, Level 11.0
  Client date/time: 12/03/2020 18:14:03
(c) Copyright by IBM Corporation and other(s) 1990, 2020. All Rights Reserved.

Node Name: NODE.SERVER-TO-BACKUP-HOSTNAME.COM
Session established with server TSM2_SERVER: AIX
  Server Version 8, Release 1, Level 10.000
  Server date/time: 12/03/2020 18:14:04  Last access: 12/03/2020 18:06:29
 
Protect> query backup -subdir=yes "/" -fromdate=12/3/2020
           Size        Backup Date                Mgmt Class           A/I File
           —-        ———–                ———-           — —-
         6,776  B  12/03/2020 01:26:53             DEFAULT              A  /etc/freshclam.conf
         6,685  B  12/03/2020 01:26:53             DEFAULT              A  /etc/freshclam.conf-2020-12-02
         5,602  B  12/03/2020 01:26:53             DEFAULT              A  /etc/hosts
         5,506  B  12/03/2020 01:26:53             DEFAULT              A  /etc/hosts-2020-12-02
           398  B  12/03/2020 01:26:53             DEFAULT              A  /opt/tivoli/tsm/client/ba/bin/tsmstats.ini
       114,328  B  12/03/2020 01:26:53             DEFAULT              A  /root/.bash_history
           403  B  12/03/2020 01:26:53             DEFAULT              A  /root/.lesshst

IBM TSM dsmc console client use for listing configured backups, checking set scheduled backups and backup and restore operations howto

Friday, March 6th, 2020

tsm-ibm-logo_tivoli-dsmc-console-client-listing-backups-create-backups-and-restore-on-linux-unix-windows

Creating a simple home based backup solution with some shell scripting and rsync is a common use. However as a sysadmin in a middle sized or large corporations most companies use some professional backup service such as IBM Tivoli Storage Manager TSM – recently IBM changed the name of the product to IBM Spectrum.

IBM TSM  is a data protection platform that gives enterprises a single point of control and administration for backup and recovery that is used for Privare Clouds backup and other high end solutions where data criticality is top.
Usually in large companies TSM backup handling is managed by a separate team or teams as managing a large TSM infrastructure is quite a complex task, however my experience as a sysadmin show me that even if you don't have too much of indepth into tsm it is very useful to know how to manage at least basic Incremental backup operations such as view what is set to be backupped, set-up a new directory structure for backup, check the backup schedule configured, check what files are included and which excluded from the backup store etc. 

TSM has multi OS support ans you can use it on most streamline Operating systems Windows / Mac OS X and Linux in this specific article I'll be talking concretely about backing up data with tsm on Linux, tivoli can be theoretically brought up even on FreeBSD machines via the Linuxemu BSD module and the 64-Bit Tivoli Storage Manager RPMs.
Therefore in this small article I'll try to give few useful operations for the novice admin that stumbles on tsm backupped server that needs some small maintenance.
 

1. Starting up the dsmc command line client


Nomatter the operating system on which you run it to run the client run:

# dsmc


tsm-check-backup-schedule-set-time

Note that usually dsmc should run as superuser so if you try to run it via a normal non-root user you will get an error message like:


[ user@linux ~]$ dsmc
ANS1398E Initialization functions cannot open one of the Tivoli Storage Manager logs or a related file: /var/tsm/dsmerror.log. errno = 13, Permission denied


Tivoli SM has an extensive help so to get the use basics, type help
 

tsm> help
1.0 New for IBM Tivoli Storage Manager Version 6.4
2.0 Using commands
  2.1 Start and end a client command session
    2.1.1 Process commands in batch mode
    2.1.2 Process commands in interactive mode
  2.2 Enter client command names, options, and parameters
    2.2.1 Command name
    2.2.2 Options
    2.2.3 Parameters
    2.2.4 File specification syntax
  2.3 Wildcard characters
  2.4 Client commands reference
  2.5 Archive
  2.6 Archive FastBack

Enter 'q' to exit help, 't' to display the table of contents,
press enter or 'd' to scroll down, 'u' to scroll up or
enter a help topic section number, message number, option name,
command name, or command and subcommand:    


2. Listing files listed for backups


A note to make here is as in most corporate products tsm supports command aliases so any command supported described in the help like query, could be
abbreviated with its first letters only, e.g. query filespace tsm cmd can be abbreviated as

tsm> q fi

Commands can be run non-interactive mode also so if you want the output of q fi you can straight use:

tsm> dsmc q fi


tsm-check-included-excluded-files-q-file-if-backupped-list-backup-set-directories

This shows the directories and files that are set for backup creation with Tivoli.


3. Getting included and excluded backup set files


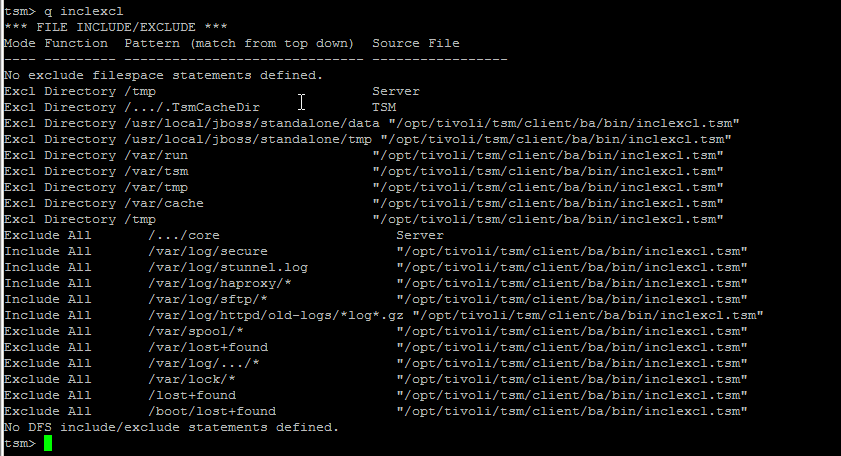
It is useful to know what are the exact excluded files from tsm set backup this is done with query inclexcl

tsm-check-excluded-included-files


4. Querying for backup schedule time

Tivoli as every other backup solution is creating its set to backup files in a certain time slot periods. 
To find out what is the time slot for backup creation use;

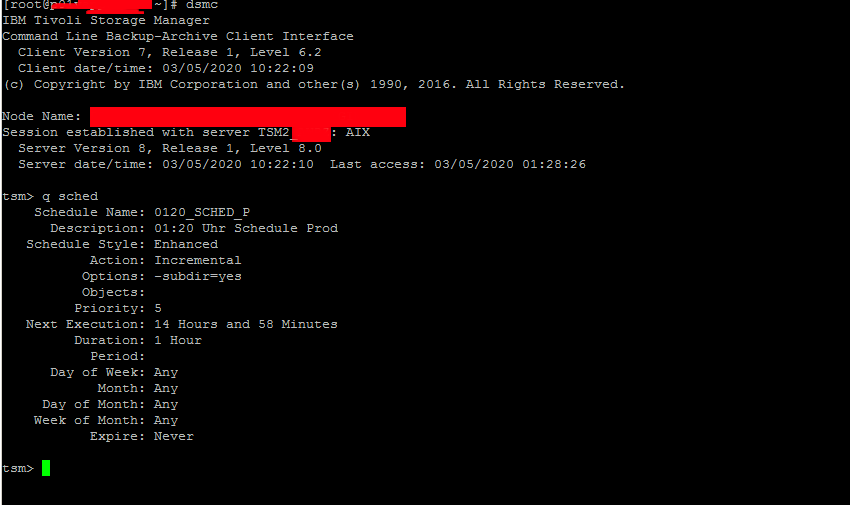
tsm> q sched
Schedule Name: WEEKLY_ITSERV
      Description: ITSERV weekly incremental backup
   Schedule Style: Classic
           Action: Incremental
          Options: 
          Objects: 
         Priority: 5
   Next Execution: 180 Hours and 35 Minutes
         Duration: 15 Minutes
           Period: 1 Week  
      Day of Week: Wednesday
            Month:
     Day of Month:
    Week of Month:
           Expire: Never  


tsm-query-partitions-backupeed-or-not


5. Check which files have been backed up

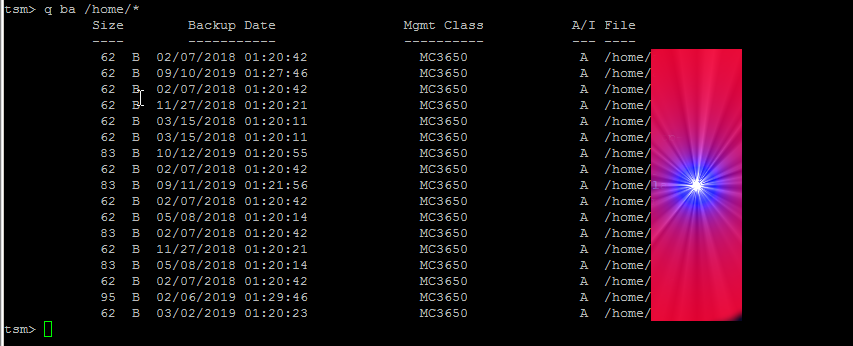
If you want to make sure backups are really created it is a good to check, which files from the selected backup files have already
a working backup copy.

This is done with query backup like so:

tsm> q ba /home/*


tsm-dsmc-query-user-home-for-backups

If you want to query all the current files and directories backed up under a directory and all its subdirectories you need to add the -subdir=yes option as below:


tsm> q ba /home/hipo/projects/* -subdir=yes
   
Size      Backup Date        Mgmt Class A/I File
   —-      ———–        ———- — —-
    512  12-09-2011 19:57:09    STANDARD    A  /home/hipo/projects/hfs0106
  1,024  08-12-2011 02:46:53    STANDARD    A  /home/hipo/projects/hsm41perf
    512  12-09-2011 19:57:09    STANDARD    A  /home/hipo/projects/hsm41test
    512  24-04-2012 00:22:56    STANDARD    A  /home/hipo/projects/hsm42upg
  1,024  12-09-2011 19:57:09    STANDARD    A  /home/hipo/projects/hfs0106/test
  1,024  12-09-2011 19:57:09    STANDARD    A  /home/hipo/projects/hfs0106/test/test2
 12,048  04-12-2011 02:01:29    STANDARD    A  /home/hipo/projects/hsm41perf/tables
 50,326  30-04-2012 01:35:26    STANDARD    A  /home/hipo/projects/hsm42upg/PMR70023
 50,326  27-04-2012 00:28:15    STANDARD    A  /home/hipo/projects/hsm42upg/PMR70099
 11,013  24-04-2012 00:22:56    STANDARD    A  /home/hipo/projects/hsm42upg/md5check  


  • To make tsm, backup some directories on Linux / AIX other unices:


tsm> incr /  /usr  /usr/local  /home /lib


  • For tsm to backup some standard netware drives, use:


tsm> incr NDS:  USR:  SYS:  APPS:  


  • To backup C:\ D:\ E:\ F:\ if TSM is running on Windows


tsm> incr C:  D:  E: F:  -incrbydate 


  • To back up entire disk volumes irrespective of whether files have changed since the last backup, use the selective command with a wildcard and -subdir=yes as below:


tsm> sel /*  /usr/*   /home/*  -su=yes   ** Unix/Linux


7. Backup selected files from a backup location


It is intuitive to think you can just add some wildcard characters to select what you want
to backup from a selected location but this is not so, if you try something like below
you will get an err.


tsm> incr /home/hipo/projects/*/* -su=yes      
ANS1071E Invalid domain name entered: '/home/hipo/projects/*/*'


The proper way to select a certain folder / file for backup is with:


tsm> sel /home/hipo/projects/*/* -su=yes


8. Restoring tsm data from backup


To restore the config httpd.conf to custom directory use:


tsm> rest /etc/httpd/conf/httpd.conf  /home/hipo/restore/


N!B! that in order for above to work you need to have the '/' trailing slash at the end.

If you want to restore a file under a different name:


tsm> rest /etc/ntpd.conf  /home/hipo/restore/


9. Restoring a whole backupped partition


tsm> rest /home/*  /tmp/restore/ -su=yes


This is using the Tivoli 'Restoring multiple files and directories', and the files to restore '*'
are kept till the one that was recovered (saying this in case if you accidently cancel the restore)


10. Restoring files with back date 


By default the restore function will restore the latest available backupped file, if you need
to recover a specific file, you need the '-inactive' '-pick' options.
The 'pick' interface is interactive so once listed you can select the exact file from the date
you want to restore.

General restore command syntax is:
 

tsm> restore [source-file] [destination-file]


tsm> rest /home/hipo/projects/*  /tmp/restore/ -su=yes  -inactive -pick

TSM Scrollable PICK Window – Restore

     #    Backup Date/Time        File Size A/I  File
   ————————————————————————————————–
   170. | 12-09-2011 19:57:09        650  B  A   /home/hipo/projects/hsm41test/inclexcl.test
   171. | 12-09-2011 19:57:09       2.74 KB  A   /home/hipo/projects/hsm41test/inittab.ORIG
   172. | 12-09-2011 19:57:09       2.74 KB  A   /home/hipo/projects/hsm41test/inittab.TEST
   173. | 12-09-2011 19:57:09       1.13 KB  A   /home/hipo/projects/hsm41test/md5.out
   174. | 30-04-2012 01:35:26        512  B  A   /home/hipo/projects/hsm42125upg/PMR70023
   175. | 26-04-2012 01:02:08        512  B  I   /home/hipo/projects/hsm42125upg/PMR70023
   176. | 27-04-2012 00:28:15        512  B  A   /home/hipo/projects/hsm42125upg/PMR70099
   177. | 24-04-2012 19:17:34        512  B  I   /home/hipo/projects/hsm42125upg/PMR70099
   178. | 24-04-2012 00:22:56       1.35 KB  A   /home/hipo/projects/hsm42125upg/dsm.opt
   179. | 24-04-2012 00:22:56       4.17 KB  A   /home/hipo/projects/hsm42125upg/dsm.sys
   180. | 24-04-2012 00:22:56       1.13 KB  A   /home/hipo/projects/hsm42125upg/dsmmigfstab
   181. | 24-04-2012 00:22:56       7.30 KB  A   /home/hipo/projects/hsm42125upg/filesystems
   182. | 24-04-2012 00:22:56       1.25 KB  A   /home/hipo/projects/hsm42125upg/inclexcl
   183. | 24-04-2012 00:22:56        198  B  A   /home/hipo/projects/hsm42125upg/inclexcl.dce
   184. | 24-04-2012 00:22:56        291  B  A   /home/hipo/projects/hsm42125upg/inclexcl.ox_sys
   185. | 24-04-2012 00:22:56        650  B  A   /home/hipo/projects/hsm42125upg/inclexcl.test
   186. | 24-04-2012 00:22:56        670  B  A   /home/hipo/projects/hsm42125upg/inetd.conf
   187. | 24-04-2012 00:22:56       2.71 KB  A   /home/hipo/projects/hsm42125upg/inittab
   188. | 24-04-2012 00:22:56       1.00 KB  A   /home/hipo/projects/hsm42125upg/md5check
   189. | 24-04-2012 00:22:56      79.23 KB  A   /home/hipo/projects/hsm42125upg/mkreport.020423.out
   190. | 24-04-2012 00:22:56       4.27 KB  A   /home/hipo/projects/hsm42125upg/ssamap.020423.out
   191. | 26-04-2012 01:02:08      12.78 MB  A   /home/hipo/projects/hsm42125upg/PMR70023/70023.tar
   192. | 25-04-2012 16:33:36      12.78 MB  I   /home/hipo/projects/hsm42125upg/PMR70023/70023.tar
        0———10——–20——–30——–40——–50——–60——–70——–80——–90–
<U>=Up  <D>=Down  <T>=Top  <B>=Bottom  <R#>=Right  <L#>=Left
<G#>=Goto Line #  <#>=Toggle Entry  <+>=Select All  <->=Deselect All
<#:#+>=Select A Range <#:#->=Deselect A Range  <O>=Ok  <C>=Cancel
pick> 


To navigate in pick interface you can select individual files to restore via the number seen leftside.
To scroll up / down use 'U' and 'D' as described in the legenda.


11. Restoring your data to another machine


In certain circumstances, it may be necessary to restore some, or all, of your data onto a machine other than the original from which it was backed up.

In ideal case the machine platform should be identical to that of the original machine. Where this is not possible or practical please note that restores are only possible for partition types that the operating system supports. Thus a restore of an NTFS partition to a Windows 9x machine with just FAT support may succeed but the file permissions will be lost.
TSM does not work fine with cross-platform backup / restore, so better do not try cross-platform restores.
 Trying to restore files onto a Windows machine that have previously been backed up with a non-Windows one. TSM created backups on Windows sent by other OS platforms can cause  backups to become inaccessible from the host system.

To restore your data to another machine you will need the TSM software installed on the target machine. Entries in Tivoli configuration files dsm.sys and/or dsm.opt need to be edited if the node that you are restoring from does not reside on the same server. Please see our help page section on TSM configuration files for their locations for your operating system. 

To access files from another machine you should then start the TSM client as below:


# dsmc -virtualnodename=RESTORE.MACHINE      


You will then be prompted for the TSM password for this machine.


You will probably want to restore to a different destination to the original files to prevent overwriting files on the local machine, as below:


  • Restore of D:\ Drive to D:\Restore ** Windows 


tsm> rest D:\*   D:\RESTORE\    -su=yes 


  • Restore user /home/* to /scratch on ** Mac, Unix/Linux


tsm> rest /home/* /scratch/     -su=yes  


  • Restoring Tivoli data on old netware


tsm> rest SOURCE-SERVER\USR:*  USR:restore/   -su=yes  ** Netware


12. Adding more directories for incremental backup / Check whether TSM backup was done correctly?

The easiest way is to check the produced dschmed.log if everything is okay there should be records in the log that Tivoli backup was scheduled in a some hours time
succesfully.
A normally produced backup scheduled in log should look something like:


14-03-2020 23:03:04 — SCHEDULEREC STATUS BEGIN
14-03-2020 23:03:04 Total number of objects inspected:   91,497
14-03-2020 23:03:04 Total number of objects backed up:      113
14-03-2020 23:03:04 Total number of objects updated:          0
14-03-2020 23:03:04 Total number of objects rebound:          0
14-03-2020 23:03:04 Total number of objects deleted:          0
14-03-2020 23:03:04 Total number of objects expired:         53
14-03-2020 23:03:04 Total number of objects failed:           6
14-03-2020 23:03:04 Total number of bytes transferred:    19.38 MB
14-03-2020 23:03:04 Data transfer time:                    1.54 sec
14-03-2020 23:03:04 Network data transfer rate:        12,821.52 KB/sec
14-03-2020 23:03:04 Aggregate data transfer rate:        114.39 KB/sec
14-03-2020 23:03:04 Objects compressed by:                    0%
14-03-2020 23:03:04 Elapsed processing time:           00:02:53
14-03-2020 23:03:04 — SCHEDULEREC STATUS END
14-03-2020 23:03:04 — SCHEDULEREC OBJECT END WEEKLY_23_00 14-12-2010 23:00:00
14-03-2020 23:03:04 Scheduled event 'WEEKLY_23_00' completed successfully.
14-03-2020 23:03:04 Sending results for scheduled event 'WEEKLY_23_00'.
14-03-2020 23:03:04 Results sent to server for scheduled event 'WEEKLY_23_00'.


in case of errors you should check dsmerror.log
 

Conclusion


In this article I've briefly evaluated some basics of IBM Commercial Tivoli Storage Manager (TSM) to be able to  list backups, check backup schedules and how to the files set to be
excluded from a backup location and most importantly how to check that data backed up data is in a good shape and accessible.
It was explained how backups can be restored on a local and remote machine as well as how to  append new files to be set for backup on next incremental scheduled backup.
It was shown how the pick interactive cli interface could be used to restore files at a certain data back in time as well as how full partitions can be restored and how some
certain file could be retrieved from the TSM data copy.

Play Midis on Linux / Make Linux MIDI Ready for the Future – Enable embedded MIDI music to play in a Browser, Play MIDIs with VLC and howto enjoy Midis in Text Console

Wednesday, October 4th, 2017

how-to-play-midi-on-gnu-linux-in-graphic-environment-console-and-browser-midi-synthesizer-and-linux-tux-together


Play Midis on Linux or Make Linux MIDI Ready for the Future – Enable embedded MIDI music to play in a Browser, Play MIDIs with VLC and howto enjoy Midis in Text Console HOWTO


Playing MIDI has been quite a lot of fun historically,

if you grow up in the days when personal computers were still young and the Sound Blaster was a luxury, before the raise of Mp3 music format, you have certainly enjoyed the beeping of PC Speaker and later on during 386 and 486 / 586 computers the enjoyment of playing tracked music such as S3M and MOD,

in that good days playing MIDI music was the only alternative for PC maniacs who doesn't own a CD Drive (which itself) was another luxury and even thouse who had a CD ROM device, were mainly playing music in CD audio format (.CDA).
Anyhow MIDI was a cheap and a CPU unintensive way to listen to equivalent of favourite popular Audio Songs and for those who still remember many of the songs were recreated in MIDI format, just with a number of synthesized instruments without any voice (as MIDI is usually).

The same was true also for the good old days of raise of Mobile Phones, when polyphonic was a standard as CPU power was low MIDI was a perfect substitute for the CPU heavy Encoded MP3s / OGG and other formats that required a modern for that time Intel CPU running in 50+ Mhz usually 100 / 166Mhz was perfect for the days to play Mp3 but still even on that PCs we listened to Midi songs.

Therefore if you're one of those people like me who still enjoy to play some Midi Music in the year 2017 and feel a bit like Back into the Future movie and a Free Software fan and user, especially if you're a novice GNU  / Linux Free Software user, you will be unpleasently surprised that most today's default Linux distributions doesn't have an easy way to play Midi music format out of the box right after install.

Hence below article aims to give you an understanding on

How you can play Midi Music on GNU / Linux Operating System

First, lets Prepare to load necessery Linux kernel modules to make sure MIDI can be played by soundcard:

In /etc/modules make sure you have the following list of modules loaded:
 

linux-desktop:~# cat /etc/modules
3c59x
snd-emu10k1
snd-pcm-oss
snd-mixer-oss
snd-seq-oss

!Note the modules are working as of time of writting and in time can change to some other modules, depending on how the development of ALSA (Advanced Linux Sound Architecture) goes, and if the developers decide to rename the upmentioned modules

If you just have added the modules to /etc/modules with vim / nano to reload modules into the Linux kernel run:


linux-desktop:~# modprobe -a


Secondly, Installing a whole bunch of MIDI music related program tools can be achieved in Debian by installing the multimedia-midi package, e.g.:


linux-desktop:~# apt-get install –yes multimedia-midi


1. Playing Midi in Graphical environment with a double click using VLC


How to make MIDI easy listanable in Linux graphical environment like GNOME / KDE / XFCE desktop ?


If you want to make Midi music execution sa easy as  just clicking on the .MIDI file format on Linux you can do that with a midi extension available for VLC (Video Lan Client) Universal Multi Platform Media Player player

To install it on Debian Ubuntu GNU / Linux
 

# apt-get install –yes vlc-plugin-fluidsynth


Необходимо е да се изтеглят 6754 B архиви.
След тази операция ще бъде използвано 35,8 kB допълнително дисково пространство.
Изт:1 http://deb.debian.org/debian stretch/main amd64 vlc-plugin-fluidsynth amd64 2.2.6-1~deb9u1 [6754 B]
Изтеглени 6754 B за 0с (33,6 kB/сек)           
Selecting previously unselected package vlc-plugin-fluidsynth:amd64.
(Reading database … 382976 files and directories currently installed.)
Preparing to unpack …/vlc-plugin-fluidsynth_2.2.6-1~deb9u1_amd64.deb …
Unpacking vlc-plugin-fluidsynth:amd64 (2.2.6-1~deb9u1) …
Setting up vlc-plugin-fluidsynth:amd64 (2.2.6-1~deb9u1) …
Processing triggers for libvlc-bin:amd64 (2.2.6-1~deb9u1) …


Besides making your MIDI play on the GUI environment easy as a a point and click VLC will also be able to play MIDIs on GNU / Linux from your favourite browser (nomatter Firefox / Chrome or Opera), even though the player would play in a new PopUP Window it is easy to select once MIDI file from a random website for example – here is a directory listing of Webserver with Doom II Soundtrack in MIDI format , click over any file from list and Choose option for VLC to always remember that MIDI files has to be opened with VLC player.


2. Enable Firefox / IceWeasel browser to Support Website embedded MIDI files


So VLC could make you listen the downloadable MIDIs from Web pages but,
 

What if you have stumbled on an old website which was configured with very OLD HTML Code to play some nice music (or even different MIDI songs) for each part of the website (for each webpage) and you want to have the Websites created with embedded MIDIs to automatically play on Linux oncce you visit the site?


Sadly default support in Browser for MIDI across all GNU / Linux, I've used so far never worked out of the box, not that still anyone is developing modern websites with MIDIs, but still for the sake of backward compitability and for sake of interactivity it is worthy to enable embedded MIDI support in Linux

But with a couple of tunings as usual GNU / Linux can do almost everything, so here is how to enable embedded browser support for Midi on Linux (That should work with minor modifications not only on Debian / Ubuntu / ArchLinux but also on Fedoras, CentOS etc.
If you try it on any of this distributions, please drop a short comment and tell me in few lines how you made embedded midi worked on that distros.


apt-get install –yes timidity mozplugger

Next do restart firefox

Sometimes in order to work you might need to delete /home/[YOUR_USERNAME]/.mozilla/pluginreg.dat and restart firefox again, e.g. make a backup and give it a try:


cp -rpf /home/hipo/.mozilla/pluginreg.dat /home/hipo/.mozilla/pluginreg.dat.bak
rm -f /home/hipo/.mozilla/pluginreg.dat


Another good tip as talking for embedding MIDI support is to embed XPDF to render PDF pages inside the Browser, by default this is done by GNOME's Evince PDF reader but as it is sometimes buggy and might crash it is generally a good idea to switch to xpdf instead, if for some reason PDF is not directly displaying in browser or suddenly stopped working after some distro uipgrade, you might want to do below as well:
 

apt-get install xpdf

vim /etc/mozpluggerrc

Fin d and Comment out the line starting with:

It should look like this afterwards:

 Repeat Swallow ….
 

text/x-pdf: pdf: PDF file
#      repeat swallow(documentShell) fill: acroread -geometry +9000+9000 +useFrontEndProgram "$file"
        repeat noisy swallow(Xpdf) fill: xpdf -g +9000+9000 "$file"
        repeat noisy swallow(gv) fill: gv –safer –quiet –antialias -geometry +9000+9000 "$file"


3. Play Midi music in Linux text console / terminal


There is a console tool that historically has been like the Linux standard for playing midis over the years as I remember, its called timidity


To install timidity on .Deb based Linux:
 

linux-desktop:~$ su root
Password:
linux-desktop:~# apt-get install –yes timidity

Необходимо е да се изтеглят 0 B/580 kB архиви.
След тази операция ще бъде използвано 0 B допълнително дисково пространство.
(Reading database … 382981 files and directories currently installed.)
Preparing to unpack …/timidity_2.13.2-40.5_amd64.deb …
Unpacking timidity (2.13.2-40.5) over (2.13.2-40.5) …
Processing triggers for menu (2.1.47+b1) …
Processing triggers for man-db (2.7.6.1-2) …
Setting up timidity (2.13.2-40.5) …
Processing triggers for menu (2.1.47+b1) …


To test your new MIDI Synthesizer tool and make the enjoyment full you can download Doom 2 extracted MIDI Soundtrack from here
 

Once you have downloaded above Metal MIDI DOOM old school arcade soundtrack and untarred it into your home directory be it ~/doom-midis

A remark to make here is timidity is quite CPU intensive, but on modern Dual and Quad-Core PC Notebooks, the CPU load is not of a big concern.

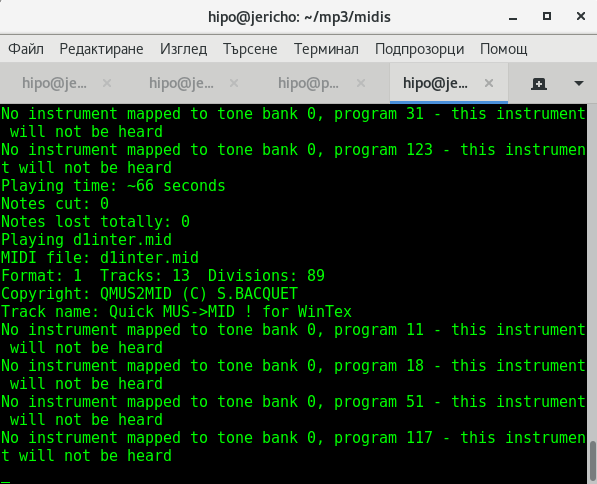
To test and play with timidity:
 

linux-desktop~$ timidity ~/mp3/midis/*

timidity-playing-doom-midi-bunny-song-on-debian-stretch-gnome-terminal-screenshot
 

hipo@jericho:~/mp3/midis$ aplaymidi -l
 Port    Client name                      Port name
 14:0    Midi Through                     Midi Through Port-0
128:0    TiMidity                         TiMidity port 0
128:1    TiMidity                         TiMidity port 1
128:2    TiMidity                         TiMidity port 2
128:3    TiMidity                         TiMidity port 3


We have also the playmidi  (simple midi text console terminal player), which historically was working quite decent and I use it to in the past on my RedHat 6.0 and RedHat 7.0 to listen to my .MID format files but unfortunately as of time of writting something is wrong with it, so when I try to play MIDIs with it instead of timidity I get this erro:


$ playmidi *.mid
Playmidi 2.4 Copyright (C) 1994-1997 Nathan I. Laredo, AWE32 by Takashi Iwai
This is free software with ABSOLUTELY NO WARRANTY.
For details please see the file COPYING.
open /dev/sequencer: No such file or directory

Even though I tried hard to resolve that error by loading various midi related MIDI modules and following a lot of the suggestions online on how to  make /dev/sequencer work again it was all no luck.
 

Some people back in the distant year 2005, reported the problem was solved by simply loading snd-seq

But as of time of writting:


# modprobe snd-seq


Some people said in archlinux's Forum

/dev/sequencer sequencer: No such file or directory


is solved by loading snd-seq-oss kernel module, but on my Debian Linux 9.1 Stretch, this ain't work as well :


root@jericho:/home/hipo/mp3/midis# modprobe snd-seq-oss
modprobe: FATAL: Module snd-seq-oss not found in directory /lib/modules/4.9.0-3-amd64
root@jericho:/home/hipo/mp3/midis# uname -a;
Linux jericho 4.9.0-3-amd64 #1 SMP Debian 4.9.30-2+deb9u5 (2017-09-19) x86_64 GNU/Linux


Another invention of mine was to try to also link /dev/snd/seq to /dev/sequencer but this produced no positive result either:


# ln -sf /dev/snd/seq /dev/sequencer
# ls -al /dev/sequencer
lrwxrwxrwx 1 root root 12 окт  4 16:48 /dev/sequencer -> /dev/snd/seq


Note that after lining in that way I got following error with my attempt to play MIDIs with playmidi

# playmidi *.mid
Playmidi 2.4 Copyright (C) 1994-1997 Nathan I. Laredo, AWE32 by Takashi Iwai
This is free software with ABSOLUTELY NO WARRANTY.
For details please see the file COPYING.
there is no soundcard


Anyhow on some other Linux distributions (especially with Older Kernel versions), some of the above 3 suggested Fix might work perfectly fine so if you have some time give it a try please and drop me  a comment on how it went, you will help the GNU / Linux community out there that way.

Well never mind the bollocks, so

Now back to where I started timidity even though it will play fine it will not give any indication on the lenght of the midi song (precious information such as how much time is left until the end is over).

Hence if you prefer a player that gives you an indicator on how much is left towards the end length of each of the played MIDI file you can give a try to wildmidi:


linux-desktop:~$ apt-cache show wildmidi|grep -i description -A 2

Description-en: software MIDI player
 Minimal MIDI player implementation based on the wildmidi library that
 can either dump to WAV or playback over ALSA. It is intended to

Description-md5: b4b34070ae88e73e3289b751230cfc89
Homepage: http://www.mindwerks.net/projects/wildmidi/
Tag: implemented-in::c, role::program, sound::midi, sound::player,

Description: software MIDI player
Description-md5: 4673a7051f104675c73eb344bb045607
Homepage: http://wildmidi.sourceforge.net/
Bugs: https://bugs.launchpad.net/ubuntu/+filebug


If yet not installed install it after becoming admin user:


linux-desktop:~$ su root
Password:

linux-desktop:~# apt-get install –yes wildmidi


wildmidi is much less CPU intensive (it uses gstreamer to play (Gstreamer – open source multimedia framework)

And next give it a try by running:


linux-desktop:~$ wildmidi ~/mp3/midis/*
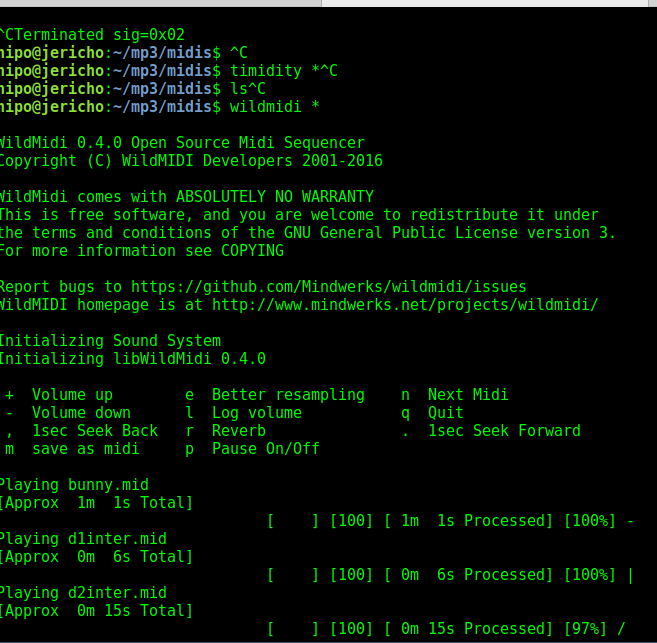
 

wildmidi-midi-lenght-status-text-console-player-for-linux-ubuntu-debian-fedora-suse


4. Editting MIDI files with Free Software and Proprietary MIDI Editor Programs


If you want a professional software that can play Midi in a fuzzy interactive GUI way and have some extra possibilities to edit MIDIs and other format give a try to Muse Sequencer:


linux-desktop:~$ sudo apt-get install –yes muse

The following NEW packages will be installed:
  muse
0 upgraded, 1 newly installed, 0 to remove and 38 not upgraded.
Need to get 5814 kB of archives.
After this operation, 21.0 MB of additional disk space will be used.
Get:1 http://deb.debian.org/debian stretch/main amd64 muse amd64 2.1.2-3+b1 [5814 kB]
Fetched 5814 kB in 2s (2205 kB/s)                             
    are supported and installed on your system.
Preconfiguring packages …
Selecting previously unselected package muse.
(Reading database … 382981 files and directories currently installed.)
Preparing to unpack …/muse_2.1.2-3+b1_amd64.deb …
Unpacking muse (2.1.2-3+b1) …
Processing triggers for mime-support (3.60) …
Processing triggers for desktop-file-utils (0.23-1) …
Processing triggers for doc-base (0.10.7) …
Processing 1 added doc-base file…
Registering documents with scrollkeeper…
Processing triggers for man-db (2.7.6.1-2) …
Processing triggers for shared-mime-info (1.8-1) …
Unknown media type in type 'all/all'
Unknown media type in type 'all/allfiles'
Processing triggers for gnome-menus (3.13.3-9) …
Setting up muse (2.1.2-3+b1) …
Processing triggers for hicolor-icon-theme (0.15-1) …


Below is short description what Muse can do for you:


MusE is a MIDI/audio sequencer with recording and editing capabilities.
 Some Highlights:
 

  * Standard midifile (smf) import-/export.
  * Organizes songs in tracks and parts which you can arrange with
    the part editor.
  * MIDI editors: pianoroll, drum, list, controller.
  * Score editor with high quality postscript printer output.
  * Realtime: editing while playing.
  * Unlimited number of open editors.
  * Unlimited undo/redo.
  * Realtime and step-recording.
  * Multiple MIDI devices.
  * Unlimited number of tracks.
  * Sync to external devices: MTC/MMC, Midi Clock, Master/Slave.
  * Audio tracks, LADSPA host for master effects.
  * Multithreaded.
  * Uses raw MIDI devices.
  * XML project file.
  * Project file contains complete app state (session data).
  * Application spanning Cut/Paste Drag/Drop.


linux-desktop~:$ muse
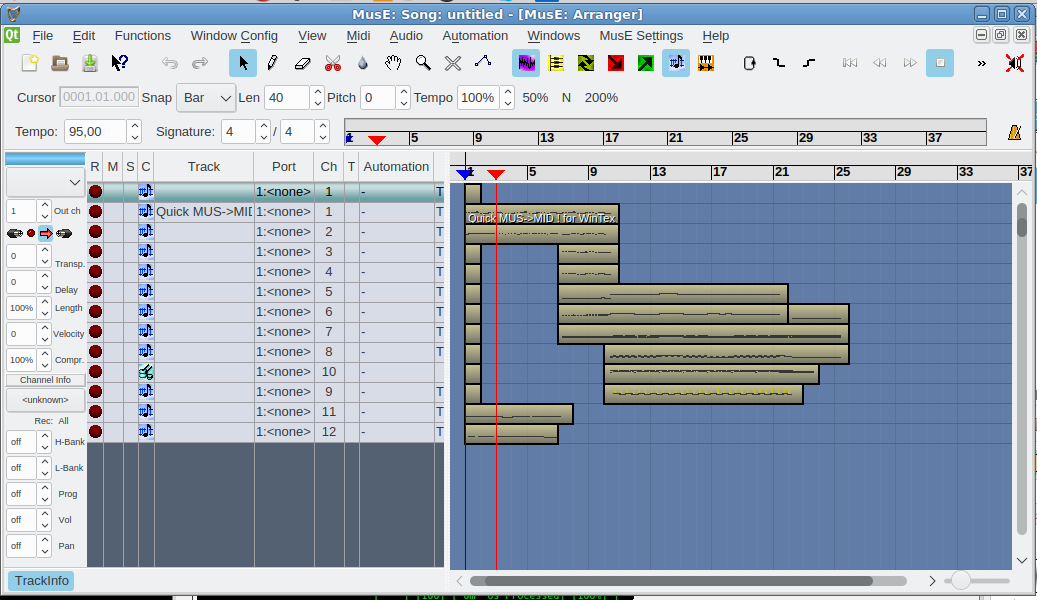
muse-advanced-midi-editor-free-software-for-linux


Below is another non-free program that you might, try if MusE doesn't fit your needs (is not rich enough for editting capabilities is bitwig (though I don't recommend since it is not free software)

bitwig – Bitwig Studio is a multi-platform music-creation system for production, performance and DJing, with a focus on flexible editing tools and a super-fast workflow.
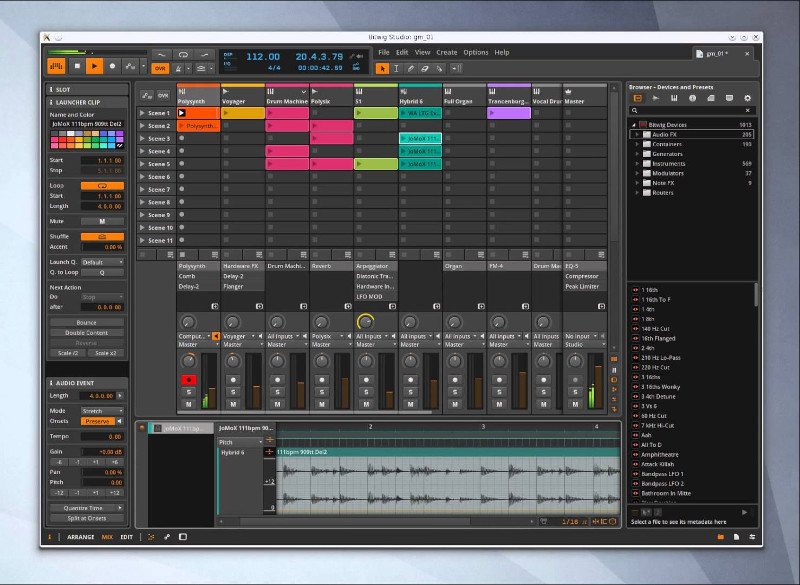


bitwig-midi-and-audio-non-free-software-advanced-useful-sound-editor-for-linx


5. Some examples for Text editing and MIDI Conversion to CSV and ABC file formats There is pretty much more

For the MIDI Extremists who or people that create MIDIs and want to learn how a MIDI is made (the content of it etc.), I suggest you take a look at these 3 command line MIDI editing / conversion tools
 

  • midi2abc – A little tool to create MIDI formats to ABC format
  • midi2csv – Conver tour Favourite MIDI files to CSV for educational purposes so see what Channels, Tracks and Time Intervals is a MIDI song mad
  • midicopy – Copy selected, track, channel, time interval of MIDI file to another MIDI file3


Well, that's all folks now enjoy your MIDIs and don't forget to donate, as I'm jobless at the moment and the only profit I make is just a few bucks out of advertisement on this blog.
 

How to fix unfixable broken package dependencies on Debian GNU / Linux – Fix package mismatch

Wednesday, September 27th, 2017

how-to-fix-unfixable-broken-package-dependency-on-debian-ubuntu-linux-icon

I just tried to upgrade my Debian Wheezy 7 to the latest stable Debian Stretch 9 by not thinking too much and just changing the word wheezy with stretch in /etc/apt/sources.list so onwards on it looked like so:
 

cat /etc/apt/sources.list


deb http://ftp.bg.debian.org/debian/ stretch main contrib non-free
deb-src http://ftp.bg.debian.org/debian/ stretch main

deb http://security.debian.org/ stretch/updates main
deb-src http://security.debian.org/ stretch/updates main 

# stretch-updates, previously known as 'volatile'
##deb http://deb.debian.org/debian/ stretch-updates main
deb-src http://deb.debian.org/debian/ stretch-updates main


I also make sure all the defined Google Chrome / Opera / Skype and Squeeze Backports repositories existent in /etc/apt/sources.list.d directory files which in my case were like so;


root@noah:/etc/apt/sources.list.d# ls
google-chrome.list  opera-stable.list  squeeze-backports.list
opera.list          skype-stable.list


 were commented out because they were producing extra apt update errors …

And afterwards ran as usual:


apt-get update
apt-get –yes upgrade


The upgrade command executed fine and a lot of packages got downloaded and reinstalled without much issue, so I thought everything would be fine and just proceeded with the attempt to finalize the distribution major release 7 to major release 9 by running:


apt-get –yes dist-upgrade


But guess what now I got some dependency errors with cron and other installed packages that depend on package versions that are not going to be installed as the apt-get tool informed me.

I tried to out-smart the dpkg dependency system and removed all the packages reporting to have a missing dependencies with a short for bash loop after duming all the problematic packages showing dependency issues with commands such as:

apt-get -f dist-upgrade >> out.txt
for i in $(cat out.txt); awk '{ print $1 }' >> to_delete.txt; done


Before proceeding further I had to manually edit few lines in a text editor to remove some of the junk left from apt-get too.

So i was brave and just removed the dependency missing packages with following other for loop:


for i in $(cat to_delete.txt); do dpkg -r –force-all $i; done


Now I was hoping that rerunning:


apt-get autoremove

dpkg --configure -a

apt-get update -f
apt-get dist-upgrade -f


would no longer complain and I would just install the removed packages in another for shell loop once every other packages gets installed.

But guess what I was wrong … the system entered into another bunch of depedency terribly issues and messed up so badly that there were at least 50 packages reporting to have a missing / broken or uninstallable deb version depedency …

I got totally Angry, I knew already from experience that just trying to jump over while skipping a major release e.g. upgrade Debian 7 to Debian 9, instead of first upgrading to Debian 8 Linux and then upgrading Debian 8 to Debian 9 have always produced the same mess but I was lame and stupid again to f**k it up and I was out of mind swearing (a truly bad habid I'm not proud of) …

So as the notebook with Linux so far was perfectly working with Debian 7 and had a tons of old installed software and I was in a state where if I restart the system it was very likely my Thinkpad r61 laptop won't boot at all, I googled around to find a solution unfortunately without any luck, so finally I used the good old and tested method to DO IT MYSELF and Find the Fix without Uncle Google's help and by God's grace I did, after experimenting a while with the aptitude package / install / remove update tool without much success, finally I find the solution to the totally messed up Debian package dependencies and it all came to a simply reverting back my /etc/apt/source.list to look like following:


# deb cdrom:[Debian GNU/Linux 7.0.0 _Wheezy_ – Official amd64 CD Binary-1 20130504-14:44]/ wheezy main

##deb cdrom:[Debian GNU/Linux 7.0.0 _Wheezy_ – Official amd64 CD Binary-1 20130504-14:44]/ wheezy main

deb http://ftp.bg.debian.org/debian/ wheezy main contrib non-free
deb-src http://ftp.bg.debian.org/debian/ wheezy main

deb http://security.debian.org/ wheezy/updates main
deb-src http://security.debian.org/ wheezy/updates main

# wheezy-updates, previously known as 'volatile'
##deb http://deb.debian.org/debian/ wheezy-updates main
deb-src http://deb.debian.org/debian/ wheezy-updates main
##deb http://www.deb-multimedia.org wheezy main non-free
#deb http://ftp.debian.org/debian/ wheezy-backports main
###deb http://ftp.debian.org/debian/ wheezy-backports main contrib non-free
##deb http://dl.google.com/linux/chrome/deb/ wheezy main
#deb http://ftp2.de.debian.org/debian-volatile wheezy/volatile main
###deb http://www.deb-multimedia.org wheezy main non-free


run of the following two depedency fix commands !!!!


aptitude upgrade –full-resolver

aptitude full-upgrade –full-resolver


After a while a Debian LinuxOS system downgrade was initated and the missing packages were found, downloaded from the correct wheezy repositories and all broken and missing dependencies packages were fixed !!! HOORAY IT WORKS AGAIN!!


Resume sftp / scp cancelled (interrupted) network transfer – Continue (large) partially downloaded files on Linux / Windows

Thursday, April 23rd, 2015

resume-sftp-scp-cancelled-interrupted-file-transfer-download-upload-network-transfer-continue-large-partially-downloaded-file-howto-linux-windows
I've recentely have a task to transfer some huge Application server long time stored data (about 70GB) of data after being archived between an old Linux host server and a new one to where the new Tomcat Application (Linux) server will be installed to fit the increased sites accessibility (server hardware overload).

The two systems are into a a paranoid DMZ network and does not have access between each other via SSH / FTP / FTPs and even no Web Access on port (80 or SSL – 443) between the two hosts, so in order to move the data I had to use a third HOP station Windows (server) which have a huge SAN network attached storage of 150 TB (as a Mapped drive I:/).

On the Windows HOP station which is giving me access via Citrix Receiver to the DMZ-ed network I'm using mobaxterm so I have the basic UNIX commands such as sftp / scp already existing on the Windows system via it.
Thus to transfer the Chronos Tomcat application stored files .tar.gz archived I've sftp-ed into the Linux host and used get command to retrieve it, e.g.:


sftp UserName@Linux-server.net
Password:
Connected to Linux-server.
sftp> get Chronos_Application_23_04_2015.tar.gz

….


The Secured DMZ Network seemed to have a network shaper limiting my get / Secured SCP download to be at 2.5MBytes / sec, thus the overall file transfer seemed to require a lot of time about 08:30 hours to complete. As it was the middle of day about 13:00 and my work day ends at 18:00 (this meant I would be able to keep the file retrieval session for a maximum of 5 hrs) and thus file transfer would cancel when I logout of the HOP station (after 18:00). However I've already left the file transfer to continue for 2hrs and thus about 23% of file were retrieved, thus I wondered whether SCP / SFTP Protocol file downloads could be resumed. I've checked thoroughfully all the options within sftp (interactive SCP client) and the scp command manual itself however none of it doesn't have a way to do a resume option. Then I thought for a while what I can use to continue the interrupted download and I remembered good old rsync (versatile remote and local file copying tool) which I often use to create customer backup stragies has the ability to resume partially downloaded files I wondered whether this partially downloaded file resume could be done only if file transfer was only initiated through rsync itself and luckily rsync is able to continue interrupted file transfers no matter what kind of HTTP / HTTPS / SCP / FTP program was used to start file retrievalrsync is able to continue cancelled / failed transfer due to network problems or user interaction activity), that turned even pretty easy to continue failed file transfer download from where it was interrupted I had to change to directory where file is located:
 

cd /path/to/interrupted_file/


and issue command:
 

rsync -av –partial username@Linux-server.net:/path/to/file .


the –partial option is the one that does the file resume trick, -a option stands for –archive and turns on the archive mode; equals -rlptgoD (no -H,-A,-X) arguments and -v option shows a file transfer percantage status line and an avarage estimated time for transfer to complete, an easier to remember rsync resume is like so:
 

rsync -avP username@Linux-server.net:/path/to/file .
Password:
receiving incremental file list
chronos_application_23_04_2015.tar.gz
  4364009472   8%    2.41MB/s    5:37:34

To continue a failed file upload with rsync (e.g. if you used sftp put command and the upload transfer failed or have been cancalled:
 

rsync -avP chronos_application_23_04_2015.tar.gz username@Linux-server.net:/path/where_to/upload


Of course for the rsync resume to work remote Linux system had installed rsync (package), if rsync was not available on remote system this would have not work, so before using this method make sure remote Linux / Windows server has rsync installed. There is an rsync port also for Windows so to resume large Giga or Terabyte file archive downloads easily between two Windows hosts use cwRsync.

Save data from failing hard disk on Linux – Rescuing data from failing disk with bad blocks

Wednesday, April 16th, 2014

save-data-from-failing-hard-drive-data-recovery-badblocks-linux_1.jpg
Sooner or later your Linux Desktop or Linux server hard drive will start breaking up, whether you have a hardware or software RAID 1, 6 or 10 you can  and good hard disk health monitoring software you can react on time but sometimes as admins we have to take care of old servers which either have RAID 0 or missing RAID configuration and or disk firmware is unable to recognize failing blocks on time and remap them. Thus it is quite useful to have techniques to save data from failing hard disk drives with physical badblocks.

With ddrescue tool there is still hope for your Linux data though disk is full of unrecoverable I/O errors.

apt-cache show ddrescue
 

apt-cache show ddrescue|grep -i description -A 12

Description: copy data from one file or block device to another
 dd_rescue is a tool to help you to save data from crashed
 partition. Like dd, dd_rescue does copy data from one file or
 block device to another. But dd_rescue does not abort on errors
 on the input file (unless you specify a maximum error number).
 It uses two block sizes, a large (soft) block size and a small
 (hard) block size. In case of errors, the size falls back to the
 small one and is promoted again after a while without errors.
 If the copying process is interrupted by the user it is possible
 to continue at any position later. It also does not truncate
 the output file (unless asked to). It allows you to start from
 the end of a file and move backwards as well. dd_rescue does
 not provide character conversions.


To use ddrescue for saving data first thing is to shutdown the Linux host boot the system with a Rescue LiveCD like SystemRescueCD – (Linux system rescue disk), Knoppix (Most famous bootable LiveCD / LiveDVD), Ubuntu Rescue Remix or BackTrack LiveCD – (A security centered "hackers" distro which can be used also for forensics and data recovery), then mount the failing disk (I assume disk is still mountable :). Note that it is very important to mount the disk as read only, because any write operation on hard drive increases chance that it completely becomes unusable before saving your data!

To make backup of your whole hard disk data to secondary mounted disk into /mnt/second_disk

# mkdir /mnt/second_disk/rescue
# mount /dev/sda2 /mnt/second_disk/rescue
# dd_rescue -d -r 10 /dev/sda1 /mnt/second_disk/rescue/backup.img
# mount -o loop /mnt/second_disk/rescue/backup.img

In above example change /dev/sda2 to whatever your hard drive device is named.

Whether you have already an identical secondary drive attached to the Linux host and you would like to copy whole failing Linux partition (/dev/sda) to the identical drive (/dev/sdb) issue:

ddrescue -d -f -r3 /dev/sda /dev/sdb /media/PNY_usb/rescue.logfile

If you got just a few unreadable files and you would like to recover only them then run ddrescue just on the damaged files:

ddrescue -d –R -r 100 /damaged/disk/some_dir/damaged_file /mnt/secondary_disk/some_dir/recoveredfile

-d instructs to use direct I/O
-R retrims the error area on each retry
-r 100 sets the retry limit to 100 (tries to read data 100 times before resign)

Of course this is not always working as on some HDDs recovery is impossible due to hard physical damages, if above command can't recover a file in 10 attempts it is very likely that it never succeeds …

A small note to make here is that there is another tool dd_rescue (make sure you don't confuse them) – which is also for recovery but GNU ddrescue performs better with recovery.
How ddrescue works is it keeps track of the bad sectors, and go back and try to do a slow read of that data in order to read them.
By the way BSD users would happy to know there is ddrescue port already, so data recovery on BSDs *NIX filesystems if you're a Windows user you can use ddrescue to recover data too via Cygwin.
Of course final data recovery is also very much into God's hands so before launching ddrescue, don't forget to say a prayer 🙂

Fix “tar: Error exit delayed from previous errors” and its cause and solution

Monday, August 18th, 2014

fix-solve-tar-error-delayed-exit-from-previous-errors-tarball-error

tar: Error exit delayed from previous errors

error is a very common error encountered when creating archives (or backing up server configurations / websites / sql binary data). The error is quite unexplanatory and whenever creating files verbose in order to see the files added to archve in "real time" with lets say:

tar -czvf /tmp/filename_backup_date-of-backup.tar.gz /home/websites /home/sql


its pretty hard to track on exactly which file is the backup producing the Error exit delayed from previous errors, this is especially the case whenever adding to archive directories containing millions of tiny few kilobyte sized files. Many novice on uncautious Linux admins , might simply ignore the warning if they're in a hurry / are having excessive work to be done as there will be .tar.gz backup produced and whenever uncompressed most of the files are there and the backup error would seem not of a big issue.

However as backuping files is vital stuff, especially when moving the files from a server to be decomissioned you have to be extra careful and make the backup properly, e.g. figure out the cause of the error, to do so log the full output of tar operations with tee command, like so:

tar -czvf /tmp/filename_backup_date-of-backup.tar.gz /home/websites/ /home/sql | tee /tmp/backup_tar_full_output.log

Then you will have to review the file and lookup for errors with less search string – / (slash) – look for "error" and "permission den" keywords and this should point you to what is causing the error. In cases when millions of files are to be archived, the log might grow really big and hard to process, therefore a much quicker way to understand what's happening is to only log and show in shell standard output last file error with > (shell redirect):
 

tar -czvf /tmp/filename_backup_date-of-backup.tar.gz /home/websites /home/sql > /tmp/backup_failure-cause.log


tar: www.ur-website.com-http/2.0.63/conf/tnsnames.ora.20080918: Cannot open: Permission denied
tar: Removing leading `/' from member names

The error indicates clearly the cause of error is lack of Permissions to read the file tnsnames.ora.20080918 so solution is to either grant permissions to non-root user with (chmod / chown) cmds, in my case grant perms to user hipo with which tar is ran, or run again the website backup with superuser, I usually just run with root user to prevent tampering with original permissions, e.g. to solve the error, either:

$ su root
# tar -czvf /tmp/filename_backup_date-of-backup.tar.gz /home/websites /home/sql

Or even better if sudo is installed and user is added to /etc/sudoers file

$ sudo tar -czvf /tmp/filename_backup_date-of-backup.tar.gz /home/websites /home/sql


Though permission errors is the most often reason for:

tar: Error exit delayed from previous errors, you should keep in mind that in some cases the error might be caused due to failing RAID membered disk drive or single hdd failure on systems that are not in some RAID array


Creating data backups on Debian and Ubuntu servers with Bacula professional backup tool

Wednesday, April 17th, 2013

Bacula professional GNU Linux Freebsd Netbsd backup software logo with bat

1. Install Bacula Backup System

root@pcfreak:~# apt-cache show bacula |grep -i description -A 5

Description: network backup, recovery and verification – meta-package
 Bacula is a set of programs to manage backup, recovery and verification
 of computer data across a network of computers of different kinds.
 .
 It is efficient and relatively easy to use, while offering many advanced
 storage management features that make it easy to find and recover lost or
 damaged files. Due to its modular design, Bacula is scalable from small
 single computer systems to networks of hundreds of machines.
 .

root@pcfreak:~# apt-get install bacula


Reading package lists… Done
Building dependency tree      
Reading state information… Done
The following extra packages will be installed:
  bacula-client bacula-common bacula-common-sqlite3 bacula-console bacula-director-common bacula-director-sqlite3 bacula-fd bacula-sd
  bacula-sd-sqlite3 bacula-server bacula-traymonitor libsqlite0 mt-st mtx sqlite sqlite3
Suggested packages:
  bacula-doc dds2tar scsitools sg3-utils kde gnome-desktop-environment sqlite-doc sqlite3-doc
The following NEW packages will be installed:
  bacula bacula-client bacula-common bacula-common-sqlite3 bacula-console bacula-director-common bacula-director-sqlite3 bacula-fd bacula-sd
  bacula-sd-sqlite3 bacula-server bacula-traymonitor libsqlite0 mt-st mtx sqlite sqlite3
0 upgraded, 17 newly installed, 0 to remove and 0 not upgraded.
2 not fully installed or removed.
Need to get 2,859 kB of archives.
After this operation, 6,992 kB of additional disk space will be used.
Do you want to continue [Y/n]? Y
Get:1 http://security.debian.org/ squeeze/updates/main bacula-common amd64 5.0.2-2.2+squeeze1 [637 kB]
Get:2 http://security.debian.org/ squeeze/updates/main bacula-common-sqlite3 amd64 5.0.2-2.2+squeeze1 [102 kB]
Get:3 http://security.debian.org/ squeeze/updates/main bacula-console amd64 5.0.2-2.2+squeeze1 [67.6 kB]
Get:4 http://security.debian.org/ squeeze/updates/main bacula-director-common amd64 5.0.2-2.2+squeeze1 [56.6 kB]
Get:5 http://security.debian.org/ squeeze/updates/main bacula-director-sqlite3 amd64 5.0.2-2.2+squeeze1 [308 kB]
Get:6 http://security.debian.org/ squeeze/updates/main bacula-sd amd64 5.0.2-2.2+squeeze1 [459 kB]
Get:7 http://security.debian.org/ squeeze/updates/main bacula-sd-sqlite3 amd64 5.0.2-2.2+squeeze1 [435 kB]
Get:8 http://security.debian.org/ squeeze/updates/main bacula-server all 5.0.2-2.2+squeeze1 [48.5 kB]
Get:9 http://security.debian.org/ squeeze/updates/main bacula-fd amd64 5.0.2-2.2+squeeze1 [124 kB]
Get:10 http://security.debian.org/ squeeze/updates/main bacula-client all 5.0.2-2.2+squeeze1 [48.5 kB]
Get:11 http://security.debian.org/ squeeze/updates/main bacula all 5.0.2-2.2+squeeze1 [1,030 B]
Get:12 http://security.debian.org/ squeeze/updates/main bacula-traymonitor amd64 5.0.2-2.2+squeeze1 [70.0 kB]
Get:13 http://ftp.uk.debian.org/debian/ squeeze/main sqlite3 amd64 3.7.3-1 [100 kB]
Get:14 http://ftp.uk.debian.org/debian/ squeeze/main libsqlite0 amd64 2.8.17-6 [188 kB]
Get:15 http://ftp.uk.debian.org/debian/ squeeze/main sqlite amd64 2.8.17-6 [22.0 kB]
Get:16 http://ftp.uk.debian.org/debian/ squeeze/main mtx amd64 1.3.12-3 [154 kB]
Get:17 http://ftp.uk.debian.org/debian/ squeeze/main mt-st amd64 1.1-4 [35.6 kB]                                                            
Fetched 2,859 kB in 6s (471 kB/s)                                                                                                           
Selecting previously deselected package bacula-common.
(Reading database … 86693 files and directories currently installed.)
Unpacking bacula-common (from …/bacula-common_5.0.2-2.2+squeeze1_amd64.deb) …
Adding user 'bacula'… Ok.
Selecting previously deselected package bacula-common-sqlite3.
Unpacking bacula-common-sqlite3 (from …/bacula-common-sqlite3_5.0.2-2.2+squeeze1_amd64.deb) …
Selecting previously deselected package bacula-console.
Unpacking bacula-console (from …/bacula-console_5.0.2-2.2+squeeze1_amd64.deb) …
Processing triggers for man-db …
Setting up bacula-common (5.0.2-2.2+squeeze1) …
Selecting previously deselected package bacula-director-common.
(Reading database … 86860 files and directories currently installed.)
Unpacking bacula-director-common (from …/bacula-director-common_5.0.2-2.2+squeeze1_amd64.deb) …
Selecting previously deselected package sqlite3.
Unpacking sqlite3 (from …/sqlite3_3.7.3-1_amd64.deb) …
Selecting previously deselected package libsqlite0.
Unpacking libsqlite0 (from …/libsqlite0_2.8.17-6_amd64.deb) …
Selecting previously deselected package sqlite.
Unpacking sqlite (from …/sqlite_2.8.17-6_amd64.deb) …
Selecting previously deselected package bacula-director-sqlite3.
Unpacking bacula-director-sqlite3 (from …/bacula-director-sqlite3_5.0.2-2.2+squeeze1_amd64.deb) …
Selecting previously deselected package mtx.
Unpacking mtx (from …/mtx_1.3.12-3_amd64.deb) …
Selecting previously deselected package bacula-sd.
Unpacking bacula-sd (from …/bacula-sd_5.0.2-2.2+squeeze1_amd64.deb) …
Selecting previously deselected package bacula-sd-sqlite3.
Unpacking bacula-sd-sqlite3 (from …/bacula-sd-sqlite3_5.0.2-2.2+squeeze1_amd64.deb) …
Selecting previously deselected package bacula-server.
Unpacking bacula-server (from …/bacula-server_5.0.2-2.2+squeeze1_all.deb) …
Selecting previously deselected package bacula-fd.
Unpacking bacula-fd (from …/bacula-fd_5.0.2-2.2+squeeze1_amd64.deb) …
Selecting previously deselected package bacula-client.
Unpacking bacula-client (from …/bacula-client_5.0.2-2.2+squeeze1_all.deb) …
Selecting previously deselected package bacula.
Unpacking bacula (from …/bacula_5.0.2-2.2+squeeze1_all.deb) …
Selecting previously deselected package bacula-traymonitor.
Unpacking bacula-traymonitor (from …/bacula-traymonitor_5.0.2-2.2+squeeze1_amd64.deb) …
Selecting previously deselected package mt-st.
Unpacking mt-st (from …/archives/mt-st_1.1-4_amd64.deb) …
Processing triggers for man-db …
Setting up acct (6.5.4-2.1) …
Setting up bacula-director-common (5.0.2-2.2+squeeze1) …
Setting up bacula-director-sqlite3 (5.0.2-2.2+squeeze1) …
config: Running dbc_go bacula-director-sqlite3 configure
Stopping Bacula Director…:.
 *** Checking type of existing DB at /var/lib/bacula/bacula.db: None
 *** Will create new database at this location.
dbconfig-common: writing config to /etc/dbconfig-common/bacula-director-sqlite3.conf

Creating config file /etc/dbconfig-common/bacula-director-sqlite3.conf with new version
creating database bacula.db: success.
verifying database bacula.db exists: success.
populating database via sql…  done.
Processing configuration…Ok.
Starting Bacula Director…:.
Setting up bacula-sd (5.0.2-2.2+squeeze1) …
Starting Bacula Storage daemon…:.
Setting up acct (6.5.4-2.1) …
insserv: warning: script 'K02courier-imap' missing LSB tags and overrides
insserv: script iptables: service skeleton already provided!
insserv: warning: script 'courier-imap' missing LSB tags and overrides
Turning on process accounting, file set to '/var/log/account/pacct'.
Done..
Setting up bacula-sd-sqlite3 (5.0.2-2.2+squeeze1) …
Setting up bacula-server (5.0.2-2.2+squeeze1) …
Setting up bacula-fd (5.0.2-2.2+squeeze1) …
Starting Bacula File daemon…:.
Setting up bacula-client (5.0.2-2.2+squeeze1) …
Setting up bacula (5.0.2-2.2+squeeze1) …
Setting up proftpd-basic (1.3.3a-6squeeze6) …
Starting ftp server: proftpd.
Setting up mt-st (1.1-4) …
update-alternatives: using /bin/mt-st to provide /bin/mt (mt) in auto mode.


Once installed you will have 3 processes running in background used by Bacula backup system (bacula-dir, bacula-sd and bacula-fd)
root@pcfreak:~# ps ax |grep -i bacula|grep -v grep
6044 ? Ssl 0:00 /usr/sbin/bacula-dir -c /etc/bacula/bacula-dir.conf -u bacula -g bacula
6089 ? Ssl 0:00 /usr/sbin/bacula-sd -c /etc/bacula/bacula-sd.conf -u bacula -g tape
6167 ? Ssl 0:00 /usr/sbin/bacula-fd -c /etc/bacula/bacula-fd.conf

Here is what each of them does:

a) Bacula-dir or Bacula-Director is main Bacula Backup system component. Bacula-dir controls the whole backup system and the various other 2 daemons Bacula-FD and  Bacula-SD.

b) Bacula-fd – (Bacula File Daemon) acts as the interface between  Bacula network backup system and the filesystems to be backed up:  it  is  responsible for   reading/writing/verifying the files to be  backup'd/verified/restored. Network transfer can optionally be compressed.

c) Bacula-sd – (Bacula Storage Daemon) acts as interface between Bacula network backup system and Tape Drive or filesystem where backups will be stored

Each of 3 processes bacula-dir, bacula-fd and bacula-sd has their own init script in /etc/rc.d/, e.g.:

# /etc/init.d/bacula-directory
# /etc/init.d/bacula-fd
# /etc/init.d/bacula-sd

2. Configuring Bacula Backup System

Configuring Bacula is done via configuration files located in /etc/bacula

root@pcfreak:~# cd /etc/bacula
root@pcfreak:/etc/bacula# ls -1
bacula-dir.conf
bacula-fd.conf
bacula-fd.conf.dist
bacula-sd.conf
bacula-sd.conf.dist
bconsole.conf
common_default_passwords
scripts/
tray-monitor.conf

3. Defining what needs to be backed up

Here is a short description of most important configuration blocks in Bacula's main config bacula-dir.conf
 

1.Director resource defines the Director’s parameters. Name, Password, WorkingDirectory, and PidDirectory must be set. QueryFile specifies where the Director can find the SQL queries.

2.Job defines a backup or restore to perform. You will need at least one job per client. To simplify configuration of similar clients, create a common JobDefs resource and refer to it from within a Job. For example, if you have one set of defaults for desktops and another set for servers, you can create a Desktop and Server (these names are arbitrary and set with the Name attribute) JobDefs and refer to those two collections of settings from a Job.

3. Schedule resource is referred to within a Job to allow it to occur automatically.

4. FileSet resource defines which files are to be backed up. You can both Include and Exclude files.

5.Each Client resource details the clients that this Director can back up.

6.Storage resource specifies the storage daemon available to the Director.

7.Pool identifies a set of storage volumes (tapes/files) that Bacula can write data to. Each Pool can be configured to use different sets of tapes for different jobs.

8.Catalog resource defines Bacula catalog (database) to be used.

9. Messages resource captures where to send messages and which messages to send.
 

a) Defining directories to be backed up

Defining what needs to be backed up is done through bacula-dir.conf ( /etc/bacula/bacula-dir.conf ). In the file there is a FileSet section, where dirs to backed up have to be included, below config defines to backup /usr/sbin, /etc/, /root, /usr and /var directories
 

# List of files to be backed up
FileSet {
  Name = "Full Set"
  Include {
    Options {
      signature = MD5
    }
#   
#  Put your list of files here, preceded by 'File =', one per line
#    or include an external list with:
#
#    File = <file-name
#
#  Note: / backs up everything on the root partition.
#    if you have other partitions such as /usr or /home
#    you will probably want to add them too.
#
#  By default this is defined to point to the Bacula binary
#    directory to give a reasonable FileSet to backup to
#    disk storage during initial testing.
#
    File = /usr/sbin
    File = /root
    File = /etc
    File = /usr
    File = /var

  }

b) Defining where to store back ups

All configuration of where Bacula will store created backups is done through /etc/bacula/bacula-sd.conf

There are few configurations that needs to be tuned according to custom user purposes, below I paste them from config:
 

Storage {                             # definition of myself
  Name = pcfreak-sd
  SDPort = 9103                  # Director's port     
  WorkingDirectory = "/var/lib/bacula"
  Pid Directory = "/var/run/bacula"
  Maximum Concurrent Jobs = 20
  SDAddress = 127.0.0.1
}

Device {
  Name = FileStorage
  Media Type = File
  Archive Device = /nonexistant/path/to/file/archive/dir
  LabelMedia = yes;                   # lets Bacula label unlabeled media
  Random Access = Yes;
  AutomaticMount = yes;               # when device opened, read it
  RemovableMedia = no;
  AlwaysOpen = no;
}

Messages {
  Name = Standard
  director = pcfreak-dir = all

}


Storage sets working directory where temporary backups are created on backup creation time – default is /var/lib/bacula

Device – defines exact directory where backups will be stored after created – usually this is a directory with  mounted hard disk specially for backups. Bacula default is /nonexistant/path/to/file/archive/dir

Messages – configures where and what kind of messages are send on bacula operations

c) Configuring Bacula to create backups via network

Configuring where Bacula will act just on server localhost, or will bind and be visible to store backups via network IP is done from Bacula-FD (Bacula File Daemon).

By default it listens to localhost127.0.0.1. Bacula-FD configurations are done from /etc/bacula/bacula-fd.conf. Most important section configuring where bacula listens is named FileDaemon.
 

#
# "Global" File daemon configuration specifications
#
FileDaemon {                          # this is me
  Name = pcfreak-fd
  FDport = 9102                  # where we listen for the director
  WorkingDirectory = /var/lib/bacula
  Pid Directory = /var/run/bacula
  Maximum Concurrent Jobs = 20
  FDAddress = 127.0.0.1
}


By commenting FDAddress, Bacula will automatically listen to external IP configured on lan interface eth0

4. Managing Bacula Command Line Interfa – bconsole

Managing bacula interactively is done through bconsole (Bacula's Management Console) command.

root@pcfreak:~# bconsole

Connecting to Director localhost:9101
1000 OK: pcfreak-dir Version: 5.0.2 (28 April 2010)
Enter a period to cancel a command.
*
*help
  Command       Description
  =======       ===========
  add           Add media to a pool
  autodisplay   Autodisplay console messages
  automount     Automount after label
  cancel        Cancel a job
  create        Create DB Pool from resource
  delete        Delete volume, pool or job
  disable       Disable a job
  enable        Enable a job
  estimate      Performs FileSet estimate, listing gives full listing
  exit          Terminate Bconsole session
  gui           Non-interactive gui mode
  help          Print help on specific command
  label         Label a tape
  list          List objects from catalog
  llist         Full or long list like list command
  messages      Display pending messages
  memory        Print current memory usage
  mount         Mount storage
  prune         Prune expired records from catalog
  purge         Purge records from catalog
  python        Python control commands
  quit          Terminate Bconsole session
  query         Query catalog
  restore       Restore files
  relabel       Relabel a tape
  release       Release storage
  reload        Reload conf file
  run           Run a job
  status        Report status
  setdebug      Sets debug level
  setip         Sets new client address — if authorized
  show          Show resource records
  sqlquery      Use SQL to query catalog
  time          Print current time
  trace         Turn on/off trace to file
  unmount       Unmount storage
  umount        Umount – for old-time Unix guys, see unmount
  update        Update volume, pool or stats
  use           Use catalog xxx
  var           Does variable expansion
  version       Print Director version
  wait          Wait until no jobs are running

When at a prompt, entering a period cancels the command.

You have messages.
*
 

On run bconsole launches another service bacula-console.

root@pcfreak:~# ps ax |grep -i bacula-console|grep -v grep 13959 pts/5 Sl+ 0:00 /usr/sbin/bacula-console -c /etc/bacula/bconsole.conf

There are 4 tcp/ip ports via which communication between Bacula processes is done;

a) Communication from bconsole to Bacula is throigh Port Number 9101
b) Communication from bacula-dir to bacula-sd is done using Port Number 9103
c) bacula-dir to bacula-fd talks via Port Number 9102
d) Messages between Bacula-fd to bacula-sd is via port num 9103

Both of 4 ports are only listening on (127.0.0.1) / localhost and thus there is no security risk from external malicious users to enter Bacula remotely.

a) some essential commands while in bconsole shell

*show pools
Pool: name=Default PoolType=Backup
      use_cat=1 use_once=0 cat_files=1
      max_vols=0 auto_prune=1 VolRetention=1 year
      VolUse=0 secs recycle=1 LabelFormat=*None*
      CleaningPrefix=*None* LabelType=0
      RecyleOldest=0 PurgeOldest=0 ActionOnPurge=0
      MaxVolJobs=0 MaxVolFiles=0 MaxVolBytes=0
      MigTime=0 secs MigHiBytes=0 MigLoBytes=0
      JobRetention=0 secs FileRetention=0 secs
Pool: name=File PoolType=Backup
      use_cat=1 use_once=0 cat_files=1
      max_vols=100 auto_prune=1 VolRetention=1 year
      VolUse=0 secs recycle=1 LabelFormat=*None*
      CleaningPrefix=*None* LabelType=0
      RecyleOldest=0 PurgeOldest=0 ActionOnPurge=0
      MaxVolJobs=0 MaxVolFiles=0 MaxVolBytes=53687091200
      MigTime=0 secs MigHiBytes=0 MigLoBytes=0
      JobRetention=0 secs FileRetention=0 secs
Pool: name=Scratch PoolType=Backup
      use_cat=1 use_once=0 cat_files=1
      max_vols=0 auto_prune=1 VolRetention=1 year
      VolUse=0 secs recycle=1 LabelFormat=*None*
      CleaningPrefix=*None* LabelType=0
      RecyleOldest=0 PurgeOldest=0 ActionOnPurge=0
      MaxVolJobs=0 MaxVolFiles=0 MaxVolBytes=0
      MigTime=0 secs MigHiBytes=0 MigLoBytes=0
      JobRetention=0 secs FileRetention=0 secs
You have messages.

*status
Status available for:
     1: Director
     2: Storage
     3: Client
     4: All
Select daemon type for status (1-4):

*label
Automatically selected Catalog: MyCatalog
Using Catalog "MyCatalog"
Automatically selected Storage: File
Enter new Volume name:

*messages

b) Restoring Backups with bconsole

Restoring from backups is done with restore command

*restore
Automatically selected Catalog: MyCatalog
Using Catalog "MyCatalog"

First you select one or more JobIds that contain files
to be restored. You will be presented several methods
of specifying the JobIds. Then you will be allowed to
select which files from those JobIds are to be restored.

To select the JobIds, you have the following choices:
     1: List last 20 Jobs run
     2: List Jobs where a given File is saved
     3: Enter list of comma separated JobIds to select
     4: Enter SQL list command
     5: Select the most recent backup for a client
     6: Select backup for a client before a specified time
     7: Enter a list of files to restore
     8: Enter a list of files to restore before a specified time
     9: Find the JobIds of the most recent backup for a client
    10: Find the JobIds for a backup for a client before a specified time
    11: Enter a list of directories to restore for found JobIds
    12: Select full restore to a specified Job date
    13: Cancel
Select item:  (1-13):


Bacula can create backups on Tapes as well as tapes are still heavily used for backing data in some Banks, airports and other organizations where data is crucial.

Bacula is not among the easiest systems to create backups but for Backup administrators who work with Linux and FreeBSD it is great. Its scalability allows to make a very robust and complex backupping scheme which are hardly achievalable with other less professional backup tools like rsnapshot or rsync.