Posts Tagged ‘package’

Monitoring Linux hardware Hard Drives / Temperature and Disk with lm_sensors / smartd / hddtemp and Zabbix Userparameter lm_sensors report script

Thursday, April 30th, 2020

monitoring-linux-hardware-with-software-temperature-disk-cpu-health-zabbix-userparameter-script

I'm part of a  SysAdmin Team that is partially doing some minor Zabbix imrovements on a custom corporate installed Zabbix in an ongoing project to substitute the previous HP OpenView monitoring for a bunch of Legacy Linux hosts.
As one of the necessery checks to have is regarding system Hardware, the task was to invent some simplistic way to monitor hardware with the Zabbix Monitoring tool.  Monitoring Bare Metal servers hardware of HP / Dell / Fujituse etc. servers  in Linux usually is done with a third party software provided by the Hardware vendor. But as this requires an additional services to run and sometimes is not desired. It was interesting to find out some alternative Linux native ways to do the System hardware monitoring.
Monitoring statistics from the system hardware components can be obtained directly from the server components with ipmi / ipmitool (for more info on it check my previous article Reset and Manage intelligent  Platform Management remote board article).
With ipmi
 hardware health info could be received straight from the ILO / IDRAC / HPMI of the server. However as often the Admin-Lan of the server is in a seperate DMZ secured network and available via only a certain set of routed IPs, ipmitool can't be used.

So what are the other options to use to implement Linux Server Hardware Monitoring?

The tools to use are perhaps many but I know of two which gives you most of the information you ever need to have a prelimitary hardware damage warning system before the crash, these are:
 

1. smartmontools (smartd)

Smartd is part of smartmontools package which contains two utility programs (smartctl and smartd) to control and monitor storage systems using the Self-Monitoring, Analysis and Reporting Technology system (SMART) built into most modern ATA/SATA, SCSI/SAS and NVMe disks

Disk monitoring is handled by a special service the package provides called smartd that does query the Hard Drives periodically aiming to find a warning signs of hardware failures.
The downside of smartd use is that it implies a little bit of extra load on Hard Drive read / writes and if misconfigured could reduce the the Hard disk life time.


linux:~#  /usr/sbin/smartctl -a /dev/sdb2
smartctl 6.6 2017-11-05 r4594 [x86_64-linux-4.19.0-5-amd64] (local build)
Copyright (C) 2002-17, Bruce Allen, Christian Franke, www.smartmontools.org

=== START OF INFORMATION SECTION ===
Device Model:     KINGSTON SA400S37240G
Serial Number:    50026B768340AA31
LU WWN Device Id: 5 0026b7 68340aa31
Firmware Version: S1Z40102
User Capacity:    240,057,409,536 bytes [240 GB]
Sector Size:      512 bytes logical/physical
Rotation Rate:    Solid State Device
Device is:        Not in smartctl database [for details use: -P showall]
ATA Version is:   ACS-3 T13/2161-D revision 4
SATA Version is:  SATA 3.2, 6.0 Gb/s (current: 3.0 Gb/s)
Local Time is:    Thu Apr 30 14:05:01 2020 EEST
SMART support is: Available – device has SMART capability.
SMART support is: Enabled

=== START OF READ SMART DATA SECTION ===
SMART overall-health self-assessment test result: PASSED

General SMART Values:
Offline data collection status:  (0x00) Offline data collection activity
                                        was never started.
                                        Auto Offline Data Collection: Disabled.
Self-test execution status:      (   0) The previous self-test routine completed
                                        without error or no self-test has ever
                                        been run.
Total time to complete Offline
data collection:                (  120) seconds.
Offline data collection
capabilities:                    (0x11) SMART execute Offline immediate.
                                        No Auto Offline data collection support.
                                        Suspend Offline collection upon new
                                        command.
                                        No Offline surface scan supported.
                                        Self-test supported.
                                        No Conveyance Self-test supported.
                                        No Selective Self-test supported.
SMART capabilities:            (0x0002) Does not save SMART data before
                                        entering power-saving mode.
                                        Supports SMART auto save timer.
Error logging capability:        (0x01) Error logging supported.
                                        General Purpose Logging supported.
Short self-test routine
recommended polling time:        (   2) minutes.
Extended self-test routine
recommended polling time:        (  10) minutes.

SMART Attributes Data Structure revision number: 1
Vendor Specific SMART Attributes with Thresholds:
ID# ATTRIBUTE_NAME          FLAG     VALUE WORST THRESH TYPE      UPDATED  WHEN_FAILED RAW_VALUE
  1 Raw_Read_Error_Rate     0x0032   100   100   000    Old_age   Always       –       100
  9 Power_On_Hours          0x0032   100   100   000    Old_age   Always       –       2820
 12 Power_Cycle_Count       0x0032   100   100   000    Old_age   Always       –       21
148 Unknown_Attribute       0x0000   100   100   000    Old_age   Offline      –       0
149 Unknown_Attribute       0x0000   100   100   000    Old_age   Offline      –       0
167 Unknown_Attribute       0x0000   100   100   000    Old_age   Offline      –       0
168 Unknown_Attribute       0x0012   100   100   000    Old_age   Always       –       0
169 Unknown_Attribute       0x0000   100   100   000    Old_age   Offline      –       0
170 Unknown_Attribute       0x0000   100   100   010    Old_age   Offline      –       0
172 Unknown_Attribute       0x0032   100   100   000    Old_age   Always       –       0
173 Unknown_Attribute       0x0000   100   100   000    Old_age   Offline      –       0
181 Program_Fail_Cnt_Total  0x0032   100   100   000    Old_age   Always       –       0
182 Erase_Fail_Count_Total  0x0000   100   100   000    Old_age   Offline      –       0
187 Reported_Uncorrect      0x0032   100   100   000    Old_age   Always       –       0
192 Power-Off_Retract_Count 0x0012   100   100   000    Old_age   Always       –       16
194 Temperature_Celsius     0x0022   034   052   000    Old_age   Always       –       34 (Min/Max 19/52)
196 Reallocated_Event_Count 0x0032   100   100   000    Old_age   Always       –       0
199 UDMA_CRC_Error_Count    0x0032   100   100   000    Old_age   Always       –       0
218 Unknown_Attribute       0x0032   100   100   000    Old_age   Always       –       0
231 Temperature_Celsius     0x0000   097   097   000    Old_age   Offline      –       97
233 Media_Wearout_Indicator 0x0032   100   100   000    Old_age   Always       –       2104
241 Total_LBAs_Written      0x0032   100   100   000    Old_age   Always       –       1857
242 Total_LBAs_Read         0x0032   100   100   000    Old_age   Always       –       1141
244 Unknown_Attribute       0x0000   100   100   000    Old_age   Offline      –       32
245 Unknown_Attribute       0x0000   100   100   000    Old_age   Offline      –       107
246 Unknown_Attribute       0x0000   100   100   000    Old_age   Offline      –       15940

SMART Error Log Version: 1
No Errors Logged

SMART Self-test log structure revision number 1
No self-tests have been logged.  [To run self-tests, use: smartctl -t]

Selective Self-tests/Logging not supported


2. hddtemp


Usually if smartd is used it is useful to also use hddtemp which relies on smartd data.
 The hddtemp program monitors and reports the temperature of PATA, SATA
 or SCSI hard drives by reading Self-Monitoring Analysis and Reporting
 Technology (S.M.A.R.T.)
information on drives that support this feature.
 

linux:~# /usr/sbin/hddtemp /dev/sda1
/dev/sda1: Hitachi HDS721050CLA360: 31°C
linux:~# /usr/sbin/hddtemp /dev/sdc6
/dev/sdc6: KINGSTON SV300S37A120G: 25°C
linux:~# /usr/sbin/hddtemp /dev/sdb2
/dev/sdb2: KINGSTON SA400S37240G: 34°C
linux:~# /usr/sbin/hddtemp /dev/sdd1
/dev/sdd1: WD Elements 10B8: S.M.A.R.T. not available


3. lm-sensors / i2c-tools 

 Lm-sensors is a hardware health monitoring package for Linux. It allows you
 to access information from temperature, voltage, and fan speed sensors.
i2c-tools
was historically bundled in the same package as lm_sensors but has been seperated cause not all hardware monitoring chips are I2C devices, and not all I2C devices are hardware monitoring chips.

The most basic use of lm-sensors is with the sensors command


linux:~# sensors
i350bb-pci-0600
Adapter: PCI adapter
loc1:         +55.0 C  (high = +120.0 C, crit = +110.0 C)


coretemp-isa-0000
Adapter: ISA adapter
Physical id 0:  +28.0 C  (high = +78.0 C, crit = +88.0 C)
Core 0:         +26.0 C  (high = +78.0 C, crit = +88.0 C)
Core 1:         +28.0 C  (high = +78.0 C, crit = +88.0 C)
Core 2:         +28.0 C  (high = +78.0 C, crit = +88.0 C)
Core 3:         +28.0 C  (high = +78.0 C, crit = +88.0 C)


On CentOS Linux useful tool is also  lm_sensors-sensord.x86_64 – A Daemon that periodically logs sensor readings to syslog or a round-robin database, and warns of sensor alarms.

In Debian Linux there is also the psensors-server (an HTTP server providing JSON Web service which can be used by GTK+ Application to remotely monitor sensors) useful for developers
psesors-server

psensor-linux-graphical-tool-to-check-cpu-hard-disk-temperature-unix

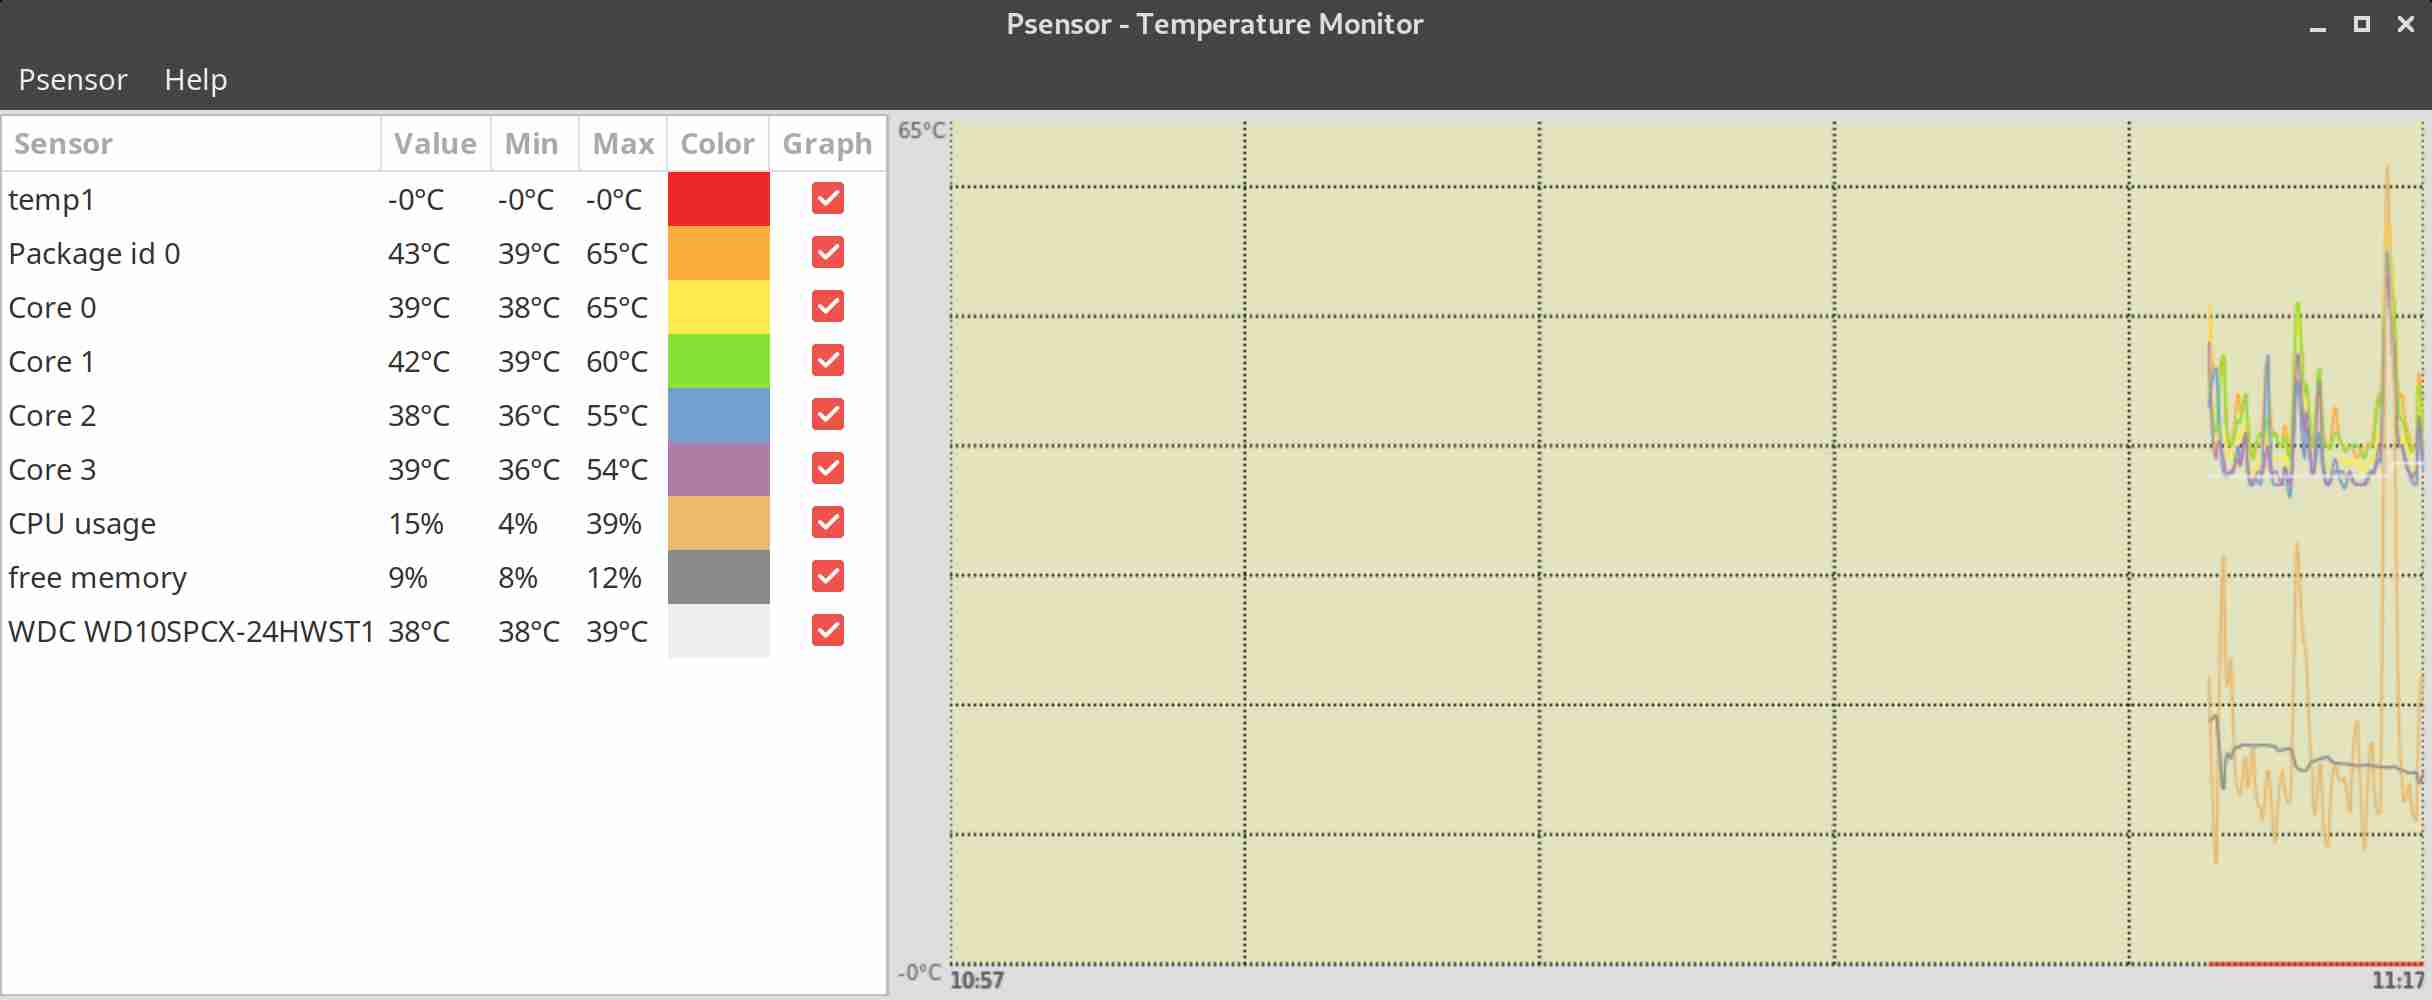
If you have a Xserver installed on the Server accessed with Xclient or via VNC though quite rare,
You can use xsensors or Psensora GTK+ (Widget Toolkit for creating Graphical User Interface) application software.

With this 3 tools it is pretty easy to script one liners and use the Zabbix UserParameters functionality to send hardware report data to a Company's Zabbix Sserver, though Zabbix has already some templates to do so in my case, I couldn't import this templates cause I don't have Zabbix Super-Admin credentials, thus to work around that a sample work around is use script to monitor for higher and critical considered temperature.
Here is a tiny sample script I came up in 1 min time it can be used to used as 1 liner UserParameter and built upon something more complex.

SENSORS_HIGH=`sensors | awk '{ print $6 }'| grep '^+' | uniq`;
SENSORS_CRIT=`sensors | awk '{ print $9 }'| grep '^+' | uniq`; ;SENSORS_STAT=`sensors|grep -E 'Core\s' | awk '{ print $1" "$2" "$3 }' | grep "$SENSORS_HIGH|$SENSORS_CRIT"`;
if [ ! -z $SENSORS_STAT ]; then
echo 'Temperature HIGH';
else 
echo 'Sensors OK';
fi 

Of course there is much more sophisticated stuff to use for monitoring out there


Below script can be easily adapted and use on other Monitoring Platforms such as Nagios / Munin / Cacti / Icinga and there are plenty of paid solutions, but for anyone that wants to develop something from scratch just like me I hope this
article will be a good short introduction.
If you know some other Linux hardware monitoring tools, please share.

A lightweight Email Client Graphical client for old computers with Linux (Claws)

Sunday, August 12th, 2018

claws-email-logo-best-email-leightweight-client-for-older-computer-configurations-with-linux.

If you happen to be system administrating an old computers with some 512 Megabytes of RAM or 1 Gigabyte of Memory with preinstalled some archaic version of GNU / Linux distro such as Slackware, Calderra Linux,  Debian / Ubuntu / Fedora etc. and there is suddenly need to use this PCs with a decent graphical email client for its existing GUI environment LXDE / XFCE / WindowMaker / Mate etc. then Mozilla Thunderbird

Definitely won't be the client of choice especially if you have to add 5 or 10 email accounts (with a few hundred of emails laying on the remote mail server) to be periodically fetched via POP3 or IMAP protocol.

Of course there is always the option to just use a simple Text Email clients such as Fetchmail, PINE or MUTT and unload the PCs memory and CPU with the simplistic text interface however as most people are totally unacquainted with Linux console or terminal, for most that won't be the option of choice.
 

  • So what is the best solution for a lightweight Graphical Email Client for Linux for Old Computers ?


!!! Say Hello to Sylpheed CLAWS EMail Desktop client !!!

Best-Email-client-for-old-computers-with-Linux-Sylpheed-Claws_1-screenshot-on-Window-Maker


linux:~# apt-cache show claws-mail|grep -i descrip -A 3 -B 1
Breaks: claws-mail-extra-plugins (<< 3.9.1-1)
Description-en: Fast, lightweight and user-friendly GTK+2 based email client
 Claws Mail is a powerful and full-featured mail client formerly called
 Sylpheed-Claws. It is also extensible using loadable plugins, which can
 provide support for additional features, like other storage formats,
 feed reader, calendar management, mail filtering, etc.

Description-md5: f9d9f85803d938ab3d5fbc85f90e263a
Multi-Arch: foreign
Homepage: http://www.claws-mail.org
Section: mail


A. Installing Claws Email on Debian Linux distribution
 

Assuming you need to install claws on Debian based Linux distributions;


debian:~# apt-get install –yes claws-mail


B. Installing Claws on Fedora Linux distribution

For older Fedora Linux:
 

[root@fedora ~:]# yum install claws-mail


On a newer Fedora Linux installations (for those who are already used to Claws and migrate to a newer computer with a fresh Fedora install)
 

[root@fedora ~:]# dhf install claws-mail


Note that newer versions of Fedora Linux the default yum package manager has been substituted for the newer and (said to be more) advanced dhf
 

C. Installing Claws email on Slackware Linux

Claws Mail is also available as a (Tar XZ – That's a slackware highly compressed .tar.gz equivallent which saves a lot of space for its packages), to install on slack get the package from the CD / DVD or download from internet and:


darkstar:~# installpkg claws-mail*.txz


By the way Claws mail might be also the email client of choice (for those who don't have to be bound by the slavery of Office 365 / Microsoft Office and transporters and Active Domain Controller Directory with Outlook Express.

windows_claws-email-lightweight-email-client-screenshot

Even on old Computers with Microsoft Windows Claws email (which has also a Windows 32 Bit Port) might be among the best options for those who value their computer resources and interface simplicity and hence want to save memory and CPU load.

That is it,  try and enjoy Sylpheed Claws !


Check linux install date / How do I find out how long a Linux server OS was installed?

Wednesday, March 30th, 2016

linux-check-install-date-howto-commands-on-debian-and-fedora-tux_the_linux_penguin_by_hello

To find out the Linux install date, there is no one single solution according to the Linux distribution type and version, there are some common ways to get the Linux OS install age.
Perhaps the most popular way to get the OS installation date and time is to check out when the root filesystem ( / ) was created, this can be done with tune2fs command


server:~# tune2fs -l /dev/sda1 | grep 'Filesystem created:'
Filesystem created:       Thu Sep  6 21:44:22 2012


server:~# ls -alct /|tail -1|awk '{print $6, $7, $8}'
sep 6 2012


root home directory is created at install time


server:~# ls -alct /root


root@server:~# ls -lAhF /etc/hostname
-rw-r–r– 1 root root 8 sep  6  2012 /etc/hostname


For Debian / Ubuntu and other deb based distributions the /var/log/installer directory is being created during OS install, so on Debian the best way to check the Linux OS creation date is with:
 

root@server:~# ls -ld /var/log/installer
drwxr-xr-x 3 root root 4096 sep  6  2012 /var/log/installer/
root@server:~# ls -ld /lost+found
drwx—— 2 root root 16384 sep  6  2012 /lost+found/


On Red Hat / Fedora / CentOS, redhat based Linuces , you can use:


rpm -qi basesystem | grep "Install Date"


basesystem is the package containing basic Linux binaries many of which should not change, however in some cases if there are some security updates package might change so it is also good to check the root filesystem creation time and compare whether these two match.

Removing exim and installing qmail / Generate and install pseudo mta dummy package on Debian / Ubuntu etc. .deb based Linux

Thursday, March 10th, 2016

debian-dummy-mta-package-install-howto-tux-mail-nice-mascot
If you happen to be installing Qmail Mail server on a Debian or Ubuntu (.deb) based Linux, you will notice by default there will be some kind of MTA (Mail Transport Agent) already installed mail-transfer-agent package will be installed and because of Debian .deb package depedency to have an MTA always installed on the system you will be unable to remove Exim MTA without installing some other MTA (Postix / Qmail) etc.

This will be a problem for those like me who prefer to compile and install Qmail from source, thus to get around this it is necessery to create a dummy package that will trick the deb packaging depencies that actually mta-local MTA package is present on the server.

The way to go here is to use equivs (Circumvent debian package dependencies):
 

debian:~# apt-cache show equivs|grep -i desc -A 10

Description: Circumvent Debian package dependencies
 This package provides a tool to create trivial Debian packages.
 Typically these packages contain only dependency information, but they
 can also include normal installed files like other packages do.
 .
 One use for this is to create a metapackage: a package whose sole
 purpose is to declare dependencies and conflicts on other packages so
 that these will be automatically installed, upgraded, or removed.
 .
 Another use is to circumvent dependency checking: by letting dpkg
 think a particular package name and version is installed when it

Btw creating a .deb dummy package will be necessery in many other cases when you have to install from some third party debian repositories or some old and alrady unmaintaned deb-src packages for the sake of making some archaic software to resurrect somewhere, so sooner or later even if you're not into Mail servers you will certainly need equivs.

Then install equivs and go on proceeding creating the dummy mail-transport-agent package
 

debian:~# cd /tmp debian:~# cp -rpf /usr/share/doc/equivs/examples/mail-transport-agent.ctl . debian:~# equivs-build mail-transport-agent.ctl


Above command will build and package /tmp/mta-local_1.0_all.deb dummy package.
So continue and install it with dpkg as you use to install debian packages


debian:~# dpkg -i /tmp/mta-local_1.0_all.deb


From then on you can continue your standard LWQ – Life with Qmail or any other source based qmail installation with:


./config-fast mail.yourmaildomain.net


So that's it now .deb packaging system consistency will be complete so standard security package updates with apt-get and aptitude updates or dpkg -i third party custom software insatlls will not be breaking up any more.

Hope that helped someone 🙂


Create SSH Tunnel to MySQL server to access remote filtered MySQL port 3306 host through localhost port 3308

Friday, February 27th, 2015

create_ssh_tunnel_to-mysql_server-to-access-remote-filtered-mysql-on-port-3306-secure_ssh_traffic
On our Debian / CentOS / Ubuntu Linux and Windows servers we're running multiple MySQL servers and our customers sometimes need to access this servers.
This is usually problem because MySQL Db  servers are running in a DMZ Zone with a strong firewall and besides that for security reasons SQLs are configured to only listen for connections coming from localhost, I mean in config files across our Debian Linux servers and CentOS / RHEL Linux machines the /etc/mysql/my.cnf and /etc/my.cnf the setting for bind-address is 127.0.0.1:
 

[root@centos ~]# grep -i bind-address /etc/my.cnf 
bind-address            = 127.0.0.1
##bind-address  = 0.0.0.0


For source code developers which are accessing development SQL servers only through a VPN secured DMZ Network there are few MySQL servers witha allowed access remotely from all hosts, e.g. on those I have configured:
 

[root@ubuntu-dev ~]# grep -i bind-address /etc/my.cnf 

bind-address  = 0.0.0.0


However though clients insisted to have remote access to their MySQL Databases but since this is pretty unsecure, we decided not to configure MySQLs to listen to all available IP addresses / network interfaces. 
MySQl acess is allowed only through PhpMyAdmin accessible via Cleint's Web interface which on some servers is CPanel  and on other Kloxo (This is open source CPanel like very nice webhosting platform).

For some stubborn clients which wanted to have a mysql CLI and MySQL Desktop clients access to be able to easily analyze their databases with Desktop clients such as MySQL WorkBench there is a "hackers" like work around to create and use a MySQL Tunnel to SQL server from their local Windows PCs using standard OpenSSH Linux Client from Cygwin,  MobaXterm which already comes with the SSH client pre-installed and has easy GUI interface to create SSH tunnels or eventually use Putty's Plink (Command Line Interface) to create the tunnel

Anyways the preferred and recommended (easiest) way to achieve a tunnel between MySQL and local PC (nomatter whether Windows or Linux client system) is to use standard ssh client and below command:
 

ssh -o ServerAliveInterval=10 -M -T -M -N -L 3308:localhost:3306 your-server.your-domain.com


By default SSH tunnel will keep opened for 3 minutes and if not used it will automatically close to get around this issue, you might want to raise it to (lets say 15 minutes). To do so in home directory user has to add in:
 

~/.ssh/config

ServerAliveInterval 15
ServerAliveCountMax 4


Note that sometimes it is possible ven though ssh tunnel timeout value is raised to not take affect if there is some NAT (Network Adress Translation) with low timeout setting on a firewall level. If you face constant SSH Tunnel timeouts you can use below bash few lines code to auto-respawn SSH tunnel connection (for Windows users use MobaXterm or install in advance bash shell cygwin package):
 

while true
do
 
ssh -o ServerAliveInterval=10 -M -T -M -N -L 3308:localhost:3306 your-server.your-domain.com
  sleep 15
done


Below is MySQLBench screenshot connected through server where this blog is located after establishing ssh tunnel to remote mysql server on port 3308 on localhost

mysql-workbench-database-analysis-and-management-gui-tool-convenient-for-data-migratin-and-queries-screenshot-

There is also another alternative way to access remote firewall filtered mysql servers without running complex commands to Run a tunnel which we recommend for clients (sql developers / sql designers) by using HeidiSQL (which is a useful tool for webdevelopers who has to deal with MySQL and MSSQL hosted Dbs).

heidisql-show-host_processlist-screenshot

To connect to remote MySQL server through a Tunnel using Heidi:

mysql_connection_configuration-heidi-mysql-gui-connect-tool


In the ‘Settings’ tab

1. In the dropdown list of ‘Network type’, please select SSH tunnel

2. Hostname/IP: localhost (even you are connecting remotely)

3. Username & Password: your mysql user and password

Next, in the tab SSH Tunnel:

1. specify plink.exe or you need to download it and specify where it’s located

2. Host + port: the remote IP of your SSH server(should be MySQL server as well), port 22 if you don’t change anything

3. Username & password: SSH username (not MySQL user)


heidi-connection_ssh_tunnel_configuration-heidi-sql-tool-screenshot
 

How to deb upgrade PHP 5.3.3-7 / MySQL Server 5.1 to PHP 5.4.37 MySQL 5.5 Server on Debian 6.0 / 7.0 Squeeze / Wheezy GNU / Linux

Thursday, February 12th, 2015

how-to-deb-upgrade-mysql-server-5.1-to-mysql-5.5-php-5.3-to-php-5.4-5.5-upgrade-howto-on-old-stable-debian-squeeze-wheezy

I've been still running Debian Squeeze 6.0 GNU / Linux on few of the Linux / Apache / MySQL servers I'm administrating and those servers are running few Wordperss / Joomla websites which lately face severe MySQL performance issues. I tried to optimize using various mysql performance optimization scripts such as mysql-tuner.pl, Tuning-primer.sh and Percona Toolkit – a collection of advanced command-line tools for system administrators and tech / support staff to perform a variety of MySQL and system tasks that are too difficult or complex to perform manually. Though with above tools and some my.cnf tunizations I managed to achieve positive performance improvement results with above optimizations, still I didn't like how MyQSL served queries and since the SQL server is already about 5 years old (running version 5.1) and the PHP on sever is still at 5.3 branch, I was advised by my dear colleague Anatoliy to try version update as a mean to improve SQLserver performance. I took seriously the suggestion to try upgrade as a mean to resolve performance issues in this article I will explain in short what I had to do to make MySQL upgrade a success

Of course to try keep deb installed software versions as fresh as possible possible deb packagse, I'm already using Debian Back Ports (for those who hear it a first time Debian Backports is a special repository for Stable versioned Debian Desktop and Servers  – supporting stable releases of Debian Linux) which allows you to keep install packages versions less outdated (than default installable software which usually are way behind latest stable package versions with 2-5 years).

If you happen to administer Stable Debian servers and you never used BackPorts I warmly recommend it as it often includes security patches of packages part of Debian stable releases that reached End Of Support (EOS) and already too old even for security updates to be issued by respective Debian Long Term Suport (LTS) repositories.

If you're like me and still in situation to manage remotely Debian 6.0 Squeeze and its the first time you hear about BackPorts and Debian LTShttps://wiki.debian.org/LTS/ to start using those two add to your /etc/apt/sources.list below 3 lines

Open with vim editor and press shift+G to go to last line of file and then press I to enter INSERT mode, once you're done to save, press (ESC) then press : and type x! in short key combination for exit and save setting in vim is 
 

Esc + :x! 


debian-server:~# vim /etc/apt/sources.list
deb http://http.debian.net/debian squeeze-lts main contrib non-free
deb-src http://http.debian.net/debian squeeze-lts main contrib non-free
deb http://http.debian.net/debian-backports squeeze-backports main

If you haven't been added a security updates line in /etc/apt/sources.list make sure you add also:


deb http://security.debian.org/ squeeze/updates main contrib non-free
deb-src http://security.debian.org/ squeeze/updates main contrib non-free


Then to apply latest security updates and packages from LTS / Backports repository run the usual:


debian-server:~# apt-get update && apt-get –yes upgrade
….

If you need to search a package or install something from just added backports repository use:


debian-server:~# apt-cache -t squeeze-backports search "mysql-server"
auth2db – Powerful and eye-candy IDS logger, log viewer and alert generator
torrentflux – web based, feature-rich BitTorrent download manager
cacti – Frontend to rrdtool for monitoring systems and services
mysql-server-5.1 – MySQL database server binaries and system database setup
mysql-server-core-5.1 – MySQL database server binaries
mysql-server – MySQL database server (metapackage depending on the latest version)


To install specific packages only with all their dependencies from Backports while keeping rest of packages from Debian Stable:


debian-server:~# apt-get install -t squeeze-backports "package_name"

In same way you can also search or install specific packages from LTS repo:


debian-server:~# apt-get search -t squeeze-lts "package_name"

debian-server:~# apt-get install -t squeeze-lts "package_name"

Latest mysql available from Debian BackPorts and LTS is still quite old 5.1.73-1+deb6u1 therefore I made an extensive research online on how can I easily update MySQL 5.1 to MySQL 5.5 / 5.6 on Debian Stable Linux.
 

Luckily there were already DotDeb deb repositories for Debian LAMP (Linux / Apache  / MySQL / PHP / Nginx ) running servers prepared in order to keep the essential Webserver services up2date even long after distro official support is over. I learned about existence of this repo thanks to a Ryan Tate's post who updates his LAMP stack on TurnKey Linux which by the way is based on slightly modified official stable Debian Linux releases packages

To start using DotDeb repos add in /etc/apt/sources.list (depending whereh you're on Squeeze or Wheeze Debian):


deb http://packages.dotdeb.org squeeze all
deb-src http://packages.dotdeb.org squeeze all

or for Debian Wheezy add repos:


deb http://packages.dotdeb.org wheezy all
deb-src http://packages.dotdeb.org wheezy all


I was updating my DebianLatest MySQL / PHP / Apache release to Latest ones on (6.0.4) Squeeze so added above squeeze repos:

Before refreshing list of package repositories, to authenticate repos issue:


debian-server:~# wget -q http://www.dotdeb.org/dotdeb.gpg
debian-server:~# apt-key add dotdeb.gpg

Once again to update my packages from newly added DodDeb repository


debian-server:~# apt-get update

Before running the SQL upgrade to insure myself, I dumped all databases with:


debian-server:~# mysqldump -u root -p -A > /root/dump.sql

Finally I was brave enough to run apt-get dist-upgrade to update with latest LAMP packages


debian-server:~# apt-get dist-upgrade
Reading package lists… Done
Building dependency tree
Reading state information… Done
Calculating upgrade… Done
The following packages will be REMOVED:
  mysql-client-5.1 mysql-server mysql-server-5.1
The following NEW packages will be installed:
  libaio1 libmysqlclient18 mysql-client-5.5 mysql-client-core-5.5 python-chardet python-debian
The following packages will be upgraded:
  curl krb5-multidev libapache2-mod-php5 libc-bin libc-dev-bin libc6 libc6-dev libc6-i386 libcurl3 libcurl3-gnutls libcurl4-openssl-dev libevent-1.4-2
  libgssapi-krb5-2 libgssrpc4 libjasper1 libk5crypto3 libkadm5clnt-mit7 libkadm5srv-mit7 libkdb5-4 libkrb5-3 libkrb5-dev libkrb53 libkrb5support0 libmysqlclient-dev
  libxml2 libxml2-dev locales mysql-client mysql-common ntp ntpdate php-pear php5 php5-cgi php5-cli php5-common php5-curl php5-dev php5-gd php5-imagick php5-mcrypt
  php5-mysql php5-odbc php5-recode php5-sybase php5-xmlrpc php5-xsl python-reportbug reportbug unzip

50 upgraded, 6 newly installed, 3 to remove and 0 not upgraded.
Need to get 51.7 MB of archives.
After this operation, 1,926 kB of additional disk space will be used.
Do you want to continue [Y/n]? Y

As you see from above output above command updates Apache webservers / PHP and PHP related modules, however it doesn't update MySQL installed version, to update also MySQL server 5.1 to MySQL server 5.5


debian-server:~#  apt-get install –yes mysql-server mysql-server-5.5

You will be prompted with the usual Debian ncurses text blue interface to set a root password to mysql server, just set it the same as it used to be on old upgraded MySQL 5.1 server.

Well now see whether mysql has properly restarted with ps auxwwf


debian-server:~#  ps axuwwf|grep -i sql
root     22971  0.0  0.0 112360   884 pts/11   S+   15:50   0:00  |                   \_ grep -i sql
root     19436  0.0  0.0 115464  1556 pts/1    S    12:53   0:00 /bin/sh /usr/bin/mysqld_safe
mysql    19837  4.0  2.3 728192 194552 pts/1   Sl   12:53   7:12  \_ /usr/sbin/mysqld –basedir=/usr –datadir=/var/lib/mysql –plugin-dir=/usr/lib/mysql/plugin –user=mysql –pid-file=/var/run/mysqld/mysqld.pid –socket=/var/run/mysqld/mysqld.sock –port=3306
root     19838  0.0  0.0 110112   700 pts/1    S    12:53   0:00  \_ logger -t mysqld -p daemon.error

In my case it was running, however if it fails to run try to debug what is going wrong on initialization by manually executing init script /etc/init.d/mysql stop; /etc/init.d/mysql start and look for errors. You can also manually try to run mysqld_safe from console if it is not running run:


debian-server:~# /usr/bin/mysqld_safe &

This should give you a good hint on why it is failing to run
 

One more thing left is to check whether php modules load correctly to do so issue:


debian-server:~# php -v
Failed loading /usr/lib/php5/20090626/xcache.so:  /usr/lib/php5/20090626/xcache.so: cannot open shared object file: No such file or directory

Failed loading /usr/lib/php5/20090626/xdebug.so:  /usr/lib/php5/20090626/xdebug.so: cannot open shared object file: No such file or directory


You will likely get an exception (error) like above.
To solve the error, reinstall xcache and xcache-debug debs


debian-server:~# apt-get purge php5-xcache php5-xdebug

Now PHP + MySQL + Apache environment should be running much smootly.

debian-squeeze-wheeze-update-install-mysql-sevver5.55-620x344-howto

Upgrading the MySQL server / PHP library to MySQL server 5.6 / PHP 5.5 on Wheeze Linux is done in very much analogous ways all you have to do is change the repositories with above wheeze 7.0 ones and to follow the process as described in this article. I haven't tested update on Wheezy yet, so if you happen to try my article with wheezy reports and got a positive upgrade result please drop a comment.

How to stop / start services in boot time and install / remove / update SuSE SLES (Suse Enterprise Linux Server)?

Friday, February 6th, 2015

Suse-Logo-stop-start-services-on-linux-boot-time-howto-chkconfig
If you're long time Linux sysadmin but you haven't need to adminster SuSE Linux still and your company buys other business / company which already owns some SuSE servers and you need to deal with them, even though you're just starting up with SuSE Linux but you had already plenty of experience with other Linux distributions Fedora / RHEL / CentOS, don't worry set up / stop / start a service (daemon) to boot on Linux boot time is just the same as any other Redhat (RPM) Linux based distributions. it is done by multiple shell scripts located in /etc/init.d directory which can be manually stopped start by issuing the script with an argument e.g
 

suse:/etc/init.d# cd /etc/init.d/
suse:/etc/init.d# ./snmpd 
Usage: ./snmpd {start|stop|try-restart|restart|force-reload|reload|status}


To configure how each of the /etc/init.d/ existent service boots you can the use good old /sbin/chkconfig (a script written in perl) – which you already know from Fedora / CentOS and other RPM distros.

1. Get a list of all enabled on boot SuSE Linux services

To get a list of all set up to run on boot SuSE server services with chkconfig:


suse:/etc/init.d# /sbin/chkfong –list 

Makefile                  0:off  1:off  2:off  3:off  4:off  5:off  6:off
OVCtrl                    0:off  1:off  2:off  3:on   4:on   5:on   6:off
SuSEfirewall2_init        0:off  1:off  2:off  3:off  4:off  5:off  6:off
SuSEfirewall2_setup       0:off  1:off  2:off  3:off  4:off  5:off  6:off
Tivoli_lcfd1              0:off  1:off  2:on   3:on   4:off  5:on   6:off
Tivoli_lcfd1.bkp          0:off  1:off  2:off  3:off  4:off  5:off  6:off
aaeventd                  0:off  1:off  2:off  3:off  4:off  5:off  6:off
acpid                     0:off  1:off  2:on   3:on   4:off  5:on   6:off
alsasound                 0:off  1:off  2:on   3:on   4:off  5:on   6:off
apache2-eis               0:off  1:off  2:off  3:off  4:off  5:off  6:off
atd                       0:off  1:off  2:off  3:off  4:off  5:off  6:off
auditd                    0:off  1:off  2:off  3:on   4:off  5:on   6:off
autofs                    0:off  1:off  2:off  3:off  4:off  5:off  6:off
autoyast                  0:off  1:off  2:off  3:off  4:off  5:off  6:off
boot.apparmor             0:off  1:off  2:on   3:on   4:off  5:on   6:off  B:on
cron                      0:off  1:off  2:on   3:on   4:off  5:on   6:off
dbus                      0:off  1:off  2:off  3:on   4:off  5:on   6:off
earlykbd                  0:off  1:off  2:off  3:off  4:off  5:on   6:off
earlysyslog               0:off  1:off  2:off  3:off  4:off  5:on   6:off
esound                    0:off  1:off  2:off  3:off  4:off  5:off  6:off
evms                      0:off  1:off  2:off  3:off  4:off  5:off  6:off
fbset                     0:off  1:on   2:on   3:on   4:off  5:on   6:off
firstboot                 0:off  1:off  2:off  3:off  4:off  5:off  6:off
fixperms                  0:off  1:off  2:off  3:off  4:off  5:off  6:off
gpm                       0:off  1:off  2:off  3:off  4:off  5:off  6:off
gssd                      0:off  1:off  2:off  3:off  4:off  5:off  6:off
gwproxy                   0:off  1:off  2:on   3:on   4:off  5:on   6:off
haldaemon                 0:off  1:off  2:off  3:on   4:off  5:on   6:off
hp-health                 0:off  1:off  2:on   3:on   4:on   5:on   6:off
hp-ilo                    0:off  1:off  2:off  3:on   4:off  5:on   6:off
hp-snmp-agents            0:off  1:off  2:on   3:on   4:on   5:on   6:off
hpsmhd                    0:off  1:off  2:off  3:on   4:on   5:on   6:off
idmapd                    0:off  1:off  2:off  3:off  4:off  5:off  6:off
ipmi                      0:off  1:off  2:off  3:off  4:off  5:off  6:off
ipmi.hp                   0:off  1:off  2:off  3:off  4:off  5:off  6:off
irq_balancer              0:off  1:on   2:on   3:on   4:off  5:on   6:off
itcaIBMTivoliCommonAgent0  0:off  1:off  2:on   3:on   4:off  5:on   6:off
jboss                     0:off  1:off  2:off  3:off  4:off  5:off  6:off
joystick                  0:off  1:off  2:off  3:off  4:off  5:off  6:off
kadmind                   0:off  1:off  2:off  3:off  4:off  5:off  6:off
kbd                       0:off  1:on   2:on   3:on   4:off  5:on   6:off  S:on
kdump                     0:off  1:off  2:off  3:off  4:off  5:off  6:off
kpropd                    0:off  1:off  2:off  3:off  4:off  5:off  6:off
krb524d                   0:off  1:off  2:off  3:off  4:off  5:off  6:off
krb5kdc                   0:off  1:off  2:off  3:off  4:off  5:off  6:off
ldap                      0:off  1:off  2:off  3:on   4:off  5:on   6:off
lm_sensors                0:off  1:off  2:off  3:off  4:off  5:off  6:off
lw_agt                    0:off  1:off  2:off  3:off  4:off  5:off  6:off
mdadmd                    0:off  1:off  2:off  3:off  4:off  5:off  6:off
microcode                 0:off  1:on   2:on   3:on   4:off  5:on   6:off  S:on
multipathd                0:off  1:off  2:off  3:off  4:off  5:off  6:off
mysql                     0:off  1:off  2:off  3:off  4:off  5:off  6:off
network                   0:off  1:off  2:on   3:on   4:off  5:on   6:off
nfs                       0:off  1:off  2:off  3:on   4:off  5:on   6:off
nfsboot                   0:off  1:off  2:off  3:on   4:off  5:on   6:off
nfsserver                 0:off  1:off  2:off  3:off  4:off  5:off  6:off
nohup.out                 0:off  1:off  2:off  3:off  4:off  5:off  6:off
novell-zmd                0:off  1:off  2:off  3:off  4:off  5:off  6:off
nscd                      0:off  1:off  2:off  3:on   4:off  5:on   6:off
ntp                       0:off  1:off  2:on   3:on   4:off  5:on   6:off
openct                    0:off  1:off  2:off  3:off  4:off  5:off  6:off
opsware-agent             0:off  1:off  2:off  3:on   4:on   5:on   6:off
osddownt                  0:off  1:off  2:off  3:on   4:on   5:on   6:off
ovpa                      0:on   1:off  2:on   3:on   4:off  5:on   6:off
pcscd                     0:off  1:off  2:off  3:off  4:off  5:off  6:off
pctl                      0:off  1:off  2:on   3:on   4:off  5:on   6:off
portmap                   0:off  1:off  2:off  3:on   4:off  5:on   6:off
postfix                   0:off  1:off  2:off  3:on   4:off  5:on   6:off
powerd                    0:off  1:off  2:off  3:off  4:off  5:off  6:off
powersaved                0:off  1:off  2:off  3:off  4:off  5:off  6:off
random                    0:off  1:off  2:on   3:on   4:off  5:on   6:off
raw                       0:off  1:off  2:off  3:off  4:off  5:off  6:off
resmgr                    0:off  1:off  2:on   3:on   4:off  5:on   6:off
rpasswdd                  0:off  1:off  2:off  3:off  4:off  5:off  6:off
rpmconfigcheck            0:off  1:off  2:off  3:off  4:off  5:off  6:off
rrdtools                  0:off  1:off  2:off  3:on   4:off  5:on   6:off
rsyncd                    0:off  1:off  2:off  3:off  4:off  5:off  6:off
saslauthd                 0:off  1:off  2:off  3:off  4:off  5:off  6:off
skeleton.compat           0:off  1:off  2:off  3:off  4:off  5:off  6:off
slurpd                    0:off  1:off  2:off  3:off  4:off  5:off  6:off
smartd                    0:off  1:off  2:off  3:off  4:off  5:off  6:off
smpppd                    0:off  1:off  2:off  3:off  4:off  5:off  6:off
snmpd                     0:off  1:off  2:on   3:on   4:off  5:on   6:off
splash                    0:off  1:on   2:on   3:on   4:off  5:on   6:off  S:on
splash_early              0:off  1:off  2:on   3:on   4:off  5:on   6:off
sshd                      0:off  1:off  2:off  3:on   4:off  5:on   6:off
suseRegister              0:off  1:off  2:off  3:off  4:off  5:off  6:off
svcgssd                   0:off  1:off  2:off  3:off  4:off  5:off  6:off
syslog                    0:off  1:off  2:on   3:on   4:off  5:on   6:off
sysstat                   0:off  1:off  2:off  3:off  4:off  5:off  6:off
tecad_logfile             0:off  1:off  2:off  3:on   4:off  5:on   6:off
tomcat55                  0:off  1:off  2:off  3:off  4:off  5:off  6:off
tomcat_eis                0:off  1:off  2:off  3:off  4:off  5:off  6:off
tpmgwproxy.sh             0:off  1:off  2:on   3:on   4:off  5:on   6:off
uc4_smgrp                 0:off  1:off  2:off  3:on   4:off  5:on   6:off
uc4_smgrq1                0:off  1:off  2:off  3:on   4:off  5:on   6:off
xbis-ldap-tool            0:off  1:off  2:off  3:off  4:off  5:off  6:off
xdm                       0:off  1:off  2:off  3:off  4:off  5:on   6:off
xfs                       0:off  1:off  2:off  3:off  4:off  5:off  6:off
xinetd                    0:off  1:off  2:off  3:off  4:off  5:off  6:off
ypbind                    0:off  1:off  2:off  3:off  4:off  5:off  6:off
xinetd based services:
        chargen:            off
        chargen-udp:        off
        daytime:            off
        daytime-udp:        off
        echo:               off
        echo-udp:           off
        netstat:            off
        rsync:              off
        servers:            off
        services:           off
        systat:             off
        time:               off
        time-udp:           off


2. Stop / Disable a service in all Linux boot runlevels or in a concrete one

As you should know already in Linux there are multiple runlevels in which server can boot, under normal circumstances SuSE servers (as of time of writting) this article boots into runlevel 3, if you'r'e  unsure about the runlevel you can check it with runlevel command:
 

 suse:/etc/init.d# /sbin/runlevel
N 3

To stop a service on all possible boot runlevels – 1,2,3,4,5
 

suse:/etc/init.d# /sbin/chkconfig xinetd off


If you want to stop xinetd or any other service just for certain runlevels (lets say run-level 3,4,5):
 

suse:/etc/init.d# chkconfig –level 345 xinetd off


3. Start / Enable a service for a runlevel or all boot levels 1,2,3,4,5

To disable boot.apparmor on all boot runlevels –  kernel enhancement that enabled to set a limited set of resources for services (good for tightened security, but often creating issues with some external server configured services).
 

suse:/etc/init.d# chkconfig boot.apparmor off


Or for single boot modes again with –level option:
 

suse:/etc/init.d# chkconfig –level 345 boot.apparmor off


suse:/etc/init.d# chkconfig xfs off 


4. SuSE Linux Package management zypper console tool

If you need / wonder how to install /remove / update a service on a SuSE Linux server, take a look at zypper tool.
zypper is  a  command-line  interface to ZYPP system management library.

To install a package / service with zypper the syntax is very much like yum, for example:
 

suse: ~# zypper install vim -emacs


will remove emacs editor and install Vi Improved

The equivalent of yum -y  Fedora command in SuSE Enterprise Linux is –non-interactive option


suse:~# zypper –non-interactive install


In SuSE it is pretty annoying when you're asked for accepting licensing on some proprietary (external vendor) non-free software packages to get around this:
 

suse:~# zypper patch –auto-agree-with-licenses


To keep the SuSE server up2date – i.e. SLES equivalent of CentOS's yum update && yum upgrade


suse:~# zypper list-patches
Loading repository data…
Reading installed packages…
 
Repository                          | Name      | Version | Category | Status
————————————+———–+———+———-+——-
Updates for openSUSE 11.3 11.3-1.82 | lxsession | 2776    | security | needed


suse:~# zypper patch-check
Loading repository data…
Reading installed packages…
5 patches needed (1 security patch)


To look for a certain package with Zypper (equivalent of yum search packagename)

suse: ~# zypper search apache


To verify whether an RPM installed package dependecies are OK:
 

suse:~# zypper verify


The equivalent of Fedora yum update command in SuSE (SLES) are:

suse:~# zypper refresh


To force a complete refresh and rebuild of the database, including a forced download of raw metadata.
 

suse:~# zypper refresh -fdb


For people that are used to ncurses (midnight commander) like text interface you can also use yoast2 (text GUI) package manager:
 

suse:~# yoast2


update-linux-suse-server-with-yoast2-ncurses-package-text-gui-management-tool

If a package is messed you can always go back and use good old RPM (Redhat Package Manager) to solve it.


Monitoring Disk use, CPU Load, Memory use and Network in one console ncurses interface – Glance

Thursday, August 14th, 2014

monitoring-disk-use-memory-cpu-load-and-network-in-one-common-interfaces-with-glances-Linux-BSD-UNIX
If you're Linux / UNIX / BSD system administrator you already have experience with basic admin's system monitoring:

  •     CPU load
  •     OS Name/Kernel version
  •     System load avarage and Uptime
  •     Disk and Network Input/Output I/O operations by interface
  •     Process statistics / Top loading processes etc.
  •     Memory / SWAP usage and free memory
  •     Mounted partitions


Such info is provided by command line tools such as:

top, df, free, sensors, ifconfig, iotop, hddtemp, mount, nfsstat, nfsiostat, dstat, uptime, nethogs iptraf

etc.

There are plenty of others advanced tools also Web based server monitoring visualization  tools, such as Monit, Icanga, PHPSysInfo, Cacti which provide you statistics on computer hardware and network utilization

So far so good, if you already are used to convenience of web *NIX based monitoring but you don't want to put load on the servers with such and you're lazy to write custom scripts that show most important monitoring information – necessery for daily system administration monitoring and prevention from downtimes and tracking bottlenecks you will be glad to hear about Glances
 

Glances is a free (LGPL) cross-platform curses-based monitoring tool which aims to present a maximum of information in a minimum of space, ideally to fit in a classical 80×24 terminal or higher to have additionnal information. Glances can adapt dynamically the displayed information depending on the terminal size. It can also work in a client/server mode for remote monitoring.


1. Installing Glances curses-based monitoring tool on Debian 7 / Ubuntu 13+ / Mint  Linux

We have to install python-pip (python package installer tool) to later install Glances

apt-get install –yes 'python-dev' 'python-jinja2' 'python-psutil'
                        'python-setuptools' 'hddtemp' 'python-pip' 'lm-sensors'


Before proceeding to install Glances to make Thermal sensors working (if supported by hardware) run:


 sensors-detect

Glances is written in Python and uses psutil library to obtain monitoring statistic values, thus it is necessery to install few more Python libraries:

pip install 'batinfo' 'pysensors'

If you're about to use pip – Python package installer tool, behind a proxy server use instead:
 

pip install –proxy=http://your-proxy-host.com:8080 'batinfo' 'pysensors'

Then install Glances script itself again using pip
 

pip install 'Glances'

Downloading/unpacking Glances
  Downloading Glances-2.0.1.tar.gz (3.3Mb): 3.3Mb downloaded
  Running setup.py egg_info for package Glances
    
Downloading/unpacking psutil>=2.0.0 (from Glances)
  Downloading psutil-2.1.1.tar.gz (216Kb): 216Kb downloaded
  Running setup.py egg_info for package psutil

Successfully installed Glances psutil


Then run glances from terminal
 

glances -t 3

-t 3 option tells glances to refresh collected statistics every 3 seconds

glances-console-monitoring-tool-every-systemad-ministrator-should-know-and-use-show-memory-disk-cpu-mount-point-statistics-in-common-shared-screen-linux-freebsd-unix


2. Installing Glances monitoring console tool on CentOS / RHEL / Fedora / Scientific Linux

Installing glances on CentOS 7 / Fedora and rest of RPM based distributions can be done by adding external RPM repositories, cause glances is not available in default yum repositories.

To enable Extra-packages repositories:
 

rpm -ivh http://dl.fedoraproject.org/pub/epel/6/x86_64/epel-release-6-8.noarch.rpm


Then update yum to include new repository's packages into package list and install python-pip and python-devel rpms
 

yum update
yum install python-pip python-devel


Glances-console-server-stateScreenhot-on-CentOS-Linux-monitoring-in-ncurses-Linux-BSD

There is also FreeBSD port to install Glances on FreeBSD:
 

cd /usr/sysutils/py-glances
make install


Enjoy 🙂 !


luckyBackup Linux GUI back-up and synchronization tool

Wednesday, May 14th, 2014

luckybackup_best-linux-graphical-tool-for-backup_linux_gui-defacto-standard-tool
If you're a using GNU / Linux  for Desktop and you're already tired of creating backups by your own hacks using terminal and you want to make your life a little bit more easier and easily automate your important files back up through GUI program take a look at luckyBackup.

Luckibackup is a GUI frontend to the infamous rsync command line backup  tool. Luckibackup is available as a package in almost all modern Linux distributions its very easy to setup and can save you a lot of time especially if you have to manage a number of your Workplace Desktop Office Linux based computers.
Luckibackup is an absolute must have program for Linux Desktop start-up users. If you're migrating from Microsoft Windows realm and you're used to BackupPC, Luckibackup is probably the defacto Linux BackupPC substitute.

The sad news for Linux GNOME Desktop users is luckibackup is written in QT and it using it will load up a bit your notebook.
It is not installed by default so once a new Linux Desktop is installed you will have to install it manually on Debian and Ubuntu based Linux-es to install Luckibackup apt-get it.

debian:~# apt-get install --yes luckibackup
...

On Fedora and CentOS Linux install LuckiBackup via yum rpm package manager

[root@centos :~]# yum -y install luckibackup
.

Luckibackup is also ported for OpenSuSE Slackware, Gentoo, Mandriva and ArchLinux. In 2009 Luckibackup won the prize of Sourceforge Community Choice Awards for "best new project".

luckyBackup copies over only the changes you've made to the source directory and nothing more.
You will be surprised when your huge source is backed up in seconds (after the first backup).

Whatever changes you make to the source including adding, moving, deleting, modifying files / directories etc, will have the same effect to the destination.
Owner, group, time stamps, links and permissions of files are preserved (unless stated otherwise).

Luckibackup creates different multiple backup "snapshots".Each snapshot is an image of the source data that refers to a specific date-time.
Easy rollback to any of the snapshots is possible. Besides that luckibackup support Sync (just like rsync) od any directories keeping the files that were most recently modified on both of them.

Useful if you modify files on more than one PCs (using a flash-drive and don't want to bother remembering what did you use last. Luckibackup is capable of excluding certain files or directories from backupsExclude any file, folder or pattern from backup transfer.

After each operation a logfile is created in your home folder. You can have a look at it any time you want.

luckyBackup can run in command line if you wish not to use the gui, but you have to first create the profile that is going to be executed.
Type "luckybackup –help" at a terminal to see usage and supported options.
There is also TrayNotification – Visual feedback at the tray area informs you about what is going on.


FreeBSD 10.0 RELEASE is out pkg_add FreeBSD default package manager to be substituted with pkg

Thursday, January 23rd, 2014

freebsd 10 is out logo pkg add to be removed - freebsd big news pkg_add to be substituted by another package manager

New latest version of FreeBSD 10.0-RELEASE is out this. FBSD 10  is the latest stable release of 10 branch. The biggest change in FBSD 10 is removal of long time used pkg_add and its substitute with the newer and more advanced pkg. For BSD users who don't know pkg  stiill check out handbook on pkgng

Key highlights of FreeBSD 10 as taken from FreeBSD-10.0-RELEASE announcement;
 

  • GCC is no longer installed by default on architectures where clang(1) is the default compiler.

  • Unbound has been imported to the base system as the local caching DNS resolver.

  • BIND has been removed from the base system.

  • make(1) has been replaced with bmake(1), obtained from the NetBSD Project.

  • pkg(7) is now the default package management utility.

  • pkg_add(1), pkg_delete(1), and related tools have been removed.

  • Major enhancements in virtualization, including the addition of bhyve(8), virtio(4), and native paravirtualized drivers providing support for FreeBSD as a guest operating system on Microsoft Hyper-V.

  • TRIM support for Solid State Drives has been added to ZFS.

  • Support for the high-performance LZ4 compression algorithm has been added to ZFS.

    There is a big news for Raspberry Pi lovers as from FreeBSD 10 there is an official support for Raspberry Pi
    Happy new release. Cheers to testers 🙂