Archive for the ‘CentOS’ Category

How to make 27 inch monitor to work on 2560×1440 with Virtualbox Linux

Wednesday, October 4th, 2023

make-virtualbox-with-linux-work-on-2k-2560x1440-howto

I've bought a new "second hand" refurbished EIZO Flexscan Monitor EV2760 S1 K1 awesome monitor re from Kvant Serviz a company reseller of Second Hand electronics that is located on the territy of Bulgarian Academy of Sciences (BAN / BAS) and was created by BAS people originally for the BAS people and am pretty happy with it for doing my daily job as system administrator, especially as the monitor has been used on very short screen time for only 256 use hours (which is less than a year of full-use time), whether EIZO does guarantee their monitors to be able to serve up to 5 Full years monitor use time.

For those who deals with Graphics such as Designers and people into art working with Computers knows EIZO brand Monitors for quite some time now and it seems as much of those people are using Windows or Macintoshes, these monitors have been mainly created to work optimally with Windows / Mac computers on a higher resolution.
My work PC that is Dell Latitude 5510 with its HDMI cable has been running perfect with The EIZO with Windows 10, however as I'm using a Virtualbox virutal machines with CentOS Linux, the VM does not automatically detected the highest resolution 2K that this monitors supports 2560×1440 at 60 Hz is the best one can use to get more things fit into the screen and hopefully also good for the Eyes, the Ecoview shoulk also be a good idea for the eyes, as the Ecoview by EIZO tries to adjust the monitor brightness to lower levels according to the light in the room to try to minimize the eye strain on the eyes. The Ecoview mode is a little bit I guess like the famous BENQ's monitors Eye care. 
I'm talking about all this Displays specifics as I spend quite a lot of time to learn the very basics about monitors as my old old 24 Inch EIZO Monitor Flexscan model 2436W started to wear off with time and doesn't support HDMI cable input, so I had to use a special. cable connector that modifies the signal from HDMI to DVI (and I'm not sure how this really effects the eyes), plus the DVI quality is said to be a little bit worse than HDMI as far as I read a bit on the topic online.

Well anyways currently I'm a happy owner of the EIZO EV2760 Monitor which has a full set of inputs of:

  • 27" In-Plane Switching (IPS) Panel
  • DisplayPort | HDMI | DVI-D | 3.5mm Audio
  • 2560 x 1440 Native Resolution
  • 1000:1 Typical Contrast Ratio
     

I've tried to make the monitor work with Linux and my first assumption from what I've read was that I have to reinstall the Guess Addition Tools on the Virtualbox with additing the Guest Addition Tools via the Vbox GUI interface:

Devices -> Insert Guest Additions CD Image

virtualbox-resolutions-screenshot

But got an error that the Guest additions tools iso is missing
So eventually resolved it by remounting and reinstalling the guest addition tools with the following set of commands:

[root@localhost test]# yum install perl gcc dkms kernel-devel kernel-headers make bzip2
[root@localhost test]# cd /mnt/cdrom/
[root@localhost cdrom]# ls
AUTORUN.INF  runasroot.sh                       VBoxSolarisAdditions.pkg
autorun.sh   TRANS.TBL                          VBoxWindowsAdditions-amd64.exe
cert         VBoxDarwinAdditions.pkg            VBoxWindowsAdditions.exe
NT3x         VBoxDarwinAdditionsUninstall.tool  VBoxWindowsAdditions-x86.exe
OS2          VBoxLinuxAdditions.run


[root@localhost cdrom]# ./VBoxLinuxAdditions.run 

Verifying archive integrity… All good.
Uncompressing VirtualBox 6.1.34 Guest Additions for Linux……..
VirtualBox Guest Additions installer
Removing installed version 6.1.34 of VirtualBox Guest Additions…
Copying additional installer modules …
Installing additional modules …
VirtualBox Guest Additions: Starting.
VirtualBox Guest Additions: Building the VirtualBox Guest Additions kernel
modules.  This may take a while.
VirtualBox Guest Additions: To build modules for other installed kernels, run
VirtualBox Guest Additions:   /sbin/rcvboxadd quicksetup <version>
VirtualBox Guest Additions: or
VirtualBox Guest Additions:   /sbin/rcvboxadd quicksetup all
VirtualBox Guest Additions: Building the modules for kernel
3.10.0-1160.80.1.el7.x86_64.
ERROR: Can't map '//etc/selinux/targeted/policy/policy.31':  Invalid argument

ERROR: Unable to open policy //etc/selinux/targeted/policy/policy.31.
libsemanage.semanage_read_policydb: Error while reading kernel policy from /etc/selinux/targeted/active/policy.kern. (No such file or directory).
OSError: No such file or directory
VirtualBox Guest Additions: Running kernel modules will not be replaced until
the system is restarted


The solution to that was to reinstal the security policy-target was necessery

[root@localhost test]# yum install selinux-policy-targeted –reinstall


And of course rerun the reinstall of Guest addition tools up to the latest

[root@localhost cdrom]# ./VBoxLinuxAdditions.run 

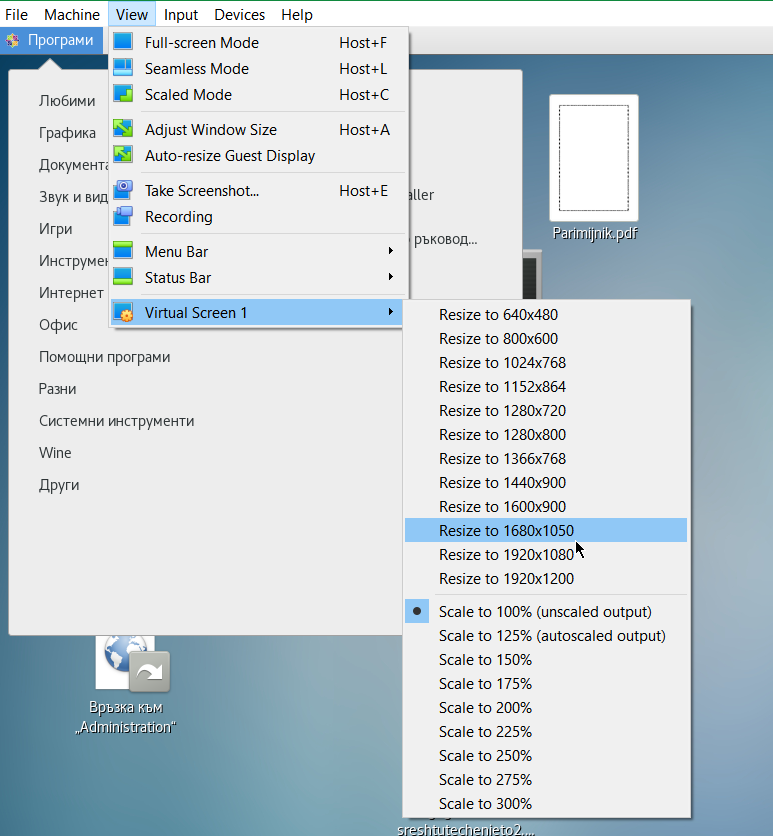
Unfortunately that doesn't make it resolve it and even shutting down the VM machine and reloading it again with Raised Video Memory for the simulated hardware from settings from 16 MB to 128MB for the VM does not give the option from the Virtualbox interface to set the resolution from
 

View -> Virtual Screen 1 (Resize to 1920×1200)

to any higher than that.

After a bit of googling I found some newer monitors doesn't seem to be seen by xrandr command and few extra commands with xrandr need to be run to make the 2K resolution 2560×1440@60 Herzes work under the Linux virtual machine.

These are the extra xranrd command that make it happen

# xrandr –newmode "2560x1440_60.00" 311.83  2560 2744 3024 3488  1440 1441 1444 1490  -HSync +Vsync
# xrandr –addmode Virtual1 2560x1440_60.00
# xrandr –output Virtual1 –mode "2560x1440_60.00"

As this kind of settings needs to be rerun on next time the Virtual Machine runs it is a good idea to place the commands in a tiny shell script:

[test@localhost ~]$ cat xrandr-set-resolution-to-2560×1440.sh 
#!/bin/bash
xrandr –newmode "2560x1440_60.00" 311.83  2560 2744 3024 3488  1440 1441 1444 1490  -HSync +Vsync
xrandr –addmode Virtual1 2560x1440_60.00
xrandr –output Virtual1 –mode "2560x1440_60.00"


You can Download  the xrandr-set-resolution-to-2560×1440.sh script from here

Once the commands are run, to make it affect the Virtualbox, you can simply put it in FullScreen mode via


View -> Full-Screen Mode (can be teriggered from keyboard by pressing Right CTRL + F) together

[test@localhost ~]$ xrandr –addmode Virtual1 2560x1440_60.00
[test@localhost ~]$ xrandr –output Virtual1 –mode "2560x1440_60.00"
[test@localhost ~]$ xrandr 
Screen 0: minimum 1 x 1, current 2560 x 1440, maximum 8192 x 8192
Virtual1 connected primary 2560×1440+0+0 (normal left inverted right x axis y axis) 0mm x 0mm
   1920×1200     60.00 +  59.88  
   2560×1600     59.99  
   1920×1440     60.00  
   1856×1392     60.00  
   1792×1344     60.00  
   1600×1200     60.00  
   1680×1050     59.95  
   1400×1050     59.98  
   1280×1024     60.02  
   1440×900      59.89  
   1280×960      60.00  
   1360×768      60.02  
   1280×800      59.81  
   1152×864      75.00  
   1280×768      59.87  
   1024×768      60.00  
   800×600       60.32  
   640×480       59.94  
   2560x1440_60.00  60.00* 
Virtual2 disconnected (normal left inverted right x axis y axis)
Virtual3 disconnected (normal left inverted right x axis y axis)
Virtual4 disconnected (normal left inverted right x axis y axis)
Virtual5 disconnected (normal left inverted right x axis y axis)
Virtual6 disconnected (normal left inverted right x axis y axis)
Virtual7 disconnected (normal left inverted right x axis y axis)
Virtual8 disconnected (normal left inverted right x axis y axis)

Tadadadam ! That's all folks, enjoy having your 27 Inch monitor running at 2560×1440 @ 60 Hz 🙂


How to RPM update Hypervisors and Virtual Machines running Haproxy High Availability cluster on KVM, Virtuozzo without a downtime on RHEL / CentOS Linux

Friday, May 20th, 2022

virtuozzo-kvm-virtual-machines-and-hypervisor-update-manual-haproxy-logo


Here is the scenario, lets say you have on your daily task list two Hypervisor (HV) hosts running CentOS or RHEL Linux with KVM or Virutozzo technology and inside the HV hosts you have configured at least 2 pairs of virtual machines one residing on HV Host 1 and one residing on HV Host 2 and you need to constantly keep the hosts to the latest distribution major release security patchset.

The Virtual Machines has been running another set of Redhat Linux or CentOS configured to work in a High Availability Cluster running Haproxy / Apache / Postfix or any other kind of HA solution on top of corosync / keepalived or whatever application cluster scripts Free or Open Source technology that supports a switch between clustered Application nodes.

The logical question comes how to keep up the CentOS / RHEL Machines uptodate without interfering with the operations of the Applications running on the cluster?

Assuming that the 2 or more machines are configured to run in Active / Passive App member mode, e.g. one machine is Active at any time and the other is always Passive, a switch is possible between the Active and Passive node.

HAProxy--Load-Balancer-cluster-2-nodes-your-Servers

In this article I'll give a simple step by step tested example on how you I succeeded to update (for security reasons) up to the latest available Distribution major release patchset on one by one first the Clustered App on Virtual Machines 1 and VM2 on Linux Hypervisor Host 1. Then the App cluster VM 1 / VM 2 on Hypervisor Host 2.
And finally update the Hypervisor1 (after moving the Active resources from it to Hypervisor2) and updating the Hypervisor2 after moving the App running resources back on HV1.
I know the procedure is a bit monotonic but it tries to go through everything step by step to try to mitigate any possible problems. In case of failure of some rpm dependencies during yum / dnf tool updates you can always revert to backups so in anyways don't forget to have a fully functional backup of each of the HV hosts and the VMs somewhere on a separate machine before proceeding further, any possible failures due to following my aritcle literally is your responsibility 🙂


0. Check situation before the update on HVs / get VM IDs etc.

Check the virsion of each of the machines to be updated both Hypervisor and Hosted VMs, on each machine run:
 

# cat /etc/redhat-release
CentOS Linux release 7.9.2009 (Core)


The machine setup I'll be dealing with is as follows:
 

hypervisor-host1 -> hypervisor-host1.fqdn.com 
•    virt-mach-centos1
•    virt-machine-zabbix-proxy-centos (zabbix proxy)

hypervisor-host2 -> hypervisor-host2.fqdn.com
•    virt-mach-centos2
•    virt-machine-zabbix2-proxy-centos (zabbix proxy)

To check what is yours check out with virsh cmd –if on KVM or with prlctl if using Virutozzo, you should get something like:

[root@hypervisor-host2 ~]# virsh list
 Id Name State
—————————————————-
 1 vm-host1 running
 2 virt-mach-centos2 running

 # virsh list –all

[root@hypervisor-host1 ~]# virsh list
 Id Name State
—————————————————-
 1 vm-host2 running
 3 virt-mach-centos1 running

[root@hypervisor-host1 ~]# prlctl list
UUID                                    STATUS       IP_ADDR         T  NAME
{dc37c201-08c9-589d-aa20-9386d63ce3f3}  running      –               VM virt-mach-centos1
{76e8a5f8-caa8-5442-830e-aa4bfe8d42d9}  running      –               VM vm-host2
[root@hypervisor-host1 ~]#

If you have stopped VMs with Virtuozzo to list the stopped ones as well.
 

# prlctl list -a

[root@hypervisor-host2 74a7bbe8-9245-5385-ac0d-d10299100789]# vzlist -a
                                CTID      NPROC STATUS    IP_ADDR         HOSTNAME
[root@hypervisor-host2 74a7bbe8-9245-5385-ac0d-d10299100789]# prlctl list
UUID                                    STATUS       IP_ADDR         T  NAME
{92075803-a4ce-5ec0-a3d8-9ee83d85fc76}  running      –               VM virt-mach-centos2
{74a7bbe8-9245-5385-ac0d-d10299100789}  running      –               VM vm-host1

# prlctl list -a


If due to Virtuozzo version above command does not return you can manually check in the VM located folder, VM ID etc.
 

[root@hypervisor-host2 vmprivate]# ls
74a7bbe8-9245-4385-ac0d-d10299100789  92075803-a4ce-4ec0-a3d8-9ee83d85fc76
[root@hypervisor-host2 vmprivate]# pwd
/vz/vmprivate
[root@hypervisor-host2 vmprivate]#


[root@hypervisor-host1 ~]# ls -al /vz/vmprivate/
total 20
drwxr-x—. 5 root root 4096 Feb 14  2019 .
drwxr-xr-x. 7 root root 4096 Feb 13  2019 ..
drwxr-x–x. 4 root root 4096 Feb 18  2019 1c863dfc-1deb-493c-820f-3005a0457627
drwxr-x–x. 4 root root 4096 Feb 14  2019 76e8a5f8-caa8-4442-830e-aa4bfe8d42d9
drwxr-x–x. 4 root root 4096 Feb 14  2019 dc37c201-08c9-489d-aa20-9386d63ce3f3
[root@hypervisor-host1 ~]#


Before doing anything with the VMs, also don't forget to check the Hypervisor hosts has enough space, otherwise you'll get in big troubles !
 

[root@hypervisor-host2 vmprivate]# df -h
Filesystem                       Size  Used Avail Use% Mounted on
/dev/mapper/centos_hypervisor-host2-root   20G  1.8G   17G  10% /
devtmpfs                          20G     0   20G   0% /dev
tmpfs                             20G     0   20G   0% /dev/shm
tmpfs                             20G  2.0G   18G  11% /run
tmpfs                             20G     0   20G   0% /sys/fs/cgroup
/dev/sda1                        992M  159M  766M  18% /boot
/dev/mapper/centos_hypervisor-host2-home  9.8G   37M  9.2G   1% /home
/dev/mapper/centos_hypervisor-host2-var   9.8G  355M  8.9G   4% /var
/dev/mapper/centos_hypervisor-host2-vz    755G   25G  692G   4% /vz


[root@hypervisor-host1 ~]# df -h
Filesystem               Size  Used Avail Use% Mounted on
/dev/mapper/centos-root   50G  1.8G   45G   4% /
devtmpfs                  20G     0   20G   0% /dev
tmpfs                     20G     0   20G   0% /dev/shm
tmpfs                     20G  2.1G   18G  11% /run
tmpfs                     20G     0   20G   0% /sys/fs/cgroup
/dev/sda2                992M  153M  772M  17% /boot
/dev/mapper/centos-home  9.8G   37M  9.2G   1% /home
/dev/mapper/centos-var   9.8G  406M  8.9G   5% /var
/dev/mapper/centos-vz    689G   12G  643G   2% /vz

Another thing to do before proceeding with update is to check and tune if needed the amount of CentOS repositories used, before doing anything with yum.
 

[root@hypervisor-host2 yum.repos.d]# ls -al
total 68
drwxr-xr-x.   2 root root  4096 Oct  6 13:13 .
drwxr-xr-x. 110 root root 12288 Oct  7 11:13 ..
-rw-r–r–.   1 root root  4382 Mar 14  2019 CentOS7.repo
-rw-r–r–.   1 root root  1664 Sep  5  2019 CentOS-Base.repo
-rw-r–r–.   1 root root  1309 Sep  5  2019 CentOS-CR.repo
-rw-r–r–.   1 root root   649 Sep  5  2019 CentOS-Debuginfo.repo
-rw-r–r–.   1 root root   314 Sep  5  2019 CentOS-fasttrack.repo
-rw-r–r–.   1 root root   630 Sep  5  2019 CentOS-Media.repo
-rw-r–r–.   1 root root  1331 Sep  5  2019 CentOS-Sources.repo
-rw-r–r–.   1 root root  6639 Sep  5  2019 CentOS-Vault.repo
-rw-r–r–.   1 root root  1303 Mar 14  2019 factory.repo
-rw-r–r–.   1 root root   666 Sep  8 10:13 openvz.repo
[root@hypervisor-host2 yum.repos.d]#


[root@hypervisor-host1 yum.repos.d]# ls -al
total 68
drwxr-xr-x.   2 root root  4096 Oct  6 13:13 .
drwxr-xr-x. 112 root root 12288 Oct  7 11:09 ..
-rw-r–r–.   1 root root  1664 Sep  5  2019 CentOS-Base.repo
-rw-r–r–.   1 root root  1309 Sep  5  2019 CentOS-CR.repo
-rw-r–r–.   1 root root   649 Sep  5  2019 CentOS-Debuginfo.repo
-rw-r–r–.   1 root root   314 Sep  5  2019 CentOS-fasttrack.repo
-rw-r–r–.   1 root root   630 Sep  5  2019 CentOS-Media.repo
-rw-r–r–.   1 root root  1331 Sep  5  2019 CentOS-Sources.repo
-rw-r–r–.   1 root root  6639 Sep  5  2019 CentOS-Vault.repo
-rw-r–r–.   1 root root  1303 Mar 14  2019 factory.repo
-rw-r–r–.   1 root root   300 Mar 14  2019 obsoleted_tmpls.repo
-rw-r–r–.   1 root root   666 Sep  8 10:13 openvz.repo


1. Dump VM definition XMs (to have it in case if it gets wiped during update)

There is always a possibility that something will fail during the update and you might be unable to restore back to the old version of the Virtual Machine due to some config misconfigurations or whatever thus a very good idea, before proceeding to modify the working VMs is to use KVM's virsh and dump the exact set of XML configuration that makes the VM roll properly.

To do so:
Check a little bit up in the article how we have listed the IDs that are part of the directory containing the VM.
 

[root@hypervisor-host1 ]# virsh dumpxml (Id of VM virt-mach-centos1 ) > /root/virt-mach-centos1_config_bak.xml
[root@hypervisor-host2 ]# virsh dumpxml (Id of VM virt-mach-centos2) > /root/virt-mach-centos2_config_bak.xml


2. Set on standby virt-mach-centos1 (virt-mach-centos1)

As I'm upgrading two machines that are configured to run an haproxy corosync cluster, before proceeding to update the active host, we have to switch off
the proxied traffic from node1 to node2, – e.g. standby the active node, so the cluster can move up the traffic to other available node.
 

[root@virt-mach-centos1 ~]# pcs cluster standby virt-mach-centos1


3. Stop VM virt-mach-centos1 & backup on Hypervisor host (hypervisor-host1) for VM1

Another prevention step to make sure you don't get into damaged VM or broken haproxy cluster after the upgrade is to of course backup 


[root@hypervisor-host1 ]# prlctl backup virt-mach-centos1

or
 

[root@hypervisor-host1 ]# prlctl stop virt-mach-centos1
[root@hypervisor-host1 ]# cp -rpf /vz/vmprivate/dc37c201-08c9-489d-aa20-9386d63ce3f3 /vz/vmprivate/dc37c201-08c9-489d-aa20-9386d63ce3f3-bak
[root@hypervisor-host1 ]# tar -czvf virt-mach-centos1_vm_virt-mach-centos1.tar.gz /vz/vmprivate/dc37c201-08c9-489d-aa20-9386d63ce3f3

[root@hypervisor-host1 ]# prlctl start virt-mach-centos1


4. Remove package version locks on all hosts

If you're using package locking to prevent some other colleague to not accidently upgrade the machine (if multiple sysadmins are managing the host), you might use the RPM package locking meachanism, if that is used check RPM packs that are locked and release the locking.

+ List actual list of locked packages

[root@hypervisor-host1 ]# yum versionlock list  

…..
0:libtalloc-2.1.16-1.el7.*
0:libedit-3.0-12.20121213cvs.el7.*
0:p11-kit-trust-0.23.5-3.el7.*
1:quota-nls-4.01-19.el7.*
0:perl-Exporter-5.68-3.el7.*
0:sudo-1.8.23-9.el7.*
0:libxslt-1.1.28-5.el7.*
versionlock list done
                          

+ Clear the locking            

# yum versionlock clear                               


+ List actual list / == clear all entries
 

[root@virt-mach-centos2 ]# yum versionlock list; yum versionlock clear
[root@virt-mach-centos1 ]# yum versionlock list; yum versionlock clear
[root@hypervisor-host1 ~]# yum versionlock list; yum versionlock clear
[root@hypervisor-host2 ~]# yum versionlock list; yum versionlock clear


5. Do yum update virt-mach-centos1


For some clarity if something goes wrong, it is really a good idea to make a dump of the basic packages installed before the RPM package update is initiated,
The exact versoin of RHEL or CentOS as well as the list of locked packages, if locking is used.

Enter virt-mach-centos1 (ssh virt-mach-centos1) and run following cmds:
 

# cat /etc/redhat-release  > /root/logs/redhat-release-$(hostname)-$(date '+%Y-%m-%d_%H-%M-%S').out
# cat /etc/grub.d/30_os-prober > /root/logs/grub2-efi-$(hostname)-$(date '+%Y-%m-%d_%H-%M-%S').out


+ Only if needed!!
 

# yum versionlock clear
# yum versionlock list


Clear any previous RPM packages – careful with that as you might want to keep the old RPMs, if unsure comment out below line
 

# yum clean all |tee /root/logs/yumcleanall-$(hostname)-$(date '+%Y-%m-%d_%H-%M-%S').out


Proceed with the update and monitor closely the output of commands and log out everything inside files using a small script that you should place under /root/status the script is given at the end of the aritcle.:
 

yum check-update |tee /root/logs/yumcheckupdate-$(hostname)-$(date '+%Y-%m-%d_%H-%M-%S').out
yum check-update | wc -l
yum update |tee /root/logs/yumupdate-$(hostname)-$(date '+%Y-%m-%d_%H-%M-%S').out
sh /root/status |tee /root/logs/status-before-$(hostname)-$(date '+%Y-%m-%d_%H-%M-%S').out


6. Check if everything is running fine after upgrade

Reboot VM
 

# shutdown -r now


7. Stop VM virt-mach-centos2 & backup  on Hypervisor host (hypervisor-host2)

Same backup step as prior 

# prlctl backup virt-mach-centos2


or
 

# prlctl stop virt-mach-centos2
# cp -rpf /vz/vmprivate/92075803-a4ce-4ec0-a3d8-9ee83d85fc76 /vz/vmprivate/92075803-a4ce-4ec0-a3d8-9ee83d85fc76-bak
## tar -czvf virt-mach-centos2_vm_virt-mach-centos2.tar.gz /vz/vmprivate/92075803-a4ce-4ec0-a3d8-9ee83d85fc76

# prctl start virt-mach-centos2


8. Do yum update on virt-mach-centos2

Log system state, before the update
 

# cat /etc/redhat-release  > /root/logs/redhat-release-vorher-$(hostname)-$(date '+%Y-%m-%d_%H-%M-%S').out
# cat /etc/grub.d/30_os-prober > /root/logs/grub2-efi-vorher-$(hostname)-$(date '+%Y-%m-%d_%H-%M-%S').out
# yum versionlock clear == if needed!!
# yum versionlock list


Clean old install update / packages if required
 

# yum clean all |tee /root/logs/yumcleanall-$(hostname)-$(date '+%Y-%m-%d_%H-%M-%S').out


Initiate the update

# yum check-update |tee /root/logs/yumcheckupdate-$(hostname)-$(date '+%Y-%m-%d_%H-%M-%S').out 2>&1
# yum check-update | wc -l 
# yum update |tee /root/logs/yumupdate-$(hostname)-$(date '+%Y-%m-%d_%H-%M-%S').out 2>&1
# sh /root/status |tee /root/logs/status-before-$(hostname)-$(date '+%Y-%m-%d_%H-%M-%S').out


9. Check if everything is running fine after upgrade
 

Reboot VM
 

# shutdown -r now


10. Stop VM vm-host2 & backup
 

# prlctl backup vm-host2


or

# prlctl stop vm-host2

Or copy the actual directory containig the Virtozzo VM (use the correct ID)
 

# cp -rpf /vz/vmprivate/76e8a5f8-caa8-5442-830e-aa4bfe8d42d9 /vz/vmprivate/76e8a5f8-caa8-5442-830e-aa4bfe8d42d9-bak
## tar -czvf vm-host2.tar.gz /vz/vmprivate/76e8a5f8-caa8-4442-830e-aa5bfe8d42d9

# prctl start vm-host2


11. Do yum update vm-host2
 

# cat /etc/redhat-release  > /root/logs/redhat-release-vorher-$(hostname)-$(date '+%Y-%m-%d_%H-%M-%S').out
# cat /etc/grub.d/30_os-prober > /root/logs/grub2-efi-vorher-$(hostname)-$(date '+%Y-%m-%d_%H-%M-%S').out


Clear only if needed

# yum versionlock clear
# yum versionlock list
# yum clean all |tee /root/logs/yumcleanall-$(hostname)-$(date '+%Y-%m-%d_%H-%M-%S').out


Do the rpm upgrade

# yum check-update |tee /root/logs/yumcheckupdate-$(hostname)-$(date '+%Y-%m-%d_%H-%M-%S').out
# yum check-update | wc -l
# yum update |tee /root/logs/yumupdate-$(hostname)-$(date '+%Y-%m-%d_%H-%M-%S').out
# sh /root/status |tee /root/logs/status-before-$(hostname)-$(date '+%Y-%m-%d_%H-%M-%S').out


12. Check if everything is running fine after upgrade
 

Reboot VM
 

# shutdown -r now


13. Do yum update hypervisor-host2


# cat /etc/redhat-release  > /root/logs/redhat-release-vorher-$(hostname)-$(date '+%Y-%m-%d_%H-%M-%S').out
# cat /etc/grub.d/30_os-prober > /root/logs/grub2-efi-vorher-$(hostname)-$(date '+%Y-%m-%d_%H-%M-%S').out

Clear lock   if needed

# yum versionlock clear
# yum versionlock list
# yum clean all |tee /root/logs/yumcleanall-$(hostname)-$(date '+%Y-%m-%d_%H-%M-%S').out


Update rpms
 

# yum check-update |tee /root/logs/yumcheckupdate-$(hostname)-$(date '+%Y-%m-%d_%H-%M-%S').out 2>&1
# yum check-update | wc -l
# yum update |tee /root/logs/yumupdate-$(hostname)-$(date '+%Y-%m-%d_%H-%M-%S').out 2>&1
# sh /root/status |tee /root/logs/status-before-$(hostname)-$(date '+%Y-%m-%d_%H-%M-%S').out


14. Stop VM vm-host1 & backup


Some as ealier
 

# prlctl backup vm-host1

or
 

# prlctl stop vm-host1

# cp -rpf /vz/vmprivate/74a7bbe8-9245-4385-ac0d-d10299100789 /vz/vmprivate/74a7bbe8-9245-4385-ac0d-d10299100789-bak
# tar -czvf vm-host1.tar.gz /vz/vmprivate/74a7bbe8-9245-4385-ac0d-d10299100789

# prctl start vm-host1


15. Do yum update vm-host2
 

# cat /etc/redhat-release  > /root/logs/redhat-release-vorher-$(hostname)-$(date '+%Y-%m-%d_%H-%M-%S').out
# cat /etc/grub.d/30_os-prober > /root/logs/grub2-efi-vorher-$(hostname)-$(date '+%Y-%m-%d_%H-%M-%S').out
# yum versionlock clear == if needed!!
# yum versionlock list
# yum clean all |tee /root/logs/yumcleanall-$(hostname)-$(date '+%Y-%m-%d_%H-%M-%S').out
# yum check-update |tee /root/logs/yumcheckupdate-$(hostname)-$(date '+%Y-%m-%d_%H-%M-%S').out
# yum check-update | wc -l
# yum update |tee /root/logs/yumupdate-$(hostname)-$(date '+%Y-%m-%d_%H-%M-%S').out
# sh /root/status |tee /root/logs/status-before-$(hostname)-$(date '+%Y-%m-%d_%H-%M-%S').out


16. Check if everything is running fine after upgrade

+ Reboot VM

# shutdown -r now


17. Do yum update hypervisor-host1

Same procedure for HV host 1 

# cat /etc/redhat-release  > /root/logs/redhat-release-vorher-$(hostname)-$(date '+%Y-%m-%d_%H-%M-%S').out
# cat /etc/grub.d/30_os-prober > /root/logs/grub2-efi-vorher-$(hostname)-$(date '+%Y-%m-%d_%H-%M-%S').out

Clear lock
 

# yum versionlock clear
# yum versionlock list
# yum clean all |tee /root/logs/yumcleanall-$(hostname)-$(date '+%Y-%m-%d_%H-%M-%S').out

# yum check-update |tee /root/logs/yumcheckupdate-$(hostname)-$(date '+%Y-%m-%d_%H-%M-%S').out
# yum check-update | wc -l
# yum update |tee /root/logs/yumupdate-$(hostname)-$(date '+%Y-%m-%d_%H-%M-%S').out
# sh /root/status |tee /root/logs/status-before-$(hostname)-$(date '+%Y-%m-%d_%H-%M-%S').out


18. Check if everything is running fine after upgrade

Reboot VM
 

# shutdown -r now


Check hypervisor-host1 all VMs run as expected 


19. Check if everything is running fine after upgrade

Reboot VM
 

# shutdown -r now


Check hypervisor-host2 all VMs run as expected afterwards


20. Check once more VMs and haproxy or any other contained services in VMs run as expected

Login to hosts and check processes and logs for errors etc.
 

21. Haproxy Unstandby virt-mach-centos1

Assuming that the virt-mach-centos1 and virt-mach-centos2 are running a Haproxy / corosync cluster you can try to standby node1 and check the result
hopefully all should be fine and traffic should come to host node2.

[root@virt-mach-centos1 ~]# pcs cluster unstandby virt-mach-centos1


Monitor logs and make sure HAproxy works fine on virt-mach-centos1


22. If necessery to redefine VMs (in case they disappear from virsh) or virtuosso is not working

[root@virt-mach-centos1 ]# virsh define /root/virt-mach-centos1_config_bak.xml
[root@virt-mach-centos1 ]# virsh define /root/virt-mach-centos2_config_bak.xml


23. Set versionlock to RPMs to prevent accident updates and check OS version release

[root@virt-mach-centos2 ]# yum versionlock \*
[root@virt-mach-centos1 ]# yum versionlock \*
[root@hypervisor-host1 ~]# yum versionlock \*
[root@hypervisor-host2 ~]# yum versionlock \*

[root@hypervisor-host2 ~]# cat /etc/redhat-release 
CentOS Linux release 7.8.2003 (Core)

Other useful hints

[root@hypervisor-host1 ~]# virsh console dc37c201-08c9-489d-aa20-9386d63ce3f3
Connected to domain virt-mach-centos1
..

! Compare packages count before the upgrade on each of the supposable identical VMs and HVs – if there is difference in package count review what kind of packages are different and try to make the machines to look as identical as possible  !

Packages to update on hypervisor-host1 Count: XXX
Packages to update on hypervisor-host2 Count: XXX
Packages to update virt-mach-centos1 Count: – 254
Packages to update virt-mach-centos2 Count: – 249

The /root/status script

+++

#!/bin/sh
echo  '=======================================================   '
echo  '= Systemctl list-unit-files –type=service | grep enabled '
echo  '=======================================================   '
systemctl list-unit-files –type=service | grep enabled

echo  '=======================================================   '
echo  '= systemctl | grep ".service" | grep "running"            '
echo  '=======================================================   '
systemctl | grep ".service" | grep "running"

echo  '=======================================================   '
echo  '= chkconfig –list                                        '
echo  '=======================================================   '
chkconfig –list

echo  '=======================================================   '
echo  '= netstat -tulpn                                          '
echo  '=======================================================   '
netstat -tulpn

echo  '=======================================================   '
echo  '= netstat -r                                              '
echo  '=======================================================   '
netstat -r


+++

That's all folks, once going through the article, after some 2 hours of efforts or so you should have an up2date machines.
Any problems faced or feedback is mostly welcome as this might help others who have the same setup.

Thanks for reading me 🙂

Install Zabbix Agent client on CentOS 9 Stream Linux, Disable Selinux and Firewalld on CentOS9 to make zabbix-agentd send data to server

Thursday, April 14th, 2022

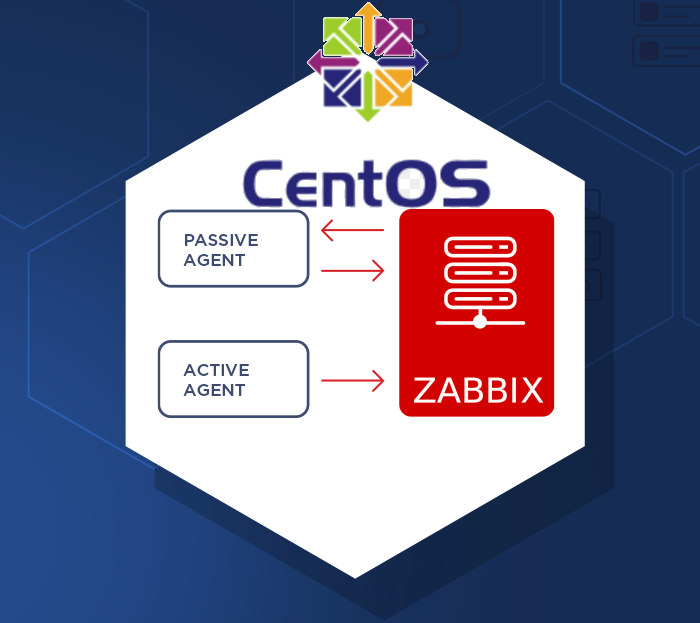
https://pc-freak.net/images/zabbix_agent_active_passive-zabbix-agent-centos-9-install-howto

Installing Zabbix is usually a trivial stuff, you either use the embedded distribution built packages if such are available this is for example defetch the right zabbix release repository  that configures the Zabbix official repo in the system, configure the Zabbix server or Proxy if such is used inside /etc/zabbix/zabbix_agentd.conf and start the client, i.e. I expected that it will be a simple and straight forward also on the freshly installed CentOS 9 Linux cause placing a zabbix-agent monitroing is a trivial stuff however installing came to error:

Key import failed (code 2). Failing package is: zabbix-agent-6.0.3-1.el8.x86_64


This is what I've done

1. Download and install zabbix-release-6.0-1.el8.noarch.rpm directly from zabbix

I've followed the official documentation from zabbix.com and ran:
 

[root@centos9 /root ]# rpm -Uvh https://repo.zabbix.com/zabbix/6.0/rhel/8/x86_64/zabbix-release-6.0-1.el8.noarch.rpm


2. Install  the zabbix-agent RPM package from the repositry

[root@centos9 rpm-gpg]# yum install zabbix-agent -y
Last metadata expiration check: 0:02:46 ago on Tue 12 Apr 2022 08:49:34 AM EDT.
Dependencies resolved.
=============================================
 Package                               Architecture                Version                              Repository                      Size
=============================================
Installing:
 zabbix-agent                          x86_64                      6.0.3-1.el8                          zabbix                         526 k
Installing dependencies:
 compat-openssl11                      x86_64                      1:1.1.1k-3.el9                       appstream                      1.5 M
 openldap-compat                       x86_64                      2.4.59-4.el9                         baseos                          14 k

Transaction Summary
==============================================
Install  3 PackagesTotal size: 2.0 M
Installed size: 6.1 M
Downloading Packages:
[SKIPPED] openldap-compat-2.4.59-4.el9.x86_64.rpm: Already downloaded
[SKIPPED] compat-openssl11-1.1.1k-3.el9.x86_64.rpm: Already downloaded
[SKIPPED] zabbix-agent-6.0.3-1.el8.x86_64.rpm: Already downloaded
Zabbix Official Repository – x86_64                                                                          1.6 MB/s | 1.7 kB     00:00
Importing GPG key 0xA14FE591:
 Userid     : "Zabbix LLC <packager@zabbix.com>"
 Fingerprint: A184 8F53 52D0 22B9 471D 83D0 082A B56B A14F E591
 From       : /etc/pki/rpm-gpg/RPM-GPG-KEY-ZABBIX-A14FE591
Key import failed (code 2). Failing package is: zabbix-agent-6.0.3-1.el8.x86_64
 GPG Keys are configured as: file:///etc/pki/rpm-gpg/RPM-GPG-KEY-ZABBIX-A14FE591
The downloaded packages were saved in cache until the next successful transaction.
You can remove cached packages by e
xecuting 'yum clean packages'.
Error: GPG check FAILED


3. Work around to skip GPG to install zabbix-agent 6 on CentOS 9

With Linux everything becomes more and more of a hack …
The logical thing to was to first,  check and it assure that the missing RPM GPG key is at place

[root@centos9 rpm-gpg]# ls -al  /etc/pki/rpm-gpg/RPM-GPG-KEY-ZABBIX-A14FE591
-rw-r–r– 1 root root 1719 Feb 11 16:29 /etc/pki/rpm-gpg/RPM-GPG-KEY-ZABBIX-A14FE591

Strangely the key was in place.

Hence to have the key loaded I've tried to import the gpg key manually with gpg command:

[root@centos9 rpm-gpg]# gpg –import /etc/pki/rpm-gpg/RPM-GPG-KEY-ZABBIX-A14FE591


And attempted install again zabbix-agent once again:
 

[root@centos9 rpm-gpg]# yum install zabbix-agent -y
Last metadata expiration check: 0:02:46 ago on Tue 12 Apr 2022 08:49:34 AM EDT.
Dependencies resolved.
==============================================
 Package                               Architecture                Version                              Repository                      Size
==============================================
Installing:
 zabbix-agent                          x86_64                      6.0.3-1.el8                          zabbix                         526 k
Installing dependencies:
 compat-openssl11                      x86_64                      1:1.1.1k-3.el9                       appstream                      1.5 M
 openldap-compat                       x86_64                      2.4.59-4.el9                         baseos                          14 k

Transaction Summary
==============================================
Install  3 Packages

Total size: 2.0 M
Installed size: 6.1 M
Downloading Packages:
[SKIPPED] openldap-compat-2.4.59-4.el9.x86_64.rpm: Already downloaded
[SKIPPED] compat-openssl11-1.1.1k-3.el9.x86_64.rpm: Already downloaded
[SKIPPED] zabbix-agent-6.0.3-1.el8.x86_64.rpm: Already downloaded
Zabbix Official Repository – x86_64                                                                          1.6 MB/s | 1.7 kB     00:00
Importing GPG key 0xA14FE591:
 Userid     : "Zabbix LLC <packager@zabbix.com>"
 Fingerprint: A184 8F53 52D0 22B9 471D 83D0 082A B56B A14F E591
 From       : /etc/pki/rpm-gpg/RPM-GPG-KEY-ZABBIX-A14FE591
Key import failed (code 2). Failing package is: zabbix-agent-6.0.3-1.el8.x86_64
 GPG Keys are configured as: file:///etc/pki/rpm-gpg/RPM-GPG-KEY-ZABBIX-A14FE591
The downloaded packages were saved in cache until the next successful transaction.
You can remove cached packages by executing 'yum clean packages'.
Error: GPG check FAILED


Unfortunately that was not a go, so totally pissed off I've disabled the gpgcheck for packages completely as a very raw bad and unrecommended work-around to eventually install the zabbix-agentd like that.

Usually the RPM gpg key failures check on RPM packages could be could be workaround with in dnf, so I've tried that one without success.

[root@centos9 rpm-gpg]# dnf update –nogpgcheck
Total                                                                                                        181 kB/s | 526 kB     00:02
Zabbix Official Repository – x86_64                                                                          1.6 MB/s | 1.7 kB     00:00
Importing GPG key 0xA14FE591:
 Userid     : "Zabbix LLC <packager@zabbix.com>"
 Fingerprint: A184 8F53 52D0 22B9 471D 83D0 082A B56B A14F E591
 From       : /etc/pki/rpm-gpg/RPM-GPG-KEY-ZABBIX-A14FE591
Is this ok [y/N]: y
Key import failed (code 2). Failing package is: zabbix-agent-6.0.3-1.el8.x86_64
 GPG Keys are configured as: file:///etc/pki/rpm-gpg/RPM-GPG-KEY-ZABBIX-A14FE591
The downloaded packages were saved in cache until the next successful transaction.
You can remove cached packages by executing 'dnf clean packages'.
Error: GPG check FAILED

Further tried to use the –nogpgpcheck 
which according to its man page:


–nogpgpcheck 
Skip checking GPG signatures on packages (if RPM policy allows).


In yum the nogpgcheck option according to its man yum does exactly the same thing


[root@centos9 rpm-gpg]# yum install zabbix-agent –nogpgcheck -y
 

Dependencies resolved.
===============================================
 Package                             Architecture                  Version                               Repository                     Size
===============================================
Installing:
 zabbix-agent                        x86_64                        6.0.3-1.el8                           zabbix                        526 k

Transaction Summary
===============================================

Total size: 526 k
Installed size: 2.3 M
Is this ok [y/N]: y
Downloading Packages:

Running transaction check
Transaction check succeeded.
Running transaction test
Transaction test succeeded.
Running transaction
  Preparing        :                                                                                                                     1/1
  Running scriptlet: zabbix-agent-6.0.3-1.el8.x86_64                                                                                     1/2
  Reinstalling     : zabbix-agent-6.0.3-1.el8.x86_64                                                                                     1/2
  Running scriptlet: zabbix-agent-6.0.3-1.el8.x86_64                                                                                     1/2
  Running scriptlet: zabbix-agent-6.0.3-1.el8.x86_64                                                                                     2/2
  Cleanup          : zabbix-agent-6.0.3-1.el8.x86_64                                                                                     2/2
  Running scriptlet: zabbix-agent-6.0.3-1.el8.x86_64                                                                                     2/2
  Verifying        : zabbix-agent-6.0.3-1.el8.x86_64                                                                                     1/2
  Verifying        : zabbix-agent-6.0.3-1.el8.x86_64                                                                                     2/2

Installed:
  zabbix-agent-6.0.3-1.el8.x86_64

Complete!
[root@centos9 ~]#

Voila! zabbix-agentd on CentOS 9 Install succeeded!

Yes I know disabling a GPG check is not really secure and seems to be an ugly solution but since I'm cut of time in the moment and it is just for experimental install of zabbix-agent on CentOS
plus we already trusted the zabbix package repository anyways, I guess it doesn't much matter.

4. Configure Zabbix-agent on the machine

Once you choose how the zabbix-agent should sent the data to the zabbix-server (e.g. Active or Passive) mode the The minimum set of configuration you should
have at place should be something like mine:

[root@centos9 ~]# grep -v '\#' /etc/zabbix/zabbix_agentd.conf | sed /^$/d
PidFile=/var/run/zabbix/zabbix_agentd.pid
LogFile=/var/log/zabbix/zabbix_agentd.log
LogFileSize=0
Server=192.168.1.70,127.0.0.1
ServerActive=192.168.1.70,127.0.0.1
Hostname=centos9
Include=/etc/zabbix/zabbix_agentd.d/*.conf

5. Start and Enable zabbix-agent client

To have it up and running

[root@centos9 ~]# systemct start zabbix-agent
[root@centos9 ~]# systemctl enable zabbix-agent

6. Disable SELinux to prevent it interfere with zabbix-agentd 

Other amazement was that even though I've now had configured Active check and a Server and correct configuration the Zabbix-Server could not reach the zabbix-agent for some weird reason.
I thought that it might be selinux and checked it and seems by default in the fresh installed CentOS 9 Linux selinux is already automatically set to enabled.

After stopping it i made sure, SeLinux would block for security reasons client connectivity to the zabbix-server until you either allow zabbix exception in SeLinux or until completely disable it.
 

[root@centos9 ~]# sestatus

SELinux status:                 enabled
SELinuxfs mount:                /sys/fs/selinux
SELinux root directory:         /etc/selinux
Loaded policy name:             targeted
Current mode:                   enforcing
Mode from config file:          enforcing
Policy MLS status:              enabled
Policy deny_unknown status:     allowed
Memory protection checking:     actual (secure)
Max kernel policy version:      31

To temporarily change the mode from its default targeted to permissive mode 

[root@centos9 ~]# setenforce 0

[root@centos9 ~]# sestatus

SELinux status:                 enabled
SELinuxfs mount:                /sys/fs/selinux
SELinux root directory:         /etc/selinux
Loaded policy name:             targeted
Current mode:                   permissive
Mode from config file:          permissive
Policy MLS status:              enabled
Policy deny_unknown status:     allowed
Memory protection checking:     actual (secure)
Max kernel policy version:      31


That would work for current session but won't take affect on next reboot, thus it is much better to disable selinux on next boot:

[root@centos9 ~]# cat /etc/selinux/config
# This file controls the state of SELinux on the system.
# SELINUX= can take one of these three values:
#     enforcing – SELinux security policy is enforced.
#     permissive – SELinux prints warnings instead of enforcing.
#     disabled – No SELinux policy is loaded.
SELINUX=permissive
# SELINUXTYPE= can take one of these three values:
#     targeted – Targeted processes are protected,
#     minimum – Modification of targeted policy. Only selected processes are protected. 
#     mls – Multi Level Security protection.
SELINUXTYPE=targeted


To disable selinux change:

SELINUXTYPE=disabled

[root@centos9 ~]# grep -v \# /etc/selinux/config

SELINUX=disabled
SELINUXTYPE=targeted


To make the OS disable selinux and test it is disabled you will have to reboot 

[root@centos9 ~]# reboot


Check its status again, it should be:

[root@centos9 ~]# sestatus
SELinux status:                 disabled


7. Enable zabbix-agent through firewall or disable firewalld service completely

By default CentOS 9 has the firewalld also enabled and either you have to enable zabbix to communicate to the remote server host.

To enable access for from and to zabbix-agentd in both Active / Passive mode:

#firewall settings:
[root@centos9 rpm-gpg]# firewall-cmd –permanent –add-port=10050/tcp
[root@centos9 rpm-gpg]# firewall-cmd –permanent –add-port=10051/tcp
[root@centos9 rpm-gpg]# firewall-cmd –reload
[root@centos9 rpm-gpg]# systemctl restart firewalld
[root@centos9 rpm-gpg]# systemctl restart zabbix-agent


If the machine is in a local DMZ-ed network with tightly configured firewall router in front of it, you could completely disable firewalld.

[root@centos9 rpm-gpg]# systemctl stop firewalld
[root@centos9 rpm-gpg]# systemctl disable firewalld
Removed /etc/systemd/system/multi-user.target.wants/firewalld.service.
Removed /etc/systemd/system/dbus-org.fedoraproject.FirewallD1.service.


Next login to Zabbix-server web interface with administrator and from Configuration -> Hosts -> Create the centos9 hostname and add it a template of choice. The data from the added machine should shortly appear after another zabbix restart:

[root@centos9 rpm-gpg]#  systemctl restart zabbix-agentd


8. Tracking other oddities with the zabbix-agent through log

If anyways still zabbix have issues connectin to remote node, increase the debug log level section
 

[root@centos9 rpm-gpg]# vim /etc/zabbix/zabbix_agentd.conf
DebugLevel 5

### Option: DebugLevel
#       Specifies debug level:
#       0 – basic information about starting and stopping of Zabbix processes
#       1 – critical information
#       2 – error information
#       3 – warnings
#       4 – for debugging (produces lots of information)
#       5 – extended debugging (produces even more information)
#
# Mandatory: no
# Range: 0-5
# Default:
# DebugLevel=3

[root@centos9 rpm-gpg]# systemctl restart zabbix-agent

Keep in mind that debugging will be too verbose, so once you make the machine being seen in zabbix, don't forget to comment out the line and restart agent to turn it off.

9. Testing zabbix-agent, How to send an alert to specific item key

Usually when writting userparameter scripts, data collected from scripts is being sent to zabbix serveria via Item keys.
Thus one way to check the zabbix-agent -> zabbix server data send works fine is to send some simultaneous data via a key
Once zabbix-agent is configured on the machine 

In this case we will use something like ApplicationSupport-Item as an item.
 

[root@centos9 rpm-gpg]# /usr/bin/zabbix_sender -c "/etc/zabbix/zabbix_agentd.conf" -k "ApplicationSupport-Item" -o "here is the message"

Assuming you have created the newly prepared zabbix-agent host into Zabbix Server, you should be shortly able to see the data come in Latest data.

How to remove GNOME environment and Xorg server on CentOS 7 / 8 / 9 Linux

Wednesday, April 13th, 2022

centos-linux-remove-gnome-gui-remove-howto-logo

If you have installed recent version of CentOS, you have noticed by default the Installator did setup Xserver and GNOME as Graphical Environment as well the surrounding GUI Administration tools. That's really not needed on "headless" monitorless Linux servers as this wastes up for nothing a very tiny amount of the machine CPU and RAM and Disk resource on keeping services up and running. Even worse a Graphical Environment on a Production server poses a security breach as their are much more services running on the OS that could be potentially hacked.

Removal of GUI across CentOS is similar but slightly differs. Hence in this article, I'll show how it can be removed on CentOS Linux 7 / 8 and 9. Removal of Graphics is usual operation for sysadmins thus there is plenty of info on the net,how this is done on CentOS 7 and COS 8 but unfortunately as of time of writting this article, couldn't find anything on the net on how to Remove GUI environment on CentOS 9.

The reason for this article is mostly for documentation purposes for myself

First list the available meta-package groups installed on the OS:

1. List machine installed package groups


yum-groupinstall-gnome

[root@centos ~]# yum grouplist
Last metadata expiration check: 3:55:48 ago on Mon 11 Apr 2022 03:26:06 AM EDT.
Available Environment Groups:
   Server
   Minimal Install
   Workstation
   KDE Plasma Workspaces
   Custom Operating System
   Virtualization Host
Installed Environment Groups:
   Server with GUI
Installed Groups:
   Container Management
   Headless Management
Available Groups:
   Legacy UNIX Compatibility
   Console Internet Tools
   Development Tools
   .NET Development
   Graphical Administration Tools
   Network Servers
   RPM Development Tools
   Scientific Support
   Security Tools
   Smart Card Support
   System Tools
   Fedora Packager


On CentOS 8 and CentOS 9 to list the installed package groups, you can use also:

[root@centos ~]# dnf grouplist

Installed Environment Groups:
   Server with GUI

2. Remove GNOME and Xorg GUIs on CentOS 7

[root@centos ~]# yum groupremove "Server with GUI" –skip-broken

[root@centos ~]# yum groupremove "GNOME Desktop" -y

3. Remove GNOME and X on CentOS 8

[root@centos ~]# dnf groupremove 'X Window System' 'GNOME' -y

4. Remove Graphical Environment on CentOS 9


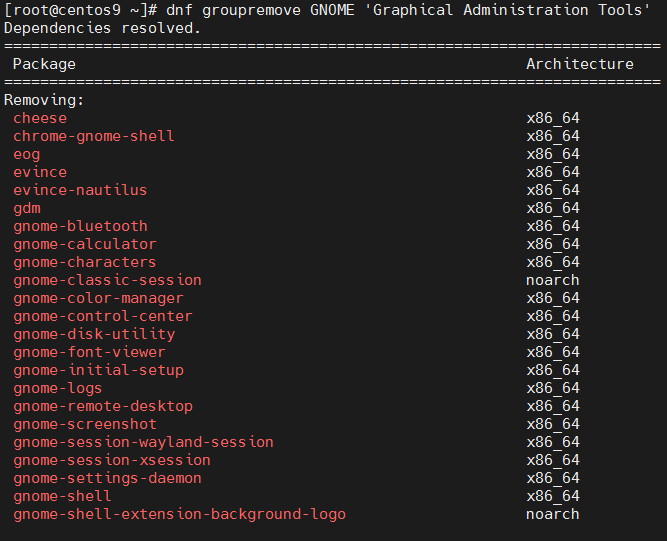
centos9-linux-groupremove-command-screenshot

[root@centos ~]# yum groupremove GNOME 'Graphical Administration Tools' -y


Removing Groups:
 GNOME

Transaction Summary
====================================================
Remove  123 Packages

Freed space: 416 M
Is this ok [y/N]: y
Is this ok [y/N]: y
Running transaction check
Transaction check succeeded.
Running transaction test
Transaction test succeeded.


  xorg-x11-drv-libinput-1.0.1-3.el9.x86_64
  xorg-x11-server-Xorg-1.20.11-10.el9.x86_64
  xorg-x11-server-Xwayland-21.1.3-2.el9.x86_64
  xorg-x11-server-common-1.20.11-10.el9.x86_64
  xorg-x11-server-utils-7.7-44.el9.x86_64
  xorg-x11-xauth-1:1.1-10.el9.x86_64
  xorg-x11-xinit-1.4.0-11.el9.x86_64

Complete!


Graphical Administration Tools – is a group of tools that 

Or alternatively you can do

[root@centos ~]# yum remove gnome* xorg* -y


5. Change the Graphical boot to text multiuser

[root@centos ~]# systemctl set-default multi-user.target


6. Install GNOME / X GUI on the CentOS 7 / 8 / 9

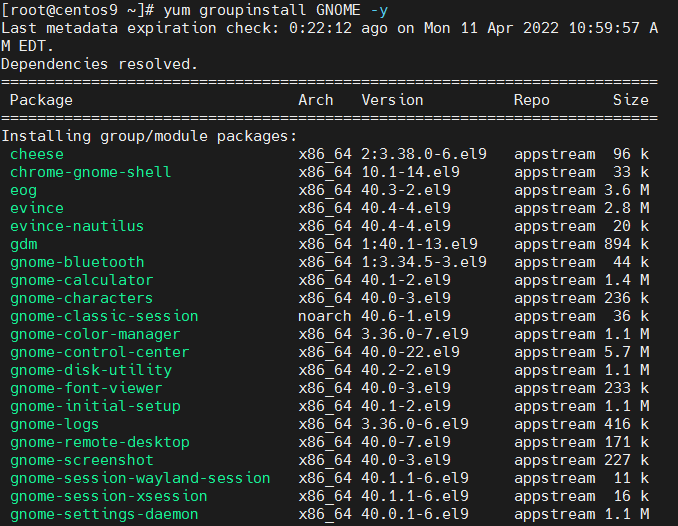
Sometimes GNOME Desktop environment and Xorg are missing on previously delpoyed installs but you need it back for some reason.For example it was earlier removed a year ago on the server as it was not needed, but the machine use type changes and now you need to have installed an Oracle Server / Oracle Client which usually depends on having at least a minimal working version of X environment ont the Linux.


To install back the GNOME and X back on the machine:

[root@centos ~]# yum groupistall "Server with GUI" –skip-broken

[root@centos9 network-scripts]# yum groupinstall "Server with GUI" –skip-broken
Last metadata expiration check: 0:09:26 ago on Mon 11 Apr 2022 07:43:11 AM EDT.
No match for group package "insights-client"
No match for group package "redhat-release"
No match for group package "redhat-release-eula"
Dependencies resolved.
===================================================
 Package                                       Arch       Version              Repository     Size
===================================================
Installing group/module packages:
 NetworkManager-wifi                           x86_64     1:1.37.2-1.el9       baseos         75 k
 cheese                                        x86_64     2:3.38.0-6.el9       appstream      96 k
 chrome-gnome-shell                            x86_64     10.1-14.el9          appstream      33 k
 eog                                           x86_64     40.3-2.el9           appstream     3.6 M
 evince                                        x86_64     40.4-4.el9           appstream     2.8 M
 evince-nautilus                               x86_64     40.4-4.el9           appstream      20 k
 gdm                                           x86_64     1:40.1-13.el9        appstream     894 k
 gnome-bluetooth                               x86_64     1:3.34.5-3.el9       appstream      44 k
 gnome-calculator                              x86_64     40.1-2.el9           appstream     1.4 M
 gnome-characters                              x86_64     40.0-3.el9           appstream     236 k
 gnome-classic-session                         noarch     40.6-1.el9           appstream      36 k
 gnome-color-manager                           x86_64     3.36.0-7.el9         appstream     1.1 M
 gnome-control-center                          x86_64     40.0-22.el9          appstream     5.7 M
 gnome-disk-utility                            x86_64     40.2-2.el9           appstream     1.1 M
 gnome-font-viewer                             x86_64     40.0-3.el9           appstream     233 k
 gnome-initial-setup                           x86_64     40.1-2.el9           appstream     1.1 M
 gnome-logs                                    x86_64     3.36.0-6.el9         appstream     416 k

Installing dependencies:
 cheese-libs                                   x86_64     2:3.38.0-6.el9       appstream     941 k
 clutter                                       x86_64     1.26.4-7.el9         appstream     1.1 M
 clutter-gst3                                  x86_64     3.0.27-7.el9         appstream      85 k
 clutter-gtk                                   x86_64     1.8.4-13.el9         appstream      47 k
 cogl                                          x86_64     1.22.8-5.el9         appstream     505 k
 colord-gtk                                    x86_64     0.2.0-7.el9          appstream      33 k
 dbus-daemon                                   x86_64     1:1.12.20-5.el9      appstream     202 k
 dbus-tools                                    x86_64     1:1.12.20-5.el9      baseos         52 k
 evince-previewer                              x86_64     40.4-4.el9           appstream      29 k

Installing weak dependencies:
 gnome-tour                                    x86_64     40.1-1.el9           appstream     722 k
 nm-connection-editor                          x86_64     1.26.0-1.el9         appstream     838 k
 p11-kit-server                                x86_64     0.24.1-2.el9         appstream     199 k
 pinentry-gnome3                               x86_64     1.1.1-8.el9          appstream      41 k
Installing Environment Groups:
 Server with GUI
Installing Groups:
 base-x
 Container Management
 core
 fonts
 GNOME
 guest-desktop-agents
 Hardware Monitoring Utilities
 hardware-support
 Headless Management
 Internet Browser
 multimedia
 networkmanager-submodules
 print-client
 Server product core
 standard

Transaction Summary
=======================================================
Install  114 Packages

Total download size: 96 M
Installed size: 429 M
Is this ok [y/N]: y

or yum groupinstall GNOME

[root@centos9 ~]# yum grouplist
Last metadata expiration check: 3:55:48 ago on Mon 11 Apr 2022 03:26:06 AM EDT.
Available Environment Groups:

Installed Environment Groups:
   Server with GUI

Next you should change the OS default run level to 5 to make CentOS automatically start the Xserver and gdm.

To see the list of available default Login targets do:


[root@centos ~]# find / -name "runlevel*.target"
/usr/lib/systemd/system/runlevel0.target
/usr/lib/systemd/system/runlevel1.target
/usr/lib/systemd/system/runlevel2.target
/usr/lib/systemd/system/runlevel3.target
/usr/lib/systemd/system/runlevel4.target
/usr/lib/systemd/system/runlevel5.target
/usr/lib/systemd/system/runlevel6.target

The meaning of each runlevel is as follows:

Run Level Target Units Description
0 runlevel0.target, poweroff.target Shut down and power off
1 runlevel1.target, rescue.target Set up a rescue shell
2,3,4 runlevel[234].target, multi- user.target Set up a nongraphical multi-user shell
5 runlevel5.target, graphical.target Set up a graphical multi-user shell
6 runlevel6.target, reboot.target Shut down and reboot the system


If this does not work you can try:

yum-groupinstall-gnome

[root@centos ~]#  yum -y groups install "GNOME Desktop"


7. To check the OS configured boot target
 

[root@centos ~]# systemctl get-default
multi-user.target


multi-user.target is a mode of operation that is text mode only with multiple logins supported on tty and remotely.

To change it to graphical

[root@centos ~]# systemctl set-default graphical.target


or simply link it yourself
 

[root@centos ~]# ln -sf /lib/systemd/system/runlevel5.target /etc/systemd/system/default.target

[root@centos ~]# reboot


If the X was not used so far ever, you will get a few graphial screens to accept the License Information and Finish the configuration,i .e.

1. Accept the license by clicking on the “LICENSE INFORMATION“.

2. Tick mark the “accept the license agreement” and click on “Done“.

3. Click on “FINISH CONFIGURATION” to complete the setup.
And voila GDM (Graphical Login) Greater should shine up.
 

You could also go the manual route by adding an .xinitrc file in your home directory (instead of making the graphical login screen the default, as done above with the sudo systemctl set-default graphical.target command). To do this, issue the command:

[root@centos ~]# echo "exec gnome-session" >> ~/.xinitrc


How to mask rpcbind on CentOS to prevent rpcbind service from auto start new local server port listener triggered by Security audit port scanner software

Wednesday, December 1st, 2021

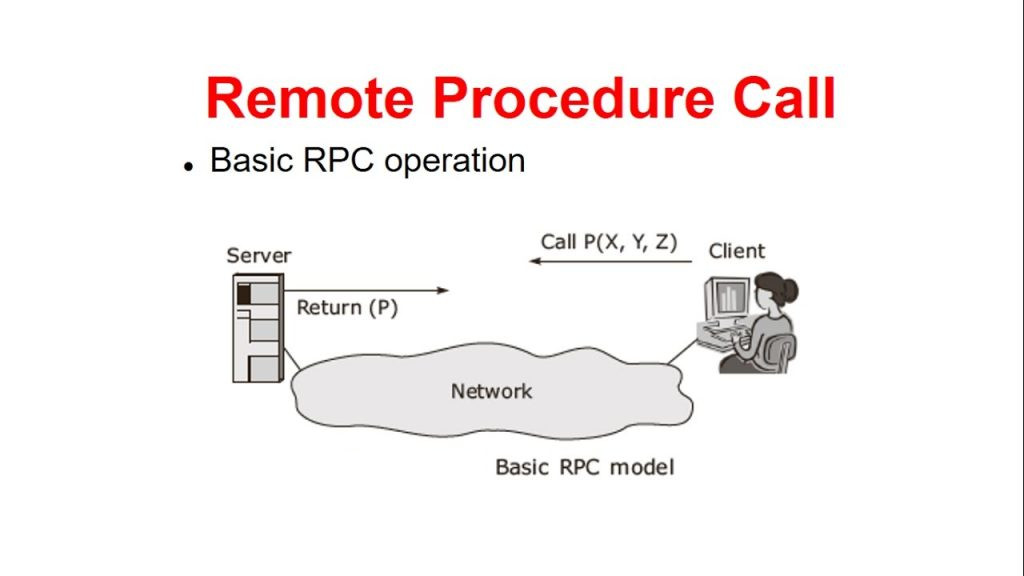
how to mute rpcbind on CentOS to prevent rpcbind service from auto start new local server port rpc-remote-procedure-call-picture


Introduction to  THE PROBLEM :
rpcbind TCP/UDP port 111 automatically starting itself out of nothing on CentOS 7 Linux

For server environments that are being monitored regularly for CVI security breaches based on opened TCP / UDP ports with like Qualys (a proprietary business software that helps automate the full spectrum of auditing, compliance and protection of your IT systems and web applications.), perhaps the closest ex-open source equivallent was Nessus Security Scanner or the more modern security audit Linux tools – Intruder (An Effortless Vulnerability Scanner), OpenVAS (Open Vulnerability Assessment Scanner) or even a simple nmap command port scan on TCP IP / UDP protocol for SunRPC default predefined machine port 111.


[root@centos~]# cat /etc/redhat-release
CentOS Linux release 7.9.2009 (Core)


[root@centos~]# grep -i rpcbind /etc/services
sunrpc          111/tcp         portmapper rpcbind      # RPC 4.0 portmapper TCP
sunrpc          111/udp         portmapper rpcbind      # RPC 4.0 portmapper UDP


Note! For those who don't know it or newer to Linux 
/etc/services file
used to be a file with predefiend well known services and their ports in Linux as well as other UNIXes for years now.

So once this scan is triggered you might end up in a very strange situation that the amount of processes on the CentOS Linux server misterously change with +1 as even though disabled systemctl rpcbind.service process will appear running again.
 

[root@centos~]# ps -ef|grep -i rpcbind
rpc        100     1  0 Nov11 ?        00:00:02 /sbin/rpcbind -w
root     29099 22060  0 13:07 pts/0    00:00:00 grep –color=auto -i rpcbind
[root@centos ~]#

By the wayit took us a while to me and my colleagues to identify what was the mysterious reason for triggering rpcbind process on a  gets triggered and rpcbind process appears in process list even though the machine is in a very secured DMZ Lan and there is no cron jobs or any software that does any kind of scheduling that might lead rpcbind to start up like it does.

[root@centos ~]# systemctl list-unit-files|grep -i rpcbind
rpcbind.service                               disabled
rpcbind.socket                                disabled
rpcbind.target                                static


There is absoultely no logic in that a service whose stopped on TCP / UDP 111 on a machine that is lacking no firewall rules such as iptables CHAINs or whatever.

[root@centos~]# systemctl status rpcbind
● rpcbind.service – RPC bind service
   Loaded: loaded (/usr/lib/systemd/system/rpcbind.service; disabled; vendor preset: enabled)
   Active: inactive (dead)


A you can see the service after all seems to have been disabled originally but after some time this output auto-magically was turning to rpcbind.socket enabled:

root@centos ~]# systemctl list-unit-files|grep -i rpcbind
rpcbind.service                               disabled
rpcbind.socket                                enabled
rpcbind.target                                static

Hence to prevent the rpcbind.socket to automatically respawn itself and lead to resurrection of the dead and disabled /sbin/rpcbind


1. Disable listener in  /usr/lib/systemd/system/rpcbind.socket file


And comment all Listen* rows there

[root@centos ~]# vi /usr/lib/systemd/system/rpcbind.socket

[Unit]

Description=RPCbind Server Activation Socket


[Socket]

ListenStream=/var/run/rpcbind.sock


# RPC netconfig can't handle ipv6/ipv4 dual sockets

BindIPv6Only=ipv6-only

#ListenStream=0.0.0.0:111

#ListenDatagram=0.0.0.0:111

#ListenStream=[::]:111

#ListenDatagram=[::]:111


[Install]

WantedBy=sockets.target

2. Mask rpcbind.socket and, sure /etc/systemd/system/rpcbind.socket links to /dev/null

Mute completely rpcbind.socket (this is systemd option "feature" to link service to /dev/null)

[root@centos ~]# systemctl mask rpcbind.socket


Hence, the link from /etc/systemd/system/rpcbind.socket must be linked to /dev/null

[root@centos ~]# ls -l /etc/systemd/system/rpcbind.socket
lrwxrwxrwx 1 root root 9 Jan 27  2020 /etc/systemd/system/rpcbind.socket -> /dev/null


Voila ! That should be it rpcbind should not hang around anymore among other processes.

Listing installed RPMs by vendor installed on CentOS / RedHat Linux

Friday, January 8th, 2021

Listing installed RPMs by vendor installed on CentOS / RedHat Linux

Listing installed RPMs by vendor is useful sysadmin stuff if you have third party software installed that is not part of official CentOS / RedHat Linux and you want to only list this packages, here is how this is done


[root@redhat ~]# rpm -qa –qf '%{NAME} %{VENDOR} %{PACKAGER} \n' | grep -v 'CentOS' | sort

criu Virtuozzo Virtuozzo (http://www.virtuozzo.com/support/)
gskcrypt64 IBM IBM
gskssl64 IBM IBM
ipxe-roms-qemu Virtuozzo Virtuozzo (http://www.virtuozzo.com/support/)
libevent (none) (none)
libguestfs-appliance Virtuozzo Virtuozzo (http://www.virtuozzo.com/support/)
libguestfs-tools-c Virtuozzo Virtuozzo (http://www.virtuozzo.com/support/)
libguestfs Virtuozzo Virtuozzo (http://www.virtuozzo.com/support/)
libprlcommon Virtuozzo Virtuozzo (http://www.virtuozzo.com/support/)
libprlsdk-python Virtuozzo Virtuozzo (http://www.virtuozzo.com/support/)
libprlsdk Virtuozzo Virtuozzo (http://www.virtuozzo.com/support/)
libprlxmlmodel Virtuozzo Virtuozzo (http://www.virtuozzo.com/support/)
libtcmu Virtuozzo Virtuozzo (http://www.virtuozzo.com/support/)
libvcmmd Virtuozzo Virtuozzo (http://www.virtuozzo.com/support/)
libvirt-client Virtuozzo Virtuozzo (http://www.virtuozzo.com/support/)
libvirt-daemon-config-nwfilter Virtuozzo Virtuozzo (http://www.virtuozzo.com/support/)
libvirt-daemon-driver-interface Virtuozzo Virtuozzo (http://www.virtuozzo.com/support/)
libvirt-daemon-driver-network Virtuozzo Virtuozzo (http://www.virtuozzo.com/support/)
libvirt-daemon-driver-nodedev Virtuozzo Virtuozzo (http://www.virtuozzo.com/support/)
libvirt-daemon-driver-nwfilter Virtuozzo Virtuozzo (http://www.virtuozzo.com/support/)
libvirt-daemon-driver-qemu Virtuozzo Virtuozzo (http://www.virtuozzo.com/support/)
libvirt-daemon-driver-storage-core Virtuozzo Virtuozzo (http://www.virtuozzo.com/support/)
libvirt-daemon-driver-storage Virtuozzo Virtuozzo (http://www.virtuozzo.com/support/)
libvirt-daemon-kvm Virtuozzo Virtuozzo (http://www.virtuozzo.com/support/)
libvirt-daemon Virtuozzo Virtuozzo (http://www.virtuozzo.com/support/)
libvirt-libs Virtuozzo Virtuozzo (http://www.virtuozzo.com/support/)
libvirt-python Virtuozzo Virtuozzo (http://www.virtuozzo.com/support/)
libvirt Virtuozzo Virtuozzo (http://www.virtuozzo.com/support/)
libvzctl Virtuozzo Virtuozzo (http://www.virtuozzo.com/support/)
libvzevent Virtuozzo Virtuozzo (http://www.virtuozzo.com/support/)
openvz-logos Virtuozzo Virtuozzo (http://www.virtuozzo.com/support/)
p7zip-plugins Fedora Project Fedora Project
ploop-lib Virtuozzo Virtuozzo (http://www.virtuozzo.com/support/)
ploop Virtuozzo Virtuozzo (http://www.virtuozzo.com/support/)
prlctl Virtuozzo Virtuozzo (http://www.virtuozzo.com/support/)
prl-disk-tool Virtuozzo Virtuozzo (http://www.virtuozzo.com/support/)
prl-disp-service Virtuozzo Virtuozzo (http://www.virtuozzo.com/support/)
python2-lockfile Fedora Project Fedora Project
python2-psutil Fedora Project Fedora Project
python-daemon Fedora Project Fedora Project
python-subprocess32 Virtuozzo Virtuozzo (http://www.virtuozzo.com/support/)
qemu-img-vz Virtuozzo Virtuozzo (http://www.virtuozzo.com/support/)
qemu-kvm-common-vz Virtuozzo Virtuozzo (http://www.virtuozzo.com/support/)
qemu-kvm-vz Virtuozzo Virtuozzo (http://www.virtuozzo.com/support/)
qt Virtuozzo Virtuozzo (http://www.virtuozzo.com/support/)
rkhunter Fedora Project Fedora Project
seabios-bin Virtuozzo Virtuozzo (http://www.virtuozzo.com/support/)
seavgabios-bin Virtuozzo Virtuozzo (http://www.virtuozzo.com/support/)
spfs Virtuozzo Virtuozzo (http://www.virtuozzo.com/support/)
TIVsm-API64 IBM (none)
TIVsm-APIcit IBM (none)
TIVsm-BAcit IBM (none)
TIVsm-BA IBM (none)
vcmmd Virtuozzo Virtuozzo (http://www.virtuozzo.com/support/)
vmauth Virtuozzo Virtuozzo (http://www.virtuozzo.com/support/)
vzctl Virtuozzo Virtuozzo (http://www.virtuozzo.com/support/)
vzkernel Virtuozzo Virtuozzo (http://www.virtuozzo.com/support/)
vztt_checker Virtuozzo Virtuozzo (http://www.virtuozzo.com/support/)
vztt-lib Virtuozzo Virtuozzo (http://www.virtuozzo.com/support/)
vztt Virtuozzo Virtuozzo (http://www.virtuozzo.com/support/)
zabbix-agent (none) (none)


That instructs rpm to output each package's name and vendor, then we exclude those from "Red Hat, Inc." (which is the exact string Red Hat conveniently uses in the "vendor" field of all RPMs they pacakge).

By default, rpm -qa uses the format '%{NAME}-%{VERSION}-%{RELEASE}', and it's nice to see version and release, and on 64-bit systems, it's also nice to see the architecture since both 32- and 64-bit packages are often installed. Here's how I did that:

[root@redhat ~]# rpm -qa –qf '%{NAME}-%{VERSION}-%{RELEASE}.%{ARCH} %{VENDOR} %{PACKAGER} \n' | grep -v 'CentOS' | sort

criu-3.10.0.23-1.vz7.x86_64 Virtuozzo Virtuozzo (http://www.virtuozzo.com/support/)
gskcrypt64-8.0-55.17.x86_64 IBM IBM
gskssl64-8.0-55.17.x86_64 IBM IBM
ipxe-roms-qemu-20170123-1.git4e85b27.1.vz7.5.noarch Virtuozzo Virtuozzo (http://www.virtuozzo.com/support/)
libevent-2.0.22-1.rhel7.x86_64 (none) (none)
libguestfs-1.36.10-6.2.vz7.12.x86_64 Virtuozzo Virtuozzo (http://www.virtuozzo.com/support/)
libguestfs-appliance-1.36.10-6.2.vz7.12.x86_64 Virtuozzo Virtuozzo (http://www.virtuozzo.com/support/)
libguestfs-tools-c-1.36.10-6.2.vz7.12.x86_64 Virtuozzo Virtuozzo (http://www.virtuozzo.com/support/)
libprlcommon-7.0.162-1.vz7.x86_64 Virtuozzo Virtuozzo (http://www.virtuozzo.com/support/)
libprlsdk-7.0.226-2.vz7.x86_64 Virtuozzo Virtuozzo (http://www.virtuozzo.com/support/)
libprlsdk-python-7.0.226-2.vz7.x86_64 Virtuozzo Virtuozzo (http://www.virtuozzo.com/support/)
libprlxmlmodel-7.0.80-1.vz7.x86_64 Virtuozzo Virtuozzo (http://www.virtuozzo.com/support/)
libtcmu-1.2.0-16.2.vz7.x86_64 Virtuozzo Virtuozzo (http://www.virtuozzo.com/support/)
libvcmmd-7.0.22-3.vz7.x86_64 Virtuozzo Virtuozzo (http://www.virtuozzo.com/support/)
libvirt-3.9.0-14.vz7.38.x86_64 Virtuozzo Virtuozzo (http://www.virtuozzo.com/support/)
libvirt-client-3.9.0-14.vz7.38.x86_64 Virtuozzo Virtuozzo (http://www.virtuozzo.com/support/)
libvirt-daemon-3.9.0-14.vz7.38.x86_64 Virtuozzo Virtuozzo (http://www.virtuozzo.com/support/)
libvirt-daemon-config-nwfilter-3.9.0-14.vz7.38.x86_64 Virtuozzo Virtuozzo (http://www.virtuozzo.com/support/)
libvirt-daemon-driver-interface-3.9.0-14.vz7.38.x86_64 Virtuozzo Virtuozzo (http://www.virtuozzo.com/support/)
libvirt-daemon-driver-network-3.9.0-14.vz7.38.x86_64 Virtuozzo Virtuozzo (http://www.virtuozzo.com/support/)
libvirt-daemon-driver-nodedev-3.9.0-14.vz7.38.x86_64 Virtuozzo Virtuozzo (http://www.virtuozzo.com/support/)
libvirt-daemon-driver-nwfilter-3.9.0-14.vz7.38.x86_64 Virtuozzo Virtuozzo (http://www.virtuozzo.com/support/)
libvirt-daemon-driver-qemu-3.9.0-14.vz7.38.x86_64 Virtuozzo Virtuozzo (http://www.virtuozzo.com/support/)
libvirt-daemon-driver-storage-3.9.0-14.vz7.38.x86_64 Virtuozzo Virtuozzo (http://www.virtuozzo.com/support/)
libvirt-daemon-driver-storage-core-3.9.0-14.vz7.38.x86_64 Virtuozzo Virtuozzo (http://www.virtuozzo.com/support/)
libvirt-daemon-kvm-3.9.0-14.vz7.38.x86_64 Virtuozzo Virtuozzo (http://www.virtuozzo.com/support/)
libvirt-libs-3.9.0-14.vz7.38.x86_64 Virtuozzo Virtuozzo (http://www.virtuozzo.com/support/)
libvirt-python-3.9.0-1.vz7.1.x86_64 Virtuozzo Virtuozzo (http://www.virtuozzo.com/support/)
libvzctl-7.0.506-1.vz7.x86_64 Virtuozzo Virtuozzo (http://www.virtuozzo.com/support/)
libvzevent-7.0.7-5.vz7.x86_64 Virtuozzo Virtuozzo (http://www.virtuozzo.com/support/)
openvz-logos-70.0.13-1.vz7.noarch Virtuozzo Virtuozzo (http://www.virtuozzo.com/support/)
p7zip-plugins-16.02-10.el7.x86_64 Fedora Project Fedora Project
ploop-7.0.137-1.vz7.x86_64 Virtuozzo Virtuozzo (http://www.virtuozzo.com/support/)
ploop-lib-7.0.137-1.vz7.x86_64 Virtuozzo Virtuozzo (http://www.virtuozzo.com/support/)
prlctl-7.0.164-1.vz7.x86_64 Virtuozzo Virtuozzo (http://www.virtuozzo.com/support/)
prl-disk-tool-7.0.43-1.vz7.x86_64 Virtuozzo Virtuozzo (http://www.virtuozzo.com/support/)
prl-disp-service-7.0.925-1.vz7.x86_64 Virtuozzo Virtuozzo (http://www.virtuozzo.com/support/)
python2-lockfile-0.11.0-17.el7.noarch Fedora Project Fedora Project
python2-psutil-5.6.7-1.el7.x86_64 Fedora Project Fedora Project
python-daemon-1.6-4.el7.noarch Fedora Project Fedora Project
python-subprocess32-3.2.7-1.vz7.5.x86_64 Virtuozzo Virtuozzo (http://www.virtuozzo.com/support/)
qemu-img-vz-2.10.0-21.7.vz7.67.x86_64 Virtuozzo Virtuozzo (http://www.virtuozzo.com/support/)
qemu-kvm-common-vz-2.10.0-21.7.vz7.67.x86_64 Virtuozzo Virtuozzo (http://www.virtuozzo.com/support/)
qemu-kvm-vz-2.10.0-21.7.vz7.67.x86_64 Virtuozzo Virtuozzo (http://www.virtuozzo.com/support/)
qt-4.8.7-2.vz7.2.x86_64 Virtuozzo Virtuozzo (http://www.virtuozzo.com/support/)
rkhunter-1.4.6-2.el7.noarch Fedora Project Fedora Project
seabios-bin-1.10.2-3.1.vz7.3.noarch Virtuozzo Virtuozzo (http://www.virtuozzo.com/support/)
seavgabios-bin-1.10.2-3.1.vz7.3.noarch Virtuozzo Virtuozzo (http://www.virtuozzo.com/support/)
spfs-0.09.0010-1.vz7.x86_64 Virtuozzo Virtuozzo (http://www.virtuozzo.com/support/)
TIVsm-API64-8.1.11-0.x86_64 IBM (none)
TIVsm-APIcit-8.1.11-0.x86_64 IBM (none)
TIVsm-BA-8.1.11-0.x86_64 IBM (none)
TIVsm-BAcit-8.1.11-0.x86_64 IBM (none)
vcmmd-7.0.160-1.vz7.x86_64 Virtuozzo Virtuozzo (http://www.virtuozzo.com/support/)
vmauth-7.0.10-2.vz7.x86_64 Virtuozzo Virtuozzo (http://www.virtuozzo.com/support/)
vzctl-7.0.194-1.vz7.x86_64 Virtuozzo Virtuozzo (http://www.virtuozzo.com/support/)
vzkernel-3.10.0-862.11.6.vz7.64.7.x86_64 Virtuozzo Virtuozzo (http://www.virtuozzo.com/support/)
vzkernel-3.10.0-862.20.2.vz7.73.29.x86_64 Virtuozzo Virtuozzo (http://www.virtuozzo.com/support/)
vztt-7.0.63-1.vz7.x86_64 Virtuozzo Virtuozzo (http://www.virtuozzo.com/support/)
vztt_checker-7.0.2-1.vz7.i686 Virtuozzo Virtuozzo (http://www.virtuozzo.com/support/)
vztt_checker-7.0.2-1.vz7.x86_64 Virtuozzo Virtuozzo (http://www.virtuozzo.com/support/)
vztt-lib-7.0.63-1.vz7.x86_64 Virtuozzo Virtuozzo (http://www.virtuozzo.com/support/)
zabbix-agent-3.2.11-1.el7.x86_64 (none) (none)

Remove old unused kernels and cleanup orphaned packages on CentOS / RHEL/ Fedora and Debian Linux

Friday, October 23rd, 2020

remove-old-unused-kernel-on-centos-redhat-rhel-fedora-linux-howto-delete-orphaned-packages

If you administer CentOS 7 / CentOS  8 bunch of servers it is very likely after one of the scheduled Patch days every 6 months or so, you end up with a multiple Linux OS kernels installed on the system.
In normal situation on a freshly installed CentOS machine only one rpm package is installed on the system with the kernel release shipped with CentOS / RHEL / Fedora distro:
The reason to remove the old unused kernels is very simple, you don't want to have a messy installation and after some of the updates to boot up in a revert back old kernel or if you're pedantic to simply save few megas of space.
Some people choose to have more than one kernel just to make sure, if the new installed one doesn't boot, after a restart from ILO / IDRAC remote console interface you can select to boot the proper kernel. I agree having the old kernel before the system *kernel* upgrade as backup recovery is a good thing but this is a good thing to the point the system gets booted after reboot (you know we sysadmins usually after each major system package upgrade), we like to reboot the system warmly praying and hoping it will boot up next time 🙂
 

1. Remove CentOS last XX kernels from the OS

Of course removal of old kernels could be managed by a simple

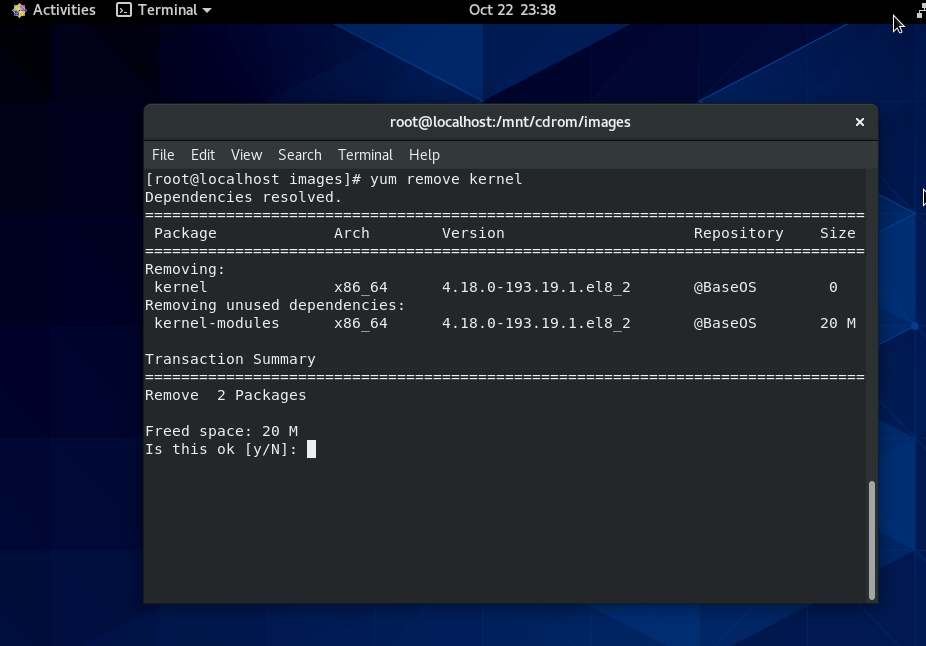
yum remove kernel


yum-kernel-remove-centos-linux

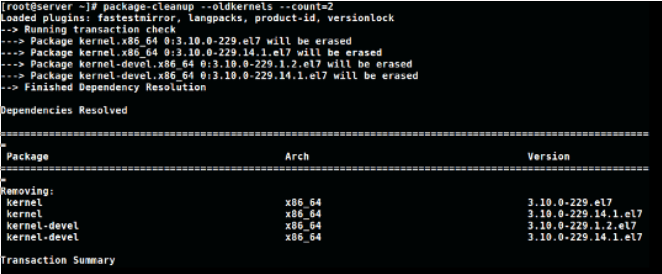
One more than one kernel is present you can hence leave only lets say the last 2 installed kernel on the CentOS host (some people prefer to have only one) but just for the sake of having a backup kernel I like more to have last two kernels installed present, to do so run package-cleanup which is contained in yum-utils rpm package CentOS – this is CentOS / Redhat ( RHEL) specific command.
 

[root@centos ~ ]:# package-cleanup –oldkernels –count=2

package-cleanup-centos-linux-screenshot-1

–count=number argument – tells how many from the  latest version kernels to get removed.

Note if you don't have the package-cleanup command install yum-utils package:

[root@centos ~ :]#  yum install -y yum-utils

cleanup-old-kernels-linux-leave-only-set-of-2-kernels-active-on-centos-rhel-fedora


2. RemoveOld kernels from Fedora Linux – leave only the latest 3 installed

This is done with dnf by setting the –-latest-limit arg to negative value to how many last kernels want to keep

[root@fedora ~ ]:# dnf remove $(dnf repoquery –installonly –latest-limit=-3 -q)


3. Set how many kernels you want to be present on system all the time after package upgrades

It is possible to tell CentOS / RHEL / Fedora's on how many kernels show be kept installed on the system, the default configured on Operating system install time is to keep the last 5 installed kernel on the OS. This is controlled from installonly_limit=5 value that is usually as of year 2020 RPM based distributions found under /etc/yum.conf (on CentOS / RHEL) and in /etc/dnf/dnf.conf (in Fedora) configuration file and sets the desired number of kernels present on system after issuing commands yum upgrade / dnf upgrade –refresh etc.
The minimum number to give to  installonly_limit is 2.
 

4. Remove orphan rpm packages from server

The next thing to do is to check the installed orphan packages to see if we can safely remove them; by orphaned packages we mean all packages which no longer serve a purpose of package dependencies.
Orphan packages are packages who left over from some old dependencies that are no longer needed on the system but just take up space and impose a possible security risk as some of them might end up with time with a public well known and hacked CVE vulnearbility.

Let me try to explain this concept with a quick example: package A is depended on package B, thus, in order to install package A the package B must also be installed. Once the package A is removed the package B might still be installed, hence the package B is now orphaned package.
Here’s how we can safely see the orphan packages we do have on our system:

[root@centos ~ :]#  package-cleanup –quiet –leaves –exclude-bin

And here’s how we can delete them:

[root@centos ~ :]# package-cleanup –quiet –leaves –exclude-bin | xargs yum remove -y


The above commands should be launched multiple times, because the packages deleted with the first batch could create additional orphan packages, and so on: be sure to perform these tasks until no orphan packages appear anymore after the first package-cleanup command.


5. Delete Old Kernels and keep only last three ones on Debian / Ubuntu Linux

To do the same on a debian based distribution there is a command is provided by a deb package byobu, if you want to clean up old kernels on Debians :

$ sudo purge-old-kernels –keep 3


That's all folks enjoy ! 🙂