Yesterday I drinked 200 gr. of Vodka yesterday Night, it was pretty refreshing for me but I got drunk a little.I'm smoking again … Things are going bad in my life recently. I have health issues. And I intend to go to doctor today.Yesterday I went to the polyclinic but my personal Dr. Nikolay was not there (I was angry, I went to doctor once in years and he is not there) so I'll try again today. I had pains somewhere around the stomach. At least at work things are going smoothly at least God hears my prayers about this. I'm very confused and I have completely no idea what to do with my life. Yesterday I was out with Lily and Kiril on the fountain. The previous day Nomen, I, Yavor, Kiro and Bino went to the "Kobaklyka" (a woody place which is close to Dobrich.) Well that's most of what's happening lately with my life. I wrote a little script to make that nautilus to get restarted if it starts burning the cpu. It's a dumb script (the bad thing is that I'm loosing form scripting, Well I don't script much lately). Here is the script http://pcfreak.d-bg.net/bshscr/restart_nautilus.sh https://www.pc-freak.net/bshscr/restart_nautilus.sh. The days before the 4 days weekend, I hat to spend a lot of time on one of the servers fighting with Spammers. Hate spammers really! I ended removing bounce messages at all for one of the domains, which fixed the bounce spam method spammers use (btw qmail's chkuser seems to not work properly for some reason) … Also I started watching Stargate – SG1. First I thought it's a stupid sci-fi serial. But after the first serie I now think it has it's good moments :]. Also I had something like a Mortification Day going on during Monday. The whole day I listened to Mortification (The first Christian Death Metal Band). I Liked much the "Hammer of God" album. In the evening Sabin (Bino) came home and we watched some Mortification videos at Youtube. Right now I listen again to "Ever – Idyll" a pretty great song. And yeah I keep listening to ChristianIndustrial.net a lot, a great radio. Try it if you haven't!END—–
Posts Tagged ‘quot’
Cracking zip protected password files on GNU/Linux and FreeBSD
Wednesday, October 5th, 2011 
Its not very common, but sometimes it happens you have to crack some downloaded file from thepiratebay.com or some other big torrent tracker. An example scenario would be downloading a huge words dictionary (a rainbow tables) dictionary etc., which was protected by the author with a password and zipped.
Fortunately Mark Lehmann developed a software called fcrackzip which is capable of brute forcing zip protected file passwords straight on UNIX like operating systems (GNU/Linux, FreeBSD).
fcrackzip is available from package repositories on Debian and Ubuntu Linuces to install via apt:
linux:~# apt-get install frackzip

...
fcrackzip is also available on FreeBSD via the ports tree and can be installed with:
freebsd# cd /usr/ports/security/fcrackzip

freebsd# make install cleam
On Debian it's worthy to have a quick look on the README file:
linux:~# cat /usr/share/doc/fcrackzip/READMESee fcrackzip.txt (which is derived from the manpage), or fcrackzip.html
There is a web page with more information at
http://lehmann.home.ml.org/fcrackzip.html or
http://www.goof.com/pcg/marc/fcrackzip.html
A sample password-protected .zip file is included as "noradi.zip". It's
password has 6 lower case characters, and fcrackzip will find it (and a
number of false positives) with
fcrackzip -b -c a -p aaaaaa ./noradi.zip
which will take between one and thirty minutes on typical machines.
To find out which of these passwords is the right one either try them out
or use the –use-unzip option.
Marc
Cracking the noradi.zip password protected sample file on my dual core 1.8 ghz box with 2gb, it took 30 seconds.
linux:~# time fcrackzip -u -b -c a -p aaaaaa noradi.zip
PASSWORD FOUND!!!!: pw == noradi
real 0m29.627s
user 0m29.530s
sys 0m0.064s
Of course the sample set password for noradi.zip is pretty trivial and with more complex passwords, sometimes cracking the password can take up to 30 minutes or an hour and it all depends on the specific case, but at least now we the free software users have a new tool in the growing arsenal of free software programs 😉
Here are the options passed on to the above fcrackzip command:
-u – Try to decompress with the detected possible archive passwords using unzip (This is necessery to precisely find the archive password, otherwise it will just print out a number of possible matching archive passwords and you have to try each of the passwords one by one. Note that this option depends on a working unzip version installed.)
-c a – include all charsets to be tried with the generated passwords
-b – Select brute force mode – Tries all possible combinations of letters specified
-p aaaaaa – init-password string (Look up for a password between the password length 6 characters long)
FCrackZip is partly written in assembler and thus is generally works fast, to reduce the CPU load fcrackzip will put on the processor its also capable of using external words dictionary file by passing it the option:
-D – The file should be in a format one word per line and be preliminary alphabetically sorted with let's say sort
Also fcrackzip supports parallel file brute force, for example if you have 10 zip files protected with passwords it can paralelly try to brute force the pwds.
As of time of writting frackzip reached version 1.0 and seems to be pretty stable. Happy cracking.
Just to make sure fcrackzip's source is not lost somewhere in the line in the long future to come, I've created a fcrackzip download mirror here
How to configure VIVACOM 3g USB ( internet ) modem HUAWEI Mobile broadband E173 on Debian and Ubuntu GNU / Linux
Wednesday, July 4th, 2012 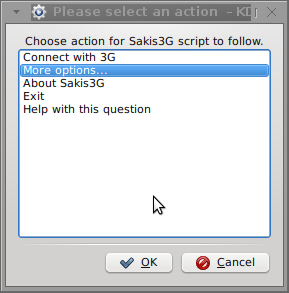
I've been given a HUAWEI Mobile Broadband E173 USB 3g model. The USB modem contains a flash USB Storage segment storing a little install program dedicated to make the modem work fine on Microsoft Windows XP / Vista / 7 and probably other M$ OSes. I'm a long time DebianGNU / Linux user and as a free software enthusiast I ofcourse wanted to be able to use Vivacom's 3G USB Modem on my Linux powered notebook.
Thanksfully as I've red on Vivacom's website the modem supports Linux OS 🙂
For those unaware in Bulgaria there are currently 3 major GSM network providers providing 3G internet this are;;;
- VIVACOM – The ex Government ran national company BTC (Bulgarian Telecommunication Company)
- M-Tel – The first GSM network provider that entered Bulgaria around year 1995
- GLOBUL – The 3rd and last GSM mobile and net provider entered last and not so much used by Bulgarians today
Until today I had no experience in running any 3G modems on Linux, neither I had used the 3 networks 3G internet to determine which one is best, however I've been given for temporal use a VIVACOM 3G internet modem today so I proceeded to try installing it on my Debian host.
My Linux system is a bit strangely configured as I use wicd network connection manager -( wicd-gtk ) to manage wireless and LAN connections instead of the standard installed GNOME network manager – available through package ( network-manager-gnome ).
The reason I use wicd is not that it is so much better than GNOME network manger but rather for historical reasons because few years past I had impression it works better in connecting me to wireless networks. Another reason why I choosed wicd back then was the nice looking stats …
I tried plugging in the Vivacom USB 3G modem stick and checked in wicd to see if I can see a possibility to connect to the mobile opeartor 3G network but unfortunately nothing appeared.
Though the 3G adsl modem was unavailable straing in wicd, checking about it in the list of attached USB devices I could see it detected, e.g.:
noah:~# lsusb |grep -i huawei

Bus 001 Device 007: ID 12d1:1c05 Huawei Technologies Co., Ltd.
This was at least a good sign pointing me to the thoughts that the modem is probably gonna work.
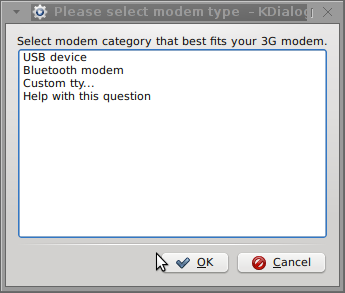
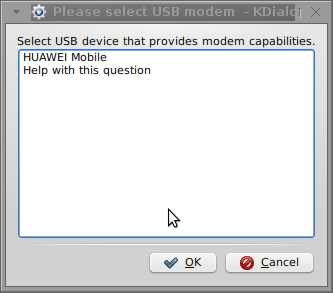
I did a quick Google search to see if other people succeded running the device on a Linux host and came across a few blog posts in Bulgarian explaining a "success story" on Ubuntu Linux through using a tweakened shell script – sakis3g. For more on how the script works and script download check out Sakis3g
Here is a quote from sakis3g's website describing the script:
It automagically setups your USB or Bluetooth™ modem, and may even detect operator settings.
You should try it when anything else fails!
Sakis3g has different versions designed for for plenty of spacific hware architectures i.e. for (i386, amd64, armv4t, armv5t).
There is also a version of the script which by the way contains a combination of bash shell scripting instruction and some binary exec data.
To run sakis3g on my laptop I did:
1. Download sakis3g
My notebook architecture is 64 bit so I download and used the amd64 version of the script;;;
hipo@noah:~$ mkdir sakis3g

hipo@noah:~$ cd sakis3g

hipo@noah:~/sakis3g$ wget http://www.sakis3g.org/versions/latest/amd64/sakis3g.gz
I've made also a mirror of sakis3g i386, 64 bit and all architecture the mirrors just in case it disappears in future. The mirror versions of sakis3g are here:
a. sakis3g i386 b. sakis3g amd64 c. sakis3g all architectures source
2. Unarchive and make it executable
After downloading it as it is in gzip I had to do the usual de-gzipping and making the file executable;;;
hipo@noah:~/sakis3g$ /bin/gzip -d sakis3g.gz

hipo@noah:~/sakis3g$ chmod +x sakis3g
The script is then ready to run by either clicking twice on it or (as I prefer for debugging reasons to run it in terminal):
hipo@noah:~$ ./sakis3g
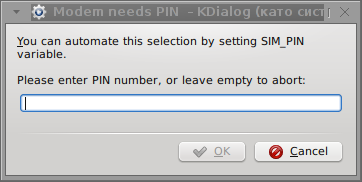
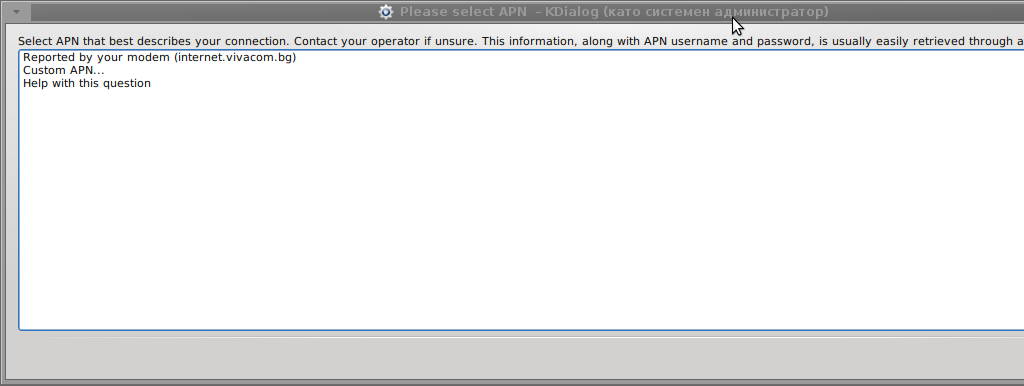
Something that I have wondered a bit was the dialog where I had to fill in some data of some variable APN abbreviation for – (Access Point Name)
The APN host for VIVACOM mobile internet is;;;
APN: internet.vivacom.bg
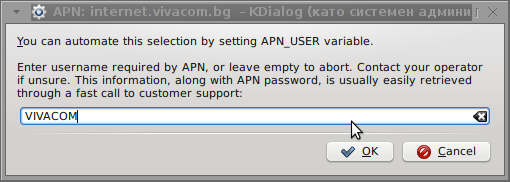
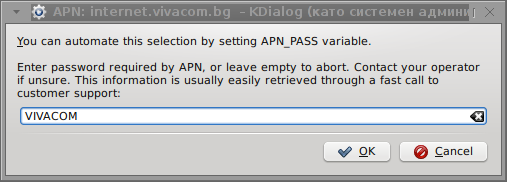
I've used the Windows configuration progrma to gather also the following data that I thought might be important for configuring the 3G adsl modem on the Linux host;;;
Auth: *99#

User: VIVACOM

pass: VIVACOM
Here are all the configuration screenshots I've taken from sakis3g and all the data that I filled in.
Next the following tiny window appeared on screen:
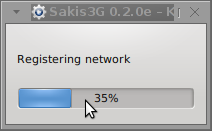
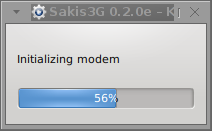

Well that's all folks, now sakis3g succesfully connected to the I_net via an (PPP) VPN connection tunnel here is data from ifconfig command showing the succesful 3G connection to VIVACOM;;;
noah:~# /sbin/ifconfig ppp0

ppp0 Link encap:Point-to-Point Protocol

inet addr:10.58.146.232 P-t-P:10.64.64.64 Mask:255.255.255.255

UP POINTOPOINT RUNNING NOARP MULTICAST MTU:1500 Metric:1

RX packets:2066 errors:1 dropped:0 overruns:0 frame:0

TX packets:1609 errors:0 dropped:0 overruns:0 carrier:0

collisions:0 txqueuelen:3

RX bytes:2232058 (2.1 MiB) TX bytes:341693 (333.6 KiB)
The internet via the 3G connection is not blazing fast but good enough to check your mail or read some webpages. VIVACOM currently has different (traffic limited packages) for their 3G internet, I'm not sure which package exactly is the 3G USB stick modem but probably the "quick" internet connection that is now would slow down once the traffic limit is reached …
Hope this post helps someone to configure 3G internet on VIVACOM in Debian and Ubuntu Linux. Though I've tested sakis3g on Debian it should work with no hassles on any other GNU Linux distribution that has bash installed.
Jesus is Risen – Truly he is Risen / Hristos Voskrese paschal greeting and why Orthodox Christians don’t celebrate with Roman Catholics and Jewish
Thursday, April 19th, 2012 
It is the first week after Orthodox Christian Easter. This year 2012, the Orthodox Christians Easter date was on fifteen of April.
We've not just had a feast of an Eastern, but we actually celebrated the greatest day in all human history that happened 2012 years ago – The Glories Resurrection of our Lord Jesus Christ from the Death in the Third day!
Some Roman Catholic Christians, might be wondering, why the Orthodox Church is celebrating one week after Jewish Pascha, so in short I will explain in the reason.We orthodox christians do not celebrate with Roman Catholics Easter because Roman Catholics use the gregorian calendar to calculate and decided the day in which the Eastern celebrations should occur, where we the Orthodox Christians use still the old moon calendar (which the jews used too), when Jesus was crucified.
The gregorian calendar is very precise from a scientific point of view, however from a Church stand point it is completely wrong because, plainly taking the gregorian calendar math model doesn't take in consideration, that the jews are still celebrating their pascha following the old moon calendar.
The consequence is this year Roman Catholics, celebrated with Jewish. This from our Orthodox Christian point of view is incorrect, because Christ's Cross suffering is the pascha for us christians.
We Christians consider that the old God ordained jewish pascha was a prophecy feast, simply to remind jewish people before Christ's coming that Messiah (Christ) will come to say his people.
As Jewish rejected their true Messiah and Crucified him on the Cross, they have rejected to accept Christ as being the true pascha lamb slained for our sins.
Hence the Orthodox Christian Church teaches even to this day, that it is not righteous to celebrate Christ's Glorious Resurrection with Jewish Pascha.
Prohibition to celebrate Easter and Jewish Pascha on the same day is an Orthodox Church rule, since the early church days.
The Holy Fathers in their Church councils Council of Nicaea etc. has established as unchangable Church rule that, Jesus's Resurrection day feath, should never-ever coincide with the Jewish Pascha Celebrations.
The reasons the Church fathers ordered the Church Easter day to be always 1 week after Jewish Pascha is our saviour Jesus Christ ate pascha with his desciples as we can read in the 4 gospels in Holy Bible. After Jesus ate pascha, he was caught mocked, tortured and crucified (killed on a cross shaped trees).
Jesus is Risen! Truly He is Risen!
The Slavonic Paschal Greeting, translated words, we use across the Slavonic dome: ( Bulgaria / Russia / Ukraine, Serbia) is:
Христос Воскресе ! Воистину Воскресе!
According to our Church Tradition, Christians should great each other with the Paschal greeting Hristos Voskrese during the whole "bright week" instead of the usual Hi / Hello phrase.
The current Bulgarian version of Христос Възкресе ! Воистину Воскресе! is
Христос Възкръсна! Наистина Възкръсна!
One great miracle that testifies about the Christ's resurrection each and every year happens on each Orthodox Christian Eastern in Jerusalem in the Temple of Holy Sepulchre (where the saviour's grave cave, before the resurrection used to be). Last year, I've written to great all Christians for the Resurrection with the joyful Paschal Greeting Jesus is Risen and the Miracle of the Holy Fire
Pitily, the number of Roman Catholics who heard or know about this amazing miracle are mostly within the clergy. Its very rare a layman Christian in Roman Catholic realm heard of the miracle. Once again as a closure I want to great everyone with the joyful paschal greeting in the manners of Russians which say it three times during the paschal period.
Христос Воскресе! Воистину Воскресе !
Христос Воскресе! Воистину Воскресе !
Христос Воскресе! Воистину Воскресе !
How to connect to WiFi network using console or terminal on GNU / Linux
Wednesday, November 2nd, 2011 
Sometimes its useful to connect to Wireless Networks using console . The reasons for that might be many, one possible reason is to be able to debug, Wireless connection failures or simply omit the use of the many available GUI wifi connection programs.
As a first step before connecting in terminal is to look up for the wifi networks available for connection, this is done with cmd:
linux:~# iwlist wlan0 scanning

wlan0 Scan completed :

Cell 01 - Address: 00:24:01:90:8F:38

Channel:7

Frequency:2.442 GHz (Channel 7)

Quality=70/70 Signal level=-39 dBm

Encryption key:on

ESSID:"magdanoz"

Bit Rates:1 Mb/s; 2 Mb/s; 5.5 Mb/s; 11 Mb/s

Bit Rates:6 Mb/s; 9 Mb/s; 12 Mb/s; 48 Mb/s; 18 Mb/s

24 Mb/s; 36 Mb/s; 54 Mb/s

Mode:Master

Extra:tsf=000000034f5c786b

Extra: Last beacon: 68ms ago

IE: Unknown: 00086D616764616E6F7A

IE: Unknown: 010482848B96

IE: Unknown: 030107

IE: Unknown: 32080C1218602430486C

IE: Unknown: CC0700CC020000018A

IE: Unknown: CC0700CC0300000100

IE: WPA Version 1

Group Cipher : TKIP

Pairwise Ciphers (2) : TKIP CCMP

Authentication Suites (1) : PSK

IE: IEEE 802.11i/WPA2 Version 1

Group Cipher : TKIP

Pairwise Ciphers (2) : TKIP CCMP

Authentication Suites (1) : PSK

Cell 02 - Address: 00:1E:2A:60:5E:DC

Channel:1

...
To just list the ESSID s of the wifi networks:
linux:~# iwlist wlan0 scanning|grep -i 'essid'

ESSID:"magdanoz"

ESSID:"default"

ESSID:"todorov"

ESSID:"BTC-ADSL"

ESSID:"Zahari"

ESSID:"Drago"
1. Connecting to Open Wireless Network
Now from the above output it is clear 6 wifi networks are available for connection. The default wifi network from the list is an Open network (e.g. without pass). To connect to it I use cmd:
linux:~# /sbin/iwconfig wlan0 essid 'default'

linux:~# /sbin/iwconfig wlan0 key open
After connected to configure IP, Gateway and DNS from a DHCP server running on the WIFI router, dhclient cmd is used:
linux:~# /sbin/dhclient wlan0
2. Connecting to WEP 64bit / 128bit encrypted network
linux:~# /sbin/iwconfig wlan0 key 1234-5678-9101-1213
3. Connecting to WPA / WPA2 encrypted wifi network
To connect to WPA or WPA2 encrypted network its necessery to have installed wpasupplicant package. The name of the package might vary in different distributions on Debian and Ubuntu, the name of the package is wpasupplicant, on Fedora, CentOS and RHEL the package that has to be in is wpa_supplicant :
After having installed the wpa_supplicant to connect to the network with ESSID name magdanoz , wpa_passphrase is used first:
linux:~# /usr/bin/wpa_passphrase magdanoz Secret_Wifi_Password | tee -a /etc/wpa_supplicant.conf

network={

ssid="magdanoz"

#psk="Secret_Wifi_Password"

psk=6f7590250c4496ff7bf8dd25199ac3bb5a614d4bc069975aa884bcf084da73bc

}
As you see in above command the secret password key is generated printed on the screen and then added to /etc/wpa_supplicant.conf , necessery to establish the wireless connection with wpa_supplicant with cmd:
linux:~# /sbin/wpa_supplicant wpa_supplicant -d wext -i wlan0 -c /etc/wpa_supplicant.conf -B
-d wext instructs wpa_supplicant to use (Linux wireless extension driver).
-B tells wpa_supplicant to background the connection to prevent the wireless connection to drop off, if the console / terminal from which it is launched gets closed.
In case of succesful connection with wpa_supplicant , once again IP, Gateway and DNS is configured fetching the settings from the wifi hotspot dhcp server:
linux:~# /sbin/dhclient wlan0
General information about the wireless network and info related to the established connection can be obtained with /usr/bin/iwconfig :
linux:~# /sbin/iwconfig

lo no wireless extensions.

eth0 no wireless extensions.

wlan0 IEEE 802.11abg ESSID:"magdanoz"

Mode:Managed Frequency:2.442 GHz Access Point: 00:24:00:90:8F:38

Bit Rate=54 Mb/s Tx-Power=15 dBm

Retry long limit:7 RTS thr:off Fragment thr:off

Encryption key:off

Power Management:off

Link Quality=70/70 Signal level=-39 dBm

Rx invalid nwid:0 Rx invalid crypt:0 Rx invalid frag:0

Tx excessive retries:0 Invalid misc:0 Missed beacon:0
To configure the exact channel over which the wireless connection will be established again is done with iwconfig, for instance to configure wlan0 wifi connection established to be on wifi channel 7:
linux:~# /sbin/iwconfig wlan0 channel 11
By default iwconfig is set to automatically set the channel based on connected network ESSID , if the channel is modified to some specific number to revert it back use:
linux:~# /sbin/iwconfig wlan0 channel auto
How to disable tidy HTML corrector and validator to output error and warning messages
Sunday, March 18th, 2012 
I've noticed in /var/log/apache2/error.log on one of the Debian servers I manage a lot of warnings and errors produced by tidy – HTML syntax checker and reformatter program.
There were actually quite plenty frequently appearing messages in the the log like:
...

To learn more about HTML Tidy see http://tidy.sourceforge.net

Please fill bug reports and queries using the "tracker" on the Tidy web site.

Additionally, questions can be sent to html-tidy@w3.org

HTML and CSS specifications are available from http://www.w3.org/

Lobby your company to join W3C, see http://www.w3.org/Consortium

line 1 column 1 - Warning: missing <!DOCTYPE> declaration

line 1 column 1 - Warning: plain text isn't allowed in <head> elements

line 1 column 1 - Info: <head> previously mentioned

line 1 column 1 - Warning: inserting implicit <body>

line 1 column 1 - Warning: inserting missing 'title' element

Info: Document content looks like HTML 3.2

4 warnings, 0 errors were found!

...
I did a quick investigation on where from this messages are logged in error.log, and discovered few .php scripts in one of the websites containing the tidy string.
I used Linux find + grep cmds find in all php files the "tidy "string, like so:
server:~# find . -iname '*.php'-exec grep -rli 'tidy' '{}' ;

find . -iname '*.php' -exec grep -rli 'tidy' '{}' ; ./new_design/modules/index.mod.php

./modules/index.mod.php

./modules/index_1.mod.php

./modules/index1.mod.php
Opening the files, with vim to check about how tidy is invoked, revealed tidy calls like:
exec('/usr/bin/tidy -e -ashtml -utf8 '.$tmp_name,$rett);
As you see the PHP programmers who wrote this website, made a bigtidy mess. Instead of using php5's tidy module, they hard coded tidy external command to be invoked via php's exec(); external tidy command invocation.
This is extremely bad practice, since it spawns the command via a pseudo limited apache shell.
I've notified about the issue, but I don't know when, the external tidy calls will be rewritten.
Until the external tidy invocations are rewritten to use the php tidy module, I decided to at least remove the tidy warnings and errors output.
To remove the warning and error messages I've changed:
exec('/usr/bin/tidy -e -ashtml -utf8 '.$tmp_name,$rett);
exec('/usr/bin/tidy --show-warnings no --show-errors no -q -e -ashtml -utf8 '.$tmp_name,$rett);
The extra switches meaning is like so:
q – instructs tidy to produce quiet output
-e – show only errors and warnings
–show warnings no && –show errors no, completely disable warnings and error output
Onwards tidy no longer logs junk messages in error.log Not logging all this useless warnings and errors has positive effect on overall server performance especially, when the scripts, running /usr/bin/tidy are called as frequently as 1000 times per sec. or more
Why saint George is depicted on icons killing a Dragon (an ancient story of saint George killing the last dragon) – A Collection of 7 icons of Saint Martyr George
Friday, July 6th, 2012 
Saint George is one of the most venerated Orthodox Christian saints in the Eastern Orthodox Church. My interest in saint George is cause of the reason, I myself bear the name Georgi (the Bulgarian equivalent of George). Saint George is mostly venerated in the Slavonic Christian-dome.In almost all Church icons depicting st. George in Orthodox and Roman Catholic christiandome saint George is piercing killing a dragon.
One of the reasons, st. George is depicted piercing the dragon is a reference of st. George victory over satan, through his martyrdom.
The Beast (Dragon) on the iconi is a straight reference to the Holy Bible; Chapter Revelation also known under the name Apocalypse.
In revelation, we read humanity and our saviour Jesus Christ will finally once and for all will kill the "ancient beast" = (satan)
In same logic, as Saint Martyr George has been victorious over Satan by his unshakable confession of faith in Jesus Christ in early 5th century A.D. , we believe in the Orthodox Church he is given the crown of (eternal) life as a prize for bearing un-human tortures in the name of the of Christ.
To illustrate visually the victory of saint George over Satan through his immesurable faith confession with which he become, there is a an early tradition in iconography in the Church to depict st. George killing a dragon.
The other reason why saint George is depicted to kill a Dragon is due to a Lebanon / Palestinian ancient story saying; There was a huge Dragon living somewhere in nowdays Lebanon / Palestinian lands.
The beast created a huge havoc killing many people and systematically torturing people in the area.
As the Eastern Orthodox Christian tradition continues …. the Dragon is said to have inhabited one of the caves near some village.
Interesting, the story tells these very same dragon was the last Dragon crawling the earth before the final disappearance of dragons.
Many brave local people tried to kill the beast but many died as the beast was unbeatable.
Being unable to beat-up the dragon with a physical (human) force the local population turnted to God for help – saying continously prayers to Saint George to help them defeat their dragon mischief.
Soon after, Saint George appeared on a white horse and pierced the "old dragon / snake". The dragon liberation miracle is said to be evidenced by local people and according to Orthodox monk books is one of the many great miracles occuring in past times.
The report of the miracle has quickly spread around all Lebanon / Palestinian lands and soon, being confirmed as real spread along all Russia as well as the rest of the Slavonic and Orthodox Christian world (Bulgaria, Serbia), Greece, Egypt (Alexandria) etc..
To illustrate saint George's appearance miracle, monastic iconographers started depicting saint George as we see him until this very day – Riding a horse and slaughtering a monstrous beast.
Below are seven 12-th century early icons of saint Saint Great-Martyr George killing the dragon;;
I've collected the icons from various website online. Hope this collection will be blessing for all Christ brother and sisters and generally anyone reading this post:
![]()
12-th century mosaic icon of st. George the Great Martyr Xenophontos Monastery
![]()
Orthodox Christian icon saint George dated to 1130 – 1150 A.D.
![]()
Saint Georgius the Dragon Slayer icon XII century orth icon
![]()
St. George Enamel icon Georgia 12th century
![]()
saint George Christian icon Yuriev Monastery Novgorod 12th century
![]()
st. George Staraya Ladoga Orthodox Christian icon
![]()
sv. Georgius 12th century Aios
Nowdays saint George Holy Relics particles are kept for veneration in many Orthodox Christian countries monasteries. Here in Bulgaria saint George Holy Relics are kept in a Monastery nearby the seacoast in Pomorie. Any Christian visiting Bulgaria have the opportunity to venerate the Holy in (Pomorie's Monastery – St. Great Martyr Georgi.
Don’t revoke GoDaddy SSL certificate. (Expired) Revoked SSL is impossible to revert
Thursday, April 12th, 2012 ![]()
One of our company SSL (https) Certificates recently expired so I needed to renew the SSL certificate.
I was in a hurry doing plenty of other stuffs so it seemed logical for me to Revoke the Certificate. I thought revoking the certificate will simply cancel it and afterwards, in Godaddy's SSL (Manager Certificates) interface the Revoked – Cancelled certificate will re-appear in the menu, ready to be generated in the same way as earlier I initially generated the Godaddy's bought SSL certificate
Hence I proceeded and used Revoke button:
Well guess what my calculations, were wrong.
Revoking, just cancel it. The revoked domain SSL certificate did not show up again in Godaddy's Cert Manager and I have no way from their interface to revert the changes.
To deal with the situation, I contacted Godaddy Support immediately with the following inquiry:
Other : Revoked SSL Certificate
Issue :
Hello we have revoked the SSL certificate for our domain our.domain-name.com.
Can we revert back the certificate as it was.
If not how to generate a new key for our domain https://our.domain-name.com
Thanks in Advance.
Kindest Regards"My-Company-name" Tech Support
In 5 hours time I received the following tech support answer:
Dear Tech Support,
Thank you for contacting Online Support. It is not possible to reinstate a canceled certificate. You will need to purchase a new certificate. I have requested that a refund be applied to your account. Once the credit appears in your account, please allow 5-7 business days to see the funds applied to the associated payment method. Thank you for your patience and understanding in this matter.
Please let us know if we can help you in any other way.
Sincerely,
Christian P.
Online Support Team
Customer Inquiry
Name : Cadia Tech Support
Domain Name : our.domain-name.com
ShopperID : xxxxxxxxx
Phone : xxxxxxxx
Shopper Validated : Yes
Browser : Mozilla/5.0 (Windows; U; Windows NT 6.1; en-US; rv:1.9.2.3) Gecko/20100401 Firefox/3.6.3
Apparently Godaddy, can work out a bit on their tech support answering time 5 hours for a simple reply is quite long.
Now taking in consideration, above reply from Godady, my only options are to either wait for 5 to 7 (business days) or buy a new credit for SSL certificate.
Buying a new credit will probably not happen as our company is experiencing some financial troubles because of the crisis. So I guess we will have to wait for this 7 days at worst. So again if you wonder to REVOKE or not an SSL certificate. Think again …
Just a small note to make here, that Godaddy has a very straight forward way to just renew an expered certificate, which I succesfully later have done for 4 domains. Well, if only I knew earlier what REVOKE SSL cert really does I wouldn't have ended in this mess …
How to migrate vpopmail multiple servers (mail accounts) to single vpopmail (qmail) install
Friday, October 21st, 2011 ![]()
I needed to migrate vpopmail/domains multiple directories stored on 2 servers to a single vpopmail install.
Merging the two vpopmails user Maildir/ stored accounts actually actually was quite simple, though it needed a bit of tweaks.
Here is how I migrated the two vpopmail installations to reside on the one vpopmail mail storage.
1. I used tar to archive the two vpopmail installations on the two different
First I logged in with root over ssh on the first node, e.g.:
qmail-server1:~# cd /home/vpopmail/

qmail-server1:/home/vpopmail# ionice -c 3 tar -czvf vpopmail1_$(date +%Y%m%d).tar.gz domains/

...
Then logged in on the second machine:
qmail-server2:~# cd /home/vpopmail

qmail-server2:/home/vpopmail# ionice -c 3 tar -czvf vpopmail2_$(date +%Y%m%d).tar.gz domains/
I used ionice -c 3 which instructs the tar archive of vpopmail directory to be created using idle (sparing the hard disk) from I/O overheads.
Sometimes not using ionice especially the case where hundreds of mail domains exist in domains/ could overload the server and stop the qmail and even sometimes ssh from properly responding for a very long periods as well as delaying the work of the mail server and failure to accept some user connections to pop3 or smtp protocols.I found out about the exisnte of ionice command just recently, reading some blog online. The command is absolute "must use", always when have to archive directories with tens of thousands of files and subdirectories. It's also nice in general, also on some copy or move operations on GNU / Linux, ionice is truly great.
Anyways after a while I had my both archives on both servers existing, so I used sftp (one can use scp as well) to transfer the archives to the newly configured qmail + vpopmail installation.
2. Use sftp or scp to copy the archives to the new configured vpopmail server
Again on both servers I had to execute, sftp I prefer sftp as I love being interactive on the shell 😉
qmail-server1:/home/vpopmail# sftp root@my-vpopmail-server-host.com

Password:

Connected to my-vpopmail-server-host.com.

sftp> cd /home/vpopmail

sftp> put vpopmail1_$(date +%Y%m%d).tar.gz

...

sftp> exit
Once again the same commands has to be issued on the second vpomail server, where the second domains/ mail accounts archive was just made:
qmail-server2:/home/vpopmail# sftp root@my-vpopmail-server-host.com

Password:

Connected to my-vpopmail-server-host.com.

sftp> cd /home/vpopmail

sftp> put vpopmail2_$(date +%Y%m%d).tar.gz

...

sftp> exit
Now as both of the archives are uploaded, next step is to login to the root@my-vpopmail-server-host.com server, where the two archives were just uploaded:
qmail-server1:/var/domains# ssh root@my-vpopmail-server-host.com

my-vpopmal-server-host:~# cd /home/vpopmailmy-vpopmail-server-host:/home/vpopmail# tar -zxvf vpopmail1_$(date +%Y%m%d).tar.gz domains/

...
Next on, the second vpopmail2_$(date +%Y%m%d).tar.gz is untarred:
3. Unarchive the uploaded vpopmail*.tar.gz archives
my-vpopmail-server-host:/home/vpopmail# tar -zxvf vpopmail2_$(date +%Y%m%d).tar.gz domains/

...
Now, if the two archives are properly tarred and no errors are returned (that was my case thx God).
4. Use a shell script to generate a script, to later change all user emails passwords on the my-vpopmail-server-host.com
The next thing which has to be done is that all email accounts with passwords are recreated with vpopmail's /home/vpopmail/bin/vpasswd command. Even though the domains are existing with the respective vpasswd and vpasswd.cdb in each mailbox on the new server my-vpopmail-server-host still the mailboxes were not visible by vpopmail. To make all the mailboxes with the correct passwords be responding on the new vpopmail connections via IMAP and POP3 mail fetch protocols, I wrote a small script which does change the passwords of all mailboxes just transferred from the two servers to my-vpopmail-server-host
The script is very simple and actually is not too automated, but at least it works. I've called my script to dump all the user passwords for all the vpopmail filesystem existing mail domains dump_vpopmail_mail_passwords.sh
To use the script its necessery that the script is downloaded on both the vpopmail mail servers from which domains/ directory is migrated, e.g.:
qmail-server1:/home/vpopmail# wget https://www.pc-freak.net/bshscr/dump_vpopmail_mail_passwords.sh

...

qmail-server1:/home/vpopmail# sh dump_vpopmail_mail_passwords.sh >> change_mail_account_pwds.sh
Same procedure goes on the second vpopmail server qmail-server2:
qmail-server2:/home/vpopmail# wget https://www.pc-freak.net/bshscr/dump_vpopmail_mail_passwords.sh

...

qmail-server2:/home/vpopmail# sh dump_vpopmail_mail_passwords.sh >> change_mail_account_pwds.sh
5. Upload the change_mail_accounts_pwds.sh shell script created on the two qmail mail servers to dump_vpopmail_mail_passwords.sh
Again I used sftp to upload the two change_mail_account_pwds.sh bash scripts:
qmail-server1:/home/vpopmail# sftp root@my-vpopmail-server-host.com
sftp>
Password:
Connected to my-vpopmail-server-host.com.
sftp> put change_mail_account_pwds.sh change_mail_account_pwds1.sh
...
sftp> exit
qmail-serve2:/home/vpopmail# sftp root@my-vpopmail-server-host.com

Password:

Connected to my-vpopmail-server-host.com.

sftp> put change_mail_account_pwds.sh change_mail_account_pwds2.sh

...

sftp> exit
6. Execute change_mail_account_pwds1.sh and change_mail_account_pwds2.sh on my-vpopmail-server-host.com
On the 3rd server where the two vpopmail domains are migrated my-vpopmail-server-host.com , from /home/vpopmail invoke the above two scripts:
root@my-vpopmail-server-host.com:/home/vpopmail# sh change_mail_account_pwds1.sh

root@my-vpopmail-server-host.com:/home/vpopmail# sh change_mail_account_pwds2.sh
The two scripts will contain list with all the two migrated vpopmail user mail addresses in a format similar to:
vpasswd mail_account@mail-domain.com password1

vpasswd mail_account1@mail-domain.com some_password

vpasswd mail_accountX@mail-domain.com other_password

etc..
After following this steps, all the mail accounts (or most of them ;)) should be merged from the two servers on the new configured vpopmail on my-vpopmail-server-host.com host.
The up-described procedure could be literally followed with migratingm any number of vpopmail /home/vpopmail/domains user email accounts.
If it has to be mass deployed based, its coparatively easy even to write an automated script to do the various aforementioned steps without any user interaction.
I've seen also some other explanations on how to migrate qmail.jsm1.net , but honestly was too lazy to read them, so I just came up with the ways described here.
One important note to make here is always to make backups, this steps worked for me but I can't guarantee this migration tutorial will work at all. I hope this helps somebody out there. Cheers 😉


How to show country flag, web browser type and Operating System in WordPress Comments
Wednesday, February 15th, 2012!!! IMPORTANT UPDATE COMMENT INFO DETECTOR IS NO LONGER SUPPORTED (IS OBSOLETE) AND THE COUNTRY FLAGS AND OPERATING SYSTEM WILL BE NOT SHOWING INSTEAD,
!!!! TO MAKE THE COUNTRY FLAGS AND OS WP FUNCTIONALITY WORK AGAIN YOU WILL NEED TO INSTALL WP-USERAGENT !!!
I've come across a nice WordPress plugin that displays country flag, operating system and web browser used in each of posted comments blog comments.
Its really nice plugin, since it adds some transperancy and colorfulness to each of blog comments 😉
here is a screenshot of my blog with Comments Info Detector "in action":
Comments Info Detector as of time of writting is at stable ver 1.0.5.
The plugin installation and configuration is very easy as with most other WP plugins. To install the plugin;
1. Download and unzip Comments Info Detector
linux:/var/www/blog:# cd wp-content/pluginslinux:/var/www/blog/wp-content/plugins:# wget http://downloads.wordpress.org/plugin/comment-info-detector.zip
...
linux:/var/www/blog/wp-content/plugins:# unzip comment-info-detector.zip
...
Just for the sake of preservation of history, I've made a mirror of comments-info-detector 1.0.5 wp plugin for download here
2. Activate Comment-Info-Detector
To enable the plugin Navigate to;
Plugins -> Inactive -> Comment Info Detector (Activate)After having enabled the plugin as a last 3rd step it has to be configured.
3. Configure comment-info-detector wp plugin
By default the plugin is disabled. To change it to enabled (configure it) by navigating to:
Settings -> Comments Info DetectorNext a a page will appear with variout fields and web forms, where stuff can be changed. Here almost all of it should be left as it is the only change should be in the drop down menus near the end of the page:
Display Country Flags Automatically (Change No to Yes)Display Web Browsers and OS Automatically (Change No to Yes
After the two menus are set to "Yes" and pressing on Save Changes the plugin is enabled it will immediately start showing information inside each comment the GeoIP country location flag of the person who commented as well as OS type and Web Browser 🙂
Tags: action, Auto, blog, Browsers, change, Comment, Comments, configured, country flag, country location, Detector, Display, downloads, Draft, drop, drop down menus, flag web, How to, Inactive, information, installation, Linux, location, mirror, operating system, os type, page, person, plugin, plugin installation, quot, sake, Save Changes, screenshot, show, Stable, time, transperancy, type, unzip, web browser type, web browsers, web forms, wget, Wordpress, Wordpress Comments, writting, www, zip linux
Posted in Web and CMS, Wordpress | 1 Comment »