Posts Tagged ‘var’

Configure aide file integrity check server monitoring in Zabbix to track for file changes on servers

Tuesday, March 28th, 2023

zabbix-aide-log-monitoring-logo

Earlier I've written a small article on how to setup AIDE monitoring for Server File integrity check on Linux, which put the basics on how this handy software to improve your server overall Security software can be installed and setup without much hassle.

Once AIDE is setup and a preset custom configuration is prepared for AIDE it is pretty useful to configure AIDE to monitor its critical file changes for better server security by monitoring the AIDE log output for new record occurs with Zabbix. Usually if no files monitored by AIDE are modified on the machine, the log size will not grow, but if some file is modified once Advanced Linux Intrusion Detecting (aide) binary runs via the scheduled Cron job, the /var/log/app_aide.log file will grow zabbix-agentd will continuously check the file for size increases and will react.

Before setting up the Zabbix required Template, you will have to set few small scripts that will be reading a preconfigured list of binaries or application files etc. that aide will monitor lets say via /etc/aide-custom.conf
 

1. Configure aide to monitor files for changes


Before running aide, it is a good idea to prepare a file with custom defined directories and files that you plan to monitor for integrity checking e.g. future changes with aide, for example to capture bad intruders who breaks into server which runs aide and modifies critical files such as /etc/passwd /etc/shadow /etc/group or / /usr/local/etc/* or /var/* / /usr/* critical files that shouldn't be allowed to change without the admin to soon find out.

# cat /etc/aide-custom.conf

# Example configuration file for AIDE.
@@define DBDIR /var/lib/aide
@@define LOGDIR /var/log/aide
# The location of the database to be read.
database=file:@@{DBDIR}/app_custom.db.gz
database_out=file:@@{DBDIR}/app_aide.db.new.gz
gzip_dbout=yes
verbose=5

report_url=file:@@{LOGDIR}/app_custom.log
#report_url=syslog:LOG_LOCAL2
#report_url=stderr
#NOT IMPLEMENTED report_url=mailto:root@foo.com
#NOT IMPLEMENTED report_url=syslog:LOG_AUTH

# These are the default rules.
#
#p:      permissions
#i:      inode:
#n:      number of links
#u:      user
#g:      group
#s:      size
#b:      block count
#m:      mtime
#a:      atime
#c:      ctime
#S:      check for growing size
#acl:           Access Control Lists
#selinux        SELinux security context
#xattrs:        Extended file attributes
#md5:    md5 checksum
#sha1:   sha1 checksum
#sha256:        sha256 checksum
#sha512:        sha512 checksum
#rmd160: rmd160 checksum
#tiger:  tiger checksum

#haval:  haval checksum (MHASH only)
#gost:   gost checksum (MHASH only)
#crc32:  crc32 checksum (MHASH only)
#whirlpool:     whirlpool checksum (MHASH only)

FIPSR = p+i+n+u+g+s+m+c+acl+selinux+xattrs+sha256

#R:             p+i+n+u+g+s+m+c+acl+selinux+xattrs+md5
#L:             p+i+n+u+g+acl+selinux+xattrs
#E:             Empty group
#>:             Growing logfile p+u+g+i+n+S+acl+selinux+xattrs

# You can create custom rules like this.
# With MHASH…
# ALLXTRAHASHES = sha1+rmd160+sha256+sha512+whirlpool+tiger+haval+gost+crc32
ALLXTRAHASHES = sha1+rmd160+sha256+sha512+tiger
# Everything but access time (Ie. all changes)
EVERYTHING = R+ALLXTRAHASHES

# Sane, with multiple hashes
# NORMAL = R+rmd160+sha256+whirlpool
NORMAL = FIPSR+sha512

# For directories, don't bother doing hashes
DIR = p+i+n+u+g+acl+selinux+xattrs

# Access control only
PERMS = p+i+u+g+acl+selinux

# Logfile are special, in that they often change
LOG = >

# Just do sha256 and sha512 hashes
LSPP = FIPSR+sha512

# Some files get updated automatically, so the inode/ctime/mtime change
# but we want to know when the data inside them changes
DATAONLY =  p+n+u+g+s+acl+selinux+xattrs+sha256

##############TOUPDATE
#To delegate to app team create a file like /app/aide.conf
#and uncomment the following line
#@@include /app/aide.conf
#Then remove all the following lines
/etc/zabbix/scripts/check.sh FIPSR
/etc/zabbix/zabbix_agentd.conf FIPSR
/etc/sudoers FIPSR
/etc/hosts FIPSR
/etc/keepalived/keepalived.conf FIPSR
# monitor haproxy.cfg
/etc/haproxy/haproxy.cfg FIPSR
# monitor keepalived
/home/keepalived/.ssh/id_rsa FIPSR
/home/keepalived/.ssh/id_rsa.pub FIPSR
/home/keepalived/.ssh/authorized_keys FIPSR

/usr/local/bin/script_to_run.sh FIPSR
/usr/local/bin/another_script_to_monitor_for_changes FIPSR

#  cat /usr/local/bin/aide-config-check.sh
#!/bin/bash
/sbin/aide -c /etc/aide-custom.conf -D

# cat /usr/local/bin/aide-init.sh
#!/bin/bash
/sbin/aide -c /etc/custom-aide.conf -B database_out=file:/var/lib/aide/custom-aide.db.gz -i


# cat /usr/local/bin/aide-check.sh

#!/bin/bash
/sbin/aide -c /etc/custom-aide.conf -Breport_url=stdout -B database=file:/var/lib/aide/custom-aide.db.gz -C|/bin/tee -a /var/log/aide/custom-aide-check.log|/bin/logger -t custom-aide-check-report
/usr/local/bin/aide-init.sh


# cat /usr/local/bin/aide_app_cron_daily.txt

#!/bin/bash
#If first time, we need to init the DB
if [ ! -f /var/lib/aide/app_aide.db.gz ]
   then
    logger -p local2.info -t app-aide-check-report  "Generating NEW AIDE DATABASE for APPLICATION"
    nice -n 18 /sbin/aide –init -c /etc/aide_custom.conf
    mv /var/lib/aide/app_aide.db.new.gz /var/lib/aide/app_aide.db.gz
fi

nice -n 18 /sbin/aide –update -c /etc/aide_app.conf
#since the option for syslog seems not fully implemented we need to push logs via logger
/bin/logger -f /var/log/aide/app_aide.log -p local2.info -t app-aide-check-report
#Acknoledge the new database as the primary (every results are sended to syslog anyway)
mv /var/lib/aide/app_aide.db.new.gz /var/lib/aide/app_aide.db.gz

What above cron job does is pretty simple, as you can read it yourself. If the configuration predefined aide database store file /var/lib/aide/app_aide.db.gz, does not
exists aide will create its fresh empty database and generate a report for all predefined files with respective checksums to be stored as a comparison baseline for file changes. 

Next there is a line to write aide file changes via rsyslog through the logger and local2.info handler


2. Setup Zabbix Template with Items, Triggers and set Action

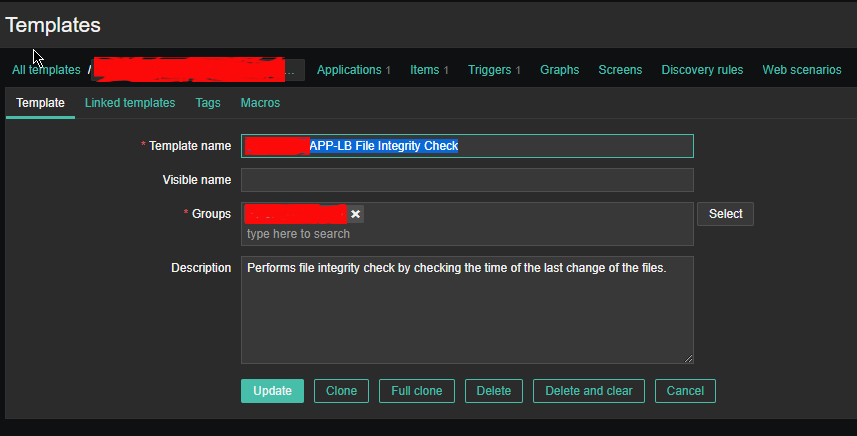
2.1 Create new Template and name it YourAppName APP-LB File integrity Check

aide-itengrity-check-zabbix_ Configuration of templates

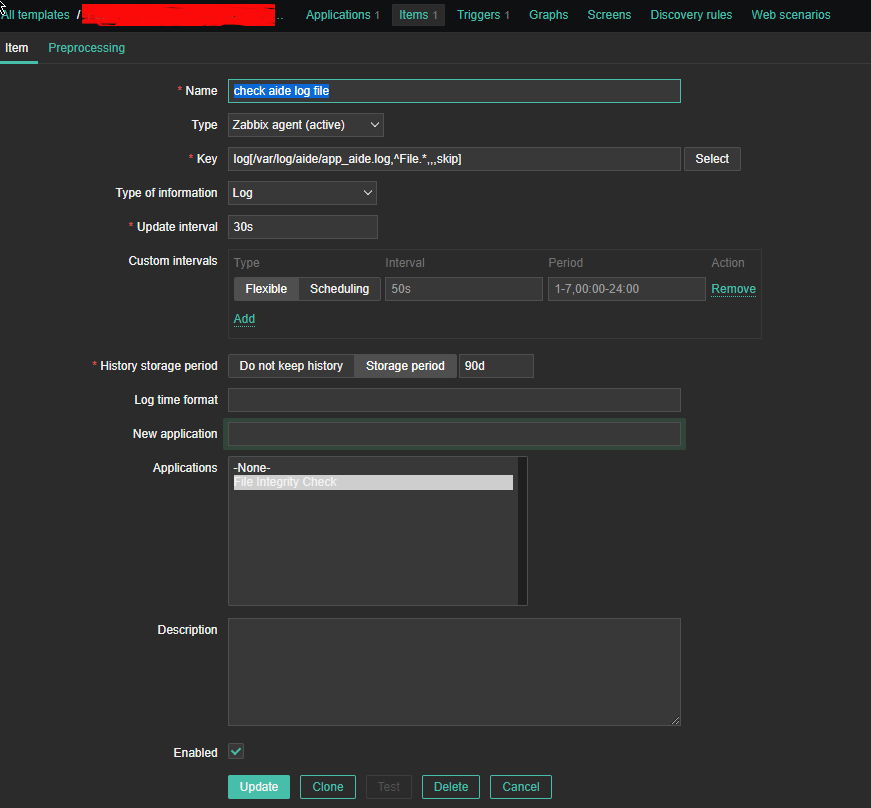
Then setup the required Items, that will be using zabbix's Skip embedded function to scan file in a predefined period of file, this is done by the zabbix-agent that is
supposed to run on the server.

2.2 Configure Item like

aide-zabbix-triggers-screenshot
 

*Name: check aide log file

Type: zabbix (active)

log[/var/log/aide/app_aide.log,^File.*,,,skip]

Type of information: Log

Update Interval: 30s

Applications: File Integrity Check

Configure Trigger like

Enabled: Tick On

images/aide-zabbix-screenshots/check-aide-log-item


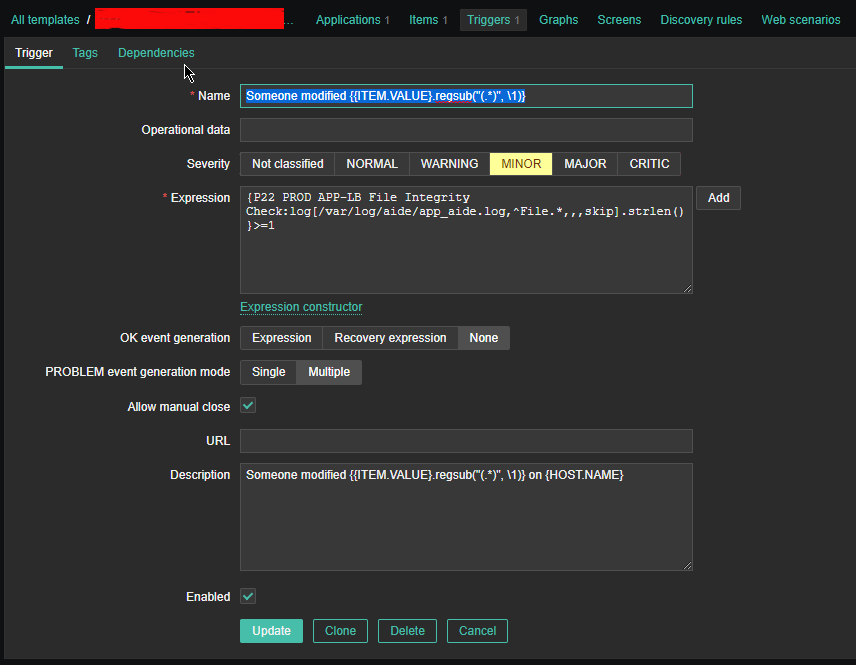
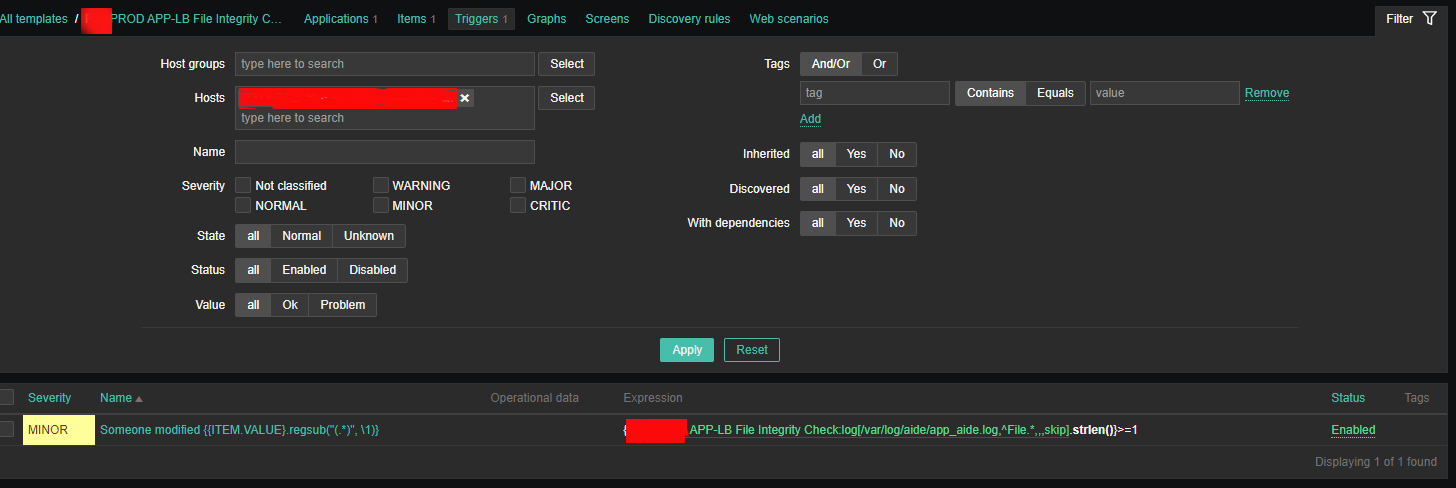
2.3 Create Triggers with the respective regular expressions, that would check the aide generated log file for file modifications


aide-zabbix-screenshot-minor-config

Configure Trigger like
 

Enabled: Tick On


*Name: Someone modified {{ITEM.VALUE}.regsub("(.*)", \1)}

*Expression: {PROD APP-LB File Integrity Check:log[/var/log/aide/app_aide.log,^File.*,,,skip].strlen()}>=1

Allow manual close: yes tick

*Description: Someone modified {{ITEM.VALUE}.regsub("(.*)", \1)} on {HOST.NAME}


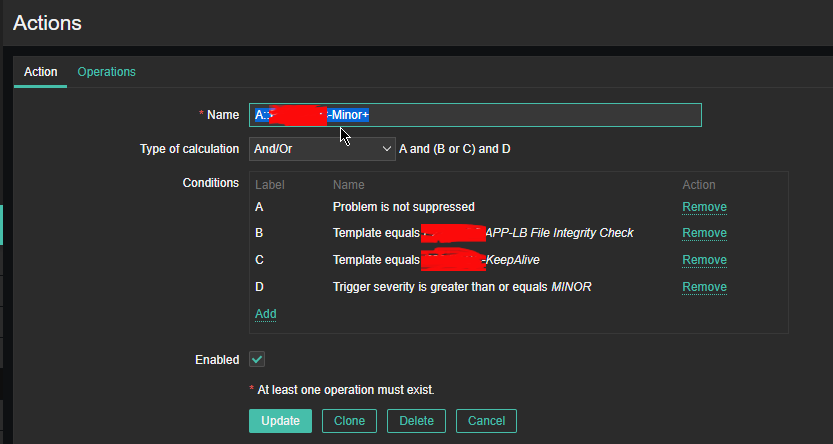
2.4 Configure Action


aide-zabbix-file-monitoring-action-screensho

Now assuming the Zabbix server has  a properly set media for communication and you set Alerting rules zabbix-server can be easily set tosend mails to a Support email to get Notifications Alerts, everytime a monitored file by aide gets changed.

That's all folks ! Enjoy being notified on every file change on your servers  !
 

How to log every Linux executed command by every running system program to separte log via rsyslog for better server Security and audit trails

Wednesday, March 15th, 2023

snoopy-log-all-commands-on-linux-server-tux-logo

To keep a good eye on installed Debian Linux server security if you have to be PCI compliant (e.g. follow a high security) standards or you work in a company, where system security is crucial and any kind of security breach is untorrelated and in case of unexpected security holes exploited on running system processess listening on network peripherals (that malicious crackers) does to be able to easily identify what really happened e.g. do a Security RCA (Root Cause Analysis) for how this hack happened in order to mitigate it for future if possible capture the crackers and close the security hole the better, some kind of paranoid running program logging is required.

For such higher security systems, Linux / BSD / UNIX sysadmins can benefit from;

Snoopy command logger – a small library that logs all program executions on your Linux/BSD system.

Embedding snoopy into a running uptodate system is relatively easy, you either have to download the respective distribution package (in this particular article that would be Debian GNU / Linux) or for Linux distributions, that doesn't have the package integrated into the existing package repositories or externally available package repos, the code can be easily git cloned and installed from github snoopy program page following the README.md


However consider that snoopy run and logging the executed commands, make sure that if you use it you have rsyslogd configured to log to external logging server to make sure (someone did not manipulate the running system to avoid their actions being logged by snoopy, this is pointed by snoopy security disclaimer on the FAQ of official github snoopy project page, the page reads as so:

Security disclaimer
WARNING: Snoopy is not a reliable auditing solution.
Rogue users can easily manipulate environment to avoid their actions being logged by Snoopy. Consult this FAQ entry for more information.                


Most likely this warning is pointed out by the tool authors, in order to set the logging Tool creators free for any liability in case if someone uses the snoopy tool for some unauthorized logging
and sniffing of systems etc.

Before we proceed with the tool, install first for some clarity it is a good idea to know on what kind of Debian Linux you're about to install Snoopy command logger.

root@linux:~ # cat /etc/os-release
PRETTY_NAME="Debian GNU/Linux 11 (bullseye)"
NAME="Debian GNU/Linux"
VERSION_ID="11"
VERSION="11 (bullseye)"
VERSION_CODENAME=bullseye
ID=debian
HOME_URL="https://www.debian.org/"
SUPPORT_URL="https://www.debian.org/support"
BUG_REPORT_URL="https://bugs.debian.org/"


1. Prepare separate log file for snoopy that will keep log of every system command run by running processes visible by (ps -ef)

Next check the permissions user / group and read / write / executable flags with which the default generated rsyslog will be writting and set snoopy to whatever you would like it to write with

root@linux:~ # cat /etc/rsyslog.conf | grep "^\$File\|\$Umask"~
$FileOwner root
$FileGroup adm
$FileCreateMode 0640


Create Rsyslog configuration for snoopy.log

root@linux:~ # cat << EOF | sudo tee /etc/rsyslog.d/01-snoopy.conf
# Send snoopy messages to a dedicated logfile
if (\$programname startswith "snoopy") then {
  action(type="omfile" fileOwner="root" fileGroup="root" fileCreateMode="0600" file="/var/log/snoopy.log")
  stop
}

EOF


To make sure that snoopy library will be preloaded after installation on next boot:

root@linux:~ # cat << EOF | sudo debconf-set-selections
snoopy snoopy/install-ld-preload boolean true
EOF


root@linux:~ # systemctl restart rsyslog


root@linux:~ # systemctl status rsyslog
● rsyslog.service – System Logging Service
     Loaded: loaded (/lib/systemd/system/rsyslog.service; enabled; vendor preset: enabled)
     Active: active (running) since Tue 2023-03-14 12:59:05 EET; 59min ago
TriggeredBy: ● syslog.socket
       Docs: man:rsyslogd(8)
             man:rsyslog.conf(5)
             https://www.rsyslog.com/doc/
   Main PID: 713745 (rsyslogd)
      Tasks: 6 (limit: 4654)
     Memory: 1.1M
        CPU: 548ms
     CGroup: /system.slice/rsyslog.service
             └─713745 /usr/sbin/rsyslogd -n -iNONE

мар 14 12:59:05 haproxy2 systemd[1]: Started System Logging Service.
мар 14 12:59:05 haproxy2 rsyslogd[713745]: warning: ~ action is deprecated, consider using the 'stop' statement instead [v8.210>
мар 14 12:59:05 haproxy2 rsyslogd[713745]: [198B blob data]
мар 14 12:59:05 haproxy2 rsyslogd[713745]: imuxsock: Acquired UNIX socket '/run/systemd/journal/syslog' (fd 3) from systemd.  [>
мар 14 12:59:05 haproxy2 rsyslogd[713745]: [origin software="rsyslogd" swVersion="8.2102.0" x-pid="713745" x-info="https://www.>
мар 14 13:19:05 haproxy2 rsyslogd[713745]: — MARK —
мар 14 13:39:05 haproxy2 rsyslogd[713745]: — MARK —


2. Install snoopy deb package and configure it

root@linux:~ # apt install snoopy
Четене на списъците с пакети… Готово
Изграждане на дървото със зависимости… Готово
Четене на информацията за състоянието… Готово
Следните пакети са били инсталирани автоматично и вече не са необходими:
  bsdmainutils cpp-8 geoip-database libasan5 libbind9-161 libcroco3 libdns1104 libdns1110 libevent-core-2.1-6
  libevent-pthreads-2.1-6 libgdk-pixbuf-xlib-2.0-0 libgdk-pixbuf2.0-0 libgeoip1 libicu63 libisc1100 libisc1105 libisccc161
  libisccfg163 libisl19 liblwres161 libmpdec2 libmpx2 libperl5.28 libpython2-stdlib libpython2.7-minimal libpython2.7-stdlib
  libpython3.7-minimal libpython3.7-stdlib libreadline7 netcat-traditional node-ansi-align node-arrify node-bluebird
  node-boxen node-builtin-modules node-call-limit node-camelcase node-cli-boxes node-cliui node-co node-concat-stream
  node-config-chain node-cross-spawn node-cyclist node-decamelize node-decompress-response node-deep-extend node-detect-indent
  node-detect-newline node-duplexer3 node-duplexify node-editor node-end-of-stream node-errno node-execa node-find-up
  node-flush-write-stream node-from2 node-fs-vacuum node-get-caller-file node-get-stream node-got node-has-symbol-support-x
  node-has-to-string-tag-x node-import-lazy node-invert-kv node-is-buffer node-is-builtin-module node-is-npm node-is-object
  node-is-plain-obj node-is-retry-allowed node-is-stream node-isurl node-json-buffer node-kind-of node-latest-version
  node-lazy-property node-lcid node-libnpx node-locate-path node-lowercase-keys node-mem node-merge-stream node-mimic-fn
  node-mimic-response node-minimist node-mississippi node-node-uuid node-npm-run-path node-os-locale node-p-cancelable
  node-p-finally node-p-limit node-p-locate node-p-timeout node-package-json node-parallel-transform node-path-exists
  node-path-is-inside node-prepend-http node-proto-list node-prr node-pump node-pumpify node-qw node-rc
  node-registry-auth-token node-registry-url node-require-directory node-require-main-filename node-semver-diff node-sha
  node-shebang-command node-shebang-regex node-slide node-sorted-object node-stream-each node-stream-iterate node-stream-shift
  node-strip-eof node-strip-json-comments node-term-size node-through2 node-timed-out node-typedarray node-uid-number
  node-unpipe node-url-parse-lax node-url-to-options node-which-module node-widest-line node-wrap-ansi node-xdg-basedir
  node-xtend node-y18n node-yargs node-yargs-parser perl-modules-5.28 python-pkg-resources python2 python2-minimal python2.7
  python2.7-minimal python3.7-minimal

Използвайте „apt autoremove“ за да ги премахнете.
Следните НОВИ пакети ще бъдат инсталирани:
  snoopy
0 актуализирани, 1 нови инсталирани, 0 за премахване и 1 без промяна.
Необходимо е да се изтеглят 46,0 kB архиви.
След тази операция ще бъде използвано 124 kB допълнително дисково пространство.
Изт:1 http://deb.debian.org/debian bullseye/main amd64 snoopy amd64 2.4.12-1 [46,0 kB]
Изтеглени 46,0 kB за 0с (93,2 kB/сек)
Предварително настройване на пакети …


Selecting previously unselected package snoopy.
(Reading database … 56067 files and directories currently installed.)
Preparing to unpack …/snoopy_2.4.12-1_amd64.deb ...
Unpacking snoopy (2.4.12-1) …
Setting up snoopy (2.4.12-1) …
Processing triggers for libc-bin (2.31-13+deb11u5) …

root@linux:/etc# ls -al /var/log/snoopy.log
-rw——- 1 root root 14472 14 мар 13:40 /var/log/snoopy.log

Any specific configuration for snoopy can be tuned through /etc/snoopy.ini

Now you will find all the commands executed by all monitored running processes in /var/log/snoopy.

root@linux:/etc# tail -30 /var/log/snoopy.log
Mar 14 12:59:32 haproxy2 snoopy[713804]: [login:root ssh:(192.168.0.1 62796 192.168.0.210 22) sid:713792 tty:/dev/pts/2 (0/root) uid:root(0)/root(0) cwd:/]: ldconfig
Mar 14 12:59:32 haproxy2 snoopy[713806]: [login:zabbix ssh:((undefined)) sid:682168 tty:(none) ((none)/(none)) uid:zabbix(108)/zabbix(108) cwd:/]: who
Mar 14 12:59:32 haproxy2 snoopy[713807]: [login:zabbix ssh:((undefined)) sid:682168 tty:(none) ((none)/(none)) uid:zabbix(108)/zabbix(108) cwd:/]: wc -l
Mar 14 13:00:07 haproxy2 snoopy[713815]: [login:root ssh:((undefined)) sid:713815 tty:(none) ((none)/(none)) uid:root(0)/root(0) cwd:/usr/lib/sysstat]: /usr/lib/sysstat/sadc -F -L -S DISK 1 1 /var/log/sysstat
Mar 14 13:00:32 haproxy2 snoopy[713823]: [login:zabbix ssh:((undefined)) sid:682168 tty:(none) ((none)/(none)) uid:zabbix(108)/zabbix(108) cwd:/]: who
Mar 14 13:00:32 haproxy2 snoopy[713824]: [login:zabbix ssh:((undefined)) sid:682168 tty:(none) ((none)/(none)) uid:zabbix(108)/zabbix(108) cwd:/]: wc -l
Mar 14 13:01:32 haproxy2 snoopy[713834]: [login:zabbix ssh:((undefined)) sid:682168 tty:(none) ((none)/(none)) uid:zabbix(108)/zabbix(108) cwd:/]: who
Mar 14 13:01:32 haproxy2 snoopy[713835]: [login:zabbix ssh:((undefined)) sid:682168 tty:(none) ((none)/(none)) uid:zabbix(108)/zabbix(108) cwd:/]: wc -l
Mar 14 13:02:32 haproxy2 snoopy[713843]: [login:zabbix ssh:((undefined)) sid:682168 tty:(none) ((none)/(none)) uid:zabbix(108)/zabbix(108) cwd:/]: who
Mar 14 13:02:32 haproxy2 snoopy[713844]: [login:zabbix ssh:((undefined)) sid:682168 tty:(none) ((none)/(none)) uid:zabbix(108)/zabbix(108) cwd:/]: wc -l
Mar 14 13:03:32 haproxy2 snoopy[713855]: [login:zabbix ssh:((undefined)) sid:682168 tty:(none) ((none)/(none)) uid:zabbix(108)/zabbix(108) cwd:/]: who
Mar 14 13:03:32 haproxy2 snoopy[713856]: [login:zabbix ssh:((undefined)) sid:682168 tty:(none) ((none)/(none)) uid:zabbix(108)/zabbix(108) cwd:/]: wc -l
Mar 14 13:04:32 haproxy2 snoopy[713868]: [login:zabbix ssh:((undefined)) sid:682168 tty:(none) ((none)/(none)) uid:zabbix(108)/zabbix(108) cwd:/]: who


3. Set up logrotation (archiving) for snoopy logs

root@linux:/etc# vim /etc/logrotate.d/snoopy    


/var/log/snoopy.log {
        daily
        rotate 30
        compress
        delaycompress
        notifempty
        create 640 root adm

}
 

If you want to test logrotation without actually rotating the file:               

root@linux:/etc# logrotate –debug –force /etc/logrotate.d/snoopy   
  log needs rotating
rotating log /var/log/snoopy.log, log->rotateCount is 30
dateext suffix '-20230314'
glob pattern '-[0-9][0-9][0-9][0-9][0-9][0-9][0-9][0-9]'
previous log /var/log/snoopy.log.1 does not exist
renaming /var/log/snoopy.log.30.gz to /var/log/snoopy.log.31.gz (rotatecount 30, logstart 1, i 30),


renaming /var/log/snoopy.log.1.gz to /var/log/snoopy.log.2.gz (rotatecount 30, logstart 1, i 1),
renaming /var/log/snoopy.log.0.gz to /var/log/snoopy.log.1.gz (rotatecount 30, logstart 1, i 0),
log /var/log/snoopy.log.31.gz doesn't exist — won't try to dispose of it
renaming /var/log/snoopy.log to /var/log/snoopy.log.1
creating new /var/log/snoopy.log mode = 0640 uid = 0 gid = 4


4. Monitoring only selected applications  executed commands with snoopy                                                                             

By default snoopy after installed will set itself to monitor all kind of running processes on the system is done by preloading the ldconfig's (libcld.so.preload

root@haproxy2:/etc# cat /etc/ld.so.preload
/lib/x86_64-linux-gnu/libsnoopy.so

If you want to monitor a concrete application and not log everything from the running processes in process list, comment this out this line run ldconfig command

Then to any concrete application you would like to monitor with snoopy add to its init script either /etc/init.d/app_init_script or to systemctl's start script before the application binary program run:

export LD_PRELOAD=/lib/snoopy.so


  As per the README states


 Snoopy is placed in /etc/ld.so.preload to trap all occurrences of exec, if 
 you wish to monitor only certain applications you can do so through the    
 LD_PRELOAD environment variable.
Simply set it to /lib/snoopy.so before  loading the application.

For example

 # export LD_PRELOAD=/lib/snoopy.so                                           
 # lynx http://example.com/                           


How to configure multiple haproxies and frontends to log in separate log files via rsyslog

Monday, September 5th, 2022

log-multiple-haproxy-servers-to-separate-files-log-haproxy-froentend-to-separate-file-haproxy-rsyslog-Logging-diagram
In my last article How to create multiple haproxy instance separate processes for different configuration listeners,  I've shortly explained how to create a multiple instances of haproxies by cloning the systemd default haproxy.service and the haproxy.cfg to haproxyX.cfg.
But what if you need also to configure a separate logging for both haproxy.service and haproxy-customname.service instances how this can be achieved?

The simplest way is to use some system local handler staring from local0 to local6, As local 1,2,3 are usually used by system services a good local handler to start off would be at least 4.
Lets say we already have the 2 running haproxies, e.g.:

[root@haproxy2:/usr/lib/systemd/system ]# ps -ef|grep -i hapro|grep -v grep
root      128464       1  0 Aug11 ?        00:01:19 /usr/sbin/haproxy -Ws -f /etc/haproxy/haproxy.cfg -p /run/haproxy.pid -S /run/haproxy-master.sock
haproxy   128466  128464  0 Aug11 ?        00:49:29 /usr/sbin/haproxy -Ws -f /etc/haproxy/haproxy.cfg -p /run/haproxy.pid -S /run/haproxy-master.sock

root      346637       1  0 13:15 ?        00:00:00 /usr/sbin/haproxy-customname-wrapper -Ws -f /etc/haproxy/haproxy_customname_prod.cfg -p /run/haproxy_customname_prod.pid -S /run/haproxy-customname-master.sock
haproxy   346639  346637  0 13:15 ?        00:00:00 /usr/sbin/haproxy-customname-wrapper -Ws -f /etc/haproxy/haproxy_customname_prod.cfg -p /run/haproxy_customname_prod.pid -S /run/haproxy-customname-master.sock


1. Configure local messaging handlers to work via /dev/log inside both haproxy instance config files
 

To congigure the separte logging we need to have in /etc/haproxy/haproxy.cfg and in /etc/haproxy/haproxy_customname_prod.cfg the respective handlers.

To log in separate files you should already configured in /etc/haproxy/haproxy.cfg something like:


global
        stats socket /var/run/haproxy/haproxy.sock mode 0600 level admin #Creates Unix-Like socket to fetch stats
        log /dev/log    local0
        log /dev/log    local1 notice

#       nbproc 1
#       nbthread 2
#       cpu-map auto:1/1-2 0-1
        nbproc          1
        nbthread 2
        cpu-map         1 0
        cpu-map         2 1
        chroot /var/lib/haproxy
        user haproxy
        group haproxy
        daemon
        maxconn 99999

defaults
        log     global
        mode    tcp


        timeout connect 5000
        timeout connect 30s
        timeout server 10s

    timeout queue 5s
    timeout tunnel 2m
    timeout client-fin 1s
    timeout server-fin 1s

    option forwardfor
        maxconn 3000
    retries                 15

frontend http-in
        mode tcp

        option tcplog
        log global


        option logasap
        option forwardfor
        bind 0.0.0.0:80

default_backend webservers_http
backend webservers_http
    fullconn 20000
        balance source
stick match src
    stick-table type ip size 200k expire 30m

        server server-1 192.168.1.50:80 check send-proxy weight 255 backup
        server server-2 192.168.1.54:80 check send-proxy weight 254
        server server-3 192.168.0.219:80 check send-proxy weight 252 backup
        server server-4 192.168.0.210:80 check send-proxy weight 253 backup
        server server-5 192.168.0.5:80 maxconn 3000 check send-proxy weight 251 backup

For the second /etc/haproxy/haproxy_customname_prod.cfg the logging configuration should be similar to:
 

global
        stats socket /var/run/haproxy/haproxycustname.sock mode 0600 level admin #Creates Unix-Like socket to fetch stats
        log /dev/log    local5
        log /dev/log    local5 notice

#       nbproc 1
#       nbthread 2
#       cpu-map auto:1/1-2 0-1
        nbproc          1
        nbthread 2
        cpu-map         1 0
        cpu-map         2 1
        chroot /var/lib/haproxy
        user haproxy
        group haproxy
        daemon
        maxconn 99999

defaults
        log     global
        mode    tcp


2. Configure separate haproxy Frontend logging via local5 inside haproxy.cfg
 

As a minimum you need a configuration for frontend like:


frontend http-in
        mode tcp

        option tcplog
        log /dev/log    local5 debug
…..
….

..
.

Of course the mode tcp in my case is conditional you might be using mode http etc. 


3. Optionally but (preferrably) make local5 / local6 handlers to work via rsyslogs UDP imudp protocol


In this example /dev/log is straightly read by haproxy instead of sending the messages first to rsyslog, this is a good thing in case if you have doubts that rsyslog might stop working and respectively you might end up with no logging, however if you prefer to use instead rsyslog which most of people usually do you will have instead for /etc/haproxy/haproxy.cfg to use config:

global
    log          127.0.0.1 local6 debug

defaults
        log     global
        mode    tcp

And for /etc/haproxy_customname_prod.cfg config like:

global
    log          127.0.0.1 local5 debug

defaults
        log     global
        mode    tcp

If you're about to send the haproxy logs directly via rsyslog, it should have enabled in /etc/rsyslog.conf the imudp module if you're not going to use directly /dev/log

# provides UDP syslog reception
module(load="imudp")
input(type="imudp" port="514")


4. Prepare first and second log file and custom frontend output file and set right permissions
 

Assumably you already have /var/log/haproxy.log and this will be the initial haproxy log if you don't want to change it, normally it is installed on haproxy package install time on Linux and should have some permissions like following:

root@haproxy2:/etc/rsyslog.d# ls -al /var/log/haproxy.log
-rw-r–r– 1 haproxy haproxy 6681522  1 сеп 16:05 /var/log/haproxy.log


To create the second config with exact permissions like haproxy.log run:

root@haproxy2:/etc/rsyslog.d# touch /var/log/haproxy_customname.log
root@haproxy2:/etc/rsyslog.d# chown haproxy:haproxy /var/log/haproxy_customname.log

Create the haproxy_custom_frontend.log file that will only log output of exact frontend or match string from the logs
 

root@haproxy2:/etc/rsyslog.d# touch  /var/log/haproxy_custom_frontend.log
root@haproxy2:/etc/rsyslog.d# chown haproxy:haproxy  /var/log/haproxy_custom_frontend.log


5. Create the rsyslog config for haproxy.service to log via local6 to /var/log/haproxy.log
 

root@haproxy2:/etc/rsyslog.d# cat 49-haproxy.conf
# Create an additional socket in haproxy's chroot in order to allow logging via
# /dev/log to chroot'ed HAProxy processes
$AddUnixListenSocket /var/lib/haproxy/dev/log

# Send HAProxy messages to a dedicated logfile
:programname, startswith, "haproxy" {
  /var/log/haproxy.log
  stop
}


Above configs will make anything returned with string haproxy (e.g. proccess /usr/sbin/haproxy) to /dev/log to be written inside /var/log/haproxy.log and trigger a stop (by the way the the stop command works exactly as the tilda '~' discard one, except in some newer versions of haproxy the ~ is no now obsolete and you need to use stop instead (bear in mind that ~ even though obsolete proved to be working for me whether stop not ! but come on this is no strange this is linux mess), for example if you run latest debian Linux 11 as of September 2022 haproxy with package 2.2.9-2+deb11u3.
 

6. Create configuration for rsyslog to log from single Frontend outputting local2 to /var/log/haproxy_customname.log
 

root@haproxy2:/etc/rsyslog.d# cat 48-haproxy.conf
# Create an additional socket in haproxy's chroot in order to allow logging via
# /dev/log to chroot'ed HAProxy processes
$AddUnixListenSocket /var/lib/haproxy/dev/log

# Send HAProxy messages to a dedicated logfile
#:programname, startswith, "haproxy" {
#  /var/log/haproxy.log
#  stop
#}
# GGE/DPA 2022/08/02: HAProxy logs to local2, save the messages
local5.*                                                /var/log/haproxy_customname.log


You might also explicitly define the binary that will providing the logs inside the 48-haproxy.conf as we have a separate /usr/sbin/haproxy-customname-wrapper in that way you can log the output from the haproxy instance only based
on its binary command and you can omit writting to local5 to log via it something else 🙂

root@haproxy2:/etc/rsyslog.d# cat 48-haproxy.conf
# Create an additional socket in haproxy's chroot in order to allow logging via
# /dev/log to chroot'ed HAProxy processes
$AddUnixListenSocket /var/lib/haproxy/dev/log

# Send HAProxy messages to a dedicated logfile
#:programname, startswith, "haproxy" {
#  /var/log/haproxy.log
#  stop
#}
# GGE/DPA 2022/08/02: HAProxy logs to local2, save the messages

:programname, startswith, "haproxy-customname-wrapper " {
 
/var/log/haproxy_customname.log
  stop
}


7. Create the log file to log the custom frontend of your preference e.g. /var/log/haproxy_custom_frontend.log under local5 /prepare rsyslog config for
 

root@haproxy2:/etc/rsyslog.d# cat 47-haproxy-custom-frontend.conf
$ModLoad imudp
$UDPServerAddress 127.0.0.1
$UDPServerRun 514
#2022/02/02: HAProxy logs to local6, save the messages
local4.*                                                /var/log/haproxy_custom_frontend.log
:msg, contains, "https-in" ~

The 'https-in' is my frontend inside /etc/haproxy/haproxy.cfg it returns the name of it every time in /var/log/haproxy.log therefore I will log the frontend to local5 and to prevent double logging inside /var/log/haproxy.log of connections incoming towards the same frontend inside /var/log/haproxy.log, I have the tilda symbol '~' which instructs rsyslog to discard any message coming to rsyslog with "https-in" string in, immediately after the same frontend as configured inside /etc/haproxy/haproxy.cfg will output the frontend operations inside local5.


!!! Note that for rsyslog it is very important to have the right order of configurations, the configuration order is being considered based on the file numbering. !!!
 

Hence notice that my filter file number 47_* preceeds the other 2 configured rsyslog configs.
 

root@haproxy2:/etc/rsyslog.d# ls -1
47-haproxy-custom-frontend.conf
48-haproxy.conf
49-haproxy.conf

This will make 47-haproxy-custom-frontend.conf to be read and processed first 48-haproxy.conf processed second and 49-haproxy.conf processed third.


8. Reload rsyslog and haproxy and test


root@haproxy2: ~# systemctl restart rsyslog
root@haproxy2: ~# systemctl restart haproxy
root@haproxy2: ~# systemctl status rsyslog

● rsyslog.service – System Logging Service
     Loaded: loaded (/lib/systemd/system/rsyslog.service; enabled; vendor preset: enabled)
     Active: active (running) since Thu 2022-09-01 17:34:51 EEST; 1s ago
TriggeredBy: ● syslog.socket
       Docs: man:rsyslogd(8)
             man:rsyslog.conf(5)
             https://www.rsyslog.com/doc/
   Main PID: 372726 (rsyslogd)
      Tasks: 6 (limit: 4654)
     Memory: 980.0K
        CPU: 8ms
     CGroup: /system.slice/rsyslog.service
             └─372726 /usr/sbin/rsyslogd -n -iNONE

сеп 01 17:34:51 haproxy2 systemd[1]: Stopped System Logging Service.
сеп 01 17:34:51 haproxy2 rsyslogd[372726]: warning: ~ action is deprecated, consider using the 'stop' statement instead [v8.210>
сеп 01 17:34:51 haproxy2 systemd[1]: Starting System Logging Service…
сеп 01 17:34:51 haproxy2 rsyslogd[372726]: [198B blob data]
сеп 01 17:34:51 haproxy2 systemd[1]: Started System Logging Service.
сеп 01 17:34:51 haproxy2 rsyslogd[372726]: [198B blob data]
сеп 01 17:34:51 haproxy2 rsyslogd[372726]: imuxsock: Acquired UNIX socket '/run/systemd/journal/syslog' (fd 3) from systemd.  [>
сеп 01 17:34:51 haproxy2 rsyslogd[372726]: [origin software="rsyslogd" swVersion="8.2102.0" x-pid="372726" x-info="https://www.

Do some testing with some tool like curl / wget / lynx / elinks etc. on each of the configured haproxy listeners and frontends and check whether everything ends up in the correct log files.
That's all folks enjoy ! 🙂
 

Monitor service log is continously growing with Zabbix on Windows with batch userparameter script and trigger Alert if log is unchanged

Thursday, March 17th, 2022

monitor-if-log-file-is-growing-with-zabbix-zabbix-userparameter-script-howto

Recently we had an inteteresting Monitoring work task to achieve. We have an Application that is constantly simulating encrypted connections traffic to a remote side machine and sending specific data on TCP/IP ports.
Communiucation between App Server A -> App Server B should be continous and if all is working as expected App Server A messages output are logged in the Application log file on the machine which by the way Runs
Windows Server 2020.

Sometimes due to Network issues this constant reconnections from the Application S. A to the remote checked machine TCP/IP ports gets interrupted due to LAN issues or a burned Network Switch equipment, misconfiguration on the network due to some Network admin making stoopid stuff etc..

Thus it was important to Monitor somehow whether the log is growing or not and feed the output of whether Application log file is growing or it stuck to a Central Zabbix Server. 
To be able to better understand the task, lets divide the desired outcome in few parts on required:

1. Find The latest file inside a folder C:\Path-to-Service\Monitoring\Log\
2. Open the and check it is current logged records and log the time
3. Re-open file in a short while and check whether in few seconds new records are written
4. Report the status out to Zabbix
5. Make Zabbix Item / Trigger / Action in case if monitored file is not growing

In below article I'll briefly explain how Monitoring a Log on a Machine for growing was implemented using a pure good old WIN .BAT (.batch) script and Zabbix Userparameter key


1. Enable userparameter script for Local Zabbix-Agent on the Windows 10 Server Host


Edit Zabbix config file usually on Windows Zabbix installs file is named:

zabbix_agentd.win ]


Uncomment the following lines to enable userparameter support for zabbix-agentd:


# Include=c:\zabbix\zabbix_agentd.userparams.conf

Include=c:\zabbix\zabbix_agentd.conf.d\

# Include=c:\zabbix\zabbix_agentd.conf.d\*.conf


2. Create folders for userparameter script and for the userparameter.conf

Before creating userparameter you can to create the folder and grant permissions

Folder name under C:\Zabbix -> zabbix_agentd.conf.d

If you don't want to use Windows Explorer) but do it via cmd line:

C:\Users\LOGUser> mkdir \Zabbix\zabbix_agentd.conf\
C:\User\LOGUser> mkdir \Zabbix\zabbix_scripts\


3. Create Userparameter with some name file ( Userparameter-Monitor-Grow.conf )

In the directory C:\Zabbix\zabbix_agentd.conf.d you should create a config file like:
Userparameter-Monitor-Grow.conf and in it you should have a standard userparameter key and script so file content is:

UserParameter=service.check,C:\Zabbix\zabbix_scripts\GROW_LOG_MONITOR-USERPARAMETER.BAT


4. Create the Batch script that will read the latest file in the service log folder and will periodically check and report to zabbix that file is changing

notepad C:\Zabbix\zabbix_scripts\GROW_LOG_MONITOR-USERPARAMETER.BAT

REM "SCRIPT MONITOR IF FILE IS GROWING OR NOT"
@echo off

set work_dir=C:\Path-to-Service\Monitoring\Log\

set client=client Name

set YYYYMMDD=%DATE:~10,4%%DATE:~4,2%%DATE:~7,2%

set name=csv%YYYYMMDD%.csv

set mytime=%TIME:~0,8%

for %%I in (..) do set CurrDirName=%%~nxI


setlocal EnableDelayedExpansion

set "line1=findstr /R /N "^^" %work_dir%\output.csv | find /C ":""


for /f %%a in ('!line1!') do set number1=%%a

set "line2=findstr /R /N "^^" %work_dir%\%name% | find /C ":""


for /f %%a in ('!line2!') do set number2=%%a


IF  %number1% == %number2% (

echo %YYYYMMDD% %mytime% MAJOR the log is not incrementing for %client%

echo %YYYYMMDD% %mytime% MAJOR the log is not incrementing for %client% >> monitor-grow_err.log

) ELSE (

echo %YYYYMMDD% %mytime% NORMAL the log is incrementing for %client%

SETLOCAL DisableDelayedExpansion

del %work_dir%\output.csv

FOR /F "usebackq delims=" %%a in (`"findstr /n ^^ %work_dir%\%name%"`) do (

    set "var=%%a"

    SETLOCAL EnableDelayedExpansion

    set "var=!var:*:=!"

    echo(!var! >> %work_dir%\output.csv

    ENDLOCAL

)

)


To download GROW_LOG_MONITOR-USERPARAMETER.BAT click here.
The script needs to have configured the path to directory containing multiple logs produced by the Monitored Application.
As prior said it will, list the latest created file based on DATE timestamp in the folder will output a simple messages:

If the log file is being fed with data the script will output to output.csv messages continuously, either:

%%mytime%% NORMAL the log is incrementing for %%client%%

Or if the Monitored application log is not writting anything for a period it will start writting messages

%%mytime%%mytime MAJOR the log is not incrementing for %client%

The messages will also be sent in Zabbix.

Before saving the script make sure you modify the Full Path location to the Monitored file for growing, i.e.:

set work_dir=C:\Path-to-Service\Monitoring\Log\


5. Create The Zabbix Item

Set whatever service.check name you would like and a check interval to fetch the info from the userparameter (if you're dealing with very large log files produced by Monitored log of application, then 10 minutes might be too frequent, in most cases 10 minutes should be fine)
monitor-if-log-grows-windows-zabbix-item-service-check-screenshot
 

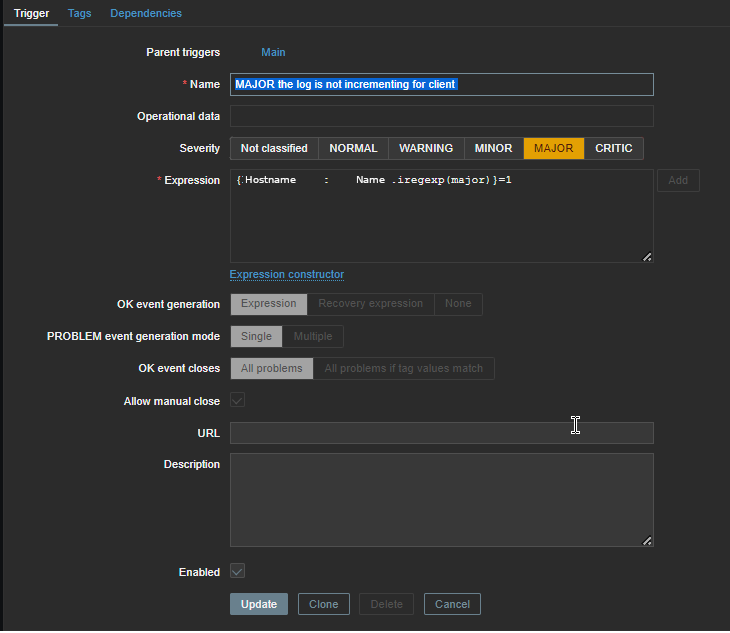
6. Create Zabbix Trigger


You will need a Trigger something similar to below:

Now considering that zabbix server receives correctly data from the client and the monitored log is growing you should in Zabbix:

%%mytime%% NORMAL the log is incrementing for %%client%%


7. Lastly create an Action to send Email Alert if log is not growing

Create Linux High Availability Load Balancer Cluster with Keepalived and Haproxy on Linux

Tuesday, March 15th, 2022

keepalived-logo-linux

Configuring a Linux HA (High Availibiltiy) for an Application with Haproxy is already used across many Websites on the Internet and serious corporations that has a crucial infrastructure has long time
adopted and used keepalived to provide High Availability Application level Clustering.
Usually companies choose to use HA Clusters with Haproxy with Pacemaker and Corosync cluster tools.
However one common used alternative solution if you don't have the oportunity to bring up a High availability cluster with Pacemaker / Corosync / pcs (Pacemaker Configuration System) due to fact machines you need to configure the cluster on are not Physical but VMWare Virtual Machines which couldn't not have configured a separate Admin Lans and Heartbeat Lan as we usually do on a Pacemaker Cluster due to the fact the 5 Ethernet LAN Card Interfaces of the VMWare Hypervisor hosts are configured as a BOND (e.g. all the incoming traffic to the VMWare vSphere  HV is received on one Virtual Bond interface).

I assume you have 2 separate vSphere Hypervisor Physical Machines in separate Racks and separate switches hosting the two VMs.
For the article, I'll call the two brand new brought Virtual Machines with some installation automation software such as Terraform or Ansible – vm-server1 and vm-server2 which would have configured some recent version of Linux.

In that scenario to have a High Avaiability for the VMs on Application level and assure at least one of the two is available at a time if one gets broken due toe malfunction of the HV, a Network connectivity issue, or because the VM OS has crashed.
Then one relatively easily solution is to use keepalived and configurea single High Availability Virtual IP (VIP) Address, i.e. 10.10.10.1, which would float among two VMs using keepalived so at a time at least one of the two VMs would be reachable on the Network.
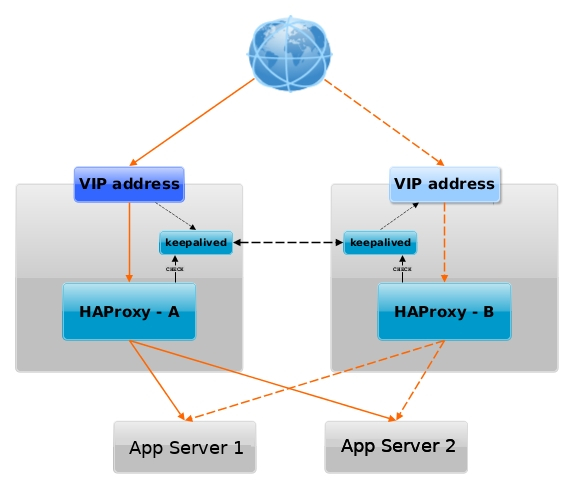
haproxy_keepalived-vip-ip-diagram-linux

Having a VIP IP is quite a common solution in corporate world, as it makes it pretty easy to add F5 Load Balancer in front of the keepalived cluster setup to have a 3 Level of security isolation, which usually consists of:

1. Physical (access to the hardware or Virtualization hosts)
2. System Access (The mechanism to access the system login credetials users / passes, proxies, entry servers leading to DMZ-ed network)
3. Application Level (access to different programs behind L2 and data based on the specific identity of the individual user,
special Secondary UserID,  Factor authentication, biometrics etc.)


1. Install keepalived and haproxy on machines

Depending on the type of Linux OS:

On both machines
 

[root@server1:~]# yum install -y keepalived haproxy

If you have to install keepalived / haproxy on Debian / Ubuntu and other Deb based Linux distros

[root@server1:~]# apt install keepalived haproxy –yes

2. Configure haproxy (haproxy.cfg) on both server1 and server2


Create some /etc/haproxy/haproxy.cfg configuration


[root@server1:~]vim /etc/haproxy/haproxy.cfg

#———————————————————————
# Global settings
#———————————————————————
global
    log          127.0.0.1 local6 debug
    chroot       /var/lib/haproxy
    pidfile      /run/haproxy.pid
    stats socket /var/lib/haproxy/haproxy.sock mode 0600 level admin 
    maxconn      4000
    user         haproxy
    group        haproxy
    daemon
    #debug
    #quiet

#———————————————————————
# common defaults that all the 'listen' and 'backend' sections will
# use if not designated in their block
#———————————————————————
defaults
    mode        tcp
    log         global
#    option      dontlognull
#    option      httpclose
#    option      httplog
#    option      forwardfor
    option      redispatch
    option      log-health-checks
    timeout connect 10000 # default 10 second time out if a backend is not found
    timeout client 300000
    timeout server 300000
    maxconn     60000
    retries     3

#———————————————————————
# round robin balancing between the various backends
#———————————————————————

listen FRONTEND_APPNAME1
        bind 10.10.10.1:15000
        mode tcp
        option tcplog
#        #log global
        log-format [%t]\ %ci:%cp\ %bi:%bp\ %b/%s:%sp\ %Tw/%Tc/%Tt\ %B\ %ts\ %ac/%fc/%bc/%sc/%rc\ %sq/%bq
        balance roundrobin
        timeout client 350000
        timeout server 350000
        timeout connect 35000
        server app-server1 10.10.10.55:30000 weight 1 check port 68888
        server app-server2 10.10.10.55:30000 weight 2 check port 68888

listen FRONTEND_APPNAME2
        bind 10.10.10.1:15000
        mode tcp
        option tcplog
        #log global
        log-format [%t]\ %ci:%cp\ %bi:%bp\ %b/%s:%sp\ %Tw/%Tc/%Tt\ %B\ %ts\ %ac/%fc/%bc/%sc/%rc\ %sq/%bq
        balance roundrobin
        timeout client 350000
        timeout server 350000
        timeout connect 35000
        server app-server1 10.10.10.55:30000 weight 5
        server app-server2 10.10.10.55:30000 weight 5 


You can get a copy of above haproxy.cfg configuration here.
Once configured roll it on.

[root@server1:~]#  systemctl start haproxy
 
[root@server1:~]# ps -ef|grep -i hapro
root      285047       1  0 Mar07 ?        00:00:00 /usr/sbin/haproxy -Ws -f /etc/haproxy/haproxy.cfg -p /run/haproxy.pid
haproxy   285050  285047  0 Mar07 ?        00:00:26 /usr/sbin/haproxy -Ws -f /etc/haproxy/haproxy.cfg -p /run/haproxy.pid

Bring up the haproxy also on server2 machine, by placing same configuration and starting up the proxy.
 

[root@server1:~]vim /etc/haproxy/haproxy.cfg


3. Configure keepalived on both servers

We'll be configuring 2 nodes with keepalived even though if necessery this can be easily extended and you can add more nodes.
First we make a copy of the original or existing server configuration keepalived.conf (just in case we need it later on or if you already had something other configured manually by someone – that could be so on inherited servers by other sysadmin)
 

[root@server1:~]# mv /etc/keepalived/keepalived.conf /etc/keepalived/keepalived.conf.orig
[root@server2:~]# mv /etc/keepalived/keepalived.conf /etc/keepalived/keepalived.conf.orig

a. Configure keepalived to serve as a MASTER Node


[root@server1:~]# vim /etc/keepalived/keepalived.conf

Master Node
global_defs {
  router_id server1-fqdn # The hostname of this host.
  
  enable_script_security
  # Synchro of the state of the connections between the LBs on the eth0 interface
   lvs_sync_daemon eth0
 
notification_email {
        linuxadmin@notify-domain.com     # Email address for notifications 
    }
 notification_email_from keepalived@server1-fqdn        # The from address for the notifications
    smtp_server 127.0.0.1                       # SMTP server address
    smtp_connect_timeout 15
}

vrrp_script haproxy {
  script "killall -0 haproxy"
  interval 2
  weight 2
  user root
}

vrrp_instance LB_VIP_QA {
  virtual_router_id 50
  advert_int 1
  priority 51

  state MASTER
  interface eth0
  smtp_alert          # Enable Notifications Via Email
  
  authentication {
              auth_type PASS
              auth_pass testp141

    }
### Commented because running on VM on VMWare
##    unicast_src_ip 10.44.192.134 # Private IP address of master
##    unicast_peer {
##        10.44.192.135           # Private IP address of the backup haproxy
##   }

#        }
# master node with higher priority preferred node for Virtual IP if both keepalived up
###  priority 51
###  state MASTER
###  interface eth0
  virtual_ipaddress {
     10.10.10.1 dev eth0 # The virtual IP address that will be shared between MASTER and BACKUP
  }
  track_script {
      haproxy
  }
}


 To dowload a copy of the Master keepalived.conf configuration click here

Below are few interesting configuration variables, worthy to mention few words on, most of them are obvious by their names but for more clarity I'll also give a list here with short description of each:


  • vrrp_instance – defines an individual instance of the VRRP protocol running on an interface.
  • state – defines the initial state that the instance should start in (i.e. MASTER / SLAVE )state –
  • interface – defines the interface that VRRP runs on.
  • virtual_router_id – should be unique value per Keepalived Node (otherwise slave master won't function properly)
  • priority – the advertised priority, the higher the priority the more important the respective configured keepalived node is.
  • advert_int – specifies the frequency that advertisements are sent at (1 second, in this case).
  • authentication – specifies the information necessary for servers participating in VRRP to authenticate with each other. In this case, a simple password is defined.
    only the first eight (8) characters will be used as described in  to note is Important thing
    man keepalived.conf – keepalived.conf variables documentation !!! Nota Bene !!! – Password set on each node should match for nodes to be able to authenticate !
  • virtual_ipaddress – defines the IP addresses (there can be multiple) that VRRP is responsible for.
  • notification_email – the notification email to which Alerts will be send in case if keepalived on 1 node is stopped (e.g. the MASTER node switches from host 1 to 2)
  • notification_email_from – email address sender from where email will originte
    ! NB ! In order for notification_email to be working you need to have configured MTA or Mail Relay (set to local MTA) to another SMTP – e.g. have configured something like Postfix, Qmail or Postfix

b. Configure keepalived to serve as a SLAVE Node

[root@server1:~]vim /etc/keepalived/keepalived.conf
 

#Slave keepalived
global_defs {
  router_id server2-fqdn # The hostname of this host!

  enable_script_security
  # Synchro of the state of the connections between the LBs on the eth0 interface
  lvs_sync_daemon eth0
 
notification_email {
        linuxadmin@notify-host.com     # Email address for notifications
    }
 notification_email_from keepalived@server2-fqdn        # The from address for the notifications
    smtp_server 127.0.0.1                       # SMTP server address
    smtp_connect_timeout 15
}

vrrp_script haproxy {
  script "killall -0 haproxy"
  interval 2
  weight 2
  user root
}

vrrp_instance LB_VIP_QA {
  virtual_router_id 50
  advert_int 1
  priority 50

  state BACKUP
  interface eth0
  smtp_alert          # Enable Notifications Via Email

authentication {
              auth_type PASS
              auth_pass testp141
}
### Commented because running on VM on VMWare    
##    unicast_src_ip 10.10.192.135 # Private IP address of master
##    unicast_peer {
##        10.10.192.134         # Private IP address of the backup haproxy
##   }

###  priority 50
###  state BACKUP
###  interface eth0
  virtual_ipaddress {
     10.10.10.1 dev eth0 # The virtual IP address that will be shared betwee MASTER and BACKUP.
  }
  track_script {
    haproxy
  }
}


Download the keepalived.conf slave config here


c. Set required sysctl parameters for haproxy to work as expected
 

[root@server1:~]vim /etc/sysctl.conf
#Haproxy config
# haproxy
net.core.somaxconn=65535
net.ipv4.ip_local_port_range = 1024 65000
net.ipv4.ip_nonlocal_bind = 1
net.ipv4.tcp_tw_reuse = 1
net.ipv4.tcp_max_syn_backlog = 10240
net.ipv4.tcp_max_tw_buckets = 400000
net.ipv4.tcp_max_orphans = 60000
net.ipv4.tcp_synack_retries = 3

4. Test Keepalived keepalived.conf configuration syntax is OK


[root@server1:~]keepalived –config-test
(/etc/keepalived/keepalived.conf: Line 7) Unknown keyword 'lvs_sync_daemon_interface'
(/etc/keepalived/keepalived.conf: Line 21) Unable to set default user for vrrp script haproxy – removing
(/etc/keepalived/keepalived.conf: Line 31) (LB_VIP_QA) Specifying lvs_sync_daemon_interface against a vrrp is deprecated.
(/etc/keepalived/keepalived.conf: Line 31)              Please use global lvs_sync_daemon
(/etc/keepalived/keepalived.conf: Line 35) Truncating auth_pass to 8 characters
(/etc/keepalived/keepalived.conf: Line 50) (LB_VIP_QA) track script haproxy not found, ignoring…

I've experienced this error because first time I've configured keepalived, I did not mention the user with which the vrrp script haproxy should run,
in prior versions of keepalived, leaving the field empty did automatically assumed you have the user with which the vrrp script runs to be set to root
as of RHELs keepalived-2.1.5-6.el8.x86_64, i've been using however this is no longer so and thus in prior configuration as you can see I've
set the user in respective section to root.
The error Unknown keyword 'lvs_sync_daemon_interface'
is also easily fixable by just substituting the lvs_sync_daemon_interface and lvs_sync_daemon and reloading
keepalived etc.

Once keepalived is started and you can see the process on both machines running in process list.

[root@server1:~]ps -ef |grep -i keepalived
root     1190884       1  0 18:50 ?        00:00:00 /usr/sbin/keepalived -D
root     1190885 1190884  0 18:50 ?        00:00:00 /usr/sbin/keepalived -D

Next step is to check the keepalived statuses as well as /var/log/keepalived.log

If everything is configured as expected on both keepalived on first node you should see one is master and one is slave either in the status or the log

[root@server1:~]#systemctl restart keepalived


[root@server1:~]systemctl status keepalived|grep -i state
Mar 14 18:59:02 server1-fqdn Keepalived_vrrp[1192003]: (LB_VIP_QA) Entering MASTER STATE

[root@server1:~]systemctl status keepalived

● keepalived.service – LVS and VRRP High Availability Monitor
   Loaded: loaded (/usr/lib/systemd/system/keepalived.service; enabled; vendor preset: disabled)
   Active: inactive (dead) since Mon 2022-03-14 18:15:51 CET; 32min ago
  Process: 1187587 ExecStart=/usr/sbin/keepalived $KEEPALIVED_OPTIONS (code=exited, status=0/SUCCESS)
 Main PID: 1187589 (code=exited, status=0/SUCCESS)

Mar 14 18:15:04 server1lb-fqdn Keepalived_vrrp[1187590]: Sending gratuitous ARP on eth0 for 10.44.192.142
Mar 14 18:15:50 server1lb-fqdn systemd[1]: Stopping LVS and VRRP High Availability Monitor…
Mar 14 18:15:50 server1lb-fqdn Keepalived[1187589]: Stopping
Mar 14 18:15:50 server1lb-fqdn Keepalived_vrrp[1187590]: (LB_VIP_QA) sent 0 priority
Mar 14 18:15:50 server1lb-fqdn Keepalived_vrrp[1187590]: (LB_VIP_QA) removing VIPs.
Mar 14 18:15:51 server1lb-fqdn Keepalived_vrrp[1187590]: Stopped – used 0.002007 user time, 0.016303 system time
Mar 14 18:15:51 server1lb-fqdn Keepalived[1187589]: CPU usage (self/children) user: 0.000000/0.038715 system: 0.001061/0.166434
Mar 14 18:15:51 server1lb-fqdn Keepalived[1187589]: Stopped Keepalived v2.1.5 (07/13,2020)
Mar 14 18:15:51 server1lb-fqdn systemd[1]: keepalived.service: Succeeded.
Mar 14 18:15:51 server1lb-fqdn systemd[1]: Stopped LVS and VRRP High Availability Monitor

[root@server2:~]systemctl status keepalived|grep -i state
Mar 14 18:59:02 server2-fqdn Keepalived_vrrp[297368]: (LB_VIP_QA) Entering BACKUP STATE

[root@server1:~]# grep -i state /var/log/keepalived.log
Mar 14 18:59:02 server1lb-fqdn Keepalived_vrrp[297368]: (LB_VIP_QA) Entering MASTER STATE
 

a. Fix Keepalived SECURITY VIOLATION – scripts are being executed but script_security not enabled.
 

When configurating keepalived for a first time we have faced the following strange error inside keepalived status inside keepalived.log 
 

Feb 23 14:28:41 server1 Keepalived_vrrp[945478]: SECURITY VIOLATION – scripts are being executed but script_security not enabled.


To fix keepalived SECURITY VIOLATION error:

Add to /etc/keepalived/keepalived.conf on the keepalived node hosts
inside 

global_defs {}

After chunk
 

enable_script_security

include

# Synchro of the state of the connections between the LBs on the eth0 interface
  lvs_sync_daemon_interface eth0


5. Prepare rsyslog configuration and Inlcude additional keepalived options
to force keepalived log into /var/log/keepalived.log

To force keepalived log into /var/log/keepalived.log on RHEL 8 / CentOS and other Redhat Package Manager (RPM) Linux distributions

[root@server1:~]# vim /etc/rsyslog.d/48_keepalived.conf

#2022/02/02: HAProxy logs to local6, save the messages
local7.*                                                /var/log/keepalived.log
if ($programname == 'Keepalived') then -/var/log/keepalived.log
if ($programname == 'Keepalived_vrrp') then -/var/log/keepalived.log
& stop

[root@server:~]# touch /var/log/keepalived.log

Reload rsyslog to load new config
 

[root@server:~]# systemctl restart rsyslog
[root@server:~]# systemctl status rsyslog


rsyslog.service – System Logging Service
   Loaded: loaded (/usr/lib/systemd/system/rsyslog.service; enabled; vendor preset: enabled)
  Drop-In: /etc/systemd/system/rsyslog.service.d
           └─rsyslog-service.conf
   Active: active (running) since Mon 2022-03-07 13:34:38 CET; 1 weeks 0 days ago
     Docs: man:rsyslogd(8)

           https://www.rsyslog.com/doc/
 Main PID: 269574 (rsyslogd)
    Tasks: 6 (limit: 100914)
   Memory: 5.1M
   CGroup: /system.slice/rsyslog.service
           └─269574 /usr/sbin/rsyslogd -n

Mar 15 08:15:16 server1lb-fqdn rsyslogd[269574]: — MARK —
Mar 15 08:35:16 server1lb-fqdn rsyslogd[269574]: — MARK —
Mar 15 08:55:16 server1lb-fqdn rsyslogd[269574]: — MARK —


If once keepalived is loaded but you still have no log written inside /var/log/keepalived.log

[root@server1:~]# vim /etc/sysconfig/keepalived
 KEEPALIVED_OPTIONS="-D -S 7"

[root@server2:~]# vim /etc/sysconfig/keepalived
 KEEPALIVED_OPTIONS="-D -S 7"

[root@server1:~]# systemctl restart keepalived.service
[root@server1:~]#  systemctl status keepalived

● keepalived.service – LVS and VRRP High Availability Monitor
   Loaded: loaded (/usr/lib/systemd/system/keepalived.service; enabled; vendor preset: disabled)
   Active: active (running) since Thu 2022-02-24 12:12:20 CET; 2 weeks 4 days ago
 Main PID: 1030501 (keepalived)
    Tasks: 2 (limit: 100914)
   Memory: 1.8M
   CGroup: /system.slice/keepalived.service
           ├─1030501 /usr/sbin/keepalived -D
           └─1030502 /usr/sbin/keepalived -D

Warning: Journal has been rotated since unit was started. Log output is incomplete or unavailable.

[root@server2:~]# systemctl restart keepalived.service
[root@server2:~]# systemctl status keepalived

6. Monitoring VRRP traffic of the two keepaliveds with tcpdump
 

Once both keepalived are up and running a good thing is to check the VRRP protocol traffic keeps fluently on both machines.
Keepalived VRRP keeps communicating over the TCP / IP Port 112 thus you can simply snoop TCP tracffic on its protocol.
 

[root@server1:~]# tcpdump proto 112

tcpdump: verbose output suppressed, use -v or -vv for full protocol decode
listening on eth0, link-type EN10MB (Ethernet), capture size 262144 bytes
11:08:07.356187 IP server1lb-fqdn > vrrp.mcast.net: VRRPv2, Advertisement, vrid 50, prio 53, authtype simple, intvl 1s, length 20
11:08:08.356297 IP server1lb-fqdn > vrrp.mcast.net: VRRPv2, Advertisement, vrid 50, prio 53, authtype simple, intvl 1s, length 20
11:08:09.356408 IP server1lb-fqdn > vrrp.mcast.net: VRRPv2, Advertisement, vrid 50, prio 53, authtype simple, intvl 1s, length 20
11:08:10.356511 IP server1lb-fqdn > vrrp.mcast.net: VRRPv2, Advertisement, vrid 50, prio 53, authtype simple, intvl 1s, length 20
11:08:11.356655 IP server1lb-fqdn > vrrp.mcast.net: VRRPv2, Advertisement, vrid 50, prio 53, authtype simple, intvl 1s, length 20

[root@server2:~]# tcpdump proto 112

tcpdump: verbose output suppressed, use -v or -vv for full protocol decode
​listening on eth0, link-type EN10MB (Ethernet), capture size 262144 bytes
11:08:07.356187 IP server1lb-fqdn > vrrp.mcast.net: VRRPv2, Advertisement, vrid 50, prio 53, authtype simple, intvl 1s, length 20
11:08:08.356297 IP server1lb-fqdn > vrrp.mcast.net: VRRPv2, Advertisement, vrid 50, prio 53, authtype simple, intvl 1s, length 20
11:08:09.356408 IP server1lb-fqdn > vrrp.mcast.net: VRRPv2, Advertisement, vrid 50, prio 53, authtype simple, intvl 1s, length 20
11:08:10.356511 IP server1lb-fqdn > vrrp.mcast.net: VRRPv2, Advertisement, vrid 50, prio 53, authtype simple, intvl 1s, length 20
11:08:11.356655 IP server1lb-fqdn > vrrp.mcast.net: VRRPv2, Advertisement, vrid 50, prio 53, authtype simple, intvl 1s, length 20

As you can see the VRRP traffic on the network is originating only from server1lb-fqdn, this is so because host server1lb-fqdn is the keepalived configured master node.

It is possible to spoof the password configured to authenticate between two nodes, thus if you're bringing up keepalived service cluster make sure your security is tight at best the machines should be in a special local LAN DMZ, do not configure DMZ on the internet !!! 🙂 Or if you eventually decide to configure keepalived in between remote hosts, make sure you somehow use encrypted VPN or SSH tunnels to tunnel the VRRP traffic.

[root@server1:~]tcpdump proto 112 -vv
tcpdump: listening on eth0, link-type EN10MB (Ethernet), capture size 262144 bytes
11:36:25.530772 IP (tos 0xc0, ttl 255, id 59838, offset 0, flags [none], proto VRRP (112), length 40)
    server1lb-fqdn > vrrp.mcast.net: vrrp server1lb-fqdn > vrrp.mcast.net: VRRPv2, Advertisement, vrid 50, prio 53, authtype simple, intvl 1s, length 20, addrs: VIPIP_QA auth "testp431"
11:36:26.530874 IP (tos 0xc0, ttl 255, id 59839, offset 0, flags [none], proto VRRP (112), length 40)
    server1lb-fqdn > vrrp.mcast.net: vrrp server1lb-fqdn > vrrp.mcast.net: VRRPv2, Advertisement, vrid 50, prio 53, authtype simple, intvl 1s, length 20, addrs: VIPIP_QA auth "testp431"

Lets also check what floating IP is configured on the machines:

[root@server1:~]# ip -brief address show
lo               UNKNOWN        127.0.0.1/8 
eth0             UP             10.10.10.5/26 10.10.10.1/32 

The 10.10.10.5 IP is the main IP set on LAN interface eth0, 10.10.10.1 is the floating IP which as you can see is currently set by keepalived to listen on first node.

[root@server2:~]# ip -brief address show |grep -i 10.10.10.1

An empty output is returned as floating IP is currently configured on server1

To double assure ourselves the IP is assigned on correct machine, lets ping it and check the IP assigned MAC  currently belongs to which machine.
 

[root@server2:~]# ping 10.10.10.1
PING 10.10.10.1 (10.10.10.1) 56(84) bytes of data.
64 bytes from 10.10.10.1: icmp_seq=1 ttl=64 time=0.526 ms
^C
— 10.10.10.1 ping statistics —
1 packets transmitted, 1 received, 0% packet loss, time 0ms
rtt min/avg/max/mdev = 0.526/0.526/0.526/0.000 ms

[root@server2:~]# arp -an |grep -i 10.44.192.142
? (10.10.10.1) at 00:48:54:91:83:7d [ether] on eth0
[root@server2:~]# ip a s|grep -i 00:48:54:91:83:7d
[root@server2:~]# 

As you can see from below output MAC is not found in configured IPs on server2.
 

[root@server1-fqdn:~]# /sbin/ip a s|grep -i 00:48:54:91:83:7d -B1 -A1
 eth0: <BROADCAST,MULTICAST,UP,LOWER_UP> mtu 1500 qdisc mq state UP group default qlen 1000
    link/ether 00:48:54:91:83:7d brd ff:ff:ff:ff:ff:ff
inet 10.10.10.1/26 brd 10.10.1.191 scope global noprefixroute eth0

Pretty much expected MAC is on keepalived node server1.


7. Testing keepalived on server1 and server2 maachines VIP floating IP really works
 

To test the overall configuration just created, you should stop keeaplived on the Master node and in meantime keep an eye on Slave node (server2), whether it can figure out the Master node is gone and switch its
state BACKUP to save MASTER. By changing the secondary (Slave) keepalived to master the floating IP: 10.10.10.1 will be brought up by the scripts on server2.

Lets assume that something went wrong with server1 VM host, for example the machine crashed due to service overload, DDoS or simply a kernel bug or whatever reason.
To simulate that we simply have to stop keepalived, then the broadcasted information on VRRP TCP/IP proto port 112 will be no longer available and keepalived on node server2, once
unable to communicate to server1 should chnage itself to state MASTER.

[root@server1:~]# systemctl stop keepalived
[root@server1:~]# systemctl status keepalived

● keepalived.service – LVS and VRRP High Availability Monitor
   Loaded: loaded (/usr/lib/systemd/system/keepalived.service; enabled; vendor preset: disabled)
   Active: inactive (dead) since Tue 2022-03-15 12:11:33 CET; 3s ago
  Process: 1192001 ExecStart=/usr/sbin/keepalived $KEEPALIVED_OPTIONS (code=exited, status=0/SUCCESS)
 Main PID: 1192002 (code=exited, status=0/SUCCESS)

Mar 14 18:59:07 server1lb-fqdn Keepalived_vrrp[1192003]: Sending gratuitous ARP on eth0 for 10.10.10.1
Mar 15 12:11:32 server1lb-fqdn systemd[1]: Stopping LVS and VRRP High Availability Monitor…
Mar 15 12:11:32 server1lb-fqdn Keepalived[1192002]: Stopping
Mar 15 12:11:32 server1lb-fqdn Keepalived_vrrp[1192003]: (LB_VIP_QA) sent 0 priority
Mar 15 12:11:32 server1lb-fqdn Keepalived_vrrp[1192003]: (LB_VIP_QA) removing VIPs.
Mar 15 12:11:33 server1lb-fqdn Keepalived_vrrp[1192003]: Stopped – used 2.145252 user time, 15.513454 system time
Mar 15 12:11:33 server1lb-fqdn Keepalived[1192002]: CPU usage (self/children) user: 0.000000/44.555362 system: 0.001151/170.118126
Mar 15 12:11:33 server1lb-fqdn Keepalived[1192002]: Stopped Keepalived v2.1.5 (07/13,2020)
Mar 15 12:11:33 server1lb-fqdn systemd[1]: keepalived.service: Succeeded.
Mar 15 12:11:33 server1lb-fqdn systemd[1]: Stopped LVS and VRRP High Availability Monitor.


On keepalived off, you will get also a notification Email on the Receipt Email configured from keepalived.conf from the working keepalived node with a simple message like:

=> VRRP Instance is no longer owning VRRP VIPs <=

Once keepalived is back up you will get another notification like:

=> VRRP Instance is now owning VRRP VIPs <=

[root@server2:~]# systemctl status keepalived
● keepalived.service – LVS and VRRP High Availability Monitor
   Loaded: loaded (/usr/lib/systemd/system/keepalived.service; enabled; vendor preset: disabled)
   Active: active (running) since Mon 2022-03-14 18:13:52 CET; 17h ago
  Process: 297366 ExecStart=/usr/sbin/keepalived $KEEPALIVED_OPTIONS (code=exited, status=0/SUCCESS)
 Main PID: 297367 (keepalived)
    Tasks: 2 (limit: 100914)
   Memory: 2.1M
   CGroup: /system.slice/keepalived.service
           ├─297367 /usr/sbin/keepalived -D -S 7
           └─297368 /usr/sbin/keepalived -D -S 7

Mar 15 12:11:33 server2lb-fqdn Keepalived_vrrp[297368]: Sending gratuitous ARP on eth0 for 10.10.10.1
Mar 15 12:11:33 server2lb-fqdn Keepalived_vrrp[297368]: Remote SMTP server [127.0.0.1]:25 connected.
Mar 15 12:11:33 server2lb-fqdn Keepalived_vrrp[297368]: SMTP alert successfully sent.
Mar 15 12:11:38 server2lb-fqdn Keepalived_vrrp[297368]: (LB_VIP_QA) Sending/queueing gratuitous ARPs on eth0 for 10.10.10.1
Mar 15 12:11:38 server2lb-fqdn Keepalived_vrrp[297368]: Sending gratuitous ARP on eth0 for 10.10.10.1

[root@server2:~]#  ip addr show|grep -i 10.10.10.1
    inet 10.10.10.1/32 scope global eth0
    

As you see the VIP is now set on server2, just like expected – that's OK, everything works as expected. If the IP did not move double check the keepalived.conf on both nodes for errors or misconfigurations.

To recover the initial order of things so server1 is MASTER and server2 SLAVE host, we just have to switch on the keepalived on server1 machine.

[root@server1:~]# systemctl start keepalived

The automatic change of server1 to MASTER node and respective move of the VIP IP is done because of the higher priority (of importance we previously configured on server1 in keepalived.conf).
 

What we learned?
 

So what we learned in  this article?
We have seen how to easily install and configure a High Availability Load balancer with Keepalived with single floating VIP IP address with 1 MASTER and 1 SLAVE host and a Haproxy example config with few frontends / App backends. We have seen how the config can be tested for potential errors and how we can monitor whether the VRRP2 network traffic flows between nodes and how to potentially debug it further if necessery.
Further on rawly explained some of the keepalived configurations but as keepalived can do pretty much more,for anyone seriously willing to deal with keepalived on a daily basis or just fine tune some already existing ones, you better read closely its manual page "man keepalived.conf" as well as the official Redhat Linux documentation page on setting up a Linux cluster with Keepalived (Be prepare for a small nightmare as the documentation of it seems to be a bit chaotic, and even I would say partly missing or opening questions on what does the developers did meant – not strange considering the havoc that is pretty much as everywhere these days.)

Finally once keepalived hosts are prepared, it was shown how to test the keepalived application cluster and Floating IP does move between nodes in case if one of the 2 keepalived nodes is inaccessible.

The same logic can be repeated multiple times and if necessery you can set multiple VIPs to expand the HA reachable IPs solution.
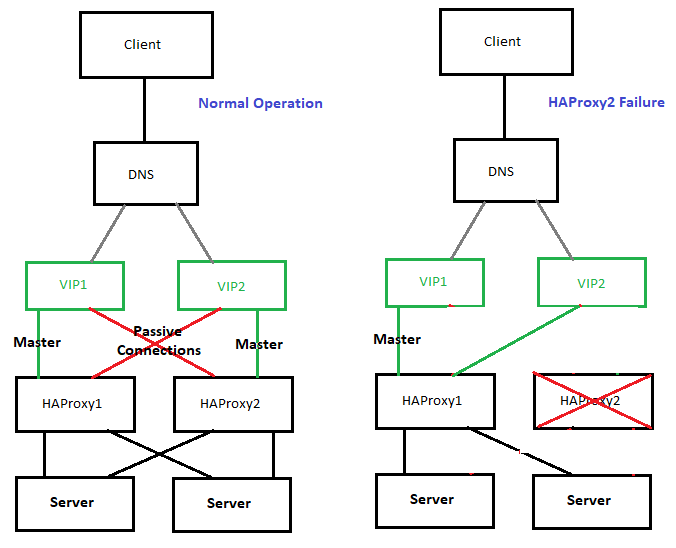
high-availability-with-two-vips-example-diagram

The presented idea is with haproxy forward Proxy server to proxy requests towards Application backend (servince machines), however if you need to set another set of server on the flow to  process HTML / XHTML / PHP / Perl / Python  programming code, with some common Webserver setup ( Nginx / Apache / Tomcat / JBOSS) and enable SSL Secure certificate with lets say Letsencrypt, this can be relatively easily done. If you want to implement letsencrypt and a webserver check this redundant SSL Load Balancing with haproxy & keepalived article.

That's all folks, hope you enjoyed.
If you need to configure keepalived Cluster or a consultancy write your query here 🙂

Fix weird double logging in haproxy.log file due to haproxy.cfg misconfiguration

Tuesday, March 8th, 2022

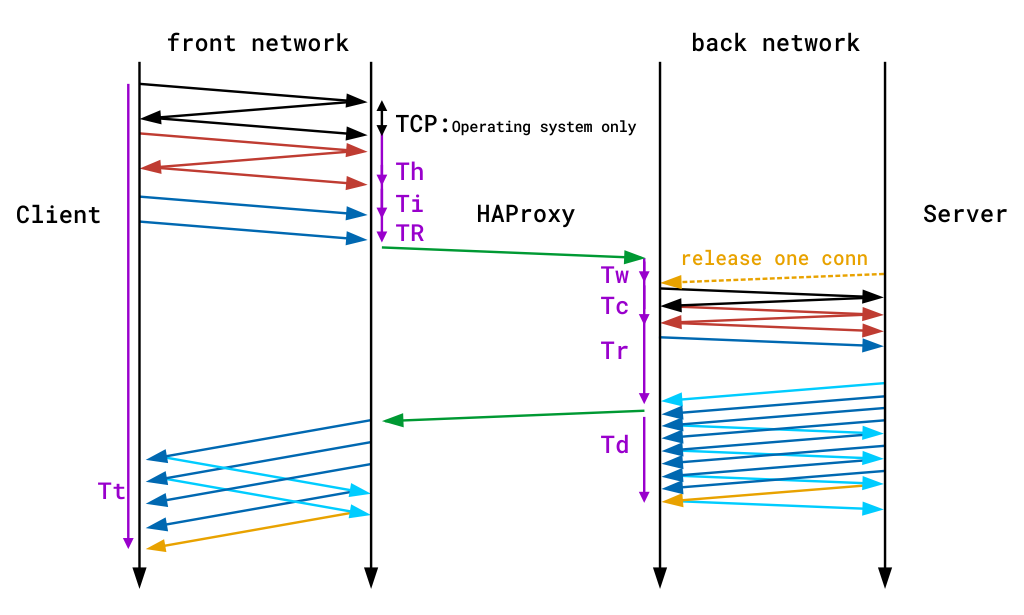
haproxy-logging-front-network-back-network-diagram

While we were building a new machine that will serve as a Haproxy server proxy frontend to tunnel some traffic to a number of backends, 
came across weird oddity. The call requests sent to the haproxy and redirected to backend servers, were being written in the log twice.

Since we have two backend Application servers hat are serving the request, my first guess was this is caused by the fact haproxy
tries to connect to both nodes on each sent request, or that the double logging is caused by the rsyslogd doing something strange on each
received query. The rsyslog configuration configured to send via local6 facility to rsyslog is like that:

$ModLoad imudp
$UDPServerAddress 127.0.0.1
$UDPServerRun 514
#2022/02/02: HAProxy logs to local6, save the messages
local6.*                                                /var/log/haproxy.log


The haproxy basic global and defaults and frontend section config is like that:
 

global
    log          127.0.0.1 local6 debug
    chroot       /var/lib/haproxy
    pidfile      /run/haproxy.pid
    stats socket /var/lib/haproxy/haproxy.sock mode 0600 level admin
    maxconn      4000
    user         haproxy
    group        haproxy
    daemon


defaults
    mode        tcp
    log         global
#    option      dontlognull
#    option      httpclose
#    option      httplog
#    option      forwardfor
    option      redispatch
    option      log-health-checks
    timeout connect 10000 # default 10 second time out if a backend is not found
    timeout client 300000
    timeout server 300000
    maxconn     60000
    retries     3
 

listen FRONTEND1
        bind 10.71.80.5:63750
        mode tcp
        option tcplog
        log global
        log-format [%t]\ %ci:%cp\ %bi:%bp\ %b/%s:%sp\ %Tw/%Tc/%Tt\ %B\ %ts\ %ac/%fc/%bc/%sc/%rc\ %sq/%bq
        balance roundrobin
        timeout client 350000
        timeout server 350000
        timeout connect 35000
        server backend-host1 10.80.50.1:13750 weight 1 check port 15000
        server backend-host2 10.80.50.2:13750 weight 2 check port 15000

After quick research online on why this odd double logging of request ends in /var/log/haproxy.log it turns out this is caused by the 

log global  defined double under the defaults section as well as in the frontend itself, hence to resolve simply had to comment out the log global in Frontend, so it looks like so:

listen FRONTEND1
        bind 10.71.80.5:63750
        mode tcp
        option tcplog
  #      log global
        log-format [%t]\ %ci:%cp\ %bi:%bp\ %b/%s:%sp\ %Tw/%Tc/%Tt\ %B\ %ts\ %ac/%fc/%bc/%sc/%rc\ %sq/%bq
        balance roundrobin
        timeout client 350000
        timeout server 350000
        timeout connect 35000
        server backend-host1 10.80.50.1:13750 weight 1 check port 15000
        server backend-host2 10.80.50.2:13750 weight 2 check port 15000


Next just reloaded haproxy and one request started leaving only one trail inside haproxy.log as expected 🙂
 

Zabbix rkhunter monitoring check if rootkits trojans and viruses or suspicious OS activities are detected

Wednesday, December 8th, 2021

monitor-rkhunter-with-zabbix-zabbix-rkhunter-check-logo

If you're using rkhunter to monitor for malicious activities, a binary changes, rootkits, viruses, malware, suspicious stuff and other famous security breach possible or actual issues, perhaps you have configured your machines to report to some Email.
But what if you want to have a scheduled rkhunter running on the machine and you don't want to count too much on email alerting (especially because email alerting) makes possible for emails to be tracked by sysadmin pretty late?

We have been in those situation and in this case me and my dear colleague Georgi Stoyanov developed a small rkhunter Zabbix userparameter check to track and Alert if any traces of "Warning"''s are mateched in the traditional rkhunter log file /var/log/rkhunter/rkhunter.log

To set it up and use it is pretty use you will need to have a recent version of zabbix-agent installed on the machine and connected to a Zabbix server, in my case this is:

[root@centos ~]# rpm -qa |grep -i zabbix-agent
zabbix-agent-4.0.7-1.el7.x86_64

 placed inside /etc/zabbix/zabbix_agentd.d/userparameter_rkhunter_warning_check.conf

[root@centos /etc/zabbix/zabbix_agentd.d ]# cat userparameter_rkhunter_warning_check.conf
# userparameter script to check if any Warning is inside /var/log/rkhunter/rkhunter.log and if found to trigger Zabbix alert
UserParameter=rkhunter.warning, (TODAY=$(date |awk '{ print $1" "$2" "$3 }'); if [ $(cat /var/log/rkhunter/rkhunter.log | awk “/$TODAY/,EOF” | /bin/grep -i ‘\[ Warning \]’ | /usr/bin/wc -l) != ‘0’ ]; then echo 1; else echo 0; fi)
UserParameter=rkhunter.suspected,(/bin/grep -i 'Suspect files: ' /var/log/rkhunter/rkhunter.log|tail -n 1| awk '{ print $4 }')
UserParameter=rkhunter.rootkits,(/bin/grep -i 'Possible rootkits: ' /var/log/rkhunter/rkhunter.log|tail -n 1| awk '{ print $4 }')


2. Prepare Rkhunter Template, Triggers and Items


In Zabbix Server that you access from web control interface, you will have to prepare a new template called lets say Rkhunter with the necessery Triggers and Items


2.1 Create Rkhunter Items
 

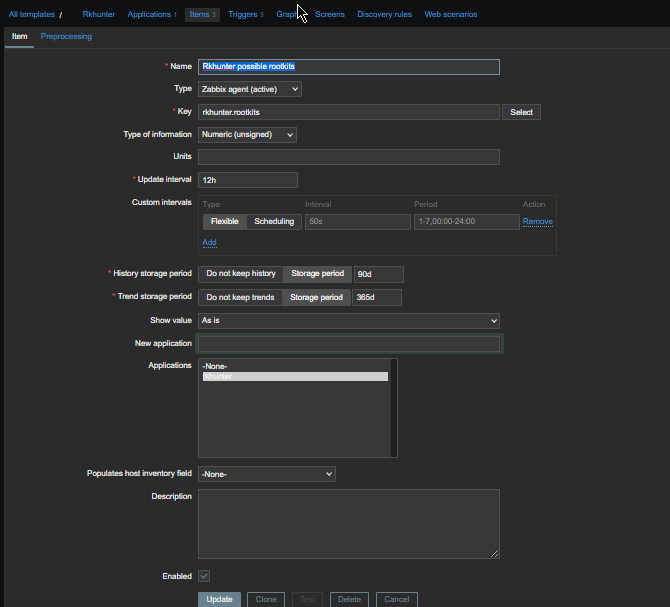
On Zabbix Server side, uou will have to configure 3 Items for the 3 configured userparameter above script keys, like so:

rkhunter-items-zabbix-screenshot.png

  • rkhunter.suspected Item configuration


rkhunter-suspected-files

  • rkhunter.warning Zabbix Item config

rkhunter-warning-found-check-zabbix

  • rkhunter.rootkits Zabbix Item config


    rkhunter-zabbix-possible-rootkits-item1

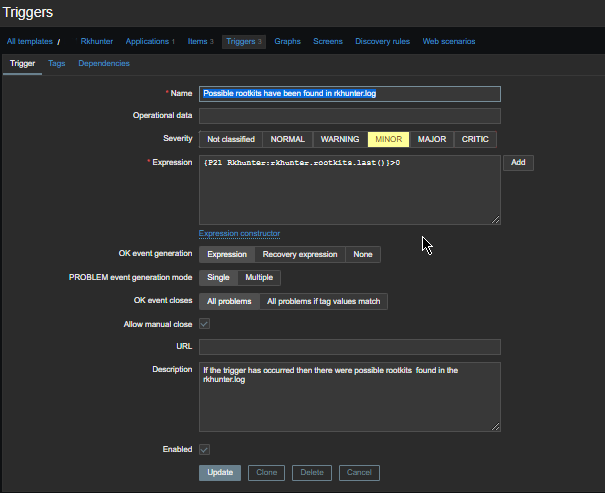
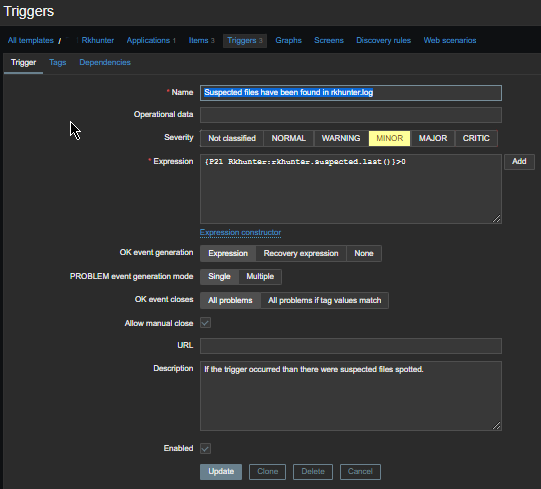
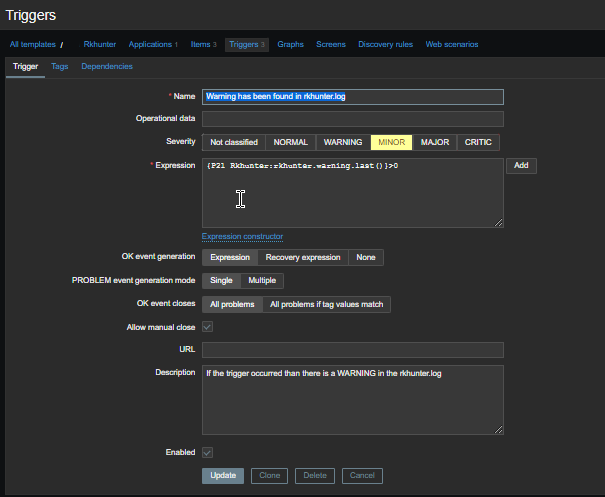
    2.2 Create Triggers
     

You need to have an overall of 3 triggers like in below shot:

zabbix-rkhunter-all-triggers-screenshot
 

  • rkhunter.rootkits Trigger config

rkhunter-rootkits-trigger-zabbix1

  • rkhunter.suspected Trigger cfg

rkhunter-suspected-trigger-zabbix1

  • rkhunter warning Trigger cfg

rkhunter-warning-trigger1

3. Reload zabbix-agent and test the keys


It is necessery to reload zabbix agent for the new userparameter to start to be sent to remote zabbix server (through a proxy if you have one configured).

[root@centos ~]# systemctl restart zabbix-agent


To make the zabbix-agent send the keys to the server you can use zabbix_sender to have the test tool you will have to have installed (zabbix-sender) on the server.

To trigger a manualTest if you happen to have some problems with the key which shouldn''t be the case you can sent a value to the respectve key with below command:

[root@centos ~ ]# zabbix_sender -vv -c "/etc/zabbix/zabbix_agentd.conf" -k "khunter.warning" -o "1"


Check on Zabbix Server the sent value is received, for any oddities as usual check what is inside  /var/log/zabbix/zabbix_agentd.log for any errors or warnings.

Install and configure rkhunter for improved security on a PCI DSS Linux / BSD servers with no access to Internet

Wednesday, November 10th, 2021

install-and-configure-rkhunter-with-tightened-security-variables-rkhunter-logo

rkhunter or Rootkit Hunter scans systems for known and unknown rootkits. The tool is not new and most system administrators that has to mantain some good security servers perhaps already use it in their daily sysadmin tasks.

It does this by comparing SHA-1 Hashes of important files with known good ones in online databases, searching for default directories (of rootkits), wrong permissions, hidden files, suspicious strings in kernel modules, commmon backdoors, sniffers and exploits as well as other special tests mostly for Linux and FreeBSD though a ports for other UNIX operating systems like Solaris etc. are perhaps available. rkhunter is notable due to its inclusion in popular mainstream FOSS operating systems (CentOS, Fedora,Debian, Ubuntu etc.).

Even though rkhunter is not rapidly improved over the last 3 years (its last Official version release was on 20th of Febuary 2018), it is a good tool that helps to strengthen even further security and it is often a requirement for Unix servers systems that should follow the PCI DSS Standards (Payment Card Industry Data Security Standards).

Configuring rkhunter is a pretty straight forward if you don't have too much requirements but I decided to write this article for the reason there are fwe interesting options that you might want to adopt in configuration to whitelist any files that are reported as Warnings, as well as how to set a configuration that sets a stricter security checks than the installation defaults. 

1. Install rkhunter .deb / .rpm package depending on the Linux distro or BSD

  • If you have to place it on a Redhat based distro CentOS / Redhat / Fedora

[root@Centos ~]# yum install -y rkhunter


  • On Debian distros the package name is equevallent to install there exec usual:

root@debian:~# apt install –yes rkhunter

  • On FreeBSD / NetBSD or other BSD forks you can install it from the BSD "World" ports system or install it from a precompiled binary.

freebsd# pkg install rkhunter

One important note to make here is to have a fully functional Alarming from rkhunter, you will have to have a fully functional configured postfix / exim / qmail whatever mail server to relay via official SMTP so you the Warning Alarm emails be able to reach your preferred Alarm email address. If you haven't installed postfix for example and configure it you might do.

– On Deb based distros 

[root@Centos ~]#yum install postfix


– On RPM based distros

root@debian:~# apt-get install –yes postfix


and as minimum, further on configure some functional Email Relay server within /etc/postfix/main.cf
 

# vi /etc/postfix/main.cf
relayhost = [relay.smtp-server.com]

2. Prepare rkhunter.conf initial configuration


Depending on what kind of files are present on the filesystem it could be for some reasons some standard package binaries has to be excluded for verification, because they possess unusual permissions because of manual sys admin monification this is done with the rkhunter variable PKGMGR_NO_VRFY.

If remote logging is configured on the system via something like rsyslog you will want to specificly tell it to rkhunter so this check as a possible security issue is skipped via ALLOW_SYSLOG_REMOTE_LOGGING=1. 

In case if remote root login via SSH protocol is disabled via /etc/ssh/sshd_config
PermitRootLogin no variable, the variable to include is ALLOW_SSH_ROOT_USER=no

It is useful to also increase the hashing check algorithm for security default one SHA256 you might want to change to SHA512, this is done via rkhunter.conf var HASH_CMD=SHA512

Triggering new email Warnings has to be configured so you receive, new mails at a preconfigured mailbox of your choice via variable
MAIL-ON-WARNING=SetMailAddress


# vi /etc/rkhunter.conf

PKGMGR_NO_VRFY=/usr/bin/su

PKGMGR_NO_VRFY=/usr/bin/passwd

ALLOW_SYSLOG_REMOTE_LOGGING=1

# Needed for corosync/pacemaker since update 19.11.2020

ALLOWDEVFILE=/dev/shm/qb-*/qb-*

# enabled ssh root access skip

ALLOW_SSH_ROOT_USER=no

HASH_CMD=SHA512

# Email address to sent alert in case of Warnings

MAIL-ON-WARNING=Your-Customer@Your-Email-Server-Destination-Address.com

MAIL-ON-WARNING=Your-Second-Peronsl-Email-Address@SMTP-Server.com

DISABLE_TESTS=os_specific


Optionally if you're using something specific such as corosync / pacemaker High Availability cluster or some specific software that is creating /dev/ files identified as potential Risks you might want to add more rkhunter.conf options like:
 

# Allow PCS/Pacemaker/Corosync
ALLOWDEVFILE=/dev/shm/qb-attrd-*
ALLOWDEVFILE=/dev/shm/qb-cfg-*
ALLOWDEVFILE=/dev/shm/qb-cib_rw-*
ALLOWDEVFILE=/dev/shm/qb-cib_shm-*
ALLOWDEVFILE=/dev/shm/qb-corosync-*
ALLOWDEVFILE=/dev/shm/qb-cpg-*
ALLOWDEVFILE=/dev/shm/qb-lrmd-*
ALLOWDEVFILE=/dev/shm/qb-pengine-*
ALLOWDEVFILE=/dev/shm/qb-quorum-*
ALLOWDEVFILE=/dev/shm/qb-stonith-*
ALLOWDEVFILE=/dev/shm/pulse-shm-*
ALLOWDEVFILE=/dev/md/md-device-map
# Needed for corosync/pacemaker since update 19.11.2020
ALLOWDEVFILE=/dev/shm/qb-*/qb-*

# tomboy creates this one
ALLOWDEVFILE="/dev/shm/mono.*"
# created by libv4l
ALLOWDEVFILE="/dev/shm/libv4l-*"
# created by spice video
ALLOWDEVFILE="/dev/shm/spice.*"
# created by mdadm
ALLOWDEVFILE="/dev/md/autorebuild.pid"
# 389 Directory Server
ALLOWDEVFILE=/dev/shm/sem.slapd-*.stats
# squid proxy
ALLOWDEVFILE=/dev/shm/squid-cf*
# squid ssl cache
ALLOWDEVFILE=/dev/shm/squid-ssl_session_cache.shm
# Allow podman
ALLOWDEVFILE=/dev/shm/libpod*lock*


3. Set the proper mirror database URL location to internal network repository


Usually  file /var/lib/rkhunter/db/mirrors.dat does contain Internet server address where latest version of mirrors.dat could be fetched, below is how it looks by default on Debian 10 Linux.

root@debian:/var/lib/rkhunter/db# cat mirrors.dat 
Version:2007060601
mirror=http://rkhunter.sourceforge.net

As you can guess a machine that doesn't have access to the Internet neither directly, neither via some kind of secure proxy because it is in a Paranoic Demilitarized Zone (DMZ) Network with many firewalls. What you can do then is setup another Mirror server (Apache / Nginx) within the local PCI secured LAN that gets regularly the database from official database on http://rkhunter.sourceforge.net/ (by installing and running rkhunter –update command on the Mirror WebServer and copying data under some directory structure on the remote local LAN accessible server, to keep the DB uptodate you might want to setup a cron to periodically copy latest available rkhunter database towards the http://mirror-url/path-folder/)

# vi /var/lib/rkhunter/db/mirrors.dat

local=http://rkhunter-url-mirror-server-url.com/rkhunter/1.4/


A mirror copy of entire db files from Debian 10.8 ( Buster ) ready for download are here.

Update entire file property db and check for rkhunter db updates


# rkhunter –update && rkhunter –propupdate

[ Rootkit Hunter version 1.4.6 ]

Checking rkhunter data files…
  Checking file mirrors.dat                                  [ Skipped ]
  Checking file programs_bad.dat                             [ No update ]
  Checking file backdoorports.dat                            [ No update ]
  Checking file suspscan.dat                                 [ No update ]
  Checking file i18n/cn                                      [ No update ]
  Checking file i18n/de                                      [ No update ]
  Checking file i18n/en                                      [ No update ]
  Checking file i18n/tr                                      [ No update ]
  Checking file i18n/tr.utf8                                 [ No update ]
  Checking file i18n/zh                                      [ No update ]
  Checking file i18n/zh.utf8                                 [ No update ]
  Checking file i18n/ja                                      [ No update ]


rkhunter-update-propupdate-screenshot-centos-linux


4. Initiate a first time check and see whether something is not triggering Warnings

# rkhunter –check

rkhunter-checking-for-rootkits-linux-screenshot

As you might have to run the rkhunter multiple times, there is annoying Press Enter prompt, between checks. The idea of it is that you're able to inspect what went on but since usually, inspecting /var/log/rkhunter/rkhunter.log is much more easier, I prefer to skip this with –skip-keypress option.

# rkhunter –check  –skip-keypress


5. Whitelist additional files and dev triggering false warnings alerts


You have to keep in mind many files which are considered to not be officially PCI compatible and potentially dangerous such as lynx browser curl, telnet etc. might trigger Warning, after checking them thoroughfully with some AntiVirus software such as Clamav and checking the MD5 checksum compared to a clean installed .deb / .rpm package on another RootKit, Virus, Spyware etc. Clean system (be it virtual machine or a Testing / Staging) machine you might want to simply whitelist the files which are incorrectly detected as dangerous for the system security.

Again this can be achieved with

PKGMGR_NO_VRFY=

Some Cluster softwares that are preparing their own /dev/ temporary files such as Pacemaker / Corosync might also trigger alarms, so you might want to suppress this as well with ALLOWDEVFILE

ALLOWDEVFILE=/dev/shm/qb-*/qb-*


If Warnings are found check what is the issue and if necessery white list files due to incorrect permissions in /etc/rkhunter.conf .

rkhunter-warnings-found-screenshot

Re-run the check until all appears clean as in below screenshot.

rkhunter-clean-report-linux-screenshot

Fixing Checking for a system logging configuration file [ Warning ]

If you happen to get some message like, message appears when rkhunter -C is done on legacy CentOS release 6.10 (Final) servers:

[13:45:29] Checking for a system logging configuration file [ Warning ]
[13:45:29] Warning: The 'systemd-journald' daemon is running, but no configuration file can be found.
[13:45:29] Checking if syslog remote logging is allowed [ Allowed ]

To fix it, you will have to disable SYSLOG_CONFIG_FILE at all.
 

SYSLOG_CONFIG_FILE=NONE

Fix Out of inodes on Postfix Linux Mail Cluster. How to clean up filesystem running out of Inodes, Filesystem inodes on partition is 100% full

Wednesday, August 25th, 2021

Inode_Entry_inode-table-content

Recently we have faced a strange issue with with one of our Clustered Postfix Mail servers (the cluster is with 2 nodes that each has configured Postfix daemon mail servers (running on an OpenVZ virtualized environment).
A heartbeat that checks liveability of clusters and switches nodes in case of one of the two gets broken due to some reason), pretty much a standard SMTP cluster.

So far so good but since the cluster is a kind of abondoned and is pretty much legacy nowadays and used just for some Monitoring emails from different scripts and systems on servers, it was not really checked thoroughfully for years and logically out of sudden the alarming email content sent via the cluster stopped working.

The normal sysadmin job here  was to analyze what is going on with the cluster and fix it ASAP. After some very basic analyzing we catched the problem is caused by a  "inodes full" (100% of available inodes were occupied) problem, e.g. file system run out of inodes on both machines perhaps due to a pengine heartbeat process  bug  leading to producing a high number of .bz2 pengine recovery archive files stored in /var/lib/pengine>

Below are the few steps taken to analyze and fix the problem.
 

1. Finding out about the the system run out of inodes problem


After logging on to system and not finding something immediately is wrong with inodes, all I can see from crm_mon is cluster was broken.
A plenty of emails were left inside the postfix mail queue visible with a standard command

[root@smtp1: ~ ]# postqueue -p

It took me a while to find ot the problem is with inodes because a simple df -h  was showing systems have enough space but still cluster quorum was not complete.
A bit of further investigation led me to a  simple df -i reporting the number of inodes on the local filesystems on both our SMTP1 and SMTP2 got all occupied.

[root@smtp1: ~ ]# df -i
Filesystem            Inodes   IUsed   IFree IUse% Mounted on
/dev/simfs            500000   500000  0   100% /
none                   65536      61   65475    1% /dev

As you can see the number of inodes on the Virual Machine are unfortunately depleted

Next step was to check directories occupying most inodes, as this is the place from where files could be temporary moved to a remote server filesystem or moved to another partition with space on a server locally attached drives.
Below command gives an ordered list with directories locally under the mail root filesystem / and its respective occupied number files / inodes,
the more files under a directory the more inodes are being occupied by the files on the filesystem.


run-out-if-inodes-what-is-inode-find-out-which-filesystem-or-directory-eating-up-all-your-system-inodes-linux_inode_diagram.gif
1.1 Getting which directory consumes most of the inodes on the systems


[root@smtp1: ~ ]# { find / -xdev -printf '%h\n' | sort | uniq -c | sort -k 1 -n; } 2>/dev/null
….
…..

…….
    586 /usr/lib64/python2.4
    664 /usr/lib64
    671 /usr/share/man/man8
    860 /usr/bin
   1006 /usr/share/man/man1
   1124 /usr/share/man/man3p
   1246 /var/lib/Pegasus/prev_repository_2009-03-10-1236698426.308128000.rpmsave/root#cimv2/classes
   1246 /var/lib/Pegasus/prev_repository_2009-05-18-1242636104.524113000.rpmsave/root#cimv2/classes
   1246 /var/lib/Pegasus/prev_repository_2009-11-06-1257494054.380244000.rpmsave/root#cimv2/classes
   1246 /var/lib/Pegasus/prev_repository_2010-08-04-1280907760.750543000.rpmsave/root#cimv2/classes
   1381 /var/lib/Pegasus/prev_repository_2010-11-15-1289811714.398469000.rpmsave/root#cimv2/classes
   1381 /var/lib/Pegasus/prev_repository_2012-03-19-1332151633.572875000.rpmsave/root#cimv2/classes
   1398 /var/lib/Pegasus/repository/root#cimv2/classes
   1696 /usr/share/man/man3
   400816 /var/lib/pengine

Note, the above command orders the files from bottom to top order and obviosuly the bottleneck directory that is over-eating Filesystem inodes with an exceeding amount of files is
/var/lib/pengine
 

2. Backup old multitude of files just in case of something goes wrong with the cluster after some files are wiped out


The next logical step of course is to check what is going on inside /var/lib/pengine just to find a very ,very large amount of pe-input-*NUMBER*.bz2 files were suddenly produced.


[root@smtp1: ~ ]# ls -1 pe-input*.bz2 | wc -l
 400816


The files are produced by the pengine process which is one of the processes that is controlling the heartbeat cluster state, presumably it is done by running process:

[root@smtp1: ~ ]# ps -ef|grep -i pengine
24        5649  5521  0 Aug10 ?        00:00:26 /usr/lib64/heartbeat/pengine


Hence in order to fix the issue, to prevent some inconsistencies in the cluster due to the file deletion,  copied the whole directory to another mounted parition (you can mount it remotely with sshfs for example) or use a local one if you have one:

[root@smtp1: ~ ]# cp -rpf /var/lib/pengine /mnt/attached_storage


and proceeded to clean up some old multitde of files that are older than 2 years of times (720 days):


3. Clean  up /var/lib/pengine files that are older than two years with short loop and find command


First I made a list with all the files to be removed in external text file and quickly reviewed it by lessing it like so

[root@smtp1: ~ ]#  cd /var/lib/pengine
[root@smtp1: ~ ]# find . -type f -mtime +720|grep -v pe-error.last | grep -v pe-input.last |grep -v pe-warn.last -fprint /home/myuser/pengine_older_than_720days.txt
[root@smtp1: ~ ]# less /home/myuser/pengine_older_than_720days.txt


Once reviewing commands I've used below command to delete the files you can run below command do delete all older than 2 years that are different from pe-error.last / pe-input.last / pre-warn.last which might be needed for proper cluster operation.

[root@smtp1: ~ ]#  for i in $(find . -type f -mtime +720 -exec echo '{}' \;|grep -v pe-error.last | grep -v pe-input.last |grep -v pe-warn.last); do echo $i; done


Another approach to the situation is to simply review all the files inside /var/lib/pengine and delete files based on year of creation, for example to delete all files in /var/lib/pengine from 2010, you can run something like:
 

[root@smtp1: ~ ]# for i in $(ls -al|grep -i ' 2010 ' | awk '{ print $9 }' |grep -v 'pe-warn.last'); do rm -f $i; done


4. Monitor real time inodes freeing

While doing the clerance of old unnecessery pengine heartbeat archives you can open another ssh console to the server and view how the inodes gets freed up with a command like:


# check if inodes is not being rapidly decreased

[root@csmtp1: ~ ]# watch 'df -i'


5. Restart basic Linux services producing pid files and logs etc. to make then workable (some services might not be notified the inodes on the Hard drive are freed up)

Because the hard drive on the system was full some services started to misbehaving and /var/log logging was impacted so I had to also restart them in our case this is the heartbeat itself
that  checks clusters nodes availability as well as the logging daemon service rsyslog


# restart rsyslog and heartbeat services
[root@csmtp1: ~ ]# /etc/init.d/heartbeat restart
[root@csmtp1: ~ ]# /etc/init.d/rsyslog restart

The systems had been a data integrity legacy service samhain so I had to restart this service as well to reforce the /var/log/samhain log file to again continusly start writting data to HDD.

# Restart samhain service init script 
[root@csmtp1: ~ ]# /etc/init.d/samhain restart


6. Check up enough inodes are freed up with df

[root@smtp1 log]# df -i
Filesystem Inodes IUsed IFree IUse% Mounted on
/dev/simfs 500000 410531 19469 91% /
none 65536 61 65475 1% /dev


I had to repeat the same process on the second Postfix cluster node smtp2, and after all the steps like below check the status of smtp2 node and the postfix queue, following same procedure made the second smtp2 cluster member as expected 🙂


7. Check the cluster node quorum is complete, e.g. postfix cluster is operating normally


# Test if email cluster is ok with pacemaker resource cluster manager – lt-crm_mon
 

[root@csmtp1: ~ ]# crm_mon -1
============
Last updated: Tue Aug 10 18:10:48 2021
Stack: Heartbeat
Current DC: smtp2.fqdn.com (bfb3d029-89a8-41f6-a9f0-52d377cacd83) – partition with quorum
Version: 1.0.12-unknown
2 Nodes configured, unknown expected votes
4 Resources configured.
============

Online: [ smtp2.fqdn.com smtp1.fqdn.com ]

failover-ip (ocf::heartbeat:IPaddr2): Started csmtp1.ikossvan.de
Clone Set: postfix_clone
Started: [ smtp2.fqdn.com smtp1fqdn.com ]
Clone Set: pingd_clone
Started: [ smtp2.fqdn.com smtp1.fqdn.com ]
Clone Set: mailto_clone
Started: [ smtp2.fqdn.com smtp1.fqdn.com ]


8.  Force resend a few hundred thousands of emails left in the email queue


After some inodes gets freed up due to the file deletion, i've reforced a couple of times the queued mail servers to be immediately resent to remote mail destinations with cmd:


# force emails in queue to be resend with postfix

[root@smtp1: ~ ]# sendmail -q


– It was useful to watch in real time how the queued emails are quickly decreased (queued mails are successfully sent to destination addresses) with:


# Monitor  the decereasing size of the email queue
[root@smtp1: ~ ]# watch 'postqueue -p|grep -i '@'|wc -l'