Posts Tagged ‘host’

Hack: Using ssh / curl or wget to test TCP port connection state to remote SSH, DNS, SMTP, MySQL or any other listening service in PCI environment servers

Wednesday, December 30th, 2020

using-curl-ssh-wget-to-test-tcp-port-opened-or-closed-for-web-mysql-smtp-or-any-other-linstener-in-pci-linux-logo

If you work on PCI high security environment servers in isolated local networks where each package installed on the Linux / Unix system is of importance it is pretty common that some basic stuff are not there in most cases it is considered a security hole to even have a simple telnet installed on the system. I do have experience with such environments myself and thus it is pretty daunting stuff so in best case you can use something like a simple ssh client if you're lucky and the CentOS / Redhat / Suse Linux whatever distro has openssh-client package installed.
If you're lucky to have the ssh onboard you can use telnet in same manner as netcat or the swiss army knife (nmap) network mapper tool to test whether remote service TCP / port is opened or not. As often this is useful, if you don't have access to the CISCO / Juniper or other (networ) / firewall equipment which is setting the boundaries and security port restrictions between networks and servers.

Below is example on how to use ssh client to test port connectivity to lets say the Internet, i.e.  Google / Yahoo search engines.
 

[root@pciserver: /home ]# ssh -oConnectTimeout=3 -v google.com -p 23
OpenSSH_7.9p1 Debian-10+deb10u2, OpenSSL 1.1.1g  21 Apr 2020
debug1: Connecting to google.com [172.217.169.206] port 23.
debug1: connect to address 172.217.169.206 port 23: Connection timed out
debug1: Connecting to google.com [2a00:1450:4017:80b::200e] port 23.
debug1: connect to address 2a00:1450:4017:80b::200e port 23: Cannot assign requested address
ssh: connect to host google.com port 23: Cannot assign requested address
root@pcfreak:/var/www/images# ssh -oConnectTimeout=3 -v google.com -p 80
OpenSSH_7.9p1 Debian-10+deb10u2, OpenSSL 1.1.1g  21 Apr 2020
debug1: Connecting to google.com [172.217.169.206] port 80.
debug1: connect to address 172.217.169.206 port 80: Connection timed out
debug1: Connecting to google.com [2a00:1450:4017:807::200e] port 80.
debug1: connect to address 2a00:1450:4017:807::200e port 80: Cannot assign requested address
ssh: connect to host google.com port 80: Cannot assign requested address
root@pcfreak:/var/www/images# ssh google.com -p 80
ssh_exchange_identification: Connection closed by remote host
root@pcfreak:/var/www/images# ssh google.com -p 80 -v -oConnectTimeout=3
OpenSSH_7.9p1 Debian-10+deb10u2, OpenSSL 1.1.1g  21 Apr 2020
debug1: Connecting to google.com [172.217.169.206] port 80.
debug1: connect to address 172.217.169.206 port 80: Connection timed out
debug1: Connecting to google.com [2a00:1450:4017:80b::200e] port 80.
debug1: connect to address 2a00:1450:4017:80b::200e port 80: Cannot assign requested address
ssh: connect to host google.com port 80: Cannot assign requested address
root@pcfreak:/var/www/images# ssh google.com -p 80 -v -oConnectTimeout=5
OpenSSH_7.9p1 Debian-10+deb10u2, OpenSSL 1.1.1g  21 Apr 2020
debug1: Connecting to google.com [142.250.184.142] port 80.
debug1: connect to address 142.250.184.142 port 80: Connection timed out
debug1: Connecting to google.com [2a00:1450:4017:80c::200e] port 80.
debug1: connect to address 2a00:1450:4017:80c::200e port 80: Cannot assign requested address
ssh: connect to host google.com port 80: Cannot assign requested address
root@pcfreak:/var/www/images# ssh google.com -p 80 -v
OpenSSH_7.9p1 Debian-10+deb10u2, OpenSSL 1.1.1g  21 Apr 2020
debug1: Connecting to google.com [172.217.169.206] port 80.
debug1: Connection established.
debug1: identity file /root/.ssh/id_rsa type 0
debug1: identity file /root/.ssh/id_rsa-cert type -1
debug1: identity file /root/.ssh/id_dsa type -1
debug1: identity file /root/.ssh/id_dsa-cert type -1
debug1: identity file /root/.ssh/id_ecdsa type -1
debug1: identity file /root/.ssh/id_ecdsa-cert type -1
debug1: identity file /root/.ssh/id_ed25519 type -1
debug1: identity file /root/.ssh/id_ed25519-cert type -1
debug1: identity file /root/.ssh/id_xmss type -1
debug1: identity file /root/.ssh/id_xmss-cert type -1
debug1: Local version string SSH-2.0-OpenSSH_7.9p1 Debian-10+deb10u2
debug1: ssh_exchange_identification: HTTP/1.0 400 Bad Request


debug1: ssh_exchange_identification: Content-Type: text/html; charset=UTF-8


debug1: ssh_exchange_identification: Referrer-Policy: no-referrer


debug1: ssh_exchange_identification: Content-Length: 1555


debug1: ssh_exchange_identification: Date: Wed, 30 Dec 2020 14:13:25 GMT


debug1: ssh_exchange_identification:


debug1: ssh_exchange_identification: <!DOCTYPE html>

debug1: ssh_exchange_identification: <html lang=en>

debug1: ssh_exchange_identification:   <meta charset=utf-8>

debug1: ssh_exchange_identification:   <meta name=viewport content="initial-scale=1, minimum-scale=1, width=device-width">

debug1: ssh_exchange_identification:   <title>Error 400 (Bad Request)!!1</title>

debug1: ssh_exchange_identification:   <style>

debug1: ssh_exchange_identification:     *{margin:0;padding:0}html,code{font:15px/22px arial,sans-serif}html{background:#fff;color:#222;padding:15px}body{margin:7% auto 0;max-width:390px;min-height:180px;padding:30px 0 15px}* > body{background:url(//www.google.com/images/errors/robot.png) 10
debug1: ssh_exchange_identification: 0% 5px no-repeat;padding-right:205px}p{margin:11px 0 22px;overflow:hidden}ins{color:#777;text-decoration:none}a img{border:0}@media screen and (max-width:772px){body{background:none;margin-top:0;max-width:none;padding-right:0}}#logo{background:url(//www.g
debug1: ssh_exchange_identification: oogle.com/images/branding/googlelogo/1x/googlelogo_color_150x54dp.png) no-repeat;margin-left:-5px}@media only screen and (min-resolution:192dpi){#logo{background:url(//www.google.com/images/branding/googlelogo/2x/googlelogo_color_150x54dp.png) no-repeat 0
debug1: ssh_exchange_identification: % 0%/100% 100%;-moz-border-image:url(//www.google.com/images/branding/googlelogo/2x/googlelogo_color_150x54dp.png) 0}}@media only screen and (-webkit-min-device-pixel-ratio:2){#logo{background:url(//www.google.com/images/branding/googlelogo/2x/googlelogo_
debug1: ssh_exchange_identification: color_150x54dp.png) no-repeat;-webkit-background-size:100% 100%}}#logo{display:inline-block;height:54px;width:150px}

debug1: ssh_exchange_identification:   </style>

debug1: ssh_exchange_identification:   <a href=//www.google.com/><span id=logo aria-label=Google></span></a>

debug1: ssh_exchange_identification:   <p><b>400.</b> <ins>That\342\200\231s an error.</ins>

debug1: ssh_exchange_identification:   <p>Your client has issued a malformed or illegal request.  <ins>That\342\200\231s all we know.</ins>

ssh_exchange_identification: Connection closed by remote host


Here is another example on how to test remote host whether a certain service such as DNS (bind) or telnetd is enabled and listening on remote local network  IP with ssh

[root@pciserver: /home ]# ssh 192.168.1.200 -p 53 -v -oConnectTimeout=5
OpenSSH_7.9p1 Debian-10+deb10u2, OpenSSL 1.1.1g  21 Apr 2020
debug1: Connecting to 192.168.1.200 [192.168.1.200] port 53.
debug1: connect to address 192.168.1.200 port 53: Connection timed out
ssh: connect to host 192.168.1.200 port 53: Connection timed out

[root@server: /home ]# ssh 192.168.1.200 -p 23 -v -oConnectTimeout=5
OpenSSH_7.9p1 Debian-10+deb10u2, OpenSSL 1.1.1g  21 Apr 2020
debug1: Connecting to 192.168.1.200 [192.168.1.200] port 23.
debug1: connect to address 192.168.1.200 port 23: Connection timed out
ssh: connect to host 192.168.1.200 port 23: Connection timed out


But what if Linux server you have tow work on is so paranoid that you even the ssh client is absent? Well you can use anything else that is capable of doing a connectivity to remote port such as wget or curl. Some web servers or application servers usually have wget or curl as it is integral part for some local shell scripts doing various operation needed for proper services functioning or simply to test locally a local or remote listener services, if that's the case we can use curl to connect and get output of a remote service simulating a normal telnet connection like this:

host:~# curl -vv 'telnet://remote-server-host5:22'
* About to connect() to remote-server-host5 port 22 (#0)
*   Trying 10.52.67.21… connected
* Connected to aflpvz625 (10.52.67.21) port 22 (#0)
SSH-2.0-OpenSSH_5.3

Now lets test whether we can connect remotely to a local net remote IP's Qmail mail server with curls telnet simulation mode:

host:~#  curl -vv 'telnet://192.168.0.200:25'
* Expire in 0 ms for 6 (transfer 0x56066e5ab900)
*   Trying 192.168.0.200…
* TCP_NODELAY set
* Expire in 200 ms for 4 (transfer 0x56066e5ab900)
* Connected to 192.168.0.200 (192.168.0.200) port 25 (#0)
220 This is Mail Pc-Freak.NET ESMTP

Fine it works, lets now test whether a remote server who has MySQL listener service on standard MySQL port TCP 3306 is reachable with curl

host:~#  curl -vv 'telnet://192.168.0.200:3306'
* Expire in 0 ms for 6 (transfer 0x5601fafae900)
*   Trying 192.168.0.200…
* TCP_NODELAY set
* Expire in 200 ms for 4 (transfer 0x5601fafae900)
* Connected to 192.168.0.200 (192.168.0.200) port 3306 (#0)
Warning: Binary output can mess up your terminal. Use "–output -" to tell
Warning: curl to output it to your terminal anyway, or consider "–output
Warning: <FILE>" to save to a file.
* Failed writing body (0 != 107)
* Closing connection 0
root@pcfreak:/var/www/images#  curl -vv 'telnet://192.168.0.200:3306'
* Expire in 0 ms for 6 (transfer 0x5598ad008900)
*   Trying 192.168.0.200…
* TCP_NODELAY set
* Expire in 200 ms for 4 (transfer 0x5598ad008900)
* Connected to 192.168.0.200 (192.168.0.200) port 3306 (#0)
Warning: Binary output can mess up your terminal. Use "–output -" to tell
Warning: curl to output it to your terminal anyway, or consider "–output
Warning: <FILE>" to save to a file.
* Failed writing body (0 != 107)
* Closing connection 0

As you can see the remote connection is returning binary data which is unknown to a standard telnet terminal thus to get the output received we need to pass curl suggested arguments.

host:~#  curl -vv 'telnet://192.168.0.200:3306' –output –
* Expire in 0 ms for 6 (transfer 0x55b205c02900)
*   Trying 192.168.0.200…
* TCP_NODELAY set
* Expire in 200 ms for 4 (transfer 0x55b205c02900)
* Connected to 192.168.0.200 (192.168.0.200) port 3306 (#0)
g


The curl trick used to troubleshoot remote port to remote host from a Windows OS host which does not have telnet installed by default but have curl instead.

Also When troubleshooting vSphere Replication, it is often necessary to troubleshoot port connectivity as common Windows utilities are not available.
As Curl is available in the VMware vCenter Server Appliance command line interface.

On servers where curl is not there but you have wget is installed you can use it also to test a remote port


# wget -vv -O /dev/null http://google.com:554 –timeout=5
–2020-12-30 16:54:22–  http://google.com:554/
Resolving google.com (google.com)… 172.217.169.206, 2a00:1450:4017:80b::200e
Connecting to google.com (google.com)|172.217.169.206|:554… failed: Connection timed out.
Connecting to google.com (google.com)|2a00:1450:4017:80b::200e|:554… failed: Cannot assign requested address.
Retrying.

–2020-12-30 16:54:28–  (try: 2)  http://google.com:554/
Connecting to google.com (google.com)|172.217.169.206|:554… ^C

As evident from output the port 554 is filtered in google which is pretty normal.

If curl or wget is not there either as a final alternative you can either install some perl, ruby, python or bash script etc. that can opens a remote socket to the remote IP.

Deny DHCP Address by MAC on Linux

Thursday, October 8th, 2020

Deny DHCP addresses by MAC ignore MAC to not be DHCPD leased on GNU / Linux howto

I have not blogged for a long time due to being on a few weeks vacation and being in home with a small cute baby. However as a hardcore and a bit of dumb System administrator, I have spend some of my vacation and   worked on bringing up the the www.pc-freak.net and the other Websites hosted as a high availvailability ones living on a 2 Webservers running on a Master to Master MySQL Replication backend database, this is oll hosted on  servers, set to run as a round robin DNS hosts on 2 servers one old Lenove ThinkCentre Edge71 as well as a brand new real Lenovo server Lenovo ThinkServer SD350 with 24 CPUs and a 32 GB of RAM
To assure Internet Connectivity is having a good degree of connectivity and ensure websites hosted on both machines is not going to die if one of the 2 pair configured Fiber Optics Internet Providers Bergon.NET has some Issues, I've rented another Internet Provider Line is set bought from the VIVACOM Mobile Fiber Internet provider – that is a 1 Gigabit Fiber Optics Line.
Next to that to guarantee there is no Database, Webserver, MailServer, Memcached and other running services did not hit downtimes due to Electricity power outage, two Powerful Uninterruptable Power Supplies (UPS)  FPS Fortron devices are connected to the servers each of which that could keep the machine and the connected switches and Servers for up to 1 Hour.

The machines are configured to use dhcpd to distributed IP addresses and the Main Node is set to distribute IPs, however as there is a local LAN network with more of a personal Work PCs, Wireless Devices and Testing Computers and few Virtual machines in the Network and the IPs are being distributed in a consequential manner via a ISC DHCP server.

As always to make everything work properly hence, I had again some a bit weird non-standard requirement to make some of the computers within the Network with Static IP addresses and the others to have their IPs received via the DHCP (Dynamic Host Configuration Protocol) and add some filter for some of the Machine MAC Addresses which are configured to have a static IP addresses to prevent the DHCP (daemon) server to automatically reassign IPs to this machines.

After a bit of googling and pondering I've done it and some of the machines, therefore to save others the efforts to look around How to set Certain Computers / Servers Network Card MAC (Interfaces) MAC Addresses  configured on the LAN network to use Static IPs and instruct the DHCP server to ingnore any broadcast IP addresses leases – if they're to be destined to a set of IGNORED MAcs, I came up with this small article.

Here is the DHCP server /etc/dhcpd/dhcpd.conf from my Debian GNU / Linux (Buster) 10.4


option domain-name "pcfreak.lan";
option domain-name-servers 8.8.8.8, 8.8.4.4, 208.67.222.222, 208.67.220.220;
max-lease-time 891200;
authoritative;
class "black-hole" {
    match substring (hardware, 1, 6);
    ignore booting;
}
subclass "black-hole" 18:45:91:c3:d9:00;
subclass "black-hole" 70:e2:81:13:44:11;
subclass "black-hole" 70:e2:81:13:44:12;
subclass "black-hole" 00:16:3f:53:5d:11;
subclass "black-hole" 18:45:9b:c6:d9:00;
subclass "black-hole" 16:45:93:c3:d9:09;
subclass "black-hole" 16:45:94:c3:d9:0d;/etc/dhcpd/dhcpd.conf
subclass "black-hole" 60:67:21:3c:20:ec;
subclass "black-hole" 60:67:20:5c:20:ed;
subclass "black-hole" 00:16:3e:0f:48:04;
subclass "black-hole" 00:16:3e:3a:f4:fc;
subclass "black-hole" 50:d4:f5:13:e8:ba;
subclass "black-hole" 50:d4:f5:13:e8:bb;
subnet 192.168.0.0 netmask 255.255.255.0 {
        option routers                  192.168.0.1;
        option subnet-mask              255.255.255.0;
}
host think-server {
        hardware ethernet 70:e2:85:13:44:12;
        fixed-address 192.168.0.200;
}
default-lease-time 691200;
max-lease-time 891200;
log-facility local7;

To spend you copy paste efforts a file with Deny DHCP Address by Mac Linux configuration is here
/home/hipo/info
Of course I have dumped the MAC Addresses to omit a data leaking but I guess the idea behind the MAC ADDR ignore is quite clear

The main configuration doing the trick to ignore a certain MAC ALenovo ThinkServer SD350ddresses that are reachable on the Connected hardware switch on the device is like so:

class "black-hole" {
    match substring (hardware, 1, 6);
    ignore booting;
}
subclass "black-hole" 18:45:91:c3:d9:00;


The Deny DHCP Address by MAC is described on isc.org distribution lists here but it seems the documentation on the topic on how to Deny / IGNORE DHCP Addresses by MAC Address on Linux has been quite obscure and limited online.

As you can see in above config the time via which an IP is freed up and a new IP lease is done from the server is severely maximized as often DHCP servers do use a max-lease-time like 1 hour (3600) seconds:, the reason for increasing the lease time to be to like 10 days time is that the IPs in my network change very rarely so it is a waste of CPU cycles to do a frequent lease.

default-lease-time 691200;
max-lease-time 891200;


As you see to Guarantee resolving works always as expected I have configured – Google Public DNS and OpenDNS IPs

option domain-name-servers 8.8.8.8, 8.8.4.4, 208.67.222.222, 208.67.220.220;


One hint to make is, after setting up all my desired config in the standard config location /etc/dhcp/dhcpd.conf it is always good idea to test configuration before reloading the running dhcpd process.


root@pcfreak: ~# /usr/sbin/dhcpd -t
Internet Systems Consortium DHCP Server 4.4.1
Copyright 2004-2018 Internet Systems Consortium.
All rights reserved.
For info, please visit https://www.isc.org/software/dhcp/
Config file: /etc/dhcp/dhcpd.conf
Database file: /va/home/hipo/infor/lib/dhcp/dhcpd.leases
PID file: /var/run/dhcpd.pid
 

That's all folks with this sample config the IPs under subclass "black-hole", which are a local LAN Static IP Addresses will never be offered leasess anymore from the ISC DHCP.
Hope this stuff helps someone, enjoy and in case if you need a colocation of a server or a website hosting for a really cheap price on this new set High Availlability up described machines open an inquiry on https://web.www.pc-freak.net.


Howto Pass SSH traffic through a Secured Corporate Proxy server with corkscrew, using sshd as a standalone proxy service with no proxy installed on remote Linux server or VPS

Tuesday, November 19th, 2019

howto pass ssh traffic through proxy to remote server use remote machine as a proxy for connecting to the Internet

Working in the big bad corporate world (being employed in  any of the Fortune 500) companies, especially in an IT delivery company is a nasty thing in terms of User Personal Data Privacy because usually when employeed in any of a corporation, the company ships you with a personal Computer with some kind of pre-installed OS (most often this is Windows) and the computer is not a standalone one but joined in Active Directory (AD) belonging to Windows Domain and centrally administered by whoever.

As part of the default deplyed configuration in this pre-installed OS and software is that part or all your network traffic and files is being monitored in some kind of manner as your pre-installed Windows or Linux notebook given by the Corporation is having a set of standard software running in the background, and even though you have Windows Administrator there are many things you have zero control or even if you have changed it once the Domain Policy is triggered your custom made changes / Installed Programs that happen to be against the company policy are being automatically deleted, any registry changes made are being rewinded etc. Sometimes even by trying to manually clean up your PC from the corporate crapware,  you might breaks access to the corporate DMZ firewalled network. A common way to secure their employee PC data large companies have a Network seperation, your PC when not connected to the Corporate VPN is having a certain IP configuration and once connected to the Demilitarized Zone VPN those configuration changes and the PC have access to internal company infrastructure servers / router / switches / firewalls / SANs etc. Access to corporate Infrastructure is handled via crypted VPN clinet such as Cisco AnyConnect Secure Mobility Client which is perhaps one of the most used ones out there.

Part of the common software installed to Monitor your PC for threats / viruses / trojans among which is MCafee / EMET (Enhandced Mitigation Experience Toolkit) the PC is often prebundled with some kind of anti-malware (crapware) :). But the tip of the iceberg on user surveillance where most of surveillance happens is the default installed proxy on the PC which usually does keep track of all your remote accessed HTTP Website URLs accessed in plain text – traffic flowing on Port 80 and crypted one on standard (SSL) Port 443. This Web Traffic is handled by the Central Corporate proxy that is being deployed via some kind of Domain policy, every time the Computer joins the Windows domain. 

This of course is a terrible thing for your Browsing security and together with the good security practice to run your browser in Incognito mode, which makes all your browsing activity such as access URLs History or Saved Cookies data to be cleared up on a Browser close it is important to make sure you run your own personal traffic via a separate browser which you will use only for your own concern browsing such as Accessing your Bank Money Accounts to check your Monthly Sallary / Purchase things online via Amazon.com / Ebay.com, whether all of the rest traffic company related is trafficed via the default set corporate central proxy.
This is relatively easy sometimes in companies, where security is not of a top concern but in corporations with tightened security accessing remote proxy, or accessing even common daily news and Public Email websites or social media sites  Gmail.com / Twitter / Youtube will be filtered so the only way to reach them will be via some kind of Proxy and often this proxy is the only way out to the Free world from the corporate jail.

Here is where the good old SSH comes as a saving grace as it turns out SSH traffic could be trafficed over a proxy. In below article I will give you a short insight on how Proxy through SSH could be achieved to Secure your dailty web traffic and use SSH to reach your own server on the Internet as well as how you can copy securely data via SSH through corporate Proxy. 
 

1. How to view your corporate used (default) proxy / Check Proxy.pac file definitions


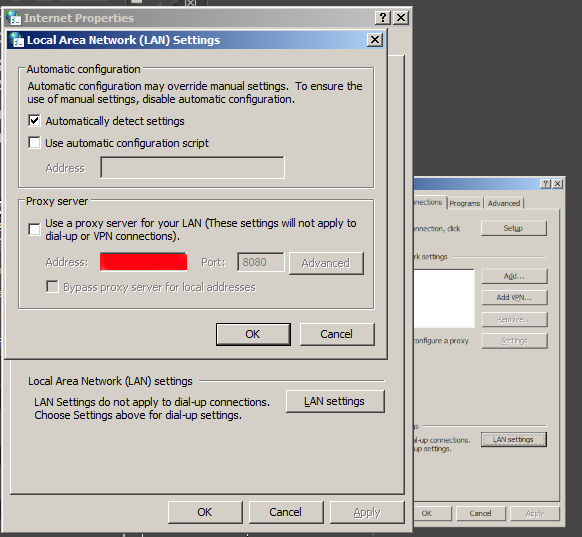
To get an idea what is the used proxy on your Corporate PC (as most corporate employee given notebooks are running some kind of M$ Windows)  you can go to:

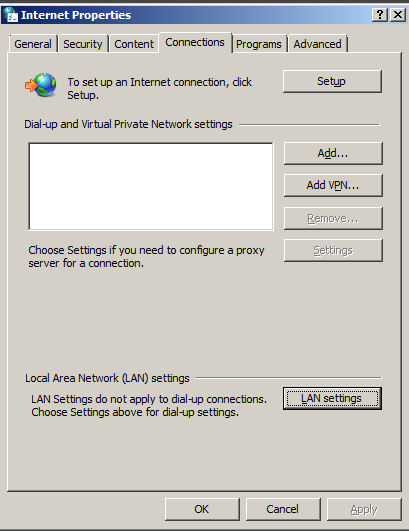
Windows Control Panel -> Internet Options -> Connections -> Lan Settings


internet-properties-microsoft-windows-screenshot

Under the field Proxy server (check out the Proxy configured Address and Port number )

local-area-network-lan-settings-screenshot-windows-1
 

Having that as browsers venerate the so-called Proxy.pac file, to be rawly aware on some general Company Proxy configured definitions you can access in a browser the proxy itself fething the proxy.pac file for example.


http://your-corporate-firewall-rpoxy-url:8080/proxy.pac


This is helpful as some companies Proxies have some proxy rules that reveal some things about its Internet architecture and even some have some badly configured proxy.pac files which could be used to fool the proxy under some circumstances 🙂
 

2. Few of the reasons corporations proxy all their employee's work PC web traffic


The corporate proxying of traffic has a number of goals, some of which are good hearted and others are for mostly spying on the users.


1. Protect Corporate Employees from malicious Viruses / Trojans Horses / Malware / Badware / Whatever ware – EXCELLENT
2. Prevent users from acessing a set of sources that due to the corporate policy are considered harmful (e.g. certain addresses 
of information or disinformation of competitors, any Internet source that might preach against the corporation, hacking ralated websites etc.) – NOT GOOD (for the employee / user) and GOOD for the company
3.Spy on the users activity and be able to have evidence against the employee in case he decided to do anything harmful to the company evidences from proxy could even later be used in court if some kind of corpoate infringment occurs due to misbehave of the employee. – PERFECT FOR COMPANY and Complete breach of User privacy and IMHO totally against European Union privacy legislation such as GDRP
4. In companies that are into the field of Aritificial Intelligence / Users behavior could even be used to advance Self-learning bots and mechanisms – NASTY ! YAECKES


3. Run SSH Socks proxy to remote SSHd server running on common SSL 443 port


Luckily sysadmins who were ordered the big bosses to sniff on your Web behaviour and preferences could be outsmarted with some hacks.

To protect your Browsing behaviours and Secure your privacy perhaps the best option is to use the Old but gold practice o Securing your Networkf traffic using SSH Over Proxy and SSH Dynamic tunnel as a Proxy as explained in my previous article here.

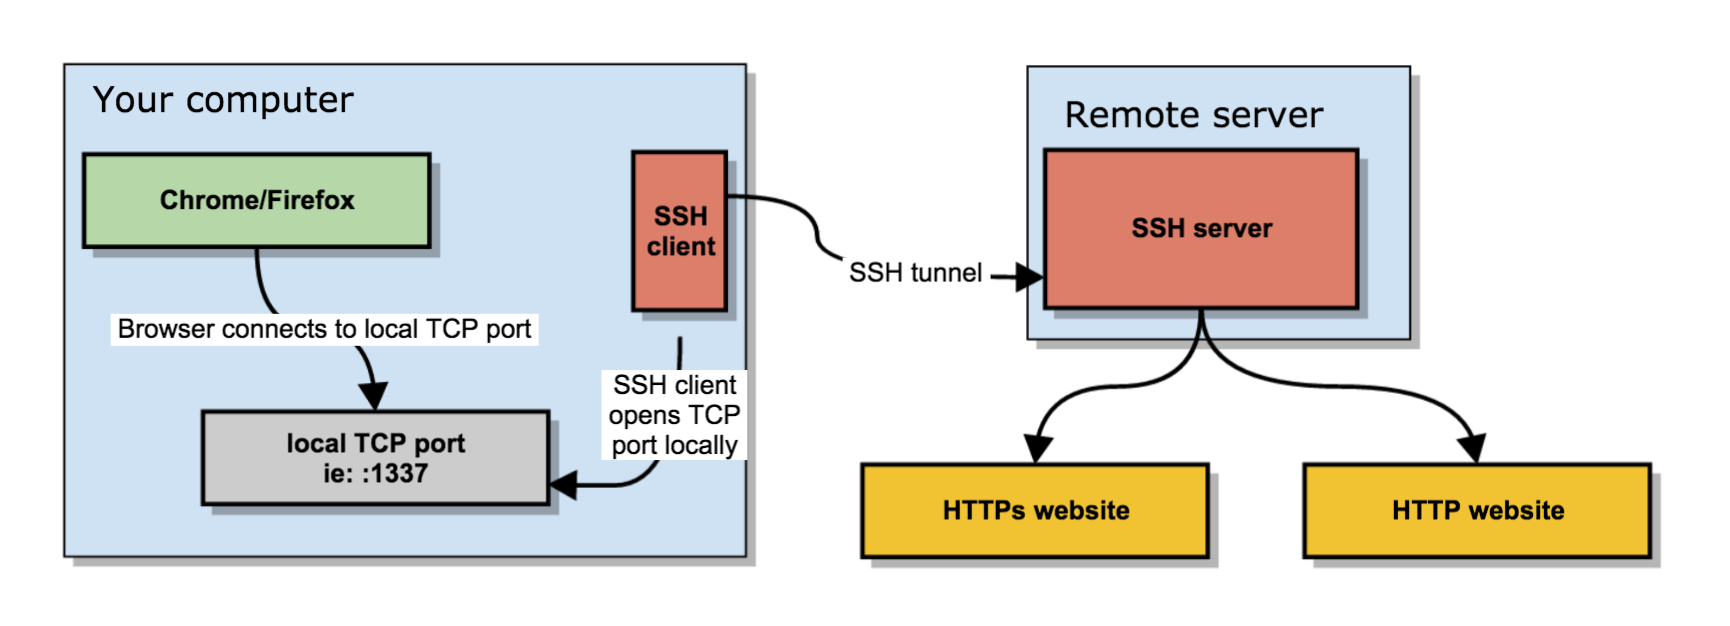
how-to-use-sshd-server-as-a-proxy-without-a-real-proxy-ssh-socks5_proxy_linux
 

In short the quest way to have your free of charge SOCKS  Remote proxy to your Home based Linux installed OS server / VPN with a Public Internet address is to use ssh as so:


ssh -D 3128 UserName@IP-of-Remote-SSHD-Host -p 443


This will start the SOCKS Proxy tunnel from Corporate Work PC to your Own Home brew server.

For some convenience it is useful to set up an .alias (for cygwin) / linux users in .bashrc file:


alias proxy='ssh -D 3128 UserName@IP-of-Remote-SSHD-Host -p 443';


To start using the Proxy from browser, I use a plugin called FoxyProxy in Chrome and Firefox browsers
set-up to connect to localhost – 127.0.0.1:3128 for All Protocols as a SOCKs v5 Proxy.

The sshd Socks proxy can be used for multiple others for example, using it you can also pass on traffic from Mail client such as Thunderbird to your Email server if you're behind a firewall prohibiting access to the common POP3 port 110 or IMAP port TCP 143. 

4. How to access SSH through Proxy using jumphost SSH hop


If you're like me and you have on your Home Linux machine only one Internet address and you have already setupped an SSL enabled service (lets say Webmail) to listen to that Public Internet IP and you don't have the possibility to run another instance of /usr/bin/sshd on port 443 via configuration or manually one time by issuing:


/usr/sbin/sshd -p 443


Then you can use another ssh another Linux server as a jump host to your own home Linux sshd server. This can be done even by purchasing a cheap VPS server for lets say 3 dollars month etc. or even better if you have a friend with another Linux home server, you can ask him to run you sshd on TCP port 443 and add you an ssh account.
Once you have the second Linux machine as JumpHost to reach out to your own machine use:


ssh -J Your-User@Your-jump-host.com:443 hipo@your-home-server.com -v


To easify this a bit long line it is handy to use some kind of alias like:


alias sshhome='ssh -J Your-User@Your-jump-host.com:443 hipo@your-home-server.com -v'


The advantage here is just by issuing this sshd tunnel and keeping it open in a terminal or setting it up as Plink Putty tunnel you have all your Web Traffic Secured
between your Work Corporate PC and your Home Brew Server, keeping the curious eyes of your Company Security Officers from your own Web traffic, hence
separating the corporate privacy from your own personal privacy. Using the just established own SSH Proxy Tunnel to home for your non-work stuff browsing habits
from the corporate systems which are accessed by switching with a button click in FoxyProxy to default proxy settings.
 

5. How to get around paranoid corporate setup where only remote access to Corporate proxy on TCP Port 80 and TCP 443 is available in Browser only


Using straight ssh and to create Proxy will work in most of the cases but it requires SSH access to your remote SSH running server / VPS on TCP Port 22, however under some Fort-Nox like financial involved institutions and companies for the sake of tightened security, it is common that all Outbound TCP Ports are prohibited except TCP Port 80 and SSL 443 as prior said, so what can you do then to get around this badful firewall and access the Internet via your own server Proxy? 
The hack to run SSH server either on tcp port 80 or tcp port 443 on remote Host and use 443 / 80 to acess SSHD should work, but then even for the most paranoid corporations the ones who are PCI Compliant – PCI stands for (Payment Card Industry), e.g. works with Debit and Credit Card data etc, accessing even 80 or 443  ports with something like telnet client or netcat will be impossible. 
Once connected to the corporate VPN,  this 2 two ports firewall exceptions will be only accessible via the Corporate Proxy server defined in a Web Browser (Firefox / IE / Chrome etc.) as prior explained in article.

The remedy here is to use a 3rd party tools such as httptunnel or corkscrew that  are able to TUNNEL SSH TRAFFIC VIA CORPORATE PROXY SERVER and access your own resource out of the DMZ.

Both httptunnel and corkscrew are installable both on most Linux distros or for Windows users via CygWin for those who use MobaXterm.

Just to give you better idea on what corkscrew and (hts) httptunnel does, here is Debian packages descriptions.

# apt-cache show​ corkscrew
" corkscrew is a simple tool to tunnel TCP connections through an HTTP
 proxy supporting the CONNECT method. It reads stdin and writes to
 stdout during the connection, just like netcat.
 .
 It can be used for instance to connect to an SSH server running on
 a remote 443 port through a strict HTTPS proxy.
"


# apt-cache show httptunnel|grep -i description -A 7
Description-en: Tunnels a data stream in HTTP requests
 Creates a bidirectional virtual data stream tunnelled in
 HTTP requests. The requests can be sent via a HTTP proxy
 if so desired.
 .
 This can be useful for users behind restrictive firewalls. If WWW
 access is allowed through a HTTP proxy, it's possible to use
 httptunnel and, say, telnet or PPP to connect to a computer

Description-md5: ed96b7d53407ae311a6c5ef2eb229c3f
Homepage: http://www.nocrew.org/software/httptunnel.html
Tag: implemented-in::c, interface::commandline, interface::daemon,
 network::client, network::server, network::vpn, protocol::http,
 role::program, suite::gnu, use::routing
Section: net
Priority: optional
Filename: pool/main/h/httptunnel/httptunnel_3.3+dfsg-4_amd64.deb

Windows cygwin users can install the tools with:
 

apt-cyg install –yes corkscrew httptunnel


Linux users respectively with:

apt-get install –yes corkscrew httptunnel

or 

yum install -y corkscrew httptunnel


You will then need to have the following configuration in your user home directory $HOME/.ssh/config file
 

Host host-addrs-of-remote-home-ssh-server.com
ProxyCommand /usr/bin/corkscrew your-corporate-firewall-rpoxy-url 8080 %h %p


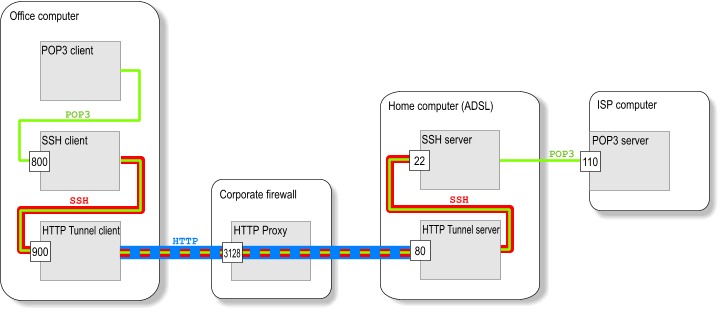
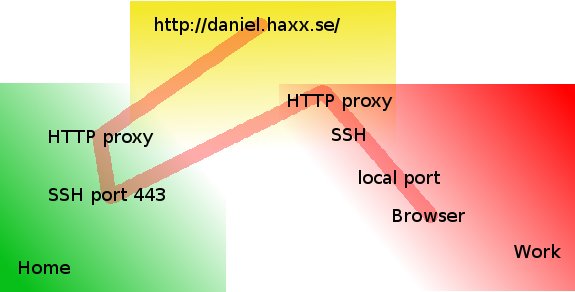
howto-transfer-ssh-traffic-over-proxy

Picture Copyright by Daniel Haxx

The best picture on how ssh traffic is proxied is the one found on Daniel Haxx's website which is a great quick tutorial which originally helped to get the idea of how corkscrew works in proxying traffic I warmly recommend you take a quick look at his SSH Through or over Proxy article.

Host-addrs-of-remote-home-ssh-server.com could be also and IP if you don't have your own domain name in case if using via some cheap VPN Linux server with SSH, or alternatively
if you don't want to spend money on buying domain for SSH server (assuming you don't have such yet) you can use Dyn DNS or NoIP.

Another thing is to setup the proper http_proxy / https_proxy / ftp_proxy variable exports in $HOME/.bashrc in my setup I have the following:
 

export ftp_proxy="http://your-corporate-firewall-rpoxy-url:8080"
export https_proxy="https://your-corporate-firewall-rpoxy-url:8080"
export http_proxy="http://your-corporate-firewall-rpoxy-url:8080"
export HTTP_PROXY="http://your-corporate-firewall-rpoxy-url:8080"
export HTTPS_PROXY="http://your-corporate-firewall-rpoxy-url:8080"


6. How to Transfer Files / Data via SSH Protocol through  Proxy with SCP and SFTP


Next logical question is how to Transfer your own personal encrypted files (that contains no corporate sensitive information) between your Work laptop and home brew Linux ssh server or cheap VPN.

It took me quite a lot of try-outs until finally I got it how Secure Copy (scp) command can be used toto transfer files between my Work Computer and my Home brew server using JumpHost, here is how:
 

scp -o 'ProxyJump Username@Jumpt-Host-or-IP.com:443' ~/file-or-files-to-copy* Username@home-ssh-server.com:/path/where/to/copy/files


I love using sftp (Secure FTP) command Linux client to copy files and rarely use scp so I have a lot of try-outs to connect interacitvely via the Corporate Proxy server over a Jump-Host:443 to my Destination home machine, 


I've tried using netcat as it was pointed in many articles online, like so to traffic my sftp traffic via my localhost binded SSH Socks proxy on :3128 together with netcat as shown in article prior example, using following line:
 

sftp -oProxyCommand='/bin/nc -X connect -x 127.0.0.1:3128 %h %p' Username@home-ssh-server.com 22


Also tried proxy connect like this:


sftp -o ProxyCommand="proxy-connect -h localhost -p 3128 %h %p" Username@home-ssh-server.com


Moreover, tried to use the ssh  command (-s) argument capability to invoke SSH protocol subsystem feature which is used to facilitiate use of SSH secure transport for other application
 

ssh -v -J hipo@Jump-Host:443 -s sftp root@home-ssh-server.com -v

open failed: administratively prohibited: open failed


Finally decided to give a try to the same options arguments as in scp and thanks God it worked and I can even access via the Corporate Proxy through the Jump Host SSH interactively via Secure FTP 🙂

!! THE FINAL WORKING SFTP THROUGH PROXY VIA SSH JUMPHOST !!
 

sftp -o 'ProxyJump Username@Jumpt-Host-or-IP.com:443' Username@home-ssh-server.com


To save time from typing this long line every time, I've setup the following alias to ~/.bashrc
 

alias sftphome='sftp -o 'ProxyJump Username@Jumpt-Host-or-IP.com:443' Username@home-ssh-server.com'


Conclusion

Of course using own Proxy via your Home brew SSH Machine as well as transferring your data securely from your Work PC (notebook) to Home does not completely make you Surveillance free, as the Corporate Windows installed OS image is perhaps prebundled with its own integrated Keylogger as well as the Windows Domain administrators have certainly access to connect to your PC and run various commands, so this kind of Security is just an attempt to make company has less control and know less on your browsing habits and the best solution where possible to secure your privacy and separate your Personal Space form Work space by using a second computer (if having the ability to work from home) with a KVM Switch device and switch over your Work PC and Home PC via it or in some cases (where companies) allows it, setup something like VNC server (TightVNC / RealVNC) on work PC and leave it all time running in office and connect remotely with vncviewer from your own controlled secured computer.

In article I've explained shortly common scenario found in corporate Work computers proxy setup, designed to Surveil all your move, mentioned few common softwares running by default to protect from Viruses and aimed to Protect user from malicious hacking tools, explained how to view your work notebook configured Proxy, shortly mentioned on Proxy.pac and hinted how to view proxy.pac config as well as gave few of the reasons why all web traffic is being routed over central proxy.

That's all folks, Enjoy the Freedom to be less surveilled !

Why du and df reporting different on a filesystem / How to fix inconsistency between used space on FS and disk showing full strangeness

Wednesday, July 24th, 2019

linux-why-du-and-df-shows-different-result-inconsincy-explained-filesystem-full-oddity

If you're a sysadmin on a large server environment such as a couple of hundred of Virtual Machines running Linux OS on either physical host or OpenXen / VmWare hosted guest Virtual Machine, you might end up sometimes at an odd case where some mounted partition mount point reports its file use different when checked with
df
cmd than when checked with du command, like for example:
 

root@sqlserver:~# df -hT /var/lib/mysql
Filesystem   Type  Size Used Avail Use% Mounted On
/dev/sdb5      ext4    19G  3,4G    14G  20% /var/lib/mysql

Here the '-T' argument is used to show us the filesystem.

root@sqlserver:~# du -hsc /var/lib/mysql
0K    /var/lib/mysql/
0K    total


1. Simple debug on what might be the root cause for df / du inconsistency reporting


Of course the basic thing to do when in that weird situation is to be totally shocked how this is possible and to investigate a bit what is the biggest first level sub-directories that eat up the space on the mounted location, with du:


# du -hkx –max-depth=1 /var/lib/mysql/|uniq|sort -n
4       /var/lib/mysql/test
8       /var/lib/mysql/ezmlm
8       /var/lib/mysql/micropcfreak
8       /var/lib/mysql/performance_schema
12      /var/lib/mysql/mysqltmp
24      /var/lib/mysql/speedtest
64      /var/lib/mysql/yourls
144     /var/lib/mysql/narf
320     /var/lib/mysql/webchat_plus
424     /var/lib/mysql/goodfaithair
528     /var/lib/mysql/moonman
648     /var/lib/mysql/daniel
852     /var/lib/mysql/lessn
1292    /var/lib/mysql/gallery

The given output is in Kilobytes so it is a little bit hard to read, if you're used to Mbytes instead, do


 # du -hmx –max-depth=1 /var/lib/mysql/|uniq|sort -n|less


I've also investigated on the complete /var directory contents sorted by size with:


 # du -akx ./ | sort -n
5152564    ./cache/rsnapshot/hourly.2/localhost
5255788    ./cache/rsnapshot/hourly.2
5287912    ./cache/rsnapshot
7192152    ./cache


Even after finding out the bottleneck dirs and trying to clear up a bit, continued facing that inconsistently shown in two commands and if you're likely to be stunned like me and try … to move some files to a different filesystem to free up space or assigned inodes with a hope that shown inconsitency output will be fixed as it might be caused  due to some kernel / FS caching ?? and this will eventually make the mounted FS to refresh …

But unfortunately, if you try it you'll figure out clearing up a couple of Megas or Gigas will make no difference in cmd output.

In my exact case /var/lib/mysql is a separate mounted ext4 filesystem, however same issue was present also on a Network Filesystem (NFS) and thus, my first thought that this is caused by a network failure problem or NFS bug turned to be wrong.

After further short investigation on the inodes on the Filesystem, it was clear enough inodes are available:
 

# df -i /var/lib/mysql
Filesystem       Inodes  IUsed   IFree IUse% Mounted on
/dev/sdb5      1221600  2562 1219038   1% /var/lib/mysql


So the filled inodes count assumed issue also has been rejected.
P.S. (if you're not well familiar with them read manual, i.e. – man 7 inode).
 

– Remounting the mounted filesystem

To make sure the filesystem shown inconsistency between du and df is not due to some hanging network mount or bug, first logical thing I did is to remount the filesytem showing different in size, in my case this was done with:
 

# mount -o remount,rw -t ext4 /var/lib/mysql

For machines with NFS remote mounted storage locations, used:

# mount -o remount,rw -t nfs /var/www


FS remount did not solved it so I continued to ponder what oddity and of course I thought of a workaround (in case if this issues are caused by kernel bug or OS lib issue) reboot might be the solution, however unfortunately restarting the VMs was not a wanted easy to do solution, thus I continued investigating what is wrong …

Next check of course was to check, what kind of network connections are opened to the affected hosts with:
 

# netstat -tupanl


Did not found anything that might point me to the reported different Megabytes issue, so next step was to check what is the situation with currently opened files by running processes on the weird df / du reported systems with lsof, and boom there I observed oddity such as multiple files


# lsof -nP | grep '(deleted)'

COMMAND   PID   USER   FD   TYPE DEVICE    SIZE NLINK  NODE NAME
mysqld   2588  mysql    4u   REG 253,17      52     0  1495 /var/lib/mysql/tmp/ibY0cXCd (deleted)
mysqld   2588  mysql    5u   REG 253,17    1048     0  1496 /var/lib/mysql/tmp/ibOrELhG (deleted)
mysqld   2588  mysql    6u   REG 253,17       777884290     0  1497 /var/lib/mysql/tmp/ibmDFAW8 (deleted)
mysqld   2588  mysql    7u   REG 253,17       123667875     0 11387 /var/lib/mysql/tmp/ib2CSACB (deleted)
mysqld   2588  mysql   11u   REG 253,17       123852406     0 11388 /var/lib/mysql/tmp/ibQpoZ94 (deleted)


Notice that There were plenty of '(deleted)' STATE files shown in memory an overall of 438:


# lsof -nP | grep '(deleted)' |wc -l
438


As I've learned a bit online about the problem, I found it is also possible to find deleted unlinked files only without any greps (to list all deleted files in memory files with lsof args only):


# lsof +L1|less


The SIZE field (fourth column)  shows a number of files that are really hard in size and that are kept in open on filesystem and in memory, totally messing up with the filesystem. In my case this is temp files created by MYSQLD daemon but depending on the server provided service this might be apache's www-data, some custom perl / bash script executed via a cron job, stalled rsync jobs etc.
 

2. Check all the list open files with the mysql / root user as part of the the server filesystem inconsistency debugging with:


– Grep opened files on server by user

# lsof |grep mysql
mysqld    1312                       mysql  cwd       DIR               8,21       4096          2 /var/lib/mysql
mysqld    1312                       mysql  rtd       DIR                8,1       4096          2 /
mysqld    1312                       mysql  txt       REG                8,1   20336792   23805048 /usr/sbin/mysqld
mysqld    1312                       mysql  mem       REG               8,21      24576         20 /var/lib/mysql/tc.log
mysqld    1312                       mysql  DEL       REG               0,16                 29467 /[aio]
mysqld    1312                       mysql  mem       REG                8,1      55792   14886933 /lib/x86_64-linux-gnu/libnss_files-2.28.so


# lsof | grep root
COMMAND    PID   TID TASKCMD          USER   FD      TYPE             DEVICE   SIZE/OFF       NODE NAME
systemd      1                        root  cwd       DIR                8,1       4096          2 /
systemd      1                        root  rtd       DIR                8,1       4096          2 /
systemd      1                        root  txt       REG                8,1    1489208   14928891 /lib/systemd/systemd
systemd      1                        root  mem       REG                8,1    1579448   14886924 /lib/x86_64-linux-gnu/libm-2.28.so

Other command that helped to track the discrepancy between df and du different file usage on FS is:
 

# du -hxa  / | egrep '^[[:digit:]]{1,1}G[[:space:]]*'


3. Fixing large files kept in memory filesystem problem


What is the real reason for ending up with this file handlers opened by running backgrounded programs on the Linux OS?
It could be multiple  but most likely it is due to exceeded server / client interactions or breaking up RAM or HDD drive with writing plenty of logs on the FS without ending keeping space occupied or Programming library bugs used by hanged service leaving the FH opened on storage.

What is the solution to file system files left in memory problem?

The best solution is to first fix custom script or hanged service and then if possible to simply restart the server to make the kernel / services reload or if this is not possible just restart the problem creation processes.

Once the process is identified like in my case this was MySQL on systemd enabled newer OS distros, just do:


# systemctl restart mysqld.service


or on older init.d system V ones:

# /etc/init.d/service restart


For custom hanged scripts being listed in ps axuwef you can grep the pid and do a kill -HUP (if the script is written in a good way to recognize -HUP and restart the sub-running process properly – BE EXTRA CAREFUL IF YOU'RE RESTARTING BROKEN SCRIPTS as this might cause your running service disruptions …).

# pgrep -l script.sh
7977 script.sh


# kill -HUP PID


Now finally this should either mitigate or at best case completely solve the reported disagreement between df and du, after which the calculated / reported disk space should be back to normal and show up approximately the same (note that size changes a bit as mysql service is writting data) constantly extending the size between the two checks.


# df -hk /var/lib/mysql; du -hskc /var/lib/mysql
Filesystem       Inodes  IUsed   IFree IUse% Mounted on
/dev/sdb5        19097172 3472744 14631296  20% /var/lib/mysql
3427772    /var/lib/mysql
3427772    total


What we learned?

What I've explained in this article is why and how it comes that 'zoombie' files reside on a filesystem
appearing to be eating disk space on a mounted local or network partition, giving strange inconsistent
reports, leading to system service disruptions and impossibility to have correctly shown information on used
disk space on mounted drive.

I went through with some standard logic on debugging service / filesystem / inode issues up explainat, that led me to the finding about deleted files being kept in filesystem and producing the filesystem strange sized / showing not correct / filled even after it was extended with tune2fs and was supposed to have extra 50GBs.

Finally it was explained shortly how to HUP / restart hanging script / service to fix it.

Some few good readings that helped to fix the issue:

What to do when du and df report different usage is here
df in linux not showing correct free space after file removal is here
Why do “df” and “du” commands show different disk usage?
 

How to synchronize with / from Remote FTP server using LFTP like with rsync

Sunday, October 15th, 2017

how-to-synchronize-from-remote-ftp-server-easily-like-rsync.jpg

Have you ever been in a need to easily synchronize with a remote host which only runs FTP server?

Or are you in a local network and you need to mirror a directory or a couple of directories in a fast and easy to remember way?

If so then you'll be happy to use below LFTP command that is doing pretty much the same as Rsync, with only difference that it can mirror files over FTP (old but gold File Transfer Protocol).
 

lftp -u FTP_USERNAME,FTP_PASSWORD -e 'mirror REMOTE_DIRECTORY LOCAL_DIRECTORY' FTP_SERVER_HOSTNAME


Enjoy and thanks to my dear friend Amridikon for the tip ! 🙂

How to share your Windows local drives via Remote Desktop (RDP) – Safe file copy with RDP protocol

Tuesday, October 14th, 2014

remote-desktop-connection-options-button-screenshot

Just had a task to install Tomcat 7, Java JRE 1.7 and .NET Framework 3.5 and MS Visual C++ x86 on a Windows 2008 RC2 system situated behind a firewalled network NAT. To do the installation I had to use a special jump host (which was also a MS Windows system). The end system where installation had to occur did not have access to the Internet was in special DMZ-ed network so to install above 3 software packages I had to transfer them from my notebook to install host.
To depic what had to happen, I had to:

Transfer files from (host A – my notebook) -> via host (B – jump host) to host (C – the end install host).

Default Windows RDP Client command (mstsc.exe) supports transferring files between host A and RDP-ed host B via standard file copy / paste, so I tried transferring files between my work Windows PC to (jump host B), by copy pasting the files, but as the DotNetFx35Client.exe file was 261 Megabytes and the network between host A and B has some shapings and network firewalls the file transfer timed out. Copy / Paste method via RDP Protocol by default, doesn’t support Transfer Resume thus in order to transfer the 261 MB file, I tried Sharing C:Temp Folder and transfer that way, but unfortunately I didn’t have the permissions in that Windows Domain to create sharings (even though on the remote system I was already logged in with admin accounts). I’ve consulted a colleague on advise on how to transfer the files and I was told about a Win RDP client option to share drives.

Here is how to share your PC drive letters C: D: E: etc. via Remote Desktop Protocol


1. Run mstsc.exe

2. Click the Options button

remote-desktop-connection-options-button-screenshot

3. Click Local Resources tab

4. Click More button

remote-desktop-connection-more-options-button-screenshot

5. Click on Drives

remote-desktop-connection-share-windows-disk-drives-option-screenshot

Then after connecting to the Remote RDP host, all your local PC drive partitions C: D: E: will be visible as (attached) ones in mounted in My Computer / MS Explorer with assigned new drive letters

Once, I transferred the .NET Framework 3.5 while using the installer I was notified that .NET Framework 3.5 is by default included in Windows 8 and I need only to enable it.

To enable .NET Framework 3.5 in Windows 8 from Control Panel

Choose Programs, and then choose Turn Windows features on or off.

Select the .NET Framework 3.5 (includes .NET 2.0 and 3.0) check box.
enable-dot-net-framework-windows-8-windows-8.1-add-feature-screenshot

Preserve domain name after redirect with mod_rewrite and some useful mod rewrite redirect and other examples – Redirect domain without changing URL

Friday, July 11th, 2014

redirect_domain_name_without_changing_url_apache_rewrite_rule_preventing_host_in_ip_mod_rewrite
If you're a webhosting company sysadmin, sooner or later you will be asked by application developer or some client to redirect from an Apache webserver to some other webserver / URL's IP, in a way that the IP gets preserved after the redirect.

I'm aware of two major ways to do the redirect on webserver level:

1. To redirect From Apache host A to Webserver on host B using ReverseProxy mod_proxy

2. To use Mod Rewrite to redirect all client requests on host A to host B.

There is quite a lot to be said and is said and written online on using mod_rewrite to redirect URLs.
So in this article I will not say nothing new but just present some basic scenarios on Redirecting with mod rewrite and some use cases.
Hope this examples, will help some colleague sys-admin to solve some his crazy boss redirection tasks 🙂 I'm saying crazy boss because I already worked for a  start-up company which was into internet marketing and the CEO has insane SEO ideas, often impossible to achieve …

a) Dynamic URL Redirect from Apache host A to host B without changing domain name in browser URL and keeping everything after the query in

Lets say you want to redirect incoming traffic to DomainA to DomainB keeping whole user browser request, i.e.

Redirect:

http://your-domainA.com/whole/a/lot/of/sub/directory/query.php


Passthe the whole request including /whole/a/lot/of/sub/directory/query.php

so when Apache redirects to redirect to:

http://your-domainB.com/whole/a/lot/of/sub/directory/query.php

In browser 
To do it with Mod_Rewrite either you have to add in .htaccess mod_rewite rules:

RewriteEngine On
RewriteCond %{HTTP_HOST} ^your-domainA.com [OR]
RewriteCond %{HTTP_HOST} ^http://your-domainA.com
RewriteRule ^(.*) http://your-domainB.com/$1 [P]

or include this somewhere in VirtualHost configuration of your domain
 

Above mod_rewrite will make any request to your-domainA.com to forward to your-domainB.com while preserving the hostname in browser URL bar to old domain http://your-domainA.com, however still contet will be served by http://your-domainB.com
 

http://yourdomainA.com/YOUR-CUSTOM-REQUEST-ADDRESS


to redirect to

http://yourdomainB.com/YOUR-CUSTOM-REQUEST-ADDRESS


WARNING !!  If you're concerned about your SEO well positioning in search Engines, be sure to never ever use such redirects. Making such redirects will cause two domains to show up duplicate content
and will make Search Engines to reduce your Google, Yahoo, Yandex etc. Pagerank !!

Besides that such, redirect will use mod_rewrite on each and every redirect so from performance stand point it is a CPU killer (for such redirect using native mod_proxy ProxyPass is much more efficient – on websites with hundred of thousands of requests daily using such redirects will cause you to spend your  hardware badly  …)

P.S. ! Mod_Rewrite and Proxy modules needs to be previously enabled
On Debian Linux, make sure following links are existing and pointing to proper existing files from /etc/apache2/mods-available/ to /etc/apache2/mods-enabled

debian:~#  ls -al /etc/apache2/mods-available/*proxy*
-rw-r–r– 1 root root  87 Jul 26  2011 /etc/apache2/mods-available/proxy_ajp.load
-rw-r–r– 1 root root 355 Jul 26  2011 /etc/apache2/mods-available/proxy_balancer.conf
-rw-r–r– 1 root root  97 Jul 26  2011 /etc/apache2/mods-available/proxy_balancer.load
-rw-r–r– 1 root root 803 Jul 26  2011 /etc/apache2/mods-available/proxy.conf
-rw-r–r– 1 root root  95 Jul 26  2011 /etc/apache2/mods-available/proxy_connect.load
-rw-r–r– 1 root root 141 Jul 26  2011 /etc/apache2/mods-available/proxy_ftp.conf
-rw-r–r– 1 root root  87 Jul 26  2011 /etc/apache2/mods-available/proxy_ftp.load
-rw-r–r– 1 root root  89 Jul 26  2011 /etc/apache2/mods-available/proxy_http.load
-rw-r–r– 1 root root  62 Jul 26  2011 /etc/apache2/mods-available/proxy.load
-rw-r–r– 1 root root  89 Jul 26  2011 /etc/apache2/mods-available/proxy_scgi.load

debian:/etc/apache2/mods-avaialble:~# ls *proxy*
proxy.conf@  proxy_connect.load@  proxy_http.load@  proxy.load@


If it is is not enabled to enable proxy support in Apache on Debian / Ubuntu Linux, either create the symbolic links as you see them from above paste or issue with root:
 

a2enmod proxy_http
a2enmod proxy


b) Redirect Main Domain requests to other Domain specific URL
 

RewriteEngine On
RewriteCond %{HTTP_HOST} ^your-domainA.com
RewriteRule ^(.*) http://your-domainB.com/YOUR-CUSTOM-URL [P]

Note that no matter what kind of subdirectory you request on http://your-domain.com (lets say you type in http://your-domainA.com/My-monkey-sucks ) it will get redirected to:

http://your-domainB.com/YOUR-CUSTOM-URL

Sometimes this is convenient for SEO, because it can make you to redirect any requests (including mistakenly typed requests by users or Bot Crawlers to real existing landing page).

c) Redirecting an IP address to a Domain Name

This probably a very rare thing to do as usually a Domain Name is redirected to an IP, however if you ever need to redirect IP to Domain Name:

RewriteCond %{HTTP_HOST} ^##.##.##.##
RewriteRule (.*) http://your-domainB.com/$1 [R=301,L]

Replace ## with digits of your IP address, the is used to escape the (.) – dots are normally interpreted by mod_rewrite.

d) Rewritting URL extensions from .htm to .php, doc to docx etc.

Lets say you're updating an old website with .htm or .html to serve .php files with same names as old .htmls use following rewrite rules:. Or all your old .doc files are converted and replaced with .docx and you need to make Apache redirect all .doc requests to .docx.
 

Options +FollowSymlinks
RewriteEngine on
RewriteRule ^(.*).html$ $1.php [NC]

Options +FollowSymlinks
RewriteEngine on
RewriteRule ^(.*).doc$ $1.docx [NC]

The [NC] flag at the end means "No Case", or "case-insensitive"; Meaning it will not matter whether files are requested with capital or small letters, they will just show files if file under requested name is matched.

Using such a redirect will not cause Apache to redirect old files .html, .htm, .doc and they will still be accessible again creating duplicate content which will have a negavite impact on Search Engine Optimization.

The better way to do old extensioned files redirect is by using:

Options +FollowSymlinks
RewriteEngine on
RewriteRule ^(.+).htm$ http://your-domainB.com/$1.php [R,NC]

[R] flag would tell make mod_rewrite send HTTP "MOVED TEMPORARILY" redirection, aka, "302" to browser. This would cause search engines and other spidering entities will automatically update their links to the new locations.

e) Grabbing content from URL with Mod Rewrite and passing it to another domain

Lets say you want zip files contained in directory files/ to be redirected from your current webserver on domainA to domainB's download.php script and be passed as argument to the script

Options +FollowSymlinks
RewriteEngine on
RewriteRule ^files/([^/]+)/([^/]+).zip https://www.pc-freak.net/download.php?section=$1&file=$2 [R,NC]


f) Shortening URLs with mod_rewrite

This is ueful If you have a long URL address accessible via some fuzzy long hard to remember URL address and you want to make it acessible via a shorter URL without phyisally moving the files within a short named directory, do:

Options +FollowSymlinks
RewriteEngine On
RewriteRule ^james-brown /james-brown/files/download/download.php

Above rule would make requests coming to http://your-domain.com/james-brown?file=my.zip be opened via http://mysite/public/james-brown/files/download/download.php?file=my.zip

g) Get rid of the www in your domain name

Nowdays many people are used to typing www.your-domain.com, if this annoys you and you want them not to see in served URLs the annoying www nonsense, use this:

Options +FollowSymlinks
RewriteEngine on
RewriteCond %{http_host} ^www.your-domain.com [NC]
RewriteRule ^(.*)$ http://your-domain.com/$1 [R=301,NC]

That's mostly some common uses of mod rewrite redirection, there are thousands of nice ones. If you know others, please share?


References and thanks to:

How to redirect domain without changing the URL

More .htaccess tips and tricks – part 2


Linux: Virtualbox shared folder – how to share files from host to guest OS in Virtualbox

Monday, June 9th, 2014

add-shared-folder-in-virtualbox-linux-virtual-machine-on-top-of-windows-howto

If you just installed Debian / Ubuntu / CentOS Linux on top of Windows inside Virtualbox Virtual Machine and you're wondering how to Share files between Windows Host Operating System and Guest Operating System (Linux), here is how:

1. First make sure Virtualbox guest additions are installed

Besides installing Virtualbox guest additions which will enable you to resize VBox Window / enable copy paste between guest and host OS it is useful to have also Virtualbox extension packs which allows your Virtual Machine to be accessed remote via Remote Desktop Protocol (RDP) – the so called VRDP

2. From Virtualbox VM select folder on Windows hsot which will be shared

Selection of which Win folder to mount in Vbox is done via Virtualbox menus:
 

Machine -> Settings -> Shared Folder

virtualbox-windows-linux-guest-OS-how-to-shared_folder-screenshot2

virtualbox-windows-linux-guest-OS-how-to-shared_folder-screenshot

3. Launch Linux Virtual Machine and use mount command to mount shared folder

I like the practice of creating a new folder inside c:UsersgeorgiDownloadsShared_folder

Then fire up gnome-terminal / xterm whatever terminal you like and to mount shared folder inside emulated Linux issue:

mount -t vboxsf -o rw Shared_folder /mnt/Shared_folder/


This will mount Shared_folder in rw (read / write) mode, if you prefer to only mount Virtualbox Shared_folder for reading:

mount -t vboxsf -o ro Shared_folder /mnt/Shared_folder/

4. Configure Virtualbox Shared Folder to auto mount in Linux via fstab

As we all know automating mounts in Linux is done by adding line in /etc/fstab to automate Vbox Shared_Folder mount add new line to fstab like:
 

Shared_folder         /mnt/Shared_folder         vboxsf  defaults,rw    0 0

This will auto-mount in vbox shared folder read / write mode, to auto-mount it in read only mode:

Shared_folder         /mnt/Shared_folder         vboxsf  defaults,ro    0 0

  If you added it to /etc/fstab (and you didn't mount Shared Folder manually before), run

mount -a

to make Linux system re-read auto-mounts defined in fstab
 

The new mounted folder will appear in whenever said to be mounted. Enjoy 🙂


Install VMWare tools on Debian and Ubuntu Linux – Enable VMWare Fullscreen and copy paste between OS host and Virtual machine

Wednesday, May 28th, 2014

install-vmware-tools-on-debian-gnu-linux-and-ubuntu-howto

If you need to use Virtual Machine to run some testing on heterogenous Operating Systems and you have chosen VMWare as a Virtual Machine. You will soon notice some of Virtual Machines functionality like copy between host operating system and Virtual Machine, true fullscreen mode and most importantly Copy paste between your host operating system and VMWare is not working. I'm not too much into Virtualization these days so for me it was truely shocking that a proprietary software like VMWare, claimed to be the best and most efficient Virtual Machine nowadays is not supporting copy / paste, fullscreen and copy between host and guest OS.  For those arguing why I'm using VMWare at all as it is proprietary and there is already free software Virtual Machines like QEMU and Oracle's VirtualBox its simply because now I have the chance to install and use VMWare 9 Enterprise on my work place at HP with a free Corporate license – in other words I'm using VMWare just for the sake of educating myself and would always recommend VirtualBox for those looking for good substitute free alternative to VMWare.

Before trying out VMWare, I tried Virtualbox to emulate Linux on my HP work PC running Windows with VirtualBox I was having issues with keyboard not working (because of lack of support of USB, no full screen support and lack of copy / paste between OS-es), I've just recently understood this is not because Virtualbox is bad Virtualization solution but because I forgot to install VirtualBox Oracle VM VirtualBox Extension Pack which allows support for USB, enables copy paste and full screen support. The equivalent to Virtualbox Oracle VM VirtualBox in VMWare world is called VMWare-Tools and once the guest operating system is installed inside VMWare VM, its necessary to install vmware-tools to enable better screen resolution and copy paste.
 

In Windows Virtual Machine installation of vmware-tools is pretty straight forward you go through VMWare's menus


VM -> Install Vmware-tools

install-vmware-tools-on-linux-guest-host-os-debian-redhat-screenshot

follow the instructions and you're done, however as always installing VMWare-tools on Linux is little bit more complicated you need to run few commands from Linux installed inside the Virtual Machine to install vmware-tools. Here is how vmware-tools is installed on Debian / Ubuntu / Linux Mint and rest of Debian based operating systems:

  1. Install Build essentials and gcc You need to have this installed some developer tools as well as GCC compiler in order for the vmware-tools to compile a special Linux kernel module which enables extra support (integration) between the VMWare VM and the installed inside VM Linux distro

apt-get install --yes build-essential gcc
...

2. Install appropriate Linux headers corresponding to current Linux OS installed kernel

apt-get install --yes linux-headers-$(uname -r)
....

3. Mount CD (Virtual) Content to obtain the vmware-tools version for your Linux

Be sure to have first checked from VMWare menus on menus VM -> Intall Vmware Tools
This step is a little bit strange but just do it without too much questioning …


mount /dev/cdrom /mnt/
umount /media/cdrom0/
mount /media/cdrom
mount /dev/sr0 /mnt/cdrom/
mount /dev/sr0 /mnt/


Note that /dev/sr0, might already be mounted and sometimes it might be necessary to unmount it first (don't remember exactly if I unmounted it or not)

4. Copy and Untar VMwareTools-9.2.0-799703.tar.gz

cp -rpf /media/cdrom/VMwareTools-9.2.0-799703.tar.gz /tmp/
cd /tmp/
tar -zxvvf VMwareTools-9.2.0-799703.tar.gz
...

5. Run vmware-tools installer

cd vmware-tools-distrib/
./vmware-install.pl

You will be asked multiple questions you can safely press enter to answer with default settings to all settings, hopefully if all runs okay this will make VMWare Tools installed
 

Creating a new VMware Tools installer database using the tar4 format.
Installing VMware Tools.
In which directory do you want to install the binary files?
[/usr/bin]
What is the directory that contains the init directories (rc0.d/ to rc6.d/)?
[/etc]
What is the directory that contains the init scripts?
[/etc/init.d]
In which directory do you want to install the daemon files?
[/usr/sbin]
In which directory do you want to install the library files?
[/usr/lib/vmware-tools]
The path "/usr/lib/vmware-tools" does not exist currently. This program is
going to create it, including needed parent directories. Is this what you want?
[yes]
In which directory do you want to install the documentation files?
[/usr/share/doc/vmware-tools]
The path "/usr/share/doc/vmware-tools" does not exist currently. This program
is going to create it, including needed parent directories. Is this what you
want? [yes]
The installation of VMware Tools 9.2.0 build-799703 for Linux completed
successfully. You can decide to remove this software from your system at any
time by invoking the following command: "/usr/bin/vmware-uninstall-tools.pl".
Before running VMware Tools for the first time, you need to configure it by
invoking the following command: "/usr/bin/vmware-config-tools.pl". Do you want
this program to invoke the command for you now? [yes]
Initializing…
Making sure services for VMware Tools are stopped.
Stopping VMware Tools services in the virtual machine:
Guest operating system daemon: done
Unmounting HGFS shares: done
Guest filesystem driver: done
[EXPERIMENTAL] The VMware FileSystem Sync Driver (vmsync) is a new feature that creates backups of virtual machines. Please refer to the VMware Knowledge Base for more details on this capability. Do you wish to enable this feature?
[no]
Before you can compile modules, you need to have the following installed…
make
gcc
kernel headers of the running kernel
Searching for GCC…
Detected GCC binary at "/usr/bin/gcc-4.6".
The path "/usr/bin/gcc-4.6" appears to be a valid path to the gcc binary.
Would you like to change it? [no]
Searching for a valid kernel header path…
Detected the kernel headers at "/lib/modules/3.2.0-4-amd64/build/include".
The path "/lib/modules/3.2.0-4-amd64/build/include" appears to be a valid path
to the 3.2.0-4-amd64 kernel headers.
Would you like to change it? [no]
The vmblock enables dragging or copying files between host and guest in a
Fusion or Workstation virtual environment. Do you wish to enable this feature?
[no] yes
make: Leaving directory `/tmp/vmware-root/modules/vmblock-only'

No X install found.
Creating a new initrd boot image for the kernel.
update-initramfs: Generating /boot/initrd.img-3.2.0-4-amd64
Checking acpi hot plug done
Starting VMware Tools services in the virtual machine:
Switching to guest configuration: done
VM communication interface: done
VM communication interface socket family: done
File system sync driver: done
Guest operating system daemon: done
The configuration of VMware Tools 8.6.10 build-913593 for Linux for this
running kernel completed successfully.
You must restart your X session before any mouse or graphics changes take
effect.
You can now run VMware Tools by invoking "/usr/bin/vmware-toolbox-cmd" from the
command line or by invoking "/usr/bin/vmware-toolbox" from the command line
during an X server session.
To enable advanced X features (e.g., guest resolution fit, drag and drop, and
file and text copy/paste), you will need to do one (or more) of the following:
1. Manually start /usr/bin/vmware-user
2. Log out and log back into your desktop session; and,
3. Restart your X session.
Enjoy,
–the VMware team
Found VMware Tools CDROM mounted at /mnt. Ejecting device /dev/sr0 …

.To make sure vmware-tools compiled modules are loaded into Linux kernel inside VM, restart the Virtual Machine. Once Linux boots again and you login to gnome-terminal to check what is vmware-tools status (e.g. if properly loaded) run:

service vmware-tools status
vmtoolsd is running

install-vmware-tools-on-debian-gnu-linux-and-ubuntu-virtual-machine-screenshot

This method of installing works on Debian 7 (Wheezy) but same steps should work on any Ubuntu and rest of Debian derivatives. For Redhat (RPM) based Linux distributions to install vmware-tools after mounting cdrom drive following above instructions you will have an rpm package instead of .tar.gz archive so all you have to do is install the rpm, e.g. launch smth. like:

rpm -Uhv /mnt/cdrom/VMwareTools-9.2.0-799703.i386.rpm
Cheers 😉

Best Windows tools to Test (Benchmark) Hard Drives, SSD Drives and RAID Storage Controllers

Wednesday, April 23rd, 2014

atto-windows-hard-disk-benchmark-freeware-tool-screenshot-check-hard-disk-speed-windows
Disk Benchmarking is very useful for people involved in Graphic Design, 3D modelling, system admins  and anyone willing to squeeze maximum of his PC hardware.

If you want to do some benchmarking on newly built Windows server targetting Hard Disk performance, just bought a new hard SSD (Solid State Drives) and you want to test how well Hard Drive I/O operations behave or you want to see a regular HDD benchmarking of group of MS Windows PCs and plan hardware optiomization, check out ATTO Disk Benchmark.

So why exactly ATTO Benchmark? – Cause it is one of the best Windows Free Benchmark tools on the internet.

ATTO is a widely-accepted Disk Benchmark freeware utility to help measure storage system performance. ATTO though being freeware is among top tools utilized in industry. It is very useful in comparing different Hard Disk vendors speed, measure Windows storage systems performance with various transfer sizes and test lengths for reads and writes.

ATTO Disk Benchmark is used by manufacturers of Hardware RAID controllers, its precious tool to test Windows storage controllers, host bus adapters (HBAs).

Here is ATTO Benchmark tool specifications (quote from their webstie):
 

  • Transfer sizes from 512KB to 8MB
  • Transfer lengths from 64KB to 2GB
  • Support for overlapped I/O
  • Supports a variety of queue depths
  • I/O comparisons with various test patterns
  • Timed mode allows continuous testing
  • Non-destructive performance measurement on formatted drives
  • Transfer sizes from 512KB to 8MB
  • Transfer lengths from 64KB to 2GB
  • Support for overlapped I/O
  • Supports a variety of queue depths
  • I/O comparisons with various test patterns
  • Timed mode allows continuous testing
  • Non-destructive performance measurement on formatted drives
  • – See more at: http://www.attotech.com/disk-benchmark/#sthash.rRlgSTOE.dpuf

Here is mirrored latest version of ATTO Disk for Download. Once you get your HDD statistics you will probably want to compare to other people results. On  TomsHardware's world famous Hardware geek site there are plenty of Hard Drives performance Charts

Of course there are other GUI alternatives to ATTO Benchmark one historically famous is NBench

NBench

nbench_benchmark_windows_hard-drive-cpu-and-memory

Nbench is nice little benchmarking program for Windows NT. Nbench reports the following components of performance:

CPU speed: integer and floating operations/sec
L1 and L2 cache speeds: MB/sec
main memory speed: MB/sec
disk read and write speeds: MB/sec

SMP systems and multi-tasking OS efficiency can be tested using up to 20 separate threads of execution.

For Console Geeks or Windows server admins there are also some ports of famous *NIX Hard Disk Benchmarking tools:

NTiogen

NTiogen benchmark was written by Symbios Logic, It's Windows NT port of their popular UNIX benchmark IOGEN. NTIOGEN is the parent processes that spawns the specified number of IOGEN processes that actually do the I/O.
The program will display as output the number of processes, the average response time, the number of I/O operations per second, and the number of KBytes per second. You can download mirror copy of Ntiogen here


There are plenty of other GUI and Console HDD Benchmarking Win Tools, i.e.:

IOMeter (ex-developed by Intel and now abandoned available as open source available on SourceForge)

iometer-benchmark-disk-storage-speed-windows
 

Bench32 – Comprehensive benchmark that measures overall system performance under Windows NT or Windows 95, now obsolete not developed anymore abandoned by producer company.

ThreadMark32 – capable of bench (ex developed and supported by ADAPTEC) but also already unsupported

IOZone – filesystem benchmark tool. The benchmark generates and measures a variety of file operations. Iozone has been ported to many machines and runs under many operating systems.
 

N! B! Important note to make here is above suggested tools will provide you more realistic results than the proprietary vendor tools shipped by your hardware vendor. Using proprietary software produced by a single vendor makes it impossible to analyze and compare different hardwares, above HDD benchmarking tools are for "open systems", e.g. nomatter what the hardware producer is produced results can be checked against each other.
Another thing to consider is even though if you use any of above tools to test and compare two storage devices still results will be partially imaginary, its always best to conduct tests in Real Working Application Environments. If you're planning to launch a new services structure always test it first and don't rely on preliminary returned soft benchmarks.

if you know some other useful benchmarking software i'm missing please share.