Archive for the ‘Hacks’ Category

How to log multiple haproxy / apache / mysql instance via haproxy log-tagging / Segregating log management for multiple HAProxy instances using rsyslog

Tuesday, May 23rd, 2023

rsyslog-logo-picture-use-programname-and-haproxy-log-tag-directives-together-to-log-as-many-process-streams-as-you-like


Introduction

This article provides a guide on refining haproxy  logging mechanism by leveraging the `programname` property in rsyslog, coupled with the `log-tag` directive in haproxy.
This approach will create a granular logging setup, separating logs according to their originating services and specific custom tags, enhancing overall log readability.

Though the article is written concretely for logging multiple log streams from haproxy this can be successfully applied
for any other Linux service to log as many concrete log-tagged data streams as you prefer.

Scope

The guide focuses on tailoring the logging mechanisms for two haproxy  instances named `haproxy` and `haproxyssl`, utilizing the `programname` property in rsyslog and the `log-tag` directive in haproxy for precise log management.

The haproxy and haproxyssl instances are two separate systemd config file prepared instances.
haproxy instance is simple haproxy proxying tcp traffic in non-encrypted form, whether haproxyssl is a special instance
prepared to tunnel the incoming http traffic in ssl form. Both instances of haproxy runs as a separate processes on the server.

Here is the systemd configuration of haproxy systemd service file:

# cat /usr/lib/systemd/system/haproxy.service
[Unit]
Description=HAProxy Load Balancer
After=network-online.target
Wants=network-online.target

[Service]
Environment="CONFIG=/etc/haproxy/haproxy.cfg" "PIDFILE=/run/haproxy.pid"
EnvironmentFile=/etc/sysconfig/haproxy
ExecStartPre=/usr/sbin/haproxy -f $CONFIG -c -q $OPTIONS
ExecStart=/usr/sbin/haproxy -Ws -f $CONFIG -p $PIDFILE $OPTIONS
ExecReload=/usr/sbin/haproxy -f $CONFIG -c -q $OPTIONS
ExecReload=/bin/kill -USR2 $MAINPID
SuccessExitStatus=143
KillMode=mixed
Type=notify

[Install]
WantedBy=multi-user.target


As well as the systemd service configuration for haproxyssl:
 

# cat /usr/lib/systemd/system/haproxyssl.service
[Unit]
Description=HAProxy Load Balancer
After=network-online.target
Wants=network-online.target

[Service]
Environment="CONFIG=/etc/haproxy/haproxy_ssl_prod.cfg" "PIDFILE=/run/haproxy_ssl_prod.pid"
EnvironmentFile=/etc/sysconfig/haproxy
ExecStartPre=/usr/sbin/haproxyssl -f $CONFIG -c -q $OPTIONS
ExecStart=/usr/sbin/haproxyssl -Ws -f $CONFIG -p $PIDFILE $OPTIONS
ExecReload=/usr/sbin/haproxyssl -f $CONFIG -c -q $OPTIONS
ExecReload=/bin/kill -USR2 $MAINPID
SuccessExitStatus=143
KillMode=mixed
Type=notify

[Install]
WantedBy=multi-user.target


Step 1: Configuring HAProxy instances with `log-tag`
 

To distinguish between logs from two HAProxy instances, `log-tag` directive is used to add tags to logs. This tag is used to filter these logs in rsyslog.
Modify the HAProxy configuration file in `/etc/haproxy/haproxy.*.cfg`

HAProxy Instance 1 (haproxy)
 

#———————————————————————
# Global settings
#———————————————————————
global
      log          127.0.0.1 local6 debug
      log-tag      haproxy

HAProxy Instance 2 (haproxyssl)


#———————————————————————
# Global settings
#———————————————————————
global
    log          127.0.0.1 local5 debug
    log-tag      haproxyssl


Step 2: Implementing rsyslog configuration for haproxy logs
 

Next, create a new rsyslog configuration file, stored in /etc/rsyslog.d/. Ensure the new configuration file ends in `.conf`

HAProxy Instance 1 (haproxy)

Now add rsyslog rules to filters logs based on the `programname` and the custom log tag:
 

# vi /etc/rsyslog.d/55_haproxy.conf
if $programname == 'haproxy' then /var/log/haproxy.log
&stop

HAProxy Instance 2 (haproxyssl)
# vi /etc/rsyslog.d/51_haproxy_ssl.conf
if $programname == 'haproxy_ssl' then /var/log/haproxy_ssl.log
&stop


These rules filter logs that originate from haproxy  and contain the respective string haproxy   or haproxy_ssl , directing them to their respective log files. The `& stop` directive ensures that rsyslog stops processing the log once a match is found, preventing dublication.

Finally, restart both the haproxy and rsyslog services for the changes to take effect:

# systemctl restart haproxy
# systemctl restart haproxyssl
# systemctl restart rsyslog


Reading References

haproxy:   log-tag directive

rsyslog:    rsyslogd documentation

This is a guest article originally written by: Dimitar Paskalev, guest blogging with good interesting articles is always mostly welcome 

How to configure multiple haproxies and frontends to log in separate log files via rsyslog

Monday, September 5th, 2022

log-multiple-haproxy-servers-to-separate-files-log-haproxy-froentend-to-separate-file-haproxy-rsyslog-Logging-diagram
In my last article How to create multiple haproxy instance separate processes for different configuration listeners,  I've shortly explained how to create a multiple instances of haproxies by cloning the systemd default haproxy.service and the haproxy.cfg to haproxyX.cfg.
But what if you need also to configure a separate logging for both haproxy.service and haproxy-customname.service instances how this can be achieved?

The simplest way is to use some system local handler staring from local0 to local6, As local 1,2,3 are usually used by system services a good local handler to start off would be at least 4.
Lets say we already have the 2 running haproxies, e.g.:

[root@haproxy2:/usr/lib/systemd/system ]# ps -ef|grep -i hapro|grep -v grep
root      128464       1  0 Aug11 ?        00:01:19 /usr/sbin/haproxy -Ws -f /etc/haproxy/haproxy.cfg -p /run/haproxy.pid -S /run/haproxy-master.sock
haproxy   128466  128464  0 Aug11 ?        00:49:29 /usr/sbin/haproxy -Ws -f /etc/haproxy/haproxy.cfg -p /run/haproxy.pid -S /run/haproxy-master.sock

root      346637       1  0 13:15 ?        00:00:00 /usr/sbin/haproxy-customname-wrapper -Ws -f /etc/haproxy/haproxy_customname_prod.cfg -p /run/haproxy_customname_prod.pid -S /run/haproxy-customname-master.sock
haproxy   346639  346637  0 13:15 ?        00:00:00 /usr/sbin/haproxy-customname-wrapper -Ws -f /etc/haproxy/haproxy_customname_prod.cfg -p /run/haproxy_customname_prod.pid -S /run/haproxy-customname-master.sock


1. Configure local messaging handlers to work via /dev/log inside both haproxy instance config files
 

To congigure the separte logging we need to have in /etc/haproxy/haproxy.cfg and in /etc/haproxy/haproxy_customname_prod.cfg the respective handlers.

To log in separate files you should already configured in /etc/haproxy/haproxy.cfg something like:


global
        stats socket /var/run/haproxy/haproxy.sock mode 0600 level admin #Creates Unix-Like socket to fetch stats
        log /dev/log    local0
        log /dev/log    local1 notice

#       nbproc 1
#       nbthread 2
#       cpu-map auto:1/1-2 0-1
        nbproc          1
        nbthread 2
        cpu-map         1 0
        cpu-map         2 1
        chroot /var/lib/haproxy
        user haproxy
        group haproxy
        daemon
        maxconn 99999

defaults
        log     global
        mode    tcp


        timeout connect 5000
        timeout connect 30s
        timeout server 10s

    timeout queue 5s
    timeout tunnel 2m
    timeout client-fin 1s
    timeout server-fin 1s

    option forwardfor
        maxconn 3000
    retries                 15

frontend http-in
        mode tcp

        option tcplog
        log global


        option logasap
        option forwardfor
        bind 0.0.0.0:80

default_backend webservers_http
backend webservers_http
    fullconn 20000
        balance source
stick match src
    stick-table type ip size 200k expire 30m

        server server-1 192.168.1.50:80 check send-proxy weight 255 backup
        server server-2 192.168.1.54:80 check send-proxy weight 254
        server server-3 192.168.0.219:80 check send-proxy weight 252 backup
        server server-4 192.168.0.210:80 check send-proxy weight 253 backup
        server server-5 192.168.0.5:80 maxconn 3000 check send-proxy weight 251 backup

For the second /etc/haproxy/haproxy_customname_prod.cfg the logging configuration should be similar to:
 

global
        stats socket /var/run/haproxy/haproxycustname.sock mode 0600 level admin #Creates Unix-Like socket to fetch stats
        log /dev/log    local5
        log /dev/log    local5 notice

#       nbproc 1
#       nbthread 2
#       cpu-map auto:1/1-2 0-1
        nbproc          1
        nbthread 2
        cpu-map         1 0
        cpu-map         2 1
        chroot /var/lib/haproxy
        user haproxy
        group haproxy
        daemon
        maxconn 99999

defaults
        log     global
        mode    tcp


2. Configure separate haproxy Frontend logging via local5 inside haproxy.cfg
 

As a minimum you need a configuration for frontend like:


frontend http-in
        mode tcp

        option tcplog
        log /dev/log    local5 debug
…..
….

..
.

Of course the mode tcp in my case is conditional you might be using mode http etc. 


3. Optionally but (preferrably) make local5 / local6 handlers to work via rsyslogs UDP imudp protocol


In this example /dev/log is straightly read by haproxy instead of sending the messages first to rsyslog, this is a good thing in case if you have doubts that rsyslog might stop working and respectively you might end up with no logging, however if you prefer to use instead rsyslog which most of people usually do you will have instead for /etc/haproxy/haproxy.cfg to use config:

global
    log          127.0.0.1 local6 debug

defaults
        log     global
        mode    tcp

And for /etc/haproxy_customname_prod.cfg config like:

global
    log          127.0.0.1 local5 debug

defaults
        log     global
        mode    tcp

If you're about to send the haproxy logs directly via rsyslog, it should have enabled in /etc/rsyslog.conf the imudp module if you're not going to use directly /dev/log

# provides UDP syslog reception
module(load="imudp")
input(type="imudp" port="514")


4. Prepare first and second log file and custom frontend output file and set right permissions
 

Assumably you already have /var/log/haproxy.log and this will be the initial haproxy log if you don't want to change it, normally it is installed on haproxy package install time on Linux and should have some permissions like following:

root@haproxy2:/etc/rsyslog.d# ls -al /var/log/haproxy.log
-rw-r–r– 1 haproxy haproxy 6681522  1 сеп 16:05 /var/log/haproxy.log


To create the second config with exact permissions like haproxy.log run:

root@haproxy2:/etc/rsyslog.d# touch /var/log/haproxy_customname.log
root@haproxy2:/etc/rsyslog.d# chown haproxy:haproxy /var/log/haproxy_customname.log

Create the haproxy_custom_frontend.log file that will only log output of exact frontend or match string from the logs
 

root@haproxy2:/etc/rsyslog.d# touch  /var/log/haproxy_custom_frontend.log
root@haproxy2:/etc/rsyslog.d# chown haproxy:haproxy  /var/log/haproxy_custom_frontend.log


5. Create the rsyslog config for haproxy.service to log via local6 to /var/log/haproxy.log
 

root@haproxy2:/etc/rsyslog.d# cat 49-haproxy.conf
# Create an additional socket in haproxy's chroot in order to allow logging via
# /dev/log to chroot'ed HAProxy processes
$AddUnixListenSocket /var/lib/haproxy/dev/log

# Send HAProxy messages to a dedicated logfile
:programname, startswith, "haproxy" {
  /var/log/haproxy.log
  stop
}


Above configs will make anything returned with string haproxy (e.g. proccess /usr/sbin/haproxy) to /dev/log to be written inside /var/log/haproxy.log and trigger a stop (by the way the the stop command works exactly as the tilda '~' discard one, except in some newer versions of haproxy the ~ is no now obsolete and you need to use stop instead (bear in mind that ~ even though obsolete proved to be working for me whether stop not ! but come on this is no strange this is linux mess), for example if you run latest debian Linux 11 as of September 2022 haproxy with package 2.2.9-2+deb11u3.
 

6. Create configuration for rsyslog to log from single Frontend outputting local2 to /var/log/haproxy_customname.log
 

root@haproxy2:/etc/rsyslog.d# cat 48-haproxy.conf
# Create an additional socket in haproxy's chroot in order to allow logging via
# /dev/log to chroot'ed HAProxy processes
$AddUnixListenSocket /var/lib/haproxy/dev/log

# Send HAProxy messages to a dedicated logfile
#:programname, startswith, "haproxy" {
#  /var/log/haproxy.log
#  stop
#}
# GGE/DPA 2022/08/02: HAProxy logs to local2, save the messages
local5.*                                                /var/log/haproxy_customname.log


You might also explicitly define the binary that will providing the logs inside the 48-haproxy.conf as we have a separate /usr/sbin/haproxy-customname-wrapper in that way you can log the output from the haproxy instance only based
on its binary command and you can omit writting to local5 to log via it something else 🙂

root@haproxy2:/etc/rsyslog.d# cat 48-haproxy.conf
# Create an additional socket in haproxy's chroot in order to allow logging via
# /dev/log to chroot'ed HAProxy processes
$AddUnixListenSocket /var/lib/haproxy/dev/log

# Send HAProxy messages to a dedicated logfile
#:programname, startswith, "haproxy" {
#  /var/log/haproxy.log
#  stop
#}
# GGE/DPA 2022/08/02: HAProxy logs to local2, save the messages

:programname, startswith, "haproxy-customname-wrapper " {
 
/var/log/haproxy_customname.log
  stop
}


7. Create the log file to log the custom frontend of your preference e.g. /var/log/haproxy_custom_frontend.log under local5 /prepare rsyslog config for
 

root@haproxy2:/etc/rsyslog.d# cat 47-haproxy-custom-frontend.conf
$ModLoad imudp
$UDPServerAddress 127.0.0.1
$UDPServerRun 514
#2022/02/02: HAProxy logs to local6, save the messages
local4.*                                                /var/log/haproxy_custom_frontend.log
:msg, contains, "https-in" ~

The 'https-in' is my frontend inside /etc/haproxy/haproxy.cfg it returns the name of it every time in /var/log/haproxy.log therefore I will log the frontend to local5 and to prevent double logging inside /var/log/haproxy.log of connections incoming towards the same frontend inside /var/log/haproxy.log, I have the tilda symbol '~' which instructs rsyslog to discard any message coming to rsyslog with "https-in" string in, immediately after the same frontend as configured inside /etc/haproxy/haproxy.cfg will output the frontend operations inside local5.


!!! Note that for rsyslog it is very important to have the right order of configurations, the configuration order is being considered based on the file numbering. !!!
 

Hence notice that my filter file number 47_* preceeds the other 2 configured rsyslog configs.
 

root@haproxy2:/etc/rsyslog.d# ls -1
47-haproxy-custom-frontend.conf
48-haproxy.conf
49-haproxy.conf

This will make 47-haproxy-custom-frontend.conf to be read and processed first 48-haproxy.conf processed second and 49-haproxy.conf processed third.


8. Reload rsyslog and haproxy and test


root@haproxy2: ~# systemctl restart rsyslog
root@haproxy2: ~# systemctl restart haproxy
root@haproxy2: ~# systemctl status rsyslog

● rsyslog.service – System Logging Service
     Loaded: loaded (/lib/systemd/system/rsyslog.service; enabled; vendor preset: enabled)
     Active: active (running) since Thu 2022-09-01 17:34:51 EEST; 1s ago
TriggeredBy: ● syslog.socket
       Docs: man:rsyslogd(8)
             man:rsyslog.conf(5)
             https://www.rsyslog.com/doc/
   Main PID: 372726 (rsyslogd)
      Tasks: 6 (limit: 4654)
     Memory: 980.0K
        CPU: 8ms
     CGroup: /system.slice/rsyslog.service
             └─372726 /usr/sbin/rsyslogd -n -iNONE

сеп 01 17:34:51 haproxy2 systemd[1]: Stopped System Logging Service.
сеп 01 17:34:51 haproxy2 rsyslogd[372726]: warning: ~ action is deprecated, consider using the 'stop' statement instead [v8.210>
сеп 01 17:34:51 haproxy2 systemd[1]: Starting System Logging Service…
сеп 01 17:34:51 haproxy2 rsyslogd[372726]: [198B blob data]
сеп 01 17:34:51 haproxy2 systemd[1]: Started System Logging Service.
сеп 01 17:34:51 haproxy2 rsyslogd[372726]: [198B blob data]
сеп 01 17:34:51 haproxy2 rsyslogd[372726]: imuxsock: Acquired UNIX socket '/run/systemd/journal/syslog' (fd 3) from systemd.  [>
сеп 01 17:34:51 haproxy2 rsyslogd[372726]: [origin software="rsyslogd" swVersion="8.2102.0" x-pid="372726" x-info="https://www.

Do some testing with some tool like curl / wget / lynx / elinks etc. on each of the configured haproxy listeners and frontends and check whether everything ends up in the correct log files.
That's all folks enjoy ! 🙂
 

How to create multiple haproxy instance separate processes for different configuration listeners with systemd on single Linux server

Tuesday, August 30th, 2022

HAProxy-Multiple-instanes-with-systemd-on-same-host-howto-Load-Balance-Your-Servers

In this aticle will be explained, howto configure multiple haproxy instances with separate haproxy binary wrappers and configs to run on the same Linux server host
by creating and using systemd additional .services.

Usually haproxy as installed and  ran standard on Linux swapns 2 listener processes which are configured to serve any proxy configuration setup inside /etc/haproxy/haproxy.cfg.

Here is example:

[root@haproxy2:~ ]# ps -ef|grep -i haproxy
root      128464       1  0 Aug11 ?        00:01:19 /usr/sbin/haproxy -Ws -f /etc/haproxy/haproxy.cfg -p /run/haproxy.pid -S /run/haproxy-master.sock
haproxy   128466  128464  0 Aug11 ?        00:49:24 /usr/sbin/haproxy -Ws -f /etc/haproxy/haproxy.cfg -p /run/haproxy.pid -S /run/haproxy-master.sock

However what if you need to have a multiple services to be proxied and you need to have multiple configuration files separated under various
/etc/haproxy/ stored files (.e.g /etc/haproxy/haproxy-customer1.cfg /etc/haproxy-customer2.cfg /etc/haproxy-custmXYZ.fg) etc. , what then how this can be done ?

Besides the many down sides of involving systemd into Linux, there is some good sides of it, as on any modern Linux there is a separate service to manage haproxy as of year 2022 on most modern Linuxes Debian / CentOS / Redhat the location where usually systemd service scripts are located is under directory /usr/lib/systemd/system/ the systemd managed service files are with extension .service

[root@haproxy2:/usr/lib/systemd/system ]# ls -al haproxy.service
-rw-r–r– 1 root root 1509 Sep  5  2021 haproxy.service

[root@haproxy2:/usr/lib/systemd/system ]# ls -al cron.service
-rw-r–r– 1 root root 316 Feb 23  2021 cron.service

[root@haproxy2:/usr/lib/systemd/system ]# ls -al networking.service
-rw-r–r– 1 root root 643 Sep 21  2020 networking.service

[root@haproxy2:/usr/lib/systemd/system ]# ls -al systemd-journald.service
-rw-r–r– 1 root root 1812 Jul 13  2021 systemd-journald.service


1. Create new haproxy-custom.service and /etc/haproxy.cfg file copies
 

Adding new services that will be managed by systemd is pretty simple hence, you just need to have the original service file in that case this is haproxy.service and modify it a bit, original haproxy.service file on Red Hat Enterprise Linux release 8.5 (Ootpa) would look like this

Make exact copy of haproxy.service to haproxy-your-custom.service

[root@haproxy2:/usr/lib/systemd/system ]#  cp -vprf haproxy.service haproxy-customname.service
'haproxy.service' -> 'haproxy-customname.service'

[root@haproxy2:/usr/lib/systemd/system]# cp -vrpf /etc/haproxy/haproxy.cfg /etc/haproxy/haproxy_customname_prod.cfg
'/etc/haproxy/haproxy.cfg' -> '/etc/haproxy/haproxy_customname_prod.cfg'


2. Modify the new haproxy-customname.service and haproxy-custoname.cfg

a) Create hardlink copy of /usr/sbin/haproxy binary

It is a good idea to separte the haproxy executable binary for the additional systemd haproxy instance. This can be done either by copying /usr/sbin/haproxy to something like /usr/sbin/haproxy-customname-wrapper or by creating a hard link. As i'm cautious to keep the haproxy-customname-wrapper binary up2date and updated together once the haproxy rpm package / deb package is updated either with yum or apt depending on the Linux distro, hard link  use is always better.
Just for reference hardlink does keep an own copy of the binary data and occupies additional Filesystem inodes, but at the same time the first inode of the binary does point to the original binary, meaning that a package update will make the hardlink be updated up to the latest version of the file and no extra management of the hard linked haproxy-customname-wrapper is necessery.

[root@haproxy2:/usr/sbin ]# ln haproxy haproxy-custname-wrapper

[root@haproxy2:/usr/sbin ]#  ls -al haproxy-custname-wrapper
-rwxr-xr-x 2 root root 2541848 Sep  5  2021 haproxy-custname-wrapper*
root@haproxy2:/usr/sbin# ls -al haproxy
-rwxr-xr-x 2 root root 2541848 Sep  5  2021 haproxy*


b) Modify haproxy-custoname.service systemd instance

The original service file will have content like

[Unit]
Description=HAProxy Load Balancer
After=network-online.target
Wants=network-online.target

[Service]
Environment="CONFIG=/etc/haproxy/haproxy.cfg" "PIDFILE=/run/haproxy.pid"
EnvironmentFile=/etc/sysconfig/haproxy
ExecStartPre=/usr/sbin/haproxy -f $CONFIG -c -q $OPTIONS
ExecStart=/usr/sbin/haproxy -Ws -f $CONFIG -p $PIDFILE $OPTIONS
ExecReload=/usr/sbin/haproxy -f $CONFIG -c -q $OPTIONS

ExecReload=/bin/kill -USR2 $MAINPID
SuccessExitStatus=143
KillMode=mixed
Type=notify

[Install]
WantedBy=multi-user.target


The modified one for the customname.service should have content similar to:
 

[Unit]
Description=HAProxy Load Balancer
After=network-online.target
Wants=network-online.target

[Service]
Environment="CONFIG=/etc/haproxy/haproxy_customname_prod.cfg" "PIDFILE=/run/haproxy_customname_prod.pid"
EnvironmentFile=/etc/sysconfig/haproxy
ExecStartPre=/usr/sbin/haproxy_customname -f $CONFIG -c -q $OPTIONS
ExecStart=/usr/sbin/haproxy_customname -Ws -f $CONFIG -p $PIDFILE $OPTIONS
ExecReload=/usr/sbin/haproxy_customname -f $CONFIG -c -q $OPTIONS

ExecReload=/bin/kill -USR2 $MAINPID
SuccessExitStatus=143
KillMode=mixed
Type=notify

[Install]
WantedBy=multi-user.target

c) modify haproxy_customname_prod.cfg

Do the required config and save the file, below is minimal config sample:

[root@haproxy2:/etc/haproxy ]#  vim /etc/haproxy/haproxy_customname_prod.cfg
 

#———————————————————————
# Global settings
#———————————————————————
global
    log          127.0.0.1 local6 debug
    chroot       /var/lib/haproxy
    pidfile      /run/haproxy.pid
    stats socket /var/lib/haproxy/haproxy.sock mode 0600 level admin
    maxconn      4000
    user         haproxy
    group        haproxy
    daemon
    #debug
    #quiet

#———————————————————————
# common defaults that all the 'listen' and 'backend' sections will
# use if not designated in their block
#———————————————————————
defaults
    mode        tcp
    log         global
#    option      dontlognull
#    option      httpclose
#    option      httplog
#    option      forwardfor
    option      redispatch
    option      log-health-checks
    timeout connect 10000 # default 10 second time out if a backend is not found
    timeout client 300000
    timeout server 300000
    maxconn     60000
    retries     3


#———————————————————————
# round robin balancing between the various backends
#———————————————————————

frontend Frotnend_customname1
        bind 10.10.10.1:15000
        mode tcp
        option tcplog
        #log global
        log-format [%t]\ %ci:%cp\ %bi:%bp\ %b/%s:%sp\ %Tw/%Tc/%Tt\ %B\ %ts\ %ac/%fc/%bc/%sc/%rc\ %sq/%bq

       default_backend Frontend_customname1

backend Frontend_customname1
        balance roundrobin
        timeout client 350000
        timeout server 350000
        timeout connect 35000
        server backend-server1 10.10.10.50:15000 weight 1 check port 15000
        server backend-server2 10.10.10.51:15000 weight 2  check port 15000


3. Reload systemd to make haproxy-customname.service known to systemctl, restart the freshly created service
and check its status


a) Execute daemon-reload to refresh known .service files in systemd

[root@haproxy2:/etc/haproxy ]# systemctl daemon-reload
[root@haproxy2:/etc/haproxy ]#


b) Restart haproxy-customname

[root@haproxy2:/usr/lib/systemd/system ]# systemctl restart haproxy-customname
[root@haproxy2:/usr/lib/systemd/system ]#

c) Check status is active running and process is properly forked

[root@haproxy2:/usr/lib/systemd/system ]# systemctl status haproxy-customname
● haproxy-customname.service – HAProxy Load Balancer
     Loaded: loaded (/lib/systemd/system/haproxy-customname.service; disabled; vendor preset: enabled)
     Active: active (running) since Tue 2022-08-30 13:15:35 EEST; 16s ago
       Docs: man:haproxy(1)
             file:/usr/share/doc/haproxy/configuration.txt.gz
    Process: 346635 ExecStartPre=/usr/sbin/haproxy-customname-wrapper -f $CONFIG -c -q $EXTRAOPTS (code=exited, status=0/SUCCES>
   Main PID: 346637 (haproxy-customn)
      Tasks: 3 (limit: 4654)
     Memory: 14.5M
        CPU: 68ms
     CGroup: /system.slice/haproxy-customname.service
             ├─346637 /usr/sbin/haproxy-customname-wrapper -Ws -f /etc/haproxy/haproxy_customname_prod.cfg -p /run/haproxy_cust>
             └─346639 /usr/sbin/haproxy-customname-wrapper -Ws -f /etc/haproxy/haproxy_customname_prod.cfg -p /run/haproxy_cust>

Aug 30 13:15:35 haproxy2 haproxy-customname-wrapper[346637]:    | timeouts are set to a non-zero value: 'client', 'connect', 's>
Aug 30 13:15:35 haproxy2 haproxy-customname-wrapper[346637]: [NOTICE] 241/131535 (346637) : New worker #1 (346639) forked
Aug 30 13:15:35 haproxy2 haproxy-customname-wrapper[346637]: Proxy webservers_http started.
Aug 30 13:15:35 haproxy2 haproxy-customname-wrapper[346637]: Proxy https-in started.
Aug 30 13:15:35 haproxy2 haproxy-customname-wrapper[346637]: Proxy webservers-https started.
Aug 30 13:15:35 haproxy2 haproxy-customname-wrapper[346637]: Proxy stats started.

The new haproxy-customname.service processes will be visible in process list together with the normal haproxy.service spawned processes:

[root@haproxy2:/usr/lib/systemd/system ]# ps -ef|grep -i hapro|grep -v grep
root      128464       1  0 Aug11 ?        00:01:19 /usr/sbin/haproxy -Ws -f /etc/haproxy/haproxy.cfg -p /run/haproxy.pid -S /run/haproxy-master.sock
haproxy   128466  128464  0 Aug11 ?        00:49:29 /usr/sbin/haproxy -Ws -f /etc/haproxy/haproxy.cfg -p /run/haproxy.pid -S /run/haproxy-master.sock

root      346637       1  0 13:15 ?        00:00:00 /usr/sbin/haproxy-customname-wrapper -Ws -f /etc/haproxy/haproxy_customname_prod.cfg -p /run/haproxy_customname_prod.pid -S /run/haproxy-customname-master.sock
haproxy   346639  346637  0 13:15 ?        00:00:00 /usr/sbin/haproxy-customname-wrapper -Ws -f /etc/haproxy/haproxy_customname_prod.cfg -p /run/haproxy_customname_prod.pid -S /run/haproxy-customname-master.sock


Following the same steps you can create as many separate haproxy instances as you like, but you have to be cautious not to intermix the listener ports for frontends. There is always risk when you copy from the original /etc/haproxy/haproxy.cfg to /etc/haproxy/haproxy-whatever.cfg to forget to change the listen port addresses in new config. 
Also note, that you might have problems, if you exceeed the usual maximum number of ports  65535 by using a high port ranges in the listeneres and due to that your additional systemd instances might refuse to start.

If you need to create a multiple bunch of systemd separte instances and haproxy configurations you can write easily a small script in bash that does this steps automatically.
Hope this article helped someone. If so drop me a thanks email or do your appreatiation for my blog by supporting my patreon.

Cheers ! 🙂

How to move transfer binary files encoded with base64 on Linux with Copy Paste of text ASCII encoded string

Monday, October 25th, 2021

base64-encode-decode-binary-files-to-transfer-between-servers-base64-artistic-logo

If you have to work on servers in a protected environments that are accessed via multiple VPNs, Jump hosts or Web Citrix and you have no mean to copy binary files to your computer or from your computer because you have all kind of FTP / SFTP or whatever Data Copy clients disabled on remote jump host side or CITRIX server and you still are looking for a way to copy files between your PC and the Remote server Side.
Or for example if you have 2 or more servers that are in a special Demilitarized Network Zones ( DMZ ) and the machines does not have SFTP / FTP / WebServer or other kind of copy protocol service that can be used to copy files between the hosts and you still need to copy some files between the 2 or more machines in a slow but still functional way, then you might not know of one old school hackers trick you can employee to complete the copy of files between DMZ-ed Server Host A lets say with IP address (192.168.50.5) -> Server Host B (192.168.30.7). The way to complete the binary file copy is to Encode the binary on Server Host A and then, use cat  command to display the encoded string and copy whole encoded cat command output  to your (local PC buffer from where you access the remote side via SSH via the CITRIX or Jump host.). Then decode the encoded file with an encoding tool such as base64 or uuencode. In this article, I'll show how this is done with base64 and uuencode. Base64 binary is pretty standard in most Linux / Unix OS-es today on most Linux distributions it is part of the coreutils package.
The main use of base64 encoding to encode non-text Attachment files to Electronic Mail, but for our case it fits perfectly.
Keep in mind, that this hack to copy the binary from Machine A to Machine B of course depends on the Copy / Paste buffer being enabled both on remote Jump host or Citrix from where you reach the servers as well as your own PC laptop from where you access the remote side.

base64-character-encoding-string-table

Base64 Encoding and Decoding text strings legend

The file copy process to the highly secured PCI host goes like this:
 

1. On Server Host A encode with md5sum command

[root@serverA ~]:# md5sum -b /tmp/inputbinfile-to-encode
66c4d7b03ed6df9df5305ae535e40b7d *inputbinfile-to-encode


As you see one good location to encode the file would be /tmp as this is a temporary home or you can use alternatively your HOME dir

but you have to be quite careful to not run out of space if you produce it anywhere 🙂


2. Encode the binary file with base64 encoding

 [root@serverB ~]:# base64 -w0 inputbinfile-to-encode > outputbin-file.base64

The -w0 option is given to disable line wrapping. Line wrapping is perhaps not needed if you will copy paste the data.

base64-encoded-binary-file-text-string-linux-screenshot

Base64 Encoded string chunk with line wrapping

For a complete list of possible accepted arguments check here.

3. Cat the inputbinfile-to-encode just generated to display the text encoded file in your SecureCRT / Putty / SuperPutty etc. remote ssh access client

[root@serverA ~]:# cat /tmp/inputbinfile-to-encode
f0VMRgIBAQAAAAAAAAAAAAMAPgABAAAAMGEAAAAAAABAAAAAAAAAACgXAgAAAAAAAAAAA
EAAOAALAEAAHQAcAAYAAAAEAAA ……………………………………………………………… cTD6lC+ViQfUCPn9bs


4. Select the cat-ted string and copy it to your PC Copy / Paste buffer


If the bin file is not few kilobytes, but few megabytes copying the file might be tricky as the string produced from cat command would be really long, so make sure the SSH client you're using is configured to have a large buffer to scroll up enough and be able to select the whole encoded string until the end of the cat command and copy it to Copy / Paste buffer.


5. On Server Host B paste the bas64 encoded binary inside a newly created file

Open with a text editor vim / mc or whatever is available

[root@serverB ~]:# vi inputbinfile-to-encode

Some very paranoid Linux / UNIX systems might not have even a normal text editor like 'vi' if you happen to need to copy files on such one a useful thing is to use a simple cat on the remote side to open a new File Descriptor buffer, like this:

[root@server2 ~]:# cat >> inputbinfile-to-encode <<'EOF'
Paste the string here


6. Decode the encoded binary with base64 cmd again

[root@serverB ~]:# base64 –decode outputbin-file.base64 > inputbinfile-to-encode


7. Set proper file permissions (the same as on Host A)

[root@serverB ~]:#  chmod +x inputbinfile-to-encode


8. Check again the binary file checksum on Host B is identical as on Host A

[root@serverB ~]:# md5sum -b inputbinfile-to-encode
66c4d7b03ed6df9df5305ae535e40b7d *inputbinfile-to-encode

As you can md5sum match on both sides so file should be OK.


9. Encoding and decoding files with uuencode


If you are lucky and you have uuencode installed (sharutils) package is present on remote machine to encode lets say an archived set of binary files in .tar.gz format do:

Prepare the archive of all the files you want to copy with tar on Host A:

[root@Machine1 ~]:#  tar -czvf /bin/whatever /usr/local/bin/htop /usr/local/bin/samhain /etc/hosts archived-binaries-and-configs.tar.gz

[root@Machine1 ~]:# uuencode archived-binaries-and-configs.tar.gz archived-binaries-and-configs.uu

Cat / Copy / paste the encoded content as usual to a file on Host B:

Then on Machine 2 decode:

[root@Machine2 ~]:# uuencode -c < archived-binaries-and-configs.tar.gz.uu


Conclusion


In this short method I've shown you a hack that is used often by script kiddies to copy over files between pwn3d machines, a method which however is very precious and useful for sysadmins like me who has to admin a paranoid secured servers that are placed in a very hard to access environments.

With the same method you can encode or decode not only binary file but also any standard input/output file content. base64 encoding is quite useful stuff to use also in bash scripts or perl where you want to have the script copy file in a plain text format . Datas are encoded and decoded to make the data transmission and storing process easier. You have to keep in mind always that Encoding and Decoding are not similar to encryption and decryption as encr. deprytion gives a special security layers to the encoded that. Encoded data can be easily revealed by decoding, so if you need to copy between the servers very sensitive data like SSL certificates Private RSA / DSA key, this command line utility tool better to be not used for sesitive data copying.


Remove “Windows 7 PC is out of Support” annoying reoccuring warning popup alert

Friday, September 10th, 2021

Windows-7-End-of-life-pc-is-out-of-support-removal-rip-win-7

Since January 15th 2020, Windows 7 which reached its End of Life (EOL)  and is no longer Supported. Windows 7 Service Pack 1 Starter, Home Basic, Home Premium, and Professional installations will display the message


"Your Windows 7 PC is out of support".

The use of Windows 7, since 2020 is steadily declining but some hard core maniacs, who refuse to be in tune with latest fashion do still roll Windows 7 on dedicated VPS Servers (running on Xen / VMWare etc.).
With the reach of End of Support, people who still run Windows 7 have no longer the usual Operating system provided.

  • No security updates
  • No software updates
  • No tech support

Even though running End of Support system is quite dangerous and you might get hacked easily by autometed bot, still for some custom uses and if the Windows 7 Runs behind a solid firewall it could be considered relatively safe.

Microsoft hence made their Windows (remote controlled system) to have an annoying pop up window with the "YOUR WINDOWS 7 PC IS OUT OF SUPPORT" as shown in below screenshot:

windows-7-disable-pc-is-out-of-support-popup-annoying-message-screenshot.

For those who don't plan to migrate from Windows 7 to Windows 10, this message becomes quickly very annoying especially if you happen to access remotely your Windows 7 VPS and use it for simple things as browsing a few news websites or you're a marketer and you use the Windows for accessing Amazon / Ebay from a different country as many Marketers do to access General Webstores emulating access from a remote location. 


Disable "Your Windows 7 PC is out of support" popup alert
 

Luckily it is possible to disable this annoying Your Windows 7 pop-up alert by setting a value key in Windows Registry
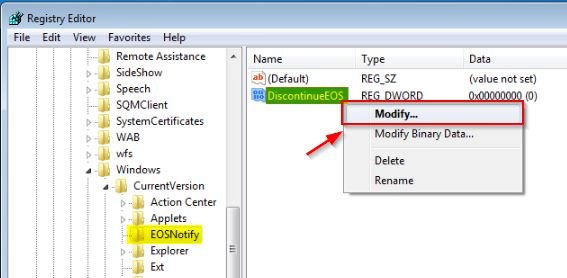
DiscontinueEOS to 1.

To do so launch from Administrator command  line cmd.exe prompt (or start it from Windows start menu):

regedit

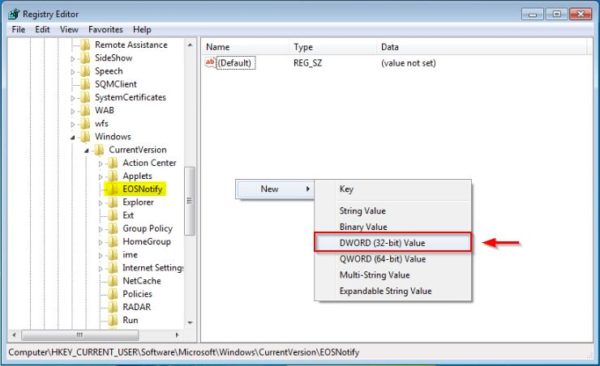
1. Open Windows Registry Editor and navigate to

HKEY_CURRENT_USER\Software\Microsoft\Windows\CurrentVersion\EOSNotify.

 You will need to set the DWORD DiscontinueEOS value to 1 in the Windows Registry
 

windows-7-disable-pc-is-out-of-support-popup-eosnotify-dword-registry-03-600x366

windows-7-disable-pc-is-out-of-support-popup-discontinueEOS-registry-modify

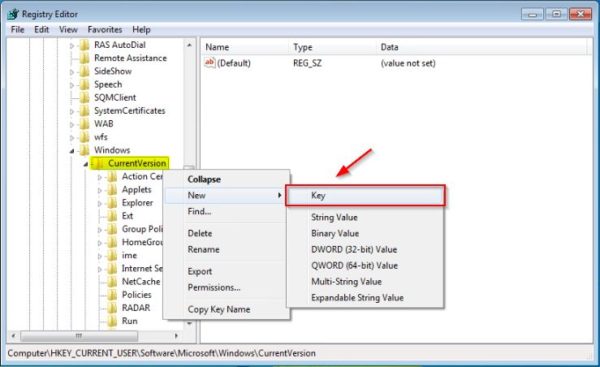
–  In case EOSNotify key is not available, right-click the CurrentVersion key and select New > Key and name it EOSNotify.

windows-7-disable-pc-is-out-of-support-popup-EOSNotify-create-new-key-600x367

2. Right click anywhere in the right pane and select New > DWORD (32-bit) Value and name it DiscontinueEOS.

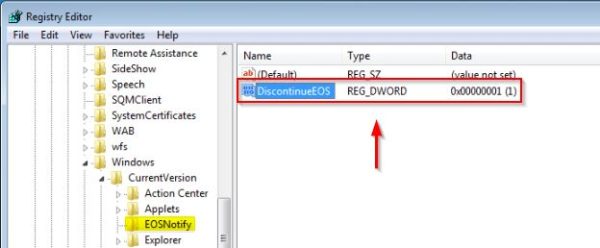
3. Set Value data to 1 and click OK.

windows-7-disable-pc-is-out-of-support-popup-edit-dword-32-bit-value-regedit-screenshot.

4. When the new value has been set, Restart the Windows7 computer / Virtual machine, to make sure registry setting take effect.

windows-7-disable-pc-is-out-of-support-popup-discontninueEOS-reg-dword-0x000000001-600x248


To automate the procedure in large environments, you can create a small script using the reg  command load the Registry key or use Windows GPO (Group Policy Object) to enforce the setting across all Active Directory PC members.
 

[HKEY_CURRENT_USER\Software\Microsoft\Windows\CurrentVersion\EOSNotify]
"DiscontinueEOS"=dword:00000001
custom GPO in Active Directory.

To avoid potential issues using a non supported OS, you should start planning to upgrade your Windows 7 clients to Windows 10.

That's it ! Out of support Windows 7  alert should no longer bug you 🙂

Adding custom user based host IP aliases load custom prepared /etc/hosts from non root user on Linux – Script to allow define IPs that doesn’t have DNS records to user preferred hostname

Wednesday, April 14th, 2021

adding-custom-user-based-host-aliases-etc-hosts-logo-linux

Say you have access to a remote Linux / UNIX / BSD server, i.e. a jump host and you have to remotely access via ssh a bunch of other servers
who have existing IP addresses but the DNS resolver recognized hostnames from /etc/resolv.conf are long and hard to remember by the jump host in /etc/resolv.conf and you do not have a way to include a new alias to /etc/hosts because you don't have superuser admin previleges on the hop station.
To make your life easier you would hence want to add a simplistic host alias to be able to easily do telnet, ssh, curl to some aliased name like s1, s2, s3 … etc.


The question comes then, how can you define the IPs to be resolvable by easily rememberable by using a custom User specific /etc/hosts like definition file? 

Expanding /etc/hosts predefined host resolvable records is pretty simple as most as most UNIX / Linux has the HOSTALIASES environment variable
Hostaliases uses the common technique for translating host names into IP addresses using either getaddrinfo(3) or the obsolete gethostbyname(3). As mentioned in hostname(7), you can set the HOSTALIASES environment variable to point to an alias file, and you've got per-user aliases

create ~/.hosts file

linux:~# vim ~/.hosts

with some content like:
 

g google.com
localhostg 127.0.0.1
s1 server-with-long-host1.fqdn-whatever.com 
s2 server5-with-long-host1.fqdn-whatever.com
s3 server18-with-long-host5.fqdn-whatever.com

linux:~# export HOSTALIASES=$PWD/.hosts

The caveat of hostaliases you should know is this will only works for resolvable IP hostnames.
So if you want to be able to access unresolvable hostnames.
You can use a normal alias for the hostname you want in ~/.bashrc with records like:

alias server-hostname="ssh username@10.10.10.18 -v -o stricthostkeychecking=no -o passwordauthentication=yes -o UserKnownHostsFile=/dev/null"
alias server-hostname1="ssh username@10.10.10.19 -v -o stricthostkeychecking=no -o passwordauthentication=yes -o UserKnownHostsFile=/dev/null"
alias server-hostname2="ssh username@10.10.10.20 -v -o stricthostkeychecking=no -o passwordauthentication=yes -o UserKnownHostsFile=/dev/null"

then to access server-hostname1 simply type it in terminal.

The more elegant solution is to use a bash script like below:

# include below code to your ~/.bashrc
function resolve {
        hostfile=~/.hosts
        if [[ -f “$hostfile” ]]; then
                for arg in $(seq 1 $#); do
                        if [[ “${!arg:0:1}” != “-” ]]; then
                                ip=$(sed -n -e "/^\s*\(\#.*\|\)$/d" -e "/\<${!arg}\>/{s;^\s*\(\S*\)\s*.*$;\1;p;q}" "$hostfile")
                                if [[ -n “$ip” ]]; then
                                        command "${FUNCNAME[1]}" "${@:1:$(($arg-1))}" "$ip" "${@:$(($arg+1)):$#}"
                                        return
                                fi
                        fi
                done
        fi
        command "${FUNCNAME[1]}" "$@"
}

function ping {
        resolve "$@"
}

function traceroute {
        resolve "$@"
}

function ssh {
        resolve "$@"
}

function telnet {
        resolve "$@"
}

function curl {
        resolve "$@"
}

function wget {
        resolve "$@"
}


Now after reloading bash login session $HOME/.bashrc with:

linux:~# source ~/.bashrc

ssh / curl / wget / telnet / traceroute and ping will be possible to the defined ~/.hosts IP addresses just like if it have been defined global wide on System in /etc/hosts.

Enjoy
 

Hack: Using ssh / curl or wget to test TCP port connection state to remote SSH, DNS, SMTP, MySQL or any other listening service in PCI environment servers

Wednesday, December 30th, 2020

using-curl-ssh-wget-to-test-tcp-port-opened-or-closed-for-web-mysql-smtp-or-any-other-linstener-in-pci-linux-logo

If you work on PCI high security environment servers in isolated local networks where each package installed on the Linux / Unix system is of importance it is pretty common that some basic stuff are not there in most cases it is considered a security hole to even have a simple telnet installed on the system. I do have experience with such environments myself and thus it is pretty daunting stuff so in best case you can use something like a simple ssh client if you're lucky and the CentOS / Redhat / Suse Linux whatever distro has openssh-client package installed.
If you're lucky to have the ssh onboard you can use telnet in same manner as netcat or the swiss army knife (nmap) network mapper tool to test whether remote service TCP / port is opened or not. As often this is useful, if you don't have access to the CISCO / Juniper or other (networ) / firewall equipment which is setting the boundaries and security port restrictions between networks and servers.

Below is example on how to use ssh client to test port connectivity to lets say the Internet, i.e.  Google / Yahoo search engines.
 

[root@pciserver: /home ]# ssh -oConnectTimeout=3 -v google.com -p 23
OpenSSH_7.9p1 Debian-10+deb10u2, OpenSSL 1.1.1g  21 Apr 2020
debug1: Connecting to google.com [172.217.169.206] port 23.
debug1: connect to address 172.217.169.206 port 23: Connection timed out
debug1: Connecting to google.com [2a00:1450:4017:80b::200e] port 23.
debug1: connect to address 2a00:1450:4017:80b::200e port 23: Cannot assign requested address
ssh: connect to host google.com port 23: Cannot assign requested address
root@pcfreak:/var/www/images# ssh -oConnectTimeout=3 -v google.com -p 80
OpenSSH_7.9p1 Debian-10+deb10u2, OpenSSL 1.1.1g  21 Apr 2020
debug1: Connecting to google.com [172.217.169.206] port 80.
debug1: connect to address 172.217.169.206 port 80: Connection timed out
debug1: Connecting to google.com [2a00:1450:4017:807::200e] port 80.
debug1: connect to address 2a00:1450:4017:807::200e port 80: Cannot assign requested address
ssh: connect to host google.com port 80: Cannot assign requested address
root@pcfreak:/var/www/images# ssh google.com -p 80
ssh_exchange_identification: Connection closed by remote host
root@pcfreak:/var/www/images# ssh google.com -p 80 -v -oConnectTimeout=3
OpenSSH_7.9p1 Debian-10+deb10u2, OpenSSL 1.1.1g  21 Apr 2020
debug1: Connecting to google.com [172.217.169.206] port 80.
debug1: connect to address 172.217.169.206 port 80: Connection timed out
debug1: Connecting to google.com [2a00:1450:4017:80b::200e] port 80.
debug1: connect to address 2a00:1450:4017:80b::200e port 80: Cannot assign requested address
ssh: connect to host google.com port 80: Cannot assign requested address
root@pcfreak:/var/www/images# ssh google.com -p 80 -v -oConnectTimeout=5
OpenSSH_7.9p1 Debian-10+deb10u2, OpenSSL 1.1.1g  21 Apr 2020
debug1: Connecting to google.com [142.250.184.142] port 80.
debug1: connect to address 142.250.184.142 port 80: Connection timed out
debug1: Connecting to google.com [2a00:1450:4017:80c::200e] port 80.
debug1: connect to address 2a00:1450:4017:80c::200e port 80: Cannot assign requested address
ssh: connect to host google.com port 80: Cannot assign requested address
root@pcfreak:/var/www/images# ssh google.com -p 80 -v
OpenSSH_7.9p1 Debian-10+deb10u2, OpenSSL 1.1.1g  21 Apr 2020
debug1: Connecting to google.com [172.217.169.206] port 80.
debug1: Connection established.
debug1: identity file /root/.ssh/id_rsa type 0
debug1: identity file /root/.ssh/id_rsa-cert type -1
debug1: identity file /root/.ssh/id_dsa type -1
debug1: identity file /root/.ssh/id_dsa-cert type -1
debug1: identity file /root/.ssh/id_ecdsa type -1
debug1: identity file /root/.ssh/id_ecdsa-cert type -1
debug1: identity file /root/.ssh/id_ed25519 type -1
debug1: identity file /root/.ssh/id_ed25519-cert type -1
debug1: identity file /root/.ssh/id_xmss type -1
debug1: identity file /root/.ssh/id_xmss-cert type -1
debug1: Local version string SSH-2.0-OpenSSH_7.9p1 Debian-10+deb10u2
debug1: ssh_exchange_identification: HTTP/1.0 400 Bad Request


debug1: ssh_exchange_identification: Content-Type: text/html; charset=UTF-8


debug1: ssh_exchange_identification: Referrer-Policy: no-referrer


debug1: ssh_exchange_identification: Content-Length: 1555


debug1: ssh_exchange_identification: Date: Wed, 30 Dec 2020 14:13:25 GMT


debug1: ssh_exchange_identification:


debug1: ssh_exchange_identification: <!DOCTYPE html>

debug1: ssh_exchange_identification: <html lang=en>

debug1: ssh_exchange_identification:   <meta charset=utf-8>

debug1: ssh_exchange_identification:   <meta name=viewport content="initial-scale=1, minimum-scale=1, width=device-width">

debug1: ssh_exchange_identification:   <title>Error 400 (Bad Request)!!1</title>

debug1: ssh_exchange_identification:   <style>

debug1: ssh_exchange_identification:     *{margin:0;padding:0}html,code{font:15px/22px arial,sans-serif}html{background:#fff;color:#222;padding:15px}body{margin:7% auto 0;max-width:390px;min-height:180px;padding:30px 0 15px}* > body{background:url(//www.google.com/images/errors/robot.png) 10
debug1: ssh_exchange_identification: 0% 5px no-repeat;padding-right:205px}p{margin:11px 0 22px;overflow:hidden}ins{color:#777;text-decoration:none}a img{border:0}@media screen and (max-width:772px){body{background:none;margin-top:0;max-width:none;padding-right:0}}#logo{background:url(//www.g
debug1: ssh_exchange_identification: oogle.com/images/branding/googlelogo/1x/googlelogo_color_150x54dp.png) no-repeat;margin-left:-5px}@media only screen and (min-resolution:192dpi){#logo{background:url(//www.google.com/images/branding/googlelogo/2x/googlelogo_color_150x54dp.png) no-repeat 0
debug1: ssh_exchange_identification: % 0%/100% 100%;-moz-border-image:url(//www.google.com/images/branding/googlelogo/2x/googlelogo_color_150x54dp.png) 0}}@media only screen and (-webkit-min-device-pixel-ratio:2){#logo{background:url(//www.google.com/images/branding/googlelogo/2x/googlelogo_
debug1: ssh_exchange_identification: color_150x54dp.png) no-repeat;-webkit-background-size:100% 100%}}#logo{display:inline-block;height:54px;width:150px}

debug1: ssh_exchange_identification:   </style>

debug1: ssh_exchange_identification:   <a href=//www.google.com/><span id=logo aria-label=Google></span></a>

debug1: ssh_exchange_identification:   <p><b>400.</b> <ins>That\342\200\231s an error.</ins>

debug1: ssh_exchange_identification:   <p>Your client has issued a malformed or illegal request.  <ins>That\342\200\231s all we know.</ins>

ssh_exchange_identification: Connection closed by remote host


Here is another example on how to test remote host whether a certain service such as DNS (bind) or telnetd is enabled and listening on remote local network  IP with ssh

[root@pciserver: /home ]# ssh 192.168.1.200 -p 53 -v -oConnectTimeout=5
OpenSSH_7.9p1 Debian-10+deb10u2, OpenSSL 1.1.1g  21 Apr 2020
debug1: Connecting to 192.168.1.200 [192.168.1.200] port 53.
debug1: connect to address 192.168.1.200 port 53: Connection timed out
ssh: connect to host 192.168.1.200 port 53: Connection timed out

[root@server: /home ]# ssh 192.168.1.200 -p 23 -v -oConnectTimeout=5
OpenSSH_7.9p1 Debian-10+deb10u2, OpenSSL 1.1.1g  21 Apr 2020
debug1: Connecting to 192.168.1.200 [192.168.1.200] port 23.
debug1: connect to address 192.168.1.200 port 23: Connection timed out
ssh: connect to host 192.168.1.200 port 23: Connection timed out


But what if Linux server you have tow work on is so paranoid that you even the ssh client is absent? Well you can use anything else that is capable of doing a connectivity to remote port such as wget or curl. Some web servers or application servers usually have wget or curl as it is integral part for some local shell scripts doing various operation needed for proper services functioning or simply to test locally a local or remote listener services, if that's the case we can use curl to connect and get output of a remote service simulating a normal telnet connection like this:

host:~# curl -vv 'telnet://remote-server-host5:22'
* About to connect() to remote-server-host5 port 22 (#0)
*   Trying 10.52.67.21… connected
* Connected to aflpvz625 (10.52.67.21) port 22 (#0)
SSH-2.0-OpenSSH_5.3

Now lets test whether we can connect remotely to a local net remote IP's Qmail mail server with curls telnet simulation mode:

host:~#  curl -vv 'telnet://192.168.0.200:25'
* Expire in 0 ms for 6 (transfer 0x56066e5ab900)
*   Trying 192.168.0.200…
* TCP_NODELAY set
* Expire in 200 ms for 4 (transfer 0x56066e5ab900)
* Connected to 192.168.0.200 (192.168.0.200) port 25 (#0)
220 This is Mail Pc-Freak.NET ESMTP

Fine it works, lets now test whether a remote server who has MySQL listener service on standard MySQL port TCP 3306 is reachable with curl

host:~#  curl -vv 'telnet://192.168.0.200:3306'
* Expire in 0 ms for 6 (transfer 0x5601fafae900)
*   Trying 192.168.0.200…
* TCP_NODELAY set
* Expire in 200 ms for 4 (transfer 0x5601fafae900)
* Connected to 192.168.0.200 (192.168.0.200) port 3306 (#0)
Warning: Binary output can mess up your terminal. Use "–output -" to tell
Warning: curl to output it to your terminal anyway, or consider "–output
Warning: <FILE>" to save to a file.
* Failed writing body (0 != 107)
* Closing connection 0
root@pcfreak:/var/www/images#  curl -vv 'telnet://192.168.0.200:3306'
* Expire in 0 ms for 6 (transfer 0x5598ad008900)
*   Trying 192.168.0.200…
* TCP_NODELAY set
* Expire in 200 ms for 4 (transfer 0x5598ad008900)
* Connected to 192.168.0.200 (192.168.0.200) port 3306 (#0)
Warning: Binary output can mess up your terminal. Use "–output -" to tell
Warning: curl to output it to your terminal anyway, or consider "–output
Warning: <FILE>" to save to a file.
* Failed writing body (0 != 107)
* Closing connection 0

As you can see the remote connection is returning binary data which is unknown to a standard telnet terminal thus to get the output received we need to pass curl suggested arguments.

host:~#  curl -vv 'telnet://192.168.0.200:3306' –output –
* Expire in 0 ms for 6 (transfer 0x55b205c02900)
*   Trying 192.168.0.200…
* TCP_NODELAY set
* Expire in 200 ms for 4 (transfer 0x55b205c02900)
* Connected to 192.168.0.200 (192.168.0.200) port 3306 (#0)
g


The curl trick used to troubleshoot remote port to remote host from a Windows OS host which does not have telnet installed by default but have curl instead.

Also When troubleshooting vSphere Replication, it is often necessary to troubleshoot port connectivity as common Windows utilities are not available.
As Curl is available in the VMware vCenter Server Appliance command line interface.

On servers where curl is not there but you have wget is installed you can use it also to test a remote port


# wget -vv -O /dev/null http://google.com:554 –timeout=5
–2020-12-30 16:54:22–  http://google.com:554/
Resolving google.com (google.com)… 172.217.169.206, 2a00:1450:4017:80b::200e
Connecting to google.com (google.com)|172.217.169.206|:554… failed: Connection timed out.
Connecting to google.com (google.com)|2a00:1450:4017:80b::200e|:554… failed: Cannot assign requested address.
Retrying.

–2020-12-30 16:54:28–  (try: 2)  http://google.com:554/
Connecting to google.com (google.com)|172.217.169.206|:554… ^C

As evident from output the port 554 is filtered in google which is pretty normal.

If curl or wget is not there either as a final alternative you can either install some perl, ruby, python or bash script etc. that can opens a remote socket to the remote IP.

Howto Pass SSH traffic through a Secured Corporate Proxy server with corkscrew, using sshd as a standalone proxy service with no proxy installed on remote Linux server or VPS

Tuesday, November 19th, 2019

howto pass ssh traffic through proxy to remote server use remote machine as a proxy for connecting to the Internet

Working in the big bad corporate world (being employed in  any of the Fortune 500) companies, especially in an IT delivery company is a nasty thing in terms of User Personal Data Privacy because usually when employeed in any of a corporation, the company ships you with a personal Computer with some kind of pre-installed OS (most often this is Windows) and the computer is not a standalone one but joined in Active Directory (AD) belonging to Windows Domain and centrally administered by whoever.

As part of the default deplyed configuration in this pre-installed OS and software is that part or all your network traffic and files is being monitored in some kind of manner as your pre-installed Windows or Linux notebook given by the Corporation is having a set of standard software running in the background, and even though you have Windows Administrator there are many things you have zero control or even if you have changed it once the Domain Policy is triggered your custom made changes / Installed Programs that happen to be against the company policy are being automatically deleted, any registry changes made are being rewinded etc. Sometimes even by trying to manually clean up your PC from the corporate crapware,  you might breaks access to the corporate DMZ firewalled network. A common way to secure their employee PC data large companies have a Network seperation, your PC when not connected to the Corporate VPN is having a certain IP configuration and once connected to the Demilitarized Zone VPN those configuration changes and the PC have access to internal company infrastructure servers / router / switches / firewalls / SANs etc. Access to corporate Infrastructure is handled via crypted VPN clinet such as Cisco AnyConnect Secure Mobility Client which is perhaps one of the most used ones out there.

Part of the common software installed to Monitor your PC for threats / viruses / trojans among which is MCafee / EMET (Enhandced Mitigation Experience Toolkit) the PC is often prebundled with some kind of anti-malware (crapware) :). But the tip of the iceberg on user surveillance where most of surveillance happens is the default installed proxy on the PC which usually does keep track of all your remote accessed HTTP Website URLs accessed in plain text – traffic flowing on Port 80 and crypted one on standard (SSL) Port 443. This Web Traffic is handled by the Central Corporate proxy that is being deployed via some kind of Domain policy, every time the Computer joins the Windows domain. 

This of course is a terrible thing for your Browsing security and together with the good security practice to run your browser in Incognito mode, which makes all your browsing activity such as access URLs History or Saved Cookies data to be cleared up on a Browser close it is important to make sure you run your own personal traffic via a separate browser which you will use only for your own concern browsing such as Accessing your Bank Money Accounts to check your Monthly Sallary / Purchase things online via Amazon.com / Ebay.com, whether all of the rest traffic company related is trafficed via the default set corporate central proxy.
This is relatively easy sometimes in companies, where security is not of a top concern but in corporations with tightened security accessing remote proxy, or accessing even common daily news and Public Email websites or social media sites  Gmail.com / Twitter / Youtube will be filtered so the only way to reach them will be via some kind of Proxy and often this proxy is the only way out to the Free world from the corporate jail.

Here is where the good old SSH comes as a saving grace as it turns out SSH traffic could be trafficed over a proxy. In below article I will give you a short insight on how Proxy through SSH could be achieved to Secure your dailty web traffic and use SSH to reach your own server on the Internet as well as how you can copy securely data via SSH through corporate Proxy. 
 

1. How to view your corporate used (default) proxy / Check Proxy.pac file definitions


To get an idea what is the used proxy on your Corporate PC (as most corporate employee given notebooks are running some kind of M$ Windows)  you can go to:

Windows Control Panel -> Internet Options -> Connections -> Lan Settings
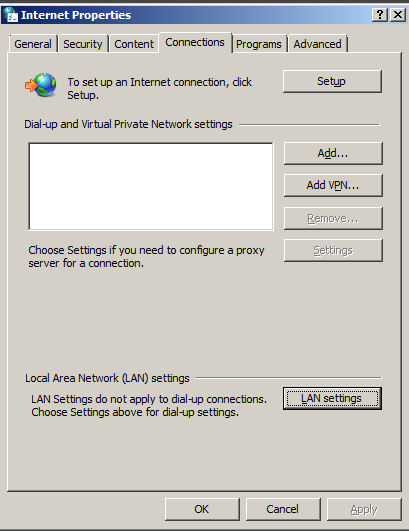

internet-properties-microsoft-windows-screenshot

Under the field Proxy server (check out the Proxy configured Address and Port number )
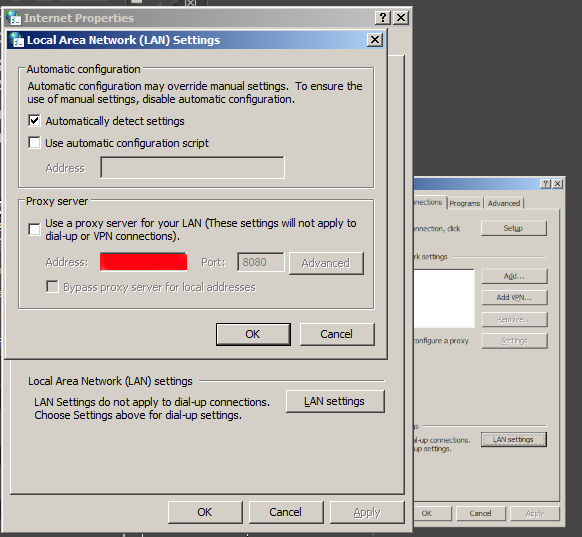
local-area-network-lan-settings-screenshot-windows-1
 

Having that as browsers venerate the so-called Proxy.pac file, to be rawly aware on some general Company Proxy configured definitions you can access in a browser the proxy itself fething the proxy.pac file for example.


http://your-corporate-firewall-rpoxy-url:8080/proxy.pac


This is helpful as some companies Proxies have some proxy rules that reveal some things about its Internet architecture and even some have some badly configured proxy.pac files which could be used to fool the proxy under some circumstances 🙂
 

2. Few of the reasons corporations proxy all their employee's work PC web traffic


The corporate proxying of traffic has a number of goals, some of which are good hearted and others are for mostly spying on the users.


1. Protect Corporate Employees from malicious Viruses / Trojans Horses / Malware / Badware / Whatever ware – EXCELLENT
2. Prevent users from acessing a set of sources that due to the corporate policy are considered harmful (e.g. certain addresses 
of information or disinformation of competitors, any Internet source that might preach against the corporation, hacking ralated websites etc.) – NOT GOOD (for the employee / user) and GOOD for the company
3.Spy on the users activity and be able to have evidence against the employee in case he decided to do anything harmful to the company evidences from proxy could even later be used in court if some kind of corpoate infringment occurs due to misbehave of the employee. – PERFECT FOR COMPANY and Complete breach of User privacy and IMHO totally against European Union privacy legislation such as GDRP
4. In companies that are into the field of Aritificial Intelligence / Users behavior could even be used to advance Self-learning bots and mechanisms – NASTY ! YAECKES


3. Run SSH Socks proxy to remote SSHd server running on common SSL 443 port


Luckily sysadmins who were ordered the big bosses to sniff on your Web behaviour and preferences could be outsmarted with some hacks.

To protect your Browsing behaviours and Secure your privacy perhaps the best option is to use the Old but gold practice o Securing your Networkf traffic using SSH Over Proxy and SSH Dynamic tunnel as a Proxy as explained in my previous article here.
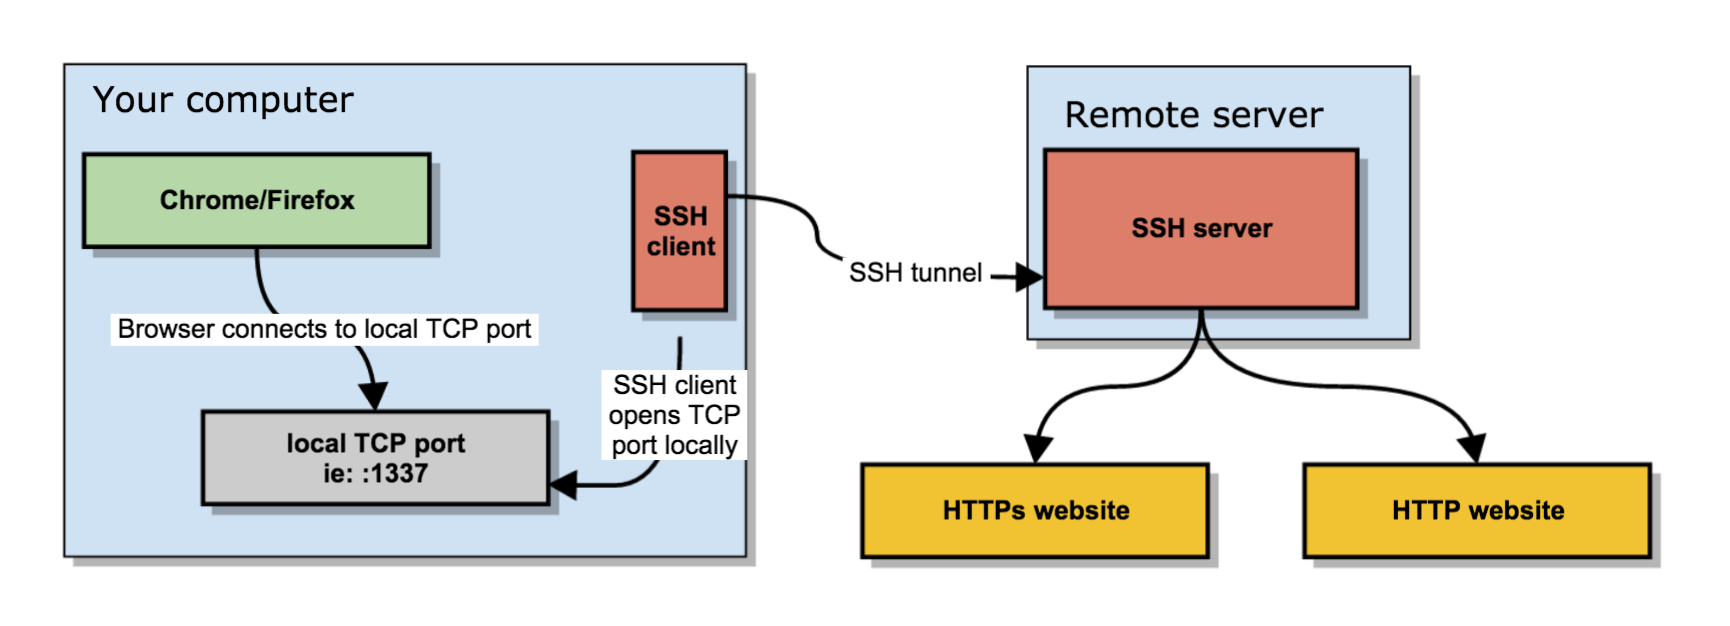
how-to-use-sshd-server-as-a-proxy-without-a-real-proxy-ssh-socks5_proxy_linux
 

In short the quest way to have your free of charge SOCKS  Remote proxy to your Home based Linux installed OS server / VPN with a Public Internet address is to use ssh as so:


ssh -D 3128 UserName@IP-of-Remote-SSHD-Host -p 443


This will start the SOCKS Proxy tunnel from Corporate Work PC to your Own Home brew server.

For some convenience it is useful to set up an .alias (for cygwin) / linux users in .bashrc file:


alias proxy='ssh -D 3128 UserName@IP-of-Remote-SSHD-Host -p 443';


To start using the Proxy from browser, I use a plugin called FoxyProxy in Chrome and Firefox browsers
set-up to connect to localhost – 127.0.0.1:3128 for All Protocols as a SOCKs v5 Proxy.

The sshd Socks proxy can be used for multiple others for example, using it you can also pass on traffic from Mail client such as Thunderbird to your Email server if you're behind a firewall prohibiting access to the common POP3 port 110 or IMAP port TCP 143. 

4. How to access SSH through Proxy using jumphost SSH hop


If you're like me and you have on your Home Linux machine only one Internet address and you have already setupped an SSL enabled service (lets say Webmail) to listen to that Public Internet IP and you don't have the possibility to run another instance of /usr/bin/sshd on port 443 via configuration or manually one time by issuing:


/usr/sbin/sshd -p 443


Then you can use another ssh another Linux server as a jump host to your own home Linux sshd server. This can be done even by purchasing a cheap VPS server for lets say 3 dollars month etc. or even better if you have a friend with another Linux home server, you can ask him to run you sshd on TCP port 443 and add you an ssh account.
Once you have the second Linux machine as JumpHost to reach out to your own machine use:


ssh -J Your-User@Your-jump-host.com:443 hipo@your-home-server.com -v


To easify this a bit long line it is handy to use some kind of alias like:


alias sshhome='ssh -J Your-User@Your-jump-host.com:443 hipo@your-home-server.com -v'


The advantage here is just by issuing this sshd tunnel and keeping it open in a terminal or setting it up as Plink Putty tunnel you have all your Web Traffic Secured
between your Work Corporate PC and your Home Brew Server, keeping the curious eyes of your Company Security Officers from your own Web traffic, hence
separating the corporate privacy from your own personal privacy. Using the just established own SSH Proxy Tunnel to home for your non-work stuff browsing habits
from the corporate systems which are accessed by switching with a button click in FoxyProxy to default proxy settings.
 

5. How to get around paranoid corporate setup where only remote access to Corporate proxy on TCP Port 80 and TCP 443 is available in Browser only


Using straight ssh and to create Proxy will work in most of the cases but it requires SSH access to your remote SSH running server / VPS on TCP Port 22, however under some Fort-Nox like financial involved institutions and companies for the sake of tightened security, it is common that all Outbound TCP Ports are prohibited except TCP Port 80 and SSL 443 as prior said, so what can you do then to get around this badful firewall and access the Internet via your own server Proxy? 
The hack to run SSH server either on tcp port 80 or tcp port 443 on remote Host and use 443 / 80 to acess SSHD should work, but then even for the most paranoid corporations the ones who are PCI Compliant – PCI stands for (Payment Card Industry), e.g. works with Debit and Credit Card data etc, accessing even 80 or 443  ports with something like telnet client or netcat will be impossible. 
Once connected to the corporate VPN,  this 2 two ports firewall exceptions will be only accessible via the Corporate Proxy server defined in a Web Browser (Firefox / IE / Chrome etc.) as prior explained in article.

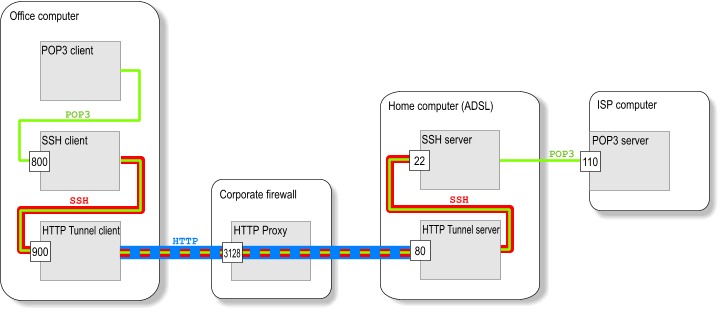
The remedy here is to use a 3rd party tools such as httptunnel or corkscrew that  are able to TUNNEL SSH TRAFFIC VIA CORPORATE PROXY SERVER and access your own resource out of the DMZ.

Both httptunnel and corkscrew are installable both on most Linux distros or for Windows users via CygWin for those who use MobaXterm.

Just to give you better idea on what corkscrew and (hts) httptunnel does, here is Debian packages descriptions.

# apt-cache show​ corkscrew
" corkscrew is a simple tool to tunnel TCP connections through an HTTP
 proxy supporting the CONNECT method. It reads stdin and writes to
 stdout during the connection, just like netcat.
 .
 It can be used for instance to connect to an SSH server running on
 a remote 443 port through a strict HTTPS proxy.
"


# apt-cache show httptunnel|grep -i description -A 7
Description-en: Tunnels a data stream in HTTP requests
 Creates a bidirectional virtual data stream tunnelled in
 HTTP requests. The requests can be sent via a HTTP proxy
 if so desired.
 .
 This can be useful for users behind restrictive firewalls. If WWW
 access is allowed through a HTTP proxy, it's possible to use
 httptunnel and, say, telnet or PPP to connect to a computer

Description-md5: ed96b7d53407ae311a6c5ef2eb229c3f
Homepage: http://www.nocrew.org/software/httptunnel.html
Tag: implemented-in::c, interface::commandline, interface::daemon,
 network::client, network::server, network::vpn, protocol::http,
 role::program, suite::gnu, use::routing
Section: net
Priority: optional
Filename: pool/main/h/httptunnel/httptunnel_3.3+dfsg-4_amd64.deb

Windows cygwin users can install the tools with:
 

apt-cyg install –yes corkscrew httptunnel


Linux users respectively with:

apt-get install –yes corkscrew httptunnel

or 

yum install -y corkscrew httptunnel


You will then need to have the following configuration in your user home directory $HOME/.ssh/config file
 

Host host-addrs-of-remote-home-ssh-server.com
ProxyCommand /usr/bin/corkscrew your-corporate-firewall-rpoxy-url 8080 %h %p
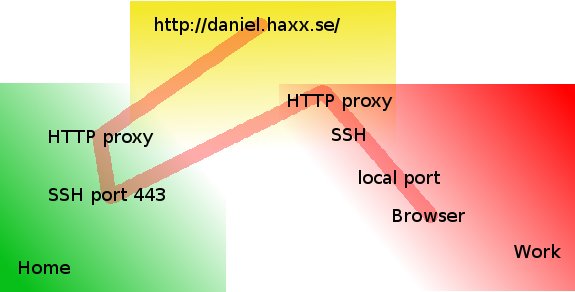
 

howto-transfer-ssh-traffic-over-proxy

Picture Copyright by Daniel Haxx

The best picture on how ssh traffic is proxied is the one found on Daniel Haxx's website which is a great quick tutorial which originally helped to get the idea of how corkscrew works in proxying traffic I warmly recommend you take a quick look at his SSH Through or over Proxy article.

Host-addrs-of-remote-home-ssh-server.com could be also and IP if you don't have your own domain name in case if using via some cheap VPN Linux server with SSH, or alternatively
if you don't want to spend money on buying domain for SSH server (assuming you don't have such yet) you can use Dyn DNS or NoIP.

Another thing is to setup the proper http_proxy / https_proxy / ftp_proxy variable exports in $HOME/.bashrc in my setup I have the following:
 

export ftp_proxy="http://your-corporate-firewall-rpoxy-url:8080"
export https_proxy="https://your-corporate-firewall-rpoxy-url:8080"
export http_proxy="http://your-corporate-firewall-rpoxy-url:8080"
export HTTP_PROXY="http://your-corporate-firewall-rpoxy-url:8080"
export HTTPS_PROXY="http://your-corporate-firewall-rpoxy-url:8080"


6. How to Transfer Files / Data via SSH Protocol through  Proxy with SCP and SFTP


Next logical question is how to Transfer your own personal encrypted files (that contains no corporate sensitive information) between your Work laptop and home brew Linux ssh server or cheap VPN.

It took me quite a lot of try-outs until finally I got it how Secure Copy (scp) command can be used toto transfer files between my Work Computer and my Home brew server using JumpHost, here is how:
 

scp -o 'ProxyJump Username@Jumpt-Host-or-IP.com:443' ~/file-or-files-to-copy* Username@home-ssh-server.com:/path/where/to/copy/files


I love using sftp (Secure FTP) command Linux client to copy files and rarely use scp so I have a lot of try-outs to connect interacitvely via the Corporate Proxy server over a Jump-Host:443 to my Destination home machine, 


I've tried using netcat as it was pointed in many articles online, like so to traffic my sftp traffic via my localhost binded SSH Socks proxy on :3128 together with netcat as shown in article prior example, using following line:
 

sftp -oProxyCommand='/bin/nc -X connect -x 127.0.0.1:3128 %h %p' Username@home-ssh-server.com 22


Also tried proxy connect like this:


sftp -o ProxyCommand="proxy-connect -h localhost -p 3128 %h %p" Username@home-ssh-server.com


Moreover, tried to use the ssh  command (-s) argument capability to invoke SSH protocol subsystem feature which is used to facilitiate use of SSH secure transport for other application
 

ssh -v -J hipo@Jump-Host:443 -s sftp root@home-ssh-server.com -v

open failed: administratively prohibited: open failed


Finally decided to give a try to the same options arguments as in scp and thanks God it worked and I can even access via the Corporate Proxy through the Jump Host SSH interactively via Secure FTP 🙂

!! THE FINAL WORKING SFTP THROUGH PROXY VIA SSH JUMPHOST !!
 

sftp -o 'ProxyJump Username@Jumpt-Host-or-IP.com:443' Username@home-ssh-server.com


To save time from typing this long line every time, I've setup the following alias to ~/.bashrc
 

alias sftphome='sftp -o 'ProxyJump Username@Jumpt-Host-or-IP.com:443' Username@home-ssh-server.com'


Conclusion

Of course using own Proxy via your Home brew SSH Machine as well as transferring your data securely from your Work PC (notebook) to Home does not completely make you Surveillance free, as the Corporate Windows installed OS image is perhaps prebundled with its own integrated Keylogger as well as the Windows Domain administrators have certainly access to connect to your PC and run various commands, so this kind of Security is just an attempt to make company has less control and know less on your browsing habits and the best solution where possible to secure your privacy and separate your Personal Space form Work space by using a second computer (if having the ability to work from home) with a KVM Switch device and switch over your Work PC and Home PC via it or in some cases (where companies) allows it, setup something like VNC server (TightVNC / RealVNC) on work PC and leave it all time running in office and connect remotely with vncviewer from your own controlled secured computer.

In article I've explained shortly common scenario found in corporate Work computers proxy setup, designed to Surveil all your move, mentioned few common softwares running by default to protect from Viruses and aimed to Protect user from malicious hacking tools, explained how to view your work notebook configured Proxy, shortly mentioned on Proxy.pac and hinted how to view proxy.pac config as well as gave few of the reasons why all web traffic is being routed over central proxy.

That's all folks, Enjoy the Freedom to be less surveilled !

Cracking zip protected password files on GNU/Linux and FreeBSD

Wednesday, October 5th, 2011

crack-zip-freebsd

Its not very common, but sometimes it happens you have to crack some downloaded file from thepiratebay.com or some other big torrent tracker. An example scenario would be downloading a huge words dictionary (a rainbow tables) dictionary etc., which was protected by the author with a password and zipped.

Fortunately Mark Lehmann developed a software called fcrackzip which is capable of brute forcing zip protected file passwords straight on UNIX like operating systems (GNU/Linux, FreeBSD).

fcrackzip is available from package repositories on Debian and Ubuntu Linuces to install via apt:

linux:~# apt-get install frackzip
...

fcrackzip is also available on FreeBSD via the ports tree and can be installed with:

freebsd# cd /usr/ports/security/fcrackzip
freebsd# make install cleam

On Debian it's worthy to have a quick look on the README file:

linux:~# cat /usr/share/doc/fcrackzip/READMESee fcrackzip.txt (which is derived from the manpage), or fcrackzip.html

There is a web page with more information at
http://lehmann.home.ml.org/fcrackzip.html or
http://www.goof.com/pcg/marc/fcrackzip.html

A sample password-protected .zip file is included as "noradi.zip". It's
password has 6 lower case characters, and fcrackzip will find it (and a
number of false positives) with

fcrackzip -b -c a -p aaaaaa ./noradi.zip

which will take between one and thirty minutes on typical machines.

To find out which of these passwords is the right one either try them out
or use the –use-unzip option.

Marc

Cracking the noradi.zip password protected sample file on my dual core 1.8 ghz box with 2gb, it took 30 seconds.

linux:~# time fcrackzip -u -b -c a -p aaaaaa noradi.zip

PASSWORD FOUND!!!!: pw == noradi

real 0m29.627s
user 0m29.530s
sys 0m0.064s

Of course the sample set password for noradi.zip is pretty trivial and with more complex passwords, sometimes cracking the password can take up to 30 minutes or an hour and it all depends on the specific case, but at least now we the free software users have a new tool in the growing arsenal of free software programs 😉

Here are the options passed on to the above fcrackzip command:

-uTry to decompress with the detected possible archive passwords using unzip (This is necessery to precisely find the archive password, otherwise it will just print out a number of possible matching archive passwords and you have to try each of the passwords one by one. Note that this option depends on a working unzip version installed.)

-c ainclude all charsets to be tried with the generated passwords

-bSelect brute force mode – Tries all possible combinations of letters specified

-p aaaaaainit-password string (Look up for a password between the password length 6 characters long)

FCrackZip is partly written in assembler and thus is generally works fast, to reduce the CPU load fcrackzip will put on the processor its also capable of using external words dictionary file by passing it the option:

-DThe file should be in a format one word per line and be preliminary alphabetically sorted with let's say sort

Also fcrackzip supports parallel file brute force, for example if you have 10 zip files protected with passwords it can paralelly try to brute force the pwds.

As of time of writting frackzip reached version 1.0 and seems to be pretty stable. Happy cracking.
Just to make sure fcrackzip's source is not lost somewhere in the line in the long future to come, I've created a fcrackzip download mirror here