Archive for the ‘Programming’ Category

VIM Project (VI Improvied IDE Editor extension to facilitate web development with vi enhanced editor

Wednesday, August 25th, 2010

I use VIM as an editor of choice for many years already.
Yet it's until recently I use it for a PHP ZF (Zend Framework) web development.

Few days ago I've blogged How to configure vimrc for a php syntax highlightning (A Nicely pre-configured vimrc to imrpove the daily text editing experience

This enhancements significantly improves the overall PHP code editing with VIM. However I felt something is yet missing because I didn't have the power and functunality of a complete IDE like for instance The Eclipse IDE

I was pretty sure that VIM has to have a way to be used in a similar fashion to a fully functional IDE and looked around the net to find for any VIM plugins that will add vim an IDE like coding interface.

I then come accross a vim plugin called VIM Prokject : Organize/Navigate projects of files (like IDE/buffer explorer)

The latest VIM Project as of time of writting is 1.4.1 and I've mirrored it here

The installation of the VIM Project VIM extension is pretty straight forward to install it and start using it on your PC issue commands:

1. Install the project VIM add-on

debian:~$ wget https://www.pc-freak.net/files/project-1.4.1.tar.gz
debian:~$ mv project-1.4.1.tar.gz ~/.vim/
debian:~$ cd ~/.vim/
debian:~$ tar -zxvvf project-1.4.1.tar.gz

2. Load the plugin

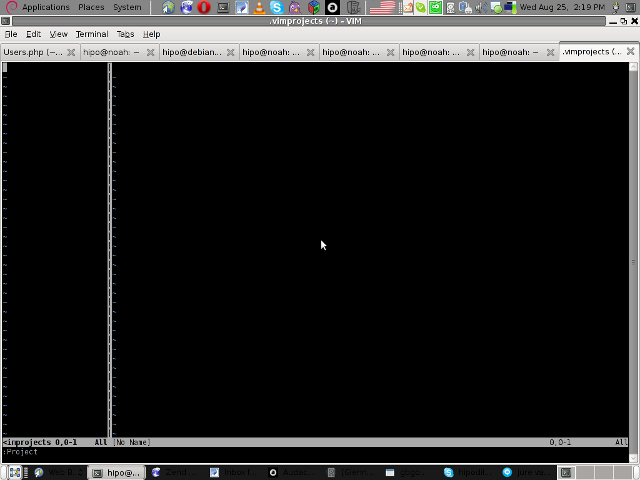
Launch your vim editor and type : Project(without the space between : and P)
You will further see a screen like:

vim project entry screen

3. You will have to press C within the Project window to load a new project

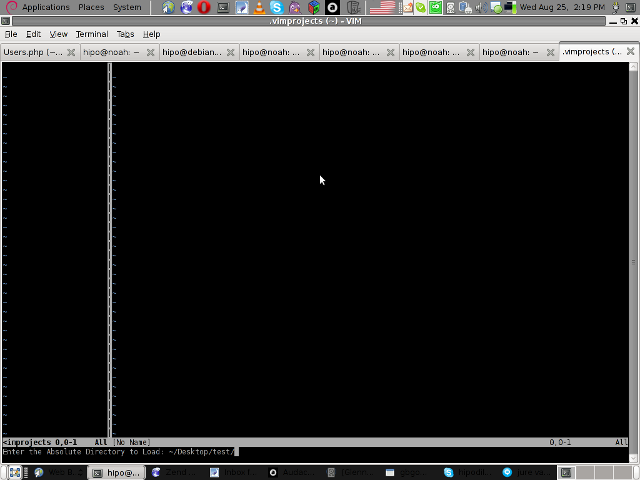
Then you will have to type a directory to use to load a project sources files from:

vim project enter file source directory screen

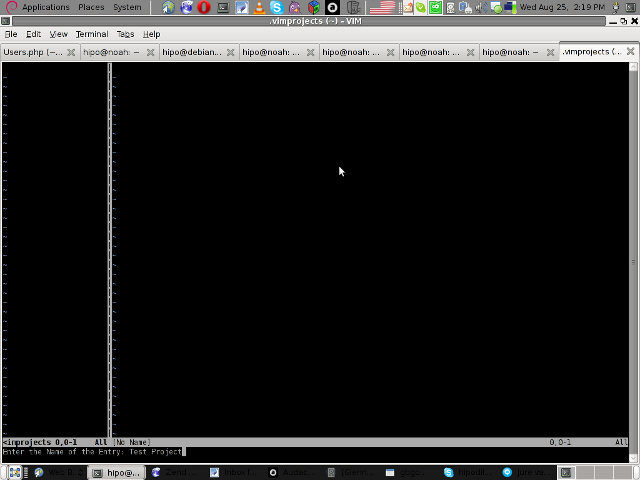
You will be prompted with to type a project name like in the screenshot below:

vim project load test project

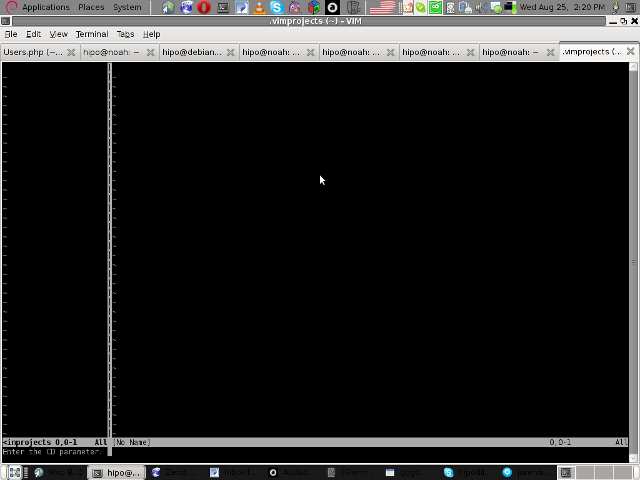
4. Next you will have to type a CD (Current Dir) parameter
To see more about the CD parameter consult vim project documentation by typing in main vim pane :help project

The appearing screen will be something like:

vim project extension cd parameter screen

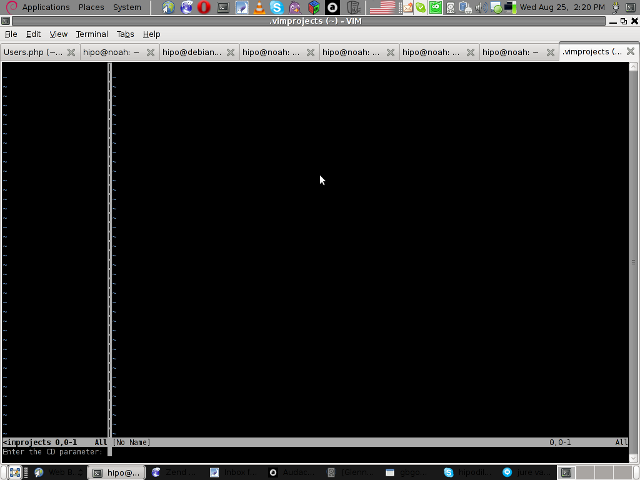
5. Thereafter you will have to type a file filter

File filter is necessary and will instruct the vim project plugin to load all files with the specified extension within vim project pane window

You will experience a screen like:


vim project plugin file filter screen

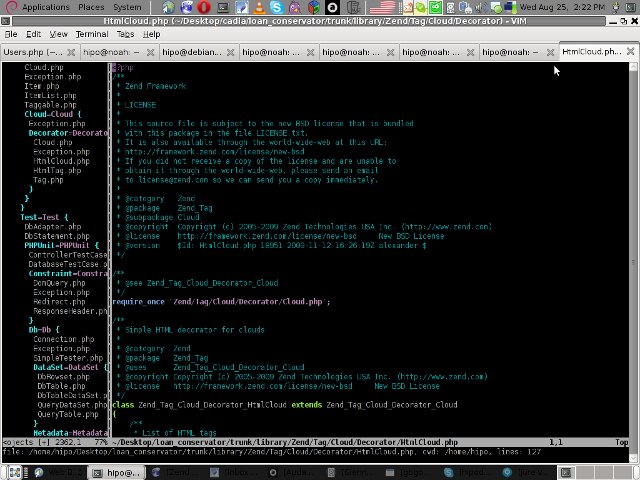
Following will be a short interval in which all specified files by the filter type will get loaded in VIM project pane and your Zend Framework, PHP or any other source files will be listed in a directory tree structure like in the picture shown below:

vim project successful loaded project screen

6. Saving loaded project hierarchy state

In order to save a state of a loaded project within the VIM project window pane you will have to type in vim, let's say:

:saveas .projects/someproject

Later on to load back the saved project state you will have to type in vim :r .projects/someproject

You will now have almost fully functional development IDE on top of your simple vim text editor.

You can navigate within the Project files loaded with the Project extension pane easily and select a file you would like to open up, whenever a source file is opened and you work on it to switch in between the Project file listing pane and the opened source code file you will have to type twice CTRL+w or in vim language C-w

To even further sophisticate your web development in PHP with vim you can add within your ~/.vimrc file the following two lines:

" run file with PHP CLI (CTRL-M)
:autocmd FileType php noremap <C-M> :w!<CR>:!/usr/bin/php %<CR>
" PHP parser check (CTRL-L)
:autocmd FileType php noremap <C-L> :!/usr/bin/php -l %>CR>

In the above vim configuration directovies the " character is a comment line and the autocmd is actually vim declarations.
The first :autocmd … declaration will instruct vim to execute your current opened php source file with the php cli interpreter whenever a key press of CTRL+M (C-m) occurs.

The second :autocmd … will add to your vim a shortcut, so whenever a CTRL+L (C-l) key combination is pressed VIM editor will check your current edited source file for syntax errors.
Therefore this will enable you to very easily periodically check if your file syntax is correct.

Well this things were really helpful to me, so I hope they will be profitable for you as well.
Cheers 🙂

How to install and use memcached on Debian GNU / Linux to share php sessions between DNS round robined Apache webservers

Monday, November 9th, 2020

apache-load-balancing-keep-persistent-php-sessions-memcached-logo

Recently I had to come up with a solution to make A bunch of websites hosted on a machine to be high available. For the task haproxy is one of logical options to use. However as I didn't wanted to set new IP addresses and play around to build a cluster. I decided the much more simplistic approach to use 2 separate Machines each running Up-to-date same version of Apache Webserver as front end and using a shared data running on Master-to-Master MySQL replication database as a backend. For the load balancing itself I've used a simple 2 multiple DNS 'A' Active records, configured via the Bind DNS name server an Round Robin DNS load balancing for each of the domains, to make them point to the the 2 Internet IP addresses (XXX.XXX.XXX.4 and YYY.YYY.YYY.5) each configured on the 2 Linux servers eth0.

So far so good, this setup worked but immediately, I've run another issue as I found out the WordPress and Joomla based websites's PHP sessions are lost, as the connectivity by the remote client browser reaches one time on XXX…4 and one time on YYY…4 configured listerner on TCP port 80 and TCP p. 443. In other words if request comes up to Front end Apache worker webserver 1 with opened channel data is sent back to Client Browser and the next request is sent due to the other IP resolved by the DNS server to come to Apache worker webserver 2 of course webserver 2 has no idea about this previous session data and it gets confused and returns soemething like a 404 or 500 or any other error … not exciting really huh …

I've thought about work around and as I didn't wanted to involve thirty party stuff as Privoxy / Squid  / Varnish / Polipo etc. just as that would add extra complexity as if I choose to use haproxy from the beginning, after short investigation came to a reason to use memcached as a central PHP sessions storage.

php-memcached-apache-workers-webbrowser-keep-sessions-diagram
 

Why I choose memcached ?


Well it is relatively easy to configure, it doesn't come with mambo-jambo unreadable over-complicated configuration and the time to configure everything is really little as well as the configuration is much straight forward, plus I don't need to occupy more IP addresses and I don't need to do any changes to the already running 2 WebServers on 2 separate Linux hosts configured to be reachable from the Internet.
Of course using memcached is not a rock solid and not the best solution out there, as there is risk that if a memcached dies out for some reason all sessions stored in are lost as they're stored only in volatile memory, as well as there is a drawback that if a communication was done via one of the 2 webservers and one of them goes down sessions that were known by one of Apache's workers disappears.

So let me proceed and explain you the steps to take to configure memcached as a central session storage system.
 

1. Install memcached and php-memcached packages


To enable support for memcached besides installing memcached daemon, you need to have the php-memcached which will provide the memcached.so used by Apache loaded php script interpretter module.

On a Debian / Ubuntu and other deb based GNU / Linux it should be:

webserver1:~# apt-get install memcached php-memcached

TO use php-memcached I assume Apache and its support for PHP is already installed with lets say:
 

webserver1:~# apt-get install php libapache2-mod-php php-mcrypt


On CentOS / RHEL / Fedora Linux it is a little bit more complicated as you'll need to install php-pear and compile the module with pecl


[root@centos ~]# yum install php-pear

[root@centos ~]# yum install php-pecl-memcache


Compile memcache

[root@centos ~]# pecl install memcache


2. Test if memcached is properly loaded in PHP


Once installed lets check if memcached service is running and memcached support is loaded as module into PHP core.


webserver1:~# ps -efa  | egrep memcached
nobody   14443     1  0 Oct23 ?        00:04:34 /usr/bin/memcached -v -m 64 -p 11211 -u nobody -l 127.0.0.1 -l 192.168.0.1

root@webserver1:/# php -m | egrep memcache
memcached


To get a bit more verbose information on memcache version and few of memcached variable settings:

root@webserver1:/# php -i |grep -i memcache
/etc/php/7.4/cli/conf.d/25-memcached.ini
memcached
memcached support => enabled
libmemcached version => 1.0.18
memcached.compression_factor => 1.3 => 1.3
memcached.compression_threshold => 2000 => 2000
memcached.compression_type => fastlz => fastlz
memcached.default_binary_protocol => Off => Off
memcached.default_connect_timeout => 0 => 0
memcached.default_consistent_hash => Off => Off
memcached.serializer => php => php
memcached.sess_binary_protocol => On => On
memcached.sess_connect_timeout => 0 => 0
memcached.sess_consistent_hash => On => On
memcached.sess_consistent_hash_type => ketama => ketama
memcached.sess_lock_expire => 0 => 0
memcached.sess_lock_max_wait => not set => not set
memcached.sess_lock_retries => 5 => 5
memcached.sess_lock_wait => not set => not set
memcached.sess_lock_wait_max => 150 => 150
memcached.sess_lock_wait_min => 150 => 150
memcached.sess_locking => On => On
memcached.sess_number_of_replicas => 0 => 0
memcached.sess_persistent => Off => Off
memcached.sess_prefix => memc.sess.key. => memc.sess.key.
memcached.sess_randomize_replica_read => Off => Off
memcached.sess_remove_failed_servers => Off => Off
memcached.sess_sasl_password => no value => no value
memcached.sess_sasl_username => no value => no value
memcached.sess_server_failure_limit => 0 => 0
memcached.store_retry_count => 2 => 2
Registered save handlers => files user memcached


Make sure /etc/default/memcached (on Debian is enabled) on CentOS / RHELs this should be /etc/sysconfig/memcached

webserver1:~# cat default/memcached 
# Set this to no to disable memcached.
ENABLE_MEMCACHED=yes

As assured on server1 memcached + php is ready to be used, next login to Linux server 2 and repeat the same steps install memcached and the module and check it is showing as loaded.

Next place under some of your webservers hosted websites under check_memcached.php below PHP code
 

<?php
if (class_exists('Memcache')) {
    $server = 'localhost';
    if (!empty($_REQUEST[‘server’])) {
        $server = $_REQUEST[‘server’];
    }
    $memcache = new Memcache;
    $isMemcacheAvailable = @$memcache->connect($server);

    if ($isMemcacheAvailable) {
        $aData = $memcache->get('data');
        echo '<pre>';
        if ($aData) {
            echo '<h2>Data from Cache:</h2>';
            print_r($aData);
        } else {
            $aData = array(
                'me' => 'you',
                'us' => 'them',
            );
            echo '<h2>Fresh Data:</h2>';
            print_r($aData);
            $memcache->set('data', $aData, 0, 300);
        }
        $aData = $memcache->get('data');
        if ($aData) {
            echo '<h3>Memcache seem to be working fine!</h3>';
        } else {
            echo '<h3>Memcache DOES NOT seem to be working!</h3>';
        }
        echo '</pre>';
    }
}

if (!$isMemcacheAvailable) {
    echo 'Memcache not available';
}

?>


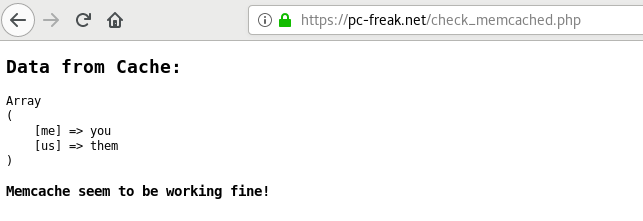
Launch in a browser https://your-dns-round-robined-domain.com/check_memcached.php, the browser output should be as on below screenshot:
check_memcached-php-script-website-screenshot

3. Configure memcached daemons on both nodes

All we need to set up is the listen IPv4 addresses

On Host Webserver1
You should have in /etc/memcached.conf

-l 127.0.0.1
-l 192.168.0.1

webserver1:~# grep -Ei '\-l' /etc/memcached.conf 
-l 127.0.0.1
-l 192.168.0.1


On Host Webserver2

-l 127.0.0.1
-l 192.168.0.200


webserver2:~# grep -Ei '\-l' /etc/memcached.conf
-l 127.0.0.1
-l 192.168.0.200


4. Configure memcached in php.ini

Edit config /etc/php.ini (on CentOS / RHEL) or on Debians / Ubuntus etc. modify /etc/php/*/apache2/php.ini (where depending on the PHP version you're using your php location could be different lets say /etc/php/5.6/apache2/php.ini):

If you wonder where is the php.ini config in your case you can usually get it from the php cli:

webserver1:~# php -i | grep "php.ini"
Configuration File (php.ini) Path => /etc/php/7.4/cli
Loaded Configuration File => /etc/php/7.4/cli/php.ini


! Note: That on on PHP-FPM installations (where FastCGI Process Manager) is handling PHP requests,path would be rather something like:
 

/etc/php5/fpm/php.ini

in php.ini you need to change as minimum below 2 variables
 

session.save_handler =
session.save_path =


By default session.save_path would be set to lets say session.save_path = "

/var/lib/php7/sessions"


To make php use a 2 central configured memcached servers on webserver1 and webserver2 or even more memcached configured machines set it to look as so:

session.save_path="192.168.0.200:11211, 192.168.0.1:11211"


Also modify set

session.save_handler = memcache


Overall changed php.ini configuration on Linux machine 1 ( webserver1 ) and Linux machine 2 ( webserver2 ) should be:

session.save_handler = memcache
session.save_path="192.168.0.200:11211, 192.168.0.1:11211"


Below is approximately how it should look on both :

webserver1: ~# grep -Ei 'session.save_handler|session.save_path' /etc/php.ini
;; session.save_handler = files
session.save_handler = memcache
;     session.save_path = "N;/path"
;     session.save_path = "N;MODE;/path"
;session.save_path = "/var/lib/php7/sessions"
session.save_path="192.168.0.200:11211, 192.168.0.1:11211"
;       (see session.save_path above), then garbage collection does *not*


webserver2: ~# grep -Ei 'session.save_handler|session.save_path' /etc/php.ini
;; session.save_handler = files
session.save_handler = memcache
;     session.save_path = "N;/path"
;     session.save_path = "N;MODE;/path"
;session.save_path = "/var/lib/php7/sessions"
session.save_path="192.168.0.200:11211, 192.168.0.1:11211"
;       (see session.save_path above), then garbage collection does *not*


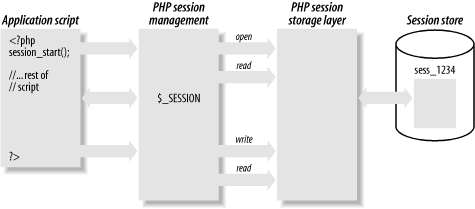
As you can see I have configured memcached on webserver1 to listen on internal local LAN IP 192.168.0.200 and on Local LAN eth iface 192.168.0.1 on TCP port 11211 (this is the default memcached connections listen port), for security or obscurity reasons you might choose another empty one. Make sure to also set the proper firewalling to that port, the best is to enable connections only between 192.168.0.200 and 192.168.0.1 on each of machine 1 and machine 2.
loadbalancing2-php-sessions-scheme-explained
 

5. Enable Memcached for session redundancy


Next step is to configure memcached to allow failover (e.g. use both memcached on 2 linux hosts) and configure session redundancy.
Configure /etc/php/7.3/mods-available/memcache.ini or /etc/php5/mods-available/memcache.ini or respectively to the right location depending on the PHP installed and used webservers version.
 

webserver1 :~#  vim /etc/php/7.3/mods-available/memcache.ini

; configuration for php memcached module
; priority=20
; settings to write sessions to both servers and have fail over
memcache.hash_strategy=consistent
memcache.allow_failover=1
memcache.session_redundancy=3
extension=memcached.so


webserver2 :~# vim /etc/php/7.3/mods-available/memcache.ini

; configuration for php memcached module
; priority=20
; settings to write sessions to both servers and have fail over
memcache.hash_strategy=consistent
memcache.allow_failover=1
memcache.session_redundancy=3
extension=memcached.so


memcache.session_redundancy directive must be equal to the number of memcached servers + 1 for the session information to be replicated to all the servers. This is due to a bug in PHP.
I have only 2 memcached configured that's why I set it to 3.
 

6. Restart Apache Webservers

Restart on both machines webserver1 and webserver2 Apache to make php load memcached.so
 

webserver1:~# systemctl restart httpd

webserver2:~# systemctl restart httpd


7. Restart memcached on machine 1 and 2


webserver1 :~# systemctl restart memcached

webserver2 :~# systemctl restart memcached


8. Test php sessions are working as expected with a php script

Copy to both website locations to accessible URL a file test_sessions.php:
 

<?php  
session_start();

if(isset($_SESSION[‘georgi’]))
{
echo "Sessions is ".$_SESSION[‘georgi’]."!\n";
}
else
{
echo "Session ID: ".session_id()."\n";
echo "Session Name: ".session_name()."\n";
echo "Setting 'georgi' to 'cool'\n";
$_SESSION[‘georgi’]='cool';
}
?>


Now run the test to see PHP sessions are kept persistently:
 

hipo@jeremiah:~/Desktop $ curl -vL -s https://www.pc-freak.net/session.php 2>&1 | grep 'Set-Cookie:'
< Set-Cookie: PHPSESSID=micir464cplbdfpo36n3qi9hd3; expires=Tue, 10-Nov-2020 12:14:32 GMT; Max-Age=86400; path=/

hipo@jeremiah:~/Desktop $ curl -L –cookie "PHPSESSID=micir464cplbdfpo36n3qi9hd3" http://83.228.93.76/session.php http://213.91.190.233/session.php
Session is cool!
Session is cool!


Copy to the locations that is resolving to both DNS servers some sample php script such as sessions_test.php  with below content:

<?php
    header('Content-Type: text/plain');
    session_start();
    if(!isset($_SESSION[‘visit’]))
    {
        echo "This is the first time you're visiting this server\n";
        $_SESSION[‘visit’] = 0;
    }
    else
            echo "Your number of visits: ".$_SESSION[‘visit’] . "\n";

    $_SESSION[‘visit’]++;

    echo "Server IP: ".$_SERVER[‘SERVER_ADDR’] . "\n";
    echo "Client IP: ".$_SERVER[‘REMOTE_ADDR’] . "\n";
    print_r($_COOKIE);
?>

Test in a Web Opera / Firefox / Chrome browser.

You should get an output in the browser similar to:
 

Your number of visits: 15
Server IP: 83.228.93.76
Client IP: 91.92.15.51
Array
(
    [_ga] => GA1.2.651288003.1538922937
    [__utma] => 238407297.651288003.1538922937.1601730730.1601759984.45
    [__utmz] => 238407297.1571087583.28.4.utmcsr=google|utmccn=(organic)|utmcmd=organic|utmctr=(not provided)
    [shellInABox] => 467306938:1110101010
    [fpestid] => EzkIzv_9OWmR9PxhUM8HEKoV3fbOri1iAiHesU7T4Pso4Mbi7Gtt9L1vlChtkli5GVDKtg
    [__gads] => ID=8a1e445d88889784-22302f2c01b9005b:T=1603219663:RT=1603219663:S=ALNI_MZ6L4IIaIBcwaeCk_KNwmL3df3Z2g
    [PHPSESSID] => mgpk1ivhvfc2d0daq08e0p0ec5
)

If you want to test php sessions are working with text browser or from another external script for automation use something as below PHP code:
 

<?php
// save as "session_test.php" inside your webspace  
ini_set('display_errors', 'On');
error_reporting(6143);

session_start();

$sessionSavePath = ini_get('session.save_path');

echo '<br><div style="background:#def;padding:6px">'
   , 'If a session could be started successfully <b>you should'
   , ' not see any Warning(s)</b>, otherwise check the path/folder'
   , ' mentioned in the warning(s) for proper access rights.<hr>';
echo "WebServer IP:" . $_SERVER[‘SERVER_ADDR’] . "\n<br />";
if (empty($sessionSavePath)) {
    echo 'A "<b>session.save_path</b>" is currently',
         ' <b>not</b> set.<br>Normally "<b>';
    if (isset($_ENV[‘TMP’])) {
        echo  $_ENV[‘TMP’], ‘” ($_ENV[“TMP”]) ';
    } else {
        echo '/tmp</b>" or "<b>C:\tmp</b>" (or whatever',
             ' the OS default "TMP" folder is set to)';
    }    
    echo ' is used in this case.';
} else {
    echo 'The current "session.save_path" is "<b>',
         $sessionSavePath, '</b>".';
}

echo '<br>Session file name: "<b>sess_', session_id()
   , '</b>".</div><br>';
?>

You can download the test_php_sessions.php script here.

To test with lynx:

hipo@jeremiah:~/Desktop $ lynx -source 'https://www.pc-freak.net/test_php_sessions.php'
<br><div style="background:#def;padding:6px">If a session could be started successfully <b>you should not see any Warning(s)</b>, otherwise check the path/folder mentioned in the warning(s) for proper access rights.<hr>WebServer IP:83.228.93.76
<br />The current "session.save_path" is "<b>tcp://192.168.0.200:11211, tcp://192.168.0.1:11211</b>".<br>Session file name: "<b>sess_5h18f809b88isf8vileudgrl40</b>".</div><br>
How to Avoid the 7 Most Frequent Mistakes in Python Programming

Monday, September 9th, 2019

python-programming-language-logo

Python is very appealing for Rapid Application Development for many reasons, including high-level built in data structures, dynamic typing and binding, or to use as glue to connect different components. It’s simple and easy to learn but new Python developers can fall in the trap of missing certain subtleties.

Here are 7 common mistakes that are harder to catch but that even more experienced Python developers have fallen for.


1. The misuse of expressions as function argument defaults

Python allows developers to indicate optional function arguments by giving them default values. In most cases, this is a great feature of Python, but it can create some confusion when the default value is mutable. In fact, the common mistake is thinking that the optional argument is set to whatever default value you’ve set every time the function argument is presented without a value. It can seem a bit complicated, but the answer is that the default value for this function argument is only evaluated at the time you’ve defined the function, one time only.  

how-to-avoid-the-7-most-frequent-mistakes-in-python-programming-3


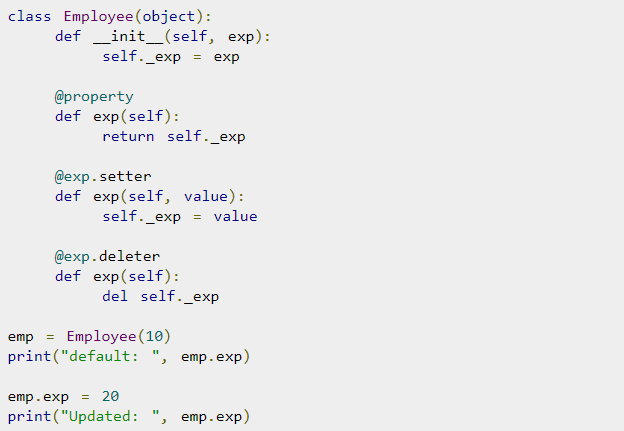
2. Incorrect use of class variables

Python handles class variables internally as dictionaries and they will follow the Method Resolution Order (MRO). If an attribute is not found in one class it will be looked up in base classes so references to one part of the code are actually references to another part, and that can be quite difficult to handle well in Python. For class attributes, I recommend reading up on this aspect of Python independently to be able to handle them.

how-to-avoid-the-7-most-frequent-mistakes-in-python-programming-2


3. Incorrect specifications of parameters for exception blocks

There is a common problem in Python when except statements are provided but they don’t take a list of the exceptions specified. The syntax except Exception is used to bind these exception blocks to optional parameters so that there can be further inspections. What happens, however, is that certain exceptions are then not being caught by the except statement, but the exception becomes bound to parameters. The way to get block exceptions in one except statement has to be done by specifying the first parameter as a tuple to contain all the exceptions that you want to catch.

how-to-avoid-the-7-most-frequent-mistakes-in-python-programming-1
 

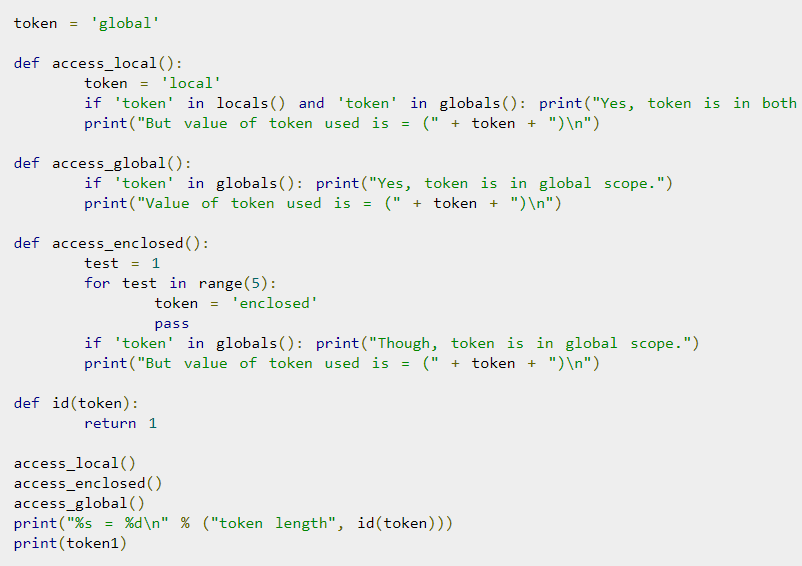
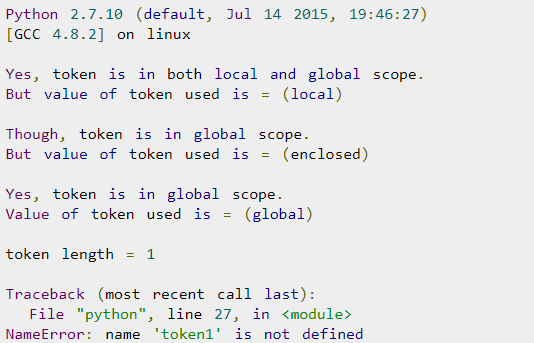
4. Failure to understand the scope rules

The scope resolution on Python is built on the LEGB rule as it’s commonly known, which means Local, Enclosing, Global, Built-in. Although at first glance this seems simple, there are some subtleties about the way it actually works in Python, which creates a more complex Python problem. If you make an assignment to a variable in a scope, Python will assume that variable is local to the scope and will shadow a variable that’s similarly named in other scopes. This is a particular problem especially when using lists.


5. Modifying lists during iterations over it


When a developer deletes an item from a list or array while iterating, they stumble upon a well known Python problem that’s easy to fall into. To address this, Python has incorporated many programming paradigms which can really simplify and streamline code when they’re used properly. Simple code is less likely to fall into the trap of deleting a list item while iterating over it. You can also use list comprehensions to avoid this problem.

how-to-avoid-the-7-most-frequent-mistakes-in-python-programming-8


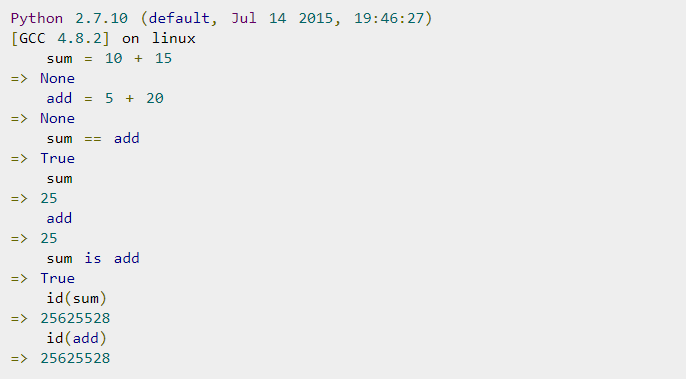
6. Name clash with Python standard library


Python has so many library modules which is a bonus of the language, but the problem is that you can inadvertently have a name clash between your module and a module in the standard library. The problem here is that you can accidentally import another library which will import the wrong version. To avoid this, it’s important to be aware of the names in the standard library modules and stay away from using them.

how-to-avoid-the-7-most-frequent-mistakes-in-python-programming-5


7. Problems with binding variables in closures


Python has a late binding behavior which looks up the values of variables in closure only when the inner function is called. To address this, you may have to take advantage of default arguments to create anonymous functions that will give you the desired behavior – it’s either elegant or a hack depending on how you look at it, but it’s important to know.


how-to-avoid-the-7-most-frequent-mistakes-in-python-programming-6

Python is very powerful and flexible and it’s a great language for developers, but it’s important to be familiar with the nuances of it to optimize it and avoid these errors.

Ellie Coverdale, a technical writer at Essay roo and UK Writings, is involved in tech research and projects to find new advances and share her insights. She shares what she has learned with her readers on the Boom Essays blog.

How to build Linux logging bash shell script write_log, logging with Named Pipe buffer, Simple Linux common log files logging with logger command

Monday, August 26th, 2019

how-to-build-bash-script-for-logging-buffer-named-pipes-basic-common-files-logging-with-logger-command

Logging into file in GNU / Linux and FreeBSD is as simple as simply redirecting the output, e.g.:
 

echo "$(date) Whatever" >> /home/hipo/log/output_file_log.txt


or with pyping to tee command


echo "$(date) Service has Crashed" | tee -a /home/hipo/log/output_file_log.txt


But what if you need to create a full featured logging bash robust shell script function that will run as a daemon continusly as a background process and will output
all content from itself to an external log file?
In below article, I've given example logging script in bash, as well as small example on how a specially crafted Named Pipe buffer can be used that will later store to a file of choice.
Finally I found it interesting to mention few words about logger command which can be used to log anything to many of the common / general Linux log files stored under /var/log/ – i.e. /var/log/syslog /var/log/user /var/log/daemon /var/log/mail etc.
 

1. Bash script function for logging write_log();


Perhaps the simplest method is just to use a small function routine in your shell script like this:
 

write_log()
LOG_FILE='/root/log.txt';
{
  while read text
  do
      LOGTIME=`date "+%Y-%m-%d %H:%M:%S"`
      # If log file is not defined, just echo the output
      if [ “$LOG_FILE” == “” ]; then
    echo $LOGTIME": $text";
      else
        LOG=$LOG_FILE.`date +%Y%m%d`
    touch $LOG
        if [ ! -f $LOG ]; then echo "ERROR!! Cannot create log file $LOG. Exiting."; exit 1; fi
    echo $LOGTIME": $text" | tee -a $LOG;
      fi
  done
}


  •  Using the script from within itself or from external to write out to defined log file


echo "Skipping to next copy" | write_log


2. Use Unix named pipes to pass data – Small intro on what is Unix Named Pipe.


Named Pipe –  a named pipe (also known as a FIFO (First In First Out) for its behavior) is an extension to the traditional pipe concept on Unix and Unix-like systems, and is one of the methods of inter-process communication (IPC). The concept is also found in OS/2 and Microsoft Windows, although the semantics differ substantially. A traditional pipe is "unnamed" and lasts only as long as the process. A named pipe, however, can last as long as the system is up, beyond the life of the process. It can be deleted if no longer used.
Usually a named pipe appears as a file, and generally processes attach to it for IPC.


Once named pipes were shortly explained for those who hear it for a first time, its time to say named pipe in unix / linux is created with mkfifo command, syntax is straight foward:
 

mkfifo /tmp/name-of-named-pipe


Some older Linux-es with older bash and older bash shell scripts were using mknod.
So idea behind logging script is to use a simple named pipe read input and use date command to log the exact time the command was executed, here is the script.


#!/bin/bash
named_pipe='/tmp/output-named-pipe';
output_named_log='
/tmp/output-named-log.txt ';

if [ -p $named_pipe ]; then
rm -f $named_pipe
fi
mkfifo $named_pipe

while true; do
read LINE <$named_pipe
echo $(date): "$LINE" >>/tmp/output-named-log.txt
done


To write out any other script output and get logged now, any of your output with a nice current date command generated output write out any output content to the loggin buffer like so:


echo 'Using Named pipes is so cool' > /tmp/output-named-pipe
echo 'Disk is full on a trigger' > /tmp/output-named-pipe

  • Getting the output with the date timestamp

# cat /tmp/output-named-log.txt
Mon Aug 26 15:21:29 EEST 2019: Using Named pipes is so cool
Mon Aug 26 15:21:54 EEST 2019: Disk is full on a trigger


If you wonder why it is better to use Named pipes for logging, they perform better (are generally quicker) than Unix sockets.


3. Logging files to system log files with logger


If you need to do a one time quick way to log any message of your choice with a standard Logging timestamp, take a look at logger (a part of bsdutils Linux package), and is a command which is used to enter messages into the system log, to use it simply invoke it with a message and it will log your specified output by default to /var/log/syslog common logfile


root@linux:/root# logger 'Here we go, logging'
root@linux:/root # tail -n 3 /var/log/syslog
Aug 26 15:41:01 localhost CRON[24490]: (root) CMD (chown qscand:qscand -R /var/run/clamav/ 2>&1 >/dev/null)
Aug 26 15:42:01 localhost CRON[24547]: (root) CMD (chown qscand:qscand -R /var/run/clamav/ 2>&1 >/dev/null)
Aug 26 15:42:20 localhost hipo: Here we go, logging


If you have took some time to read any of the init.d scripts on Debian / Fedora / RHEL / CentOS Linux etc. you will notice the logger logging facility is heavily used.

With logger you can print out message with different priorities (e.g. if you want to write an error message to mail.* logs), you can do so with:
 

 logger -i -p mail.err "Output of mail processing script"


To log a normal non-error (priority message) with logger to /var/log/mail.log system log.


 logger -i -p mail.notice "Output of mail processing script"


A whole list of supported facility named priority valid levels by logger (as taken of its current Linux manual) are as so:


FACILITIES AND LEVELS
       Valid facility names are:

              auth
              authpriv   for security information of a sensitive nature
              cron
              daemon
              ftp
              kern       cannot be generated from userspace process, automatically converted to user
              lpr
              mail
              news
              syslog
              user
              uucp
              local0
                to
              local7
              security   deprecated synonym for auth

       Valid level names are:

              emerg
              alert
              crit
              err
              warning
              notice
              info
              debug
              panic     deprecated synonym for emerg
              error     deprecated synonym for err
              warn      deprecated synonym for warning

       For the priority order and intended purposes of these facilities and levels, see syslog(3).


If you just want to log to Linux main log file (be it /var/log/syslog or /var/log/messages), depending on the Linux distribution, just type', even without any shell quoting:


logger 'The reason to reboot the server Currently was a System security Update


So what others is logger useful for?

 In addition to being a good diagnostic tool, you can use logger to test if all basic system logs with its respective priorities work as expected, this is especially
useful as I've seen on a Cloud Holsted OpenXEN based servers as a SAP consultant, that sometimes logging to basic log files stops to log for months or even years due to
syslog and syslog-ng problems hungs by other thirt party scripts and programs.
To test test all basic logging and priority on system logs as expected use the following logger-test-all-basic-log-logging-facilities.sh shell script.


#!/bin/bash
for i in {auth,auth-priv,cron,daemon,kern, \
lpr,mail,mark,news,syslog,user,uucp,local0 \
,local1,local2,local3,local4,local5,local6,local7}

do        
# (this is all one line!)


for k in {debug,info,notice,warning,err,crit,alert,emerg}
do

logger -p $i.$k "Test daemon message, facility $i priority $k"

done

done

Note that on different Linux distribution verions, the facility and priority names might differ so, if you get

logger: unknown facility name: {auth,auth-priv,cron,daemon,kern,lpr,mail,mark,news, \
syslog,user,uucp,local0,local1,local2,local3,local4, \
local5,local6,local7}

check and set the proper naming as described in logger man page.


4. Using a file descriptor that will output to a pre-set log file


Another way is to add the following code to the beginning of the script

#!/bin/bash
exec 3>&1 4>&2
trap 'exec 2>&4 1>&3' 0 1 2 3
exec 1>log.out 2>&1
# Everything below will go to the file 'log.out':

The code Explaned

  •     Saves file descriptors so they can be restored to whatever they were before redirection or used themselves to output to whatever they were before the following redirect.
    trap 'exec 2>&4 1>&3' 0 1 2 3
  •     Restore file descriptors for particular signals. Not generally necessary since they should be restored when the sub-shell exits.

          exec 1>log.out 2>&1

  •     Redirect stdout to file log.out then redirect stderr to stdout. Note that the order is important when you want them going to the same file. stdout must be redirected before stderr is redirected to stdout.

From then on, to see output on the console (maybe), you can simply redirect to &3. For example
,

echo "$(date) : Do print whatever you want logging to &3 file handler" >&3


I've initially found out about this very nice bash code from serverfault.com's post how can I fully log all bash script actions (but unfortunately on latest Debian 10 Buster Linux  that is prebundled with bash shell 5.0.3(1)-release the code doesn't behave exactly, well but still on older bash versions it works fine.

Sum it up


To shortlysummarize there is plenty of ways to do logging from a shell script logger command but using a function or a named pipe is the most classic. Sometimes if a script is supposed to write user or other script output to a a common file such as syslog, logger command can be used as it is present across most modern Linux distros.
If you have a better ways, please drop a common and I'll add it to this article.


How to make for loop (cycles) in KSH useful for FreeBSD / UNIX system administrators

Friday, November 3rd, 2017

korn-shell-how-to-make-loops-easily-for-sys-admin-purposes

Sometimes we have to administrate this operating systems such as FreeBSD / AIX / HP UX or even Mac OS server where by default due to historical reasons or for security bash shell is not avialable. That's not a common scenario but it happens so if as sysadmin we need to create for loops on ksh it is useful to know how to do that, as for loop cycles are one of the most important command line tools the sysadmin swiss army knife kind of.

So how to create a for loop (cycle) in ksh (Korn Shell)?

The most basic example for a KSH loop shell is below:
 

#!/bin/ksh
for i in 1 2 3 4 5
do
  echo "Welcome $i times"
done


Add the content to any file lets say ksh_loop.ksh then make it executable as you do in bash shells


$ chmod +x ksh_loop.ksh
$ ksh ksh_loop.ksh


The overall syntax of the for loop ksh command is as follows:


for {Variable} in {lists}
do
    echo ${Variable}
done


Hence to list lets say 20 iterations in a loop in ksh you can use something like:
 

#!/bin/ksh
for i in {1..20}
do
  echo "Just a simple echo Command $i times";
# add whatever system commands you like here
done


Example for some useful example with KSH loop is to list a directory content so you can execute whatever command you need on each of the files or directories inside


#!/bin/ksh
for f in $(ls /tmp/*)
do
        print "Iterating whatever command you like on /tmp dir : $f"
done


Other useful for loop iteration would be to print a file content line by line just like it is done in bash shell, you can do that with a small loop like belows:


#!/bin/ksh
for iteration_variable in $(cat  file_with-your-loved-content-to-iterate.txt)
do
        print "Current iteration like is : $iteration_variable"
done


SuperMarket Psychology or how the super markets are built to cheat you to buy more

Friday, June 22nd, 2012

super-market-psychology-or-how-supermarkets-are-built-to-cheat-you-to-buy-more-or-legally-lie-make-you-spend-more

Recently I blogged on The Color Psychology and how it affects us

In my continous research on color programming I have come across an interesting interview with a Marketing Manager, who explains a few bits on why the super markets and big stores are designed the way they are.

Have you noticed the big super markets are a bit like a maze and you often when you go inside a such you feel a bit lost there, this is on purpose and is connected with Trauma Based conditioning and Pavlov's early days neural conditioning experiments

Another typical things in super markets is the flower on the front doors, trying to make the impression to the customer of freshnes and mood UP. Then it comes the other things like the positioning of products. Many supermarkets put the fresh fruits and vegetables, either near the entry where the client walks in or at the end of the supermarket (this depends on the kind of customers targetted) and company policy and top managerial decisions.

As the short movie I post below mentions the baby products are positioned on a bit secluded place the reason is to invoke old time feelings to adults. Nowdays many supermarkets include also TVs playing cartoons so parents can leave the kids watch the cartoons and spend more time "pondering" what they have to buy for home and therefore buy more of goods (the reason is the kids are a common distractor and they could be a reason for the parent to buy quickly and leave the shop) and what actually is targetted in the shop is to customer to spend more time inside.

Longer stays in the shop means often more purchases and more money for the store. What really shocked me in the video is that as of time of writtings many shop chains have even an eye tracking devices with which they aim to track where the clients is watching (e.g. based on the feedback the shop can products can be re-ordered in a way to generate more sales profit).

The lightning in the shop is very important also the scent many shops have intentionally a separate department chopping meats or yellow cheese in front of the walking customers. Seeing fresh food makes the customer feel hungry so he might buy more.

The result of this secret tricks designed to make us consume more makes us a dumb un-thinking consuming society.

SuperMarket Psychology Entrances layout and Shelving

The science of "psychology in supermarket" is more developed in the west and we the Eastern Europeans were less exposed to buyer behaviour modification due to our belonging to the USSR communist Union and the existing of the "cold barrier" between communistic and democrats free economies.

Its my personal belief that more and more people should get aware of what is happening in super markets. I personally have never been a fan of super-markets since they're connected with amalgamation of business and always when I can I do buy food and goods from small district grocery stores.

It is my firm believe that buying from Malls and supermarkets is in future time to create more problems than goods since by doing so one helps the large business to become even larger and helps the merging of companies and therefore helps the creation of one new global communism based not on government ruling but on a tiny number of companies to own the world product creation distribution and selling …
 

Super Market Psychology – Few tips on how to shop "budget" friendly"

SuperMarket Secrets and Deception a video explaining the badness of use of super-markets and how super market chains lie to us

Saturday, June 23rd, 2012

SUPERMARKET SECRETS & DECEPTIONS PART 1 (Full Video)
(AKA "How To Avoid Being Fooled at the Supermarket")

Today almost every country in both the developed the less-developed and the under-development world has already largely adopted the super market buying culture.
Not that the people are so keen on buying from super-market but rather it is the people with money business-es has slowly "forced" those fake buying culture.

Though things are organized so well and it seems like the supermarket is a great place all made to benefit the client it is exactly the other way around. The truth is the whole super-market with the most little details was designed to benefit the company owning the market.

Below is an interesting documentary, showing parts of how foods are processed before they enter the super-market shelf. Also it is explained, how the strive for perfect looking products takes its toll in terms of end-client quality. Though many fruit and vegetables looks perfectly looking (perfectly shaped) the nutrition this perfect vegs and fruits is often inferior to grown foods which are less symmetrical. Often this is evident even by tasting the fruits and vegetables bought, they somehow are tasteless or whether you eat it feels like you eat plastic.

The movie also wents through showing a lot of farms for growing cows for beef and milk and the bad conditions the animals lives their whole short live on earth. Also the fast food injections the animals are given often results in unexpected animal disease. The lack of movement and the short living space for animals is another severe problem as most of the animals does not grow the way God intended them to when he created the earth animals and us.

The offers to get 3 for the price of 1 or "pay 1 get 2" that so many super-market offer today is another sad story.

The expenses for this fall on the producer and the client instead on the super-market franchiser.

Another severe problem is the 'international logistics' applied by mostly all large super-market chains. At many cases foods grown or breed has to travel hundreds or thousands of kilometers for something as simple as cutting the meat or vegs and packaging them. So a food produced just 50 or 100 kilometers away from the local super-market from where we buy travels some 500 kilometers for the packaging and then comes back packaged in the super-store. As you can guess this increases significantly the price of the product for us the buyers and besides that creates a large environmental contamination.

Also the movie shows that often fruits and vegetables one can buy from local open market are both more nutritious than in super-markets as well as can be gotten on lower price.

Knowing all this it makes one wonder why anyone still is buying from the super-market. Well let me tell you it is because of habit. Through the last 50 years in most countries large supermarket chains successfully imposed the New Age super market culture. As a result for youngsters it is absolutely natural to purchase goods from the super market and buying from anywhere else is considered nowdays unusual.

The result of the lack of nutritious food we buy from the super market severe affects our health and budget. In many countries the over fatness of youngsters is a severe problem.

This problem has a direct relation with the culture of eating junk package food introduced within super markets as well as the over consumption which took place the last years again "thanks" to the huge increase of advertisement influence on people behavior and supermarkets profit only concerned company policies.

Command to get CPU server load in % percentage using bash and /proc/stat on Linux

Wednesday, March 11th, 2015

Command-to-get-CPU-server-load-in-percentage-using-bash-shell-script-and-linux-proc-stat

Getting load avarage is easy with uptime command, however since nowadays Linux servers are running on multiple CPU machines and Dual cores, returned load avarage shows only information concerning a single processor. Of course seeing overall CPU server load is possible with TOP / TLoad command  / HTOP and a bunch of other monitoring commands, but how you can get a CPU percentage server load using just  /proc/stat and bash scripting? Here is hwo:
 

:;sleep=1;CPU=(`cat /proc/stat | head -n 1`);PREV_TOTAL=0;for VALUE in "${CPU[@]}”; do let “PREV_TOTAL=$PREV_TOTAL+$VALUE”;done;PREV_IDLE=${CPU[4]};sleep $sleep; CPU=(`cat /proc/stat | head -n 1`);unset CPU[0];IDLE=${CPU[4]};TOTAL=0; for VALUE in “${CPU[@]}"; do let "TOTAL=$TOTAL+$VALUE"; done;echo $(echo "scale=2; ((($sleep*1000)*(($TOTAL-$PREV_TOTAL)-($IDLE-$PREV_IDLE))/($TOTAL-$PREV_TOTAL))/10)" | bc -l );

52.45

As you can see command output shows CPU is loaded on 52.45%, so this server will soon have to be replaced with better hardware, because it gets CPU loaded over 50%

It is useful to use above bash shell command one liner together with little for loop to refresh output every few seconds and see how the CPU is loaded in percentage over time.


for i in $(seq 0 10); do :;sleep=1;CPU=(`cat /proc/stat | head -n 1`);PREV_TOTAL=0;for VALUE in "${CPU[@]}”; do let “PREV_TOTAL=$PREV_TOTAL+$VALUE”;done;PREV_IDLE=${CPU[4]};sleep $sleep; CPU=(`cat /proc/stat | head -n 1`);unset CPU[0];IDLE=${CPU[4]};TOTAL=0; for VALUE in “${CPU[@]}"; do let "TOTAL=$TOTAL+$VALUE"; done;echo $(echo "scale=2; ((($sleep*1000)*(($TOTAL-$PREV_TOTAL)-($IDLE-$PREV_IDLE))/($TOTAL-$PREV_TOTAL))/10)" | bc -l ); done

47.50

13.86
27.36
82.67
77.18

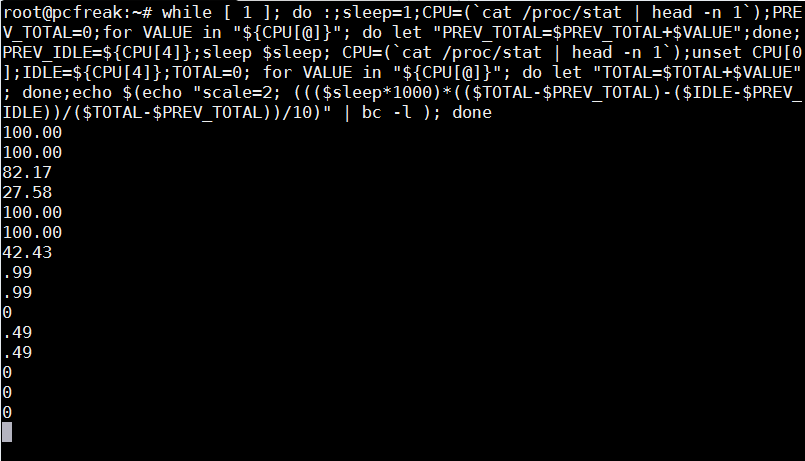
To monitor "forever" output from all server processor overall load use:
 

while [ 1 ]; do :;sleep=1;CPU=(`cat /proc/stat | head -n 1`);PREV_TOTAL=0;for VALUE in “${CPU[@]}”; do let “PREV_TOTAL=$PREV_TOTAL+$VALUE”;done;PREV_IDLE=${CPU[4]};sleep $sleep; CPU=(`cat /proc/stat | head -n 1`);unset CPU[0];IDLE=${CPU[4]};TOTAL=0; for VALUE in “${CPU[@]}"; do let "TOTAL=$TOTAL+$VALUE"; done;echo $(echo "scale=2; ((($sleep*1000)*(($TOTAL-$PREV_TOTAL)-($IDLE-$PREV_IDLE))/($TOTAL-$PREV_TOTAL))/10)" | bc -l ); done