Posts Tagged ‘Windows’

How to disable Windows pagefile.sys and hiberfil.sys to temporary or permamently save disk space if space is critically low

Monday, March 28th, 2022

howto-pagefile-hiberfil.sys-remove-reduce-increase-increase-size-windows-logo

Sometimes you have to work with Windows 7 / 8 / 10 PCs  etc. that has a very small partition C:\
drive or othertimes due to whatever the disk got filled up with time and has only few megabytes left
and this totally broke up the windows performance as Windows OS becomes terribly sluggish and even
simple things as opening Internet Browser (Chrome / Firefox / Opera ) or Windows Explorer stones the PC performance.

You might of course try to use something like Spacesniffer tool (a great tool to find lost data space on PC s short description on it is found in my previous article how to
delete temporary Internet Files and Folders to to speed up and free disk space
 ) or use CCleaner to clean up a bit the pc.
Sometimes this is not enough though or it is not possible to do at all the main
partition disk C:\ is anyhow too much low (only 30-50MB are available on HDD) or the Physical or Virtual Machine containing the OS is filled with important data
and you couldn't risk to remove anything including Internet Temporary files, browsing cookies … whatever.

Lets say you are the fate chosen guy as sysadmin to face this uneasy situation and have no easy
way to add disk space from another present free space partition or could not add a new SATA hard drive
SSD drive, what should you do?
 

The solution wipe off pagefile.sys and hiberfil.sys

Usually every Windows installation has a pagefile.sys and hiberfil.sys.

  • pagefile.sys – is the default file that is used as a swap file, immediately once the machine runs out of memory. For Unix / Linux users better understanding pagefile.sys is the equivallent of Linux's swap partition. Of course as the pagefile is in a file and not in separate partition the swapping in Windows is perhaps generally worse than in Linux.
  • hiberfil.sys – is used to store data from the machine on machine Hibernation (for those who use the feature)


Pagefile.sys which depending on the configured RAM memory on the OS could takes up up to 5 – 8 GB, there hanging around doing nothing but just occupying space. Thus a temporary workaround that could free you some space even though it will degrade performance and on servers and production machines this is not a good solution on just user machines, where you temporary need to free space any other important task you can free up space
by seriously reducing the preconfigured default size of pagefile.sys (which usually is 1.5 times the active memory on the OS – hence if you have 4GB you would have a 6Gigabytes of pagefile.sys).

Other possibility especially on laptop and movable devices running Win OS is to disable hiberfil.sys, read below how this is done.


The temporary solution here is to simply free space by either reducing the pagefile.sys or completely disabling it


1. Disable pagefile.sys on Windows XP, Windows 7 / 8 / 10 / 11


The GUI interface to disable pagefile across all NT based Windows OS-es is quite similar, the only difference is newer versions of Windows has slightly more options.


1.1 Disable pagefile on Windows XP


Quickest way is to find pagefile.sys settings from GUI menus

1. Computer (My Computer) – right click mouse
2. Properties (System Preperties will appear)
3. Advanced (tab) 
4. Settings
5. Advanced (tab)
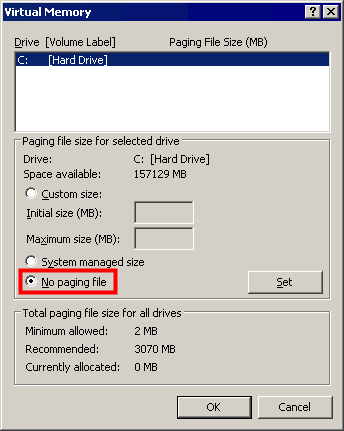
6. Change button

windows-xp-pagefile-disable-screenshot

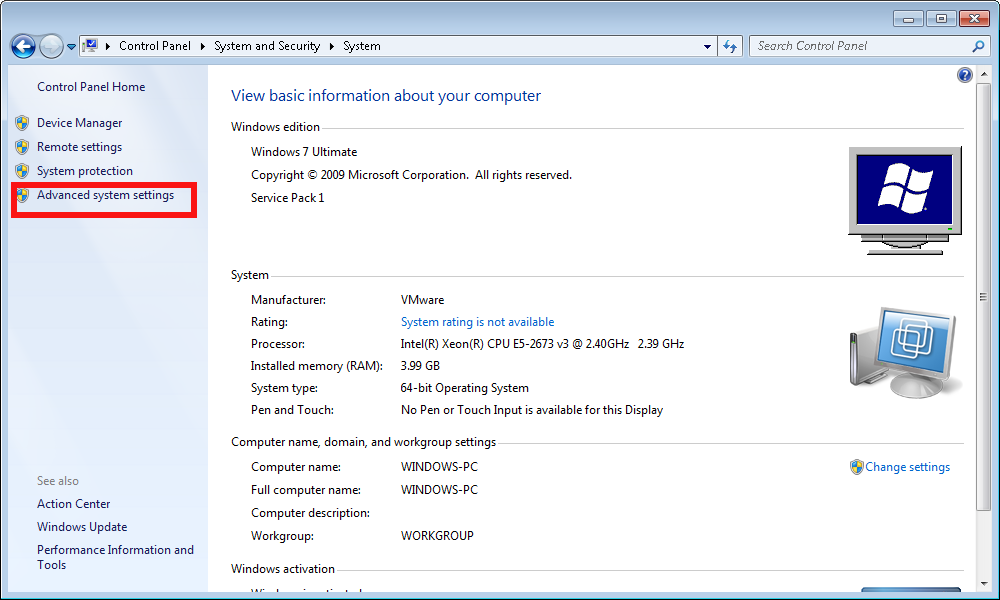
1.2 Disable pagefile on Windows 7


advanced-system-settings-control-panel-system-and-security-screenshot

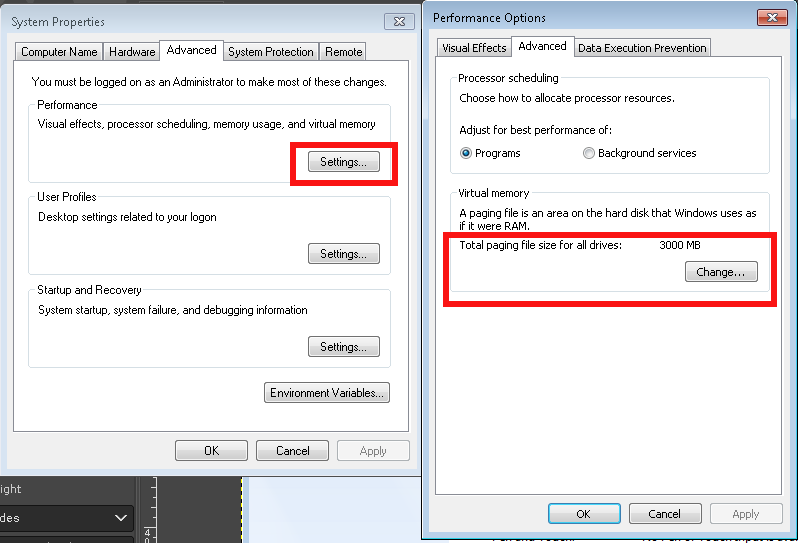
windows-system-properties-screenshot-properties-advanced-change-Virtual-memory-pagefile-screenshot

system-properties-performance-options
 

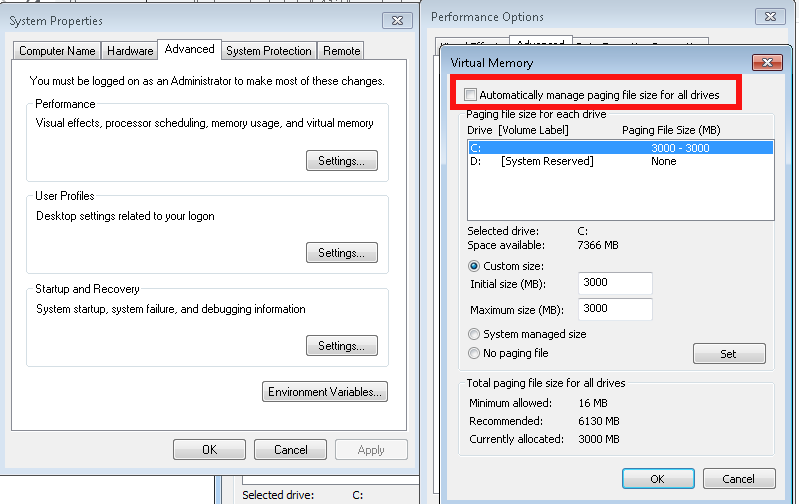
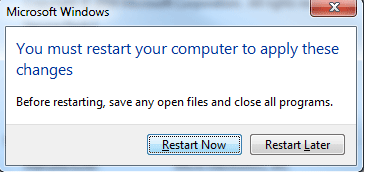
Once applied you'll be required to reboot the PC

How-to-turn-off-Virtual-Memory-Paging_File-in-Windows-7-restart


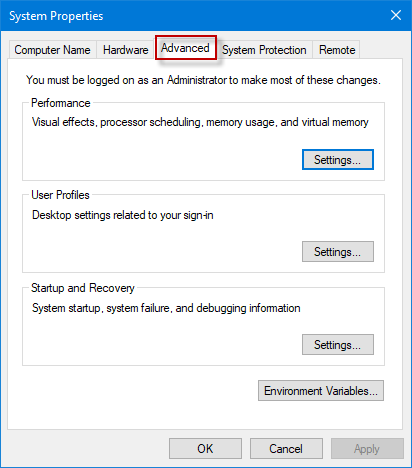
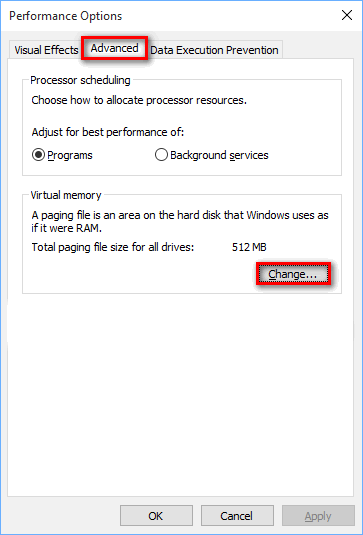
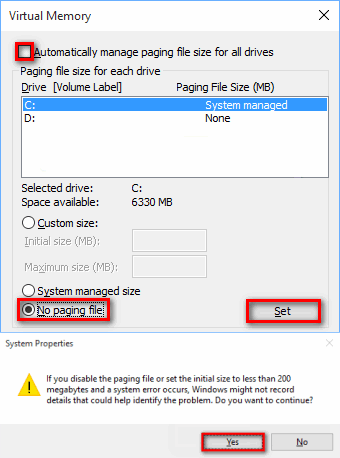
1.3 Disable Increase / Decrease pagefile.sys on Windows 10 / Win 11
 

open-system-properties-advanced-win10

win10-performance-options-menu-screenshot

configure-virtual-memory-win-10-screenshot


1.4 Make Windows clear pagefile.sys on shutdown

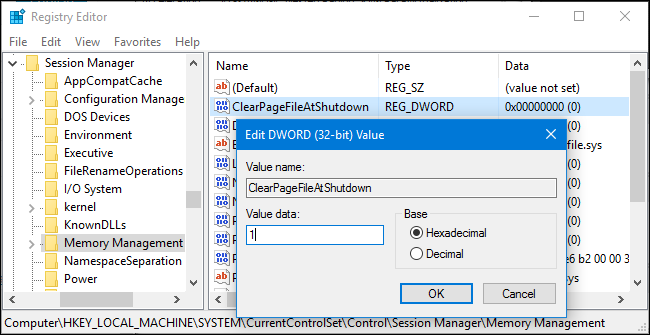
On home PCs it might be useful thing to clear up ( nullify) pagefile.sys on shutdown, that could save you some disk space on every reboot, until file continuously grows to its configured Maximum.

Run

regedit

Modify registry key at location


HKEY_LOCAL_MACHINE\SYSTEM\CurrentControlSet\Control\Session Manager\Memory Management

windows-clean-up-pagefile-sys-file-on-shutdown-or-reboot-registry-editor-value-screenshot

You can apply the value also via a registry file you can get the Enable Clearpagefile at shutdown here .reg.
 

2. Manipulating pagefile.sys size and file delete from command line with wmic tool 

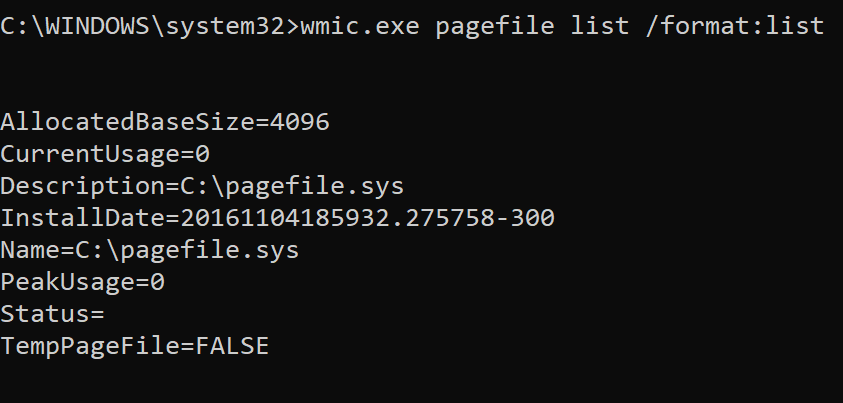
For scripting purposes you might want to use the wmic pagefile which can do increase / decrase or delete the file without GUI, that is very helpful if you have to admin a Windows Domain (Active Directory)
 

[hipo.WINDOWS-PC] ➤ wmic pagefile /?

PAGEFILE – Virtual memory file swapping management.

HINT: BNF for Alias usage.
(<alias> [WMIObject] | [] | [] ) [].

USAGE:

PAGEFILE ASSOC []
PAGEFILE CREATE <assign list>
PAGEFILE DELETE
PAGEFILE GET [] []
PAGEFILE LIST [] []


[hipo.WINDOWS-PC] ➤ wmic pagefile
AllocatedBaseSize  Caption          CurrentUsage  Description      InstallDate                Name             PeakUsage  Status  TempPageFile
4709               C:\pagefile.sys  499           C:\pagefile.sys  20200912061902.938000+180  C:\pagefile.sys  525                FALSE


[hipo.WINDOWS-PC] ➤ wmic pagefile list /format:list

AllocatedBaseSize=4709
CurrentUsage=499
Description=C:\pagefile.sys
InstallDate=20200912061902.938000+180
Name=C:\pagefile.sys
PeakUsage=525
Status=
TempPageFile=FALSE

wmic-pagefile-command-line-tool-for-windows-default-output-screenshot


  • To change the Initial Size or Maximum Size of Pagefile use:
     

➤ wmic pagefileset where name="C:\\pagefile.sys" set InitialSize=2048,MaximumSize=2048

  • To move the pagefile / change location of pagefile to less occupied disk drive partition (i.e. D:\ drive)


    Sometimes you might have multiple drives on the PC and some of them might be having multitudes of gigabytes while main drive C:\ could be fully occupied due to initial install bad drive organization, in that case a good work arount to save you space so you can work normally with the server is just to temporary or permanently move pagefile to another drive.

wmic pagefileset where name="D:\\pagefile.sys" set InitialSize=2048,MaximumSize=2048


!! CONSIDER !!! 

That if you have the option to move the pagefile.sys for best performance it is advicable to place the file inside another physical disk, preferrably a Solid State Drive one, SATA disks are too slow and reduced Input / Output disk operations will lead to degraded performance, if there is lack of memory (i.e. pagefile.sys is actively open read and wrote in).
 

  • To delete pagefile.sys 
     

➤ wmic pagefileset where name="C:\\pagefile.sys" delete


If for some reason you prefer to not use wmic but simple del command you can delete pagefile.sys also by:

Removing file default "Hidden" and "system" file attributes – set for security reasons as the file is a system file usually not touched by user. This will save you from "permission denied" errors:
 

➤ attrib -s -h %systemdrive%\pagefile.sys


Delete the file:
 

➤ del /a /q %systemdrive%\pagefile.sys


3. Disable hibernation on Windows 7 / 8 and Win 10 / 11

Disabling hibernation file hiberfil.sys can also free up some space, especially if the hibernation has been actively used before and the file is written with data. Of course, that is more common on notebooks.
Windows hibernation has significantly improved over time though i didn't have very pleasant experience in the past and I prefer to disable it just in case.
 

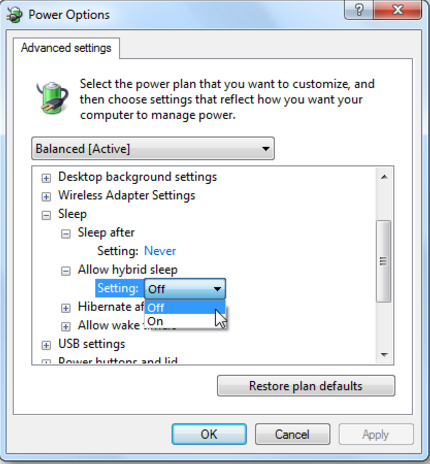
3.1 Disable Windows 7 / 8 / 10 / 11 hibernation from GUI 

Disable it through:

Control Panel -> All Control Panel Items -> Power Options -> Edit Plan Settings -> Change advanced power settings


 like shown in below screenshot:

Windqows-power-options-Advanced-settings-Allow-Hybrid-sleep-option-menu-screenshot


3.2 Disable Windows 7 / 8 / 10 / 11 hibernation from command line

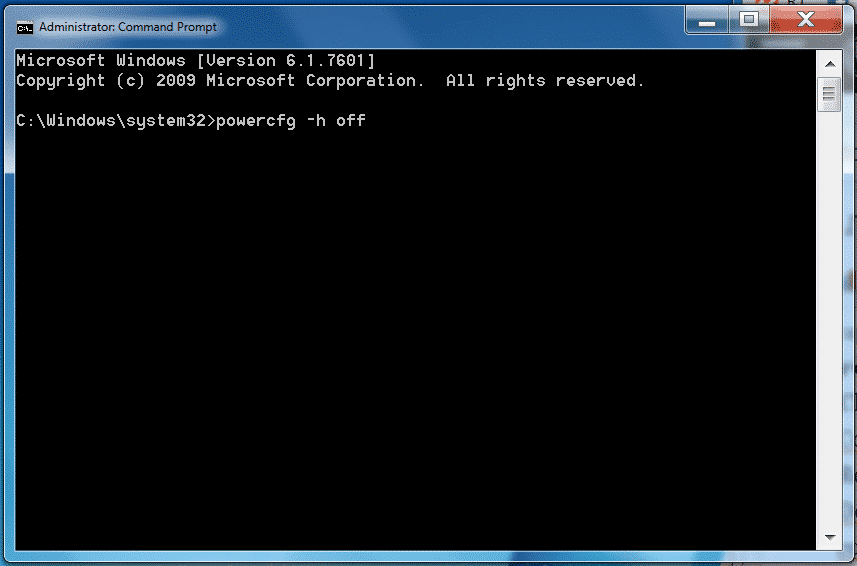
Disable hibernation Is done in the same way through the powercfg.exe command, to disable it
if you're cut of disk space and you want to save space from it:

run as Administrator in Command Line Windows (cmd.exe)
 

powercfg.exe /hibernate off

If you later need to switch on hibernation
 

powercfg.exe /hibernate on


disable-hiberfile-windows-screenshot

3.3 Disable Windows hibernation on legacy Windows XP

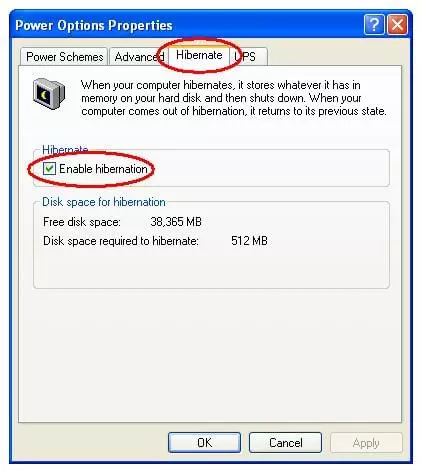
On XP to disable hibernation open

1. Power Options Properties
2. Select Hibernate
3. Select Enable Hibernation to clear the checkbox and disable Hibernation mode. 
4. Select OK to apply the change.

Close the Power Options Properties box. 

enable-disable-hibernate-windows-xp-menu-screenshot

To sum it up

We have learned some basics on Windows swapping and hibernation and i've tried to give some insight on how thiese files if misconfigured could lead to degraded Win OS performance. In any case using SSD as of 2022 to store both files is a best practice for machines that has plenty of memory always try to completely disable / remove the files. It was shown how  to manage pagefile.sys and hiberfil.sys across Windows Operating Systems different versions both from GUI and via command line as well as how you can configure pagefile.sys to be cleared up on pc reboot.
 

Monitor service log is continously growing with Zabbix on Windows with batch userparameter script and trigger Alert if log is unchanged

Thursday, March 17th, 2022

monitor-if-log-file-is-growing-with-zabbix-zabbix-userparameter-script-howto

Recently we had an inteteresting Monitoring work task to achieve. We have an Application that is constantly simulating encrypted connections traffic to a remote side machine and sending specific data on TCP/IP ports.
Communiucation between App Server A -> App Server B should be continous and if all is working as expected App Server A messages output are logged in the Application log file on the machine which by the way Runs
Windows Server 2020.

Sometimes due to Network issues this constant reconnections from the Application S. A to the remote checked machine TCP/IP ports gets interrupted due to LAN issues or a burned Network Switch equipment, misconfiguration on the network due to some Network admin making stoopid stuff etc..

Thus it was important to Monitor somehow whether the log is growing or not and feed the output of whether Application log file is growing or it stuck to a Central Zabbix Server. 
To be able to better understand the task, lets divide the desired outcome in few parts on required:

1. Find The latest file inside a folder C:\Path-to-Service\Monitoring\Log\
2. Open the and check it is current logged records and log the time
3. Re-open file in a short while and check whether in few seconds new records are written
4. Report the status out to Zabbix
5. Make Zabbix Item / Trigger / Action in case if monitored file is not growing

In below article I'll briefly explain how Monitoring a Log on a Machine for growing was implemented using a pure good old WIN .BAT (.batch) script and Zabbix Userparameter key


1. Enable userparameter script for Local Zabbix-Agent on the Windows 10 Server Host


Edit Zabbix config file usually on Windows Zabbix installs file is named:

zabbix_agentd.win ]


Uncomment the following lines to enable userparameter support for zabbix-agentd:


# Include=c:\zabbix\zabbix_agentd.userparams.conf

Include=c:\zabbix\zabbix_agentd.conf.d\

# Include=c:\zabbix\zabbix_agentd.conf.d\*.conf


2. Create folders for userparameter script and for the userparameter.conf

Before creating userparameter you can to create the folder and grant permissions

Folder name under C:\Zabbix -> zabbix_agentd.conf.d

If you don't want to use Windows Explorer) but do it via cmd line:

C:\Users\LOGUser> mkdir \Zabbix\zabbix_agentd.conf\
C:\User\LOGUser> mkdir \Zabbix\zabbix_scripts\


3. Create Userparameter with some name file ( Userparameter-Monitor-Grow.conf )

In the directory C:\Zabbix\zabbix_agentd.conf.d you should create a config file like:
Userparameter-Monitor-Grow.conf and in it you should have a standard userparameter key and script so file content is:

UserParameter=service.check,C:\Zabbix\zabbix_scripts\GROW_LOG_MONITOR-USERPARAMETER.BAT


4. Create the Batch script that will read the latest file in the service log folder and will periodically check and report to zabbix that file is changing

notepad C:\Zabbix\zabbix_scripts\GROW_LOG_MONITOR-USERPARAMETER.BAT

REM "SCRIPT MONITOR IF FILE IS GROWING OR NOT"
@echo off

set work_dir=C:\Path-to-Service\Monitoring\Log\

set client=client Name

set YYYYMMDD=%DATE:~10,4%%DATE:~4,2%%DATE:~7,2%

set name=csv%YYYYMMDD%.csv

set mytime=%TIME:~0,8%

for %%I in (..) do set CurrDirName=%%~nxI


setlocal EnableDelayedExpansion

set "line1=findstr /R /N "^^" %work_dir%\output.csv | find /C ":""


for /f %%a in ('!line1!') do set number1=%%a

set "line2=findstr /R /N "^^" %work_dir%\%name% | find /C ":""


for /f %%a in ('!line2!') do set number2=%%a


IF  %number1% == %number2% (

echo %YYYYMMDD% %mytime% MAJOR the log is not incrementing for %client%

echo %YYYYMMDD% %mytime% MAJOR the log is not incrementing for %client% >> monitor-grow_err.log

) ELSE (

echo %YYYYMMDD% %mytime% NORMAL the log is incrementing for %client%

SETLOCAL DisableDelayedExpansion

del %work_dir%\output.csv

FOR /F "usebackq delims=" %%a in (`"findstr /n ^^ %work_dir%\%name%"`) do (

    set "var=%%a"

    SETLOCAL EnableDelayedExpansion

    set "var=!var:*:=!"

    echo(!var! >> %work_dir%\output.csv

    ENDLOCAL

)

)


To download GROW_LOG_MONITOR-USERPARAMETER.BAT click here.
The script needs to have configured the path to directory containing multiple logs produced by the Monitored Application.
As prior said it will, list the latest created file based on DATE timestamp in the folder will output a simple messages:

If the log file is being fed with data the script will output to output.csv messages continuously, either:

%%mytime%% NORMAL the log is incrementing for %%client%%

Or if the Monitored application log is not writting anything for a period it will start writting messages

%%mytime%%mytime MAJOR the log is not incrementing for %client%

The messages will also be sent in Zabbix.

Before saving the script make sure you modify the Full Path location to the Monitored file for growing, i.e.:

set work_dir=C:\Path-to-Service\Monitoring\Log\


5. Create The Zabbix Item

Set whatever service.check name you would like and a check interval to fetch the info from the userparameter (if you're dealing with very large log files produced by Monitored log of application, then 10 minutes might be too frequent, in most cases 10 minutes should be fine)
monitor-if-log-grows-windows-zabbix-item-service-check-screenshot
 

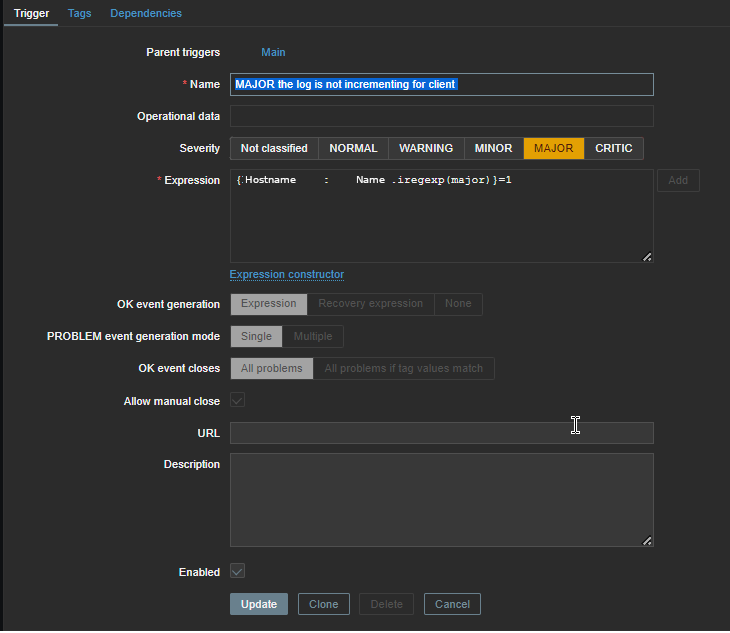
6. Create Zabbix Trigger


You will need a Trigger something similar to below:

Now considering that zabbix server receives correctly data from the client and the monitored log is growing you should in Zabbix:

%%mytime%% NORMAL the log is incrementing for %%client%%


7. Lastly create an Action to send Email Alert if log is not growing

How to filter dhcp traffic between two networks running separate DHCP servers to prevent IP assignment issues and MAC duplicate addresses

Tuesday, February 8th, 2022

how-to-filter-dhcp-traffic-2-networks-running-2-separate-dhcpd-servers-to-prevent-ip-assignment-conflicts-linux
Tracking the Problem of MAC duplicates on Linux routers
 

If you have two networks that see each other and they're not separated in VLANs but see each other sharing a common netmask lets say 255.255.254.0 or 255.255.252.0, it might happend that there are 2 dhcp servers for example (isc-dhcp-server running on 192.168.1.1 and dhcpd running on 192.168.0.1 can broadcast their services to both LANs 192.168.1.0.1/24 (netmask 255.255.255.0) and Local Net LAN 192.168.1.1/24. The result out of this is that some devices might pick up their IP address via DHCP from the wrong dhcp server.

Normally if you have a fully controlled little or middle class home or office network (10 – 15 electronic devices nodes) connecting to the LAN in a mixed moth some are connected via one of the Networks via connected Wifi to 192.168.1.0/22 others are LANned and using static IP adddresses and traffic is routed among two ISPs and each network can see the other network, there is always a possibility of things to go wrong. This is what happened to me so this is how this post was born.

The best practice from my experience so far is to define each and every computer / phone / laptop host joining the network and hence later easily monitor what is going on the network with something like iptraf-ng / nethogs  / iperf – described in prior  how to check internet spepeed from console and in check server internet connectivity speed with speedtest-cliiftop / nload or for more complex stuff wireshark or even a simple tcpdump. No matter the tools network monitoring is only part on solving network issues. A very must have thing in a controlled network infrastructure is defining every machine part of it to easily monitor later with the monitoring tools. Defining each and every host on the Hybrid computer networks makes administering the network much easier task and  tracking irregularities on time is much more likely. 

Since I have such a hybrid network here hosting a couple of XEN virtual machines with Linux, Windows 7 and Windows 10, together with Mac OS X laptops as well as MacBook Air notebooks, I have followed this route and tried to define each and every host based on its MAC address to pick it up from the correct DHCP1 server  192.168.1.1 (that is distributing IPs for Internet Provider 1 (ISP 1), that is mostly few computers attached UTP LAN cables via LiteWave LS105G Gigabit Switch as well from DHCP2 – used only to assigns IPs to servers and a a single Wi-Fi Access point configured to route incoming clients via 192.168.0.1 Linux NAT gateway server.

To filter out the unwanted IPs from the DHCPD not to propagate I've so far used a little trick to  Deny DHCP MAC Address for unwanted clients and not send IP offer for them.

To give you more understanding,  I have to clear it up I don't want to have automatic IP assignments from DHCP2 / LAN2 to DHCP1 / LAN1 because (i don't want machines on DHCP1 to end up with IP like 192.168.0.50 or DHCP2 (to have 192.168.1.80), as such a wrong IP delegation could potentially lead to MAC duplicates IP conflicts. MAC Duplicate IP wrong assignments for those older or who have been part of administrating large ISP network infrastructures  makes the network communication unstable for no apparent reason and nodes partially unreachable at times or full time …

However it seems in the 21-st century which is the century of strangeness / computer madness in the 2022, technology advanced so much that it has massively started to break up some good old well known sysadmin standards well documented in the RFCs I know of my youth, such as that every electronic equipment manufactured Vendor should have a Vendor Assigned Hardware MAC Address binded to it that will never change (after all that was the idea of MAC addresses wasn't it !). 
Many mobile devices nowadays however, in the developers attempts to make more sophisticated software and Increase Anonimity on the Net and Security, use a technique called  MAC Address randomization (mostly used by hackers / script kiddies of the early days of computers) for their Wi-Fi Net Adapter OS / driver controlled interfaces for the sake of increased security (the so called Private WiFi Addresses). If a sysadmin 10-15 years ago has seen that he might probably resign his profession and turn to farming or agriculture plant growing, but in the age of digitalization and "cloud computing", this break up of common developed network standards starts to become the 'new normal' standard.

I did not suspected there might be a MAC address oddities, since I spare very little time on administering the the network. This was so till recently when I accidently checked the arp table with:

Hypervisor:~# arp -an
192.168.1.99     5c:89:b5:f2:e8:d8      (Unknown)
192.168.1.99    00:15:3e:d3:8f:76       (Unknown)

..


and consequently did a network MAC Address ARP Scan with arp-scan (if you never used this little nifty hacker tool I warmly recommend it !!!)
If you don't have it installed it is available in debian based linuces from default repos to install

Hypervisor:~# apt-get install –yes arp-scan


It is also available on CentOS / Fedora / Redhat and other RPM distros via:

Hypervisor:~# yum install -y arp-scan


Hypervisor:~# arp-scan –interface=eth1 192.168.1.0/24

192.168.1.19    00:16:3e:0f:48:05       Xensource, Inc.
192.168.1.22    00:16:3e:04:11:1c       Xensource, Inc.
192.168.1.31    00:15:3e:bb:45:45       Xensource, Inc.
192.168.1.38    00:15:3e:59:96:8e       Xensource, Inc.
192.168.1.34    00:15:3e:d3:8f:77       Xensource, Inc.
192.168.1.60    8c:89:b5:f2:e8:d8       Micro-Star INT'L CO., LTD
192.168.1.99     5c:89:b5:f2:e8:d8      (Unknown)
192.168.1.99    00:15:3e:d3:8f:76       (Unknown)

192.168.x.91     02:a0:xx:xx:d6:64        (Unknown)
192.168.x.91     02:a0:xx:xx:d6:64        (Unknown)  (DUP: 2)

N.B. !. I found it helpful to check all available interfaces on my Linux NAT router host.

As you see the scan revealed, a whole bunch of MAC address mess duplicated MAC hanging around, destroying my network topology every now and then 
So far so good, the MAC duplicates and strangely hanging around MAC addresses issue, was solved relatively easily with enabling below set of systctl kernel variables.
 

1. Fixing Linux ARP common well known Problems through disabling arp_announce / arp_ignore / send_redirects kernel variables disablement


Linux answers ARP requests on wrong and unassociated interfaces per default. This leads to the following two problems:

ARP requests for the loopback alias address are answered on the HW interfaces (even if NOARP on lo0:1 is set). Since loopback aliases are required for DSR (Direct Server Return) setups this problem is very common (but easy to fix fortunately).

If the machine is connected twice to the same switch (e.g. with eth0 and eth1) eth2 may answer ARP requests for the address on eth1 and vice versa in a race condition manner (confusing almost everything).

This can be prevented by specific arp kernel settings. Take a look here for additional information about the nature of the problem (and other solutions): ARP flux.

To fix that generally (and reboot safe) we  include the following lines into


Hypervisor:~# cp -rpf /etc/sysctl.conf /etc/sysctl.conf_bak_07-feb-2022
Hypervisor:~# cat >> /etc/sysctl.conf

# LVS tuning
net.ipv4.conf.lo.arp_ignore=1
net.ipv4.conf.lo.arp_announce=2
net.ipv4.conf.all.arp_ignore=1
net.ipv4.conf.all.arp_announce=2

net.ipv4.conf.all.send_redirects=0
net.ipv4.conf.eth0.send_redirects=0
net.ipv4.conf.eth1.send_redirects=0
net.ipv4.conf.default.send_redirects=0

Press CTRL + D simultaneusly to Write out up-pasted vars.


To read more on Load Balancer using direct routing and on LVS and the arp problem here


2. Digging further the IP conflict / dulicate MAC Problems

Even after this arp tunings (because I do have my Hypervisor 2 LAN interfaces connected to 1 switch) did not resolved the issues and still my Wireless Connected devices via network 192.168.1.1/24 (ISP2) were randomly assigned the wrong range IPs 192.168.0.XXX/24 as well as the wrong gateway 192.168.0.1 (ISP1).
After thinking thoroughfully for hours and checking the network status with various tools and thanks to the fact that my wife has a MacBook Air that was always complaining that the IP it tried to assign from the DHCP was already taken, i"ve realized, something is wrong with DHCP assignment.
Since she owns a IPhone 10 with iOS and this two devices are from the same vendor e.g. Apple Inc. And Apple's products have been having strange DHCP assignment issues from my experience for quite some time, I've thought initially problems are caused by software on Apple's devices.
I turned to be partially right after expecting the logs of DHCP server on the Linux host (ISP1) finding that the phone of my wife takes IP in 192.168.0.XXX, insetad of IP from 192.168.1.1 (which has is a combined Nokia Router with 2.4Ghz and 5Ghz Wi-Fi and LAN router provided by ISP2 in that case Vivacom). That was really puzzling since for me it was completely logical thta the iDevices must check for DHCP address directly on the Network of the router to whom, they're connecting. Guess my suprise when I realized that instead of that the iDevices does listen to the network on a wide network range scan for any DHCPs reachable baesd on the advertised (i assume via broadcast) address traffic and try to connect and take the IP to the IP of the DHCP which responds faster !!!! Of course the Vivacom Chineese produced Nokia router responded DHCP requests and advertised much slower, than my Linux NAT gateway on ISP1 and because of that the Iphone and iOS and even freshest versions of Android devices do take the IP from the DHCP that responds faster, even if that router is not on a C class network (that's invasive isn't it??). What was even more puzzling was the automatic MAC Randomization of Wifi devices trying to connect to my ISP1 configured DHCPD and this of course trespassed any static MAC addresses filtering, I already had established there.

Anyways there was also a good think out of tthat intermixed exercise 🙂 While playing around with the Gigabit network router of vivacom I found a cozy feature SCHEDULEDING TURNING OFF and ON the WIFI ACCESS POINT  – a very useful feature to adopt, to stop wasting extra energy and lower a bit of radiation is to set a swtich off WIFI AP from 12:30 – 06:30 which are the common sleeping hours or something like that.
 

3. What is MAC Randomization and where and how it is configured across different main operating systems as of year 2022?

Depending on the operating system of your device, MAC randomization will be available either by default on most modern mobile OSes or with possibility to have it switched on:

  • Android Q: Enabled by default 
  • Android P: Available as a developer option, disabled by default
  • iOS 14: Available as a user option, disabled by default
  • Windows 10: Available as an option in two ways – random for all networks or random for a specific network

Lately I don't have much time to play around with mobile devices, and I do not my own a luxury mobile phone so, the fact this ne Androids have this MAC randomization was unknown to me just until I ended a small mess, based on my poor configured networks due to my tight time constrains nowadays.

Finding out about the new security feature of MAC Randomization, on all Android based phones (my mother's Nokia smartphone and my dad's phone, disabled the feature ASAP:


4. Disable MAC Wi-Fi Ethernet device Randomization on Android

MAC Randomization creates a random MAC address when joining a Wi-Fi network for the first time or after “forgetting” and rejoining a Wi-Fi network. It Generates a new random MAC address after 24 hours of last connection.

Disabling MAC Randomization on your devices. It is done on a per SSID basis so you can turn off the randomization, but allow it to function for hotspots outside of your home.

  1. Open the Settings app
  2. Select Network and Internet
  3. Select WiFi
  4. Connect to your home wireless network
  5. Tap the gear icon next to the current WiFi connection
  6. Select Advanced
  7. Select Privacy
  8. Select "Use device MAC"
     

5. Disabling MAC Randomization on MAC iOS, iPhone, iPad, iPod

To Disable MAC Randomization on iOS Devices:

Open the Settings on your iPhone, iPad, or iPod, then tap Wi-Fi or WLAN


  1. Tap the information button next to your network
  2. Turn off Private Address
  3. Re-join the network


Of course next I've collected their phone Wi-Fi adapters and made sure the included dhcp MAC deny rules in /etc/dhcp/dhcpd.conf are at place.

The effect of the MAC Randomization for my Network was terrible constant and strange issues with my routings and networks, which I always thought are caused by the openxen hypervisor Virtualization VM bugs etc.

That continued for some months now, and the weird thing was the issues always started when I tried to update my Operating system to the latest packetset, do a reboot to load up the new piece of software / libraries etc. and plus it happened very occasionally and their was no obvious reason for it.


6. How to completely filter dhcp traffic between two network router hosts
IP 192.168.0.1 / 192.168.1.1 to stop 2 or more configured DHCP servers
on separate networks see each other

To prevent IP mess at DHCP2 server side (which btw is ISC DHCP server, taking care for IP assignment only for the Servers on the network running on Debian 11 Linux), further on I had to filter out any DHCP UDP traffic with iptables completely.
To prevent incorrect route assignments assuming that you have 2 networks and 2 routers that are configurred to do Network Address Translation (NAT)-ing Router 1: 192.168.0.1, Router 2: 192.168.1.1.

You have to filter out UDP Protocol data on Port 67 and 68 from the respective source and destination addresses.

In firewall rules configuration files on your Linux you need to have some rules as:

# filter outgoing dhcp traffic from 192.168.1.1 to 192.168.0.1
-A INPUT -p udp -m udp –dport 67:68 -s 192.168.1.1 -d 192.168.0.1 -j DROP
-A OUTPUT -p udp -m udp –dport 67:68 -s 192.168.1.1 -d 192.168.0.1 -j DROP
-A FORWARD -p udp -m udp –dport 67:68 -s 192.168.1.1 -d 192.168.0.1 -j DROP

-A INPUT -p udp -m udp –dport 67:68 -s 192.168.0.1 -d 192.168.1.1 -j DROP
-A OUTPUT -p udp -m udp –dport 67:68 -s 192.168.0.1 -d 192.168.1.1 -j DROP
-A FORWARD -p udp -m udp –dport 67:68 -s 192.168.0.1 -d 192.168.1.1 -j DROP

-A INPUT -p udp -m udp –sport 67:68 -s 192.168.1.1 -d 192.168.0.1 -j DROP
-A OUTPUT -p udp -m udp –sport 67:68 -s 192.168.1.1 -d 192.168.0.1 -j DROP
-A FORWARD -p udp -m udp –sport 67:68 -s 192.168.1.1 -d 192.168.0.1 -j DROP


You can download also filter_dhcp_traffic.sh with above rules from here


Applying this rules, any traffic of DHCP between 2 routers is prohibited and devices from Net: 192.168.1.1-255 will no longer wrongly get assinged IP addresses from Network range: 192.168.0.1-255 as it happened to me.


7. Filter out DHCP traffic based on MAC completely on Linux with arptables

If even after disabling MAC randomization on all devices on the network, and you know physically all the connecting devices on the Network, if you still see some weird MAC addresses, originating from a wrongly configured ISP traffic router host or whatever, then it is time to just filter them out with arptables.

## drop traffic prevent mac duplicates due to vivacom and bergon placed in same network – 255.255.255.252
dchp1-server:~# arptables -A INPUT –source-mac 70:e2:83:12:44:11 -j DROP


To list arptables configured on Linux host

dchp1-server:~# arptables –list -n


If you want to be paranoid sysadmin you can implement a MAC address protection with arptables by only allowing a single set of MAC Addr / IPs and dropping the rest.

dchp1-server:~# arptables -A INPUT –source-mac 70:e2:84:13:45:11 -j ACCEPT
dchp1-server:~# arptables -A INPUT  –source-mac 70:e2:84:13:45:12 -j ACCEPT


dchp1-server:~# arptables -L –line-numbers
Chain INPUT (policy ACCEPT)
1 -j DROP –src-mac 70:e2:84:13:45:11
2 -j DROP –src-mac 70:e2:84:13:45:12

Once MACs you like are accepted you can set the INPUT chain policy to DROP as so:

dchp1-server:~# arptables -P INPUT DROP


If you later need to temporary, clean up the rules inside arptables on any filtered hosts flush all rules inside INPUT chain, like that
 

dchp1-server:~#  arptables -t INPUT -F

Use multiple certificates using one IP address (same IP address) on IIS Windows web server

Saturday, October 24th, 2020

If you had to administer some Windows webservers based on IIS and you're coming from the Linux realm, it would be really confusing on how you can use a single IP address to have binded multiple domain certificates.

For those who have done it on linux, they know Apache and other webservers in recent versions support the configuration Directive of a Wildcard instead of IP through the SNI extension capble to capture in the header of the incoming SSL connection the exact domain and match it correctly against the domain with the respective certificate.  Below is what I mean, lets say you have a website called yourdomain.com and you want this domain to be pointing to another location for example to yourdomain1.com

For example in Apache Webserver this is easily done by defining 2 separate virtualhost configuration files similar to below:

/etc/apache2/sites-available/yourdomain.com

<Virtualhost *>

Servername yourdomain.com
ServerAlias www.yourdomain.com
….

        SSLCertificateFile /etc/letsencrypt/live/yourdomain1.com/fullchain.pem
SSLCertificateKeyFile /etc/letsencrypt/live/yourdomain1.com/privkey.pem
</VirtualHost>


/etc/apache2/sites-available/yourdomain1.com

<Virtualhost *>

Servername yourdomain1.com
ServerAlias yourdomain1.com


        SSLCertificateFile /etc/letsencrypt/live/yourdomain1.com/fullchain.pem
SSLCertificateKeyFile /etc/letsencrypt/live/yourdomain1.com/privkey.pem
</VirtualHost>


Unfortunately for those who still run legacy Windows servers  with IIS version 7 / 7.5 your only option is to use separate IP addresses (or ports, but not really acceptable for public facing sites) and to bind each site with it's SSL certificate to that IP address.

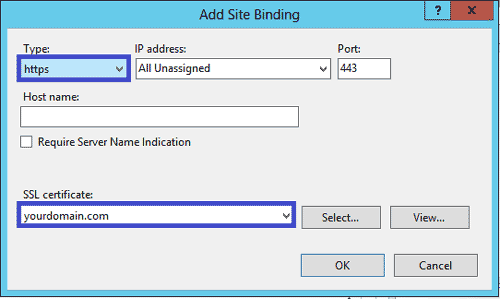
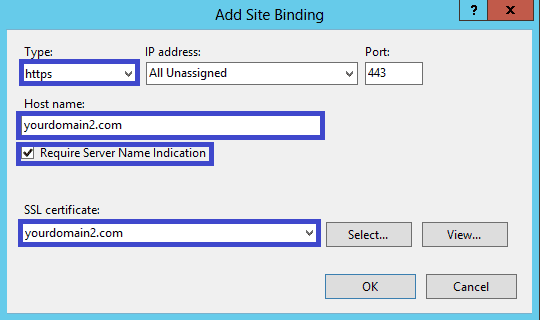
IIS ver. 8+ supports the Server Name Indication extension of TLS which will allow you to bind multiple SSL sites to the same IP address/port based on the host name. It will be transparent and the binding will work the same as with non-HTTPS sites.

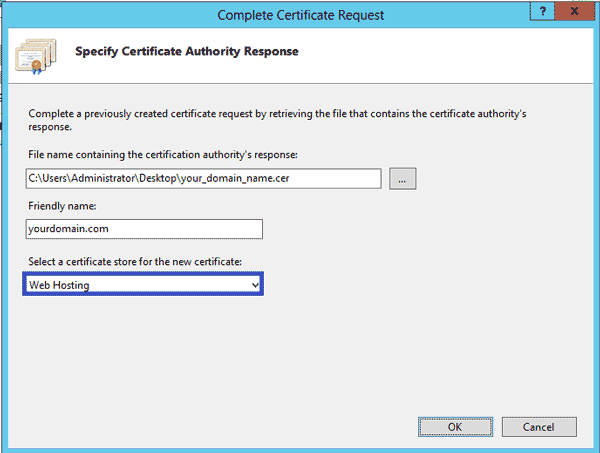
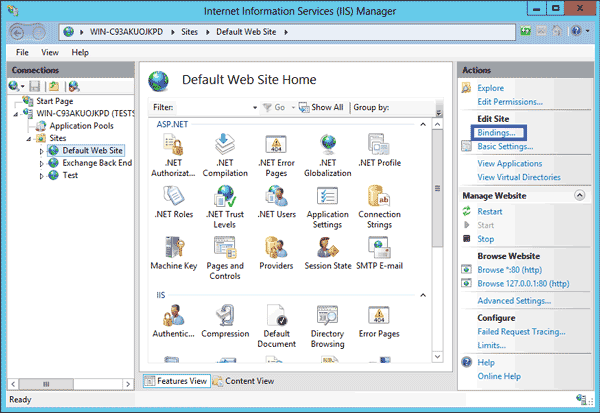
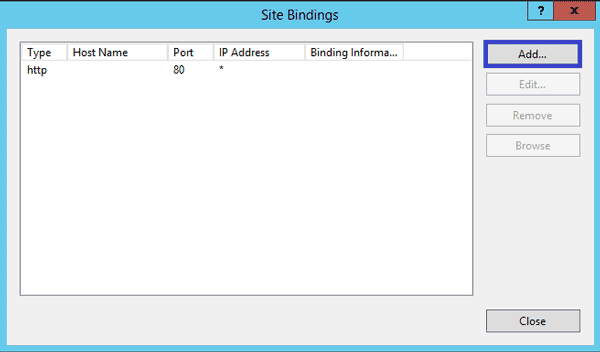
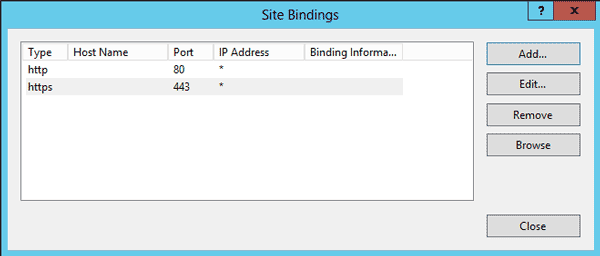
In Microsoft IIS Webserver to configure, it is not possible to simply edit some configurations but you have to do it the clicking way as usually happen in Windows. thus you will need to have generated the Domain Certificate requests and so on and then you can simply do as pointed in below screenshots.

howto-install-iis-8-webserver-ssl-sni-certificate-windows-screenshot
 

iis-config-domain-alias-windows-server-iis-8-webserver

iis-config-domain-alias-windows-server-iis-8-webserver-1

iis-config-domain-alias-windows-server-iis-8-webserver-2

iis-config-domain-alias-windows-server-iis-8-webserver-3

iis-config-domain-alias-windows-server-iis-8-webserver-4
 

Check when Windows Active Directory user expires and set user password expire to Never

Thursday, January 9th, 2020

micorosoft-windows-10-logo-net-user-command-check-expiry-dates

If you're working for a company that is following high security / PCI Security Standards and you're using m$ Windows OS that belongs to the domain it is useful to know when your user is set to expiry
to know how many days are left until you'll be forced to change your Windows AD password.
In this short article I'll explain how to check Windows AD last password set date / date expiry date and how you can list expiry dates for other users, finally will explain how to set your expiry date to Never
to get rid of annoying change password every 90 days.


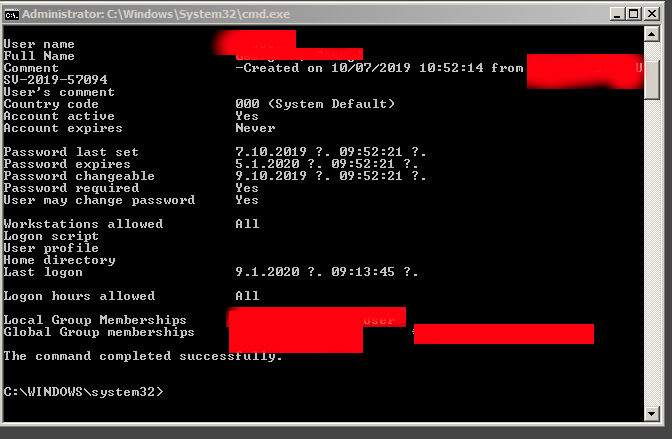
1. Query domain Username for Password set / Password Expires set dates

To know this info you need to know the Password expiration date for Active Directory user account, to know it just open Command Line Prompt cmd.exe

And run command:


NET USER Your-User-Name /domain


net-user-domain-command-check-AD-user-expiry

Note that, many companies does only connect you to AD for security reason only on a VPN connect with something like Cisco AnyConnect Secure Mobility Client whatever VPN connect tool is used to encrypt the traffic between you and the corporate DMZ-ed network

Below is basic NET USER command usage args:

Net User Command Options
 

Item          Explanation

net user    Execute the net user command alone to show a very simple list of every user account, active or not, on the computer you're currently using.

username    This is the name of the user account, up to 20 characters long, that you want to make changes to, add, or remove. Using username with no other option will show detailed information about the user in the Command Prompt window.

password    Use the password option to modify an existing password or assign one when creating a new username. The minimum characters required can be viewed using the net accounts command. A maximum of 127 characters is allowed1.
*    You also have the option of using * in place of a password to force the entering of a password in the Command Prompt window after executing the net user command.

/add    Use the /add option to add a new username on the system.
options    See Additional Net User Command Options below for a complete list of available options to be used at this point when executing net user.

/domain    This switch forces net user to execute on the current domain controller instead of the local computer.

/delete    The /delete switch removes the specified username from the system.

/help    Use this switch to display detailed information about the net user command. Using this option is the same as using the net help command with net user: net help user.
/?    The standard help command switch also works with the net user command but only displays the basic command syntax. Executing net user without options is equal to using the /? switch.


2. Listing all Active Directory users last set date / never expires and expiration dates


If you have the respective Active Directory rights and you have the Remote Server Administration Tools for Windows (RSAT Tools), you are able to do also other interesting stuff,


such as

– using PowerShell to list all user last set dates, to do so use Open Power Shell and issue:
 

get-aduser -filter * -properties passwordlastset, passwordneverexpires |ft Name, passwordlastset, Passwordneverexpires


get-aduser-properties-passwordlastset-passwordneverexpires1

This should show you info as password last set date and whether password expiration is set for account.

– Using PS to get only the password expirations for all AD existing users is with:


Get-ADUser -filter {Enabled -eq $True -and PasswordNeverExpires -eq $False} –Properties "DisplayName", "msDS-UserPasswordExpiryTimeComputed" |
Select-Object -Property "Displayname",@{Name="ExpiryDate";Expression={[datetime]::FromFileTime($_."msDS-UserPasswordExpiryTimeComputed")}}


If you need the output data to get stored in CSV file delimitered format you can add to above PS commands
 

| export-csv YOUR-OUTPUT-FILE.CSV


3. Setting a user password to never Expiry


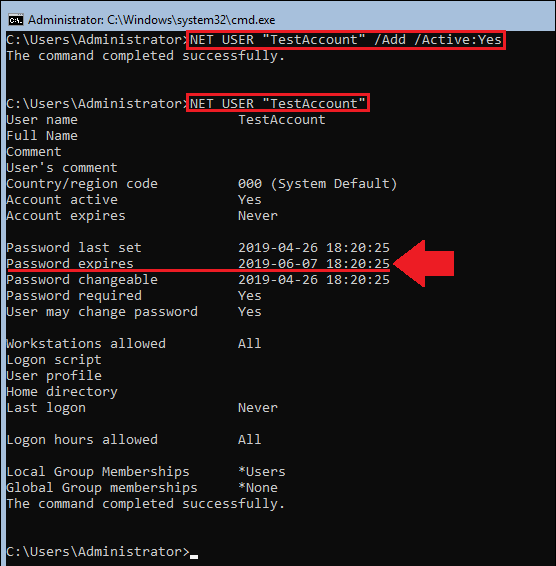
If the user was created with NET USER command by default it will have been created to have a password expiration. 
However if you need to create new users for yourself (assuming you have the rights), with passwords that never expire on lets say Windows Server 2016 – (if you don't care about security so much), use:
 

NET USER "Username" /Add /Active:Yes

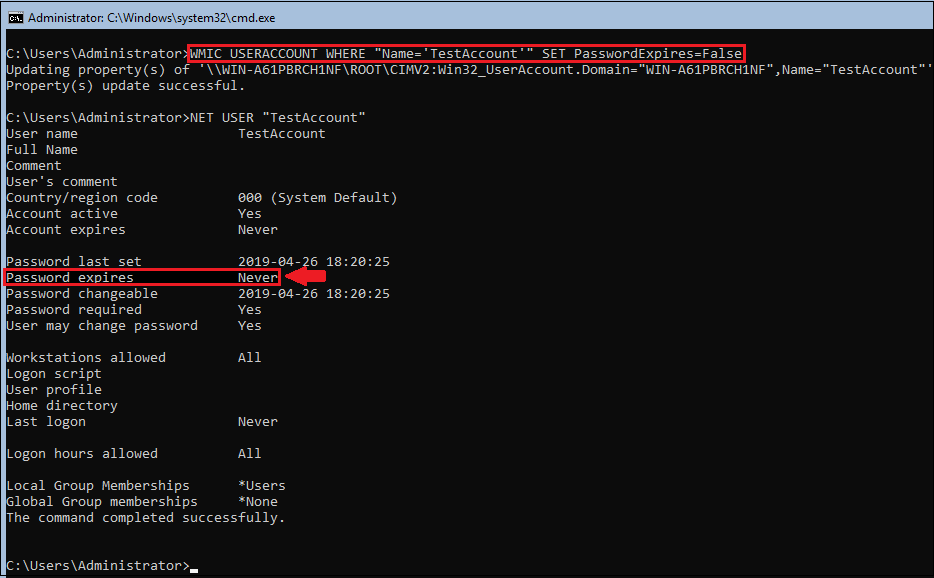
WMIC USERACCOUNT WHERE "Name='Username' SET PasswordExpires=False


NET-USER-ADD_Active-yes-Microsoft-Windows-screenshot

NET-USER-set-password-policy-to-Never-expiry-MS-Windows

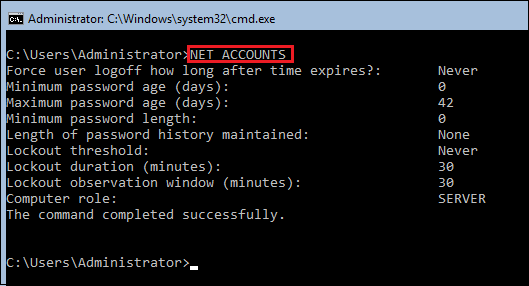
To view the general password policies, type following:
 

NET ACCOUNTS


NET-ACCOUNTS-view-default-Microsoft-Windows-password-policy


How to clear ARP cache on Linux / Windows for a single IP address / Flush All IPs ARP cache

Wednesday, December 11th, 2019

linux-how-to-delete-modify-arp-cache-entries-after-IP-is-migrated-from-one-server-or-VPN-host-to-another-resized

On times of Public Internet IP migration or Local IPs between Linux servers or especially in clustered Linux Application Services running on environments like Pacemaker / Corosync / Heartbeat with services such as Haproxy.
Once an IP gets migrated due to complex network and firewall settings often the Migrated IP from Linux Server 1 (A) to Linux Server 2 (B) keeps time until a request to reload the Internet server IP ARP cache with to point to the new IP location, causing a disruption of accessibility to the Newly configured IP address on the new locations. I will not get much into details here what are the ARP (Address Resolution protocol) and Network ARP records on a Network attached Computer and how they correspond uniquely to each IP address assigned on Ethernet or Aliased network Interfaces (eth0 eth0:1 eth0:2) . But in this article, I'll briefly explain once IP Version 4 address is migrated from one server Data Center location to another DC, how the unique corresponding ARP record kept in OS system memory should be flushed in the ARP corresponding Operating System so called ARP table (of which you should think as a logical block in memory keeping a Map of where IP addresses are located physically on a Network recognized by the corresponding Unique MAC Address.
 

1. List the current ARP cache entries do

Arp is part of net-tools on Debian GNU / Linux and is also available and installed by default on virtually any Linux distribution Fedora / CentOS / RHEL / Ubuntu / Arch Linux and even m$ Windows NT / XP / 2000 / 10 / whatever, the only difference is Linux tool has a bit of more functionality and has a bit more complex use.
Easiest use of arp on GNU / Linux OS-es is.
 

# arp -an 

sample-IP-address-list-with-the-assigned-ARP-cache-mac-addresses
The -a lists all records and -n flag is here to omit IP resolving as some IPs are really slow to resolve and output of command could get lagged.

2. Delete one IP entry from the cache


Assuming only one IP address was migrated, if you want to delete the IP entry from local ARP table on any interface:
 

# arp -d 192.168.0.8


It is useful to delete an ARP cached entry for IP address only on a certain interface, to do so:
 

# /usr/sbin/arp -i eth1 -d 10.0.0.1


3. Create ARP entry MAC address with a static one for tightened security


A useful Hack is to (assign) / bind specific Static MAC addresses to be static in the ARP cache, this is very useful to improve security and fight an ARP poisoning attacks.
Doing so is pretty easy, to do so:

Above will staticly make IP 192.168.0.8 to always appear in the ARP cache table to the MAC 00:50:ba:85:85:ca. So even if we have another system with the same MAC
trying to spoof our location and thus break our real record location for the Hostname in the network holding in reality the MAC 00:50:ba:85:85:ca, poisoning us
trying to make our host to recognize 192.168.0.8 to a different address this will not happen as the static ARP will be kept unchanged in ARP caching table.


 # arp -s 192.168.0.8 00:50:ba:85:85:ca


4. Flush all ARP records only for specific Ethernet Interface


After the IP on interface was migrated run:


# ip link set arp off dev eth0 ; ip link set arp on dev eth0


5. Remove a set of few IPs only migrated ARP cache entries


# for i in 192.168.0.1 10.0.0.1 172.168.0.3; do sudo arp -d $i; done


Once old ARP entries are removed the arp command would return as:


linux:~$ arp
? (192.168.0.8) at <incomplete>  on eth1
? (172.168.0.3) at <incomplete>  on eth2


The 192.168.0.8 / 172.168.0.3 entry now shows as incomplete, which means the ARP entry will be refreshed when it is needed again, this would also depend
on the used network switches / firewalls in the network settings so often could take up to 1 minute or so..


6. Flush all ARP table records on Linux

flush-all-arp-cache-addresses-on-linux-howto-with-ip-command


# ip -s -s neigh flush all


7. Delete ARP Cache on FreeBSD and other BSDs

# arp -d -a 


8.  Flush arp cache on Windows

Run command prompt as Administrator -> (cmd.exe)  and do:

C:\> ipconfig /all
netsh interface ip delete arpcache


9. Monitoring the arp table


On servers with multiple IP addresses, where you expect a number of IP addresses migrated to change it is useful to use watch + arp like so:
 

# watch -n 0.1 'arp -an'

The -n 0.1 will make the arp -an be rerun every 10 miliseconds and by the way is a useful trick to monitor stuff returned by commands that needs a higher refresh frequency.
 

Conclusion


In short in this article, was explained how to list your arp cache table.The arp command is also available both on Linux and Windows) and as integral part of OS networking it is useful to check thoroghfully to its man page (man arp).
Explained was how to create Static ARP table records to prevent ARP poisoning attacks on a server.
I went through how to delete only a single ARP records (in case if) only certain IPs on a host are changed and an ARP cache entry reload is needed, as well as how to flush the complete set of ARP records need to get refreshed, sometimes useful on networks with Buggy Network Switches or when completely changing the set of IP-addresses assigned on a server host.

Getting Console and Graphical hardware system information on Linux with cpuinfo, neofetch, CPU-X (CPU-Z Unix alternative), I-nex and inxi

Tuesday, September 17th, 2019

getting-console-information-and-graphical-hardware-system-information-Linux-cpuinfo-neofetch-cpu-x-i-nex-1

Earlier I've wrote extensive article on how to get hardware information on Linux using tools such as dmidecode, hardinfo, lshw, hwinfo, x86info and biosdecode but there are few other hardware reporting tools for Linux worthy to mention that has been there for historical reasons such as cpuinfo as we as some new shiny ones such as neofetch (a terminal / console hardware report tool as well the CPU-X and I-Nex  which is Linux equivalent to the all known almost standard for Windows hardware detection CPU-Z worthy to say few words about.
 

1. cpuinfo


Perhaps the most basic tool to give you a brief information about your Processor type (model) number of Cores and Logical Processors is cpuinfo

I remember cpuinfo has been there since the very beginning on almost all Linux distributions's repository, nowadays its popularity of the days when the kings on the Linux OS server scenes were Slackware, Caldera OpenLinux and Redhat 6.0 Linux and Debian 3.0  declined but still for scripting purposes it is handy small proggie.

To install and run it in Debian  / Ubuntu / Mint Linux etc.:


aptitude install -y cpuinfo

/usr/bin/cpu-info


Linux-get-processor-system-info-in-console-cpu-info


2. neofetch


The next one worthy to install and check is neofetch (a cross-platform and easy-to-use system information
 command line script that collects your Linux system information and display it on the terminal next to an image, it could be your distributions logo or any ascii art of your choice.)

The cool thing about neofetch is besides being able to identify the System server / desktop hardware parameters, it gives some basic info about number of packages installed on the system, memory free and in use, used kernel and exact type of System (be it Dell PowerEdge Model XX, IBM eSeries Model / HP Proliant Model etc.

neofetch-OS-hardware-information-Linux-ascii-system-info-desktop-notebook

neofetch info generated on my home used Lenovo Thikpad T420

neofetch-OS-hardware-information-Linux-ascii-system-info-pcfreak-home-server
neofetch info from www.pc-freak.net running current machine

neofetch even supports Mac OS X and Windows OS ! 🙂

To install neofetch on Mac OS X:
 

/usr/bin/ruby -e "$(curl -fsSL https://raw.githubusercontent.com/Homebrew/install/master/install)"


or via Mac ported packages using brew

brew install neofetch


neofetch-screenshot-from-Mac-OS-X

neofetch is even installable on Windows OS that has the scoop command line installer tool installer manager with below PowerShell code in cmd.exe (Command line):

powershell Set-ExecutionPolicy RemoteSigned -scope CurrentUser
iex (new-object net.webclient).downloadstring('https://get.scoop.sh')
scoop install git
scoop install neofetch

neofetch-microsoft-windows-hardware-command-line-report-tool-screenshot


By the way Scoop was quite a finding for me and it is pretty handy to install plenty of useful command line Linux / UNIX tools, such as curl, wget, git etc. in the same easy straight forward way as a standard yum or apt-get on Windows (without explicitly installing things as GnuWin and CygWin).
 

3. CPU-X graphical user interface hardware report Linux GUI alternative to Windows CPU-Z


The packages for CPU-X are a bit outdated and even though there are rpm packages for Fedora, OpenSuSE and .deb package for Debian for Debian, Ubuntu and ArchLinux (pacman), there is no up to date version for Debian 10 and the package builds distributed for different Linux distros are a bit outdated.

Thus to install CPU-X on any Linux distribution it is perhaps best to use the portable version (static binary) of CPU-X.
It is currently available on https://github.com/X0rg/CPU-X/releases

To install latest portable version of CPU-X

wget https://github.com/X0rg/CPU-X/releases/download/v3.2.4/CPU-X_v3.2.4_portable.tar.gz

mkdir CPU-X
cd CPU-X

tar -zxvvf CPU-X_v3.2.4_portable.tar.gz
-rwxr-xr-x yohan/users 4563032 2019-01-13 22:15 CPU-X_v3.2.4_portable.bsd64
-rwxr-xr-x yohan/users 5484968 2019-01-13 22:15 CPU-X_v3.2.4_portable.linux64


cp -rpf CPU-X_v3.2.4_portable.linux64 /usr/local/bin/
ln -sf /usr/local/bin/CPU-X_v3.2.4_portable.linux64 /usr/local/bin/cpu-x


Next run as superuser (root)
 

hipo@jeremiah:~$ su -c 'cpu-x'


As seen from below screenshots cpu-x reports a lot of concrete specific hardware data on:

  • Processor
  • Motherboard
  • Memory
  • System
  • Graphic card
  • Performance

cpu-x-cpu-cpu-z-alternative-linux-screenshot-CPU-info

cpu-x-cpu-cpu-z-alternative-linux-screenshot-caches-info

cpu-x-cpu-cpu-z-alternative-linux-screenshot-Motherboard-info

cpu-x-cpu-cpu-z-alternative-linux-screenshot-memory-info

cpu-x-cpu-cpu-z-alternative-linux-screenshot-system-info

cpu-x-cpu-cpu-z-alternative-linux-screenshot-graphics-info

CPU-X can be installed also on FreeBSD very easily by just installing from BSD port tree sysutils/cpu-x/
It is also said to work on other *BSDs, NetBSD, OpenBSD Unixes but I guess this will require a manual compilation based on FreeBSD's port Makefile.

4. I-Nex another GUI alternative to CPU-Z for UNIX / Linux

I-Nex is even more useful for general hardware reporting as it reports many hardware specifications not reported by CPU-X such as Battery type and Model Name  (if the hardware report is on a laptop), info on USB devices slots or plugged USB devices brand and specifications, the available Network devices on the system (MAC Addresses) of each of it, Installed and used drivers on Hard Disk (ATA / SATA / SCSI / SSD), HW Sector size, Logical Block size, HDD Sectors count and other specific Hard Drive data as well as information on available Audio (Sound Blaster) devices (HDA-Intel), used Codecs, loaded kernel ALSA driver, Video card used and most importantly indicators on Processor reported CPU (temperature).


To install I-nex

Go to https://launchpad.net/i-nex or any of the mirror links where it resides and install the respective package, in my case, I was doing the installation on Debian Linux, so fetched current latest amd64 package which as of moment of writting this article is i-nex_7.6.0-0-bzr977-20161012-ubuntu16.10.1_amd64.deb , next installed it with dpkg
 

dpkg -i i-nex_7.6.0-0-bzr977-20161012-ubuntu16.10.1_amd64.deb


As the package was depending on some other .deb packages, which failed to install to install the missing ones I had to further run
 

apt –fix-broken install

i-nex-cpu-info-linux-hardware-info-program


hre

I-Nex thermal indicators about CPU temperature on a Linux Desktop notebook

i-nex-gpu-info-linux-hardware-info-program

i-nex-mobo-info-linux-hardware-info-program

i-nex-audio-info-linux-hardware-info-program

i-nex-drivers-info-linux-hardware-info-program

i-nex-system-info-linux-hardware-info-program

i-nex-battery-info-linux-hardware-info-program


There are other Hardware identification report tools such as CUDA-Z that are useful to check if you have Nvidia Video Card hardware Installed on the PC to check the status of CUDA enabled GPUs, useful if working with nVidia Geforce, Quadro, Tesla cards and ION chipsets.

If you use it however be aware that CUDA-Z is not compatible with 3rd-party linux drivers for NVidia so make sure you have the current official Nvidia version.


5. Inxi full featured system information script


Inxi is a 10000 lines mega bash script that fetches hardware details from multiple different sources in /proc /sys and from commands on the system, and generates a beautiful looking console report that non technical users can read easily.

inxi-10-k-mega-bash-shell-script-reporting-on-installed-system-computer-hardware


inxi -Fx


inxi-report-on-installed-hardware-on-my-lenovo-thinkpad-home-laptop

Each of the pointed above tools has different method of collection of Hardware information from various resources e.g. – kernel loaded modules, dmesg, files like /proc/meminfo /proc/version /proc/scsi/scsi /proc/partitions.
Hence some of the tools are likely to report more info than otheres, so in case if some information you need regarding the system plugged in hardware is missing you can perhaps obtain it from another program. Most Linux distribution desktop provided GNOME package are including Hardinfo gui tool, but in many cases above mentioned tools are likely to add even more on info on what is inside your PC Box.
If you're aware of others tools that are useful not mentioned here please share it.

Check weather forecast from console (terminal) on GNU / Linux and FreeBSD howto

Friday, August 23rd, 2019

how to get weather forecast prognosis from command line text terminal / console on Linux and FreeBSD

Doing everything in Linux console / terminal is a question perhaps every Linux / BSD hacker wants to do as Graphical user interface and using web search or using Graphical Environment plugins is an unneded complexity + googling or duckduckgoing for weather to check your next vacation destination city has been more and more of a terrible experience (for me) as I'm not a big fan of using the OS in a GUI.
In that manner of thoughts, as a Linux console geek and hard core ASCII art fan. I was recently happy to find that  possible to check weather forecast in tty console or Linux terminal in a beautiful ascii art way easily through a Web wttr.in service – a web application weather forecast service that supports displaying the current and few days in future, weather forecast either in browser as a plain text or from the command line by simply accessing it with your favourite web access / transfer tool such as;
wget / curl or any of your favourite text browser elinks / lynx / w3m or if on *BSDs use fetch command.


Install Curl data transfer tool if it is not already


Wget is installed by default across most Linux distributions and fetch is present by default on BSDs, displaying it in text browser would perhaps be never used but if you decide to give it a try maybe try with elinks (to get colorful output), w3m and lynx will display a black and white results.

In case if you miss curl, install it:

On Debian distro


aptitude install -y curl


or Fedora

yum install -y curl


Of course to use wttr.in as it is Internet based Weather Forecast service the minimum you need to have is to have Internet connection to your Linux / BSD desktop computer.

Text based Weather Forecast Web App currently supports:

display the current weather as well as a 3-day weather forecast, split into morning, noon, evening and night

  • Temperature is displayed for morning, noon, evening and night (includes temperature range, wind speed and direction, viewing distance, precipitation amount and probability)
  • Provide results for Weather based on City / town / village location
  • Supports display of Moon Phases Forecast in calendar days
  • Supports multilingual names (Bulgarian Phonetic cyrillic / Russian and other exotic UTF-8 encodings such as Chineese and Japanese),  50+ languages are currently supported
  • Has ability for prognosis for hostname (domain) location based on an its IP GeoIP location on the Globe
  • Geographical locations / landmarks such as Lakes / Mountains etc. can be easily queried
  • Query results metrics could be configured, e.g. USCS units or EU and rest of world accepted ones (SI) metric
  • Displayed result could be either in ANSI (if from terminal / console / HTML if queried from browser or in PNG – if needed)


Where wttr.in could be useful ?

The best applications use, I can think of are for server (shell) / perl scripting automation purposes, it could be useful especially in TOO HOT, TOO, COLD, TOO WET location in Small and Middle sized Data Centers Green Energy (Sun Panel) Parks / Wind Energy situated Linux monitoring hosts to track possible problems of overheats or overcolding of servers due to abnormal excessive temperatures such as the ones we experienced this summer here All across in Europe or in too Cold DC locations such as heat locations Deserts in African Countries, Saudi Arabia or Chukotka or Siberia in Russia.
Other application is as a backup option to other normal Weather report services by PHP or Python scripts that fetch data, from multiple places.
Of course since this is a third party controlled service, the downtime is due to excessive connection requests, the service could get flooded and stopped working, but I guess for any Commercial use, wttr.in creator Igor Chubin would be happy to sell a specific crafted service for any end user candidates.


Here is few examples of the beautiful returned ASCII art formatted output of wttr.in.
 

1. Getting a three days Weather Forecast prognosis for city / town location

To get what is current weather in my current city of Living, Sofia Bulgaria just pass the city to the URL address

curl http://wttr.in/Sofia

text-console-wttr.in-Weather-forecast-Sofia-for-Linux


links http://wttr.in/Dobrich


curl-Linux-show--Dobrich-Weather-forecast-in-lynx-text-browser


Default links (Linux) www text browser produces ugly black and white

2. Displaying Weather forecast with wget


wget -O- -q http://wttr.in


getting-weather-forecast-on-linux-terminal-console-with-wget-command

If you're lazy you can even omit the http:// as wget will look for HyperText Transmission Protocol by itself


wget -O- -q wttr.in


3. Getting Forecast results for a Tourist Destination


Lets get the weather forecast for the popular tourist Bulgarian destination of the Seven Rila Lakes (near Rila Monastery), situated in the Rila Mountain BG.


curl http://wttr.in/Seven+Rila+Lakes


Console-terminal-Weather-forecast-Linux-Seven-Rila-Lakes


4. Display Forecast for a specific server IP


Displaying information on specific server IP address current situated in GeoIP database, of course could be not really true, as the IP could be just a Load Balancer a router that does NAT to some internal DMZ-ed location server, but anyways it is a cool feature.

Lets get information on what is the weather on Google Global's Public DNS server IP 8.8.8.8 so commonly used to guarantee a Windows and Linux Desktop client machines Internet connectivity.
 

curl wttr.in/@8.8.8.8


wttr.in-Linux-text--forecast-service-curl-screenshot Google Public DNS location weather forecast

5. Download PNG image picture from wttr.in service


Lets say you want to get a 3 days standard Weather forecast for the popular Black Sea Resort town in Bulgaria Pomorie (a beautiful sea city which has even a functioning 5 Monks Monastery Pomorie Monastery situated near sea coast)


curl http://wttr.in/Pomorie.png


–2019-08-22 20:15:51–  http://wttr.in/Pomorie.png
Resolving wttr.in (wttr.in)… 5.9.243.187
Connecting to wttr.in (wttr.in)|5.9.243.187|:80… connected.
HTTP request sent, awaiting response… 200 OK
Length: 42617 (42K) [image/png]
Saving to: ‘Pomorie.png’

Pomorie.png                                     100%[=======================================================================================================>]  41.62K  –.-KB/s    in 0.07s   

2019-08-22 20:15:52 (586 KB/s) – ‘Pomorie.png’ saved [42617/42617]


Note: The generated .png is again the ASCII art produced by a direct text fetch bug in pic format


6. Displaying Current Moon Phase


If you want to enjoy a text based Moon phase picture through wttr.in 🙂

wget -O- -q wttr.in/Moon


Display-current-Phase-of-Moon-in-terminal-console-Linux-wttr.in-service

You can also get a Moon Phase prognosis for a current future date or get a previous date phase


curl wttr.in/moon@2019-09-15

Full-Moon-Weather-forecast-text-console-reporting-via-wttr.in-on-Gnu_Linux


Full Moon Madness !! – Vampires are out beaware and Enjoy the ultra kewl ASCII Colorful Art 🙂
 

7. Getting help for wttr.in terminal Waether Forecast results


$ curl wttr.in/:help
Usage:


    $ curl wttr.in          # current location
    $ curl wttr.in/muc      # weather in the Munich airport

Supported location types:

    /paris                  # city name
    /~Eiffel+tower          # any location
    /Москва                 # Unicode name of any location in any language
    /muc                    # airport code (3 letters)
    /@stackoverflow.com     # domain name
    /94107                  # area codes
    /-78.46,106.79          # GPS coordinates

Special locations:

    /moon                   # Moon phase (add ,+US or ,+France for these cities)
    /moon@2016-10-25        # Moon phase for the date (@2016-10-25)

Units:

    m                       # metric (SI) (used by default everywhere except US)
    u                       # USCS (used by default in US)
    M                       # show wind speed in m/s

View options:

    0                       # only current weather
    1                       # current weather + 1 day
    2                       # current weather + 2 days
    A                       # ignore User-Agent and force ANSI output format (terminal)
    F                       # do not show the "Follow" line
    n                       # narrow version (only day and night)
    q                       # quiet version (no "Weather report" text)
    Q                       # superquiet version (no "Weather report", no city name)
    T                       # switch terminal sequences off (no colors)

PNG options:

    /paris.png              # generate a PNG file
    p                       # add frame around the output
    t                       # transparency 150
    transparency=…        # transparency from 0 to 255 (255 = not transparent)

Options can be combined:

    /Paris?0pq
    /Paris?0pq&lang=fr
    /Paris_0pq.png          # in PNG the file mode are specified after _
    /Rome_0pq_lang=it.png   # long options are separated with underscore

Localization:

    $ curl fr.wttr.in/Paris
    $ curl wttr.in/paris?lang=fr
    $ curl -H "Accept-Language: fr" wttr.in/paris

Supported languages:

    af da de el et fr fa hu id it nb nl pl pt-br ro ru tr uk vi (supported)
    az be bg bs ca cy cs eo es fi ga hi hr hy is ja jv ka kk ko ky lt lv mk ml nl fy nn pt pt-br sk sl sr sr-lat sv sw th te uz zh zu he (in progress)

Special URLs:

    /:help                  # show this page
    /:bash.function         # show recommended bash function wttr()
    /:translation           # show the information about the translators


8. Comparing two cities weather from command line


One useful use of wttr.in if you plan to travel from Location city A to Location city B is to compare the temperatures with a simple bash one liner script:


diff -Naur <(curl -s http://wttr.in/Sofia ) <(curl -s http://wttr.in/Beograd )


9. Using ansiweather command to get Weather Temperature / Wind / Humidity in one line beuatiful text


If you go and install answeather Linux package


apt-get install –yes ansiweather


You will get a shell script wrapper with ANSI colors and Unicode symbols support. Weather data comes from OpenWeatherMap, this is useful if wttr.in is not working due to some URL malfunction (due to service is DoS-ed) etc.


ansiweather -l Atina


ansiweather-Atina-weather-forecast-result-linux-text-console

Lets use ansiweather to print the weather prognosis for upcoming 5 days for near port of Burgas, BG
 

ansiweather -F -l Burgas

ansiweather-print-weather-forecast-prognosis-for-5-days-in-Linux-text-terminal


10. Get all Weather current forecast for each Capital in the world


You can download and use this simple plain text file list of All Country Capitals in the World (country-capitals-all-world.txt) with ansiweather and a bash loop to get displayed each and every current day Weather Forecast in the World, here is how:


while read line; do ansiweather -l $line; sleep 3; done < country-capitals-all-world.txt


ansiweather-all-countires-capitals-result

As you can see some of the very exotic third world capitals does not return data so 'ERROR: Cannot fetch weather data' is returned.


You can also substitute ansiweather with curl wttr.in/$line to do get the beautiful ASCII art 3 days weather forecast via wttr.in


while read line; do curl http://wttr.in/$line; sleep 3; done < country-capitals-all-world.txt


I'll be happy to know other nice ASCII Art supporting Web service to enjoy from text terminal on Linux (nomatter useful or) just funny joyful prank maniacal pranks such as Watching text ASCII version remake of Star Wars Classic Movie by simply telnetting to towel.blinkenlights.nl (if you haven't so just telnet and enjoy the streamed ASCIIs ! 🙂


telnet towel.blinkenlights.nl


watch-star-wars-ascii-art-version-remake-online-with-telnet-on-linux-console-terminal


Talking about fun and ASCII, its worthy to mention hollywood Linux package

hipo@jeremiah:~/Desktop$ apt-cache show hollywood|grep -i desc -A 3
Description-en: fill your console with Hollywood melodrama technobabble
 This utility will split your console into a multiple panes of genuine
 technobabble, perfectly suitable for any Hollywood geek melodrama.
 It is particularly suitable on any number of computer consoles in the


Description-md5: 768f44c76220ea2b35f855ea34c8bc35
Homepage: http://launchpad.net/hollywood
Section: games
Priority: optional


Once installed on Debian with:

aptitude install -y hollywood

You can get in a rapid manner plenty of tmux (screen like – virtual console emulator) split screen statistics about your notebook / workstation / server CPU usage, mlocate.db status, info about plugged in machine voltage, Speedometer (statistics about Network bandwidth usage), System load avarage (CPU Count, Memory Utilization) and some other random info coming out of dmesg kernel log and more. The information displayed in splitted windows changes rapidly and (assuming you run it at home Desktop with a soundblaster) and not remotely, a james bond Agent 007 soundtrack is played on the back, that brings up one's adrenaline and makes it look even cooler.

hollywood-melodrama-technobubble-split-console-multiple-panes-for-genuine-technobubble

To give you an idea what to expect, here is shot of /usr/games/hollywood (the program start binary location) on Debian GNU / Linux running, Enjoy! 🙂
 

Make laptop not to sleep on close on Microsoft Windows 10 / Disable notebook LID close sleep Windows

Thursday, November 8th, 2018

Windows10-Define-power-options-actions-settings

I have to use Windows 10 Enterprise on a notebook for Work purposes once again and use a Docking station connected to an external Display Monitor at the Company Office work location one of the first things to configure is to disable LID Display Sleep on laptop close because otherwise the notebook has to be left opened almost half opened in order to work with the PC to change that unwanted behavior there is an easy way via Windows Control Panel configuration, here is how:

Open

Windows Control Panel 


navigate to:

edit-plan-settings-power-settings-windows-10.png


Power Options


choose:

Change advanced power settings, scroll down a bit to:

power-options-power-buttons-and-lid-lid-close-action-do-nothing-windows-10-scresnshot


Power Buttons and lid (menu) 


press over it from sub-menu
 

Plugged in


Select


Do nothing


That's all from now on closing the notebook when plugged in to the Dock station or to a direct External Monitor will no longer do the sleep.

As you can see from the menus, there is a lot of triggering rules to configure further from Power Management (Advanced Settings) on how applications / USBs / Multimedia and Hard Disks should behave under different power conditions so if you have the time I recommend you go through them and check them for yourself.

How to stop REDSHIFT night light brightness and color saturation eye strain protection on GNU / Linux

Tuesday, August 7th, 2018

http://jonls.dk/assets/redshift-icon-256

You know on most operating systems such as Windows 8 / 10 ,  Mac OS X as well as  GNU / Linux / BSDs (FreeBSD) etc. with graphical environments such as  GNOME / KDE etc. , there is this default functionality nowadays that is helping to reduce eye strain and improve night sleep by modifying the light and brightness as well as coloring eminated by the monitor. 

On Windows this technology is called Night Light and is easily enabled by nagivating through menus:


Start  > Settings  > System > Display > Night light > Night light settings.


set-your-display-windows-night-time-windows-os-10

Windows 10 Night Time settings shot

On GNU / Linux and BSD-es the eye strain application that comes preinstalled by default on most distributions is redshift – for more what is redshift check out my previous article get more peaceful night sleep on Ubuntu, Mint and Xubuntu Linux.

There is also the alternative to use F.lux (which by the way is used to prevent eye strain on Mac OS X and was the program of choice to prevent eye strain in older Windows versions)

Even though Night Light / and redshift monitor color warmth change is often mostly useful and have a positive impact improving sleep as well removes eye strain on Linux my experience with it is not too positive as it changes the monitor color gamma and makes it often quite reddish and annoying even through a normal day and not only night time.
This makes the work experience on the computer not pleasurable thus just removing it for me and I guess for many would be a must.

Assuming that you have installed Free software OS such as Linux with redshift (note that on on older releases of Deb and RPM package based distributions: you will have to manually install it with something like:)

On Debian based distros with:
 

root@debian:~# apt-get install –yes redshift redshift-gtk


On RPM Fedora / Cent OS, Redhat Enterprise Linux etc. with a command like:


[root@fedora]# yum install –yes redshift redshift-gtk

redshift-on-KDE-settings-menu

Redshift settings on Linux with KDE GUI

So in order to remove redshift it completely from Linux which usually on most GNU / Linux distros is running as a default process

redshift-change-monitor-brightness-to-reduce-eye-strain-gnome


1. * Make sure you kill all processes called redshift and redshift-gtk


to do so check processes with same name and KILL 'EM ALL!:
 

root@linux:~# ps aux|grep -i redshift
hipo     44058  2.8  0.5 620980 42340 pts/2    Sl+  20:33   0:00 /usr/bin/python3 /usr/bin/redshift-gtk
hipo     44059  0.1  0.0 295712  6476 pts/2    Sl+  20:33   0:00 /usr/bin/redshift -v

root@linux:~# kill -9 44058 44059


2. * Set the color temperature of the Monitor / Screen back to 6500K (this can be done either by the button menu that most screens have)


or manually with redshift itself by executing command:


root@linux:~# redshift -O 6500


As the screen is back to normal color gamma, its now time to completely remove redshift in order to prevent it to mess up with your monitor colors, on next PC boot or on Gnome / Mate whatever UI used session logout.

To do so issue commands:


root@linux:~# dpkg –purge redshift redshift-gtk
(Reading database … 516053 files and directories currently installed.)
Removing redshift-gtk (1.11-1) …
Purging configuration files for redshift-gtk (1.11-1) …
Removing redshift (1.11-1) …
Processing triggers for man-db (2.8.3-2) …
Processing triggers for hicolor-icon-theme (0.17-2) …
Processing triggers for mime-support (3.61) …
Processing triggers for gnome-menus (3.13.3-11) …
Processing triggers for desktop-file-utils (0.23-3) …
Processing triggers for menu (2.1.47+b1) …

3. Enjoy normal colors on your monitor  Goodbye Forever REDSHIFT, goodbuy dark crappy Screen during the day. Hello normal Screen light !!! 🙂