Posts Tagged ‘Ubuntu’

Ansible Quick Start Cheatsheet for Linux admins and DevOps engineers

Wednesday, October 24th, 2018

ansible-quick-start-cheetsheet-ansible-logo

Ansible is widely used (Configuration management, deployment, and task execution system) nowadays for mass service depoyments on multiple servers and Clustered environments like, Kubernetes clusters (with multiple pods replicas) virtual swarms running XEN / IPKVM virtualization hosting multiple nodes etc. .

Ansible can be used to configure or deploy GNU / Linux tools and services such as Apache / Squid / Nginx / MySQL / PostgreSQL. etc. It is pretty much like Puppet (server / services lifecycle management) tool , except its less-complecated to start with makes it often a choose as a tool for mass deployment (devops) automation.

Ansible is used for multi-node deployments and remote-task execution on group of servers, the big pro of it it does all its stuff over simple SSH on the remote nodes (servers) and does not require extra services or listening daemons like with Puppet. It combined with Docker containerization is used very much for later deploying later on inside Cloud environments such as Amazon AWS / Google Cloud Platform / SAP HANA / OpenStack etc.

Ansible-Architechture-What-Is-Ansible-Edureka

0. Instaling ansible on Debian / Ubuntu Linux


Ansible is a python script and because of that depends heavily on python so to make it running, you will need to have a working python installed on local and remote servers.

Ansible is as easy to install as running the apt cmd:


# apt-get install –yes ansible
 

The following additional packages will be installed:
  ieee-data python-jinja2 python-kerberos python-markupsafe python-netaddr python-paramiko python-selinux python-xmltodict python-yaml
Suggested packages:
  sshpass python-jinja2-doc ipython python-netaddr-docs python-gssapi
Recommended packages:
  python-winrm
The following NEW packages will be installed:
  ansible ieee-data python-jinja2 python-kerberos python-markupsafe python-netaddr python-paramiko python-selinux python-xmltodict python-yaml
0 upgraded, 10 newly installed, 0 to remove and 1 not upgraded.
Need to get 3,413 kB of archives.
After this operation, 22.8 MB of additional disk space will be used.

apt-get install –yes sshpass


Installing Ansible on Fedora Linux is done with:


# dnf install ansible –yes sshpass


On CentOS to install:
 

# yum install ansible –yes sshpass

sshpass needs to be installed only if you plan to use ssh password prompt authentication with ansible.

Ansible is also installable via python-pip tool, if you need to install a specific version of ansible you have to use it instead, the package is available as an installable package on most linux distros.

Ansible has a lot of pros and cons and there are multiple articles already written on people for and against it in favour of Chef or Puppet As I recently started learning Ansible. The most important thing to know about Ansible is though many of the things can be done directly using a simple command line, the tool is planned for remote installing of server services using a specially prepared .yaml format configuration files. The power of Ansible comes of the use of Ansible Playbooks which are yaml scripts that tells ansible how to do its activities step by step on remote server. In this article, I'm giving a quick cheat sheet to start quickly with it.
 

1. Remote commands execution with Ansible
 

First thing to do to start with it is to add the desired hostnames ansible will operate with it can be done either globally (if you have a number of remote nodes) to deploy stuff periodically by using /etc/ansible/hosts or use a custom host script for each and every ansible custom scripts developed.

a. Ansible main config files

A common ansible /etc/ansible/hosts definition looks something like that:


# cat /etc/ansible/hosts
[mysqldb]
10.69.2.185
10.69.2.186
[master]
10.69.2.181
[slave]
10.69.2.187
[db-servers]
10.69.2.181
10.69.2.187
[squid]
10.69.2.184

Host to execute on can be also provided via a shell variable $ANSIBLE_HOSTS
b) is remote hosts reachable / execute commands on all remote host

To test whether hour hosts are properly configure from /etc/ansible/hosts you can ping all defined hosts with:


ansible all -m ping


ansible-check-hosts-ping-command-screenshot

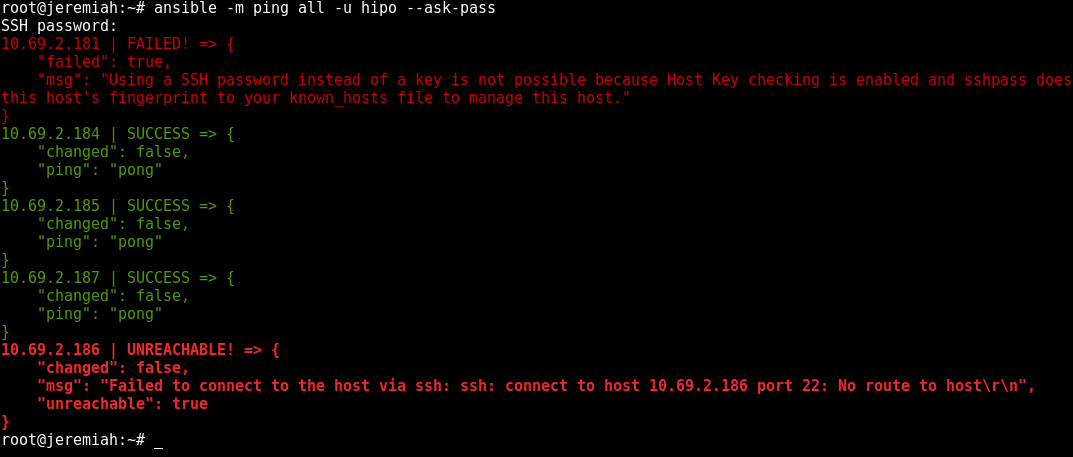
This makes ansible try to remote to remote hosts (if you have properly configured SSH public key authorization) the command should return success statuses on every host.


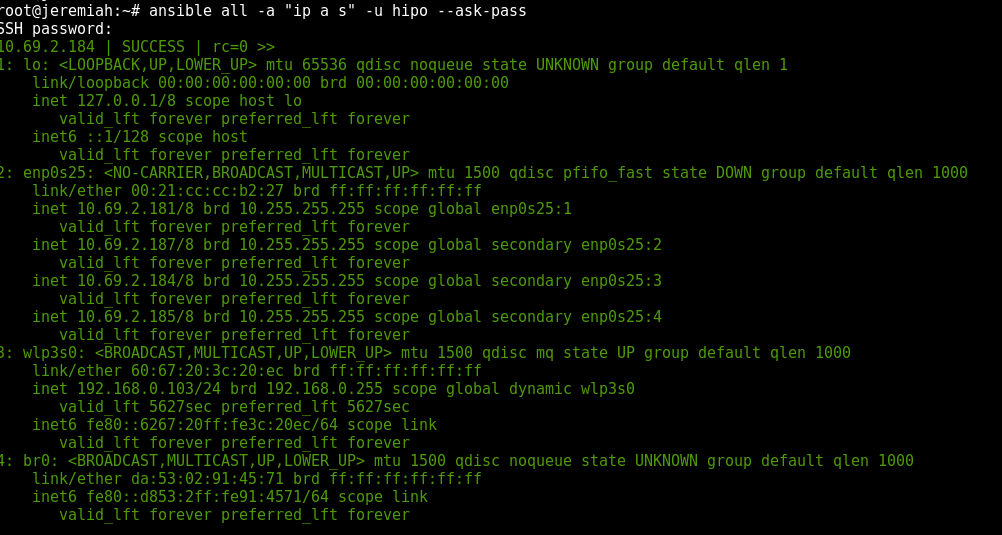
ansible all -a "ifconfig -a"


If you don't have SSH keys configured you can also authenticate with an argument (assuming) all hosts are configured with same password with:


ansible all –ask-pass -a "ip all show" -u hipo –ask-pass


ansible-show-ips-ip-a-command-screenshot-linux

If you have configured group of hosts via hosts file you can also run certain commands on just a certain host group, like so:


ansible <host-group> -a <command>

It is a good idea to always check /etc/ansible/ansible.cfg which is the system global (main red ansible config file).

c) List defined host groups
 

ansible localhost -m debug -a 'var=groups.keys()'
ansible localhost -m debug -a 'var=groups'

d) Searching remote server variables


# Search remote server variables
ansible localhost -m setup -a 'filter=*ipv4*'


ansible localhost -m setup -a 'filter=ansible_domain'


ansible all -m setup -a 'filter=ansible_domain'


# uninstall package on RPM based distros
ansible centos -s -m yum -a "name=telnet state=absent"
# uninstall package on APT distro
ansible localhost -s -m apt -a "name=telnet state=absent"


2. Debugging – Listing information about remote hosts (facts) and state of a host


# All facts for one host
ansible -m setup
  # Only ansible fact for one host
ansible
-m setup -a 'filter=ansible_eth*'
# Only facter facts but for all hosts
ansible all -m setup -a 'filter=facter_*'


To Save outputted information per-host in separate files in lets say ~/ansible/host_facts


ansible all -m setup –tree ~/ansible/host_facts


3. Playing with Playbooks deployment scripts


a) Syntax Check of a playbook yaml


ansible-playbook –syntax-check


b) Run General Infos about a playbook such as get what a playbook would do on remote hosts (tasks to run) and list-hosts defined for a playbook (like above pinging).


ansible-playbook –list-hosts
ansible-playbook
–list-tasks


To get the idea about what an yaml playbook looks like, here is example from official ansible docs, that deploys on remote defined hosts a simple Apache webserver.


– hosts: webservers
  vars:
    http_port: 80
    max_clients: 200
  remote_user: root
  tasks:
  – name: ensure apache is at the latest version
    yum:
      name: httpd
      state: latest
  – name: write the apache config file
    template:
      src: /srv/httpd.j2
      dest: /etc/httpd.conf
    notify:
    – restart apache
  – name: ensure apache is running
    service:
      name: httpd
      state: started
  handlers:
    – name: restart apache
      service:
        name: httpd
        state: restarted

To give it a quick try save the file as webserver.yml and give it a run via ansible-playbook command
 

ansible-playbook -s playbooks/webserver.yml


The -s option instructs ansible to run play on remote server with super user (root) privileges.

The power of ansible is its modules, which are constantly growing over time a complete set of Ansible supported modules is in its official documenation.

Ansible-running-playbook-Commands-Task-script-Successful-output-1024x536

There is a lot of things to say about playbooks, just to give the brief they have there own language like a  templates, tasks, handlers, a playbook could have one or multiple plays inside (for instance instructions for deployment of one or more services).

The downsides of playbooks are they're so hard to write from scratch and edit, because yaml syntaxing is much more stricter than a normal oldschool sysadmin configuration file.
I've stucked with problems with modifying and writting .yaml files and I should say the community in #ansible in irc.freenode.net was very helpful to help me debug the obscure errors.

yamllint (The YAML Linter tool) comes handy at times, when facing yaml syntax errors, to use it install via apt:
 

# apt-get install –yes yamllint


a) Running ansible in "dry mode" just show what ansible might do but not change anything
 

ansible-playbook playbooks/PLAYBOOK_NAME.yml –check


b) Running playbook with different users and separate SSH keys


ansible-playbook playbooks/your_playbook.yml –user ansible-user
 
ansible -m ping hosts –private-key=~/.ssh/keys/custom_id_rsa -u centos


c) Running ansible playbook only for certain hostnames part of a bigger host group


ansible-playbook playbooks/PLAYBOOK_NAME.yml –limit "host1,host2,host3"


d) Run Ansible on remote hosts in parallel

To run in raw of 10 hosts in parallel
 

# Run 10 hosts parallel
ansible-playbook <File.yaml> -f 10            


e) Passing variables to .yaml scripts using commandline

Ansible has ability to pre-define variables from .yml playbooks. This variables later can be passed from shell cli, here is an example:

# Example of variable substitution pass from command line the var in varsubsts.yaml if present is defined / replaced ansible-playbook playbooks/varsubst.yaml –extra-vars "myhosts=localhost gather=yes pkg=telnet"


4. Ansible Galaxy (A Docker Hub) like large repository with playbook (script) files


Ansible Galaxy has about 10000 active users which are contributing ansible automation playbooks in fields such as Development / Networking / Cloud / Monitoring / Database / Web / Security etc.

To install from ansible galaxy use ansible-galaxy

# install from galaxy the geerlingguy mysql playbook
ansible-galaxy install geerlingguy.mysql


The available packages you can use as a template for your purpose are not so much as with Puppet as Ansible is younger and not corporate supported like Puppet, anyhow they are a lot and does cover most basic sysadmin needs for mass deployments, besides there are plenty of other unofficial yaml ansible scripts in various github repos.

Use apt-get with Proxy howto – Set Proxy system-wide in Linux shell and Gnome

Friday, May 16th, 2014

linux-apt-get-configure-proxy-howto-set-proxy-systemwide-in-linux

I juset setup a VMWare Virtual Machine on my HP notebook and installed Debian 7.0 stable Wheezy. Though VMWare identified my Office Internet and configured automatically NAT, I couldn't access the internet from a browser until I remembered all HP traffic is going through a default set browser proxy.
After setting a proxy to Iceweasel, Internet pages started opening normally, however as every kind of traffic was also accessible via HP's proxy, package management with apt-get (apt-get update, apt-get install etc. were failing with errors):


# apt-get update

Ign cdrom://[Debian GNU/Linux 7.2.0 _Wheezy_ – Official i386 CD Binary-1 20131012-12:56] wheezy Release.gpg
Ign cdrom://[Debian GNU/Linux 7.2.0 _Wheezy_ – Official i386 CD Binary-1 20131012-12:56] wheezy Release
Ign cdrom://[Debian GNU/Linux 7.2.0 _Wheezy_ – Official i386 CD Binary-1 20131012-12:56] wheezy/main i386 Packages/DiffIndex
Ign cdrom://[Debian GNU/Linux 7.2.0 _Wheezy_ – Official i386 CD Binary-1 20131012-12:56] wheezy/main Translation-en_US
Err http://ftp.by.debian.org wheezy Release.gpg
  Could not connect to ftp.by.debian.org:80 (86.57.151.3). – connect (111: Connection refused)
Err http://ftp.by.debian.org wheezy-updates Release.gpg
  Unable to connect to ftp.by.debian.org:http:
Err http://security.debian.org wheezy/updates Release.gpg
  Cannot initiate the connection to security.debian.org:80 (2607:ea00:101:3c0b:207:e9ff:fe00:e595). – connect (101: Network is unreachable) [IP: 2607:ea00:101:3c0b:207:e9ff:fe00:e595 80]
Reading package lists…


This error is caused because apt-get is trying to directly access above http URLs and because port 80 is filtered out from HP Office, it fails in order to make it working I had to configure apt-get to use Proxy host – here is how:

a) Create /etc/apt/apt.conf.d/02proxy file (if not already existing)
and place inside:
 

Acquire::http::proxy::Proxy "https://web-proxy.cce.hp.com";
Acquire::ftp::proxy::Proxy "ftp://web-proxy.cce.hp.com";


To do it from console / gnome-terminal issue:
echo ''Acquire::http::Proxy "https://web-proxy.cce.hp.com:8088";' >> /etc/apt/apt.conf.d/02proxy
echo ''Acquire::ftp::Proxy "https://web-proxy.cce.hp.com:8088";' >> /etc/apt/apt.conf.d/02proxy

That's all now apt-get will tunnel all traffic via HTTP and FTP proxy host web-proxy.cce.hp.com and apt-get works again.

Talking about Proxyfing Linux's apt-get, its possible to also set proxy shell variables, which are red and understood by many console programs like Console browsers lynx, links, elinks  as well as wget and curl commands, e.g.:


export http_proxy=http://192.168.1.5:5187/
export https_proxy=$http_proxy
export ftp_proxy=$http_proxy
export rsync_proxy=$http_proxy
export no_proxy="localhost,127.0.0.1,localaddress,.localdomain.com"

For proxies protected with username and password export variables should look like so: echo -n "username:"
read -e username
echo -n "password:"
read -es password
export http_proxy="http://$username:$password@proxyserver:8080/"
export https_proxy=$http_proxy
export ftp_proxy=$http_proxy
export rsync_proxy=$http_proxy
export no_proxy="localhost,127.0.0.1,localaddress,.localdomain.com"

To make this Linux proxy settings system wide on Debian / Ubuntu there is the /etc/environment file add to it:
 

http_proxy=http://proxy.server.com:8080/
https_proxy=http://proxy.server.com:8080/
ftp_proxy=http://proxy.server.com:8080/
no_proxy="localhost,127.0.0.1,localaddress,.localdomain.com"
HTTP_PROXY=http://proxy.server.com:8080/
HTTPS_PROXY=http://proxy.server.com:8080/
FTP_PROXY=http://proxy.server.com:8080/
NO_PROXY="localhost,127.0.0.1,localaddress,.localdomain.com"


To make proxy global (systemwide) for most (non-Debian specific) Linux distributions shell environments create new file /etc/profile.d/proxy.sh and place something like:

function proxy(){
echo -n "username:"
read -e username
echo -n "password:"
read -es password
export http_proxy="http://$username:$password@proxyserver:8080/"
export https_proxy=$http_proxy
export ftp_proxy=$http_proxy
export rsync_proxy=$http_proxy
export no_proxy="localhost,127.0.0.1,localaddress,.localdomain.com"
echo -e "nProxy environment variable set."
}
function proxyoff(){
unset HTTP_PROXY
unset http_proxy
unset HTTPS_PROXY
unset https_proxy
unset FTP_PROXY
unset ftp_proxy
unset RSYNC_PROXY
unset rsync_proxy
echo -e "nProxy environment variable removed."
}

To set Global Proxy (make Proxy Systemwide) for a user in GNOME Desktop environment launch gnome-control-center

And go to Network -> Network Proxy

/images/gnome-configure-systemwide-proxy-howto-picture1

/images/gnome-configure-systemwide-proxy-howto-picture2

To make proxy settings also system wide for some GUI Gnome GTK3 applications

gsettings set org.gnome.system.proxy mode 'manual'
gsettings set org.gnome.system.proxy.http host 'your-proxy.server.com'
gsettings set org.gnome.system.proxy.http port 8080

luckyBackup Linux GUI back-up and synchronization tool

Wednesday, May 14th, 2014

luckybackup_best-linux-graphical-tool-for-backup_linux_gui-defacto-standard-tool
If you're a using GNU / Linux  for Desktop and you're already tired of creating backups by your own hacks using terminal and you want to make your life a little bit more easier and easily automate your important files back up through GUI program take a look at luckyBackup.

Luckibackup is a GUI frontend to the infamous rsync command line backup  tool. Luckibackup is available as a package in almost all modern Linux distributions its very easy to setup and can save you a lot of time especially if you have to manage a number of your Workplace Desktop Office Linux based computers.
Luckibackup is an absolute must have program for Linux Desktop start-up users. If you're migrating from Microsoft Windows realm and you're used to BackupPC, Luckibackup is probably the defacto Linux BackupPC substitute.

The sad news for Linux GNOME Desktop users is luckibackup is written in QT and it using it will load up a bit your notebook.
It is not installed by default so once a new Linux Desktop is installed you will have to install it manually on Debian and Ubuntu based Linux-es to install Luckibackup apt-get it.

debian:~# apt-get install --yes luckibackup
...

On Fedora and CentOS Linux install LuckiBackup via yum rpm package manager

[root@centos :~]# yum -y install luckibackup
.

Luckibackup is also ported for OpenSuSE Slackware, Gentoo, Mandriva and ArchLinux. In 2009 Luckibackup won the prize of Sourceforge Community Choice Awards for "best new project".

luckyBackup copies over only the changes you've made to the source directory and nothing more.
You will be surprised when your huge source is backed up in seconds (after the first backup).

Whatever changes you make to the source including adding, moving, deleting, modifying files / directories etc, will have the same effect to the destination.
Owner, group, time stamps, links and permissions of files are preserved (unless stated otherwise).

Luckibackup creates different multiple backup "snapshots".Each snapshot is an image of the source data that refers to a specific date-time.
Easy rollback to any of the snapshots is possible. Besides that luckibackup support Sync (just like rsync) od any directories keeping the files that were most recently modified on both of them.

Useful if you modify files on more than one PCs (using a flash-drive and don't want to bother remembering what did you use last. Luckibackup is capable of excluding certain files or directories from backupsExclude any file, folder or pattern from backup transfer.

After each operation a logfile is created in your home folder. You can have a look at it any time you want.

luckyBackup can run in command line if you wish not to use the gui, but you have to first create the profile that is going to be executed.
Type "luckybackup –help" at a terminal to see usage and supported options.
There is also TrayNotification – Visual feedback at the tray area informs you about what is going on.


Happy Birthday Debian! – Rejoice, Debian GNU / Linux turns 20 :)

Wednesday, August 28th, 2013

Debian Happy birthday cake with debian logo spiral - Debian Linux becomes 20 years old

 A bit outdated news but still worthy to mention as Debian GNU / Linux is important part of my life. On 16 of August this year Debian turned 20 years! I'm actively using Debian Linux for servers and Desktops over the past 13 years and for this time I've seen right before my eyes how debian grow and from buggy hobbyinst Linux distribution became a robust and rock-solid OS. Moreover Debian is now practically the most important Linux distribution around. Thanks to it currently a thousands of other world changing distributions like Ubuntu, Arch Linux, Knoppix Linux LiveCD, Linux Mint etc. Debian is truly multi platform as of time of writting supports 10 hardware architecture (platforms) – in this number Embedded devices like ARM processors, has translation of most shipped software to 73 languages and comes with about 20 000 installable software packages. Contribution of Debian GNU Linux for Free software community is immerse, hundreds of millions or even billion Debian servers or some kind of Debian based OSes are running all around the net. Besides that Debian is one of the largest if not the biggest and most influential Open Source Project. By its essence existing of Debian is just a miracle. 
Though out of date again,  lets great each other with Happy Debian Anniversary and Wish Debian a many and healthy years of successful development!

Linux PHP Disable chmod() and chown() functions for better Apache server security

Monday, July 15th, 2013

php_tighten_security_by_enabling_safe_mode-php-ini-function-prevent-crackers-break-in-your-server
I have to administer few inherited Linux servers with Ubuntu and Debian Linux. The servers hosts mainly websites with regularly un-updated Joomlas and some custom developed websites which were developed pretty unsecure. To mitigate hacked websites I already disabled some of most insecure functions like system(); eval etc. – I followed literally my previous tutorial PHP Webhosting security disable exec();, system();, open(); and eval();
Still in logs I see shits like:
 

[error] [client 66.249.72.100] PHP Warning:  mkdir(): No such file or directory in /var/www/site/plugins/system/jfdatabase/intercept.jdatabasemysql.php on line 161

Hence to prevent PHP mkdir(); and chown(); functiosn being active, I had to turn on in /etc/php5/apache2/php.ini – safe_mode . For some reason whoever configured Apache leave it off.

safe_mode = on

Hopefully by disabling this functions will keep cracker bot scripts to not create some weird directory structures on HDD or use it as mean to DoS overflow servers filesystem.

Hope this help others stabilize their servers too. Enjoy ! 🙂

Linux: Configure Midnight Commander to use mcedit instead of nano or vi text editor

Friday, June 21st, 2013

reverting mc text editor to mcedit fix problem with mcedit not working in linux

I use Midnight Commander console file manager on any UNIX like servers, since my early days as system administrator. mc comes with its own text editor mcedit which is often very handy for reading config files or pieces of source code. Many times I had to modify files which were spitting errors which I couldn't track in VIM, jor or whatever text editor had on server at hand and after checking file with mcedit I caught my config or source code mistake. I guess many other admins has similar nice experiences with mcedit Internal file editor of GNU Midnight Commander. Nowadays, I install mostly Debian Linux on new configured servers and using mc to navigate in file system is very useful. I prefer mc to open files for edit with F4 (Edit – kbd shortcut) with its default mcedit, however for some reasons most of Debian / Ubuntu and other Linuxes, nowadays has set global environment text editor to nano. I totally dislike this text editor and like changing mc always to use mcedit. This is done straight from MC menus by:

Pressing F9 -> Going to Options -> Configuration -> (Setting mark on) -> Use Inernal Edit
/code>

unix terminal file manager midnight commander configuration menu screenshot

linux console file manager midnight commander use internal edit menu unchecked screenshot

<

Remote Desktop client – Remmina, Connect Remote to MS Windows VNC hosts from Linux

Friday, May 31st, 2013

remmina remote connet to windows linux vnc client logo

If you're system administrator, who use Linux as Desktop. You surely want to check out Remmina – The GTK+ Remote Desktop Client.

As far as I tested among all VNC Linux clients I know Remmina is definitely the one of choice in terms of Interface simplicity / stability and remote connection level of responsibility.

Before finding out about Remmina existence, I tried xtightvncviewer, xvnc4viewer, gvncviewer, gtkvncviewer. xtightvncviewer, xvncviewer and gvncviewer are more for console geeks and hence either they lack GUI interface or user interface looks terrible.

GTKVncViewer's interface is also not bad but still not со nice as Remmina's.

gtkvncviewer Debian GNU Linux Wheezy screenshot Linux VNC simple client

As you see in above shot, gtkvncviewer lacks any configuration. The only thing it can do is connect to remote host and you have option to configure nothing related how remote connection will respond, what type of Resolution to use etc.

I know of of no other Linux VNC Clients that has configurability and GUI interface of Remmina.


As of time of writting Remmina is at stable version 1.0 and supports following Remote connection protocols:

  • VNC
  • VNC
  • RDP
  • RDPF
  • RDPS
  • SFTP
  • SSH

Remmina is available across mostly all Linux mainstream distributions:

To install Remmina on Debian / Ubuntu and deb derivatives:

debian:~# apt-get –yes install remmina
….

On Redhats (Fedora, CentOS, RHEL – RPM based Linuxes) install via:

[root@centos ~]# yum –yes install remmina

Below are few screenshots of Remmina:

Remmina Linux remote vnc connect best software gui frontend screenshot

Linux VNC best VNC connect tool Remmina preferences screenshot

One of best Remmina feature is it supports Tabbing just like in Firefox. You can open a number of Remote VNC connects to different Windows hosts and manage them all by switching from tab to tab.

Remmina best vnc linux desktop client screenshot with tabs / What is best VNC client for Linux

Merging pictures on Linux command shell with ImageMagick merge

Friday, May 17th, 2013

combining-multiple-jpg-png-pictures-imagemagick-magician-logo

It is generally useful to combine multiple pictures into single one. A example case, where merging pictures on Linux is necessary is if you previously used ImageMagick's convert command line tool to convert PDF file (pages) to JPEG / PNG pictures. Unfortunately convertion with convert(as far as I know is only capable of generating multiple picture files instead of one single one), thus you further need montage to merge pages in separate photos to one. In my case I had my Curriculum Vitae in PDF and I needed to have same PDF in single photo for my applications for online Job Employment Belarusian portal site rabota.tut.by.

montage is one of numerous ImageMagick package script (plugins).
On all major Linux distributions (Debian / Ubuntu, Fedora, CentOS, RHEL, SuSE) montage comes installed together with imagemagick deb / rpm package.

Whether you don't have montage on Debian / Ubuntu and deb derivatives install it via:

linux:~# apt-get install --yes imagemagick
....

On CentOS, Fedora, RHEL, SuSE to install montage:

[root@centos ~]# yum -y install imagemagick
....

To merge two JPEG Photos into single PNG format picture:
linux:~$ montage -geometry +2+2 Picture-1.jpeg Merged-picture.png

Combining more photos, lets say my 8 Pages photos output from previous PDF convert to pictures is done with:

linux:~$ montage -geometry +8+8 CV_Georgi_Georgiev_bg-0.png \ CV_Georgi_Georgiev_bg-1.png \ CV_Georgi_Georgiev_bg-2.png \ CV_Georgi_Georgiev_bg-3.png \ CV_Georgi_Georgiev_bg-4.png \ CV_Georgi_Georgiev_bg-5.png \ CV_Georgi_Georgiev_bg-6.png \ CV_Georgi_Georgiev_bg-7.png \ CV_Georgi_Georgiev_bg.png
montage has plenty of useful other options, to do various photo montages from command line. Other way to merge photos with montage is by using:

linux:~$ montage -mode concatenate -tile 1x input-pic*.jpg out.jpg

Merging photos is also possible by using directly convert.

Combining multiple photos into single JPEG or PNG with Imagick convert is done with:

linux:~$ convert -append input-pic-*.jpg combined-picture.jpg

Other example use of montage is located on ImageMagick's montage's script site here


Creating data backups on Debian and Ubuntu servers with Bacula professional backup tool

Wednesday, April 17th, 2013

Bacula professional GNU Linux Freebsd Netbsd backup software logo with bat

1. Install Bacula Backup System

root@pcfreak:~# apt-cache show bacula |grep -i description -A 5

Description: network backup, recovery and verification – meta-package
 Bacula is a set of programs to manage backup, recovery and verification
 of computer data across a network of computers of different kinds.
 .
 It is efficient and relatively easy to use, while offering many advanced
 storage management features that make it easy to find and recover lost or
 damaged files. Due to its modular design, Bacula is scalable from small
 single computer systems to networks of hundreds of machines.
 .

root@pcfreak:~# apt-get install bacula


Reading package lists… Done
Building dependency tree      
Reading state information… Done
The following extra packages will be installed:
  bacula-client bacula-common bacula-common-sqlite3 bacula-console bacula-director-common bacula-director-sqlite3 bacula-fd bacula-sd
  bacula-sd-sqlite3 bacula-server bacula-traymonitor libsqlite0 mt-st mtx sqlite sqlite3
Suggested packages:
  bacula-doc dds2tar scsitools sg3-utils kde gnome-desktop-environment sqlite-doc sqlite3-doc
The following NEW packages will be installed:
  bacula bacula-client bacula-common bacula-common-sqlite3 bacula-console bacula-director-common bacula-director-sqlite3 bacula-fd bacula-sd
  bacula-sd-sqlite3 bacula-server bacula-traymonitor libsqlite0 mt-st mtx sqlite sqlite3
0 upgraded, 17 newly installed, 0 to remove and 0 not upgraded.
2 not fully installed or removed.
Need to get 2,859 kB of archives.
After this operation, 6,992 kB of additional disk space will be used.
Do you want to continue [Y/n]? Y
Get:1 http://security.debian.org/ squeeze/updates/main bacula-common amd64 5.0.2-2.2+squeeze1 [637 kB]
Get:2 http://security.debian.org/ squeeze/updates/main bacula-common-sqlite3 amd64 5.0.2-2.2+squeeze1 [102 kB]
Get:3 http://security.debian.org/ squeeze/updates/main bacula-console amd64 5.0.2-2.2+squeeze1 [67.6 kB]
Get:4 http://security.debian.org/ squeeze/updates/main bacula-director-common amd64 5.0.2-2.2+squeeze1 [56.6 kB]
Get:5 http://security.debian.org/ squeeze/updates/main bacula-director-sqlite3 amd64 5.0.2-2.2+squeeze1 [308 kB]
Get:6 http://security.debian.org/ squeeze/updates/main bacula-sd amd64 5.0.2-2.2+squeeze1 [459 kB]
Get:7 http://security.debian.org/ squeeze/updates/main bacula-sd-sqlite3 amd64 5.0.2-2.2+squeeze1 [435 kB]
Get:8 http://security.debian.org/ squeeze/updates/main bacula-server all 5.0.2-2.2+squeeze1 [48.5 kB]
Get:9 http://security.debian.org/ squeeze/updates/main bacula-fd amd64 5.0.2-2.2+squeeze1 [124 kB]
Get:10 http://security.debian.org/ squeeze/updates/main bacula-client all 5.0.2-2.2+squeeze1 [48.5 kB]
Get:11 http://security.debian.org/ squeeze/updates/main bacula all 5.0.2-2.2+squeeze1 [1,030 B]
Get:12 http://security.debian.org/ squeeze/updates/main bacula-traymonitor amd64 5.0.2-2.2+squeeze1 [70.0 kB]
Get:13 http://ftp.uk.debian.org/debian/ squeeze/main sqlite3 amd64 3.7.3-1 [100 kB]
Get:14 http://ftp.uk.debian.org/debian/ squeeze/main libsqlite0 amd64 2.8.17-6 [188 kB]
Get:15 http://ftp.uk.debian.org/debian/ squeeze/main sqlite amd64 2.8.17-6 [22.0 kB]
Get:16 http://ftp.uk.debian.org/debian/ squeeze/main mtx amd64 1.3.12-3 [154 kB]
Get:17 http://ftp.uk.debian.org/debian/ squeeze/main mt-st amd64 1.1-4 [35.6 kB]                                                            
Fetched 2,859 kB in 6s (471 kB/s)                                                                                                           
Selecting previously deselected package bacula-common.
(Reading database … 86693 files and directories currently installed.)
Unpacking bacula-common (from …/bacula-common_5.0.2-2.2+squeeze1_amd64.deb) …
Adding user 'bacula'… Ok.
Selecting previously deselected package bacula-common-sqlite3.
Unpacking bacula-common-sqlite3 (from …/bacula-common-sqlite3_5.0.2-2.2+squeeze1_amd64.deb) …
Selecting previously deselected package bacula-console.
Unpacking bacula-console (from …/bacula-console_5.0.2-2.2+squeeze1_amd64.deb) …
Processing triggers for man-db …
Setting up bacula-common (5.0.2-2.2+squeeze1) …
Selecting previously deselected package bacula-director-common.
(Reading database … 86860 files and directories currently installed.)
Unpacking bacula-director-common (from …/bacula-director-common_5.0.2-2.2+squeeze1_amd64.deb) …
Selecting previously deselected package sqlite3.
Unpacking sqlite3 (from …/sqlite3_3.7.3-1_amd64.deb) …
Selecting previously deselected package libsqlite0.
Unpacking libsqlite0 (from …/libsqlite0_2.8.17-6_amd64.deb) …
Selecting previously deselected package sqlite.
Unpacking sqlite (from …/sqlite_2.8.17-6_amd64.deb) …
Selecting previously deselected package bacula-director-sqlite3.
Unpacking bacula-director-sqlite3 (from …/bacula-director-sqlite3_5.0.2-2.2+squeeze1_amd64.deb) …
Selecting previously deselected package mtx.
Unpacking mtx (from …/mtx_1.3.12-3_amd64.deb) …
Selecting previously deselected package bacula-sd.
Unpacking bacula-sd (from …/bacula-sd_5.0.2-2.2+squeeze1_amd64.deb) …
Selecting previously deselected package bacula-sd-sqlite3.
Unpacking bacula-sd-sqlite3 (from …/bacula-sd-sqlite3_5.0.2-2.2+squeeze1_amd64.deb) …
Selecting previously deselected package bacula-server.
Unpacking bacula-server (from …/bacula-server_5.0.2-2.2+squeeze1_all.deb) …
Selecting previously deselected package bacula-fd.
Unpacking bacula-fd (from …/bacula-fd_5.0.2-2.2+squeeze1_amd64.deb) …
Selecting previously deselected package bacula-client.
Unpacking bacula-client (from …/bacula-client_5.0.2-2.2+squeeze1_all.deb) …
Selecting previously deselected package bacula.
Unpacking bacula (from …/bacula_5.0.2-2.2+squeeze1_all.deb) …
Selecting previously deselected package bacula-traymonitor.
Unpacking bacula-traymonitor (from …/bacula-traymonitor_5.0.2-2.2+squeeze1_amd64.deb) …
Selecting previously deselected package mt-st.
Unpacking mt-st (from …/archives/mt-st_1.1-4_amd64.deb) …
Processing triggers for man-db …
Setting up acct (6.5.4-2.1) …
Setting up bacula-director-common (5.0.2-2.2+squeeze1) …
Setting up bacula-director-sqlite3 (5.0.2-2.2+squeeze1) …
config: Running dbc_go bacula-director-sqlite3 configure
Stopping Bacula Director…:.
 *** Checking type of existing DB at /var/lib/bacula/bacula.db: None
 *** Will create new database at this location.
dbconfig-common: writing config to /etc/dbconfig-common/bacula-director-sqlite3.conf

Creating config file /etc/dbconfig-common/bacula-director-sqlite3.conf with new version
creating database bacula.db: success.
verifying database bacula.db exists: success.
populating database via sql…  done.
Processing configuration…Ok.
Starting Bacula Director…:.
Setting up bacula-sd (5.0.2-2.2+squeeze1) …
Starting Bacula Storage daemon…:.
Setting up acct (6.5.4-2.1) …
insserv: warning: script 'K02courier-imap' missing LSB tags and overrides
insserv: script iptables: service skeleton already provided!
insserv: warning: script 'courier-imap' missing LSB tags and overrides
Turning on process accounting, file set to '/var/log/account/pacct'.
Done..
Setting up bacula-sd-sqlite3 (5.0.2-2.2+squeeze1) …
Setting up bacula-server (5.0.2-2.2+squeeze1) …
Setting up bacula-fd (5.0.2-2.2+squeeze1) …
Starting Bacula File daemon…:.
Setting up bacula-client (5.0.2-2.2+squeeze1) …
Setting up bacula (5.0.2-2.2+squeeze1) …
Setting up proftpd-basic (1.3.3a-6squeeze6) …
Starting ftp server: proftpd.
Setting up mt-st (1.1-4) …
update-alternatives: using /bin/mt-st to provide /bin/mt (mt) in auto mode.


Once installed you will have 3 processes running in background used by Bacula backup system (bacula-dir, bacula-sd and bacula-fd)
root@pcfreak:~# ps ax |grep -i bacula|grep -v grep
6044 ? Ssl 0:00 /usr/sbin/bacula-dir -c /etc/bacula/bacula-dir.conf -u bacula -g bacula
6089 ? Ssl 0:00 /usr/sbin/bacula-sd -c /etc/bacula/bacula-sd.conf -u bacula -g tape
6167 ? Ssl 0:00 /usr/sbin/bacula-fd -c /etc/bacula/bacula-fd.conf

Here is what each of them does:

a) Bacula-dir or Bacula-Director is main Bacula Backup system component. Bacula-dir controls the whole backup system and the various other 2 daemons Bacula-FD and  Bacula-SD.

b) Bacula-fd – (Bacula File Daemon) acts as the interface between  Bacula network backup system and the filesystems to be backed up:  it  is  responsible for   reading/writing/verifying the files to be  backup'd/verified/restored. Network transfer can optionally be compressed.

c) Bacula-sd – (Bacula Storage Daemon) acts as interface between Bacula network backup system and Tape Drive or filesystem where backups will be stored

Each of 3 processes bacula-dir, bacula-fd and bacula-sd has their own init script in /etc/rc.d/, e.g.:

# /etc/init.d/bacula-directory
# /etc/init.d/bacula-fd
# /etc/init.d/bacula-sd

2. Configuring Bacula Backup System

Configuring Bacula is done via configuration files located in /etc/bacula

root@pcfreak:~# cd /etc/bacula
root@pcfreak:/etc/bacula# ls -1
bacula-dir.conf
bacula-fd.conf
bacula-fd.conf.dist
bacula-sd.conf
bacula-sd.conf.dist
bconsole.conf
common_default_passwords
scripts/
tray-monitor.conf

3. Defining what needs to be backed up

Here is a short description of most important configuration blocks in Bacula's main config bacula-dir.conf
 

1.Director resource defines the Director’s parameters. Name, Password, WorkingDirectory, and PidDirectory must be set. QueryFile specifies where the Director can find the SQL queries.

2.Job defines a backup or restore to perform. You will need at least one job per client. To simplify configuration of similar clients, create a common JobDefs resource and refer to it from within a Job. For example, if you have one set of defaults for desktops and another set for servers, you can create a Desktop and Server (these names are arbitrary and set with the Name attribute) JobDefs and refer to those two collections of settings from a Job.

3. Schedule resource is referred to within a Job to allow it to occur automatically.

4. FileSet resource defines which files are to be backed up. You can both Include and Exclude files.

5.Each Client resource details the clients that this Director can back up.

6.Storage resource specifies the storage daemon available to the Director.

7.Pool identifies a set of storage volumes (tapes/files) that Bacula can write data to. Each Pool can be configured to use different sets of tapes for different jobs.

8.Catalog resource defines Bacula catalog (database) to be used.

9. Messages resource captures where to send messages and which messages to send.
 

a) Defining directories to be backed up

Defining what needs to be backed up is done through bacula-dir.conf ( /etc/bacula/bacula-dir.conf ). In the file there is a FileSet section, where dirs to backed up have to be included, below config defines to backup /usr/sbin, /etc/, /root, /usr and /var directories
 

# List of files to be backed up
FileSet {
  Name = "Full Set"
  Include {
    Options {
      signature = MD5
    }
#   
#  Put your list of files here, preceded by 'File =', one per line
#    or include an external list with:
#
#    File = <file-name
#
#  Note: / backs up everything on the root partition.
#    if you have other partitions such as /usr or /home
#    you will probably want to add them too.
#
#  By default this is defined to point to the Bacula binary
#    directory to give a reasonable FileSet to backup to
#    disk storage during initial testing.
#
    File = /usr/sbin
    File = /root
    File = /etc
    File = /usr
    File = /var

  }

b) Defining where to store back ups

All configuration of where Bacula will store created backups is done through /etc/bacula/bacula-sd.conf

There are few configurations that needs to be tuned according to custom user purposes, below I paste them from config:
 

Storage {                             # definition of myself
  Name = pcfreak-sd
  SDPort = 9103                  # Director's port     
  WorkingDirectory = "/var/lib/bacula"
  Pid Directory = "/var/run/bacula"
  Maximum Concurrent Jobs = 20
  SDAddress = 127.0.0.1
}

Device {
  Name = FileStorage
  Media Type = File
  Archive Device = /nonexistant/path/to/file/archive/dir
  LabelMedia = yes;                   # lets Bacula label unlabeled media
  Random Access = Yes;
  AutomaticMount = yes;               # when device opened, read it
  RemovableMedia = no;
  AlwaysOpen = no;
}

Messages {
  Name = Standard
  director = pcfreak-dir = all

}


Storage sets working directory where temporary backups are created on backup creation time – default is /var/lib/bacula

Device – defines exact directory where backups will be stored after created – usually this is a directory with  mounted hard disk specially for backups. Bacula default is /nonexistant/path/to/file/archive/dir

Messages – configures where and what kind of messages are send on bacula operations

c) Configuring Bacula to create backups via network

Configuring where Bacula will act just on server localhost, or will bind and be visible to store backups via network IP is done from Bacula-FD (Bacula File Daemon).

By default it listens to localhost127.0.0.1. Bacula-FD configurations are done from /etc/bacula/bacula-fd.conf. Most important section configuring where bacula listens is named FileDaemon.
 

#
# "Global" File daemon configuration specifications
#
FileDaemon {                          # this is me
  Name = pcfreak-fd
  FDport = 9102                  # where we listen for the director
  WorkingDirectory = /var/lib/bacula
  Pid Directory = /var/run/bacula
  Maximum Concurrent Jobs = 20
  FDAddress = 127.0.0.1
}


By commenting FDAddress, Bacula will automatically listen to external IP configured on lan interface eth0

4. Managing Bacula Command Line Interfa – bconsole

Managing bacula interactively is done through bconsole (Bacula's Management Console) command.

root@pcfreak:~# bconsole

Connecting to Director localhost:9101
1000 OK: pcfreak-dir Version: 5.0.2 (28 April 2010)
Enter a period to cancel a command.
*
*help
  Command       Description
  =======       ===========
  add           Add media to a pool
  autodisplay   Autodisplay console messages
  automount     Automount after label
  cancel        Cancel a job
  create        Create DB Pool from resource
  delete        Delete volume, pool or job
  disable       Disable a job
  enable        Enable a job
  estimate      Performs FileSet estimate, listing gives full listing
  exit          Terminate Bconsole session
  gui           Non-interactive gui mode
  help          Print help on specific command
  label         Label a tape
  list          List objects from catalog
  llist         Full or long list like list command
  messages      Display pending messages
  memory        Print current memory usage
  mount         Mount storage
  prune         Prune expired records from catalog
  purge         Purge records from catalog
  python        Python control commands
  quit          Terminate Bconsole session
  query         Query catalog
  restore       Restore files
  relabel       Relabel a tape
  release       Release storage
  reload        Reload conf file
  run           Run a job
  status        Report status
  setdebug      Sets debug level
  setip         Sets new client address — if authorized
  show          Show resource records
  sqlquery      Use SQL to query catalog
  time          Print current time
  trace         Turn on/off trace to file
  unmount       Unmount storage
  umount        Umount – for old-time Unix guys, see unmount
  update        Update volume, pool or stats
  use           Use catalog xxx
  var           Does variable expansion
  version       Print Director version
  wait          Wait until no jobs are running

When at a prompt, entering a period cancels the command.

You have messages.
*
 

On run bconsole launches another service bacula-console.

root@pcfreak:~# ps ax |grep -i bacula-console|grep -v grep 13959 pts/5 Sl+ 0:00 /usr/sbin/bacula-console -c /etc/bacula/bconsole.conf

There are 4 tcp/ip ports via which communication between Bacula processes is done;

a) Communication from bconsole to Bacula is throigh Port Number 9101
b) Communication from bacula-dir to bacula-sd is done using Port Number 9103
c) bacula-dir to bacula-fd talks via Port Number 9102
d) Messages between Bacula-fd to bacula-sd is via port num 9103

Both of 4 ports are only listening on (127.0.0.1) / localhost and thus there is no security risk from external malicious users to enter Bacula remotely.

a) some essential commands while in bconsole shell

*show pools
Pool: name=Default PoolType=Backup
      use_cat=1 use_once=0 cat_files=1
      max_vols=0 auto_prune=1 VolRetention=1 year
      VolUse=0 secs recycle=1 LabelFormat=*None*
      CleaningPrefix=*None* LabelType=0
      RecyleOldest=0 PurgeOldest=0 ActionOnPurge=0
      MaxVolJobs=0 MaxVolFiles=0 MaxVolBytes=0
      MigTime=0 secs MigHiBytes=0 MigLoBytes=0
      JobRetention=0 secs FileRetention=0 secs
Pool: name=File PoolType=Backup
      use_cat=1 use_once=0 cat_files=1
      max_vols=100 auto_prune=1 VolRetention=1 year
      VolUse=0 secs recycle=1 LabelFormat=*None*
      CleaningPrefix=*None* LabelType=0
      RecyleOldest=0 PurgeOldest=0 ActionOnPurge=0
      MaxVolJobs=0 MaxVolFiles=0 MaxVolBytes=53687091200
      MigTime=0 secs MigHiBytes=0 MigLoBytes=0
      JobRetention=0 secs FileRetention=0 secs
Pool: name=Scratch PoolType=Backup
      use_cat=1 use_once=0 cat_files=1
      max_vols=0 auto_prune=1 VolRetention=1 year
      VolUse=0 secs recycle=1 LabelFormat=*None*
      CleaningPrefix=*None* LabelType=0
      RecyleOldest=0 PurgeOldest=0 ActionOnPurge=0
      MaxVolJobs=0 MaxVolFiles=0 MaxVolBytes=0
      MigTime=0 secs MigHiBytes=0 MigLoBytes=0
      JobRetention=0 secs FileRetention=0 secs
You have messages.

*status
Status available for:
     1: Director
     2: Storage
     3: Client
     4: All
Select daemon type for status (1-4):

*label
Automatically selected Catalog: MyCatalog
Using Catalog "MyCatalog"
Automatically selected Storage: File
Enter new Volume name:

*messages

b) Restoring Backups with bconsole

Restoring from backups is done with restore command

*restore
Automatically selected Catalog: MyCatalog
Using Catalog "MyCatalog"

First you select one or more JobIds that contain files
to be restored. You will be presented several methods
of specifying the JobIds. Then you will be allowed to
select which files from those JobIds are to be restored.

To select the JobIds, you have the following choices:
     1: List last 20 Jobs run
     2: List Jobs where a given File is saved
     3: Enter list of comma separated JobIds to select
     4: Enter SQL list command
     5: Select the most recent backup for a client
     6: Select backup for a client before a specified time
     7: Enter a list of files to restore
     8: Enter a list of files to restore before a specified time
     9: Find the JobIds of the most recent backup for a client
    10: Find the JobIds for a backup for a client before a specified time
    11: Enter a list of directories to restore for found JobIds
    12: Select full restore to a specified Job date
    13: Cancel
Select item:  (1-13):


Bacula can create backups on Tapes as well as tapes are still heavily used for backing data in some Banks, airports and other organizations where data is crucial.

Bacula is not among the easiest systems to create backups but for Backup administrators who work with Linux and FreeBSD it is great. Its scalability allows to make a very robust and complex backupping scheme which are hardly achievalable with other less professional backup tools like rsnapshot or rsync.
 

deb Linux: How to add support for Bulgarian, Russian, Belarusian, Ukrainian, Serbian, Macedonian, Bosnian language cyrillic localization to Xfce, GNOME, KDE Desktop

Monday, March 18th, 2013

If just installed Ubuntu or Xubuntu and choose as a default language English by mistake and you happen to live in Bulgaria, Russia, Ukraine, Belarus or any other cyrillic speaking / writting country and you want to make the desktop graphical environment to display menus in mother language Cyrillic. Here is how;

To add cyrillic localization, native support in GUI environment for major Dsektop Graphic Environments (XFCE, GNOME, KDE …) run in terminal:

For Bulgarian Cyrillic language Desktop support:

linux:~# apt-get install language-pack-bg

Четене на списъците с пакети… Готово
Изграждане на дървото със зависимости      
Четене на информацията за състоянието… Готово
Следните допълнителни пакети ще бъдат инсталирани:
  firefox-locale-bg language-pack-bg-base
Следните НОВИ пакети ще бъдат инсталирани:
  firefox-locale-bg language-pack-bg language-pack-bg-base
0 актуализирани, 3 нови инсталирани, 0 за премахване и 2 без промяна.
Необходимо е да се изтеглят 0 B/1048 kB архиви.
След тази операция ще бъде използвано 3533 kB допълнително дисково пространство.
Искате ли да продължите [Y/n]? Y
Selecting previously unselected package language-pack-bg-base.
(Reading database … 287291 files and directories currently installed.)
Unpacking language-pack-bg-base (from …/language-pack-bg-base_1%3a12.04+20130128_all.deb) …
Selecting previously unselected package language-pack-bg.
Unpacking language-pack-bg (from …/language-pack-bg_1%3a12.04+20130128_all.deb) …
Selecting previously unselected package firefox-locale-bg.
Unpacking firefox-locale-bg (from …/firefox-locale-bg_19.0.2+build1-0ubuntu0.12.04.1_i386.deb) …
Processing triggers for software-center …
Updating software catalog…this may take a moment.
INFO:softwarecenter.db.pkginfo_impl.aptcache:aptcache.open()
Software catalog update was successful.
Инсталиране на firefox-locale-bg (19.0.2+build1-0ubuntu0.12.04.1) …
Инсталиране на language-pack-bg (1:12.04+20130128) …
Инсталиране на language-pack-bg-base (1:12.04+20130128) …
Generating locales…
  bg_BG.UTF-8… up-to-date
Generation complete.
 

Two packages language-pack-bg and language-pack-bg-base packages add to system localization files which in Linux are in the format of .mo files. Here is list of 2 packs file content:


linux:~# dpkg -L language-pack-bg

/.
/usr
/usr/share
/usr/share/doc
/usr/share/doc/language-pack-bg
/usr/share/doc/language-pack-bg/copyright
/usr/share/doc/language-pack-bg/changelog.gz
/usr/share/locale-langpack


linux:~# dpkg -L language-pack-bg-base

/.
/usr
/usr/share
/usr/share/doc
/usr/share/doc/language-pack-bg-base
/usr/share/doc/language-pack-bg-base/copyright
/usr/share/doc/language-pack-bg-base/changelog.gz
/usr/share/locale-langpack
/usr/share/locale-langpack/bg
/usr/share/locale-langpack/bg/LC_MESSAGES
/usr/share/locale-langpack/bg/LC_MESSAGES/Linux-PAM.mo
/usr/share/locale-langpack/bg/LC_MESSAGES/pidgin.mo
/usr/share/locale-langpack/bg/LC_MESSAGES/findutils.mo
/usr/share/locale-langpack/bg/LC_MESSAGES/mutt.mo
/usr/share/locale-langpack/bg/LC_MESSAGES/help2man.mo
/usr/share/locale-langpack/bg/LC_MESSAGES/pppconfig.mo
/usr/share/locale-langpack/bg/LC_MESSAGES/jade.mo
/usr/share/locale-langpack/bg/LC_MESSAGES/recode.mo
/usr/share/locale-langpack/bg/LC_MESSAGES/wdiff-gnulib.mo
/usr/share/locale-langpack/bg/LC_MESSAGES/software-properties.mo
/usr/share/locale-langpack/bg/LC_MESSAGES/grub.mo
/usr/share/locale-langpack/bg/LC_MESSAGES/cracklib.mo
/usr/share/locale-langpack/bg/LC_MESSAGES/ggzcore.mo
/usr/share/locale-langpack/bg/LC_MESSAGES/libapt-inst1.4.mo
/usr/share/locale-langpack/bg/LC_MESSAGES/system-service.mo
/usr/share/locale-langpack/bg/LC_MESSAGES/gwibber-service-sohu.mo
/usr/share/locale-langpack/bg/LC_MESSAGES/mlocate.mo
/usr/share/locale-langpack/bg/LC_MESSAGES/lynx.mo
/usr/share/locale-langpack/bg/LC_MESSAGES/dnsmasq.mo
/usr/share/locale-langpack/bg/LC_MESSAGES/apparmorapplet.mo
/usr/share/locale-langpack/bg/LC_MESSAGES/gettext-tools.mo
/usr/share/locale-langpack/bg/LC_MESSAGES/binutils.mo
/usr/share/locale-langpack/bg/LC_MESSAGES/hello.mo
/usr/share/locale-langpack/bg/LC_MESSAGES/quota.mo
/usr/share/locale-langpack/bg/LC_MESSAGES/ld.mo
/usr/share/locale-langpack/bg/LC_MESSAGES/libvisual-0.4.mo
/usr/share/locale-langpack/bg/LC_MESSAGES/friendly-recovery.mo
/usr/share/locale-langpack/bg/LC_MESSAGES/gnupg2.mo
/usr/share/locale-langpack/bg/LC_MESSAGES/git-gui.mo
/usr/share/locale-langpack/bg/LC_MESSAGES/bash.mo
/usr/share/locale-langpack/bg/LC_MESSAGES/apturl.mo
/usr/share/locale-langpack/bg/LC_MESSAGES/sharutils.mo
/usr/share/locale-langpack/bg/LC_MESSAGES/ubuntuone-control-panel.mo
/usr/share/locale-langpack/bg/LC_MESSAGES/pulseaudio.mo
/usr/share/locale-langpack/bg/LC_MESSAGES/hello-debhelper.mo
/usr/share/locale-langpack/bg/LC_MESSAGES/hunspell.mo
/usr/share/locale-langpack/bg/LC_MESSAGES/dctrl-tools.mo
/usr/share/locale-langpack/bg/LC_MESSAGES/gwibber-service-sina.mo
/usr/share/locale-langpack/bg/LC_MESSAGES/popt.mo
/usr/share/locale-langpack/bg/LC_MESSAGES/powertop.mo
/usr/share/locale-langpack/bg/LC_MESSAGES/xdiagnose.mo
/usr/share/locale-langpack/bg/LC_MESSAGES/ubuntuone-client.mo
/usr/share/locale-langpack/bg/LC_MESSAGES/gettext-runtime.mo
/usr/share/locale-langpack/bg/LC_MESSAGES/debian-tasks.mo
/usr/share/locale-langpack/bg/LC_MESSAGES/nano.mo
/usr/share/locale-langpack/bg/LC_MESSAGES/lvm2.mo
/usr/share/locale-langpack/bg/LC_MESSAGES/ecryptfs-utils.mo
/usr/share/locale-langpack/bg/LC_MESSAGES/duplicity.mo
/usr/share/locale-langpack/bg/LC_MESSAGES/ubuntu-wallpapers.mo
/usr/share/locale-langpack/bg/LC_MESSAGES/dselect.mo
/usr/share/locale-langpack/bg/LC_MESSAGES/debconf.mo
/usr/share/locale-langpack/bg/LC_MESSAGES/mountall.mo
/usr/share/locale-langpack/bg/LC_MESSAGES/JabberBot.mo
/usr/share/locale-langpack/bg/LC_MESSAGES/net-tools.mo
/usr/share/locale-langpack/bg/LC_MESSAGES/apport.mo
/usr/share/locale-langpack/bg/LC_MESSAGES/libidn.mo
/usr/share/locale-langpack/bg/LC_MESSAGES/newt.mo
/usr/share/locale-langpack/bg/LC_MESSAGES/tar.mo
/usr/share/locale-langpack/bg/LC_MESSAGES/gnupg.mo
/usr/share/locale-langpack/bg/LC_MESSAGES/coreutils.mo
/usr/share/locale-langpack/bg/LC_MESSAGES/make.mo
/usr/share/locale-langpack/bg/LC_MESSAGES/libapt-pkg4.12.mo
/usr/share/locale-langpack/bg/LC_MESSAGES/kerneloops.mo
/usr/share/locale-langpack/bg/LC_MESSAGES/ldm.mo
/usr/share/locale-langpack/bg/LC_MESSAGES/ufw.mo
/usr/share/locale-langpack/bg/LC_MESSAGES/pidgin-libnotify.mo
/usr/share/locale-langpack/bg/LC_MESSAGES/pppoeconf.mo
/usr/share/locale-langpack/bg/LC_MESSAGES/acl.mo
/usr/share/locale-langpack/bg/LC_MESSAGES/python-apt.mo
/usr/share/locale-langpack/bg/LC_MESSAGES/gutenprint.mo
/usr/share/locale-langpack/bg/LC_MESSAGES/MoinMoin.mo
/usr/share/locale-langpack/bg/LC_MESSAGES/usbcreator.mo
/usr/share/locale-langpack/bg/LC_MESSAGES/launchpad-integration.mo
/usr/share/locale-langpack/bg/LC_MESSAGES/example-content.mo
/usr/share/locale-langpack/bg/LC_MESSAGES/avahi.mo
/usr/share/locale-langpack/bg/LC_MESSAGES/transmission-gtk.mo
/usr/share/locale-langpack/bg/LC_MESSAGES/xkeyboard-config.mo
/usr/share/locale-langpack/bg/LC_MESSAGES/dpkg-dev.mo
/usr/share/locale-langpack/bg/LC_MESSAGES/libgpg-error.mo
/usr/share/locale-langpack/bg/LC_MESSAGES/human-theme.mo
/usr/share/locale-langpack/bg/LC_MESSAGES/grep.mo
/usr/share/locale-langpack/bg/LC_MESSAGES/sane-backends.mo
/usr/share/locale-langpack/bg/LC_MESSAGES/NetworkManager.mo
/usr/share/locale-langpack/bg/LC_MESSAGES/libvirt.mo
/usr/share/locale-langpack/bg/LC_MESSAGES/ubuntu-sso-client.mo
/usr/share/locale-langpack/bg/LC_MESSAGES/app-install-data.mo
/usr/share/locale-langpack/bg/LC_MESSAGES/dpkg.mo
/usr/share/locale-langpack/bg/LC_MESSAGES/whois.mo
/usr/share/locale-langpack/bg/LC_MESSAGES/system-config-kickstart.mo
/usr/share/locale-langpack/bg/LC_MESSAGES/gprof.mo
/usr/share/locale-langpack/bg/LC_MESSAGES/zeitgeist.mo
/usr/share/locale-langpack/bg/LC_MESSAGES/shared-mime-info.mo
/usr/share/locale-langpack/bg/LC_MESSAGES/virt-manager.mo
/usr/share/locale-langpack/bg/LC_MESSAGES/bison-runtime.mo
/usr/share/locale-langpack/bg/LC_MESSAGES/wget.mo
/usr/share/locale-langpack/bg/LC_MESSAGES/quilt.mo
/usr/share/locale-langpack/bg/LC_MESSAGES/command-not-found.mo
/usr/share/locale-langpack/bg/LC_MESSAGES/jockey.mo
/usr/share/locale-langpack/bg/LC_MESSAGES/attr.mo
/usr/share/locale-langpack/bg/LC_MESSAGES/ltsp-login.mo
/usr/share/locale-langpack/bg/LC_MESSAGES/kcm_gtk.mo
/usr/share/locale-langpack/bg/LC_MESSAGES/alsa-utils.mo
/usr/share/locale-langpack/bg/LC_MESSAGES/aspell.mo
/usr/share/locale-langpack/bg/LC_MESSAGES/fetchmail.mo
/usr/share/locale-langpack/bg/LC_MESSAGES/man-db-gnulib.mo
/usr/share/locale-langpack/bg/LC_MESSAGES/devscripts.mo
/usr/share/locale-langpack/bg/LC_MESSAGES/xscreensaver.mo
/usr/share/locale-langpack/bg/LC_MESSAGES/unity-2d.mo
/usr/share/locale-langpack/bg/LC_MESSAGES/compiz.mo
/usr/share/locale-langpack/bg/LC_MESSAGES/apt.mo
/usr/share/locale-langpack/bg/LC_MESSAGES/gODBCConfig.mo
/usr/share/locale-langpack/bg/LC_MESSAGES/libc.mo
/usr/share/locale-langpack/bg/LC_MESSAGES/plasma_applet_menubarapplet.mo
/usr/share/locale-langpack/bg/LC_MESSAGES/update-manager.mo
/usr/share/locale-langpack/bg/LC_MESSAGES/psmisc.mo
/usr/share/locale-langpack/bg/LC_MESSAGES/screen-resolution-extra.mo
/usr/share/locale-langpack/bg/LC_MESSAGES/unattended-upgrades.mo
/usr/share/locale-langpack/bg/LC_MESSAGES/adduser.mo
/usr/share/locale-langpack/bg/LC_MESSAGES/sysstat.mo
/usr/share/locale-langpack/bg/LC_MESSAGES/checkbox.mo
/usr/share/locale-langpack/bg/LC_MESSAGES/apt-listchanges.mo
/usr/share/locale-langpack/bg/LC_MESSAGES/ubuntuone-installer.mo
/usr/share/locale-langpack/bg/LC_MESSAGES/upstart.mo
/usr/share/locale-langpack/bg/LC_MESSAGES/upower.mo
/usr/share/locale-langpack/bg/LC_MESSAGES/tasksel.mo
/usr/share/locale-langpack/bg/LC_MESSAGES/byobu.mo
/usr/share/locale-langpack/bg/LC_MESSAGES/language-selector.mo
/var
/var/lib
/var/lib/locales
/var/lib/locales/supported.d
/var/lib/locales/supported.d/bg


Above .mo files are  binary files, generated from plain text .po / .pod files. In free software OS .po files are the most common language translation files, where for each different language a set of .po files exist. Translators usually translate from English to respective language using a GUI text editor called poedit. Once translation is made from those .po files .mo binaries are generated and shipped as localizations for program or group of programs. Below is edit of one of Polish translation of lang file belonging to CUPS Printing service.

poedit gnu linux xubuntu screenshot editing cups .po language plain text file

Once .po files are created, generation of .mo files can be done in various way, however usually Linux system uses msgfmt – (compile message catalog to binary format). In order to generate .mo file out of lets say cups_pl.po;

hipo@linux:~$ msgfmt cups_pl.so
hipo@linux:~$ ls -al *.mo
-rw-rw-r-- 1 hipo hipo 31988 Mar 18 12:38 messages.mo

Anyways, here is how to add Cyrillic support for rest of Major cyrillic speaking countries, issue;

For Russian Cyrillic language Linux Desktop env support;

linux:~# apt-get install --yes language-pack-ru
...

For Belarusian Cyrillic Linux Desktop;

linux:~# apt-get install --yes language-pack-be

For Linux Desktop in Ukrainian;

linux:~# apt-get install --yes language-pack-uk

For Linux Desktop in Serbian language;

linux:~# apt-get install --yes language-pack-sr
...

For Graphic Environment in Macedonian;

linux:~# apt-get install --yes llanguage-pack-mk
...

For Linux GUI in Bosnian;

linux:~# apt-get install --yes language-pack-bs
...

For Kyrgyz language Linux localization;

linux:~# apt-get install --yes language-pack-ky

Whether, you are using Linux Desktop internationalization on some other Cyrillic related language, which I'm missing here please feel free to drop me a comment how you install it? I