Posts Tagged ‘Desktop’
Thursday, November 29th, 2018 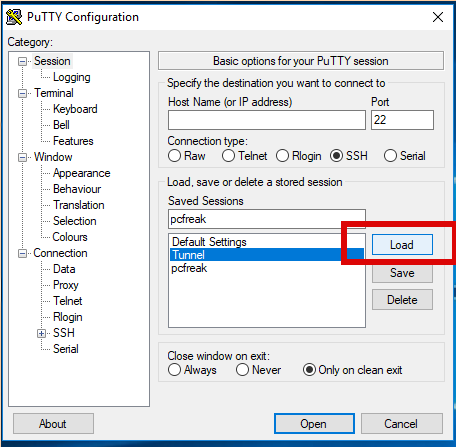
Recently I had to use PuTTY which I haven't used for years to open a number of SSH Pernanent Tunnels necessery for my daily work as a SAP Consultant.
I've saved them under a certain new profile and saved the set SSH Tunnel configuration not in the default Session but in separate named one, therefore had to press Load button every time after clicking over my Putty shortcut icon.
That was annoying and took few seconds out of my life every next morning for about a week, so finally I found osme time to google it and it seemed it is pretty easy to have any Putty sessoin loaded you like.
Here is how:
1. Create a new Putty Shortcut
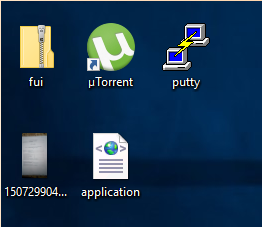
Click over Putty icon while holding CTRL + SHIFT (Control SHIFT keys simultaneously ) and move the mouse somewhere on the desktop to create the shortcut.
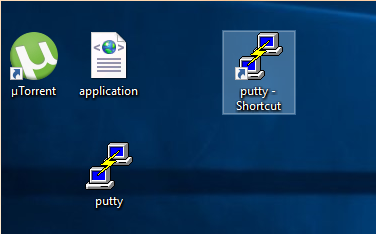
2. Right click on Putty Shortcut
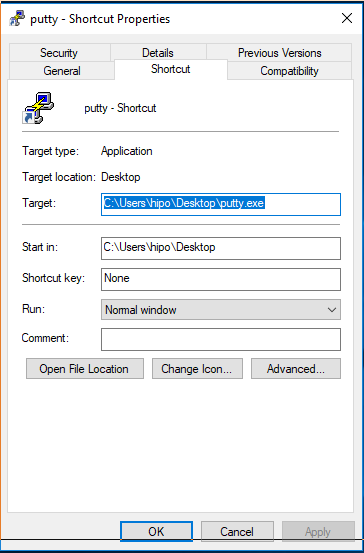
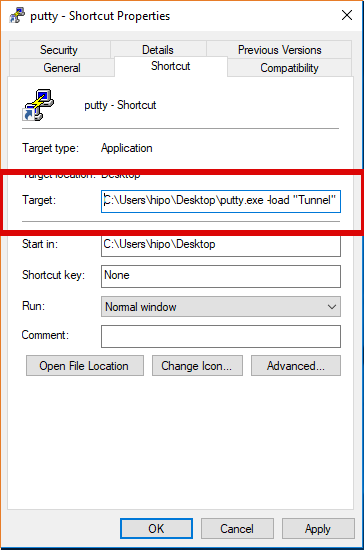
"C:\Program Files\PuTTY\putty.exe" -load "your_saved_session" "username@your_server_address" -pw "your_password"
fill out "target" field of shortcut using above code (alter to your own properties).
click Apply button.
If you need to pass a user and password from Shortcut itself (which is a bad practice for security but sometimes useful, for not so important Tunnels – for example a tunnel to an Open Proxy), do it by typing in the target field like so:
"C:\Program Files\PuTTY\putty.exe" -load "your_saved_session" "username@your_server_address" -pw "your_password"
And Hooray !!! After that when you click on PuTTy shortcut it loads your session automatically using given username and password.
Tags: about, after, and, annoying, another, ANY, Button, Click, code, Configuration, control, create, Ctrl, daily, default, Desktop, Easy, example, Putty, session
Posted in Everyday Life, Windows | No Comments »
Tuesday, October 12th, 2010 I'm studying Project Management, right now. In that spirit of thoughts I and a couple of other guys are building a Project Plan.
As it Project Plan it's necessary to put a GANTT Chart in it to show visually the project timeline (the phases), the duration and the inter-relation between the different tasks which leads the project to an actual completion.
After a bit of thorough research online on available software to deal with project management and particularly, ones that are capable to build a GANTT charts on Linux / BSD.
I've come with the following list of software capable to be a substitute for the Microsoft Project software.
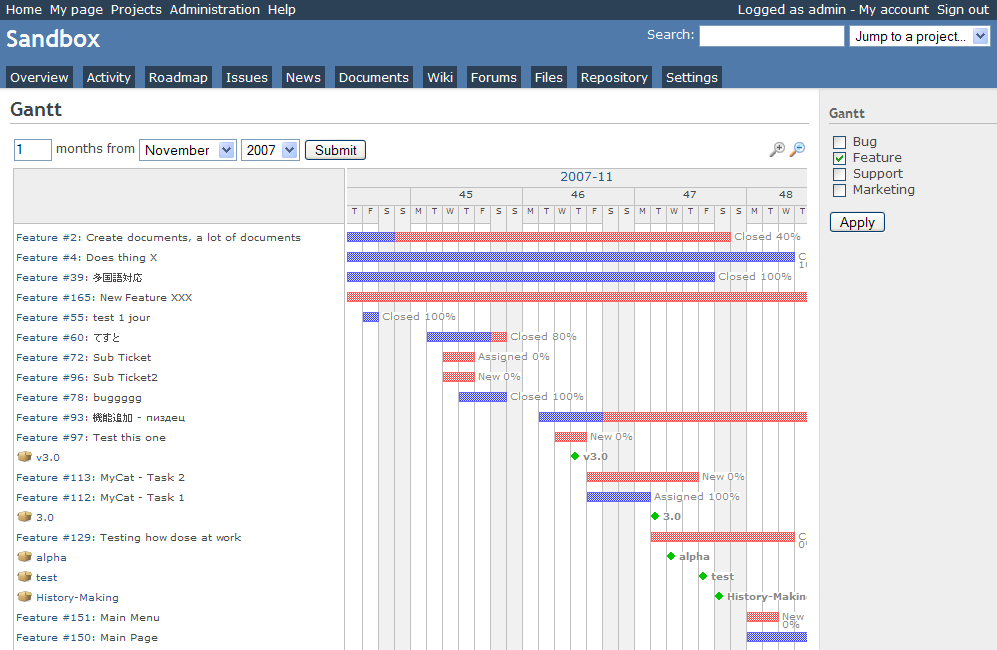
Redmine GANTT Chart
1. Gantt Project
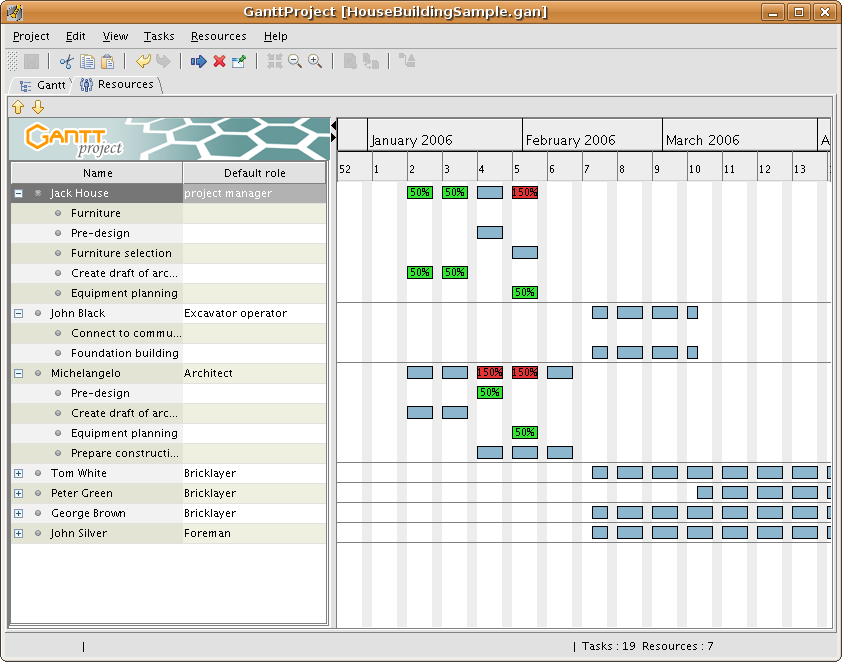 GANTTProject Chart
2. Gnome Planner
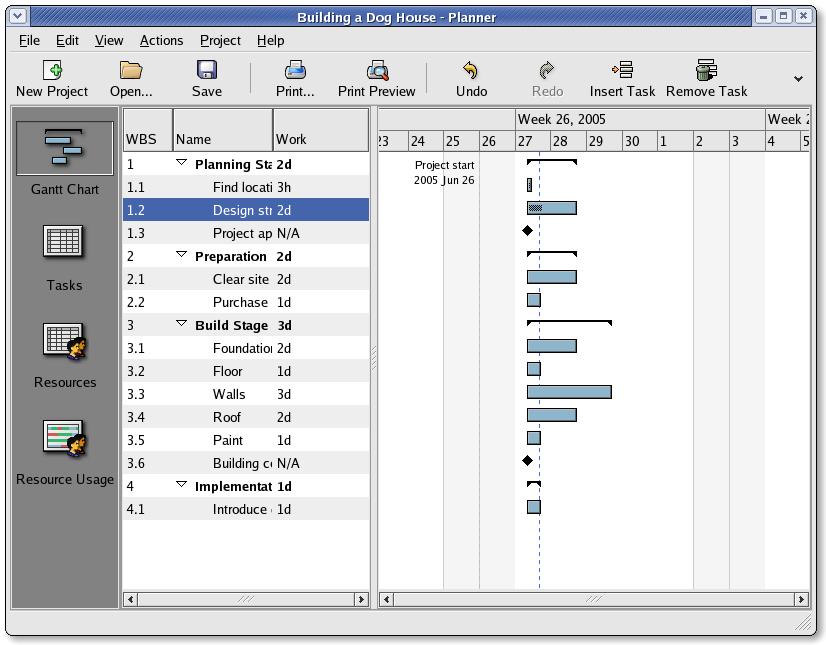 Planner GANTT Chone Chart
3. Task Juggler Project Manager with GANTT Capability for (KDE)
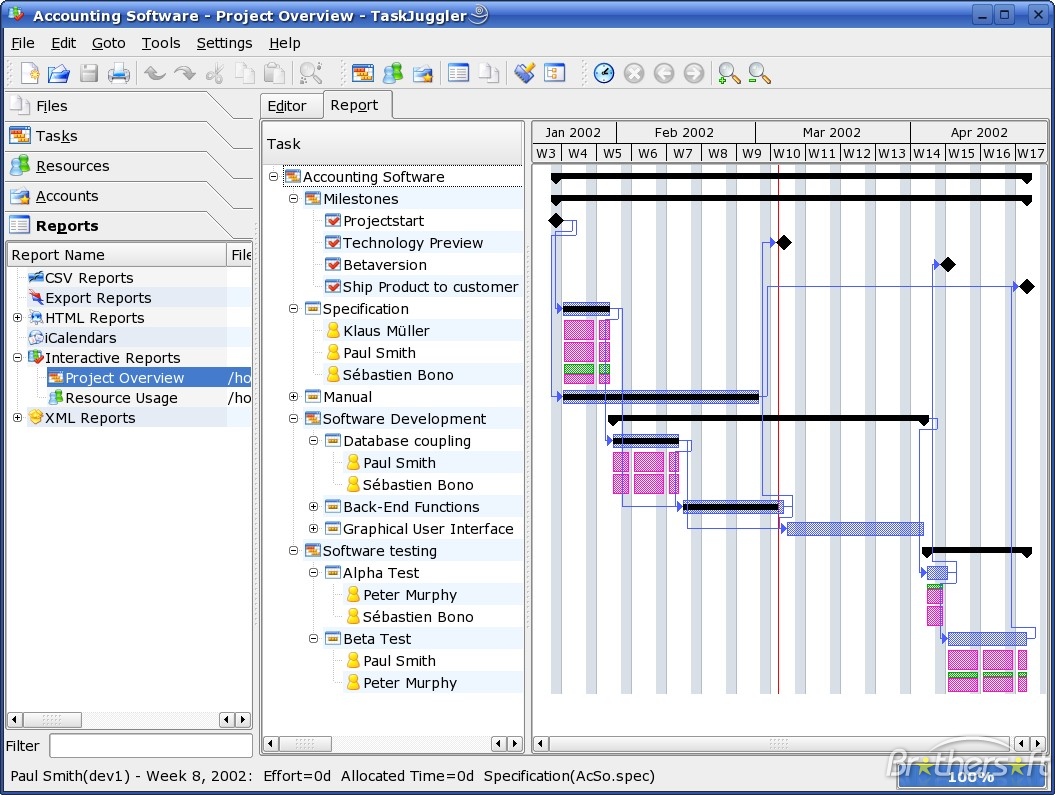 Task Juggler
4. JxProject – This software is not free, though it can be considered almost free
Take a look also at:
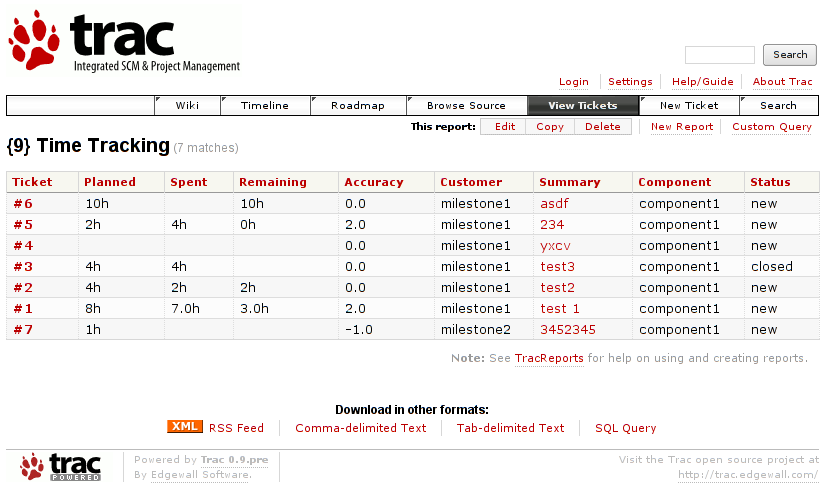
5. Trac , though it doesn't really support GANTT charts it's a lovely software to be used for PM.
Another option you have is to try out:
6. PHProjekt
Update 20.09.2016 – PHPProject Old download link is no longer active
It is this link http://www.phprojekt.com/, but the page doesn’t seem to be active any more. I thought you might want to update.
If you are looking for an alternative please check out http://wiht.link/PHProjekt-PM, it may make a suitable replacement.
Kind Regards,
Tom Wilcox
That piece of softwre really looks promising, especially if we consider that it's web based and how much essential is today to have an anline tools for doing the ordinary desktop jobs.
You can even check an online demo of the PHPProjekt software here
If you're a type of KDE user you definitely has to try out Kplato
As I've tested the software the software is easy to be used, however it still is missing some essential parts that Microsoft Project includes so it's not 100% substitute.
Also it's not able to open Microsoft Project (MPP) files, neither able to save the charts in the .mpp format.
Moving ahead I've came across DotProject 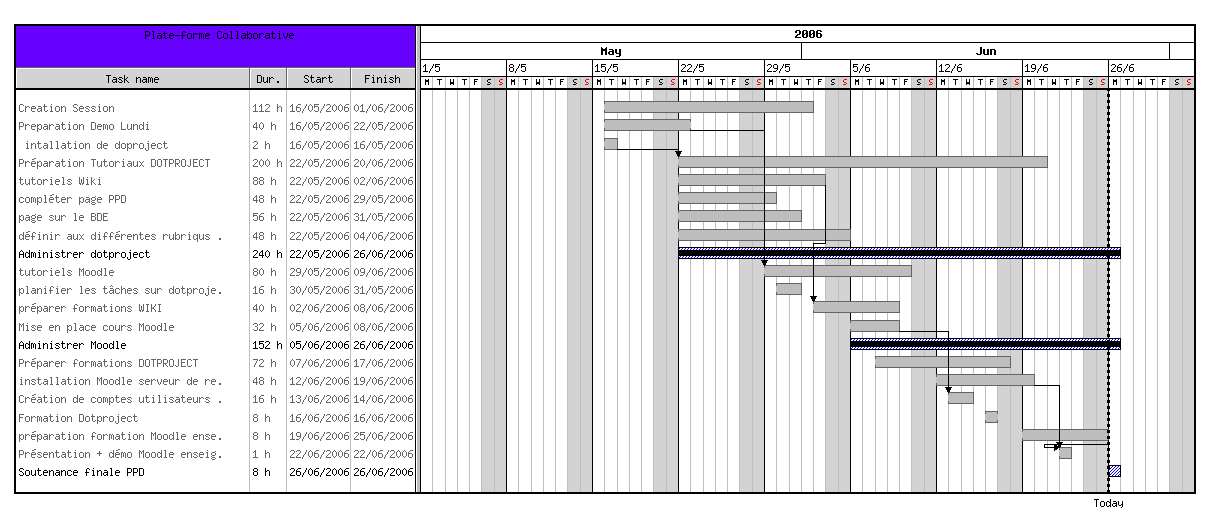
DottProject Gantt Chart
I haven't took the time to test it myself but however, as I go through the software website the project looked quite good.
Lastly you can take a look at: 7. PStricks as a mean of project management, however I think it doesn't support GANTT chart building.
>
Tags: anline, available software, BSD, building, capability, Chart, check, completion, demo, Desktop, doesn, Drawing GANTT Charts and Project Management on Linux, duration, GANTT, gantt chart, gantt charts, Gnome, jobs, Juggler, Linux, linux microsoft, look, Microsoft, Microsoft Project, microsoft project software, mpp, mpp format, online, option, page doesn, PHProjekt, piece, project, project management, project mpp, Project Plan, project timeline, software, software website, Spirit, substitute, support, time, trac, type, unix
Posted in Business Management, Curious Facts, Everyday Life, Linux | 1 Comment »
Friday, April 15th, 2011 
If you're on Linux the questions like, how can I convert between video and audio formats, how to do photo editing etc. etc. have always been a taugh question as with it's diversity Linux often allows too many ways to do the same things.
In the spirit of questioning I have been recently curious, how can a subtitles be added to a flash video (.flv) video?
After some research online I've come up with the below suggested solution which uses mplayer to do the flash inclusion of the subtitles file.
mplayer your_flash_movie.flv -fs -subfont-text-scale 3
While including the subtitles to the .flv file, it's best to close up all the active browsers and if running something else on the desktop close it up.
Note that above's mplayer example for (.srt and .sub) subtitle files example is only appropriate for a .flv movie files which already has a third party published subtitle files.
What is interesting is that often if you want to make custom subtitles to let's say a video downloaded from Youtube on Linux the mplayer way pointed above will be useless. Why?
Well the Linux programs that allows a user to add custom subtitles to a movie does not support the flv (flash video) file format.
My idea on how to create custom subtitles and embed them into a flv movie file is very simple and it goes like this:
1. Convert the .flv file format to let's say .avi or .mpeg
2. Use gnome-subitles or subtitleeditor to create the subtitles for the .avi or .mpeg file
3. Convert back the .avi/.mpeg file with included subtitles to .flv (flash video format)
This methodology is really long and time consuming, but pitily as far as my understanding goes it's the only way to do that on your Linux until now.
To make the conversations between .flv and .avi format you will need to use the ffmpeg – (FFMpeg command line tool video converter), here is how:
– Convert .flv to .avi
debian:~# /usr/bin/ffmpeg -i input_flvfilename.flv output_avifilename.avi
– Convert .avi file to .flv
debian:~# /usr/bin/ffmpeg -y -i /path/to/your/avi/input_avifilename.avi -acodec mp3 -ar 22050 -f flv

/path/to/your/flv/output_flvfilename.flv
The required overall tools which you will have to have installed on your Debian or Ubuntu Linux are:
1. ffmpeg
2. gnome-subtitles
3. subtitleeditor
4. mplayer
You will also have to spend some time to get to know gnome-subtitles or subtitleeditor, but it won't be that long until you get the idea on how to use them.
Tags: and, avi, avi file, avi format, avi mpeg, close, command line tool, consuming, conversations, Convert, custom, Desktop, editing, editor, ffmpeg, file, Flash, flv file format, format, Gnome, How to, inclusion, Linux, linux programs, methodology, movie file, movie files, mpeg, mpeg file, mplayer, party, photo editing, something, subtitle editor, subtitle files, subtitles, taugh, time, time consuming, tool, Ubuntu, use, video, video converter, video file, youtube
Posted in Linux, Linux and FreeBSD Desktop, Linux Audio & Video | 1 Comment »
Tuesday, October 4th, 2011 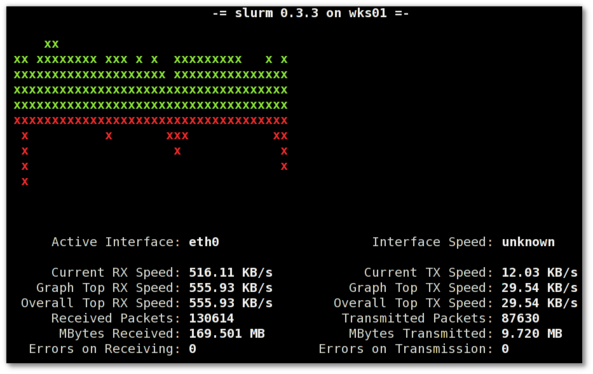
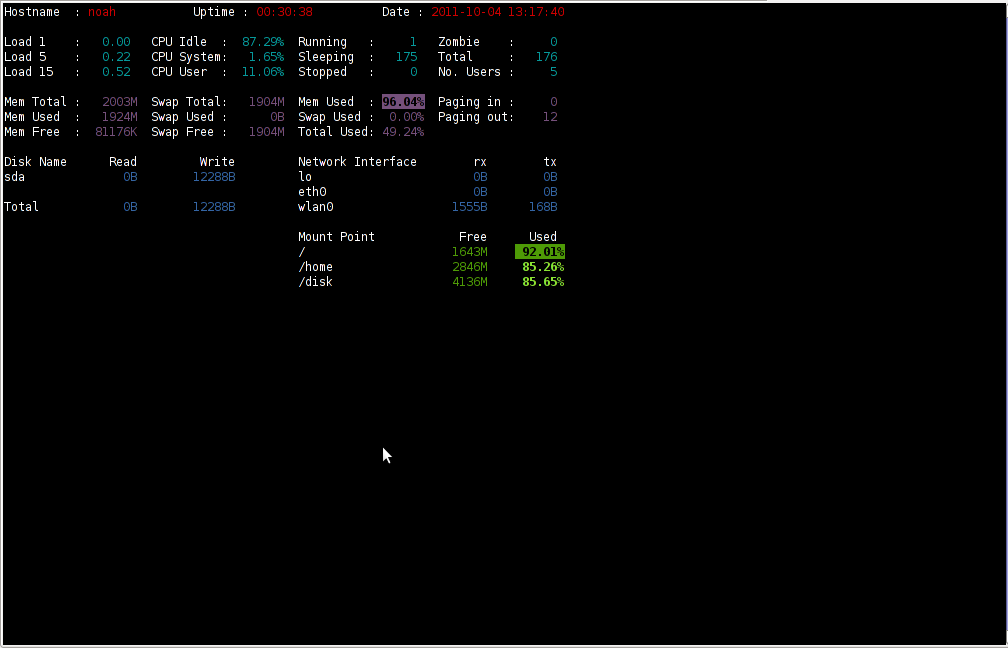
saidar is a text based ncurses program to display live statistics about general system health.
It displays in one refreshable screen (similar to top) statistics about server state of:
CPU, Load, Memory, Swap, Network, I/O disk operations
Besides that saidar supports a ncurses console colors, which makes it more funny to look at.
Saidar extracts the statistics for system state based on libgstrap cross platform statistics library about pc system health.
On Debian, Ubuntu, Fedora, CentOS Linuxes saider is available for install straight from distribution repositories.
On Debian and Ubuntu saidar is installed with cmd:
debian:~# apt-get install saidar

...
On CentOS and Fedora saidar is bundled as a part of statgrab-tools rpm package.
Installing it on 64 bit CentOS with yum is with command:
[root@centos ~]# yum install statgrab-tools.x86_64
Saidar is also available on FreeBSD as a part of the /usr/ports/devel/libgstrab, hence to use on my FreeBSD I had to install the libgstrab port:
freebsd# cd /usr/ports/devel/libstatgrab

freebsd# make install clean
Here is saidar running on my Desktop Debian on Thinkpad in color output:
debian:~# saidar -c
I've seen many people, who use various shell scripts to output system monitoring information, this scripts however are often written to just run without efficiency in mind and they put some let's say 1% extra load on the system CPU. This is not the case with saidar which is written in C and hence the program is optimized well for what it does.
Update: Next to saidar I recommend you check out Slurm (Real Time Network Interface Monitor) it can visualizes network interface traffic using ascii graph such as on top of the article. On Debian and Ubuntu Slurm is available and easily installable via simple:
apt-get install –yes slurm
Tags: CentOS, cleanHere, cpu load, cross platform, Desktop, desktop system, Disk, disk operations, distribution, extracts, fedora, freebsd, health, information, libgstrab, libgstrap, Linux, Load, load memory, memory, Monitor General Server Desktop, package, platform, ports, repositories, root, rpm, saidar, saider, screen, server desktop, server state, Shell, shell scripts, Slurm Real Time Network Interface Monitor, statistics library, system cpu, system health, text, thinkpad, Ubuntu, use, yum
Posted in FreeBSD, Linux, Monitoring, Networking, System Administration | 1 Comment »
Wednesday, February 22nd, 2012 
Everyone who used Linux is probably familiar with wget or has used this handy download console tools at least thousand of times. Not so many Desktop GNU / Linux users like Ubuntu and Fedora Linux users had tried using wget to do something more than single files download.
Actually wget is not so popular as it used to be in earlier linux days. I've noticed the tendency for newer Linux users to prefer using curl (I don't know why).
With all said I'm sure there is plenty of Linux users curious on how a website mirror can be made through wget.
This article will briefly suggest few ways to do website mirroring on linux / bsd as wget is both available on those two free operating systems.
1. Most Simple exact mirror copy of website
The most basic use of wget's mirror capabilities is by using wget's -mirror argument:
# wget -m http://website-to-mirror.com/sub-directory/
Creating a mirror like this is not a very good practice, as the links of the mirrored pages will still link to external URLs. In other words link URL will not pointing to your local copy and therefore if you're not connected to the internet and try to browse random links of the webpage you will end up with many links which are not opening because you don't have internet connection.
2. Mirroring with rewritting links to point to localhost and in between download page delay
Making mirror with wget can put an heavy load on the remote server as it fetches the files as quick as the bandwidth allows it. On heavy servers rapid downloads with wget can significantly reduce the download server responce time. Even on a some high-loaded servers it can cause the server to hang completely.
Hence mirroring pages with wget without explicity setting delay in between each page download, could be considered by remote server as a kind of DoS – (denial of service) attack. Even some site administrators have already set firewall rules or web server modules configured like Apache mod_security which filter requests to IPs which are doing too frequent HTTP GET /POST requests to the web server.
To make wget delay with a 10 seconds download between mirrored pages use:
# wget -mk -w 10 -np --random-wait http://website-to-mirror.com/sub-directory/
The -mk stands for -m/-mirror and -k / shortcut argument for –convert-links (make links point locally), –random-wait tells wget to make random waits between o and 10 seconds between each page download request.
3. Mirror / retrieve website sub directory ignoring robots.txt "mirror restrictions"
Some websites has a robots.txt which restricts content download with clients like wget, curl or even prohibits, crawlers to download their website pages completely.
/robots.txt restrictions are not a problem as wget has an option to disable robots.txt checking when downloading.
Getting around the robots.txt restrictions with wget is possible through -e robots=off option.
For instance if you want to make a local mirror copy of the whole sub-directory with all links and do it with a delay of 10 seconds between each consequential page request without reading at all the robots.txt allow/forbid rules:
# wget -mk -w 10 -np -e robots=off --random-wait http://website-to-mirror.com/sub-directory/
4. Mirror website which is prohibiting Download managers like flashget, getright, go!zilla etc.
Sometimes when try to use wget to make a mirror copy of an entire site domain subdirectory or the root site domain, you get an error similar to:
Sorry, but the download manager you are using to view this site is not supported.
We do not support use of such download managers as flashget, go!zilla, or getright
This message is produced by the site dynamic generation language PHP / ASP / JSP etc. used, as the website code is written to check on the browser UserAgent sent.
wget's default sent UserAgent to the remote webserver is:
Wget/1.11.4
As this is not a common desktop browser useragent many webmasters configure their websites to only accept well known established desktop browser useragents sent by client browsers.
Here are few typical user agents which identify a desktop browser:
- Mozilla/5.0 (Windows NT 6.1; rv:6.0) Gecko/20110814 Firefox/6.0
- Mozilla/5.0 (X11; Linux i686; rv:6.0) Gecko/20100101 Firefox/6.0
- Mozilla/6.0 (Macintosh; I; Intel Mac OS X 11_7_9; de-LI; rv:1.9b4) Gecko/2012010317 Firefox/10.0a4
- Mozilla/5.0 (Windows NT 6.1; Win64; x64; rv:2.2a1pre) Gecko/20110324 Firefox/4.2a1pre
etc. etc.
If you're trying to mirror a website which has implied some kind of useragent restriction based on some "valid" useragent, wget has the -U option enabling you to fake the useragent.
If you get the Sorry but the download manager you are using to view this site is not supported , fake / change wget's UserAgent with cmd:
# wget -mk -w 10 -np -e robots=off \

--random-wait

--referer="http://www.google.com" \--user-agent="Mozilla/5.0 (Windows; U; Windows NT 5.1; en-US; rv:1.8.1.6) Gecko/20070725 Firefox/2.0.0.6" \--header="Accept:text/xml,application/xml,application/xhtml+xml,text/html;q=0.9,text/plain;q=0.8,image/png,*/*;q=0.5" \--header="Accept-Language: en-us,en;q=0.5" \--header="Accept-Encoding: gzip,deflate" \--header="Accept-Charset: ISO-8859-1,utf-8;q=0.7,*;q=0.7" \--header="Keep-Alive: 300"
For the sake of some wget anonimity – to make wget permanently hide its user agent and pretend like a Mozilla Firefox running on MS Windows XP use .wgetrc like this in home directory.
5. Make a complete mirror of a website under a domain name
To retrieve complete working copy of a site with wget a good way is like so:
# wget -rkpNl5 -w 10 --random-wait www.website-to-mirror.com
Where the arguments meaning is:
-r – Retrieve recursively
-k – Convert the links in documents to make them suitable for local viewing
-p – Download everything (inline images, sounds and referenced stylesheets etc.)
-N – Turn on time-stamping
-l5 – Specify recursion maximum depth level of 5
6. Make a dynamic pages static site mirror, by converting CGI, ASP, PHP etc. to HTML for offline browsing
It is often websites pages are ending in a .php / .asp / .cgi … extensions. An example of what I mean is for instance the URL http://php.net/manual/en/tutorial.php. You see the url page is tutorial.php once mirrored with wget the local copy will also end up in .php and therefore will not be suitable for local browsing as .php extension is not understood how to interpret by the local browser.
Therefore to copy website with a non-html extension and make it offline browsable in HTML there is the –html-extension option e.g.:
# wget -mk -w 10 -np -e robots=off \

--random-wait \

--convert-links http://www.website-to-mirror.com
A good practice in mirror making is to set a download limit rate. Setting such rate is both good for UP and DOWN side (the local host where downloading and remote server). download-limit is also useful when mirroring websites consisting of many enormous files (documental movies, some music etc.).
To set a download limit to add –limit-rate= option. Passing by to wget –limit-rate=200K would limit download speed to 200KB.
Other useful thing to assure wget has made an accurate mirror is wget logging. To use it pass -o ./my_mirror.log to wget.
Tags: adm, argument, Auto, bandwidth, briefly, browser, BSD, capabilities, cgi, common, connection, copy, denial of service, denial of service attack, Desktop, download, Draft, exact mirror, external urls, fedora linux, flashget, free operating systems, gnu linux, heavy load, home directory, How to, internet connection, Linux, linux users, localhost, make, manager, mirror copy, Mozilla, option, page, php extension, quot, random links, remote server, request, servers, site mirroring, something, tendency, text, text html, time, Ubuntu, URLs, UserAgent, website mirror, wget
Posted in Linux, System Administration, Web and CMS | 2 Comments »
Friday, December 16th, 2011 
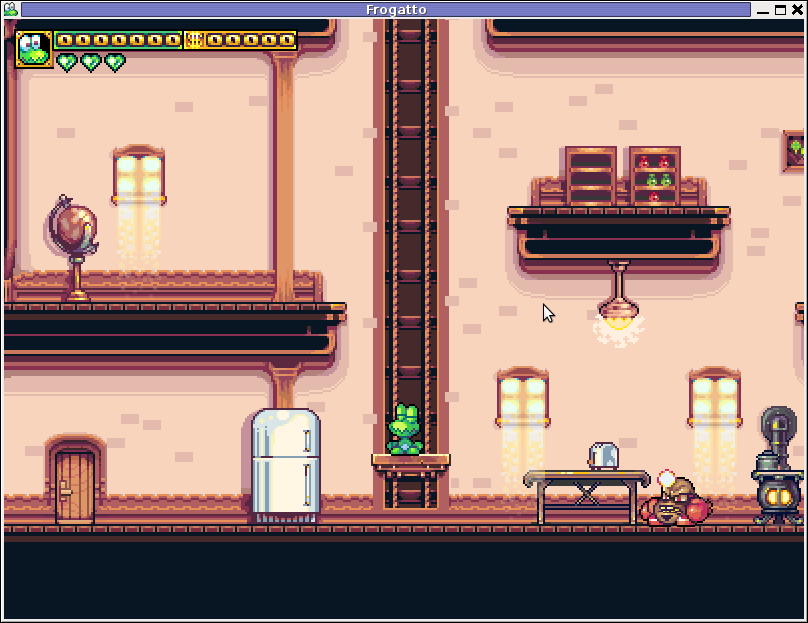
1. Frogatto & Friends – Is an Indian Free Software (Open Source) game in the spirit of old-school jump’en runs like Commander Keen, Prehistoric, Jazz Jack Rabbit
The game is really entertaining, the graphics looks approximately nice, the music is awesome, the gamelplay is good even though after some point in the game the moment with “where should I go now, I can’t find exit” comes through and it gets boring.
Generally if you compare with all the existing jump and run arcade games free software games available for Linux and FreeBSD the game will definetely arrange itself in the list of TOP 10 free software Arcade Games
and therefore its my own believe that Frogatto is a game that every GNU / Linux and FreeBSD desktop should have in Application -> Games GNOME menu.
Frogatto is rich of levels, enemies obstacles objects, places to visit (which puts it ahead of many of the linux arcade games which often miss enough game levels, has a too short game plots, or simply miss overall game diversity).

The game’s general look & feel is like a professional game and not just some tiny free software arcade, made by its authors for the sake to learn some programming, graphics or music creation.


Besides that Frogatto & Friends is multi-platform supporting all the major operating systems.
Game supports:
- Windows
- Mac
- iPhone
- Debian GNU / Linux
- FreeBSD
The game source code is also available on Frogatto.com – The Game’s Official website
The game is available as a deb package in Debian and Ubuntu GNU / Linuxes so to install on those deb based distributions, simply use apt:
debian:~# apt-get install frogatto

...
The above command will install two packages frogatto (containing the game’s main executable binary) and frogatto-data containinng all the game textures, levels, graphics, music etc.
BTW the package saparation on a gamename and gamename-data in Debian (for all those who have not still noticed), can be seen on most of the games with a game data that takes more disk space.
After the game is installed the only way to start the game is to run it manually through pressing ALT+F2 in GNOME or running the progrtam through gnome-terminal with cmd:
debian:~$ frogatto
Here are few more Frogatto gameplay screenshots:

I’ve noticed Frogatto is also available as an RPM package for Fedora Linux, as well as has a FreeBSD port in the /usr/ports/games/frogatto and this makes it easy to install on most free software OSes in the wild.
While checking frogatto.com , I found an interesting link to a website offering free graphics (pictures), textures and sounds for free and open source games for all those who hold interest into the development of Free Software & Open Source Games make sure you check OpenGameArt.org
OpenGameArt.org looks like a great initiative and will definitely be highly beneficial to the development of more and better FSOS Games so I wish them God speed with this noble initiative.
Frogatto is very suitable for growing kids since it doesn’t contain no violence and every now and then the main game actor the Frogatto Frog leads few lines English dialogues with some of the characters found in the quest.
For none speaking English countries, the game can help the kids to learn some basic english words and thus can help develop kids intellect and knowledge
And oh yeah one more criticism towards the game is the Enlish structure, it seems people who wrote the plot can work this out in the time to come. Many of the English sentences during dialogues the frog leads with the cranks he met does not sound like a common and sometimes even correct english / phrases.
Besides those little game “defect”, the game is pretty awesome and worthy to kill some time and relax from a long stressy day.
Tags: arcade games, code, com, deb package, Debian, debian gnu, Desktop, Disk, English, exit, fedora linux, Free, free software games, freebsd, game levels, game source code, game textures, Gnome, gnu linux, Indian, IPhone, jack rabbit, jack rabbitthe, Jazz, jazz jack rabbit, jump, jump and run, knowledge, linux freebsd, look feel, menu, music creation, nbsp, official, Open, open source game, open source games, operating systems, package, Prehistoric, professional game, programming graphics, quot, saparation, school jump, short game, software, software arcade, software open source, Source, time, Ubuntu
Posted in Everyday Life, FreeBSD, Games Linux, Linux, Linux and FreeBSD Desktop | No Comments »
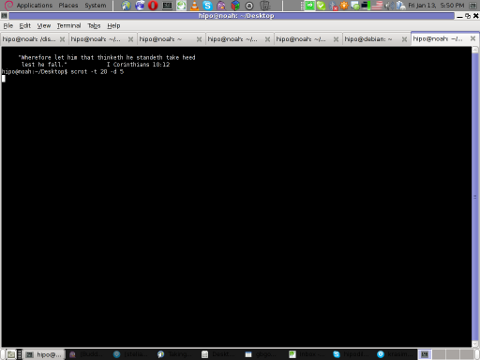
Friday, January 13th, 2012 scrot and import are two commands, which can be used to take screenshot in terminal on Linux and FreeBSD:
To use scrot cmd to take screenshots on Ubuntu and Debian the scrot package has to be installed:
noah:~# apt-get install scrot

...
scrot should also be available on most other Linux distributions in the main repositories, I'll be glad to hear if someone has used it on Fedora, SUSE etc.
On FreeBSD, there is a port called scrot , to install on FreeBSD:
freebsd# cd /usr/ports/graphics/scrot

freebsd# make install clean

...
Scrot has plenty of nice arguments one can use to make a screenshot. Maybe the most handy one in my view is after a preliminary set delay before screenshot is taken.
To take screenshot with it after lets say 5 seconds delay before the screenshot:
hipo@noah:~/Desktop$ scrot -t 20 -d 5
To put an year, month and day and year followed by screen resolution with scrot :
hipo@noah:~$ scrot '%Y-%m-%d_$wx$h.png'
Another way to take a screenshot of screen with command is by using ImageMagick's – import image manipulation package.
To take screenshot of the current screen via terminal using import , type in xterm, gnome-termina or Gnome's Run Application (ALT+F2)
hipo@noah:~$ import -window root ScreenShot.png
To make import command to save the taken screenshot in a format (minute:hour:day:month:year)i :
hipo@noah:~$ import -window root $screenshot_dir/screenshot-$(date +%M_%k_%d_%m_%Y|sed -e 's/^ *//').png
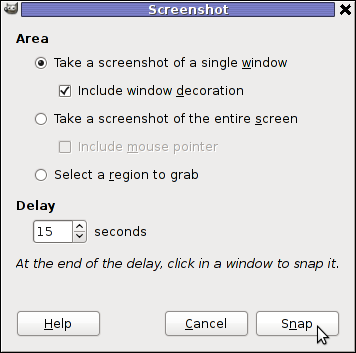
Taking a delayed screenshot is also possible via The GIMP via menus File -> Create -> Screenshot
Now here is an interesting question, what if I would like to take periodic screenshots of what I do on my Desktop to take random movie scenes from a movie I watch with totem or vlc??
This task is quite easily achiavable with a little bash shell script, I wrote:
screenshot_dir='Screenshots';

seconds='60';

if [ ! -d "$screenshot_dir" ]; then

mkdir $screenshot_dir;

fi

while [ 1 ]; do

sleep $seconds;

(import -window root $screenshot_dir/screenshot-$(date +%M_%k_%d_%m_%Y|sed -e 's/^ *//').png) &

done
This script will take screenshot automatically to Screenshots/ directory every (1 min – 60 seconds)
You can also my downloads take_screenshot_every_60_secs_import.sh here
To use take_screenshot_every_60_secs_import.sh just issue the script inside xterm or gnome-terminal, after that simply use your computer as you normally would.
The script will take snapshots every minute and store all taken screenshots in Screenshots dir.
If you prefer to use scrot to take automatically the screenshots every lets say 5 minutes, you can use a script like:
screenshot_dir='Screenshots';

# 300 secs (5 mins)seconds='300';

if [ ! -d "$screenshot_dir" ]; then

mkdir $screenshot_dir;

fi

while [ 1 ]; do

sleep $seconds;

(scrot $screenshot_dir/'%Y-%m-%d_$wx$h.png') &

done
You can fetch take_screenshot_every_60_secs_scrot.sh here
The script using scrot is better in terms of efficiency, the system load scrot will put on your machine will be less.
Using some of this scripts will be handy if you need screenshots to Movies, Programs and favourite Free Software games.
Hope this is educative to someone 😉
Tags: Alt, Auto, bash shell script, Desktop, Draft, fedora, freebsd, GIMP, Gnome, gnu linux, handy one, hipo, How to, image manipulation, ImageMagick, import, import command, import image, import window, linux distributions, manipulation package, multiple, noah, package, png, quot, repositories, root, screen, screenshot, Screenshots, scrot, Shell, someone, SUSE, terminal, totem, type, Ubuntu, wx, xterm, year
Posted in FreeBSD, Linux, Linux and FreeBSD Desktop, System Administration, Various | No Comments »
Tuesday, May 3rd, 2011 In short I’ll explain here what is Grsecurity http://www.grsecurity.net/ for all those who have not used it yet and what kind of capabilities concerning enhanced kernel security it has.
Grsecurity is a combination of patches for the Linux kernel accenting at the improving kernel security.
The typical application of GrSecurity is in the field of Linux systems which are administered through SSH/Shell, e.g. (remote hosts), though you can also configure grsecurity on a normal Linux desktop system if you want a super secured Linux desktop ;).
GrSecurity is used heavily to protect server system which require a multiple users to have access to the shell.
On systems where multiple user access is required it’s a well known fact that (malicious users, crackers or dumb script kiddies) get administrator (root) privileges with a some just poped in 0 day root kernel exploit.
If you’re an administrator of a system (let’s say a web hosting) server with multiple users having access to the shell it’s also common that exploits aiming at hanging in certain daemon service is executed by some of the users.
In other occasions you have users which are trying to DoS the server with some 0 day Denial of Service exploit.
In all this cases GrSecurity having a kernel with grsecurity is priceless.
Installing grsecurity patched kernel is an easy task for Debian and Ubuntu and is explained in one of my previous articles.
This article aims to explain in short some configuration options for a GrSecurity tightened kernel, when one have to compile a new kernel from source.
I would skip the details on how to compile the kernel and simply show you some picture screens with GrSecurity configuration options which are working well and needs to be set-up before a make command is issued to compile the new kernel.
After preparing the kernel source for compilation and issuing:
linux:/usr/src/kernel-source$ make menuconfig
You will have to select options like the ones you see in the pictures below:
[nggallery id=”8″]
After completing and saving your kernel config file, continue as usual with an ordinary kernel compilation, e.g.:
linux:/usr/src/kernel-source$ make

linux:/usr/src/kernel-source$ make modules

linux:/usr/src/kernel-source$ su root

linux:/usr/src/kernel-source# make modules_install

linux:/usr/src/kernel-source# make install

linux:/usr/src/kernel-source# mkinitrd -o initrd.img-2.6.xx 2.6.xx
Also make sure the grub is properly configured to load the newly compiled and installed kernel.
After a system reboot, if all is fine you should be able to boot up the grsecurity tightened newly compiled kernel, but be careful and make sure you have a backup solution before you reboot, don’t blame me if your new grsecurity patched kernel fails to boot! You’re on your own boy 😉
This article is written thanks to based originally on his article in Bulgarian. If you’re a Bulgarian you might also checkout static’s blog
Tags: administrator, combination, compilation, config, configuration options, configure, crackers, day, Denial, denial of service, Desktop, desktop system, exploits, file, grsecurity, hosting server, How to, img, installlinux, kernel source, Linux, linux desktop, linux kernel, linux systems, make, malicious users, Maximum, maximum linux, menuconfigYou, multiple users, picture, root, root privileges, say, script, script kiddies, server system, Shell, src, system, typical application, Ubuntu, usr
Posted in Linux, Linux and FreeBSD Desktop, System Administration | No Comments »
Thursday, June 5th, 2014 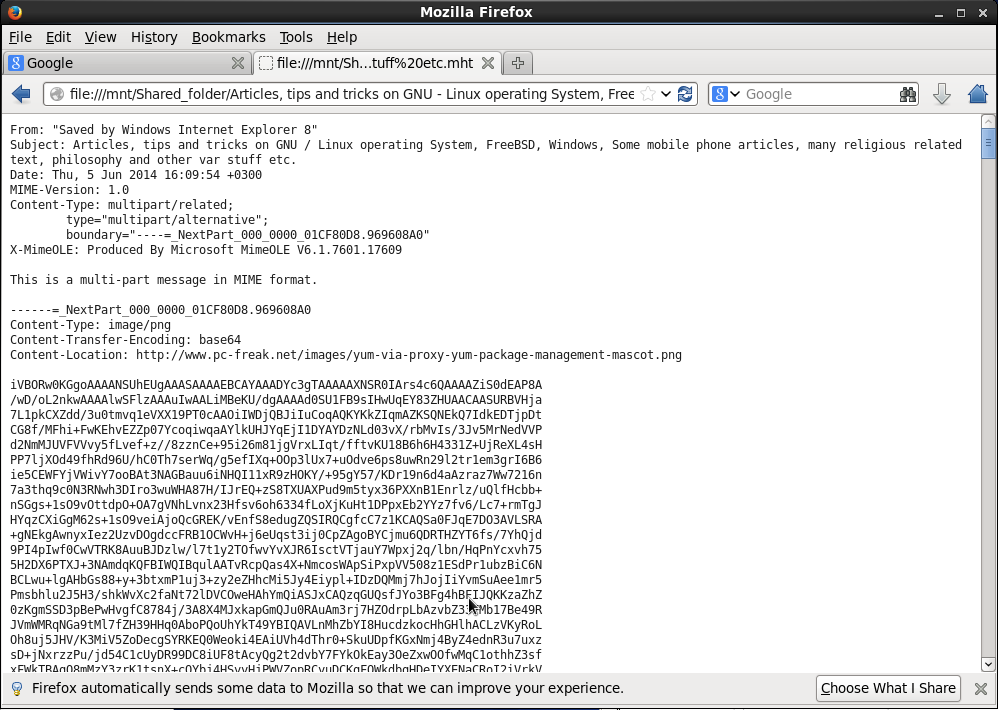
If you're using Linux as a Desktop system sooner or later you will receive an email with instructions or an html page stored in .mht file format.
So what is mht? MHT is an webpage archive format (short for MIME HTML document). MHTML saves the Web page content and incorporates external resources, such as images, applets, Flash animations and so on, into HTML documents. Usually those .mht files were produced with Microsoft Internet Explorer – saving pages through:
File -> Save As (Save WebPage) dialog saves pages in .MHT.
To open those .mht files on Linux, where Firefox is available add the UNMHT FF Extension to browser. Besides allowing you to view MHT on Linux, whether some customer is requiring a copy of an HTML page in MHT, UNMHT allows you to also save complete web pages, including text and graphics, into a MHT file.
There is also support for Google Chrome browser for MHT opening and saving via a plugin called IETAB. But unfortunately IETAB is not supported in Linux.
Anyways IETAB is worthy to mention here as if your'e a Windows users and you want to browse pages compatible only with Internet Explorer, IETAB will emulates exactly IE by using IE rendering engine in Chrome and supports Active X Controls. IETAB is a great extension for QA (web testers) using Windows for desktop who prefer to not use IE for security reasons. IETab supports IE6, IE7, IE8 and IE9.
Another way to convert .MHT content file into HTML is to use Linux KDE's mhttohtml tool.
Another approach to open .MHT files in Linux is to use Opera browser for Linux which has support for .MHT
Note that because MHT files could be storing potentially malicious content (like embedded Malware) it is always wise when opening MHT on Windows to assure you have scanned the file with Antivirus program. Often mails containing .MHT from unknown recipients are containing viruses or malware. Also links embedded into MHT file could easily expose you to spoof attacks. MHT files are encoded in combination of plain text MIMEs and BASE64 encoding scheme, MHT's mimetype is:
MIME type: message/rfc822
Tags: archive, browser, content, customer, Desktop, file format, Google Chrome, html page, IETAB, Linux, Microsoft Internet Explorer, plugin, support, webpage, Windows
Posted in Everyday Life, Various, Windows | No Comments »
Wednesday, August 13th, 2014 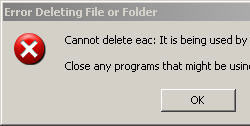
I had to fix recently another Windows XP infected with plenty of malicious malware. I've used tips from http://malwaretips.com/blogs/ and launch all suggested tools to cleanup the PC. Some few thousands of infections were cleaned and the PC started working much better than earlier, however still there was one weird issue on the Windows XP desktop there was an .exe file hanging with 0 bytes size and whenever I tried to delete the file either from GUI or command line with (del command) it refused to delete with error:
The process cannot access the file because it is being used by another process.
Well the message clearly shows, the file can't be deleted because some program was using it however I couldn't see any program that has locked the .exe file. I've checked that in (Windows Task Manager) run from
Start -> Run:
taskmgr
I've done a quick search online to see, whether someone has fixed the issues, and saw many threads talking about the issue suggesting that the issue got solved Windows XP OS re-install, as this was not an option for me because the PC's reinstall would be at least a 2 day time work, plus it contains some programs which will probably be hard to freshly install, because they're no longed supported.
Finally I've seen in this thread suggestion to try to kill Windows Explorer after you have opened windows with windows cmd.exe because this will prevent the .exe file being locked by Windows Explorer and will allow it to be deleted with del command. This actually worked. I've launched
Start -> Run
taskmgr
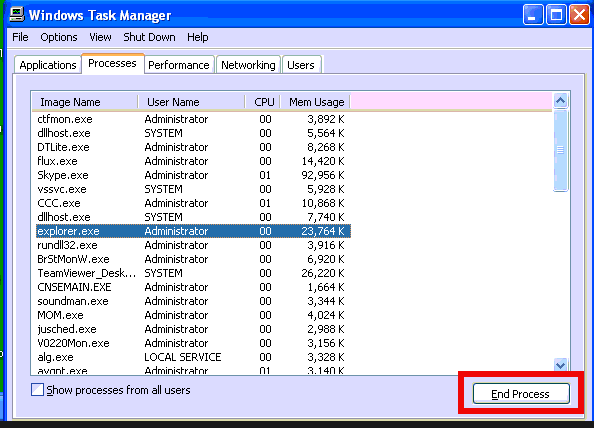
and
cmd.exe
Found explorer.exe process and killed it, this makes the whole desktop (icons, start menu etc. disappear) – as Windows Explorer is main managing Windows app. Then using Alt+Tab to switch to Command Prompt window deleted it with:
del Process_that_cannot_be_killed.exe
And finally succesfully deleted it 🙂
Tags: Cannot Delete, Desktop, desktop icons, exe, file, issue, online, Pc, process, threads, windows explorer, Windows Task Manager
Posted in Everyday Life, System Administration, Various, Windows | No Comments »


