Posts Tagged ‘gnu linux’
Wednesday, October 5th, 2011 
Its not very common, but sometimes it happens you have to crack some downloaded file from thepiratebay.com or some other big torrent tracker. An example scenario would be downloading a huge words dictionary (a rainbow tables) dictionary etc., which was protected by the author with a password and zipped.
Fortunately Mark Lehmann developed a software called fcrackzip which is capable of brute forcing zip protected file passwords straight on UNIX like operating systems (GNU/Linux, FreeBSD).
fcrackzip is available from package repositories on Debian and Ubuntu Linuces to install via apt:
linux:~# apt-get install frackzip

...
fcrackzip is also available on FreeBSD via the ports tree and can be installed with:
freebsd# cd /usr/ports/security/fcrackzip

freebsd# make install cleam
On Debian it's worthy to have a quick look on the README file:
linux:~# cat /usr/share/doc/fcrackzip/READMESee fcrackzip.txt (which is derived from the manpage), or fcrackzip.html
There is a web page with more information at
http://lehmann.home.ml.org/fcrackzip.html or
http://www.goof.com/pcg/marc/fcrackzip.html
A sample password-protected .zip file is included as "noradi.zip". It's
password has 6 lower case characters, and fcrackzip will find it (and a
number of false positives) with
fcrackzip -b -c a -p aaaaaa ./noradi.zip
which will take between one and thirty minutes on typical machines.
To find out which of these passwords is the right one either try them out
or use the –use-unzip option.
Marc
Cracking the noradi.zip password protected sample file on my dual core 1.8 ghz box with 2gb, it took 30 seconds.
linux:~# time fcrackzip -u -b -c a -p aaaaaa noradi.zip
PASSWORD FOUND!!!!: pw == noradi
real 0m29.627s
user 0m29.530s
sys 0m0.064s
Of course the sample set password for noradi.zip is pretty trivial and with more complex passwords, sometimes cracking the password can take up to 30 minutes or an hour and it all depends on the specific case, but at least now we the free software users have a new tool in the growing arsenal of free software programs 😉
Here are the options passed on to the above fcrackzip command:
-u – Try to decompress with the detected possible archive passwords using unzip (This is necessery to precisely find the archive password, otherwise it will just print out a number of possible matching archive passwords and you have to try each of the passwords one by one. Note that this option depends on a working unzip version installed.)
-c a – include all charsets to be tried with the generated passwords
-b – Select brute force mode – Tries all possible combinations of letters specified
-p aaaaaa – init-password string (Look up for a password between the password length 6 characters long)
FCrackZip is partly written in assembler and thus is generally works fast, to reduce the CPU load fcrackzip will put on the processor its also capable of using external words dictionary file by passing it the option:
-D – The file should be in a format one word per line and be preliminary alphabetically sorted with let's say sort
Also fcrackzip supports parallel file brute force, for example if you have 10 zip files protected with passwords it can paralelly try to brute force the pwds.
As of time of writting frackzip reached version 1.0 and seems to be pretty stable. Happy cracking.
Just to make sure fcrackzip's source is not lost somewhere in the line in the long future to come, I've created a fcrackzip download mirror here
Tags: brute, case characters, com, downloaded file, dual core, example scenario, false positives, fcrackzip, file, file linux, frackzip, gnu linux, goof, htmlThere, information, lehmann, linux freebsd, linux?, lower case, manpage, number, option, outor, package, page, password, pcg, quot, README, readme file, READMESee, repositories, right, softw, software, spassword, TABLE, time, torrent tracker, tree, Ubuntu, withfcrackzip, words dictionary, zip file, zippassword
Posted in Computer Security, Hacks, System Administration | 1 Comment »
Tuesday, October 25th, 2011 
After a recent new Debian Squeeze Apache+PHP server install and moving a website from another server host running on CentOS 5.7 Linux server, some of the PHP scripts running via crontab started displaying the following annoying PHP Warnings :
debian:~# php /home/website/www/cron/update.php
PHP Warning: PHP Startup: Unable to load dynamic library '/usr/lib/php5/20090626/suhosin.so' – /usr/lib/php5/20090626/suhosin.so: cannot open shared object file: No such file or directory in Unknown on line 0
Obviously the error revealed that PHP cli is not happy that, I've previously removes the suhosin php5-suhosin module from the system.
I wouldn't have removed php5-suhosin if sometimes it doesn't produced some odd experiences with the Apache webserver.
To fix the PHP Warning, I used first grep to see, where exactly the suhosin module gets included in debian's php.ini config files.
debian:~# cd /etc/php5

debian:/etc/php5# grep -rli suhosin *

apache2/conf.d/suhosin.ini

cgi/conf.d/suhosin.ini

cli/conf.d/suhosin.ini

conf.d/suhosin.ini
Yeah that's right Debian has three php.ini php config files. One for the php cli – /usr/bin/php, another for the Apache webserver loaded php library – /usr/lib/apache2/modules/libphp5.so and one for Apache's cgi module – /usr/lib/apache2/modules/mod_fcgid.so .
I was too lazy to edit all the above found declarations trying to include the suhosin module in PHP, hence I remembered that probably all this obsolete suhosin module declaration are still present because probably the php5-suhosin package is still not purged from the system.
A quick check with dpkg , further strenthened my assumption as the php5-suhosin module was still hanging around as an (rc – remove candidate);
debian:~# dpkg -l |grep -i suhosin

rc php5-suhosin 0.9.32.1-1 advanced protection module for php5
Hence to remove the obsolete package config and directories completely out of the system and hence solve the PHP Warning I used dpkg –purge, like so:
debian:~# dpkg --purge php5-suhosin

(Reading database ... 76048 files and directories currently installed.)

Removing php5-suhosin ...

Purging configuration files for php5-suhosin ...

Processing triggers for libapache2-mod-php5 ...

Reloading web server config: apache2.
Further on to make sure the PHP Warning is solved I did the cron php script another go and it produced no longer errors:
debian:~# php /home/website/www/cron/update.php

debian:~#
Tags: apache, apache php, assumption, candidate, CentOS, cgi, cgi module, cli, config, cron, debian gnu, declaration, declarations, doesn, dpkg, file, gnu linux, host, ini, inicgi, iniconf, lib, libapache, Linux, mod, odd experiences, package, php scripts, php server, protection, right, rli, server host, shared object, squeeze, suhosin, unable to load dynamic library, Warnings
Posted in Linux, System Administration, Various, Web and CMS | 8 Comments »
Tuesday, April 8th, 2008 
Some time ago I thought of ways to optimize my Linux Servers network performance.
Even though there are plenty of nice articles on the topic on how to better optimize Linux server performance by tunning up the kernel sysctl (variables).
Many of the articles I found was not structed in enough understandable way so I decided togoogle around and found few interesting websites which gives a good overview on how one can speed up a bit and decrease overall server loads by simply tuning few basic kernel sysctl variables.
Below article is a product of my research on the topic on how to increase my GNU / Linux servers performance which are mostly running LAMP (Linux / Apache / MySQL / PHP) together with Qmail mail servers.
The article is focusing on Networking as networking is usual bottleneck for performance.
Below are the variables I found useful for optimizing the Linux kernel Network stack.
Implementing the variables might reduce your server load or if not decrease server load times and CPU utilization, they would at lease increase thoroughput so more users will be able to access your servers with (hopefully) less interruptions.
That of course would save you some Hardware costs and raise up your Servers efficiency.
Here are the variables themselves and some good example:
# values.net.ipv4.ip_forward = 0 ( Turn off IP Forwarding )
		net.ipv4.conf.default.rp_filter = 1
		# ( Control Source route verification )

net.ipv4.conf.default.accept_redirects = 0
		# ( Disable ICMP redirects )

net.ipv4.conf.all.accept_redirects = 0 ( same as above )

net.ipv4.conf.default.accept_source_route = 0
		# ( Disable IP source routing )

net.ipv4.conf.all.accept_source_route = 0

( - || - )net.ipv4.tcp_fin_timeout = 40
		# ( Decrease FIN timeout ) - Useful on busy/high load

serversnet.ipv4.tcp_keepalive_time = 4000 ( keepalive tcp timeout )

net.core.rmem_default = 786426 - Receive memory stack size ( a good idea to increase it if your server receives big files )

net.ipv4.tcp_rmem = "4096 87380 4194304"

net.core.wmem_default = 8388608 ( Reserved Memory per connection )

net.core.wmem_max = 8388608

net.core.optmem_max = 40960

( maximum amount of option memory buffers )
		# like a homework investigate by yourself what the variables below stand for :)

net.ipv4.tcp_max_tw_buckets = 360000

net.ipv4.tcp_reordering = 5

net.core.hot_list_length = 256

net.core.netdev_max_backlog = 1024
# Below are newly added experimental
#net.core.rmem_max = 16777216
#net.core.wmem_max = 16777216
##kernel.msgmni = 1024
##kernel.sem = 250 256000 32 1024
##vm.swappiness=0
kernel.sched_migration_cost=5000000
Also a good sysctl.conf file which one might want to substitite or use as a skele for some productive server is ready for download here
Even if you can't reap out great CPU reduction benefits from integrating above values or similar ones, your overall LAMP performance to end customers should increase – at some occasions dramatically, at others little bit but still noticable.
If you're unsure on exact kernel variable values to use check yourself what should be the best values that fits you according to your server Hardware – usually this is done by experimenting and reading the kernel documentation as provided for each one of uplisted variables.
Above sysctl.conf is natively created to run on Debian and on other distributions like CentOS, Fedora Slackware some values might either require slight modifications.
Hope this helps and gives you some idea of how network optimization in Linux is usually done. Happy (hacking) tweakening !
Tags: amount, backlog, buckets, CentOS, connection, control source, Decrease, distributions, download, example values, fedora, file, gnu linux, good, homework, Hope, hot list, ICMP, interesting websites, ipv, linux network, linux servers, memory buffers, network optimization, network stack, option, performanceand, Receive, reordering, servers, servers network, serversnet, source route, stack size, substitite, tcp ip, time, Useful, variables, wmem
Posted in Computer Security, Linux, Networking, Performance Tuning, System Administration | 2 Comments »
Monday, September 11th, 2017 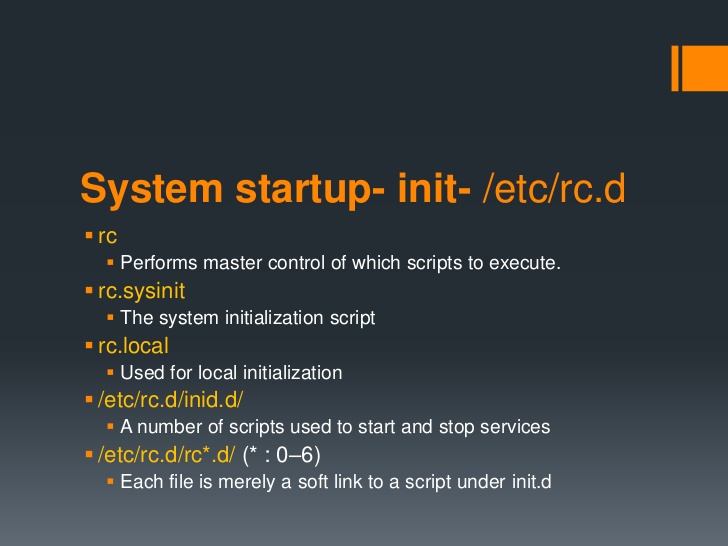
If you have installed a newer version of Debian GNU / Linux such as Debian Jessie or Debian 9 Stretch or Ubuntu 16 Xenial Xerus either on a server or on a personal Desktop laptop and you want tto execute a number of extra commands next to finalization of system boot just like we GNU / Linux users used to do already for the rest 25+ years you will be surprised that /etc/rc.local is no longer available (file is completely missing!!!).
This kind of behaviour (to avoid use of /etc/rc.local and make the file not present by default right after Linux OS install) was evident across many RedHack (Redhat) distributions such as Fedora and CentOS Linux for the last number of releases and the tendency was to also happen in Debian based distros too as it often does, however there was a possibility on this RPM based distros as well as rest of Linux distros to have the /etc/rc.local manually created to work around the missing file.
But NOoooo, the smart new generation GNU / Linux architects with large brains decided to completely wipe out the execution on Linux boot of /etc/rc.local from finalization stage, SMART isn't it??
For instance If you used to eat certain food for the last 25+ years and they suddenly prohibit you to eat it because they say this is not necessery anymore how would you feel?? Crazy isn't it??
Yes I understand the idea to wipe out /etc/rc.local did have a reason as the developers are striving to constanly improve the boot speed process (and the introduction of systemd (system and service manager) in Debian 8 Jessie over the past years did changed significantly on how Linux boots (earlier used SysV boot and LSB – linux standard based init scripts), but come on guys /etc/rc.local
doesn't stone the boot process with minutes, including it will add just 2, 3 seconds extra to boot runtime, so why on earth did you decided to remove it??
What I really loved about Linux through the years was the high level of consistency and inter-operatibility, most things worked just the same way across distributions and there was some logic upgrade, but lately this kind of behaviour is changing so in many of the new things in both GUI and text mode (console) way to interact with a GNU / Linux PC all becomes messy sadly …
So the smart guys who develop Gnu / Linux distros said its time to depreciate /etc/rc.local to prevent the user to be able to execute his set of finalization commands at the end of each booted multiuser runlevel.
The good news is you can bring back (resurrect) /etc/rc.local really easy:
To so, just execute the following either in Physical /dev/tty Console or in Gnome-Terminal (for GNOME users) or for KDE GUI environment users in KDE's terminal emulator konsole:
cat <<EOF >/etc/rc.local
#!/bin/sh -e
#
# rc.local
#
# This script is executed at the end of each multiuser runlevel.
# Make sure that the script will "exit 0" on success or any other
# value on error.
#
# In order to enable or disable this script just change the execution
# bits.
#
# By default this script does nothing.
exit 0
EOF
chmod +x /etc/rc.local
systemctl start rc-local
systemctl status rc-local
I think above is self-explanatory /etc/rc.local file is being created and then to enable it we run systemctl start rc-local and then to check the just run rc-local service status systemctl status
You will get an output similar to below:
root@jericho:/home/hipo# systemctl start rc-local
root@jericho:/home/hipo# systemctl status rc-local
● rc-local.service – /etc/rc.local Compatibility
Loaded: loaded (/lib/systemd/system/rc-local.service; static; vendor preset:
Drop-In: /lib/systemd/system/rc-local.service.d
└─debian.conf
Active: active (exited) since Mon 2017-09-11 13:15:35 EEST; 6s ago
Process: 5008 ExecStart=/etc/rc.local start (code=exited, status=0/SUCCESS)
Tasks: 0 (limit: 4915)
CGroup: /system.slice/rc-local.service
sep 11 13:15:35 jericho systemd[1]: Starting /etc/rc.local Compatibility…
setp 11 13:15:35 jericho systemd[1]: Started /etc/rc.local Compatibility.
To test /etc/rc.local is working as expected you can add to print any string on boot, right before exit 0 command in /etc/rc.local
you can add for example:
echo "YES, /etc/rc.local IS NOW AGAIN WORKING JUST LIKE IN EARLIER LINUX DISTRIBUTIONS!!! HOORAY !!!!";
On CentOS 7 and Fedora 18 codename (Spherical Cow) or other RPM based Linux distro if /etc/rc.local is missing you can follow very similar procedures to have it enabled, make sure
/etc/rc.d/rc.local
is existing
and /etc/rc.local is properly symlined to /etc/rc.d/rc.local
Also don't forget to check whether /etc/rc.d/rc.local is set to be executable file with ls -al /etc/rc.d/rc.local
If it is not executable, make it be by running cmd:
chmod a+x /etc/rc.d/rc.local
If file /etc/rc.d/rc.local happens to be missing just create it with following content:
#!/bin/sh
# Your boot time rc.commands goes somewhere below and above before exit 0
exit 0
That's all folks rc.local not working is solved,
enjoy /etc/rc.local working again 🙂
Tags: CentOS, content, example, exit, file, gnu linux, how to make /etc/rc.local work again, lsb, rc.local on newer linu enable, solve unworking rc.local, status, tendency, terminal emulator
Posted in Everyday Life, Linux, Linux and FreeBSD Desktop, System Administration | 2 Comments »
Tuesday, May 8th, 2012 
I believe, the quickest way to take notes on Linux and BSD and later view the notes is to use the command line.
A very easy simple way to keep record of various short notes is just to use a simple text editor like (vim) and store each note in a separate file in lets say ~/notes/ directory.
Actually, I'm using this way to take notes and store sensitive info for various important information I need for further reference, since 5 years or so..
Opening a new text editor for each note and then doing cd ~/notes/; ls |grep -i 'string' is a bit time consuming.
Fortunately there is a quick two shell functions hack that shortens time for note taking. The following two bash functions has to be added in ~/.bashrc:
n() {

vim ~/notes/"$*".txt

}

nls() {

ls -c ~/notes/ | grep "$1"

}
Copy / Paste this two functions in the beginning or the end of ~/.bashrc in order to use them.
Also if ~/notes directory is not existing, yet create it:
hipo@noah:~$ mkdir notes
To make the two new input functions active across opened bash shells on console or terminal either re-login or reread the .bashrc by "sourcing it", e.g.
hipo@noah:~$ source ~/.bashrc
Afterwards, note taking becomes a piece of cake to store a new note with login credentials (user/password) for a new registration to a random named website, type something like:
hipo@noah:~$ n my_website_name-user-pass
This will open for editting ~/.notes/my_website_name-user-pass.txt, type the new desired note content and do save and exit from vim (press esc and type :x!.
Then to get a quick list of all previously stored notes use:
hipo@noah:~$ nls website

my_website_name-user-pass.txt
If you already have a directory containing subdirectories with various taken notes (like me), you will need to use an improved version nls written by Jason Ryan, the nls improved is like this:
nls () { tree -CR --noreport ~/notes | awk '{

if ((NR >) gsub(/.txt/,"")); if

(NF==1) print $1; else if (NF==2)

print $2; else if (NF==3)

printf " %s\n", $3}';

}
This two functions, were not my creation but was suggested in Linux Magazine issue 135 article entitled Command-line task managers and note-taking tools written by Dmitri Popov.
Hope this two functions, will be helpful to console geeks out there.
Tags: Auto, BSD, cake, consuming, copy paste, cr, Draft, file, freebsd, gnu linux, hack, hipo, important information, info, information, input functions, jason ryan, Linux, login, login credentials, mkdir, need, nls, noah, opening, password, piece, piece of cake, sensitive info, Shell, shell functions, shells, something, store, subdirectories, terminal, text, time, time consuming, Tip Quick Note, txtIf, type, use, vim, websitemy
Posted in Curious Facts, Linux, System Administration, vim editor | 2 Comments »
Friday, October 21st, 2011 
I needed to migrate vpopmail/domains multiple directories stored on 2 servers to a single vpopmail install.
Merging the two vpopmails user Maildir/ stored accounts actually actually was quite simple, though it needed a bit of tweaks.
Here is how I migrated the two vpopmail installations to reside on the one vpopmail mail storage.
1. I used tar to archive the two vpopmail installations on the two different
First I logged in with root over ssh on the first node, e.g.:
qmail-server1:~# cd /home/vpopmail/

qmail-server1:/home/vpopmail# ionice -c 3 tar -czvf vpopmail1_$(date +%Y%m%d).tar.gz domains/

...
Then logged in on the second machine:
qmail-server2:~# cd /home/vpopmail

qmail-server2:/home/vpopmail# ionice -c 3 tar -czvf vpopmail2_$(date +%Y%m%d).tar.gz domains/
I used ionice -c 3 which instructs the tar archive of vpopmail directory to be created using idle (sparing the hard disk) from I/O overheads.
Sometimes not using ionice especially the case where hundreds of mail domains exist in domains/ could overload the server and stop the qmail and even sometimes ssh from properly responding for a very long periods as well as delaying the work of the mail server and failure to accept some user connections to pop3 or smtp protocols.I found out about the exisnte of ionice command just recently, reading some blog online. The command is absolute "must use", always when have to archive directories with tens of thousands of files and subdirectories. It's also nice in general, also on some copy or move operations on GNU / Linux, ionice is truly great.
Anyways after a while I had my both archives on both servers existing, so I used sftp (one can use scp as well) to transfer the archives to the newly configured qmail + vpopmail installation.
2. Use sftp or scp to copy the archives to the new configured vpopmail server
Again on both servers I had to execute, sftp I prefer sftp as I love being interactive on the shell 😉
qmail-server1:/home/vpopmail# sftp root@my-vpopmail-server-host.com

Password:

Connected to my-vpopmail-server-host.com.

sftp> cd /home/vpopmail

sftp> put vpopmail1_$(date +%Y%m%d).tar.gz

...

sftp> exit
Once again the same commands has to be issued on the second vpomail server, where the second domains/ mail accounts archive was just made:
qmail-server2:/home/vpopmail# sftp root@my-vpopmail-server-host.com

Password:

Connected to my-vpopmail-server-host.com.

sftp> cd /home/vpopmail

sftp> put vpopmail2_$(date +%Y%m%d).tar.gz

...

sftp> exit
Now as both of the archives are uploaded, next step is to login to the root@my-vpopmail-server-host.com server, where the two archives were just uploaded:
qmail-server1:/var/domains# ssh root@my-vpopmail-server-host.com

my-vpopmal-server-host:~# cd /home/vpopmailmy-vpopmail-server-host:/home/vpopmail# tar -zxvf vpopmail1_$(date +%Y%m%d).tar.gz domains/

...
Next on, the second vpopmail2_$(date +%Y%m%d).tar.gz is untarred:
3. Unarchive the uploaded vpopmail*.tar.gz archives
my-vpopmail-server-host:/home/vpopmail# tar -zxvf vpopmail2_$(date +%Y%m%d).tar.gz domains/

...
Now, if the two archives are properly tarred and no errors are returned (that was my case thx God).
4. Use a shell script to generate a script, to later change all user emails passwords on the my-vpopmail-server-host.com
The next thing which has to be done is that all email accounts with passwords are recreated with vpopmail's /home/vpopmail/bin/vpasswd command. Even though the domains are existing with the respective vpasswd and vpasswd.cdb in each mailbox on the new server my-vpopmail-server-host still the mailboxes were not visible by vpopmail. To make all the mailboxes with the correct passwords be responding on the new vpopmail connections via IMAP and POP3 mail fetch protocols, I wrote a small script which does change the passwords of all mailboxes just transferred from the two servers to my-vpopmail-server-host
The script is very simple and actually is not too automated, but at least it works. I've called my script to dump all the user passwords for all the vpopmail filesystem existing mail domains dump_vpopmail_mail_passwords.sh
To use the script its necessery that the script is downloaded on both the vpopmail mail servers from which domains/ directory is migrated, e.g.:
qmail-server1:/home/vpopmail# wget https://www.pc-freak.net/bshscr/dump_vpopmail_mail_passwords.sh

...

qmail-server1:/home/vpopmail# sh dump_vpopmail_mail_passwords.sh >> change_mail_account_pwds.sh
Same procedure goes on the second vpopmail server qmail-server2:
qmail-server2:/home/vpopmail# wget https://www.pc-freak.net/bshscr/dump_vpopmail_mail_passwords.sh

...

qmail-server2:/home/vpopmail# sh dump_vpopmail_mail_passwords.sh >> change_mail_account_pwds.sh
5. Upload the change_mail_accounts_pwds.sh shell script created on the two qmail mail servers to dump_vpopmail_mail_passwords.sh
Again I used sftp to upload the two change_mail_account_pwds.sh bash scripts:
qmail-server1:/home/vpopmail# sftp root@my-vpopmail-server-host.com

Password:

Connected to my-vpopmail-server-host.com.

sftp> put change_mail_account_pwds.sh change_mail_account_pwds1.sh

...

sftp> exit
sftp>
qmail-serve2:/home/vpopmail# sftp root@my-vpopmail-server-host.com

Password:

Connected to my-vpopmail-server-host.com.

sftp> put change_mail_account_pwds.sh change_mail_account_pwds2.sh

...

sftp> exit
6. Execute change_mail_account_pwds1.sh and change_mail_account_pwds2.sh on my-vpopmail-server-host.com
On the 3rd server where the two vpopmail domains are migrated my-vpopmail-server-host.com , from /home/vpopmail invoke the above two scripts:
root@my-vpopmail-server-host.com:/home/vpopmail# sh change_mail_account_pwds1.sh

root@my-vpopmail-server-host.com:/home/vpopmail# sh change_mail_account_pwds2.sh
The two scripts will contain list with all the two migrated vpopmail user mail addresses in a format similar to:
vpasswd mail_account@mail-domain.com password1

vpasswd mail_account1@mail-domain.com some_password

vpasswd mail_accountX@mail-domain.com other_password

etc..
After following this steps, all the mail accounts (or most of them ;)) should be merged from the two servers on the new configured vpopmail on my-vpopmail-server-host.com host.
The up-described procedure could be literally followed with migratingm any number of vpopmail /home/vpopmail/domains user email accounts.
If it has to be mass deployed based, its coparatively easy even to write an automated script to do the various aforementioned steps without any user interaction.
I've seen also some other explanations on how to migrate qmail.jsm1.net , but honestly was too lazy to read them, so I just came up with the ways described here.
One important note to make here is always to make backups, this steps worked for me but I can't guarantee this migration tutorial will work at all. I hope this helps somebody out there. Cheers 😉
Tags: archive directories, cd home, change, com, command, comPassword, configured, copy, czvf, Disk, email accounts, failure, gnu linux, gz, hard disk, How to, installation, login, long periods, mail accounts, mail domains, mail server, mail storage, move, node, pop, protocols, quot, root, scp, script, servers, sftp, Shell, smtp, ssh, tar archive, tar gz, tens of thousands, thx, tweaks, vpomail, vpopmail, wget, work
Posted in Linux, Qmail, System Administration, Various | 1 Comment »
Monday, June 11th, 2012 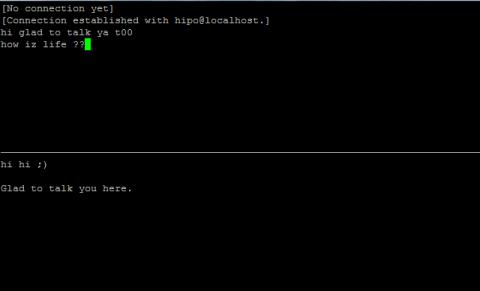
After writting in previous article on how talk be used to handle interactive chat console sessions on FreeBSD, I thought of dropping a few lines on how same is done on Debian, so here is how:
1.; Install talk and talkd
noah:/home/hipo# apt-get --yes install talk talkd

Reading package lists... Done

Building dependency tree

Reading state information... Done

The following NEW packages will be installed:

talk talkd

0 upgraded, 2 newly installed, 0 to remove and 93 not upgraded.

Need to get 19.0 kB/42.3 kB of archives.

After this operation, 201 kB of additional disk space will be used.

Get:1 http://ftp.nl.debian.org/debian/ stable/main talkd amd64 0.17-14 [19.0 kB]

Fetched 19.0 kB in 0s (67.1 kB/s)

Selecting previously deselected package talk.

(Reading database ... 90%

Unpacking talk (from .../talk_0.17-14_amd64.deb) ...

Selecting previously deselected package talkd.

Unpacking talkd (from .../talkd_0.17-14_amd64.deb) ...

Processing triggers for man-db ...

Setting up talk (0.17-14) ...

update-alternatives: using /usr/bin/netkit-ntalk to provide /usr/bin/talk (talk) in auto mode.

Setting up talkd (0.17-14) ...
2.;; Check and make sure talk and ntalkd lines are present in /etc/inetd.conf
noah:/home/hipo# grep -i talk /etc/inetd.conf

#:BSD: Shell, login, exec and talk are BSD protocols.

talk dgram udp wait nobody.tty /usr/sbin/in.talkd in.talkd

ntalk dgram udp wait nobody.tty /usr/sbin/in.ntalkd in.ntalkd
Now you probably wonder why are there two lines in /etc/inetd.conf for ))
in.talkd and in.ntald
in.talkd daemon's aim is to deliver talk sessions between logged in users on one Linux host with few logged in users willing to talk to each other locally;;
Wheter in.ntalkd is designed to serve interactive user talks between the host where in.ntalkd is installed and remote systems ruwhich have the talk client program installed. Of course in order for remote talks to work properly the firewall (if such has to be modified to allow in.ntalkd chats. I've never used in.ntalkd and on most machines having in.ntald hanging around from inetd, could be a potential security hole so, for people not planning to initiate remote TALKs between Unix / Linux / BSD hosts on a network it is a good practice the ntalkd line seen above in inetd.conf to be commented out ::;
noah:/home/hipo# grep -i talk /etc/inetd.conf

#:BSD: Shell, login, exec and talk are BSD protocols.

talk dgram udp wait nobody.tty /usr/sbin/in.talkd in.talkd

#ntalk dgram udp wait nobody.tty /usr/sbin/in.ntalkd in.ntalkd
3.;;; Restart openbsd-inetd init script and talk is ready to use
noah:~# /etc/init.d/openbsd-inetd restart

* Restarting internet superserver inetd
Onwards to use talk between two users the syntax is same like on other BSD, as a matter of fact TALK – console / terminal interactive chat originally was developed for the 4.2BSD UNIX release ;; the Linux code is a port of this BSD talk and not rewrite from scratch.
Using talk between two logged in users on pts/1 (lets say user test) and tty1 (user logged as root) is done with:
noah:~$ tty

noah:~$ talk root@localhost tty1

/dev/pts/1
On tty1 the user has to have enabled Talk sessions request, by default this behaviour in Debian and probably other Debian based Linuxes (Ubuntu) for instance is configured to have talks disabled, i,e ,,,
root@noah:~# mesg

is n
Enabling it on root console is done with:
root@noah:~# mesg y
Once enabled the root will be able to see the TALK service requests on tty1 otherwise, the user gets nothing. With enabled messaging the root user will get on his tty:
Message from TalkDaemon@his_machine...

talk: connection requested by your_name@your_machine.

talk: respond with: talk your_name@your_machine
So on the root console to reply back to talk chat request:
noah:~$ talk hipo@localhost
Tags: aim, Auto, auto mode, building, configured, confnoah, daemon, deb, debian gnu, dependency, dependency tree, dgram, Disk, disk space, DoneBuilding, Draft, exec, Fetched, freebsd, gnu linux, inetd, information, Install, Installing, interactive user, localhost, login, mesg, network, noah, nobody, ntalk, ntalkd, operation, package, protocols, reading database, reading package, request, root, root user, sbin, sessions, Shell, shell login, state information, tree, tty, wait, work, writting
Posted in Curious Facts, Everyday Life, Linux, Various | No Comments »
Wednesday, April 18th, 2012 
The default behaviour of lynx – console text browser on Linuces, BSD and other free OSes is to always ask, for the accept cookies prompt once an internet web page is opened that requires browser cookies to be enabled.
I should admin, having this "secure by default" (always ask for new cookies) behaviour in lynx was a good practice from a security point of view.
Another reason, why this cookies prompt is enabled by default is back in the days, when lynx was actively developed by programmers the websites with cookies support was not that many and even cookies was mostly required for user/pass authentication (all those who still remember this days the websites that requires authentication was a way less than today) …
With this said the current continuing security cautious behaviour in the browser, left from its old days is understandable.
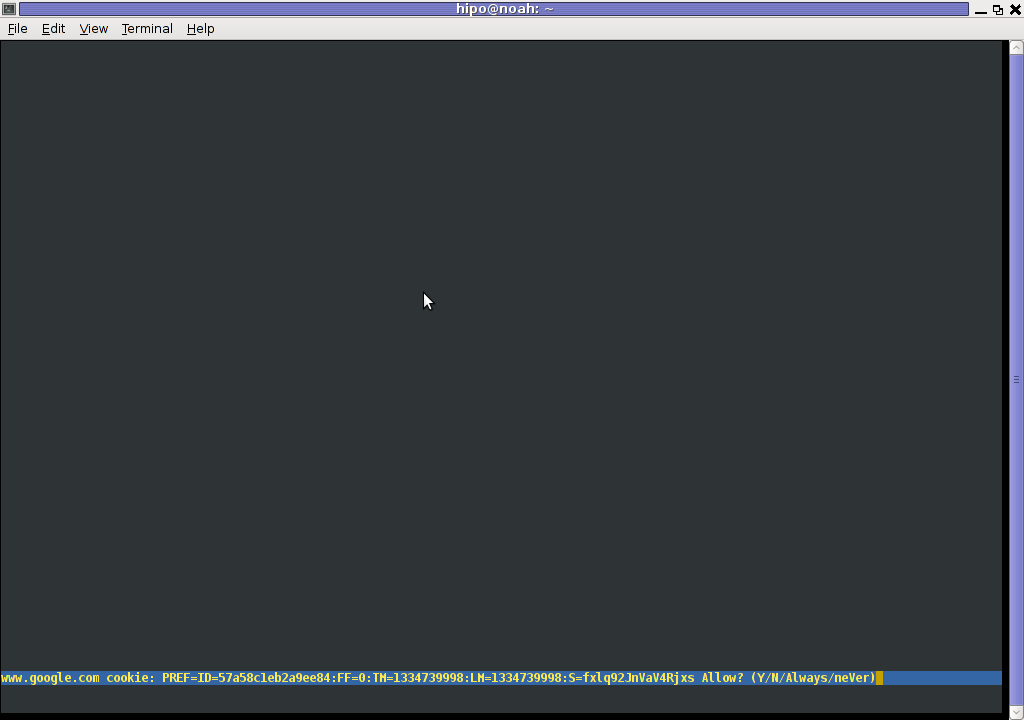
However I personally sometimes, need to use lynx more frequently and this behaviour of always opening a new website in text mode in console to prompts me for a cookie suddenly becomes a big waste of time if you use lynx to browser more than few sites. Hence I decided to change the default way lynx handles cookies and make them enabled by default instead.
Actually even in the past, when I was mainly using internet in console on every new server or home Linux install, I was again making the cookies to be permanently accepted.
Everyone who used lynx a few times already knows its "annoying" to all time accept cookie prompts … This provoked me to write this short article to explain how enabling of constant cookie accepting in lynx is done
To enable the persistent cookies in lynx, one needs to edit lynx.cfg on different GNU / Linux and BSD* distributions lynx.cfg is located in different directory.
Most of the lynx.cfg usual locations are /etc/lynx/lynx.cfg or /etc/lynx.cfg as of time of writting this post in Debian Squeeze GNU / Linux the lynx.cfg is located in /etc/lynx-cur/lynx.cfg, whether for FreeBSD / NetBSD / OpenBSD users the file is located in /usr/local/etc/lynx.cfg
What I did to allow all cookies is open lynx.cfg in vim edit and change the following lines:
a)
#FORCE_SSL_COOKIES_SECURE:FALSE
with
FORCE_SSL_COOKIES_SECURE:TRUE
b)
#SET_COOKIES:TRUE
uncomment it to:
SET_COOKIES:TRUE
c) next, change
ACCEPT_ALL_COOKIES:FALSE
ACCEPT_ALL_COOKIES:TRUE
Onwards opening any website with lynx auto-accepts the cookies.
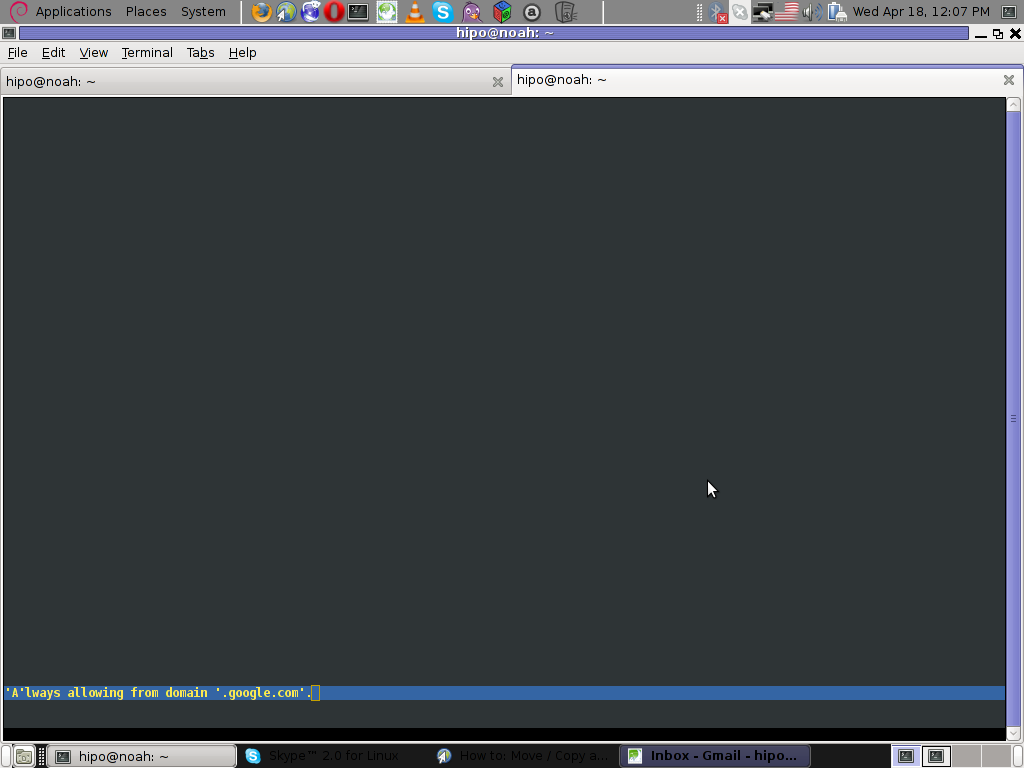
For people who care about there security (who still browse in console (surely not many anymore)), permanently allowing the cookies is not a good idea. But for those who are ready to drop off little security for convenience its ok.
Tags: ALL, authentication, Auto, browser cookies, BSD, bsd distributions, cfg, change, convenience, Cookie, default behaviour, Draft, everyone, file, free oses, GNU, gnu linux, good, How to, internet web, Linux, Lynx, lynx one, NetBSD, Onwards, OpenBSD, page, persistent cookies, point of view, programmers, quot, reason, security point, squeeze, support, text, text browser, text mode, time, TRUEb, TRUEc, TRUEuncomment, uncomment, use, using internet, vim, waste, waste of time, web page, writ
Posted in Curious Facts, Everyday Life, FreeBSD, Linux, System Administration | 1 Comment »
Wednesday, February 22nd, 2012 
Everyone who used Linux is probably familiar with wget or has used this handy download console tools at least thousand of times. Not so many Desktop GNU / Linux users like Ubuntu and Fedora Linux users had tried using wget to do something more than single files download.
Actually wget is not so popular as it used to be in earlier linux days. I've noticed the tendency for newer Linux users to prefer using curl (I don't know why).
With all said I'm sure there is plenty of Linux users curious on how a website mirror can be made through wget.
This article will briefly suggest few ways to do website mirroring on linux / bsd as wget is both available on those two free operating systems.
1. Most Simple exact mirror copy of website
The most basic use of wget's mirror capabilities is by using wget's -mirror argument:
# wget -m http://website-to-mirror.com/sub-directory/
Creating a mirror like this is not a very good practice, as the links of the mirrored pages will still link to external URLs. In other words link URL will not pointing to your local copy and therefore if you're not connected to the internet and try to browse random links of the webpage you will end up with many links which are not opening because you don't have internet connection.
2. Mirroring with rewritting links to point to localhost and in between download page delay
Making mirror with wget can put an heavy load on the remote server as it fetches the files as quick as the bandwidth allows it. On heavy servers rapid downloads with wget can significantly reduce the download server responce time. Even on a some high-loaded servers it can cause the server to hang completely.
Hence mirroring pages with wget without explicity setting delay in between each page download, could be considered by remote server as a kind of DoS – (denial of service) attack. Even some site administrators have already set firewall rules or web server modules configured like Apache mod_security which filter requests to IPs which are doing too frequent HTTP GET /POST requests to the web server.
To make wget delay with a 10 seconds download between mirrored pages use:
# wget -mk -w 10 -np --random-wait http://website-to-mirror.com/sub-directory/
The -mk stands for -m/-mirror and -k / shortcut argument for –convert-links (make links point locally), –random-wait tells wget to make random waits between o and 10 seconds between each page download request.
3. Mirror / retrieve website sub directory ignoring robots.txt "mirror restrictions"
Some websites has a robots.txt which restricts content download with clients like wget, curl or even prohibits, crawlers to download their website pages completely.
/robots.txt restrictions are not a problem as wget has an option to disable robots.txt checking when downloading.
Getting around the robots.txt restrictions with wget is possible through -e robots=off option.
For instance if you want to make a local mirror copy of the whole sub-directory with all links and do it with a delay of 10 seconds between each consequential page request without reading at all the robots.txt allow/forbid rules:
# wget -mk -w 10 -np -e robots=off --random-wait http://website-to-mirror.com/sub-directory/
4. Mirror website which is prohibiting Download managers like flashget, getright, go!zilla etc.
Sometimes when try to use wget to make a mirror copy of an entire site domain subdirectory or the root site domain, you get an error similar to:
Sorry, but the download manager you are using to view this site is not supported.
We do not support use of such download managers as flashget, go!zilla, or getright
This message is produced by the site dynamic generation language PHP / ASP / JSP etc. used, as the website code is written to check on the browser UserAgent sent.
wget's default sent UserAgent to the remote webserver is:
Wget/1.11.4
As this is not a common desktop browser useragent many webmasters configure their websites to only accept well known established desktop browser useragents sent by client browsers.
Here are few typical user agents which identify a desktop browser:
- Mozilla/5.0 (Windows NT 6.1; rv:6.0) Gecko/20110814 Firefox/6.0
- Mozilla/5.0 (X11; Linux i686; rv:6.0) Gecko/20100101 Firefox/6.0
- Mozilla/6.0 (Macintosh; I; Intel Mac OS X 11_7_9; de-LI; rv:1.9b4) Gecko/2012010317 Firefox/10.0a4
- Mozilla/5.0 (Windows NT 6.1; Win64; x64; rv:2.2a1pre) Gecko/20110324 Firefox/4.2a1pre
etc. etc.
If you're trying to mirror a website which has implied some kind of useragent restriction based on some "valid" useragent, wget has the -U option enabling you to fake the useragent.
If you get the Sorry but the download manager you are using to view this site is not supported , fake / change wget's UserAgent with cmd:
# wget -mk -w 10 -np -e robots=off \

--random-wait

--referer="http://www.google.com" \--user-agent="Mozilla/5.0 (Windows; U; Windows NT 5.1; en-US; rv:1.8.1.6) Gecko/20070725 Firefox/2.0.0.6" \--header="Accept:text/xml,application/xml,application/xhtml+xml,text/html;q=0.9,text/plain;q=0.8,image/png,*/*;q=0.5" \--header="Accept-Language: en-us,en;q=0.5" \--header="Accept-Encoding: gzip,deflate" \--header="Accept-Charset: ISO-8859-1,utf-8;q=0.7,*;q=0.7" \--header="Keep-Alive: 300"
For the sake of some wget anonimity – to make wget permanently hide its user agent and pretend like a Mozilla Firefox running on MS Windows XP use .wgetrc like this in home directory.
5. Make a complete mirror of a website under a domain name
To retrieve complete working copy of a site with wget a good way is like so:
# wget -rkpNl5 -w 10 --random-wait www.website-to-mirror.com
Where the arguments meaning is:
-r – Retrieve recursively
-k – Convert the links in documents to make them suitable for local viewing
-p – Download everything (inline images, sounds and referenced stylesheets etc.)
-N – Turn on time-stamping
-l5 – Specify recursion maximum depth level of 5
6. Make a dynamic pages static site mirror, by converting CGI, ASP, PHP etc. to HTML for offline browsing
It is often websites pages are ending in a .php / .asp / .cgi … extensions. An example of what I mean is for instance the URL http://php.net/manual/en/tutorial.php. You see the url page is tutorial.php once mirrored with wget the local copy will also end up in .php and therefore will not be suitable for local browsing as .php extension is not understood how to interpret by the local browser.
Therefore to copy website with a non-html extension and make it offline browsable in HTML there is the –html-extension option e.g.:
# wget -mk -w 10 -np -e robots=off \

--random-wait \

--convert-links http://www.website-to-mirror.com
A good practice in mirror making is to set a download limit rate. Setting such rate is both good for UP and DOWN side (the local host where downloading and remote server). download-limit is also useful when mirroring websites consisting of many enormous files (documental movies, some music etc.).
To set a download limit to add –limit-rate= option. Passing by to wget –limit-rate=200K would limit download speed to 200KB.
Other useful thing to assure wget has made an accurate mirror is wget logging. To use it pass -o ./my_mirror.log to wget.
Tags: adm, argument, Auto, bandwidth, briefly, browser, BSD, capabilities, cgi, common, connection, copy, denial of service, denial of service attack, Desktop, download, Draft, exact mirror, external urls, fedora linux, flashget, free operating systems, gnu linux, heavy load, home directory, How to, internet connection, Linux, linux users, localhost, make, manager, mirror copy, Mozilla, option, page, php extension, quot, random links, remote server, request, servers, site mirroring, something, tendency, text, text html, time, Ubuntu, URLs, UserAgent, website mirror, wget
Posted in Linux, System Administration, Web and CMS | 2 Comments »
Tuesday, July 6th, 2010 I’ve recently broke my grub untentianally while whiping out one of my disk partitions who was prepared to run a hackintosh.
Thus yesterday while switching on my notebook I was unpleasently surprised with an error Grub Error 17 and the boot process was hanging before it would even get to grub’s OS select menu.
That was nasty and gave me a big headache, since I wasn’t even sure if my partitions are still present.
What made things even worse that I haven’t created any backups preliminary to prepare for an emergency!
Thus restoring my system was absolutely compulsory at any cost.
In recovering the my grub boot manager I have used as a basis of my recovery an article called How to install Grub from a live Ubuntu cd
Though the article is quite comprehensive, it’s written a bit foolish, probably because it targets Ubuntu novice users 🙂
Another interesting article that gave me a hand during solving my issues was HOWTO: install grub with a chroot
Anyways, My first unsuccessful attempt was following a mix of the aforementioned articles and desperately trying to chroot to my mounted unbootable partition in order to be able to rewrite the grub loader in my MBR.
The error that slap me in my face during chroot was:
chroot: cannot execute /bin/sh : exec format error
Ghh Terrible … After reasoning on the shitty error I came to the conclusion that probably the livecd I’m trying to chroot to my debian linux partition is probably using a different incompatible version of glibc , if that kind of logic is true I concluded that it’s most likely that the glibc on my Linux system is newer (I came to that assumption because I was booting from livecds (Elive, Live CentOS as well Sabayon Linux, which were burnt about two years ago).
To proof my guesses I decided to try using Debian testing Squeeze/Sid install cd . That is the time to mention that I’m running Debian testing/unstable under the code name (Squeeze / Sid).
I downloaded the Debian testing amd64 last built image from here burnt it to a cd on another pc.
And booted it to my notebook, I wasn’t completely sure if the Install CD would have all the necessary recovery tools that I would need to rebuilt my grub but eventually it happened that the debian install cd1 has everything necessary for emergency situations like this one.
After I booted from the newly burned Debian install cd I followed the following recovery route to be able to recovery my system back to normal.It took me a while until I come with the steps described here, but I won’t get into details for brevity
1. Make new dir where you intend to mount your Linux partition and mount /proc, /dev, /dev/pts filesystems and the partition itself
noah:~# mkdir /mnt/root

noah:~# mount -t ext3 /dev/sda8 /mnt/root

noah:~# mount -o bind /dev /mnt/root/dev

noah:~# mount devpts /dev/pts -t devpts
Change /dev/sda8 in the above example commands with your partition name and number.
2. chroot to the mounted partition in order to be able to use your filesystem, exactly like you normally use it when you’re using your Linux partition
noah:~# chroot /mnt/root /bin/bash
Hopefully now you should be in locked in your filesystem and use your Linux non-bootable system as usual.
Being able to access your /boot/grub directory I suggest you first check that everything inside:
/boot/grub/menu.lst is well defined and there are no problems with the paths to the Linux partitions.
Next issue the following commands which will hopefully recover your broken grub boot loader.
noah:~# grub

noah:~# find /boot/grub/stage1
The second command find /boot/grub/stage1 should provide you with your partitions range e.g. it should return something like:
root (hd0,7)
Nevertheless in my case instead of the expected root (hd0,7) , I was returned
/boot/grub/stage1 not found
Useless to say this is uncool 🙂
As a normal reaction I tried experimenting in order to fix the mess. Logically enough I tried to reinstall grub using the
noah:~# grub-install --root-directory=/boot /dev/sda

noah:~# update-grub
To check if that would fix my grub issues I restarted my notebook. Well now grub menu appeared with some error generated by splashy
Trying to boot any of the setup Linux kernels was failing with some kind of error where the root file system was trying to be loaded from /root directory instead of the normal / because of that neither /proc /dev and /sys filesystems was unable to be mounted and the boot process was interrupting in some kind of rescue mode similar to busybox, though it was a was less flexible than a normal busybox shell.
To solve that shitty issue I once again booted with the Debian Testing (Sid / Squeeze ) Install CD1 and used the commands displayed above to mount my linux partition.
Next I reinstalled the following packages:
noah:~# apt-get update

noah:~# apt-get install --reinstall linux-image-amd64 uswsusp hibernate grub grub-common initramfs-tools
Here the grub reinstall actually required me to install the new grub generation 2 (version 2)
It was also necessary to remove the splashy
noah:~# apt-get remove splashy
As well as to grep through all my /etc/ and look for a /dev/sda6 and substitute it with my changed partition name /dev/sda8
One major thing where I substituted /dev/sda6 to my actual linux partition now with a name /dev/sda8 was in:
initramfs-tools/conf.d/resumeThe kernel reinstall and consequently (update) does offered me to substitute my normal /dev/sda* content in my /etc/fstab to some UUIDS like UUID=ba6058da-37f8-4065-854b-e3d0a874fb4e
Including this UUIDs and restarting now rendered my system completely unbootable … So I booted once again from the debian install cd .. arrgh 🙂 and removed the UUID new included lines in /etc/fstab and left the good old declarations.
After rebooting the system now my system booted once again! Hooray! All my data and everything is completely intact now Thanks God! 🙂
Tags: assumption, boot manager, boot process, chroot, debian linux, dev, disk partitions, exec format error, filesystems, glibc, gnu linux, grub boot loader, grub error 17, hackintosh, incompatible version, linux partition, linux system, livecd, MBR, mkdir, mnt, noah, novice users, Recover/Restore unbootable GRUB boot loader on Debian Testing GNU/Linux using Linux LiveCD (Debian Install CD1), recovery, squeeze, unsuccessful attempt, whiping
Posted in Linux, Linux and FreeBSD Desktop, System Administration | 8 Comments »


How to permanently enable Cookies in Lynx text browser – Disable accept cookies prompt in lynx console browser
Wednesday, April 18th, 2012The default behaviour of lynx – console text browser on Linuces, BSD and other free OSes is to always ask, for the accept cookies prompt once an internet web page is opened that requires browser cookies to be enabled.
I should admin, having this "secure by default" (always ask for new cookies) behaviour in lynx was a good practice from a security point of view.
Another reason, why this cookies prompt is enabled by default is back in the days, when lynx was actively developed by programmers the websites with cookies support was not that many and even cookies was mostly required for user/pass authentication (all those who still remember this days the websites that requires authentication was a way less than today) …
With this said the current continuing security cautious behaviour in the browser, left from its old days is understandable.
However I personally sometimes, need to use lynx more frequently and this behaviour of always opening a new website in text mode in console to prompts me for a cookie suddenly becomes a big waste of time if you use lynx to browser more than few sites. Hence I decided to change the default way lynx handles cookies and make them enabled by default instead.
Actually even in the past, when I was mainly using internet in console on every new server or home Linux install, I was again making the cookies to be permanently accepted.
Everyone who used lynx a few times already knows its "annoying" to all time accept cookie prompts … This provoked me to write this short article to explain how enabling of constant cookie accepting in lynx is done
To enable the persistent cookies in lynx, one needs to edit lynx.cfg on different GNU / Linux and BSD* distributions lynx.cfg is located in different directory.
Most of the lynx.cfg usual locations are /etc/lynx/lynx.cfg or /etc/lynx.cfg as of time of writting this post in Debian Squeeze GNU / Linux the lynx.cfg is located in /etc/lynx-cur/lynx.cfg, whether for FreeBSD / NetBSD / OpenBSD users the file is located in /usr/local/etc/lynx.cfg
What I did to allow all cookies is open lynx.cfg in vim edit and change the following lines:
a)
#FORCE_SSL_COOKIES_SECURE:FALSEwith
FORCE_SSL_COOKIES_SECURE:TRUEb)
#SET_COOKIES:TRUEuncomment it to:
SET_COOKIES:TRUEc) next, change
ACCEPT_ALL_COOKIES:FALSEACCEPT_ALL_COOKIES:TRUEOnwards opening any website with lynx auto-accepts the cookies.
For people who care about there security (who still browse in console (surely not many anymore)), permanently allowing the cookies is not a good idea. But for those who are ready to drop off little security for convenience its ok.
Tags: ALL, authentication, Auto, browser cookies, BSD, bsd distributions, cfg, change, convenience, Cookie, default behaviour, Draft, everyone, file, free oses, GNU, gnu linux, good, How to, internet web, Linux, Lynx, lynx one, NetBSD, Onwards, OpenBSD, page, persistent cookies, point of view, programmers, quot, reason, security point, squeeze, support, text, text browser, text mode, time, TRUEb, TRUEc, TRUEuncomment, uncomment, use, using internet, vim, waste, waste of time, web page, writ
Posted in Curious Facts, Everyday Life, FreeBSD, Linux, System Administration | 1 Comment »