There are many saints who labored hard over the centuries, but there are few known that has done their feat in the Bulgarian lands. We Christian honor of the saints for centuries and whose memory is marked in the Church calendar of Saints, but there are some less known but not lesser in their confessory saints than the ancients. The Lord honors with eternal wreaths not only the sufferers of the early Christian times (during the early periods of persecution 1st and 2nd century) , but also those who are much closer to us in time and place and have endured persecutions and torments no less than the ancients.
We know about them from history, but it is not history that will join us to the sacrificial table, that will gather us in the church temple and that will strengthen us in faith. The signs of holiness are given to us from above, but our participation to accept it is also necessary, our "Let it be, Oh Lord!", another knowledge, so that we can pluck holiness from the depths of oblivion, be part of its path, tell about it and we bear witness to her miracles.
Today is another day of reaffirmation of holiness, deserved before God and known to people for a time.
Today, our thoughts and prayers are directed to the foothills of the Central Balkans (mountains) and to the Holy Trinity Monastery, illuminated by the martyrdom of the sisters, whose feet once touched the ground here and prayer chants rose day and night along with the fragrant smoke from the incense in the temple. And indeed, this monastery is like a candlestick placed on high, so that the light from it, which illuminated our land in the time of April's bloody harvest (on 20th of April 1976, The April Revolt against the Ottoman turks yoke has arised) never goes out and shines again, especially when our Church needs it.
Although it is not ancient, like others that glorify the Lord in the Slavic language over the centuries, the virgin monastery "Holy Trinity" was built around 1830 – when the Orthodox faith, like a vine, daily burned by non-believers, instead of withering – strengthened , and the thought of liberation more and more embraces souls and gives hope. For decades girls from the most awake and enlightened Orthodox families – not only from Novo Selo, but also from the neighboring places – put themselves under the protection of the One God the Holy Trinity. The inhabitants of Novo Selo ( Novoseltsi ) are famous with his zeal – both to the Church and to good morals.
Indeed, Novo Selo is a place worthy of raising and offering to the Most High the animate sacrifices of the true faith. To work for the pleasing to God, every wealthy family gave its contribution – and not only in form of money donations, lands and all kind of donations for the maintenance of the temples, the monastery, but also in the selection of worthy priests who would lay down their souls for their (flock) pasoms. And it is enough to mention only the two who received from the Savior a bright crown for their martyrdom, so that through their holy endurance and faith be be praised through them all the priests, guardians of the Christian faith who put their live for the herd during the many years of slavery that Bulgarians, Serbians, Greek, Romanians and many other Christians has suffered from the unfaithful.
With what words can we describe the zeal of priest Nikola Barbulov, a teacher and presbyter with a wise soul, who worked hard to successfully complete his studies in Bessarabia (nowadays Moldavia). He was fond of books, prosperous as a teacher, worthy as a priest, and educated many pupils; his spiritual children were the most active part of the Church body, among which many received priesthood as well.
Saint Pope Nicholas is similar to the great patriarch Euthymius, because he stayed to the end to guard his verbal flock; moreover, he was not a bloodless martyr, but a sufferer, put to death in terrible torments without renouncing his faith.
And with what words should we call the priest Georgi Dylgodreiski?
A warrior of Christ, as if a second Saint George, he fought not only against the thought, but also against the living enemy of the Cross. The new passion sufferer did not defend himself in the single combat with the Agarians (ottoman turks), he did not defend himself, he did not think about himself, but how to slow down the hordes of beasts and give the weak and helpless at least a little time to escape or hide from the ferocious infidels.
He guarded the House of God (the Church) and accepted circumcision as a grace, because he knew that through it he received eternal life.
We will not have enough words to praise the strength of those fragile nuns – fragile by nature, but strong in their faith.
The testimony of their life and death are the stories passed down from generation to generation in the new village families. There are not many memories, but the grace of their martyrdom is like an invisible light above the earth and, even without mentioning them, without praying to them, they are intercessors for those in trouble. There is no need for descriptions of their existence, because it is before the eyes of all who know the order in Orthodox monasteries. The sisters lived a celibate and angelic life – in deeds and prayers, in common breathing. Through their association they were a model and a guarantee of virtue to each one of them.
They prayed not only for their souls and for the salvation and well-being of their neighbors, but also for what was then in the heart of every Bulgarian – that God's destinies would be fulfilled and the Fatherland would once again become an independent Christian state.
Raised from childhood in piety and firm confession, entrusted by their relatives to God and the Mother of God, the brides of Christ humbly and daily wore the sweet yoke of Christ.
Every good deed of theirs – both prayer and manual work (following the example of the ancients saints of the path of ‘ora and labora’ – added oil to the lamps with which they would welcome the Bridegroom and enter with Him into the Kingdom of God.
The abbess of the monastery at that time was Susana, daughter of the mayor of the village, the fighter for faith and family Tsonko Somlev.
She worthily carries the burden of the board, making sure that the sisters reside according to the statute drawn up for them on Mount Athos by hieromonk Spyridon.
The ordeal of the priests and nuns whose martyrdom we celebrate today began when, on May 1, 1876, a mutiny signal was given on Mount Baban.
During this very harsh times for Bulgarian enslaved people in attempt to revolt against the unrighteess system of Ottoman empire not honoring the liberty and rights of people, the drunkenness of the breath of freedom raised the people to their feet, and the very next day the leaders announced the Novosel Republic (as a separate entity from the Ottoman Empire). During the several days of celebration, bells ring the valley, and prayer chants invite everyone to experience a moment of earthly joy, but also to call on the Lord of hosts to be their helper in the coming sorrows …
In the following days, the Christians tried to organize themselves and resist the Agarians, which hearing about the desire of people to self-govern themselves in a new tiny Christian country.
The unexpected cold and snow tormented the Chetniks (armed group part of Cheta a small battalion of armed liberation forces) of Tsanko Dyustabanov, and hunger weakened severely their strength.
And here the thirty nuns of the "Holy Trinity," adding to their prayers and service with the strength of their godly devotion, give no sleep to their eyes, nor slumber to their eyelids, but some alternate in the kitchen and bakery, and others took constant care for the under-shoeed and under-dressed boys, collecting everything that could serve them as clothing – socks knitted manually by them, scarfs, warm flannels…
And just according to the Gospel of Christ, anticipating the close meeting with the Bridegroom, they repeat the words of the Psalmist: "My heart is ready, God, my heart is ready…" (Ps. 56:8).
At that time, an army gathered around Sevlievo and Pleven, but not regular soldiers, to fight only against the armed chetniks and to keep the many innocent peaceful villants who officially did not took the guns but only supported and beseeched for the freedom of the darkness of harsh taxes and lack of rights as the ordinary muslims.
A blasphemous congregation of Abazis and Circassians is coming and multiplying around the monastery.
Adding to their natural demonic cruelty the orders of their leader, the thrice-cursed Deli Nejib Agha, they, seized with depravity and a desire to kill, slither like locusts, consigning to death and scorn all living things in their path..
Some of the residents, known for the approaching bashi-bazouk (irregular soldiers of Ottomans army rised in times of war), are hiding in the mountains, others are running in panic to the fields, and some of the houses in the new village are already engulfed in flames.
However, most of the nuns remain in the monastery.
In vain they hope that the hordes will not dare to desecrate the Holy presanctified heavenly place of God, the Holy Trinity monastery.
The priest Georgi Hristov, holed up in the upper floor of one of the monastery buildings, tries to slow down the enemy and give at least some of the fleeing time to escape.
There, once captured his body was cut down bit by bit by the enraged Circassians who burst through the monastery gate…
The last refuge of some of the nuns is the church building. One of them fails to enter with the others and is cut with a scythe (turkish half moon shaped sword) at the threshold of the temple.
We know about the last moments of the earthly life of the new martyrs from the shocking stories of four of the nuns who survived after having inflicted unbearable sufferings.
For the rest of their lives, they relive their humiliation and humiliation and vilify those of their sisters who took the martyrdom wreath.
The ungodly infidels shoot through the windows and hit several of the sisters.
Then they enter the church and start cutting whoever they want – both the living and the dead.
In front of the Church altar and inside it, Mother Abbess Susana, six other nuns and one laywoman died.
The abuses of the innocent victims, according to the testimonies, are inhumanly cruel. When they begin to strip everyone of their clothes and see that one of the sisters is still alive, the demonic minions blind and suffocate her, stuffing her eyes and mouth with mortar. The enraged and embittered instruments of the devil indulge in robbery and violence, not only in the church and the monastery, but everywhere in the settlement.
And so for the hearth (in glory) of the Bulgarian Orthodox true Christian faith, which was destroyed by the permission of the all-powerful providence. Ehat was said came true: "They shed their blood like water around Jerusalem and there was no one to bury them: they left the corpses of the slaves for food for the birds of the sky and the bodies of your reverends – for the earthly beasts."
But what is happening in Novo Selo is even more terrible – the Agarians not only desecrate the bodies of their victims. In the monastery church, they cut the icons into splinters, ransacked everything, and finally began to burn both the holy abode and the houses, so that there was nothing left to bury and mourn, and everywhere the abomination of desolation reigned.
But in the temple, the fire does not completely destroy the remains of the martyrs, so that later the dry bones can speak to everyone who looks at them with believing eyes and bows before their feat. And the testimony of our words is the ossuary of the "Holy Trinity" monastery rebuilt from the ashes, where one feels the invisible spiritual power and God's grace flowing from the remains – the holy relics – of the martyrs.
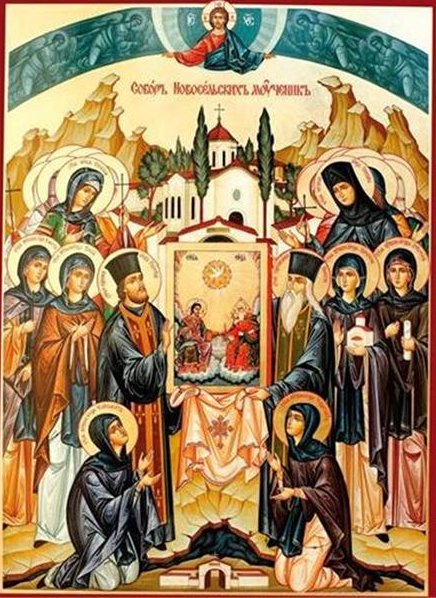
And let us from today on May 9, on the day of their suffering death, call them by their names, so that we also have their holy intercession prayers: you, newly martyred holy nuns
Susanna, Sophia, Elisaveta, Ephrosinia, Christina, Calista and Ekaterina,
and you, Susana Chorbadjieva, who during her lifetime was not able to join the sisters, but through your blood received a place in their image, as well as you, newly martyred priests Nicholai and Georgi, a couple of sympathizers and namesakes of the Glorious 9 Martyrs of Serdika (martyred near city of Sofia), together with all others who suffered for the faith and family, whose names now only the Lord knows, because they are all with Him in eternal and endless life, pray to the Holy Trinity, call on the Holy Mother of God and all the saints and give us strength to preserve your memory, so that you will be mentioned in future generations and forever. Amen.
* Novo selo – now a district of the town of Apriltsi Bulgaria.
Translated with minor inclusions from Official site of Bulgarian Orthodox Church
Origianl Bulgarian text Source : Holy Metropolis of Lovchan, Bulgaria
Note:
The Holy Novoselski Muchenici was canonized by the Bulgarian Orthodox Church, after following a canonization procedures and affirmation of the saintship of the martyrs of Novoselo decided to officially
canonize the saints together with the Martyrs Saints of Batak.
Canonization of the Nove Selo Monastery saints, was officially announced with a Holy Liturgy in Sofia Capital, Church Saint Alexander Nevski on April 3, 2011.


2 Comments »