Install Zabbix Proxy configure and connect to Zabbix server on CentOS Linux


May 4th, 2023

Install Zabbix Proxy configure and connect to Zabbix server on CentOS Linux

1. Why use Zabbix-Proxy hidden advantages of using Zabbix-Proxy ?
 

Proxy can be used for many purposes and can provide many hidden benefits, just to name few of them:

  • Offload Zabbix Server when monitoring thousands of devices
  • Monitor remote locations
  • Monitor locations having unreliable communications
  • Simplify maintenance of distributed monitoring
  • Improved Security (Zabbix server can be restricted to be connectable only by the set of connected Zabbix Proxy / Proxies
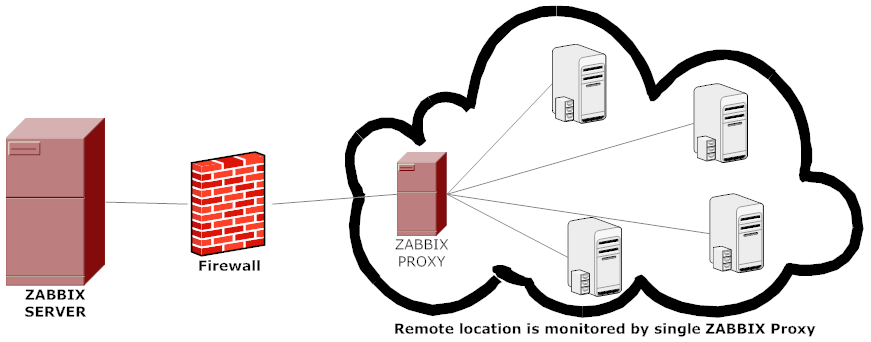

advantages-of-using-zabbix-proxy-instead-of-direct-connect-monitored-hosts-to-zabbix-server-diagram


A Zabbix proxy is the ideal solution if you have numerous hosts with multiple slow items that are affecting the performance of the server simply because processes are spending most of the time simply waiting for a response. A proxy can collect information from all hosts using its internal processes and then send raw historical data to the server. The time needed to connect and receive the host response will be on the proxy site, and the server performance will not be affected at all. A proxy just sends raw values to the server, and the server itself does not have to connect to the host to get the data.
 

2. Install zabbix-proxy-sqlite3 rpm package from Zabbix Official Repositories download page

Zabbix repository provides choice of 3 packages named as follows:

zabbix-proxy-mysql
zabbix-proxy-pgsql
zabbix-proxy-sqlite3

where the last value of the name (after zabbix-proxy) represents database type of the package — MySQL, PostgreSQL and SQLite respectively.

To not bother installing MySQL / PostgreSQL separate database servers, a lightweight choice is to use the sqlite3 db version. 
As I prefer zabbix-proxy data to be stored inside a flat database, thus I choose to use zabbix-proxy-sqlite3.

[root@sysadminshelp:/root ]# yum info zabbix-proxy-sqlite3-5.0.31-1.el7.x86_64
Заредени плъгини: fastestmirror
Loading mirror speeds from cached hostfile
 * base: mirrors.netix.net
 * epel: fedora.ipacct.com
 * extras: mirrors.netix.net
 * remi: remi.mirror.karneval.cz
 * remi-php74: remi.mirror.karneval.cz
 * remi-safe: remi.mirror.karneval.cz
 * updates: mirrors.netix.net
Инсталирани пакети
Име         : zabbix-proxy-sqlite3
Архитект.   : x86_64
Версия      : 5.0.31
Издание     : 1.el7
Обем        : 4.4 M
Хранилище   : installed
Обобщение   : Zabbix proxy for SQLite3 database
URL         : http://www.zabbix.com/
Лиценз      : GPLv2+
Описание    : Zabbix proxy with SQLite3 database support.

My experience to try to install thethe default CentOS RPM package for zabbix-proxy-sqlite3 provided by default
RPM package that came with CentOS did not work as expected and trying to install / configure and use it via

[root@sysadminshelp:/root ]# yum install zabbix-proxy-sqlite3.x86_64 -y

[root@sysadminshelp:/root ]# vi /etc/zabbix/zabbix_proxy.conf


Led me to a nasty errors seen in /var/log/zabbixsrv/zabbix_proxy.log like:

May 1st 2023, 08:42:45.020 zabbix_server cannot set list of PSK ciphersuites: file ssl_lib.c line 1314: error:1410D0B9:SSL routines:SSL_CTX_set_cipher_list:no cipher match
May 1st 2023, 08:42:45.018 zabbix_server cannot set list of PSK ciphersuites: file ssl_lib.c line 1314: error:1410D0B9:SSL routines:SSL_CTX_set_cipher_list:no cipher match
May 1st 2023, 08:42:45.013 zabbix_server cannot set list of PSK ciphersuites: file ssl_lib.c line 1314: error:1410D0B9:SSL routines:SSL_CTX_set_cipher_list:no cipher match
May 1st 2023, 08:42:45.011 zabbix_server cannot set list of PSK ciphersuites: file ssl_lib.c line 1314: error:1410D0B9:SSL routines:SSL_CTX_set_cipher_list:no cipher match


After some googling and reading some threads came upon this one https://support.zabbix.com/browse/ZBXNEXT-3604, there is exmplaed errors preventing the configured zabbix-proxy
to start are caused by the zabbix-proxy-sqlite3 package provided by Redhat (due to openssl incompitability bug or something ).

As one of people in the discussion pointed out the quickest workaround suggested is simply to use the official Zabbix Repository packages for zabbix-proxy-sqlite3, in order to not waste anymore time on this
trivial stuff to install it, simply run:

[root@sysadminshelp:/root ]# rpm -Uvh \
https://repo.zabbix.com/zabbix/5.0/rhel/7/x86_64/zabbix-proxy-sqlite3-5.0.31-1.el7.x86_64.rpm

Alternative way if you seem to not have the machine connected to the internet is simply download the package with wget / lynx / curl / w3m from another machine 
that can reach the Internet upload the package via the local LAN or VPN and install it:

# wget https://repo.zabbix.com/zabbix/5.0/rhel/7/x86_64/zabbix-proxy-sqlite3-5.0.31-1.el7.x86_64.rpm

[root@sysadminshelp:/root ]# rpm -ivh zabbix-proxy-sqlite3-5.0.31-1.el7.x86_64.rpm

NOTE ! Before you install proxy, keep in mind that your proxy version must match the Zabbix server version !

3. Generate a PSK random secret key and set proper permissions for zabbix-proxy directories


[root@sysadminshelp:/root ]# cd /etc/zabbix/
    
[root@sysadminshelp:/root ]# openssl rand -hex 32 >> /etc/zabbix/zabbix_proxy.psk     
[root@sysadminshelp:/root ]# chown root:zabbix zabbix_proxy.psk [root@sysadminshelp:/root ]# vi /etc/zabbix/zabbix_proxy.conf [root@sysadminshelp:/root ]# mkdir -p /var/lib/zabbix-proxy/sqlite3db
[root@sysadminshelp:/root ]# chown -R zabbix:zabbix /var/lib/zabbix-proxy
[root@sysadminshelp:/var/lib/zabbixsrv/sqlite3db]# sqlite3 zabbix_proxy
SQLite version 3.7.17 2013-05-20 00:56:22
Enter ".help" for instructions
Enter SQL statements terminated with a ";"
sqlite> .databases
seq  name             file
—  —————  ———————————————————-
0    main             /var/lib/zabbixsrv/sqlite3db/zabbix_proxy
sqlite>
[root@sysadminshelp:/root ]# vi /etc/zabbix_proxy.conf
#DBName=zabbix_proxy
DBName=/var/lib/zabbixsrv/sqlite3db/zabbix_proxy

4. Configure zabbix proxy to be able to connect to Zabbix Server

[root@sysadminshelp:/root ]#  vi /etc/zabbix/zabbix_proxy.conf     ############ GENERAL PARAMETERS #################
    ProxyMode=0
    Server=192.168.1.28
    ServerPort=10051
    Hostname=zabbix-proxy
    ListenPort=10051
    SourceIP=10.168.1.55
    LogFile=/var/log/zabbix/zabbix_proxy.log
    LogFileSize=1
    DebugLevel=2
    PidFile=/var/run/zabbix/zabbix_proxy.pid
    DBName=/var/lib/zabbix-proxy/sqlite3db/zabbix_proxy.db
    DBUser=zabbix
    
    ######### PROXY SPECIFIC PARAMETERS #############
    ProxyOfflineBuffer=24
    HeartbeatFrequency=60
    ConfigFrequency=120
    
    ############ ADVANCED PARAMETERS ################
    StartPollersUnreachable=3
    StartHTTPPollers=3
    JavaGateway=127.0.0.1
    JavaGatewayPort=10052
    StartJavaPollers=5
    SNMPTrapperFile=/var/log/snmptrap/snmptrap.log
    StartSNMPTrapper=1
    CacheSize=32M
    Timeout=4
    ExternalScripts=/usr/lib/zabbix/externalscripts
    LogSlowQueries=3000
    
    ####### TLS-RELATED PARAMETERS #######
    TLSConnect=psk
    TLSAccept=psk
    TLSPSKIdentity=PSK zabbix-proxy-fqdn-hostname
    TLSPSKFile=/etc/zabbix/zabbix_proxy.psk

5. Check and make sure the installed zabbix proxy as well as the zabbix_proxy server zabbix_agentd client and zabbix_server are at the same major version release

a) Check zabbix proxy version

[root@sysadminshelp:/etc/zabbix]# zabbix_proxy -V
zabbix_proxy (Zabbix) 5.0.31
Revision f64a07aefca 30 January 2023, compilation time: Jan 30 2023 09:55:10

Copyright (C) 2023 Zabbix SIA
License GPLv2+: GNU GPL version 2 or later <https://www.gnu.org/licenses/>.
This is free software: you are free to change and redistribute it according to
the license. There is NO WARRANTY, to the extent permitted by law.

This product includes software developed by the OpenSSL Project
for use in the OpenSSL Toolkit (http://www.openssl.org/).

Compiled with OpenSSL 1.0.1e-fips 11 Feb 2013
Running with OpenSSL 1.0.1e-fips 11 Feb 2013

[root@sysadminshelp:/etc/zabbix]#

b) check zabbix_agentd version

[root@sysadminshelp:/etc/zabbix]# zabbix_agentd -V
zabbix_agentd (daemon) (Zabbix) 5.0.30
Revision 2c96c38fb4b 28 November 2022, compilation time: Nov 28 2022 11:27:43

Copyright (C) 2022 Zabbix SIA
License GPLv2+: GNU GPL version 2 or later <https://www.gnu.org/licenses/>.
This is free software: you are free to change and redistribute it according to
the license. There is NO WARRANTY, to the extent permitted by law.

This product includes software developed by the OpenSSL Project
for use in the OpenSSL Toolkit (http://www.openssl.org/).

Compiled with OpenSSL 1.0.1e-fips 11 Feb 2013
Running with OpenSSL 1.0.1e-fips 11 Feb 2013

c) Check zabbix server version

[root@zabbix:~]# zabbix_server -V
zabbix_server (Zabbix) 5.0.30
Revision 2c96c38fb4b 28 November 2022, compilation time: Nov 28 2022 09:19:03

Copyright (C) 2022 Zabbix SIA
License GPLv2+: GNU GPL version 2 or later <https://www.gnu.org/licenses/>.
This is free software: you are free to change and redistribute it according to
the license. There is NO WARRANTY, to the extent permitted by law.

This product includes software developed by the OpenSSL Project
for use in the OpenSSL Toolkit (http://www.openssl.org/).

Compiled with OpenSSL 1.1.1d  10 Sep 2019
Running with OpenSSL 1.1.1n  15 Mar 2022

6. Starting the zabbix-proxy for a first time

Before beginning with installation make sure selinux is disabled, as it might cause some issues with Zabbix

[root@sysadminshelp:/etc/zabbix]# sestatus
SELinux status:                 disabled

If you need to have the selinux enabled you will have to allow the zabbix-proxy into selinux as well:

cd /tmp
# grep zabbix_proxy /var/log/audit/audit.log | grep denied | audit2allow -m zabbix_proxy > zabbix_proxy.te
grep zabbix_proxy /var/log/audit/audit.log | grep denied | audit2allow -M zabbix_proxy
semodule -i zabbix_proxy.pp


[root@sysadminshelp:/etc/zabbix]# systemctl start zabbix-proxy

Also lets enable zabbix-proxy to automatically start it on next server reboot / boot.

root@sysadminshelp:/etc/zabbix]# systemctl enable zabbix-proxy

Normally running zabbix-proxy should provide a status messages like:

[root@sysadminshelp:/etc/zabbix]# systemctl status zabbix-proxy
● zabbix-proxy.service – Zabbix Proxy
   Loaded: loaded (/usr/lib/systemd/system/zabbix-proxy.service; disabled; vendor preset: disabled)
   Active: active (running) since чт 2023-05-04 14:58:36 CEST; 2h 59min ago
  Process: 8500 ExecStop=/bin/kill -SIGTERM $MAINPID (code=exited, status=0/SUCCESS)
  Process: 8504 ExecStart=/usr/sbin/zabbix_proxy -c $CONFFILE (code=exited, status=0/SUCCESS)
 Main PID: 8506 (zabbix_proxy)
   CGroup: /system.slice/zabbix-proxy.service
           ├─8506 /usr/sbin/zabbix_proxy -c /etc/zabbix/zabbix_proxy.conf
           ├─8507 /usr/sbin/zabbix_proxy: configuration syncer [synced config 40521 bytes in 0.0…
           ├─8508 /usr/sbin/zabbix_proxy: trapper #1 [processed data in 0.000808 sec, waiting fo…
           ├─8509 /usr/sbin/zabbix_proxy: trapper #2 [processed data in 0.005028 sec, waiting fo…
           ├─8510 /usr/sbin/zabbix_proxy: trapper #3 [processed data in 0.001240 sec, waiting fo…
           ├─8511 /usr/sbin/zabbix_proxy: trapper #4 [processed data in 0.004378 sec, waiting fo…
           ├─8512 /usr/sbin/zabbix_proxy: trapper #5 [processed data in 0.004991 sec, waiting fo…
           ├─8513 /usr/sbin/zabbix_proxy: preprocessing manager #1 [queued 0, processed 3 values…
           ├─8514 /usr/sbin/zabbix_proxy: preprocessing worker #1 started
           ├─8515 /usr/sbin/zabbix_proxy: preprocessing worker #2 started
           ├─8516 /usr/sbin/zabbix_proxy: preprocessing worker #3 started
           ├─8517 /usr/sbin/zabbix_proxy: heartbeat sender [sending heartbeat message success in…
           ├─8518 /usr/sbin/zabbix_proxy: data sender [sent 0 values in 0.005241 sec, idle 1 sec…
           ├─8519 /usr/sbin/zabbix_proxy: housekeeper [deleted 4501 records in 0.011462 sec, idl…
           ├─8520 /usr/sbin/zabbix_proxy: http poller #1 [got 0 values in 0.000248 sec, idle 5 s…
           ├─8521 /usr/sbin/zabbix_proxy: http poller #2 [got 0 values in 0.000239 sec, idle 5 s…
           ├─8522 /usr/sbin/zabbix_proxy: http poller #3 [got 0 values in 0.000328 sec, idle 5 s…
           ├─8523 /usr/sbin/zabbix_proxy: discoverer #1 [processed 0 rules in 0.000261 sec, idle…
           ├─8524 /usr/sbin/zabbix_proxy: history syncer #1 [processed 0 values in 0.000009 sec,…
           ├─8525 /usr/sbin/zabbix_proxy: history syncer #2 [processed 0 values in 0.000007 sec,…
           ├─8526 /usr/sbin/zabbix_proxy: history syncer #3 [processed 0 values in 0.000014 sec,…
           ├─8527 /usr/sbin/zabbix_proxy: history syncer #4 [processed 0 values in 0.000021 sec,…
           ├─8528 /usr/sbin/zabbix_proxy: java poller #1 [got 0 values in 0.000017 sec, idle 5 s…
           ├─8529 /usr/sbin/zabbix_proxy: java poller #2 [got 0 values in 0.000019 sec, idle 5 s…
           ├─8530 /usr/sbin/zabbix_proxy: java poller #3 [got 0 values in 0.000019 sec, idle 5 s…
           ├─8531 /usr/sbin/zabbix_proxy: java poller #4 [got 0 values in 0.000018 sec, idle 5 s…
           ├─8532 /usr/sbin/zabbix_proxy: java poller #5 [got 0 values in 0.000013 sec, idle 5 s…
           ├─8533 /usr/sbin/zabbix_proxy: snmp trapper [processed data in 0.000026 sec, idle 1 s…
           ├─8534 /usr/sbin/zabbix_proxy: self-monitoring [processed data in 0.000034 sec, idle …
           ├─8535 /usr/sbin/zabbix_proxy: task manager [processed 0 task(s) in 0.000169 sec, idl…
           ├─8536 /usr/sbin/zabbix_proxy: poller #1 [got 0 values in 0.000012 sec, idle 5 sec]
           ├─8537 /usr/sbin/zabbix_proxy: poller #2 [got 0 values in 0.000021 sec, idle 5 sec]
           ├─8538 /usr/sbin/zabbix_proxy: poller #3 [got 0 values in 0.000039 sec, idle 5 sec]
           ├─8539 /usr/sbin/zabbix_proxy: poller #4 [got 0 values in 0.000024 sec, idle 5 sec]
           ├─8540 /usr/sbin/zabbix_proxy: poller #5 [got 0 values in 0.000019 sec, idle 5 sec]
           ├─8541 /usr/sbin/zabbix_proxy: unreachable poller #1 [got 0 values in 0.000011 sec, i…
           ├─8542 /usr/sbin/zabbix_proxy: unreachable poller #2 [got 0 values in 0.000018 sec, i…
           ├─8543 /usr/sbin/zabbix_proxy: unreachable poller #3 [got 0 values in 0.000041 sec, i…
           └─8544 /usr/sbin/zabbix_proxy: icmp pinger #1 [got 0 values in 0.000022 sec, idle 5 s…

май 04 14:58:36 sysadminshelp systemd[1]: Stopped Zabbix Proxy.
май 04 14:58:36 sysadminshelp systemd[1]: Starting Zabbix Proxy…
май 04 14:58:36 sysadminshelp systemd[1]: Started Zabbix Proxy.
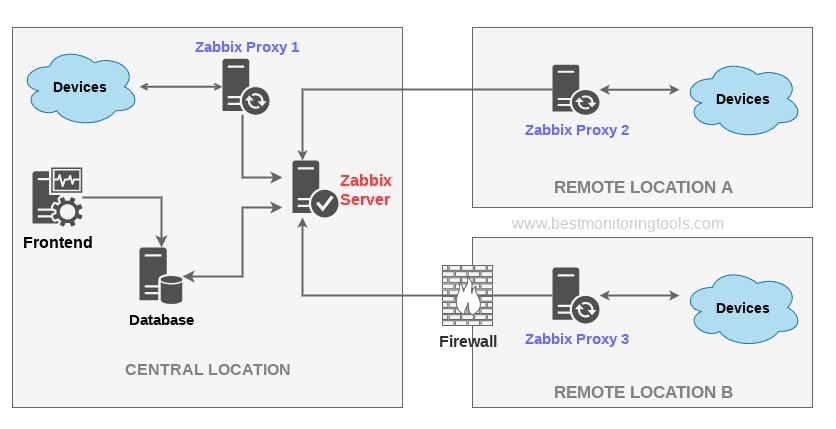
zabbix-server-zabbix-proxy-and-zabbix-clients-overview-diagram

7. Configure zabbix-agentd to use your just new brand new zabbix-proxy

Here is my sample configuration file:

[root@sysadminshelp:/etc/zabbix]# grep -v \# /etc/zabbix/zabbix_agentd.conf | sed '/^$/d'
PidFile=/var/run/zabbix/zabbix_agentd.pid
LogFile=/var/log/zabbix/zabbix_agentd.log
LogFileSize=0
Server=zabbix-proxy
ServerActive=zabbix-proxy:10051
ListenIP
Hostname=sysadminshelp
BufferSend=30
BufferSize=100
Include=/etc/zabbix/zabbix_agentd.d/*.conf


Note that the ServerActive given "zabbix-proxy" should be resolvable from the host, or even better you might want to put the IP of the Proxy if
you don't have at least a pseudo Hostname already configured inside /etc/hosts or actual DNS 'A' Active record configured inside a properly resolving
DNS server configured on the host via /etc/resolv.conf.


8. Create and Configure new proxy into the Zabbix-server host
 

Go to the zabbix server web interface URL into menus:
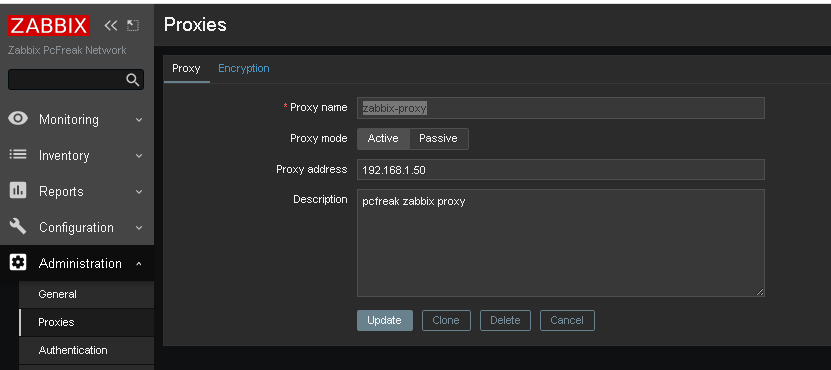
zabbix-administration-proxy-config
 

Administration -> Proxies (Proxy) 


Click on ;

Create Proxy button (uppper right corner)

*Proxy name: usually-your-host-pingable-fqdn
Proxy mode: Active
Proxy address: 192.168.1.50
Description: pcfreak zabbix proxy


Administration -> Proxies -> Encryption


From "Connection to proxy"

Untick "No encryption"

and

Tick "PSK"
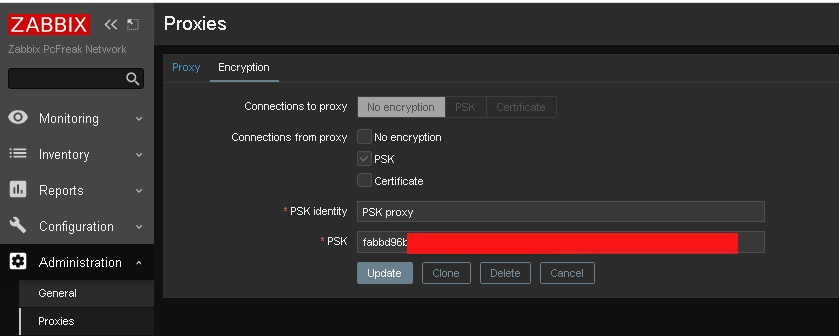

zabbix-administration-proxy-config-encryption

*PSK Identity: PSK proxy
*PSK: Put the key here (copy from /etc/zabbix/zabbix_proxy.psk generated steps earlier with openssl)

[root@sysadminshelp:/etc/zabbix]# cat zabbix_proxy.psk
faddbd96be00ac42c892fda5201634df25d51f3ndbbbf6cee9d354b2817092a28

Press the "Update" Button

zabbix-administration-proxy-config-encryption1

and go again to Proxies and check the zabbix-proxy is connected to the server and hosts configured to use the zabbix proxy reporting frequently.

To make sure that the configured new hosts to use the Zabbix Proxy instead of direct connection to Zabbix Server, go to Latest Data and check whether the configured Hostnames to connect to the Zabbix-Proxy continues to sent Data still.

9. Debugging problems with zabix-proxy and zabbix-agentd connectivity to proxy

In case of troubles check out what is going on inside the Zabbix Proxy / Agent and Server log files
 

[root@sysadminshelp:/etc/zabbix]# tail -n 50 /var/log/zabbix/zabbix_proxy.log

 6832:20230504:134032.281 Starting Zabbix Proxy (active) [zabbix-proxy]. Zabbix 5.0.31 (revision f
64a07aefca).
  6832:20230504:134032.281 **** Enabled features ****
  6832:20230504:134032.281 SNMP monitoring:       YES
  6832:20230504:134032.281 IPMI monitoring:       YES
  6832:20230504:134032.281 Web monitoring:        YES
  6832:20230504:134032.281 VMware monitoring:     YES
  6832:20230504:134032.281 ODBC:                  YES
  6832:20230504:134032.281 SSH support:           YES
  6832:20230504:134032.281 IPv6 support:          YES
  6832:20230504:134032.281 TLS support:           YES
  6832:20230504:134032.281 **************************
  6832:20230504:134032.281 using configuration file: /etc/zabbix/zabbix_proxy.conf
  6832:20230504:134032.291 current database version (mandatory/optional): 05000000/05000005
  6832:20230504:134032.291 required mandatory version: 05000000
  6832:20230504:134032.292 proxy #0 started [main process]
  6833:20230504:134032.292 proxy #1 started [configuration syncer #1]
  6833:20230504:134032.329 received configuration data from server at "192.168.1.28", datalen 40521
  6834:20230504:134032.392 proxy #2 started [trapper #1]
  6835:20230504:134032.401 proxy #3 started [trapper #2]
  6836:20230504:134032.402 proxy #4 started [trapper #3]
  6838:20230504:134032.405 proxy #6 started [trapper #5]
  6837:20230504:134032.409 proxy #5 started [trapper #4]
  6843:20230504:134032.409 proxy #11 started [heartbeat sender #1]
  6845:20230504:134032.412 proxy #13 started [housekeeper #1]
  6847:20230504:134032.412 proxy #15 started [discoverer #1]
  8526:20230504:145836.512 proxy #20 started [history syncer #3]
  8517:20230504:145836.512 proxy #11 started [heartbeat sender #1]
  8530:20230504:145836.515 proxy #24 started [java poller #3]
  8531:20230504:145836.517 proxy #25 started [java poller #4]
  8532:20230504:145836.520 proxy #26 started [java poller #5]
  8536:20230504:145836.522 proxy #30 started [poller #1]
  8527:20230504:145836.525 proxy #21 started [history syncer #4]
  8535:20230504:145836.525 proxy #29 started [task manager #1]
  8533:20230504:145836.528 proxy #27 started [snmp trapper #1]
  8539:20230504:145836.528 proxy #33 started [poller #4]
  8538:20230504:145836.529 proxy #32 started [poller #3]
  8534:20230504:145836.532 proxy #28 started [self-monitoring #1]
  8544:20230504:145836.532 proxy #38 started [icmp pinger #1]
  8543:20230504:145836.532 proxy #37 started [unreachable poller #3]
  8542:20230504:145836.535 proxy #36 started [unreachable poller #2]
  8541:20230504:145836.537 proxy #35 started [unreachable poller #1]
  8540:20230504:145836.540 proxy #34 started [poller #5]
  8507:20230504:150036.453 received configuration data from server at "192.168.1.28", datalen 40521
  8507:20230504:150236.503 received configuration data from server at "192.168.1.28", datalen 40521
  8507:20230504:150436.556 received configuration data from server at "192.168.1.28", datalen 40521
  8507:20230504:150636.608 received configuration data from server at "192.168.1.28", datalen 40521
  8507:20230504:150836.662 received configuration data from server at "192.168.1.28", datalen 40521


[root@sysadminshelp:/etc/zabbix]# tail -n 10  /var/log/zabbix-agent/zabbix_agentd.log
3096166:20230504:182840.461 agent #1 started [collector]
3096167:20230504:182840.462 agent #2 started [listener #1]
3096168:20230504:182840.463 agent #3 started [listener #2]
3096169:20230504:182840.464 agent #4 started [listener #3]
3096170:20230504:182840.464 agent #5 started [active checks #1]

If necessery to Debug further and track some strange errors, you might want to increase the DebugLevel to lets say DebugLevel=5

5 – extended debugging (produces even more information)

If checking both zabbix_agentd.log and zabbix_proxy.log cannot give you enough of a hint on what might be the issues you face with your userparameter scripts or missing Monitored data etc. and hopefully you have access to the zabbix-server machine, check out the zabbix server log as well

[root@zabbix:~]# tail -n 100 /var/log/zabbix/zabbix_server.log

3145027:20230504:182641.556 sending configuration data to proxy "zabbix-proxy" at "192.168.1.50", datalen 40521, bytes 6120 with compression ratio 6.6
3145029:20230504:182716.529 cannot send list of active checks to "192.168.1.30": host [pcfrxenweb] not found
3145028:20230504:182731.959 cannot send list of active checks to "192.168.1.30": host [pcfrxenweb] not found
3145029:20230504:182756.634 cannot send list of active checks to "192.168.1.30": host [pcfrxenweb] not found

Wrapping it up

In this article, we have learned how to install and configure a zabbix-proxy server and prepare a PSK encryption secret key for it.
We learned also  how to connect this server to the central zabbix monitoring host machine in Active mode, so both Zabbix proxy and server can communicate in a secure crypted form,
as well as how to set zabbix_agentd clients to connect to the zabbix proxy
which will from itself send its data to the Central Zabbix server host as well as how to Debug and hopefully solve issues with communication between Zabbix client -> Zabbix Proxy -> Zabbix server.

I know this article, does not say anything revolutionary and there is plenty of posts online talking about how to run yourself a zabbix proxy and make in your home or corporate network,
but I thought to write it down as by writting it and reading a bit more on the topic of Zabbix Server / Proxy / Agent, that give myself a better overview on how this technologies work and such an article will give myself an easier step by step guide to follow,
in future when I have to configure Zabbix Environments for personal hobby or professionally for customers.
Hope you enjoyed. Cheers ! 🙂

Analyze disk space usage in Linux / BSD with du / find and filelight /qdirstat / baobab GUI disk usage analyzers to check what takes up your disk space on Unix like OSes


April 21st, 2023

linux-how-to-find-out-what-files-and-directories-has-occupied-all-your-disk-space-partition-from-console-and-GUI_du-find-filelight-baobab-qdirstat-duff-linux-450x450

If you're a Desktop Linux or BSD UNIX user and your hard disk / external SSD / flash drive etc. space starts to be misteriously disapper due to whatever reaseon such as a crashing applications producing rapidly log error / warning messages leading quickly to filling up the disk or out of a sudden you have some Disk space lost without knowing what kind of data filled up the disk or you're downloading some big sized bittorrent files forgotten in your bittorrent client or complete mirroring a large website and you suddenly get the result of root directory ( / ) getting fully or nearly filled up, then you definitely would want to check out what has disk activity has eaten up your disk space and leaing to OS and Aplication slow responsiveness.

For the Linux regular *nix user finding out what is filling the disk is a trivial task with with find / du -hsc * but as people have different habits to use find and du I'll show you the most common ways I use this two command line tools to identify disk space low issues for the sake of comparison.
Others who have better easier ways to do it are very welcome to share it with me in the comments.
 

1. Finding large files on hard disk with find Linux command tool
 

host:~# find /home -type f -printf "%s\t%p\n" | sort -n | tail -10
2100000000    /home/hipo/Downloads/MameUIfx incl. ROMs/MameUIfx incl. ROMs-6.bin
2100000000    /home/hipo/Downloads/MameUIfx incl. ROMs/MameUIfx incl. ROMs-7.bin
2100000000    /home/hipo/Downloads/MameUIfx incl. ROMs/MameUIfx incl. ROMs-8.bin
2100000000    /home/hipo/Downloads/MameUIfx incl. ROMs/MameUIfx incl. ROMs-9.bin
2815424080    /home/hipo/.thunderbird/h3dasfii.default\
/ImapMail/imap.gmail.com/INBOX
2925584895    /home/hipo/Documents/.git/\
objects/pack/pack-8590b069cad26ac0af7560fb42b51fa9bfe41050.pack
4336918067    /home/hipo/Games/Mames_4GB-compilation-best-arcade-games-of-your-14_04_2021.tar.gz
6109003776    /home/hipo/VirtualBox VMs/CentOS/CentOS.vdi
23599251456    /home/hipo/VirtualBox VMs/Windows 7/Windows 7.vdi
33913044992    /home/hipo/VirtualBox VMs/Windows 10/Windows 10.vdi

I use less rarely find on Desktops and more when I have to do some kind of data usage analysis on servers, of course for my Linux home computer and any other Linux desktop machines, or just a small incomprehensive analysis du cmd is much more appropriate to use.


2. Finding large files Megabyte occupying space files sorted in Megabytes and Gigas with du
 

  • Check main 10 files sorted in megabytes that are hanging in a directory

pcfkreak:~# du -hsc /home/hipo/*|grep 'M\s'|sort -rn|head -n 10
956M    /home/hipo/last_dump1.sql
711M    /home/hipo/hipod
571M    /home/hipo/from-thinkpad_r61
453M    /home/hipo/ultimate-edition-themes
432M    /home/hipo/metasploit-framework
355M    /home/hipo/output-upgrade.txt
333M    /home/hipo/Плот
209M    /home/hipo/Work-New.tar.gz
98M    /home/hipo/DOOM64
90M    /home/hipo/mp3

  • Get 10 top larges files in Gigabytes that are space hungry and eating up your space

pcfkreak:~# du -hsc /home/hipo/*|grep 'G\s'|sort -rn|head -n 10
156G    total
60G    /home/hipo/VirtualBox VMs
37G    /home/hipo/Downloads
18G    /home/hipo/Desktop
11G    /home/hipo/Games
7.4G    /home/hipo/ownCloud
7.1G    /home/hipo/Документи
4.6G    /home/hipo/music
2.9G    /home/hipo/root
2.8G    /home/hipo/Documents


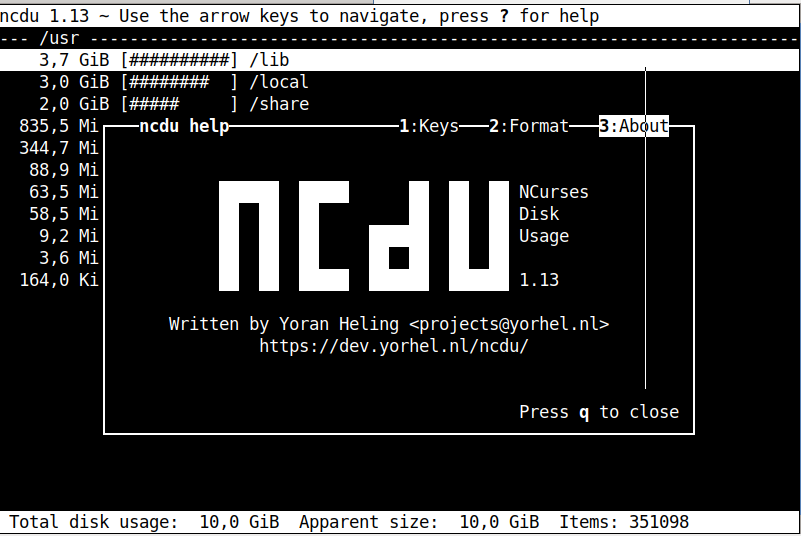
If you want to still work on the console terminal but you don't want to type too much you can use ncdu (ncurses) text tool, install it with

# apt install –yes ncdu


https://www.pc-freak.net/images/ncdu-gnu-linux-debian-screenshot.png

 For the most lazy ones or complete Linux newbies that doesn't want to spend time typing / learing or using text commands or softwares you can also check what has eaten up your full disk space with GUI tools as well.

There are at least 3 tools to use to check in Graphical Interface what has occupied your disk space on Linux / BSD, I'm aware of:

3. Filelight GUI disk usage analysis Linux tool

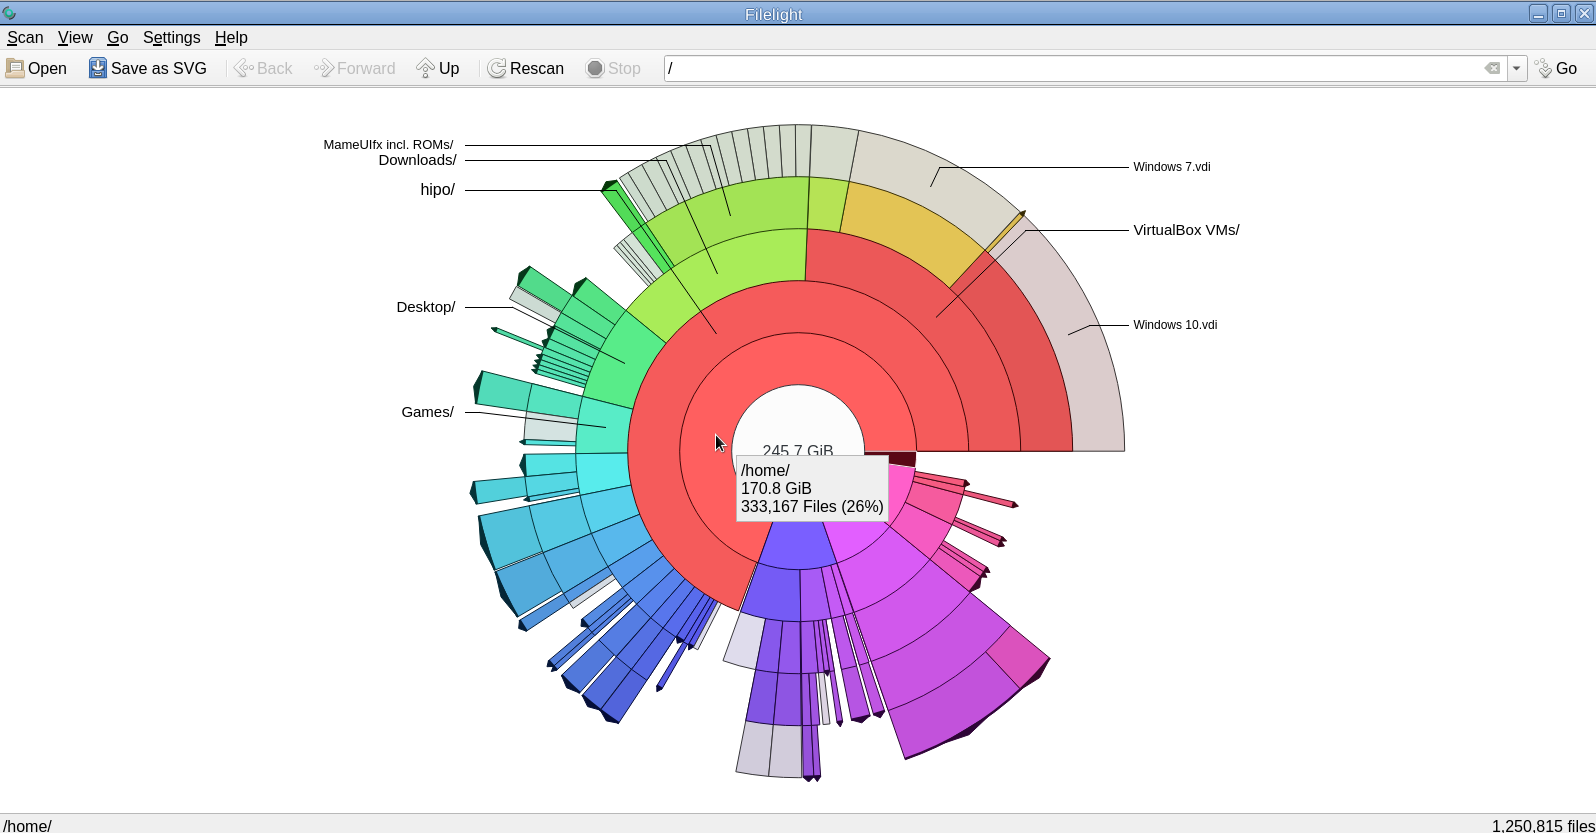
For those using KDE or preferring a shiny GUI interface that will capture the eye, perhaps filelight would be the option of choice tool to get analysis sum of your directory sturctures and file use on the laptop or desktop *unix OS.

unix-desktop:~# apt-cache show filelight|grep -i description-en -A 7
Description-en: show where your diskspace is being used
 Filelight allows you to understand your disk usage by graphically
 representing your filesystem as a set of concentric, segmented rings.
 .
 It is like a pie-chart, but the segments nest, allowing you to see both
 which directories take up all your space, and which directories
 and files inside those directories are the real culprits.
Description-md5: 397ff9a469e07a772f22460c66b66875


To use it simply go ahead and install it with apt or yum / dnf or whatever Linux package manager your distro uses:

unix-desktop:~# apt-get install –yes filelight

filelight-show-where-disk-space-is-being-used-graphically-tool-linux

4. GNOME DIsk Usage Analyzer Baobab GUI tool

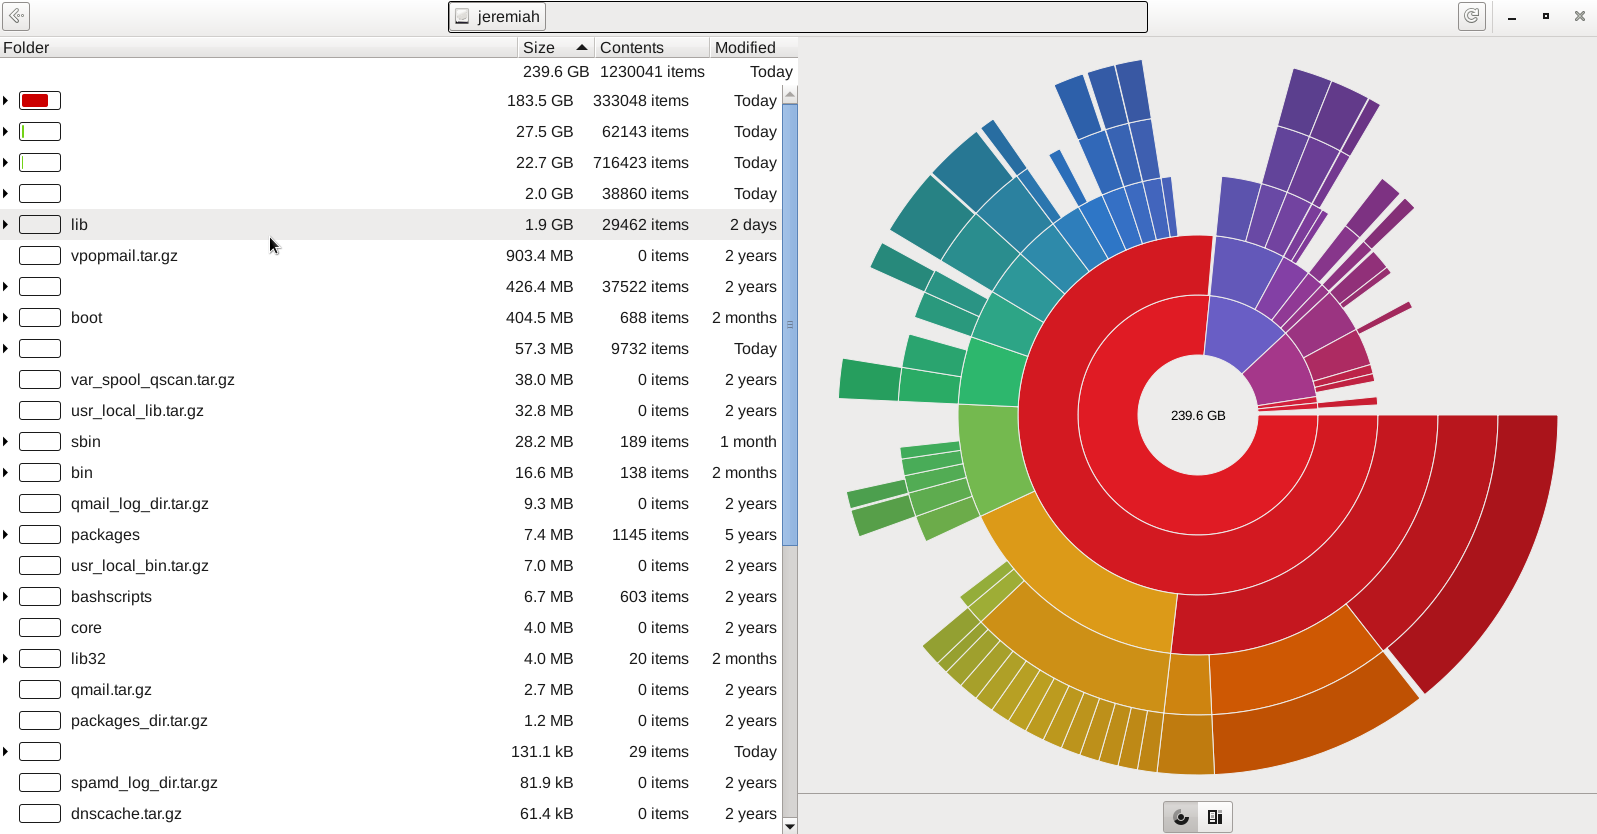
For those being a GNOME / Mate / Budgie / Cinnamon Graphical interface users baobab shold be the program to use as it uses the famous LibGD library.

unix-desktop:~# apt-cache show baobab|grep -i description-en -A10
Description-en: GNOME disk usage analyzer
 Disk Usage Analyzer is a graphical, menu-driven application to analyse
 disk usage in a GNOME environment. It can easily scan either the whole
 filesystem tree, or a specific user-requested directory branch (local or
 remote).
 .
 It also auto-detects in real-time any changes made to your home
 directory as far as any mounted/unmounted device. Disk Usage Analyzer
 also provides a full graphical treemap window for each selected folder.
Description-md5: 5f6072b89ebb1dc83433fa7658814dc6
Homepage: https://wiki.gnome.org/Apps/Baobab


gnome-disk-analyzer-baobab-tool-screenshot-of-hard-disk-directory-locations-sorted-by-size

5. Qdirstat graphical application to show where your disk space has gone on Linux

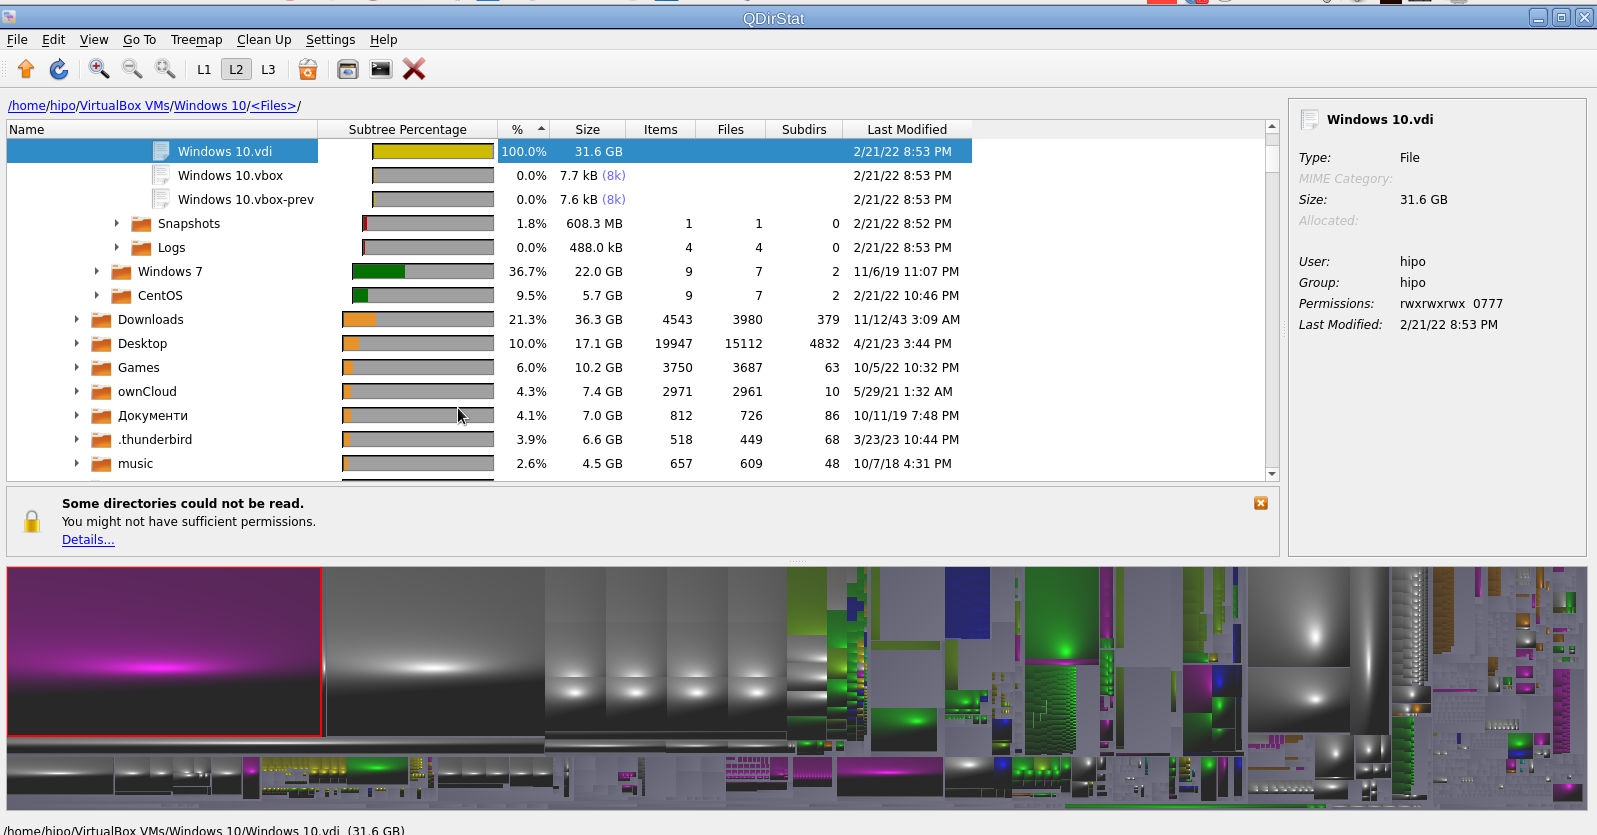
Qdirstat is perhaps well known tool to track disk space issues on Linux desktop hosts, known by the hardcore KDE / LXDE / LXQT / DDE GUI interface / environment lovers and as a KDE tool uses the infamous Qt library. I personally don't like it and don't put it on machines I use because I never use kde and don't want to waste my disk space with additional libraries such as the QT Library which historically was not totally free in terms of licensing and even now is in both free and non free licensing GPL / LGPL and QT Commercial Licensing license.

unix-desktop:~# apt-cache show qdirstat|grep -i description-en -A10
Description-en: Qt-based directory statistics
 QDirStat is a graphical application to show where your disk space has gone and
 to help you to clean it up.
 .
 QDirStat has a number of new features compared to KDirStat. To name a few:
  * Multi-selection in both the tree and the treemap.
  * Unlimited number of user-defined cleanup actions.
  * Properly show errors of cleanup actions (and their output, if desired).
  * File categories (MIME types) and their treemap color are now configurable.
  * Exclude rules for directories are easily configurable.
  * Desktop-agnostic; no longer relies on KDE or any other specific desktop.


qdirstat-linux-screenshot-show-what-directory-uses-most-hard-disk-space

That shiny fuzed graphics is actually a repsesantation of all directories the bigger and if one scrolls on the colorful gamma a text with directory and size or file will appear. Though the graphical represantation is really c00l to me it is a bit unreadable, thus I prefer and recommend the other two GUI tools filelight or baobab instead.

6. Finding duplicate files on Linux system with duff command tool

Talking about big unknown left-over files on your hard drives, it is appropriate to mention one tool here that is a console one but very useful to anyone willing to get rid of old duplicate files that are hanging around on the disk. Sometimes such copies are produced while copying large amount of files from place to place or simply by mistake while copying Photo / Video files from your Smart Phone to Linux desktop etc. 

This is where the duff command line utility might be super beneficial for you.

unix-desktop:~# apt-cache show duff|grep -i description-en -A3
Description-en: Duplicate file finder
 Duff is a command-line utility for identifying duplicates in a given set of
 files.  It attempts to be usably fast and uses the SHA family of message
 digests as a part of the comparisons.

Using duff tool is very straight forward to see all the duplicate files hanging in a directory lets say your home folder.

unix-desktop:~#  duff -rP /home/hipo

/home/hipo/music/var/Quake II Soundtrack – Kill Ratio.mp3
/home/hipo/mp3/Quake II Soundtrack – Kill Ratio.mp3
2 files in cluster 44 (7913472 bytes, digest 98f38be49e2ffcbf90927f9357b3e24a81d5a649)
/home/hipo/music/var/HYPODIL_01-Scakauec.mp3
/home/hipo/mp3/HYPODIL_01-Scakauec.mp3
2 files in cluster 45 (2807808 bytes, digest ce9067ce1f132fc096a5044845c7fac73e99c0ed)
/home/hipo/music/var/Quake II Suondtrack – March Of The Stoggs.mp3
/home/hipo/mp3/Quake II Suondtrack – March Of The Stoggs.mp3
2 files in cluster 46 (3506176 bytes, digest efcc401b4ebda9b0b2367aceb8e334c8ba1a357d)
/home/hipo/music/var/Quake II Suondtrack – Quad Machine.mp3
/home/hipo/mp3/Quake II Suondtrack – Quad Machine.mp3
2 files in cluster 47 (7917568 bytes, digest 0905c1d790654016c2ecf2949f78d47a870c3822)
/home/hipo/music/var/Cyberpunk Group – Futureshock!.mp3
/home/hipo/mp3/Cyberpunk Group – Futureshock!.mp3

-r (Recursively search into all specified directories.)

P (Don't follow any symbolic links.  This overrides any previous -H or -L option.  This is the default.  Note that this only applies to directories, as sym‐
             bolic links to files are never followed.)

7. Deleting duplicate files with duff

If you're absolutely sure you know what you're doing and you have a backup in case if something messes up during duplicate teletions, to get rid of lets say any duplicate Picture files found by duff run sommething like:

# duff -e0 -r /home/hipo/Pictures/ | xargs -0 rm

!!! Please note that using duff is for those who absolutely know what they're doing and have their data recent data. Deleting the wrong data by mistake with the tool might put you in the first grade and you'll be the only one to blame  🙂 !!!

Wrap it Up

Filling up the disk with unknown large files is a task to resolve that happens often. For the unlazy on Linux / BSD / Mac OS and other UNIX like OS-es the easiest way is to use find or du with some one liner command. For the lazy Windows addicted Graphical users filelightqdirstat or baobab GUI disk usage analysis tools are there.
If you have a lot of files and many of thems are duplicates you can use duff to check them out and remove all unneded duplicates and save space. 
Hope this article, was helpful for someone.
That's all folks, enjoy your data profilactics, if you know any other good easy command or GUI tools or hints for drive disk space profilactics please share.

Monitor cluster heartbeat lines IP reahability via ping ICMP protocol with Zabbix


April 12th, 2023

https://pc-freak.net/images/zabbix-monitoring-icmp-ping-on-application-crm-clusters-with-userparameter-script-howto

Say you're having an haproxy load balancer cluster with two or more nodes and you are running the servers inside some complex organizational hybrid complex network that is a combination of a local DMZ lans, many switches, dedicated connectivity lines and every now and then it happens for the network to mysteriously go down. Usually simply setting monitoring on the network devices CISCO itself or the smart switches used is enough to give you an overview on what's going on but if haproxy is in the middle of the end application servers and in front of other Load balancers and network equipment sometimes it might happen that due to failure of a network equipment / routing issues or other strange unexpected reasons one of the 2 nodes connectivity might fail down via the configured dedicated additional Heartbeat lines that are usually configured in order to keep away the haproxy CRM Resource Manager cluster thus ending it up in a split brain scenarios.

Assuming that this is the case like it is with us you would definitely want to keep an eye on the connectivity of Connect Line1 and Connect Line2 inside some monitoring software like zabbix. As our company main monitoring software used to monitor our infrastructure is Zabbix in this little article, I'll briefly explain how to configre the network connectivity status change from haproxy node1 and haproxy node2 Load balancer cluster to be monitored via a simple ICMP ping echo checks.

Of course the easies way to configure an ICMP monitor via Zabbix is using EnableRemoteCommands=1 inside /etc/zabbix/zabbix-agentd.conf but if your infrastructure should be of High Security and PCI perhaps this options is prohibited to be used on the servers. This is why to achieve still the ICMP ping checks with EnableRemoteCommands=0 a separate simple bash user parameter script could be used. Read further to find out one way ICMP monitoring with a useparameter script can be achieved with Zabbix.


1. Create the userparameter check for heartbeat lines

root@haproxy1 zabbix_agentd.d]# cat userparameter_check_heartbeat_lines.conf
UserParameter=heartbeat.check,\
/etc/zabbix/scripts/check_heartbeat_lines.sh

root@haproxy2 zabbix_agentd.d]# cat userparameter_check_heartbeat_lines.conf
UserParameter=heartbeat.check,\
/etc/zabbix/scripts/check_heartbeat_lines.sh

2. Create check_heartbeat_lines.sh script which will be actually checking connectivity with simple ping

root@haproxy1 zabbix_agentd.d]# cat /etc/zabbix/scripts/check_heartbeat_lines.sh
#!/bin/bash
hb1=haproxy2-lb1
hb2=haproxy2-lb2
if ping -c 1 $hb1  &> /dev/null
then
  echo "$hb1 1"
else
  echo "$hb1 0"
fi
if ping -c 1 $hb2  &> /dev/null
then
  echo "$hb2 1"
else
  echo "$hb2 0"
fi

[root@haproxy1 zabbix_agentd.d]#

root@haproxy2 zabbix_agentd.d]# cat /etc/zabbix/scripts/check_heartbeat_lines.sh
#!/bin/bash
hb1=haproxy1-hb1
hb2=haproxy1-hb2
if ping -c 1 $hb1  &> /dev/null
then
  echo "$hb1 1"
else
  echo "$hb1 0"
fi
if ping -c 1 $hb2  &> /dev/null
then
  echo "$hb2 1"
else
  echo "$hb2 0"
fi

[root@haproxy2 zabbix_agentd.d]#


3. Test script heartbeat lines first time

Each of the nodes from the cluster are properly pingable via ICMP protocol

The script has to be run on both haproxy1 and haproxy2 Cluster (load) balancer nodes

[root@haproxy-hb1 zabbix_agentd.d]# /etc/zabbix/scripts/check_heartbeat_lines.sh
haproxy2-hb1 1
haproxy2-hb2 1

[root@haproxy-hb2 zabbix_agentd.d]# /etc/zabbix/scripts/check_heartbeat_lines.sh
haproxy1-hb1 1
haproxy1-hb2 1


The status of 1 returned by the script should be considered remote defined haproxy node is reachable / 0 means ping command does not return any ICMP status pings back.

4. Restart the zabbix-agent on both cluster node machines that will be conducting the ICMP ping check

[root@haproxy zabbix_agentd.d]# systemctl restart zabbix-agentd
[root@haproxy zabbix_agentd.d]# systemctl status zabbix-agentd

[root@haproxy zabbix_agentd.d]# tail -n 100 /var/log/zabbix_agentd.log


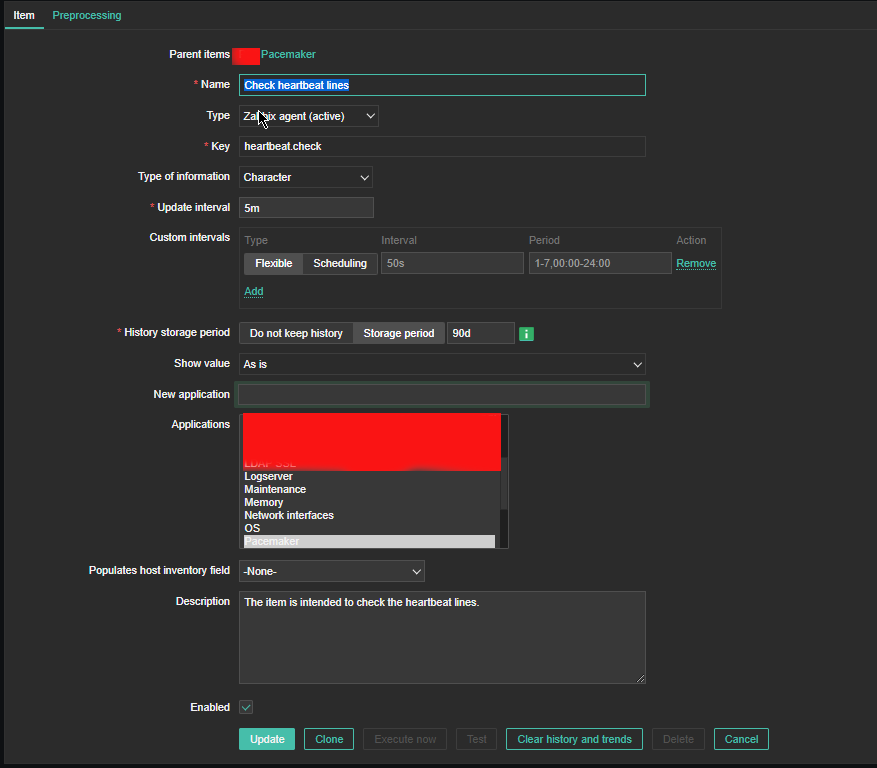
5. Create Item to process the userparam script

Create Item as follows:

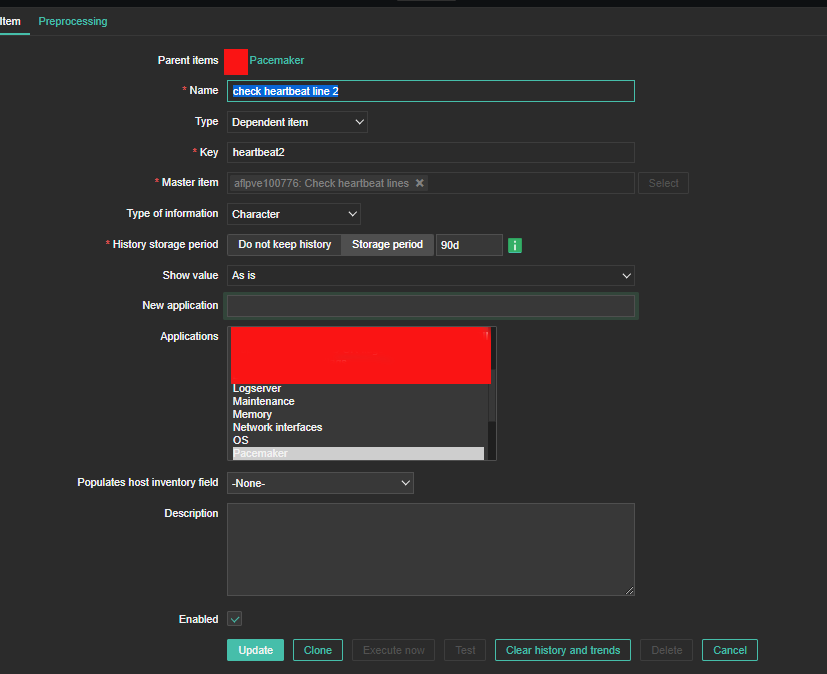
6. Create the Dependent Item required
 

zabbix-heartbeat-check-screenshots/heartbeat-line1-preprocessing

For processing you need to put the following simple regular expression

Name: Regular Expression
Parameters: hb1(\s+)(\d+)
Custom on fail: \2

zabbix-heartbeat-check-screenshots/heartbeat-line2-preprocessing1

zabbix-heartbeat-check-screenshots/heartbeat-lines-triggers


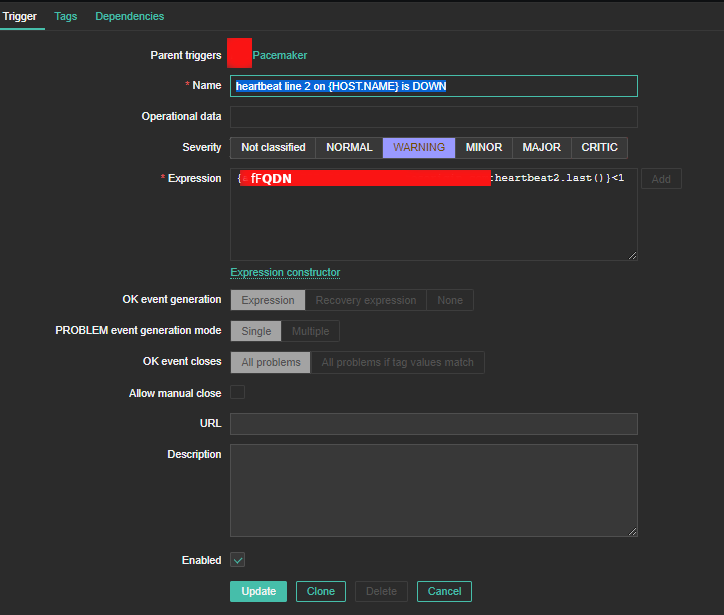
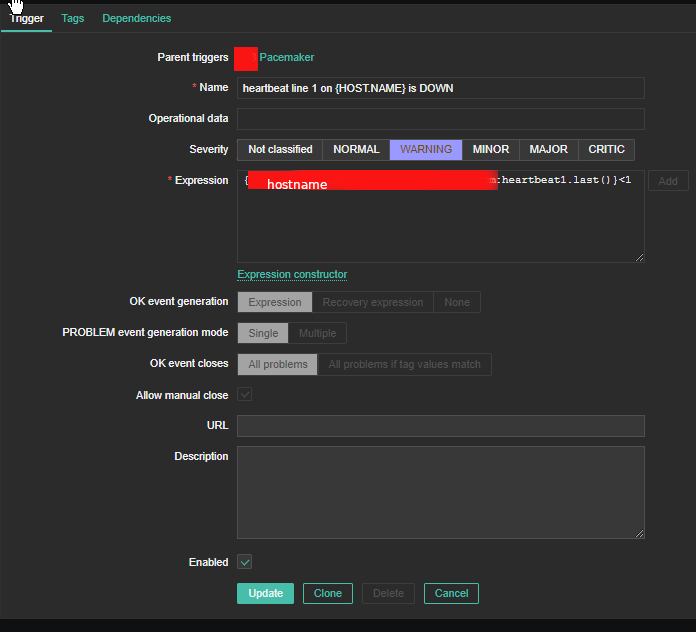
7. Create triggers that will be generating the Alert

Create the required triggers as well

zabbix-heartbeat-check-screenshots/heartbeat2-line
Main thing to configure here in Zabbix is below expression

Expression: {FQDN:heartbeat2.last()}<1

triggers_heartbeat1

You can further configure Zabbix Alerts to mail yourself or send via Slack / MatterMost or Teams alarms in case of problems.

Enable PSK encryption on Zabbix Agent (client) sent encrypted monitored datas to Zabbix server


April 7th, 2023

zabbix-client-server-encryption-public-key-exchange

Those concerned of security and in use of their Zabbix monitored data who communicate Zabbix collected agent
data over internet or via some kind of untrusted network might definitely not enjoy the fact that zabbix-agent sents
its collected data to server in a plain text. Clear text data is allowing any network sniffer to possibly collect your
monitored server and hardware devices data and exposes all data sent over the network to same problems like in the past
the old uencrypted SMTP protocol.

To mitigate those great security hole for the paranoid sys admin it is rather easy to enable PSK (Pre Shared Key) based encryption.
To generate Pre Shared key you have to had to important values present

1. PSK Identity
2. PSK Secret

PSK secret should be minimum of 128 bit (16-byte PSK, entered as 32 hexadecimal digits), and supports up to
2048 bit (256-byte PSK, entered as 512 hexadecimal digits)

Usually something like 256 bit PSK secret on the machine should be strong enough and simply generated by running

# openssl rand -hex 32

1. Agent to zabbix server or proxy connection config

In /etc/zabbix/zabbix_agentd.conf for a Server Active (e.g. server to actively request the client to sent its collected data)
On machine running zabbix-agent should have a configuration similar to:

# cat /etc/zabbix/zabbix_agentd.conf

PidFile=/var/run/zabbix/zabbix_agentd.pid
LogFile=/var/log/zabbix/zabbix_agentd.log
LogFileSize=0

# IP of the machine
SourceIP=10.10.10.30
# turn it on if you need to execute to remote machine commands
EnableRemoteCommands=0

# IP of the server
servers=10.30.50.80
ListenPort=10080

# IP of the machine
ListenIP=10.30.30.31

# IP of the server
ServerActive=10.30.50.80

HostMetadataItem=system.uname
BufferSize=5400
MaxLinesPerSecond=5
Timeout=10
AllowRoot=0
StartAgents=5
LogRemoteCommands=0


# Machine hostname
Hostname=fqdn-of-zabbix-data-collect-server.com
Include=/etc/zabbix/zabbix_agentd.d/*.conf

# Encryption
TLSConnect=psk
TLSAccept=psk
TLSPSKIdentity=PSK to Zabbix Server5
TLSPSKFile=/etc/zabbix/zabbix_agentd.psk


! Important security note

!!! The TLSPSKIdentity value you decide will not be encrypted on transport, so don't use anything sensitive.

Once you include the TSL config

2 Generate / Create Zabbix Agent Key

Generate the key with pseudo-random bites inside /etc/zabbix/zabbix_agentd_key.psk

# cd /etc/zabbix
# openssl rand -hex 32 > zabbix_agentd_key.psk
# chown zabbix:zabbix zabbix_agentd_key.psk
# chmod 600 zabbix_agentd_key.psk

3. Configure PSK encryption in Zabbix Server Web User interface

Go to Zabbix Server User interface in browser and configure the PSK encryption options for the host.

Select the:

'Connections to host' = PSK

'Connections from host' = PSK

'PSK Identity' = [public-value-configured-in-Zabbix-agent-config]

'PSK' = [paste the long hex string generated from the OpenSSL command above]


In some seconds up to a minute or two the Zabbix Server and Agent will successfully communicate using PSK encryption.
Making the monitored data unreadable in plain text for malignant sniffers hanging in the middle equipment between the zabbix-agent and zabbix-server hosts.

4. PSK encryption behind a Proxy

Many companies, nowadays use zabbix proxy for improvement of network infrastrucutre. For example it is used to offload the zabbix-server when multiple zabbix-agents have to report various datas or to monitor servers and devices that are phyisically in separate networks or data centers (are passing through paranoic built firewalls) or monitor locations are having unreliable communications between each other.
 

To enable PSK for communications between your Zabbix Server and Zabbix Proxy.

1. Create a new secret, and add the PSK Identity and Secret to

Administration ⇾ Proxies ⇾ [Your proxy] ⇾ Encryption

2. Adjust the settings inside the zabbix proxies configuration file at /etc/zabbix/zabbix_proxy.conf


If setting up PSK encryption for agents behind a Zabbix proxy, ensure your have

Zabbix Server ⇽⇾ Proxy PSK enabled
first in Zabbix Server UI.

This is because, when you start the Proxy, or do some testing to send some key value to Zabbix server via the proxy with commands :

# zabbix_get -s 127.0.0.1 -k system.hostname
# zabbix_server -R config_cache_reload


config_cache_reload, the Proxy will download all its host settings from the server, and this also includes the servers copy of the secret.

The proxy needs to know the secret since it is now managing the communications on behalf of the server.

3. To add PSK encryption for any Agents behind a proxy, then you continue to set up the Agents as normal by creating a new secret, editing

Configuration ⇾ Hosts ⇾ [Your Host] ⇾ Encryption page

and also editing /etc/zabbix/zabbix_agentd.conf.

Remember that, since your Agents Host configuration in the Zabbix UI will be set as Monitored by Proxy, the PSK settings will be applicable for communications happening between the Zabbix Proxy and the Agent that it is monitoring, not between the Zabbix Server and the Agent behind the proxy.

You can also add PSK Encryption between your Zabbix Proxy and its own local Agent if you want.
You would set its PSK settings in the Proxy Agents host configuration at

Configuration ⇾ Hosts ⇾ [Your proxy] ⇾ Encryption

and modify the settings in the agents on configuration file at /etc/zabbix/zabbix_agentd.conf.
Keep in mind, this is only applicable to communications between the Zabbix Proxy, and its own Agent process.

When setting up PSK encryption for the Zabbix Server, Proxy and Agents, you may see an error in the Proxy logs,

cannot send proxy data to server at "zabbix.your-domain.tld": connection of type "TLS with PSK" is not allowed for proxy "your-proxy".

If you hit this, check that your

Zabbix Server ⇽⇾ Proxy PSK settings

are correct first.

Don't get confused between the Proxies own optional agent process, and its main Proxy process which is required.

Configure aide file integrity check server monitoring in Zabbix to track for file changes on servers


March 28th, 2023

zabbix-aide-log-monitoring-logo

Earlier I've written a small article on how to setup AIDE monitoring for Server File integrity check on Linux, which put the basics on how this handy software to improve your server overall Security software can be installed and setup without much hassle.

Once AIDE is setup and a preset custom configuration is prepared for AIDE it is pretty useful to configure AIDE to monitor its critical file changes for better server security by monitoring the AIDE log output for new record occurs with Zabbix. Usually if no files monitored by AIDE are modified on the machine, the log size will not grow, but if some file is modified once Advanced Linux Intrusion Detecting (aide) binary runs via the scheduled Cron job, the /var/log/app_aide.log file will grow zabbix-agentd will continuously check the file for size increases and will react.

Before setting up the Zabbix required Template, you will have to set few small scripts that will be reading a preconfigured list of binaries or application files etc. that aide will monitor lets say via /etc/aide-custom.conf
 

1. Configure aide to monitor files for changes


Before running aide, it is a good idea to prepare a file with custom defined directories and files that you plan to monitor for integrity checking e.g. future changes with aide, for example to capture bad intruders who breaks into server which runs aide and modifies critical files such as /etc/passwd /etc/shadow /etc/group or / /usr/local/etc/* or /var/* / /usr/* critical files that shouldn't be allowed to change without the admin to soon find out.

# cat /etc/aide-custom.conf

# Example configuration file for AIDE.
@@define DBDIR /var/lib/aide
@@define LOGDIR /var/log/aide
# The location of the database to be read.
database=file:@@{DBDIR}/app_custom.db.gz
database_out=file:@@{DBDIR}/app_aide.db.new.gz
gzip_dbout=yes
verbose=5

report_url=file:@@{LOGDIR}/app_custom.log
#report_url=syslog:LOG_LOCAL2
#report_url=stderr
#NOT IMPLEMENTED report_url=mailto:root@foo.com
#NOT IMPLEMENTED report_url=syslog:LOG_AUTH

# These are the default rules.
#
#p:      permissions
#i:      inode:
#n:      number of links
#u:      user
#g:      group
#s:      size
#b:      block count
#m:      mtime
#a:      atime
#c:      ctime
#S:      check for growing size
#acl:           Access Control Lists
#selinux        SELinux security context
#xattrs:        Extended file attributes
#md5:    md5 checksum
#sha1:   sha1 checksum
#sha256:        sha256 checksum
#sha512:        sha512 checksum
#rmd160: rmd160 checksum
#tiger:  tiger checksum

#haval:  haval checksum (MHASH only)
#gost:   gost checksum (MHASH only)
#crc32:  crc32 checksum (MHASH only)
#whirlpool:     whirlpool checksum (MHASH only)

FIPSR = p+i+n+u+g+s+m+c+acl+selinux+xattrs+sha256

#R:             p+i+n+u+g+s+m+c+acl+selinux+xattrs+md5
#L:             p+i+n+u+g+acl+selinux+xattrs
#E:             Empty group
#>:             Growing logfile p+u+g+i+n+S+acl+selinux+xattrs

# You can create custom rules like this.
# With MHASH…
# ALLXTRAHASHES = sha1+rmd160+sha256+sha512+whirlpool+tiger+haval+gost+crc32
ALLXTRAHASHES = sha1+rmd160+sha256+sha512+tiger
# Everything but access time (Ie. all changes)
EVERYTHING = R+ALLXTRAHASHES

# Sane, with multiple hashes
# NORMAL = R+rmd160+sha256+whirlpool
NORMAL = FIPSR+sha512

# For directories, don't bother doing hashes
DIR = p+i+n+u+g+acl+selinux+xattrs

# Access control only
PERMS = p+i+u+g+acl+selinux

# Logfile are special, in that they often change
LOG = >

# Just do sha256 and sha512 hashes
LSPP = FIPSR+sha512

# Some files get updated automatically, so the inode/ctime/mtime change
# but we want to know when the data inside them changes
DATAONLY =  p+n+u+g+s+acl+selinux+xattrs+sha256

##############TOUPDATE
#To delegate to app team create a file like /app/aide.conf
#and uncomment the following line
#@@include /app/aide.conf
#Then remove all the following lines
/etc/zabbix/scripts/check.sh FIPSR
/etc/zabbix/zabbix_agentd.conf FIPSR
/etc/sudoers FIPSR
/etc/hosts FIPSR
/etc/keepalived/keepalived.conf FIPSR
# monitor haproxy.cfg
/etc/haproxy/haproxy.cfg FIPSR
# monitor keepalived
/home/keepalived/.ssh/id_rsa FIPSR
/home/keepalived/.ssh/id_rsa.pub FIPSR
/home/keepalived/.ssh/authorized_keys FIPSR

/usr/local/bin/script_to_run.sh FIPSR
/usr/local/bin/another_script_to_monitor_for_changes FIPSR

#  cat /usr/local/bin/aide-config-check.sh
#!/bin/bash
/sbin/aide -c /etc/aide-custom.conf -D

# cat /usr/local/bin/aide-init.sh
#!/bin/bash
/sbin/aide -c /etc/custom-aide.conf -B database_out=file:/var/lib/aide/custom-aide.db.gz -i


# cat /usr/local/bin/aide-check.sh

#!/bin/bash
/sbin/aide -c /etc/custom-aide.conf -Breport_url=stdout -B database=file:/var/lib/aide/custom-aide.db.gz -C|/bin/tee -a /var/log/aide/custom-aide-check.log|/bin/logger -t custom-aide-check-report
/usr/local/bin/aide-init.sh


# cat /usr/local/bin/aide_app_cron_daily.txt

#!/bin/bash
#If first time, we need to init the DB
if [ ! -f /var/lib/aide/app_aide.db.gz ]
   then
    logger -p local2.info -t app-aide-check-report  "Generating NEW AIDE DATABASE for APPLICATION"
    nice -n 18 /sbin/aide –init -c /etc/aide_custom.conf
    mv /var/lib/aide/app_aide.db.new.gz /var/lib/aide/app_aide.db.gz
fi

nice -n 18 /sbin/aide –update -c /etc/aide_app.conf
#since the option for syslog seems not fully implemented we need to push logs via logger
/bin/logger -f /var/log/aide/app_aide.log -p local2.info -t app-aide-check-report
#Acknoledge the new database as the primary (every results are sended to syslog anyway)
mv /var/lib/aide/app_aide.db.new.gz /var/lib/aide/app_aide.db.gz

What above cron job does is pretty simple, as you can read it yourself. If the configuration predefined aide database store file /var/lib/aide/app_aide.db.gz, does not
exists aide will create its fresh empty database and generate a report for all predefined files with respective checksums to be stored as a comparison baseline for file changes. 

Next there is a line to write aide file changes via rsyslog through the logger and local2.info handler


2. Setup Zabbix Template with Items, Triggers and set Action

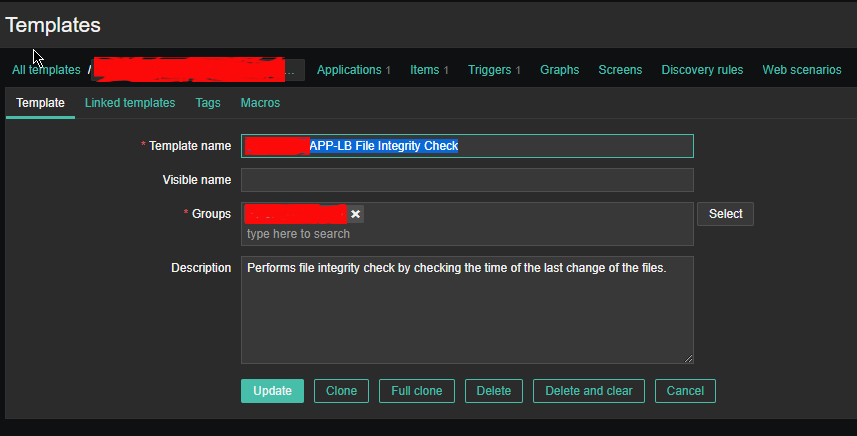
2.1 Create new Template and name it YourAppName APP-LB File integrity Check

aide-itengrity-check-zabbix_ Configuration of templates

Then setup the required Items, that will be using zabbix's Skip embedded function to scan file in a predefined period of file, this is done by the zabbix-agent that is
supposed to run on the server.

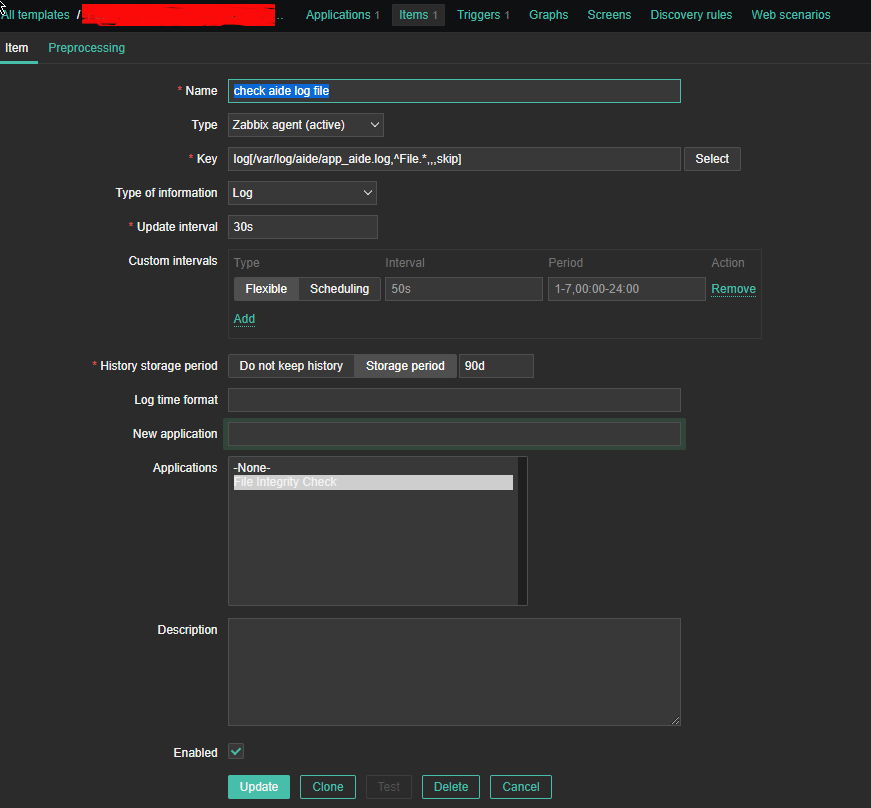
2.2 Configure Item like

aide-zabbix-triggers-screenshot
 

*Name: check aide log file

Type: zabbix (active)

log[/var/log/aide/app_aide.log,^File.*,,,skip]

Type of information: Log

Update Interval: 30s

Applications: File Integrity Check

Configure Trigger like

Enabled: Tick On

images/aide-zabbix-screenshots/check-aide-log-item


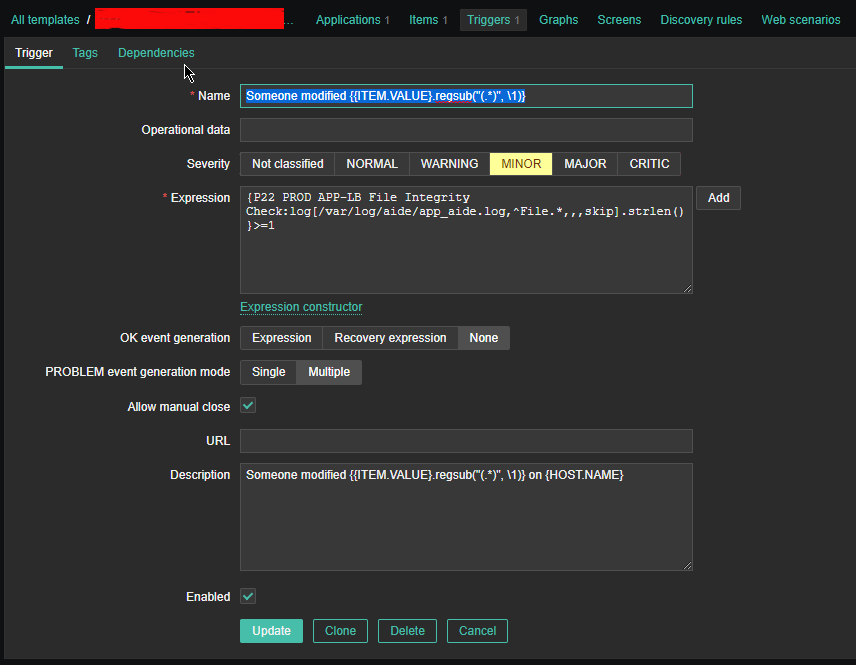
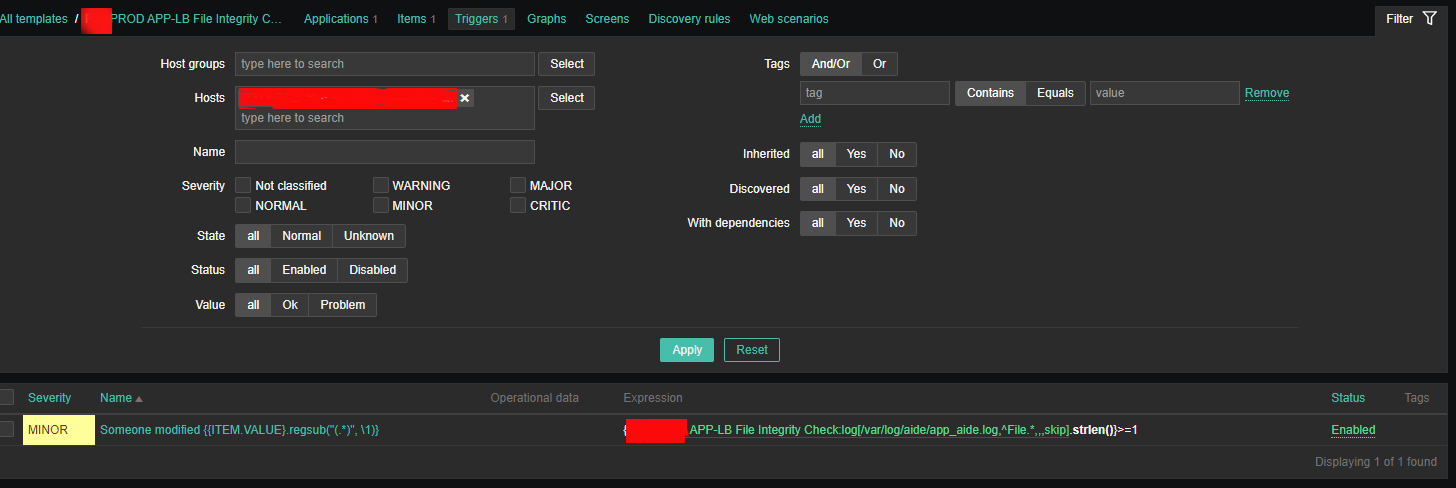
2.3 Create Triggers with the respective regular expressions, that would check the aide generated log file for file modifications


aide-zabbix-screenshot-minor-config

Configure Trigger like
 

Enabled: Tick On


*Name: Someone modified {{ITEM.VALUE}.regsub("(.*)", \1)}

*Expression: {PROD APP-LB File Integrity Check:log[/var/log/aide/app_aide.log,^File.*,,,skip].strlen()}>=1

Allow manual close: yes tick

*Description: Someone modified {{ITEM.VALUE}.regsub("(.*)", \1)} on {HOST.NAME}


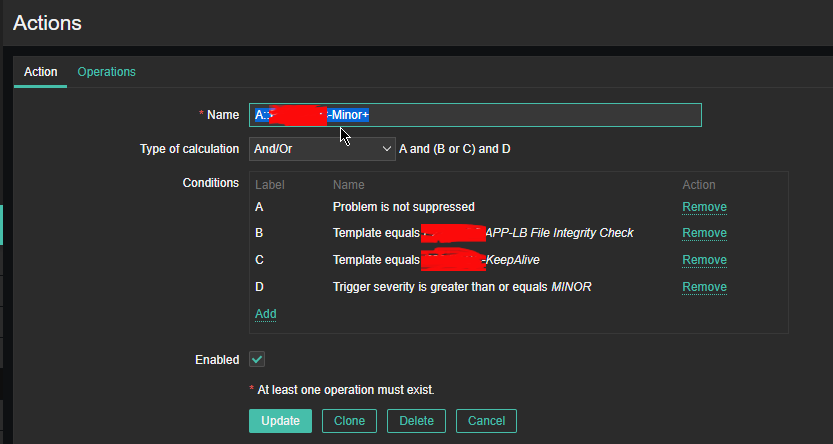
2.4 Configure Action


aide-zabbix-file-monitoring-action-screensho

Now assuming the Zabbix server has  a properly set media for communication and you set Alerting rules zabbix-server can be easily set tosend mails to a Support email to get Notifications Alerts, everytime a monitored file by aide gets changed.

That's all folks ! Enjoy being notified on every file change on your servers  !
 

How to log every Linux executed command by every running system program to separte log via rsyslog for better server Security and audit trails


March 15th, 2023

snoopy-log-all-commands-on-linux-server-tux-logo

To keep a good eye on installed Debian Linux server security if you have to be PCI compliant (e.g. follow a high security) standards or you work in a company, where system security is crucial and any kind of security breach is untorrelated and in case of unexpected security holes exploited on running system processess listening on network peripherals (that malicious crackers) does to be able to easily identify what really happened e.g. do a Security RCA (Root Cause Analysis) for how this hack happened in order to mitigate it for future if possible capture the crackers and close the security hole the better, some kind of paranoid running program logging is required.

For such higher security systems, Linux / BSD / UNIX sysadmins can benefit from;

Snoopy command logger – a small library that logs all program executions on your Linux/BSD system.

Embedding snoopy into a running uptodate system is relatively easy, you either have to download the respective distribution package (in this particular article that would be Debian GNU / Linux) or for Linux distributions, that doesn't have the package integrated into the existing package repositories or externally available package repos, the code can be easily git cloned and installed from github snoopy program page following the README.md


However consider that snoopy run and logging the executed commands, make sure that if you use it you have rsyslogd configured to log to external logging server to make sure (someone did not manipulate the running system to avoid their actions being logged by snoopy, this is pointed by snoopy security disclaimer on the FAQ of official github snoopy project page, the page reads as so:

Security disclaimer
WARNING: Snoopy is not a reliable auditing solution.
Rogue users can easily manipulate environment to avoid their actions being logged by Snoopy. Consult this FAQ entry for more information.                


Most likely this warning is pointed out by the tool authors, in order to set the logging Tool creators free for any liability in case if someone uses the snoopy tool for some unauthorized logging
and sniffing of systems etc.

Before we proceed with the tool, install first for some clarity it is a good idea to know on what kind of Debian Linux you're about to install Snoopy command logger.

root@linux:~ # cat /etc/os-release
PRETTY_NAME="Debian GNU/Linux 11 (bullseye)"
NAME="Debian GNU/Linux"
VERSION_ID="11"
VERSION="11 (bullseye)"
VERSION_CODENAME=bullseye
ID=debian
HOME_URL="https://www.debian.org/"
SUPPORT_URL="https://www.debian.org/support"
BUG_REPORT_URL="https://bugs.debian.org/"


1. Prepare separate log file for snoopy that will keep log of every system command run by running processes visible by (ps -ef)

Next check the permissions user / group and read / write / executable flags with which the default generated rsyslog will be writting and set snoopy to whatever you would like it to write with

root@linux:~ # cat /etc/rsyslog.conf | grep "^\$File\|\$Umask"~
$FileOwner root
$FileGroup adm
$FileCreateMode 0640


Create Rsyslog configuration for snoopy.log

root@linux:~ # cat << EOF | sudo tee /etc/rsyslog.d/01-snoopy.conf
# Send snoopy messages to a dedicated logfile
if (\$programname startswith "snoopy") then {
  action(type="omfile" fileOwner="root" fileGroup="root" fileCreateMode="0600" file="/var/log/snoopy.log")
  stop
}

EOF


To make sure that snoopy library will be preloaded after installation on next boot:

root@linux:~ # cat << EOF | sudo debconf-set-selections
snoopy snoopy/install-ld-preload boolean true
EOF


root@linux:~ # systemctl restart rsyslog


root@linux:~ # systemctl status rsyslog
● rsyslog.service – System Logging Service
     Loaded: loaded (/lib/systemd/system/rsyslog.service; enabled; vendor preset: enabled)
     Active: active (running) since Tue 2023-03-14 12:59:05 EET; 59min ago
TriggeredBy: ● syslog.socket
       Docs: man:rsyslogd(8)
             man:rsyslog.conf(5)
             https://www.rsyslog.com/doc/
   Main PID: 713745 (rsyslogd)
      Tasks: 6 (limit: 4654)
     Memory: 1.1M
        CPU: 548ms
     CGroup: /system.slice/rsyslog.service
             └─713745 /usr/sbin/rsyslogd -n -iNONE

мар 14 12:59:05 haproxy2 systemd[1]: Started System Logging Service.
мар 14 12:59:05 haproxy2 rsyslogd[713745]: warning: ~ action is deprecated, consider using the 'stop' statement instead [v8.210>
мар 14 12:59:05 haproxy2 rsyslogd[713745]: [198B blob data]
мар 14 12:59:05 haproxy2 rsyslogd[713745]: imuxsock: Acquired UNIX socket '/run/systemd/journal/syslog' (fd 3) from systemd.  [>
мар 14 12:59:05 haproxy2 rsyslogd[713745]: [origin software="rsyslogd" swVersion="8.2102.0" x-pid="713745" x-info="https://www.>
мар 14 13:19:05 haproxy2 rsyslogd[713745]: — MARK —
мар 14 13:39:05 haproxy2 rsyslogd[713745]: — MARK —


2. Install snoopy deb package and configure it

root@linux:~ # apt install snoopy
Четене на списъците с пакети… Готово
Изграждане на дървото със зависимости… Готово
Четене на информацията за състоянието… Готово
Следните пакети са били инсталирани автоматично и вече не са необходими:
  bsdmainutils cpp-8 geoip-database libasan5 libbind9-161 libcroco3 libdns1104 libdns1110 libevent-core-2.1-6
  libevent-pthreads-2.1-6 libgdk-pixbuf-xlib-2.0-0 libgdk-pixbuf2.0-0 libgeoip1 libicu63 libisc1100 libisc1105 libisccc161
  libisccfg163 libisl19 liblwres161 libmpdec2 libmpx2 libperl5.28 libpython2-stdlib libpython2.7-minimal libpython2.7-stdlib
  libpython3.7-minimal libpython3.7-stdlib libreadline7 netcat-traditional node-ansi-align node-arrify node-bluebird
  node-boxen node-builtin-modules node-call-limit node-camelcase node-cli-boxes node-cliui node-co node-concat-stream
  node-config-chain node-cross-spawn node-cyclist node-decamelize node-decompress-response node-deep-extend node-detect-indent
  node-detect-newline node-duplexer3 node-duplexify node-editor node-end-of-stream node-errno node-execa node-find-up
  node-flush-write-stream node-from2 node-fs-vacuum node-get-caller-file node-get-stream node-got node-has-symbol-support-x
  node-has-to-string-tag-x node-import-lazy node-invert-kv node-is-buffer node-is-builtin-module node-is-npm node-is-object
  node-is-plain-obj node-is-retry-allowed node-is-stream node-isurl node-json-buffer node-kind-of node-latest-version
  node-lazy-property node-lcid node-libnpx node-locate-path node-lowercase-keys node-mem node-merge-stream node-mimic-fn
  node-mimic-response node-minimist node-mississippi node-node-uuid node-npm-run-path node-os-locale node-p-cancelable
  node-p-finally node-p-limit node-p-locate node-p-timeout node-package-json node-parallel-transform node-path-exists
  node-path-is-inside node-prepend-http node-proto-list node-prr node-pump node-pumpify node-qw node-rc
  node-registry-auth-token node-registry-url node-require-directory node-require-main-filename node-semver-diff node-sha
  node-shebang-command node-shebang-regex node-slide node-sorted-object node-stream-each node-stream-iterate node-stream-shift
  node-strip-eof node-strip-json-comments node-term-size node-through2 node-timed-out node-typedarray node-uid-number
  node-unpipe node-url-parse-lax node-url-to-options node-which-module node-widest-line node-wrap-ansi node-xdg-basedir
  node-xtend node-y18n node-yargs node-yargs-parser perl-modules-5.28 python-pkg-resources python2 python2-minimal python2.7
  python2.7-minimal python3.7-minimal

Използвайте „apt autoremove“ за да ги премахнете.
Следните НОВИ пакети ще бъдат инсталирани:
  snoopy
0 актуализирани, 1 нови инсталирани, 0 за премахване и 1 без промяна.
Необходимо е да се изтеглят 46,0 kB архиви.
След тази операция ще бъде използвано 124 kB допълнително дисково пространство.
Изт:1 http://deb.debian.org/debian bullseye/main amd64 snoopy amd64 2.4.12-1 [46,0 kB]
Изтеглени 46,0 kB за 0с (93,2 kB/сек)
Предварително настройване на пакети …


Selecting previously unselected package snoopy.
(Reading database … 56067 files and directories currently installed.)
Preparing to unpack …/snoopy_2.4.12-1_amd64.deb ...
Unpacking snoopy (2.4.12-1) …
Setting up snoopy (2.4.12-1) …
Processing triggers for libc-bin (2.31-13+deb11u5) …

root@linux:/etc# ls -al /var/log/snoopy.log
-rw——- 1 root root 14472 14 мар 13:40 /var/log/snoopy.log

Any specific configuration for snoopy can be tuned through /etc/snoopy.ini

Now you will find all the commands executed by all monitored running processes in /var/log/snoopy.

root@linux:/etc# tail -30 /var/log/snoopy.log
Mar 14 12:59:32 haproxy2 snoopy[713804]: [login:root ssh:(192.168.0.1 62796 192.168.0.210 22) sid:713792 tty:/dev/pts/2 (0/root) uid:root(0)/root(0) cwd:/]: ldconfig
Mar 14 12:59:32 haproxy2 snoopy[713806]: [login:zabbix ssh:((undefined)) sid:682168 tty:(none) ((none)/(none)) uid:zabbix(108)/zabbix(108) cwd:/]: who
Mar 14 12:59:32 haproxy2 snoopy[713807]: [login:zabbix ssh:((undefined)) sid:682168 tty:(none) ((none)/(none)) uid:zabbix(108)/zabbix(108) cwd:/]: wc -l
Mar 14 13:00:07 haproxy2 snoopy[713815]: [login:root ssh:((undefined)) sid:713815 tty:(none) ((none)/(none)) uid:root(0)/root(0) cwd:/usr/lib/sysstat]: /usr/lib/sysstat/sadc -F -L -S DISK 1 1 /var/log/sysstat
Mar 14 13:00:32 haproxy2 snoopy[713823]: [login:zabbix ssh:((undefined)) sid:682168 tty:(none) ((none)/(none)) uid:zabbix(108)/zabbix(108) cwd:/]: who
Mar 14 13:00:32 haproxy2 snoopy[713824]: [login:zabbix ssh:((undefined)) sid:682168 tty:(none) ((none)/(none)) uid:zabbix(108)/zabbix(108) cwd:/]: wc -l
Mar 14 13:01:32 haproxy2 snoopy[713834]: [login:zabbix ssh:((undefined)) sid:682168 tty:(none) ((none)/(none)) uid:zabbix(108)/zabbix(108) cwd:/]: who
Mar 14 13:01:32 haproxy2 snoopy[713835]: [login:zabbix ssh:((undefined)) sid:682168 tty:(none) ((none)/(none)) uid:zabbix(108)/zabbix(108) cwd:/]: wc -l
Mar 14 13:02:32 haproxy2 snoopy[713843]: [login:zabbix ssh:((undefined)) sid:682168 tty:(none) ((none)/(none)) uid:zabbix(108)/zabbix(108) cwd:/]: who
Mar 14 13:02:32 haproxy2 snoopy[713844]: [login:zabbix ssh:((undefined)) sid:682168 tty:(none) ((none)/(none)) uid:zabbix(108)/zabbix(108) cwd:/]: wc -l
Mar 14 13:03:32 haproxy2 snoopy[713855]: [login:zabbix ssh:((undefined)) sid:682168 tty:(none) ((none)/(none)) uid:zabbix(108)/zabbix(108) cwd:/]: who
Mar 14 13:03:32 haproxy2 snoopy[713856]: [login:zabbix ssh:((undefined)) sid:682168 tty:(none) ((none)/(none)) uid:zabbix(108)/zabbix(108) cwd:/]: wc -l
Mar 14 13:04:32 haproxy2 snoopy[713868]: [login:zabbix ssh:((undefined)) sid:682168 tty:(none) ((none)/(none)) uid:zabbix(108)/zabbix(108) cwd:/]: who


3. Set up logrotation (archiving) for snoopy logs

root@linux:/etc# vim /etc/logrotate.d/snoopy    


/var/log/snoopy.log {
        daily
        rotate 30
        compress
        delaycompress
        notifempty
        create 640 root adm

}
 

If you want to test logrotation without actually rotating the file:               

root@linux:/etc# logrotate –debug –force /etc/logrotate.d/snoopy   
  log needs rotating
rotating log /var/log/snoopy.log, log->rotateCount is 30
dateext suffix '-20230314'
glob pattern '-[0-9][0-9][0-9][0-9][0-9][0-9][0-9][0-9]'
previous log /var/log/snoopy.log.1 does not exist
renaming /var/log/snoopy.log.30.gz to /var/log/snoopy.log.31.gz (rotatecount 30, logstart 1, i 30),


renaming /var/log/snoopy.log.1.gz to /var/log/snoopy.log.2.gz (rotatecount 30, logstart 1, i 1),
renaming /var/log/snoopy.log.0.gz to /var/log/snoopy.log.1.gz (rotatecount 30, logstart 1, i 0),
log /var/log/snoopy.log.31.gz doesn't exist — won't try to dispose of it
renaming /var/log/snoopy.log to /var/log/snoopy.log.1
creating new /var/log/snoopy.log mode = 0640 uid = 0 gid = 4


4. Monitoring only selected applications  executed commands with snoopy                                                                             

By default snoopy after installed will set itself to monitor all kind of running processes on the system is done by preloading the ldconfig's (libcld.so.preload

root@haproxy2:/etc# cat /etc/ld.so.preload
/lib/x86_64-linux-gnu/libsnoopy.so

If you want to monitor a concrete application and not log everything from the running processes in process list, comment this out this line run ldconfig command

Then to any concrete application you would like to monitor with snoopy add to its init script either /etc/init.d/app_init_script or to systemctl's start script before the application binary program run:

export LD_PRELOAD=/lib/snoopy.so


  As per the README states


 Snoopy is placed in /etc/ld.so.preload to trap all occurrences of exec, if 
 you wish to monitor only certain applications you can do so through the    
 LD_PRELOAD environment variable.
Simply set it to /lib/snoopy.so before  loading the application.

For example

 # export LD_PRELOAD=/lib/snoopy.so                                           
 # lynx http://example.com/                           


How to install and configure AIDE ( Advanced Intrusion Detection Environment ) on Debian GNU / Linux 11 to monitor files for changes


March 9th, 2023

aide-logo-linux

How to install and configure AIDE ( Advanced Intrusion Detection Environment ) on Debian GNU / Linux 11 to monitor files for changes

Having a intrusion detection system is essential to keeping a server security to good level and being compliant with PCI (Payment Card Industry) DSS Standards. It is a great thing for the sake to protect oneself from hackers assaults. 

There is plenty of Intrusion Detection systems available all around since many years, in the past one of main ones for Linux as older system administrators should remember was Tripwire – integrity tool for monitoring and alerting on specific file change(s) on a range of systems

Tripwire is still used today but many today prefer to use AIDE that is a free software replacement for Tripwire under GPL (General Public License), that is starting to become like a "standard"  for many Unix-like systems as an inexpensive baseline control and rootkit detection system.

In this article I'll explain shortly how to Install / Configure and Use AIDE to monitor, changes with files on the system.

But before proceeding it is worthy to mention on some of the alternatives companies and businesses choose to as an IDS (Intrusion Detection Systems), that is useful to give a brief idea of the sysadmins that has to deal with Security, on what is some of the main Intrusion Detection Systems adopted on UNIX OSes today:
 

  • Samhain

    An integrity checker and host intrusion detection system that can be used on single hosts as well as large, UNIX-based networks. It supports central monitoring as well as powerful (and new) stealth features to run undetected in memory, using steganography. Samhain is an open-source multiplatform application for POSIX systems (Unix, Linux, Cygwin/Windows).

  • OSSEC 
    OSSEC uses a centralized, cross-platform architecture allowing multiple systems to be monitored and managed.
     
  • Snort
    IDS which has the capabilities to prevent attacks. By taking a particular action based on traffic patterns, it can become an intrusion prevention system (IPS). – written in Pure C.
     
  • Zeek (Bro)
    Zeek helps to perform security monitoring by looking into the network's activity. It can find suspicious data streams. Based on the data, it alert, react, and integrate with other tools – written in C++.
  • Maltrail (Maltrail monitors for traffic on the network that might indicate system compromise or other bad behavior. It is great for intrusion detection and monitoring. – written in Python).

1. Install aide deb package

# apt -y install aide

root@haproxy2:~# aide -v
Aide 0.17.3

Compiled with the following options:

WITH_MMAP
WITH_PCRE
WITH_POSIX_ACL
WITH_SELINUX
WITH_XATTR
WITH_CAPABILITIES
WITH_E2FSATTRS
WITH_ZLIB
WITH_MHASH
WITH_AUDIT

Default config values:
config file: <none>
database_in: <none>
database_out: <none>

Available hashsum groups:
md5: yes
sha1: yes
sha256: yes
sha512: yes
rmd160: yes
tiger: yes
crc32: yes
crc32b: yes
haval: yes
whirlpool: yes
gost: yes
stribog256: no
stribog512: no

Default compound groups:
R: l+p+u+g+s+c+m+i+n+md5+acl+selinux+xattrs+ftype+e2fsattrs+caps
L: l+p+u+g+i+n+acl+selinux+xattrs+ftype+e2fsattrs+caps
>: l+p+u+g+i+n+acl+S+selinux+xattrs+ftype+e2fsattrs+caps
H: md5+sha1+rmd160+tiger+crc32+haval+gost+crc32b+sha256+sha512+whirlpool
X: acl+selinux+xattrs+e2fsattrs+caps

2. Prepare AIDE configuration and geenrate (initialize) database

Either you can use the default AIDE configuration which already has a preset rules for various files and directories to be monitored,
or you might add up additional ones.
 

  • For details on configuration of aide.conf accepted options "man aide.conf"

The rules and other configurations resides lays under  /etc/aide/ directory
 

The AIDE database is located under /var/lib/aide

root@server:~# ls -al /var/lib/aide/
общо 33008
drwxr-xr-x  2 root root     4096  9 мар 12:38 ./
drwxr-xr-x 27 root root     4096  9 мар 12:01 ../
-rw——-  1 root root 16895467  9 мар 16:03 aide.db
-rw——-  1 root root 16895467  9 мар 18:49 aide.db.new


Also, details about major setting rules config regarding how AIDE will run via cronjob as with most debian services are into /etc/default/aide

Default aide.conf config is in /etc/aide/aide.conf if you need custom stuff to do with it simply edit it.

Here is an Example:
Lets say you want to omit some directory to not be monitored by aide, which would otherwise do, i.e.
omit /var/log/* from monitoring

# At the end of file /etc/aide/aide.conf

add:

!/var/log
!/home/
!/var/lib
!/proc

  • Initialize the aide database first time

Run aideinit command, aideinit will create a new baseline database –  /var/lib/aide/aide.db.new (a baseline)
Note that, /var/lib/aide/aide.db is the old database that aide uses to check against for any changes of files / directories on the configured monitored filesystem objects.

root@server:~# aideinit
Running aide –init…

debug1: client_input_channel_req: channel 0 rtype keepalive@openssh.com reply 1
Start timestamp: 2023-03-09 12:06:16 +0200 (AIDE 0.17.3)
AIDE initialized database at /var/lib/aide/aide.db.new

Number of entries:      66971

—————————————————
The attributes of the (uncompressed) database(s):
—————————————————

/var/lib/aide/aide.db.new
 SHA256    : nVrYljiBFM/KaKCTjbaJtR2w6N8vc8qN
             DPObbo2UMVo=
 SHA512    : S1ZNB0DCqb4UTmuqaalTgiQ3UAltTOzO
             YNfEQJldp32q5ahplBo4/65uwgtGusMy
             rJC8nvxvYmh+mq+16kfrKA==
 RMD160    : xaUnfW1+/DJV/6FEm/nn1k1UKOU=
 TIGER     : nGYEbX281tsQ6T21VPx1Hr/FwBdwF4cK
 CRC32     : fzf7cg==
 HAVAL     : yYQw/87KUmRiRLSu5JcEIvBUVfsW/G9H
             tVvs6WqL/0I=
 WHIRLPOOL : 6b5y42axPjpUxWFipUs1PtbgP2q0KJWK
             FwFvAGxHXjZeCBPEYZCNkj8mt8MkXBTJ
             g83ZELK9GQBPLea7UF3tng==
 GOST      : sHAzx7hkr5H3q8TCSGCKjndEiZgcvCEL
             E45qcRb25tM=


End timestamp: 2023-03-09 12:38:30 +0200 (run time: 32m 14s)


Be patient now, go grab a coffee / tea or snack as the command might take up to few minutes for the aide to walk through the whole monitored filesystems and built its database.

root@server:~# echo cp /var/lib/aide/aide.db{.new,}
cp /var/lib/aide/aide.db.new /var/lib/aide/aide.db


root@server:~# cp /var/lib/aide/aide.db{.new,}

root@server:~# aide –check –config /etc/aide/aide.conf

Start timestamp: 2023-03-09 13:01:32 +0200 (AIDE 0.17.3)
AIDE found differences between database and filesystem!!

Summary:
  Total number of entries:      66972
  Added entries:                1
  Removed entries:              0
  Changed entries:              7

—————————————————
Added entries:
—————————————————

f+++++++++++++++++: /var/lib/aide/aide.db

—————————————————
Changed entries:
—————————————————

d =…. mc.. .. . : /etc/aide
d =…. mc.. .. . : /root
f <…. mci.H.. . : /root/.viminfo
f =…. mc..H.. . : /var/lib/fail2ban/fail2ban.sqlite3
d =…. mc.. .. . : /var/lib/vnstat
f =…. mc..H.. . : /var/lib/vnstat/vnstat.db
f >b… mc..H.. . : /var/log/sysstat/sa09

—————————————————
Detailed information about changes:
—————————————————

Directory: /etc/aide
 Mtime     : 2023-03-09 12:04:03 +0200        | 2023-03-09 12:51:11 +0200
 Ctime     : 2023-03-09 12:04:03 +0200        | 2023-03-09 12:51:11 +0200

Directory: /root
 Mtime     : 2023-03-09 12:06:13 +0200        | 2023-03-09 12:51:11 +0200
 Ctime     : 2023-03-09 12:06:13 +0200        | 2023-03-09 12:51:11 +0200

File: /root/.viminfo
 Size      : 18688                            | 17764
 Mtime     : 2023-03-09 12:06:13 +0200        | 2023-03-09 12:51:11 +0200
 Ctime     : 2023-03-09 12:06:13 +0200        | 2023-03-09 12:51:11 +0200
 Inode     : 133828                           | 133827
 SHA256    : aV54gi33aA/z/FuBj2ZioU2cTa9H16TT | dnFdLVQ/kx3UlTah09IgEMrJ/aYgczHe
             TzkLSxBDSB4=                     | DdxDAmPOSAM=

3. Test aide detects file changes

Create a new file and append some text and rerun the aide check


root@server:~# touch /root/test.txt
root@server:~# echo aaa > /root/test.txt
root@server:~# aide –check –config /etc/aide/aide.conf


Start timestamp: 2023-03-09 13:07:21 +0200 (AIDE 0.17.3)
AIDE found differences between database and filesystem!!

Summary:
  Total number of entries:      66973
  Added entries:                2
  Removed entries:              0
  Changed entries:              7

—————————————————
Added entries:
—————————————————

f+++++++++++++++++: /root/test.txt
f+++++++++++++++++: /var/lib/aide/aide.db

—————————————————
Changed entries:
—————————————————

d =…. mc.. .. . : /etc/aide
d =…. mc.. .. . : /root
f <…. mci.H.. . : /root/.viminfo
f =…. mc..H.. . : /var/lib/fail2ban/fail2ban.sqlite3
d =…. mc.. .. . : /var/lib/vnstat
f =…. mc..H.. . : /var/lib/vnstat/vnstat.db
f >b… mc..H.. . : /var/log/sysstat/sa09

….


The same command can be shortened for the lazy typist:

root@server:~# aide -c /etc/aide/aide.conf -C

The command will basically try to check the deviation between the AIDE database and the filesystem.

4. Limiting AIDES Integrity Checks to Specific Files / Directories

In order to limit the integrity checks to a specific entries for example /etc, pass the –limit REGEX option to AIDE check command where REGEX is the entry to check.

For example, check and update the database entries matching /etc, you would run aide command as shown below;
 

root@server:~# aide -c /etc/aide/aide.conf –limit /etc –check


AIDE found differences between database and filesystem!!
Limit: /etc

Summary:
  Total number of entries:      66791
  Added entries:                0
  Removed entries:              0
  Changed entries:              2

—————————————————
Changed entries:
—————————————————

d =…. mc.. .. . : /etc/aide
d =…. mc.. .. . : /etc/default

—————————————————
Detailed information about changes:
—————————————————

Directory: /etc/aide
 Mtime     : 2023-03-09 15:59:53 +0200        | 2023-03-09 16:43:03 +0200
 Ctime     : 2023-03-09 15:59:53 +0200        | 2023-03-09 16:43:03 +0200

Directory: /etc/default
 Mtime     : 2023-03-09 12:06:13 +0200        | 2023-03-09 18:42:12 +0200
 Ctime     : 2023-03-09 12:06:13 +0200        | 2023-03-09 18:42:12 +0200


—————————————————
The attributes of the (uncompressed) database(s):
—————————————————

/var/lib/aide/aide.db
 SHA256    : sjCxyIkr0nC/gTkNmn7DNqAQWttreDF6
             vSUV4jBoFY4=
 SHA512    : vNMpb54qxrbOk6S1Z+m9r0UwGvRarkWY
             0m50TfMvGElfZWR1I3SSaeTdORAZ4rQe
             17Oapo5+Sc0E2E+STO93tA==
 RMD160    : anhm5E6UlKmPYYJ4WYnWXk/LT3A=
 TIGER     : 5e1wycoF35/ABrRf7FNypZ45169VTuV4
 CRC32     : EAJlFg==
 HAVAL     : R5imONWRYgNGEfhBTc096K+ABnMFkMmh
             Hsqe9xt20NU=
 WHIRLPOOL : c6zySLliXNgnOA2DkHUdLTCG2d/T18gE
             4rdAuKaC+s7gqAGyA4p2bnDHhdd0v06I
             xEGY7YXCOXiwx8BM8xHAvQ==
 GOST      : F5zO2Ovtvf+f7Lw0Ef++ign1znZAQMHM
             AApQOiB9CqA=


End timestamp: 2023-03-09 20:02:18 +0200 (run time: 1m 32s)

5. Add the modified /root/test.txt to AIDE list of known modified files database
 

root@server:~# aide –update –config /etc/aide/aide.
  ERROR: cannot open config file '/etc/aide/aide.': No such file or directory


root@server:~# ​ aide –update –config /etc/aide/aide.conf
 

Start timestamp: 2023-03-09 18:45:17 +0200 (AIDE 0.17.3)
AIDE found differences between database and filesystem!!
New AIDE database written to /var/lib/aide/aide.db.new

Summary:
  Total number of entries:      66791
  Added entries:                0
  Removed entries:              0
  Changed entries:              8

—————————————————
Changed entries:
—————————————————

d =…. mc.. .. . : /etc/aide
d =…. mc.. .. . : /etc/default
d =…. mc.. .. . : /root
f >…. mci.H.. . : /root/.viminfo
f >…. mci.H.. . : /root/test.txt
f =…. mc..H.. . : /var/lib/fail2ban/fail2ban.sqlite3
d =…. mc.. .. . : /var/lib/vnstat
f =…. mc..H.. . : /var/lib/vnstat/vnstat.db

—————————————————
Detailed information about changes:
—————————————————

Directory: /etc/aide
 Mtime     : 2023-03-09 15:59:53 +0200        | 2023-03-09 16:43:03 +0200
 Ctime     : 2023-03-09 15:59:53 +0200        | 2023-03-09 16:43:03 +0200

Directory: /etc/default
 Mtime     : 2023-03-09 12:06:13 +0200        | 2023-03-09 18:42:12 +0200
 Ctime     : 2023-03-09 12:06:13 +0200        | 2023-03-09 18:42:12 +0200

Directory: /root
 Mtime     : 2023-03-09 15:59:53 +0200        | 2023-03-09 18:44:34 +0200
 Ctime     : 2023-03-09 15:59:53 +0200        | 2023-03-09 18:44:34 +0200

File: /root/.viminfo
 Size      : 16706                            | 16933
 Mtime     : 2023-03-09 15:59:53 +0200        | 2023-03-09 18:44:34 +0200
 Ctime     : 2023-03-09 15:59:53 +0200        | 2023-03-09 18:44:34 +0200
 Inode     : 136749                           | 133828
 SHA256    : KMHGoMVJo10BtafVrWIOLt3Ht9gK8bc+ | rrp8S3VftzZzvjBP1JC+PBpODv9wPKGw
             9uHh/z7iJWA=                     | TA+hyhTiY+U=
 SHA512    : ieDHy7ObSTfYm5d8DtYcHKxHya13CS65 | PDAJjyZ39uU3kKFo2lHBduTqxMDq4i01
             ObMYIRAre6IgvLslEs0ZodQFyrczMyRt | 1Kvm/h6xzFhHtFgjidtcemG8wDcjtfNF
             +d6SrW0gn3skKn2B7G09eQ==         | Z7LO230fgGeO7UepqtxZjQ==
 RMD160    : nUgg/G4zsVGKzVmmrqltuYUDvtg=     | jj61KAFONK92mj+u66RDJmxFhmI=
 TIGER     : 3vPSOrla5k+k2br1E2ES4eNiSZ2novFX | mn4kNCzd8SQr2ID2VSe4f4l0ta7pO/xo
 CRC32     : NDnMgw==                         | AyzVUQ==
 HAVAL     : Q9/KozxRiPbLEkaIfnBUZdEWftaF52Mw | 6jADKV6jg7ZVr/A/oMhR4NXc8TO1AOGW
             7tiR7DXhl0o=                     | NrYe+j6UcO0=
 WHIRLPOOL : vB/ZMCul4hN0aYd39gBu+HmZT/peRUI8 | mg6c1lYYVNZcy4mVzGojwraim8e3X2/R
             KDkaslNb8+YleoFWx0mbhAbkGurc0+jh | urVvEmbsgTuUCJOuf9+OrEACiF0fbe/x
             YPBviZIKcxUbTc2nGthTWw==         | t+BXnSQWk08OL9EI6gMGqA==
 GOST      : owVGTgU9BH3b0If569wQygw3FAbZIZde | ffx29GV2jaCB7XzuNjdiRzziIiZYnbi3
             eAfQfzlRPGY=                     | Ar7jyNMUutk=

File: /root/test.txt
 Size      : 4                                | 8
 Mtime     : 2023-03-09 13:07:12 +0200        | 2023-03-09 18:44:34 +0200
 Ctime     : 2023-03-09 13:07:12 +0200        | 2023-03-09 18:44:34 +0200
 Inode     : 133828                           | 136751
 SHA256    : F+aC8GC1+OR+oExcSFWQiwpa1hICImD+ | jUIZMGfiMdAlWFHu8mmmlml4qAGNQNL5
             UOEeywzAq3Y=                     | 6NhzJ1sYFZE=
 SHA512    : d+UmFKFBzvGadt5hk+nIRbjP//7PSXNl | ixn20lcEMDEtsJo3hO90Ea/wHWLCHcrz
             Pl16XRIUUPq2FCiQ4PeUcVciukJX7ijL | seBWunbBysY0z3BWcfgnN2vH05WfRfvA
             D045ZvGOEcnmL6a6vwp0jw==         | QiNtQS1tStuEdB3Voq54zQ==
 RMD160    : I6waxKN3rMx4WTz4VCUQXoNoxUg=     | urTh1j1t3UHchnJGnBG4lUZnjI4=
 TIGER     : cwUYgfKHcJnWXcA0pr/OKuxuoxh+b9lA | prstKqCfMXL39aVGFPA0kX4Q9x7a+hUn
 CRC32     : UD78Dw==                         | zoYiEA==
 HAVAL     : bdbKR9LvPgsYClViKiHx48fFixfIL/jA | ZdpdeMhw4MvKBgWsM4EeyUgerO86Rt82
             F3tjdc2Gm8Y=                     | W94fJFRWbrM=
 WHIRLPOOL : OLP0Y4oKcqW2yEvme8z419N1KE4TB9GJ | Xk8Ujo3IU2SzSqbJFegq7p1ockmrnxJF
             biHn/9XgrBz4fQiDJ8eHpx+0exA9hXmY | R3Rfstd1jWSwLFNTEwfbRRw+TARtRK50
             EbbakMJJdzLt1ipKWiV9gg==         | iWJeHLsD5dZ+CzV0tf4sUg==
 GOST      : ystISzoeH/ZznYrrXmxe4rwmybWMpGuE | GhMWNxg7Is0svJ+5LP+DVWbgt+CDQO+3
             0PzRnVEqnR8=                     | 08dwBuVAwB8=

File: /var/lib/fail2ban/fail2ban.sqlite3
 Mtime     : 2023-03-09 15:55:01 +0200        | 2023-03-09 18:45:01 +0200
 Ctime     : 2023-03-09 15:55:01 +0200        | 2023-03-09 18:45:01 +0200
 SHA256    : lLilXNleqSgHIP1y4o7c+oG5XyUPGzgi | NCJJ2H6xgCw/NYys1LMA7hOWwoOoxI8Y
             RHYH+zvlAL4=                     | 4SJygfqEioE=
 SHA512    : iQj2pNT4NES4fBcujzdlEEGZhDnkhKgc | ClQZ5HMOSayUNb//++eZc813fiMJcXnj
             QDlGFSAn6vi+RXesFCjCABT7/00eEm5/ | vTGs/2tANojoe6cqpsT/LaJ3QZXpmrfh
             ILcaqlQtBSLJgHjMQehzdg==         | syVak1I4n9yg8cDKEkZUvw==
 RMD160    : Xg4YU8YI935L+DLvkRsDanS4DGo=     | SYrQ27n+/1fvIZ7v+Sar/wQHulI=
 TIGER     : 2WhhPq9kuyeNJkOicDTDeOeJB8HR8zZe | o1LDZtRclri2KfZBe5J3D4YhM05UaP4E
 CRC32     : NQmi4A==                         | tzIsqg==
 HAVAL     : t1ET+84+8WgfwqlLy4R1Qk9qGZQRUbJI | MwVnjtM3dad/RuN2BfgsySX2DpfYq4qi
             z2J0ROGduXc=                     | H1pq6RYsA6o=
 WHIRLPOOL : xKSn71gFIVhk5rWJIBaYQASl0V+pGn+3 | m5LEXfhBbhWFg/d8CFJhklOurmRSkDSG
             N85R0tiCKsTZ2+LRkxDrzcVQdss2k8+z | LC/vICnbEWzLwrCuMwBi1/e5wDNIY8gK
             oqExhoXtPsMaREjpCugd3Q==         | mvGn40x+G4cCYNZ6lGT9Zg==
 GOST      : WptpUlfooIlUjzDHU8XGuOU2waRud5SR | i6K4COXU0nyZ1mL3ZBuGUPz/ZXTj8KKQ
             E/tnoBqk+q0=                     | L6VNyS8/X2Y=

Directory: /var/lib/vnstat
 Mtime     : 2023-03-09 16:00:00 +0200        | 2023-03-09 18:45:01 +0200
 Ctime     : 2023-03-09 16:00:00 +0200        | 2023-03-09 18:45:01 +0200

File: /var/lib/vnstat/vnstat.db
 Mtime     : 2023-03-09 16:00:00 +0200        | 2023-03-09 18:45:00 +0200
 Ctime     : 2023-03-09 16:00:00 +0200        | 2023-03-09 18:45:00 +0200
 SHA256    : X/lnJuuSo4jX4HRzxMBodnKHAjQFvugi | oqtY3HTNds/qDNFCRAEsfN5SuO0U5LRg
             2sh2c0u69x8=                     | otc5z1y+eGY=
 SHA512    : U/g8O6G8cuhsqCUCbrElxgiy+naJKPkI | y+sw4LX8mlDWkRJMX38TsYSo1DQzxPOS
             hG7vdH9rBINjakL87UWajT0s6WSy0pvt | 068otnzw2FSSlM5X5j5EtyJiY6Hd5P+A
             ALaTcDFKHBAmmFrl8df2nQ==         | jFiWStMbx+dQidXYZ4XFAw==
 RMD160    : F6YEjIIQu2J3ru7IaTvSemA9e34=     | bmVSaRKN2qU7qpEWkzfXFoH4ZK4=
 TIGER     : UEwLoeR6Qlf2oOI58pUCEDaWk0pHDkcY | 0Qb4nUqe3cKh/g5CQUnOXGfjZwJHjeWa
 CRC32     : Bv3/6A==                         | jvW6mg==
 HAVAL     : VD7tjHb8o8KTUo5xUH7eJEmTWgB9zjft | rumfiWJvy/sTK/09uj7XlmV3f7vj6KBM
             kOkzKxFWqqU=                     | qeOuKvu0Zjc=
 WHIRLPOOL : wR0qt8u4N8aQn8VQ+bmfrxB7CyCWVwHi | FVWDRE3uY6qHxLlJQLU9i9QggLW+neMj
             ADHpMTUxBEKOpOBlHTWXIk13qYZiD+o/ | Wt+Dj9Rz92BG9EomgLUgUkxfiVFO8cMq
             XtzTB4rMbxS4Z5PAdC/07A==         | WaR/KKq3Z7R8f/50tc9GMQ==
 GOST      : l3ibqMkHMSPpQ+9ok51/xBthET9+JQMd | qn0GyyCg67KRGP13At52tnviZfZDgyAm
             OZtiFGYXmgU=                     | c82NXSzeyV0=


—————————————————
The attributes of the (uncompressed) database(s):
—————————————————

/var/lib/aide/aide.db
 SHA256    : sjCxyIkr0nC/gTkNmn7DNqAQWttreDF6
             vSUV4jBoFY4=
 SHA512    : vNMpb54qxrbOk6S1Z+m9r0UwGvRarkWY
             0m50TfMvGElfZWR1I3SSaeTdORAZ4rQe
             17Oapo5+Sc0E2E+STO93tA==
 RMD160    : anhm5E6UlKmPYYJ4WYnWXk/LT3A=
 TIGER     : 5e1wycoF35/ABrRf7FNypZ45169VTuV4
 CRC32     : EAJlFg==
 HAVAL     : R5imONWRYgNGEfhBTc096K+ABnMFkMmh
             Hsqe9xt20NU=
 WHIRLPOOL : c6zySLliXNgnOA2DkHUdLTCG2d/T18gE
             4rdAuKaC+s7gqAGyA4p2bnDHhdd0v06I
             xEGY7YXCOXiwx8BM8xHAvQ==
 GOST      : F5zO2Ovtvf+f7Lw0Ef++ign1znZAQMHM
             AApQOiB9CqA=

/var/lib/aide/aide.db.new
 SHA256    : QRwubXnz8md/08n28Ek6DOsSQKGkLvuc
             gSZRsw6gRw8=
 SHA512    : 238RmI1PHhd9pXhzcHqM4+VjNzR0es+3
             6eiGNrXHAdDTz7GlAQQ4WfKeQJH9LdyT
             1r5ho/oXRgzfa2BfhKvTHg==
 RMD160    : GJWuX/nIPY05gz62YXxk4tWiH5I=
 TIGER     : l0aOjXlM4/HjyN9bhgBOvvCYeqoQyjpw
 CRC32     : KFz6GA==
 HAVAL     : a//4jwVxF22URf2BRNA612WOOvOrScy7
             OmI44KrNbBM=
 WHIRLPOOL : MBf+NeXElUvscJ2khIuAp+NDu1dm4h1f
             5tBQ0XrQ6dQPNA2HZfOShCBOPzEl/zrl
             +Px3QFV4FqD0jggr5sHK2g==
 GOST      : EQnPh6jQLVUqaAK9B4/U4V89tanTI55N
             K7XqZR9eMG4=


End timestamp: 2023-03-09 18:49:51 +0200 (run time: 4m 34s)
 

6. Substitute old aide database with the new that includes the modified files

As you see AIDE detected the changes in /root/test.txt

To apply the changes be known by AIDE for next time (e.g. this file was authorized and supposed to be written there) simply move the new generated database
to current aide database.

# copy generated DB to master DB
root@dlp:~# cp -p /var/lib/aide/aide.db.new /var/lib/aide/aide.db

7. Check once again to make sure recently modified files are no longer seen as changed by AIDE

Recheck again the database to make sure the files you wanted to omit are no longer mentioned as changed

root@server:~# aide –check –config /etc/aide/aide.conf
Start timestamp: 2023-03-09 16:23:05 +0200 (AIDE 0.17.3)
AIDE found differences between database and filesystem!!

Summary:
  Total number of entries:      66791
  Added entries:                0
  Removed entries:              0
  Changed entries:              3

—————————————————
Changed entries:
—————————————————

f =…. mc..H.. . : /var/lib/fail2ban/fail2ban.sqlite3
d =…. mc.. .. . : /var/lib/vnstat
f =…. mc..H.. . : /var/lib/vnstat/vnstat.db

—————————————————
Detailed information about changes:
—————————————————

File: /var/lib/fail2ban/fail2ban.sqlite3
 Mtime     : 2023-03-09 15:55:01 +0200        | 2023-03-09 16:25:02 +0200
 Ctime     : 2023-03-09 15:55:01 +0200        | 2023-03-09 16:25:02 +0200
 SHA256    : lLilXNleqSgHIP1y4o7c+oG5XyUPGzgi | MnWXC2rBMf7DNJ91kXtHXpM2c2xxF60X
             RHYH+zvlAL4=                     | DfLUQLHiSiY=
 SHA512    : iQj2pNT4NES4fBcujzdlEEGZhDnkhKgc | gxHVBxhGTKi0TjRE8/sn6/gtWsRw7Mfy
             QDlGFSAn6vi+RXesFCjCABT7/00eEm5/ | /wCfPlDK0dkRZEbr8IE2BNUhBgwwocCq
             ILcaqlQtBSLJgHjMQehzdg==         | zuazTy4N4x6X8bwOzRmY0w==
 RMD160    : Xg4YU8YI935L+DLvkRsDanS4DGo=     | +ksl9kjDoSU9aL4tR7FFFOK3mqw=
 TIGER     : 2WhhPq9kuyeNJkOicDTDeOeJB8HR8zZe | 9cvXZNbU+cp5dA5PLiX6sGncXd1Ff5QO
 CRC32     : NQmi4A==                         | y6Oixg==
 HAVAL     : t1ET+84+8WgfwqlLy4R1Qk9qGZQRUbJI | aPnCrHfmZAUm7QjROGEl6rd3776wO+Ep
             z2J0ROGduXc=                     | s/TQn7tH1tY=
 WHIRLPOOL : xKSn71gFIVhk5rWJIBaYQASl0V+pGn+3 | 9Hu6NBhz+puja7uandb21Nt6cEW6zEpm
             N85R0tiCKsTZ2+LRkxDrzcVQdss2k8+z | bTsq4xYA09ekhDHMQJHj2WpKpzZbA+t0
             oqExhoXtPsMaREjpCugd3Q==         | cttMDX8J8M/UadqfL8KZkQ==
 GOST      : WptpUlfooIlUjzDHU8XGuOU2waRud5SR | WUQfAMtye4wADUepBvblvgO+vBodS0Ej
             E/tnoBqk+q0=                     | cIbXy4vpPYc=

Directory: /var/lib/vnstat
 Mtime     : 2023-03-09 16:00:00 +0200        | 2023-03-09 16:25:01 +0200
 Ctime     : 2023-03-09 16:00:00 +0200        | 2023-03-09 16:25:01 +0200

File: /var/lib/vnstat/vnstat.db
 Mtime     : 2023-03-09 16:00:00 +0200        | 2023-03-09 16:25:01 +0200
 Ctime     : 2023-03-09 16:00:00 +0200        | 2023-03-09 16:25:01 +0200
 SHA256    : X/lnJuuSo4jX4HRzxMBodnKHAjQFvugi | N1lzhV3+tkDBud3AVlmIpDkU1c3Rqhnt
             2sh2c0u69x8=                     | YqE8naDicoM=
 SHA512    : U/g8O6G8cuhsqCUCbrElxgiy+naJKPkI | +8B9HvHhOp1C/XdlOORjyd3J2RtTbRBF
             hG7vdH9rBINjakL87UWajT0s6WSy0pvt | b0Moo2Gj+cIxaMCu5wOkgreMp6FloqJR
             ALaTcDFKHBAmmFrl8df2nQ==         | UH4cNES/bAWtonmbj4W7Vw==
 RMD160    : F6YEjIIQu2J3ru7IaTvSemA9e34=     | 8M6TIOHt0NWgR5Mo47DxU28cp+4=
 TIGER     : UEwLoeR6Qlf2oOI58pUCEDaWk0pHDkcY | Du9Ue0JA2URO2tiij31B/+663OaWKefR
 CRC32     : Bv3/6A==                         | v0Ai4w==
 HAVAL     : VD7tjHb8o8KTUo5xUH7eJEmTWgB9zjft | XA+vRnMNdVGFrO+IZtEA0icunWqBGaCf
             kOkzKxFWqqU=                     | leR27LN4ejc=
 WHIRLPOOL : wR0qt8u4N8aQn8VQ+bmfrxB7CyCWVwHi | HG31dNEEcak2zZGR24W7FDJx8mh24MaJ
             ADHpMTUxBEKOpOBlHTWXIk13qYZiD+o/ | BQNhqkuS6R/bmlhx+P+eQ/JimwPAPOaM
             XtzTB4rMbxS4Z5PAdC/07A==         | xWG7cMETIXdT9sUOUal8Sw==
 GOST      : l3ibqMkHMSPpQ+9ok51/xBthET9+JQMd | y6Ek/TyAMGV5egkfCu92Y4qqk1Xge8c0
             OZtiFGYXmgU=                     | 3ONXRveOlr0=


—————————————————
The attributes of the (uncompressed) database(s):
—————————————————

/var/lib/aide/aide.db
 SHA256    : sjCxyIkr0nC/gTkNmn7DNqAQWttreDF6
             vSUV4jBoFY4=
 SHA512    : vNMpb54qxrbOk6S1Z+m9r0UwGvRarkWY
             0m50TfMvGElfZWR1I3SSaeTdORAZ4rQe
             17Oapo5+Sc0E2E+STO93tA==
 RMD160    : anhm5E6UlKmPYYJ4WYnWXk/LT3A=
 TIGER     : 5e1wycoF35/ABrRf7FNypZ45169VTuV4
 CRC32     : EAJlFg==
 HAVAL     : R5imONWRYgNGEfhBTc096K+ABnMFkMmh
             Hsqe9xt20NU=
 WHIRLPOOL : c6zySLliXNgnOA2DkHUdLTCG2d/T18gE
             4rdAuKaC+s7gqAGyA4p2bnDHhdd0v06I
             xEGY7YXCOXiwx8BM8xHAvQ==
 GOST      : F5zO2Ovtvf+f7Lw0Ef++ign1znZAQMHM
             AApQOiB9CqA=


End timestamp: 2023-03-09 16:27:33 +0200 (run time: 4m 28s)

As you can see there are no new added entries for /root/test.txt and some other changed records for vnstat service as well as fail2ban ones, so the Intrusion detection system works just as we expected it.

8. Configure Email AIDE changed files alerting Email recipient address

From here on aide package has set its own cron job which is automatically doing the check operation every day and any new file modifications will be captured and alerts sent to local root@localhost mailbox account, so you can check it out later with mail command.

If you want to sent the Email alert for any files modifications occured to another email, assuming that you have a locally running SMTP server with a mail relay to send to external mails, you can do it via /etc/default/aide via:

MAILTO=root


For example change it to a FQDN email address

MAILTO=external_mail@your-mail.com

9.Force AIDE to run AIDE at specitic more frequent time intervals

You can as well install a cron job to execute AIDE at specific time intervals, as of your choice

Lets say you want to run a custom prepared set of files to monitor in /etc/aide/aide_custom_config.conf configure a new cronjob like below:

root@server:~# crontab -u root -e
*/5 * * * * aide -c /etc/aide/aide_custom_config.conf -u && cp /var/lib/custom-aide/aide.db{.new,}


This will execute AIDE system check every 5 minutse and email the report to ealier configured email username@whatever-your-smtp.com via /etc/default/aide

10. Check the output of AIDE for changes – useful for getting a files changes from aide from scripts

Check the command exit status.

root@server:~# echo $?

According to AIDE man pages, the AIDE’s exit status is normally 0 if no errors occurred. Except when the –check, –compare or –update command was requested, in which case the exit status is defined as:

   1 * (new files detected?)     +

   2 * (removed files detected?) +

   4 * (changed files detected?)


   Since  those three cases can occur together, the respective error codes are added. For example, if there are new files and removed files detected, the exit status will be 1 + 2 = 3.

   Additionally, the following exit codes are defined for generic error conditions in aide help manual:

   14 Error writing error

   15 Invalid argument error

   16 Unimplemented function error

   17 Invalid configureline error

   18 IO error

   19 Version mismatch error

PLEASE CONSIDER

  • That AIDE checks might be resource intensive
    and could cause a peak in CPU use and have a negative effect on lets very loaded application server machines,
    thus causing a performance issuea during integrity checks !
     
  • If you are scanning file system wide and you do it frequent, be sure to provide “enough” resources or schedule the scan at a times that the Linux host will be less used !
     
  • Whenever you made any AIDE configuration changes, remember to initialize the database to create a baseline !

Short history on how 8 of March Woman International Day (IWD) made up feast replaced the Real Woman Day celebrated on the Christian feast of Annunciation


March 8th, 2023

International Woman's day short history - 8 of march beautiful flowers - Triumph of Woman
International Woman's Day was first observed in 1911, by more than a million people around the world.
​Today is therefore the centennial observance, which is being celebrated with events in more than 100 countries, including Israel.

The International Woman Day (IWD) or the Triumph of Women has been growing as a great day to celebrate the achievemts of woman in history and their significance but most people know little or near nothing regarding that feast, that was disguised by the free world as it was connected to Communist countries of the United States of Soviet Republic (USSR) and today's People's Republic of China and Vietnam and only in 1975 accepted to be the International Woman Day be the United Nations.

Origin of 8 of March Woman's day

The earliest reported Women's Day observance, called "National Woman's Day", was held on February 28, 1909, in New York City, organized by the Socialist Party of America[14] at the suggestion of activist Theresa Malkiel.There have been claims that the day was commemorating a protest by women garment workers in New York on March 8, 1857, but researchers have alleged this to be a myth intended to detach International Women's Day from its socialist origin.

In August 1910, an International Socialist Women's Conference was organized ahead of the general meeting of the Socialist Second International in Copenhagen, Denmark. However, what made history for the modern celebration of International Women's Day, according to the ILO, was the fire at the Triangle Shirtwaist factory in New York City on March 25, 1911, which killed 146 young workers, most of whom were immigrants.
Inspired in part by the American socialists, German delegates Clara Zetkin, Käte Duncker, Paula Thiede, and others proposed the establishment of an annual "Women's Day", although no date was specified. The 100 delegates, representing 17 countries, agreed with the idea as a strategy to promote equal rights, including women's suffrage.
 
The following year, on March 19, 1911, the first International Women's Day was marked by over a million people in Austria, Denmark, Germany, and Switzerland. In Austria-Hungary alone, there were 300 demonstrations,with women parading on the Ringstrasse in Vienna, carrying banners honoring the martyrs of the Paris Commune. Across Europe, women demanded the right to vote and to hold public office, and protested against employment sex discrimination.
IWD initially had no set date, though it was generally celebrated in late February or early March. Americans continued to observe "National Women's Day" on the last Sunday in February, while Russia observed International Women's Day for the first time in 1913, on the last Saturday in February (albeit based on the Julian calendar, as in the Gregorian calendar, the date was March 8).

In 1914, International Women's Day was held on March 8 for the first time in Germany, possibly because that date was a Sunday. As elsewhere, Germany's observance was dedicated to women's right to vote, which German women did not win until 1918. Concurrently, there was a march in London in support of women's suffrage, during which Sylvia Pankhurst was arrested in front of Charing Cross station on her way to speak in Trafalgar Square.

8 of March in Modern Times the socialist faux for Annunciation

However as the Soviet system of USSR collapsed in the 1992, the feast started to take heet among other Western countries quickly, now to the point that even some country regions in Western europe do celebrate 8 of March in some kind of a form, today it is under some form celebrated or marked to more than 100+ countries.

The feast started originally in America (United States) on 27 February 1909 in New Year and has walked its way until it become official with many turmoils, public strikes of woman and woman rage. A key

What has to be said is 8 of March has been a Public feast of Great importance among all the countries from Soviet Russia (USSR) and its satellites for many years now. 

In ex-USSR not venerating the woman nearby by at least flower giving is near a crime deed, and even for a traditionally Orthodox Christian countries, where there is already a feast of triumph and Veneration of woman the day of Annunciation, 8 of March is continuously celebrated even though nowadays the original meaning of the feast as a riot of woman against unequality in socity has nearly turn to a cult towards the woman for a day.

Every year, thousands of inhabitants of the planet will celebrate a world holiday – International Women's Day, which is celebrated on March 8.

But we as Christians who live in the Church should celebrate the feast of the saint commemorated respectively and not the public holiday, which of this year is Saint Teophilakt (Bishop of Necomedia).

Many of the Christian women will accept flowers from their husbands and children, many of them especially from ex-Soviet space will celebrate women's day and even require, their portion of flowers or feel ignored if they don't.

We will celebrate it too, wishfully or not almost forced  … forgetting that the real day of the Mother and the woman is on March 25 on the Great and Beautiful feast of Annunciation, the date on which the Holy Theotokos (Virgin Mary) has received the Angel with the good news that she is about to become a Mother of The Lord Jesus Christ.

For the historical reference it is worthy to make a short historic review of the International Woman Day, for those who still value the feast as a feast that fits well together with the Christian doctrines.

March 8 – Women's Day, this holiday was first celebrated on February 28, 1909 in the USA at the initiative of the American Socialist Party and later become one of the leverages for Communist party worldwide to put attractiveness to their agendas.

The idea of creating an international women's day appeared after the rapid industrialization and economic expansion of the early 20th century, which gave rise to woman protests for the improvement of working conditions.

Historic time of the day is associated with the first mass demonstration of women workers, which took place on March 8, 1857 in New York.

Women from sewing and textile enterprises come out to protest against poor working conditions and low wages, which had a good point as America was a country which still tolerated even Black slavery of the time.

The female workers protesters were attacked and dispersed by the police, as this was seen as a social misconduct dangerous for society by the police officers back then.

Two years later, on the same month, these women formed their first trade union.

In the following years, other protests followed, the most famous of which was in 1908, when women organized a march through New York with demands for a shorter working day, better payment fees and the right to vote.

In 1965, March 8 was officially announced as a non-working day and women's holiday in the USSR. And even today the day is non-working in Russia and other countries of the former Soviet Union – Belarus, Moldova, Kazakhstan, Kyrgyzstan, Tajikistan, Ukraine, as well as in Macedonia and Mongolia etc as well as in Communist China and Vietnam.

In my homeland country Bulgaria (the history of the feast is entangled with the history of socialist oriented parties in it).
March 8 was initially "celebrated" with orgnized public talks in a narrow circle of socialists in 1911, in 1915 was the first public celebration, but the kingship and government back of the day did not look well towards this trend, even though tolerated it.

As a general standard Bulgarian holiday, March 8 began to be celebrated after September 9, 1944 with the raise of communism (and the communist revolution – that was very much externally imported by the USSR sent agents) at the finalizing days of World War II.

At first, following the trend of the newly installed pro-bolshevik governments, different meetings were held in various nationalized enterprises, factories, and institutions, where the contribution of women in production, culture, science, and public life was taken into account and praised.

After 1960, the celebration took on particularly wide proportions and became a favorite holiday of women and men of all ages, especially in government offices, perhaps also as an attempts for communist to show the betternes of the socialist regime installed in the country. To reinburse the feeling of the importance of the feast the day was made official non-working day, together with other partheon of imaginative feasts without much meaning, like is for example 1st of March, The day of Labor, the day of the Shepherd and other artificial communist party members made up ones.

The day since then has become a public holiday in Albania, Armenia, Azerbaijan, Belarus, Bosnia and Herzegovina, Cameroon, Kazakhstan, China, Kyrgyzstan, Cuba, Macedonia, Moldova, Mongolia, Poland, Russia, Serbia, Tajikistan, Ukraine, Uzbekistan, Montenegro and Vietnam.

As the Communist led countries parties did not have a good set of traditions, they had to set new ones and started the trend to celebrate the feast through men giving flowers to the women around them – mothers, wives, girlfriends, colleagues. As the times of Communist isolation and dictatorship in this countries was harsh time for the people, any kind of feast that can give some freshness to the gray daily routine of the working class was well and quickly accepted by society.

Gifting a flower was also advantegous for many people, as this was another way to sell flowers and make some extra cash for the poor 🙂

Internetioanl Woman Day in some of the mentioned countries including Bulgaria in the past was celebrated as the equivalent of Mother's Day, where children give small gifts to their mothers and grandmothers.

And I remember when I was still in the kindergarden, we had a task to prepare special post-cards for mom with a photo of ourselves and a written text like “Mother I love you”.

After reading this short story, it will not become clear, but for the elder people it was that the holiday was not really of a big importance and was one of the many inventions of the party to build the new communist man “homo sovieticus”.

Why 8 of March was not a considered big deal in the past?

Because in 1944, the socialist party changed a traditional holiday in Bulgaria, Mother's Day, and instead of the Annunciation, that was already a public holiday dedicated to the mother / women on 25 of March, the date was moved to March 8.

A proof to that is in history, here is what was said in a message to Radio Sofia in year 1943.
– "On the Annunciation., His Eminence Metropolitan Stefan will celebrate in the metropolitan church "Saint Sophia", a temple holiday of the same, the bishop's Holy Liturgy, and the day before – a great bishop's vespers with Pentecost at 6 p.m. In 4:30 p.m. on the occasion of Mother's Day, on behalf of the church and the women's committee from the brotherhood, our famous writer and public figure Konstantin Petkanov will speak in the "Saint Sophia" church, on the topic: The Christian heart of the Bulgarian woman ". Before and after the story, the church choir will perform appropriate chants.”

This is how our ancestors celebrated mother's day, on the day of the Mother of God, when the archangel announced the great joy that the Messiah would come to redeem the world from sin. And about whether the Christian woman is equal to the man, that should be clear, for anything who has a head. By simple physiologyand psycho-somatism, woman and man are different, however in spiritual sense in the eyes of God both male and female are equal and wonderfully made by the Good god.
A proof for the spiritual equality of man and woman are the words of Saint Apostle Paul, who says:

"There is neither Jew nor Greek; there is neither slave nor free; there is neither male nor female; for you are all one in Christ Jesus." (Gal. 3:28).

In the Church, this is also the interesting and captivating thing, that everyone has their place there where he is set on, their work, their home, everyone is given his own talent to develop.

Eight of March Epitaph

Showing respect and appreciation for a woman by bying her a flower on 8th of March is a good thing, but then again this can be done any other day and each of us man who love and venerate our mothers and wifes do it every now and then.
There is also little known facts, that one who digs deeper in history of 8 of March will certainly found, which can stun him and not everything around the feast is so white and shiny as most people thing nowadays. 
But of course it is rather better to make the flower gift on the true feast when the Church and the elements and universe together with it celebartes it, and on the date when our ancestors venerated their woman too for hundreds of years before us on the Annunciation.

Saint new Martyr John the Bulgarian feast day on his martyrdom that was on 5 March 1784


March 5th, 2023

Saint_John-the-Bulgarian-new-martyr-5-march-year-1784


Life of St. Martyr John the Bulgarian – born circa year 1763 martyred 5 of March, 1784

Blessed John was a native of Bulgarian and as such he has been by inheritance an Orthodox Christian in the 18 century, where still Bulgaria was under the Ottoman Turks Slavery in which time being an Orthodox Christian was taugh as often Turks did they best to convert every Christian they can to the truthful in their opinion Islamic faith. Under the atmosphere of many great hardship for Christians.
By some chance he succumbed to the devil's wiles and denied Christ.

But after some time he realized his great transgression, feeling he fall badly from Grace and began to repent of his denial of the Christian faith.

In this state of mind, seeking to calm his conscience (internal voice of the soul who was talking in him that he did a huge wrong against the love of the Good Christ, he left his birthplace and came to Mount Athos, looking for help to heal his great soul wound.

Here John served, a spiritual elder for three years for the sake to receive a great help for his soul and receive forgiveness for his deniel of Christ. But because his conscience still troubled him, 
he was always depressed, sad, and silent and couldn't find peace with himself.

His very appearance indicated from far sight that he had suffered some great accident or badness in his life which doesn't give him any moment of peace and does not give him to living just like every ordinary person did.

As he could no longer bear the pangs of conscience of the internal man, John left Holy Mount Athos, came to Constantinople (Istanbul), dressed as a turk and in this guise entered the "Hagia Sophia (Wisdom of God)" mosque, which for many years has been the greatest symbol of Orthodox Christianity until the fall of Constantinople under Turks on May 29 1451.

There he began to cross himself with the Sign of the Cross, the Orthodox Christians does and to pray in a Christian way, which greatly smite the Agarians.

Enraged, they attacked him harshly and asked him why he was doing this? 


In a responce, he fearlessly confessed that he was a Christian, and that is why he Crossed himself as a Christian and worshiped Christ Only, who is the Son of God and true God!

Sveti_Ioan-Bylgarin-saint-John-the-Bulgarian-Ottoman-Empire-New-Martyr-for-Christ

The Hagarenes tried to divert him from his firm Creed of Faith (to save his earthly life) – as it was the common norm that "anyone who did such a shameful to muslims deed was worthy for dead", but when they tried hard to make him denounce his deed, pardon himself for his "unrighteous deed against the prophet Mohammed" and the Islamic faith but failed and were completely convinced that John was adamant and will not renounce his beliefs neither sorry for his embarassment, they immediately cut off his head outside in the courtyard of Hagia Sophia.

This happened on March 5, 1784. Thus, blessed John received a bright martyr's crown from Christ God at the age of 19 (and according to other biographical sources when he was just 18 years old).

Living Source © Lives of the Saints. Synodal Publishing House, Sofia, 1991
 

Living of St. John the Bulgarian (from the Greek Neon Martirologon)

Blessed John was a native from Bulgaria, young in age, about 18 years old, handsome in face, and literate.

On some occasion that befell him, he renounced – alas! from Christ.

But then, after a short time, he became aware of the evil he had done, repented and, leaving his birthplace, came to Holy Mount Athos monk republic and stayed in the great Lavra of St. Athanasius (founded in year 963 AD), where he ministered to a crippled spiritual elder and along dedicating his time to reading the holy books.

But because his conscience was gnawing o him because, the denial of Christ committed, he always walked dark, sorrowful and silent, so that by his sad appearance he showed everyone that he had experienced some great misfortune.

So, one day, under the pretext of going to his native place, he set out and went to Constantinople, where he put a Turkish distingushing muslim uniform that every muslim wear the red hat (fez) on his head and put on red shoes on his feet, and in this guise entered the mosque of Hagia Sophia (that was then a mosque but earlier the most glorious Christian temple who Saint Constantine has built and a symbol to the world for Christian). There he began to be crossing his shoulders with the sign of the cross and perform Christian worship.

When the Agareans saw him, they were indignant and fell upon him and sternly asked him why he was doing this?

And he, fearlessly confessed that he was a Christian and as a Christian he depicts the sign of Salvation his Life giving Cross and worships Jesus Christ, who is the Son of God and God.

The Agareans tried in various ways to convert him to islam, but found no way.

Finally, seeing the steadfastness of his conviction, they beheaded him outside the courtyard of the aforementioned mosque, and in this way, on March 5, 1784, the saint received the crown of martyrdom from Christ our God, Who deserves glory and power throughout the ages!

Amen!

Living Source: From "Neon Martirologon", a translation from the Greek epic. Parthenius