![]()
I've had a task at my work place to install Multiple Tomcat servers on Windows 2012 Server R2 the task seems trivial however I've faced few minor issues and the few searches in Google returned very few articles discussing the topic and this give me the idea that it might be helpful to others to come up with my own article as this might save time for those Linux guys who need to install Multiple Tomcat instances on the same Windows server without spending too much time to dig into the arcane winblows.
I stumbled on some issues during installation thus took the time to systemize below shortly how I managed to run 2 Tomcat servers on One Windows 2012 R2 machine.
First thing to do is to obtain latest compiled Tomcat server archive from Tomcat's official download page here.
Latest Tomcat stable release as of time of writting this article is 7.0.69, so I've downloaded 64 Bit archive (as the server is running X64 Operating system) and unarchived it twice on the Install server under 2 separate directory locations under:
D:TomcatTomcat_Instance-1
and
D:TomcatTomcat_Instance-2
Copy of the 7.0.69 X86 tomcat zip archive is here and X64 bit tomcat 7.0.69 is here
Once the files are properly untarred I also needed to download also Java as the WAR application supposed to run on the Windows machine had as requirement Java JDK 8.
Downloading Java is a trivial task, however in my case the server used to be in DMZ (Demiliterized Zone) / Firewalled network and hence instead of using the default Java installer provided from Oracle website which is trying to download from Internet, I had instead to download and use the Offline current JAVA 8u91 version.
Just for sake of some convenience I've made a mirrored version of X86 JAVA 8 (8u91) is here and JAVA 8u91 X64 version here
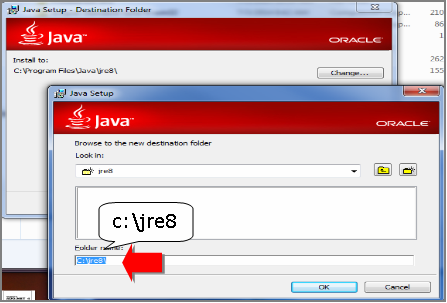
JAVA JDK install is a trivial task just run the isntaller set the proper locations initially for JDK base folder in my case this was:
D:Javajdk
and later throughout during install, I was asked also to fill in full path location for JRE, in my case this was
D:Javajre
It was a little bit surprising for me that JRE install path had to be entered and because I was not careful enough I had twice entered the same path for both JRE and JDK, i.e. entered on both prompts:
D:Java
This caused issues and a messed Java install but I realized that after the 3rd re-install of Java when I decided to also read instead of by habit click Next / Next and Complete the install as used to be in the good old days of Windows XP and Windows 98 🙂
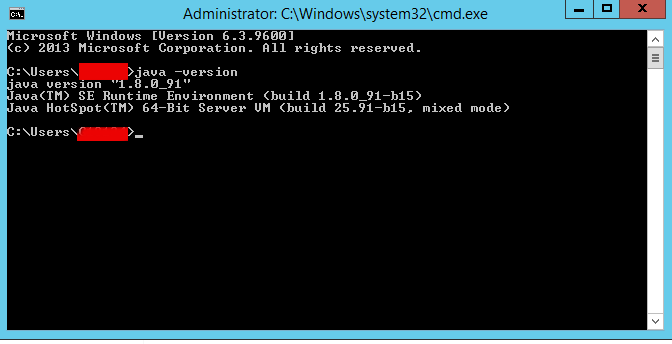
Once Java set up correctly I've tested it with:
C:Usersgeorgi> java -version
It is also necessery to set properly following 2 JAVA command line environment variables:
JAVA_HOME
JRE_HOME
On the logged in user Environment Variables with which Tomcat will be running on how to do that check my previous article how to add Environment Variables on Windows
Make sure you have the following 2 environment variables set upped:
JAVA_HOME=D:Javajdk
JRE_HOME=D:Javajre
For one time set (assuming Java is installed) under D:Javajre and D:Javajdk, you will need to type in command prompt:
set JAVA_HOME=D:Javajdk
set JRE_HOME=D:Javajre
Once assured Java is running fine I proceeded to run the Tomcat serevrs, in order to make them working it was necessery to change all coinciding Port names under:
conf/server.xml
because if there are coinciding ports (assuming that like me you're trying to run both Tomcat under the same IP address), the servers will fail to run because they're trying to bind under the same Port TCP addresses.
Assuming that the tomcat archive files are copied from .zip into D:TomcatTomcat_Instance-1 and D:TomcatTomcat_Instance-2 folders and you have in each of the 2 the following directory structure:
/bin : This directory contains the startup and shutdown scripts for both Windows and Linux.
/conf : This directory contains the main configuration files for Tomcat. The two most important are the server.xml and the global web.xml .
/server : This directory contains the Tomcat Java Archive files.
/lib : This directory contains Java Archive files that Tomcat is dependent upon.
/logs : This directory contains Tomcat’s log files.
/src : This directory contains the source code used by the Tomcat server. Once Tomcat is released, it will probably contain interfaces and abstract classes only.
/webapps : All web applications are deployed in this directory; it contains the WAR file.
/work : This is the directory in which Tomcat will place all servlets that are generated from JSPs. If you want to see exactly how a particular JSP is interpreted, look in this directory.
You will need to edit server.xml in both of the Tomcats and make sure the configuration for ports is not coinciding, i.e., I've changed the following configurations for Tomcat_Instance-2 installation:
Connector Port : This is the port where Apache Tomcat listen for the HTTP requests. Default port is 8080, I've changed this to 8089 for second Tomcat server
Shutdown Port : This port is used when we try to shutdown the Apache Tomcat Server. Default port is 8005 so changed that to 8006 in Tomcat_Instance-2
AJP (Apache JServ Protocol) Connector Port : The Apache JServ Protocol (AJP) is a binary protocol that can conduct inbound requests from a web server through to an application server that sits behind the web server.
I've commented out the configuration for AJP completely and used for my custom needs the following server.xml configuration:<Connector port="11111" address="10.251.27.24" protocol="AJP/1.3" enableLookups="false"/>
Redirect Port : Any redirection happening inside Apache Tomcat will happen through this port. In Apache TOMCAT there are two instance where redirect Port is mentioned. First one is for the Apache TOMCAT server and other one is for the AJP port. Default here is port 8443 so changed that one to to listen to 8444 instead.
Another thing necessery to do is to create setenv.bat file under both D:TomcatTomcat_Instance-1bin and D:TomcatTomcat_Instance-2bin with following content:
set JRE_HOME=D:javajre
set JAVA_HOME=d:javajdk
exit /b 0
The quickest way to do it without bothering with Notepad text editor is by issuing:
cd tomcatTomcat_Instance1bin
echo set JRE_HOME=D:javajre > setenv.bat
echo set JAVA_HOME=D:javajdk >> setenv.bat
cd tomcatTomcat_Instance2bin
echo set JRE_HOME=D:javajre > setenv.bat
echo set JAVA_HOME=D:javajdk >> setenv.bat
The setenv.sh is a standard variables file read by Tomcat on Instance start up time
Next part of Tomcat installation is to install each of the 2 instances after defining CATALINA_BASE to point to first and second Tomcat instance directories, e.g open a Command Prompt (cmd.exe) and run there:
set CATALINA_BASE=D:TomcatTomcat_Instance-1
C:|> d:
D:|> cd TomcatTomcat_Instance-1bin
D:TomcatTomcat_Instance-1bin> service install Tomcat_Instance-1
You will get output like:
Using CATALINA_BASE: " D:TomcatTomcat_Instance-1"
Using CATALINA_HOME: " D:TomcatTomcat_Instance-1"
Using CATALINA_TMPDIR: " D:TomcatTomcat_Instance-1temp"
Using JRE_HOME: "D:javajre"
Using CLASSPATH: "D:TomcatTomcat_Instance-1binbootstrap.jar; D:TomcatTomcat_Instance-1bintomcat-juli.jar"
Then for the second Tomcat server instance run in command prompt:
set CATALINA_BASE=D:TomcatTomcat_Instance-2
d:
cd TomcatTomcat_Instance-2bin
service install Tomcat_Instance-2
Using CATALINA_BASE: " D:TomcatTomcat_Instance-2"
Using CATALINA_HOME: " D:TomcatTomcat_Instance-2"
Using CATALINA_TMPDIR: " D:TomcatTomcat_Instance-2temp"
Using JRE_HOME: "D:javajre"
Using CLASSPATH: "D:TomcatTomcat_Instance-1binbootstrap.jar; D:TomcatTomcat_Instance-2bintomcat-juli.jar"
Here is all the service.bat batch file parameters:
D:TomcatTomcat_Instance-11bin>service.bat /
?
Unknown parameter "/?"
Usage: service.bat install/remove [service_name] [/user username]
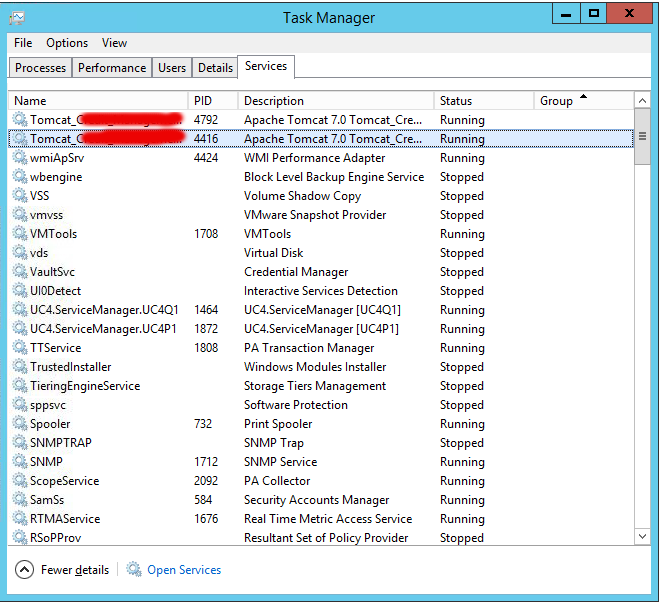
To test both Tomcat servers where they run simultaneously without issues, I run in 2 separate command prompts – opened (cmd.exe) two times and run in each of them:
What this little command does is uses Tomcat7.exe command to Add / Remove / Modify the Tomcat instance into Windows Services, the same can be happily done also with the good old
sc (service configure) windows command.
D:
cd TomcatTomcat_Instance-1binstartup.bat
D:
cd TomcatTomcat_Instance-2binstartup.bat
Both executed without errors in command line and to stop them I've pressed the usual CTRL+C.
To make sure once again both server instances ran wihtout errors, I've checked in D:TomcatTomcat_Instance-{1,2}logs/catalina*.log and in both of them all looked fine.
Another good check if you want to be 10000% sure Tomcat is running is to look up for Tomcat listening on above configured ports, for example run below in cmd:
D:Tomcat> netstat -a|findstr "8080"
I've also used the 2 following command to set up proper Services description for both of services:
D:TomcatTomcat_Instance-1tomcat7 //US//Tomcat_Instance1 –Description="Apache Tomcat Server – Tomcat-Instance1.my-site.com"
D:TomcatInstance_Instance-2tomcat7 //US//Tomcat_Instance2 –Description="Apache Tomcat Server – Tomcat-Instance2.my-site.com "
N! B! Very important note to make here for anyone experiencing strange issues when trying to add multiple issues is below:
I've experienced some issues while trying to add the 2 Tomcat servers into Windows services initially with tomcat7.exe command like so:
Trying installing Tomcat71 service with cmd:
tomcat7 //IS//Tomcat71 –DisplayName="Apache Tomcat 7" ^
–Install="D:TomcatTomcat_Instance-1bintomcat7.exe" –Jvm=auto ^
–StartMode=jvm –StopMode=jvm ^
–StartClass=org.apache.catalina.startup.Bootstrap –StartParams=start ^
–StopClass=org.apache.catalina.startup.Bootstrap –StopParams=stop
And Tomcat72 instance with cmd:
tomcat7 //IS//Tomcat71 –DisplayName="Apache Tomcat 7" ^
–Install="D:TomcatTomcat_Instance-2bintomcat7.exe" –Jvm=auto ^
–StartMode=jvm –StopMode=jvm ^
–StartClass=org.apache.catalina.startup.Bootstrap –StartParams=start ^
–StopClass=org.apache.catalina.startup.Bootstrap –StopParams=stop
I've tried multiplet imes to Add and remove the Tomcat71 and Tomcat72 Windows service names (with) Tomcat DS (Delete Service)
tomcat7 //DS/Tomcat71
tomcat7 //DS/Tomcat72
And strangely the two instances were continuously crashing when I tried to start them (with Properties button and Start instruction) from Windows Task Manager (taskmgr.exe) -> Services
Finally I realized the issue is caused by some problems that somehow occured with Windows Service Names Tomcat71 and Tomcat72 by simply readding the two instances under another name the instances stopped crashing and all worked thanks to help of colleague Anatoliy who pointed me tot he problem by trying to install his own instances under a different service name).
Thanks God finally the 2 instances run fine !


More helpful Articles

Tags: Apache Tomcat Server, archive files, Connector Port, Environment Variables, installation, one time, Redirect Port, Shutdown Port, startup, windows command


Mozilla/5.0 (Windows NT 6.1; WOW64; rv:49.0) Gecko/20100101 Firefox/49.0
In case if you need to later delete the Tomcat instance or you have mistakenly added a wrong one use the command from command prompt:
sc delete ServiceName
you can get the exact service name after giving a properties dialog to the Tomcat instance in services.msc (command again to be run from command line).
View CommentView Comment