Posts Tagged ‘one time’

How to Avoid the 7 Most Frequent Mistakes in Python Programming

Monday, September 9th, 2019

python-programming-language-logo

Python is very appealing for Rapid Application Development for many reasons, including high-level built in data structures, dynamic typing and binding, or to use as glue to connect different components. It’s simple and easy to learn but new Python developers can fall in the trap of missing certain subtleties.

Here are 7 common mistakes that are harder to catch but that even more experienced Python developers have fallen for.


1. The misuse of expressions as function argument defaults

Python allows developers to indicate optional function arguments by giving them default values. In most cases, this is a great feature of Python, but it can create some confusion when the default value is mutable. In fact, the common mistake is thinking that the optional argument is set to whatever default value you’ve set every time the function argument is presented without a value. It can seem a bit complicated, but the answer is that the default value for this function argument is only evaluated at the time you’ve defined the function, one time only.  

how-to-avoid-the-7-most-frequent-mistakes-in-python-programming-3


2. Incorrect use of class variables

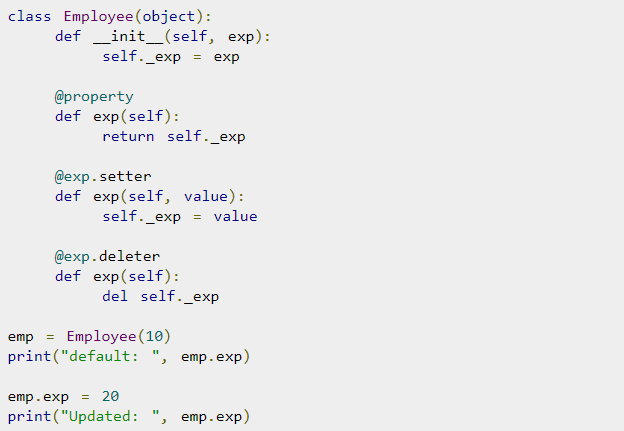
Python handles class variables internally as dictionaries and they will follow the Method Resolution Order (MRO). If an attribute is not found in one class it will be looked up in base classes so references to one part of the code are actually references to another part, and that can be quite difficult to handle well in Python. For class attributes, I recommend reading up on this aspect of Python independently to be able to handle them.

how-to-avoid-the-7-most-frequent-mistakes-in-python-programming-2


3. Incorrect specifications of parameters for exception blocks

There is a common problem in Python when except statements are provided but they don’t take a list of the exceptions specified. The syntax except Exception is used to bind these exception blocks to optional parameters so that there can be further inspections. What happens, however, is that certain exceptions are then not being caught by the except statement, but the exception becomes bound to parameters. The way to get block exceptions in one except statement has to be done by specifying the first parameter as a tuple to contain all the exceptions that you want to catch.

how-to-avoid-the-7-most-frequent-mistakes-in-python-programming-1
 

4. Failure to understand the scope rules

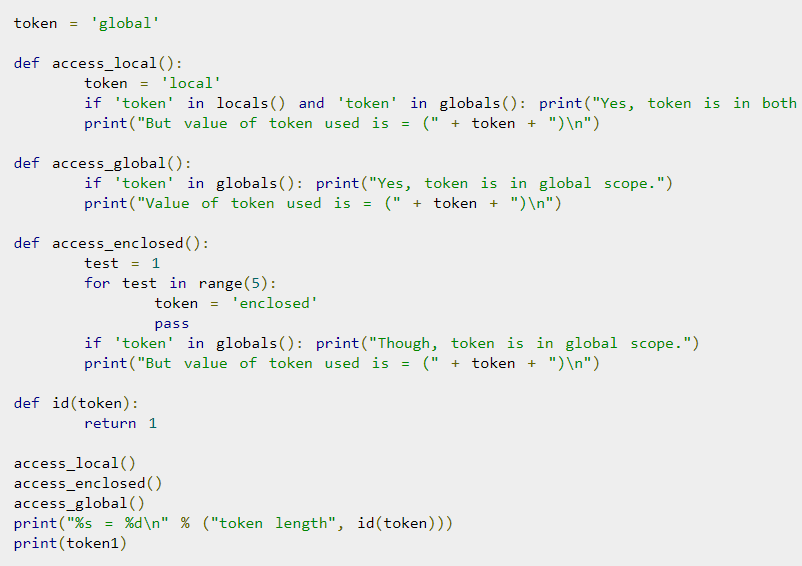
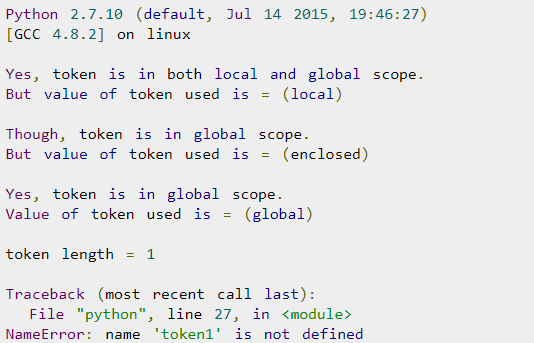
The scope resolution on Python is built on the LEGB rule as it’s commonly known, which means Local, Enclosing, Global, Built-in. Although at first glance this seems simple, there are some subtleties about the way it actually works in Python, which creates a more complex Python problem. If you make an assignment to a variable in a scope, Python will assume that variable is local to the scope and will shadow a variable that’s similarly named in other scopes. This is a particular problem especially when using lists.


5. Modifying lists during iterations over it


When a developer deletes an item from a list or array while iterating, they stumble upon a well known Python problem that’s easy to fall into. To address this, Python has incorporated many programming paradigms which can really simplify and streamline code when they’re used properly. Simple code is less likely to fall into the trap of deleting a list item while iterating over it. You can also use list comprehensions to avoid this problem.

how-to-avoid-the-7-most-frequent-mistakes-in-python-programming-8


6. Name clash with Python standard library


Python has so many library modules which is a bonus of the language, but the problem is that you can inadvertently have a name clash between your module and a module in the standard library. The problem here is that you can accidentally import another library which will import the wrong version. To avoid this, it’s important to be aware of the names in the standard library modules and stay away from using them.

how-to-avoid-the-7-most-frequent-mistakes-in-python-programming-5


7. Problems with binding variables in closures


Python has a late binding behavior which looks up the values of variables in closure only when the inner function is called. To address this, you may have to take advantage of default arguments to create anonymous functions that will give you the desired behavior – it’s either elegant or a hack depending on how you look at it, but it’s important to know.


how-to-avoid-the-7-most-frequent-mistakes-in-python-programming-6

Python is very powerful and flexible and it’s a great language for developers, but it’s important to be familiar with the nuances of it to optimize it and avoid these errors.

Ellie Coverdale, a technical writer at Essay roo and UK Writings, is involved in tech research and projects to find new advances and share her insights. She shares what she has learned with her readers on the Boom Essays blog.

How to build Linux logging bash shell script write_log, logging with Named Pipe buffer, Simple Linux common log files logging with logger command

Monday, August 26th, 2019

how-to-build-bash-script-for-logging-buffer-named-pipes-basic-common-files-logging-with-logger-command

Logging into file in GNU / Linux and FreeBSD is as simple as simply redirecting the output, e.g.:
 

echo "$(date) Whatever" >> /home/hipo/log/output_file_log.txt


or with pyping to tee command


echo "$(date) Service has Crashed" | tee -a /home/hipo/log/output_file_log.txt


But what if you need to create a full featured logging bash robust shell script function that will run as a daemon continusly as a background process and will output
all content from itself to an external log file?
In below article, I've given example logging script in bash, as well as small example on how a specially crafted Named Pipe buffer can be used that will later store to a file of choice.
Finally I found it interesting to mention few words about logger command which can be used to log anything to many of the common / general Linux log files stored under /var/log/ – i.e. /var/log/syslog /var/log/user /var/log/daemon /var/log/mail etc.
 

1. Bash script function for logging write_log();


Perhaps the simplest method is just to use a small function routine in your shell script like this:
 

write_log()
LOG_FILE='/root/log.txt';
{
  while read text
  do
      LOGTIME=`date "+%Y-%m-%d %H:%M:%S"`
      # If log file is not defined, just echo the output
      if [ “$LOG_FILE” == “” ]; then
    echo $LOGTIME": $text";
      else
        LOG=$LOG_FILE.`date +%Y%m%d`
    touch $LOG
        if [ ! -f $LOG ]; then echo "ERROR!! Cannot create log file $LOG. Exiting."; exit 1; fi
    echo $LOGTIME": $text" | tee -a $LOG;
      fi
  done
}


  •  Using the script from within itself or from external to write out to defined log file


echo "Skipping to next copy" | write_log


2. Use Unix named pipes to pass data – Small intro on what is Unix Named Pipe.


Named Pipe –  a named pipe (also known as a FIFO (First In First Out) for its behavior) is an extension to the traditional pipe concept on Unix and Unix-like systems, and is one of the methods of inter-process communication (IPC). The concept is also found in OS/2 and Microsoft Windows, although the semantics differ substantially. A traditional pipe is "unnamed" and lasts only as long as the process. A named pipe, however, can last as long as the system is up, beyond the life of the process. It can be deleted if no longer used.
Usually a named pipe appears as a file, and generally processes attach to it for IPC.


Once named pipes were shortly explained for those who hear it for a first time, its time to say named pipe in unix / linux is created with mkfifo command, syntax is straight foward:
 

mkfifo /tmp/name-of-named-pipe


Some older Linux-es with older bash and older bash shell scripts were using mknod.
So idea behind logging script is to use a simple named pipe read input and use date command to log the exact time the command was executed, here is the script.


#!/bin/bash
named_pipe='/tmp/output-named-pipe';
output_named_log='
/tmp/output-named-log.txt ';

if [ -p $named_pipe ]; then
rm -f $named_pipe
fi
mkfifo $named_pipe

while true; do
read LINE <$named_pipe
echo $(date): "$LINE" >>/tmp/output-named-log.txt
done


To write out any other script output and get logged now, any of your output with a nice current date command generated output write out any output content to the loggin buffer like so:


echo 'Using Named pipes is so cool' > /tmp/output-named-pipe
echo 'Disk is full on a trigger' > /tmp/output-named-pipe

  • Getting the output with the date timestamp

# cat /tmp/output-named-log.txt
Mon Aug 26 15:21:29 EEST 2019: Using Named pipes is so cool
Mon Aug 26 15:21:54 EEST 2019: Disk is full on a trigger


If you wonder why it is better to use Named pipes for logging, they perform better (are generally quicker) than Unix sockets.


3. Logging files to system log files with logger


If you need to do a one time quick way to log any message of your choice with a standard Logging timestamp, take a look at logger (a part of bsdutils Linux package), and is a command which is used to enter messages into the system log, to use it simply invoke it with a message and it will log your specified output by default to /var/log/syslog common logfile


root@linux:/root# logger 'Here we go, logging'
root@linux:/root # tail -n 3 /var/log/syslog
Aug 26 15:41:01 localhost CRON[24490]: (root) CMD (chown qscand:qscand -R /var/run/clamav/ 2>&1 >/dev/null)
Aug 26 15:42:01 localhost CRON[24547]: (root) CMD (chown qscand:qscand -R /var/run/clamav/ 2>&1 >/dev/null)
Aug 26 15:42:20 localhost hipo: Here we go, logging


If you have took some time to read any of the init.d scripts on Debian / Fedora / RHEL / CentOS Linux etc. you will notice the logger logging facility is heavily used.

With logger you can print out message with different priorities (e.g. if you want to write an error message to mail.* logs), you can do so with:
 

 logger -i -p mail.err "Output of mail processing script"


To log a normal non-error (priority message) with logger to /var/log/mail.log system log.


 logger -i -p mail.notice "Output of mail processing script"


A whole list of supported facility named priority valid levels by logger (as taken of its current Linux manual) are as so:


FACILITIES AND LEVELS
       Valid facility names are:

              auth
              authpriv   for security information of a sensitive nature
              cron
              daemon
              ftp
              kern       cannot be generated from userspace process, automatically converted to user
              lpr
              mail
              news
              syslog
              user
              uucp
              local0
                to
              local7
              security   deprecated synonym for auth

       Valid level names are:

              emerg
              alert
              crit
              err
              warning
              notice
              info
              debug
              panic     deprecated synonym for emerg
              error     deprecated synonym for err
              warn      deprecated synonym for warning

       For the priority order and intended purposes of these facilities and levels, see syslog(3).


If you just want to log to Linux main log file (be it /var/log/syslog or /var/log/messages), depending on the Linux distribution, just type', even without any shell quoting:


logger 'The reason to reboot the server Currently was a System security Update


So what others is logger useful for?

 In addition to being a good diagnostic tool, you can use logger to test if all basic system logs with its respective priorities work as expected, this is especially
useful as I've seen on a Cloud Holsted OpenXEN based servers as a SAP consultant, that sometimes logging to basic log files stops to log for months or even years due to
syslog and syslog-ng problems hungs by other thirt party scripts and programs.
To test test all basic logging and priority on system logs as expected use the following logger-test-all-basic-log-logging-facilities.sh shell script.


#!/bin/bash
for i in {auth,auth-priv,cron,daemon,kern, \
lpr,mail,mark,news,syslog,user,uucp,local0 \
,local1,local2,local3,local4,local5,local6,local7}

do        
# (this is all one line!)


for k in {debug,info,notice,warning,err,crit,alert,emerg}
do

logger -p $i.$k "Test daemon message, facility $i priority $k"

done

done

Note that on different Linux distribution verions, the facility and priority names might differ so, if you get

logger: unknown facility name: {auth,auth-priv,cron,daemon,kern,lpr,mail,mark,news, \
syslog,user,uucp,local0,local1,local2,local3,local4, \
local5,local6,local7}

check and set the proper naming as described in logger man page.


4. Using a file descriptor that will output to a pre-set log file


Another way is to add the following code to the beginning of the script

#!/bin/bash
exec 3>&1 4>&2
trap 'exec 2>&4 1>&3' 0 1 2 3
exec 1>log.out 2>&1
# Everything below will go to the file 'log.out':

The code Explaned

  •     Saves file descriptors so they can be restored to whatever they were before redirection or used themselves to output to whatever they were before the following redirect.
    trap 'exec 2>&4 1>&3' 0 1 2 3
  •     Restore file descriptors for particular signals. Not generally necessary since they should be restored when the sub-shell exits.

          exec 1>log.out 2>&1

  •     Redirect stdout to file log.out then redirect stderr to stdout. Note that the order is important when you want them going to the same file. stdout must be redirected before stderr is redirected to stdout.

From then on, to see output on the console (maybe), you can simply redirect to &3. For example
,

echo "$(date) : Do print whatever you want logging to &3 file handler" >&3


I've initially found out about this very nice bash code from serverfault.com's post how can I fully log all bash script actions (but unfortunately on latest Debian 10 Buster Linux  that is prebundled with bash shell 5.0.3(1)-release the code doesn't behave exactly, well but still on older bash versions it works fine.

Sum it up


To shortlysummarize there is plenty of ways to do logging from a shell script logger command but using a function or a named pipe is the most classic. Sometimes if a script is supposed to write user or other script output to a a common file such as syslog, logger command can be used as it is present across most modern Linux distros.
If you have a better ways, please drop a common and I'll add it to this article.


Install and Run Multiple Tomcat and JAVA server instances on single Windows server Howto

Friday, June 17th, 2016

tomcat-windows-install-multiple-tomcats-on-one-single-windows-logo
I've had a task at my work place to install Multiple Tomcat servers on Windows 2012 Server R2 the task seems trivial however I've faced few minor issues and the few searches in Google returned very few articles discussing the topic and this give me the idea that it might be helpful to others to come up with my own article as this might save time for those Linux guys who need to install Multiple Tomcat instances on the same Windows server without spending too much time to dig into the arcane winblows.

I stumbled on some issues during installation  thus took the time to systemize below shortly how I managed to run 2 Tomcat servers on One Windows 2012 R2 machine.
 

First thing to do is to obtain latest compiled Tomcat server archive from Tomcat's official download page here.

Latest Tomcat stable release as of time of writting this article is 7.0.69, so I've downloaded 64 Bit archive (as the server is running X64 Operating system) and unarchived it twice on the Install server under 2 separate directory locations under:


D:\Tomcat\Tomcat_Instance-1


and


D:\Tomcat\Tomcat_Instance-2


Copy of the 7.0.69 X86 tomcat zip archive is here and X64 bit tomcat 7.0.69 is here

Once the files are properly untarred I also needed to download also Java as the WAR application supposed to run on the Windows machine had as requirement Java JDK 8.

Downloading Java is a trivial task, however in my case the server used to be in DMZ (Demiliterized Zone) / Firewalled network and hence instead of using the default Java installer provided from Oracle website which is trying to download from Internet, I had instead to download and use the Offline current JAVA 8u91 version.
Just for sake of some convenience I've made a mirrored version of X86 JAVA 8 (8u91) is here and JAVA 8u91 X64 version here
 

install-Java-JDK-and-JRE-8-on-Microsoft-Windows-howto

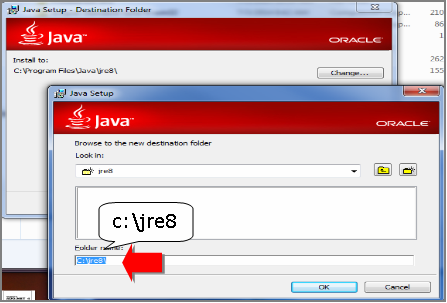
JAVA JDK install is a trivial task just run the isntaller set the proper locations initially for JDK base folder in my case this was:


D:\Java\jdk


and later throughout during install, I was asked also to fill in full path location for JRE, in my case this was


D:\Java\jre


It was a little bit surprising for me that JRE install path had to be entered and because I was not careful enough I had twice entered the same path for both JRE and JDK, i.e. entered on both prompts:


D:\Java


This caused issues and a messed Java install but I realized that after the 3rd re-install of Java when I decided to also read instead of by habit click Next / Next and Complete the install as used to be in the good old days of Windows XP and Windows 98 🙂

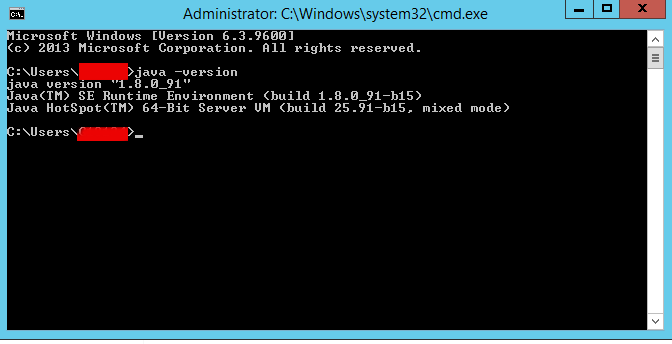
Once Java set up correctly I've tested it with:


C:\Users\georgi> java -version


test-java-version-on-microsoft-windows-command-howto-screenshot


It is also necessery to set properly following 2 JAVA command line environment variables:
 

JAVA_HOME
JRE_HOME


On the logged in user Environment Variables with which Tomcat will be running on how to do that check my previous article how to add Environment Variables on Windows


Make sure you have the following 2 environment variables set upped:


JAVA_HOME=D:\Java\jdk


JRE_HOME=D:\Java\jre


For one time set (assuming Java is installed) under D:Javajre and D:Javajdk, you will need to type in command prompt:

set JAVA_HOME=D:\Java\jdk

set JRE_HOME=D:\Java\jre

Once assured Java is running fine I proceeded to run the Tomcat serevrs, in order to make them working it was necessery to change all coinciding Port names under:


conf/server.xml


because if there are coinciding ports (assuming that like me you're trying to run both Tomcat under the same IP address), the servers will fail to run because they're trying to bind under the same Port TCP addresses.

Assuming that the tomcat archive files are copied from .zip into D:TomcatTomcat_Instance-1 and D:TomcatTomcat_Instance-2 folders and you have in each of the 2 the following directory structure:


    /bin : This directory contains the startup and shutdown scripts for both Windows and Linux.
    /conf : This directory contains the main configuration files for Tomcat. The two most important are the server.xml and the global web.xml .
    /server : This directory contains the Tomcat Java Archive files.
    /lib : This directory contains Java Archive files that Tomcat is dependent upon.
    /logs : This directory contains Tomcat’s log files.
    /src : This directory contains the source code used by the Tomcat server. Once Tomcat is released, it will probably contain interfaces and abstract classes only.
    /webapps : All web applications are deployed in this directory; it contains the WAR file.
    /work : This is the directory in which Tomcat will place all servlets that are generated from JSPs. If you want to see exactly how a particular JSP is interpreted, look in this directory.


You will need to edit server.xml in both of the Tomcats and make sure the configuration for ports is not coinciding, i.e., I've changed the following configurations for Tomcat_Instance-2 installation:


    Connector Port : This is the port where Apache Tomcat listen for the HTTP requests. Default port is 8080, I've changed this to 8089 for second Tomcat server
    Shutdown Port : This port is used when we try to shutdown the Apache Tomcat Server. Default port is 8005 so changed that to 8006 in Tomcat_Instance-2
    AJP (Apache JServ Protocol) Connector Port : The Apache JServ Protocol (AJP) is a binary protocol that can conduct inbound requests from a web server through to an application server that sits behind the web server.
I've commented out the configuration for AJP completely and used for my custom needs the following server.xml configuration:

<Connector port="11111" address="10.251.27.24" protocol="AJP/1.3" enableLookups="false"/>

    Redirect Port : Any redirection happening inside Apache Tomcat will happen through this port. In Apache TOMCAT there are two instance where redirect Port is mentioned. First one is for the Apache TOMCAT server and other one is for the AJP port. Default here is port 8443 so changed that one to to listen to 8444 instead.


Another thing necessery to do is to create setenv.bat file under both D:\TomcatTomcat_Instance-1\bin and D:\Tomcat\Tomcat_Instance-2\bin with following content:
 

set JRE_HOME=D:\java\jre
set JAVA_HOME=d:\java\jdk
exit /b 0


The quickest way to do it without bothering with Notepad text editor is by issuing:


cd tomcat\Tomcat_Instance1\bin
echo set JRE_HOME=D:\java\jre > setenv.bat
echo set JAVA_HOME=D:javajdk >> setenv.bat


cd tomcat\Tomcat_Instance2\bin
echo set JRE_HOME=D:\java\jre > setenv.bat
echo set JAVA_HOME=D:\java\jdk >> setenv.bat


The setenv.sh is a standard variables file read by Tomcat on Instance start up time
 

Next part of Tomcat installation is to install each of the 2 instances after defining CATALINA_BASE to point to first and second Tomcat instance directories, e.g open a Command Prompt (cmd.exe) and run there:


set CATALINA_BASE=D:\Tomcat\Tomcat_Instance-1

C:|> d:

D:|> cd Tomcat\Tomcat_Instance-1\bin


D:Tomcat\Tomcat_Instance-1\bin> service install Tomcat_Instance-1


You will get output like:


Using CATALINA_BASE:   " D:\Tomcat\Tomcat_Instance-1"
Using CATALINA_HOME:   " D:\Tomcat\Tomcat_Instance-1"
Using CATALINA_TMPDIR: " D:\TomcatTomcat_Instance-1\temp"
Using JRE_HOME:        "D:\java\jre"
Using CLASSPATH:       "D:\Tomcat\Tomcat_Instance-1\bin\bootstrap.jar; D:\Tomcat\Tomcat_Instance-1\bin\tomcat-juli.jar"


Then for the second Tomcat server instance run in command prompt:


set CATALINA_BASE=D:\Tomcat\Tomcat_Instance-2

d:

cd Tomcat\Tomcat_Instance-2\bin
service install Tomcat_Instance-2

Using CATALINA_BASE:   " D:\Tomcat\Tomcat_Instance-2"
Using CATALINA_HOME:   " D:\Tomcat\Tomcat_Instance-2"
Using CATALINA_TMPDIR: " D:\Tomcat\Tomcat_Instance-2\temp"
Using JRE_HOME:        "D:\java\jre"
Using CLASSPATH:       "D:\Tomcat\Tomcat_Instance-1\bin\bootstrap.jar; D:\TomcatTomcat_Instance-2\bin\tomcat-juli.jar"
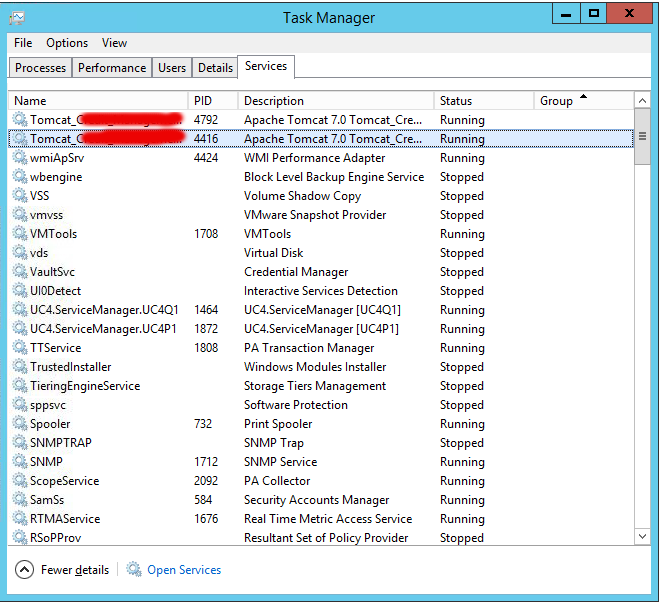
windows-running-two-tomcat-instances-on-the-same-single-server-screenshot


Here is all the service.bat batch file parameters:


D:\Tomcat\Tomcat_Instance-11\bin>service.bat /
?
Unknown parameter "/?"


Usage: service.bat install/remove [service_name] [/user username]


To test both Tomcat servers where they run simultaneously without issues, I run in 2 separate command prompts – opened (cmd.exe) two times and run in each of them:

What this little command does is uses Tomcat7.exe command to Add / Remove / Modify the Tomcat instance into Windows Services, the same can be happily done also with the good old
sc (service configure) windows command.


D:

cd Tomcat\Tomcat_Instance-1\bin\startup.bat

D:

cd Tomcat\Tomcat_Instance-2\bin\startup.bat
 

Both executed without errors in command line and to stop them I've pressed the usual CTRL+C.
To make sure once again both server instances ran wihtout errors, I've checked in D:TomcatTomcat_Instance-{1,2}logs/catalina*.log and in both of them all looked fine.
Another good check if you want to be 10000% sure Tomcat is running is to look up for Tomcat listening on above configured ports, for example run below in cmd:


D:Tomcat> netstat -a|findstr "8080"


I've also used the 2 following command to set up proper Services description for both of services:


D:\Tomcat\Tomcat_Instance-1\tomcat7 //US//Tomcat_Instance1 –Description="Apache Tomcat Server – Tomcat-Instance1.my-site.com"

D:\Tomcat\Instance_Instance-2\tomcat7 //US//Tomcat_Instance2 –Description="Apache Tomcat Server – Tomcat-Instance2.my-site.com "


A very helpful resource during the Apache (Windows Service) instance install / setup /modification that helped me is on Tomcat's official site here
 

N! B! Very important note to make here for anyone experiencing strange issues when trying to add multiple issues is below:

I've experienced some issues while trying to add the 2 Tomcat servers into Windows services initially with tomcat7.exe command like so:

Trying installing Tomcat71 service with cmd:
 

 tomcat7 //IS//Tomcat71 –DisplayName="Apache Tomcat 7" ^
     –Install="D:\Tomcat\Tomcat_Instance-1\bin\tomcat7.exe" –Jvm=auto ^
     –StartMode=jvm –StopMode=jvm ^
     –StartClass=org.apache.catalina.startup.Bootstrap –StartParams=start ^
     –StopClass=org.apache.catalina.startup.Bootstrap –StopParams=stop


And Tomcat72 instance with cmd:
 

 tomcat7 //IS//Tomcat71 –DisplayName="Apache Tomcat 7" ^
     –Install="D:\Tomcat\Tomcat_Instance-2\bin\tomcat7.exe" –Jvm=auto ^
     –StartMode=jvm –StopMode=jvm ^
     –StartClass=org.apache.catalina.startup.Bootstrap –StartParams=start ^
     –StopClass=org.apache.catalina.startup.Bootstrap –StopParams=stop


I've tried multiplet imes to Add and remove the Tomcat71 and Tomcat72 Windows service names (with) Tomcat DS (Delete Service)
 

tomcat7 //DS/Tomcat71
tomcat7 //DS/Tomcat72


And strangely the two instances were continuously crashing when I tried to start them (with Properties button and Start instruction) from Windows Task Manager (taskmgr.exe) -> Services

Finally I realized the issue is caused by some problems that somehow occured with Windows Service Names Tomcat71 and Tomcat72 by simply readding the two instances under another name the instances stopped crashing and all worked thanks to help of colleague Anatoliy who pointed me tot he problem by trying to install his own instances under a different service name).

Thanks God finally the 2 instances run fine !


Disable bluetooth on Linux IBM / Lenovo Thinkpad laptops

Thursday, February 14th, 2013

bluetooth gnu linux disable bluetooth linux how to tux logo bluetooth thinkpad

I have a Debian GNU / Linux squeeze with bluetooth and bluetooth is started automatically on system boot. This is pretty annoying, cause I use bluetooth quite rarely.
 disable / enable bluetooth via terminal is controlled via Linux sysfs virtual filesystem. The command to disable bluetooth one time is:

debian:~# echo 0 > /sys/devices/platform/thinkpad_acpi/bluetooth_enable

It is efficient in terms of energy saving especially if you use often your notebook on battery to turn off bluetooth permanently and only enable it when needed with:

debian:~# echo 1 > /sys/devices/platform/thinkpad_acpi/bluetooth_enable

To permanently disable bluetooth on Linux boot use:

# service bluetooth stop

In /etc/rc.local before exit 0 line place:

echo 0 > /sys/devices/platform/thinkpad_acpi/bluetooth_enable

An alternative method to permanently disable bluetooth (on other non-Thinkpad – any brand laptops) is via rfkill (bluetooth device control interface), on Ubuntu rfkill is installed by default but Debian users has to explicitly install it via apt:

debian:~# apt-get install –yes rfkill

Once rfkill is installed on host put a line before exit 0 in /etc/local:

rfkill block bluetooth