Posts Tagged ‘clients’

Implementing and using gssproxy, example guide on how to use it to authenticate ssh, samba, nfs with no password via kerberos protocol

Friday, September 26th, 2025

Implementing and using gssproxy, example guide on how to use it to authenticate ssh, samba, nfs with no password via kerberos protocol

GSS-Proxy is a daemon that safely performs GSSAPI (Kerberos) operations on behalf of other processes. It’s useful when services running as unprivileged users need to accept or initiate Kerberos GSSAPI authentication but shouldn’t hold or access long‑lived keys (keytabs) or raw credentials themselves. Typical users: OpenSSH, SSSD, Samba, NFS idmap, and custom daemons.

This article walks through what gssproxy does, how it works, how to install and configure it, example integrations (sshd and an unprivileged service), testing, debugging and common pitfalls.
 

1. What gssproxy does (quick conceptual summary)
 

  • Runs as a privileged system daemon (typically root) and holds access to keytabs or system credentials.
  • Exposes a local IPC (Unix socket) and controlled API so allowed clients can ask it to perform GSSAPI accept/init operations on their behalf.
  • Enforces access controls by client PID/user and by named service configuration (you map a client identity to the allowed service name and keytab).
  • Minimizes the need to distribute keytabs or give services direct access to Kerberos credentials.
     

2. Installation

On many modern Linux distributions (Fedora, RHEL/CentOS, Debian/Ubuntu) gssproxy is packaged.

Example (RHEL/Fedora/CentOS):

# RHEL/CentOS 7/8/9 (dnf or yum)


sudo dnf install gssproxy


# or


sudo yum install gssproxy

Example (Debian/Ubuntu):

sudo apt update

sudo apt install gssproxy

If you must build from source:

# get source, then typical autotools or meson/ninja workflow per upstream README

./configure

make

sudo make install


After install, systemd unit gssproxy.service should be available.
 

3. Main configuration concepts

The main config file is usually /etc/gssproxy/gssproxy.conf. It consists of mechs (mechanisms), services, clients, and possibly mappings. Key elements:

  • mech: declares a GSSAPI mechanism (e.g., krb5) and default keytab(s) for acceptor credentials.
  • service: logical service names (e.g., ssh, nfs, httpd) with attributes: user (the Unix user running the service), keytab, cred_store, mechs, and whether the service is allowed to be client (initiate) and/or server (accept).
  • client: rules mapping local client sockets / users / pids to allowed services.

A minimal working example that allows sshd to use gssproxy:

mechs = {

    krb5_mech = {

        mech = krb5;

        default_keytab = /etc/krb5.keytab;

    };

};


services = {

    ssh = {

        mech = krb5_mech;

        user = "sshd";

        keytab = /etc/krb5.keytab;

        # allow both acceptor (server) and initiator (client) ops if needed

        client = yes;

        server = yes;

    };

};

Client rules are often implicit: gssproxy can enforce that calls on a given service socket originate from the configured Unix user. For more complex setups you add policy and client blocks. Example to allow a specific PID or user to use the ssh service:

clients = {

    ssh_clients = {

        clients = [

            { match = "uid:0" },      # root can ask for ssh service

            { match = "user:sshd" },  # or the sshd user

        ];

        service = "ssh";

    };

};

Paths and sockets: gssproxy listens on a socket (e.g. /var/run/gssproxy/socket) and possibly per-user sockets (e.g. /run/gssproxy/uid_1000). The systemd unit usually creates the runtime directory with correct permissions.
 

4. Example: Integrate with OpenSSH server (sshd)

Goal: allow sshd and session processes to accept delegated GSS credentials and let unprivileged child processes use those credentials via gssproxy.

Server side config

  1. Ensure sshd is built/installed with GSSAPI support. On SSH server:

    • In /etc/ssh/sshd_config:
    • GSSAPIAuthentication yes
    • GSSAPICleanupCredentials yes
    • GSSAPIKeyExchange yes        # optional: if you want GSS key exchange
  2. Configure gssproxy with an ssh service entry pointing to the host keytab (so gssproxy can accept SPNEGO/kerberos accept_sec_context calls):

mechs = {

    krb5 = {

        mech = krb5;

        default_keytab = /etc/krb5.keytab;

    };

};


services = {

    ssh = {

        mech = krb5;

        user = "sshd";

        keytab = /etc/krb5.keytab;

        server = yes;

        client = yes;

    };

};

  1. Ensure /etc/krb5.keytab contains the host principal host/fqdn@REALM (or host/short@REALM depending on SPN strategy). Use ktutil or kadmin to create/populate.
  2. Restart gssproxy and sshd:

sudo systemctl restart gssproxy

sudo systemctl restart sshd

Client side

  • ssh client configuration (usually ~/.ssh/config or /etc/ssh/ssh_config):

Host myhost.example.com

    GSSAPIAuthentication yes

    GSSAPIDelegateCredentials yes

Client must have a TGT in the credential cache (kinit user), or use a client that acquires one.

Result

When the client initiates GSSAPI authentication and delegates credentials (GSSAPIDelegateCredentials yes or -K for older OpenSSH), gssproxy on the server handles acceptor functions. If a session process needs to use the delegated credentials (e.g., to access network resources as that user), gssproxy arranges a per-session credential store that unprivileged processes can use via the kernel keyring or other mechanisms gssproxy supports.
 

5. Example: Allow an unprivileged service to acquire initiator creds via gssproxy

Suppose a service mydaemon runs as myuser and needs to initiate Kerberos-authenticated connections using a specific service principal stored in /etc/mydaemon.keytab but you don’t want to expose that keytab to myuser.

Add a mech and service:

mechs = {

    krb5 = {

        mech = krb5;

        default_keytab = /etc/krb5.keytab;

    };

    mydaemon_mech = {

        mech = krb5;

        default_keytab = /etc/mydaemon.keytab;

    };

};


services = {

    mydaemon = {

        mech = mydaemon_mech;

        user = "myuser";

        keytab = /etc/mydaemon.keytab;

        client = yes;    # allow initiator operations

        server = no;

    };

};

Configure a client mapping so the mydaemon process (uid myuser) is allowed to use the mydaemon service. Once gssproxy runs, mydaemon uses the gssapi libraries (GSSAPI libs detect gssproxy via environment or library probe) and calls the GSSAPI functions; gssproxy will perform gss_acquire_cred using /etc/mydaemon.keytab and return a handle to the calling process. The service itself never directly reads the keytab.
 

6. Testing and tools

  • kinit / klist: manage and list Kerberos TGTs on clients.
  • journalctl -u gssproxy -f (or systemctl status gssproxy) to watch logs.
  • ss -l or ls -l /run/gssproxy to inspect sockets.
  • If you have gssproxy command-line utilities installed (may vary by distro), some installations include gssproxy CLI helpers. Otherwise use the service that relies on gssproxy and watch logs.

Example basic tests:

  1. Ensure gssproxy is running:

sudo systemctl status gssproxy

  1. On server, check socket and permissions:

sudo ls -l /run/gssproxy

# or

sudo ss -x -a | grep gssproxy

  1. Attempt SSH from a client with a TGT:

kinit alice

ssh -o GSSAPIDelegateCredentials=yes alice@server.example.com

# then on server, check journalctl logs for gssproxy/sshd messages
 

7. Debugging tips

  • Journal logs: journalctl -u gssproxy -xe will be your first stop.
  • Permissions: Ensure that gssproxy can read the keytab(s) (typically root-owned with restrictive perms). In config you may point to a keytab readable only by gssproxy.
  • Clients blocked: If a client is denied, check the clients block and match rules (uid/pid/user).
  • Keytab issues: Use klist -k /etc/krb5.keytab to list principals in a keytab. Ensure correct SPN and realm.
  • Clock skew: Kerberos is time-sensitive. Ensure NTP/chrony is working.
  • DNS / SPNs: Ensure hostnames and reverse DNS match the principal names expected for the service.
  • SSHD integration: If sshd still complains it can’t accept GSSAPI creds, enable debug logging (LogLevel DEBUG), and check gssproxy logs.
  • SELinux: On SELinux-enabled systems, you may need to ensure file contexts and SELinux policies allow gssproxy to access keytabs and sockets. Check audit.log for AVC denials and use semanage fcontext/restorecon or local policy modules when needed.
     

8. Common pitfalls & best practices

  • Don’t expose keytabs to unprivileged users. Let gssproxy hold them.
  • Principals & SPNs must match service hostnames used by clients. Consistent DNS is essential.
  • Minimal privileges: configure services and clients narrowly: allow only the minimum users/PIDs and only the required mech ops.
  • Rotation: when rotating keytabs, reload/restart gssproxy or send a signal if supported. Plan for keytab updates.
  • Logging: enable adequate logging during deployment and revert to normal verbosity in production.
  • Testing in staging: GSSAPI behavior across SSH clients and other daemons can be subtle — test across your client set (Linux, macOS, Windows via native Kerberos clients, etc.).
     

9. Security considerations

  • gssproxy centralizes credential access: secure the host and the gssproxy process.
  • Protect keytab files using strict filesystem permissions and (if needed) SELinux policy.
  • Restrict which local processes may request operations for a service — map by UID/PID carefully.
  • Monitor logs for unexpected use of gssproxy.
     

10. Example full config (simple)

Save as /etc/gssproxy/gssproxy.conf:

mechs = {

    krb5 = {

        mech = krb5;

        default_keytab = /etc/krb5.keytab;

    };

};


services = {

    ssh = {

        mech = krb5;

        user = "sshd";

        keytab = /etc/krb5.keytab;

        server = yes;

        client = yes;

    };


    mydaemon = {

        mech = krb5;

        user = "myuser";

        keytab = /etc/mydaemon.keytab;

        client = yes;

        server = no;

    };

};


clients = {

    allow_root_for_ssh = {

        clients = [

            { match = "uid:0" },

        ];

        service = "ssh";

    };


    mydaemon_client = {

        clients = [

            { match = "user:myuser" },

        ];

        service = "mydaemon";

    };

};

Restart: sudo systemctl restart gssproxy and then restart dependent services (sshd, mydaemon, etc.) if needed.


Useful resources for gssproxy and further integrations

  • Read your distribution’s /usr/share/doc/gssproxy/ or man pages (man gssproxy, man gssproxy.conf) — they contain distribution-specific details.
  • Check integrations: Samba/Winbind, SSSD, NFS idmap — many modern stacks support gssproxy as an option to avoid exposing keytabs to many daemons.
  • For production: automate keytab distribution, rotation and monitor gssproxy usage.


How to Install and Set Up an NFS Server network Shares on on Linux to easify data transfer across multiple hosts

Monday, April 7th, 2025

How to Configure NFS Server in Redhat,CentOS,RHEL,Debian,Ubuntu and Oracle Linux

Network File System (NFS) is a protocol that allows one system to share directories and files with others over a network. It's commonly used in Linux environments for file sharing between systems. In this guide, we'll walk you through the steps to install and set up an NFS server on a Linux system.

Prerequisites

Before you start, make sure you have:

  • A Linux system distros (e.g., Ubuntu, CentOS, Debian, etc.)
  • Root or sudo privileges on the system.
  • A network connection between the server (NFS server) and clients (machines that will access the shared directories).
     

1. Install NFS Server Package


On Ubuntu / Debian based Linux systems:

a. First, update the package list 

# apt update

b. Install the NFS server package
 

# apt install nfs-kernel-server

On CentOS/REL-based systems:

 2. Install the NFS server package
 

      # yum install nfs-utils 

Once the package is installed, ensure that the necessary services are enabled.

 3. Create Shared Directory for file sharing

Decide which directory you want to share over NFS. If the directory doesn't exist, you can create one. For example:

# mkdir -p /nfs_srv_dir/nfs_share

Make sure the directory has the appropriate permissions so that the nfs clients can access it.

# chown nobody:nogroup /nfs_srv_dir/nfs_share 
# chmod 755 /nfs_srv_dir/nfs_share

4. Configure NFS Exports ( /etc/exports file)

The NFS exports file (/etc/exports) is perhaps most important file you will have to create and deal with regularly to define the expored shares, this file contains the configuration settings for directories you want to share with other systems.

       a. Open the /etc/exports file for editing:

vi /etc/exports

Add an entry for the directory you want to share. For example, if you're sharing /nfs_srv_dir/nfs_share and allowing access to all systems on the network (192.168.1.0/24), add the following line:
 

/nfs_srv_dir/nfs_share 192.168.1.0/24(rw,sync,no_subtree_check)


Here’s what each option means:

  • rw: Read and write access.
  • sync: Ensures that changes are written to disk before responding to the client.


Here is few lines of  example of my working /etc/exports on my home running NFS server

/var/www 192.168.0.209/32(rw,no_root_squash,async,subtree_check)
/home/jordan 192.168.0.209/32(rw,no_root_squash,async,subtree_check)
/mnt/sda1/icons-frescoes/ 192.168.0.209/32(rw,no_root_squash,async,subtree_check)
/home/mobfiles 192.168.0.209/32(rw,no_root_squash,async,subtree_check)
/mnt/sda1/icons-frescoes/ 192.168.0.200/32(rw,no_root_squash,async,subtree_check)
/home/hipo/public_html 192.168.0.209/32(rw,no_root_squash,async,subtree_check)
/home/alex/public_html 192.168.0.209/32(rw,no_root_squash,async,subtree_check)
/home/necroleak/public_html 192.168.0.209/32(rw,no_root_squash,async,subtree_check)
/bashscripts 192.168.0.209/32(rw,no_root_squash,async,subtree_check)
/backups/Family-Videos 192.168.0.200/32(ro,no_root_squash,async,subtree_check)


5. Export the NFS Shares with exportfs command

Once the export file is configured, you need to inform the NFS server to start sharing the directory:
 

# exportfs -a


The -a flag will make it export all the sharings.

6. Start and Enable NFS Services

You need to start and enable the NFS server so it will run on system boot.

On Ubuntu / Debian Linux run the following commands:
 

# systemctl start nfs-kernel-server 
# systemctl enable nfs-kernel-server


On CentOS / RHEL Linux:
 

# systemctl start nfs-server
# systemctl enable nfs-server


7. Allow NFS Traffic Through the Firewall

If your server has a firewall configured / enabled, you will need to allow NFS-related ports through the firewall.
These ports include 2049 TCP protocol Ports (NFS) and 111 (RPCbind) UDP and TCP protocol , and some additional ports.

On Ubuntu/Debian (assuming you are using ufw [UNCOMPLICATED FIREWALL]):

# ufw allow from 192.168.1.0/24 to any port nfs sudo ufw reload

On CentOS / RHEL Linux:

# firewall-cmd –permanent –add-service=nfs sudo firewall-cmd –permanent –add-service=mountd sudo firewall-cmd –permanent –add-service=rpc-bind sudo firewall-cmd –reload

8. Verify NFS Server is Running

To ensure the NFS server is running properly, use the following command:
 

# systemctl status nfs-kernel-server

or

# systemctl status nfs-server

You should see output indicating that the service is active and running.


9. Test the NFS Share (Client-Side)

To test the NFS share, you will need to mount it on a client machine. Here's how to mount it:

On the client machine, install the NFS client utilities:

Ubuntu / Debian Linux

# apt install nfs-common

For CentOS / RHEL Linux

# yum install nfs-utils


Create a mount point (Nomatter the distro),:
 

# mkdir -p /mnt/nfs_share


Mount the NFS share:

# mount -t nfs <nfs_server_ip>:/nfs_srv_dir/nfs_share /mnt/nfs_share

Replace <nfs_server_ip> with the IP address of the NFS server or DNS host alias if you have one defined in /etc/hosts file.

Verify that the share is mounted:

​# df -h

You should see the NFS share listed under the mounted file systems.

10. Configure Auto-Mount at Boot (Optional)

To have the NFS share automatically mounted at boot, you can add an entry to the /etc/fstab file on the client machine.

Open /etc/fstab for editing:

# vi /etc/fstab

Add the following line: 

<server-ip>:/nfs_srv_dir/nfs_share /mnt/nfs_share nfs defaults 0 0

Save and close the file.

The NFS share will now be automatically mounted whenever the system reboots.

Debug NFS configuration issues (basics)


You can continue to modify the /etc/exports file to share more directories or set specific access restrictions depending on your needs.

If you encounter any issues, checking the server logs or using
 

# exportfs -v
/var/www          192.168.0.209/32(async,wdelay,hide,sec=sys,rw,secure,no_root_squash,no_all_squash)
/home/var_data      192.168.0.205/32(async,wdelay,hide,sec=sys,rw,secure,no_root_squash,no_all_squash)
/mnt/sda1/
        192.168.0.209/32(async,wdelay,hide,sec=sys,rw,secure,no_root_squash,no_all_squash)
/mnt/sda2/info
        192.168.0.200/32(async,wdelay,hide,sec=sys,rw,secure,no_root_squash,no_all_squash)
/home/mobfiles    192.168.0.209/32(async,wdelay,hide,sec=sys,rw,secure,no_root_squash,no_all_squash)
/home/var_data/public_html
        192.168.0.209/32(async,wdelay,hide,sec=sys,rw,secure,no_root_squash,no_all_squash)
/var/public
        192.168.0.209/32(async,wdelay,hide,sec=sys,rw,secure,no_root_squash,no_all_squash)
/neon/data
        192.168.0.209/32(async,wdelay,hide,sec=sys,rw,secure,no_root_squash,no_all_squash)
/scripts      192.168.0.209/32(async,wdelay,hide,sec=sys,rw,secure,no_root_squash,no_all_squash)
/backups/data-limited
        192.168.0.200/32(async,wdelay,hide,sec=sys,ro,secure,no_root_squash,no_all_squash)
/disk/filetransfer
        192.168.0.200/23(async,wdelay,hide,sec=sys,ro,secure,no_root_squash,no_all_squash)
/public_shared/data
        192.168.0.200/23(async,wdelay,hide,sec=sys,ro,secure,no_root_squash,no_all_squash)


 Of course there is much more to be said on that you can for example, check /var/log/messages /var/log/syslog and other logs that can give you hints about issues, as well as manually try to mount / unmount a NFS stuck share to know more on what is going on, but for a starter that should be enough.

command can help severely in troubleshooting the NFS configuration.

Sum it up what learned ?

We learned how to  set up basic NFS server and mounted its shared directory on a client machine.
This is a great solution for centralized file sharing and collaboration on Linux systems (even though many companies are trying to not use it due to its lack of connection encryption for historical reasons NFS has been widely used over the years and has helped dramatically for the Internet as we know it to become the World Wide Web of today. Thus for a well secured network and perhaps not a critical files infrastructure, still NFS is a key player in file sharing among heterogenous networks for multitudes of Gigabytes or Terra Pentabytes of data you would like to share amoung your Personal Computers / Servers / Phones / Tablets and generally all kind of digital computer equipment devices.

Email Linux alternative text console clients to Thunderbird, fetchmail, Mutt, fetchmail + Alpine how to

Saturday, November 4th, 2017

linux-email-alternatives-for-text-console-email-fetching-gathering-alternative-to-thunderbird-and-evolution-howto

As a GNU / Linux user you might end up searching for the best email client to satisfy your needs, for those who used so far Outlook Express on M$ Windows first switch to GNU / Linux the most likely one to choose is either Mozilla Thunderbird or GNOME's Evolution default Mail Clientbut what more text / console programs are there that will allow you to easily check email via POP3 and IMAP on Linux?


1. Install Fetchmail and use to collect and copy your emails from remote server to your local machine
 

 SSL enabled POP3, APOP, IMAP mail gatherer/forwarder
 fetchmail is a free, full-featured, robust, and well-documented remote mail
 retrieval and forwarding utility intended to be used over on-demand TCP/IP
 links (such as SLIP or PPP connections).  It retrieves mail from remote mail
 servers and forwards it to your local (client) machine's delivery system, so
 it can then be read by normal mail user agents such as mutt, elm, pine,
 (x)emacs/gnus, or mailx.  The fetchmailconf package includes an interactive
 GUI configurator suitable for end-users.

To install it, issue:
 

apt-get install –yes fetchmail procmail


To configure fetchmail to gather your mail from your POP3 / IMAP mailbox, create below
.fetchmailrc configuratoin and modify according to your account


# vim .fetchmailrc


#### .fetchmailrc
 set daemon 600
 set logfile fetchmail.log

 poll the_mail_server_hostname proto POP3

  user "Remote_Username" pass "PASSWORD=" is "local_username" preconnect "date >> fetchmail.log"
 #ssl
  fetchall
  #no keep
  no rewrite
  mda "/usr/bin/procmail -f %F -d %T";


Here is also few words on each of the .fetchmailrc config options

set daemon 600 The fetchmail binary with run in the background in daemon mod and fetch mail from the server every 600 seconds or 10 minutes.

set logfile fetchmail.log This will set the directory and file name of the fetchmail user log file. Eveytime fetchmail recieves an email, checks the pop3 server or errors out you will find an entry here.

poll the_isp_mail_server proto POP3 This line tells fetchmail what mail server to contact, in theis case "the_isp_mail_server" and to use the "POP3" protocol.

user "remote_user_name" pass "PASSWORD" is "local_username" preconnect "date >> fetchmail.log The user directive tells fetchmail what the name of the user on the remote mail server is for example "remote_user_name". The pass directive is simply the password you will use for the remote user on the mail server. The "is" directive is optional. It tells fetchmail to deliver mail to a diferent user name if the user on the remote mail server and the local machine are different. For example, I may be using the name "joe.doe" on the mail server, but my local user name is "jdoe". I would use a line like user "joe.doe" pass "PASSWORD" is "jdoe". The preconnect command simply adds the current time and date to the fetchmail log file every time fetchmail checks for new mail.

ssl The "ssl" directive tells fetchmail to use encryption when connecting to the pop3 mail server. Fetchmail will use port 995 instead of port 110 for un-encypted mail communication. In order to use ssl the remote mail server must be able to use ssl. Comment out this directive if you do _not_ use pop3s.

fetchall Fetchall just means to fetch all of the mail on the mail server no matter what the "read" flag is. It is possibly to read mail through many different processes. If you use another mail client from another location, for example you could have read you mail and kept it ont he server, but marked it with the "read" flag. At this point if you did _not_ use the "fetchall" flag then only mail marked as new would be downloaded.

no keep Once the mail is downloded from the mail server fetchmail is to tell the server to remove it from the server. You may choose to comment this option out if you want to leave all mail on the server.

no rewrite Do not rewrite headers. When fetchmail recieves the mail you do not want any of the headers mangled in any way. This directive tells fetchmail to leave the headers alone.

mda "/usr/bin/procmail -f %F -d %T"; The mda is your "mail delivery agent. Procmail is the program that fetchmail will hand the mail off to once it is downloaded. The argument "-f %F" logs who the mail if from and "-d %T" turns on explicit delivery mode, delivery will be to the local user recipient.

For configuring multiple mailboxes email to be gathered to local machine through fetchmail add to above configuration, some more config similar to this:

 poll mail.example.com protocol pop3:
       username "admin" password "your-plain-text-password" is "username" here;
       username "what-ever-user-name" password "Just-another-pass#" is "foreman" here;

  poll mail.example.org protocol pop3 with option sslproto '':
       user "whatever-user1" password "its-my-pass" mda "/usr/bin/procmail -d %T":   user "whatever-user1" password "its-my-pass" mda "/usr/bin/procmail -d %T


Because as you can see fetchmail keeps password in plaintext it is a best security practice to set some good file permissions on .fetchmailrc just to make sure some other local user on the same Linux / Unix machine will not be able to read your plaintext password, to do so issue below command.
 

chmod 600 ~/.fetchmailrc


For the purpose of logging as we have it into the config you will also need to create new blank file fetchmail.log
 

touch fetchmail.log


Once fetchmail all your emails you can use mail command to view your messages or further configure alpine or mutt to read the downloaded messages.


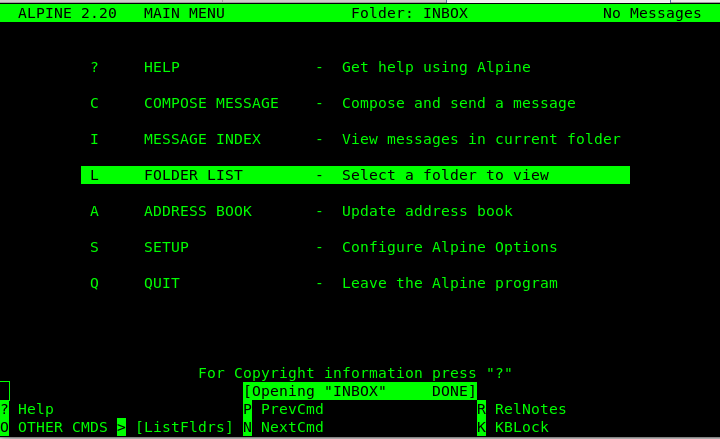
2. Use Alpine text based email client to check your downloaded email with fetchmail
 

Alpine is Text-based email client, friendly for novices but powerful
 Alpine is an upgrade of the well-known PINE email client.  Its name derives
 from the use of the Apache License and its ties to PINE.

In other words what Alpine is it is a rewritten and improved version of the good old PINE Unix email client (for those who remember it).

To give alpine a try on Debian / Ubuntu install it with:


apt-get install –yes alpine pilot


Mutt-text-console-linux-email-client


3. Use MuTT advanced and much more colorful text email client to view your emailbox

mutt-text-email-client-logo-dog

 Mutt is a sophisticated text-based Mail User Agent. Some highlights:
 .
  * MIME support (including RFC1522 encoding/decoding of 8-bit message
    headers and UTF-8 support).
  * PGP/MIME support (RFC 2015).
  * Advanced IMAP client supporting SSL encryption and SASL authentication.
  * POP3 support.
  * ESMTP support.
  * Message threading (both strict and non-strict).
  * Keybindings are configurable, default keybindings are much like ELM;
    Mush and PINE-like ones are provided as examples.
  * Handles MMDF, MH and Maildir in addition to regular mbox format.
  * Messages may be (indefinitely) postponed.
  * Colour support.
  * Highly configurable through easy but powerful rc file.


To install MuTT:


linux:~# apt-get install –yes mutt

Configuring mutt if you don't have priorly set-up with fetchmail to collect your remote e-mails, you might want to try out .mutt's email fetch features to do so you will need a .muttrc configuration like that:
 

# Automatically log in to this mailbox at startup
set spoolfile="imaps://User_Name:Your-Secret-Password@mail.example.com/"
# Define the = shortcut, and the entry point for the folder browser (c?)
set folder="imaps://mail.example.com/"
set record="=Sent"
set postponed="=Drafts"

You might also omit placing the password inside .muttrc configuration as storing the password in plaintext might be a big security hole if someone is able to read it at certain point, but the downside of that is you'll be asked by mutt to fill in your email password on every login which at a point becomes pretty annoying.
 

If you face problems with inability of mutt to connect to remote mail server due to TLS problems, you can also try to play with below configurations:
 

# activate TLS if available on the server
 set ssl_starttls=yes
 # always use SSL when connecting to a server
 set ssl_force_tls=yes
 # Don't wait to enter mailbox manually
 unset imap_passive        
 # Automatically poll subscribed mailboxes for new mail (new in 1.5.11)
 set imap_check_subscribed
 # Reduce polling frequency to a sane level
 set mail_check=60
 # And poll the current mailbox more often (not needed with IDLE in post 1.5.11)
 set timeout=10
 # keep a cache of headers for faster loading (1.5.9+?)
 set header_cache=~/.hcache
 # Display download progress every 5K
 set net_inc=5


Once you have the emails downloaded with fetchmail for your mailbox mutt should be showing your email stuff like in below screenshot
 

linux:~$ mutt


Mutt-text-console-linux-email-client

Of course a very handy thing to have is w3m-img text browser that displays images as it might be able to open your pictures attached to email if you're on a physical console tty.

I'll be curious to hear, if you know of better and easier solutions to check mail in console, so if you know such please drop a comment explaining how you check your mail text.