Posts Tagged ‘email’

Log rsyslog script incoming tagged string message to separate external file to prevent /var/log/message from string flood

Wednesday, December 22nd, 2021

rsyslog_logo-log-external-tag-scripped-messages-to-external-file-linux-howto

If you're using some external bash script to log messages via rsyslogd to some of the multiple rsyslog understood data tubes (called in rsyslog language facility levels) and you want Rsyslog to move message string to external log file, then you had the same task as me few days ago.

For example you have a bash shell script that is writting a message to rsyslog daemon to some of the predefined facility levels be it:
 

kern,user,cron, auth etc. or some local

and your logged script data ends under the wrong file location /var/log/messages , /var/log/secure , var/log/cron etc. However  you need to log everything coming from that service to a separate file based on the localX (fac. level) the usual way to do it is via some config like, as you would usually do it with rsyslog variables as:
 

local1.info                                            /var/log/custom-log.log

# Don't log private authentication messages!
*.info;mail.none;authpriv.none;cron.none;local0.none;local1.none        /var/log/messages


Note the local1.none is instructing the rsyslog not to log anything from local1 facility towards /var/log/message. 
But what if this due to some weirdness in configuration of rsyslog on the server or even due to some weird misconfiguration in

/etc/systemd/journald.conf such as:

[Journal]
Storage=persistent
RateLimitInterval=0s
RateLimitBurst=0
SystemMaxUse=128M
SystemMaxFileSize=32M
MaxRetentionSec=1month
MaxFileSec=1week
ForwardToSyslog=yes
SplitFiles=none

Due to that config and especially the FowardToSyslog=yes, the messages sent via the logger tool to local1 still end up inside /var/log/messages, not nice huh ..

The result out of that is anything being sent with a predefined TAGGED string via the whatever.sh script which uses the logger command  (if you never use it check man logger) to enter message into rsyslog with cmd like:
 

# logger -p local1.info -t TAG_STRING

# logger -p local2.warn test
# tail -2 /var/log/messages
Dec 22 18:58:23 pcfreak rsyslogd: — MARK —
Dec 22 19:07:12 pcfreak hipo: test


was nevertheless logged to /var/log/message.
Of course /var/log/message becomes so overfilled with "junk" shell script data not related to real basic Operating system adminsitration, so this prevented any critical or important messages that usually should come under /var/log/message / /var/log/syslog to be lost among the big quantities of other tagged tata reaching the log.

After many attempts to resolve the issue by modifying /etc/rsyslog.conf as well as the messed /etc/systemd/journald.conf (which by the way was generated with this strange values with an OS install time automation ansible stuff). It took me a while until I found the solution on how to tell rsyslog to log the tagged message strings into an external separate file. From my 20 minutes of research online I have seen multitudes of people in different Linux OS versions to experience the same or similar issues due to whatever, thus this triggered me to write this small article on the solution to rsyslog.

The solution turned to be pretty easy but requires some further digging into rsyslog, Redhat's basic configuration on rsyslog documentation is a very nice reading for starters, in my case I've used one of the Propery-based compare-operations variable contains used to select my tagged message string.
 

1. Add msg contains compare-operations to output log file and discard the messages

[root@centos bin]# vi /etc/rsyslog.conf

# config to log everything logged to rsyslog to a separate file
:msg, contains, "tag_string:/"         /var/log/custom-script-log.log
:msg, contains, "tag_string:/"    ~

Substitute quoted tag_string:/ to whatever your tag is and mind that it is better this config is better to be placed somewhere near the beginning of /etc/rsyslog.conf and touch the file /var/log/custom-script-log.log and give it some decent permissions such as 755, i.e.
 

1.1 Discarding a message


The tilda sign –  

as placed to the end of the msg, contains is the actual one to tell the string to be discarded so it did not end in /var/log/messages.

Alternative rsyslog config to do discard the unwanted message once you have it logged is with the
rawmsg variable, like so:


# config to log everything logged to rsyslog to a separate file
:msg, contains, "tag_string:/"         /var/log/custom-script-log.log
:rawmsg, isequal, "tag_string:/" stop

Other way to stop logging immediately after log is written to custom file across some older versions of rsyslog is via the &stop

:msg, contains, "tag_string:/"         /var/log/custom-script-log.log
& stop

I don't know about other versions but Unfortunately the &stop does not work on RHEL 7.9 with installed rpm package rsyslog-8.24.0-57.el7_9.1.x86_64.

1.2 More with property based filters basic exclusion of string 

Property based filters can do much more, you can for example, do regular expression based matches of strings coming to rsyslog and forward to somewhere.

To select syslog messages which do not contain any mention of the words fatal and error with any or no text between them (for example, fatal lib error), type:

:msg, !regex, "fatal .* error"


2. Create file where tagged data should be logged and set proper permissions
 

[root@centos bin]# touch /var/log/custom-script-log.log
[root@centos bin]# chmod 755 /var/log/custom-script-log.log


3. Test rsyslogd configuration for errors and reload rsyslog

[root@centos ]# rsyslogd -N1
rsyslogd: version 8.24.0-57.el7_9.1, config validation run (level 1), master config /etc/rsyslog.conf
rsyslogd: End of config validation run. Bye.

[root@centos ]# systemctl restart rsyslog
[root@centos ]#  systemctl status rsyslog 
● rsyslog.service – System Logging Service
   Loaded: loaded (/usr/lib/systemd/system/rsyslog.service; enabled; vendor preset: enabled)
   Active: active (running) since Wed 2021-12-22 13:40:11 CET; 3h 5min ago
     Docs: man:rsyslogd(8)
           http://www.rsyslog.com/doc/
 Main PID: 108600 (rsyslogd)
   CGroup: /system.slice/rsyslog.service
           └─108600 /usr/sbin/rsyslogd -n


4. Property-based compare-operations supported by rsyslog table
 

Compare-operation Description
contains Checks whether the provided string matches any part of the text provided by the property. To perform case-insensitive comparisons, use  contains_i .
isequal Compares the provided string against all of the text provided by the property. These two values must be exactly equal to match.
startswith Checks whether the provided string is found exactly at the beginning of the text provided by the property. To perform case-insensitive comparisons, use  startswith_i .
regex Compares the provided POSIX BRE (Basic Regular Expression) against the text provided by the property.
ereregex Compares the provided POSIX ERE (Extended Regular Expression) regular expression against the text provided by the property.
isempty Checks if the property is empty. The value is discarded. This is especially useful when working with normalized data, where some fields may be populated based on normalization result.


5. Rsyslog understanding Facility levels

Here is a list of facility levels that can be used.

Note: The mapping between Facility Number and Keyword is not uniform over different operating systems and different syslog implementations, so among separate Linuxes there might be diference in the naming and numbering.

Facility Number Keyword Facility Description
0 kern kernel messages
1 user user-level messages
2 mail mail system
3 daemon system daemons
4 auth security/authorization messages
5 syslog messages generated internally by syslogd
6 lpr line printer subsystem
7 news network news subsystem
8 uucp UUCP subsystem
9   clock daemon
10 authpriv security/authorization messages
11 ftp FTP daemon
12 NTP subsystem
13 log audit
14 log alert
15 cron clock daemon
16 local0 local use 0 (local0)
17 local1 local use 1 (local1)
18 local2 local use 2 (local2)
19 local3 local use 3 (local3)
20 local4 local use 4 (local4)
21 local5 local use 5 (local5)
22 local6 local use 6 (local6)
23 local7 local use 7 (local7)


6. rsyslog Severity levels (sublevels) accepted by facility level

As defined in RFC 5424, there are eight severity levels as of year 2021:

Code Severity Keyword Description General Description
0 Emergency emerg (panic) System is unusable. A "panic" condition usually affecting multiple apps/servers/sites. At this level it would usually notify all tech staff on call.
1 Alert alert Action must be taken immediately. Should be corrected immediately, therefore notify staff who can fix the problem. An example would be the loss of a primary ISP connection.
2 Critical crit Critical conditions. Should be corrected immediately, but indicates failure in a primary system, an example is a loss of a backup ISP connection.
3 Error err (error) Error conditions. Non-urgent failures, these should be relayed to developers or admins; each item must be resolved within a given time.
4 Warning warning (warn) Warning conditions. Warning messages, not an error, but indication that an error will occur if action is not taken, e.g. file system 85% full – each item must be resolved within a given time.
5 Notice notice Normal but significant condition. Events that are unusual but not error conditions – might be summarized in an email to developers or admins to spot potential problems – no immediate action required.
6 Informational info Informational messages. Normal operational messages – may be harvested for reporting, measuring throughput, etc. – no action required.
7 Debug debug Debug-level messages. Info useful to developers for debugging the application, not useful during operations.


7. Sample well tuned configuration using severity and facility levels and immark, imuxsock, impstats
 

Below is sample config using severity and facility levels
 

# Don't log private authentication messages!
*.info;mail.none;authpriv.none;cron.none;local0.none;local1.none        /var/log/messages


Note the local0.none; local1.none tells rsyslog to not log from that facility level to /var/log/messages.

If you need a complete set of rsyslog configuration fine tuned to have a proper logging with increased queues and included configuration for loggint to remote log aggegator service as well as other measures to prevent the system disk from being filled in case if something goes wild with a logging service leading to a repeatedly messages you might always contact me and I can help 🙂
 Other from that sysadmins might benefit from a sample set of configuration prepared with the Automated rsyslog config builder  or use some fine tuned config  for rsyslog-8.24.0-57.el7_9.1.x86_64 on Redhat 7.9 (Maipo)   rsyslog_config_redhat-2021.tar.gz.

To sum it up rsyslog though looks simple and not an important thing to pre

Fix Out of inodes on Postfix Linux Mail Cluster. How to clean up filesystem running out of Inodes, Filesystem inodes on partition is 100% full

Wednesday, August 25th, 2021

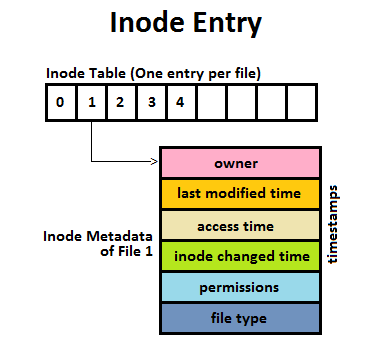
Inode_Entry_inode-table-content

Recently we have faced a strange issue with with one of our Clustered Postfix Mail servers (the cluster is with 2 nodes that each has configured Postfix daemon mail servers (running on an OpenVZ virtualized environment).
A heartbeat that checks liveability of clusters and switches nodes in case of one of the two gets broken due to some reason), pretty much a standard SMTP cluster.

So far so good but since the cluster is a kind of abondoned and is pretty much legacy nowadays and used just for some Monitoring emails from different scripts and systems on servers, it was not really checked thoroughfully for years and logically out of sudden the alarming email content sent via the cluster stopped working.

The normal sysadmin job here  was to analyze what is going on with the cluster and fix it ASAP. After some very basic analyzing we catched the problem is caused by a  "inodes full" (100% of available inodes were occupied) problem, e.g. file system run out of inodes on both machines perhaps due to a pengine heartbeat process  bug  leading to producing a high number of .bz2 pengine recovery archive files stored in /var/lib/pengine>

Below are the few steps taken to analyze and fix the problem.
 

1. Finding out about the the system run out of inodes problem


After logging on to system and not finding something immediately is wrong with inodes, all I can see from crm_mon is cluster was broken.
A plenty of emails were left inside the postfix mail queue visible with a standard command

[root@smtp1: ~ ]# postqueue -p

It took me a while to find ot the problem is with inodes because a simple df -h  was showing systems have enough space but still cluster quorum was not complete.
A bit of further investigation led me to a  simple df -i reporting the number of inodes on the local filesystems on both our SMTP1 and SMTP2 got all occupied.

[root@smtp1: ~ ]# df -i
Filesystem            Inodes   IUsed   IFree IUse% Mounted on
/dev/simfs            500000   500000  0   100% /
none                   65536      61   65475    1% /dev

As you can see the number of inodes on the Virual Machine are unfortunately depleted

Next step was to check directories occupying most inodes, as this is the place from where files could be temporary moved to a remote server filesystem or moved to another partition with space on a server locally attached drives.
Below command gives an ordered list with directories locally under the mail root filesystem / and its respective occupied number files / inodes,
the more files under a directory the more inodes are being occupied by the files on the filesystem.


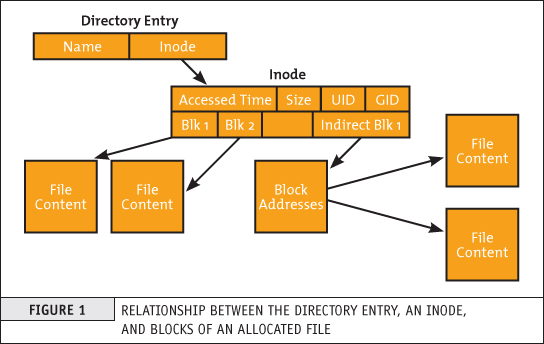
run-out-if-inodes-what-is-inode-find-out-which-filesystem-or-directory-eating-up-all-your-system-inodes-linux_inode_diagram.gif
1.1 Getting which directory consumes most of the inodes on the systems


[root@smtp1: ~ ]# { find / -xdev -printf '%h\n' | sort | uniq -c | sort -k 1 -n; } 2>/dev/null
….
…..

…….
    586 /usr/lib64/python2.4
    664 /usr/lib64
    671 /usr/share/man/man8
    860 /usr/bin
   1006 /usr/share/man/man1
   1124 /usr/share/man/man3p
   1246 /var/lib/Pegasus/prev_repository_2009-03-10-1236698426.308128000.rpmsave/root#cimv2/classes
   1246 /var/lib/Pegasus/prev_repository_2009-05-18-1242636104.524113000.rpmsave/root#cimv2/classes
   1246 /var/lib/Pegasus/prev_repository_2009-11-06-1257494054.380244000.rpmsave/root#cimv2/classes
   1246 /var/lib/Pegasus/prev_repository_2010-08-04-1280907760.750543000.rpmsave/root#cimv2/classes
   1381 /var/lib/Pegasus/prev_repository_2010-11-15-1289811714.398469000.rpmsave/root#cimv2/classes
   1381 /var/lib/Pegasus/prev_repository_2012-03-19-1332151633.572875000.rpmsave/root#cimv2/classes
   1398 /var/lib/Pegasus/repository/root#cimv2/classes
   1696 /usr/share/man/man3
   400816 /var/lib/pengine

Note, the above command orders the files from bottom to top order and obviosuly the bottleneck directory that is over-eating Filesystem inodes with an exceeding amount of files is
/var/lib/pengine
 

2. Backup old multitude of files just in case of something goes wrong with the cluster after some files are wiped out


The next logical step of course is to check what is going on inside /var/lib/pengine just to find a very ,very large amount of pe-input-*NUMBER*.bz2 files were suddenly produced.


[root@smtp1: ~ ]# ls -1 pe-input*.bz2 | wc -l
 400816


The files are produced by the pengine process which is one of the processes that is controlling the heartbeat cluster state, presumably it is done by running process:

[root@smtp1: ~ ]# ps -ef|grep -i pengine
24        5649  5521  0 Aug10 ?        00:00:26 /usr/lib64/heartbeat/pengine


Hence in order to fix the issue, to prevent some inconsistencies in the cluster due to the file deletion,  copied the whole directory to another mounted parition (you can mount it remotely with sshfs for example) or use a local one if you have one:

[root@smtp1: ~ ]# cp -rpf /var/lib/pengine /mnt/attached_storage


and proceeded to clean up some old multitde of files that are older than 2 years of times (720 days):


3. Clean  up /var/lib/pengine files that are older than two years with short loop and find command


First I made a list with all the files to be removed in external text file and quickly reviewed it by lessing it like so

[root@smtp1: ~ ]#  cd /var/lib/pengine
[root@smtp1: ~ ]# find . -type f -mtime +720|grep -v pe-error.last | grep -v pe-input.last |grep -v pe-warn.last -fprint /home/myuser/pengine_older_than_720days.txt
[root@smtp1: ~ ]# less /home/myuser/pengine_older_than_720days.txt


Once reviewing commands I've used below command to delete the files you can run below command do delete all older than 2 years that are different from pe-error.last / pe-input.last / pre-warn.last which might be needed for proper cluster operation.

[root@smtp1: ~ ]#  for i in $(find . -type f -mtime +720 -exec echo '{}' \;|grep -v pe-error.last | grep -v pe-input.last |grep -v pe-warn.last); do echo $i; done


Another approach to the situation is to simply review all the files inside /var/lib/pengine and delete files based on year of creation, for example to delete all files in /var/lib/pengine from 2010, you can run something like:
 

[root@smtp1: ~ ]# for i in $(ls -al|grep -i ' 2010 ' | awk '{ print $9 }' |grep -v 'pe-warn.last'); do rm -f $i; done


4. Monitor real time inodes freeing

While doing the clerance of old unnecessery pengine heartbeat archives you can open another ssh console to the server and view how the inodes gets freed up with a command like:


# check if inodes is not being rapidly decreased

[root@csmtp1: ~ ]# watch 'df -i'


5. Restart basic Linux services producing pid files and logs etc. to make then workable (some services might not be notified the inodes on the Hard drive are freed up)

Because the hard drive on the system was full some services started to misbehaving and /var/log logging was impacted so I had to also restart them in our case this is the heartbeat itself
that  checks clusters nodes availability as well as the logging daemon service rsyslog


# restart rsyslog and heartbeat services
[root@csmtp1: ~ ]# /etc/init.d/heartbeat restart
[root@csmtp1: ~ ]# /etc/init.d/rsyslog restart

The systems had been a data integrity legacy service samhain so I had to restart this service as well to reforce the /var/log/samhain log file to again continusly start writting data to HDD.

# Restart samhain service init script 
[root@csmtp1: ~ ]# /etc/init.d/samhain restart


6. Check up enough inodes are freed up with df

[root@smtp1 log]# df -i
Filesystem Inodes IUsed IFree IUse% Mounted on
/dev/simfs 500000 410531 19469 91% /
none 65536 61 65475 1% /dev


I had to repeat the same process on the second Postfix cluster node smtp2, and after all the steps like below check the status of smtp2 node and the postfix queue, following same procedure made the second smtp2 cluster member as expected 🙂


7. Check the cluster node quorum is complete, e.g. postfix cluster is operating normally


# Test if email cluster is ok with pacemaker resource cluster manager – lt-crm_mon
 

[root@csmtp1: ~ ]# crm_mon -1
============
Last updated: Tue Aug 10 18:10:48 2021
Stack: Heartbeat
Current DC: smtp2.fqdn.com (bfb3d029-89a8-41f6-a9f0-52d377cacd83) – partition with quorum
Version: 1.0.12-unknown
2 Nodes configured, unknown expected votes
4 Resources configured.
============

Online: [ smtp2.fqdn.com smtp1.fqdn.com ]

failover-ip (ocf::heartbeat:IPaddr2): Started csmtp1.ikossvan.de
Clone Set: postfix_clone
Started: [ smtp2.fqdn.com smtp1fqdn.com ]
Clone Set: pingd_clone
Started: [ smtp2.fqdn.com smtp1.fqdn.com ]
Clone Set: mailto_clone
Started: [ smtp2.fqdn.com smtp1.fqdn.com ]


8.  Force resend a few hundred thousands of emails left in the email queue


After some inodes gets freed up due to the file deletion, i've reforced a couple of times the queued mail servers to be immediately resent to remote mail destinations with cmd:


# force emails in queue to be resend with postfix

[root@smtp1: ~ ]# sendmail -q


– It was useful to watch in real time how the queued emails are quickly decreased (queued mails are successfully sent to destination addresses) with:


# Monitor  the decereasing size of the email queue
[root@smtp1: ~ ]# watch 'postqueue -p|grep -i '@'|wc -l'

Howto Configure Linux shell Prompt / Setup custom Terminal show Prompt using default shell variables PS1, PS2, PS3, PS4

Tuesday, August 27th, 2019

how-to-configure-lunux-bsd-shell-prompt-ps1-howto-make-your-terminal-console-shell-nice-and-shiny-1

System Console, Command Operation Console  or Terminal is a Physical device for text (command) input from keyboard, getting the command output and monitoring the status of a shell or programs I/O operations generated traditionally with attached screen. With the development of Computers, physical consoles has become emulated and the input output is translated on the monitor usually via a data transfer  protocol historically mostly over TCP/IP connection to remote IP with telnet or rsh, but due to security limitations Consoles are now accessed over data (encrypted) network protocols with SHA2 / MD5 cryptography algorithm enabled such as over SSH (Secure Shell) network protocol..
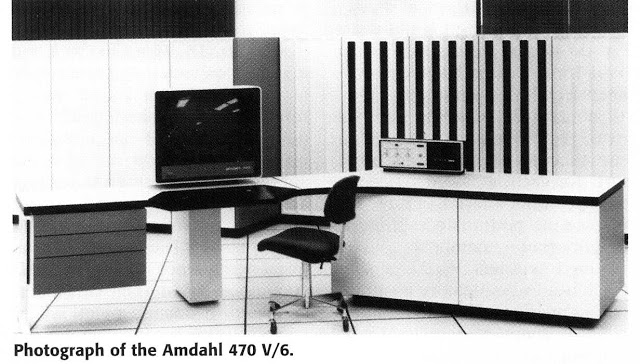
The ancestors of physical consoles which in the past were just a Terminal (Monitoring / Monitor device attached to a MainFrame system computer).
Mainframe-physical-terminal-monitor-Old-Computer

What is Physical Console
A classical TTY (TeleTYpewriter) device looked like so and served the purpose of being just a communication and display deivce, whether in reality the actual computing and storage tape devices were in a separate room and communicating to Terminal.

mainframe-super-computer-computing-tape-machine
TTYs are still present in  modern UNIX like GNU / Linux distrubions OSes and the BSD berkley 4.4 code based FreeBSD / NetBSD / OpenBSD if you have installed the OS on a physical computer in FreeBSD and Solaris / SunOS there is also tty command. TTY utility in *nix writes the name of the terminal attached to standard input to standard output, in Linux there is a GNU remake of same program part called GNU tty of coreutils package (try man tty) for more.

The physical console is recognizable in Linux as it is indicated with other tree letters pts – (pseudo terminal device) standing for a terminal device which is emulated by an other program (example: xterm, screen, or ssh are such programs). A pts is the slave part of a pts is pseudo there is no separate binary program for it but it is dynamically allocated in memory.
PTS is also called Line consle in Cisco Switches / Router devices, VTY is the physical Serial Console connected on your Cisco device and the network connection emulation to network device is creates with a virtual console session VTL (Virtual Terminal Line). In freebsd the actual /dev/pts* /dev/tty* temporary devices on the OS are slightly different and have naming such as /dev/ttys001.
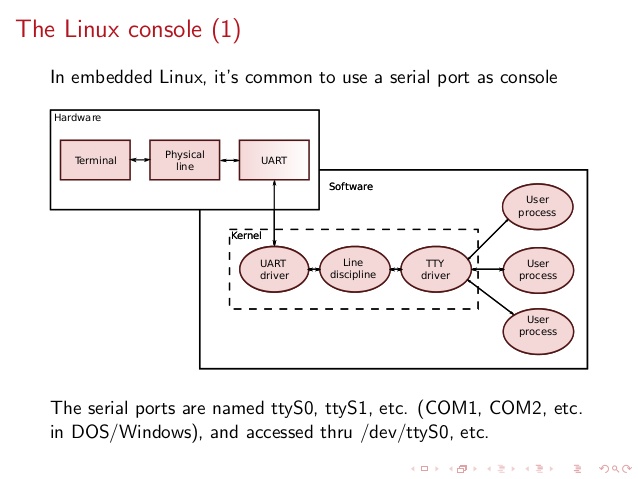
But the existence of tty and pts emulator is not enough for communicating interrupts to Kernel and UserLand binaries of the Linux / BSD OS, thus to send the commands on top of it is running a System Shell as CSH / TSH / TCSH or BASH which is usually the first program set to run after user logs in over ptty or pseudo tty virtual terminal.
linux-tty-terminal-explained-brief-intro-to-linux-device-drivers-20-638


Setting the Bash Prompt in Terminal / Console on GNU / Linux

Bash has system environments to control multiple of variables, which are usually visible with env command, one important variable to change in the past was for example USER / USERNAME which was red by IRC Chat clients  such as BitchX / irssi and could be displayed publicly so if not changed to a separate value, one could have known your Linux login username by simple /whois query to the Nickname in question (if no inetd / xinetd service was running on the Linux box and usually inetd was not running).

Below is my custom set USER / USERNAME to separate

hipo@pcfreak:~$ env|grep USER
USERNAME=Attitude
USER=Attitude

There is plenty of variables to  tune email such as MAIL store directory, terminal used TERM, EDITOR etc. but there are some
variables that are not visible with env query as they're not globally available for all users but just for the single user, to show this ones you need to use declare command instead, to get a full list of All Single and System Wide defined variables and functions type declare in the bash shell, for readability, below is last 10 returned results:


hipo@pcfreak:~$ declare | tail -10
{
    local quoted=${1//\'/\'\\\'\'};
    printf "'%s'" "$quoted"
}
quote_readline ()
{
    local quoted;
    _quote_readline_by_ref "$1" ret;
    printf %s "$ret"
}


PS1 is present there virtually on any modern Linux distribution and is installed through user home's directory $HOME/.bashrc , ~/.profile or .bash_profile or System Wide globally for all existing users in /etc/passwd (password database file) from /etc/bash.bashrc
In Debian / Ubuntu / Mint GNU / Linux this system variable is set in user home's .bashrc but in Fedora / RHEL Linux distro,
PS1 is configured from /home/username/.bash_profile to find out where PS1 is located for ur user:

cd ~
grep -Rli PS1 .bash*

Here is one more example:

hipo@pcfreak:~$ declare|grep -i PS1|head -1
PS1='\[\e]0;\u@\h: \w\a\]${debian_chroot:+($debian_chroot)}\u@\h:\w\$ '
 

hipo@pcfreak:~$ grep PS1 /etc/bash.bashrc
[ -z “$PS1” ] && return
# but only if not SUDOing and have SUDO_PS1 set; then assume smart user.
if ! [ -n “${SUDO_USER}” -a -n “${SUDO_PS1}” ]; then
  PS1='${debian_chroot:+($debian_chroot)}\u@\h:\w\$ '


Getting current logged in user shell configured PS1 variable can be done with echo:

hipo@pcfreak:~$ echo $PS1
\[\e]0;\u@\h: \w\a\]${debian_chroot:+($debian_chroot)}\u@\h:\w\$

So lets observe a little bit the meaning of this obscure line of (code) instructions code which are understood by BASH when being red from PS1 var to do so, I'll give a list of meaning of main understood commands, each of which is defined with \.

The ${debian_chroot} shell variable is defined from /etc/bash.bashrc

Easiest way to change PS1 is to export the string you like with the arguments like so:


root@linux:/home/hipo# export PS1='My-Custom_Server-Name# '
My-Custom_Server-Name# echo $PS1
My-Custom_Server-Name#


  •     \a : an ASCII bell character (07)
  •     \d : the date in “Weekday Month Date” format (e.g., “Tue May 26”)
  •     \D{format} : the format is passed to strftime(3) and the result is inserted into the prompt string; an empty format results in a locale-specific time representation. The braces are required
  •     \e : an ASCII escape character (033)
  •     \h : the hostname up to the first ‘.’
  •     \H : the hostname
  •     \j : the number of jobs currently managed by the shell
  •     \l : the basename of the shell's terminal device name
  •     \n : newline
  •     \r : carriage return
  •     \s : the name of the shell, the basename of $0 (the portion following the final slash)
  •     \t : the current time in 24-hour HH:MM:SS format
  •     \T : the current time in 12-hour HH:MM:SS format
  •     \@ : the current time in 12-hour am/pm format
  •     \A : the current time in 24-hour HH:MM format
  •     \u : the username of the current user
  •     \v : the version of bash (e.g., 2.00)
  •     \V : the release of bash, version + patch level (e.g., 2.00.0)
  •     \w : the current working directory, with $HOME abbreviated with a tilde
  •     \W : the basename of the current working directory, with $HOME abbreviated with a tilde
  •     \! : the history number of this command
  •     \# : the command number of this command
  •     \$ : if the effective UID is 0, a #, otherwise a $
  •     \nnn : the character corresponding to the octal number nnn
  •     \\ : a backslash
  •     \[ : begin a sequence of non-printing characters, which could be used to embed a terminal control sequence into the prompt
  •     \] : end a sequence of non-printing characters

The default's PS1 set prompt on Debian Linux is:
 

echo $PS1
\[\e]0;\u@\h: \w\a\]${debian_chroot:+($debian_chroot)}\u@\h:\w\$


As you can see \u (print username) \h (print hostname)  and \W (basename of current working dir) or \w (print $HOME/current working dir)
are the most essential, the rest are bell character, escape character etc.

A very good way to make your life easier and learn the abbreviations / generate exactly the PS1 PROMPT you want to have is with Easy Bash PS1 Generator Web Utility
with which you can just click over buttons that are capable to produce all of the PS1 codes.
 

1. How to show current hour:minute:seconds / print full date in Prompt Shell (PS)


Here is an example with setting the Bash Shell prompt  to include also the current time in format hour:minute:seconds (very useful if you're executing commands on a critical servers and you run commands in some kind of virtual terminal like screen or tmux.
 

root@pcfreak:~# PS1="\n\t \u@\h:\w# "
14:03:51 root@pcfreak:/home#
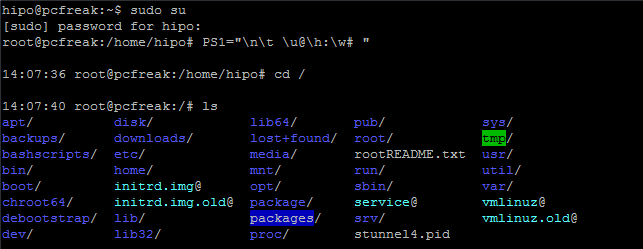

PS1-how-to-setup-date-time-hour-minutes-and-seconds-in-bash-shell-prompt


export PS1='\u@\H \D{%Y-%m-%d %H:%M;%S%z}] \W ] \$ '


export-PS1-Linux-set-full-date-time-clock-prompt-screenshot-console


Make superuser appear in RED color (adding PS1 prompt custom color for a User)
 

root@pcfreak:~$  PS1="\\[$(tput setaf 1)\\]\\u@\\h:\\w #\\[$(tput sgr0)\\]"


how-to-change-colors-in-bash-prompt-shell-on-linux-shell-environment

In above example the Shell Prompt Color changed is changed for administrator (root) to shebang symbol # in red, green, yellow and blue for the sake to show you how it is done, however this example can be adapted for any user on the system. Setting different coloring for users is very handy if you have to administer Mail Server service like Qmail or other Application that consists of multiple small ones of multiple daemons such as qmail + vpopmail + clamd + mysql etc. Under such circumstances, coloring each of the users in different color like in the example for debugging is very useful.

Coloring the PS1 system prompt on Linux to different color has been a standard practice in Linux Server environments running Redhat Enterprise Linux (RHEL) and SuSE Enterprise Linux and some Desktop distributions such as Mint Linux.

To make The Root prompt Red colored only for system super user (root) on any Linux distribution
, add the following to /etc/bashrc, e.g.

vim /etc/bashrc


# If id command returns zero, you've root access.
if [ $(id -u) -eq 0 ];
then # you are root, set red colour prompt
  PS1="\\[$(tput setaf 1)\\]\\u@\\h:\\w #\\[$(tput sgr0)\\]"
else # normal
  PS1="[\\u@\\h:\\w] $"
fi


2. How to make the prompt of a System user appear Green


Add to ~/.bashrc  following line


PS1="\\[$(tput setaf 2)\\]\\u@\\h:\\w #\\[$(tput sgr0)\\]"


3. Print New line, username@hostname, base PTY, shell level, history (number), newline and full working directory $PWD


export PS1='\n[\u@\h \l:$SHLVL:\!]\n$PWD\$ '


4. Showing the numbert of jobs the shell is currently managing.


This is useful if you run and switch with fg / bg (foreground / background) commands
to switch between jobs and forget some old job.


export PS1='\u@\H \D{%Y-%m-%d %H:%M;%S%z}] \W \$]'


Multi Lines Prompt / Make very colorful Shell prompt full of stats info

PS1="\n\[\033[35m\]\$(/bin/date)\n\[\033[32m\]\w\n\[\033[1;31m\]\u@\h: \[\033[1;34m\]\$(/usr/bin/tty | /bin/sed -e ‘s:/dev/::’): \[\033[1;36m\]\$(/bin/ls -1 | /usr/bin/wc -l | /bin/sed ‘s: ::g’) files \[\033[1;33m\]\$(/bin/ls -lah | /bin/grep -m 1 total | /bin/sed ‘s/total //’)b\[\033[0m\] -> \[\033[0m\]"


prompt-show-how-many-files-and-virtual-pts-ps1-linux
 

5. Set color change on command failure


If you have a broken command or the command ended with non zero output with some kind of bad nasty message and you want to make, that more appearing making it red heighlighted, here is how:


PROMPT_COMMAND='PS1="\[\033[0;33m\][\!]\`if [[ \$? = “0” ]]; then echo “\\[\\033[32m\\]”; else echo “\\[\\033[31m\\]”; fi\`[\u.\h: \`if [[ `pwd|wc -c|tr -d ” “` > 18 ]]; then echo “\\W”; else echo “\\w”; fi\`]\$\[\033[0m\] “; echo -ne “\033]0;`hostname -s`:`pwd`\007"'


6. Other beautiful PS1 Color Prompts with statistics


PS1="\n\[\e[32;1m\](\[\e[37;1m\]\u\[\e[32;1m\])-(\[\e[37;1m\]jobs:\j\[\e[32;1m\])-(\[\e[37;1m\]\w\[\e[32;1m\])\n(\[\[\e[37;1m\]! \!\[\e[32;1m\])-> \[\e[0m\]"


another-very-beuatiful-bash-colorful-prompt


7. Add Muliple Colors to Same Shell prompt


function prompt { local BLUE="\[\033[0;34m\]” local DARK_BLUE=”\[\033[1;34m\]” local RED=”\[\033[0;31m\]” local DARK_RED=”\[\033[1;31m\]” local NO_COLOR=”\[\033[0m\]” case $TERM in xterm*|rxvt*) TITLEBAR=’\[\033]0;\u@\h:\w\007\]’ ;; *) TITLEBAR=”” ;; esac PS1=”\u@\h [\t]> ” PS1=”${TITLEBAR}\ $BLUE\u@\h $RED[\t]>$NO_COLOR " PS2='continue-> ' PS4='$0.$LINENO+ ' }
colorful-prompt-blue-and-red-linux-console-PS1
 

8. Setting / Change Shell background Color


changing-background-color-of-bash-shell-prompt-linux


export PS1="\[$(tput bold)$(tput setb 4)$(tput setaf 7)\]\u@\h:\w $ \[$(tput sgr0)\]"


tput Color Capabilities:

  • tput setab [1-7] – Set a background color using ANSI escape
  • tput setb [1-7] – Set a background color
  • tput setaf [1-7] – Set a foreground color using ANSI escape
  • tput setf [1-7] – Set a foreground color

tput Text Mode Capabilities:

  • tput bold – Set bold mode
  • tput dim – turn on half-bright mode
  • tput smul – begin underline mode
  • tput rmul – exit underline mode
  • tput rev – Turn on reverse mode
  • tput smso – Enter standout mode (bold on rxvt)
  • tput rmso – Exit standout mode
  • tput sgr0 – Turn off all attributes

Color Code for tput:

  • 0 – Black
  • 1 – Red
  • 2 – Green
  • 3 – Yellow
  • 4 – Blue
  • 5 – Magenta
  • 6 – Cyan
  • 7 – White


9. Howto Use bash shell function inside PS1 variable

If you administrate Apache or other HTTPD servers or any other server whose processes are forked and do raise drastically at times to keep an eye while actively working on the server.


function httpdcount { ps aux | grep apache2 | grep -v grep | wc -l } export PS1="\u@\h [`httpdcount`]> "

10. PS2, PS3, PS4 little known variables
 

I'll not get much into detail to PS2, PS3, PS4 but will mention them as perhaps many people are not even aware they exist.
They're rarely used in the daily system administrator's work but useful for Shell scripting purposes of Dev Ops and Shell Scripting Guru Programmers.

  • PS2 – Continuation interactive prompt

A very long unix command can be broken down to multiple line by giving \ at the end of the line. The default interactive prompt for a multi-line command is “> “.  Let us change this default behavior to display “continue->” by using PS2 environment variable as shown below.

hipo@db-host :~$ myisamchk –silent –force –fast –update-state \
> –key_buffer_size=512M –sort_buffer_size=512M \
> –read_buffer_size=4M –write_buffer_size=4M \
> /var/lib/mysql/bugs/*.MYI
[Note: This uses the default “>” for continuation prompt]

  • PS3 – Prompt used by “select” inside shell script (usefulif you write scripts with user prompts)


  • PS4 – Used by “set -x” to prefix tracing output
    The PS4 shell variable defines the prompt that gets displayed.

You can find  example with script demonstrating PS2, PS3, PS4 use via small shell scripts in thegeekstuff's article Take control of PS1, PS2, PS3, PS4 read it here


Summary


In this article, I've shortly reviewed on what is a TTY, how it evolved into Pseudo TTY and how it relates to current shells which are the interface communicating with the modern UNIX like Operating systems's userland and kernel.
Also it was reviewed shortly how the current definitions of shell variables could be viewed with declare cmd. Also I went through on how to display the PS1 variable and  on how to modify PS1 and make the prompt different statistics and monitoring parameters straight into the command shell. I've shown some common PS1 strings that report on current date hour, minute, seconds, modify the coloring of the bash prompt shell, show processes count, and some PS1 examples were given that combines beuatiful shell coloring as well as how the Prompt background color can be changed.
Finally was shown how a combination of commands can be executed by exporting to PS1 to update process counf of Apache on every shell prompt iteration.
Other shell goodies are mostly welcome


Qmail redirect mail to another one and keep local Mailbox copy with .qmail file – Easy Set up email forwarding Qmail

Saturday, August 11th, 2018

Qmail redirect mail box to another one with .Qmail file dolphin artistic logo

QMail (Considered to be the most secure Mail server out there whose modified version is running on Google – Gmail.com and Mail Yahoo! and Yandex EMail (SMTP) servers, nowadays has been highly neglected and considered obsolete thus most people prefer to use postfix SMTP or EXIM but still if you happen to be running a number of qmail old rack Mail servers (running a bunch of Email addresses and Virtual Domains straight on the filesystem – very handy by the way for administration much better than when you have a Qmail Mail server configured to store its Mailboxes within MySQL / PostgreSQL or other Database server – because simple vpopmail configured to play nice with Qmail and store all user emails directly on Filesystem (though considered more insecure the email correspondence can be easily red, if the server is hacked it is much better managable for a small and mid-sized mailserver) or have inherited them from another sys admin and you wonder how to redirect a single Mailbox:

(under domain lets say domain's email  my-server1.com should forward to to SMTP domain my-server-whatever2.com (e.g. your-email-username@server-whatever1.com is supposed to forward to your-email-username2@server-whatever2.com).
To achieve it create new file called .qmail

Under the Qmail or VirtualDomain location for example:

/var/qmail/mailnames/myserver1.com/username/.qmail


e.g
 

root@qmail-server:~# vim /var/qmail/mailnames/myserver1.com/your-email-username/.qmail
&your-email-username@server-whatever1.com

your-email-username@example1.com
/home/vpopmail/domains/server-whatever2.com/your-email-username/Maildir/


!!! NOTE N.B. !!! the last slash / after Maildir (…Maildir/) is important to be there otherwise mail will not get delivered
That's all now send a test email, just to make sure redirection works properly, assuming the .qmail file is created by root, by default the file permissions will be with privileges root:root.

Note
 

That shouldn't be a problem at all. That's all now enjoy emails being dropped out to the second mail 🙂


Email Linux alternative text console clients to Thunderbird, fetchmail, Mutt, fetchmail + Alpine how to

Saturday, November 4th, 2017

linux-email-alternatives-for-text-console-email-fetching-gathering-alternative-to-thunderbird-and-evolution-howto

As a GNU / Linux user you might end up searching for the best email client to satisfy your needs, for those who used so far Outlook Express on M$ Windows first switch to GNU / Linux the most likely one to choose is either Mozilla Thunderbird or GNOME's Evolution default Mail Clientbut what more text / console programs are there that will allow you to easily check email via POP3 and IMAP on Linux?


1. Install Fetchmail and use to collect and copy your emails from remote server to your local machine
 

 SSL enabled POP3, APOP, IMAP mail gatherer/forwarder
 fetchmail is a free, full-featured, robust, and well-documented remote mail
 retrieval and forwarding utility intended to be used over on-demand TCP/IP
 links (such as SLIP or PPP connections).  It retrieves mail from remote mail
 servers and forwards it to your local (client) machine's delivery system, so
 it can then be read by normal mail user agents such as mutt, elm, pine,
 (x)emacs/gnus, or mailx.  The fetchmailconf package includes an interactive
 GUI configurator suitable for end-users.

To install it, issue:
 

apt-get install –yes fetchmail procmail


To configure fetchmail to gather your mail from your POP3 / IMAP mailbox, create below
.fetchmailrc configuratoin and modify according to your account


# vim .fetchmailrc


#### .fetchmailrc
 set daemon 600
 set logfile fetchmail.log

 poll the_mail_server_hostname proto POP3

  user "Remote_Username" pass "PASSWORD=" is "local_username" preconnect "date >> fetchmail.log"
 #ssl
  fetchall
  #no keep
  no rewrite
  mda "/usr/bin/procmail -f %F -d %T";


Here is also few words on each of the .fetchmailrc config options

set daemon 600 The fetchmail binary with run in the background in daemon mod and fetch mail from the server every 600 seconds or 10 minutes.

set logfile fetchmail.log This will set the directory and file name of the fetchmail user log file. Eveytime fetchmail recieves an email, checks the pop3 server or errors out you will find an entry here.

poll the_isp_mail_server proto POP3 This line tells fetchmail what mail server to contact, in theis case "the_isp_mail_server" and to use the "POP3" protocol.

user "remote_user_name" pass "PASSWORD" is "local_username" preconnect "date >> fetchmail.log The user directive tells fetchmail what the name of the user on the remote mail server is for example "remote_user_name". The pass directive is simply the password you will use for the remote user on the mail server. The "is" directive is optional. It tells fetchmail to deliver mail to a diferent user name if the user on the remote mail server and the local machine are different. For example, I may be using the name "joe.doe" on the mail server, but my local user name is "jdoe". I would use a line like user "joe.doe" pass "PASSWORD" is "jdoe". The preconnect command simply adds the current time and date to the fetchmail log file every time fetchmail checks for new mail.

ssl The "ssl" directive tells fetchmail to use encryption when connecting to the pop3 mail server. Fetchmail will use port 995 instead of port 110 for un-encypted mail communication. In order to use ssl the remote mail server must be able to use ssl. Comment out this directive if you do _not_ use pop3s.

fetchall Fetchall just means to fetch all of the mail on the mail server no matter what the "read" flag is. It is possibly to read mail through many different processes. If you use another mail client from another location, for example you could have read you mail and kept it ont he server, but marked it with the "read" flag. At this point if you did _not_ use the "fetchall" flag then only mail marked as new would be downloaded.

no keep Once the mail is downloded from the mail server fetchmail is to tell the server to remove it from the server. You may choose to comment this option out if you want to leave all mail on the server.

no rewrite Do not rewrite headers. When fetchmail recieves the mail you do not want any of the headers mangled in any way. This directive tells fetchmail to leave the headers alone.

mda "/usr/bin/procmail -f %F -d %T"; The mda is your "mail delivery agent. Procmail is the program that fetchmail will hand the mail off to once it is downloaded. The argument "-f %F" logs who the mail if from and "-d %T" turns on explicit delivery mode, delivery will be to the local user recipient.

For configuring multiple mailboxes email to be gathered to local machine through fetchmail add to above configuration, some more config similar to this:

 poll mail.example.com protocol pop3:
       username "admin" password "your-plain-text-password" is "username" here;
       username "what-ever-user-name" password "Just-another-pass#" is "foreman" here;

  poll mail.example.org protocol pop3 with option sslproto '':
       user "whatever-user1" password "its-my-pass" mda "/usr/bin/procmail -d %T":   user "whatever-user1" password "its-my-pass" mda "/usr/bin/procmail -d %T


Because as you can see fetchmail keeps password in plaintext it is a best security practice to set some good file permissions on .fetchmailrc just to make sure some other local user on the same Linux / Unix machine will not be able to read your plaintext password, to do so issue below command.
 

chmod 600 ~/.fetchmailrc


For the purpose of logging as we have it into the config you will also need to create new blank file fetchmail.log
 

touch fetchmail.log


Once fetchmail all your emails you can use mail command to view your messages or further configure alpine or mutt to read the downloaded messages.


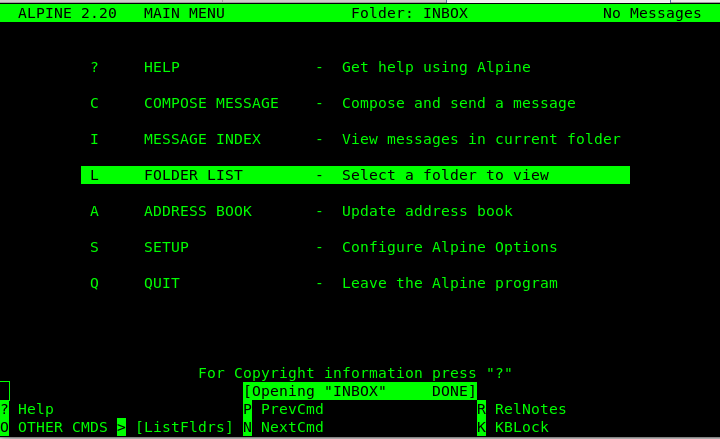
2. Use Alpine text based email client to check your downloaded email with fetchmail
 

Alpine is Text-based email client, friendly for novices but powerful
 Alpine is an upgrade of the well-known PINE email client.  Its name derives
 from the use of the Apache License and its ties to PINE.

In other words what Alpine is it is a rewritten and improved version of the good old PINE Unix email client (for those who remember it).

To give alpine a try on Debian / Ubuntu install it with:


apt-get install –yes alpine pilot


Mutt-text-console-linux-email-client


3. Use MuTT advanced and much more colorful text email client to view your emailbox

mutt-text-email-client-logo-dog

 Mutt is a sophisticated text-based Mail User Agent. Some highlights:
 .
  * MIME support (including RFC1522 encoding/decoding of 8-bit message
    headers and UTF-8 support).
  * PGP/MIME support (RFC 2015).
  * Advanced IMAP client supporting SSL encryption and SASL authentication.
  * POP3 support.
  * ESMTP support.
  * Message threading (both strict and non-strict).
  * Keybindings are configurable, default keybindings are much like ELM;
    Mush and PINE-like ones are provided as examples.
  * Handles MMDF, MH and Maildir in addition to regular mbox format.
  * Messages may be (indefinitely) postponed.
  * Colour support.
  * Highly configurable through easy but powerful rc file.


To install MuTT:


linux:~# apt-get install –yes mutt

Configuring mutt if you don't have priorly set-up with fetchmail to collect your remote e-mails, you might want to try out .mutt's email fetch features to do so you will need a .muttrc configuration like that:
 

# Automatically log in to this mailbox at startup
set spoolfile="imaps://User_Name:Your-Secret-Password@mail.example.com/"
# Define the = shortcut, and the entry point for the folder browser (c?)
set folder="imaps://mail.example.com/"
set record="=Sent"
set postponed="=Drafts"

You might also omit placing the password inside .muttrc configuration as storing the password in plaintext might be a big security hole if someone is able to read it at certain point, but the downside of that is you'll be asked by mutt to fill in your email password on every login which at a point becomes pretty annoying.
 

If you face problems with inability of mutt to connect to remote mail server due to TLS problems, you can also try to play with below configurations:
 

# activate TLS if available on the server
 set ssl_starttls=yes
 # always use SSL when connecting to a server
 set ssl_force_tls=yes
 # Don't wait to enter mailbox manually
 unset imap_passive        
 # Automatically poll subscribed mailboxes for new mail (new in 1.5.11)
 set imap_check_subscribed
 # Reduce polling frequency to a sane level
 set mail_check=60
 # And poll the current mailbox more often (not needed with IDLE in post 1.5.11)
 set timeout=10
 # keep a cache of headers for faster loading (1.5.9+?)
 set header_cache=~/.hcache
 # Display download progress every 5K
 set net_inc=5


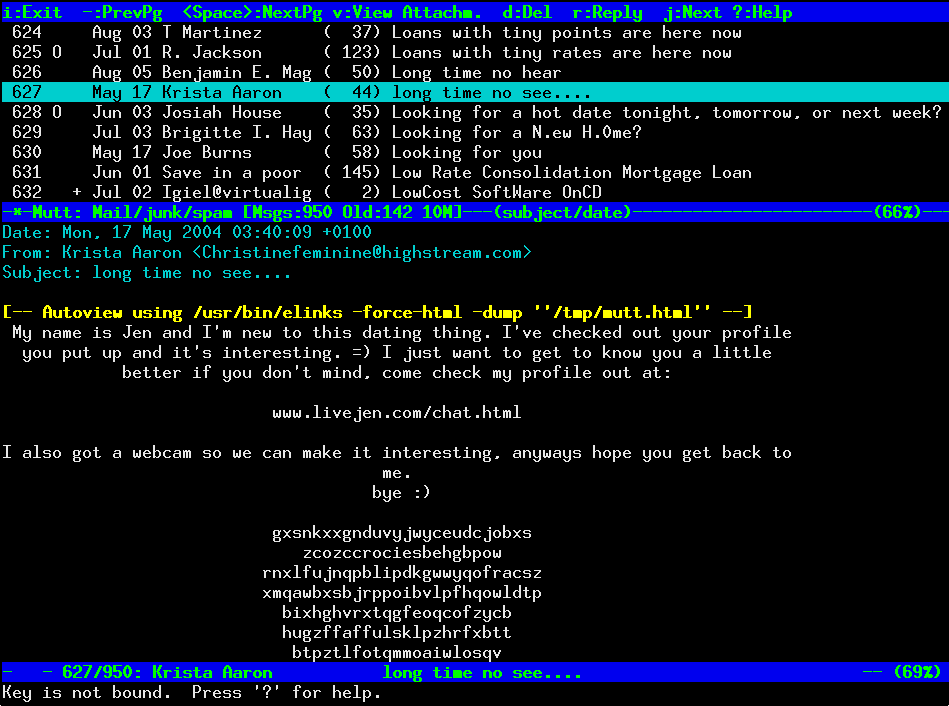
Once you have the emails downloaded with fetchmail for your mailbox mutt should be showing your email stuff like in below screenshot
 

linux:~$ mutt


Mutt-text-console-linux-email-client

Of course a very handy thing to have is w3m-img text browser that displays images as it might be able to open your pictures attached to email if you're on a physical console tty.

I'll be curious to hear, if you know of better and easier solutions to check mail in console, so if you know such please drop a comment explaining how you check your mail text.


Why don’t you use Window Maker GNU Step to improve your computer interaction performance

Monday, October 30th, 2017

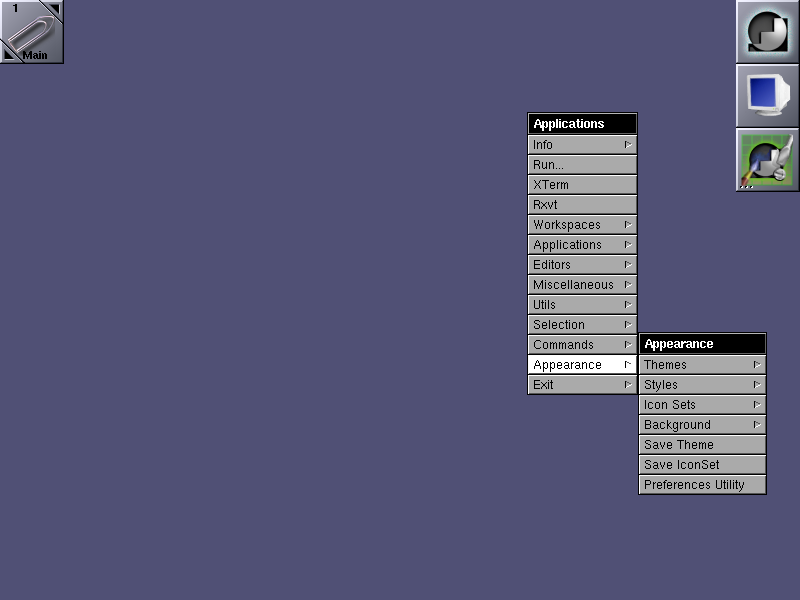
Why-dont-you-use-Window-Maker-graphical-environment-for-your-GNU_Linux-FreeBSD-desktop

If you're pissed off too already of GNOME 3 Unity / GNOME 3 Flashback and KDE Plasma  as I am you perhaps are looking for something more light weigth but you're not okay with default Debian Cinnanom GUI environment or you don't feel confortable for system administration jobs and programming with XFCE then perhaps you would like to give a try to something more old school but build with good design in Mind.

Those who are fans of the evil genius Steve Jobs (as Richard Stallman use to call him), definitely Remember NeXT company and the revolutionary Graphic Environment they tried to develop NeXT Step then you'll be happy to hear about GNUStep  which historically was called AfterStep and is a Free Software remake of NextStep graphical environment for Free and Open Source operating systems (FOSS) such as GNU / Linux and FreeBSD / OpenBSD / NetBSD etc.

Amanda_the_panda_mascot_of_window_maker-graphical-environment-system

Amanda the Panda is the mascot of Window Maker. She was designed by Agnieszka Czajkowska.

The good thing about Window Maker and the complete bunch of desktop environment GNUStep is it much lighter and less complex than the more and more becoming bloated modern Free Software graphical environments, it definitely easifies the way the user interacts with basic browsing with Firefox / Opera, terminal code writting or command system administration and basic chat functionalities such as with Gajim or Pidgin and basic email writting operatins be it with some text email client such as Mutt or with Thunderbird. Its great also to reduce the overall load the Operating System puts on your brain so you can have more time to invest in more useful stuff like programming.

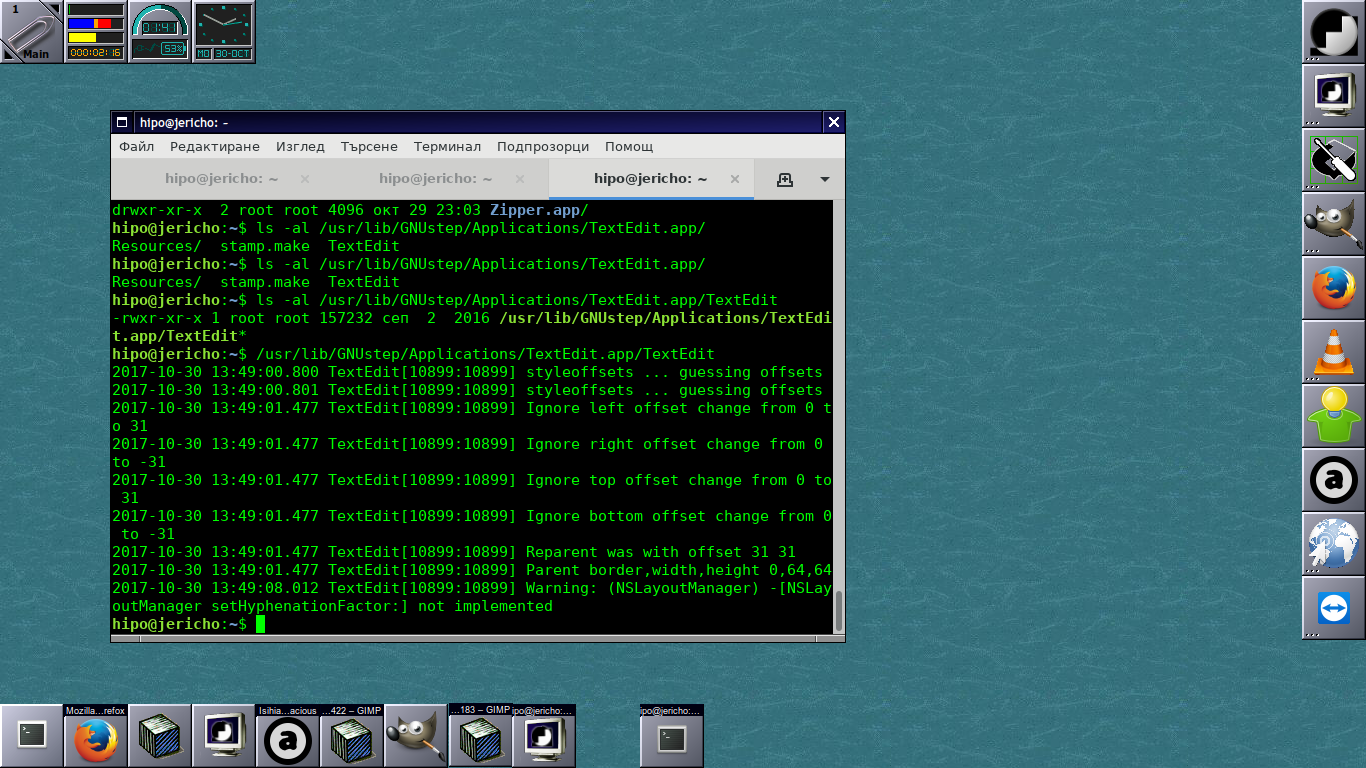
windows-maker-increase-performance-of-work-with-your-computer-howto-wmaker-screenshot

After all simplicity in Operating System is a key for an increased productivity with your computer.
Besides that stability of Window Maker is much better when compared to GNOME and GNOME 2 fork MATE graphical environment which nowadays in my opinion is becoming even more buggy than it used to be some years ago.

Below is how Window Makers site describes Window Maker:

"Window Maker is an X11 window manager originally designed to provide integration support for the GNUstep Desktop Environment. In every way possible, it reproduces the elegant look and feel of the NEXTSTEP user interface. It is fast, feature rich, easy to configure, and easy to use. It is also free software, with contributions being made by programmers from around the world.

Window Maker has a stable user interface since many years and comes with a powerful GUI configuration editor called WPrefs, which removes the need to edit text-based config files by hand. It supports running dockapps which make everyday tasks such as monitoring system performance and battery usage, mounting devices or connecting to the internet very easy. Please see the features section for more specifics on what Window Maker can do, and how it compares with other popular window managers."

Window Maker is bundled with a number of useful applications which gives ability to put Dock applets easily for easily intearcive desktop update of current Weather Report, Monitoring Network Traffic, TV Player (video4linux), laptop battery info dock, CD player and Volume control management app, text editor, pdf viewer, integrated Mail application, Calculator, RSS Reader, GNUStep games and much useful things to customize from the desktop resembling many of the basic features any other graphical environment such as GNOME / KDE Provides.

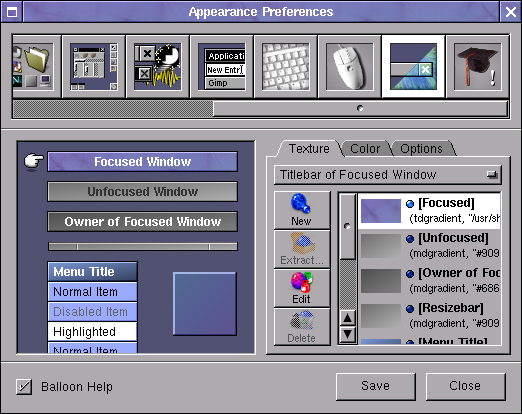
The User Interface (UI) of Window Maker is highly configurable with an integrated WMaker tool called

WPrefs

Why-dont-you-use-Wmaker-for-better-desktop-performance-Windowmaker_colour_preferences

All generated settings from WPrefs (Window Maker Prefernces) GUI tool are to be stored in a plaintext file:
 

~/GNUstep/Defaults/WMRootMenu

All Wmaker configurations are stored inside ~/GNUstep/ (Your user home GNUStep), so if you're to become its user sooner or later you will have to get acquired to it.

Wmaker is very minimalist and the performance is killing so Window Maker is perhaps the number one choice Graphical Environment to use on Old Computers with Linux and BSD.

Below is a full list of all packages installed on my Debian GNU / Linux that provides WMaker / GNUStep great functionalities:

root@jericho:/home/hipo# dpkg -l |grep -i wmaker; dpkg -l |grep -i gnustep
ii  wmaker                                        0.95.8-2                             amd64        NeXTSTEP-like window manager for X
ii  wmaker-common                                 0.95.8-2                             all          Window Maker – Architecture independent files
ii  wmbattery                                     2.50-1+b1                            amd64        display laptop battery info, dockable in WindowMaker
ii  wmcdplay                                      1.1-2+b1                             amd64        CD player based on ascd designed for WindowMaker
ii  wmifs                                         1.8-1                                amd64        WindowMaker dock app for monitoring network traffic
ii  wmnut                                         0.66-1                               amd64        WindowMaker dock app that displays UPS statistics from NUT's upsd
ii  wmpuzzle                                      0.5.2-2+b1                           amd64        WindowMaker dock app 4×4 puzzle
ii  wmrack                                        1.4-5+b1                             amd64        Combined CD Player + Mixer designed for WindowMaker
ii  wmtv                                          0.6.6-1                              amd64        Dockable video4linux TV player for WindowMaker
ii  wmweather                                     2.4.6-2+b1                           amd64        WindowMaker dockapp that shows your current weather
ii  wmweather+                                    2.15-1.1+b2                          amd64        WindowMaker dock app that shows your current weather
ii  addressmanager.app                            0.4.8-2+b2                           amd64        Personal Address Manager for GNUstep
ii  agenda.app                                    0.42.2-1+b7                          amd64        Calendar manager for GNUstep
ii  charmap.app                                   0.3~rc1-3                            amd64        Character map for GNUstep
ii  charmap.app-common                            0.3~rc1-3                            all          Character map for GNUstep (arch-independent files)
ii  cynthiune.app                                 1.0.0-1+b4                           amd64        Music player for GNUstep
ii  dictionaryreader.app                          0+20080616+dfsg-2+b6                 amd64        Dict client for GNUstep
ii  edenmath.app                                  1.1.1a-7.1+b1                        amd64        Scientific calculator for GNUstep
ii  gnumail.app                                   1.2.2-1.1                            amd64        Mail client for GNUstep
ii  gnumail.app-common                            1.2.2-1.1                            all          Mail client for GNUstep (common files)
ii  gnustep                                       7.8                                  all          User applications for the GNUstep Environment
ii  gnustep-back-common                           0.25.0-2                             amd64        GNUstep GUI Backend – common files
ii  gnustep-back0.25                              0.25.0-2                             all          GNUstep GUI Backend
ii  gnustep-back0.25-cairo                        0.25.0-2                             amd64        GNUstep GUI Backend (cairo)
ii  gnustep-base-common                           1.24.9-3.1                           all          GNUstep Base library – common files
ii  gnustep-base-doc                              1.24.9-3.1                           all          Documentation for the GNUstep Base Library
ii  gnustep-base-runtime                          1.24.9-3.1                           amd64        GNUstep Base library – daemons and tools
ii  gnustep-common                                2.7.0-1                              amd64        Common files for the core GNUstep environment
ii  gnustep-core-devel                            7.8                                  all          GNUstep Development Environment — core libraries
ii  gnustep-core-doc                              7.8                                  all          GNUstep Development Environment — core documentation
ii  gnustep-devel                                 7.8                                  all          GNUstep Development Environment — development tools
ii  gnustep-games                                 7.8                                  all          GNUstep games
ii  gnustep-gui-common                            0.25.0-4                             all          GNUstep GUI Library – common files
ii  gnustep-gui-doc                               0.25.0-4                             all          Documentation for the GNUstep GUI Library
ii  gnustep-gui-runtime                           0.25.0-4+b1                          amd64        GNUstep GUI Library – runtime files
ii  gnustep-icons                                 1.0-5                                all          Several free icons for use with GNUstep and others
ii  gnustep-make                                  2.7.0-1                              all          GNUstep build system
ii  gnustep-make-doc                              2.7.0-1                              all          Documentation for GNUstep Make
ii  gomoku.app                                    1.2.9-2+b2                           amd64        Extended TicTacToe game for GNUstep
ii  gorm.app                                      1.2.23-1                             amd64        Visual Interface Builder for GNUstep
ii  gridlock.app                                  1.10-4+b2                            amd64        Collection of grid-based board games for GNUstep
ii  grr.app                                       1.0-1+b2                             amd64        RSS reader for GNUstep
ii  gworkspace-common                             0.9.3-1                              all          GNUstep Workspace Manager – common files
ii  gworkspace.app                                0.9.3-1+b2                           amd64        GNUstep Workspace Manager
ii  helpviewer.app                                0.3-8+b3                             amd64        Online help viewer for GNUstep programs
ii  libaddresses0                                 0.4.8-2+b2                           amd64        Database API backend framework for GNUstep (library files)
ii  libaddressview0                               0.4.8-2+b2                           amd64        Address display/edit framework for GNUstep (library files)
ii  libgnustep-base-dev                           1.24.9-3.1                           amd64        GNUstep Base header files and development libraries
ii  libgnustep-base1.24                           1.24.9-3.1                           amd64        GNUstep Base library
ii  libgnustep-gui-dev                            0.25.0-4+b1                          amd64        GNUstep GUI header files and static libraries
ii  libgnustep-gui0.25                            0.25.0-4+b1                          amd64        GNUstep GUI Library
ii  libpantomime1.2                               1.2.2+dfsg1-1                        amd64        GNUstep framework for mail handling (runtime library)
ii  libpopplerkit0                                0.0.20051227svn-7.1+b9               amd64        GNUstep framework for rendering PDF content (library files)
ii  libpreferencepanes1                           1.2.0-2+b2                           amd64        GNUstep preferences library – runtime library
ii  librenaissance0                               0.9.0-4+b6                           amd64        GNUstep GUI Framework – library files
ii  librenaissance0-dev                           0.9.0-4+b6                           amd64        GNUstep GUI Framework – development files
ii  librsskit0d                                   0.4-1                                amd64        GNUstep RSS framework (runtime library)
ii  mknfonts.tool                                 0.5-11+b5                            amd64        Create nfont packages for GNUstep
ii  price.app                                     1.3.0-1                              amd64        Image filtering and manipulation using GNUstep
ii  projectcenter.app                             0.6.2-1                              amd64        IDE for GNUstep Development
ii  renaissance-doc                               0.9.0-4                              all          GNUstep GUI Framework – documentation
ii  systempreferences.app                         1.2.0-2+b2                           amd64        GNUstep preferences application
ii  terminal.app                                  0.9.8.1-1                            amd64        Terminal Emulator for GNUstep
ii  textedit.app                                  4.0+20061029-3.5+b1                  amd64        Text editor for GNUstep
ii  viewpdf.app                                   1:0.2dfsg1-5+b2                      amd64        Portable Document Format (PDF) viewer for GNUstep
ii  zipper.app                                    1.5-1+b2                             amd64        Archive manager for GNUstep

Well yes it is true Window Maker is not a spoon for every mouth, those who want to have more confortable desktop environment better look out at other options as Window Maker is Unix / Linux graphical environment that fits better hackers, computer developers and system administrators.

Anyhow if you have some old family member that has to use an old computer architecture and the person is only to use mainly just browser to check email, youtube and basic surfing then Wmaker will be a great choice as it will consume little CPU and Memory much less than the heavy and computer resources sucking GNOME and KDE.

I've historically used Wmaker also with its teminal emulator rxvt (VT102 terminal emulator for the X Windows System) which is a kinda of improved version of xterm (the default terminal program bundled with Xorg server), but for those who are already used to Gnome Terminal nice tabs perhaps that would be not the terminal of choice.

rxvt was build to match well the look and feel of AfterStep and consequently Wmaker, its scrollbar was aiming to very much resemble NeXTStep style scrollbar

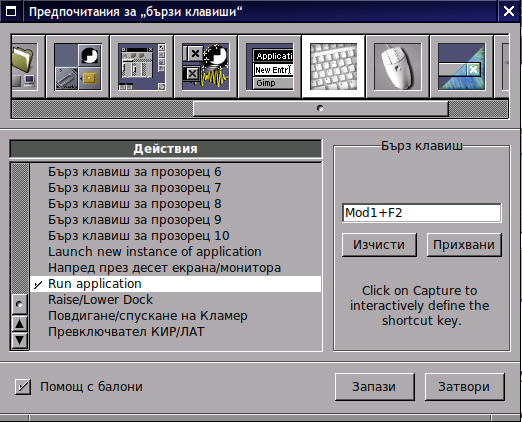
windowmaker-bind-run-application-to-make-alt-f2-work-like-in-gnome

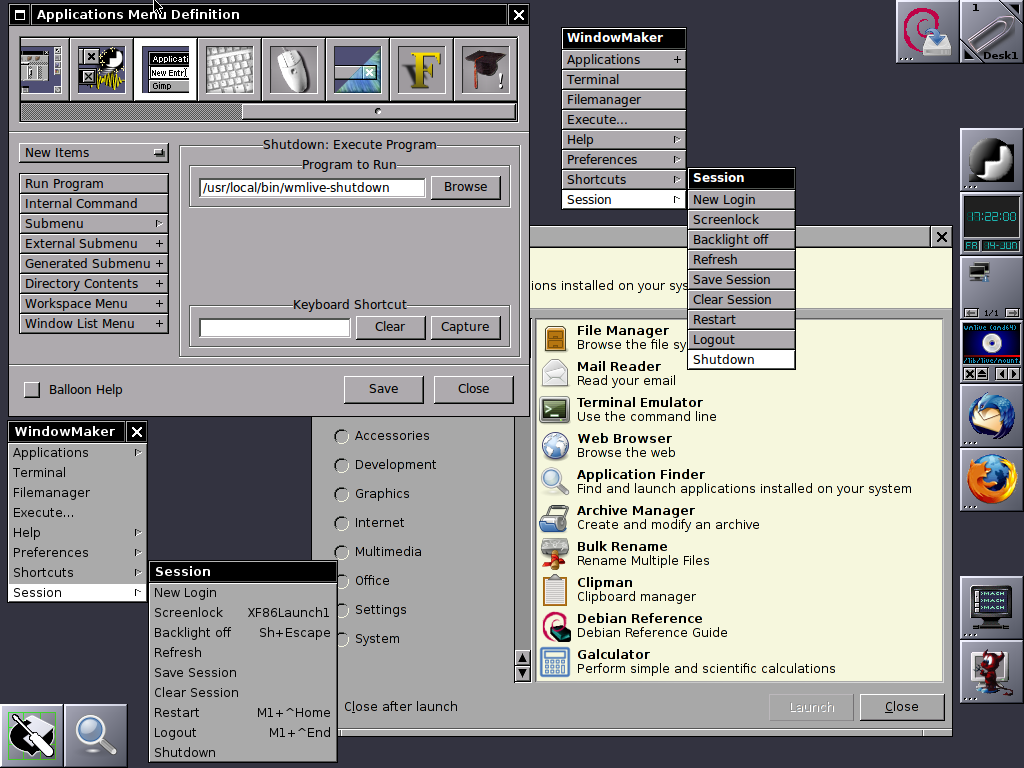
Most "custom" shortcuts are used to launch specific applications. To add your own keyboard shortcut for an application, go to the "Applications Menu Definition" panel in the Preferences app.  Select the application item in the menu for which you want to create a shortcut, then use the "capture" button to capture the keystrokes you want to assign to that item.  In the screenshot, I've assigned Mod1 + W to open Firefox.

Above  screenshot shows how to map the Run Application keyboard bind to behave like GNOME Run application ALT + F2

window-maker-run-command-like-gnome-run-screenshot-gnu-linux-unix-freebsd

Customizing background of Window Maker

Because WMaker is so simple made and targetting more of a developer audience for use it doesn't have a special graphical interaface to set a Background if you like so, but instead you need to use a wmsetbg command to do so:
 

wmsetbg -s -u filename.jpg


WMSetBG command stands for WindowMaker Set Background


If you're too lazy to install and start configuring wmaker, there is a Window Maker LiveCD, you can run Window Maker through LiveCD in Virtual Machine such as VirtualBox to get feeling what you're about to get if you install and start using Wmaker on your Computer.

window-maker-livecd-screenshot-synaptic+wprefs
 

Well at first with Window Maker you might feel confused and quickly irritating missing the already established way to work with your computer, but that's just for a starter sooner you will realize, that for using a limited number of applications for work wmaker, makes you much more efficient. Moreover using your computer with Wmaker can rewire your brain circuits to think a little bit different.

Once you switched to Window Maker you will likely want to have a graphical option to connect to Wireless Networks especially if you're using Wmaker on a notebook it is convenient to not always manually do scan for networks with
 

Iwlscan


commad and use wpasupplicant command to connect instead you can just install wicd and stop default Gnome Network Manager (called Network Manager), you can do so by running as root:
 

service network-manager stop
apt-get install wicd wicd-gtk
service wicd start
wicd-gtk &


Windows: Create quick screenshot and import it to Outlook Email – A great Outlook tip everybody should know

Saturday, October 3rd, 2015

https://www.pc-freak.net/images/make-quick-screenshot-from-your-windows-screen-with-microsoft-outlook-2010-embedded-feature

If you're into a huge company like IBM (no it doesn't stand for I Blame You butInternational Business Machines ) or Hewlett Packard – where using Microsoft Windows mailing is almost mandatory and you have to write tons of mails daily, you will certainly need to do plenty of screenshots.
Screenshotting in MS Windows is a very trivial thing, you press Prt + Scr (Print Screen Button), open Microsoft Paint and paste (CTRL+V) the file into it then Save the file as a lets say JPEG extension. However if you have to do that regularly, each time to create a screenshot you will have to loose a minute or two. Also it is quite annoying to open Paint and
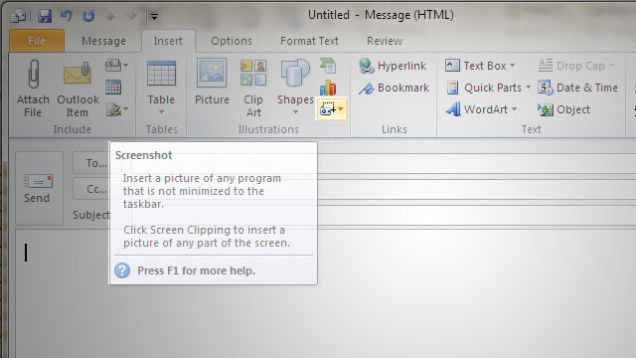
Outlook version 2010 has a very useful feature Take screenshot from any existing opened Window on Windows host.
To make screenshot directly from Outlook mail client. Click the Write new mail Button

New E-mail -> Insert (tab) -> (click Screenshot)
Depending on your ribbon menu setup, this might be a tiny icon—specifically, a little camera icon with a dotted rectangle.
You will be offered to choose along all opened Windows, for the Window from which you would like to have screenshot, choose one and enjoy
If you don't see a window you want to insert, make sure the program isn't minimized to the taskbar.
Alternatively, if you want just a portion of the screen, click on the Screen Clipping button at the bottom of the Screenshot dropdown. This will bring up a crosshair cursor for you to drag around the area of the screen you want to select.
Your selection should then be inserted into your emailscreenshot ready to share with your mates.

Fix random reboots of ZTE Blade 3 Android and other chineese smartphones – Fix battery strange discharge after reboot

Monday, August 25th, 2014

fix-solve-random-mobile-reboots-on-chineese-Android-mobile-phones-Android_greenman_logo
I'm owning ZTE Blade 3 chineese brand mobile phone. I thought there is not a big deal to buy chineese mobile phone as it saves money but the good old saying: "The Cheap always is more expensive" came true to proof the old wisdom.

The phone runs some Android port of version 4.0.4 and generally it runs well for a couple of days, but after the increase of application the battery started discharging too quickly, I have to charge almost daily … also occasionally since I have turned synchronization of mobile phone numbers with Google  from settings the ZTE Andorid phone started to randomly loose its contacts (after which I had to restore with proprietary application Dr. Fone). After a while I realized there is another fix, sometimes Contacts restore was also possible through using free application Contacts Sync Fix, but most of the times the only thing that could resolve the contacts is to dig for lost phonebook contacts with Dr. Fone …. Eventually I realized the Lost PhoneBook Contacts issue can be resolved by itself on a random principle so the missing phones issue sometimes solved by itself just by switching off complete the phone for some time and switching it on again after 12 hours?! Recently I found another alternative way to restore sudden (deleted) disappered phone numbers by:

Settings -> Profiles and Synchronization -> (Go to configured gmail account settings) -> Settings of Profile

Then

(Frequency of syncrhonization, messaging etc.) -> (click over the email address) -> Frequency of email check (every 4 hours) 

Set the every 4 hours settings to Never and then after a minute or 2 (interval), set back the Never (opt) to every 4 hours

Since some time I started facing another more severe problem – random phone reboots after which the battery often kept at a critically low charged. The batter often fall to 40% or 50% charge from 99% / 100% charge, and after some time of talking over the phone the battery fall down to as low as 18% and in a short random time it fall to 9%, then after a reboot it uppered the charge to 35% or 45% and the oddities continued. My first guess was it could be the battery being broken, some colleagues at work advised me to completely discharge the battery so the phone couldn't boot and then try to charge it with Battery Doctor free Android Application. Battery Doctor has a special 3 stage charging:

battery-doctor-android-revolutionary-battery-3-stage-charging-or-recovering-deat-dried-out-batteries-calibrating-broken-android-phone-battery-application

1. Bulk Charge

The primary purpose of a battery charger is to recharge a battery. This first stage is typically where the highest voltage and amperage the charger is rated for will actually be used. The level of charge that can be applied without overheating the battery is known as the battery's natural absorption rate. For a typical 12 volt AGM battery, the charging voltage going into a battery will reach 14.6-14.8 volts.

Where first 80% of the battery are charged with a rapid electricity influx to battery once 80% of battery charge is reached charging is moved to the so Absorption Battery Charge

2. Absorption Charge

Smart chargers will detect voltage and resistance from the battery prior to charging. After reading the battery the charger determines which stage to properly charge at. Once the battery has reached 80%* state of charge, the charger will enter the absorption stage. At this point most chargers will maintain a steady voltage, while the amperage declines. The lower current going into the battery safely brings up the charge on the battery without overheating it. This charge phase takes much longer time to charge.
Then comes the final charging state Float Charge

3. Float Charge

Some chargers enter float mode as early as 85% state of charge but others begin closer to 95%. Either way, the float stage brings the battery all the way through and maintains the 100% state of charge. The voltage will taper down and maintain at a steady 13.2-13.4 volts, which is the maximum voltage a 12 volt battery can hold. This charging is also known as "trickle charging". Float Charging battery electricity influx is so small that you can leave the phone to charge in this mode for days (if you like).

But guess what, after I tried to completely discharge the battery, it discharged to a state where it auto rebooted just before Android boots and reboots again and again, after nothing happened for about 2 hours of leaving the phone to automatically rebooted I decided to try the Battery Doctor 3 stage charging without having my battery completely dried out. The 3 Stage Charging is also known as Android Battery Calibration process and as I heard it helped fix many people's battery which for some reason got their Android battery in a broken state without physically substituting it.

Unfortunately In my case using Battery Doctor didn't help … so after spending time to read on some forum threads finally found this one. There many Bulgarians complained for buying ZTE Blade III and Huawei variations from the 3 major stream bulgarian mobile phone operatorsM-Tel, Vivacom and Globul and shortly after experiencing the strange random chineese smart phone reboots.  Some suggested that the Android Kernel is causing the issues or the firmware and suggested Phone Software Reset, however as I red most people that tried to solve it that way reported this doesn't solve it. Many People said to have shipped the phone as it was in a warranty back to services and phones were given back often with flushed firmware and in a little while the problem re-occured, some reported of another strange fix – a tiny sticky thing which kept the battery more stable?!! 🙂

zte-blade-3-and-huawei-and-other-android-chineese-phone-random-reboot-problem-fix-picture

Yes I know it looks kinda of insane … as this little holder could be any piece of paper and many reported to have fix the random battery charge drop down by sticking a tiny piece of paper between the battery and mobile shell I try it myself and GUESS WHAT?? IT WORKED !!! :)))

zteblade3_and-other-android-based-mobile-phone-brands-resolve-restart-fix-solution-screenshot

This is pretty much the Bulgarian and Russian primitive way to fix things but it works 🙂 I was exceedingly happy as I already have spend plenty of money for this mobile and I really was unwilling to buy another phone and it was out of warranty. I guess the whole issues started after I have occasionally dropped my phone on a couple of times on the ground and some little piece of plastic holding the battery eroded or whatever … Anyways the PAPER WAY WORKS! Cheers and hope this saves someone else out there from having to spend on new mobile!

Hooray !!! Thanks goes to the Lord Jesus Christ for Everything, for helping me solve it ! 🙂

Stop contact form spam emails in Joomla, Disable “E-mail a copy of this message to your own address.” in Joomla

Friday, April 11th, 2014

email-copy-of-this-message-to-your-own-address_Contact_email_form
If you happen to have installed Joomla based website and setup a contact form and everything worked fine until recently but suddenly your server starts mysteriously acting as a spam relay – even though email server is perfectly secured against spam.
You probably have some issue with a website email contact form hacked or some vulnerability which allowed hackers to upload spammer php script.

I have a website based on Joomla and just until recently everything was okay until I noticed there are tons of spam flying out from my Qmail mail server (which is configured to check spam with Spamassassin has Bayesian Filtering, Distributed Checksum Claring House, Python Razor and plenty of custom anti-spam rules.

It was just yesterday I ended into that situation, then after evaluating all the hosted website, I've realized Spam issues are caused by an Old Joomla Website Contact form!

There were two issues in the form

in the contact form you have the field with a tick:

1. Well Known Joomla Form Vulnerability
Currently all Joomla (including 1.5.22 and 1.6 versions) are vulnerable to a serious spam relay problem as described in the official Joomla site.

There is a quick dirty workaround fix to contact form vulnerability –  disable a Joomla Comonent in ../joomla/components/com_mailto/

To disable it I had to:

cd /var/www/joomla/components
mv com_mailto com_mailtoNOT_USED

Above solution was described under a post resolve joomla spam relay earlier by Anatoliy Dimitrov (after checking closely the website it happened he is a colleague at HP 🙂 )

2. Second issue causing high amount of spam sent over the email server
was: "E-mail a copy of this message to your own address." contact form tick, which was practically enabling any Spammer with a list to inect emails and spam via the form sending copies to any email out on the internet!

You would definitely want to disable  "E-mail a copy of this message to your own address."
I wonder why ever any Joomla developer came up with this "spam form"?? 

joomla-disable-email-copy-of-this-message-to-your-own-address

Here is the solution to this:

1. Login to Joomla Admin with admin account
2. Goto Components -> Contacts -> Contacts
3. Click on the relevant Contact form
4. Under Contact Parameters go to Email Parameters
5. Change field E-mail Copy from Show to Hide and click Apply button

And Hooray the E-mail a copy of this message to your own address will be gone from contact form! 🙂

I've seen already plenty of problematic hacked servers and scripts before with Joomla in my last job in International University College – where joomla was heavy used, but I never experienced Joomla Security issues myself 'till know, in future I'm planning to never ever use joomla. Though it is an easy CMS system to setup a website its quite complicated to learn the menus – I remember when creating the problematic website it took me days until I properly setup all the menus and find all joomla components … besides these there is no easy way to migrate between different versions major releases in Joomla like in Wordperss, I guess this Mail Security Issue absolutely convinced me to quit using that piece of crap in future.

In mean Time another very serious Apache security flaw leaked on the Internet just few days ago – The OpenSSL Hearbleed Bug. Thanksfully I'm not running SSL anywhere on my website but many systems are affecting making most of your SSL communication with your Internet banking, E-mail etc. in danger. If you're running Apache with SSL make sure you test it for this vulnerability. Here is description of Heartbleed SSL Critical Vulnerability.

heartbleed_ssl_remote_vulnerability_logo

"The Heartbleed Bug is a serious vulnerability in the popular OpenSSL cryptographic software library. This weakness allows stealing the information protected, under normal conditions, by the SSL/TLS encryption used to secure the Internet. SSL/TLS provides communication security and privacy over the Internet for applications such as web, email, instant messaging (IM) and some virtual private networks (VPNs).

The Heartbleed bug allows anyone on the Internet to read the memory of the systems protected by the vulnerable versions of the OpenSSL software. This compromises the secret keys used to identify the service providers and to encrypt the traffic, the names and passwords of the users and the actual content. This allows attackers to eavesdrop on communications, steal data directly from the services and users and to impersonate services and users."

11


How to change Outlook Signature – modify and delete Microsoft Outlook email signatures

Monday, February 17th, 2014

I'm using Mozilla Thunderbird over the last 5 years in my life. Just now in my new job place in Hewlett Packard, in order to have well functional mail (with exchange server) – I started using Microsoft Outlook.
Logically a little while after I started my work I have to update my Outlook E-mail signature to reflect my contact details (job position title, email, stand-alone / mobile phone, office address etc.). As of moment of writting I'm using Microsoft Outlook 14.0.6123.5001 (32 bit) part of Microsoft Office Professional Plus 2010.

Its a kind of irony that I had to use Microsoft products after all these years trying my best to avoid using Microsoft technologies but heh, this is life … Though this article will be a bit trivial I decided to blog it because already I had to change email signature for a 3rd time over the last 3 months and every now and then after a month time I tend to forget how I did it last time.

Here is how I changed Email Signature in Outlook:

1. Click on "New-Email" (located below File menu)

2. Click on "Insert" (menu tab)

3. Click on "Signature"

microsoft-outlook-pop3-mail-client-change-signature-screenshot

4. Click on "New" button

As you see Outlook is written in very intelligent manner 🙂
It is possible to have more than one signature and change them every now and then (I guess that's made for Schizophrenic people who like changing their signature a couple of times a day accepting different personalities 🙂 🙂 🙂
For already existing signatures just edit the old one – click on Edit Signature

microsoft-outlook-exchange-how-to-change-email-signature
http://www.clarion.edu/273437/
 

  • Rename Signatures:

        Perform steps 1-4 in ('Create Signatures') except click "Rename button instead of 'New' and begin typing new name.

  • Delete Signatures:

        Perform steps 1-4 in ('Create Signatures') except click 'Delete" button instead of 'New'.

  • Modify Signatures:

        Highlight signature name you wish to modify under

  1. "Select Signature to Edit" then modify signature.

  2. Click "Save" button to save any signature changes made.