Posts Tagged ‘migrate’

How to split large files in Windows via split command line and File Archive GUI tool easily

Tuesday, October 22nd, 2024

Moving around a very large files especially Virtualbox Virtual Machines or other VM formats between Windows host and OneDrive might be a problem due to either Azure Cloud configured limitations, or other reasons that your company Domain Administrator has configured, thus if you have to migrate your old Hardware Laptop PC Windows 10 to a newer faster better Harware / Better Performance Notebook Computer with Windows 11 and you still want to keep and move your old large files in this short and trivial article, will explain how.

The topic is easily and most of novice sysadmins should have already be faced to bump into something like this but anyways i found useful to mention about Git for Windows, as it is really useful too thus wrote this small article.

The moved huge files, in my case an experimental Virtual Machines Images which I needed to somehow migrate on the new Freshly installed Windows laptop, the Large files were 40 / 80 etc. Gigabytes or whatever large amount of files from your PC to the Cloud Onedrive and of course the most straight forward thing i tried was to simply add the file for inclusion into the Onedrive storage (via OneDrive tool setup interface), however this file, failed due to OneDrive Cloud file format security limitations or Antivirus solutions configured to filter out the large file copying or even a prohibition to be able to include any kind of Virtual Machines ISOs straight into the cloud.

With this big files comes the question:

How to copy the Virtual Machines from your Old Hardware Laptop to the Cloud (without being able to use an external SSD Hard Drive or a USB SSD Flash drive, due to Domain policy configured for your windows to be unable to copy to externally connected Drive but only to read from such.) ?
 

Here are few sample approaches to do it both from command line (useful if you have to repeat the process or script it and deploy to multiple hosts) or for single hosts via an Archiver tool:


1. Using split command Git for Windows (Bash) MINGW64 shell 

Download Git for Windows – https://git-scm.com/download install it and you will get the MINGW64 bash for Windows executable.

Run it either invoke bash command from command line or trigger Windows Run command prompt (Windows button + R) and type full path to executable
 

C:\Program Files\Git\git-bash.exe


Git-for-Windows-bash-for-windows-MINGW64-windows-11-screenshot

Use the integrated program split and to cut it into pieces use:


# split MyVeryLargeFileVM.vdi -b 800m


To split the .VDI virtualbox file to lets say 5 Gigabite pieces:

# split MyVeryLargeFile.vdi -b 5g

The output files will be named pieces will be named as in a normal UNIX / GNU split command in the format and each piece of 5GB will be named like:

xaa
xab
xac
xad

If you want to get a more meaningful name for the spilitted files you can set a generated split file prefix with suffixes to be 5 digits long:

# split MyVeryLargeFile.vdi MyVeryLargeFileVM-parts_ -b 5g -d -a 5

  • the -d flag for using numerical suffixes (instead of default aa, ab, ac, etc…),
  • and the option -a 5 to tell it I want the suffixes to be 5 digits long:

2. Split large files by Archiving them with Winrar (ShareWare) tool

If you have already Winrar installed and you don't want to bother with too much typing from the command line, You can use good old WinRAR as a file splitter/joiner as well.

To split a file into smaller files, select "Store" as the compression method and enter the desired value (bytes) into "Split to volumes" box.
This way you can have split files named as filename.part1.rar, filename.part2.rar, etc.

WinRAR_cut-split-large-files-into-pieces-screenshot-Windows

3. Split files with 7-Zip (FreeWare)

Assuming you have the 7-Zip installed on the PC, you can do the archiving of the Big file to a smaller pieces one, you can create the splitted file from 7Zip interfaces menus:

7zip-file-split-files-into-multiple-pieces-windows-screenshot

Or directly cut the single file into multiple volumes, directly from Windows Explorer by Selecting the file and using fall down menus :
7zip-creation-of-multiple-parts-file-from-single-one-screenshot-Windows

7-zip-split-huge-files-to-lower-parts-set-volume-size

Sum it up what learned ? 

What we learned is how to cut large files into multiple single consequential ones for easy copy between Network sides, via both Git 4 Windows and manual copy paste of parted multiple files to OneDrive / DropBox / pCloud or Google Drive.
There is a plenty of other approaches to take as there is also file GUI tools, besides using GNU Win / Gnu Tools for Windows or Cygwin / Gsplit GUI tool  or some kind of the many Archiver toolsavailable for Windows, another option to split the large files is to use a bunch of PowerShell and Batch scripts written that can help you do the file split for both binaries files or Text files. but i'll stop here as I believe that is pretty much enough for most basic needs.


How to create PCS / Corosync High Availability Cluster config backup and migrate to new Virtual Machines

Thursday, October 26th, 2023

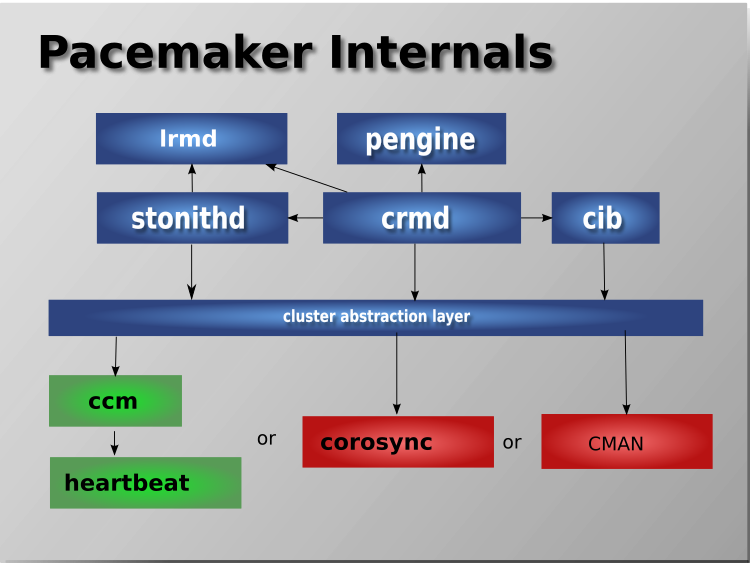
pcs-pcmk-internals-explained-picture

The aim of this article is to illustrate how to literally migrate a an Haproxy PCS Pacemaker / Corosync Cluster configurations from old Virtual Machines that due to time passed become unsupported (The Operating System end of life (EOF)) has reached to a new ones. 
This is quite a complex task especially as you usually need to setup the Hypervisor hosts with VMWare / Xen / KVM / OpenVZ or whatever kind of virtualization is to be used. Then setup the correct network interfaces IPs failover the heartbeat lines over which the cluster will work to prevent Split Brain scenartions, the Network Bonding interfaces to guarantee a higher amount of higher availability as well as physically install and update all the cluster software on the new built Linux hosts that will be members of the new cluster in setup. 

All this configuration from scratch of a PCS Corosync cluster is a very lenght topic which I'll try to cover in some of my next articles. In short to migrate the cluster from old machines to new once all this predescribed steps are in line. 
You will need to.


1. Create backup of old cluster configuration
2. Migrate the backup to a new built VM Machine hosts
3. Import the cluster configuration into the PCS Cluster.


Bear in mind that this article discusses a migration of CentOS Linux release 7.9.2009 with its shipped versions of corosync / pacemaker and pcs 

How to create cluster config backup and migrate to new VM

1. Dump cluster assuming that is a Quality Assuare or Pre – Production host  to create full cluster config backup

[root@old-cluster-machine ~]# pcs config backup old-cluster-machine.pcs.config.bak

2. Dump cluster Production full configuration

[root@old-cluster-machine1 ~]# pcs config backup old-cluster-machine1.pcs.config.bak

This command will output a backup of 

old-cluster-machine1.pcs.config.bak.tar.bz2

3. Migrate a cluster identical config to the new Virtual machines

Usually this moval of produced backup files with pcs config backup  commands can be copied with something like FTP / SFTP  or SSL-ed / TLS-ed protocol. However if you have to move the configuration files from a paranoid Citrix environment that doesn't allow you to have any SFTP / SSH or FTP kind of transfer protocol from the location where the old config lays to the new ones. 
A simple encoding of the binary format dumped configuration to plain text files can be done and files, can be moved via a simple copy / paste operation (a bit of a hack) 🙂

Encode the cluster config to be able to migrate configuration in plain text via a simple Copy / Paste operation.


[root@old-cluster-machine ~]# base64 config backup old-cluster-machine.pcs.config.bak > old-cluster-machine.pcs.config.bak.tgz.b64

[root@old-cluster-machine1 ~]# base64 old-cluster-machine1.pcs.config.bak.tar.bz2 > old-cluster-machine1.pcs.config.bak.tgz.b64
[root@old-cluster-machine ~]# cat  old-cluster-machine.pcs.config.bak.tgz.b64

(Copy output and Paste to new host VM) /root/haproxy-cluster-backup)

[root@old-cluster-machine1 ~]# cat old-cluster-machine1.pcs.config.bak.tgz.b64 


(Copy output and Paste to new host VM) /root/haproxy-cluster-backup)

Login to the new hosts, where configs has to be migrated and restore the files with base64

For QA / Preprod to restore backup config

[root@dkv-newqa-vm ~]# mkdir /root/haproxy-cluster-backup
[root@dkv-newqa-vm ~]# cd /root/haproxy-cluster-backup
[root@dkv-newqa-vm ~]# base64 -d old-cluster-machine.config.bak.tgz.b64 > old-cluster-machine.pcs.config.bak.tar.bz2
[root@dkv-newqa-vm ~]#  tar -jxvf old-cluster-machine.pcs.config.bak.tar.bz2
ak.tar.bz2
version.txt
pcs_settings.conf
corosync.conf
cib.xml
pacemaker_authkey
uidgid.d/


For Prod to restore backup config

[root@dkv-newprod-vm  ~]# mkdir /root/haproxy-cluster-backup
[root@dkv-newprod-vm ~]# cd /root/haproxy-cluster-backup
[root@dkv-newprod-vm ~]# base64 -d old-cluster-machine.config.bak.tgz.b64 > old-cluster-machine1.pcs.config.bak.tar.bz2
ak.tar.bz2
version.txt
pcs_settings.conf
corosync.conf
cib.xml
pacemaker_authkey
uidgid.d/


N!B! An Useful hin is on RHEL 8 Linux's shipped pcs command version has also a very useful command with which you can simply dump completly the config of the cluster in straight commands which you can run directly on the new VM machines where you have migrated.

The command to print out commands that would add existing cluster resources on Redhat 8:

# pcs resource config –output-format=cmd

Another useful command for cluster migration is cibadmin

i.e. to dump cluster xml config

#cibadmin –q > cluster.xml

Later you can import the prior xml dump with it.

# cibadmin –replace –xml-file cib.xml


Debian Linux: dump and migrate identical packages with (dpkg) from server 1 to server 2 /A common sysadmin dpkg package dump mistake

Wednesday, October 17th, 2012

Debian dump and migrate dpkg common mistake, copy migrating deb identical packages between Linux hosts

Over the last years it happened multiple times to me to migrate identical Debian installation (with identical services) hosts, running identical Debian version and identical installed packages and configs in order to move Old (hardware) servers to newer (harware) hosts. I will call for simplicity first system from which migrating “copy from host” and second “copy to host”. Moving exact number of installed packages between “copy host” and “copy to host” systems can probably be done in many ways but I personally prefer using a single method – using dpkg to dump all deb packages list on the system in a file; move this file to “copy to host” and there use a tiny for loop bash (cycle) + dpkg to install all listed packages. Last time I’ve done this is just 2 days ago while I was “Resurrecting” Pc-Freak machine using my l337 h4x0r zk!1lZ and same good old well tested logic 🙂

I used following to dump all packages;


# dpkg -l | awk '{ print $2 }' >> /root/packages_list.txt

This though dumps all deb packages, along with all current installed ones dumps also, package names of debs, which used to some point in time be existent on the system – removed and the belonging package configs were kept on the system (in other words a tiny part of the package left installed on the system, just in case if one needs to install and use package some time in lets say short future).

This keeping of package name configs and skele files in Debian is called in “dpkg language”
(rc – Remove Candidate). While doing operations dpkg package manager marks different packages with different flags, so rc flags are set once the package is apt-get remove-d or dpkg -r packagename is done over a pack.

For unfamiliar with Debian’s dpkg, package system flags, check out man dpkg. Just to give example of rc, here are few packages marked as RC (Remove Candidates):


# dpkg -l |grep -i ^rc|head -n 3
rc acidrip 0.14-0.3 ripping and encoding DVD tool using mplayer and mencoder
rc airsnort 0.2.7e-2 WLAN sniffer
rc airstrike 0.99+1.0pre6a-4 2d dogfight game in the tradition of 'Biplanes' and 'BIP'

The reason, why this package are still “remembered” by dpkg is they were not purged after install- i.e. (dpkg –purge whatever-packagename) was not issued over ’em.

With this said in mind, it is common mistake I make while making a dump of all packages to also dump inside list names of packages mared as RC, e.g.:


# dpkg -l | awk '{ print $2 }' >> /root/packages_list.txt

Later I install often install every packages inside /root/packages_list.txt as for exmp., pointed out in my previous article Debian Linux Squeeze 32 bit i386 to amd64 hell just to later find out I have numerous (daemons), on the old “copy from host” but are installed and ran by dpkg (config scripts) on the 2nd “copy to host ….

Thus to prevent this I recommend people, always think well before doing something (something I often miss).

Thus it is much better to dump only packages obtaining, the ii (dpkg flags).
Here is example of few packages which have ii dpkg package flags:


# dpkg -l | grep -i '^ii' | tail -n 3
ii zip 3.0-3 Archiver for .zip files
ii zlib1g 1:1.2.3.4.dfsg-3 compression library - runtime
ii zlib1g-dev 1:1.2.3.4.dfsg-3 compression library - development

Probably other people just like me, did same mistake as me to dump all ever available package names on the system and later ended up in same situation, where have to remove packages and stop services from running on system boot …

Thus the “correct” way to dump only installed and configured ones debs having the II system flags is by:


# dpkg -l | grep -i '^ii' | awk '{ print $2 }' >> /root/only_installed_deb_packages_list.txt

Then the rest of package copy from “copy from host” machine 1 to “copy to host” 2-nd machine is to be done by uploading /root/only_installed_deb_packages_list.txt to 2nd host with ftp, sftp, scp whatever transfer proto and running on copy to host:


for i in $(cat /root/only_installed_deb_packages_list.txt); do
apt-get install --reinstall $i; done
.

Generally this will make programs on copy host, be on copy to host.
Enjoy 🙂