Posts Tagged ‘packages’

Megaraid SAS software installation on CentOS Linux

Saturday, October 20th, 2012

With a standard el5 on a new Dell server, it may be necessary to install the Dell Raid driver, otherwise the OMSA always reports an error and hardware monitoring is therefore obsolete:

Previously, the megaraid_sys package was now called mptlinux

For this we need the following packages in advance:

# yum install gcc kernel-devel
Now the driver stuff:

# yum install dkms mptlinux
That should have built the new module, better test it:

# modinfo mptsas

# dkms status
After a kernel update it may be necessary to build the driver for the new version:

# dkms build -m mptlinux -v 4.00.38.02

# dkms install -m mptlinux -v 4.00.38.02

Linux: Howto Fix “N: Repository ‘http://deb.debian.org/debian buster InRelease’ changed its ‘Version’ value from ‘10.9’ to ‘10.10’” error to resolve apt-get release update issue

Friday, August 13th, 2021

Linux's surprises and disorganization is continuously growing day by day and I start to realize it is becoming mostly impossible to support easily this piece of hackware bundled together.
Usually so far during the last 5 – 7 years, I rarely had any general issues with using:

 apt-get update && apt-get upgrade && apt-get dist-upgrade 

to raise a server's working stable Debian Linux version packages e.g. version X.Y to verzion X.Z (for example up the release from Debian Jessie from 8.1 to 8.2). 

Today I just tried to follow this well known and established procedure that, of course nowdays is better to be done with the newer "apt" command instead with the legacy "apt-get"
And the set of 


# apt-get update && apt-get upgrade && apt-get dist-upgrade


has triggered below shitty error:
 

root@zabbix:~# apt-get update && apt-get upgrade
Get:1 http://security.debian.org buster/updates InRelease [65.4 kB]
Get:2 http://deb.debian.org/debian buster InRelease [122 kB]
Get:3 http://security.debian.org buster/updates/non-free Sources [688 B]
Get:4 http://repo.zabbix.com/zabbix/5.0/debian buster InRelease [7096 B]
Get:5 http://security.debian.org buster/updates/main Sources [198 kB]
Get:6 http://security.debian.org buster/updates/main amd64 Packages [300 kB]
Get:7 http://security.debian.org buster/updates/main Translation-en [157 kB]
Get:8 http://security.debian.org buster/updates/non-free amd64 Packages [556 B]
Get:9 http://deb.debian.org/debian buster/main Sources [7836 kB]
Get:10 http://repo.zabbix.com/zabbix/5.0/debian buster/main Sources [1192 B]
Get:11 http://repo.zabbix.com/zabbix/5.0/debian buster/main amd64 Packages [4785 B]
Get:12 http://deb.debian.org/debian buster/non-free Sources [85.7 kB]
Get:13 http://deb.debian.org/debian buster/contrib Sources [42.5 kB]
Get:14 http://deb.debian.org/debian buster/main amd64 Packages [7907 kB]
Get:15 http://deb.debian.org/debian buster/main Translation-en [5968 kB]
Get:16 http://deb.debian.org/debian buster/main amd64 Contents (deb) [37.3 MB]
Get:17 http://deb.debian.org/debian buster/contrib amd64 Packages [50.1 kB]
Get:18 http://deb.debian.org/debian buster/non-free amd64 Packages [87.7 kB]
Get:19 http://deb.debian.org/debian buster/non-free Translation-en [88.9 kB]
Get:20 http://deb.debian.org/debian buster/non-free amd64 Contents (deb) [861 kB]
Fetched 61.1 MB in 22s (2774 kB/s)
Reading package lists… Done
N: Repository 'http://deb.debian.org/debian buster InRelease' changed its 'Version' value from '10.9' to '10.10'


As I used to realize nowdays, as Linux started originally as 'Hackers' operating system, its legacy is just one big hack and everything from simple maintenance up to the higher and more sophisticated things requires a workaround 'hack''.


This time the hack to resolve error:
 

N: Repository 'http://deb.debian.org/debian buster InRelease' changed its 'Version' value from '10.9' to '10.10'


is up to running cmd:
 

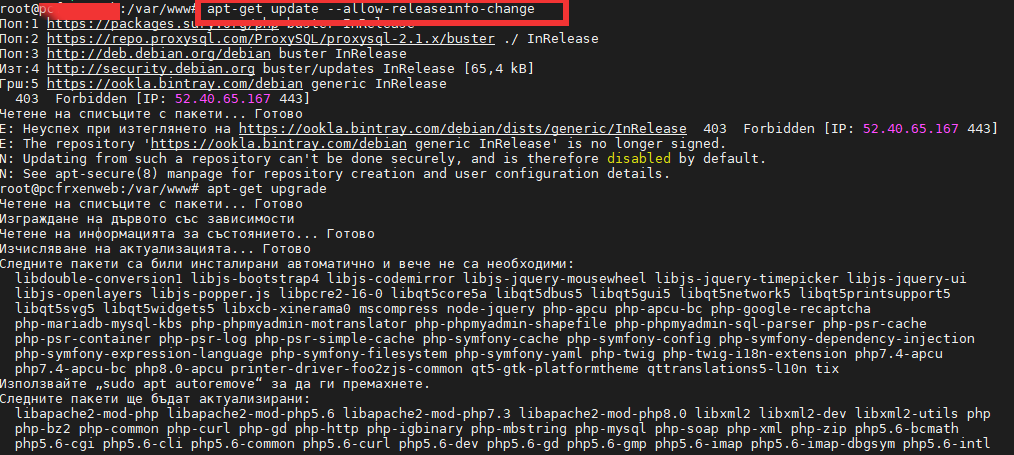
debian-server:~# apt-get update –allow-releaseinfo-change
Поп:1 http://ftp.de.debian.org/debian buster-backports InRelease
Поп:2 http://ftp.debian.org/debian stable InRelease
Поп:3 http://security.debian.org stable/updates InRelease
Изт:5 https://packages.sury.org/php buster InRelease [6837 B]
Изт:6 https://download.docker.com/linux/debian stretch InRelease [44,8 kB]
Изт:7 https://packages.sury.org/php buster/main amd64 Packages [317 kB]
Игн:4 https://attic.owncloud.org/download/repositories/production/Debian_10  InRelease
Изт:8 https://download.owncloud.org/download/repositories/production/Debian_10  Release [964 B]
Изт:9 https://packages.sury.org/php buster/main i386 Packages [314 kB]
Изт:10 https://download.owncloud.org/download/repositories/production/Debian_10  Release.gpg [481 B]
Грш:10 https://download.owncloud.org/download/repositories/production/Debian_10  Release.gpg
  Следните подписи са невалидни: DDA2C105C4B73A6649AD2BBD47AE7F72479BC94B
Грш:11 https://ookla.bintray.com/debian generic InRelease
  403  Forbidden [IP: 52.39.193.126 443]
Четене на списъците с пакети… Готово
N: Repository 'https://packages.sury.org/php buster InRelease' changed its 'Suite' value from '' to 'buster'
W: An error occurred during the signature verification. The repository is not updated and the previous index files will be used. GPG error: https://download.owncloud.org/download/repositories/production/Debian_10  Release: 

apt-get-update-allow-releaseinfo-change-debian-linux-screenshot

Onwards to upgrade the system up to the latest .deb packages, as usual run:

# apt-get -y update && apt-get upgrade -y


and updates should be applied as usual with some prompts on whether you prefer to keep or replace existing service configuration and some information on some general changes that might affect your installed services. In a few minutes and few prompts hopefully your Debian OS should be up to the latest stable.

Listing installed RPMs by vendor installed on CentOS / RedHat Linux

Friday, January 8th, 2021

Listing installed RPMs by vendor installed on CentOS / RedHat Linux

Listing installed RPMs by vendor is useful sysadmin stuff if you have third party software installed that is not part of official CentOS / RedHat Linux and you want to only list this packages, here is how this is done


[root@redhat ~]# rpm -qa –qf '%{NAME} %{VENDOR} %{PACKAGER} \n' | grep -v 'CentOS' | sort

criu Virtuozzo Virtuozzo (http://www.virtuozzo.com/support/)
gskcrypt64 IBM IBM
gskssl64 IBM IBM
ipxe-roms-qemu Virtuozzo Virtuozzo (http://www.virtuozzo.com/support/)
libevent (none) (none)
libguestfs-appliance Virtuozzo Virtuozzo (http://www.virtuozzo.com/support/)
libguestfs-tools-c Virtuozzo Virtuozzo (http://www.virtuozzo.com/support/)
libguestfs Virtuozzo Virtuozzo (http://www.virtuozzo.com/support/)
libprlcommon Virtuozzo Virtuozzo (http://www.virtuozzo.com/support/)
libprlsdk-python Virtuozzo Virtuozzo (http://www.virtuozzo.com/support/)
libprlsdk Virtuozzo Virtuozzo (http://www.virtuozzo.com/support/)
libprlxmlmodel Virtuozzo Virtuozzo (http://www.virtuozzo.com/support/)
libtcmu Virtuozzo Virtuozzo (http://www.virtuozzo.com/support/)
libvcmmd Virtuozzo Virtuozzo (http://www.virtuozzo.com/support/)
libvirt-client Virtuozzo Virtuozzo (http://www.virtuozzo.com/support/)
libvirt-daemon-config-nwfilter Virtuozzo Virtuozzo (http://www.virtuozzo.com/support/)
libvirt-daemon-driver-interface Virtuozzo Virtuozzo (http://www.virtuozzo.com/support/)
libvirt-daemon-driver-network Virtuozzo Virtuozzo (http://www.virtuozzo.com/support/)
libvirt-daemon-driver-nodedev Virtuozzo Virtuozzo (http://www.virtuozzo.com/support/)
libvirt-daemon-driver-nwfilter Virtuozzo Virtuozzo (http://www.virtuozzo.com/support/)
libvirt-daemon-driver-qemu Virtuozzo Virtuozzo (http://www.virtuozzo.com/support/)
libvirt-daemon-driver-storage-core Virtuozzo Virtuozzo (http://www.virtuozzo.com/support/)
libvirt-daemon-driver-storage Virtuozzo Virtuozzo (http://www.virtuozzo.com/support/)
libvirt-daemon-kvm Virtuozzo Virtuozzo (http://www.virtuozzo.com/support/)
libvirt-daemon Virtuozzo Virtuozzo (http://www.virtuozzo.com/support/)
libvirt-libs Virtuozzo Virtuozzo (http://www.virtuozzo.com/support/)
libvirt-python Virtuozzo Virtuozzo (http://www.virtuozzo.com/support/)
libvirt Virtuozzo Virtuozzo (http://www.virtuozzo.com/support/)
libvzctl Virtuozzo Virtuozzo (http://www.virtuozzo.com/support/)
libvzevent Virtuozzo Virtuozzo (http://www.virtuozzo.com/support/)
openvz-logos Virtuozzo Virtuozzo (http://www.virtuozzo.com/support/)
p7zip-plugins Fedora Project Fedora Project
ploop-lib Virtuozzo Virtuozzo (http://www.virtuozzo.com/support/)
ploop Virtuozzo Virtuozzo (http://www.virtuozzo.com/support/)
prlctl Virtuozzo Virtuozzo (http://www.virtuozzo.com/support/)
prl-disk-tool Virtuozzo Virtuozzo (http://www.virtuozzo.com/support/)
prl-disp-service Virtuozzo Virtuozzo (http://www.virtuozzo.com/support/)
python2-lockfile Fedora Project Fedora Project
python2-psutil Fedora Project Fedora Project
python-daemon Fedora Project Fedora Project
python-subprocess32 Virtuozzo Virtuozzo (http://www.virtuozzo.com/support/)
qemu-img-vz Virtuozzo Virtuozzo (http://www.virtuozzo.com/support/)
qemu-kvm-common-vz Virtuozzo Virtuozzo (http://www.virtuozzo.com/support/)
qemu-kvm-vz Virtuozzo Virtuozzo (http://www.virtuozzo.com/support/)
qt Virtuozzo Virtuozzo (http://www.virtuozzo.com/support/)
rkhunter Fedora Project Fedora Project
seabios-bin Virtuozzo Virtuozzo (http://www.virtuozzo.com/support/)
seavgabios-bin Virtuozzo Virtuozzo (http://www.virtuozzo.com/support/)
spfs Virtuozzo Virtuozzo (http://www.virtuozzo.com/support/)
TIVsm-API64 IBM (none)
TIVsm-APIcit IBM (none)
TIVsm-BAcit IBM (none)
TIVsm-BA IBM (none)
vcmmd Virtuozzo Virtuozzo (http://www.virtuozzo.com/support/)
vmauth Virtuozzo Virtuozzo (http://www.virtuozzo.com/support/)
vzctl Virtuozzo Virtuozzo (http://www.virtuozzo.com/support/)
vzkernel Virtuozzo Virtuozzo (http://www.virtuozzo.com/support/)
vztt_checker Virtuozzo Virtuozzo (http://www.virtuozzo.com/support/)
vztt-lib Virtuozzo Virtuozzo (http://www.virtuozzo.com/support/)
vztt Virtuozzo Virtuozzo (http://www.virtuozzo.com/support/)
zabbix-agent (none) (none)


That instructs rpm to output each package's name and vendor, then we exclude those from "Red Hat, Inc." (which is the exact string Red Hat conveniently uses in the "vendor" field of all RPMs they pacakge).

By default, rpm -qa uses the format '%{NAME}-%{VERSION}-%{RELEASE}', and it's nice to see version and release, and on 64-bit systems, it's also nice to see the architecture since both 32- and 64-bit packages are often installed. Here's how I did that:

[root@redhat ~]# rpm -qa –qf '%{NAME}-%{VERSION}-%{RELEASE}.%{ARCH} %{VENDOR} %{PACKAGER} \n' | grep -v 'CentOS' | sort

criu-3.10.0.23-1.vz7.x86_64 Virtuozzo Virtuozzo (http://www.virtuozzo.com/support/)
gskcrypt64-8.0-55.17.x86_64 IBM IBM
gskssl64-8.0-55.17.x86_64 IBM IBM
ipxe-roms-qemu-20170123-1.git4e85b27.1.vz7.5.noarch Virtuozzo Virtuozzo (http://www.virtuozzo.com/support/)
libevent-2.0.22-1.rhel7.x86_64 (none) (none)
libguestfs-1.36.10-6.2.vz7.12.x86_64 Virtuozzo Virtuozzo (http://www.virtuozzo.com/support/)
libguestfs-appliance-1.36.10-6.2.vz7.12.x86_64 Virtuozzo Virtuozzo (http://www.virtuozzo.com/support/)
libguestfs-tools-c-1.36.10-6.2.vz7.12.x86_64 Virtuozzo Virtuozzo (http://www.virtuozzo.com/support/)
libprlcommon-7.0.162-1.vz7.x86_64 Virtuozzo Virtuozzo (http://www.virtuozzo.com/support/)
libprlsdk-7.0.226-2.vz7.x86_64 Virtuozzo Virtuozzo (http://www.virtuozzo.com/support/)
libprlsdk-python-7.0.226-2.vz7.x86_64 Virtuozzo Virtuozzo (http://www.virtuozzo.com/support/)
libprlxmlmodel-7.0.80-1.vz7.x86_64 Virtuozzo Virtuozzo (http://www.virtuozzo.com/support/)
libtcmu-1.2.0-16.2.vz7.x86_64 Virtuozzo Virtuozzo (http://www.virtuozzo.com/support/)
libvcmmd-7.0.22-3.vz7.x86_64 Virtuozzo Virtuozzo (http://www.virtuozzo.com/support/)
libvirt-3.9.0-14.vz7.38.x86_64 Virtuozzo Virtuozzo (http://www.virtuozzo.com/support/)
libvirt-client-3.9.0-14.vz7.38.x86_64 Virtuozzo Virtuozzo (http://www.virtuozzo.com/support/)
libvirt-daemon-3.9.0-14.vz7.38.x86_64 Virtuozzo Virtuozzo (http://www.virtuozzo.com/support/)
libvirt-daemon-config-nwfilter-3.9.0-14.vz7.38.x86_64 Virtuozzo Virtuozzo (http://www.virtuozzo.com/support/)
libvirt-daemon-driver-interface-3.9.0-14.vz7.38.x86_64 Virtuozzo Virtuozzo (http://www.virtuozzo.com/support/)
libvirt-daemon-driver-network-3.9.0-14.vz7.38.x86_64 Virtuozzo Virtuozzo (http://www.virtuozzo.com/support/)
libvirt-daemon-driver-nodedev-3.9.0-14.vz7.38.x86_64 Virtuozzo Virtuozzo (http://www.virtuozzo.com/support/)
libvirt-daemon-driver-nwfilter-3.9.0-14.vz7.38.x86_64 Virtuozzo Virtuozzo (http://www.virtuozzo.com/support/)
libvirt-daemon-driver-qemu-3.9.0-14.vz7.38.x86_64 Virtuozzo Virtuozzo (http://www.virtuozzo.com/support/)
libvirt-daemon-driver-storage-3.9.0-14.vz7.38.x86_64 Virtuozzo Virtuozzo (http://www.virtuozzo.com/support/)
libvirt-daemon-driver-storage-core-3.9.0-14.vz7.38.x86_64 Virtuozzo Virtuozzo (http://www.virtuozzo.com/support/)
libvirt-daemon-kvm-3.9.0-14.vz7.38.x86_64 Virtuozzo Virtuozzo (http://www.virtuozzo.com/support/)
libvirt-libs-3.9.0-14.vz7.38.x86_64 Virtuozzo Virtuozzo (http://www.virtuozzo.com/support/)
libvirt-python-3.9.0-1.vz7.1.x86_64 Virtuozzo Virtuozzo (http://www.virtuozzo.com/support/)
libvzctl-7.0.506-1.vz7.x86_64 Virtuozzo Virtuozzo (http://www.virtuozzo.com/support/)
libvzevent-7.0.7-5.vz7.x86_64 Virtuozzo Virtuozzo (http://www.virtuozzo.com/support/)
openvz-logos-70.0.13-1.vz7.noarch Virtuozzo Virtuozzo (http://www.virtuozzo.com/support/)
p7zip-plugins-16.02-10.el7.x86_64 Fedora Project Fedora Project
ploop-7.0.137-1.vz7.x86_64 Virtuozzo Virtuozzo (http://www.virtuozzo.com/support/)
ploop-lib-7.0.137-1.vz7.x86_64 Virtuozzo Virtuozzo (http://www.virtuozzo.com/support/)
prlctl-7.0.164-1.vz7.x86_64 Virtuozzo Virtuozzo (http://www.virtuozzo.com/support/)
prl-disk-tool-7.0.43-1.vz7.x86_64 Virtuozzo Virtuozzo (http://www.virtuozzo.com/support/)
prl-disp-service-7.0.925-1.vz7.x86_64 Virtuozzo Virtuozzo (http://www.virtuozzo.com/support/)
python2-lockfile-0.11.0-17.el7.noarch Fedora Project Fedora Project
python2-psutil-5.6.7-1.el7.x86_64 Fedora Project Fedora Project
python-daemon-1.6-4.el7.noarch Fedora Project Fedora Project
python-subprocess32-3.2.7-1.vz7.5.x86_64 Virtuozzo Virtuozzo (http://www.virtuozzo.com/support/)
qemu-img-vz-2.10.0-21.7.vz7.67.x86_64 Virtuozzo Virtuozzo (http://www.virtuozzo.com/support/)
qemu-kvm-common-vz-2.10.0-21.7.vz7.67.x86_64 Virtuozzo Virtuozzo (http://www.virtuozzo.com/support/)
qemu-kvm-vz-2.10.0-21.7.vz7.67.x86_64 Virtuozzo Virtuozzo (http://www.virtuozzo.com/support/)
qt-4.8.7-2.vz7.2.x86_64 Virtuozzo Virtuozzo (http://www.virtuozzo.com/support/)
rkhunter-1.4.6-2.el7.noarch Fedora Project Fedora Project
seabios-bin-1.10.2-3.1.vz7.3.noarch Virtuozzo Virtuozzo (http://www.virtuozzo.com/support/)
seavgabios-bin-1.10.2-3.1.vz7.3.noarch Virtuozzo Virtuozzo (http://www.virtuozzo.com/support/)
spfs-0.09.0010-1.vz7.x86_64 Virtuozzo Virtuozzo (http://www.virtuozzo.com/support/)
TIVsm-API64-8.1.11-0.x86_64 IBM (none)
TIVsm-APIcit-8.1.11-0.x86_64 IBM (none)
TIVsm-BA-8.1.11-0.x86_64 IBM (none)
TIVsm-BAcit-8.1.11-0.x86_64 IBM (none)
vcmmd-7.0.160-1.vz7.x86_64 Virtuozzo Virtuozzo (http://www.virtuozzo.com/support/)
vmauth-7.0.10-2.vz7.x86_64 Virtuozzo Virtuozzo (http://www.virtuozzo.com/support/)
vzctl-7.0.194-1.vz7.x86_64 Virtuozzo Virtuozzo (http://www.virtuozzo.com/support/)
vzkernel-3.10.0-862.11.6.vz7.64.7.x86_64 Virtuozzo Virtuozzo (http://www.virtuozzo.com/support/)
vzkernel-3.10.0-862.20.2.vz7.73.29.x86_64 Virtuozzo Virtuozzo (http://www.virtuozzo.com/support/)
vztt-7.0.63-1.vz7.x86_64 Virtuozzo Virtuozzo (http://www.virtuozzo.com/support/)
vztt_checker-7.0.2-1.vz7.i686 Virtuozzo Virtuozzo (http://www.virtuozzo.com/support/)
vztt_checker-7.0.2-1.vz7.x86_64 Virtuozzo Virtuozzo (http://www.virtuozzo.com/support/)
vztt-lib-7.0.63-1.vz7.x86_64 Virtuozzo Virtuozzo (http://www.virtuozzo.com/support/)
zabbix-agent-3.2.11-1.el7.x86_64 (none) (none)

Install certbot on Debian, Ubuntu, CentOS, Fedora Linux 10 / Generate and use Apache / Nginx SSL Letsencrypt certificates

Monday, December 21st, 2020

letsencrypt certbot install on any linux distribution with apache or nginx webserver howto</a><p> Let's Encrypt is a free, automated, and open certificate authority brought to you by the nonprofit <a data-cke-saved-href=
Internet Security Research Group (ISRG). ISRG group gave initiative with the goal to "encrypt the internet", i.e. offer free alternative to the overpriced domani registrer sold certificates with the goal to make more people offer SSL / TSL Free secured connection line on their websites. 
ISRG group supported Letsencrypt non-profit certificate authority actrively by Internet industry standard giants such as Mozilla, Cisco, EFF (Electronic Frontier Foundation),  Facebook, Google Chrome, Amazon AWS, OVH Cloud, Redhat, VMWare, Github and many many of the leading companies in IT.

Letsencrpyt is aimed at automating the process designed to overcome manual creation, validation, signing, installation, and renewal of certificates for secure websites. I.e. you don't have to manually write on console complicated openssl command lines with passing on Certificate CSR /  KEY / PEM files etc and generate Self-Signed Untrusted Authority Certificates (noted in my previous article How to generate Self-Signed SSL Certificates with openssl or use similar process to pay money generate secret key and submit the key to third party authority through a their website webadmin  interface in order to Generate SSL brought by Godaddy or Other Certificate Authority.

But of course as you can guess there are downsides as you submit your private key automatically via letsencrypt set of SSL certificate automation domain scripts to a third party Certificate Authority which is at Letsencrypt.org. A security intrusion in their private key store servers might mean a catastrophy for your data as malicious stealer might be able to decrypt your data with some additional effort and see in plain text what is talking to your Apache / Nginx or Mail Server nevertheless the cert. Hence for a high standards such as PCI environments Letsencrypt as well as for the paranoid security freak admins,  who don't trust the mainstream letsencrypt is definitely not a choice. Anyways for most small and midsized businesses who doesn't hold too much of a top secret data and want a moderate level of security Letsencrypt is a great opportunity to try. But enough talk, lets get down to business.

How to install and use certbot on Debian GNU / Linux 10 Buster?
Certbot is not available from the Debian software repositories by default, but it’s possible to configure the buster-backports repository in your /etc/apt/sources.list file to allow you to install a backport of the Certbot software with APT tool.
 

1. Install certbot on Debian / Ubuntu Linux


root@webserver:/etc/apt# tail -n 1 /etc/apt/sources.list
deb http://ftp.debian.org/debian buster-backports main


If not there append the repositories to file:


  • Install certbot-nginx certbot-apache deb packages

root@webserver:/ # echo 'deb http://ftp.debian.org/debian buster-backports main' >> /etc/apt/sources.list


  • Install certbot-nginx certbot-apache deb packages

root@webserver:/ # apt update
root@webserver:/ # apt install certbot python-certbot-nginx python3-certbot-apache python-certbot-nginx-doc


This will install the /usr/bin/certbot python executable script which is used to register / renew / revoke / delete your domains certificates.
 

2. Install letsencrypt certbot client on CentOS / RHEL / Fedora and other Linux Distributions


For RPM based distributions and other Linux distributions you will have to install snap package (if not already installed) and use snap command :


[root@centos ~ :] # yum install snapd
systemctl enable –now snapd.socket

To enable classic snap support, enter the following to create a symbolic link between

[root@centos ~ :] # ln -s /var/lib/snapd/snap /snap

snap command lets you install, configure, refresh and remove snaps.  Snaps are packages that work across many different Linux distributions, enabling secure delivery and operation of the latest apps and utilities.

[root@centos ~ :] # snap install core; sudo snap refresh core

Logout from console or Xsession to make the snap update its $PATH definitions.

Then use snap universal distro certbot classic package

 [root@centos ~ :] # snap install –classic certbot
[root@centos ~ :] # ln -s /snap/bin/certbot /usr/bin/certbot


If you're having an XOrg server access on the RHEL / CentOS via Xming or other type of Xemulator you might check out also the snap-store as it contains a multitude of packages installable which are not usually available in RPM distros.

 [root@centos ~ :] # snap install snap-store
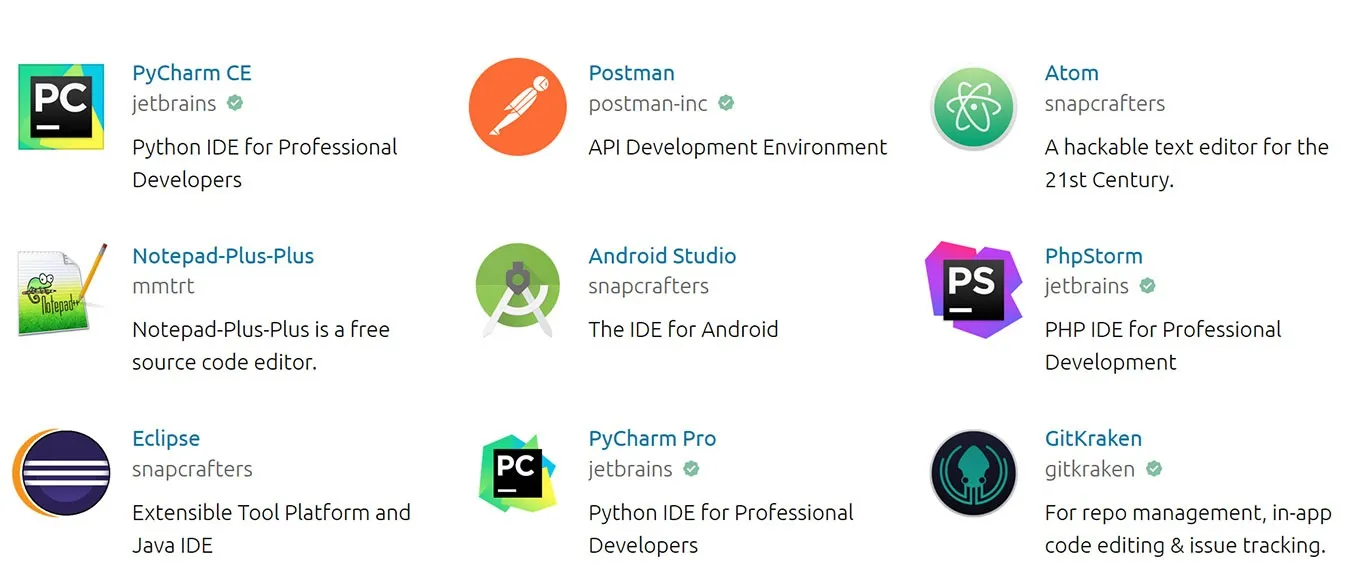

how-to-install-snap-applications-on-centos-rhel-linux-snap-store

snap-store is a powerful and via it you can install many non easily installable stuff on Linux such as eclipse famous development IDE, notepad++ , Discord, the so favourite for the Quality Assurance guy Protocol tester Postman etc.

  • Installing certbot to any distribution via acme.sh script

Another often preferred solution to Universally deploy  and upgrade an existing LetsEncrypt program to any Linux distribution (e.g. RHEL / CentOS / Fedora etc.) is the acme.sh script. To install acme you have to clone the repository and run the script with –install

P.S. If you don't have git installed yet do

root@webserver:/ # apt-get install –yes git


and then the usual git clone to fetch it at your side

# cd /root
# git clone https://github.com/acmesh-official/acme.sh
Cloning into 'acme.sh'…
remote: Enumerating objects: 71, done.
remote: Counting objects: 100% (71/71), done.
remote: Compressing objects: 100% (53/53), done.
remote: Total 12475 (delta 39), reused 38 (delta 18), pack-reused 12404
Receiving objects: 100% (12475/12475), 4.79 MiB | 6.66 MiB/s, done.
Resolving deltas: 100% (7444/7444), done.

# sh acme.sh –install


To later upgrade acme.sh to latest you can do

# sh acme.sh –upgrade


In order to renew a concrete existing letsencrypt certificiate

# sh acme.sh –renew domainname.com


To renew all certificates using acme.sh script

# ./acme.sh –renew-all


3. Generate Apache or NGINX Free SSL / TLS Certificate with certbot tool

Now lets generate a certificate for a domain running on Apache Webserver with a Website WebRoot directory /home/phpdev/public/www


root@webserver:/ # certbot –apache –webroot -w /home/phpdev/public/www/ -d your-domain-name.com -d your-domain-name.com

root@webserver:/ # certbot certonly –webroot -w /home/phpdev/public/www/ -d your-domain-name.com -d other-domain-name.com


As you see all the domains for which you will need to generate are passed on with -d option.

Once certificates are properly generated you can test it in a browser and once you're sure they work as expected usually you can sleep safe for the next 3 months ( 90 days) which is the default for TSL / SSL Letsencrypt certificates the reason behind of course is security.


4. Enable freshly generated letsencrypt SSL certificate in Nginx VirtualHost config

Go to your nginx VirtualHost configuration (i.e. /etc/nginx/sites-enabled/phpmyadmin.adzone.pro ) and inside chunk of config add after location { … } – 443 TCP Port SSL listener (as in shown in bolded configuration)
 

server {

….
   location ~ \.php$ {
      include /etc/nginx/fastcgi_params;
##      fastcgi_pass 127.0.0.1:9000;
      fastcgi_pass unix:/run/php/php7.3-fpm.sock;
      fastcgi_index index.php;
      fastcgi_param SCRIPT_FILENAME /usr/share/phpmyadmin$fastcgi_script_name;
   }


    listen 443 ssl; # managed by Certbot
    ssl_certificate /etc/letsencrypt/live/phpmyadmin.adzone.pro/fullchain.pem; # managed by Certbot
    ssl_certificate_key /etc/letsencrypt/live/phpmyadmin.adzone.pro/privkey.pem; # managed by Certbot
    include /etc/letsencrypt/options-ssl-nginx.conf; # managed by Certbot
    ssl_dhparam /etc/letsencrypt/ssl-dhparams.pem; # managed by Certbot


5. Enable new generated letsencrypt SSL certificate in Apache VirtualHost


In /etc/apache2/{sites-available,sites-enabled}/your-domain.com-ssl.conf you should have as a minimum a configuration setup like below:


NameVirtualHost *:443 <VirtualHost 123.123.123.12:443>
    ServerAdmin hipo@domain.com
    ServerName www.pc-freak.net
    ServerAlias www.your-domain.com wwww.your-domain.com your-domain.com
 
    HostnameLookups off
    DocumentRoot /var/www
    DirectoryIndex index.html index.htm index.php index.html.var


CheckSpelling on
SSLEngine on

    <Directory />
        Options FollowSymLinks
        AllowOverride All
        ##Order allow,deny
        ##allow from all
        Require all granted
    </Directory>
    <Directory /var/www>
        Options Indexes FollowSymLinks MultiViews
        AllowOverride All
##      Order allow,deny
##      allow from all
Require all granted
    </Directory>

Include /etc/letsencrypt/options-ssl-apache.conf
SSLCertificateFile /etc/letsencrypt/live/your-domain.com/fullchain.pem
SSLCertificateKeyFile /etc/letsencrypt/live/your-domain.com/privkey.pem
</VirtualHost>


6. Simulate a certificate regenerate with –dry-run

Soon before the 90 days period expiry approaches, it is a good idea to test how all installed Nginx webserver certficiates will be renewed and whether any issues are expected this can be done with the –dry-run option.

root@webserver:/ # certbot renew –dry-run


– – – – – – – – – – – – – – – – – – – – – – – – – – – – – – – – – – – – – – – –
** DRY RUN: simulating 'certbot renew' close to cert expiry
**          (The test certificates below have not been saved.)

Congratulations, all renewals succeeded. The following certs have been renewed:
  /etc/letsencrypt/live/adzone.pro/fullchain.pem (success)
  /etc/letsencrypt/live/cdn.natsr.pro/fullchain.pem (success)
  /etc/letsencrypt/live/mail.adzone.pro/fullchain.pem (success)
  /etc/letsencrypt/live/natsr.pro-0001/fullchain.pem (success)
  /etc/letsencrypt/live/natsr.pro/fullchain.pem (success)
  /etc/letsencrypt/live/phpmyadmin.adzone.pro/fullchain.pem (success)
  /etc/letsencrypt/live/www.adzone.pro/fullchain.pem (success)
  /etc/letsencrypt/live/www.natsr.pro/fullchain.pem (success)
** DRY RUN: simulating 'certbot renew' close to cert expiry
**          (The test certificates above have not been saved.)
– – – – – – – – – – – – – – – – – – – – – – – – – – – – – – – – – – – – – – – –


7. Renew a certificate from a multiple installed certificate list

In some time when you need to renew letsencrypt domain certificates you can list them and choose manually which one you want to renew.

root@webserver:/ # certbot –force-renewal
Saving debug log to /var/log/letsencrypt/letsencrypt.log

How would you like to authenticate and install certificates?
– – – – – – – – – – – – – – – – – – – – – – – – – – – – – – – – – – – – – – – –
1: Apache Web Server plugin (apache)
2: Nginx Web Server plugin (nginx)
– – – – – – – – – – – – – – – – – – – – – – – – – – – – – – – – – – – – – – – –
Select the appropriate number [1-2] then [enter] (press 'c' to cancel): 2
Plugins selected: Authenticator nginx, Installer nginx

Which names would you like to activate HTTPS for?
– – – – – – – – – – – – – – – – – – – – – – – – – – – – – – – – – – – – – – – –
1: adzone.pro
2: mail.adzone.pro
3: phpmyadmin.adzone.pro
4: www.adzone.pro
5: natsr.pro
6: cdn.natsr.pro
7: www.natsr.pro
– – – – – – – – – – – – – – – – – – – – – – – – – – – – – – – – – – – – – – – –
Select the appropriate numbers separated by commas and/or spaces, or leave input
blank to select all options shown (Enter 'c' to cancel): 3
Renewing an existing certificate
Deploying Certificate to VirtualHost /etc/nginx/sites-enabled/phpmyadmin.adzone.pro

Please choose whether or not to redirect HTTP traffic to HTTPS, removing HTTP access.
– – – – – – – – – – – – – – – – – – – – – – – – – – – – – – – – – – – – – – – –
1: No redirect – Make no further changes to the webserver configuration.
2: Redirect – Make all requests redirect to secure HTTPS access. Choose this for
new sites, or if you're confident your site works on HTTPS. You can undo this
change by editing your web server's configuration.
– – – – – – – – – – – – – – – – – – – – – – – – – – – – – – – – – – – – – – – –
Select the appropriate number [1-2] then [enter] (press 'c' to cancel): 2
Redirecting all traffic on port 80 to ssl in /etc/nginx/sites-enabled/phpmyadmin.adzone.pro

– – – – – – – – – – – – – – – – – – – – – – – – – – – – – – – – – – – – – – – –
Your existing certificate has been successfully renewed, and the new certificate
has been installed.

The new certificate covers the following domains: https://phpmyadmin.adzone.pro

You should test your configuration at:
https://www.ssllabs.com/ssltest/analyze.html?d=phpmyadmin.adzone.pro
– – – – – – – – – – – – – – – – – – – – – – – – – – – – – – – – – – – – – – – –

IMPORTANT NOTES:
 – Congratulations! Your certificate and chain have been saved at:
   /etc/letsencrypt/live/phpmyadmin.adzone.pro/fullchain.pem

   Your key file has been saved at:
   /etc/letsencrypt/live/phpmyadmin.adzone.pro/privkey.pem
   Your cert will expire on 2021-03-21. To obtain a new or tweaked
   version of this certificate in the future, simply run certbot again
   with the "certonly" option. To non-interactively renew *all* of
   your certificates, run "certbot renew"
 – If you like Certbot, please consider supporting our work by:

   Donating to ISRG / Let's Encrypt:   https://letsencrypt.org/donate
   Donating to EFF:                    https://eff.org/donate-le


8. Renew all present SSL certificates

root@webserver:/ # certbot renew

Processing /etc/letsencrypt/renewal/www.natsr.pro.conf
– – – – – – – – – – – – – – – – – – – – – – – – – – – – – – – – – – – – – – – –
Cert not yet due for renewal


– – – – – – – – – – – – – – – – – – – – – – – – – – – – – – – – – – – – – – – –

The following certs are not due for renewal yet:
  /etc/letsencrypt/live/adzone.pro/fullchain.pem expires on 2021-03-01 (skipped)
  /etc/letsencrypt/live/cdn.natsr.pro/fullchain.pem expires on 2021-02-28 (skipped)
  /etc/letsencrypt/live/mail.adzone.pro/fullchain.pem expires on 2021-02-28 (skipped)
  /etc/letsencrypt/live/natsr.pro-0001/fullchain.pem expires on 2021-03-01 (skipped)
  /etc/letsencrypt/live/natsr.pro/fullchain.pem expires on 2021-02-25 (skipped)
  /etc/letsencrypt/live/phpmyadmin.adzone.pro/fullchain.pem expires on 2021-03-21 (skipped)
  /etc/letsencrypt/live/www.adzone.pro/fullchain.pem expires on 2021-02-28 (skipped)
  /etc/letsencrypt/live/www.natsr.pro/fullchain.pem expires on 2021-03-01 (skipped)
No renewals were attempted.
– – – – – – – – – – – – – – – – – – – – – – – – – – – – – – – – – – – – – – – –


9. Renew all existing server certificates from a cron job


The certbot package will install a script under /etc/cron.d/certbot to be run that will attempt every 12 hours however from my experience
often this script is not going to work, the script looks similar to below:

# Upgrade all existing SSL certbot machine certificates


0 */12 * * * root test -x /usr/bin/certbot -a \! -d /run/systemd/system && perl -e 'sleep int(rand(43200))' && certbot -q renew

Another approach to renew all installed certificates if you want to have a specific options and keep log of what happened is using a tiny shell script like this:


10. Auto renew installed SSL / TSL Certbot certificates with a bash loop over all present certificates

#!/bin/sh
# update SSL certificates
# prints from 1 to 104 (according to each certbot generated certificate and triggers rewew and logs what happened to log file
# an ugly hack for certbot certificate renew
for i in $(seq 1 104); do echo "Updating $i SSL Cert" | tee -a /root/certificate-update.log; yes "$i" | certbot –force-renewal | tee -a /root/certificate-update.log 2>&1; sleep 5; done

Note: The seq 1 104 is the range depends on the count of installed SSL certificates you have installed on the machine, that can be seen and set the proper value according to your case when you run one time certbot –force-renewal.
 

Remove old unused kernels and cleanup orphaned packages on CentOS / RHEL/ Fedora and Debian Linux

Friday, October 23rd, 2020

remove-old-unused-kernel-on-centos-redhat-rhel-fedora-linux-howto-delete-orphaned-packages

If you administer CentOS 7 / CentOS  8 bunch of servers it is very likely after one of the scheduled Patch days every 6 months or so, you end up with a multiple Linux OS kernels installed on the system.
In normal situation on a freshly installed CentOS machine only one rpm package is installed on the system with the kernel release shipped with CentOS / RHEL / Fedora distro:
The reason to remove the old unused kernels is very simple, you don't want to have a messy installation and after some of the updates to boot up in a revert back old kernel or if you're pedantic to simply save few megas of space.
Some people choose to have more than one kernel just to make sure, if the new installed one doesn't boot, after a restart from ILO / IDRAC remote console interface you can select to boot the proper kernel. I agree having the old kernel before the system *kernel* upgrade as backup recovery is a good thing but this is a good thing to the point the system gets booted after reboot (you know we sysadmins usually after each major system package upgrade), we like to reboot the system warmly praying and hoping it will boot up next time 🙂
 

1. Remove CentOS last XX kernels from the OS

Of course removal of old kernels could be managed by a simple

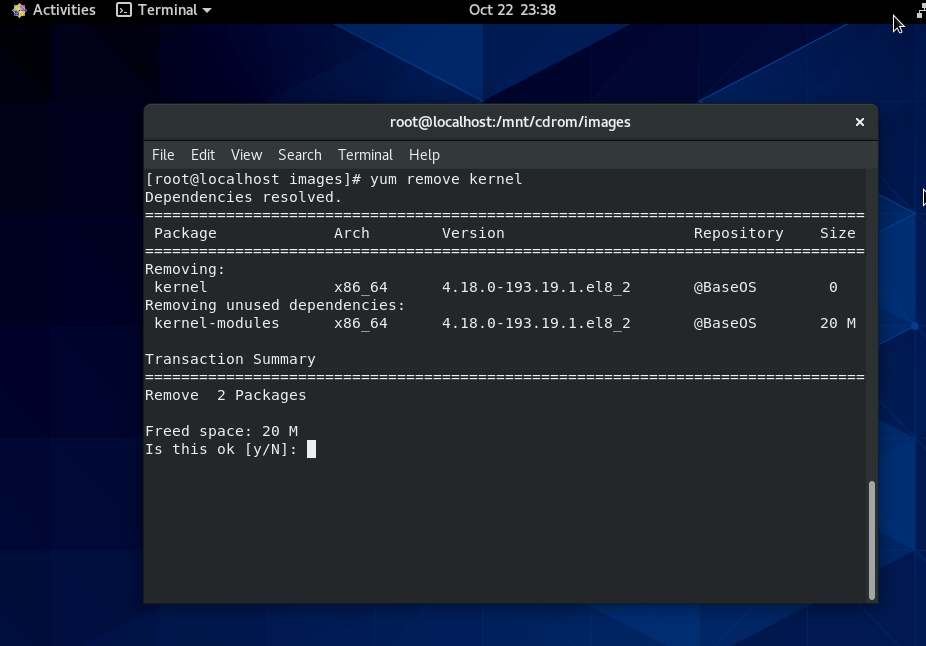
yum remove kernel


yum-kernel-remove-centos-linux

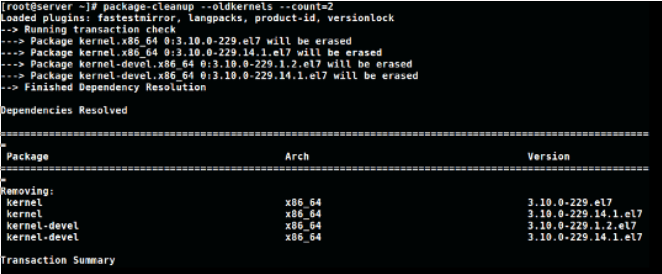
One more than one kernel is present you can hence leave only lets say the last 2 installed kernel on the CentOS host (some people prefer to have only one) but just for the sake of having a backup kernel I like more to have last two kernels installed present, to do so run package-cleanup which is contained in yum-utils rpm package CentOS – this is CentOS / Redhat ( RHEL) specific command.
 

[root@centos ~ ]:# package-cleanup –oldkernels –count=2

package-cleanup-centos-linux-screenshot-1

–count=number argument – tells how many from the  latest version kernels to get removed.

Note if you don't have the package-cleanup command install yum-utils package:

[root@centos ~ :]#  yum install -y yum-utils

cleanup-old-kernels-linux-leave-only-set-of-2-kernels-active-on-centos-rhel-fedora


2. RemoveOld kernels from Fedora Linux – leave only the latest 3 installed

This is done with dnf by setting the –-latest-limit arg to negative value to how many last kernels want to keep

[root@fedora ~ ]:# dnf remove $(dnf repoquery –installonly –latest-limit=-3 -q)


3. Set how many kernels you want to be present on system all the time after package upgrades

It is possible to tell CentOS / RHEL / Fedora's on how many kernels show be kept installed on the system, the default configured on Operating system install time is to keep the last 5 installed kernel on the OS. This is controlled from installonly_limit=5 value that is usually as of year 2020 RPM based distributions found under /etc/yum.conf (on CentOS / RHEL) and in /etc/dnf/dnf.conf (in Fedora) configuration file and sets the desired number of kernels present on system after issuing commands yum upgrade / dnf upgrade –refresh etc.
The minimum number to give to  installonly_limit is 2.
 

4. Remove orphan rpm packages from server

The next thing to do is to check the installed orphan packages to see if we can safely remove them; by orphaned packages we mean all packages which no longer serve a purpose of package dependencies.
Orphan packages are packages who left over from some old dependencies that are no longer needed on the system but just take up space and impose a possible security risk as some of them might end up with time with a public well known and hacked CVE vulnearbility.

Let me try to explain this concept with a quick example: package A is depended on package B, thus, in order to install package A the package B must also be installed. Once the package A is removed the package B might still be installed, hence the package B is now orphaned package.
Here’s how we can safely see the orphan packages we do have on our system:

[root@centos ~ :]#  package-cleanup –quiet –leaves –exclude-bin

And here’s how we can delete them:

[root@centos ~ :]# package-cleanup –quiet –leaves –exclude-bin | xargs yum remove -y


The above commands should be launched multiple times, because the packages deleted with the first batch could create additional orphan packages, and so on: be sure to perform these tasks until no orphan packages appear anymore after the first package-cleanup command.


5. Delete Old Kernels and keep only last three ones on Debian / Ubuntu Linux

To do the same on a debian based distribution there is a command is provided by a deb package byobu, if you want to clean up old kernels on Debians :

$ sudo purge-old-kernels –keep 3


That's all folks enjoy ! 🙂


Procedure Instructions to safe upgrade CentOS / RHEL Linux 7 Core to latest release

Thursday, February 13th, 2020

safe-upgrade-CentOS-and_Redhat_Enterprise_Linux_RHEL-7-to-latest-stable-release

Generally upgrading both RHEL and CentOS can be done straight with yum tool just we're pretty aware and mostly anyone could do the update, but it is good idea to do some
steps in advance to make backup of any old basic files that might help us to debug what is wrong in case if the Operating System fails to boot after the routine Machine OS restart
after the upgrade that is usually a good idea to make sure that machine is still bootable after the upgrade.

This procedure can be shortened or maybe extended depending on the needs of the custom case but the general framework should be useful anyways to someone that's why
I decided to post this.

Before you go lets prepare a small status script which we'll use to report status of  sysctl installed and enabled services as well as the netstat connections state and
configured IP addresses and routing on the system.

The script show_running_services_netstat_ips_route.sh to be used during our different upgrade stages:
 

# script status ###
echo "STARTED: $(date '+%Y-%m-%d_%H-%M-%S'):" | tee /root/logs/yumcheckupdate-$(hostname)-$(date '+%Y-%m-%d_%H-%M-%S').out
systemctl list-unit-files –type=service | grep enabled
systemctl | grep ".service" | grep "running"
netstat -tulpn
netstat -r
ip a s
/sbin/route -n
echo "ENDED $(date '+%Y-%m-%d_%H-%M-%S'):" | tee /root/logs/yumcheckupdate-$(hostname)-$(date '+%Y-%m-%d_%H-%M-%S').out
####


– Save the script in any file like /root/status.sh

– Make the /root/logs directoriy.
 

[root@redhat: ~ ]# mkdir /root/logs
[root@redhat: ~ ]# vim /root/status.sh
[root@redhat: ~ ]# chmod +x /root/status.sh


1. Get a dump of CentOS installed version release and grub-mkconfig generated os_probe


[root@redhat: ~ ]# cat /etc/redhat-release  > /root/logs/redhat-release-vorher-$(hostname)-$(date '+%Y-%m-%d_%H-%M-%S').out
[root@redhat: ~ ]# cat /etc/grub.d/30_os-prober > /root/logs/grub2-efi-vorher-$(hostname)-$(date '+%Y-%m-%d_%H-%M-%S').out


2. Clear old versionlock marked RPM packages (if there are such)


On servers maintained by multitude of system administrators just like the case is inside a Global Corporations and generally in the corporate world , where people do access the systems via LDAP and more than a single person
has superuser privileges. It is a good prevention measure to use yum package management  functionality to RPM based Linux distributions called  versionlock.
versionlock for those who hear it for a first time is locking the versions of the installed RPM packages so if someone by mistake or on purpose decides to do something like :

[root@redhat: ~ ]# yum install packageversion

Having the versionlock set will prevent the updated package to be installed with a different branch package version.

Also it will prevent a playful unknowing person who just wants to upgrade the system without any deep knowledge to be able to
run

[root@redhat: ~ ]# yum upgrade

update and leave the system in unbootable state, that will be only revealed during the next system reboot.

If you haven't used versionlock before and you want to use it you can do it with:

[root@redhat: ~ ]# yum install yum-plugin-versionlock

To add all the packages for compiling C code and all the interdependend packages, you can do something like:


[root@redhat: ~ ]# yum versionlock gcc-*

If you want to clear up the versionlock, once it is in use run:

[root@redhat: ~ ]#  yum versionlock clear
[root@redhat: ~ ]#  yum versionlock list


3.  Check RPC enabled / disabled


This step is not necessery but it is a good idea to check whether it running on the system, because sometimes after upgrade rpcbind gets automatically started after package upgrade and reboot. 
If we find it running we'll need to stop and mask the service.


# check if rpc enabled
[root@redhat: ~ ]# systemctl list-unit-files|grep -i rpc
var-lib-nfs-rpc_pipefs.mount                                      static
auth-rpcgss-module.service                                        static
rpc-gssd.service                                                  static
rpc-rquotad.service                                               disabled
rpc-statd-notify.service                                          static
rpc-statd.service                                                 static
rpcbind.service                                                   disabled
rpcgssd.service                                                   static
rpcidmapd.service                                                 static
rpcbind.socket                                                    disabled
rpc_pipefs.target                                                 static
rpcbind.target                                                    static

[root@redhat: ~ ]# systemctl status rpcbind.service
● rpcbind.service – RPC bind service
   Loaded: loaded (/usr/lib/systemd/system/rpcbind.service; disabled; vendor preset: enabled)
   Active: inactive (dead)


[root@redhat: ~ ]# systemctl status rpcbind.socket
● rpcbind.socket – RPCbind Server Activation Socket
   Loaded: loaded (/usr/lib/systemd/system/rpcbind.socket; disabled; vendor preset: enabled)
   Active: inactive (dead)
   Listen: /var/run/rpcbind.sock (Stream)
           0.0.0.0:111 (Stream)
           0.0.0.0:111 (Datagram)
           [::]:111 (Stream)
           [::]:111 (Datagram)


4. Check any previously existing downloaded / installed RPMs (check yum cache)


yum install package-name / yum upgrade keeps downloaded packages via its operations inside its cache directory structures in /var/cache/yum/*.
Hence it is good idea to check what were the previously installed packages and their count.


[root@redhat: ~ ]# cd /var/cache/yum/x86_64/;
[root@redhat: ~ ]# find . -iname '*.rpm'|wc -l


5. List RPM repositories set on the server


 [root@redhat: ~ ]# yum repolist
Loaded plugins: fastestmirror, versionlock
Repodata is over 2 weeks old. Install yum-cron? Or run: yum makecache fast
Determining fastest mirrors
repo id                                                                                 repo name                                                                                                            status
!atos-ac/7/x86_64                                                                       Atos Repository                                                                                                       3,128
!base/7/x86_64                                                                          CentOS-7 – Base                                                                                                      10,019
!cr/7/x86_64                                                                            CentOS-7 – CR                                                                                                         2,686
!epel/x86_64                                                                            Extra Packages for Enterprise Linux 7 – x86_64                                                                          165
!extras/7/x86_64                                                                        CentOS-7 – Extras                                                                                                       435
!updates/7/x86_64                                                                       CentOS-7 – Updates                                                                                                    2,500


This step is mandatory to make sure you're upgrading to latest packages from the right repositories for more concretics check what is inside in confs /etc/yum.repos.d/ ,  /etc/yum.conf 
 

6. Clean up any old rpm yum cache packages


This step is again mandatory but a good to follow just to have some more clearness on what packages is our upgrade downloading (not to mix up the old upgrades / installs with our newest one).
For documentation purposes all deleted packages list if such is to be kept under /root/logs/yumclean-install*.out file

[root@redhat: ~ ]# yum clean all |tee /root/logs/yumcleanall-$(hostname)-$(date '+%Y-%m-%d_%H-%M-%S').out


7. List the upgradeable packages's latest repository provided versions


[root@redhat: ~ ]# yum check-update |tee /root/logs/yumcheckupdate-$(hostname)-$(date '+%Y-%m-%d_%H-%M-%S').out


Then to be aware how many packages we'll be updating:


[root@redhat: ~ ]#  yum check-update | wc -l


8. Apply the actual uplisted RPM packages to be upgraded


[root@redhat: ~ ]# yum update |tee /root/logs/yumupdate-$(hostname)-$(date '+%Y-%m-%d_%H-%M-%S').out


Again output is logged to /root/logs/yumcheckupate-*.out 


9. Monitor downloaded packages count real time


To make sure yum upgrade is not in some hanging state and just get some general idea in which state of the upgrade is it e.g. Download / Pre-Update / Install  / Upgrade/ Post-Update etc.
in mean time when yum upgrade is running to monitor,  how many packages has the yum upgrade downloaded from remote RPM set repositories:


[root@redhat: ~ ]#  watch "ls -al /var/cache/yum/x86_64/7Server/…OS-repository…/packages/|wc -l"


10. Run status script to get the status again


[root@redhat: ~ ]# sh /root/status.sh |tee /root/logs/status-before-$(hostname)-$(date '+%Y-%m-%d_%H-%M-%S').out


11. Add back versionlock for all RPM packs


Set all RPM packages installed on the RHEL / CentOS versionlock for all packages.


#==if needed
# yum versionlock \*


12. Get whether old software configuration is not messed up during the Package upgrade (Lookup the logs for .rpmsave and .rpmnew)


During the upgrade old RPM configuration is probably changed and yum did automatically save .rpmsave / .rpmnew saves of it thus it is a good idea to grep the prepared logs for any matches of this 2 strings :
 

[root@redhat: ~ ]#   grep -i ".rpm" /root/logs/yumupdate-server-host-2020-01-20_14-30-41.out
[root@redhat: ~ ]#  grep -i ".rpmsave" /root/logs/yumupdate-server-host-2020-01-20_14-30-41.out
[root@redhat: ~ ]#  grep -i ".rpmnew" /root/logs/yumupdate-server-host-2020-01-20_14-30-41.out


If above commands returns output usually it is fine if there is is .rpmnew output but, if you get grep output of .rpmsave it is a good idea to review the files compare with the original files that were .rpmsaved with the 
substituted config file and atune the differences with the changes manually made for some program functionality.

What are the .rpmsave / .rpmnew files ?
This files are coded files that got triggered by the RPM install / upgrade due to prewritten procedures on time of RPM build.


If a file was installed as part of a rpm, it is a config file (i.e. marked with the %config tag), you've edited the file afterwards and you now update the rpm then the new config file (from the newer rpm) will replace your old config file (i.e. become the active file).
The latter will be renamed with the .rpmsave suffix.

If a file was installed as part of a rpm, it is a noreplace-config file (i.e. marked with the %config(noreplace) tag), you've edited the file afterwards and you now update the rpm then your old config file will stay in place (i.e. stay active) and the new config file (from the newer rpm) will be copied to disk with the .rpmnew suffix.
See e.g. this table for all the details. 

In both cases you or some program has edited the config file(s) and that's why you see the .rpmsave / .rpmnew files after the upgrade because rpm will upgrade config files silently and without backup files if the local file is untouched.

After a system upgrade it is a good idea to scan your filesystem for these files and make sure that correct config files are active and maybe merge the new contents from the .rpmnew files into the production files. You can remove the .rpmsave and .rpmnew files when you're done.


If you need to get a list of all .rpmnew .rpmsave files on the server do:

[root@redhat: ~ ]#  find / -print | egrep "rpmnew$|rpmsave$


13. Reboot the system 

To check whether on next hang up or power outage the system will boot normally after the upgrade, reboot to test it.


you can :


[root@redhat: ~ ]#  reboot


either

[root@redhat: ~ ]#  shutdown -r now


or if on newer Linux with systemd in ues below systemctl reboot.target.

[root@redhat: ~ ]#  systemctl start reboot.target


14. Get again the system status with our status script after reboot

[root@redhat: ~ ]#  sh /root/status.sh |tee /root/logs/status-after-$(hostname)-$(date '+%Y-%m-%d_%H-%M-%S').out


15. Clean up any versionlocks if earlier set


[root@redhat: ~ ]# yum versionlock clear
[root@redhat: ~ ]# yum versionlock list


16. Check services and logs for problems


After the reboot Check closely all running services on system make sure every process / listening ports and services on the system are running fine, just like before the upgrade.
If the sytem had firewall,  check whether firewall rules are not broken, e.g. some NAT is not missing or anything earlier configured to automatically start via /etc/rc.local or some other
custom scripts were run and have done what was expected. 
Go through all the logs in /var/log that are most essential /var/log/boot.log , /var/log/messages … yum.log etc. that could reveal any issues after the boot. In case if running some application server or mail server check /var/log/mail.log or whenever it is configured to log.
If the system runs apache closely check the logs /var/log/httpd/error.log or php_errors.log for any strange errors that occured due to some issues caused by the newer installed packages.
Usually most of the cases all this should be flawless but a multiple check over your work is a stake for good results.
 

Fix KDE Plasma fails to load: “All shell packages missing. This is an installation issue, please contact your distribution” in Kubuntu Linux

Friday, September 27th, 2019

Kubuntu_Linux-logo_and_wordmark-fix-plasma-graphical-environment

I've been called yesterday by a friend who has referred me to a friend of him Zvezdomir from Gabrovo who had installation of Kubuntu Desktop Linux by some other colleague but then suddenly the colleague decided to leave the country thus the Kubuntu become completely unmanaged.
In the spirit of Murphy's laws soon after it broke and as the HDD was filled with a lot of important pictures data I received the call with a beseech to help him fix his existing broken Kubuntu installation on the relatively old IBM thinkpad notebook. 
No problem,  I switched the role of a Linux Desktop user tech support  as it is part of daily job of every system admini to be on the hotline for computer medication and never say no to incoming requests 🙂

It seems the guy had messed up his Graphical Environment when as a Linux novice user decided to experiment with changing environments, he used to be using GNOME and then due to some issues with some of the Image Viewer eog – Eye of Gnome / Shotwell / Gpaint whose borders was not showing properly or something he decided to Switch to KDE Plasma. This was successful but as he continued to try out things on the Linux he broke it up badly so after the machine booted he was getting the error after boot of Xorg  Plasma was producing below error.

All-shell-packages-missing-This-is-an-installation-issue-please-contact-your-distribution

"All shell packages missing. This is an installation issue, please contact your distribution"


After spending about 30 minutes on the phone explaining him how to switch to Console as he had even no basic concepts about how to manage his Linux box, the problem was solved below are few steps taken to fix All shell packages missing issue

1. Press Ctrl + Alt + F2 Simultaneously

Usually historically switching to console on GNU / Linux was possible with CTRL + ALT + F1 but this was changed as often newer Linux distros do use TTY1 console to launch the X GUI environment.
Here we had some struggles to explain him where F1 as he thought he is supposed to press CTRL + ALT + S + 2 (perhaps misheard on the phone …) and was panicing how he is supposed to press 4 buttons simultaneously after a while it was cleared it is CTRL + ALT + F2 …
PS. In some of the other Ubuntus Lubuntu or older Ubuntus if CTRL + ALT + F2 doesn't work,

some of the other Virtual Text Consoles should be accessible with CTRL + ALT + F3CTRL + ALT + F4 etc.

2.  Login with your user login name

Once the login: field appears I had to explain him about 10 times how he should type his non-privileged user as it is always the case with computer novice. I had to stress here he should press Enter after the username / login is typed …

3. Become root (superuser) after standard login with:


sudo su


3. If the machine is not connected to internet (this might be the case if errors are produced on below 4. 5. steps)

Assuming you're already superuser (root) and you have no internet because the Network Manager is unable to connect due to failure of KDE Plasma to start, in order to connect to lets say already configured WI-Fi home wireless router,
restart networking with


service NetworkManager restart


Since internet connectivity will be required in order to be able to install the missing packages and update the package repositories, next test whether internet is reachable.


ping google.com
PING google.com (172.217.169.110) 56(84) bytes of data.
64 bytes from sof02s31-in-f14.1e100.net (172.217.169.110): icmp_seq=1 ttl=56 time=15.2 ms
64 bytes from sof02s31-in-f14.1e100.net (172.217.169.110): icmp_seq=2 ttl=56 time=11.5 ms
64 bytes from sof02s31-in-f14.1e100.net (172.217.169.110): icmp_seq=3 ttl=56 time=6.00 ms
^C
— google.com ping statistics —
3 packets transmitted, 3 received, 0% packet loss, time 5ms
rtt min/avg/max/mdev = 6.003/10.892/15.220/3.783 ms

N.B.! We had stumble blocks here too, as the Wi-Fi router seemed to be far away from the room where the PC was, after he moved to the other room where Signal was fine and re-issuing the service NetworkManager restart ping worked.

4. Next to get the latest list with available installable packages on the Ubuntu run the usual


apt-get update


5. Do install / reinstall kubuntu-desktop meta package


Finally to Fix the broken desktop GUI (that is not appearing instead of the Plasma login


apt-get install –yes kubuntu-desktop


Finally reboot the Laptop with reboot cmd:

reboot

On next boot Kubuntu's usual login screen should be as it used to be until you have broken your package system with tampering with the packages.

And Hooray ! It works again 🙂

By the way as I googled a bit to investigate futher, the problem seems to be common and the solution with a lot of fuzzling is given also pointed as an bug in Ubuntu's launchpad here


Getting Console and Graphical hardware system information on Linux with cpuinfo, neofetch, CPU-X (CPU-Z Unix alternative), I-nex and inxi

Tuesday, September 17th, 2019

getting-console-information-and-graphical-hardware-system-information-Linux-cpuinfo-neofetch-cpu-x-i-nex-1

Earlier I've wrote extensive article on how to get hardware information on Linux using tools such as dmidecode, hardinfo, lshw, hwinfo, x86info and biosdecode but there are few other hardware reporting tools for Linux worthy to mention that has been there for historical reasons such as cpuinfo as we as some new shiny ones such as neofetch (a terminal / console hardware report tool as well the CPU-X and I-Nex  which is Linux equivalent to the all known almost standard for Windows hardware detection CPU-Z worthy to say few words about.
 

1. cpuinfo


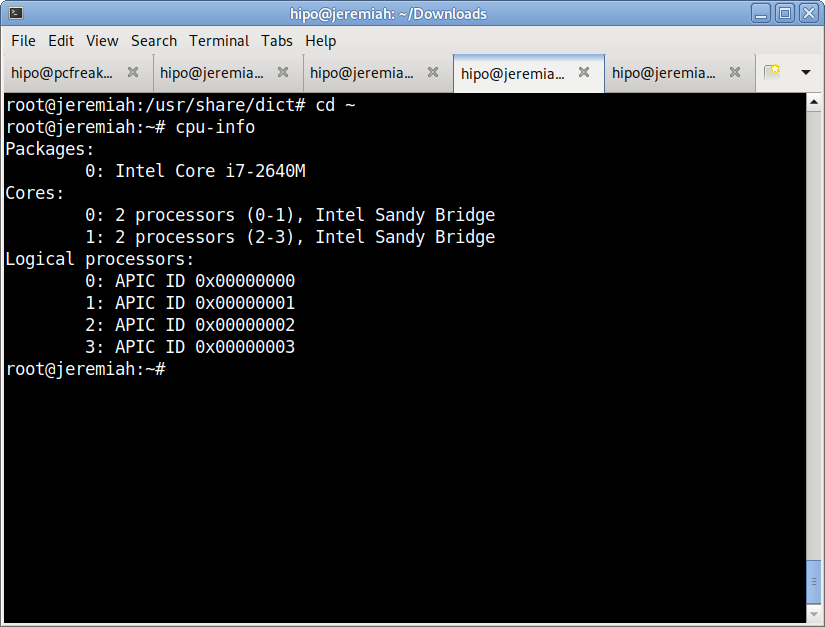
Perhaps the most basic tool to give you a brief information about your Processor type (model) number of Cores and Logical Processors is cpuinfo

I remember cpuinfo has been there since the very beginning on almost all Linux distributions's repository, nowadays its popularity of the days when the kings on the Linux OS server scenes were Slackware, Caldera OpenLinux and Redhat 6.0 Linux and Debian 3.0  declined but still for scripting purposes it is handy small proggie.

To install and run it in Debian  / Ubuntu / Mint Linux etc.:


aptitude install -y cpuinfo

/usr/bin/cpu-info


Linux-get-processor-system-info-in-console-cpu-info


2. neofetch


The next one worthy to install and check is neofetch (a cross-platform and easy-to-use system information
 command line script that collects your Linux system information and display it on the terminal next to an image, it could be your distributions logo or any ascii art of your choice.)

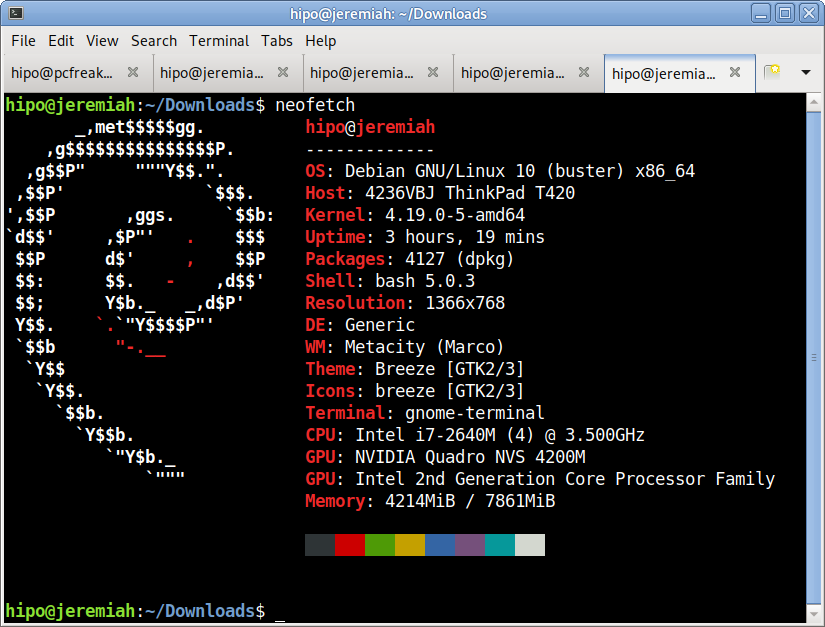
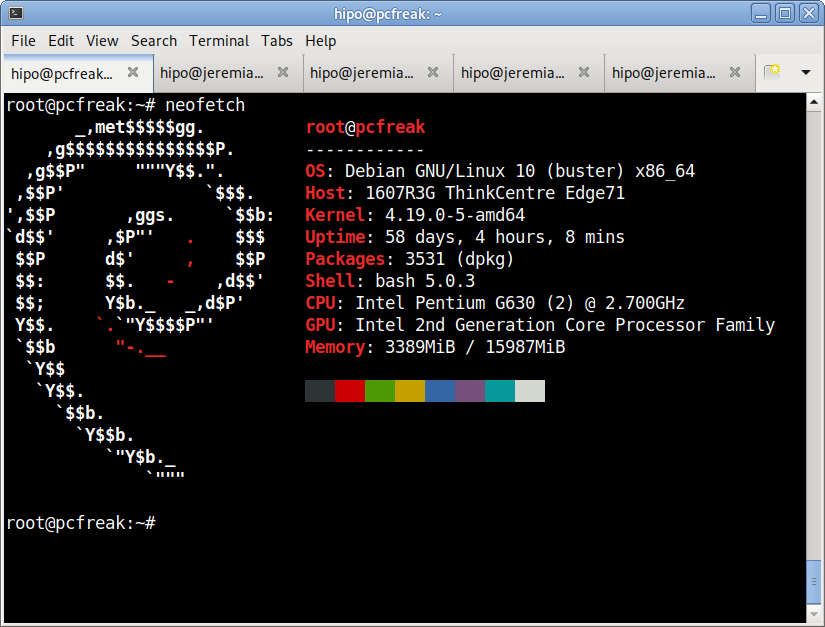
The cool thing about neofetch is besides being able to identify the System server / desktop hardware parameters, it gives some basic info about number of packages installed on the system, memory free and in use, used kernel and exact type of System (be it Dell PowerEdge Model XX, IBM eSeries Model / HP Proliant Model etc.

neofetch-OS-hardware-information-Linux-ascii-system-info-desktop-notebook

neofetch info generated on my home used Lenovo Thikpad T420

neofetch-OS-hardware-information-Linux-ascii-system-info-pcfreak-home-server
neofetch info from www.pc-freak.net running current machine

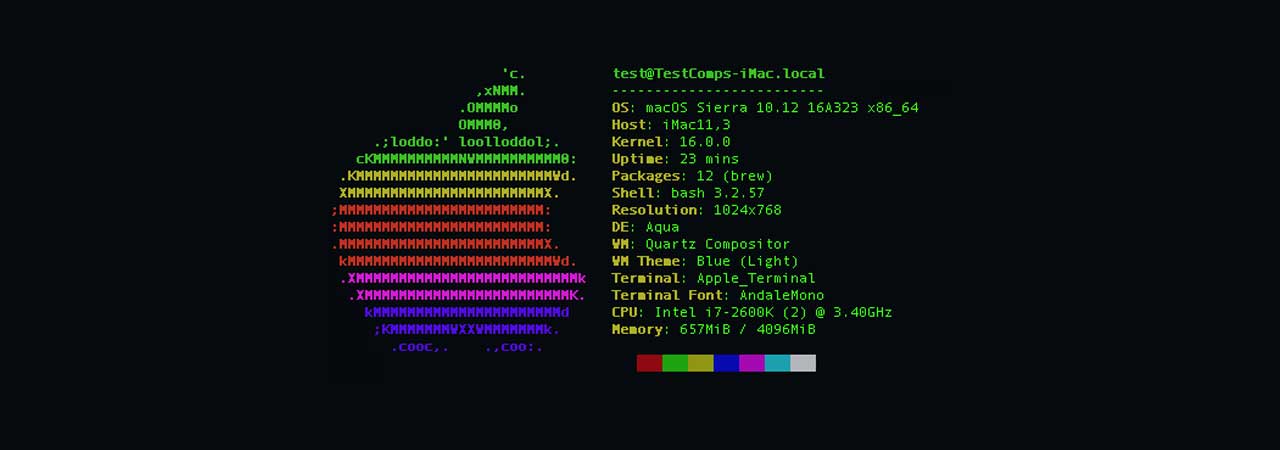
neofetch even supports Mac OS X and Windows OS ! 🙂

To install neofetch on Mac OS X:
 

/usr/bin/ruby -e "$(curl -fsSL https://raw.githubusercontent.com/Homebrew/install/master/install)"


or via Mac ported packages using brew

brew install neofetch


neofetch-screenshot-from-Mac-OS-X

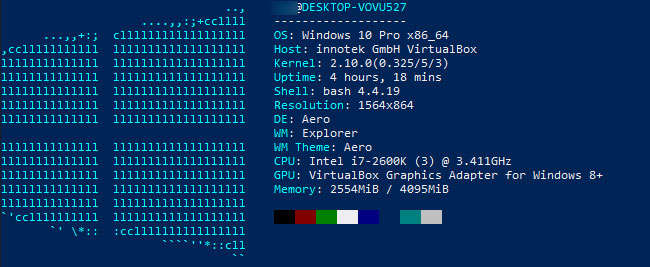
neofetch is even installable on Windows OS that has the scoop command line installer tool installer manager with below PowerShell code in cmd.exe (Command line):

powershell Set-ExecutionPolicy RemoteSigned -scope CurrentUser
iex (new-object net.webclient).downloadstring('https://get.scoop.sh')
scoop install git
scoop install neofetch

neofetch-microsoft-windows-hardware-command-line-report-tool-screenshot


By the way Scoop was quite a finding for me and it is pretty handy to install plenty of useful command line Linux / UNIX tools, such as curl, wget, git etc. in the same easy straight forward way as a standard yum or apt-get on Windows (without explicitly installing things as GnuWin and CygWin).
 

3. CPU-X graphical user interface hardware report Linux GUI alternative to Windows CPU-Z


The packages for CPU-X are a bit outdated and even though there are rpm packages for Fedora, OpenSuSE and .deb package for Debian for Debian, Ubuntu and ArchLinux (pacman), there is no up to date version for Debian 10 and the package builds distributed for different Linux distros are a bit outdated.

Thus to install CPU-X on any Linux distribution it is perhaps best to use the portable version (static binary) of CPU-X.
It is currently available on https://github.com/X0rg/CPU-X/releases

To install latest portable version of CPU-X

wget https://github.com/X0rg/CPU-X/releases/download/v3.2.4/CPU-X_v3.2.4_portable.tar.gz

mkdir CPU-X
cd CPU-X

tar -zxvvf CPU-X_v3.2.4_portable.tar.gz
-rwxr-xr-x yohan/users 4563032 2019-01-13 22:15 CPU-X_v3.2.4_portable.bsd64
-rwxr-xr-x yohan/users 5484968 2019-01-13 22:15 CPU-X_v3.2.4_portable.linux64


cp -rpf CPU-X_v3.2.4_portable.linux64 /usr/local/bin/
ln -sf /usr/local/bin/CPU-X_v3.2.4_portable.linux64 /usr/local/bin/cpu-x


Next run as superuser (root)
 

hipo@jeremiah:~$ su -c 'cpu-x'


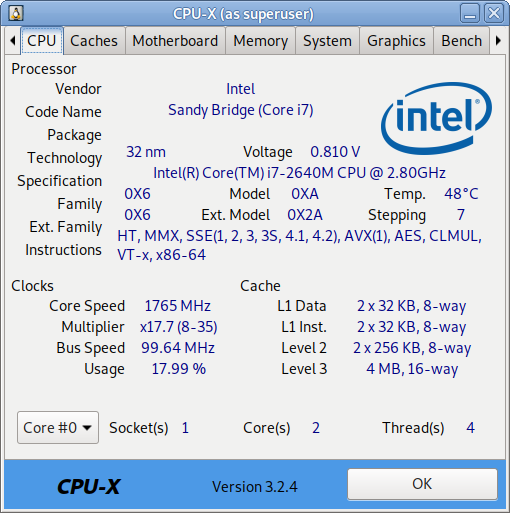
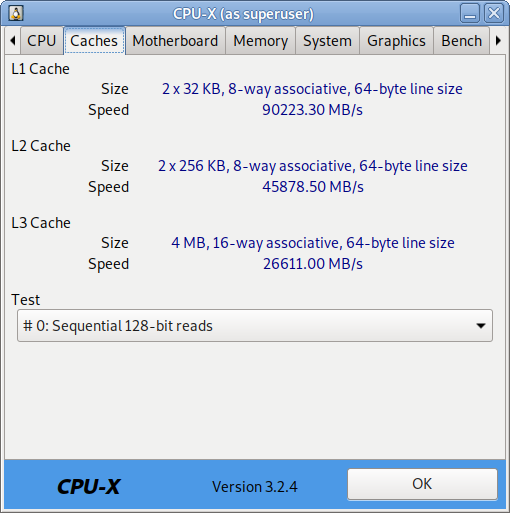
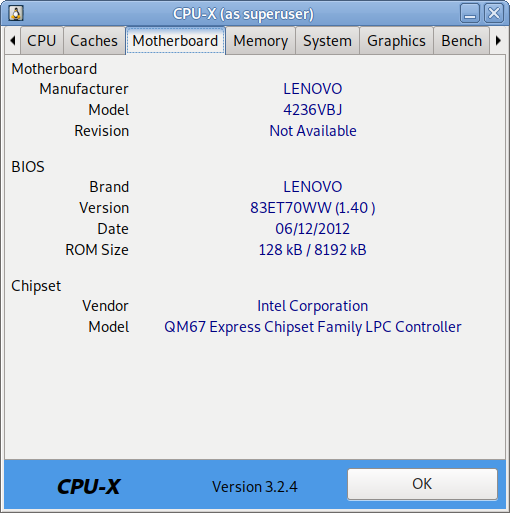
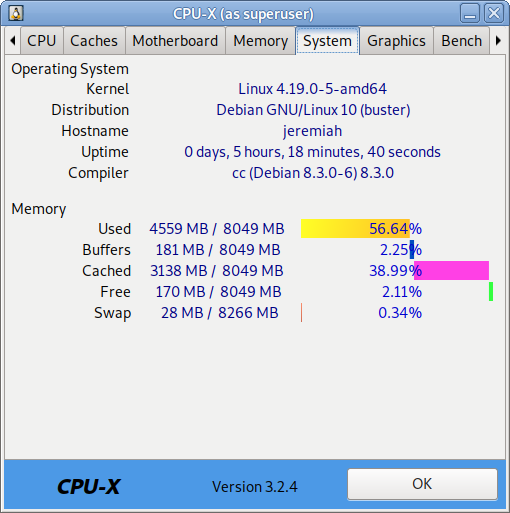
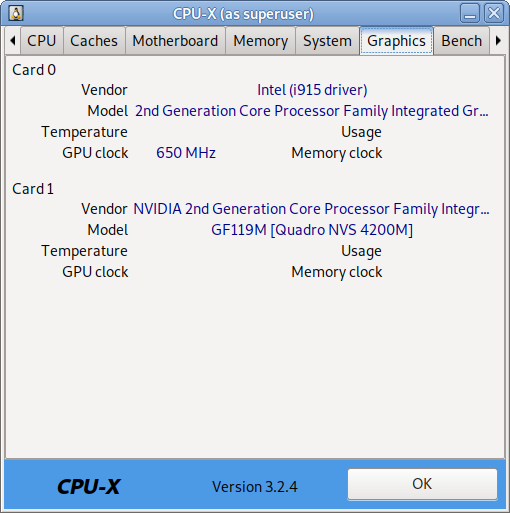
As seen from below screenshots cpu-x reports a lot of concrete specific hardware data on:

  • Processor
  • Motherboard
  • Memory
  • System
  • Graphic card
  • Performance

cpu-x-cpu-cpu-z-alternative-linux-screenshot-CPU-info

cpu-x-cpu-cpu-z-alternative-linux-screenshot-caches-info

cpu-x-cpu-cpu-z-alternative-linux-screenshot-Motherboard-info

cpu-x-cpu-cpu-z-alternative-linux-screenshot-memory-info

cpu-x-cpu-cpu-z-alternative-linux-screenshot-system-info

cpu-x-cpu-cpu-z-alternative-linux-screenshot-graphics-info

CPU-X can be installed also on FreeBSD very easily by just installing from BSD port tree sysutils/cpu-x/
It is also said to work on other *BSDs, NetBSD, OpenBSD Unixes but I guess this will require a manual compilation based on FreeBSD's port Makefile.

4. I-Nex another GUI alternative to CPU-Z for UNIX / Linux

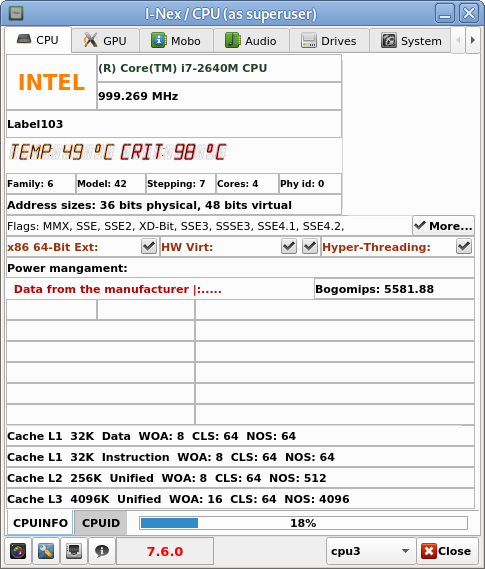
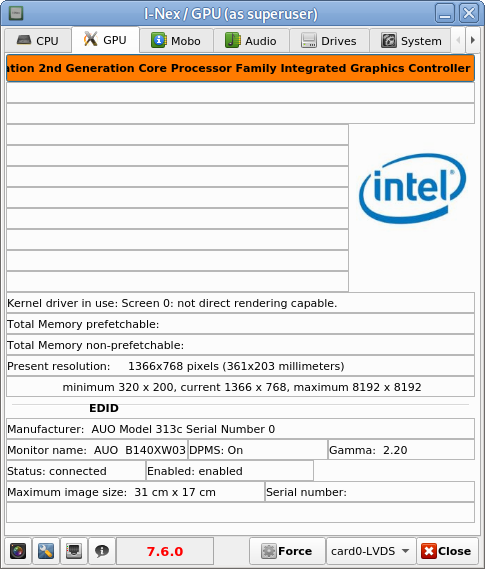
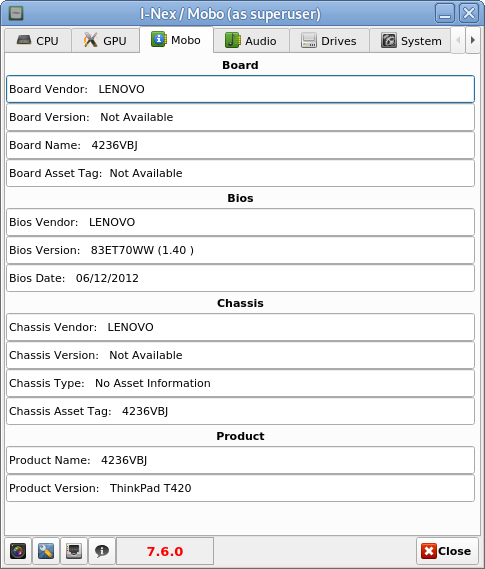
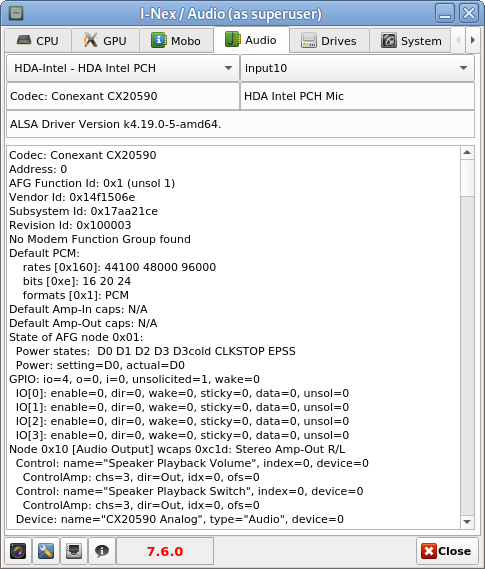
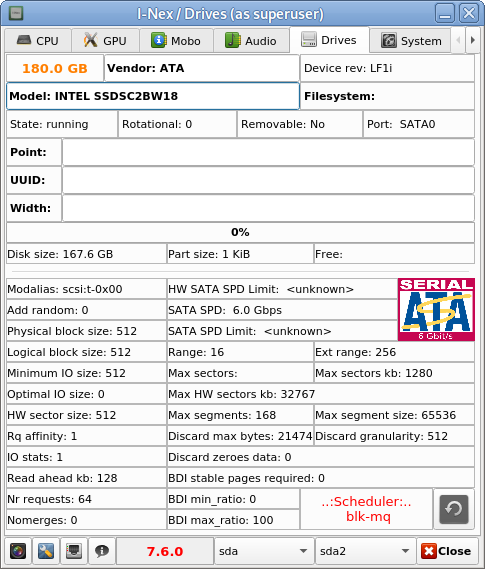
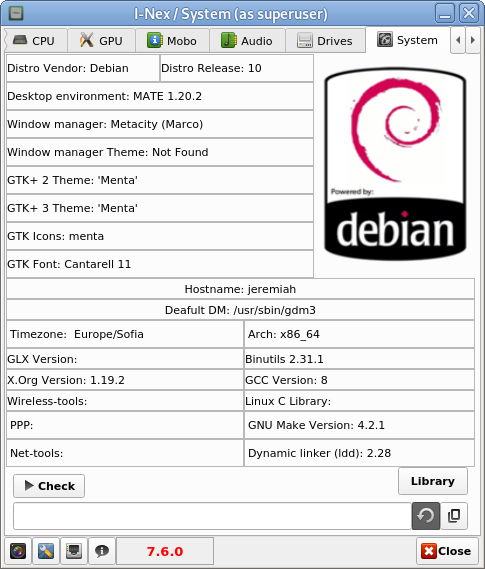
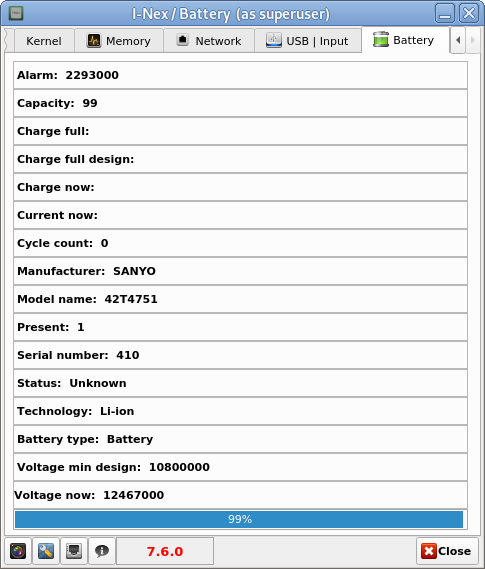
I-Nex is even more useful for general hardware reporting as it reports many hardware specifications not reported by CPU-X such as Battery type and Model Name  (if the hardware report is on a laptop), info on USB devices slots or plugged USB devices brand and specifications, the available Network devices on the system (MAC Addresses) of each of it, Installed and used drivers on Hard Disk (ATA / SATA / SCSI / SSD), HW Sector size, Logical Block size, HDD Sectors count and other specific Hard Drive data as well as information on available Audio (Sound Blaster) devices (HDA-Intel), used Codecs, loaded kernel ALSA driver, Video card used and most importantly indicators on Processor reported CPU (temperature).


To install I-nex

Go to https://launchpad.net/i-nex or any of the mirror links where it resides and install the respective package, in my case, I was doing the installation on Debian Linux, so fetched current latest amd64 package which as of moment of writting this article is i-nex_7.6.0-0-bzr977-20161012-ubuntu16.10.1_amd64.deb , next installed it with dpkg
 

dpkg -i i-nex_7.6.0-0-bzr977-20161012-ubuntu16.10.1_amd64.deb


As the package was depending on some other .deb packages, which failed to install to install the missing ones I had to further run
 

apt –fix-broken install

i-nex-cpu-info-linux-hardware-info-program


hre

I-Nex thermal indicators about CPU temperature on a Linux Desktop notebook

i-nex-gpu-info-linux-hardware-info-program

i-nex-mobo-info-linux-hardware-info-program

i-nex-audio-info-linux-hardware-info-program

i-nex-drivers-info-linux-hardware-info-program

i-nex-system-info-linux-hardware-info-program

i-nex-battery-info-linux-hardware-info-program


There are other Hardware identification report tools such as CUDA-Z that are useful to check if you have Nvidia Video Card hardware Installed on the PC to check the status of CUDA enabled GPUs, useful if working with nVidia Geforce, Quadro, Tesla cards and ION chipsets.

If you use it however be aware that CUDA-Z is not compatible with 3rd-party linux drivers for NVidia so make sure you have the current official Nvidia version.


5. Inxi full featured system information script


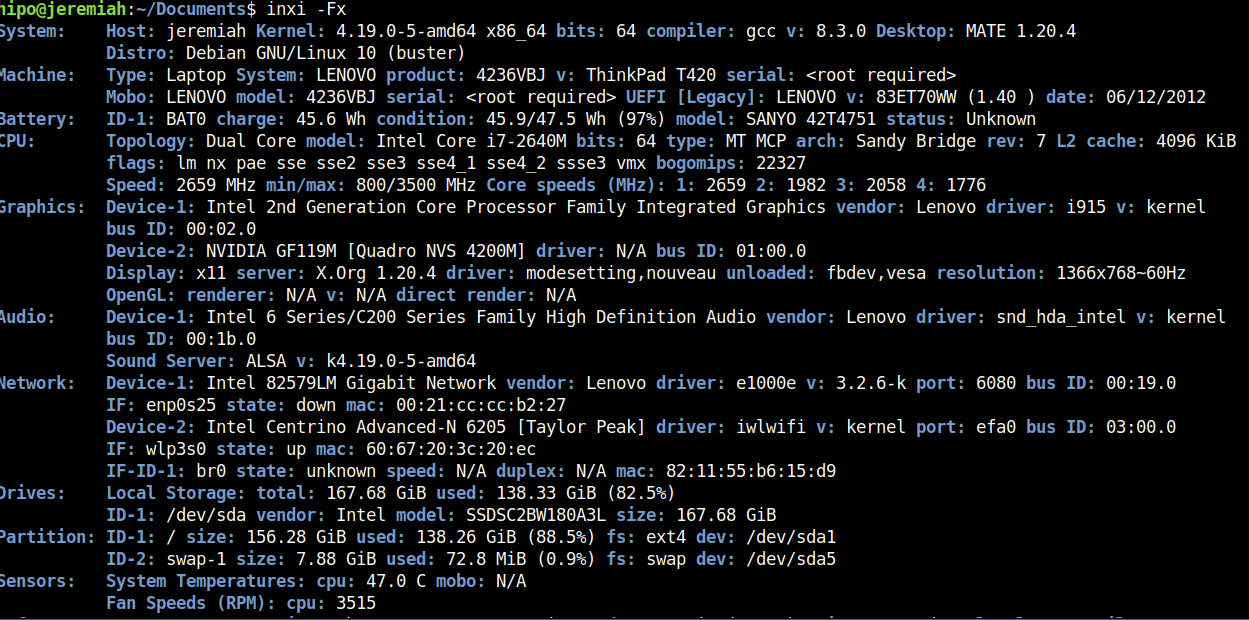
Inxi is a 10000 lines mega bash script that fetches hardware details from multiple different sources in /proc /sys and from commands on the system, and generates a beautiful looking console report that non technical users can read easily.

inxi-10-k-mega-bash-shell-script-reporting-on-installed-system-computer-hardware


inxi -Fx


inxi-report-on-installed-hardware-on-my-lenovo-thinkpad-home-laptop

Each of the pointed above tools has different method of collection of Hardware information from various resources e.g. – kernel loaded modules, dmesg, files like /proc/meminfo /proc/version /proc/scsi/scsi /proc/partitions.
Hence some of the tools are likely to report more info than otheres, so in case if some information you need regarding the system plugged in hardware is missing you can perhaps obtain it from another program. Most Linux distribution desktop provided GNOME package are including Hardinfo gui tool, but in many cases above mentioned tools are likely to add even more on info on what is inside your PC Box.
If you're aware of others tools that are useful not mentioned here please share it.

Preparing your Linux to work with the Cloud providers – Installing aws , gcloud, az, oc, cf CLI Cloud access command interfaces

Wednesday, October 10th, 2018

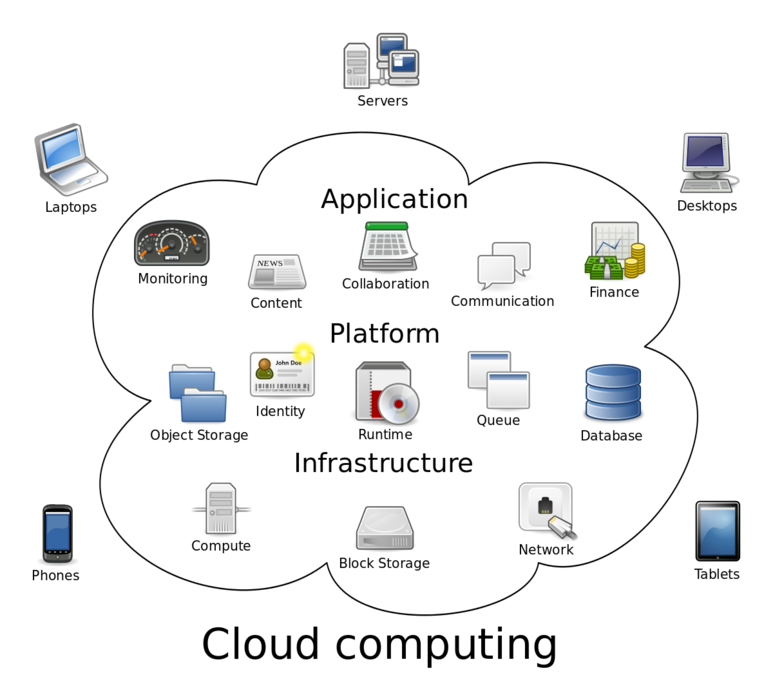
howto Install-Cloud-access-tools-for-google-aws-azure-openshift-cloud-foundryCloud_computing-explained-on-linux.svg

If you're a sysadmin / developer whose boss requires a migration of Stored Data, Database structures or Web Objects to Amazon Web Services / Google Clourd or you happen to be a DevOps Engineer you will certainly need to have installed as a minimumum amazon AWS and Google Clouds clients to do daily routines and script stuff in managing cloud resources without tampering to use the Web GUI interface.

Here is how to install the aws, gcloud, oc, az and cf next to your kubernetes client (kubectl) on your Linux Desktop.
 

1. Install Google Cloud  gcloud (to manage Google Cloud platform resources and developer workflow
 

google-cloud-logo

Here is few cmds to run to install  gcloud, gcloud alpha, gcloud beta, gsutil, and bq commands to manage your Google Cloud from CLI

a.) On Debian / Ubuntu / Mint or any other deb based distro

# Create environment variable for correct distribution
export CLOUD_SDK_REPO="cloud-sdk-$(lsb_release -c -s)"


# Add the Cloud SDK distribution URI as a package source
# echo "deb http://packages.cloud.google.com/apt $CLOUD_SDK_REPO main" | sudo tee -a /etc/apt/sources.list.d/google-cloud-sdk.list


# Import the Google Cloud Platform public key
$ sudo curl https://packages.cloud.google.com/apt/doc/apt-key.gpg | sudo apt-key add –


# Update the package list and install the Cloud SDK
$ sudo apt-get update && sudo apt-get install google-cloud-sdk


b) On CentOS, RHEL, Fedora Linux and other rpm based ones
 

$ sudo tee -a /etc/yum.repos.d/google-cloud-sdk.repo << EOM
[google-cloud-sdk]
name=Google Cloud SDK
baseurl=https://packages.cloud.google.com/yum/repos/cloud-sdk-el7-x86_64
enabled=1
gpgcheck=1
repo_gpgcheck=1
gpgkey=https://packages.cloud.google.com/yum/doc/yum-key.gpg
       https://packages.cloud.google.com/yum/doc/rpm-package-key.gpg
EOM

# yum install google-cloud-sdk


That's all now the text client to talk to Google Cloud's API gcloud is installed under
/usr/bin/gcloud

Latest install instructions of Google Cloud SDK are here.


2. Install AWS Cloud command line interface tool for managing AWS (Amazon Web Services)
 

AmazonWebservices_Logo.svg

AWS client is dependent on Python PIP so before you proceed you will have to install python-pip deb package if on Debian / Ubuntu Linux use apt:


# apt-get install –yes python-pip


It is also possible to install newest version of PIP a tiny shell script provided by Amazon get-pip.py


# curl -O https://bootstrap.pypa.io/get-pip.py
# python get-pip.py –user


# pip install awscli –upgrade –user


3. Install Azure Cloud Console access CLI command interface
 

Microsoft_Azure_Cloud-Logo.svg

On Debian / Ubuntu or any other deb based distro:

# AZ_REPO=$(lsb_release -cs)
# echo "deb [arch=amd64] https://packages.microsoft.com/repos/azure-cli/ $AZ_REPO main" | \
$ sudo tee /etc/apt/sources.list.d/azure-cli.list

# curl -L https://packages.microsoft.com/keys/microsoft.asc | sudo apt-key add –
$ sudo apt-get update
$ sudo apt-get install apt-transport-https azure-cli


Finaly to check that Azure CLI is properly installed run simple login with:


$ az login


$ sudo rpm –import https://packages.microsoft.com/keys/microsoft.asc
$ sudo sh -c 'echo -e "[azure-cli]\nname=Azure CLI\nbaseurl=https://packages.microsoft.com/yumrepos/azure-cli\nenabled=1\ngpgcheck=1\ngpgkey=https://packages.microsoft.com/keys/microsoft.asc" > /etc/yum.repos.d/azure-cli.repo'
$ sudo yum install azure-cli

$ az login


For Latest install instructions check Amazon's documentation here

4. Install OpenShift OC CLI tool to access OpenShift Open Source Cloud


OpenShift-Redhat-cloud-platform

Even thought OpenShift has its original Redhat produced package binaries, if you're not on RPM distro it is probably
best to install using official latest version from openshift github repo.


As of time of writting this article this is done with:


# wget https://github.com/openshift/origin/releases/download/v1.5.1/openshift-origin-client-tools-v1.5.1-7b451fc-linux-64bit.tar.gz
tar –xvf openshift-origin-client-tools-v1.5.1-7b451fc-linux-64bit.tar.gz


# # mv openshift-origin-client-tools-v1.5.1-7b451fc-linux-64bit oc-tool


# cd oc-tool
# echo'export PATH=$HOME/oc-tool:$PATH' >> ~/.bashrc


To test openshift, try to login to OpenShift cloud:


$ oc login
Server [https://localhost:8443]: https://128.XX.XX.XX:8443


Latest install instructions on OC here

5. Install Cloud Foundry cf CLI Cloud access tool

cloud-foundry-cloud-logo

a) On Debian / Ubuntu Linux based distributions, do run:


$ wget -q -O – https://packages.cloudfoundry.org/debian/cli.cloudfoundry.org.key | sudo apt-key add –
$ echo "deb https://packages.cloudfoundry.org/debian stable main" | sudo tee /etc/apt/sources.list.d/cloudfoundry-cli.list
$ sudo apt-get update
$ sudo apt-get install cf-cli


b) On RHEL Enterprise Linux / CentOS and Fedoras


$ sudo wget -O /etc/yum.repos.d/cloudfoundry-cli.repo https://packages.cloudfoundry.org/fedora/cloudfoundry-cli.repo
$ sudo yum install cf-cli


For latest install insructions on cf cli check Cloud Foundry's install site

There plenty of other Cloud providers with the number exponentially growing and most have their own custom cli tools to access but as there use is not so common as the 5 ones mentioned below, I've omited 'em. If you're interested to know the complete list of Cloud Providers providing Cloud Services check here.

6. Install Ruby GEMs RHC tools collection

If you have to work with Redhat Cloud Storage / OpenShift you will perhaps want to install also (RHC) Redhat Collection Tools.

Assuming that the Linux system is running an up2date version of ruby programming language do run:


root@jeremiah:~# gem install rhc
Fetching: net-ssh-5.0.2.gem (100%)
Successfully installed net-ssh-5.0.2
Fetching: net-ssh-gateway-2.0.0.gem (100%)
Successfully installed net-ssh-gateway-2.0.0
Fetching: net-ssh-multi-1.2.1.gem (100%)
Successfully installed net-ssh-multi-1.2.1
Fetching: minitar-0.7.gem (100%)
The `minitar` executable is no longer bundled with `minitar`. If you are
expecting this executable, make sure you also install `minitar-cli`.
Successfully installed minitar-0.7
Fetching: hashie-3.6.0.gem (100%)
Successfully installed hashie-3.6.0
Fetching: powerbar-1.0.18.gem (100%)
Successfully installed powerbar-1.0.18
Fetching: minitar-cli-0.7.gem (100%)
Successfully installed minitar-cli-0.7
Fetching: archive-tar-minitar-0.6.1.gem (100%)
'archive-tar-minitar' has been deprecated; just install 'minitar'.
Successfully installed archive-tar-minitar-0.6.1
Fetching: highline-1.6.21.gem (100%)
Successfully installed highline-1.6.21
Fetching: commander-4.2.1.gem (100%)
Successfully installed commander-4.2.1
Fetching: httpclient-2.6.0.1.gem (100%)
Successfully installed httpclient-2.6.0.1
Fetching: open4-1.3.4.gem (100%)
Successfully installed open4-1.3.4
Fetching: rhc-1.38.7.gem (100%)
===========================================================================


If this is your first time installing the RHC tools, please run 'rhc setup'

===========================================================================
Successfully installed rhc-1.38.7
Parsing documentation for net-ssh-5.0.2
Installing ri documentation for net-ssh-5.0.2
Parsing documentation for net-ssh-gateway-2.0.0
Installing ri documentation for net-ssh-gateway-2.0.0
Parsing documentation for net-ssh-multi-1.2.1
Installing ri documentation for net-ssh-multi-1.2.1
Parsing documentation for minitar-0.7
Installing ri documentation for minitar-0.7
Parsing documentation for hashie-3.6.0
Installing ri documentation for hashie-3.6.0
Parsing documentation for powerbar-1.0.18
Installing ri documentation for powerbar-1.0.18
Parsing documentation for minitar-cli-0.7
Installing ri documentation for minitar-cli-0.7
Parsing documentation for archive-tar-minitar-0.6.1
Installing ri documentation for archive-tar-minitar-0.6.1
Parsing documentation for highline-1.6.21
Installing ri documentation for highline-1.6.21
Parsing documentation for commander-4.2.1
Installing ri documentation for commander-4.2.1
Parsing documentation for httpclient-2.6.0.1
Installing ri documentation for httpclient-2.6.0.1
Parsing documentation for open4-1.3.4
Installing ri documentation for open4-1.3.4
Parsing documentation for rhc-1.38.7
Installing ri documentation for rhc-1.38.7
Done installing documentation for net-ssh, net-ssh-gateway, net-ssh-multi, minitar, hashie, powerbar, minitar-cli, archive-tar-minitar, highline, commander, httpclient, open4, rhc after 10 seconds
13 gems installed
root@jeremiah:~#

To start with rhc next do:
 

rhc setup
rhc app create my-app diy-0.1


and play with it to install software create services on the Redhat cloud.


Closure

This are just of the few of the numerous tools available and I definitely understand there is much more to be said on the topic.
If you can remember other tools tor interesting cloud starting up tips about stuff to do on a fresh installed Linux PC to make life easier with Cloud / PaaS / SaaS / DevOps engineer please drop a comment.