Basicly I am against the use of any Cloud type of service but as nowadays Cloud usage is almost inevitable and most of the times you need some kind of service to store and access remotely your Data from multiple devices such as DropBox, Google Drive, iCloud etc. and using some kind of infrastructure to execute high-performance computing is invitable just like the Private Cloud paid services online are booming nowdays, I decided to give a to research and test what is available as a free software in the field of Clouding (your data) 🙂
Undoubfully, it is really nice fact that there are Free Software / Open Source alternatives to run your Own personal Cloud to store your data from multiple locations on a single point.
The most popular and leading Cloud Collaboration service (which is OpenSource but unfortunately not under GPLv2 / GPV3 – e.g. not fully free software) is OwnCloud.
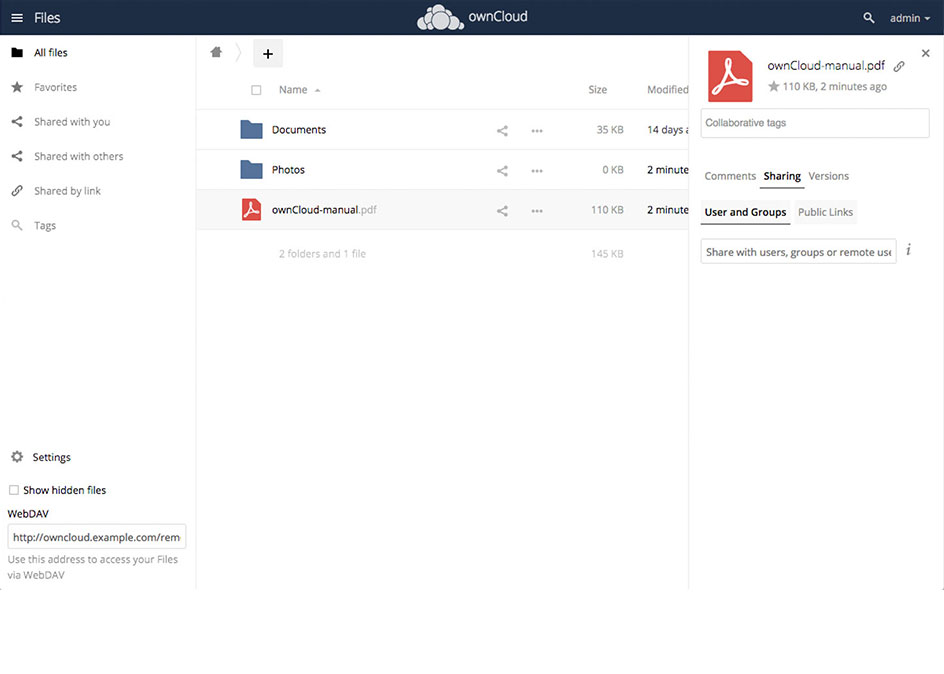
ownCloud is a flexible self-hosted PHP and Javascript based web application used for data synchronization and file sharing (where its remote file access capabilites are realized by Sabre/Dav an open source WebDav server.
OwnCloud allows end user to easily Store / Manage files, Calendars, Contacts, To-Do lists (user and group administration via OpenID and LDAP), public URLs can be easily, created, the users can interact with browser-based ODF (Open Document Format) word processor , there is a Bookmarking, URL Shortening service integrated, Gallery RSS Feed and Document Viewer tools such as PDF viewer etc. which makes it a great alternative to the popular Google Drive, iCloud, DropBox etc.
The main advantage of using a self-hosted Cloud is that Your data is hosted and managed by you (on your server and your hard drives) and not by some God knows who third party provider such as the upmentioned.
In other words by using OwnCloud you manage your own data and you don't share it ot on demand with the Security Agencies with CIA, MI6, Mussad … (as it is very likely most of publicly offered Cloud storage services keeps track on the data stored on them).
The other disadvantage of Cloud Computing is that the stored data on such is usually stored on multiple servers and you can never know for sure where your data is physically located, which in my opinion is way worse than the option with Self Hosted Cloud where you know where your data belongs and you can do whatever you want with your data keep it secret / delete it or share it on your demand.
OwnCloud has its clients for most popular Mobile (Smart Phone) platforms – an Android client is available in Google Play Store as well as in Apple iTunes besides the clients available for FreeBSD OS, the GNOME desktop integration package and Raspberry Pi.
For those who are looking for additional advanced features an Enterprise version of OwnCloud is also available aiming business use and included software support.
Assuming you have a homebrew server or have hired a dedidacted or VPS server (such as the Ones we provide) ,Installing OwnCloud on GNU / Linux is a relatively easy
task and it will take no more than 15 minutes to 2 hours of your life.
In that article I am going to give you a specific instructions on how to install on Debian GNU / Linux 9 but installing on RPM based distros is similar and straightfoward process.
1. Install MySQL / MariaDB database server backend
By default OwnCloud does use SQLite as a backend data storage but as SQLite stores its data in a file and is becoming quickly slow, is generally speaking slowre than relational databases such as MariaDB server (or the now almost becoming obsolete MySQL Community server).
Hence in this article I will explain how to install OwnCloud with MariaDB as a backend.
If you don't have it installed already, e.g. it is a new dedicated server install MariaDB with:
server:~# apt-get install –yes mariadb-server
Assuming you're install on a (brand new fresh Linux install – you might want to install also the following set of tools / services).
server:~# systemctl start mariadb
server:~# systemctl enable mariadb
server:~# mysql_secure_installation
mysql_secure_installation – is to finalize and secure MariaDB installation and set the root password.
2. Create necessery database and users for OwnCloud to the database server
linux:~# mysql -u root -p
MariaDB [(none)]> CREATE DATABASE owncloud CHARACTER SET utf8;
MariaDB [(none)]> GRANT ALL PRIVILEGES ON owncloud.* TO 'owncloud'@'localhost' IDENTIFIED BY 'owncloud_passwd';
MariaDB [(none)]> FLUSH PRIVILEGES;
MariaDB [(none)]> q
3. Install Apache + PHP necessery deb packages
As of time of writting the article on Debian 9.0 the required packages for a working Apache + PHP install for OwnCloud are as follows.
server:~# apt-get install –yes apache2 mariadb-server libapache2-mod-php7.0
openssl php-imagick php7.0-common php7.0-curl php7.0-gd
php7.0-imap php7.0-intl php7.0-json php7.0-ldap php7.0-mbstring
php7.0-mcrypt php7.0-mysql php7.0-pgsql php-smbclient php-ssh2
php7.0-sqlite3 php7.0-xml php7.0-zip php-redis php-apcu
4. Install Redis to use as a Memory Cache for accelerated / better performance ownCloud service
Redis is an in-memory kept key-value database that is similar to Memcached so OwnCloud could use it to cache stored data files. To install latest redis-server on Debian 9:
server:~# apt-get install –yes redis-server
5. Install ownCloud software packages on the server
Unfortunately, default package repositories on Debian 9 does not provide owncloud server packages but only some owncloud-client packages are provided, that's perhaps the packages issued by owncloud does not match debian packages.
As of time of writting this article, the latest available OwnCloud server version package for Debian is OC 10.
a) Add necessery GPG keys
The repositories to use are provided by owncloud.org, to use them we need to first add the necessery gpg key to verify the binaries have a legit checksum.
server:~# wget -qO- https://download.owncloud.org/download/repositories/stable/Debian_9.0/Release.key | sudo apt-key add –
b) Add owncloud.org repositories in separete sources.list file
server:~# echo 'deb https://download.owncloud.org/download/repositories/stable/Debian_9.0/ /' | sudo tee /etc/apt/sources.list.d/owncloud.list
c) Enable https transports for the apt install tool
server:~# apt-get –yes install apt-transport-https
d) Update Debian apt cache list files and install the pack
server:~# apt-get update
server:~# apt-get install –yes owncloud-files
By default owncloud store file location is /var/www/owncloud but on many servers that location is not really appropriate because /var/www might be situated on a hard drive partition whose size is not big enough, if that's the case just move the folder to another partition and create a symbolic link in /var/www/owncloud pointing to it …
6. Create necessery Apache configurations to make your new self-hosted cloud accessible
a) Create Apache config file
server:~# vim /etc/apache2/sites-available/owncloud.conf
Alias /owncloud "/var/www/owncloud/"
<Directory /var/www/owncloud/>
Options +FollowSymlinks
AllowOverride All<IfModule mod_dav.c>
Dav off
</IfModule>SetEnv HOME /var/www/owncloud
SetEnv HTTP_HOME /var/www/owncloud</Directory>
b) Enable Mod_Dav (WebDAV) if it is not enabled yet
server:~# ln -sf ../mods-available/dav_fs.conf
server:~# ln -sf ../mods-available/dav_fs.load
server:~# ln -sf ../mods-available/dav.load
server:~# ln -sf ../mods-available/dav_lock.load
c) Set proper permissions for /var/www/owncloud to make upload work properly
chown -R www-data: /var/www/owncloud/
d) Restart Apache WebServer (to make new configuration affective)
server:~# /etc/init.d/apache2 restart
7. Finalize OwnCloud Install
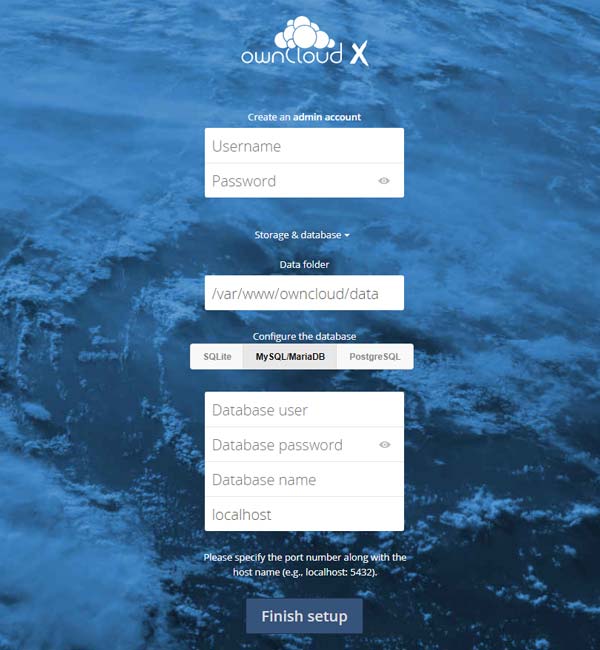
Access OwnCloud Web Interface to finish the database creation and set the administrator password for the New Self-Hosted cloud
http://Your_server_ip_address/owncloud/
By default the Web interface is accessible in unencrypted (insecure) http:// it is a recommended practice (if you already don't have an HTTPS SSL certificate install for the IP or the domain to install one either a self-signed certificate or even better to use LetsEncrypt CertBot to easily create a valid SSL for free for your domain

Just fill in in your desired user / pass and pass on the database user / password / db name (if required you can set also a different location for the data directory from the default one /var/www/owncloud/data.
Click Finish Setup and That's all folks!

OwnCloud is successfully installed on the server, you can now go and download a Mobile App or Desktop application for whatever OS you're using and start using it as a Dropbox replacement. In a certain moment you might want to consult also the official UserManual documentation as you would probably need further information on how to manage your owncloud.
Enjoy !
More helpful Articles

Tags: build own private cloud, data security, deb packages, debian linux, Free Software Open Source, linux?, owncloud, self hosted cloud, servers, stored, synchroniza data, tool, use, var, www


