Posts Tagged ‘debian linux’

Fix ruby: /usr/lib/libcrypt.so.1: version `XCRYPT_2.0′ not found in apt upgrade on Debian Linux 10

Saturday, August 5th, 2023

I've an old legacy Thinkpad Laptop that is for simplicty running Window Maker Wmaker which was laying on my home desk for almost an year and I remembered since i'm for few days in my parents home in Dobrich that it will be a good idea to update its software to the latest Debian packages to patch security issues with it. Thus if you're like me and  you tried to update your Debian 10 Linux to the latest Stable release debian packages  and you end up into a critical error that is preventing apt to to resolve conflicts (fix it with) cmds like:

# apt-get update –fix-missing

# apt –fix-broken install

As usual I looked into Google to see about solution and found few articles, claiming to have scripts that fix it but at the end nothing worked.
And the shitty error occured during the standard:

# apt-get update && apt-get upgrade

ruby: /usr/lib/libcrypt.so.1: version `XCRYPT_2.0' not found

Hence the cause and work around seemed to be very unexpected.
For some reason debian makes a link

root@noah:/lib# ls -al /lib/libcrypt.so.1
lrwxrwxrwx 1 root root 19 Aug  3 16:53 /lib/libcrypt.so.1 ->
libcrypt.so.1.bak

root@noah:/lib# ls -al /lib/libcrypt.so.1.bak
lrwxrwxrwx 1 root root 16 Jun 15  2017 /lib/libcrypt.so.1.bak -> libcrypt-2.24.so

Thus to resolve it and force the .deb upgrade package to continue it is up to simply deleting the strange simlink and re-run the

# apt-get update && apt-get upgrade

Setting up libc6:i386 (2.31-13+deb11u6) …
/usr/bin/perl: /lib/libcrypt.so.1: version `XCRYPT_2.0' not found (required by /usr/bin/perl)
dpkg: error processing package libc6:i386 (–configure):
 installed libc6:i386 package post-installation script subprocess returned error exit status 1
Errors were encountered while processing:
 libc6:i386

Few more times. If you get some critical apt failures still, each time make sure to rerun the command after doing a simple removal of the strange simbolic link with cmd:

# rm -f /lib/libcrypt.so.1

That's all folks after a short while your Debian will be updated to latest Enoy folks ! 🙂

Install btop on Debian Linux, btop an advanced htop like monitoring for Linux to beautify your console life

Tuesday, May 30th, 2023

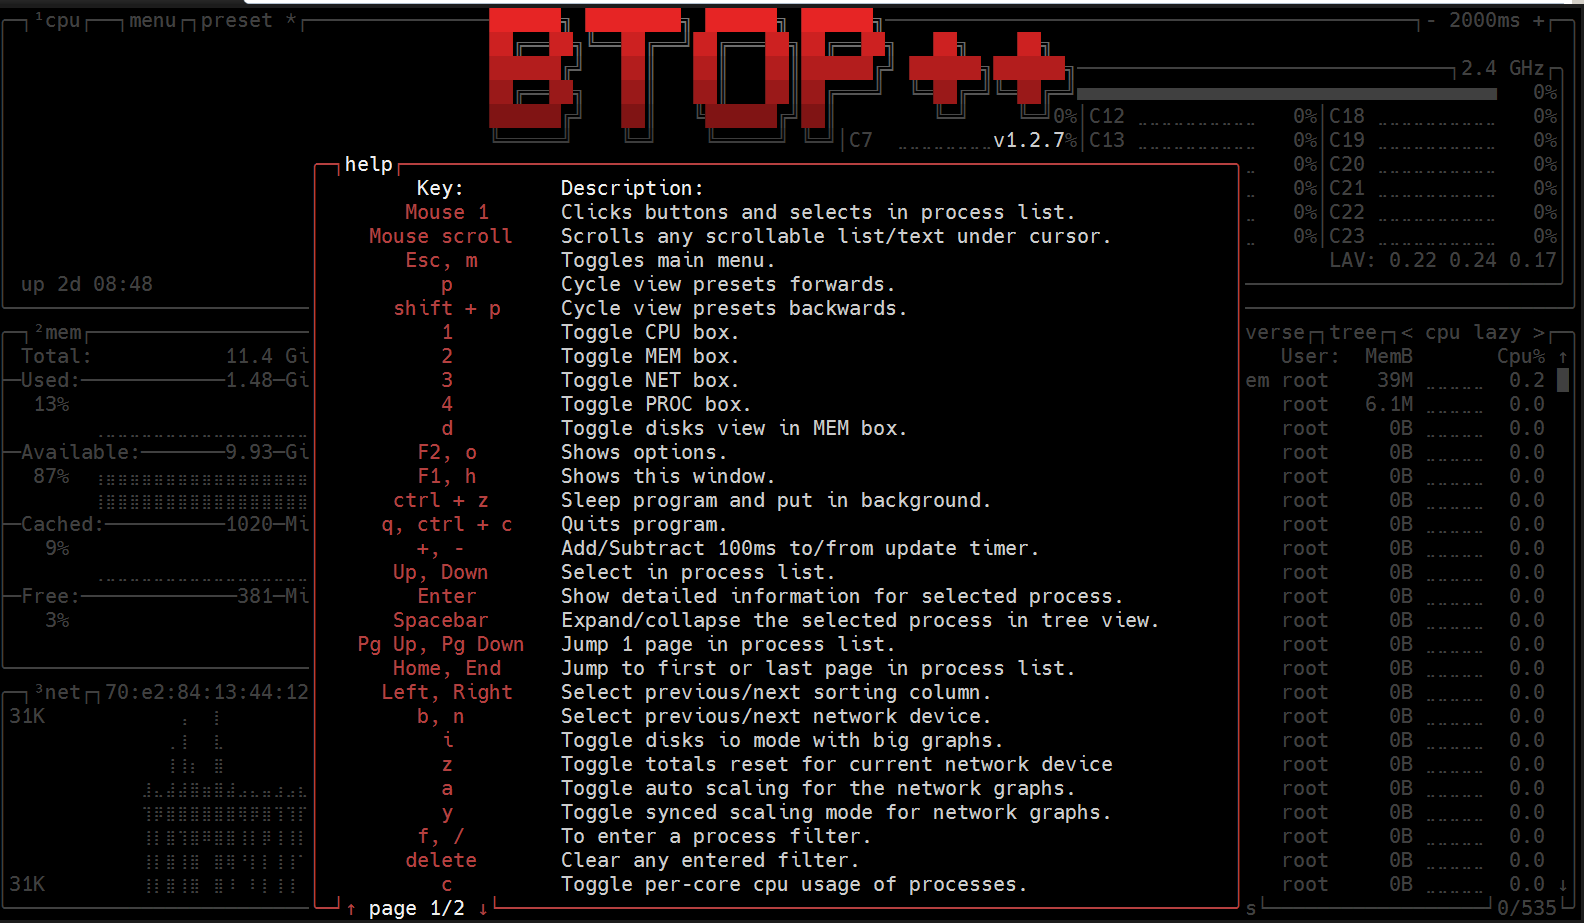
btop-linux-monitoring-tool-screenshot-help-menu

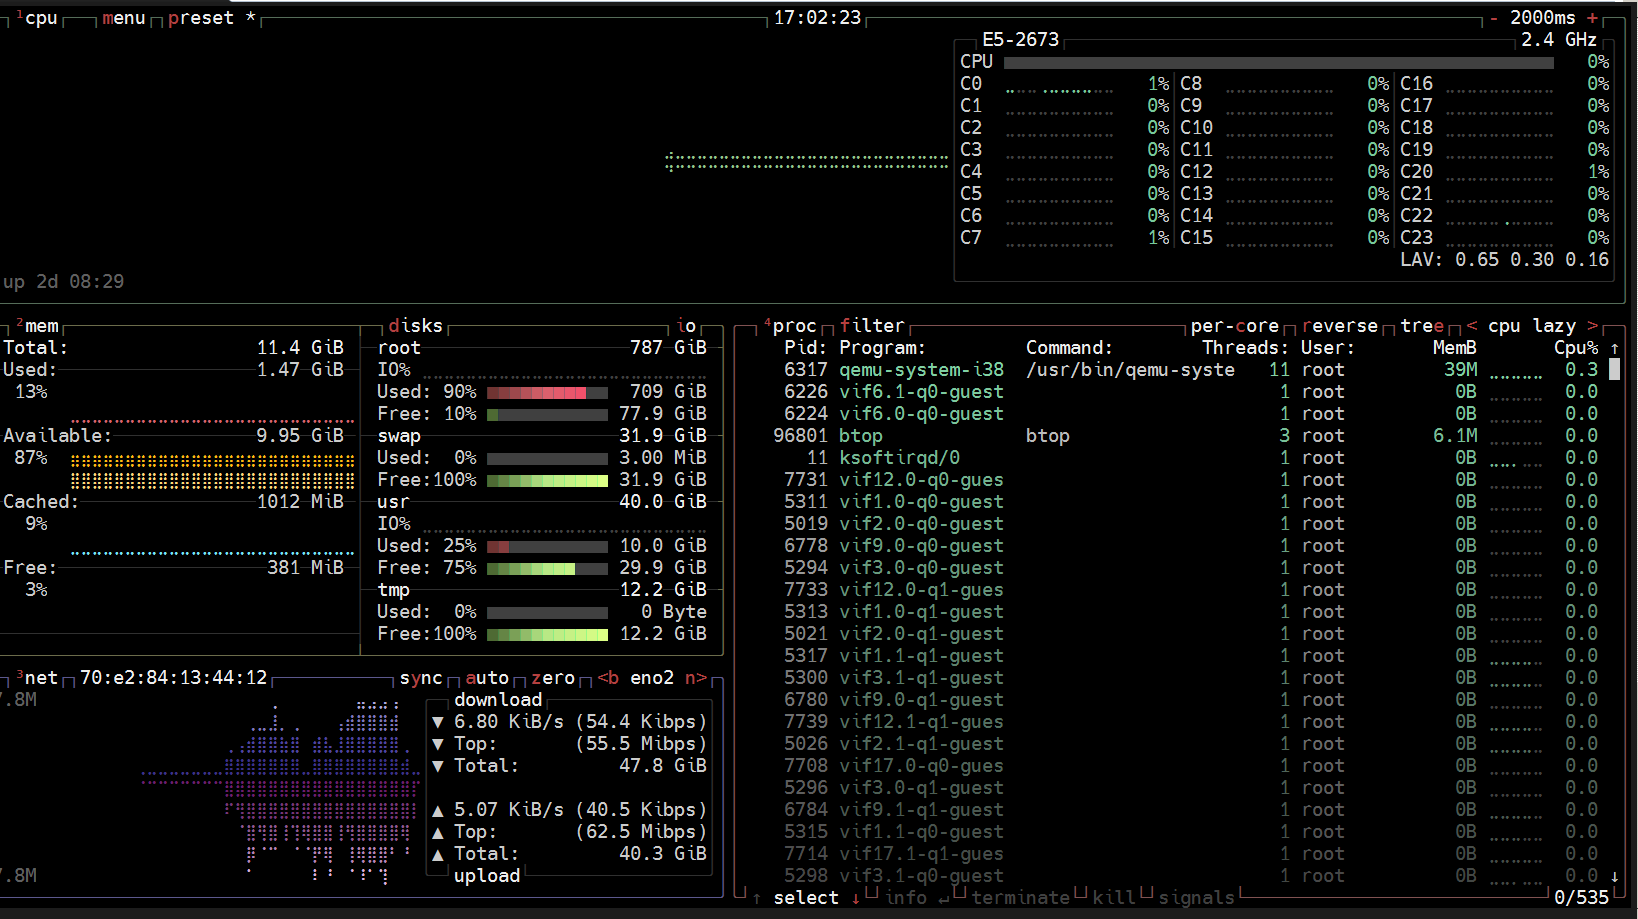
I've accidently stubmled on btop a colorful and interactive ncurses like command line utility to provide you a bunch of information about CPU / memory / disks and processes with nice console graphic in the style of Cubic Player 🙂
Those who love htop and like their consoles to be full of shiny colors, will really appreciate those nice Linux monitoring tool.
To install btop on latest current stable Debian bullseyes, you will have to install it via backports, as the regular Debian repositories does not have the tool available out of the box.

To Add backports packages support for your Debian 11:

1. Edit /etc/apt/sources.list and include following repositories


# vim /etc/apt/sources.list

deb http://deb.debian.org/debian bullseye-backports main contrib non-free
deb-src http://deb.debian.org/debian bullseye-backports main contrib non-free


2. Update the known repos list to include it


# apt update


3. Install the btop deb package from backports


# apt-cache show btop|grep -A 20 -i descrip
Description-en: Modern and colorful command line resource monitor that shows usage and stats
 btop is a modern and colorful command line resource monitor that shows
 usage and stats for processor, memory, disks, network and processes.
 btop features:
  – Easy to use, with a game inspired menu system.
  – Full mouse support, all buttons with a highlighted key is clickable
  and mouse scroll works in process list and menu boxes.
  – Fast and responsive UI with UP, DOWN keys process selection.
  – Function for showing detailed stats for selected process.
  – Ability to filter processes.
  – Easy switching between sorting options.
  – Tree view of processes.
  – Send any signal to selected process.
  – UI menu for changing all config file options.
  – Auto scaling graph for network usage.
  – Shows IO activity and speeds for disks
  – Battery meter
  – Selectable symbols for the graphs
  – Custom presets
  – And more…
  btop is written in C++ and is continuation of bashtop and bpytop.
Description-md5: 73df6c70fe01f5bf05cca0e3031c1fe2
Multi-Arch: foreign
Homepage: https://github.com/aristocratos/btop
Section: utils
Priority: optional
Filename: pool/main/b/btop/btop_1.2.7-1~bpo11+1_amd64.deb
Size: 431500
SHA256: d79e35c420a2ac5dd88ee96305e1ea7997166d365bd2f30e14ef57b556aecb36


# apt install -t bullsye-backports btop –yes

Once I installed it, I can straight use it except on some of my Linux machines, which were having a strange encoding $LANG defined, those ones spitted some errors like:

root@freak:~# btop
ERROR: No UTF-8 locale detected!
Use –utf-force argument to force start if you're sure your terminal can handle it.


To work around it simply redefine LANG variable and rerun it
 

# export LANG=en_US.UTF8

# btop


btop-linux-monitoring-console-beautiful-colorful-tool-graphics-screenshot

btop-linux-monitoring-tool-screenshot-help-menu

How to Install and Play old Arcade Multiple Arcade Machine Emulator Games on Linux in 2021 with xmame and GXMame GUI Frontend

Friday, May 14th, 2021

mame-multiple-arcade-machine-emulator
I've earlier blogged on how to install and play old arcade games with xmame compiled from source on the now old Debian 7 Linux under the article Install xmame from source on Debian Linux 7.0 (Wheezy) to play for better MAME (Arcade Games Emulation)
as well article on using the newer version of MAME emulator instead of xmame under the article Playing Arcade old school games on Debian Linux as well as how to make the MAME emulator work with a joystick see my previous How to configure Joystick ( Gamepad ) on Debian, Ubuntu, Mint GNU / Linux easily.

Since I have preinstalled my notebook with fresh Debian 10 Buster, for a long time I did not have the time as well as desire to play my favourite games of the youth to name a few this is Xain'd Sleena / Cadillacs and Dinosaurs (1993) / the Punisher (1993) / Captain Commando (1991) / Super Mario / Contra / Final Fight etc. and rest of the the SEGA Mega Drive / GameBoy / Nintendo / Terminator game (fake clone of nintendo) and other killing Arcade Classics of the late 90s and early year 2000, which we played on a public houses on a game cabinets with a joysticks. 
Hence I tried to reproduce some of my articles just as of 2021 to see whether still we can get a nice playable MAME emulator on Linux with a Graphical GUI for Mate or GNOME. And it seems using a straight mame out of Debian standard repositories did not work with some of the more sophisticated ROM .zip files from the nices such as Punisher or XSLEENA.zip, this is how this article got born in an attempt to give a way for such old school game freaks as me to be able to play there favorite games of the youth.

Below is the few steps adapted mostly from above articles with some head banging and loosing multiple hours wondering until I finally got a working XMAME ROM emulator with the simple but working GXMAME graphical frontend for M.A.M.E..

To compile xmame with joystick support be it analog or whatever joystick you have to use a Makefile like below

https://www.pc-freak.net/files/xmame-0.103-Makefile-for-joystick

Copy it on your PC and remove it to Makefile in the xmame-0.103 source dir:

# cd /usr/local/src/xmame-0.103


I have to install all the necessery package dependencies development header files, some of which are mentioned in the beginning of post articles and some of which I had to install manually, such as the preset Debian meta-package build-essentials Things to install on newly installed GNU / Linux (My favourite must have Linux text and GUI programs missing in fresh Linux installs), just to mention a few I remember had to install based on some compilation errors:

# apt-get install build-essential
# apt-get install –yes zlib1g-dev

# apt-get install –yes libexpat1-dev
# apt-get install –yes libghc-x11-dev
# apt-get install –yes x11proto-video-dev
# apt-get install –yes libxv-dev
# apt-get install libxext6
# apt-get install libxext6-dev
# apt-get install libxext-dev
# apt-get install libjpeg62-turbo-dev
# apt-get install libxinerama-dev
# apt-get install libgtk-3-dev
# apt-get install syslog-ng-dev
# apt-get install libgtk2.0-dev


If I'm missing some package necessery here you will have to find it yourself based on the *.h file produced as error during compile you should look it up with a cmd like:

# apt-file search glib2.h


And install it further.

You will need to edit Makefile or take and straight use or if necessery adapt an already prepared Makefile for my purpose:
 

# wget https://www.pc-freak.net/files/xmame-0.103-Makefile-for-joystick;
# mv https://www.pc-freak.net/files/xmame-0.103-Makefile-for-joystick Makefile
# make && make install


Some .zip roms does not properly work with the newer mame you need to instead use xmame ..

Below is the version I use on Debian 10 as of May 2021 year.

hipo@jeremiah:/usr/local/src$ xmame –version
GLINFO: loaded OpenGL library libGL.so!
GLINFO: loaded GLU    library libGLU.so!
xmame (x11) version 0.103 (May 13 2021)


To make the joystick work in xmame you will need to have a preset of modules loaded on the Linux for my old Genius joystick this is what works.

hipo@jeremiah:~/Games$ cat /etc/modules
# /etc/modules: kernel modules to load at boot time.
#
# This file contains the names of kernel modules that should be loaded
# at boot time, one per line. Lines beginning with "#" are ignored.
snd-seq
3c59x
snd-emu10k1
snd-pcm-oss
snd-mixer-oss
snd-seq-oss
joydev
ns558
sidewinder
gameport
analog
adi
pcigame
iforce
evdev
usbhid


Fill in your joystick module there and make sure you manually load each one of the modules with modprobe command.
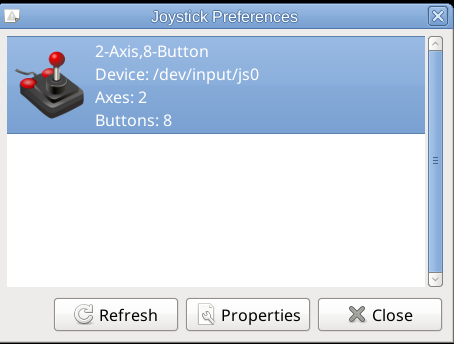
Next calibrate the joystick with some tool like jktest-gtk

jktest-gtk-linux-screenshot
If you need a good frontend for MATE / GNOME for xmame try gxmame. It is a real pain in the ass to configure, note that the only working version of xmame with good configuration as well as gxmame with a game list that is prebuild.
If you need xmame-0.103.tar.bz2 exact xmame version I'm using thethe archive is on:

https://www.pc-freak.net/files/xmame-0.103.tar.bz2
An old bundle of both gxmame and xmamerc configs is here

https://www.pc-freak.net/files/xmame.tar.gz

https://www.pc-freak.net/files/xmame-config-for-joystick-hipo.tar.gz
For example my old working version of xmame ~/.xmame is here https://www.pc-freak.net/files/xmame-config-for-joystick-hipo.tar.gz

Configuration of gxmame (even though it has has a GUI for configuring is below:

https://www.pc-freak.net/files/gxmame.tar.gz

xmamerc sample working file is here

https://www.pc-freak.net/files/xmamerc

My newest current version as of Debian 10 Squeeze of xmame and gxmame is below:

https://www.pc-freak.net/files/gxmame-config-newest_may_2021.tar.gz

https://www.pc-freak.net/files/xmame-config-newest_may_2021.tar.gz

Note that my rom files and stuff is located and configured in neewst configs to be under /home/hipo/Games/roms/ if your location is others grep it in .xmame/* and .gxmame/* files and set the correct PATH locations.

A VERY IMPORTANT NOTE is not to use the stable version of GXMAME even though it worked in 2003 fine as the project is abandoned and unsupported as of 2021 the latest downloadable stable gxmame file on Sourceforge gxmame-0.34b website is not working correctly (even though it compiles fine).
You have to compile and use instead the newer version gxmame-0.35beta1.

If you want to use gxmame with a joystick you need to compile it with the respective option:
 

root@jeremiah:/usr/local/src/gxmame-0.35beta1# ./configure –enable-joystick


gxmame 0.35beta1

Print debugging messages…… : no
Joystick support………….. : yes

GXMame will be installed in /usr/local/bin.
Warning: You have an old copy of gxmame at /usr/local/bin/gxmame.


configure complete, now type 'make'

To install compiled binaries do the usual:
 

# make && make install

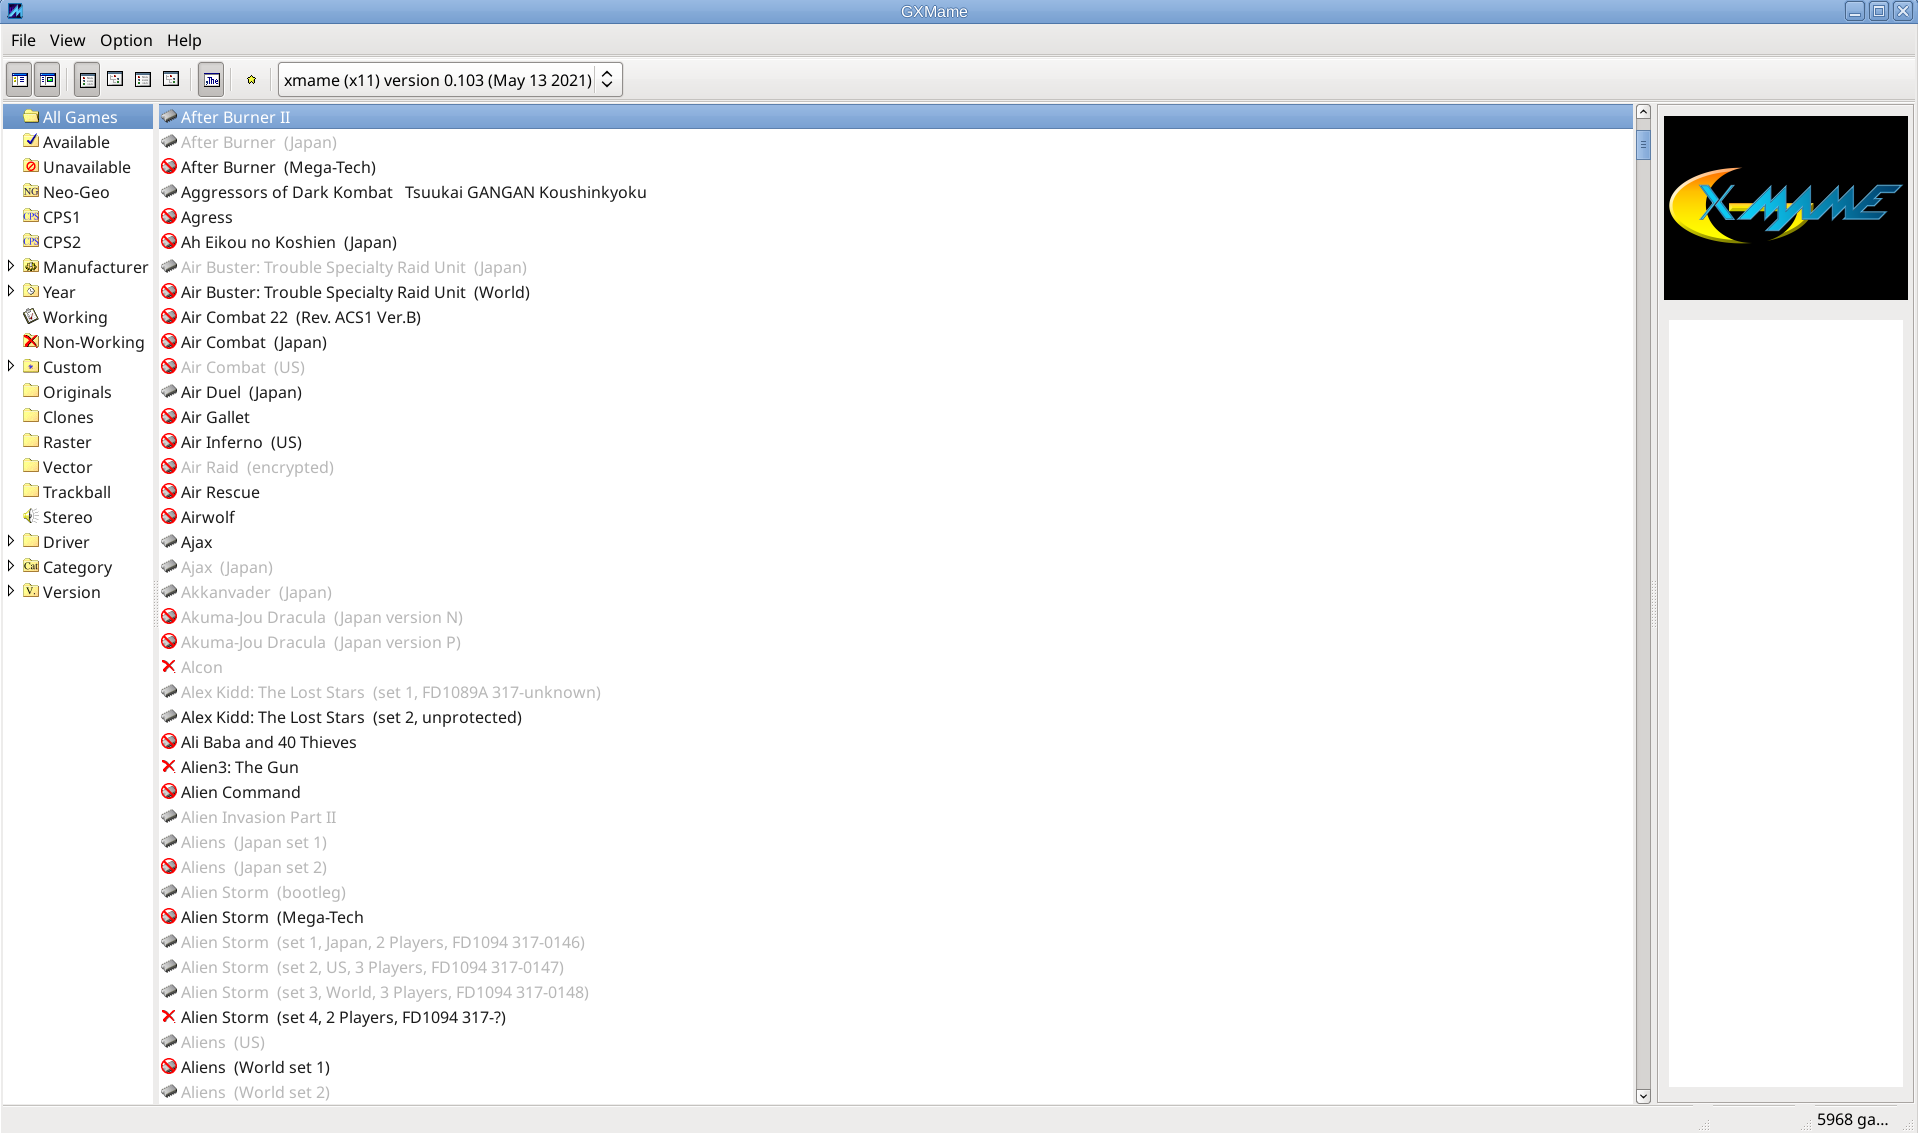
gxmame binary should be installed under /usr/local/bin/gxmame once launched you should get the shiny gxmame GUI.

gxmame-screenshot-debian-10-gnu-linux-mate-desktop

Perhaps there was other stuff I've done in the process I forgot to document here, so if you try to follow my guide and something does not work please tell me what I'm missing and you can't handle it either contact me.

The guide is for Debian Linux but should work on other .Deb based Linux distros such as Ubuntu / Linux Mint etc.

To enjoy my 4GB present of ROM files containing many of best well known M.A.M.E. ARCADE GAMES check archive here. Note that this collection was downloaded on the Internet and I do not hold any responsibility of the archive. If it contains files with any copyright infringment this is to be on your own.
 

Install certbot on Debian, Ubuntu, CentOS, Fedora Linux 10 / Generate and use Apache / Nginx SSL Letsencrypt certificates

Monday, December 21st, 2020

letsencrypt certbot install on any linux distribution with apache or nginx webserver howto</a><p> Let's Encrypt is a free, automated, and open certificate authority brought to you by the nonprofit <a data-cke-saved-href=
Internet Security Research Group (ISRG). ISRG group gave initiative with the goal to "encrypt the internet", i.e. offer free alternative to the overpriced domani registrer sold certificates with the goal to make more people offer SSL / TSL Free secured connection line on their websites. 
ISRG group supported Letsencrypt non-profit certificate authority actrively by Internet industry standard giants such as Mozilla, Cisco, EFF (Electronic Frontier Foundation),  Facebook, Google Chrome, Amazon AWS, OVH Cloud, Redhat, VMWare, Github and many many of the leading companies in IT.

Letsencrpyt is aimed at automating the process designed to overcome manual creation, validation, signing, installation, and renewal of certificates for secure websites. I.e. you don't have to manually write on console complicated openssl command lines with passing on Certificate CSR /  KEY / PEM files etc and generate Self-Signed Untrusted Authority Certificates (noted in my previous article How to generate Self-Signed SSL Certificates with openssl or use similar process to pay money generate secret key and submit the key to third party authority through a their website webadmin  interface in order to Generate SSL brought by Godaddy or Other Certificate Authority.

But of course as you can guess there are downsides as you submit your private key automatically via letsencrypt set of SSL certificate automation domain scripts to a third party Certificate Authority which is at Letsencrypt.org. A security intrusion in their private key store servers might mean a catastrophy for your data as malicious stealer might be able to decrypt your data with some additional effort and see in plain text what is talking to your Apache / Nginx or Mail Server nevertheless the cert. Hence for a high standards such as PCI environments Letsencrypt as well as for the paranoid security freak admins,  who don't trust the mainstream letsencrypt is definitely not a choice. Anyways for most small and midsized businesses who doesn't hold too much of a top secret data and want a moderate level of security Letsencrypt is a great opportunity to try. But enough talk, lets get down to business.

How to install and use certbot on Debian GNU / Linux 10 Buster?
Certbot is not available from the Debian software repositories by default, but it’s possible to configure the buster-backports repository in your /etc/apt/sources.list file to allow you to install a backport of the Certbot software with APT tool.
 

1. Install certbot on Debian / Ubuntu Linux


root@webserver:/etc/apt# tail -n 1 /etc/apt/sources.list
deb http://ftp.debian.org/debian buster-backports main


If not there append the repositories to file:


  • Install certbot-nginx certbot-apache deb packages

root@webserver:/ # echo 'deb http://ftp.debian.org/debian buster-backports main' >> /etc/apt/sources.list


  • Install certbot-nginx certbot-apache deb packages

root@webserver:/ # apt update
root@webserver:/ # apt install certbot python-certbot-nginx python3-certbot-apache python-certbot-nginx-doc


This will install the /usr/bin/certbot python executable script which is used to register / renew / revoke / delete your domains certificates.
 

2. Install letsencrypt certbot client on CentOS / RHEL / Fedora and other Linux Distributions


For RPM based distributions and other Linux distributions you will have to install snap package (if not already installed) and use snap command :


[root@centos ~ :] # yum install snapd
systemctl enable –now snapd.socket

To enable classic snap support, enter the following to create a symbolic link between

[root@centos ~ :] # ln -s /var/lib/snapd/snap /snap

snap command lets you install, configure, refresh and remove snaps.  Snaps are packages that work across many different Linux distributions, enabling secure delivery and operation of the latest apps and utilities.

[root@centos ~ :] # snap install core; sudo snap refresh core

Logout from console or Xsession to make the snap update its $PATH definitions.

Then use snap universal distro certbot classic package

 [root@centos ~ :] # snap install –classic certbot
[root@centos ~ :] # ln -s /snap/bin/certbot /usr/bin/certbot


If you're having an XOrg server access on the RHEL / CentOS via Xming or other type of Xemulator you might check out also the snap-store as it contains a multitude of packages installable which are not usually available in RPM distros.

 [root@centos ~ :] # snap install snap-store


how-to-install-snap-applications-on-centos-rhel-linux-snap-store

snap-store is a powerful and via it you can install many non easily installable stuff on Linux such as eclipse famous development IDE, notepad++ , Discord, the so favourite for the Quality Assurance guy Protocol tester Postman etc.

  • Installing certbot to any distribution via acme.sh script

Another often preferred solution to Universally deploy  and upgrade an existing LetsEncrypt program to any Linux distribution (e.g. RHEL / CentOS / Fedora etc.) is the acme.sh script. To install acme you have to clone the repository and run the script with –install

P.S. If you don't have git installed yet do

root@webserver:/ # apt-get install –yes git


and then the usual git clone to fetch it at your side

# cd /root
# git clone https://github.com/acmesh-official/acme.sh
Cloning into 'acme.sh'…
remote: Enumerating objects: 71, done.
remote: Counting objects: 100% (71/71), done.
remote: Compressing objects: 100% (53/53), done.
remote: Total 12475 (delta 39), reused 38 (delta 18), pack-reused 12404
Receiving objects: 100% (12475/12475), 4.79 MiB | 6.66 MiB/s, done.
Resolving deltas: 100% (7444/7444), done.

# sh acme.sh –install


To later upgrade acme.sh to latest you can do

# sh acme.sh –upgrade


In order to renew a concrete existing letsencrypt certificiate

# sh acme.sh –renew domainname.com


To renew all certificates using acme.sh script

# ./acme.sh –renew-all


3. Generate Apache or NGINX Free SSL / TLS Certificate with certbot tool

Now lets generate a certificate for a domain running on Apache Webserver with a Website WebRoot directory /home/phpdev/public/www


root@webserver:/ # certbot –apache –webroot -w /home/phpdev/public/www/ -d your-domain-name.com -d your-domain-name.com

root@webserver:/ # certbot certonly –webroot -w /home/phpdev/public/www/ -d your-domain-name.com -d other-domain-name.com


As you see all the domains for which you will need to generate are passed on with -d option.

Once certificates are properly generated you can test it in a browser and once you're sure they work as expected usually you can sleep safe for the next 3 months ( 90 days) which is the default for TSL / SSL Letsencrypt certificates the reason behind of course is security.


4. Enable freshly generated letsencrypt SSL certificate in Nginx VirtualHost config

Go to your nginx VirtualHost configuration (i.e. /etc/nginx/sites-enabled/phpmyadmin.adzone.pro ) and inside chunk of config add after location { … } – 443 TCP Port SSL listener (as in shown in bolded configuration)
 

server {

….
   location ~ \.php$ {
      include /etc/nginx/fastcgi_params;
##      fastcgi_pass 127.0.0.1:9000;
      fastcgi_pass unix:/run/php/php7.3-fpm.sock;
      fastcgi_index index.php;
      fastcgi_param SCRIPT_FILENAME /usr/share/phpmyadmin$fastcgi_script_name;
   }


    listen 443 ssl; # managed by Certbot
    ssl_certificate /etc/letsencrypt/live/phpmyadmin.adzone.pro/fullchain.pem; # managed by Certbot
    ssl_certificate_key /etc/letsencrypt/live/phpmyadmin.adzone.pro/privkey.pem; # managed by Certbot
    include /etc/letsencrypt/options-ssl-nginx.conf; # managed by Certbot
    ssl_dhparam /etc/letsencrypt/ssl-dhparams.pem; # managed by Certbot


5. Enable new generated letsencrypt SSL certificate in Apache VirtualHost


In /etc/apache2/{sites-available,sites-enabled}/your-domain.com-ssl.conf you should have as a minimum a configuration setup like below:


NameVirtualHost *:443 <VirtualHost 123.123.123.12:443>
    ServerAdmin hipo@domain.com
    ServerName www.pc-freak.net
    ServerAlias www.your-domain.com wwww.your-domain.com your-domain.com
 
    HostnameLookups off
    DocumentRoot /var/www
    DirectoryIndex index.html index.htm index.php index.html.var


CheckSpelling on
SSLEngine on

    <Directory />
        Options FollowSymLinks
        AllowOverride All
        ##Order allow,deny
        ##allow from all
        Require all granted
    </Directory>
    <Directory /var/www>
        Options Indexes FollowSymLinks MultiViews
        AllowOverride All
##      Order allow,deny
##      allow from all
Require all granted
    </Directory>

Include /etc/letsencrypt/options-ssl-apache.conf
SSLCertificateFile /etc/letsencrypt/live/your-domain.com/fullchain.pem
SSLCertificateKeyFile /etc/letsencrypt/live/your-domain.com/privkey.pem
</VirtualHost>


6. Simulate a certificate regenerate with –dry-run

Soon before the 90 days period expiry approaches, it is a good idea to test how all installed Nginx webserver certficiates will be renewed and whether any issues are expected this can be done with the –dry-run option.

root@webserver:/ # certbot renew –dry-run


– – – – – – – – – – – – – – – – – – – – – – – – – – – – – – – – – – – – – – – –
** DRY RUN: simulating 'certbot renew' close to cert expiry
**          (The test certificates below have not been saved.)

Congratulations, all renewals succeeded. The following certs have been renewed:
  /etc/letsencrypt/live/adzone.pro/fullchain.pem (success)
  /etc/letsencrypt/live/cdn.natsr.pro/fullchain.pem (success)
  /etc/letsencrypt/live/mail.adzone.pro/fullchain.pem (success)
  /etc/letsencrypt/live/natsr.pro-0001/fullchain.pem (success)
  /etc/letsencrypt/live/natsr.pro/fullchain.pem (success)
  /etc/letsencrypt/live/phpmyadmin.adzone.pro/fullchain.pem (success)
  /etc/letsencrypt/live/www.adzone.pro/fullchain.pem (success)
  /etc/letsencrypt/live/www.natsr.pro/fullchain.pem (success)
** DRY RUN: simulating 'certbot renew' close to cert expiry
**          (The test certificates above have not been saved.)
– – – – – – – – – – – – – – – – – – – – – – – – – – – – – – – – – – – – – – – –


7. Renew a certificate from a multiple installed certificate list

In some time when you need to renew letsencrypt domain certificates you can list them and choose manually which one you want to renew.

root@webserver:/ # certbot –force-renewal
Saving debug log to /var/log/letsencrypt/letsencrypt.log

How would you like to authenticate and install certificates?
– – – – – – – – – – – – – – – – – – – – – – – – – – – – – – – – – – – – – – – –
1: Apache Web Server plugin (apache)
2: Nginx Web Server plugin (nginx)
– – – – – – – – – – – – – – – – – – – – – – – – – – – – – – – – – – – – – – – –
Select the appropriate number [1-2] then [enter] (press 'c' to cancel): 2
Plugins selected: Authenticator nginx, Installer nginx

Which names would you like to activate HTTPS for?
– – – – – – – – – – – – – – – – – – – – – – – – – – – – – – – – – – – – – – – –
1: adzone.pro
2: mail.adzone.pro
3: phpmyadmin.adzone.pro
4: www.adzone.pro
5: natsr.pro
6: cdn.natsr.pro
7: www.natsr.pro
– – – – – – – – – – – – – – – – – – – – – – – – – – – – – – – – – – – – – – – –
Select the appropriate numbers separated by commas and/or spaces, or leave input
blank to select all options shown (Enter 'c' to cancel): 3
Renewing an existing certificate
Deploying Certificate to VirtualHost /etc/nginx/sites-enabled/phpmyadmin.adzone.pro

Please choose whether or not to redirect HTTP traffic to HTTPS, removing HTTP access.
– – – – – – – – – – – – – – – – – – – – – – – – – – – – – – – – – – – – – – – –
1: No redirect – Make no further changes to the webserver configuration.
2: Redirect – Make all requests redirect to secure HTTPS access. Choose this for
new sites, or if you're confident your site works on HTTPS. You can undo this
change by editing your web server's configuration.
– – – – – – – – – – – – – – – – – – – – – – – – – – – – – – – – – – – – – – – –
Select the appropriate number [1-2] then [enter] (press 'c' to cancel): 2
Redirecting all traffic on port 80 to ssl in /etc/nginx/sites-enabled/phpmyadmin.adzone.pro

– – – – – – – – – – – – – – – – – – – – – – – – – – – – – – – – – – – – – – – –
Your existing certificate has been successfully renewed, and the new certificate
has been installed.

The new certificate covers the following domains: https://phpmyadmin.adzone.pro

You should test your configuration at:
https://www.ssllabs.com/ssltest/analyze.html?d=phpmyadmin.adzone.pro
– – – – – – – – – – – – – – – – – – – – – – – – – – – – – – – – – – – – – – – –

IMPORTANT NOTES:
 – Congratulations! Your certificate and chain have been saved at:
   /etc/letsencrypt/live/phpmyadmin.adzone.pro/fullchain.pem

   Your key file has been saved at:
   /etc/letsencrypt/live/phpmyadmin.adzone.pro/privkey.pem
   Your cert will expire on 2021-03-21. To obtain a new or tweaked
   version of this certificate in the future, simply run certbot again
   with the "certonly" option. To non-interactively renew *all* of
   your certificates, run "certbot renew"
 – If you like Certbot, please consider supporting our work by:

   Donating to ISRG / Let's Encrypt:   https://letsencrypt.org/donate
   Donating to EFF:                    https://eff.org/donate-le


8. Renew all present SSL certificates

root@webserver:/ # certbot renew

Processing /etc/letsencrypt/renewal/www.natsr.pro.conf
– – – – – – – – – – – – – – – – – – – – – – – – – – – – – – – – – – – – – – – –
Cert not yet due for renewal


– – – – – – – – – – – – – – – – – – – – – – – – – – – – – – – – – – – – – – – –

The following certs are not due for renewal yet:
  /etc/letsencrypt/live/adzone.pro/fullchain.pem expires on 2021-03-01 (skipped)
  /etc/letsencrypt/live/cdn.natsr.pro/fullchain.pem expires on 2021-02-28 (skipped)
  /etc/letsencrypt/live/mail.adzone.pro/fullchain.pem expires on 2021-02-28 (skipped)
  /etc/letsencrypt/live/natsr.pro-0001/fullchain.pem expires on 2021-03-01 (skipped)
  /etc/letsencrypt/live/natsr.pro/fullchain.pem expires on 2021-02-25 (skipped)
  /etc/letsencrypt/live/phpmyadmin.adzone.pro/fullchain.pem expires on 2021-03-21 (skipped)
  /etc/letsencrypt/live/www.adzone.pro/fullchain.pem expires on 2021-02-28 (skipped)
  /etc/letsencrypt/live/www.natsr.pro/fullchain.pem expires on 2021-03-01 (skipped)
No renewals were attempted.
– – – – – – – – – – – – – – – – – – – – – – – – – – – – – – – – – – – – – – – –


9. Renew all existing server certificates from a cron job


The certbot package will install a script under /etc/cron.d/certbot to be run that will attempt every 12 hours however from my experience
often this script is not going to work, the script looks similar to below:

# Upgrade all existing SSL certbot machine certificates


0 */12 * * * root test -x /usr/bin/certbot -a \! -d /run/systemd/system && perl -e 'sleep int(rand(43200))' && certbot -q renew

Another approach to renew all installed certificates if you want to have a specific options and keep log of what happened is using a tiny shell script like this:


10. Auto renew installed SSL / TSL Certbot certificates with a bash loop over all present certificates

#!/bin/sh
# update SSL certificates
# prints from 1 to 104 (according to each certbot generated certificate and triggers rewew and logs what happened to log file
# an ugly hack for certbot certificate renew
for i in $(seq 1 104); do echo "Updating $i SSL Cert" | tee -a /root/certificate-update.log; yes "$i" | certbot –force-renewal | tee -a /root/certificate-update.log 2>&1; sleep 5; done

Note: The seq 1 104 is the range depends on the count of installed SSL certificates you have installed on the machine, that can be seen and set the proper value according to your case when you run one time certbot –force-renewal.
 

Reinstall all Debian packages with a copy of apt deb package list from another working Debian Linux installation

Wednesday, July 29th, 2020

Reinstall-all-Debian-packages-with-copy-of-apt-packages-list-from-another-working-Debian-Linux-installation

Few days ago, in the hurry in the small hours of the night, I've done something extremely stupid. Wanting to move out a .tar.gz binary copy of qmail installation to /var/lib/qmail with all the dependent qmail items instead of extracting to admin user /root directory (/root), I've extracted it to the main Operating system root / directrory.
Not noticing this, I've quickly executed rm -rf var with the idea to delete all directory tree under /root/var just 3 seconds later, I've realized I'm issuing the rm -rf var with the wrong location WITH a root user !!!! Being scared on what I've done, I've quickly pressed CTRL+C to immedately cancel the deletion operation of my /var.
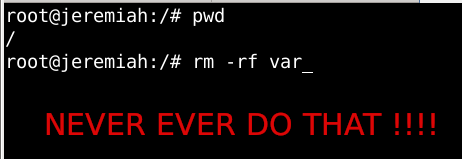
wrong-system-var-rm-linux-dont-do-that-ever-or-your-system-will-end-up-irreversably-damaged

But as you can guess, since the machine has an Slid State Drive drive and SSD memory drive are much more faster in I/O operations than the classical ATA / SATA disks. I was not quick enough to cancel the operation and I've noticed already some part of my /var have been R.I.P-pped in the heaven of directories.

This was ofcourse upsetting so for a while I rethinked the situation to get some ideas on what I can do to recover my system ASAP!!! and I had the idea of course to try to reinstall All my installed .deb debian packages to restore system closest to the normal, before my stupid mistake.

Guess my unpleasent suprise when I have realized dpkg and respectively apt-get apt and aptitude package management tools cannot anymore handle packages as Debian Linux's package dependency database has been damaged due to missing dpkg directory 


/var/lib/dpkg 


Oh man that was unpleasent, especially since I've installed plenty of stuff that is custom on my Mate based desktop and, generally reinstalling it updating the sytem to the latest Debian security updates etc. will be time consuming and painful process I wanted to omit.

So of course the logical thing to do here was to try to somehow recover somehow a database copy of /var/lib/dpkg  if that was possible, that of course led me to the idea to lookup for a way to recover my /var/lib/dpkg from backup but since I did not maintained any backup copy of my OS anywhere that was not really possible, so anyways I wondered whether dpkg does not keep some kind of database backups somewhere in case if something goes wrong with its database.
This led me to this nice Ubuntu thred which has pointed me to the part of my root rm -rf dpkg db disaster recovery solution.
Luckily .deb package management creators has thought about situation similar to mine and to give the user a restore point for /var/lib/dpkg damaged database

/var/lib/dpkg is periodically backed up in /var/backups

A typical /var/lib/dpkg on Ubuntu and Debian Linux looks like so:
 

hipo@jeremiah:/var/backups$ ls -l /var/lib/dpkg
total 12572
drwxr-xr-x 2 root root    4096 Jul 26 03:22 alternatives
-rw-r–r– 1 root root      11 Oct 14  2017 arch
-rw-r–r– 1 root root 2199402 Jul 25 20:04 available
-rw-r–r– 1 root root 2199402 Oct 19  2017 available-old
-rw-r–r– 1 root root       8 Sep  6  2012 cmethopt
-rw-r–r– 1 root root    1337 Jul 26 01:39 diversions
-rw-r–r– 1 root root    1223 Jul 26 01:39 diversions-old
drwxr-xr-x 2 root root  679936 Jul 28 14:17 info
-rw-r—– 1 root root       0 Jul 28 14:17 lock
-rw-r—– 1 root root       0 Jul 26 03:00 lock-frontend
drwxr-xr-x 2 root root    4096 Sep 17  2012 parts
-rw-r–r– 1 root root    1011 Jul 25 23:59 statoverride
-rw-r–r– 1 root root     965 Jul 25 23:59 statoverride-old
-rw-r–r– 1 root root 3873710 Jul 28 14:17 status
-rw-r–r– 1 root root 3873712 Jul 28 14:17 status-old
drwxr-xr-x 2 root root    4096 Jul 26 03:22 triggers
drwxr-xr-x 2 root root    4096 Jul 28 14:17 updates

Before proceeding with this radical stuff to move out /var/lib/dpkg/info from another machine to /var mistakenyl removed oned. I have tried to recover with the well known:

  • extundelete
  • foremost
  • recover
  • ext4magic
  • ext3grep
  • gddrescue
  • ddrescue
  • myrescue
  • testdisk
  • photorec

Linux file deletion recovery tools from a USB stick loaded with a Number of LiveCD distributions, i.e. tested recovery with:

  • Debian LiveCD
  • Ubuntu LiveCD
  • KNOPPIX
  • SystemRescueCD
  • Trinity Rescue Kit
  • Ultimate Boot CD


but unfortunately none of them couldn't recover the deleted files … 

The reason why the standard file recovery tools could not recover ?

My assumptions is after I've done by rm -rf var; from sysroot,  issued the sync (- if you haven't used it check out man sync) command – that synchronizes cached writes to persistent storage and did a restart from the poweroff PC button, this should have worked, as I've recovered like that in the past) in a normal Sys V System with a normal old fashioned blocks filesystem as EXT2 . or any other of the filesystems without a journal, however as the machine run a EXT4 filesystem with a journald and journald, this did not work perhaps because something was not updated properly in /lib/systemd/systemd-journal, that led to the situation all recently deleted files were totally unrecoverable.

1. First step was to restore the directory skele of /var/lib/dpkg

# mkdir -p /var/lib/dpkg/{alternatives,info,parts,triggers,updates}


2. Recover missing /var/lib/dpkg/status  file

The main file that gives information to dpkg of the existing packages and their statuses on a Debian based systems is /var/lib/dpkg/status

# cp /var/backups/dpkg.status.0 /var/lib/dpkg/status


3. Reinstall dpkg package manager to make package management working again

Say a warm prayer to the Merciful God ! and do:

# apt-get download dpkg
# dpkg -i dpkg*.deb


4. Reinstall base-files .deb package which provides basis of a Debian system

Hopefully everything will be okay and your dpkg / apt pair will be in normal working state, next step is to:

# apt-get download base-files
# dpkg -i base-files*.deb


5. Do a package sanity and consistency check and try to update OS package list

Check whether packages have been installed only partially on your system or that have missing, wrong or obsolete control  data  or  files.  dpkg  should suggest what to do with them to get them fixed.

# dpkg –audit

Then resynchronize (fetch) the package index files from their sources described in /etc/apt/sources.list

# apt-get update


Do apt db constistency check:

#  apt-get check


check is a diagnostic tool; it updates the package cache and checks for broken dependencies.
 

Take a deep breath ! …

Do :

ls -l /var/lib/dpkg
and compare with the above list. If some -old file is not present don't worry it will be there tomorrow.

Next time don't forget to do a regular backup with simple rsync backup script or something like Bacula / Amanda / Time Vault or Clonezilla.
 

6. Copy dpkg database from another Linux system that has a working dpkg / apt Database

Well this was however not the end of the story … There were still many things missing from my /var/ and luckily I had another Debian 10 Buster install on another properly working machine with a similar set of .deb packages installed. Therefore to make most of my programs still working again I have copied over /var from the other similar set of package installed machine to my messed up machine with the missing deleted /var.

To do so …
On Functioning Debian 10 Machine (Working Host in a local network with IP 192.168.0.50), I've archived content of /var:

linux:~# tar -czvf var_backup_debian10.tar.gz /var

Then sftped from Working Host towards the /var deleted broken one in my case this machine's hostname is jericho and luckily still had SSHD and SFTP running processes loaded in memory:

jericho:~# sftp root@192.168.0.50
sftp> get var_backup_debian10.tar.gz

Now Before extracting the archive it is a good idea to make backup of old /var remains somewhere for example somewhere in /root 
just in case if we need to have a copy of the dpkg backup dir /var/backups

jericho:~# cp -rpfv /var /root/var_backup_damaged

 
jericho:~# tar -zxvf /root/var_backup_debian10.tar.gz 
jericho:/# mv /root/var/ /

Then to make my /var/lib/dpkg contain the list of packages from my my broken Linux install I have ovewritten /var/lib/dpkg with the files earlier backupped before  .tar.gz was extracted.

jericho:~# cp -rpfv /var /root/var_backup_damaged/lib/dpkg/ /var/lib/


7. Reinstall All Debian  Packages completely scripts


I then tried to reinstall each and every package first using aptitude with aptitude this is done with

# aptitude reinstall '~i'

However as this failed, tried using a simple shell loop like below:

for i in $(dpkg -l |awk '{ print $2 }'); do echo apt-get install –reinstall –yes $i; done

Alternatively, all .deb package reninstall is also possible with dpkg –get-selections and with awk with below cmds:

dpkg –get-selections | grep -v deinstall | awk '{print $1}' > list.log;
awk '$1=$1' ORS=' ' list.log > newlist.log
;
apt-get install –reinstall $(cat newlist.log)

It can also be run as one liner for simplicity:

dpkg –get-selections | grep -v deinstall | awk '{print $1}' > list.log; awk '$1=$1' ORS=' ' list.log > newlist.log; apt-get install –reinstall $(cat newlist.log)

This produced a lot of warning messages, reporting "package has no files currently installed" (virtually for all installed packages), indicating a severe packages problem below is sample output produced after each and every package reinstall … :

dpkg: warning: files list file for package 'iproute' missing; assuming package has no files currently installed
dpkg: warning: files list file for package 'brscan-skey' missing; assuming package has no files currently installed
dpkg: warning: files list file for package 'libapache2-mod-php7.4' missing; assuming package has no files currently installed
dpkg: warning: files list file for package 'libexpat1:amd64' missing; assuming package has no files currently installed
dpkg: warning: files list file for package 'libexpat1:i386' missing; assuming package has no files currently installed
dpkg: warning: files list file for package 'php5.6-readline' missing; assuming package has no files currently installed
dpkg: warning: files list file for package 'linux-headers-4.19.0-5-amd64' missing; assuming package has no files currently installed
dpkg: warning: files list file for package 'libgraphite2-3:amd64' missing; assuming package has no files currently installed
dpkg: warning: files list file for package 'libgraphite2-3:i386' missing; assuming package has no files currently installed
dpkg: warning: files list file for package 'libbonoboui2-0:amd64' missing; assuming package has no files currently installed
dpkg: warning: files list file for package 'libxcb-dri3-0:amd64' missing; assuming package has no files currently installed
dpkg: warning: files list file for package 'libxcb-dri3-0:i386' missing; assuming package has no files currently installed
dpkg: warning: files list file for package 'liblcms2-2:amd64' missing; assuming package has no files currently installed
dpkg: warning: files list file for package 'liblcms2-2:i386' missing; assuming package has no files currently installed
dpkg: warning: files list file for package 'libpixman-1-0:amd64' missing; assuming package has no files currently installed
dpkg: warning: files list file for package 'libpixman-1-0:i386' missing; assuming package has no files currently installed
dpkg: warning: files list file for package 'gksu' missing; assuming package has no files currently installed
dpkg: warning: files list file for package 'liblogging-stdlog0:amd64' missing; assuming package has no files currently installed
dpkg: warning: files list file for package 'mesa-vdpau-drivers:amd64' missing; assuming package has no files currently installed
dpkg: warning: files list file for package 'mesa-vdpau-drivers:i386' missing; assuming package has no files currently installed
dpkg: warning: files list file for package 'libzvbi0:amd64' missing; assuming package has no files currently installed
dpkg: warning: files list file for package 'libzvbi0:i386' missing; assuming package has no files currently installed
dpkg: warning: files list file for package 'libcdparanoia0:amd64' missing; assuming package has no files currently installed
dpkg: warning: files list file for package 'libcdparanoia0:i386' missing; assuming package has no files currently installed
dpkg: warning: files list file for package 'python-gconf' missing; assuming package has no files currently installed
dpkg: warning: files list file for package 'php5.6-cli' missing; assuming package has no files currently installed
dpkg: warning: files list file for package 'libpaper1:amd64' missing; assuming package has no files currently installed
dpkg: warning: files list file for package 'mixer.app' missing; assuming package has no files currently installed

After some attempts I found a way to be able to work around the warning message, for each package by simply reinstalling the package reporting the issue with

apt –reinstall $package_name


Though reinstallation started well and many packages got reinstalled, unfortunately some packages such as apache2-mod-php5.6 and other php related ones  started failing during reinstall ending up in unfixable states right after installation of binaries from packages was successfully placed in its expected locations on disk. The failures occured during the package setup stage ( dpkg –configure $packagename) …

The logical thing to do is a recovery attempt with something like the usual well known by any Debian admin:

apt-get install –fix-missing

As well as Manual requesting to reconfigure (issue re-setup) of all installed packages also did not produced a positive result

dpkg –configure -a

But many packages were still failing due to dpkg inability to execute some post installation scripts from respective .deb files.
To work around that and continue installing the rest of packages I had to manually delete all files related to the failing package located under directory 

/var/lib/dpkg/info#

For example to omit the post installation failure of libapache2-mod-php5.6 and have a succesful install of the package next time I tried reinstall, I had to delete all /var/lib/dpkg/info/libapache2-mod-php5.6.postrm, /var/lib/dpkg/info/libapache2-mod-php5.6.postinst scripts and even sometimes everything like libapache2-mod-php5.6* that were present in /var/lib/dpkg/info dir.

The problem with this solution, however was the package reporting to install properly, but the post install script hooks were still not in placed and important things as setting permissions of binaries after install or applying some configuration changes right after install was missing leading to programs failing to  fully behave properly or even breaking up even though showing as finely installed …

The final solution to this problem was radical.
I've used /var/lib/dpkg database (directory) from ther other working Linux machine with dpkg DB OK found in var_backup_debian10.tar.gz (linux:~# host with a working dpkg database) and then based on the dpkg package list correct database responding on jericho:~# to reinstall each and every package on the system using Debian System Reinstaller script taken from the internet.
Debian System Reinstaller works but to reinstall many packages, I've been prompted again and again whether to overwrite configuration or keep the present one of packages.
To Omit the annoying [Y / N ] text prompts I had made a slight modification to the script so it finally looked like this:
 

#!/bin/bash
# Debian System Reinstaller
# Copyright (C) 2015 Albert Huang
# Copyright (C) 2018 Andreas Fendt

# This program is free software: you can redistribute it and/or modify
# it under the terms of the GNU General Public License as published by
# the Free Software Foundation, either version 3 of the License, or
# (at your option) any later version.

# This program is distributed in the hope that it will be useful,
# but WITHOUT ANY WARRANTY; without even the implied warranty of
# MERCHANTABILITY or FITNESS FOR A PARTICULAR PURPOSE.  See the
# GNU General Public License for more details.

# You should have received a copy of the GNU General Public License
# along with this program.  If not, see <http://www.gnu.org/licenses/>.

# —
# This script assumes you are using a Debian based system
# (Debian, Mint, Ubuntu, #!), and have sudo installed. If you don't
# have sudo installed, replace "sudo" with "su -c" instead.

pkgs=`dpkg –get-selections | grep -w 'install$' | cut -f 1 |  egrep -v '(dpkg|apt)'`

for pkg in $pkgs; do
    echo -e "\033[1m   * Reinstalling:\033[0m $pkg"    

    apt-get –reinstall -o Dpkg::Options::="–force-confdef" -o Dpkg::Options::="–force-confold" -y install $pkg || {
        echo "ERROR: Reinstallation failed. See reinstall.log for details."
        exit 1
    }
done


 debian-all-packages-reinstall.sh working modified version of Albert Huang and Andreas Fendt script  can be also downloaded here.

Note ! Omitting the text confirmation prompts to install newest config or keep maintainer configuration is handled by the argument:


-o Dpkg::Options::="–force-confold


I however still got few NCurses Console selection prompts during the reinstall of about 3200+ .deb packages, so even with this mod the reinstall was not completely automatic.

Note !  During the reinstall few of the packages from the list failed due to being some old unsupported packages this was ejabberd, ircd-hybrid and a 2 / 3 more.
This failure was easily solved by completely purging those packages with the usual

# dpkg –purge $packagename

and reruninng  debian-all-packages-reinstall.sh on each of the failing packages.

Note ! The failing packages were just old ones left over from Debian 8 and Debian 9 before the apt-get dist-upgrade towards 10 Duster.
Eventually I got a success by God's grance, after few hours of pains and trials, ending up in a working state package database and a complete set of freshly reinstalled packages.

The only thing I had to do finally is 2 hours of tampering why GNOME did not automatically booted after the system reboot due to failing gdm
until I fixed that I've temprary used ligthdm (x-display-manager), to do I've

dpkg –reconfigure gdm3
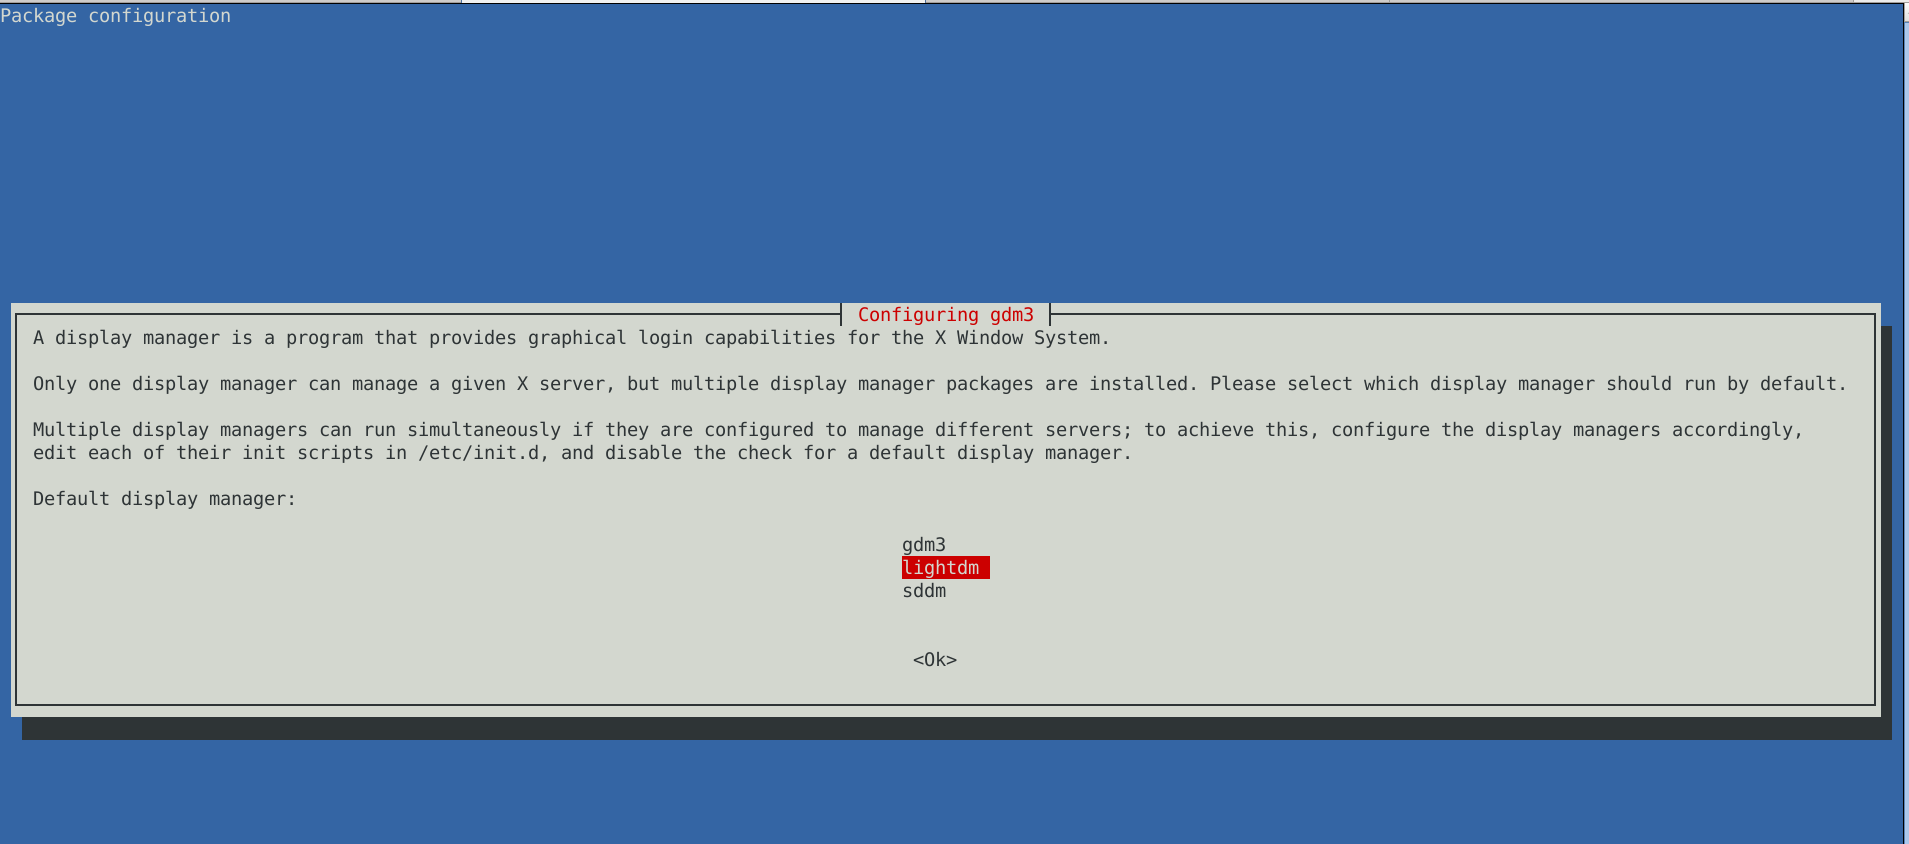
lightdm-x-display-manager-screenshot-gdm3-reconfige

 to work around this I had to also reinstall few libraries, reinstall the xorg-server, reinstall gdm and reinstall the meta package for GNOME, using below set of commands:
 

apt-get install –reinstall libglw1-mesa libglx-mesa0
apt-get install –reinstall libglu1-mesa-dev
apt install –reinstallgsettings-desktop-schemas
apt-get install –reinstall xserver-xorg-video-intel
apt-get install –reinstall xserver-xorg
apt-get install –reinstall xserver-xorg-core
apt-get install –reinstall task-desktop
apt-get install –reinstall task-gnome-desktop


As some packages did not ended re-instaled on system because on the original host from where /var/lib/dpkg db was copied did not have it I had to eventually manually trigger reinstall for those too:


apt-get install –reinstall –yes vlc
apt-get install –reinstall –yes thunderbird
apt-get install –reinstall –yes audacity
apt-get install –reinstall –yes gajim
apt-get install –reinstall –yes slack remmina
apt-get install –yes k3b
pt-get install –yes gbgoffice
pt-get install –reinstall –yes skypeforlinux
apt-get install –reinstall –yes vlc
apt-get install –reinstall –yes libcurl3-gnutls libcurl3-nss
apt-get install –yes virtualbox-5.2
apt-get install –reinstall –yes vlc
apt-get install –reinstall –yes alsa-tools-gui
apt-get install –reinstall –yes gftp
apt install ./teamviewer_15.3.2682_amd64.deb –yes


Note that some of above packages requires a properly configured third party repositories, other people might have other packages that are missing from the dpkg list and needs to be reinstalled so just decide according to your own case of left aside working system present binaries that doesn't belong to any dpkg installed package.

After a bit of struggle everything is back to normal Thanks God! 🙂 !


Fix FTP active connection issues “Cannot create a data connection: No route to host” on ProFTPD Linux dedicated server

Tuesday, October 1st, 2019

proftpd-linux-logo

Earlier I've blogged about an encounter problem that prevented Active mode FTP connections on CentOS
As I'm working for a client building a brand new dedicated server purchased from Contabo Dedi Host provider on a freshly installed Debian 10 GNU / Linux, I've had to configure a new FTP server, since some time I prefer to use Proftpd instead of VSFTPD because in my opinion it is more lightweight and hence better choice for a small UNIX server setups. During this once again I've encounted the same ACTIVE FTP not working from FTP server to FTP client host machine. But before shortly explaining, the fix I find worthy to explain briefly what is ACTIVE / PASSIVE FTP connection.


1. What is ACTIVE / PASSIVE FTP connection?
 

Whether in active mode, the client specifies which client-side port the data channel has been opened and the server starts the connection. Or in other words the default FTP client communication for historical reasons is in ACTIVE MODE. E.g.
Client once connected to Server tells the server to open extra port or ports locally via which the overall FTP data transfer will be occuring. In the early days of networking when FTP protocol was developed security was not of such a big concern and usually Networks did not have firewalls at all and the FTP DATA transfer host machine was running just a single FTP-server and nothing more in this, early days when FTP was not even used over the Internet and FTP DATA transfers happened on local networks, this was not a problem at all.

In passive mode, the server decides which server-side port the client should connect to. Then the client starts the connection to the specified port.

But with the ever increasing complexity of Internet / Networks and the ever tightening firewalls due to viruses and worms that are trying to own and exploit networks creating unnecessery bulk loads this has changed …

active-passive-ftp-explained-diagram
 

2. Installing and configure ProFTPD server Public ServerName

I've installed the server with the common cmd:


apt –yes install proftpd


And the only configuration changed in default configuration file /etc/proftpd/proftpd.conf  was
ServerName          "Debian"

I do this in new FTP setups for the logical reason to prevent the multiple FTP Vulnerability Scan script kiddie Crawlers to know the exact OS version of the server, so this was changed to:


ServerName "MyServerHostname"


Though this is the bad security through obscurity practice doing so is a good practice.
 

3. Create iptable firewall rules to allow ACTIVE FTP mode


But anyways, next step was to configure the firewall to be allowed to communicate on TCP PORT 21 and 20 to incoming source ports range 1024:65535 (to enable ACTIVE FTP) on firewal level with iptables on INPUT and OUTPUT chain rules, like this:


iptables -A INPUT -p tcp –sport 1024:65535 -d 0/0 –dport 21 -m state –state NEW,ESTABLISHED -j ACCEPT
iptables -A INPUT -p tcp -s 0/0 –sport 1024:65535 -d 0/0 –dport 20 -m state –state NEW,ESTABLISHED -j ACCEPT
iptables -A OUTPUT -p tcp -s 0/0 –sport 21 -d 0/0 –dport 1024:65535 -m state –state ESTABLISHED -j ACCEPT
iptables -A OUTPUT -p tcp -s 0/0 –sport 20 -d 0/0 –dport 1024:65535 -m state –state ESTABLISHED,RELATED -j ACCEPT


Talking about Active and Passive FTP connections perhaps for novice Linux users it might be worthy to say few words on Active and Passive FTP connections

Once firewall has enabled FTP Active / Passive connections is on and FTP server is listening, to test all is properly configured check iptable rules and FTP listener:
 

/sbin/iptables -L INPUT |grep ftp
ACCEPT     tcp  —  anywhere             anywhere             tcp spts:1024:65535 dpt:ftp state NEW,ESTABLISHED
ACCEPT     tcp  —  anywhere             anywhere             tcp spts:1024:65535 dpt:ftp-data state NEW,ESTABLISHED
ACCEPT     tcp  —  anywhere             anywhere             tcp dpt:ftp
ACCEPT     tcp  —  anywhere             anywhere             tcp dpt:ftp-data

netstat -l | grep "ftp"
tcp6       0      0 [::]:ftp                [::]:*                  LISTEN    


4. Loading nf_nat_ftp module and net.netfilter.nf_conntrack_helper (for backward compitability)


Next step of course was to add the necessery modules nf_nat_ftp nf_conntrack_sane that makes FTP to properly forward ports with respective Firewall states on any of above source ports which are usually allowed by firewalls, note that the range of ports given 1024:65535 might be too much liberal for paranoid sysadmins and in many cases if ports are not filtered, if you are a security freak you can use some smaller range such as 60000-65535.


Here is time to say for sysadmins who haven't recently had a task to configure a new (unecrypted) File Transfer Server as today Secure FTP is almost alltime used for file transfers for the sake of security might be puzzled to find out the old Linux kernel ip_conntrack_ftp which was the standard module used to make FTP Active connections work is substituted nowadays with  nf_nat_ftp and nf_conntrack_sane.

To make the 2 modules permanently loaded on next boot on Debian Linux they have to be added to /etc/modules

Here is how sample /etc/modules that loads the modules on next system boot looks like

cat /etc/modules
# /etc/modules: kernel modules to load at boot time.
#
# This file contains the names of kernel modules that should be loaded
# at boot time, one per line. Lines beginning with "#" are ignored.
softdog
nf_nat_ftp
nf_conntrack_sane


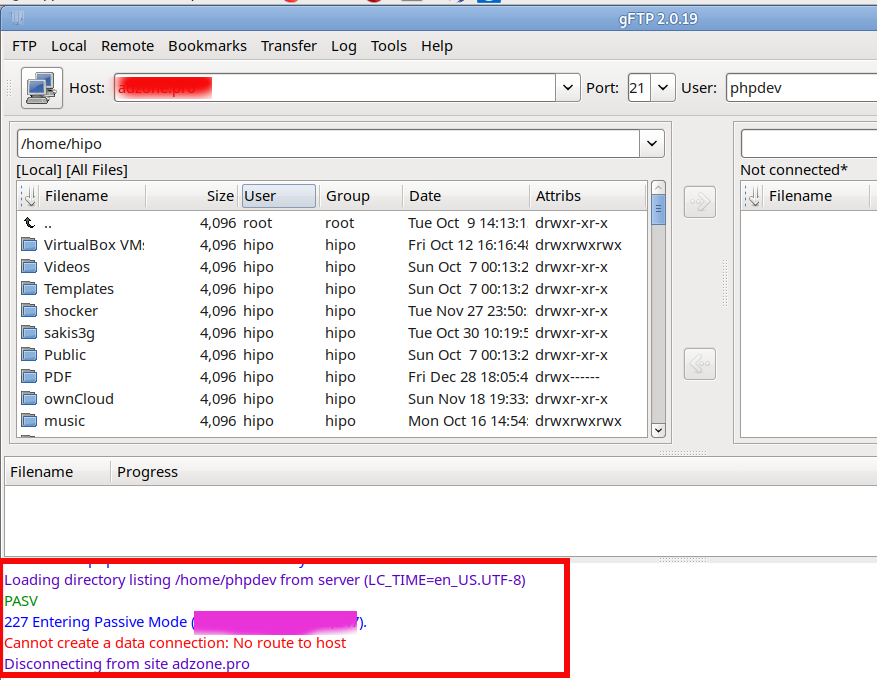
Next to say is that in newer Linux kernels 3.x / 4.x / 5.x the nf_nat_ftp and nf_conntrack-sane behaviour changed so  simply loading the modules would not work and if you do the stupidity to test it with some FTP client (I used gFTP / ncftp from my Linux desktop ) you are about to get FTP No route to host errors like:


Cannot create a data connection: No route to host


cannot-create-a-data-connection-no-route-to-host-linux-error-howto-fix


Sometimes, instead of No route to host error the error FTP client might return is:


227 entering passive mode FTP connect connection timed out error


To make the nf_nat_ftp module on newer Linux kernels hence you have to enable backwards compatibility Kernel variable


/proc/sys/net/netfilter/nf_conntrack_helper


echo 1 > /proc/sys/net/netfilter/nf_conntrack_helper


To make it permanent if you have enabled /etc/rc.local legacy one single file boot place as I do on servers – for how to enable rc.local on newer Linuxes check here

or alternatively add it to load via sysctl

sysctl -w net.netfilter.nf_conntrack_helper=1

And to make change permanent (e.g. be loaded on next boot)

echo 'net.netfilter.nf_conntrack_helper=1' >> /etc/sysctl.conf


5. Enable PassivePorts in ProFTPD or PassivePortRange in PureFTPD


Last but not least open /etc/proftpd/proftpd.conf find PassivePorts config value (commented by default) and besides it add the following line:


PassivePorts 60000 65534


Just for information if instead of ProFTPd you experience the error on PureFTPD the configuration value to set in /etc/pure-ftpd.conf is:
 

PassivePortRange 30000 35000


That's all folks, give the ncftp / lftp / filezilla or whatever FTP client you prefer and test it the FTP client should be able to talk as expected to remote server in ACTIVE FTP mode (and the auto passive mode) will be not triggered anymore, nor you will get a strange errors and failure to connect in FTP clients as gftp.

Cheers 🙂

Howto create Linux Music Audio CD from MP3 files / Create playable WAV format Audio CD Albums from MP3s

Tuesday, July 16th, 2019

cdburning-audio-music-cd-from-mp3-on-linuxcomapct-disc-tux-linux-logo

Recently my Mother asked me to prepare a Music Audio CD for her from a popular musician accordionist Stefan Georgiev from Dobrudja who has a unique folklore Bulgarian music.

As some of older people who still remember the age of the CD and who had most likely been into the CD burning Copy / Piracy business so popular in the countries of the ex-USSR so popular in the years 1995-2000 audio ,  Old CD Player Devices were not able to play the MP3 file format due to missing codecs (as MP3 was a proprietary compression that can't be installed on every device without paying the patent to the MP3 compression rights holder.

The revolutionary MP3 compression used to be booming standard for transferring Music data due to its high compression which made an ordinary MP3 of 5 minutes of 5MB (10+ times more compression than an ordinary classic WAV Audio the CPU intensiveness of MP3 files that puts on the reading device, requiring the CD Player to have a more powerful CPU.

Hence  due to high licensing cost and requirement for more powerful CPU enabled Audio Player many procuders of Audio Players never introduced MP3 to their devices and MP3 Neve become a standard for the Audio CD that was the standard for music listening inside almost every car out there.

Nowdays it is very rare need to create a Audio CD as audio CDs seems to be almost dead (As I heard from a Richard Stallman lecture In USA nowadays there is only 1 shop in the country where you can still buy CD or DVD drives) and only in third world as Africa Audio CDs perhaps are still in circulation.

Nomatter that as we have an old Stereo CD player on my village and perhaps many others, still have some old retired CD reading devices being able to burn out a CD is a useful thing.

Thus to make mother happy and as a learning excercise, I decided to prepare the CD for her on my Linux notebook.
Here I'll shortly describe the takes I took to make it happen which hopefully will be useful for other people that need to Convert and burn Audio CD from MP3 Album.


1. First I downloaded the Album in Mp3 format from Torrent tracker

My homeland Bulgaria and specific birth place place the city of Dobrich has been famous its folklore:  Galina Durmushlijska and Stefan Georgiev are just 2 of the many names along with Оркестър Кристал (Orchestra Crystal) and the multitude of gifted singers. My mother has a santiment for Stefan Georgiev, as she listened to this gifted accordinist on her Uncle's marriage.

Thus In my case this was (Стефан Георгиев Хора и ръченици от Добруджа) the album full song list here If you're interested to listen the Album and Enjoy unique Folklore from Dobrudja (Dobrich) my home city, Stefan Georgiev's album Hora and Rachenica Dances is available here


Stefan_Georgiev-old-audio-Music-CD-Hora-i-Rychenici-ot-Dobrudja-Horos-and-Ruchenitsas-from-Dobrudja-CD_Cover
I've downloaded them from Bulgarian famous torrent tracker zamunda.net in MP3 format.
Of course you need to have a CD / DVD readed and write device on the PC which nowdays is not present on most modern notebooks and PCs but as a last resort you can buy some cheap External Optical CD / DVD drive for 25 to 30$ from Amazon / Ebay etc.


2. You will need to install a couple of programs on Linux host (if you don't have it already)


To be able to convert from command line from MP3 to WAV you will need as minimum ffmpeg and normalize-audio packages as well as some kind of command line burning tool like cdrskin  wodim which is
the fork of old good known cdrecord, so in case if you you're wondering what happened with it just
use instead wodim.

Below is a good list of tools (assuming you have enough HDD space) to install:


root@jeremiah:/ # apt-get install –yes dvd+rw-tools cdw cdrdao audiotools growisofs cdlabelgen dvd+rw-tools k3b brasero wodim ffmpeg lame normalize-audio libavcodec58


Note that some of above packages I've installed just for other Write / Read operations for DVD drives and you might not need that but it is good to have it as some day in future you will perhaps need to write out a DVD or something.
Also the k3b here is specific to KDE and if you're a GNOME user you could use Native GNOME Desktop app such brasero or if you're in a more minimalistic Linux desktop due to hardware contrains use XFCE's native xfburn program.

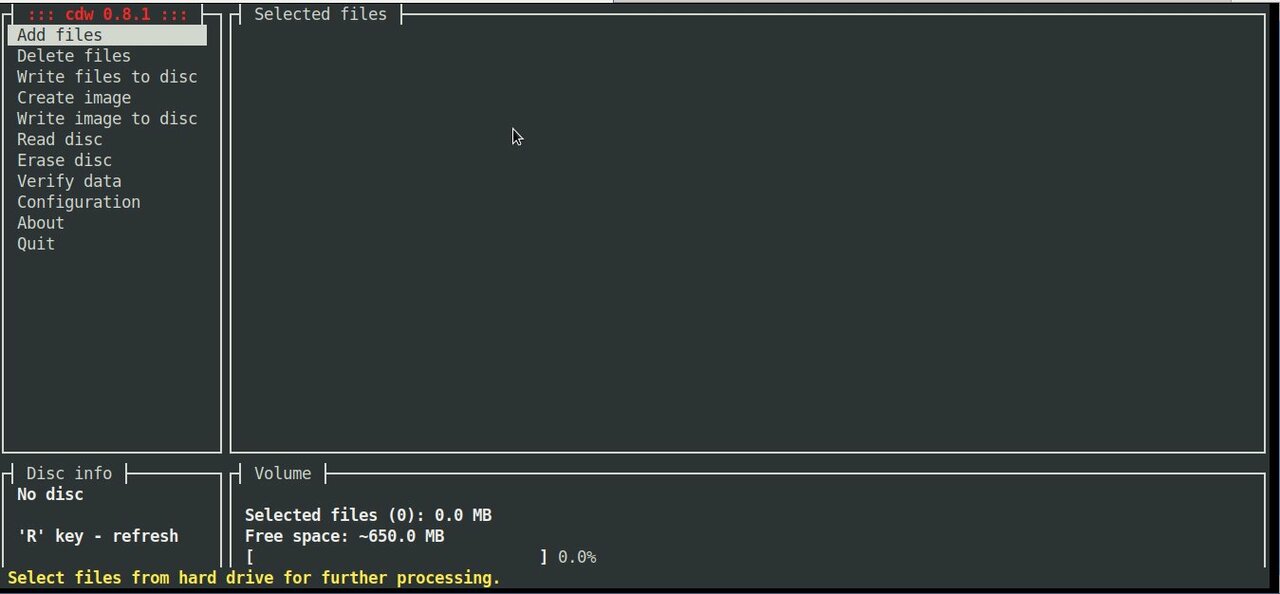
If you're a console / terminal geek like me you will definitely enjoy to use cdw
 

root@jeremiah:/ # apt-cache show cdw|grep -i description -A 1
Description-en: Tool for burning CD's – console version
 Ncurses-based frontend for wodim and genisoimage. It can handle audio and

Description-md5: 77dacb1e6c00dada63762b78b9a605d5
Homepage: http://cdw.sourceforge.net/


3. Selecting preferred CD / DVD / BD program to use to write out the CD from Linux console


cdw uses wodim (which is a successor of good old known console cdrecord command most of use used on Linux in the past to burn out new Redhat / Debian / different Linux OS distro versions for upgrade purposes on Desktop and Server machines.

To check whether your CD / DVD drive is detected and ready to burn on your old PC issue:


root@jeremiah:/# wodim -checkdrive
Device was not specified. Trying to find an appropriate drive…
Detected CD-R drive: /dev/cdrw
Using /dev/cdrom of unknown capabilities
Device type    : Removable CD-ROM
Version        : 5
Response Format: 2
Capabilities   :
Vendor_info    : 'HL-DT-ST'
Identification : 'DVDRAM GT50N    '
Revision       : 'LT20'
Device seems to be: Generic mmc2 DVD-R/DVD-RW.
Using generic SCSI-3/mmc   CD-R/CD-RW driver (mmc_cdr).
Driver flags   : MMC-3 SWABAUDIO BURNFREE
Supported modes: TAO PACKET SAO SAO/R96P SAO/R96R RAW/R16 RAW/R96P RAW/R96R

You can also use xorriso (whose added value compared to other console burn cd tools is is not using external program for ISO9660 formatting neither it use an external or an external burn program for CD, DVD or BD (Blue Ray) drive but it has its own libraries incorporated from libburnia-project.org libs.

Below output is from my Thinkpad T420 notebook. If the old computer CD drive is there and still functional in most cases you should not get issues to detect it.

cdw ncurses text based CD burner tool's interface is super intuitive as you can see from below screenshot:

cdw-burn-cds-from-console-terminal-on-GNU-Linux-and-FreeBSD-old-PC-computer

CDW has many advanced abilities such as “blanking” a disk or ripping an audio CD on a selected folder. To overcome the possible problem of CDW not automatically detecting the disk you have inserted you can go to the “Configuration” menu, press F5 to enter the Hardware options and then on the first entry press enter and choose your device (by pressing enter again). Save the setting with F9.
 

4. Convert MP3 / MP4 Files or whatever format to .WAV to be ready to burn to CD


Collect all the files you want to have collected from the CD album in .MP3 a certain directory and use a small one liner loop to convert files to WAV with ffmpeg:
 

cd /disk/Music/Mp3s/Singer-Album-directory-with-MP3/

for i in $( ls *.mp3); do ffmpeg -i $i $i.wav; done


If you don't have ffmpeg installed and have mpg123 you can also do the Mp3 to WAV conversion with mpg123 cmd like so:


for i in $( ls ); do mpg123 -w $i.wav $i.mp3; done


Another alternative for conversion is to use good old lame (used to create Mp3 audio files but abling to also) decode
mp3 to wav.


lame –decode somefile.mp3 somefile.wav


In the past there was a burn command tool that was able to easily convert MP3s to WAV but in up2date Linux modern releases it is no longer available most likely due to licensing issues, for those on older Debian Linux 7 / 8 / 9 / Ubuntu 8 to 12.XX / old Fedoras etc. if you have the command you can install burn and use it (and not bother with shell loops):

apt-get install burn

or

yum install burn


Once you have it to convert


$ burn -A -a *.mp3


5. Fix file naming to remove empty spaces such as " " and substitute to underscores as some Old CD Players are
unable to understand spaces in file naming with another short loop.


for f in *; do mv "$f" `echo $f | tr ' ' '_'`; done


6. Normalize audio produced .WAV files (set the music volume to a certain level)


In case if wondering why normalize audio is needed here is short extract from normalize-audio man page command description to shed some light.

"normalize-audio  is  used  to  adjust  the volume of WAV or MP3 audio files to a standard volume level.  This is useful for things like creating mp3 mixes, where different recording levels on different albums can cause the volume to  vary  greatly from song to song."
 

cd /disk/Music/Mp3s/Singer-Album-directory-with-MP3/

normalize-audio -m *.wav


7. Burn the produced normalized Audio WAV files to the the CD


wodim -v -fix -eject dev='/dev/sr0' -audio -pad *.wav


Alternatively you can conver all your MP3 files to .WAV with anything be it audacity
or another program or even use 
GNOME's CDBurn tool brasero (if gnome user) or KDE's CDBurn which in my opinion is
the best CD / DVD burning application for Linux K3B.

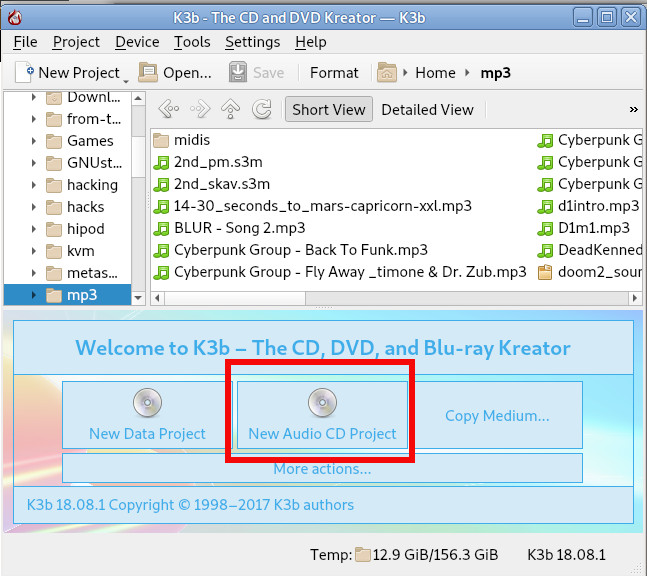
Burning Audio CD with K3b is up to few clicks and super easy and even k3b is going to handle the MP3 to WAV file Conversion itself. To burn audio with K3B just run it and click over 'New Audio CD Project'.

k3b-on-debian-gnu-linux-burn-audio-cd-screenshot

For those who want to learn a bit more on CD / DVD / Blue-Ray burning on GNU / Linux good readings are:
Linux CD Burning Mini Howto, is Linux's CD Writing Howto on ibiblio (though a bit obsolete) or Debian's official documentation on BurnCD.
 

8. What we learned here


Though the accent of this tutorial was how to Create Audio Music CD from MP3 on GNU / Linux, the same commands are available in most FreeBSD / NetBSD / OpenBSD ports tree so you can use the same method to build prepare Audio Music CD on *BSDs.

In this article, we went through few basic ways on how to prepare WAV files from MP3 normalize the new created WAV files on Linux, to prepare files for creation of Audio Music CD for the old mom or grandma's player or even just for fun to rewind some memories. For GUI users this is easily done with  k3b,  brasero or xfburn.

I've pointed you to cdw a super useful text ncurses tool that makes CD Burninng from plain text console (on servers) without a Xorg / WayLand  GUI installed super easy. It was shortly reviewed what has changed over the last few years and why and why cdrecord was substituted for wodim. A few examples were given on how to handle conversion through bash shell loops and you were pointed to some extra reading resources to learn a bit more on the topic.
There are plenty of custom scripts around for doing the same CD Burn / Covnersion tasks, so pointing me to any external / Shell / Perl scripts is mostly welcome.

Hope this learned you something new, Enjoy ! 🙂

Install and use personal Own Cloud on Debian Linux for better shared data security – OwnCloud a Free Software replacement for Google Drive

Thursday, August 23rd, 2018

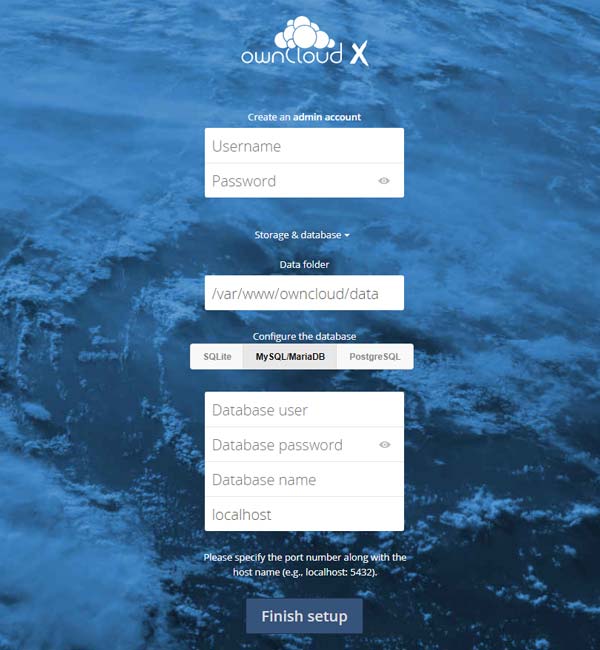
owncloud-self-hosted-cloud-file-sharing-and-storage-service-for-gnu-linux-howto-install-on-debian

Basicly I am against the use of any Cloud type of service but as nowadays Cloud usage is almost inevitable and most of the times you need some kind of service to store and access remotely your Data from multiple devices such as DropBox, Google Drive, iCloud etc. and using some kind of infrastructure to execute high-performance computing is invitable just like the Private Cloud paid services online are booming nowdays, I decided to give a to research and test what is available as a free software in the field of Clouding (your data) 🙂

Undoubfully, it is really nice fact that there are Free Software / Open Source alternatives to run your Own personal Cloud to store your data from multiple locations on a single point.

The most popular and leading Cloud Collaboration service (which is OpenSource but unfortunately not under GPLv2 / GPV3 – e.g. not fully free software) is OwnCloud.

ownCloud is a flexible self-hosted PHP and Javascript based web application used for data synchronization and file sharing (where its remote file access capabilites are realized by Sabre/Dav an open source WebDav server.
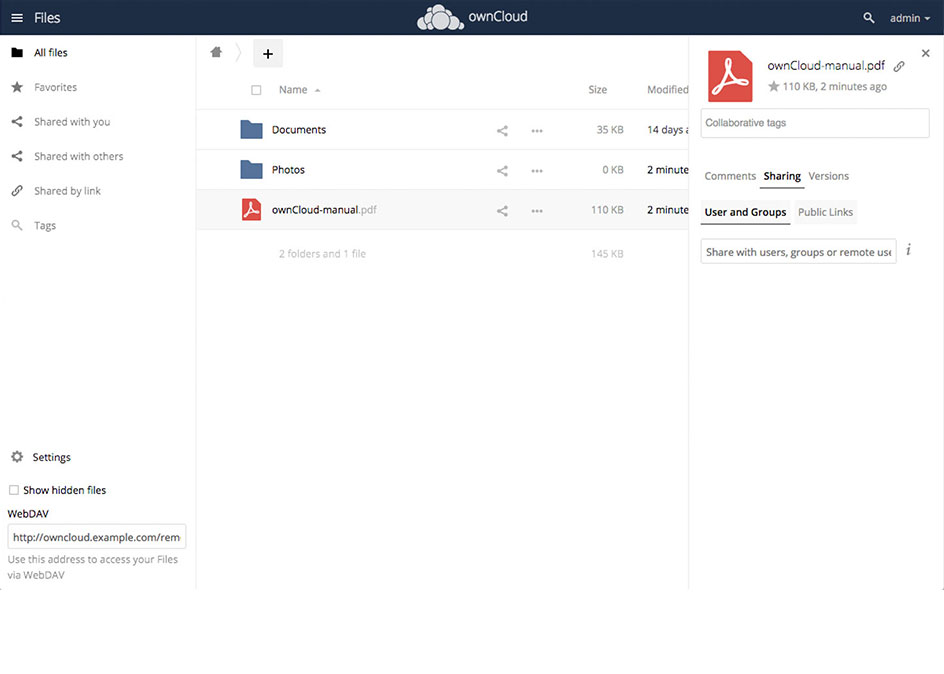
OwnCloud allows end user to easily Store / Manage files, Calendars, Contacts, To-Do lists (user and group administration via OpenID and LDAP), public URLs can be easily, created, the users can interact with browser-based ODF (Open Document Format) word processor , there is a Bookmarking, URL Shortening service integrated, Gallery RSS Feed and Document Viewer tools such as PDF viewer etc. which makes it a great alternative to the popular Google Drive, iCloud, DropBox etc.

The main advantage of using a self-hosted Cloud is that Your data is hosted and managed by you (on your server and your hard drives) and not by some God knows who third party provider such as the upmentioned.
In other words by using OwnCloud you manage your own data and you don't share it ot on demand with the Security Agencies with CIA, MI6, Mussad … (as it is very likely most of publicly offered Cloud storage services keeps track on the data stored on them).

The other disadvantage of Cloud Computing is that the stored data on such is usually stored on multiple servers and you can never know for sure where your data is physically located, which in my opinion is way worse than the option with Self Hosted Cloud where you know where your data belongs and you can do whatever you want with your data keep it secret / delete it or share it on your demand.

OwnCloud has its clients for most popular Mobile (Smart Phone) platforms – an Android client is available in Google Play Store as well as in Apple iTunes besides the clients available for FreeBSD OS, the GNOME desktop integration package and Raspberry Pi.

For those who are looking for additional advanced features an Enterprise version of OwnCloud is also available aiming business use and included software support.

Assuming you have a homebrew server or have hired a dedidacted or VPS server (such as the Ones we provide) ,Installing OwnCloud on GNU / Linux is a relatively easy
task and it will take no more than 15 minutes to 2 hours of your life.
In that article I am going to give you a specific instructions on how to install on Debian GNU / Linux 9 but installing on RPM based distros is similar and straightfoward process.
 

1. Install MySQL / MariaDB database server backend
 

By default OwnCloud does use SQLite as a backend data storage but as SQLite stores its data in a file and is becoming quickly slow, is generally speaking slowre than relational databases such as MariaDB server (or the now almost becoming obsolete MySQL Community server).
Hence in this article I will explain how to install OwnCloud with MariaDB as a backend.

If you don't have it installed already, e.g. it is a new dedicated server install MariaDB with:
 

server:~# apt-get install –yes mariadb-server


Assuming you're install on a (brand new fresh Linux install – you might want to install also the following set of tools / services).


server:~# systemctl start mariadb
server:~# systemctl enable mariadb
server:~# mysql_secure_installation


mysql_secure_installation – is to finalize and secure MariaDB installation and set the root password.
 

2. Create necessery database and users for OwnCloud to the database server
 

linux:~# mysql -u root -p
MariaDB [(none)]> CREATE DATABASE owncloud CHARACTER SET utf8;
MariaDB [(none)]> GRANT ALL PRIVILEGES ON owncloud.* TO 'owncloud'@'localhost' IDENTIFIED BY 'owncloud_passwd';
MariaDB [(none)]> FLUSH PRIVILEGES;
MariaDB [(none)]> \q


3. Install Apache + PHP necessery deb packages
 

As of time of writting the article on Debian 9.0 the required packages for a working Apache + PHP install for OwnCloud are as follows.


server:~# apt-get install –yes apache2 mariadb-server libapache2-mod-php7.0 \
openssl php-imagick php7.0-common php7.0-curl php7.0-gd \
php7.0-imap php7.0-intl php7.0-json php7.0-ldap php7.0-mbstring \
php7.0-mcrypt php7.0-mysql php7.0-pgsql php-smbclient php-ssh2 \
php7.0-sqlite3 php7.0-xml php7.0-zip php-redis php-apcu


4. Install Redis to use as a Memory Cache for accelerated / better performance ownCloud service


Redis is an in-memory kept key-value database that is similar to Memcached so OwnCloud could use it to cache stored data files. To install latest redis-server on Debian 9:
 

server:~# apt-get install –yes redis-server

5. Install ownCloud software packages on the server

Unfortunately, default package repositories on Debian 9 does not provide owncloud server packages but only some owncloud-client packages are provided, that's perhaps the packages issued by owncloud does not match debian packages.

As of time of writting this article, the latest available OwnCloud server  version package for Debian is OC 10.

a) Add necessery GPG keys

The repositories to use are provided by owncloud.org, to use them we need to first add the necessery gpg key to verify the binaries have a legit checksum.
 

server:~# wget -qO- https://download.owncloud.org/download/repositories/stable/Debian_9.0/Release.key | sudo apt-key add –


b) Add owncloud.org repositories in separete sources.list file


server:~# echo 'deb https://download.owncloud.org/download/repositories/stable/Debian_9.0/ /' | sudo tee /etc/apt/sources.list.d/owncloud.list


c) Enable https transports for the apt install tool


server:~# apt-get –yes install apt-transport-https


d) Update Debian apt cache list files and install the pack


server:~# apt-get update


server:~# apt-get install –yes owncloud-files


By default owncloud store file location is /var/www/owncloud but on many servers that location is not really appropriate because /var/www might be situated on a hard drive partition whose size is not big enough, if that's the case just move the folder to another partition and create a symbolic link in /var/www/owncloud pointing to it …


6. Create necessery Apache configurations to make your new self-hosted cloud accessible
 

a) Create Apache config file


server:~# vim /etc/apache2/sites-available/owncloud.conf


Alias /owncloud "/var/www/owncloud/"

<Directory /var/www/owncloud/>
Options +FollowSymlinks
AllowOverride All

<IfModule mod_dav.c>
Dav off
</IfModule>

SetEnv HOME /var/www/owncloud
SetEnv HTTP_HOME /var/www/owncloud

</Directory>

b) Enable Mod_Dav (WebDAV) if it is not enabled yet


server:~# ln -sf ../mods-available/dav_fs.conf
server:~# ln -sf ../mods-available/dav_fs.load
server:~# ln -sf ../mods-available/dav.load
server:~# ln -sf ../mods-available/dav_lock.load

c) Set proper permissions for /var/www/owncloud to make upload work properly


chown -R www-data: /var/www/owncloud/


d) Restart Apache WebServer (to make new configuration affective)


server:~# /etc/init.d/apache2 restart


7. Finalize  OwnCloud Install
 

Access OwnCloud Web Interface to finish the database creation and set the administrator password for the New Self-Hosted cloud
 

http://Your_server_ip_address/owncloud/

By default the Web interface is accessible in unencrypted (insecure) http:// it is a recommended practice (if you already don't have an HTTPS SSL certificate install for the IP or the domain to install one either a self-signed certificate or even better to use LetsEncrypt CertBot to easily create a valid SSL for free for your domain


installing-OwnCloud-Web-Config-User-Pass-interface-Owncloud-10-on-Debian-9-Linux-howto

Just fill in in your desired user / pass and pass on the database user / password / db name (if required you can set also a different location for the data directory from the default one /var/www/owncloud/data.

Click Finish Setup and That's all folks!

owncloud-server-web-ui-interface

OwnCloud is successfully installed on the server, you can now go and download a Mobile App or Desktop application for whatever OS you're using and start using it as a Dropbox replacement. In a certain moment you might want to consult also the official UserManual documentation as you would probably need further information on how to manage your owncloud.

Enjoy !

Installing the phpbb forum on Debian (Squeeze/Sid) Linux

Saturday, September 11th, 2010

howto-easily-install-phpbb-on-debian-gnu-linux

I've just installed the phpbb forum on a Debian Linux because we needed a goodquick to install communication media in order to improve our internal communication in a student project in Strategic HR we're developing right now in Arnhem Business School.

Here are the exact steps I followed to have a properly it properly instlled:

1. Install the phpbb3 debian package
This was pretty straight forward:

debian:~# apt-get install phpbb3

At this point of installation I've faced a dpkg-reconfigure phpbb deb package configuration issue:
I was prompted to pass in the credentials for my MySQL password right after I've selected the MySQL as my preferred database back engine.
I've feeded my MySQL root password as well as my preferred forum database name, however the database installation failed because, somehow the configuration procedure tried to connect to my MySQL database with the htcheck user.
I guess this has to be a bug in the package itself or something from my previous installation misconfigured the way the debian database backend configuration was operating.
My assumption is that my previously installed htcheck package or something beforehand I've done right after the htcheck and htcheck-php packages installation.

after the package configuration failed still the package had a status of properly installed when I reviewed it with dpkg
I've thought about trying to manually reconfigure it using the dpkg-reconfigure debian command and I gave it a try like that:

debian:~# dpkg-reconfigure phpbb3

This time along with the other fields I've to fill in the ncurses interface I was prompted for a username before the password prompted appeared.
Logically I tried to fill in the root as it's my global privileges MySQL allowed user.
However that didn't helped at all and again the configuration tried to send the credentials with user htcheck to my MySQL database server.
To deal with the situation I had to approach it in the good old manual way.

2. Manually prepare / create the required phpbb forum database

To completet that connected to the MySQL server with the mysql client and created the proper database like so:

debian:~# mysql -u root -p
mysql>
CREATE database phpbb3forum;

3. Use phpmyadmin or the mysql client command line to create a new user for the phpbb forum

Here since adding up the user using the phpmyadmin was a way easier to do I decided to go that route, anyways using the mysql cli is also an option.

From phpmyadmin It's pretty easy to add a new user and grant privileges to a certain database, to do so navigate to the following database:

Privileges -> -> Add a new user ->

Now type your User name: , Host , Password , Re-type password , also for a Host: you have to choose Local from the drop down menu.

Leave the Database for user field empty as we have already previously created our desired database in step 2 of this article

Now press the "Go" button and the user will get created.

Further after choose the Privileges menu right on the bottom of the page once again, select through the checkbox the username you have just created let's say the previously created user is phpbb3

Go to Action (There is a picture with a man and a pencil on the right side of this button

Scroll down to the page part saying Database-specific privileges and in the field Add privileges on the following database: fill in your previosly created database name in our case it's phpbb3forum

and then press the "Go" button once again.
A page will appear where you will have to select the exact privileges you would like to grant on the specific selected database.
For some simplicity just check all the checkbox to grant as many privilegs to your database as you could.
Then again you will have to press the "Go" button and there you go you should have already configured an username and database ready to go with your new phpbb forum.

4. Create a virtualhost if you would like to have the forum as a subdomain or into a separate domain

If you decide to have the forum on a separate sub-domain or domain as I did you will have to add some kind of Virtualhost into either your Apache configuration /etc/apache2/apache2.conf or into where officially the virutualhosts are laid in Debian Linux in /etc/apache2/sites-available
I've personally created a new file like for instance /etc/apache2/sites-available/mysubdomain.mydomain.com

Here is an example content of the new Virtualhost:

<VirtualHost *>
ServerAdmin admin-email@domain.com
ServerName mysubdomain.domain.com

# Indexes + Directory Root.
DirectoryIndex index.php index.php5 index.htm index.html index.pl index.cgi index.phtml index.jsp index.py index.asp

DocumentRoot /usr/share/phpbb3/www/

# Logfiles
ErrorLog /var/log/apache2/yourdomain/error.log
CustomLog /var/log/apache2/yourdomain/access.log combined
# CustomLog /dev/null combined
<Directory /usr/share/phpbb3/www/>
Options FollowSymLinks MultiViews -Includes ExecCGI
AllowOverride All
Order allow,deny
allow from all </Directory>
</VirtualHost>

In above Virtualhost just change the values for ServerAdmin , ServerName , DocumentRoot , ErrorLog , CustomLog and Directory declaration to adjust it to your situation.

5. Restart the Apache webserver for the new Virtualhost to take affect

debian:~# /etc/init.d/apache2 restart

Now accessing your http://mysubdomain.domain.com should display the installed phpbb3 forum
The default username and password for your forum you can use straight are:

username: admin
password: admin

So far so good you by now have the PHPBB3 forum properly installed and running, however if you try to Register a new user in the forum you will notice that it's impossible because of a terrible ugly message reading:

Sorry but this board is currently unavailable.

I've spend few minutes online to scrape through the forums before I can understand what I have to stop that annoying message from appearing and allow new users to register in the phpbb forum

The solution came natural and was a setting that had to be changed with the forum admin account, thus login as admin and look at the bottom of the page, below the text reading Powered by phpBB © 2000, 2002, 2005, 2007 phpBB Group you will notice a link with Administration Control Panel
just press there a whole bunch of menus will appear on the screen allowing you to do numerous things, however what you will have to do is go to
Board Settings -> Disable Board

and change the radio button there to say No

That's all now your forum will be ready to go and your users can freely register and if the server where the forum is installed has an already running mail server, they will receive an emails with a registration data concerning their new registrations in your new phpbb forum.
Cheers and Enjoy your new shiny phpbb Forum 🙂

How to install / add new root certificates on Debian, Ubuntu, Mint Linux

Saturday, October 21st, 2017

add-install-new-root-ca-certificates-to-debian-ubuntu-linux-howto

How to add / Installing a root/CA Certificate on Debian, Ubuntu, Mint Linux


 Because of various auditing failures and other security issues, the CAcert root certificate set is slowly disappearing from the Ubuntu and Debian ‘ca-certificates’ package.

That's really tricky because if you're a system administrator or have a bunch of programmers whose needs is to install a new set of root certificates for their freshly develped Application or you have to make a corporate certificates added to debian rootca, then the good news is it is quite easy to install new certificates to deb based distributions.


Given a CA certificate file foo.crt, follow these steps to install it on Debian / Ubuntu:

    Create a directory for extra CA certificates in /usr/share/ca-certificates:


    debian:~# mkdir /usr/share/ca-certificates/extra-certificates


    Copy the CA .crt file to this directory:


    debian:~# cp foo.crt /usr/share/ca-certificates/extra-certificates/foo.crt


    Let Debian / Ubuntu add the .crt file's path relative to /usr/share/ca-certificates to /etc/ca-certificates.conf (the file lists certificates that you wish to use or to ignore to be installed in /etc/ssl/certs)


    debian:~# dpkg-reconfigure ca-certificates


In case you want to include a .pem file to the list of trustable certificates on Debian / Ubuntu, it must first be converted to a .crt file first, you can do that with:


    debian:~# openssl x509 -in foo.pem -inform PEM -out foo.crt


Lets say you want to add some custom Root certificate for exapmle cacert.org


   debian:~# mkdir /usr/local/share/ca-certificates/cacert.org
   debian:~# cd /usr/local/share/ca-certificates/cacert.org
   debian:~# mkdir /usr/local/share/ca-certificates/cacert.org
   debian:~# wget -P /usr/local/share/ca-certificates/cacert.org http://www.cacert.org/certs/root.crt http://www.cacert.org/certs/class3.crt


Then once again update the ca certificates bundle

   debian:~# update-ca-certificates