Posts Tagged ‘multiple’

Make Pulseaudio play multiple sound streams in Gnome 2.26

Friday, September 4th, 2009

I’ve recently upgraded my Debian as you’ve probably red in my previous posts, anyways. I’ve noticed that after the upgrade I couldn’t play parallel sound streams of let’s say rhythmbox and audacious. So logically I started looking for a fix. First I tried to install the paprefs debian package. That nice gtk interface for configuring pulseaudio includes a menu called Simultaneous Output there I’ve ticked the Add virtual output device for simultaneous output on all local sound cards hoping that this would solve my issues. However that was no go, so I googled around looking for a solution and I came upon The following forum thread discussing howto solve the simultaneous sound issues. I tried some of the solutions proposed there and figured out the fix for me. Here is the solution itself: 1. I’ve created .asoundrc file in my home directory ~/.asoundrc containng:

pcm.pulse {
type pulse
}
ctl.pulse {
type pulse
}
pcm.!default {
type pulse
}
ctl.!default {
type pulse
}

I needed to restart my gnome session in order to make the changes in .asoundrc noticeable to pulseaudio although probably simply restarting the pulseaudio server would be a solution that won’t require to restart your current gnome session.Cheers! 🙂
END—–

Using GNU screen for opening multiple shells within a single shell / Handy way to keep constant SSH connections to servers from 1 single shell

Wednesday, October 31st, 2012

Handay way to keep ssh connections persistent after ssh logout / Using GNU screen for opening multiple shells within a shell

As GNU / Linux user I use screen window manager to manage multiple SSH connections (all over one ssh connection) to a host over the last maybe 10 years. Though screen is generally popular it is still possible some novice sysadmin did not use it or (hope not) never heard of it. For those who don't use GNU screen still, give it a try; launch it within a (system bash, csh etc.) shell and then inside the main screen window launch multiple screen internal sessions (by pressing simultaneously) keys CTRL + ALT + c .

Each CTRL + ALT + c makes screen open a new "Virtual Window (pty)"  inside itself, the multiple screen sub-instances are kept in memory of main screen program loaded in memory. In a way Virtual Windows of screen in logic are very Similar to Apache's Webserver Apache Parent and Child processes.

Anyways to test screen type in console:
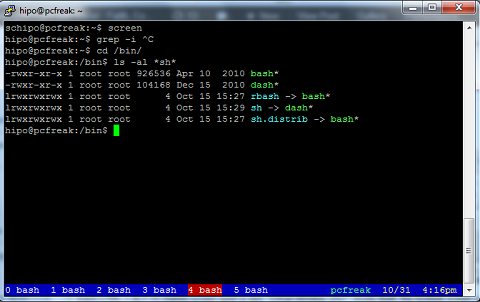
pcfreak:~$ screen

And press enter twice, it will launch under screen a new instance of your current logged in shell (if you logged in bash will open bash if zsh – zsh etc.)

Afterwards, you can open multiple Virtual Screens as I've mentioned with pressing CTRL + ALT + c.
Moving between all open screen sessions is done with simultaneous press of:

CTRL + ALT + pTo move to previous screen Virtual Window Shell Session
CTRL + ALT + n
– To move to next screen Virtual Window Session

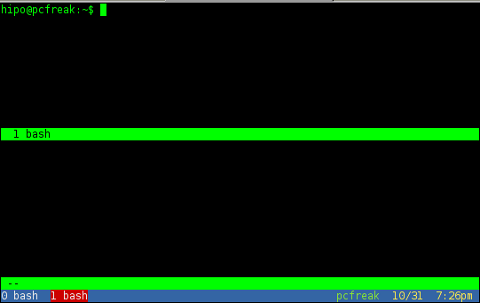
The most useful from all screen functionality is DETACH. You can detach (like save state of) curreng GNU Screen active sesion by  pressing together:

CTRL + a + d – Detach current active GNU Screen session

Screen supports detaching multiple sessions (whether 2 or more screen sessions run with identical user credentials).

An example use of multiple detached screen sessions would be if you login via SSH with a certain user lets say user myuser and later detach by pressing CTRL + a + d after which open new session, you will get in shell message similar to:

[detached from 1549.pts-11.pcfreak]

The msg indicates new screen session is detached. Onwards run screen once again, for sake of test typing in same shell once again:
 

pcfreal:~$ screen

After screen loads its second session press again CTRL + a + d – to detach second active session, again you will get msg:

[detached from 15691.pts-0.pcfreak]


Next on you can use screen to list all active window sessions by issuing:

pcfreak:~$ screen -list
There are screens on:
        1549.pts-11.pcfreak     (10/27/2012 09:45:58 PM)        (Detached)
        15691.pts-0.pcfreak     (10/24/2012 02:50:06 PM)        (Detached)
2 Sockets in /var/run/screen/S-hipo.
 

To attach to detached active GNU screen session, use:

 
pcfreak:~$ screen -r PID_OF_SESSION

For example to attach to 1 listed screen session 1549:

pcfreak:~$  screen -r 1549

To attach to second one 15691:

pcfreak:~$ screen -r 15691

The -r  switch stands for re-attach and second part of PID name like in above example pts-11.pcfreak pts-0.pcfreak is just indicating the hostname where screen was detached as well as the pty (pseudo tty number assigned to detached session), the time included shows the exact time in which main screen session was started for instance for screen 1549 it is 10/27/2012 09:45:58 PM.

The 2 Sockets in /var/run/screen/S-hipo displays the directory location of the screen socket, on each screen user startup a separte directory is created in /var/run/screen, the attach detach of screens is done via using a UNIX socket (fifo named pipe):

pcfreak :~$ ls
1549.pts-11.pcfreak|  15691.pts-0.pcfreak|  byobu.reload-required*
pcfreak:~$ cd /var/run/screenS-hipo
pcfreak:/var/run/screen/S-hipo$ file 1549.pts-11.pcfreak
1549.pts-11.pcfreak: fifo (named pipe)
 
The use case of screen are really up to your imagination, however for running programs which require you to have a permanent interactive terminal, like lets say: Midnight Commander (mc), iptraf, tcpdump, irssi (IRC chat client), ettercap, sniffit 🙂 screen is really *precious sysadmin tool
screen is great for PuTTY users who dislike that putty doesn't by default support tab-bed multple SSH logins (you might like to check my previous post where I explain about Putty Connection manager which supports tabbed ssh)
Actually, i'm so accustomed to SCREEN, that it is quite hard to imagine the times when it was not. I guess sysadmin life was much difficult back then 🙂

Many people who still remember irc clients like BitchX and epic and the IRC times should remember, how well known and frequent people used to detach those progs or even detach eggdrops with specific TCL scripts inside separate screen sessions.

The most useful use of screen of course is to open multiple SSH sessions to different server nodes and keep permanently logged in on hosts by detaching the screen session.

I can think of 3 main advantages of using ssh inside single screen session:

1. At any time you can login to just one server instead of (for exmpl. 10 servers), and use this one server as a reference through which you can "stuntly" check statuses of all 10 hosts with no need to login 10 times via SSH or with a Putty client (if logging from Windows)
 
 2. If you're using unstable often interrupted lets say modem (dial up) line to connect to the Internet and you need continuation of previously interrupted SSH ssh login due to interrupted connection

 3. You can save a lot of time and effort of typing passwords multiple times at ssh login prompts 
 

Of course there are disadvantages too;

From security point of view it is a weak practice to keep logged in to multiple servers via SSH from one single screen session. If someone sniffs user password with which screen is started and attach to the screen session he will suddenly be granted to access to 10 more servers! 
Anyhow for  lazy people who believe to maintain high security policies, e.g.:

 a. do not login to SSH sessions from Windows hosts
 b. use some kind of UNIX / Linux / BSD based OS
 c. login from a host used only by a single person
etc. etc. ,  keeping screen detached with multiple sshs might save you a lot of time; this is especially if you have to login 10 times to the servers a day changing location – lets say if you use (notebook and travel a lot).

GNU screen also understands some commands, which can configure the Shell Prompt of it as long as color gamma of main and sub-screen (virtual) sessions. To have a screen shell prompt outline and blue color gamma as in the picture in beginning of my post you can download and use my .screenrc into your ~/.screenrc i.e.:

pcfreak:/~$ cd ~
pcfreak:/~$ wget -q https://www.pc-freak.net/files/.my-screenrc
pcfreak:/~:$ mv .my-screenrc .screenrc
 
Another good screenrc configured to make your screen sessions more user friendly is here.

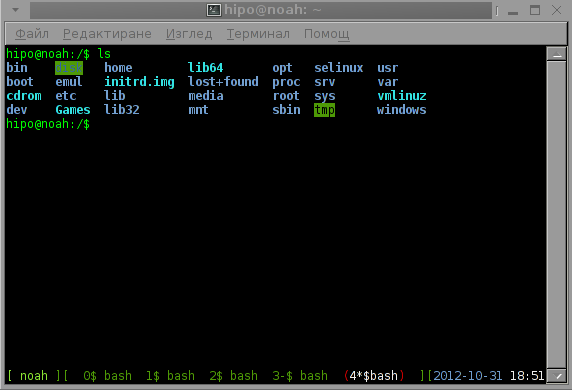
Below I include a screenshot on how screen sessions looks like, whenever above "user friendly screenrc" is used:

Screen custom screenrc in gnome terminal Debian Squeeze Linux screenshot
 It might be helpful to mention, there are newer piece of soft with richer screen functionality one of those newer virtual window managers (alternative to GNU screen) is byobu. I've tested byobu myself and I feel
  
Sometimes, when a screen session is interrupted, because screen running host is restarted or shutdown, dead screen sockets remain.

pcfreak:~$ screen -list
25542.pts-28.pcfreak (Dead ???)

1636.pts-21.pcfreak (Attached)

In case you see some screens, like this you should use screen -wipe to cleanse socket pointing to already non-existing screen:

pcfreak:~$ screen -wipe

Screen has plenty of other command shortcuts, all of them are starting with a key combination of CTRL + a + )some kbd letter)

CTRL + a + aDoes switch between first and last screen open windows

CTRL + a + HTurns screen log on for active screen session

Ctrl + a + mTurns (on/off) screen monitoring for activity of a screen shell (useful if you left kernel, openoffice or some huge app to compile

CTRL +a + _Turns monitoring and reports outside of screen session if a running shell inside screen is not active for more than 30 seconds

CTRL +a + shift + SIs very handy as it splits the screen between all logged in active screen sessions (Use control CTRL + a + tab to switch between splitted windows)

how to GNU Screen split windows Linux gnome-terminal shot

Ctrl + a + x locks the screen, in the same fashion as Screen Lock is done inside a GUI environment GNOME, KDE etc. Once pressed it can be unlocked after you type in your user pass. This is very handy if you have to go to toilet and you don't want your colleague to snuff in your console 🙂
 

It is also possible to switch between screen sub-virtual windows using:

CTRL + a + (number starting from 0), e.g.:

CTRL + a + 0
CTRL + a + 1
CTRL + a + …
CTRL + a + 9

There are plenty of other helpful functionalities which you might want to look in the manual (man screen) – check in the manual section DEFAULT KEY BINDINGS section

P. S.  – Some of screen keybindings, does not work in gnome-terminal and konsole and other terminal clients which already had a key bindings set to CTRL + a + whatever key. If that's the case you can change screen assigned keybindings through .screenrc

If you google around you will find a dozen of tricks you can do with screen, since my only goal of this article

Adding multiple VirtualHosts hosting on fresh installed Debian GNU / Linux

Monday, September 10th, 2012

Nowdays most of my new (fresh) Linux server configurations are installed with Debian Linux.

Through the years I worked with most major GNU / Linux distributions. Though intalling Apache for multiple domain VirtualHost-ing is almost equally easier to set up on all distros I tried, (Slackware, Redhat, Fedora) etc., I found Debian to be most convenient in terms of freqeuent easy updates and general security.

Every time I configure a new host which is supposed to host a dozen of websites with Apache webserver and a DB backend, it is of course necessery to enable the server to have support multiple domain VirtualHosts.

I thought there are people out who look to configure Multiple domains on fresh installed Apache webserver and this how this short post get born.

I will explain hereby in short how I configure VirtualHosts on new Debian Linux servers with fresh installed Apache.

All required to have a working many domains hosted VirtualHosts on Debian is:

1. Have installed Apache serve package

# apt-get --yes install apache2

This would install all packages necessery for VirtualHost-ing.
After apache2 installed the system should have at least this packages present.

# dpkg -l |grep -i apache2
ii apache2-mpm-prefork 2.2.16-6+squeeze7 Apache HTTPServer - traditional non-threaded model
ii apache2-utils 2.2.16-6+squeeze7 utility programs for webservers
ii apache2.2-bin 2.2.16-6+squeeze7 Apache HTTPServer common binary files
ii apache2.2-common 2.2.16-6+squeeze7 Apache HTTPServer common files
ii libapache2-mod-php5 5.3.3-7+squeeze14 server-side, HTML-embedded scripting language (Apache 2 module)

Nowadays, having enabled mod_rewrite is necessery in almost any website, so the next thing I usually do is enable mod_rewrite webserver module.

# ln -sf /etc/apache2/mods-available/rewrite.load /etc/apache2/mods-enabled/rewrite.load
# apache2ctl -k restart

By default there is an index.html page containing the annoying phrase It Works!

I really dislike this default page and many times I start configuring a server, I wonder how to remove it; if you’re like me before doing anything other I advice you edit /var/www/index.html to change it to Coming Soon or just substitute the file with some nice looking Coming Soon page (custom page) …

Once this is done, I proceed adding as many Virtualhosts as I need with the respective Virtualhost names. To Do so on Debian, just create new Vhost config files in files /etc/apache2/sites-available/yoursite.com, /etc/apache2/sites-available/yoursite1.com etc.br />
Before creating any other VHosts, I usually edit the main webserver VirtualHost which is located in /etc/apache2/sites-available/000-default, there in the VirtualHost section normally need to add proper:

ServerName and ServerAlias variables as well as change DocumentRoot to whatever the default server host Virtualhost directory will be.

An example of 000-default Vhost config I do looks like so:

<VirtualHost *>ServerName server-main-host-name.com
ServerAlias www.server-main-host-name.com server-main-host-name.com
DocumentRoot /var/www
....
</Virtualhost>

Onwards add the same ServerName server-main-host-name.com as a new line in /etc/apache2/apache2.conf config

Now for those not too unfamiliar with VirtualHost types, it is useful to say there are two ways of VirtualHosts:

  • IP Based VirtualHost
  • and

  • Host Based VirtualHosts

IP Based VirtualHosts are added by using Apache directive syntax:

<VirtualHost 192.168.0.2:80>
ServerName ....
ServerAlias ....
</VirtualHost>

whether Host Based VirutalHosts are added by using in config file, the IP address on which the respective Vhost will reside:

<VirtualHost *>
ServerName ....
ServerAlias ....
</VirtualHost>

Host Based VirtualHosts directive syntax can be either in form:

a)Virtualhost *
or
b) Virtualhost port_number (Virtualhost 80, VirtualHost 90) etc.

If a host is configured with directive <VirtualHost *>, this means it will listen for incoming connections on any port Apache is configured to listen on, whether if used with a concrete port number it will only enable VirtualHosts for whole Apache server on the concrete port.

Based on the configuration, VirtualHost 80 or Virtualhost *, the variable which will enable globally on the Apache server multiple VirtualHosts has to be modified e.g.:
Whether VirtualHost with port number is configured <VirtualHost 80>, NameVirtualHost 80 should be used or otherwise NameVirtualHost *

Once you choose the type of Virtualhost-ing, just continue on adding the VirtualHosts …
In the first created VirtualHost config file, let’s say /etc/apache2/sites-available/first-virtualhost.com

NameVirtualHost * has to be added as first line in file; in other words the file content should look similar to:

NameVirtualHost *
<VirtualHost*>
ServerAdmin hipo_aT_www.pc-freak.net AddDefaultCharset UTF-8 DocumentRoot /var/www/ ServerName www.pc-freak.net ServerAlias www.pc-freak.net....
</VirtualHost>

The same steps has to go for all domain names in separate files except the variable NameVirtualHost * should not be added in the rest of new created Vhosts.

Many of the new configured Debian + Apache servers does not require support for SSL, therefore where SSL support is not necessery I prefer disabling it.
To do so it is necessery to comment out everything dealing with Secure Socket Layer in /etc/apache2/ports.conf, as of time of writting lines to comment are:

<IfModule mod_ssl.c>
# If you add NameVirtualHost *:443 here, you will also have to change
# the VirtualHost statement in /etc/apache2/sites-available/default-ssl
# to <VirtualHost *:443>
# Server Name Indication for SSL named virtual hosts is currently not
# supported by MSIE on Windows XP.
Listen 443
</IfModule>
<IfModule mod_gnutls.c>
Listen 443
</IfModule>

Generate Awstats Statistics from multiple Apache logs / Generate Awstats statistics for multiple domain names / Automatically configure awstats to show reports for multiple domain names

Friday, April 9th, 2010

Awstats Picture

I’ve created a small shellscript that allows the administrator to build log statistics for multiple domain names.
You can download the script to generate statistics from multiple log files awstats_generate_multiple_sites.sh from here .
The usage of the script is quite self explanatory. You have to follow the instructions in the commented head of the script.
After you have properly configured the script all you have to do is set it to be executed via crontab.
Again in the script head I’ve included information with an example on how to add it to a crontab. The script takes all subdirectories from /var/log/apache2 assuming that each of the subdirectories contains access.log and error.log file names.
It generates a number of configuration files to be later red by awstats and after finishing, invokes awstats to generate the statistics from the previously generated awstats domain configuration files.
Finally the script generates an html files with links to each of the domains for whom awstats has generated statistics.
The idea for the script hit me, before a week time, after I’ve red an article which explains how to achieve something similar to what the script does manually.
You can read the article configuring multiple awstats for multiple domain on dreamhost here . I believe the script can be quite useful to the administrators out there who are looking for a quick way to generate awstats statistics from their many domain log files.
Cheers! 🙂

Howto delete multiple files in Linux and FreeBSD / How to deal with “Argument list too long” error while deleting many files in directory

Wednesday, April 7th, 2010

Linux has some Limitations on the number of files you can delete within a directory, therefore if you try to delete let’s say 100000 files with a quarantine mails from spamassassin.
In that case you are about to face an error Argument list too long . The amount of files you can delete in Linux is tied with something specified by a file:
/usr/include/linux/limits.h
This limitation is a limitation caused by kernel_limits. In order to check the limitation on your Linux distribution, you have to execute the command:

egrep ARG_MAX /usr/include/linux/limits.h

You should receive a result on most Linux distrubutions similar to:
#define ARG_MAX 131072 /* # bytes of args + environ for exec() */

The 131072 is actually a default limitation on Debian GNU/Linux as well.The reason for the error is that the the maximum number (in bytes) of the arguments to a command could be equal max to the ARG_MAX defined in the limits.h.
For instance rm -f * in a directory with 40000 fileswould be evaluted as rm -f file1 file2 file3 … file40000. Therefore at a certain point the maximum limitation of 131072 bytes long for arguments or 128KB is about to be reached and then the command let’s say ls * would refuse to list the files in the directory showing up the annoying Argument list too long error.
There are a couple of ways to deal with that unpleasant situation.

1. You can use the linux find command to delete the files, you have to execute after changing dir (cd) to the directory where the multiple files are located:
find . -exec rm -fr {} ; 2. Second approach to the problem is passing the xargs command to find .
For instance execute the command:

find . -name "*" -print | xargs rm

3. In FreeBSD to get around the “Argument list too long” problem”, in bash shell you have to execute:

for files in *.*; do rm -f $files; done

4. Another possible way is to increase the ARG_MAX value in limits.h though this approach in my personal belief could have a negative impact on some productive servers, therefore it’s not a recommended.
Yet if you desire to do so simply edit /usr/include/linux/limits.h and change the ARG_MAX to your value of choice.

FreeBSD 7 Installation and setup for tightened security / Multiple IPs in Jail problems

Wednesday, February 20th, 2008

In Saturday I went to Bergon. To help with the install and configuration of a FreeBSD 7 system to Static and Kiril(e.g. Arkadietz).The install went smoothly. Then I csupped following the handbook canonical way for rebuild world and kernel and stuff.Also I get to know personally the Bergon’s ISP owner and administrator Drago btw he looks like really good man.We spoke about the GDBOP actions when some times ago GDBOP agents break into a server room next to the office and tookBergon’s storage servers for users http://free-zone.cc (An FTP for Users). He said the GDBOP IT specialists doesn’t know evenelementary unix commands like “df” and “du” and he had to tell them what to type. We walked through the server’s room.He had some interesting servers I also observed the fiber optics and stuff. After setupping the newly installed serverto the server room. We went to the place “Seasons” and we drinked “Stolichno Tymno” and we ate Pizza on drago’s account.The idea of this FreeBSD installation was to make the machine hera.bergon.net a freeshell machine for local Bergon users assecure as possible. To achieve that I have set this sysctl settings:security.bsd.see_other_uids=0security.bsd.see_other_gids=0net.inet.tcp.msl=7500net.inet.tcp.blackhole=2net.inet.udp.blackhole=1net.inet.icmp.icmplim=50kern.ipc.somaxconn=32768Also I have installed AIDA . Also I have setupped jail with the ideato add the users into jail unfortunately. After running the jail I experienced problems with setupping multiple ips into thejail so I asked for help in ##freebsd in freenode it turned out that by default FreeBSD jail doesn’t support virtual IPs but thereis a patch to enable that unfortunately the patch is for still for FreeBSD 5,6 or 6.2 none available for 7. After somediscussion in ##freebsd I found out there is something that would do the work but it’s not still stable enough it’s calledVIMAGE, VIMAGE looks promising but will be ready maybe in FreeBSD 8 check it out here .The only think which left from the FreeBSD configuration is to setup firewall I intend to make a firewall based on “PF” but I have to spend some time reading for PF. Also I’ve upgraded the kernel at home to:FreeBSD jericho.pcfreak 7.0-PRERELEASE FreeBSD 7.0-PRERELEASE #0: Mon Feb 18 14:12:03 EET 2008 hipo@jericho.pcfreak:/usr/obj/usr/src/sys/GENERIC i386Apart from the geek stuff, yesterday I was to the fountain with Narf, today I had a walk in the Central park with Damqncho. Yesterday and today were quiet days thanks ofcourse to God almighty 🙂 Also Our Heavenly Father gives me peace through our Lord and Saviour Jesus Christ day after day through the Power of the Holy spirit 🙂 Unfortunately still I’m not too much of a healthy. But I still say The Lord is my rock I won’t be in use! Today in the college we had a business Meeting on the topic of “A New Product” I was the Personnel Manager, the last time meeting I wasa head of sales. After school and going out for a walk I went to my grandma and grandpa Georgi and Dimitrichka, after that I went to see my other grandma which is so a cool grandma (I love her much). Another good news even though they’re old ones are that my grandmother decided to give me 150$ more for buying the laptop. The only thing left is to choose the right laptop :). In USA thinkpads T series are so cheap starting from (around 950$), a good model costs something like 1150$ the same models here cost almost 1800$ pff… To end this post I would say I thank The Lord for giving me quiteful and peaceful days and blessing me in my work and in my studies. Hope he will continue to bless me in the future too.END—–