Posts Tagged ‘Delete’

KVM Creating LIVE and offline VM snapshot backup of Virtual Machines. Restore KVM VM from backup. Delete old KVM backups

Tuesday, January 16th, 2024

kvm-backup-restore-vm-logo

For those who have to manage Kernel-Based Virtual Machines it is a must to create periodic backups of VMs. The backup is usually created as a procedure part of the Update plan (schedule) of the server either after shut down the machine completely or live.

Since KVM is open source the very logical question for starters, whether KVM supports Live backups. The simple answer is Yes it does.

virsh command as most people know is the default command to manage VMs on KVM running Hypervisor servers to manage the guest domains.

KVM is flexible and could restore a VM based on its XML configuration and the VM data (either a static VM single file) or a filesystem laying on LVM filesystem etc.

To create a snapshot out of the KVM HV, list all VMs and create the backup:

# export VM-NAME=fedora;
# export SNAPSHOT-NAME=fedora-backup;
# virsh list –all


It is useful to check out the snapshot-create-as sub arguments


# virsh help snapshot-create-as

 OPTIONS
    [–domain] <string>  domain name, id or uuid
    –name <string>  name of snapshot
    –description <string>  description of snapshot
    –print-xml      print XML document rather than create
    –no-metadata    take snapshot but create no metadata
    –halt           halt domain after snapshot is created
    –disk-only      capture disk state but not vm state
    –reuse-external  reuse any existing external files
    –quiesce        quiesce guest's file systems
    –atomic         require atomic operation
    –live           take a live snapshot
    –memspec <string>  memory attributes: [file=]name[,snapshot=type]
    [–diskspec]  disk attributes: disk[,snapshot=type][,driver=type][,file=name]


# virsh shutdown $VM_NAME
# virsh snapshot-create-as –domain $VM-NAME –name "$SNAPSHOT-NAME"


1. Creating a KVM VM LIVE (running machine) backup
 

# virsh snapshot-create-as –domain debian \
–name "debian-snapshot-2024" \
–description "VM Snapshot before upgrading to latest Debian" \
–live

On successful execution of KVM Virtual Machine live backup, should get something like:

Domain snapshot debian-snapshot-2024 created


2. Listing backed-up snapshot content of KVM machine
 

# virsh snapshot-list –domain debian


a. To get more extended info about a previous snapshot backup

# virsh snapshot-info –domain debian –snapshotname debian-snapshot-2024


b. Listing info for multiple attached storage qcow partition to a VM
 

# virsh domblklist linux-guest-vm1 –details

Sample Output would be like:

 Type   Device   Target   Source
——————————————————————-
 file   disk     vda      /kvm/linux-host/linux-guest-vm1_root.qcow2
 file   disk     vdb      /kvm/linux-host/linux-guest-vm1_attached_storage.qcow2
 file   disk     vdc      /kvm/linux-host/guest01_logging_partition.qcow2
 file   cdrom    sda      –
 file   cdrom    sdb      


3. Backup KVM only Virtual Machine data files (but not VM state) Live


# virsh snapshot-create-as –name "mint-snapshot-2024" \
–description "Mint Linux snapshot" \
–disk-only \
–live
–domain mint-home-desktop


4. KVM restore snapshot (backup)
 

To revert backup VM state to older backup snapshot:
 

# virsh shutdown –domain manjaro
# virsh snapshot-revert –domain manjaro –snapshotname manjaro-linux-back-2024 –running


5. Delete old unnecessery KVM VM backup
 

# virsh snapshot-delete –domain dragonflybsd –snapshotname dragonfly-freebsd
 

Delete empty files and directories under directory tree in Linux / UNIX / BSD

Wednesday, October 21st, 2020

delete-empty-directories-and-files-freeup-inodes-by-empty-deleting-directoriers-or-files

Sometimes it happens that you end up on your server with a multiple of empty files. The reason for that could be different for example it could be /tmp is overflown with some session store files on a busy website, or due to some programmers Web executed badly written PHP / Python / Perl / Ruby code bug or lets say Content Management System ( CMS ) based website based on WordPress / Joomla / Drupal / Magento / Shopify etc. due to a broken plugin some specific directory could get filled up with plenty of meaningless empty files, that never gets wiped out if you don't care. This could happen if you offer your users to share files online to a public sharing service as WebFTP and some of the local hacked UNIX user accounts decides to make you look like a fool and run an endless loop to create files in your Hard Drive until your small server HDD filesystem of few terabytes gets filled up with useless empty files and due to full inode count on the filesystem your machine running running services gets disfunctional …

Hence on servers with shared users or simply webservers it is always a good idea to keep an eye on filesystem used nodes count by system are and in case if notices a sudden increase of used FS inodes as part of the investigation process on what caused it to check the amount of empty files on the system attached SCSI / SSD / SAS whatever drive.
 

1. Show a list of free inodes on server


Getting inodes count after logged is done with df command

root@linux-server:~# df -i
Filesystem        Inodes   IUsed     IFree IUse% Mounted on
udev             2041464     516   2040948    1% /dev
tmpfs            2046343    1000   2045343    1% /run
/dev/sdb2       14655488 1794109  12861379   13% /
tmpfs            2046343       4   2046339    1% /dev/shm
tmpfs            2046343       8   2046335    1% /run/lock
tmpfs            2046343      17   2046326    1% /sys/fs/cgroup
/dev/sdc6        6111232  6111232   0   100% /var/www
/dev/sda1       30162944 3734710  26428234   13% /mnt/sda1
/dev/sdd1      122093568 8011342 114082226    7% /backups
tmpfs            2046343      13   2046330    1% /run/user/1000


2. Show all empty files and directories count


### count empty directories ### root@linux-server:~# find /path/ -empty -type d | wc -l

### count empty files only ### root@linux-server:~# find /path/ -empty -type f | wc -l


3. List all empty files in directory or root dir

As you can see on the server in above example the amount of inodes of empty inodes is depleted.
The next step is to anylize what is happening in that web directory and if there is a multitude of empty files taking up all our disk space.
 

root@linux-server:~# find /var/www -type f -empty > /root/empty_files_list.txt


As you can see I'm redirecting output to a file as with the case of many empty files, I'll have to wait for ages and console will get filled up with a data I'll be unable to easily analyze

If the problem is another directory in your case, lets say the root dir.

root@linux-server:~#  DIR='/';
root@linux-server:~# find $DIR -type f -empty > /root/empty_files_list.txt

4. Getting empty directories list


Under some case it might be that the server is overflowed with empty directories. This is also a thing some malicious cracker guy could do to your server if he can't root the server with some exploit but wants to bug you and 'show off his script kiddie 3l337 magic tricks' :). This is easily done with a perl / python or bash shell endless loop inside which a random file named millions of empty directories instead of files is created.

To look up for empty directories hence use:

root@linux-server:~# DIR='/home';
root@linux-server:~# find  $DIR . -type d -empty > /root/empty_directories_list.txt


5. Delete all empty files only to clean up inodes

Deletion of empty files will automatically free up the inodes occupied, to delete them.

root@linux-server:~# cd /path/containing/multiple/empty-dirs/
root@linux-server:~# find . -type f -empty -exec rm -fr {} \;


6. Delete all empty directories only to clean up inocommanddes

root@linux-server:~# find . -type d -empty -exec rm -fr {} \;


7. Delete all empty files and directories to clean up inodes

root@linux-server:~# cd /path/containing/multiple/empty-dirs/
root@linux-server:~# find . -empty -delete


8. Use find + xargs to delete if files count to delete is too high

root@linux-server:~# find . -empty | xargs rm -r


That's all folks ! Enjoy now your Filesystem to have retrieved back the lost inodes from the jump empty files or directories.

Happy cleaning  🙂

How to View and Delete NetApp Storage qtree, Get statistics about Filer Volume Read / Writes operations and delete and show mounted volumes

Friday, August 2nd, 2019

how-to-delete-volume-qtree-snapmirror-view-netapp-volume-qtree-and-and-view-netapp-cluster-device-statistics-NetAppLogo

I've had recently the trivial decomissioning task to delete some NetApp Storage qtrees on some of the SAP Hana Enterprise Cloud NetApp filers.
If it is first time you heard of NetApp is a hybrid cloud data services and data management (ranked in the Fortune 500 companies).

Netapps are hybrid cloud data services for management of applications and data across cloud and on-premises environments and are a de-facto standard for Data storage on many of the existing Internet Clouds and Large Corporatons that Stores many Pentabytes of Data.

The Netapp storage devices are a kinda of proprietary Clustered version of the Small business NAS storage Solution FreeNAS (which of itself is a Free FreeBSD based Data Storage OS – The #1 Storage OS).
NetApps allow plenty of things to do such as Data Mirroring (Data Backups), Data Syncing, SpapMirroring, SnapVault and many, many more custom Data revolutionary solutions such as StorageGrid.

NetApp supports integration with Kubernetes, Docker, Oracle / SAP DB, Citrix, Xen, KVM as well as multiple cloud environments such as AWS, Azure, OpenStack and has even integration with some CI/CD DevOps data provisioning – i.e. Jenkins.

In this small article, I'll show you how a Volume / Qtree on a NetApp filer could be viewed, mounted, unmounted, deleted. I'll also show you how to get statistics, while logged in remotely to the NetApp console and finally how to view and delete a NetApp configured snapmirror.


View NetApp Qtree


Here is how to view the Storage Qtree:

netapp> qtree show -vserver netapp01fv018 -volume VOL_OS_MIG -qtree bck_01v046485_20190108

To view the file content existing on the Storage server from the Linux bost next step to do is mount it with regular mount:

linux-host:~# mount netappfiler01fv018:/VOL_OS_MIG/ bck_01v035527_20190108 /mnt/test


Delete the Qtree from NetApp (Storage) Filer

Become administrator on the device

Once assured the content could go on to delete the qtree, it is necessery to become superuser (root) on the NetApp device, to do so, I hed to type:


netapp> set -privilege advanced


Then to delete the unneded volume previously used for transferring system update files, when logged in via SSH to the NetApp device – ONTAP Proprietary Operating system :


netapp> qtree delete -vserver netapp01fv018 -volume VOL_OS_MIG -force -qtree bck_01v035527_20190108


Note that this command will return back a job ID
assigned until operation is completed, to check the status of completion of generated JOB that is backgrounded, I've used command:

netapp> job show 53412

If all is okay you should get a Status of Success otherwise, if you get failed status you have to debug further what's causing it.
 

How to view existing export polcities and remove them


If you don't want to delete the qtree or volume but want to prevent a certain Linux server / application to not have access to it, it is useful to view existing export policy for a qtree.
 

netappfc001::> qtree show -exports -volume vol1_vmspace_netapp01v000885 -qtree q_01v002131
                                                   Is Export
Vserver    Volume        Qtree        Policy Name  Policy Inherited
———- ————- ———— ———— —————–
netapp01fv001 vol1_vmspace_netapp01v000885
                         q_01v002131
                                      vol1_vmspace_netapp01v000885.exports
                                                   true


To remove then export policy (to not exist at all), this is how:


netapp> volume qtree modify -vserver hec01fv018 -qtree-path /vol/volume_name/qtree_name -export-policy ""


I've also found the following volume qtree commands NetApp ONTAP documentation page helpful to read and recommend to anyone that wants to learn more.
 

How to delete a NetApp Volume if it is not used anymore

To delete unsed netapp volume, you have to do 3 things.
1. Unmount the volume
2. Put it offline
3. Delete it

to do so run below 3 cmds:


netapp> volume unmount -vserver vserver_name -volume volume_name
netapp> volume offline -vserver vserver_name volume_name
netapp> volume delete -vserver vserver_name volume_name


Show mounted Volume junctions (Get Extra Storage Volume information)


netapp> volume show -vserver netapp01fv004 -junction
netapp> volume show -vserver netapp01fv004 -volume MUFCF01_BACKUP


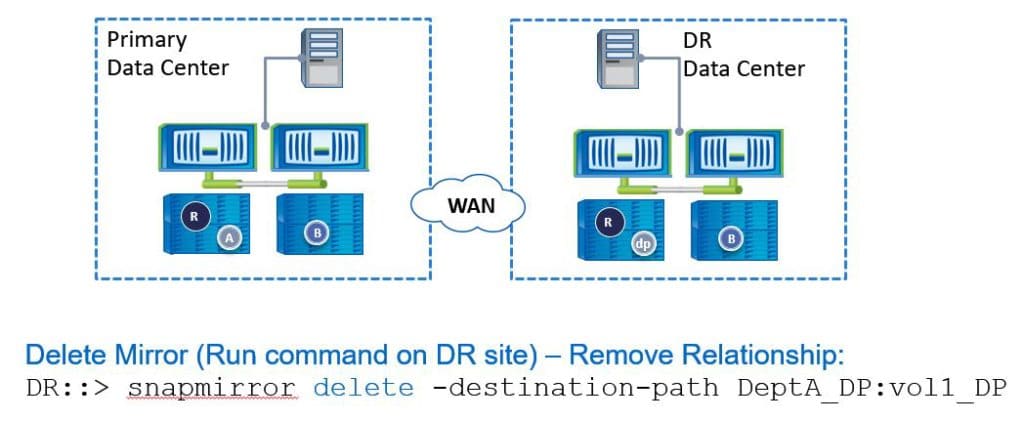
How to delete a Configured SnapMirror

What is a snapmirror?


Recovery-Scenario-Restore-Changes-To-Recovery-site-snapmirror-diagram

SnapMirror is a feature of Data ONTAP that enables you to replicate data. SnapMirror enables you to replicate data from specified source volumes or qtrees to specified destination volumes or qtrees, respectively. You need a separate license to use SnapMirror.

You can use SnapMirror to replicate data within the same storage system or with different storage systems.

After the data is replicated to the destination storage system, you can access the data on the destination to perform the following actions:

  • You can provide users immediate access to mirrored data in case the source goes down.
  • You can restore the data to the source to recover from disaster, data corruption (qtrees only), or user error.
  • You can archive the data to tape.
  • You can balance resource loads.
  • You can back up or distribute the data to remote sites.


netapp> snapmirror show -destination-path netapp02fv001:vol1_MUF_PS1_DR


netapp> snapmirror delete -destination-path netapp02fv001:vol1_MUF_PS1_DR -force
Operation succeeded: snapmirror delete for the relationship with destination "hec02fv001:vol1_MUF_PS1_DR".
 

If the snapmirror deletion gets scheduled you can use snapmirror status command to check status:
 

netapp> snapmirror status MUF_PS1_PRD
Snapmirror is on.


How to telnet from NetApp Storage to another one / check status of configured SMTPs for NetApp Cluster (filer)


You can use the autosupport and options autosupport commands to change or view AutoSupport configuration, display information about past AutoSupport messages, and send or resend an AutoSupport message.

For example if NetApp Filers have configured SMTP or SMTPs servers or other Proxy Configurations to pass on traffic from DMZ-ed network to external Internet resources or Relay servers this command will provide information on the Connection status of this remote services.


rows 0
set diag
node show

autosupport check show
systemshell -node netapp01f0018 -c telnet
autosupport show -fields proxy-url
systemshell -node netappf0018 -c telnet  147.204.148.38 80

netapp09fc001::*> systemshell -node  netapp08f0013 -c telnet  8080
  (system node systemshell)
Trying 100.127.20.4


node show – will provide information about configured nodes
rows 0 – will set the output print rows how they will be displayed
set – diag sets the device in diagnostic state

As you can see you can use the systemshell netapp command to try out telnet connections from the Configured NetApp logged in Source to any remote destination to make sure the set Proxy or SMTP is properly reachable.

How to get Statistics about NetApp existing volume Read / Write operations


On Netapp side issue:

netapp> statistics volume show -interval 5 -iterations 1 -max 25 -vserver netapp01fv004 -volume MUFCF01_BACKUP

For people starting up with NetApps, it is very useful to get a in-depth read on quick and dirty –  Netapp Commandline CheatSheet (for simplicity I've stored it in netapp-commands-cheatsheat.txt formatted file here ).

Conclusion

NetApp storages are used in many Governments and Large Corporations and for critical applications with SLAs forfeits for million bucks, mostly for applications and Database storage that are of a very large scale and too critical to be handled by the conventional storage computing of simple RAIDS 1,2,3,5,6 etc. / LVM and so on. ONTAP and NetApp Filers and Filer Clusters, are easy to maintain but due to its high number of features, not many NetApp Storage / Backup system administrators have the knowledge how to take a good advantage of this beasts. Thus finally, my even small experience with them shows that even simple things as critical errors are not handled properly at least that was my experience as a SAP consultant with SAP Hana Enterprise Cloud (HEC) and their HANA Converged Cloud where, main storage. 
This article's goal was pretty simple to guide the user on a minimum set of commands for simple qtree / volume / snapmirror view and removal decomissioning tasks. NetApps Clusters are a whole ocean of stuff and knowledge so before doing anything complex, if you're not sure what you're doing always consult a NetApp storage sysadmin as some of this animals features looks easy for the common general sysadmin but not are not so.
 

How to configure Nautilus (Linux application like Windows Explorer) to work with standard Windows button + E On Linux GNOME en Mate

Monday, October 9th, 2017

how-to-configure-nautilus-linux-applicatoin-to-act-like-windows-explorer-make-windows-button-work-in-GNOME-and-Mate
As an ex-Windows user I'm still addicted to Windows User brainwashing as an ex-victim of Windows 95 / 98 and XP:), so I tend to love very much and its still hard for me to forget some major Key Binding (Windows Key Combinations).

On every new Desktop Linux I install, I have the habit to configure few great key combination shortcuts that makes my digital life much easier.
I use usually as a graphical environment GNOME and recently switched to MATE (GNOME 2 fork, cause GNOME 3 is totally messed up and unworthy to me), that's why this article is targetting this two Linux GUI envs, I'll be glad to hear in article comments for any other useful key bindings and how to configure similar key bindings for other Major Linux graphical environments (Cinnamon, KDE Plasma, XFCE, LXDE).


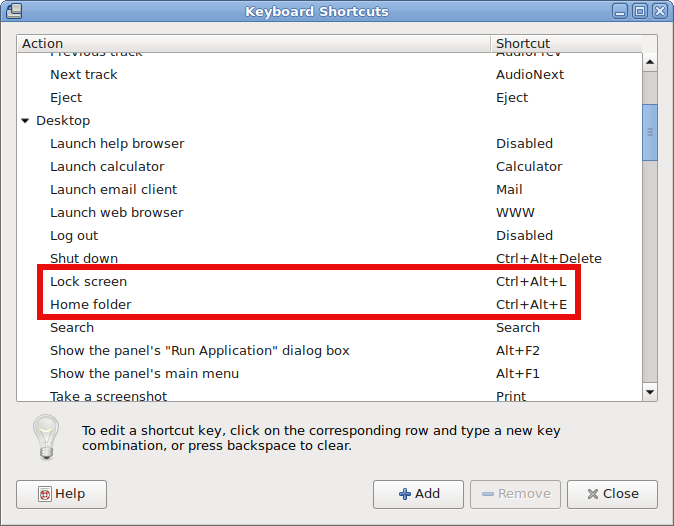
1. Configuring Lock Screen (Win button + L), Open Explorer(Win button + E), View Desktop (Win + D) in MATE graphic env


———  WINDOWS BUTTON, OFTEN USED KEY SHORTCUTS ———

Windows + E – Open new Windows File Explorer 

Windows + L – Lock Computer

Windows + M – To minimize All Windows

Windows + D – Show Desktop (similar to Windows +M though it doesn't switch to Desktop)

Win – + / – To Maginfy Text and Windows

Shift + Win + Left/Right Arrow – (In Windows if you have multiple monitors connected to the same computer lets say Right Monitor and Left, that combination switches between left monitor and right monitor)


——————————————————————–


The list goes on but I'm not used to all of them, I'll stop here and continue on with how to remake some of my favourite Windows keybindings in Gnu / Linux

Either run it from Menus:
 

System -> Settings -> Hardware -> Keyboard Shortcuts


Or run command


$ mate-keybinding-properties


howto-gnome-mate-remap-shortcut-keybinding-keys-mate-keybinding-properties


After rebinding the Windows: 
– Lock Screen and Open New Nautilus Explorer Window (Home folder) variable to be invoked with Windows button, the result
is as that:

howto-gnome-mate-remap-shortcut-keybinding-keys-mate-keybinding-properties


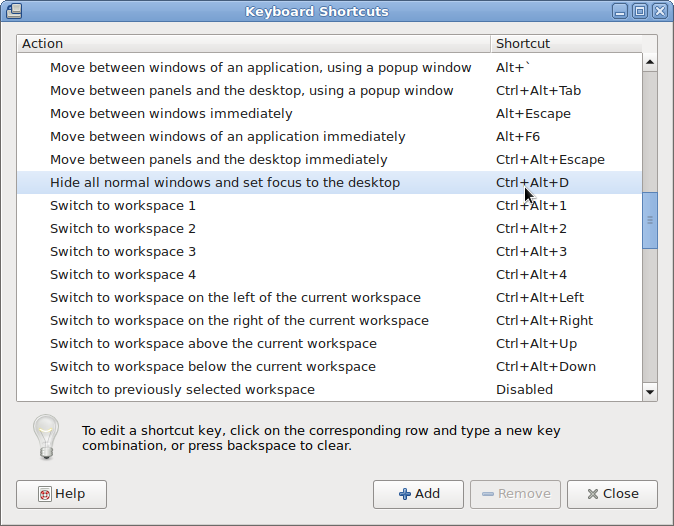
Scroll down Mate Keyboard shortcuts and you'll find

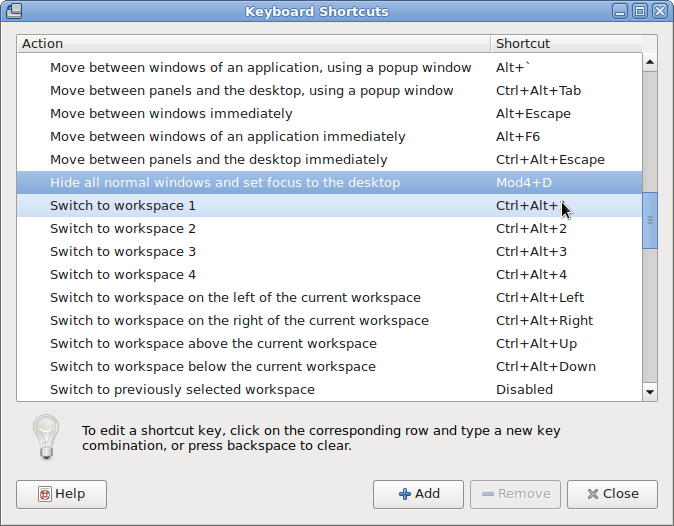
also how to configure Windows Button and D Key Combination, following 2 more screenshots showing how to do it note that MOD Key appears once you press Windows Keyboard Key + something (e.g. MATE recognizes MOD Key as Win Key):

Before the change to bind Win Key + D to work:

mate-how-to-make-desktop-view-open-with-standard-windows-button_and_d-combination-linux-debian

When configured Win Button + D looks like so:

mate-how-to-make-desktop-view-open-with-standard-windows-button_and_d-combination-linux-debian-1

2. Configuring Lock Screen (Win button + L), Open Explorer(Win button + E), View Desktop (Win + D) in GNOME

Usually in GNOME until > version 3.X.X (in older GNOME graphic environment access to KeyBinding Properties was done via:


System -> Preferences -> Keybord Shortcuts -> Add ->


In fallback gnome with Metacity (if installed along with GNOME Desktop 3.2.X environment to access Key Bindings):

d

System->Apps->Metacity->global_keybindings  


Also it is possible to remap keys via dconf-editor, I've written a small article earlier explaining how to remap Screenshotting buttons with dconf-editor but the example could be easily adapted, so you can edit almost everything.

Besides that you can use a command to run the keyboard configuration (in older GNOMEs) via:


linux:~$ gnome-keybinding-properties


Just for information for those who might know, many Key Binding interesting options are available via gnome-tweak-tool, so if you don't have it yet install it and give it a try:


linux:~# apt-get install –yes gnome-tweak-tool


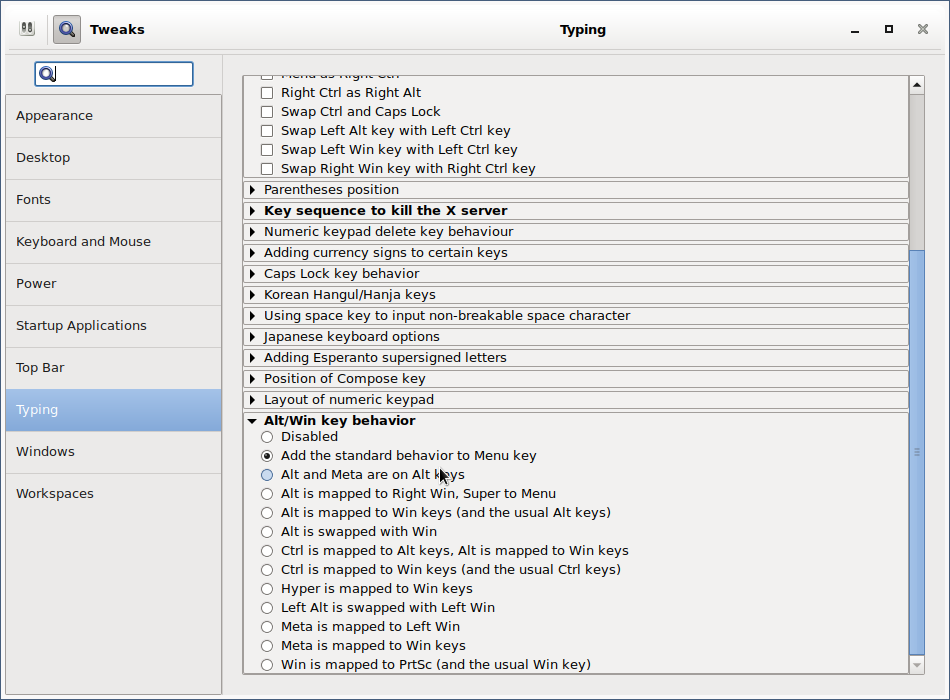
As you can see, there are plenty of options to make Win (key) to act like Alt (key):

linux:~# gnome-tweak-tool
 

gnome-tweak-tool-make-win-key-to-behave-like-alt-key-howto 


After configuring the changes enjoy your WINDOWS Button + L, WINDOWS + E and WINDOWS + D WORKING AGAIN HOORAY !!! 🙂 


3. Most used shortcuts in Gnome and Nautilus 
 

Below are most used shortcuts thanks to LinuxQuestions Forum for providing them

Howdy! I thought that it would be useful to post a practical selection of shortcut keys for GNOME (the Desktop Environment) and Nautilus (the File Manager) and some information about customizing shortcut keys in Ubuntu. I wrote it especially for Ubuntu beginners, but I hope it will prove useful for all. 


2.1 GNOME/Nautilus shortcut keys – Very useful for the keyboard maniax like me :):
 

Ctrl-H: show hidden files

Ctrl-N: new window

Ctrl-Shift-N: create new folder

Alt-Home : jump to home folder

Alt-Enter : file / folder properties

F9 : toggle side-pane

Alt-F1 : launch applications menu

Alt-F2 : launch "run application" dialogue

Ctrl-Alt – Right/Left arrow : move to the next virtual desktop

Ctrl-Alt-Shift – Right/Left arrow : take current window to the next virtual desktop

Ctrl-Alt-D: minimize all windows, and gives focus to the desktop. 

Alt-Tab: switch between windows. When you use these shortcut keys, a list of windows that you can select is displayed. Release the keys to select a window. 

Ctrl-Alt-Tab: switch the focus between the panels and the desktop. When you use these shortcut keys, a list of items that you can select is displayed. Release the keys to select an item. 

Ctrl-Alt-L: lock the screen (tested only in Ubuntu) 

Ctrl-L: shortcut for opening locations-by default the path is the home folder*
/ : same as Ctrl-L but has the root (/) as default path* (shortcut found on here)
* both shortcuts can be used while you are on the desktop (no window active)

Ctrl-T : move to trash (in Nautilus)
Quite dangerous key combination because many of us are used to press these keys in order to open a new tab. Because we all delete items using the Delete key, I recommend to deactivate this shortcut key. To do that, go to System » Preferences » Appearance » Interface. Select Editable menu shortcut keys and close the dialog box. Click on the Edit menu in the File Browser. Click the Empty Trash item (it has Ctrl-T as the keyboard shortcut) Press the Delete key to get rid of the shortcut.
You can find all GNOME shortcut keys here


2.2 How to create a custom hotkey to launch whatever application you want in GNOME
 

As an example, we will set a lock-screen shortcut.


Open "gconf-editor" as the user as you're logged in in GNOME (typing gconf-editor in the terminal or "Run Application").
 

Go to apps > metacity > keybinding_commands


Here we have a list of twelve slots for commands.


Double click on e.g. "run_command_1" 

In Key Value Type in the name of the application or command you want to launch (e.g. gnome-screensaver-command –lock).


Go to apps -> Metacity -> global_keybindings 

Double click on e.g. "run_command_1" 
Change the key value to whatever key combination you like (e.g. <Ctrl><Alt>L).Press "Ok".


2.3.How to create/change GNOME shortcuts


Click on System -> Preferences -> Keyboard Shortcuts


Click the action in the list and press Enter. 
Press the new key or key combination you want to assign to the action. (To clear a shortcut, press the Backspace key)


Hope it helps, Enjoy Life .;)

Improve Apache Load Balancing with mod_cluster – Apaches to Tomcats Application servers Get Better Load Balancing

Thursday, March 31st, 2016

improve-apache-load-balancing-with-mod_cluster-apaches-to-tomcats-application-servers-get-better-load-balancing-mod_cluster-logo


Earlier I've blogged on How to set up Apache to to serve as a Load Balancer for 2, 3, 4  etc. Tomcat / other backend application servers with mod_proxy and mod_proxy_balancer, however though default Apache provided mod_proxy_balancer works fine most of the time, If you want a more precise and sophisticated balancing with better load distribuion you will probably want to install and use mod_cluster instead.


So what is Mod_Cluster and why use it instead of Apache proxy_balancer ?
 

Mod_cluster is an innovative Apache module for HTTP load balancing and proxying. It implements a communication channel between the load balancer and back-end nodes to make better load-balancing decisions and redistribute loads more evenly.

Why use mod_cluster instead of a traditional load balancer such as Apache's mod_balancer and mod_proxy or even a high-performance hardware balancer?

Thanks to its unique back-end communication channel, mod_cluster takes into account back-end servers' loads, and thus provides better and more precise load balancing tailored for JBoss and Tomcat servers. Mod_cluster also knows when an application is undeployed, and does not forward requests for its context (URL path) until its redeployment. And mod_cluster is easy to implement, use, and configure, requiring minimal configuration on the front-end Apache server and on the back-end servers.


So what is the advantage of mod_cluster vs mod proxy_balancer ?

Well here is few things that turns the scales  in favour for mod_cluster:


  •     advertises its presence via multicast so as workers can join without any configuration
     
  •     workers will report their available contexts
     
  •     mod_cluster will create proxies for these contexts automatically
     
  •     if you want to, you can still fine-tune this behaviour, e.g. so as .gif images are served from httpd and not from workers…
     
  •     most importantly: unlike pure mod_proxy or mod_jk, mod_cluster knows exactly how much load there is on each node because nodes are reporting their load back to the balancer via special messages
     
  •     default communication goes over AJP, you can use HTTP and HTTPS


1. How to install mod_cluster on Linux ?


You can use mod_cluster either with JBoss or Tomcat back-end servers. We'll install and configure mod_cluster with Tomcat under CentOS; using it with JBoss or on other Linux distributions is a similar process. I'll assume you already have at least one front-end Apache server and a few back-end Tomcat servers installed.

To install mod_cluster, first download the latest mod_cluster httpd binaries. Make sure to select the correct package for your hardware architecture – 32- or 64-bit.
Unpack the archive to create four new Apache module files: mod_advertise.so, mod_manager.so, mod_proxy_cluster.so, and mod_slotmem.so. We won't need mod_advertise.so; it advertises the location of the load balancer through multicast packets, but we will use a static address on each back-end server.

Copy the other three .so files to the default Apache modules directory (/etc/httpd/modules/ for CentOS).
Before loading the new modules in Apache you have to remove the default proxy balancer module (mod_proxy_balancer.so) because it is not compatible with mod_cluster.

Edit the Apache configuration file (/etc/httpd/conf/httpd.conf) and remove the line


LoadModule proxy_balancer_module modules/mod_proxy_balancer.so


Create a new configuration file and give it a name such as /etc/httpd/conf.d/mod_cluster.conf. Use it to load mod_cluster's modules:


LoadModule slotmem_module modules/mod_slotmem.so
LoadModule manager_module modules/mod_manager.so
LoadModule proxy_cluster_module modules/mod_proxy_cluster.so

In the same file add the rest of the settings you'll need for mod_cluster something like:

And for permissions and Virtualhost section

Listen 192.168.180.150:9999
<virtualhost  192.168.180.150:9999="">
<directory>
Order deny,allow
Allow from all 192.168
</directory>
ManagerBalancerName mymodcluster
EnableMCPMReceive
</virtualhost>

ProxyPass / balancer://mymodcluster/


The above directives create a new virtual host listening on port 9999 on the Apache server you want to use for load balancing, on which the load balancer will receive information from the back-end application servers. In this example, the virtual host is listening on IP address 192.168.204.203, and for security reasons it allows connections only from the 192.168.0.0/16 network.
The directive ManagerBalancerName defines the name of the cluster – mymodcluster in this example. The directive EnableMCPMReceive allows the back-end servers to send updates to the load balancer. The standard ProxyPass and ProxyPassReverse directives instruct Apache to proxy all requests to the mymodcluster balancer.
That's all you need for a minimal configuration of mod_cluster on the Apache load balancer. At next server restart Apache will automatically load the file mod_cluster.conf from the /etc/httpd/conf.d directory. To learn about more options that might be useful in specific scenarios, check mod_cluster's documentation.

While you're changing Apache configuration, you should probably set the log level in Apache to debug when you're getting started with mod_cluster, so that you can trace the communication between the front- and the back-end servers and troubleshoot problems more easily. To do so, edit Apache's configuration file and add the line LogLevel debug , then restart Apache.
 

2. How to set up Tomcat appserver for mod_cluster ?
 

Mod_cluster works with Tomcat version 6, 7 and 8, to set up the Tomcat back ends you have to deploy a few JAR files and make a change in Tomcat's server.xml configuration file.
The necessary JAR files extend Tomcat's default functionality so that it can communicate with the proxy load balancer. You can download the JAR file archive by clicking on "Java bundles" on the mod_cluster download page. It will be saved under the name mod_cluster-parent-1.2.6.Final-bin.tar.gz.

Create a new directory such as /root/java_bundles and extract the files from mod_cluster-parent-1.2.6.Final-bin.tar.gz there. Inside the directory /root/java_bundlesJBossWeb-Tomcat/lib/*.jar you will find all the necessary JAR files for Tomcat, including two Tomcat version-specific JAR files – mod_cluster-container-tomcat6-1.2.6.Final.jar for Tomcat 6 and mod_cluster-container-tomcat7-1.2.6.Final.jar for Tomcat 7. Delete the one that does not correspond to your Tomcat version.

Copy all the files from /root/java_bundlesJBossWeb-Tomcat/lib/ to your Tomcat lib directory – thus if you have installed Tomcat in

/srv/tomcat

run the command:


cp -rpf /root/java_bundles/JBossWeb-Tomcat/lib/* /srv/tomcat/lib/ .


Then edit your Tomcat's server.xml file

/srv/tomcat/conf/server.xml.


After the default listeners add the following line:


<listener classname="org.jboss.modcluster.container.catalina.standalone.ModClusterListener" proxylist="192.168.204.203:9999"> </listener>


This instructs Tomcat to send its mod_cluster-related information to IP 192.168.180.150 on TCP port 9999, which is what we set up as Apache's dedicated vhost for mod_cluster.
While that's enough for a basic mod_cluster setup, you should also configure a unique, intuitive JVM route value on each Tomcat instance so that you can easily differentiate the nodes later. To do so, edit the server.xml file and extend the Engine property to contain a jvmRoute, like this:
 

.


<engine defaulthost="localhost" jvmroute="node2" name="Catalina"></engine>


Assign a different value, such as node2, to each Tomcat instance. Then restart Tomcat so that these settings take effect.

To confirm that everything is working as expected and that the Tomcat instance connects to the load balancer, grep Tomcat's log for the string "modcluster" (case-insensitive). You should see output similar to:

Mar 29, 2016 10:05:00 AM org.jboss.modcluster.ModClusterService init
INFO: MODCLUSTER000001: Initializing mod_cluster ${project.version}
Mar 29, 2016 10:05:17 AM org.jboss.modcluster.ModClusterService connectionEstablished
INFO: MODCLUSTER000012: Catalina connector will use /192.168.180.150


This shows that mod_cluster has been successfully initialized and that it will use the connector for 192.168.204.204, the configured IP address for the main listener.
Also check Apache's error log. You should see confirmation about the properly working back-end server:

[Tue Mar 29 10:05:00 2013] [debug] proxy_util.c(2026): proxy: ajp: has acquired connection for (192.168.204.204)
[Tue Mar 29 10:05:00 2013] [debug] proxy_util.c(2082): proxy: connecting ajp://192.168.180.150:8009/ to  192.168.180.150:8009
[Tue Mar 29 10:05:00 2013] [debug] proxy_util.c(2209): proxy: connected / to  192.168.180.150:8009
[Tue Mar 29 10:05:00 2013] [debug] mod_proxy_cluster.c(1366): proxy_cluster_try_pingpong: connected to backend
[Tue Mar 29 10:05:00 2013] [debug] mod_proxy_cluster.c(1089): ajp_cping_cpong: Done
[Tue Mar 29 10:05:00 2013] [debug] proxy_util.c(2044): proxy: ajp: has released connection for (192.168.180.150)


This Apache error log shows that an AJP connection with 192.168.204.204 was successfully established and confirms the working state of the node, then shows that the load balancer closed the connection after the successful attempt.

You can start testing by opening in a browser the example servlet SessionExample, which is available in a default installation of Tomcat.
Access this servlet through a browser at the URL http://balancer_address/examples/servlets/servlet/SessionExample. In your browser you should see first a session ID that contains the name of the back-end node that is serving your request – for instance, Session ID: 5D90CB3C0AA05CB5FE13121E4B23E670.node2.

Next, through the servlet's web form, create different session attributes. If you have a properly working load balancer with sticky sessions you should always (that is, until your current browser session expires) access the same node, with the previously created session attributes still available.

To test further to confirm load balancing is in place, at the same time open the same servlet from another browser. You should be redirected to another back-end server where you can conduct a similar session test.
As you can see, mod_cluster is easy to use and configure. Give it a try to address sporadic single-back-end overloads that cause overall application slowdowns.

Windows add / delete services command sc.exe create/delete – Create or Delete services

Thursday, April 9th, 2015

sc-exe-command-line-program-to-create-delete--service-start-stop-service-on-ms-windows
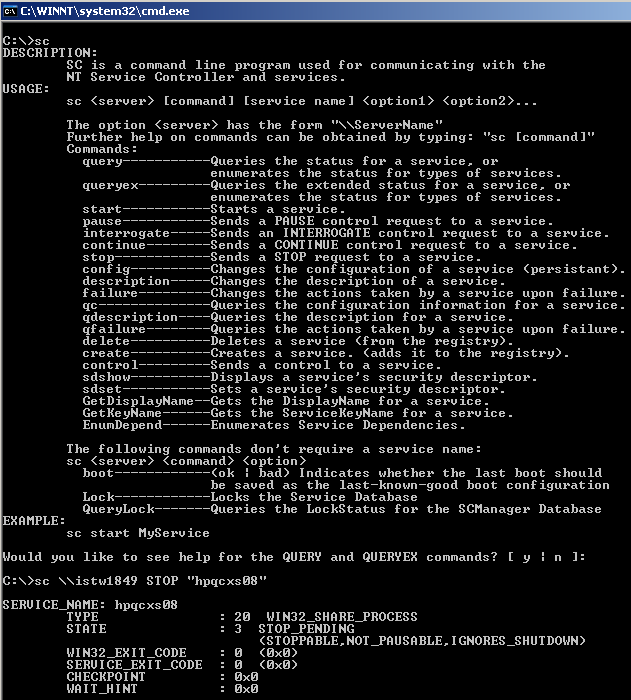
If you end up in situation where you need to delete or create services from current existing ones with a batch script because it is existing on multiple servers and you want to automate / deploy it via batch (.bat) script you will have to use sc.exe tool – Service Controller Command Tool

SC.EXE command  is standard windows console tool to create and delete services. If you want to create a new service, you can use the "create" parameter.

1. Deleting Service with Windows Service Controller Tool

Deleting service is very easy to do you just have to know the service you like to remove not to be listed or Automatically start

sc delete SERVICE_NAME_TO_BE_REMOVED


Below is a real time example on how to remove Apache webserver configured to auto-start


sc.exe delete ApacheService

[SC] DeleteService SUCCESS

2. Create / Add service to existing to auto start on Windows

Before running sc.exe create command with arguments for service you will need to know following info:

  • What will be the Service Name: A single word to name the new service.
  • Full Binary Path: The path name where the executable program for new service is currently located.
  • Dispaly Name for service: A short name for the new service.


C:\Windows>sc.exe create ApacheService 
   binPath= "C:\local\apache\bin\httpd.exe -k runservice" 
   DisplayName= "Apache Server"


[SC] CreateService SUCCESS


Once service is added to be showing in services.msc GUI  you can start the newly added Apache service with:


C:\Windows>sc.exe start ApacheService


SERVICE_NAME: ApacheService
   TYPE               : 10  WIN32_OWN_PROCESS
   STATE              : 2  START_PENDING
                      (NOT_STOPPABLE,NOT_PAUSABLE,IGNORES_SHUTDOWN)
   WIN32_EXIT_CODE    : 0  (0x0)
   SERVICE_EXIT_CODE  : 0  (0x0)
   CHECKPOINT         : 0x2
   WAIT_HINT          : 0x7530
   PID                : 2552
   FLAGS              :


To stop the ApacheService or any other service:


C:\Windows>sc.exe stop ApacheService

SERVICE_NAME: ApacheService
   TYPE               : 10  WIN32_OWN_PROCESS
   STATE              : 3  STOP_PENDING
                      (NOT_STOPPABLE,NOT_PAUSABLE,IGNORES_SHUTDOWN)
   WIN32_EXIT_CODE    : 0  (0x0)
   SERVICE_EXIT_CODE  : 0  (0x0)
   CHECKPOINT         : 0x4
   WAIT_HINT          : 0x7530


To get the status of a running service lets say the recently ran ApacheService:

C:\Windows>sc.exe query ApacheService


SERVICE_NAME: ApacheService
   TYPE               : 10  WIN32_OWN_PROCESS
   STATE              : 4  RUNNING
                      (STOPPABLE,NOT_PAUSABLE,IGNORES_SHUTDOWN)
   WIN32_EXIT_CODE    : 0  (0x0)
   SERVICE_EXIT_CODE  : 0  (0x0)
   CHECKPOINT         : 0x0
   WAIT_HINT          : 0x0


As you see from above output the STATE of service is RUNNING. If Apache Webserver was not running you will get an error like:

[SC] EnumQueryServicesStatus:OpenService FAILED 1060:
The specified service does not exist as an installed service.


Enjoy sc-ing 🙂

Fix MySQL ibdata file size – ibdata1 file growing too large, preventing ibdata1 from eating all your server disk space

Thursday, April 2nd, 2015

fix-solve-mysql-ibdata-file-size-ibdata1-file-growing-too-large-and-preventing-ibdata1-from-eating-all-your-disk-space-innodb-vs-myisam

If you're a webhosting company hosting dozens of various websites that use MySQL with InnoDB  engine as a backend you've probably already experienced the annoying problem of MySQL's ibdata1 growing too large / eating all server's disk space and triggering disk space low alerts. The ibdata1 file, taking up hundreds of gigabytes is likely to be encountered on virtually all Linux distributions which run default MySQL server <= MySQL 5.6 (with default distro shipped my.cnf). The excremental ibdata1 raise appears usually due to a application software bug on how it queries the database. In theory there are no limitation for ibdata1 except maximum file size limitation set for the filesystem (and there is no limitation option set in my.cnf) meaning it is quite possible that under certain conditions ibdata1 grow over time can happily fill up your server LVM (Storage) drive partitions.

Unfortunately there is no way to shrink the ibdata1 file and only known work around (I found) is to set innodb_file_per_table option in my.cnf to force the MySQL server create separate *.ibd files under datadir (my.cnf variable) for each freshly created InnoDB table.
 

1. Checking size of ibdata1 file

On Debian / Ubuntu and other deb based Linux servers datadir is /var/lib/mysql/ibdata1

server:~# du -hsc /var/lib/mysql/ibdata1
45G     /var/lib/mysql/ibdata1
45G     total


2. Checking info about Databases and Innodb storage Engine

server:~# mysql -u root -p
password:

mysql> SHOW DATABASES;
+——————–+
| Database           |
+——————–+
| information_schema |
| bible              |
| blog               |
| blog-sezoni        |
| blogmonastery      |
| daniel             |
| ezmlm              |
| flash-games        |


Next step is to get some understanding about how many existing InnoDB tables are present within Database server:


mysql> SELECT COUNT(1) EngineCount,engine FROM information_schema.tables WHERE table_schema NOT IN ('information_schema','performance_schema','mysql') GROUP BY engine;
+————-+——–+
| EngineCount | engine |
+————-+——–+
|         131 | InnoDB |
|           5 | MEMORY |
|         584 | MyISAM |
+————-+——–+
3 rows in set (0.02 sec)

To get some more statistics related to InnoDb variables set on the SQL server:
 

mysqladmin -u root -p'Your-Server-Password' var | grep innodb


Here is also how to find which tables use InnoDb Engine

mysql> SELECT table_schema, table_name
    -> FROM INFORMATION_SCHEMA.TABLES
    -> WHERE engine = 'innodb';

+————–+————————–+
| table_schema | table_name               |
+————–+————————–+
| blog         | wp_blc_filters           |
| blog         | wp_blc_instances         |
| blog         | wp_blc_links             |
| blog         | wp_blc_synch             |
| blog         | wp_likes                 |
| blog         | wp_wpx_logs              |
| blog-sezoni  | wp_likes                 |
| icanga_web   | cronk                    |
| icanga_web   | cronk_category           |
| icanga_web   | cronk_category_cronk     |
| icanga_web   | cronk_principal_category |
| icanga_web   | cronk_principal_cronk    |


3. Check and Stop any Web / Mail / DNS service using MySQL

server:~# ps -efl |grep -E 'apache|nginx|dovecot|bind|radius|postfix'

Below cmd should return empty output, (e.g. Apache / Nginx / Postfix / Radius / Dovecot / DNS etc. services are properly stopped on server).

4. Create Backup dump all MySQL tables with mysqldump

Next step is to create full backup dump of all current MySQL databases (with mysqladmin):

server:~# mysqldump –opt –allow-keywords –add-drop-table –all-databases –events -u root -p > dump.sql
server:~# du -hsc /root/dump.sql
940M    dump.sql
940M    total


If you have free space on an external backup server or remotely mounted attached (NFS or SAN Storage) it is a good idea to make a full binary copy of MySQL data (just in case something wents wrong with above binary dump), copy respective directory depending on the Linux distro and install location of SQL binary files set (in my.cnf).
To check where are MySQL binary stored database data (check in my.cnf):

server:~# grep -i datadir /etc/mysql/my.cnf
datadir         = /var/lib/mysql

If server is CentOS / RHEL Fedora RPM based substitute in above grep cmd line /etc/mysql/my.cnf with /etc/my.cnf

if you're on Debian / Ubuntu:

server:~# /etc/init.d/mysql stop
server:~# cp -rpfv /var/lib/mysql /root/mysql-data-backup

Once above copy completes, DROP all all databases except, mysql, information_schema (which store MySQL existing user / passwords and Access Grants and Host Permissions)

5. Drop All databases except mysql and information_schema

server:~# mysql -u root -p
password:


mysql> SHOW DATABASES;

DROP DATABASE blog;
DROP DATABASE sessions;
DROP DATABASE wordpress;
DROP DATABASE micropcfreak;
DROP DATABASE statusnet;

          etc. etc.

ACHTUNG !!! DON'T execute!DROP database mysql; DROP database information_schema; !!! – cause this might damage your User permissions to databases

6. Stop MySQL server and add innodb_file_per_table and few more settings to prevent ibdata1 to grow infinitely in future

server:~# /etc/init.d/mysql stop

server:~# vim /etc/mysql/my.cnf
[mysqld]
innodb_file_per_table
innodb_flush_method=O_DIRECT
innodb_log_file_size=1G
innodb_buffer_pool_size=4G

Delete files taking up too much space – ibdata1 ib_logfile0 and ib_logfile1

server:~# cd /var/lib/mysql/
server:~#  rm -f ibdata1 ib_logfile0 ib_logfile1
server:~# /etc/init.d/mysql start
server:~# /etc/init.d/mysql stop
server:~# /etc/init.d/mysql start
server:~# ps ax |grep -i mysql


You should get no running MySQL instance (processes), so above ps command should return blank.
 

7. Re-Import previously dumped SQL databases with mysql cli client

server:~# cd /root/
server:~# mysql -u root -p < dump.sql

Hopefully import should went fine, and if no errors experienced new data should be in.

Altearnatively if your database is too big and you want to import it in less time to mitigate SQL downtime, instead import the database with:

server:~# mysql -u root -p
password:
mysql>  SET FOREIGN_KEY_CHECKS=0;
mysql> SOURCE /root/dump.sql;
mysql> SET FOREIGN_KEY_CHECKS=1;


If something goes wrong with the import for some reason, you can always copy over sql binary files from /root/mysql-data-backup/ to /var/lib/mysql/
 

8. Connect to mysql and check whether databases are listable and re-check ibdata file size

Once imported login with mysql cli and check whther databases are there with:

server:~# mysql -u root -p
SHOW DATABASES;

Next lets see what is currently the size of ibdata1, ib_logfile0 and ib_logfile1
 

server:~# du -hsc /var/lib/mysql/{ibdata1,ib_logfile0,ib_logfile1}
19M     /var/lib/mysql/ibdata1
1,1G    /var/lib/mysql/ib_logfile0
1,1G    /var/lib/mysql/ib_logfile1
2,1G    total

Now ibdata1 will grow, but only contain table metadata. Each InnoDB table will exist outside of ibdata1.
To better understand what I mean, lets say you have InnoDB table named blogdb.mytable.
If you go into /var/lib/mysql/blogdb, you will see two files
representing the table:

  •     mytable.frm (Storage Engine Header)
  •     mytable.ibd (Home of Table Data and Table Indexes for blogdb.mytable)

Now construction will be like that for each of MySQL stored databases instead of everything to go to ibdata1.
MySQL 5.6+ admins could relax as innodb_file_per_table is enabled by default in newer SQL releases.


Now to make sure your websites are working take few of the hosted websites URLs that use any of the imported databases and just browse.
In my case ibdata1 was 45GB after clearing it up I managed to save 43 GB of disk space!!!

Enjoy the disk saving! 🙂

How to delete “Temporary Internet Files”/Content.IE5 with DEL and RD commands on Windows 7 / 8 folder contents – Clean Up Temporary files and folders to speed up and free disk space

Tuesday, February 3rd, 2015

7logo_clean-up-windows-commands-tips-and-tricks-how-to-clean-up-windows-pc-manuallyI
've been called urgently today by miss Jenia Pencheva who is the president of Christian Air Ticket Agency GoodFaithAir, her personal computer caused her quite a lot of headache, I've previously fixed it once and she was happy with that thus when she experienced problems she give me a call for remote IT support :).

She explahed her PC was unable to boot normally and in order to have some Windows she ended in Safe-Mode with Networking state. This problems caused her business losses as during PC in Safe mode the screen resolution even though with networking and she couldn't use the flight ticket ordering systems  to purchase her customers new tickets.  I've earlier installed TeamViewr on her PC so after Logging on the PC, I've immediately realized the Hard Disk was almost full (less than 1Giga free on C: Drive – where Windows install lived)

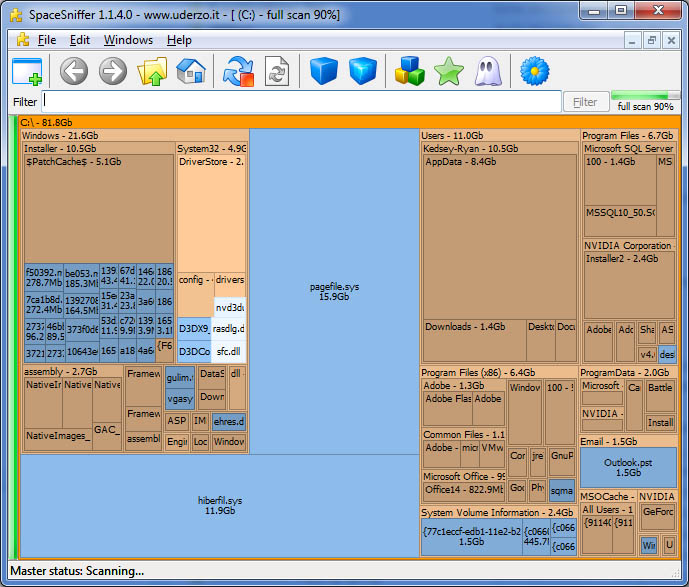
After a thorough investigation on which directory is occupying most of disk space (110GB) with a nice program called SpaceSniffer which is perfect for finding lost space on your hard disks, I've found System for ticket reservation Amadeus CRS (Computer Reservation System) was causing the disk full-full troubles.

spacesniff-visualize-disk-data-in-windows-nice-check-large-directories

I've found troubling directory  was:

C:Users\goodfaithair\AppData\Local\Microsoft\Windows\Temporary Internet Files\Content.IE5

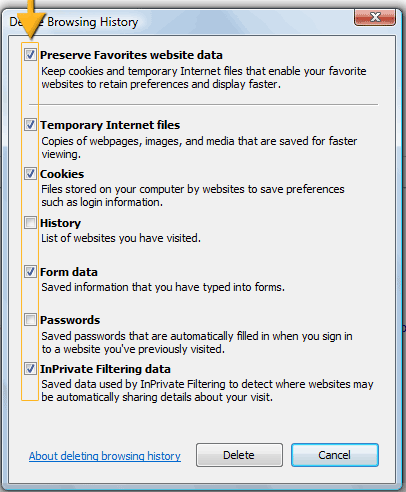
To solve it I first tried to Clean up Internet Explorer Cache (I've checked ticks Temporary Internet files, Cookies, History, Download History, Form Data, InPrivate Filtering Data).

clean-up-Microsoft-Internet-Explorer-browser-cache-IE-7-8-9-10-11

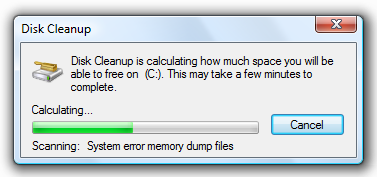
Then I used Microsoft Windows embedded clean manager (cleanmgr.exe) to run disk clean up, however Desk Clean Up managed to clear up only about 1Giga and on the computer HDD which is 150Gb still on Windows installation drive C: only 1.5GB were free.
diskcleanup-ms-windows-7-8-screenshot-free-disk-space-tool
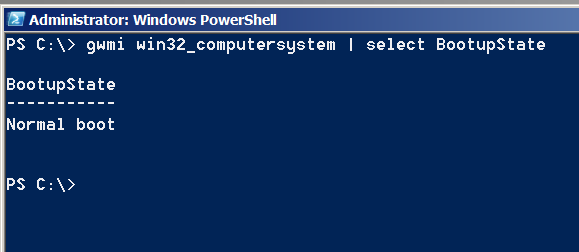
Besides that the system was having a second trouble as there were some failed updates (Computer was not shutdown properly but shutdown during Windows Update) and this was making the machine to enter Safe-Mode, I was fixing the system over TeamViewer session so after restart I had no way to see if Windows boots Normal or Safe-Mode after restart, thus to find out whether Windows was in Safe-Mode after another restart I've used below PowerShell one-liner script:

check-whether-windows-is-working-in-safe-mode-gwmi-powershell-screenshot

PS C:> gwmi win32_computersystem | select BootupState

BootupState
———–
Fail-safe with network boot

Note that possible return results from above command are:

Normal boot
Fail-safe boot
Fail-safe with network boot

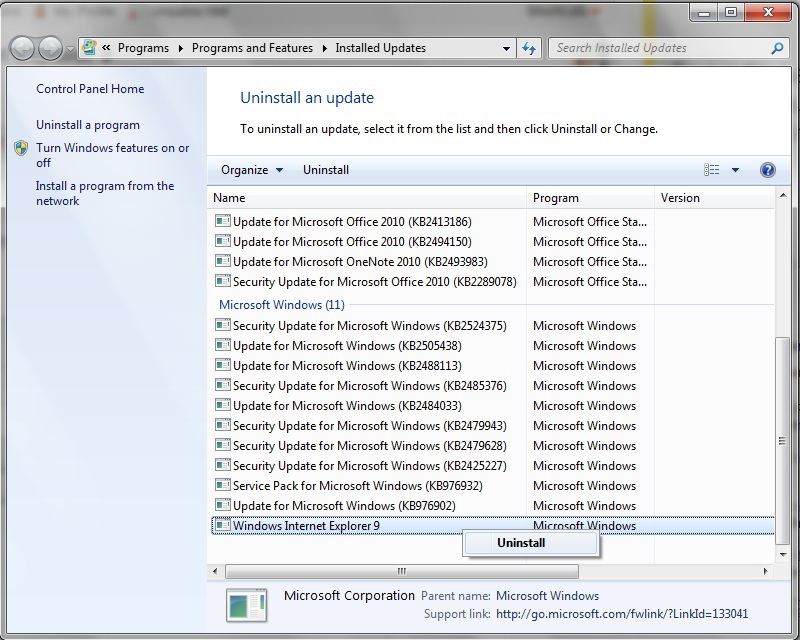
I've been struggling for a while (had to restart it multiple times) until finally I managed to make it boot in normal mode. Because PC was failing to apply some Windows Update, thus dropping by in Safe-Mode each time. To solve that I had to go and Delete two of the last Applied updates (KB2979xxxx files).
 

Control Panel ->  Program and Features -> View Installed Updates


MS-Windows-7-8-9-uninstall-updates-Patches-Control_Panel_screenshot_fix_unbootable_problems-because-updates
I've restarted and since I couldn't see the screen on Windows boot-time, I don't know what really happened but the PC booted again in Safe-Mode, and I thought the classical way to fix PC booting in Safe-Mode with SFC command will help:

C:> sfc /scannow

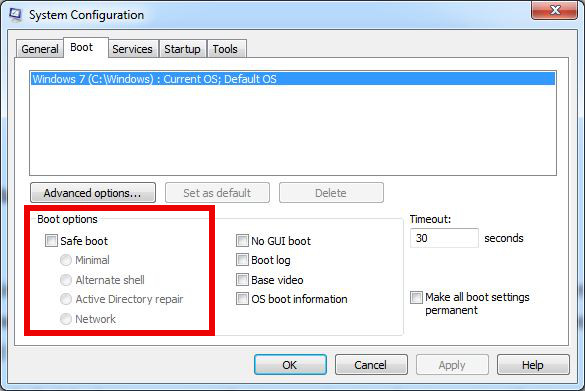
but for my surprise this helped not as the system continuously booted in Safe-Mode, to fix the Windows PC always booting to Safe-Mode, I had to change it running msconfig and unticking Safe Mode field

C:> msconfig

windows-always-booting-to-safe-mode-fix-howto-services-msc-screenshot

Then I tried to delete Temporary Internet Files with below DEL cmd line
 

C:> del "C\:Users\MyName\AppData\Local\Microsoft\Windows\Temporary Internet Files*.*"


To finally succeeding in manually delete huge Temporary Internet FilesContent.IE5 folder, I had to use good old RD (Remove Directory) command.


C:> RD "C:Users\username\AppData\Local\Microsoft\Windows\Temporary Internet Files\Content.IE5" /Q /S

I used also following dels command to delete other common locations where Windows stores temporary files

For those who like to batch DeletingTemporary Internet Files and most common Temp locations to be cleaned on Windows boot I recommend you schedule a start of (clean-temporary-internet-files-content_ie5_folder.bat) on every PC boot.

To Clean-up other common Temporary file locations that could take you disk space the command line way run in new Administarator privileged command prompt:
 

cls
cleanmgr /sageset:99
del /F /S /Q "%systemroot%temp*.*"
del /F /S /Q "%systemroot%Prefetch*.*"
del /F /S /Q "C:Documents and SettingsDefault UserLocal SettingsTemporary Internet FilesContent.IE5*.*"
del /F /S /Q "C:Documents and SettingsDefault UserLocal SettingsTemp*.*"
del /F /S /Q "C:Documents and SettingsDefault UserLocal SettingsHistory*.*"
 
del /F /S /Q "C:Documents and Settings%UserName%Local SettingsTemporary Internet FilesContent.IE5*.*"
del /F /S /Q "C:Documents and Settings%UserName%Local SettingsTemp*.*"
del /F /S /Q "C:Documents and Settings%UserName%Local SettingsHistory*.*"
 
del /F /S /Q "C:Documents and Settings%UserName%Local SettingsApplication DataTemp*.*"
del /F /S /Q "C:Documents and Settings%UserName%Local SettingsApplication DataTemporary Internet FilesContent.IE5
*.*"
 
del /F /S /Q "C:AppDataLocalMicrosoftWindowsHistory*. *"
del /F /S /Q "C:AppDataLocalMicrosoftWindowsTemporary Internet FilesContent.IE5*.*"
del /F /S /Q "C:AppDataLocalMicrosoftWindowsTemporary Internet FilesLowContent.IE5*.*"
del /F /S /Q "C:AppDataLocalMicrosoftWindowsTemporary Internet FilesTemporary Internet FilesContent.IE5*.*"
del /F /S /Q "C:AppDataLocalMicrosoftWindowsTemporary Internet FilesTemporary Internet FilesLowContent.IE5*.*"
 
del /F /S /Q "C:Users%UserName%AppDataLocalTemp*.*"
del /F /S /Q "C:Temp*.*"
del /F /S /Q "C:Users%UserName%AppDataLocalMicrosoftW indo wsTemporary Internet FilesLowContent.IE5*.*
del /F /S /Q "C:Users%UserName%AppDataLocalMicrosoftW indo wsHistory*.*
 
 
::Rem: No need to duplicate the following section for each registered User
del /F /S /Q "%homepath%Cookies*.*"
del /F /S /Q "%homepath%recent*.*"
del /F /S /Q "%homepath%Local Settingscookies*.*"
 
del /F /S /Q "%homepath%Local SettingsHistory*.*"
del /F /S /Q "%homepath%Local SettingsTemp*.*"
del /F /S /Q "%homepath%Local SettingsTemporary Internet FilesContent.IE5*.*"
 
cleanmgr /sagerun:99

Note that in some cases running above commands might left you loose some sensitive data and in case where Internet is slow cleaning temporary files, might have impact on surfing also you will loose your history so be sure you know what you're doing as you might loose sensitive data.

Finally I've run MalwareBytes to clean up the PC slowness caused by Spyware and other left Malware I've run MalwareBytes, RogueKiller, AdwCleaner, RKill, TDSSKiller in order and I found and removed few Malwares as well.

That's all, hope you learned something new. Enjoy!
 

Find all hidden files in Linux, Delete, Copy, Move all hidden files

Tuesday, April 15th, 2014

search-find-all-hidden-files-linux-delete-all-hidden-files
Listing hidden files is one of the common thing to do as sys admin. Doing manipulations with hidden files like copy / delete / move is very rare but still sometimes necessary here is how to do all this.

1. Find and show (only) all hidden files in current directory

find . -iname '.*' -maxdepth 1

maxdepth – makes files show only in 1 directory depth (only in current directory), for instance to list files in 2 subdirectories use -maxdepth 3 etc.

echo .*;

Yeah if you're Linux newbie it is useful to know echo command can be used instead of ls.
echo * command is very useful on systems with missing ls (for example if you mistakenly deleted it 🙂 )

2. Find and show (only) all hidden directories, sub-directories in current directory

To list all directories use cmd:

find /path/to/destination/ -iname ".*" -maxdepth 1 -type d

3. Log found hidden files / directories

find . -iname ".*" -maxdept 1 -type f | tee -a hidden_files.log

find . -iname ".*" -maxdepth 1 type d | tee -a hidden_directories.log
4. Delete all hidden files in current directory

cd /somedirectory
find . -iname ".*" -maxdepth 1 -type f -delete

5. Delete all hidden files in current directory

cd /somedirectory
find . -iname ".*" -maxdepth 1 -type d -delete

6. Copy all hidden files from current directory to other "backup" dir

find . -iname ".*" -maxdepth 1 -type f -exec cp -rpf '{}' directory-to-copy-to/ ;

7. Copy and move all hidden sub-directories from current directory to other "backup" dir

find . -iname ".*" -maxdepth 1 -type d -exec cp -rpf '{}' directory-to-copy-to/ ;

– Moving all hidden sub-directories from current directory to backup dir

find . -iname ".*" -maxdepth 1 -type d -exec mv '{}' directory-to-copy-to/ ;


Automatic restart Tomcat on Windows script via TaskScheduler daily – A command line to add / remove new Windows “Cron” like job

Thursday, January 22nd, 2015

automatic-restart-Tomcat-on-Windows-via-TaskShcheduler-daily-weekly-monthly-a-command-line-to-add-remove-new-windows-cron-job
I'm responsbile for a project environment made up of 3 components which is occasionally dying. Here is a short raw overview of environment

  • Apache Reverse Proxy (entry door to app server)
  • Tomcat Server with an Application enabling web access
  • A Java Standalone application using SQLite database

 The Tomcat and Java Standalone application is running on top of Windows 2008 RC2 Standard, the overall environment is becoming inacessible periodically and in order to solve that the customer decided to implement a daily Windows server reboot in my opinion this is very bad approach as it is much better to just set an auto reboot of each of components using few tiny batch scripts and Windows Taskmgr, however as the customer is king and decided to implement the reboot its their own thing. 
However even fter the daily server reboot was set once a week or so the application was becoming inaccessible and a Tomcat server restart was necessery as a fix.

Finally as a work-around to the issue, I've proposed the logical thing to automatically restart Tomcat once a day early in morning, here is how Tomcat auto Restart was implemented on the Win server:

1. Check out the name of running Tomcat service

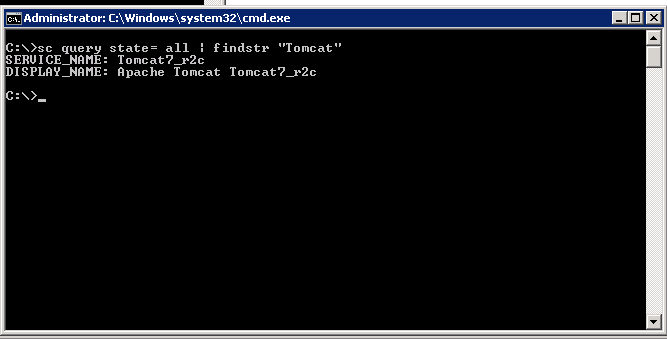
First thing is to use the sc command to find out the Tomcat application name:


how-to-show-tomcat-service-name-command-windows-screenshot

C:UsersGeorgi>sc query state= all| findstr "Tomcat"
SERVICE_NAME: Tomcat7_r2c
DISPLAY_NAME: Apache Tomcat Tomcat7_r2c

C:UsersGeorgi>


2. Create bat script to stop and start Tomcat service

Press keyboard Win-button + R, start notepad type inside:
 

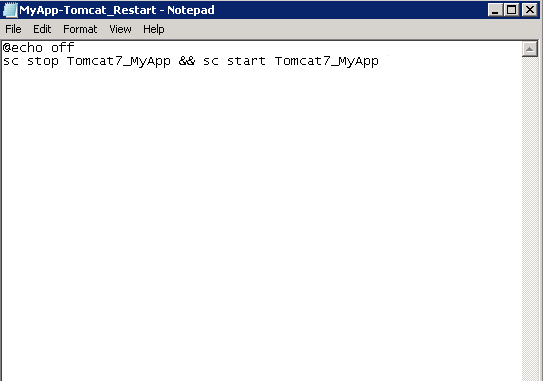
@echo off
sc stop Tomcat7_r2c && sc start Tomcat7_r2c

(MyApp-Tomact-Restart-bat-file-ms-windows-screenshot

Don't be confused from screenshot that I have Tomcat7_MyApp instead of Tomcat7_r2c, but I made screenshot in hurry for another app.
Save the file, somewhere (preferrably) in application folder/bin/  it is best to save it once with bat extension MyApp-Tomcat_Restart.bat and once as MyApp-Tomcat_Restart.xml (XML format file is later needed for import to Task Scheduler which understands .XMLs). The .bat file is good to have because it is useful to somtimes restart Tomcat manually by running it (in case of some sudden Tomcat Appserver occurs even though the auto-restart script).
 

3. Create new Task using command line (cmd.exe)


Task can be created also from command line using following syntax:
 

schtasks /Create [/S [/U [/P [  ]]]]
/XML <xmlfile> /TN <taskname>

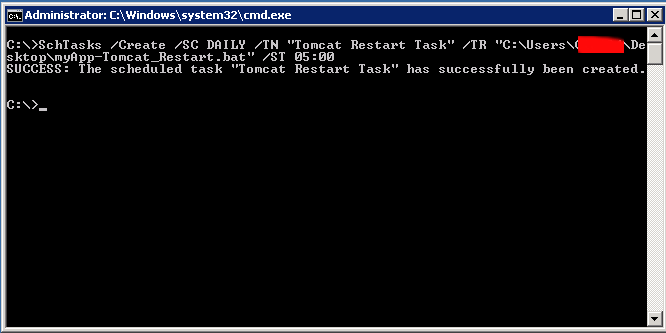
Simple way to create a new Windows task is shown in below command, it will set my Tomcat Restart script to run everyday in 05:00 early morning when no employees are using the system:

schTasks /Create /SC DAILY /TN "My Task" /TR "C:UsersGeorgiDesktopmyApp-Tomcat_Restart.bat" /ST 05:00
SUCCESS: The scheduled task "Tomcat Restart Task" has successfully been created.


import-new-windows-task-scheduler-task-from-command-line-windows-add-new-cronjob-command-screenshot


4. Create / Import new Windows "Cron" job 

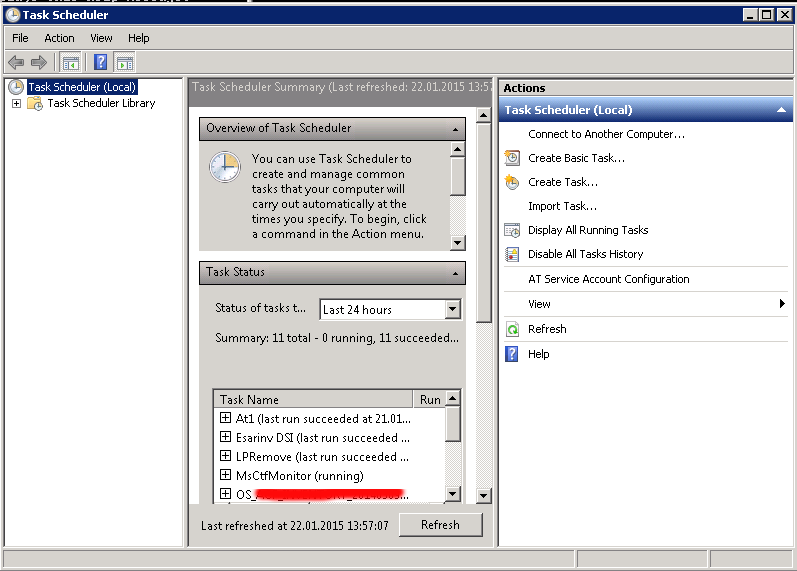
Alternative way is to use Task Scheduler GUI frontend and create new (Basic Task) or  import just created script

To run Windows Task Scheduler from comamnd line :
 

Taskschd.msc

taskschd_windows-run-from-command-line-screenshot

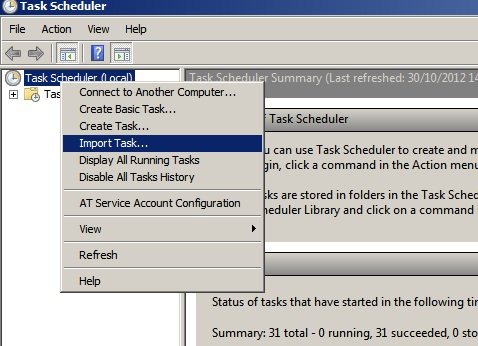
To import already existing .XML formatted file for Task scheduler, right click on the Task Scheduler (Local) and select Import task

task-scheduler-local-task-import-microsoft-2008-r2-windows-screenshot

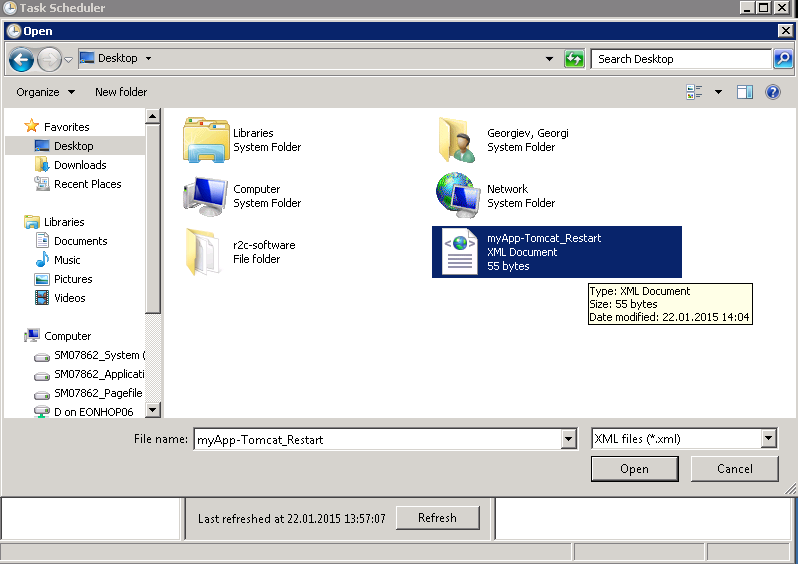
Import the myApp-Tomcat_Restart.XML previously created file

task-scheduler-import-tomcat-restart-xml-file-windows-server-2008-r2-screenshot

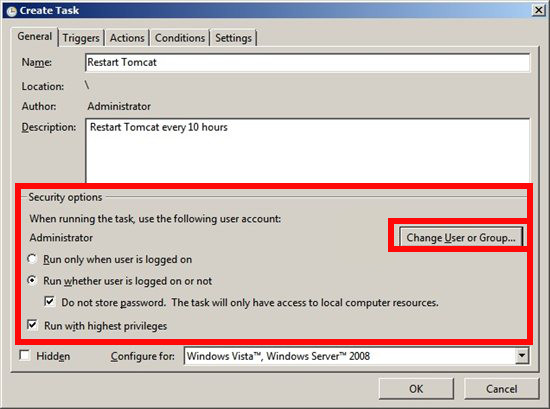
Adjust settings to suit your needs, but what change atleast:

  •         the path to the myApp-Tomcat_Restart.bat file in Actions tab
  •         the Local User account with which script will be running (administrator) in General tab

Task-Scheduler-windows-general-local-user-account-with-which-task-will-be-running

After making all changes you will be prompted for server Administrator account password 

5. check existing Win Cron job from command line

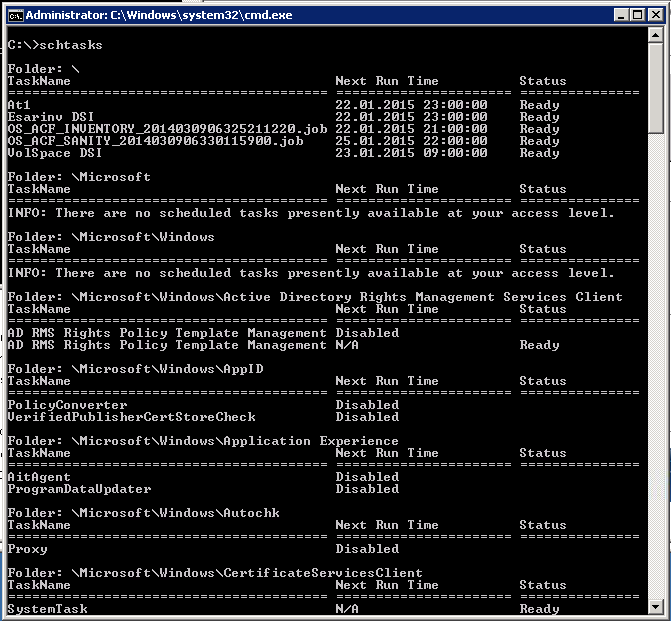
To see the configured (Scheduled Tasks) in command line mode with a command:

Schtasks.exe

schtasks-windows-equivalent-command-to-linux-unix-crontab-screenshot

The command is Windows equivalent to UNIX / Linux's crontab, e.g.:

crontab -u root -l


6. Delete existing Windows Task Job from Command line

If you happen to need to delete just created task or any other task from command line (Assuming that you know the previously created task name), use cmd:

C:>schtasks /Delete /TN "Tomcat Restart Task"
WARNING: Are you sure you want to remove the task "Tomcat Restart Task" (Y/N)? y

SUCCESS: The scheduled task "Tomcat Restart Task" was successfully deleted.


Task completed, Tomcat will auto-restart on Windows host at your scheduled time. Feedback is mostly welcome 🙂
Enjoy