Posts Tagged ‘using’

How to log multiple haproxy / apache / mysql instance via haproxy log-tagging / Segregating log management for multiple HAProxy instances using rsyslog

Tuesday, May 23rd, 2023

rsyslog-logo-picture-use-programname-and-haproxy-log-tag-directives-together-to-log-as-many-process-streams-as-you-like


Introduction

This article provides a guide on refining haproxy  logging mechanism by leveraging the `programname` property in rsyslog, coupled with the `log-tag` directive in haproxy.
This approach will create a granular logging setup, separating logs according to their originating services and specific custom tags, enhancing overall log readability.

Though the article is written concretely for logging multiple log streams from haproxy this can be successfully applied
for any other Linux service to log as many concrete log-tagged data streams as you prefer.

Scope

The guide focuses on tailoring the logging mechanisms for two haproxy  instances named `haproxy` and `haproxyssl`, utilizing the `programname` property in rsyslog and the `log-tag` directive in haproxy for precise log management.

The haproxy and haproxyssl instances are two separate systemd config file prepared instances.
haproxy instance is simple haproxy proxying tcp traffic in non-encrypted form, whether haproxyssl is a special instance
prepared to tunnel the incoming http traffic in ssl form. Both instances of haproxy runs as a separate processes on the server.

Here is the systemd configuration of haproxy systemd service file:

# cat /usr/lib/systemd/system/haproxy.service
[Unit]
Description=HAProxy Load Balancer
After=network-online.target
Wants=network-online.target

[Service]
Environment="CONFIG=/etc/haproxy/haproxy.cfg" "PIDFILE=/run/haproxy.pid"
EnvironmentFile=/etc/sysconfig/haproxy
ExecStartPre=/usr/sbin/haproxy -f $CONFIG -c -q $OPTIONS
ExecStart=/usr/sbin/haproxy -Ws -f $CONFIG -p $PIDFILE $OPTIONS
ExecReload=/usr/sbin/haproxy -f $CONFIG -c -q $OPTIONS
ExecReload=/bin/kill -USR2 $MAINPID
SuccessExitStatus=143
KillMode=mixed
Type=notify

[Install]
WantedBy=multi-user.target


As well as the systemd service configuration for haproxyssl:
 

# cat /usr/lib/systemd/system/haproxyssl.service
[Unit]
Description=HAProxy Load Balancer
After=network-online.target
Wants=network-online.target

[Service]
Environment="CONFIG=/etc/haproxy/haproxy_ssl_prod.cfg" "PIDFILE=/run/haproxy_ssl_prod.pid"
EnvironmentFile=/etc/sysconfig/haproxy
ExecStartPre=/usr/sbin/haproxyssl -f $CONFIG -c -q $OPTIONS
ExecStart=/usr/sbin/haproxyssl -Ws -f $CONFIG -p $PIDFILE $OPTIONS
ExecReload=/usr/sbin/haproxyssl -f $CONFIG -c -q $OPTIONS
ExecReload=/bin/kill -USR2 $MAINPID
SuccessExitStatus=143
KillMode=mixed
Type=notify

[Install]
WantedBy=multi-user.target


Step 1: Configuring HAProxy instances with `log-tag`
 

To distinguish between logs from two HAProxy instances, `log-tag` directive is used to add tags to logs. This tag is used to filter these logs in rsyslog.
Modify the HAProxy configuration file in `/etc/haproxy/haproxy.*.cfg`

HAProxy Instance 1 (haproxy)
 

#———————————————————————
# Global settings
#———————————————————————
global
      log          127.0.0.1 local6 debug
      log-tag      haproxy

HAProxy Instance 2 (haproxyssl)


#———————————————————————
# Global settings
#———————————————————————
global
    log          127.0.0.1 local5 debug
    log-tag      haproxyssl


Step 2: Implementing rsyslog configuration for haproxy logs
 

Next, create a new rsyslog configuration file, stored in /etc/rsyslog.d/. Ensure the new configuration file ends in `.conf`

HAProxy Instance 1 (haproxy)

Now add rsyslog rules to filters logs based on the `programname` and the custom log tag:
 

# vi /etc/rsyslog.d/55_haproxy.conf
if $programname == 'haproxy' then /var/log/haproxy.log
&stop

HAProxy Instance 2 (haproxyssl)
# vi /etc/rsyslog.d/51_haproxy_ssl.conf
if $programname == 'haproxy_ssl' then /var/log/haproxy_ssl.log
&stop


These rules filter logs that originate from haproxy  and contain the respective string haproxy   or haproxy_ssl , directing them to their respective log files. The `& stop` directive ensures that rsyslog stops processing the log once a match is found, preventing dublication.

Finally, restart both the haproxy and rsyslog services for the changes to take effect:

# systemctl restart haproxy
# systemctl restart haproxyssl
# systemctl restart rsyslog


Reading References

haproxy:   log-tag directive

rsyslog:    rsyslogd documentation

This is a guest article originally written by: Dimitar Paskalev, guest blogging with good interesting articles is always mostly welcome 

How to test RAM Memory for errors in Linux / UNIX OS servers. Find broken memory RAM banks

Friday, December 3rd, 2021

test-ram-memory-for-errors-linux-unix-find-broken-memory-logo


1. Testing the memory with motherboard integrated tools
 

Memory testing has been integral part of Computers for the last 50 years. In the dawn of computers those older perhaps remember memory testing was part of the computer initialization boot. And this memory testing was delaying the boot with some seconds and the user could see the memory numbers being counted up to the amount of memory. With the increased memory modern computers started to have and the annoyance to wait for a memory check program to check the computer hardware memory on modern computers this check has been mitigated or completely removed on some hardware.
Thus under some circumstances sysadmins or advanced computer users might need to check the memory, especially if there is some suspicion for memory damages or if for example a home PC starts crashing with Blue screens of Death on Windows without reason or simply the PC or some old arcane Linux / UNIX servers gets restarted every now and then for now apparent reason. When such circumstances occur it is an idea to start debugging the hardware issue with a simple memory check.

There are multiple ways to test installed memory banks on a server laptop or local home PC both integrated and using external programs.
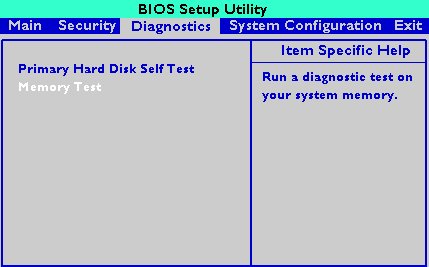
On servers that is usually easily done from ILO or IPMI or IDRAC access (usually web) interface of the vendor, on laptops and home usage from BIOS or UEFI (Unified Extensible Firmware Interface) acces interface on system boot that is possible as well.
memtest-hp
HP BIOS Setup

An old but gold TIP, more younger people might not know is the


Prolonged SHIFT key press which once held with the user instructs the machine to initiate a memory test before the computer starts reading what is written in the boot loader.

So before anything else from below article it might be a good idea to just try HOLD SHIFT for 15-20 seconds after a complete Shut and ON from the POWER button.

If this test does not triggered or it is triggered and you end up with some corrupted memory but you're not sure which exact Memory bank is really crashing and want to know more on what memory Bank and segments are breaking up you might want to do a more thorough testing. In below article I'll try to explain shortly how this can be done.


2. Test the memory using a boot USB Flash Drive / DVD / CD 
 

Say hello to memtest86+. It is a Linux GRUB boot loader bootable utility that tests physical memory by writing various patterns to it and reading them back. Since memtest86+ runs directly off the hardware it does not require any operating system support for execution. Perhaps it is important to mention that memtest86 (is PassMark memtest86)and memtest86+ (An Advanced Memory diagnostic tool) are different tools, the first is freeware and second one is FOSS software.

To use it all you'll need is some version of Linux. If you don't already have some burned in somewhere at your closet, you might want to burn one.
For Linux / Mac users this is as downloading a Linux distribution ISO file and burning it with

# dd if=/path/to/iso of=/dev/sdbX bs=80M status=progress


Windows users can burn a Live USB with whatever Linux distro or download and burn the latest versionof memtest86+ from https://www.memtest.org/  on Windows Desktop with some proggie like lets say UnetBootIn.
 

2.1. Run memtest86+ on Ubuntu

Many Linux distributions such as Ubuntu 20.0 comes together with memtest86+, which can be easily invoked from GRUB / GRUB2 Kernel boot loader.
Ubuntu has a separate menu pointer for a Memtest.
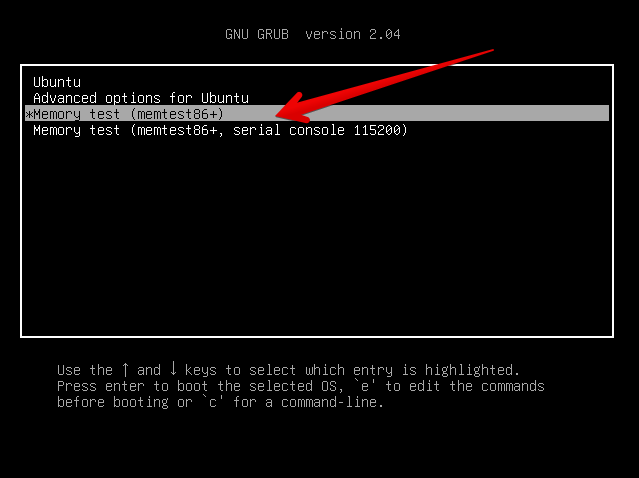
ubuntu-grub-2-04-boot-loader-memtest86-menu-screenshot

Other distributions RPM based distributions such as CentOS, Fedora Linux, Redhat things differ.

2.2. memtest86+ on Fedora


Fedora used to have the memtest86+ menu at the GRUB boot selection prompt, but for some reason removed it and in newest Fedora releases as of time such as Fedora 35 memtest86+ is preinstalled and available but not visible, to start on  already and to start a memtest memory test tool:

  •   Boot a Fedora installation or Rescue CD / USB. At the prompt, type "memtest86".

boot: memtest86

2.3 memtest86+ on RHEL Linux

The memtest86+tool is available as an RPM package from Red Hat Network (RHN) as well as a boot option from the Red Hat Enterprise Linux rescue disk.
And nowadays Red Hat Enterprise Linux ships by default with the tool.

Prior redhat (now legacy) releases such as on RHEL 5.0 it has to be installed and configure it with below 3 commands.

[root@rhel ~]# yum install memtest86+
[root@rhel ~]# memtest-setup
[root@rhel ~]# grub2-mkconfig -o /boot/grub2/grub.cfg


    Again as with CentOS to boot memtest86+ from the rescue disk, you will need to boot your system from CD 1 of the Red Hat Enterprise Linux installation media, and type the following at the boot prompt (before the Linux kernel is started):

boot: memtest86
memtestx86-8gigabytes-of-memory-boot-screenshot
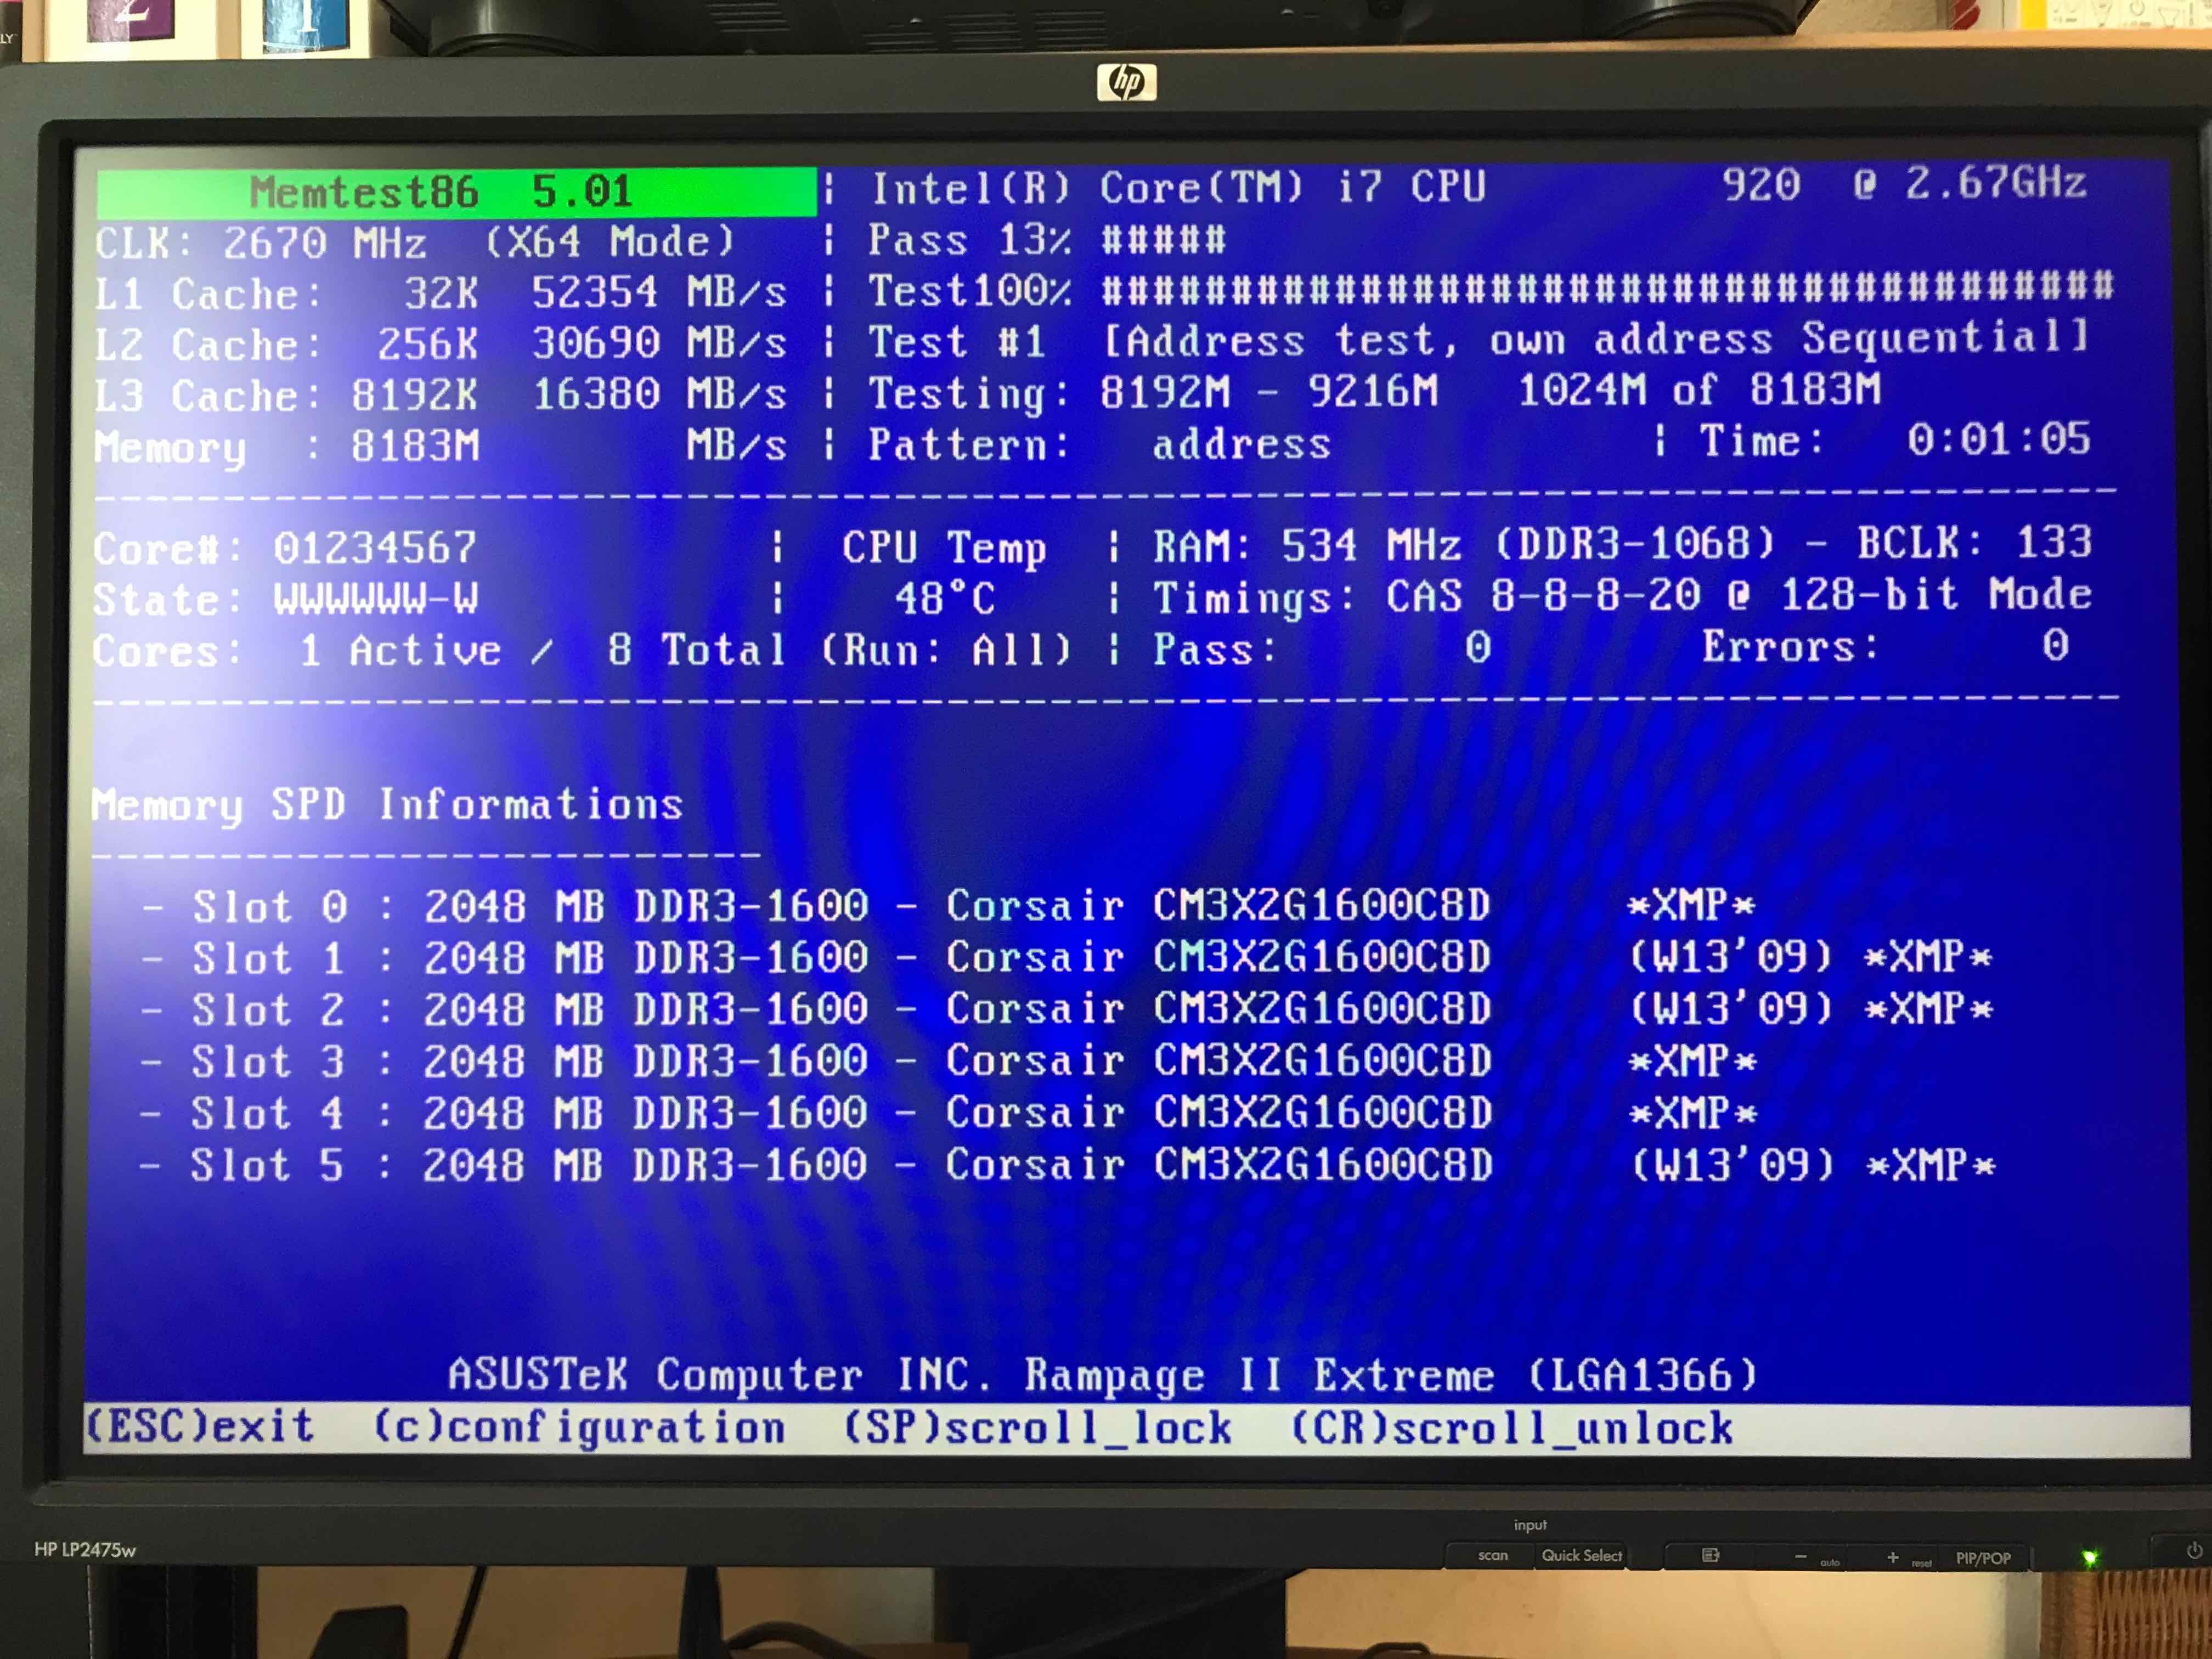
memtest86+ testing 5 memory slots

As you see all on above screenshot the Memory banks are listed as Slots. There are a number of Tests to be completed until
it can be said for sure memory does not have any faulty cells. 
The

Pass: 0
Errors: 0 

Indicates no errors, so in the end if memtest86 does not find anything this values should stay at zero.
memtest86+ is also usable to detecting issues with temperature of CPU. Just recently I've tested a PC thinking that some memory has defects but it turned out the issue on the Computer was at the CPU's temperature which was topping up at 80 – 82 Celsius.

If you're unfortunate and happen to get some corrupted memory segments you will get some red fields with the memory addresses found to have corrupted on Read / Write test operations:
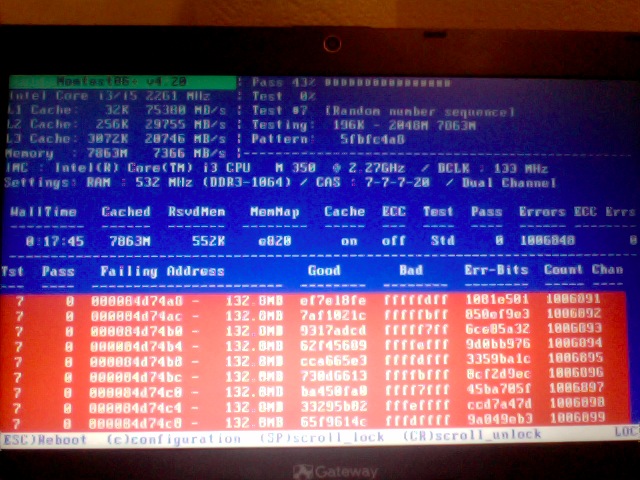
memtest86-returning-memory-address-errors-screenshot


2.4. Install and use memtest and memtest86+ on Debian / Mint Linux

You can install either memtest86+ or just for the fun put both of them and play around with both of them as they have a .deb package provided out of debian non-free /etc/apt/sources.list repositories.


root@jeremiah:/home/hipo# apt-cache show memtest86 memtest86+
Package: memtest86
Version: 4.3.7-3
Installed-Size: 302
Maintainer: Yann Dirson <dirson@debian.org>
Architecture: amd64
Depends: debconf (>= 0.5) | debconf-2.0
Recommends: memtest86+
Suggests: hwtools, memtester, kernel-patch-badram, grub2 (>= 1.96+20090523-1) | grub (>= 0.95+cvs20040624), mtools
Description-en: thorough real-mode memory tester
 Memtest86 scans your RAM for errors.
 .
 This tester runs independently of any OS – it is run at computer
 boot-up, so that it can test *all* of your memory.  You may want to
 look at `memtester', which allows testing your memory within Linux,
 but this one won't be able to test your whole RAM.
 .
 It can output a list of bad RAM regions usable by the BadRAM kernel
 patch, so that you can still use you old RAM with one or two bad bits.
 .
 This is the last DFSG-compliant version of this software, upstream
 has opted for a proprietary development model starting with 5.0.  You
 may want to consider using memtest86+, which has been forked from an
 earlier version of memtest86, and provides a different set of
 features.  It is available in the memtest86+ package.
 .
 A convenience script is also provided to make a grub-legacy-based
 floppy or image.

Description-md5: 0ad381a54d59a7d7f012972f613d7759
Homepage: http://www.memtest86.com/
Section: misc
Priority: optional
Filename: pool/main/m/memtest86/memtest86_4.3.7-3_amd64.deb
Size: 45470
MD5sum: 8dd2a4c52910498d711fbf6b5753bca9
SHA256: 09178eca21f8fd562806ccaa759d0261a2d3bb23190aaebc8cd99071d431aeb6

Package: memtest86+
Version: 5.01-3
Installed-Size: 2391
Maintainer: Yann Dirson <dirson@debian.org>
Architecture: amd64
Depends: debconf (>= 0.5) | debconf-2.0
Suggests: hwtools, memtester, kernel-patch-badram, memtest86, grub-pc | grub-legacy, mtools
Description-en: thorough real-mode memory tester
 Memtest86+ scans your RAM for errors.
 .
 This tester runs independently of any OS – it is run at computer
 boot-up, so that it can test *all* of your memory.  You may want to
 look at `memtester', which allows to test your memory within Linux,
 but this one won't be able to test your whole RAM.
 .
 It can output a list of bad RAM regions usable by the BadRAM kernel
 patch, so that you can still use your old RAM with one or two bad bits.
 .
 Memtest86+ is based on memtest86 3.0, and adds support for recent
 hardware, as well as a number of general-purpose improvements,
 including many patches to memtest86 available from various sources.
 .
 Both memtest86 and memtest86+ are being worked on in parallel.
Description-md5: aa685f84801773ef97fdaba8eb26436a
Homepage: http://www.memtest.org/

Tag: admin::benchmarking, admin::boot, hardware::storage:floppy,
 interface::text-mode, role::program, scope::utility, use::checking
Section: misc
Priority: optional
Filename: pool/main/m/memtest86+/memtest86+_5.01-3_amd64.deb
Size: 75142
MD5sum: 4f06523532ddfca0222ba6c55a80c433
SHA256: ad42816e0b17e882713cc6f699b988e73e580e38876cebe975891f5904828005


root@jeremiah:/home/hipo# apt-get install –yes memtest86+

root@jeremiah:/home/hipo# apt-get install –yes memtest86

Reading package lists… Done
Building dependency tree       
Reading state information… Done
Suggested packages:
  hwtools kernel-patch-badram grub2 | grub
The following NEW packages will be installed:
  memtest86
0 upgraded, 1 newly installed, 0 to remove and 21 not upgraded.
Need to get 45.5 kB of archives.
After this operation, 309 kB of additional disk space will be used.
Get:1 http://ftp.de.debian.org/debian buster/main amd64 memtest86 amd64 4.3.7-3 [45.5 kB]
Fetched 45.5 kB in 0s (181 kB/s)     
Preconfiguring packages …
Selecting previously unselected package memtest86.
(Reading database … 519985 files and directories currently installed.)
Preparing to unpack …/memtest86_4.3.7-3_amd64.deb …
Unpacking memtest86 (4.3.7-3) …
Setting up memtest86 (4.3.7-3) …
Generating grub configuration file …
Found background image: saint-John-of-Rila-grub.jpg
Found linux image: /boot/vmlinuz-4.19.0-18-amd64
Found initrd image: /boot/initrd.img-4.19.0-18-amd64
Found linux image: /boot/vmlinuz-4.19.0-17-amd64
Found initrd image: /boot/initrd.img-4.19.0-17-amd64
Found linux image: /boot/vmlinuz-4.19.0-8-amd64
Found initrd image: /boot/initrd.img-4.19.0-8-amd64
Found linux image: /boot/vmlinuz-4.19.0-6-amd64
Found initrd image: /boot/initrd.img-4.19.0-6-amd64
Found linux image: /boot/vmlinuz-4.19.0-5-amd64
Found initrd image: /boot/initrd.img-4.19.0-5-amd64
Found linux image: /boot/vmlinuz-4.9.0-8-amd64
Found initrd image: /boot/initrd.img-4.9.0-8-amd64
Found memtest86 image: /boot/memtest86.bin
Found memtest86+ image: /boot/memtest86+.bin
Found memtest86+ multiboot image: /boot/memtest86+_multiboot.bin
File descriptor 3 (pipe:[66049]) leaked on lvs invocation. Parent PID 22581: /bin/sh
done
Processing triggers for man-db (2.8.5-2) …


After this both memory testers memtest86+ and memtest86 will appear next to the option of booting a different version kernels and the Advanced recovery kernels, that you usually get in the GRUB boot prompt.

2.5. Use memtest embedded tool on any Linux by adding a kernel variable
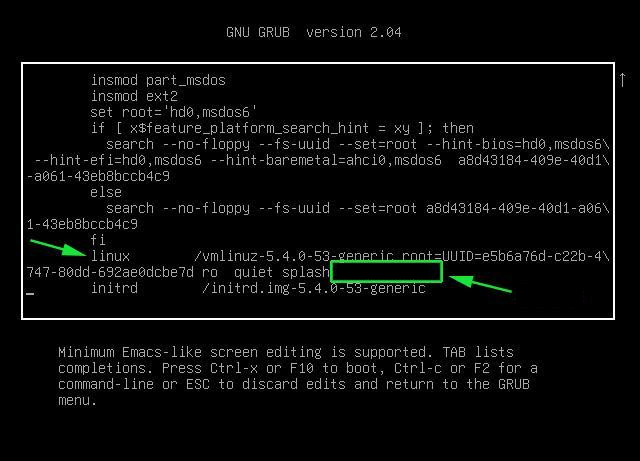
Edit-Grub-Parameters-add-memtest-4-to-kernel-boot

2.4.1. Reboot your computer

# reboot

2.4.2. At the GRUB boot screen (with UEFI, press Esc).

2.4.3 For 4 passes add temporarily the memtest=4 kernel parameter.
 

memtest=        [KNL,X86,ARM,PPC,RISCV] Enable memtest
                Format: <integer>
                default : 0 <disable>
                Specifies the number of memtest passes to be
                performed. Each pass selects another test
                pattern from a given set of patterns. Memtest
                fills the memory with this pattern, validates
                memory contents and reserves bad memory
                regions that are detected.


3. Install and use memtester Linux tool
 

At some condition, memory is the one of the suspcious part, or you just want have a quick test. memtester  is an effective userspace tester for stress-testing the memory subsystem.  It is very effective at finding intermittent and non-deterministic faults.

The advantage of memtester "live system check tool is", you can check your system for errors while it's still running. No need for a restart, just run that application, the downside is that some segments of memory cannot be thoroughfully tested as you already have much preloaded data in it to have the Operating Sytstem running, thus always when possible try to stick to rule to test the memory using memtest86+  from OS Boot Loader, after a clean Machine restart in order to clean up whole memory heap.

Anyhow for a general memory test on a Critical Legacy Server  (if you lets say don't have access to Remote Console Board, or don't trust the ILO / IPMI Hardware reported integrity statistics), running memtester from already booted is still a good idea.


3.1. Install memtester on any Linux distribution from source

wget http://pyropus.ca/software/memtester/old-versions/memtester-4.2.2.tar.gz
# tar zxvf memtester-4.2.2.tar.gz
# cd memtester-4.2.2
# make && make install

3.2 Install on RPM based distros


On Fedora memtester is available from repositories however on many other RPM based distros it is not so you have to install it from source.

[root@fedora ]# yum install -y memtester


3.3. Install memtester on Deb based Linux distributions from source
 

To install it on Debian / Ubuntu / Mint etc. , open a terminal and type:
 

root@linux:/ #  apt install –yes memtester

The general run syntax is:

memtester [-p PHYSADDR] [ITERATIONS]


You can hence use it like so:

hipo@linux:/ $ sudo memtester 1024 5

This should allocate 1024MB of memory, and repeat the test 5 times. The more repeats you run the better, but as a memtester run places a great overall load on the system you either don't increment the runs too much or at least run it with  lowered process importance e.g. by nicing the PID:

hipo@linux:/ $ nice -n 15 sudo memtester 1024 5


  • If you have more RAM like 4GB or 8GB, it is upto you how much memory you want to allocate for testing.
  • As your operating system, current running process might take some amount of RAM, Please check available Free RAM and assign that too memtester.
  • If you are using a 32 Bit System, you cant test more than 4 GB even though you have more RAM( 32 bit systems doesnt support more than 3.5 GB RAM as you all know).
  • If your system is very busy and you still assigned higher than available amount of RAM, then the test might get your system into a deadlock, leads to system to halt, be aware of this.
  • Run the memtester as root user, so that memtester process can malloc the memory, once its gets hold on that memory it will try to apply lock. if specified memory is not available, it will try to reduce required RAM automatically and try to lock it with mlock.
  • if you run it as a regular user, it cant auto reduce the required amount of RAM, so it cant lock it, so it tries to get hold on that specified memory and starts exhausting all system resources.


If you have 8 Gigas of RAM plugged into the PC motherboard you have to multiple 1024*8 this is easily done with bc (An arbitrary precision calculator language) tool:

root@linux:/ # bc -l
bc 1.07.1
Copyright 1991-1994, 1997, 1998, 2000, 2004, 2006, 2008, 2012-2017 Free Software Foundation, Inc.
This is free software with ABSOLUTELY NO WARRANTY.
For details type `warranty'. 
8*1024
8192


 for example you should run:

root@linux:/ # memtester 8192 5

memtester version 4.3.0 (64-bit)
Copyright (C) 2001-2012 Charles Cazabon.
Licensed under the GNU General Public License version 2 (only).

pagesize is 4096
pagesizemask is 0xfffffffffffff000
want 8192MB (2083520512 bytes)
got  8192MB (2083520512 bytes), trying mlock …Loop 1/1:
  Stuck Address       : ok        
  Random Value        : ok
  Compare XOR         : ok
  Compare SUB         : ok
  Compare MUL         : ok
  Compare DIV         : ok
  Compare OR          : ok
  Compare AND         : ok
  Sequential Increment: ok
  Solid Bits          : ok        
  Block Sequential    : ok        
  Checkerboard        : ok        
  Bit Spread          : ok        
  Bit Flip            : ok        
  Walking Ones        : ok        
  Walking Zeroes      : ok        
  8-bit Writes        : ok
  16-bit Writes       : ok

Done.


4. Shell Script to test server memory for corruptions
 

If for some reason the machine you want to run a memory test doesn't have connection to the external network such as the internet and therefore you cannot configure a package repository server and install memtester, the other approach is to use a simple memory test script such as memtestlinux.sh
 

#!/bin/bash
# Downloaded from https://www.srv24x7.com/memtest-linux/
echo "ByteOnSite Memory Test"
cpus=`cat /proc/cpuinfo | grep processor | wc -l`
if [ $cpus -lt 6 ]; then
threads=2
else
threads=$(($cpus / 2))
fi
echo "Detected $cpus CPUs, using $threads threads.."
memory=`free | grep 'Mem:' | awk {'print $2'}`
memoryper=$(($memory / $threads))
echo "Detected ${memory}K of RAM ($memoryper per thread).."
freespace=`df -B1024 . | tail -n1 | awk {'print $4'}`
if [ $freespace -le $memory ]; then
echo You do not have enough free space on the current partition. Minimum: $memory bytes
exit 1
fi
echo "Clearing RAM Cache.."
sync; echo 3 > /proc/sys/vm/drop_cachesfile
echo > dump.memtest.img
echo "Writing to dump file (dump.memtest.img).."
for i in `seq 1 $threads`;
do
# 1044 is used in place of 1024 to ensure full RAM usage (2% over allocation)
dd if=/dev/urandom bs=$memoryper count=1044 >> dump.memtest.img 2>/dev/null &
pids[$i]=$!
echo $i
done
for pid in "${pids[@]}"
do
wait $pid
done

echo "Reading and analyzing dump file…"
echo "Pass 1.."
md51=`md5sum dump.memtest.img | awk {'print $1'}`
echo "Pass 2.."
md52=`md5sum dump.memtest.img | awk {'print $1'}`
echo "Pass 3.."
md53=`md5sum dump.memtest.img | awk {'print $1'}`
if [ “$md51” != “$md52” ]; then
fail=1
elif [ “$md51” != “$md53” ]; then
fail=1
elif [ “$md52” != “$md53” ]; then
fail=1
else
fail=0
fi
if [ $fail -eq 0 ]; then
echo "Memory test PASSED."
else
echo "Memory test FAILED. Bad memory detected."
fi
rm -f dump.memtest.img
exit $fail

Nota Bene !: Again consider the restults might not always be 100% trustable if possible restart the server and test with memtest86+

Consider also its important to make sure prior to script run,  you''ll have enough disk space to produce the dump.memtest.img file – file is created as a test bed for the memory tests and if not scaled properly you might end up with a full ( / ) root directory!


4.1 Other memory test script with dd and md5sum checksum

I found this solution on the well known sysadmin site nixCraft cyberciti.biz, I think it makes sense and quicker.

First find out memory site using free command.
 

# free
             total       used       free     shared    buffers     cached
Mem:      32867436   32574160     293276          0      16652   31194340
-/+ buffers/cache:    1363168   31504268
Swap:            0          0          0


It shows that this server has 32GB memory,
 

# dd if=/dev/urandom bs=32867436 count=1050 of=/home/memtest


free reports by k and use 1050 is to make sure file memtest is bigger than physical memory.  To get better performance, use proper bs size, for example 2048 or 4096, depends on your local disk i/o,  the rule is to make bs * count > 32 GB.
run

# md5sum /home/memtest; md5sum /home/memtest; md5sum /home/memtest


If you see md5sum mismatch in different run, you have faulty memory guaranteed.
The theory is simple, the file /home/memtest will cache data in memory by filling up all available memory during read operation. Using md5sum command you are reading same data from memory.


5. Other ways to test memory / do a machine stress test

Other good tools you might want to check for memory testing is mprime – ftp://mersenne.org/gimps/ 
(https://www.mersenne.org/ftp_root/gimps/)

  •  (mprime can also be used to stress test your CPU)

Alternatively, use the package stress-ng to run all kind of stress tests (including memory test) on your machine.
Perhaps there are other interesting tools for a diagnosis of memory if you know other ones I miss, let me know in the comment section.

Use multiple certificates using one IP address (same IP address) on IIS Windows web server

Saturday, October 24th, 2020

If you had to administer some Windows webservers based on IIS and you're coming from the Linux realm, it would be really confusing on how you can use a single IP address to have binded multiple domain certificates.

For those who have done it on linux, they know Apache and other webservers in recent versions support the configuration Directive of a Wildcard instead of IP through the SNI extension capble to capture in the header of the incoming SSL connection the exact domain and match it correctly against the domain with the respective certificate.  Below is what I mean, lets say you have a website called yourdomain.com and you want this domain to be pointing to another location for example to yourdomain1.com

For example in Apache Webserver this is easily done by defining 2 separate virtualhost configuration files similar to below:

/etc/apache2/sites-available/yourdomain.com

<Virtualhost *>

Servername yourdomain.com
ServerAlias www.yourdomain.com
….

        SSLCertificateFile /etc/letsencrypt/live/yourdomain1.com/fullchain.pem
SSLCertificateKeyFile /etc/letsencrypt/live/yourdomain1.com/privkey.pem
</VirtualHost>


/etc/apache2/sites-available/yourdomain1.com

<Virtualhost *>

Servername yourdomain1.com
ServerAlias yourdomain1.com


        SSLCertificateFile /etc/letsencrypt/live/yourdomain1.com/fullchain.pem
SSLCertificateKeyFile /etc/letsencrypt/live/yourdomain1.com/privkey.pem
</VirtualHost>


Unfortunately for those who still run legacy Windows servers  with IIS version 7 / 7.5 your only option is to use separate IP addresses (or ports, but not really acceptable for public facing sites) and to bind each site with it's SSL certificate to that IP address.

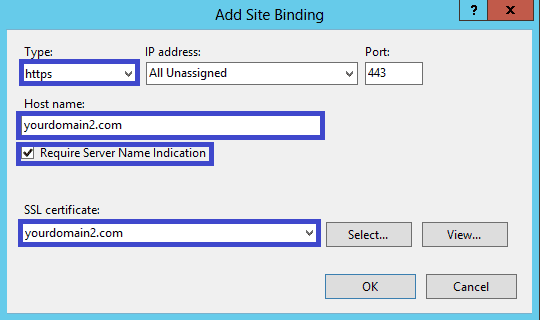
IIS ver. 8+ supports the Server Name Indication extension of TLS which will allow you to bind multiple SSL sites to the same IP address/port based on the host name. It will be transparent and the binding will work the same as with non-HTTPS sites.

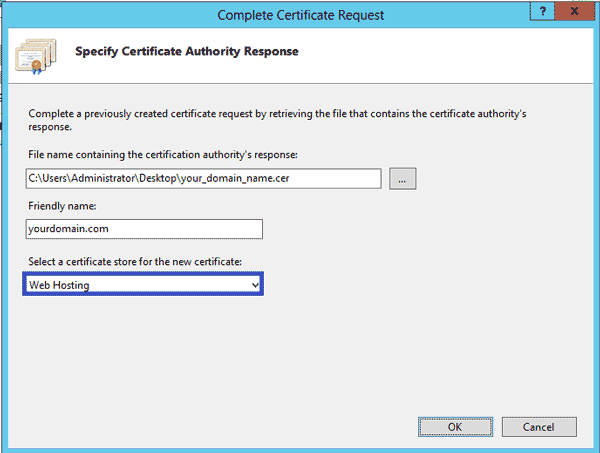
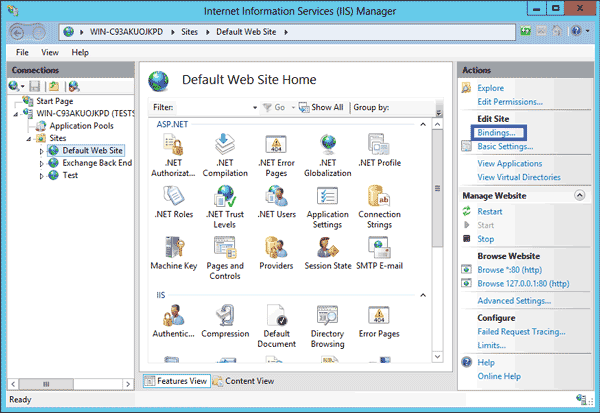
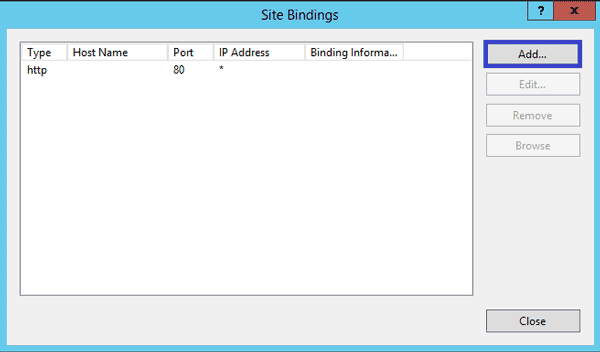
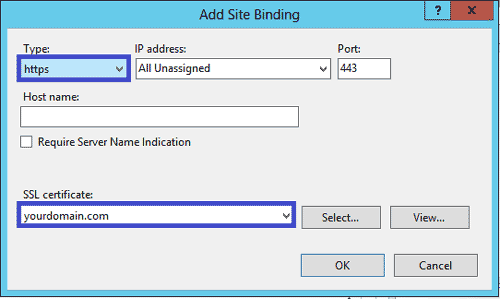
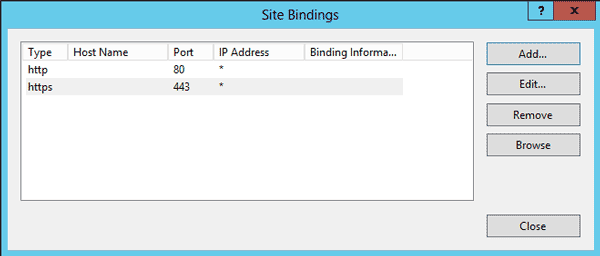
In Microsoft IIS Webserver to configure, it is not possible to simply edit some configurations but you have to do it the clicking way as usually happen in Windows. thus you will need to have generated the Domain Certificate requests and so on and then you can simply do as pointed in below screenshots.

howto-install-iis-8-webserver-ssl-sni-certificate-windows-screenshot
 

iis-config-domain-alias-windows-server-iis-8-webserver

iis-config-domain-alias-windows-server-iis-8-webserver-1

iis-config-domain-alias-windows-server-iis-8-webserver-2

iis-config-domain-alias-windows-server-iis-8-webserver-3

iis-config-domain-alias-windows-server-iis-8-webserver-4
 

How to check if shared library is loaded in AIX OS – Fix missing libreadline.so.7

Thursday, February 20th, 2020

ibm-aix-logo1

I've had to find out whether an externally Linux library is installed  on AIX system and whether something is not using it.
The returned errors was like so:


# gpg –export -a

Could not load program gpg:
Dependent module /opt/custom/lib/libreadline.a(libreadline.so.7) could not be loaded.
Member libreadline.so.7 is not found in archive


After a bit of investigation, I found that gpg was failing cause it linked to older version of libreadline.so.6, the workaround was to just substitute the newer version of libreadline.so.7 over the original installed one.

Thus I had a plan to first find out whether this libreadline.a is loaded and recognized by AIX UNIX first and second find out whether some of the running processes is not using that library.
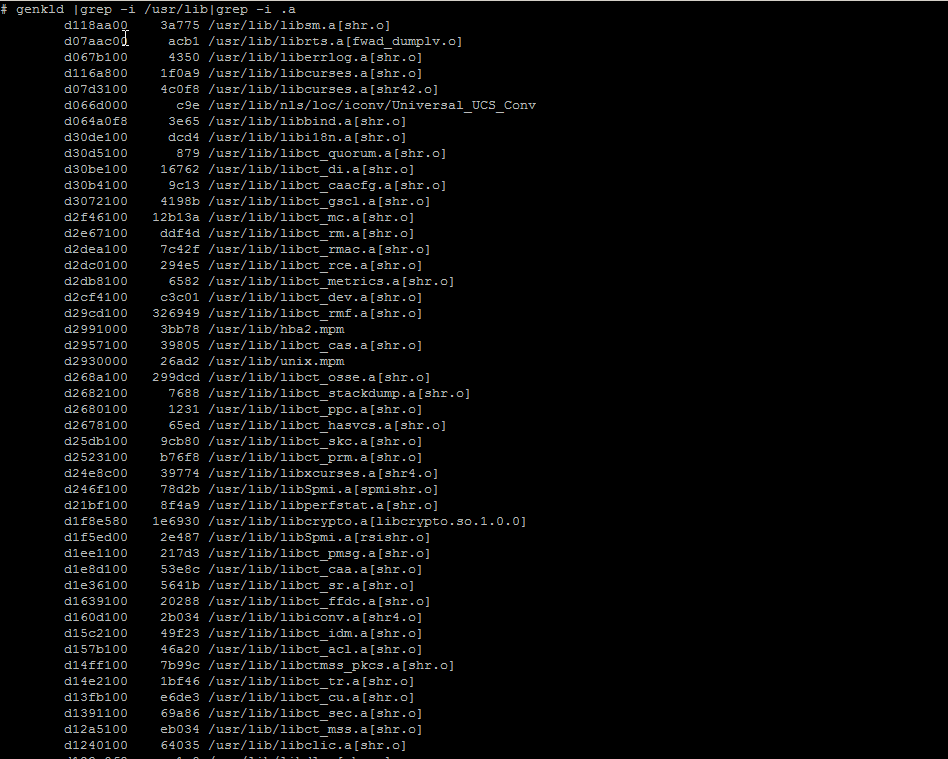
I've come across this interesting IBM official documenation that describes pretty good insights on how to determine whether a shared library  is currently loaded on the system. which mentions the genkld command that is doing
exactly what I needed.

In short:
genkld – creates a list that is printed to the console that shows all loaded shared libraries

genkld-screenshot-aix-unix

Next I used lsof (list open files) command to check whether there is in real time opened libraries by any of the running programs on the system.

After not finding anything and was sure the library is neither loaded as a system library in AIX nor it is used by any of the currently running AIX processes, I was sure I could proceed to safely overwrite libreadline.a (libreadline.so.6) with libreadline.a with (libreadline.so.7).

The result of that is again a normally running gpg as ldd command shows the binary is again normally linked to its dependend system libraries.
 

aix# ldd /usr/bin/gpg
/usr/bin/gpg needs:
         /usr/lib/threads/libc.a(shr.o)
         /usr/lib/libpthreads.a(shr_comm.o)
         /usr/lib/libpthreads.a(shr_xpg5.o)
         /opt/freeware/lib/libintl.a(libintl.so.1)
         /opt/freeware/lib/libreadline.a(libreadline.so.7)
         /opt/freeware/lib/libiconv.a(libiconv.so.2)
         /opt/freeware/lib/libz.a(libz.so.1)
         /opt/freeware/lib/libbz2.a(libbz2.so.1)
         /unix
         /usr/lib/libcrypt.a(shr.o)
         /opt/freeware/lib/libiconv.a(shr4.o)
         /usr/lib/libcurses.a(shr42.o)


# gpg –version
gpg (GnuPG) 1.4.22
Copyright (C) 2015 Free Software Foundation, Inc.
License GPLv3+: GNU GPL version 3 or later <http://gnu.org/licenses/gpl.html>
This is free software: you are free to change and redistribute it.
There is NO WARRANTY, to the extent permitted by law.


Home: ~/.gnupg
Supported algorithms:
Pubkey: RSA, RSA-E, RSA-S, ELG-E, DSA
Cipher: IDEA, 3DES, CAST5, BLOWFISH, AES, AES192, AES256, TWOFISH,
        CAMELLIA128, CAMELLIA192, CAMELLIA256
Hash: MD5, SHA1, RIPEMD160, SHA256, SHA384, SHA512, SHA224
Compression: Uncompressed, ZIP, ZLIB, BZIP2


Howto Pass SSH traffic through a Secured Corporate Proxy server with corkscrew, using sshd as a standalone proxy service with no proxy installed on remote Linux server or VPS

Tuesday, November 19th, 2019

howto pass ssh traffic through proxy to remote server use remote machine as a proxy for connecting to the Internet

Working in the big bad corporate world (being employed in  any of the Fortune 500) companies, especially in an IT delivery company is a nasty thing in terms of User Personal Data Privacy because usually when employeed in any of a corporation, the company ships you with a personal Computer with some kind of pre-installed OS (most often this is Windows) and the computer is not a standalone one but joined in Active Directory (AD) belonging to Windows Domain and centrally administered by whoever.

As part of the default deplyed configuration in this pre-installed OS and software is that part or all your network traffic and files is being monitored in some kind of manner as your pre-installed Windows or Linux notebook given by the Corporation is having a set of standard software running in the background, and even though you have Windows Administrator there are many things you have zero control or even if you have changed it once the Domain Policy is triggered your custom made changes / Installed Programs that happen to be against the company policy are being automatically deleted, any registry changes made are being rewinded etc. Sometimes even by trying to manually clean up your PC from the corporate crapware,  you might breaks access to the corporate DMZ firewalled network. A common way to secure their employee PC data large companies have a Network seperation, your PC when not connected to the Corporate VPN is having a certain IP configuration and once connected to the Demilitarized Zone VPN those configuration changes and the PC have access to internal company infrastructure servers / router / switches / firewalls / SANs etc. Access to corporate Infrastructure is handled via crypted VPN clinet such as Cisco AnyConnect Secure Mobility Client which is perhaps one of the most used ones out there.

Part of the common software installed to Monitor your PC for threats / viruses / trojans among which is MCafee / EMET (Enhandced Mitigation Experience Toolkit) the PC is often prebundled with some kind of anti-malware (crapware) :). But the tip of the iceberg on user surveillance where most of surveillance happens is the default installed proxy on the PC which usually does keep track of all your remote accessed HTTP Website URLs accessed in plain text – traffic flowing on Port 80 and crypted one on standard (SSL) Port 443. This Web Traffic is handled by the Central Corporate proxy that is being deployed via some kind of Domain policy, every time the Computer joins the Windows domain. 

This of course is a terrible thing for your Browsing security and together with the good security practice to run your browser in Incognito mode, which makes all your browsing activity such as access URLs History or Saved Cookies data to be cleared up on a Browser close it is important to make sure you run your own personal traffic via a separate browser which you will use only for your own concern browsing such as Accessing your Bank Money Accounts to check your Monthly Sallary / Purchase things online via Amazon.com / Ebay.com, whether all of the rest traffic company related is trafficed via the default set corporate central proxy.
This is relatively easy sometimes in companies, where security is not of a top concern but in corporations with tightened security accessing remote proxy, or accessing even common daily news and Public Email websites or social media sites  Gmail.com / Twitter / Youtube will be filtered so the only way to reach them will be via some kind of Proxy and often this proxy is the only way out to the Free world from the corporate jail.

Here is where the good old SSH comes as a saving grace as it turns out SSH traffic could be trafficed over a proxy. In below article I will give you a short insight on how Proxy through SSH could be achieved to Secure your dailty web traffic and use SSH to reach your own server on the Internet as well as how you can copy securely data via SSH through corporate Proxy. 
 

1. How to view your corporate used (default) proxy / Check Proxy.pac file definitions


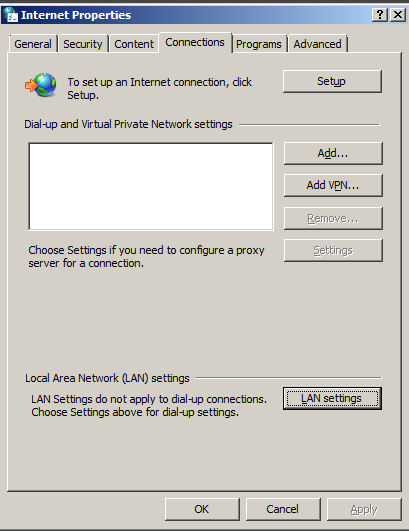
To get an idea what is the used proxy on your Corporate PC (as most corporate employee given notebooks are running some kind of M$ Windows)  you can go to:

Windows Control Panel -> Internet Options -> Connections -> Lan Settings


internet-properties-microsoft-windows-screenshot

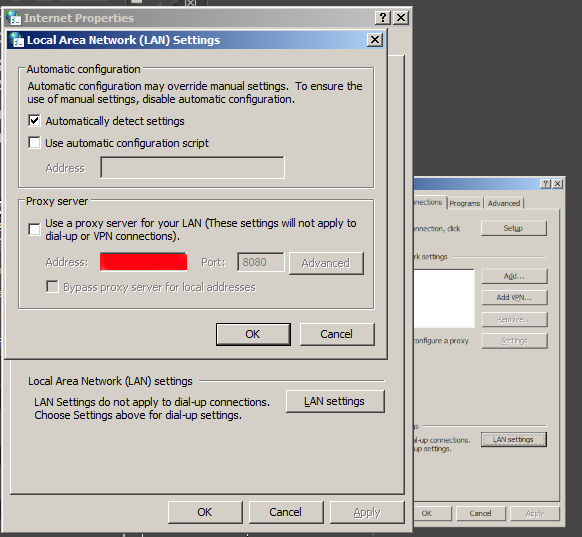
Under the field Proxy server (check out the Proxy configured Address and Port number )

local-area-network-lan-settings-screenshot-windows-1
 

Having that as browsers venerate the so-called Proxy.pac file, to be rawly aware on some general Company Proxy configured definitions you can access in a browser the proxy itself fething the proxy.pac file for example.


http://your-corporate-firewall-rpoxy-url:8080/proxy.pac


This is helpful as some companies Proxies have some proxy rules that reveal some things about its Internet architecture and even some have some badly configured proxy.pac files which could be used to fool the proxy under some circumstances 🙂
 

2. Few of the reasons corporations proxy all their employee's work PC web traffic


The corporate proxying of traffic has a number of goals, some of which are good hearted and others are for mostly spying on the users.


1. Protect Corporate Employees from malicious Viruses / Trojans Horses / Malware / Badware / Whatever ware – EXCELLENT
2. Prevent users from acessing a set of sources that due to the corporate policy are considered harmful (e.g. certain addresses 
of information or disinformation of competitors, any Internet source that might preach against the corporation, hacking ralated websites etc.) – NOT GOOD (for the employee / user) and GOOD for the company
3.Spy on the users activity and be able to have evidence against the employee in case he decided to do anything harmful to the company evidences from proxy could even later be used in court if some kind of corpoate infringment occurs due to misbehave of the employee. – PERFECT FOR COMPANY and Complete breach of User privacy and IMHO totally against European Union privacy legislation such as GDRP
4. In companies that are into the field of Aritificial Intelligence / Users behavior could even be used to advance Self-learning bots and mechanisms – NASTY ! YAECKES


3. Run SSH Socks proxy to remote SSHd server running on common SSL 443 port


Luckily sysadmins who were ordered the big bosses to sniff on your Web behaviour and preferences could be outsmarted with some hacks.

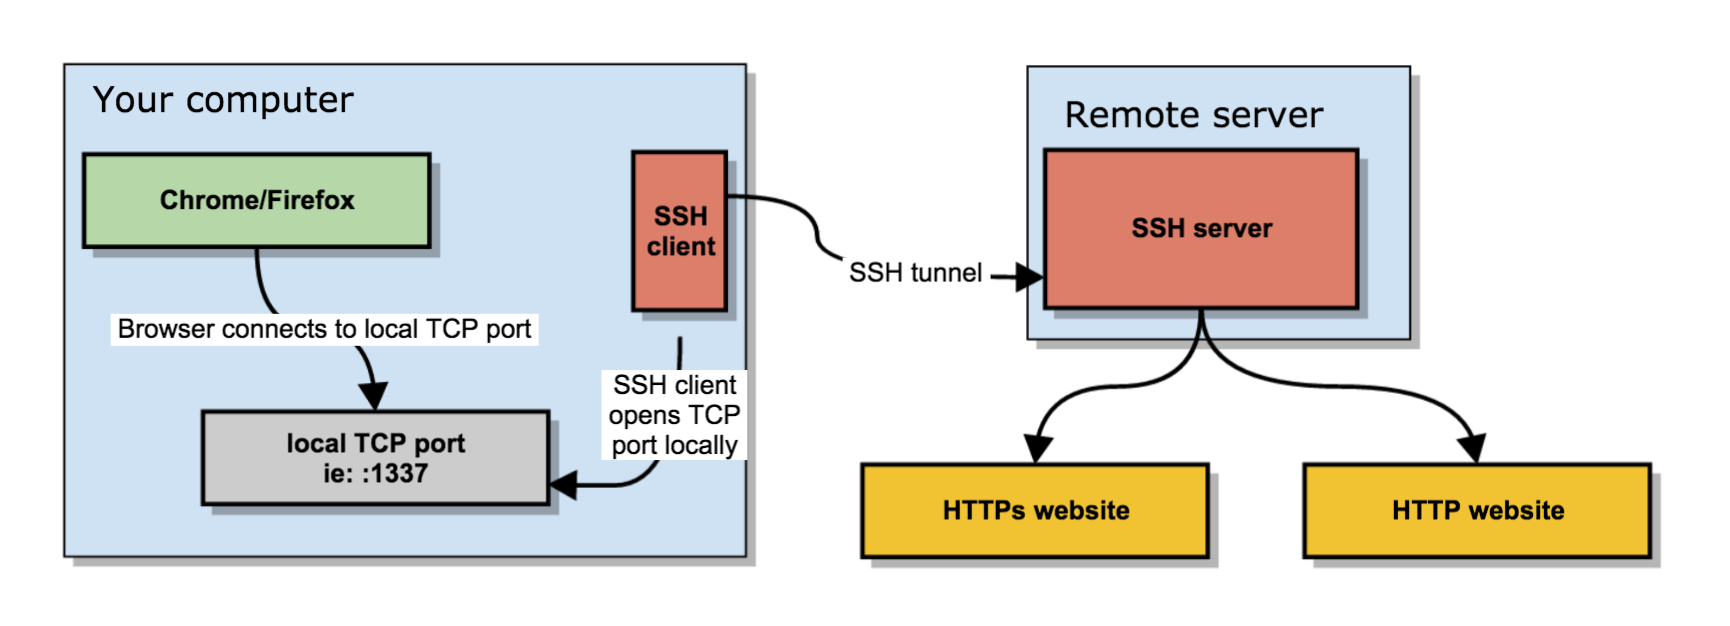
To protect your Browsing behaviours and Secure your privacy perhaps the best option is to use the Old but gold practice o Securing your Networkf traffic using SSH Over Proxy and SSH Dynamic tunnel as a Proxy as explained in my previous article here.

how-to-use-sshd-server-as-a-proxy-without-a-real-proxy-ssh-socks5_proxy_linux
 

In short the quest way to have your free of charge SOCKS  Remote proxy to your Home based Linux installed OS server / VPN with a Public Internet address is to use ssh as so:


ssh -D 3128 UserName@IP-of-Remote-SSHD-Host -p 443


This will start the SOCKS Proxy tunnel from Corporate Work PC to your Own Home brew server.

For some convenience it is useful to set up an .alias (for cygwin) / linux users in .bashrc file:


alias proxy='ssh -D 3128 UserName@IP-of-Remote-SSHD-Host -p 443';


To start using the Proxy from browser, I use a plugin called FoxyProxy in Chrome and Firefox browsers
set-up to connect to localhost – 127.0.0.1:3128 for All Protocols as a SOCKs v5 Proxy.

The sshd Socks proxy can be used for multiple others for example, using it you can also pass on traffic from Mail client such as Thunderbird to your Email server if you're behind a firewall prohibiting access to the common POP3 port 110 or IMAP port TCP 143. 

4. How to access SSH through Proxy using jumphost SSH hop


If you're like me and you have on your Home Linux machine only one Internet address and you have already setupped an SSL enabled service (lets say Webmail) to listen to that Public Internet IP and you don't have the possibility to run another instance of /usr/bin/sshd on port 443 via configuration or manually one time by issuing:


/usr/sbin/sshd -p 443


Then you can use another ssh another Linux server as a jump host to your own home Linux sshd server. This can be done even by purchasing a cheap VPS server for lets say 3 dollars month etc. or even better if you have a friend with another Linux home server, you can ask him to run you sshd on TCP port 443 and add you an ssh account.
Once you have the second Linux machine as JumpHost to reach out to your own machine use:


ssh -J Your-User@Your-jump-host.com:443 hipo@your-home-server.com -v


To easify this a bit long line it is handy to use some kind of alias like:


alias sshhome='ssh -J Your-User@Your-jump-host.com:443 hipo@your-home-server.com -v'


The advantage here is just by issuing this sshd tunnel and keeping it open in a terminal or setting it up as Plink Putty tunnel you have all your Web Traffic Secured
between your Work Corporate PC and your Home Brew Server, keeping the curious eyes of your Company Security Officers from your own Web traffic, hence
separating the corporate privacy from your own personal privacy. Using the just established own SSH Proxy Tunnel to home for your non-work stuff browsing habits
from the corporate systems which are accessed by switching with a button click in FoxyProxy to default proxy settings.
 

5. How to get around paranoid corporate setup where only remote access to Corporate proxy on TCP Port 80 and TCP 443 is available in Browser only


Using straight ssh and to create Proxy will work in most of the cases but it requires SSH access to your remote SSH running server / VPS on TCP Port 22, however under some Fort-Nox like financial involved institutions and companies for the sake of tightened security, it is common that all Outbound TCP Ports are prohibited except TCP Port 80 and SSL 443 as prior said, so what can you do then to get around this badful firewall and access the Internet via your own server Proxy? 
The hack to run SSH server either on tcp port 80 or tcp port 443 on remote Host and use 443 / 80 to acess SSHD should work, but then even for the most paranoid corporations the ones who are PCI Compliant – PCI stands for (Payment Card Industry), e.g. works with Debit and Credit Card data etc, accessing even 80 or 443  ports with something like telnet client or netcat will be impossible. 
Once connected to the corporate VPN,  this 2 two ports firewall exceptions will be only accessible via the Corporate Proxy server defined in a Web Browser (Firefox / IE / Chrome etc.) as prior explained in article.

The remedy here is to use a 3rd party tools such as httptunnel or corkscrew that  are able to TUNNEL SSH TRAFFIC VIA CORPORATE PROXY SERVER and access your own resource out of the DMZ.

Both httptunnel and corkscrew are installable both on most Linux distros or for Windows users via CygWin for those who use MobaXterm.

Just to give you better idea on what corkscrew and (hts) httptunnel does, here is Debian packages descriptions.

# apt-cache show​ corkscrew
" corkscrew is a simple tool to tunnel TCP connections through an HTTP
 proxy supporting the CONNECT method. It reads stdin and writes to
 stdout during the connection, just like netcat.
 .
 It can be used for instance to connect to an SSH server running on
 a remote 443 port through a strict HTTPS proxy.
"


# apt-cache show httptunnel|grep -i description -A 7
Description-en: Tunnels a data stream in HTTP requests
 Creates a bidirectional virtual data stream tunnelled in
 HTTP requests. The requests can be sent via a HTTP proxy
 if so desired.
 .
 This can be useful for users behind restrictive firewalls. If WWW
 access is allowed through a HTTP proxy, it's possible to use
 httptunnel and, say, telnet or PPP to connect to a computer

Description-md5: ed96b7d53407ae311a6c5ef2eb229c3f
Homepage: http://www.nocrew.org/software/httptunnel.html
Tag: implemented-in::c, interface::commandline, interface::daemon,
 network::client, network::server, network::vpn, protocol::http,
 role::program, suite::gnu, use::routing
Section: net
Priority: optional
Filename: pool/main/h/httptunnel/httptunnel_3.3+dfsg-4_amd64.deb

Windows cygwin users can install the tools with:
 

apt-cyg install –yes corkscrew httptunnel


Linux users respectively with:

apt-get install –yes corkscrew httptunnel

or 

yum install -y corkscrew httptunnel


You will then need to have the following configuration in your user home directory $HOME/.ssh/config file
 

Host host-addrs-of-remote-home-ssh-server.com
ProxyCommand /usr/bin/corkscrew your-corporate-firewall-rpoxy-url 8080 %h %p


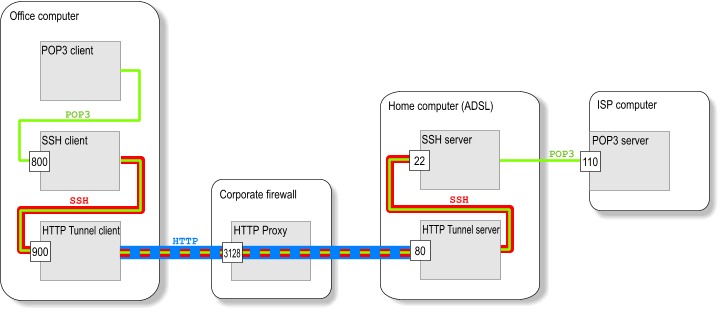
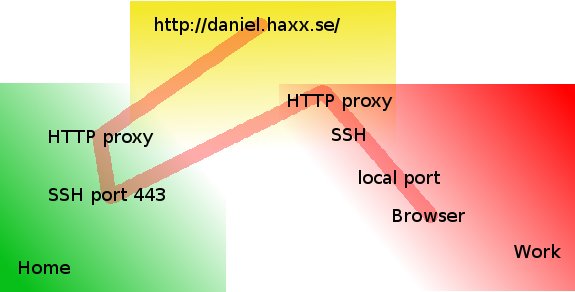
howto-transfer-ssh-traffic-over-proxy

Picture Copyright by Daniel Haxx

The best picture on how ssh traffic is proxied is the one found on Daniel Haxx's website which is a great quick tutorial which originally helped to get the idea of how corkscrew works in proxying traffic I warmly recommend you take a quick look at his SSH Through or over Proxy article.

Host-addrs-of-remote-home-ssh-server.com could be also and IP if you don't have your own domain name in case if using via some cheap VPN Linux server with SSH, or alternatively
if you don't want to spend money on buying domain for SSH server (assuming you don't have such yet) you can use Dyn DNS or NoIP.

Another thing is to setup the proper http_proxy / https_proxy / ftp_proxy variable exports in $HOME/.bashrc in my setup I have the following:
 

export ftp_proxy="http://your-corporate-firewall-rpoxy-url:8080"
export https_proxy="https://your-corporate-firewall-rpoxy-url:8080"
export http_proxy="http://your-corporate-firewall-rpoxy-url:8080"
export HTTP_PROXY="http://your-corporate-firewall-rpoxy-url:8080"
export HTTPS_PROXY="http://your-corporate-firewall-rpoxy-url:8080"


6. How to Transfer Files / Data via SSH Protocol through  Proxy with SCP and SFTP


Next logical question is how to Transfer your own personal encrypted files (that contains no corporate sensitive information) between your Work laptop and home brew Linux ssh server or cheap VPN.

It took me quite a lot of try-outs until finally I got it how Secure Copy (scp) command can be used toto transfer files between my Work Computer and my Home brew server using JumpHost, here is how:
 

scp -o 'ProxyJump Username@Jumpt-Host-or-IP.com:443' ~/file-or-files-to-copy* Username@home-ssh-server.com:/path/where/to/copy/files


I love using sftp (Secure FTP) command Linux client to copy files and rarely use scp so I have a lot of try-outs to connect interacitvely via the Corporate Proxy server over a Jump-Host:443 to my Destination home machine, 


I've tried using netcat as it was pointed in many articles online, like so to traffic my sftp traffic via my localhost binded SSH Socks proxy on :3128 together with netcat as shown in article prior example, using following line:
 

sftp -oProxyCommand='/bin/nc -X connect -x 127.0.0.1:3128 %h %p' Username@home-ssh-server.com 22


Also tried proxy connect like this:


sftp -o ProxyCommand="proxy-connect -h localhost -p 3128 %h %p" Username@home-ssh-server.com


Moreover, tried to use the ssh  command (-s) argument capability to invoke SSH protocol subsystem feature which is used to facilitiate use of SSH secure transport for other application
 

ssh -v -J hipo@Jump-Host:443 -s sftp root@home-ssh-server.com -v

open failed: administratively prohibited: open failed


Finally decided to give a try to the same options arguments as in scp and thanks God it worked and I can even access via the Corporate Proxy through the Jump Host SSH interactively via Secure FTP 🙂

!! THE FINAL WORKING SFTP THROUGH PROXY VIA SSH JUMPHOST !!
 

sftp -o 'ProxyJump Username@Jumpt-Host-or-IP.com:443' Username@home-ssh-server.com


To save time from typing this long line every time, I've setup the following alias to ~/.bashrc
 

alias sftphome='sftp -o 'ProxyJump Username@Jumpt-Host-or-IP.com:443' Username@home-ssh-server.com'


Conclusion

Of course using own Proxy via your Home brew SSH Machine as well as transferring your data securely from your Work PC (notebook) to Home does not completely make you Surveillance free, as the Corporate Windows installed OS image is perhaps prebundled with its own integrated Keylogger as well as the Windows Domain administrators have certainly access to connect to your PC and run various commands, so this kind of Security is just an attempt to make company has less control and know less on your browsing habits and the best solution where possible to secure your privacy and separate your Personal Space form Work space by using a second computer (if having the ability to work from home) with a KVM Switch device and switch over your Work PC and Home PC via it or in some cases (where companies) allows it, setup something like VNC server (TightVNC / RealVNC) on work PC and leave it all time running in office and connect remotely with vncviewer from your own controlled secured computer.

In article I've explained shortly common scenario found in corporate Work computers proxy setup, designed to Surveil all your move, mentioned few common softwares running by default to protect from Viruses and aimed to Protect user from malicious hacking tools, explained how to view your work notebook configured Proxy, shortly mentioned on Proxy.pac and hinted how to view proxy.pac config as well as gave few of the reasons why all web traffic is being routed over central proxy.

That's all folks, Enjoy the Freedom to be less surveilled !

Fix Mac OS X camera problems – Tell which application is using Mac OS X builtin Camera

Sunday, September 16th, 2018

https://www.pc-freak.net/images/macosx-check-what-process-is-using-camera-screenshot
It is a common problem on Mac OS X notebooks (MacBook Air , MacBook Proc)  with builtin Video Camera to have issues with Camera in Facetime, Skype and other applications which use it.

Considering that the Camera is physically working on the Mac (it did not burn etc.) and it stooped working suddenly (is not detected by Mac OS applications which support it), the most common cause for that is the fact that another application running on the system is using it.
With the spread of spyware and malware that can easily hit your computer by exploiting Javascript bugs in browser intepreter (Firefox, Chrome, Chrome) it is not impossible that your Mac PC got infected with a kind of WebCam spy software that keeps your Video Camera active all time.

Webcam spying is a real issue of today so to secure yourself partially you can place Oversight App to get notifications when an application starts using Mac's Webcam or audio.

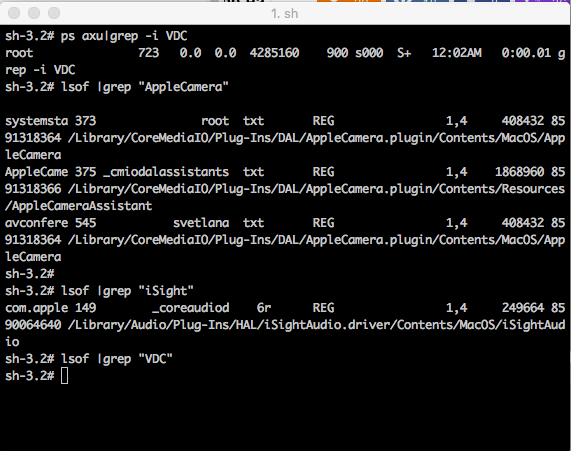
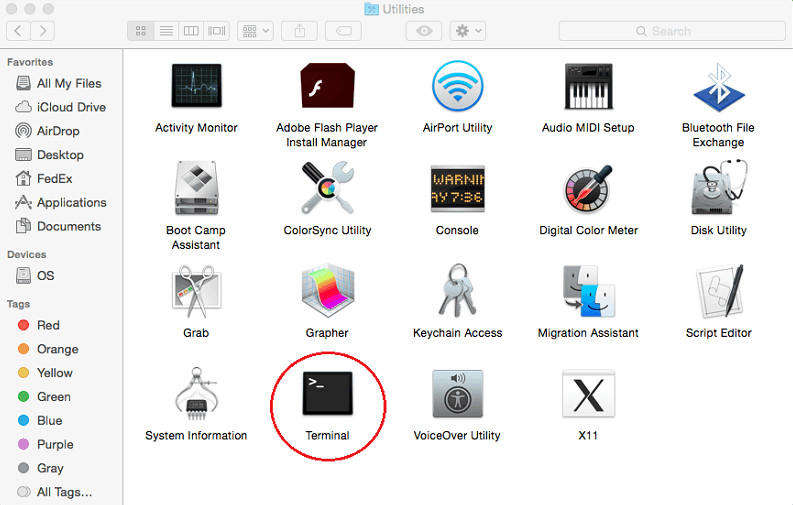
Open Finder and run Terminal to check whether the Web Camera is used by some of the Mac running processes.


Applications -> Utilities -> Terminal


macosx-utilities-terminal-osx-screenshot


MacBook-Air:Volumes root#  lsof | grep "AppleCamera"


You should see one or more results. If you don’t see any results, try running the following commands as well.
One of the below commands may be necessary if you’re using an older version of macOS.


MacBook-Air:Volumes root#  lsof | grep "iSight"


MacBook-Air:Volumes root#  lsof | grep "VDC"


If VDCAssistant process shows running kill it.
 

MacBook-Air:Volumes root#  killall -9 VDCAssistant


https://www.pc-freak.net/images/macosx-check-what-process-is-using-camera-screenshot

You can also check whether the Mac Camera is being detected by Mac OS with system_profiler command (this is Mac's equivalent of Linux's lspci / lsusb / lshw / dmidecode for more on the topic you can check my previous article Get hardware system info on Linux etc.)
 

/usr/sbin/system_profiler


   Type8Camera::12.781 system_profiler[1075:84585] Exception NSInvalidArgumentE
      Version: 10,1
      Obtained from: Apple
      Last Modified: 13.12.2017, 9:34
      Kind: Intel
      64-Bit (Intel): Yes
      Signed by: Software Signing, Apple Code Signing Certification Authority, Apple Root CA
      Location: /System/Library/Image Capture/Devices/Type8Camera.app
      Get Info String: 10.1, © Copyright 2002-2014 Apple Inc. All rights reserved.

    Type5Camera:

      Version: 10,1
      Obtained from: Apple
      Last Modified: 13.12.2017, 9:34
      Kind: Intel
      64-Bit (Intel): Yes
      Signed by: Software Signing, Apple Code Signing Certification Authority, Apple Root CA
      Location: /System/Library/Image Capture/Devices/Type5Camera.app
      Get Info String: 10.1, © Copyright 2001-2014 Apple Inc. All rights reserve

.

    Type4Camera:

      Version: 10,1
      Obtained from: Apple
      Last Modified: 13.12.2017, 9:34
      Kind: Intel
      64-Bit (Intel): Yes
      Signed by: Software Signing, Apple Code Signing Certification Authority, Apple Root CA
      Location: /System/Library/Image Capture/Devices/Type4Camera.app
      Get Info String: 10.1, © Copyright 2001-2014 Apple Inc. All rights reserved.

    PTPCamera:

      Version: 10,1
      Obtained from: Apple
      Last Modified: 13.12.2017, 9:34
      Kind: Intel
      64-Bit (Intel): Yes
      Signed by: Software Signing, Apple Code Signing Certification Authority, Apple Root CA

Convert .doc to .pdf on Linux and BSD using console / Convertion of PDF to DOC inside scripts

Tuesday, November 13th, 2012

how to Convert .doc to .PDF using console / terminal on Linux and FreeBSD

On Linux, there are plenty of ways nowadays to convert Microsoft Word or OpenOffice .DOC documents to Adobe's PDF (Postscript). However most of the ways require a graphical environment. As I'm interested in how convertion is done mainly from console to suit shell scripts and php which has to routinely convert a bunch of .DOC files to .PDF. I've checked today how PDF to DOC is possible on Debian, Ubuntu, Arch Linux  and FreeBSD..

There are few tools one can use from console, that doesn't requiere you to have running Xorg on the convertion host. The quality of the produced converted document, may vary and with some Microsoft Office doc files, there might be some garbage. But generally for simplistic and well written "macros" free documents the quality of PDF is satisfactory with few of the tools.

Here I will list the few tools, one can use for convertion:

  • abiword – you probably know abiword GUI program which is a good substitute for people who doesn't want the huge openoffice on the host. interestingly abiword supports converts with no need for GUI
     
  • wvPDF (you have to have install wv package and usually this converter works well only with very old .DOC (MS Office 97) – I was not impressed with those convert results
     
  • oowriter / swriter (whether LibreOffice installed) or writer (on LibreOffice), on some Ubuntus and derivatives the equivalent cmd is lowriter
     
  • unoconv – this tool produces really good DOC to  PDF converts, it is a python script using openoffice / libreoffice as backend convertion engine so produced PDFs will be identical like the ones produced with oowriter, the pros of the tool is its syntax is very user friendly and along with PDF to DOC it supports easy syntax converting to  bunch of other file formats. Actually unoconv supports same convertions which supported by OpenOffice.org, the advantage is however you can use it within console and even schedule convertion to be processed by a remote host.


1. Convertion of DOC to PDF with abiword

abiword --to=pdf doc_file_to_convert.doc

2. Convert DOC to PDF with wvPDF

apt-get install --yes wv texlive-base texlive-latex-base ghostscript

wvPDF doc-file-to-convert-to-pdf.doc converted-to-pdf.pdf

wvPDF doc-file-to-convert-to-pdf.doc convert-to-pdf.pdf

Current directory: /home/hipo/Desktop
"doc-file-to-convert-to-pdf.eps" exists - skipping...
Some problem running latex.
Check for Errors in steinway.log
Continuing... 


The produced .pdf was not useful most of the text inside was completely missing as well as some weird probably PostScript convertion characters were in the .PDF. Seeing its output I would as of time of writing wvPDF Debian's verion 1.2.4 is crap.


3. Convert DOC to PDF with oowriter / swriter / lowrite

a) convert with oowriter and swriter

I saw posts online claiming DOC to PDF convertion is possible directly with oowriter or swriters with commands:

oowriter -convert-to pdf:writer_pdf_Export input-doc-file-to-convert.doc

or

swriter -convert-to pdf:writer_pdf_Export steinway.doc - as named on some Linux-es
 

As long as I tested it on my Debian Squeeze, neither of the two works
.I saw some suggestions that PDF can be generated by installing and using cups-pdf debian package:

apt-get install cups-pdf oowriter -pt pdf your_word_file.doc b) convert DOC to PDF with lowriter I've seen in Ubuntu documentation and in Ubuntu forums, users saying they had some good results using lowriter, which is a sort of front-end program to ImageMagick's convert. I never tested that but I doubt of any satisfactory results, as I tried converting to PDF earlier using convert and often converts failed. Anyways you try it with:

lowriter --convert-to pdf *.doc


4. Converting PDF to DOC  with unoconv

As of time of writing it seems unoconv is best Linux console tool for converting .doc to .pdf

It produces good readable text, as well as pictures and elements looks exactly as in OpenOffice.

To install it I run:

# apt-get install --yes unoconv
....

To use it:

$ unoconv -fpdf any-file-to-convert.doc

If you don't get errors or it doesn't crash a .doc file with same name any-file-to-convert.doc is created.

What unoconv, does is precisely the same as if using OpenOffice GUI's  to convert to PDF:


  • Open -> Open Office (3.2 in my case)
  • Open Document to export
  • File->Export as PDF
  • Click: Export
  • Choose file namefor output PDF


An interesting feature of unoconv is its possibility to run and convert as a port listening server. I never used this but noticed it mentioned in manual EXAMPLE section:


EXAMPLES
       You can use unoconv in standalone mode, this means that in absence of an OpenOffice listener, it will starts its own:

       unoconv -f pdf some-document.odt
       One can use unoconv as a listener (by default localhost:2002) to let other unoconv instances connect to it:

       unoconv --listener &
       unoconv -f pdf some-document.odt
       unoconv -f doc other-document.odt
       unoconv -f jpg some-image.png
       unoconv -f xsl some-spreadsheet.csv
       kill -15 %-
       This also works on a remote host:

       unoconv --listener --server 1.2.3.4 --port 4567
       and then connect another system to convert documents:

       unoconv --server 1.2.3.4 --port 4567

unoconv does not recognize wildcards like ' * ' , so in order to convert multiple DOC to PDF files one has to use the usual shell loop:

for i in *.doc; do unoconv -fpdf $i; done

From all my tests, I think unoconv is preferred tool for Linux and BSD users (good time to mention unoconv is available on FreeBSD too. BSD users can install it via port  /usr/ports/textproc/unoconv)

Using GNU screen for opening multiple shells within a single shell / Handy way to keep constant SSH connections to servers from 1 single shell

Wednesday, October 31st, 2012

Handay way to keep ssh connections persistent after ssh logout / Using GNU screen for opening multiple shells within a shell

As GNU / Linux user I use screen window manager to manage multiple SSH connections (all over one ssh connection) to a host over the last maybe 10 years. Though screen is generally popular it is still possible some novice sysadmin did not use it or (hope not) never heard of it. For those who don't use GNU screen still, give it a try; launch it within a (system bash, csh etc.) shell and then inside the main screen window launch multiple screen internal sessions (by pressing simultaneously) keys CTRL + ALT + c .

Each CTRL + ALT + c makes screen open a new "Virtual Window (pty)"  inside itself, the multiple screen sub-instances are kept in memory of main screen program loaded in memory. In a way Virtual Windows of screen in logic are very Similar to Apache's Webserver Apache Parent and Child processes.

Anyways to test screen type in console:

pcfreak:~$ screen

And press enter twice, it will launch under screen a new instance of your current logged in shell (if you logged in bash will open bash if zsh – zsh etc.)

Afterwards, you can open multiple Virtual Screens as I've mentioned with pressing CTRL + ALT + c.
Moving between all open screen sessions is done with simultaneous press of:

CTRL + ALT + pTo move to previous screen Virtual Window Shell Session
CTRL + ALT + n
– To move to next screen Virtual Window Session

The most useful from all screen functionality is DETACH. You can detach (like save state of) curreng GNU Screen active sesion by  pressing together:

CTRL + a + d – Detach current active GNU Screen session

Screen supports detaching multiple sessions (whether 2 or more screen sessions run with identical user credentials).

An example use of multiple detached screen sessions would be if you login via SSH with a certain user lets say user myuser and later detach by pressing CTRL + a + d after which open new session, you will get in shell message similar to:

[detached from 1549.pts-11.pcfreak]

The msg indicates new screen session is detached. Onwards run screen once again, for sake of test typing in same shell once again:
 

pcfreal:~$ screen

After screen loads its second session press again CTRL + a + d – to detach second active session, again you will get msg:

[detached from 15691.pts-0.pcfreak]


Next on you can use screen to list all active window sessions by issuing:

pcfreak:~$ screen -list
There are screens on:
        1549.pts-11.pcfreak     (10/27/2012 09:45:58 PM)        (Detached)
        15691.pts-0.pcfreak     (10/24/2012 02:50:06 PM)        (Detached)
2 Sockets in /var/run/screen/S-hipo.
 

To attach to detached active GNU screen session, use:

 
pcfreak:~$ screen -r PID_OF_SESSION

For example to attach to 1 listed screen session 1549:

pcfreak:~$  screen -r 1549

To attach to second one 15691:

pcfreak:~$ screen -r 15691

The -r  switch stands for re-attach and second part of PID name like in above example pts-11.pcfreak pts-0.pcfreak is just indicating the hostname where screen was detached as well as the pty (pseudo tty number assigned to detached session), the time included shows the exact time in which main screen session was started for instance for screen 1549 it is 10/27/2012 09:45:58 PM.

The 2 Sockets in /var/run/screen/S-hipo displays the directory location of the screen socket, on each screen user startup a separte directory is created in /var/run/screen, the attach detach of screens is done via using a UNIX socket (fifo named pipe):

pcfreak :~$ ls
1549.pts-11.pcfreak|  15691.pts-0.pcfreak|  byobu.reload-required*
pcfreak:~$ cd /var/run/screenS-hipo
pcfreak:/var/run/screen/S-hipo$ file 1549.pts-11.pcfreak
1549.pts-11.pcfreak: fifo (named pipe)
 
The use case of screen are really up to your imagination, however for running programs which require you to have a permanent interactive terminal, like lets say: Midnight Commander (mc), iptraf, tcpdump, irssi (IRC chat client), ettercap, sniffit 🙂 screen is really *precious sysadmin tool
screen is great for PuTTY users who dislike that putty doesn't by default support tab-bed multple SSH logins (you might like to check my previous post where I explain about Putty Connection manager which supports tabbed ssh)
Actually, i'm so accustomed to SCREEN, that it is quite hard to imagine the times when it was not. I guess sysadmin life was much difficult back then 🙂

Many people who still remember irc clients like BitchX and epic and the IRC times should remember, how well known and frequent people used to detach those progs or even detach eggdrops with specific TCL scripts inside separate screen sessions.

The most useful use of screen of course is to open multiple SSH sessions to different server nodes and keep permanently logged in on hosts by detaching the screen session.

I can think of 3 main advantages of using ssh inside single screen session:

1. At any time you can login to just one server instead of (for exmpl. 10 servers), and use this one server as a reference through which you can "stuntly" check statuses of all 10 hosts with no need to login 10 times via SSH or with a Putty client (if logging from Windows)
 
 2. If you're using unstable often interrupted lets say modem (dial up) line to connect to the Internet and you need continuation of previously interrupted SSH ssh login due to interrupted connection

 3. You can save a lot of time and effort of typing passwords multiple times at ssh login prompts 
 

Of course there are disadvantages too;

From security point of view it is a weak practice to keep logged in to multiple servers via SSH from one single screen session. If someone sniffs user password with which screen is started and attach to the screen session he will suddenly be granted to access to 10 more servers! 
Anyhow for  lazy people who believe to maintain high security policies, e.g.:

 a. do not login to SSH sessions from Windows hosts
 b. use some kind of UNIX / Linux / BSD based OS
 c. login from a host used only by a single person
etc. etc. ,  keeping screen detached with multiple sshs might save you a lot of time; this is especially if you have to login 10 times to the servers a day changing location – lets say if you use (notebook and travel a lot).

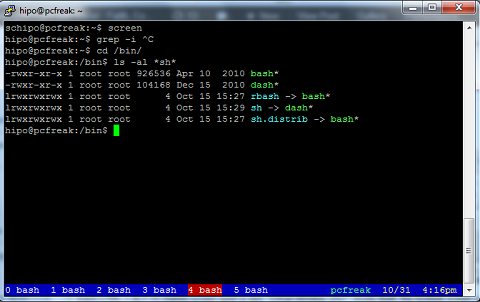
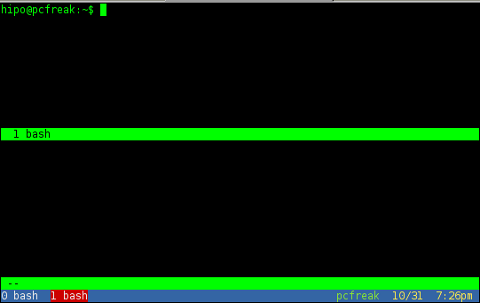
GNU screen also understands some commands, which can configure the Shell Prompt of it as long as color gamma of main and sub-screen (virtual) sessions. To have a screen shell prompt outline and blue color gamma as in the picture in beginning of my post you can download and use my .screenrc into your ~/.screenrc i.e.:

pcfreak:/~$ cd ~
pcfreak:/~$ wget -q https://www.pc-freak.net/files/.my-screenrc
pcfreak:/~:$ mv .my-screenrc .screenrc
 
Another good screenrc configured to make your screen sessions more user friendly is here.

Below I include a screenshot on how screen sessions looks like, whenever above "user friendly screenrc" is used:

Screen custom screenrc in gnome terminal Debian Squeeze Linux screenshot
 It might be helpful to mention, there are newer piece of soft with richer screen functionality one of those newer virtual window managers (alternative to GNU screen) is byobu. I've tested byobu myself and I feel
  
Sometimes, when a screen session is interrupted, because screen running host is restarted or shutdown, dead screen sockets remain.

pcfreak:~$ screen -list
25542.pts-28.pcfreak (Dead ???)

1636.pts-21.pcfreak (Attached)

In case you see some screens, like this you should use screen -wipe to cleanse socket pointing to already non-existing screen:

pcfreak:~$ screen -wipe

Screen has plenty of other command shortcuts, all of them are starting with a key combination of CTRL + a + )some kbd letter)

CTRL + a + aDoes switch between first and last screen open windows

CTRL + a + HTurns screen log on for active screen session

Ctrl + a + mTurns (on/off) screen monitoring for activity of a screen shell (useful if you left kernel, openoffice or some huge app to compile

CTRL +a + _Turns monitoring and reports outside of screen session if a running shell inside screen is not active for more than 30 seconds

CTRL +a + shift + SIs very handy as it splits the screen between all logged in active screen sessions (Use control CTRL + a + tab to switch between splitted windows)

how to GNU Screen split windows Linux gnome-terminal shot

Ctrl + a + x locks the screen, in the same fashion as Screen Lock is done inside a GUI environment GNOME, KDE etc. Once pressed it can be unlocked after you type in your user pass. This is very handy if you have to go to toilet and you don't want your colleague to snuff in your console 🙂
 

It is also possible to switch between screen sub-virtual windows using:

CTRL + a + (number starting from 0), e.g.:

CTRL + a + 0
CTRL + a + 1
CTRL + a + …
CTRL + a + 9

There are plenty of other helpful functionalities which you might want to look in the manual (man screen) – check in the manual section DEFAULT KEY BINDINGS section

P. S.  – Some of screen keybindings, does not work in gnome-terminal and konsole and other terminal clients which already had a key bindings set to CTRL + a + whatever key. If that's the case you can change screen assigned keybindings through .screenrc

If you google around you will find a dozen of tricks you can do with screen, since my only goal of this article

Playing Doom 2 on Nokia 9300i using C2Doom for S80

Wednesday, January 6th, 2010

c2doom logo

Few weeks ago, I was able to install and run properly
the wonderful oldschool game a favourite choice of every
computer geek there Doom 2 on my Nokia 9300i.
It took me a while until I was able to make the game work correctly
on this smartphone, well anyways.
Here is step by step explanation on how, I achieved in running the game
on the Nokia 9300i.


1. Download and install The c2doom file on your mobile
2. Download Doom 2′s original WAD file
3. Copy the file to your mobile via bluetooth and store it somewhere
on your memory card or the main drive (The Communicator).

This should be it, Doom2′s nokia program will automatically scan your mobile
phone drives and determine if doom’s wad is available and if it’s available
will automatically run the game with the found wad file.
I believe C2DOOM would support both Doom.wad
(to enable you play doom 1) and Doom2.wad to play (Doom 2).
I even tried C2Doom with the freedoom available WAD files,
unfortunately the game won’t run with them.
It hangs right after loading the wad file. So playing freedoom via C2DOOM
is impossible at the present moment. Let’s hope the future releases of the doomport for Nokia C2DOOM will support it as well.
Just to conclude the post, let me tell you that the game play and everything
is identical to the original PC DOOM 2 game. This is really awesome!
Even Doom 2′s cheats like:

1. idkfa – grants you all the weapons
2. iddqd – grants you immortality
work in the game
The original download page of the Doom game port for Symbian is located here
Check it out for even more stuff, the website provides you with other valuable
cool stuff, like for example the Doom Music Player which
is able to play you doom’s soundtrack 🙂 Pretty Cool man, pretty Cool! 🙂