Archive for September, 2022

How to extend LVM full partition to bigger size on Linux Virtual machine Guest running in VMware vSphere

Tuesday, September 20th, 2022

lvm-filesystem-extend-on-linux-virtual-machine-vmware-physical-group-volume-group-logical-volume-partitions-picture

Lets say you have to resize a partition that is wrongly made by some kind of automation like ansible or puppet,
because the Linux RHEL family OS template was prepared with a /home (or other partition with some very small size)  on VMware Vsphere Hypervisor hosting the Guest linux VM and the partition got quickly out of space.

To resolve the following question comes for the sysadmin

I. How to extend the LVM parititon that run out of space (without rebooting the VM Guest Linux Host)

II. how to add new disk partition space to the vSphere hypervisor OS. 

In below article i'll shortly describe that trivials steps to take to achieve that. Article won't show anything new original but I wrote it,
because I want it to have it logged for myself in case I need to LVM extend the space of my own Virtual machines and 
cause hopefully that might be of help to someone else from the Linux community that has to complete the same task.
 

I . Extending a LVM parititon that run out of space on a Linux Guest VM
 
1. Check the current parititon size that you want to extend

[root@linux-hostname home]# df -h /home/
 Filesystem            Size  Used Avail Use% Mounted on
 /dev/mapper/vg00-home
                       4.7G  4.5G     0 100% /home

2. Check the Virtualization platform

[root@vm-hostname ~]# lshw |head -3
linux-hostname
    description: Computer
    product: VMware Virtual Platform

3. Check the Operating System Linux OS type and version 

In this specific case this is a bit old Redhat -like CentOS 6.9 Linux
 

[root@vmware-host ~]# cat /etc/*release*
CentOS release 6.9 (Final)
cpe:/o:centos:linux:6:GA

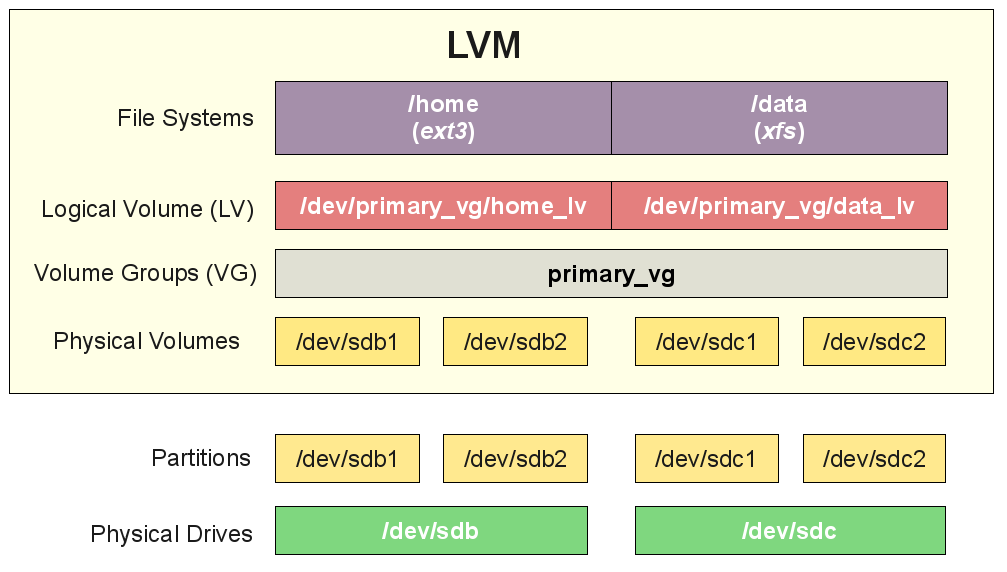
4. Find out the type of target filesystem is EXT3, EXT4 or XFS etc.?

[root@vm-hostname ~]# grep home /proc/mounts
/dev/mapper/vg00-home /home ext3 rw,relatime,errors=continue,user_xattr,acl,barrier=1,data=ordered 0 0


Filesystem is handled by LVM thus

5. Check the size of the LVM partition we want to exchange

[root@vm-hostname ~]# lvs |grep home
home vg00 -wi-ao—- 5.00g

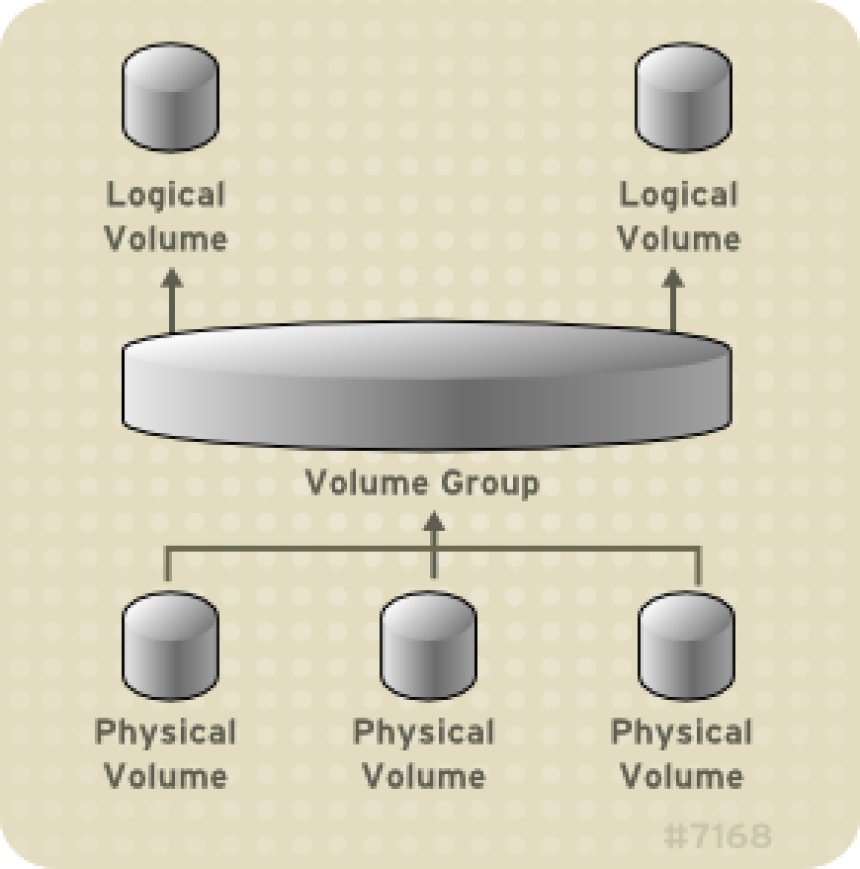
6. Check whether free space is available space in the volume group ?

[root@vm-hostname ~]# vgdisplay vg00
  — Volume group —
  VG Name               vg00
  System ID
  Format                lvm2
  Metadata Areas        2
  Metadata Sequence No  15
  VG Access             read/write
  VG Status             resizable
  MAX LV                0
  Cur LV                10
  Open LV               10
  Max PV                0
  Cur PV                2
  Act PV                2
  VG Size               128.99 GiB
  PE Size               4.00 MiB
  Total PE              33022
  Alloc PE / Size       30976 / 121.00 GiB
  Free  PE / Size       2046 / 7.99 GiB
  VG UUID               1F89PB-nIP2-7Hgu-zEVR-5H0R-7GdB-Lfj7t4


Extend VMWare space configured for additional hard disk on Hypervisor (if necessery)

In order for to extend the LVM of course you need to have a pre-existing additional hard-drive on VM (sdb,sdc etc. attached )

– If you need to extend on Vmware Vsphere Hypervisor:
Extend additional harddrive by entering the new size and Validate.

If you have previously extended the size of the Virtual Disk from VMWare to make the Linux guest vm find out about the change
you have to rerun rescan for the respective device that was grown on the HV.

7. Rescan on Linux VM host for changes in disk size from Hypervisor

Rescan disk for new size :

[root@vm-hostname ~]# echo 1> /sys/block/sdX/device/rescan

(where sdX is the extended additional harddrive)

8. Resize LVM physical volume

[root@vm-hostname ~]# pvresize /dev/sdX

9. Enlarge Logical Volume size 

[root@vm-hostname ~]# lvextend -L+5G /dev/mapper/vg00-home
     Extending logical volume LogVol00 to 10.77 GiB
     Logical volume LogVol00 successfully resized

10. Enlarge LVM hosted filesystem size

Filesystem is ext3 or ext4 :

[root@vm-hostname ~]# resize2fs /dev/mapper/vg00-home

– If the filesystem is not ext3 / ext4 but XFS you have to use xfs_growfs to let the FS know about the change.

Filesystem is XFS :
 

[root@vm-hostname ~]# xfs_growfs /dev/mapper/vg00-home

11. Check the additional filespace is already active on the Linux Guest VM

[root@vm-hostname ~]# df -h /home/
 Filesystem            Size  Used Avail Use% Mounted on
 /dev/mapper/vg_cloud-LogVol00
                        10G  4.2G  4.9G  48% /home


12. Verify  the extension of filesystem completed without errors


Check of system log:

[root@vm-hostname ~]# grep -i error /var/log/messages

Check if filesystem is writable.

[root@vm-hostname ~]# touch /home/test

[root@vm-hostname ~]# ls -al /home/test
-rw-r—– 1 root root 0 Sep 20 13:39 /home/test
[root@vm-hostname ~]# rm -f /home/test


II.  How to add additional sdb drive to a Linux host from vSPhere HV lets say (sdb)


1.  On VSphere GUI  interface

-> Select New hard drive and click Add

Enter the desired size for the new disk then unpack the disk parameters to choose Thin provision. Validate and Apply the recommendations.

basic-lvm-create-volume_group-diagram-on-linux-explained

2. On Linux system VM guest host to detect the new added sdb available space

Discover new disk :

[root@vm-hostname ~]# echo "- – -"> /sys/class/scsi_host/host2/scan && echo "- – -"> /sys/class/scsi_host/host1/scan && echo "- – -"> /sys/class/scsi_host/host0/scan

See  if discovered disk is found in /var/log/messages :

[…]
Nov 8 17:33:26 bict4004s kernel: scsi 2:0:2:0: Direct-Access VMware Virtual disk 1.0 PQ: 0 ANSI: 2
Nov 8 17:33:26 bict4004s kernel: scsi target2:0:2: Beginning Domain Validation
Nov 8 17:33:26 bict4004s kernel: scsi target2:0:2: Domain Validation skipping write tests
Nov 8 17:33:26 bict4004s kernel: scsi target2:0:2: Ending Domain Validation
Nov 8 17:33:26 bict4004s kernel: scsi target2:0:2: FAST-40 WIDE SCSI 80.0 MB/s ST (25 ns, offset 127)
Nov 8 17:33:26 bict4004s kernel: sd 2:0:2:0: Attached scsi generic sg3 type 0
Nov 8 17:33:26 bict4004s kernel: sd 2:0:2:0: [sdb] 2097152 512-byte logical blocks: (1.07 GB/1.00 GiB)
Nov 8 17:33:26 bict4004s kernel: sd 2:0:2:0: [sdb] Write Protect is off
Nov 8 17:33:26 bict4004s kernel: sd 2:0:2:0: [sdb] Cache data unavailable
Nov 8 17:33:26 bict4004s kernel: sd 2:0:2:0: [sdb] Assuming drive cache: write through
Nov 8 17:33:26 bict4004s kernel: sd 2:0:2:0: [sdb] Attached SCSI disk
[…]

3. Create new LVM Physical Volume

[root@vm-hostname ~]# pvcreate /dev/sdb

4. Enlarge LVM Volume Group to the max available size of /dev/sdb

[root@vm-hostname ~]# vgextend vg00 /dev/sdb

Enlarge LVM Logical Volume

[root@vm-hostname ~]# lvextend -L+10G /dev/mapper/vg00-home

5. Enlarge filesystem to max size of just created LVM

If Filesystem is ext3 or ext4 :

[root@vm-hostname ~]# resize2fs /dev/mapper/vg00-home


Again if we work with XFS additionally do:

[root@vm-hostname ~]# xfs_growfs /dev/mapper/vg00-home

6. Checking filesystem extension completed correct

 [root@vm-hostname ~]# df -h /home


7. Check filesystem is writtable and no errors produced in logs

Check of system log:

[root@vm-hostname ~]# grep -i error /var/log/messages


Check if filesystem is writable.

[root@vm-hostname ~]# touch /home/test

How to disable haproxy log for certain frontend / backend or stop haproxy logging completely

Wednesday, September 14th, 2022

haproxy-disable-logging-for-single-frontend-or-backend-or-stop-message-logging-completely-globally

In my previous article I've shortly explained on how it is possible to configure multiple haproxy instances to log in separate log files as well as how to configure a specific frontend to log inside a separate file. Sometimes it is simply unnecessery to keep any kind of log file for haproxy to spare disk space or even for anonymity of traffic. Hence in this tiny article will explain how to disable globally logging for haproxy and how logging for a certain frontend or backend could be stopped.

1. Disable globally logging of haproxy service
 

Disabling globally logging for haproxy in case if you don't need the log is being achieved by redirecting the log variable to /dev/null handler and to also mute the reoccurring alert, notice and info messages, that are produced in case of some extra ordinary events during start / stop of haproxy or during mising backends etc. you can send those messages to local0 and loca1 handlers which will be discarded later by rsyslogd configuration, for example thsi can be achieved with a configuration like:
 

global     log /dev/log    local0 info alert     log /dev/log    local1 notice alert  defaults log global mode http option httplog option dontlognull


<level>    is optional and can be specified to filter outgoing messages. By
           default, all messages are sent. If a level is specified, only
           messages with a severity at least as important as this level
           will be sent. An optional minimum level can be specified. If it
           is set, logs emitted with a more severe level than this one will
           be capped to this level. This is used to avoid sending "emerg"
           messages on all terminals on some default syslog configurations.
           Eight levels are known :
             emerg  alert  crit   err    warning notice info  debug


By using the log level you can also tell haproxy to omit from logging errors from log if for some reasons haproxy receives a lot of errors and this is flooding your logs, like this:

    backend Backend_Interface
  http-request set-log-level err
  no log


But sometimes you might need to disable it for a single frontend only and comes the question.


2. How to disable logging for a single frontend interface?

I thought that might be more complex but it was pretty easy with the option dontlog-normal haproxy.cfg variable:

Here is sample configuration with frontend and backend on how to instrucruct the haproxy frontend to disable all logging for the frontend
 

frontend ft_Frontend_Interface
#        log  127.0.0.1 local4 debug
        bind 10.44.192.142:12345
       
option dontlog-normal
        mode tcp
        option tcplog

              timeout client 350000
        log-format [%t]\ %ci:%cp\ %fi:%fp\ %b/%s:%sp\ %Tw/%Tc/%Tt\ %B\ %ts\ %ac/%fc/%bc/%sc/%rc\ %sq/%bq
        default_backend bk_WLP_echo_port_service

backend bk_Backend_Interface
                        timeout server 350000
                        timeout connect 35000
        server serverhost1 10.10.192.12:12345 weight 1 check port 12345
        server serverhost2 10.10.192.13:12345 weight 3 check port 12345


As you can see from those config, we have also enabled as a check port 12345 which is the application port service if something goes wrong with the application and 12345 is not anymore responding the respective server will get excluded automatically by haproxy and only one of machines will serve, the weight tells it which server will have the preference to serve the traffic the weight ratio will be 1 request will end up on one machine and 3 requests on the other machine.


3. How to disable single configured backend to not log anything but still have a log for the frontend
 

Omit the use of option dontlog normal from frontend inside the backend just set  no log:

backend bk_Backend_Interface
                       
 no log
                        timeout server 350000
                        timeout connect 35000
        server serverhost1 10.10.192.12:12345 weight 1 check port 12345
        server serverhost2 10.10.192.13:12345 weight 3 check port 12345

That's all reload haproxy service on the machine and backend will no longer log to your default configured log file via the respective local0 – local6 handler.

How to configure multiple haproxies and frontends to log in separate log files via rsyslog

Monday, September 5th, 2022

log-multiple-haproxy-servers-to-separate-files-log-haproxy-froentend-to-separate-file-haproxy-rsyslog-Logging-diagram
In my last article How to create multiple haproxy instance separate processes for different configuration listeners,  I've shortly explained how to create a multiple instances of haproxies by cloning the systemd default haproxy.service and the haproxy.cfg to haproxyX.cfg.
But what if you need also to configure a separate logging for both haproxy.service and haproxy-customname.service instances how this can be achieved?

The simplest way is to use some system local handler staring from local0 to local6, As local 1,2,3 are usually used by system services a good local handler to start off would be at least 4.
Lets say we already have the 2 running haproxies, e.g.:

[root@haproxy2:/usr/lib/systemd/system ]# ps -ef|grep -i hapro|grep -v grep
root      128464       1  0 Aug11 ?        00:01:19 /usr/sbin/haproxy -Ws -f /etc/haproxy/haproxy.cfg -p /run/haproxy.pid -S /run/haproxy-master.sock
haproxy   128466  128464  0 Aug11 ?        00:49:29 /usr/sbin/haproxy -Ws -f /etc/haproxy/haproxy.cfg -p /run/haproxy.pid -S /run/haproxy-master.sock

root      346637       1  0 13:15 ?        00:00:00 /usr/sbin/haproxy-customname-wrapper -Ws -f /etc/haproxy/haproxy_customname_prod.cfg -p /run/haproxy_customname_prod.pid -S /run/haproxy-customname-master.sock
haproxy   346639  346637  0 13:15 ?        00:00:00 /usr/sbin/haproxy-customname-wrapper -Ws -f /etc/haproxy/haproxy_customname_prod.cfg -p /run/haproxy_customname_prod.pid -S /run/haproxy-customname-master.sock


1. Configure local messaging handlers to work via /dev/log inside both haproxy instance config files
 

To congigure the separte logging we need to have in /etc/haproxy/haproxy.cfg and in /etc/haproxy/haproxy_customname_prod.cfg the respective handlers.

To log in separate files you should already configured in /etc/haproxy/haproxy.cfg something like:


global
        stats socket /var/run/haproxy/haproxy.sock mode 0600 level admin #Creates Unix-Like socket to fetch stats
        log /dev/log    local0
        log /dev/log    local1 notice

#       nbproc 1
#       nbthread 2
#       cpu-map auto:1/1-2 0-1
        nbproc          1
        nbthread 2
        cpu-map         1 0
        cpu-map         2 1
        chroot /var/lib/haproxy
        user haproxy
        group haproxy
        daemon
        maxconn 99999

defaults
        log     global
        mode    tcp


        timeout connect 5000
        timeout connect 30s
        timeout server 10s

    timeout queue 5s
    timeout tunnel 2m
    timeout client-fin 1s
    timeout server-fin 1s

    option forwardfor
        maxconn 3000
    retries                 15

frontend http-in
        mode tcp

        option tcplog
        log global


        option logasap
        option forwardfor
        bind 0.0.0.0:80

default_backend webservers_http
backend webservers_http
    fullconn 20000
        balance source
stick match src
    stick-table type ip size 200k expire 30m

        server server-1 192.168.1.50:80 check send-proxy weight 255 backup
        server server-2 192.168.1.54:80 check send-proxy weight 254
        server server-3 192.168.0.219:80 check send-proxy weight 252 backup
        server server-4 192.168.0.210:80 check send-proxy weight 253 backup
        server server-5 192.168.0.5:80 maxconn 3000 check send-proxy weight 251 backup

For the second /etc/haproxy/haproxy_customname_prod.cfg the logging configuration should be similar to:
 

global
        stats socket /var/run/haproxy/haproxycustname.sock mode 0600 level admin #Creates Unix-Like socket to fetch stats
        log /dev/log    local5
        log /dev/log    local5 notice

#       nbproc 1
#       nbthread 2
#       cpu-map auto:1/1-2 0-1
        nbproc          1
        nbthread 2
        cpu-map         1 0
        cpu-map         2 1
        chroot /var/lib/haproxy
        user haproxy
        group haproxy
        daemon
        maxconn 99999

defaults
        log     global
        mode    tcp


2. Configure separate haproxy Frontend logging via local5 inside haproxy.cfg
 

As a minimum you need a configuration for frontend like:


frontend http-in
        mode tcp

        option tcplog
        log /dev/log    local5 debug
…..
….

..
.

Of course the mode tcp in my case is conditional you might be using mode http etc. 


3. Optionally but (preferrably) make local5 / local6 handlers to work via rsyslogs UDP imudp protocol


In this example /dev/log is straightly read by haproxy instead of sending the messages first to rsyslog, this is a good thing in case if you have doubts that rsyslog might stop working and respectively you might end up with no logging, however if you prefer to use instead rsyslog which most of people usually do you will have instead for /etc/haproxy/haproxy.cfg to use config:

global
    log          127.0.0.1 local6 debug

defaults
        log     global
        mode    tcp

And for /etc/haproxy_customname_prod.cfg config like:

global
    log          127.0.0.1 local5 debug

defaults
        log     global
        mode    tcp

If you're about to send the haproxy logs directly via rsyslog, it should have enabled in /etc/rsyslog.conf the imudp module if you're not going to use directly /dev/log

# provides UDP syslog reception
module(load="imudp")
input(type="imudp" port="514")


4. Prepare first and second log file and custom frontend output file and set right permissions
 

Assumably you already have /var/log/haproxy.log and this will be the initial haproxy log if you don't want to change it, normally it is installed on haproxy package install time on Linux and should have some permissions like following:

root@haproxy2:/etc/rsyslog.d# ls -al /var/log/haproxy.log
-rw-r–r– 1 haproxy haproxy 6681522  1 сеп 16:05 /var/log/haproxy.log


To create the second config with exact permissions like haproxy.log run:

root@haproxy2:/etc/rsyslog.d# touch /var/log/haproxy_customname.log
root@haproxy2:/etc/rsyslog.d# chown haproxy:haproxy /var/log/haproxy_customname.log

Create the haproxy_custom_frontend.log file that will only log output of exact frontend or match string from the logs
 

root@haproxy2:/etc/rsyslog.d# touch  /var/log/haproxy_custom_frontend.log
root@haproxy2:/etc/rsyslog.d# chown haproxy:haproxy  /var/log/haproxy_custom_frontend.log


5. Create the rsyslog config for haproxy.service to log via local6 to /var/log/haproxy.log
 

root@haproxy2:/etc/rsyslog.d# cat 49-haproxy.conf
# Create an additional socket in haproxy's chroot in order to allow logging via
# /dev/log to chroot'ed HAProxy processes
$AddUnixListenSocket /var/lib/haproxy/dev/log

# Send HAProxy messages to a dedicated logfile
:programname, startswith, "haproxy" {
  /var/log/haproxy.log
  stop
}


Above configs will make anything returned with string haproxy (e.g. proccess /usr/sbin/haproxy) to /dev/log to be written inside /var/log/haproxy.log and trigger a stop (by the way the the stop command works exactly as the tilda '~' discard one, except in some newer versions of haproxy the ~ is no now obsolete and you need to use stop instead (bear in mind that ~ even though obsolete proved to be working for me whether stop not ! but come on this is no strange this is linux mess), for example if you run latest debian Linux 11 as of September 2022 haproxy with package 2.2.9-2+deb11u3.
 

6. Create configuration for rsyslog to log from single Frontend outputting local2 to /var/log/haproxy_customname.log
 

root@haproxy2:/etc/rsyslog.d# cat 48-haproxy.conf
# Create an additional socket in haproxy's chroot in order to allow logging via
# /dev/log to chroot'ed HAProxy processes
$AddUnixListenSocket /var/lib/haproxy/dev/log

# Send HAProxy messages to a dedicated logfile
#:programname, startswith, "haproxy" {
#  /var/log/haproxy.log
#  stop
#}
# GGE/DPA 2022/08/02: HAProxy logs to local2, save the messages
local5.*                                                /var/log/haproxy_customname.log


You might also explicitly define the binary that will providing the logs inside the 48-haproxy.conf as we have a separate /usr/sbin/haproxy-customname-wrapper in that way you can log the output from the haproxy instance only based
on its binary command and you can omit writting to local5 to log via it something else 🙂

root@haproxy2:/etc/rsyslog.d# cat 48-haproxy.conf
# Create an additional socket in haproxy's chroot in order to allow logging via
# /dev/log to chroot'ed HAProxy processes
$AddUnixListenSocket /var/lib/haproxy/dev/log

# Send HAProxy messages to a dedicated logfile
#:programname, startswith, "haproxy" {
#  /var/log/haproxy.log
#  stop
#}
# GGE/DPA 2022/08/02: HAProxy logs to local2, save the messages

:programname, startswith, "haproxy-customname-wrapper " {
 
/var/log/haproxy_customname.log
  stop
}


7. Create the log file to log the custom frontend of your preference e.g. /var/log/haproxy_custom_frontend.log under local5 /prepare rsyslog config for
 

root@haproxy2:/etc/rsyslog.d# cat 47-haproxy-custom-frontend.conf
$ModLoad imudp
$UDPServerAddress 127.0.0.1
$UDPServerRun 514
#2022/02/02: HAProxy logs to local6, save the messages
local4.*                                                /var/log/haproxy_custom_frontend.log
:msg, contains, "https-in" ~

The 'https-in' is my frontend inside /etc/haproxy/haproxy.cfg it returns the name of it every time in /var/log/haproxy.log therefore I will log the frontend to local5 and to prevent double logging inside /var/log/haproxy.log of connections incoming towards the same frontend inside /var/log/haproxy.log, I have the tilda symbol '~' which instructs rsyslog to discard any message coming to rsyslog with "https-in" string in, immediately after the same frontend as configured inside /etc/haproxy/haproxy.cfg will output the frontend operations inside local5.


!!! Note that for rsyslog it is very important to have the right order of configurations, the configuration order is being considered based on the file numbering. !!!
 

Hence notice that my filter file number 47_* preceeds the other 2 configured rsyslog configs.
 

root@haproxy2:/etc/rsyslog.d# ls -1
47-haproxy-custom-frontend.conf
48-haproxy.conf
49-haproxy.conf

This will make 47-haproxy-custom-frontend.conf to be read and processed first 48-haproxy.conf processed second and 49-haproxy.conf processed third.


8. Reload rsyslog and haproxy and test


root@haproxy2: ~# systemctl restart rsyslog
root@haproxy2: ~# systemctl restart haproxy
root@haproxy2: ~# systemctl status rsyslog

● rsyslog.service – System Logging Service
     Loaded: loaded (/lib/systemd/system/rsyslog.service; enabled; vendor preset: enabled)
     Active: active (running) since Thu 2022-09-01 17:34:51 EEST; 1s ago
TriggeredBy: ● syslog.socket
       Docs: man:rsyslogd(8)
             man:rsyslog.conf(5)
             https://www.rsyslog.com/doc/
   Main PID: 372726 (rsyslogd)
      Tasks: 6 (limit: 4654)
     Memory: 980.0K
        CPU: 8ms
     CGroup: /system.slice/rsyslog.service
             └─372726 /usr/sbin/rsyslogd -n -iNONE

сеп 01 17:34:51 haproxy2 systemd[1]: Stopped System Logging Service.
сеп 01 17:34:51 haproxy2 rsyslogd[372726]: warning: ~ action is deprecated, consider using the 'stop' statement instead [v8.210>
сеп 01 17:34:51 haproxy2 systemd[1]: Starting System Logging Service…
сеп 01 17:34:51 haproxy2 rsyslogd[372726]: [198B blob data]
сеп 01 17:34:51 haproxy2 systemd[1]: Started System Logging Service.
сеп 01 17:34:51 haproxy2 rsyslogd[372726]: [198B blob data]
сеп 01 17:34:51 haproxy2 rsyslogd[372726]: imuxsock: Acquired UNIX socket '/run/systemd/journal/syslog' (fd 3) from systemd.  [>
сеп 01 17:34:51 haproxy2 rsyslogd[372726]: [origin software="rsyslogd" swVersion="8.2102.0" x-pid="372726" x-info="https://www.

Do some testing with some tool like curl / wget / lynx / elinks etc. on each of the configured haproxy listeners and frontends and check whether everything ends up in the correct log files.
That's all folks enjoy ! 🙂