Posts Tagged ‘cause’

Install Zabbix Proxy configure and connect to Zabbix server on CentOS Linux

Thursday, May 4th, 2023

Install Zabbix Proxy configure and connect to Zabbix server on CentOS Linux

1. Why use Zabbix-Proxy hidden advantages of using Zabbix-Proxy ?
 

Proxy can be used for many purposes and can provide many hidden benefits, just to name few of them:

  • Offload Zabbix Server when monitoring thousands of devices
  • Monitor remote locations
  • Monitor locations having unreliable communications
  • Simplify maintenance of distributed monitoring
  • Improved Security (Zabbix server can be restricted to be connectable only by the set of connected Zabbix Proxy / Proxies
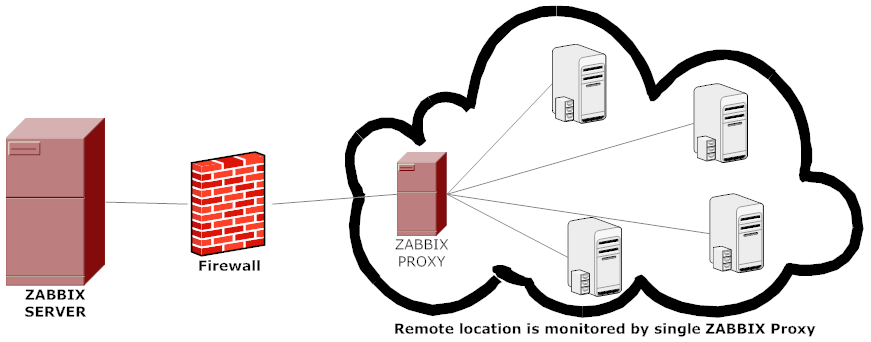

advantages-of-using-zabbix-proxy-instead-of-direct-connect-monitored-hosts-to-zabbix-server-diagram


A Zabbix proxy is the ideal solution if you have numerous hosts with multiple slow items that are affecting the performance of the server simply because processes are spending most of the time simply waiting for a response. A proxy can collect information from all hosts using its internal processes and then send raw historical data to the server. The time needed to connect and receive the host response will be on the proxy site, and the server performance will not be affected at all. A proxy just sends raw values to the server, and the server itself does not have to connect to the host to get the data.
 

2. Install zabbix-proxy-sqlite3 rpm package from Zabbix Official Repositories download page

Zabbix repository provides choice of 3 packages named as follows:

zabbix-proxy-mysql
zabbix-proxy-pgsql
zabbix-proxy-sqlite3

where the last value of the name (after zabbix-proxy) represents database type of the package — MySQL, PostgreSQL and SQLite respectively.

To not bother installing MySQL / PostgreSQL separate database servers, a lightweight choice is to use the sqlite3 db version. 
As I prefer zabbix-proxy data to be stored inside a flat database, thus I choose to use zabbix-proxy-sqlite3.

[root@sysadminshelp:/root ]# yum info zabbix-proxy-sqlite3-5.0.31-1.el7.x86_64
Заредени плъгини: fastestmirror
Loading mirror speeds from cached hostfile
 * base: mirrors.netix.net
 * epel: fedora.ipacct.com
 * extras: mirrors.netix.net
 * remi: remi.mirror.karneval.cz
 * remi-php74: remi.mirror.karneval.cz
 * remi-safe: remi.mirror.karneval.cz
 * updates: mirrors.netix.net
Инсталирани пакети
Име         : zabbix-proxy-sqlite3
Архитект.   : x86_64
Версия      : 5.0.31
Издание     : 1.el7
Обем        : 4.4 M
Хранилище   : installed
Обобщение   : Zabbix proxy for SQLite3 database
URL         : http://www.zabbix.com/
Лиценз      : GPLv2+
Описание    : Zabbix proxy with SQLite3 database support.

My experience to try to install thethe default CentOS RPM package for zabbix-proxy-sqlite3 provided by default
RPM package that came with CentOS did not work as expected and trying to install / configure and use it via

[root@sysadminshelp:/root ]# yum install zabbix-proxy-sqlite3.x86_64 -y

[root@sysadminshelp:/root ]# vi /etc/zabbix/zabbix_proxy.conf


Led me to a nasty errors seen in /var/log/zabbixsrv/zabbix_proxy.log like:

May 1st 2023, 08:42:45.020 zabbix_server cannot set list of PSK ciphersuites: file ssl_lib.c line 1314: error:1410D0B9:SSL routines:SSL_CTX_set_cipher_list:no cipher match
May 1st 2023, 08:42:45.018 zabbix_server cannot set list of PSK ciphersuites: file ssl_lib.c line 1314: error:1410D0B9:SSL routines:SSL_CTX_set_cipher_list:no cipher match
May 1st 2023, 08:42:45.013 zabbix_server cannot set list of PSK ciphersuites: file ssl_lib.c line 1314: error:1410D0B9:SSL routines:SSL_CTX_set_cipher_list:no cipher match
May 1st 2023, 08:42:45.011 zabbix_server cannot set list of PSK ciphersuites: file ssl_lib.c line 1314: error:1410D0B9:SSL routines:SSL_CTX_set_cipher_list:no cipher match


After some googling and reading some threads came upon this one https://support.zabbix.com/browse/ZBXNEXT-3604, there is exmplaed errors preventing the configured zabbix-proxy
to start are caused by the zabbix-proxy-sqlite3 package provided by Redhat (due to openssl incompitability bug or something ).

As one of people in the discussion pointed out the quickest workaround suggested is simply to use the official Zabbix Repository packages for zabbix-proxy-sqlite3, in order to not waste anymore time on this
trivial stuff to install it, simply run:

[root@sysadminshelp:/root ]# rpm -Uvh \
https://repo.zabbix.com/zabbix/5.0/rhel/7/x86_64/zabbix-proxy-sqlite3-5.0.31-1.el7.x86_64.rpm

Alternative way if you seem to not have the machine connected to the internet is simply download the package with wget / lynx / curl / w3m from another machine 
that can reach the Internet upload the package via the local LAN or VPN and install it:

# wget https://repo.zabbix.com/zabbix/5.0/rhel/7/x86_64/zabbix-proxy-sqlite3-5.0.31-1.el7.x86_64.rpm

[root@sysadminshelp:/root ]# rpm -ivh zabbix-proxy-sqlite3-5.0.31-1.el7.x86_64.rpm

NOTE ! Before you install proxy, keep in mind that your proxy version must match the Zabbix server version !

3. Generate a PSK random secret key and set proper permissions for zabbix-proxy directories


[root@sysadminshelp:/root ]# cd /etc/zabbix/
    
[root@sysadminshelp:/root ]# openssl rand -hex 32 >> /etc/zabbix/zabbix_proxy.psk     
[root@sysadminshelp:/root ]# chown root:zabbix zabbix_proxy.psk [root@sysadminshelp:/root ]# vi /etc/zabbix/zabbix_proxy.conf [root@sysadminshelp:/root ]# mkdir -p /var/lib/zabbix-proxy/sqlite3db
[root@sysadminshelp:/root ]# chown -R zabbix:zabbix /var/lib/zabbix-proxy
[root@sysadminshelp:/var/lib/zabbixsrv/sqlite3db]# sqlite3 zabbix_proxy
SQLite version 3.7.17 2013-05-20 00:56:22
Enter ".help" for instructions
Enter SQL statements terminated with a ";"
sqlite> .databases
seq  name             file
—  —————  ———————————————————-
0    main             /var/lib/zabbixsrv/sqlite3db/zabbix_proxy
sqlite>
[root@sysadminshelp:/root ]# vi /etc/zabbix_proxy.conf
#DBName=zabbix_proxy
DBName=/var/lib/zabbixsrv/sqlite3db/zabbix_proxy

4. Configure zabbix proxy to be able to connect to Zabbix Server

[root@sysadminshelp:/root ]#  vi /etc/zabbix/zabbix_proxy.conf     ############ GENERAL PARAMETERS #################
    ProxyMode=0
    Server=192.168.1.28
    ServerPort=10051
    Hostname=zabbix-proxy
    ListenPort=10051
    SourceIP=10.168.1.55
    LogFile=/var/log/zabbix/zabbix_proxy.log
    LogFileSize=1
    DebugLevel=2
    PidFile=/var/run/zabbix/zabbix_proxy.pid
    DBName=/var/lib/zabbix-proxy/sqlite3db/zabbix_proxy.db
    DBUser=zabbix
    
    ######### PROXY SPECIFIC PARAMETERS #############
    ProxyOfflineBuffer=24
    HeartbeatFrequency=60
    ConfigFrequency=120
    
    ############ ADVANCED PARAMETERS ################
    StartPollersUnreachable=3
    StartHTTPPollers=3
    JavaGateway=127.0.0.1
    JavaGatewayPort=10052
    StartJavaPollers=5
    SNMPTrapperFile=/var/log/snmptrap/snmptrap.log
    StartSNMPTrapper=1
    CacheSize=32M
    Timeout=4
    ExternalScripts=/usr/lib/zabbix/externalscripts
    LogSlowQueries=3000
    
    ####### TLS-RELATED PARAMETERS #######
    TLSConnect=psk
    TLSAccept=psk
    TLSPSKIdentity=PSK zabbix-proxy-fqdn-hostname
    TLSPSKFile=/etc/zabbix/zabbix_proxy.psk

5. Check and make sure the installed zabbix proxy as well as the zabbix_proxy server zabbix_agentd client and zabbix_server are at the same major version release

a) Check zabbix proxy version

[root@sysadminshelp:/etc/zabbix]# zabbix_proxy -V
zabbix_proxy (Zabbix) 5.0.31
Revision f64a07aefca 30 January 2023, compilation time: Jan 30 2023 09:55:10

Copyright (C) 2023 Zabbix SIA
License GPLv2+: GNU GPL version 2 or later <https://www.gnu.org/licenses/>.
This is free software: you are free to change and redistribute it according to
the license. There is NO WARRANTY, to the extent permitted by law.

This product includes software developed by the OpenSSL Project
for use in the OpenSSL Toolkit (http://www.openssl.org/).

Compiled with OpenSSL 1.0.1e-fips 11 Feb 2013
Running with OpenSSL 1.0.1e-fips 11 Feb 2013

[root@sysadminshelp:/etc/zabbix]#

b) check zabbix_agentd version

[root@sysadminshelp:/etc/zabbix]# zabbix_agentd -V
zabbix_agentd (daemon) (Zabbix) 5.0.30
Revision 2c96c38fb4b 28 November 2022, compilation time: Nov 28 2022 11:27:43

Copyright (C) 2022 Zabbix SIA
License GPLv2+: GNU GPL version 2 or later <https://www.gnu.org/licenses/>.
This is free software: you are free to change and redistribute it according to
the license. There is NO WARRANTY, to the extent permitted by law.

This product includes software developed by the OpenSSL Project
for use in the OpenSSL Toolkit (http://www.openssl.org/).

Compiled with OpenSSL 1.0.1e-fips 11 Feb 2013
Running with OpenSSL 1.0.1e-fips 11 Feb 2013

c) Check zabbix server version

[root@zabbix:~]# zabbix_server -V
zabbix_server (Zabbix) 5.0.30
Revision 2c96c38fb4b 28 November 2022, compilation time: Nov 28 2022 09:19:03

Copyright (C) 2022 Zabbix SIA
License GPLv2+: GNU GPL version 2 or later <https://www.gnu.org/licenses/>.
This is free software: you are free to change and redistribute it according to
the license. There is NO WARRANTY, to the extent permitted by law.

This product includes software developed by the OpenSSL Project
for use in the OpenSSL Toolkit (http://www.openssl.org/).

Compiled with OpenSSL 1.1.1d  10 Sep 2019
Running with OpenSSL 1.1.1n  15 Mar 2022

6. Starting the zabbix-proxy for a first time

Before beginning with installation make sure selinux is disabled, as it might cause some issues with Zabbix

[root@sysadminshelp:/etc/zabbix]# sestatus
SELinux status:                 disabled

If you need to have the selinux enabled you will have to allow the zabbix-proxy into selinux as well:

cd /tmp
# grep zabbix_proxy /var/log/audit/audit.log | grep denied | audit2allow -m zabbix_proxy > zabbix_proxy.te
grep zabbix_proxy /var/log/audit/audit.log | grep denied | audit2allow -M zabbix_proxy
semodule -i zabbix_proxy.pp


[root@sysadminshelp:/etc/zabbix]# systemctl start zabbix-proxy

Also lets enable zabbix-proxy to automatically start it on next server reboot / boot.

root@sysadminshelp:/etc/zabbix]# systemctl enable zabbix-proxy

Normally running zabbix-proxy should provide a status messages like:

[root@sysadminshelp:/etc/zabbix]# systemctl status zabbix-proxy
● zabbix-proxy.service – Zabbix Proxy
   Loaded: loaded (/usr/lib/systemd/system/zabbix-proxy.service; disabled; vendor preset: disabled)
   Active: active (running) since чт 2023-05-04 14:58:36 CEST; 2h 59min ago
  Process: 8500 ExecStop=/bin/kill -SIGTERM $MAINPID (code=exited, status=0/SUCCESS)
  Process: 8504 ExecStart=/usr/sbin/zabbix_proxy -c $CONFFILE (code=exited, status=0/SUCCESS)
 Main PID: 8506 (zabbix_proxy)
   CGroup: /system.slice/zabbix-proxy.service
           ├─8506 /usr/sbin/zabbix_proxy -c /etc/zabbix/zabbix_proxy.conf
           ├─8507 /usr/sbin/zabbix_proxy: configuration syncer [synced config 40521 bytes in 0.0…
           ├─8508 /usr/sbin/zabbix_proxy: trapper #1 [processed data in 0.000808 sec, waiting fo…
           ├─8509 /usr/sbin/zabbix_proxy: trapper #2 [processed data in 0.005028 sec, waiting fo…
           ├─8510 /usr/sbin/zabbix_proxy: trapper #3 [processed data in 0.001240 sec, waiting fo…
           ├─8511 /usr/sbin/zabbix_proxy: trapper #4 [processed data in 0.004378 sec, waiting fo…
           ├─8512 /usr/sbin/zabbix_proxy: trapper #5 [processed data in 0.004991 sec, waiting fo…
           ├─8513 /usr/sbin/zabbix_proxy: preprocessing manager #1 [queued 0, processed 3 values…
           ├─8514 /usr/sbin/zabbix_proxy: preprocessing worker #1 started
           ├─8515 /usr/sbin/zabbix_proxy: preprocessing worker #2 started
           ├─8516 /usr/sbin/zabbix_proxy: preprocessing worker #3 started
           ├─8517 /usr/sbin/zabbix_proxy: heartbeat sender [sending heartbeat message success in…
           ├─8518 /usr/sbin/zabbix_proxy: data sender [sent 0 values in 0.005241 sec, idle 1 sec…
           ├─8519 /usr/sbin/zabbix_proxy: housekeeper [deleted 4501 records in 0.011462 sec, idl…
           ├─8520 /usr/sbin/zabbix_proxy: http poller #1 [got 0 values in 0.000248 sec, idle 5 s…
           ├─8521 /usr/sbin/zabbix_proxy: http poller #2 [got 0 values in 0.000239 sec, idle 5 s…
           ├─8522 /usr/sbin/zabbix_proxy: http poller #3 [got 0 values in 0.000328 sec, idle 5 s…
           ├─8523 /usr/sbin/zabbix_proxy: discoverer #1 [processed 0 rules in 0.000261 sec, idle…
           ├─8524 /usr/sbin/zabbix_proxy: history syncer #1 [processed 0 values in 0.000009 sec,…
           ├─8525 /usr/sbin/zabbix_proxy: history syncer #2 [processed 0 values in 0.000007 sec,…
           ├─8526 /usr/sbin/zabbix_proxy: history syncer #3 [processed 0 values in 0.000014 sec,…
           ├─8527 /usr/sbin/zabbix_proxy: history syncer #4 [processed 0 values in 0.000021 sec,…
           ├─8528 /usr/sbin/zabbix_proxy: java poller #1 [got 0 values in 0.000017 sec, idle 5 s…
           ├─8529 /usr/sbin/zabbix_proxy: java poller #2 [got 0 values in 0.000019 sec, idle 5 s…
           ├─8530 /usr/sbin/zabbix_proxy: java poller #3 [got 0 values in 0.000019 sec, idle 5 s…
           ├─8531 /usr/sbin/zabbix_proxy: java poller #4 [got 0 values in 0.000018 sec, idle 5 s…
           ├─8532 /usr/sbin/zabbix_proxy: java poller #5 [got 0 values in 0.000013 sec, idle 5 s…
           ├─8533 /usr/sbin/zabbix_proxy: snmp trapper [processed data in 0.000026 sec, idle 1 s…
           ├─8534 /usr/sbin/zabbix_proxy: self-monitoring [processed data in 0.000034 sec, idle …
           ├─8535 /usr/sbin/zabbix_proxy: task manager [processed 0 task(s) in 0.000169 sec, idl…
           ├─8536 /usr/sbin/zabbix_proxy: poller #1 [got 0 values in 0.000012 sec, idle 5 sec]
           ├─8537 /usr/sbin/zabbix_proxy: poller #2 [got 0 values in 0.000021 sec, idle 5 sec]
           ├─8538 /usr/sbin/zabbix_proxy: poller #3 [got 0 values in 0.000039 sec, idle 5 sec]
           ├─8539 /usr/sbin/zabbix_proxy: poller #4 [got 0 values in 0.000024 sec, idle 5 sec]
           ├─8540 /usr/sbin/zabbix_proxy: poller #5 [got 0 values in 0.000019 sec, idle 5 sec]
           ├─8541 /usr/sbin/zabbix_proxy: unreachable poller #1 [got 0 values in 0.000011 sec, i…
           ├─8542 /usr/sbin/zabbix_proxy: unreachable poller #2 [got 0 values in 0.000018 sec, i…
           ├─8543 /usr/sbin/zabbix_proxy: unreachable poller #3 [got 0 values in 0.000041 sec, i…
           └─8544 /usr/sbin/zabbix_proxy: icmp pinger #1 [got 0 values in 0.000022 sec, idle 5 s…

май 04 14:58:36 sysadminshelp systemd[1]: Stopped Zabbix Proxy.
май 04 14:58:36 sysadminshelp systemd[1]: Starting Zabbix Proxy…
май 04 14:58:36 sysadminshelp systemd[1]: Started Zabbix Proxy.
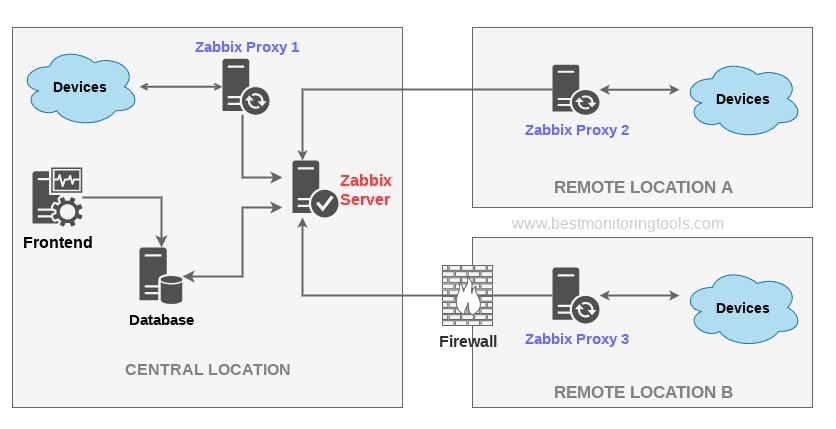
zabbix-server-zabbix-proxy-and-zabbix-clients-overview-diagram

7. Configure zabbix-agentd to use your just new brand new zabbix-proxy

Here is my sample configuration file:

[root@sysadminshelp:/etc/zabbix]# grep -v \# /etc/zabbix/zabbix_agentd.conf | sed '/^$/d'
PidFile=/var/run/zabbix/zabbix_agentd.pid
LogFile=/var/log/zabbix/zabbix_agentd.log
LogFileSize=0
Server=zabbix-proxy
ServerActive=zabbix-proxy:10051
ListenIP
Hostname=sysadminshelp
BufferSend=30
BufferSize=100
Include=/etc/zabbix/zabbix_agentd.d/*.conf


Note that the ServerActive given "zabbix-proxy" should be resolvable from the host, or even better you might want to put the IP of the Proxy if
you don't have at least a pseudo Hostname already configured inside /etc/hosts or actual DNS 'A' Active record configured inside a properly resolving
DNS server configured on the host via /etc/resolv.conf.


8. Create and Configure new proxy into the Zabbix-server host
 

Go to the zabbix server web interface URL into menus:
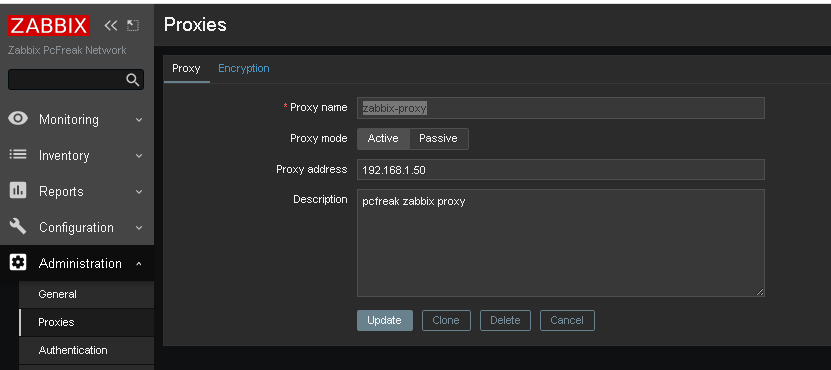
zabbix-administration-proxy-config
 

Administration -> Proxies (Proxy) 


Click on ;

Create Proxy button (uppper right corner)

*Proxy name: usually-your-host-pingable-fqdn
Proxy mode: Active
Proxy address: 192.168.1.50
Description: pcfreak zabbix proxy


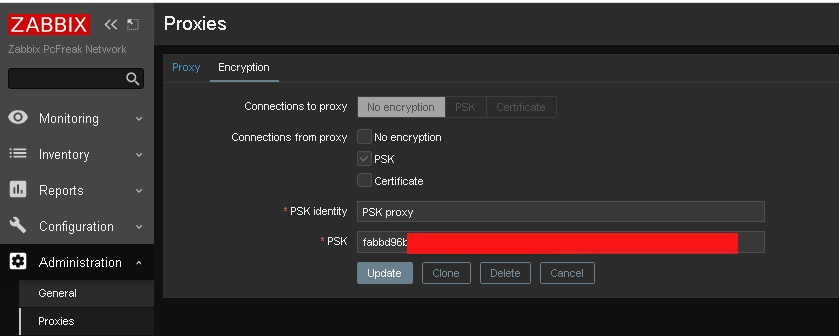
Administration -> Proxies -> Encryption


From "Connection to proxy"

Untick "No encryption"

and

Tick "PSK"

zabbix-administration-proxy-config-encryption

*PSK Identity: PSK proxy
*PSK: Put the key here (copy from /etc/zabbix/zabbix_proxy.psk generated steps earlier with openssl)

[root@sysadminshelp:/etc/zabbix]# cat zabbix_proxy.psk
faddbd96be00ac42c892fda5201634df25d51f3ndbbbf6cee9d354b2817092a28

Press the "Update" Button

zabbix-administration-proxy-config-encryption1

and go again to Proxies and check the zabbix-proxy is connected to the server and hosts configured to use the zabbix proxy reporting frequently.

To make sure that the configured new hosts to use the Zabbix Proxy instead of direct connection to Zabbix Server, go to Latest Data and check whether the configured Hostnames to connect to the Zabbix-Proxy continues to sent Data still.

9. Debugging problems with zabix-proxy and zabbix-agentd connectivity to proxy

In case of troubles check out what is going on inside the Zabbix Proxy / Agent and Server log files
 

[root@sysadminshelp:/etc/zabbix]# tail -n 50 /var/log/zabbix/zabbix_proxy.log

 6832:20230504:134032.281 Starting Zabbix Proxy (active) [zabbix-proxy]. Zabbix 5.0.31 (revision f
64a07aefca).
  6832:20230504:134032.281 **** Enabled features ****
  6832:20230504:134032.281 SNMP monitoring:       YES
  6832:20230504:134032.281 IPMI monitoring:       YES
  6832:20230504:134032.281 Web monitoring:        YES
  6832:20230504:134032.281 VMware monitoring:     YES
  6832:20230504:134032.281 ODBC:                  YES
  6832:20230504:134032.281 SSH support:           YES
  6832:20230504:134032.281 IPv6 support:          YES
  6832:20230504:134032.281 TLS support:           YES
  6832:20230504:134032.281 **************************
  6832:20230504:134032.281 using configuration file: /etc/zabbix/zabbix_proxy.conf
  6832:20230504:134032.291 current database version (mandatory/optional): 05000000/05000005
  6832:20230504:134032.291 required mandatory version: 05000000
  6832:20230504:134032.292 proxy #0 started [main process]
  6833:20230504:134032.292 proxy #1 started [configuration syncer #1]
  6833:20230504:134032.329 received configuration data from server at "192.168.1.28", datalen 40521
  6834:20230504:134032.392 proxy #2 started [trapper #1]
  6835:20230504:134032.401 proxy #3 started [trapper #2]
  6836:20230504:134032.402 proxy #4 started [trapper #3]
  6838:20230504:134032.405 proxy #6 started [trapper #5]
  6837:20230504:134032.409 proxy #5 started [trapper #4]
  6843:20230504:134032.409 proxy #11 started [heartbeat sender #1]
  6845:20230504:134032.412 proxy #13 started [housekeeper #1]
  6847:20230504:134032.412 proxy #15 started [discoverer #1]
  8526:20230504:145836.512 proxy #20 started [history syncer #3]
  8517:20230504:145836.512 proxy #11 started [heartbeat sender #1]
  8530:20230504:145836.515 proxy #24 started [java poller #3]
  8531:20230504:145836.517 proxy #25 started [java poller #4]
  8532:20230504:145836.520 proxy #26 started [java poller #5]
  8536:20230504:145836.522 proxy #30 started [poller #1]
  8527:20230504:145836.525 proxy #21 started [history syncer #4]
  8535:20230504:145836.525 proxy #29 started [task manager #1]
  8533:20230504:145836.528 proxy #27 started [snmp trapper #1]
  8539:20230504:145836.528 proxy #33 started [poller #4]
  8538:20230504:145836.529 proxy #32 started [poller #3]
  8534:20230504:145836.532 proxy #28 started [self-monitoring #1]
  8544:20230504:145836.532 proxy #38 started [icmp pinger #1]
  8543:20230504:145836.532 proxy #37 started [unreachable poller #3]
  8542:20230504:145836.535 proxy #36 started [unreachable poller #2]
  8541:20230504:145836.537 proxy #35 started [unreachable poller #1]
  8540:20230504:145836.540 proxy #34 started [poller #5]
  8507:20230504:150036.453 received configuration data from server at "192.168.1.28", datalen 40521
  8507:20230504:150236.503 received configuration data from server at "192.168.1.28", datalen 40521
  8507:20230504:150436.556 received configuration data from server at "192.168.1.28", datalen 40521
  8507:20230504:150636.608 received configuration data from server at "192.168.1.28", datalen 40521
  8507:20230504:150836.662 received configuration data from server at "192.168.1.28", datalen 40521


[root@sysadminshelp:/etc/zabbix]# tail -n 10  /var/log/zabbix-agent/zabbix_agentd.log
3096166:20230504:182840.461 agent #1 started [collector]
3096167:20230504:182840.462 agent #2 started [listener #1]
3096168:20230504:182840.463 agent #3 started [listener #2]
3096169:20230504:182840.464 agent #4 started [listener #3]
3096170:20230504:182840.464 agent #5 started [active checks #1]

If necessery to Debug further and track some strange errors, you might want to increase the DebugLevel to lets say DebugLevel=5

5 – extended debugging (produces even more information)

If checking both zabbix_agentd.log and zabbix_proxy.log cannot give you enough of a hint on what might be the issues you face with your userparameter scripts or missing Monitored data etc. and hopefully you have access to the zabbix-server machine, check out the zabbix server log as well

[root@zabbix:~]# tail -n 100 /var/log/zabbix/zabbix_server.log

3145027:20230504:182641.556 sending configuration data to proxy "zabbix-proxy" at "192.168.1.50", datalen 40521, bytes 6120 with compression ratio 6.6
3145029:20230504:182716.529 cannot send list of active checks to "192.168.1.30": host [pcfrxenweb] not found
3145028:20230504:182731.959 cannot send list of active checks to "192.168.1.30": host [pcfrxenweb] not found
3145029:20230504:182756.634 cannot send list of active checks to "192.168.1.30": host [pcfrxenweb] not found

Wrapping it up

In this article, we have learned how to install and configure a zabbix-proxy server and prepare a PSK encryption secret key for it.
We learned also  how to connect this server to the central zabbix monitoring host machine in Active mode, so both Zabbix proxy and server can communicate in a secure crypted form,
as well as how to set zabbix_agentd clients to connect to the zabbix proxy
which will from itself send its data to the Central Zabbix server host as well as how to Debug and hopefully solve issues with communication between Zabbix client -> Zabbix Proxy -> Zabbix server.

I know this article, does not say anything revolutionary and there is plenty of posts online talking about how to run yourself a zabbix proxy and make in your home or corporate network,
but I thought to write it down as by writting it and reading a bit more on the topic of Zabbix Server / Proxy / Agent, that give myself a better overview on how this technologies work and such an article will give myself an easier step by step guide to follow,
in future when I have to configure Zabbix Environments for personal hobby or professionally for customers.
Hope you enjoyed. Cheers ! 🙂

Improve MobaXterm Best Windows terminal client with some additional settings tune ups / Install extra Linux Cygwin tools on MobaXterm and various post install configuration goodies

Friday, January 20th, 2023

mobaxterm-logo_400x400-terminal-client-tune-up-howto-for-a-new-install

Earlier I've written a an article MobaXTerm: A good gnome-terminal like tabbed SSH client for Windows / Windows Putty Tabs Alternative in which I've introduced the best in my opinion SSH / Telnet / VNC / RDP / Xserver in one Terminal client emulator for Windows operating systems.

The client has been around for quite some time and it has been improving rapidly over the last 10 years, where it now more looks like a separate Operating System than a single terminal client. It's size is quite compact as well and my opinion and every self respectiving developer, system administrator, IT geek or a hacker would definitely
use the mobaxterm at home or at work place on a daily. I guess some of my readers, who have already migrated SuperPutty / SecureCRT or Putty / XMing or whatever kind of exotic Remote SSH Console terminal is used could validate this 🙂

Therefore as I've set up Mobaxterm on a multiple computers all around, I've found it useful to write a small article with some post-install hints (tune ups) one can do immediately once he has installed the Desktop or Portable Apps version of mobaxterm on desktop PC / notebook.
 

1. Set up your bashrc server / command aliases

Lets say you need to setup some rules for connectivity via a socks proxy to dig holes over a harsh company firewalls or add
custom options to every ssh client attempt to remote server, or simply alias some of your servers with custom connectivity options
and so on simply open vi / vim text editor from mobaxterm local terminal and place inside your rules, for example that could be anything like:


alias ssh='ssh -o stricthostkeychecking=no -o passwordauthentication=yes -o PreferredAuthentications=password  -v'
alias sftp='sftp -o stricthostkeychecking=no -o passwordauthentication=yes -o PreferredAuthentications=password'

alias work-server='ssh UserName@work-server -v -o passwordauthentication=yes -o PreferredAuthentications=password'

alias proxy='ssh -D 3128 UserName@proxyIP-host1 -o ConnectTimeout=80'
alias proxy1='ssh -D 3128 UserName@proxy-host2 -p 443 -o ConnectTimeout=60'
alias proxy3='ssh -D 3128 Username@proxy-host3 -p 443 -o ConnectTimeout=60'

Simply open the terminal and setup whatever you require
export ftp_proxy="http://proxy-host:8080"
export https_proxy="https://proxy-host:8080"
export http_proxy="http://proxy-host:8080"
export HTTP_PROXY="http://proxy-host:8080"
export HTTPS_PROXY="http://proxy-host:8080"


2. Set mobaxterm presistent directory / persistent root directory and default text editor

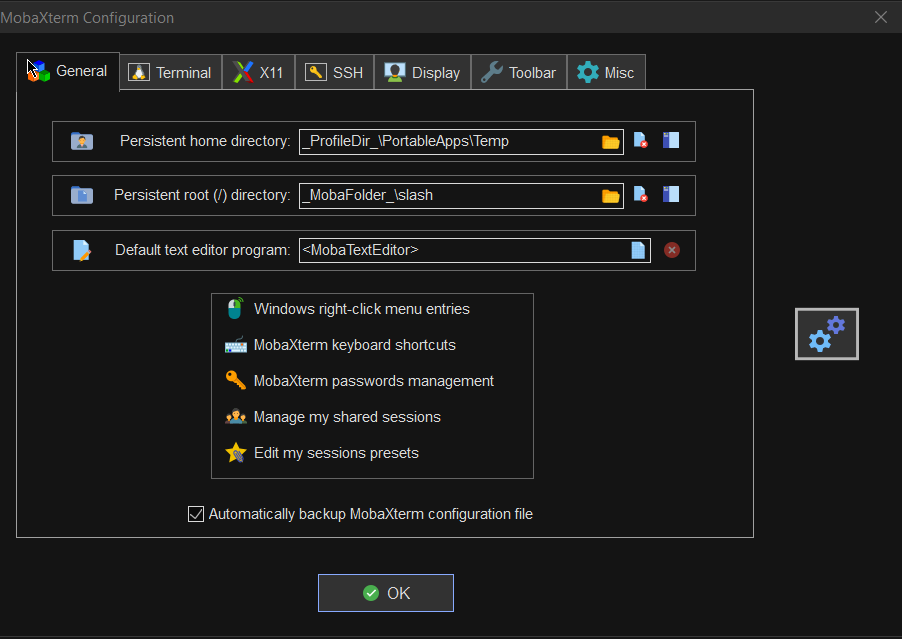
Make sure you have properly defined at least Persistent directory / Persistent directory if you want to keep the files under your /home/mobaxterm and root directory be able to save your data from local mobaxterm terminal work you have done.

To do so o to Configuration -> General

MobaXterm-persistent-home-directory
 

3. Change default settings for Opening / Closing Terminal tabs just like in gnome-terminal

MobaXterm is really awesome as the developer, followed pretty much the logic of some common GNU / Linux Terminal clients like Gnome-Terminal and KDE's default Konsole terminal.

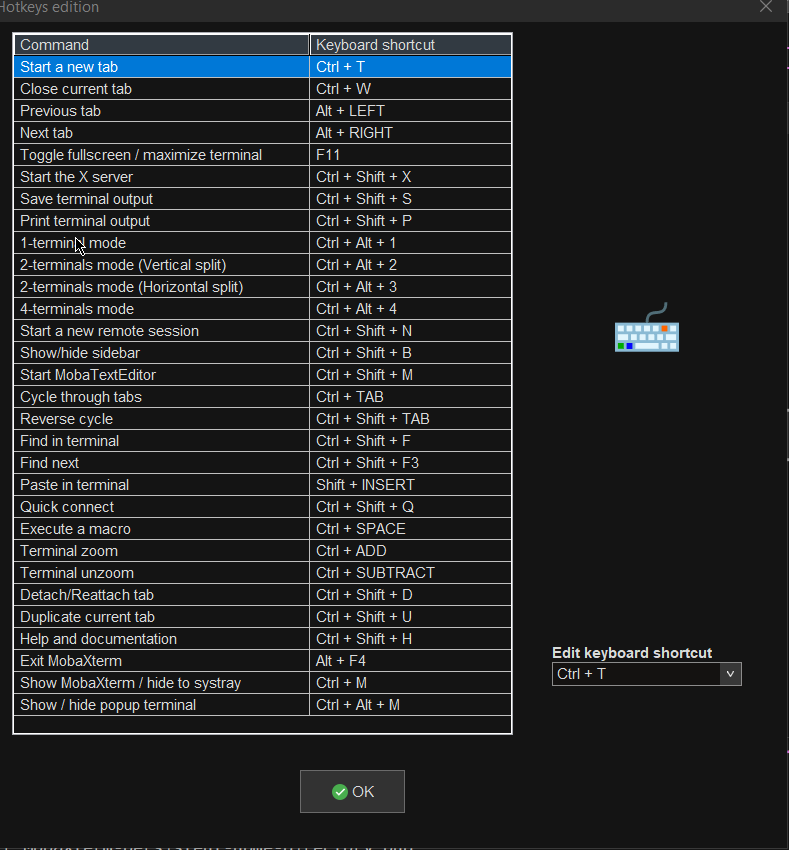
One of the first things to do once Mobaxterm is installed on the PC is to set up nice key binds as default onces might be heard to learn at the beginning or you might have already the habit to use the certain set of key combinations on your Linux desktop:

Common once are:

1. Open tab / Close tab common once I bind to are (CTRL + T / CTRL + W)
2. Previous tab move / Next tab move keys common one I use are (ALT + LEFT / ALT + RIGHT)
3. Find in terminal (CTRL + F)

rebind-mobaxterm-standard-keys
 

4. Make MobaXterm to automatically open a terminal to not Start local terminal every time

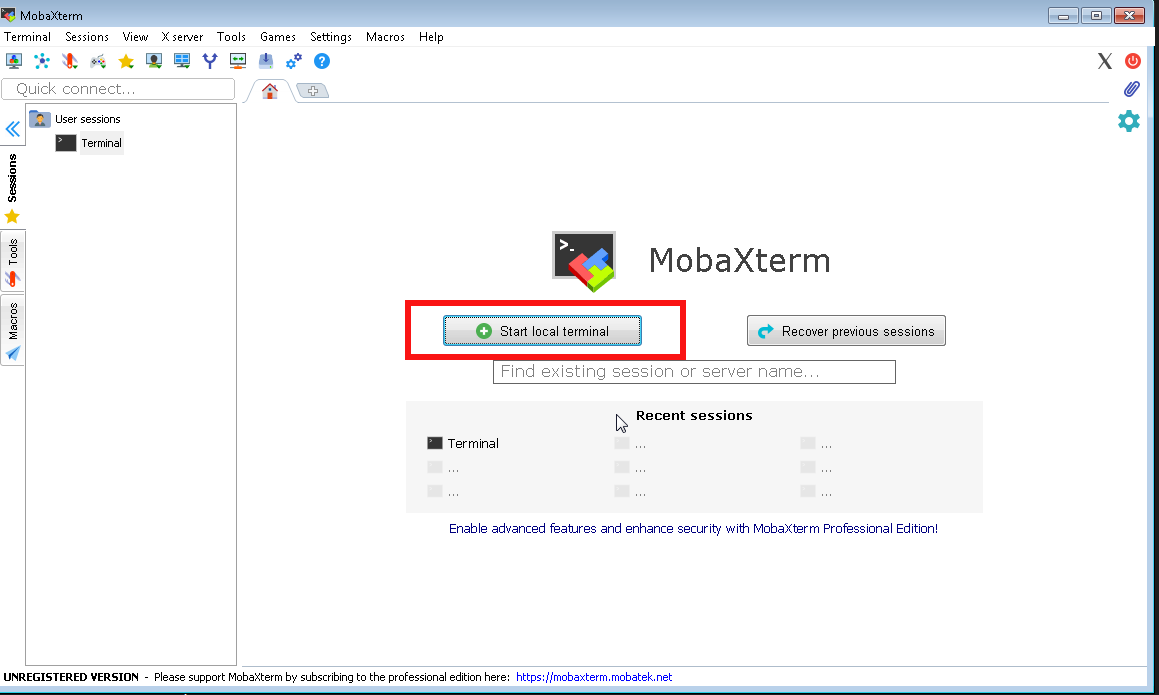
By default mobaxterm it is really annoying cause every time you run it after system reboot you have to select
Start local terminal
Once you run the terminal you get this prompt and you have to press on Start local terminal

mobaxterm-start-local-terminal


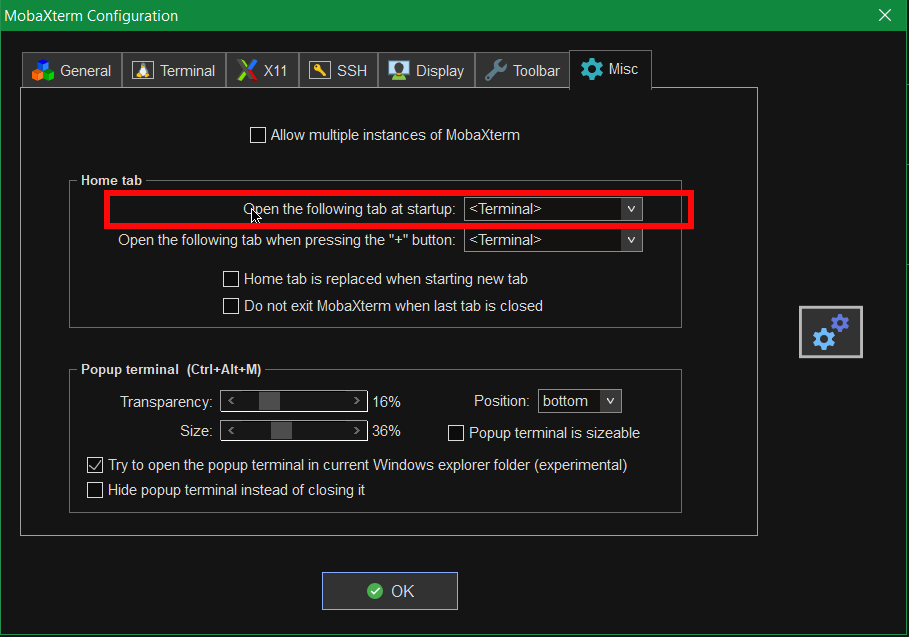
How to make Mobaxterm automatically open local Terminal Tab on every boot?
 

To fix this so every time a local terminal is spawn on MobaXterm you have get to:
 

Settings -> Configuration -> Misc


Open the Following tab at startup by default it will be

<Home (Pinned)>

Change it to:

<Terminal>

mobaxterm-open-the-followintab-tab-in-startup

That's it on next login your Local Terminal with /bin/bash.exe will auto load !
 

[hipo.WINDOWS-PC] ➤ env|grep -i SHELL
SHELL=/bin/bash.exe
PATH=/bin:/drives/c/Users/hipo/DOCUME~1
/MobaXterm/slash/bin:/drives/c/Windows:/drives/c/Windows/system32:/drives/c/Windows/system32:/drives/c/Windows:/drives/c/Windows/System32/Wbem:
/drives/c/Windows/System32/WindowsPowerShell/v1.0:/drives/c/Windows/sysnative
PSModulePath=C:\Windows\system32\WindowsPowerShell\v1.0\Modules\
CMDPATH=C:\Windows\system32;C:\Windows;C:\Windows\System32\Wbem;
C:\Windows\System32\WindowsPowerShell\v1.0\;C:\Windows\sysnative\;
C:\Users\hipo\DOCUME~1\MobaXterm\slash\bin
WINPATH=C:\Windows\system32;C:\Windows;C:\Windows\System32\Wbem;C:\Windows\System32\WindowsPowerShell\v1.0\;C:\Windows\sysnative\


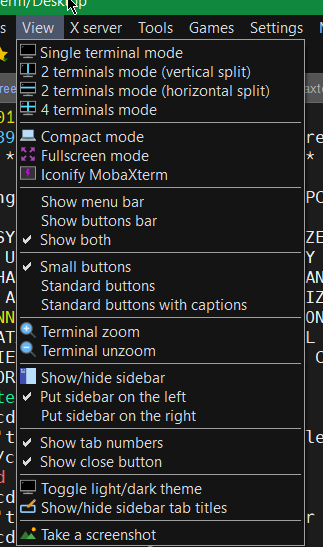
5. Make menu buttons to appear smaller


Go to menu and select
View -> (Small Buttons)

mobaxterm-select-small-buttons-screenshot

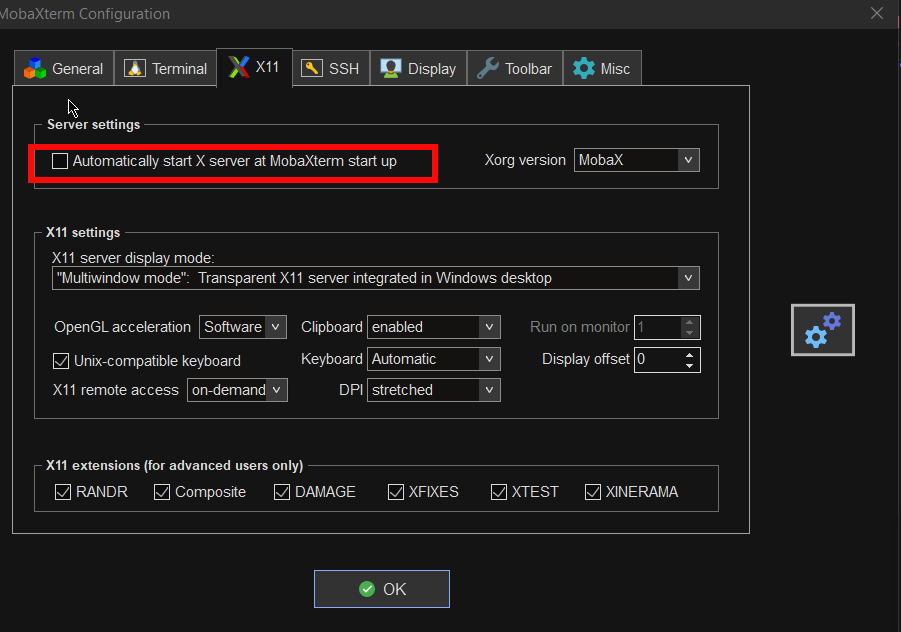
6. Disable auto start of XServer to prevent a port listener on the machine on TCP port

By default mobaxterm opens XServer listener, so you can immediately connect from a remote SSH servers missing Xserver and install software requiring an XServer, for example software such as Oracle Database or some MiddleWare WebLogig or IBM's Web Sphere. This is useful but if you want to have a good security only allow this server on a purpose. Otherwise the XServer will run in parallel with rest of your Moba and just load up your PC and eat up some RAM memory. To disable it go to:

mobaxterm-x11-automatically-start-X-server-disable-stop-at-startup

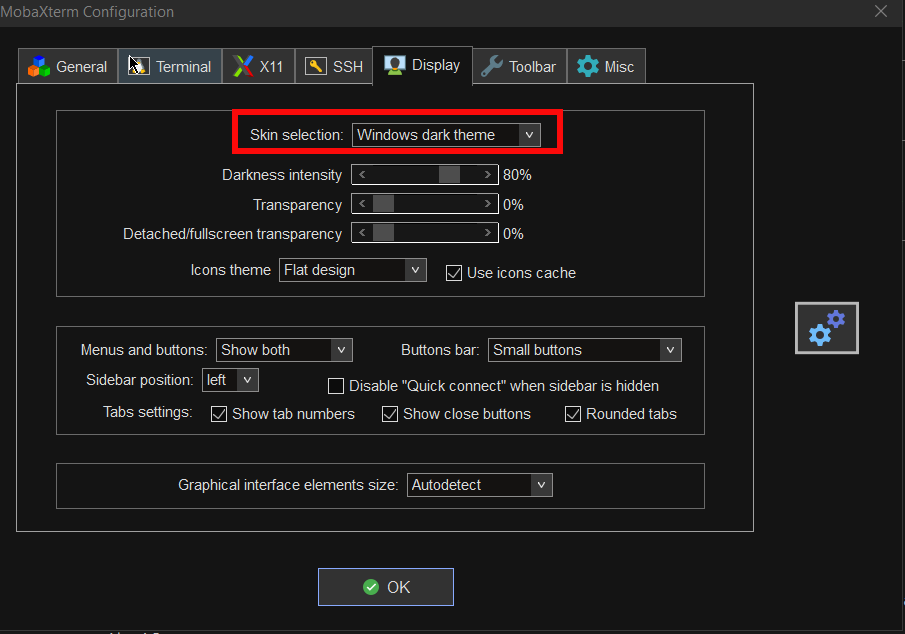
7. Change the mobaxterm Default theme to Dark

This is optional I like to set the Theme to Dark, also as a Theme for Windows as well as for MobaxTerm, the aim of that is simply to not put extra stress on my eye sight. Being on the PC around 8 to 10 hours and spending some 6 to 8 hours on console work is enough. If you want to do as well.

mobaxterm-change-default-theme-to-dark-theme

8. Install additional set of common Linux tools to mobaxterm to use on Windows
 

Tools such as:

1. Midnight Commander (mc)
2. Wget
3. Curl
4. Vim
5. Screen
6. Rsync
7. Perl
8. W3m
9. dosunix
10. unix2dos
11. gnupg
12. diffutils
13. mysql
14. mpg123
15. whois


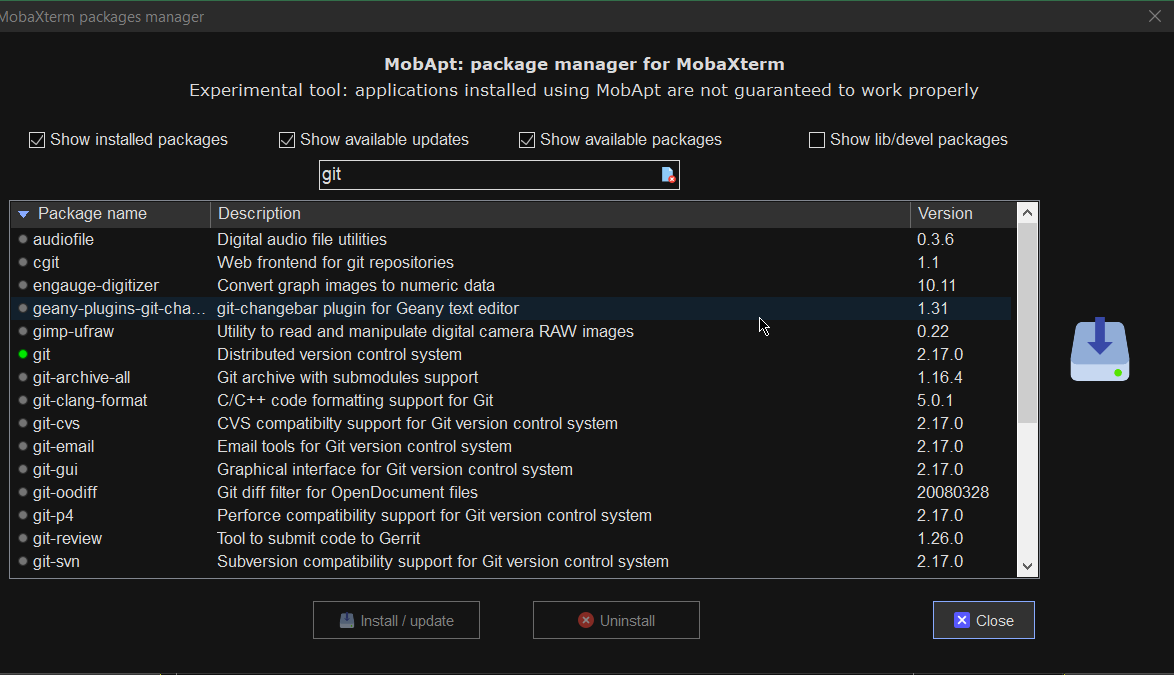
If you want to have a set of packages pre-installed that are including above as well as the rest of mine, here is a dump of my installed mobapt manager packages:

For more simply use the experimental Mobaxterm  Graphical Package installer
 

[hipo.WINDOWS-PC] ➤  for i in $(cat Downloads/installed-packages-mobaxterm.txt ); do apt-cyg install $i; done
 

Found package GeoIP-database

Installing GeoIP-database
Downloading GeoIP-database-20180505-1.tar.xz…
Unpacking GeoIP-database-20180505-1.tar.xz…


Running postinstall scripts
Package GeoIP-database installed.

Rebasing new libraries

Found package adwaita-icon-theme

Installing adwaita-icon-theme
Downloading adwaita-icon-theme-3.26.1-1.tar.xz…


You will be prompted for a single Yes for the respository

MobApt Packages Manager

mobapt-pkg-manager-install-git-from-gui-mobaxterm-package-installer

Though it is said it is experimental, I have to say the MobApt Apt Manager works quite good, I never had any issues with it so far.

9. Mobaxterm.ini the settings storage file that can help you move your configurations

If you have to prepeare new MobaXterm on multiple PCs frequently perhaps it is best to just copy the Mobaxterm.ini file. 
Here is an example of my mobaxterm.ini for download.
 

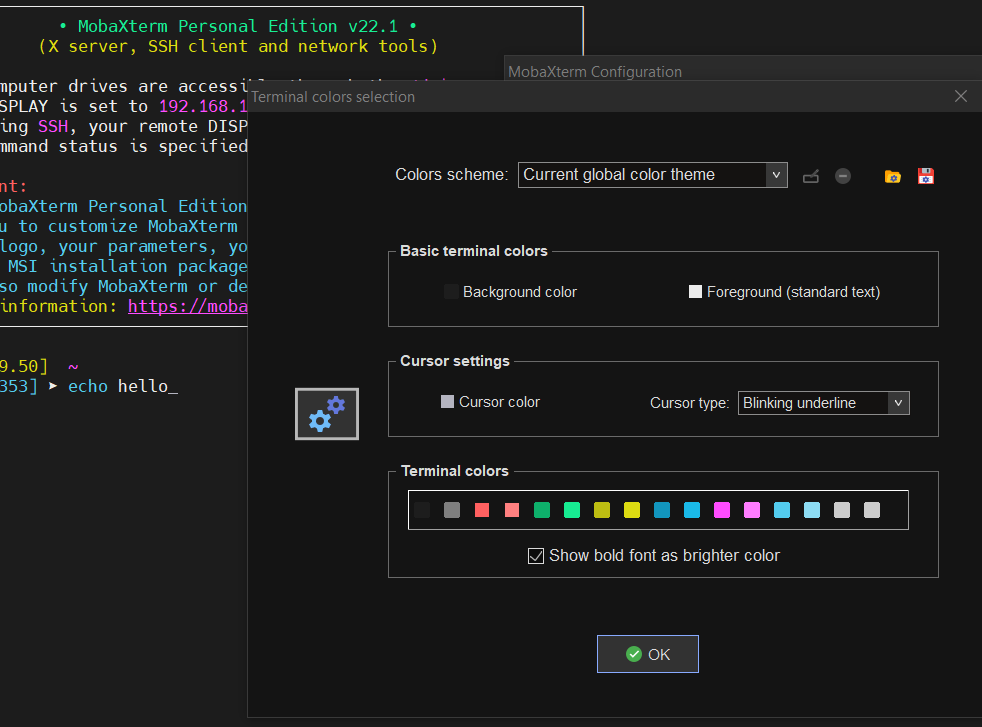
10. Change terminal colors and curor type and enable blinking (customizations)


Settings -> Configuration -> Terminal -> (Default Terminal Color Settings)


mobaxterm-change-terminal-colors-and-blinking-cursor-setting-screenshot

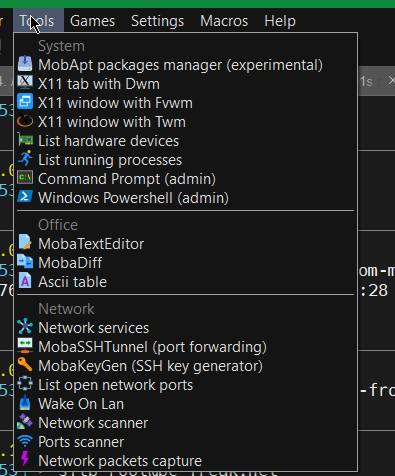
11. Use very useful moba Tools
 

mobaxterm-terminal-great-useful-tools-screenshot
For sysadmins Moba has plenty of other jems such as:

  • Network Port scanner such as Nmap with GUI

  • list open network ports (GUI interface to netmap)

  • SSH tunnel tool

  • Moba Diff

  • Wake on Lan

  • Network Packet capturer (such as tcpdump)

  • List running processes (such as taskmgr in simple form)

  • List machine hardware devices (such as Windows Device manager)

 
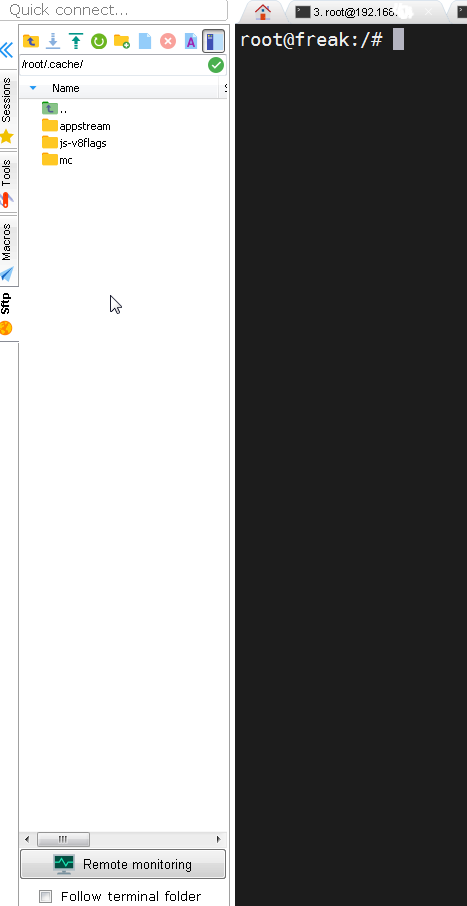
12. Remote monitoring of opened ssh session


To enable remote monitoring for a Saved session simply use the "Remote monitoring" button on the down left corner of the terminal.

mobaxterm-remote-monitoring-of-remote-ssh-server-screenshot-button

Or to enable it for a new host, open:

1. "Saved sessions"
2. Click over "User sessions"
3. New Session -> (SSH)
4. Basic SSH Settings (Remote host) -> OK
5. Click over the new created session
6. Click on Remote monitoring for the opened session

remote-monitoring-from-mobaxterm-screenshot

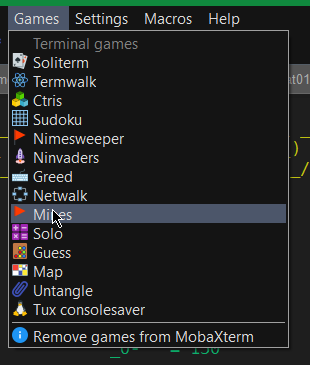
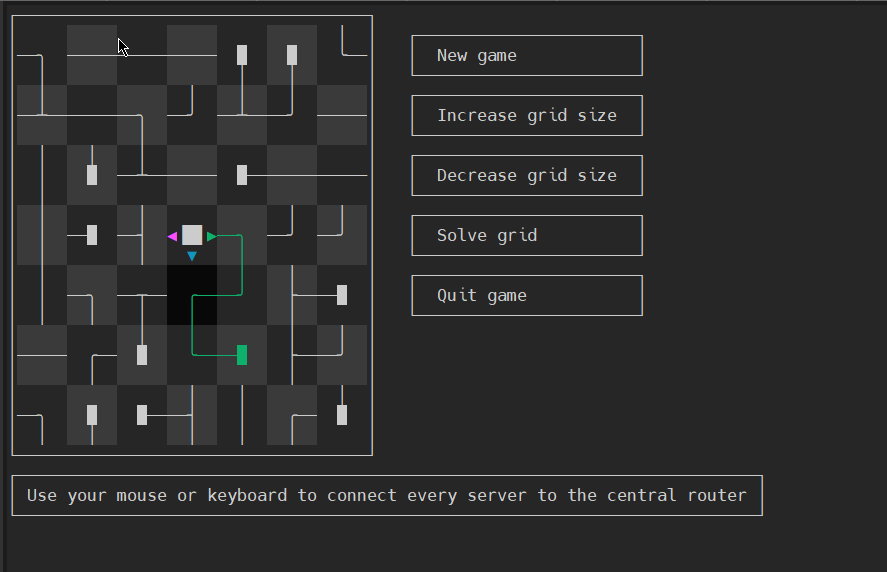
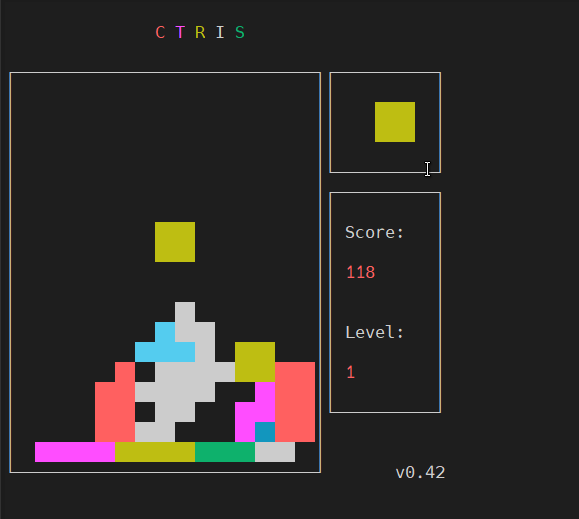
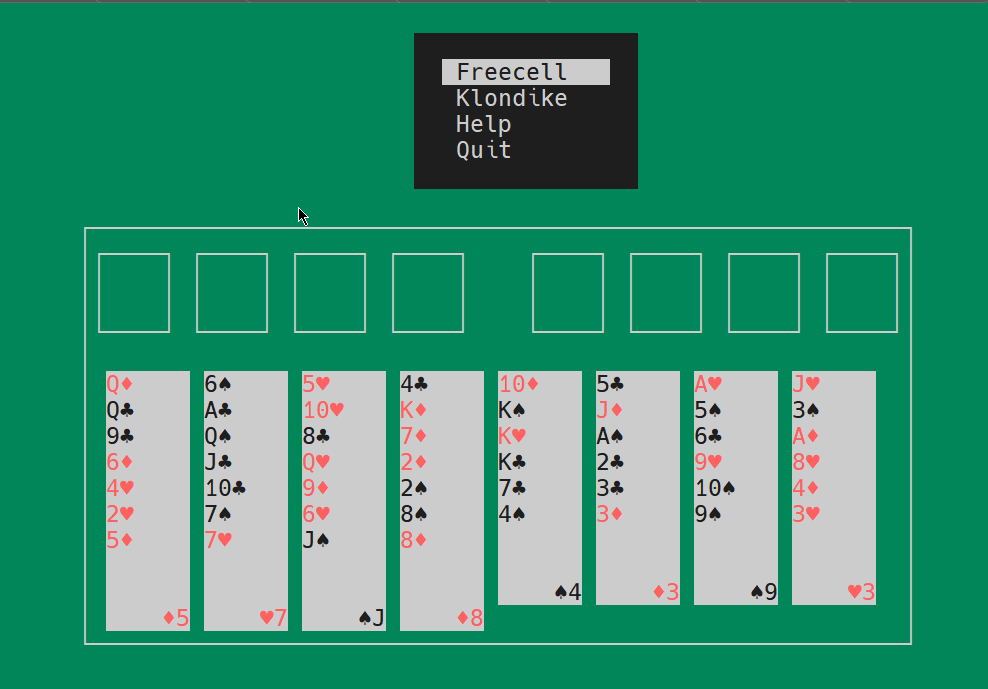
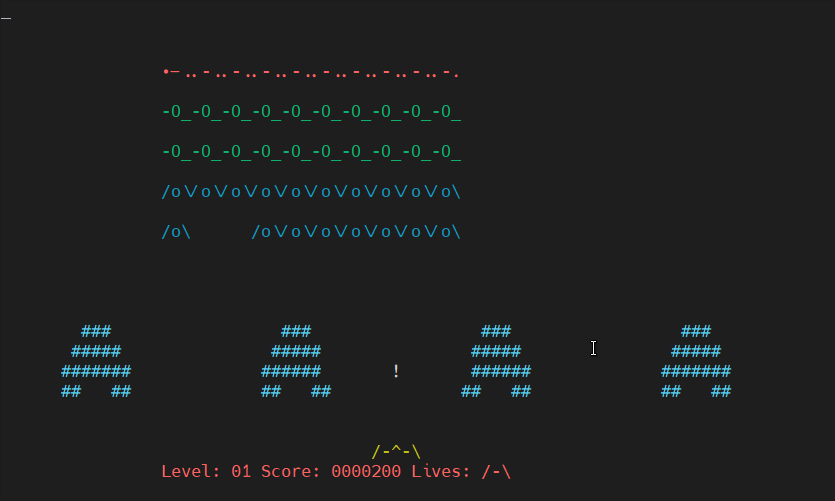
13. Play some mobaxterm console games

As you might have pissed off of configuring go on and enjoy some of the great console games, some of which are also present on a normal Linux new distribution installation. 🙂

mobaxterm-list-of-games-screenshot

List of Moba Games

teamwalk-mobaxterm-console-connect-network-routers-game
TeamWalk (Use your mouse or keyboard to connect every server to the central router)

ctris-console-text-game-mobaxterm

Ctris Console tetris from Mobaxterm

solitaire-text-console-game-played-on-mobaxterm-screenshot

Text console Solitaire from Moba
 

Ninvaders-console-game-mobaxterm

Here is NinVaders (Text Version of Space Invaders Arcade Classic)
 

Enjoy ! 🙂

How to extend LVM full partition to bigger size on Linux Virtual machine Guest running in VMware vSphere

Tuesday, September 20th, 2022

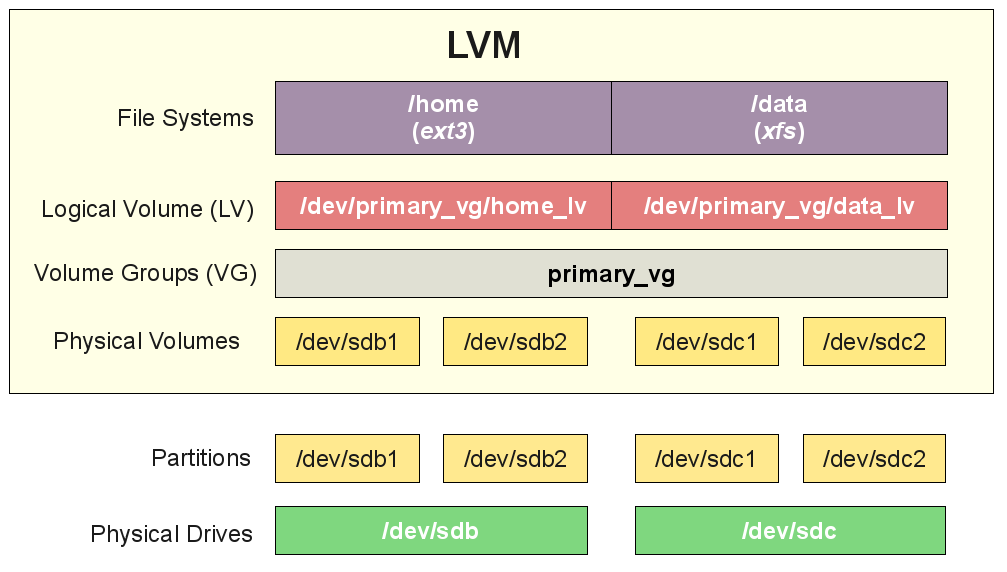
lvm-filesystem-extend-on-linux-virtual-machine-vmware-physical-group-volume-group-logical-volume-partitions-picture

Lets say you have to resize a partition that is wrongly made by some kind of automation like ansible or puppet,
because the Linux RHEL family OS template was prepared with a /home (or other partition with some very small size)  on VMware Vsphere Hypervisor hosting the Guest linux VM and the partition got quickly out of space.

To resolve the following question comes for the sysadmin

I. How to extend the LVM parititon that run out of space (without rebooting the VM Guest Linux Host)

II. how to add new disk partition space to the vSphere hypervisor OS. 

In below article i'll shortly describe that trivials steps to take to achieve that. Article won't show anything new original but I wrote it,
because I want it to have it logged for myself in case I need to LVM extend the space of my own Virtual machines and 
cause hopefully that might be of help to someone else from the Linux community that has to complete the same task.
 

I . Extending a LVM parititon that run out of space on a Linux Guest VM
 
1. Check the current parititon size that you want to extend

[root@linux-hostname home]# df -h /home/
 Filesystem            Size  Used Avail Use% Mounted on
 /dev/mapper/vg00-home
                       4.7G  4.5G     0 100% /home

2. Check the Virtualization platform

[root@vm-hostname ~]# lshw |head -3
linux-hostname
    description: Computer
    product: VMware Virtual Platform

3. Check the Operating System Linux OS type and version 

In this specific case this is a bit old Redhat -like CentOS 6.9 Linux
 

[root@vmware-host ~]# cat /etc/*release*
CentOS release 6.9 (Final)
cpe:/o:centos:linux:6:GA

4. Find out the type of target filesystem is EXT3, EXT4 or XFS etc.?

[root@vm-hostname ~]# grep home /proc/mounts
/dev/mapper/vg00-home /home ext3 rw,relatime,errors=continue,user_xattr,acl,barrier=1,data=ordered 0 0


Filesystem is handled by LVM thus

5. Check the size of the LVM partition we want to exchange

[root@vm-hostname ~]# lvs |grep home
home vg00 -wi-ao—- 5.00g

6. Check whether free space is available space in the volume group ?

[root@vm-hostname ~]# vgdisplay vg00
  — Volume group —
  VG Name               vg00
  System ID
  Format                lvm2
  Metadata Areas        2
  Metadata Sequence No  15
  VG Access             read/write
  VG Status             resizable
  MAX LV                0
  Cur LV                10
  Open LV               10
  Max PV                0
  Cur PV                2
  Act PV                2
  VG Size               128.99 GiB
  PE Size               4.00 MiB
  Total PE              33022
  Alloc PE / Size       30976 / 121.00 GiB
  Free  PE / Size       2046 / 7.99 GiB
  VG UUID               1F89PB-nIP2-7Hgu-zEVR-5H0R-7GdB-Lfj7t4


Extend VMWare space configured for additional hard disk on Hypervisor (if necessery)

In order for to extend the LVM of course you need to have a pre-existing additional hard-drive on VM (sdb,sdc etc. attached )

– If you need to extend on Vmware Vsphere Hypervisor:
Extend additional harddrive by entering the new size and Validate.

If you have previously extended the size of the Virtual Disk from VMWare to make the Linux guest vm find out about the change
you have to rerun rescan for the respective device that was grown on the HV.

7. Rescan on Linux VM host for changes in disk size from Hypervisor

Rescan disk for new size :

[root@vm-hostname ~]# echo 1> /sys/block/sdX/device/rescan

(where sdX is the extended additional harddrive)

8. Resize LVM physical volume

[root@vm-hostname ~]# pvresize /dev/sdX

9. Enlarge Logical Volume size 

[root@vm-hostname ~]# lvextend -L+5G /dev/mapper/vg00-home
     Extending logical volume LogVol00 to 10.77 GiB
     Logical volume LogVol00 successfully resized

10. Enlarge LVM hosted filesystem size

Filesystem is ext3 or ext4 :

[root@vm-hostname ~]# resize2fs /dev/mapper/vg00-home

– If the filesystem is not ext3 / ext4 but XFS you have to use xfs_growfs to let the FS know about the change.

Filesystem is XFS :
 

[root@vm-hostname ~]# xfs_growfs /dev/mapper/vg00-home

11. Check the additional filespace is already active on the Linux Guest VM

[root@vm-hostname ~]# df -h /home/
 Filesystem            Size  Used Avail Use% Mounted on
 /dev/mapper/vg_cloud-LogVol00
                        10G  4.2G  4.9G  48% /home


12. Verify  the extension of filesystem completed without errors


Check of system log:

[root@vm-hostname ~]# grep -i error /var/log/messages

Check if filesystem is writable.

[root@vm-hostname ~]# touch /home/test

[root@vm-hostname ~]# ls -al /home/test
-rw-r—– 1 root root 0 Sep 20 13:39 /home/test
[root@vm-hostname ~]# rm -f /home/test


II.  How to add additional sdb drive to a Linux host from vSPhere HV lets say (sdb)


1.  On VSphere GUI  interface

-> Select New hard drive and click Add

Enter the desired size for the new disk then unpack the disk parameters to choose Thin provision. Validate and Apply the recommendations.

basic-lvm-create-volume_group-diagram-on-linux-explained

2. On Linux system VM guest host to detect the new added sdb available space

Discover new disk :

[root@vm-hostname ~]# echo "- – -"> /sys/class/scsi_host/host2/scan && echo "- – -"> /sys/class/scsi_host/host1/scan && echo "- – -"> /sys/class/scsi_host/host0/scan

See  if discovered disk is found in /var/log/messages :

[…]
Nov 8 17:33:26 bict4004s kernel: scsi 2:0:2:0: Direct-Access VMware Virtual disk 1.0 PQ: 0 ANSI: 2
Nov 8 17:33:26 bict4004s kernel: scsi target2:0:2: Beginning Domain Validation
Nov 8 17:33:26 bict4004s kernel: scsi target2:0:2: Domain Validation skipping write tests
Nov 8 17:33:26 bict4004s kernel: scsi target2:0:2: Ending Domain Validation
Nov 8 17:33:26 bict4004s kernel: scsi target2:0:2: FAST-40 WIDE SCSI 80.0 MB/s ST (25 ns, offset 127)
Nov 8 17:33:26 bict4004s kernel: sd 2:0:2:0: Attached scsi generic sg3 type 0
Nov 8 17:33:26 bict4004s kernel: sd 2:0:2:0: [sdb] 2097152 512-byte logical blocks: (1.07 GB/1.00 GiB)
Nov 8 17:33:26 bict4004s kernel: sd 2:0:2:0: [sdb] Write Protect is off
Nov 8 17:33:26 bict4004s kernel: sd 2:0:2:0: [sdb] Cache data unavailable
Nov 8 17:33:26 bict4004s kernel: sd 2:0:2:0: [sdb] Assuming drive cache: write through
Nov 8 17:33:26 bict4004s kernel: sd 2:0:2:0: [sdb] Attached SCSI disk
[…]

3. Create new LVM Physical Volume

[root@vm-hostname ~]# pvcreate /dev/sdb

4. Enlarge LVM Volume Group to the max available size of /dev/sdb

[root@vm-hostname ~]# vgextend vg00 /dev/sdb

Enlarge LVM Logical Volume

[root@vm-hostname ~]# lvextend -L+10G /dev/mapper/vg00-home

5. Enlarge filesystem to max size of just created LVM

If Filesystem is ext3 or ext4 :

[root@vm-hostname ~]# resize2fs /dev/mapper/vg00-home


Again if we work with XFS additionally do:

[root@vm-hostname ~]# xfs_growfs /dev/mapper/vg00-home

6. Checking filesystem extension completed correct

 [root@vm-hostname ~]# df -h /home


7. Check filesystem is writtable and no errors produced in logs

Check of system log:

[root@vm-hostname ~]# grep -i error /var/log/messages


Check if filesystem is writable.

[root@vm-hostname ~]# touch /home/test

IBM TSM dsmc console client use for listing configured backups, checking set scheduled backups and backup and restore operations howto

Friday, March 6th, 2020

tsm-ibm-logo_tivoli-dsmc-console-client-listing-backups-create-backups-and-restore-on-linux-unix-windows

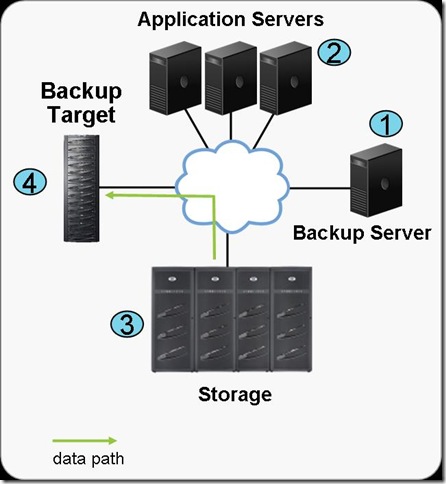
Creating a simple home based backup solution with some shell scripting and rsync is a common use. However as a sysadmin in a middle sized or large corporations most companies use some professional backup service such as IBM Tivoli Storage Manager TSM – recently IBM changed the name of the product to IBM Spectrum.

IBM TSM  is a data protection platform that gives enterprises a single point of control and administration for backup and recovery that is used for Privare Clouds backup and other high end solutions where data criticality is top.
Usually in large companies TSM backup handling is managed by a separate team or teams as managing a large TSM infrastructure is quite a complex task, however my experience as a sysadmin show me that even if you don't have too much of indepth into tsm it is very useful to know how to manage at least basic Incremental backup operations such as view what is set to be backupped, set-up a new directory structure for backup, check the backup schedule configured, check what files are included and which excluded from the backup store etc. 

TSM has multi OS support ans you can use it on most streamline Operating systems Windows / Mac OS X and Linux in this specific article I'll be talking concretely about backing up data with tsm on Linux, tivoli can be theoretically brought up even on FreeBSD machines via the Linuxemu BSD module and the 64-Bit Tivoli Storage Manager RPMs.
Therefore in this small article I'll try to give few useful operations for the novice admin that stumbles on tsm backupped server that needs some small maintenance.
 

1. Starting up the dsmc command line client


Nomatter the operating system on which you run it to run the client run:

# dsmc


tsm-check-backup-schedule-set-time

Note that usually dsmc should run as superuser so if you try to run it via a normal non-root user you will get an error message like:


[ user@linux ~]$ dsmc
ANS1398E Initialization functions cannot open one of the Tivoli Storage Manager logs or a related file: /var/tsm/dsmerror.log. errno = 13, Permission denied


Tivoli SM has an extensive help so to get the use basics, type help
 

tsm> help
1.0 New for IBM Tivoli Storage Manager Version 6.4
2.0 Using commands
  2.1 Start and end a client command session
    2.1.1 Process commands in batch mode
    2.1.2 Process commands in interactive mode
  2.2 Enter client command names, options, and parameters
    2.2.1 Command name
    2.2.2 Options
    2.2.3 Parameters
    2.2.4 File specification syntax
  2.3 Wildcard characters
  2.4 Client commands reference
  2.5 Archive
  2.6 Archive FastBack

Enter 'q' to exit help, 't' to display the table of contents,
press enter or 'd' to scroll down, 'u' to scroll up or
enter a help topic section number, message number, option name,
command name, or command and subcommand:    


2. Listing files listed for backups


A note to make here is as in most corporate products tsm supports command aliases so any command supported described in the help like query, could be
abbreviated with its first letters only, e.g. query filespace tsm cmd can be abbreviated as

tsm> q fi

Commands can be run non-interactive mode also so if you want the output of q fi you can straight use:

tsm> dsmc q fi


tsm-check-included-excluded-files-q-file-if-backupped-list-backup-set-directories

This shows the directories and files that are set for backup creation with Tivoli.


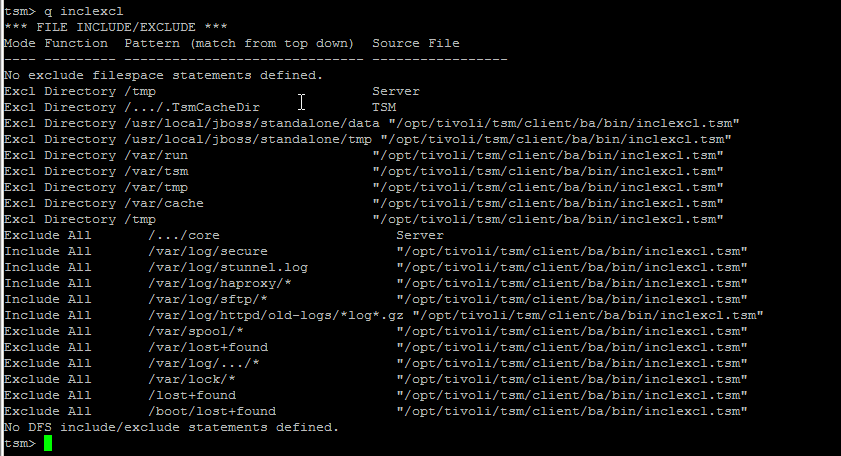
3. Getting included and excluded backup set files


It is useful to know what are the exact excluded files from tsm set backup this is done with query inclexcl

tsm-check-excluded-included-files


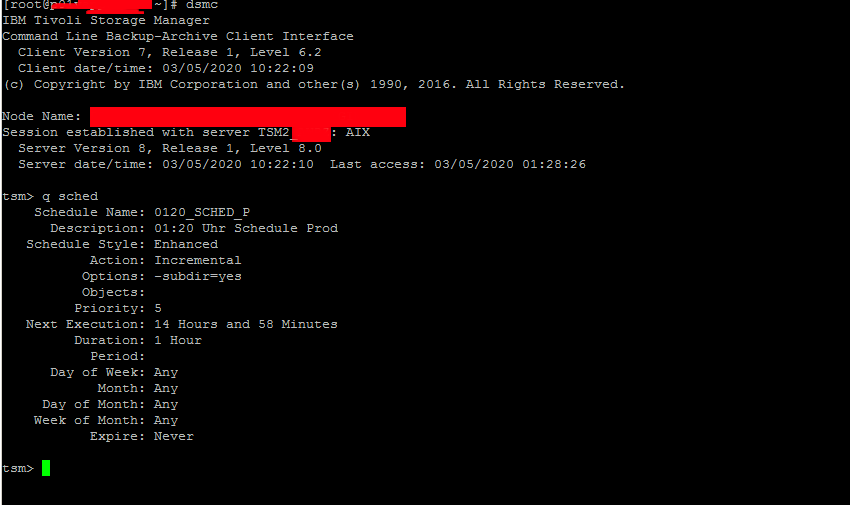
4. Querying for backup schedule time

Tivoli as every other backup solution is creating its set to backup files in a certain time slot periods. 
To find out what is the time slot for backup creation use;

tsm> q sched
Schedule Name: WEEKLY_ITSERV
      Description: ITSERV weekly incremental backup
   Schedule Style: Classic
           Action: Incremental
          Options: 
          Objects: 
         Priority: 5
   Next Execution: 180 Hours and 35 Minutes
         Duration: 15 Minutes
           Period: 1 Week  
      Day of Week: Wednesday
            Month:
     Day of Month:
    Week of Month:
           Expire: Never  


tsm-query-partitions-backupeed-or-not


5. Check which files have been backed up

If you want to make sure backups are really created it is a good to check, which files from the selected backup files have already
a working backup copy.

This is done with query backup like so:

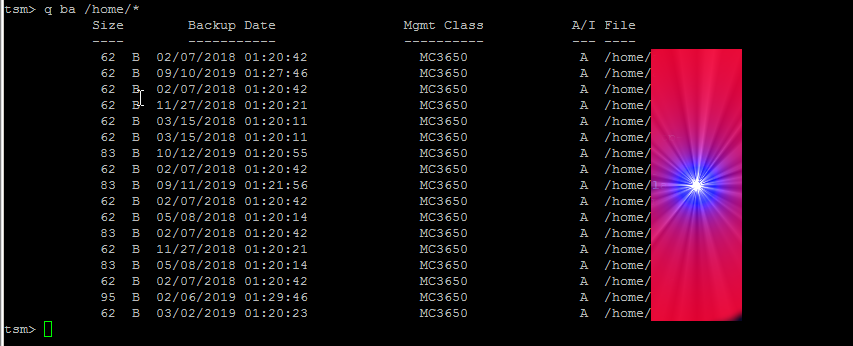
tsm> q ba /home/*


tsm-dsmc-query-user-home-for-backups

If you want to query all the current files and directories backed up under a directory and all its subdirectories you need to add the -subdir=yes option as below:


tsm> q ba /home/hipo/projects/* -subdir=yes
   
Size      Backup Date        Mgmt Class A/I File
   —-      ———–        ———- — —-
    512  12-09-2011 19:57:09    STANDARD    A  /home/hipo/projects/hfs0106
  1,024  08-12-2011 02:46:53    STANDARD    A  /home/hipo/projects/hsm41perf
    512  12-09-2011 19:57:09    STANDARD    A  /home/hipo/projects/hsm41test
    512  24-04-2012 00:22:56    STANDARD    A  /home/hipo/projects/hsm42upg
  1,024  12-09-2011 19:57:09    STANDARD    A  /home/hipo/projects/hfs0106/test
  1,024  12-09-2011 19:57:09    STANDARD    A  /home/hipo/projects/hfs0106/test/test2
 12,048  04-12-2011 02:01:29    STANDARD    A  /home/hipo/projects/hsm41perf/tables
 50,326  30-04-2012 01:35:26    STANDARD    A  /home/hipo/projects/hsm42upg/PMR70023
 50,326  27-04-2012 00:28:15    STANDARD    A  /home/hipo/projects/hsm42upg/PMR70099
 11,013  24-04-2012 00:22:56    STANDARD    A  /home/hipo/projects/hsm42upg/md5check  


  • To make tsm, backup some directories on Linux / AIX other unices:


tsm> incr /  /usr  /usr/local  /home /lib


  • For tsm to backup some standard netware drives, use:


tsm> incr NDS:  USR:  SYS:  APPS:  


  • To backup C:\ D:\ E:\ F:\ if TSM is running on Windows


tsm> incr C:  D:  E: F:  -incrbydate 


  • To back up entire disk volumes irrespective of whether files have changed since the last backup, use the selective command with a wildcard and -subdir=yes as below:


tsm> sel /*  /usr/*   /home/*  -su=yes   ** Unix/Linux


7. Backup selected files from a backup location


It is intuitive to think you can just add some wildcard characters to select what you want
to backup from a selected location but this is not so, if you try something like below
you will get an err.


tsm> incr /home/hipo/projects/*/* -su=yes      
ANS1071E Invalid domain name entered: '/home/hipo/projects/*/*'


The proper way to select a certain folder / file for backup is with:


tsm> sel /home/hipo/projects/*/* -su=yes


8. Restoring tsm data from backup


To restore the config httpd.conf to custom directory use:


tsm> rest /etc/httpd/conf/httpd.conf  /home/hipo/restore/


N!B! that in order for above to work you need to have the '/' trailing slash at the end.

If you want to restore a file under a different name:


tsm> rest /etc/ntpd.conf  /home/hipo/restore/


9. Restoring a whole backupped partition


tsm> rest /home/*  /tmp/restore/ -su=yes


This is using the Tivoli 'Restoring multiple files and directories', and the files to restore '*'
are kept till the one that was recovered (saying this in case if you accidently cancel the restore)


10. Restoring files with back date 


By default the restore function will restore the latest available backupped file, if you need
to recover a specific file, you need the '-inactive' '-pick' options.
The 'pick' interface is interactive so once listed you can select the exact file from the date
you want to restore.

General restore command syntax is:
 

tsm> restore [source-file] [destination-file]


tsm> rest /home/hipo/projects/*  /tmp/restore/ -su=yes  -inactive -pick

TSM Scrollable PICK Window – Restore

     #    Backup Date/Time        File Size A/I  File
   ————————————————————————————————–
   170. | 12-09-2011 19:57:09        650  B  A   /home/hipo/projects/hsm41test/inclexcl.test
   171. | 12-09-2011 19:57:09       2.74 KB  A   /home/hipo/projects/hsm41test/inittab.ORIG
   172. | 12-09-2011 19:57:09       2.74 KB  A   /home/hipo/projects/hsm41test/inittab.TEST
   173. | 12-09-2011 19:57:09       1.13 KB  A   /home/hipo/projects/hsm41test/md5.out
   174. | 30-04-2012 01:35:26        512  B  A   /home/hipo/projects/hsm42125upg/PMR70023
   175. | 26-04-2012 01:02:08        512  B  I   /home/hipo/projects/hsm42125upg/PMR70023
   176. | 27-04-2012 00:28:15        512  B  A   /home/hipo/projects/hsm42125upg/PMR70099
   177. | 24-04-2012 19:17:34        512  B  I   /home/hipo/projects/hsm42125upg/PMR70099
   178. | 24-04-2012 00:22:56       1.35 KB  A   /home/hipo/projects/hsm42125upg/dsm.opt
   179. | 24-04-2012 00:22:56       4.17 KB  A   /home/hipo/projects/hsm42125upg/dsm.sys
   180. | 24-04-2012 00:22:56       1.13 KB  A   /home/hipo/projects/hsm42125upg/dsmmigfstab
   181. | 24-04-2012 00:22:56       7.30 KB  A   /home/hipo/projects/hsm42125upg/filesystems
   182. | 24-04-2012 00:22:56       1.25 KB  A   /home/hipo/projects/hsm42125upg/inclexcl
   183. | 24-04-2012 00:22:56        198  B  A   /home/hipo/projects/hsm42125upg/inclexcl.dce
   184. | 24-04-2012 00:22:56        291  B  A   /home/hipo/projects/hsm42125upg/inclexcl.ox_sys
   185. | 24-04-2012 00:22:56        650  B  A   /home/hipo/projects/hsm42125upg/inclexcl.test
   186. | 24-04-2012 00:22:56        670  B  A   /home/hipo/projects/hsm42125upg/inetd.conf
   187. | 24-04-2012 00:22:56       2.71 KB  A   /home/hipo/projects/hsm42125upg/inittab
   188. | 24-04-2012 00:22:56       1.00 KB  A   /home/hipo/projects/hsm42125upg/md5check
   189. | 24-04-2012 00:22:56      79.23 KB  A   /home/hipo/projects/hsm42125upg/mkreport.020423.out
   190. | 24-04-2012 00:22:56       4.27 KB  A   /home/hipo/projects/hsm42125upg/ssamap.020423.out
   191. | 26-04-2012 01:02:08      12.78 MB  A   /home/hipo/projects/hsm42125upg/PMR70023/70023.tar
   192. | 25-04-2012 16:33:36      12.78 MB  I   /home/hipo/projects/hsm42125upg/PMR70023/70023.tar
        0———10——–20——–30——–40——–50——–60——–70——–80——–90–
<U>=Up  <D>=Down  <T>=Top  <B>=Bottom  <R#>=Right  <L#>=Left
<G#>=Goto Line #  <#>=Toggle Entry  <+>=Select All  <->=Deselect All
<#:#+>=Select A Range <#:#->=Deselect A Range  <O>=Ok  <C>=Cancel
pick> 


To navigate in pick interface you can select individual files to restore via the number seen leftside.
To scroll up / down use 'U' and 'D' as described in the legenda.


11. Restoring your data to another machine


In certain circumstances, it may be necessary to restore some, or all, of your data onto a machine other than the original from which it was backed up.

In ideal case the machine platform should be identical to that of the original machine. Where this is not possible or practical please note that restores are only possible for partition types that the operating system supports. Thus a restore of an NTFS partition to a Windows 9x machine with just FAT support may succeed but the file permissions will be lost.
TSM does not work fine with cross-platform backup / restore, so better do not try cross-platform restores.
 Trying to restore files onto a Windows machine that have previously been backed up with a non-Windows one. TSM created backups on Windows sent by other OS platforms can cause  backups to become inaccessible from the host system.

To restore your data to another machine you will need the TSM software installed on the target machine. Entries in Tivoli configuration files dsm.sys and/or dsm.opt need to be edited if the node that you are restoring from does not reside on the same server. Please see our help page section on TSM configuration files for their locations for your operating system. 

To access files from another machine you should then start the TSM client as below:


# dsmc -virtualnodename=RESTORE.MACHINE      


You will then be prompted for the TSM password for this machine.


You will probably want to restore to a different destination to the original files to prevent overwriting files on the local machine, as below:


  • Restore of D:\ Drive to D:\Restore ** Windows 


tsm> rest D:\*   D:\RESTORE\    -su=yes 


  • Restore user /home/* to /scratch on ** Mac, Unix/Linux


tsm> rest /home/* /scratch/     -su=yes  


  • Restoring Tivoli data on old netware


tsm> rest SOURCE-SERVER\USR:*  USR:restore/   -su=yes  ** Netware


12. Adding more directories for incremental backup / Check whether TSM backup was done correctly?

The easiest way is to check the produced dschmed.log if everything is okay there should be records in the log that Tivoli backup was scheduled in a some hours time
succesfully.
A normally produced backup scheduled in log should look something like:


14-03-2020 23:03:04 — SCHEDULEREC STATUS BEGIN
14-03-2020 23:03:04 Total number of objects inspected:   91,497
14-03-2020 23:03:04 Total number of objects backed up:      113
14-03-2020 23:03:04 Total number of objects updated:          0
14-03-2020 23:03:04 Total number of objects rebound:          0
14-03-2020 23:03:04 Total number of objects deleted:          0
14-03-2020 23:03:04 Total number of objects expired:         53
14-03-2020 23:03:04 Total number of objects failed:           6
14-03-2020 23:03:04 Total number of bytes transferred:    19.38 MB
14-03-2020 23:03:04 Data transfer time:                    1.54 sec
14-03-2020 23:03:04 Network data transfer rate:        12,821.52 KB/sec
14-03-2020 23:03:04 Aggregate data transfer rate:        114.39 KB/sec
14-03-2020 23:03:04 Objects compressed by:                    0%
14-03-2020 23:03:04 Elapsed processing time:           00:02:53
14-03-2020 23:03:04 — SCHEDULEREC STATUS END
14-03-2020 23:03:04 — SCHEDULEREC OBJECT END WEEKLY_23_00 14-12-2010 23:00:00
14-03-2020 23:03:04 Scheduled event 'WEEKLY_23_00' completed successfully.
14-03-2020 23:03:04 Sending results for scheduled event 'WEEKLY_23_00'.
14-03-2020 23:03:04 Results sent to server for scheduled event 'WEEKLY_23_00'.


in case of errors you should check dsmerror.log
 

Conclusion


In this article I've briefly evaluated some basics of IBM Commercial Tivoli Storage Manager (TSM) to be able to  list backups, check backup schedules and how to the files set to be
excluded from a backup location and most importantly how to check that data backed up data is in a good shape and accessible.
It was explained how backups can be restored on a local and remote machine as well as how to  append new files to be set for backup on next incremental scheduled backup.
It was shown how the pick interactive cli interface could be used to restore files at a certain data back in time as well as how full partitions can be restored and how some
certain file could be retrieved from the TSM data copy.

Into great depression – What is like to live in the Balkans?

Wednesday, May 18th, 2011

I'm so depressed these days that I'm trying to write something decent here but everytime I try I do stop and delete all I have written and start from scratch again.
It's terrible, I believe everyone have this days and they're so dark that even the smallest ray of light is gone somewhere…

The causes for depression are multiple, I know we're entering into the season period and that could be a factor, but truly for a long time I haven't felt that bad and I really cannot find the true cause. It's like hunting the unexplained.
Being a citizen of a countries on the balkans brings a lot of questions which cannot get answered. Why we the Balkan and more specificly most of the Orthodox Christian countries are suffering so badly and economically in constant crisis and recession?
From a material perspective Bulgaria is one of the worst countries one can live in, we the people on the balkans are chronically depressed and it really seems like a downward spiral
We've been gone through so far, when I was a child we were teached in the spirit of communism and a believe in a hard material realities.

Communism has taught us we're all fleshly brothers and we should live in groups and stick to the group, now as the democracy come it's on the contraty, we're being constantly re-taught that we should leave behind the group kind of thinking and all built from communism destroy it all and build the new society… We're told by individualist nations like USA and Western europe that the only thing for the good of a person is to (get an absolute individualistic life and only exist for the greater goodness of each ones self as individuals..

As with everything the Balkans are notable for being a very unordered place. Living here is like living in chaos…
The social security policies here are not working, the jurisdiction is working on behalf of the rich, the police force is seriously disfunctional and easily bribable. Put next to all this shit a high levels of unemployment and a lot of unhappy depressed people crawling around the streets and you get the picture …
As a normal consequence most of the young people have entered a dark ways of alcoholism and hard-core nihillism.
There are high level of people who are oriented into the new dark realities of Metal or underground music.
Each philosophy that is being put in from the west is being adopted here and being multiplied million times and mostly the bad things are being adopted and less rarely the good ones…
It's so mixed up that nobody can explain why it is happening as it is here.
I really am trying hard to convince myself for a years now that it is worthy to live here but the more I live here in Bulgaria the more I see all is getting worser than getting for good.

I wonder for how long it will go this pointless way, we the balkan people are living in ruins literally.

The only light we still have is the Church, but very sadly most people has left behind the faith and prefer to follow the fake American dream than to obey to our old ways and traditions.

Globalisation has entered in the Balkans in a full-force and is destroying our ancient culture and traditions and building the fakeness of the coca-cola culture that most of the people prefer to adore nowdays …

Bulgaria's population is mostly based of old people and we're a dying nation, if a miracle doesn't happen then we definitely will be gone.

Block Web server over loading Bad Crawler Bots and Search Engine Spiders with .htaccess rules

Monday, September 18th, 2017

howto-block-webserver-overloading-bad-crawler-bots-spiders-with-htaccess-modrewrite-rules-file

In last post, I've talked about the problem of Search Index Crawler Robots aggressively crawling websites and how to stop them (the article is here) explaning how to raise delays between Bot URL requests to website and how to completely probhit some bots from crawling with robots.txt.

As explained in article the consequence of too many badly written or agressive behaviour Spider is the "server stoning" and therefore degraded Web Server performance as a cause or even a short time Denial of Service Attack, depending on how well was the initial Server Scaling done.

The bots we want to filter are not to be confused with the legitimate bots, that drives real traffic to your website, just for information

 The 10 Most Popular WebCrawlers Bots as of time of writting are:
 

1. GoogleBot (The Google Crawler bots, funnily bots become less active on Saturday and Sundays :))

2. BingBot (Bing.com Crawler bots)

3. SlurpBot (also famous as Yahoo! Slurp)

4. DuckDuckBot (The dutch search engine duckduckgo.com crawler bots)

5. Baiduspider (The Chineese most famous search engine used as a substitute of Google in China)

6. YandexBot (Russian Yandex Search engine crawler bots used in Russia as a substitute for Google )

7. Sogou Spider (leading Chineese Search Engine launched in 2004)

8. Exabot (A French Search Engine, launched in 2000, crawler for ExaLead Search Engine)

9. FaceBot (Facebook External hit, this crawler is crawling a certain webpage only once the user shares or paste link with video, music, blog whatever  in chat to another user)

10. Alexa Crawler (la_archiver is a web crawler for Amazon's Alexa Internet Rankings, Alexa is a great site to evaluate the approximate page popularity on the internet, Alexa SiteInfo page has historically been the Swift Army knife for anyone wanting to quickly evaluate a webpage approx. ranking while compared to other pages)

Above legitimate bots are known to follow most if not all of W3C – World Wide Web Consorium (W3.Org) standards and therefore, they respect the content commands for allowance or restrictions on a single site as given from robots.txt but unfortunately many of the so called Bad-Bots or Mirroring scripts that are burning your Web Server CPU and Memory mentioned in previous article are either not following /robots.txt prescriptions completely or partially.

Hence with the robots.txt unrespective bots, the case the only way to get rid of most of the webspiders that are just loading your bandwidth and server hardware is to filter / block them is by using Apache's mod_rewrite through


.htaccess


file

Create if not existing in the DocumentRoot of your website .htaccess file with whatever text editor, or create it your windows / mac os desktop and transfer via FTP / SecureFTP to server.

I prefer to do it directly on server with vim (text editor)


vim /var/www/sites/your-domain.com/.htaccess


RewriteEngine On

IndexIgnore .htaccess */.??* *~ *# */HEADER* */README* */_vti*

SetEnvIfNoCase User-Agent "^Black Hole” bad_bot
SetEnvIfNoCase User-Agent "^Titan bad_bot
SetEnvIfNoCase User-Agent "^WebStripper" bad_bot
SetEnvIfNoCase User-Agent "^NetMechanic" bad_bot
SetEnvIfNoCase User-Agent "^CherryPicker" bad_bot
SetEnvIfNoCase User-Agent "^EmailCollector" bad_bot
SetEnvIfNoCase User-Agent "^EmailSiphon" bad_bot
SetEnvIfNoCase User-Agent "^WebBandit" bad_bot
SetEnvIfNoCase User-Agent "^EmailWolf" bad_bot
SetEnvIfNoCase User-Agent "^ExtractorPro" bad_bot
SetEnvIfNoCase User-Agent "^CopyRightCheck" bad_bot
SetEnvIfNoCase User-Agent "^Crescent" bad_bot
SetEnvIfNoCase User-Agent "^Wget" bad_bot
SetEnvIfNoCase User-Agent "^SiteSnagger" bad_bot
SetEnvIfNoCase User-Agent "^ProWebWalker" bad_bot
SetEnvIfNoCase User-Agent "^CheeseBot" bad_bot
SetEnvIfNoCase User-Agent "^Teleport" bad_bot
SetEnvIfNoCase User-Agent "^TeleportPro" bad_bot
SetEnvIfNoCase User-Agent "^MIIxpc" bad_bot
SetEnvIfNoCase User-Agent "^Telesoft" bad_bot
SetEnvIfNoCase User-Agent "^Website Quester" bad_bot
SetEnvIfNoCase User-Agent "^WebZip" bad_bot
SetEnvIfNoCase User-Agent "^moget/2.1" bad_bot
SetEnvIfNoCase User-Agent "^WebZip/4.0" bad_bot
SetEnvIfNoCase User-Agent "^WebSauger" bad_bot
SetEnvIfNoCase User-Agent "^WebCopier" bad_bot
SetEnvIfNoCase User-Agent "^NetAnts" bad_bot
SetEnvIfNoCase User-Agent "^Mister PiX" bad_bot
SetEnvIfNoCase User-Agent "^WebAuto" bad_bot
SetEnvIfNoCase User-Agent "^TheNomad" bad_bot
SetEnvIfNoCase User-Agent "^WWW-Collector-E" bad_bot
SetEnvIfNoCase User-Agent "^RMA" bad_bot
SetEnvIfNoCase User-Agent "^libWeb/clsHTTP" bad_bot
SetEnvIfNoCase User-Agent "^asterias" bad_bot
SetEnvIfNoCase User-Agent "^httplib" bad_bot
SetEnvIfNoCase User-Agent "^turingos" bad_bot
SetEnvIfNoCase User-Agent "^spanner" bad_bot
SetEnvIfNoCase User-Agent "^InfoNaviRobot" bad_bot
SetEnvIfNoCase User-Agent "^Harvest/1.5" bad_bot
SetEnvIfNoCase User-Agent "Bullseye/1.0" bad_bot
SetEnvIfNoCase User-Agent "^Mozilla/4.0 (compatible; BullsEye; Windows 95)" bad_bot
SetEnvIfNoCase User-Agent "^Crescent Internet ToolPak HTTP OLE Control v.1.0" bad_bot
SetEnvIfNoCase User-Agent "^CherryPickerSE/1.0" bad_bot
SetEnvIfNoCase User-Agent "^CherryPicker /1.0" bad_bot
SetEnvIfNoCase User-Agent "^WebBandit/3.50" bad_bot
SetEnvIfNoCase User-Agent "^NICErsPRO" bad_bot
SetEnvIfNoCase User-Agent "^Microsoft URL Control – 5.01.4511" bad_bot
SetEnvIfNoCase User-Agent "^DittoSpyder" bad_bot
SetEnvIfNoCase User-Agent "^Foobot" bad_bot
SetEnvIfNoCase User-Agent "^WebmasterWorldForumBot" bad_bot
SetEnvIfNoCase User-Agent "^SpankBot" bad_bot
SetEnvIfNoCase User-Agent "^BotALot" bad_bot
SetEnvIfNoCase User-Agent "^lwp-trivial/1.34" bad_bot
SetEnvIfNoCase User-Agent "^lwp-trivial" bad_bot
SetEnvIfNoCase User-Agent "^Wget/1.6" bad_bot
SetEnvIfNoCase User-Agent "^BunnySlippers" bad_bot
SetEnvIfNoCase User-Agent "^Microsoft URL Control – 6.00.8169" bad_bot
SetEnvIfNoCase User-Agent "^URLy Warning" bad_bot
SetEnvIfNoCase User-Agent "^Wget/1.5.3" bad_bot
SetEnvIfNoCase User-Agent "^LinkWalker" bad_bot
SetEnvIfNoCase User-Agent "^cosmos" bad_bot
SetEnvIfNoCase User-Agent "^moget" bad_bot
SetEnvIfNoCase User-Agent "^hloader" bad_bot
SetEnvIfNoCase User-Agent "^humanlinks" bad_bot
SetEnvIfNoCase User-Agent "^LinkextractorPro" bad_bot
SetEnvIfNoCase User-Agent "^Offline Explorer" bad_bot
SetEnvIfNoCase User-Agent "^Mata Hari" bad_bot
SetEnvIfNoCase User-Agent "^LexiBot" bad_bot
SetEnvIfNoCase User-Agent "^Web Image Collector" bad_bot
SetEnvIfNoCase User-Agent "^The Intraformant" bad_bot
SetEnvIfNoCase User-Agent "^True_Robot/1.0" bad_bot
SetEnvIfNoCase User-Agent "^True_Robot" bad_bot
SetEnvIfNoCase User-Agent "^BlowFish/1.0" bad_bot
SetEnvIfNoCase User-Agent "^JennyBot" bad_bot
SetEnvIfNoCase User-Agent "^MIIxpc/4.2" bad_bot
SetEnvIfNoCase User-Agent "^BuiltBotTough" bad_bot
SetEnvIfNoCase User-Agent "^ProPowerBot/2.14" bad_bot
SetEnvIfNoCase User-Agent "^BackDoorBot/1.0" bad_bot
SetEnvIfNoCase User-Agent "^toCrawl/UrlDispatcher" bad_bot
SetEnvIfNoCase User-Agent "^WebEnhancer" bad_bot
SetEnvIfNoCase User-Agent "^TightTwatBot" bad_bot
SetEnvIfNoCase User-Agent "^suzuran" bad_bot
SetEnvIfNoCase User-Agent "^VCI WebViewer VCI WebViewer Win32" bad_bot
SetEnvIfNoCase User-Agent "^VCI" bad_bot
SetEnvIfNoCase User-Agent "^Szukacz/1.4" bad_bot
SetEnvIfNoCase User-Agent "^QueryN Metasearch" bad_bot
SetEnvIfNoCase User-Agent "^Openfind data gathere" bad_bot
SetEnvIfNoCase User-Agent "^Openfind" bad_bot
SetEnvIfNoCase User-Agent "^Xenu’s Link Sleuth 1.1c" bad_bot
SetEnvIfNoCase User-Agent "^Xenu’s" bad_bot
SetEnvIfNoCase User-Agent "^Zeus" bad_bot
SetEnvIfNoCase User-Agent "^RepoMonkey Bait & Tackle/v1.01" bad_bot
SetEnvIfNoCase User-Agent "^RepoMonkey" bad_bot
SetEnvIfNoCase User-Agent "^Zeus 32297 Webster Pro V2.9 Win32" bad_bot
SetEnvIfNoCase User-Agent "^Webster Pro" bad_bot
SetEnvIfNoCase User-Agent "^EroCrawler" bad_bot
SetEnvIfNoCase User-Agent "^LinkScan/8.1a Unix" bad_bot
SetEnvIfNoCase User-Agent "^Keyword Density/0.9" bad_bot
SetEnvIfNoCase User-Agent "^Kenjin Spider" bad_bot
SetEnvIfNoCase User-Agent "^Cegbfeieh" bad_bot


<Limit GET POST>
order allow,deny
allow from all
Deny from env=bad_bot
</Limit>


Above rules are Bad bots prohibition rules have RewriteEngine On directive included however for many websites this directive is enabled directly into VirtualHost section for domain/s, if that is your case you might also remove RewriteEngine on from .htaccess and still the prohibition rules of bad bots should continue to work
Above rules are also perfectly suitable wordpress based websites / blogs in case you need to filter out obstructive spiders even though the rules would work on any website domain with mod_rewrite enabled.

Once you have implemented above rules, you will not need to restart Apache, as .htaccess will be read dynamically by each client request to Webserver

2. Testing .htaccess Bad Bots Filtering Works as Expected


In order to test the new Bad Bot filtering configuration is working properly, you have a manual and more complicated way with lynx (text browser), assuming you have shell access to a Linux / BSD / *Nix computer, or you have your own *NIX server / desktop computer running
 

Here is how:


lynx -useragent="Mozilla/5.0 (compatible; MegaIndex.ru/2.0; +http://megaindex.com/crawler)" -head -dump http://www.your-website-filtering-bad-bots.com/


Note that lynx will provide a warning such as:

Warning: User-Agent string does not contain "Lynx" or "L_y_n_x"!

Just ignore it and press enter to continue.

Two other use cases with lynx, that I historically used heavily is to pretent with Lynx, you're GoogleBot in order to see how does Google actually see your website?
 

  • Pretend with Lynx You're GoogleBot


lynx -useragent="Mozilla/5.0 (compatible; Googlebot/2.1; +http://www.google.com/bot.html)" -head -dump http://www.your-domain.com/


  • How to Pretend with Lynx Browser You are GoogleBot-Mobile


lynx -useragent="Mozilla/5.0 (iPhone; U; CPU iPhone OS 4_1 like Mac OS X; en-us) AppleWebKit/532.9 (KHTML, like Gecko) Version/4.0.5 Mobile/8B117 Safari/6531.22.7 (compatible; Googlebot-Mobile/2.1; +http://www.google.com/bot.html)" -head -dump http://www.your-domain.com/


Or for the lazy ones that doesn't have Linux / *Nix at disposal you can use WannaBrowser website

Wannabrowseris a web based browser emulator which gives you the ability to change the User-Agent on each website req1uest, so just set your UserAgent to any bot browser that we just filtered for example set User-Agent to CheeseBot

The .htaccess rule earier added once detecting your browser client is coming in with the prohibit browser agent will immediately filter out and you'll be unable to access the website with a message like:
 

HTTP/1.1 403 Forbidden


Just as I've talked a lot about Index Bots, I think it is worthy to also mention three great websites that can give you a lot of Up to Date information on exact Spiders returned user-agent, common known Bot traits as well as a a current updated list with the Bad Bots etc.

Bot and Browser Resources information user-agents, bad-bots and odd Crawlers and Bots specifics

1. botreports.com
2. user-agents.org
3. useragentapi.com


An updated list with robots user-agents (crawler-user-agents) is also available in github here regularly updated by Caia Almeido

There are also a third party plugin (modules) available for Website Platforms like WordPress / Joomla / Typo3 etc.

Besides the listed on these websites as well as the known Bad and Good Bots, there are perhaps a hundred of others that might end up crawling your webdsite that might or might not need  to be filtered, therefore before proceeding with any filtering steps, it is generally a good idea to monitor your  HTTPD access.log / error.log, as if you happen to somehow mistakenly filter the wrong bot this might be a reason for Website Indexing Problems.

Hope this article give you some valueable information. Enjoy ! 🙂


Some standard software programs to install on Windows to make your Windows feel more like a Linux / Unix Desktop host

Friday, March 17th, 2017

linux-freebsd-unix-migration-to-windows-some-useful-customizations-and-program-softwares-to-install-to-make-your-windows-feel-like-more-linux-and-bsd-unix

If you're Windows user like me with a Linux / FreeBSD / OpenBSD / NetBSD – a dedicated Unix user and end up working for financial reasons in some TOP 100 Fortune companies (CSC, SAP, IBM, Hewlett Packard,Enterprise, Oracle) etc.  and forced for business purposes (cause some programs such as Skype for Business Desktop Share does not run fine on Unix like and thus you have to work notebook pre-installed with Windows 7 / 8 or 10 but you're so accustomed to customizations already from UNIX environments and you would like to create yourself the Windows to resemble Linux and probably customize much of how Windows behaves by default.

Here is what I personally did on my work Windows 7 Enterprise on my HP Elitebook notebook to give myself the extra things I'm used to my Debian Linux Desktop.


1. Downloaded and instaled standard gnome-terminal xterm like immediately (E.g. check MobaXterm great alternative to Putty),
2. Changed cutomize Windows 7 appearance to be more like classical Windows XP,  change Windows 8 / 10 start menu appearance to be more like in classic Windows 2000
3. Installed following bunch of softwares

  • VIM Text Editor for Windows
  • Thunderbird Mail Client
  • OpenVPN client
  • Oracle VM Virtualbox
  • Opera
  • Mozilla Firefox
  • Password Safe
  • Ext2FS / Ext3FS (support programs)
  • F.lux (to auto adjust screen brightness day and night for better sleep)
  • install ActivePerl for Windows
  • Install GNUWin Tools (and perhaps most importantly)
  • CygWin,  (to provide Windows with most needed console Linux tools), Clink.
  • WinSCP
  • Swish (to be able to remotely mount your Linux partitions and see them as local Windows drives)
  • dosbox (to play some of the good old Dos games :))
  • Windirstat (to easily check the size of complete directory and subdirectories)
  • SpaceSniffer (to be able to see which directory or files are taking the most space on the system)


Along with all above goodies here is also some good software I find essential for every web developer / system administrator / network administrator or java,  C, php pprogrammer out there that's using Windows as his Desktop platrofm.

Another thing I prefer  on Windows 7 when used as workstation is to change the default Windows 7 LogonUI screen background as well check out how here

Perhaps there is plenty of other goodprograms to install on Windows to make it feel even more like a Linux / Unix Desktop host, if you happen to somehow stuck to this article and you've migrated from Llinux / BSD desktop to Windows for work purposes please share with me any other goodies you happen to use that is from *Unix.

Improve Apache Load Balancing with mod_cluster – Apaches to Tomcats Application servers Get Better Load Balancing

Thursday, March 31st, 2016

improve-apache-load-balancing-with-mod_cluster-apaches-to-tomcats-application-servers-get-better-load-balancing-mod_cluster-logo


Earlier I've blogged on How to set up Apache to to serve as a Load Balancer for 2, 3, 4  etc. Tomcat / other backend application servers with mod_proxy and mod_proxy_balancer, however though default Apache provided mod_proxy_balancer works fine most of the time, If you want a more precise and sophisticated balancing with better load distribuion you will probably want to install and use mod_cluster instead.


So what is Mod_Cluster and why use it instead of Apache proxy_balancer ?
 

Mod_cluster is an innovative Apache module for HTTP load balancing and proxying. It implements a communication channel between the load balancer and back-end nodes to make better load-balancing decisions and redistribute loads more evenly.

Why use mod_cluster instead of a traditional load balancer such as Apache's mod_balancer and mod_proxy or even a high-performance hardware balancer?

Thanks to its unique back-end communication channel, mod_cluster takes into account back-end servers' loads, and thus provides better and more precise load balancing tailored for JBoss and Tomcat servers. Mod_cluster also knows when an application is undeployed, and does not forward requests for its context (URL path) until its redeployment. And mod_cluster is easy to implement, use, and configure, requiring minimal configuration on the front-end Apache server and on the back-end servers.


So what is the advantage of mod_cluster vs mod proxy_balancer ?

Well here is few things that turns the scales  in favour for mod_cluster:


  •     advertises its presence via multicast so as workers can join without any configuration
     
  •     workers will report their available contexts
     
  •     mod_cluster will create proxies for these contexts automatically
     
  •     if you want to, you can still fine-tune this behaviour, e.g. so as .gif images are served from httpd and not from workers…
     
  •     most importantly: unlike pure mod_proxy or mod_jk, mod_cluster knows exactly how much load there is on each node because nodes are reporting their load back to the balancer via special messages
     
  •     default communication goes over AJP, you can use HTTP and HTTPS


1. How to install mod_cluster on Linux ?


You can use mod_cluster either with JBoss or Tomcat back-end servers. We'll install and configure mod_cluster with Tomcat under CentOS; using it with JBoss or on other Linux distributions is a similar process. I'll assume you already have at least one front-end Apache server and a few back-end Tomcat servers installed.

To install mod_cluster, first download the latest mod_cluster httpd binaries. Make sure to select the correct package for your hardware architecture – 32- or 64-bit.
Unpack the archive to create four new Apache module files: mod_advertise.so, mod_manager.so, mod_proxy_cluster.so, and mod_slotmem.so. We won't need mod_advertise.so; it advertises the location of the load balancer through multicast packets, but we will use a static address on each back-end server.

Copy the other three .so files to the default Apache modules directory (/etc/httpd/modules/ for CentOS).
Before loading the new modules in Apache you have to remove the default proxy balancer module (mod_proxy_balancer.so) because it is not compatible with mod_cluster.

Edit the Apache configuration file (/etc/httpd/conf/httpd.conf) and remove the line


LoadModule proxy_balancer_module modules/mod_proxy_balancer.so


Create a new configuration file and give it a name such as /etc/httpd/conf.d/mod_cluster.conf. Use it to load mod_cluster's modules:


LoadModule slotmem_module modules/mod_slotmem.so
LoadModule manager_module modules/mod_manager.so
LoadModule proxy_cluster_module modules/mod_proxy_cluster.so

In the same file add the rest of the settings you'll need for mod_cluster something like:

And for permissions and Virtualhost section

Listen 192.168.180.150:9999
<virtualhost  192.168.180.150:9999="">
<directory>
Order deny,allow
Allow from all 192.168
</directory>
ManagerBalancerName mymodcluster
EnableMCPMReceive
</virtualhost>

ProxyPass / balancer://mymodcluster/


The above directives create a new virtual host listening on port 9999 on the Apache server you want to use for load balancing, on which the load balancer will receive information from the back-end application servers. In this example, the virtual host is listening on IP address 192.168.204.203, and for security reasons it allows connections only from the 192.168.0.0/16 network.
The directive ManagerBalancerName defines the name of the cluster – mymodcluster in this example. The directive EnableMCPMReceive allows the back-end servers to send updates to the load balancer. The standard ProxyPass and ProxyPassReverse directives instruct Apache to proxy all requests to the mymodcluster balancer.
That's all you need for a minimal configuration of mod_cluster on the Apache load balancer. At next server restart Apache will automatically load the file mod_cluster.conf from the /etc/httpd/conf.d directory. To learn about more options that might be useful in specific scenarios, check mod_cluster's documentation.

While you're changing Apache configuration, you should probably set the log level in Apache to debug when you're getting started with mod_cluster, so that you can trace the communication between the front- and the back-end servers and troubleshoot problems more easily. To do so, edit Apache's configuration file and add the line LogLevel debug , then restart Apache.
 

2. How to set up Tomcat appserver for mod_cluster ?
 

Mod_cluster works with Tomcat version 6, 7 and 8, to set up the Tomcat back ends you have to deploy a few JAR files and make a change in Tomcat's server.xml configuration file.
The necessary JAR files extend Tomcat's default functionality so that it can communicate with the proxy load balancer. You can download the JAR file archive by clicking on "Java bundles" on the mod_cluster download page. It will be saved under the name mod_cluster-parent-1.2.6.Final-bin.tar.gz.

Create a new directory such as /root/java_bundles and extract the files from mod_cluster-parent-1.2.6.Final-bin.tar.gz there. Inside the directory /root/java_bundlesJBossWeb-Tomcat/lib/*.jar you will find all the necessary JAR files for Tomcat, including two Tomcat version-specific JAR files – mod_cluster-container-tomcat6-1.2.6.Final.jar for Tomcat 6 and mod_cluster-container-tomcat7-1.2.6.Final.jar for Tomcat 7. Delete the one that does not correspond to your Tomcat version.

Copy all the files from /root/java_bundlesJBossWeb-Tomcat/lib/ to your Tomcat lib directory – thus if you have installed Tomcat in

/srv/tomcat

run the command:


cp -rpf /root/java_bundles/JBossWeb-Tomcat/lib/* /srv/tomcat/lib/ .


Then edit your Tomcat's server.xml file

/srv/tomcat/conf/server.xml.


After the default listeners add the following line:


<listener classname="org.jboss.modcluster.container.catalina.standalone.ModClusterListener" proxylist="192.168.204.203:9999"> </listener>


This instructs Tomcat to send its mod_cluster-related information to IP 192.168.180.150 on TCP port 9999, which is what we set up as Apache's dedicated vhost for mod_cluster.
While that's enough for a basic mod_cluster setup, you should also configure a unique, intuitive JVM route value on each Tomcat instance so that you can easily differentiate the nodes later. To do so, edit the server.xml file and extend the Engine property to contain a jvmRoute, like this:
 

.


<engine defaulthost="localhost" jvmroute="node2" name="Catalina"></engine>


Assign a different value, such as node2, to each Tomcat instance. Then restart Tomcat so that these settings take effect.

To confirm that everything is working as expected and that the Tomcat instance connects to the load balancer, grep Tomcat's log for the string "modcluster" (case-insensitive). You should see output similar to:

Mar 29, 2016 10:05:00 AM org.jboss.modcluster.ModClusterService init
INFO: MODCLUSTER000001: Initializing mod_cluster ${project.version}
Mar 29, 2016 10:05:17 AM org.jboss.modcluster.ModClusterService connectionEstablished
INFO: MODCLUSTER000012: Catalina connector will use /192.168.180.150


This shows that mod_cluster has been successfully initialized and that it will use the connector for 192.168.204.204, the configured IP address for the main listener.
Also check Apache's error log. You should see confirmation about the properly working back-end server:

[Tue Mar 29 10:05:00 2013] [debug] proxy_util.c(2026): proxy: ajp: has acquired connection for (192.168.204.204)
[Tue Mar 29 10:05:00 2013] [debug] proxy_util.c(2082): proxy: connecting ajp://192.168.180.150:8009/ to  192.168.180.150:8009
[Tue Mar 29 10:05:00 2013] [debug] proxy_util.c(2209): proxy: connected / to  192.168.180.150:8009
[Tue Mar 29 10:05:00 2013] [debug] mod_proxy_cluster.c(1366): proxy_cluster_try_pingpong: connected to backend
[Tue Mar 29 10:05:00 2013] [debug] mod_proxy_cluster.c(1089): ajp_cping_cpong: Done
[Tue Mar 29 10:05:00 2013] [debug] proxy_util.c(2044): proxy: ajp: has released connection for (192.168.180.150)


This Apache error log shows that an AJP connection with 192.168.204.204 was successfully established and confirms the working state of the node, then shows that the load balancer closed the connection after the successful attempt.

You can start testing by opening in a browser the example servlet SessionExample, which is available in a default installation of Tomcat.
Access this servlet through a browser at the URL http://balancer_address/examples/servlets/servlet/SessionExample. In your browser you should see first a session ID that contains the name of the back-end node that is serving your request – for instance, Session ID: 5D90CB3C0AA05CB5FE13121E4B23E670.node2.

Next, through the servlet's web form, create different session attributes. If you have a properly working load balancer with sticky sessions you should always (that is, until your current browser session expires) access the same node, with the previously created session attributes still available.

To test further to confirm load balancing is in place, at the same time open the same servlet from another browser. You should be redirected to another back-end server where you can conduct a similar session test.
As you can see, mod_cluster is easy to use and configure. Give it a try to address sporadic single-back-end overloads that cause overall application slowdowns.

Why saint George is depicted on icons killing a Dragon (an ancient story of saint George killing the last dragon) – A Collection of 7 icons of Saint Martyr George

Friday, July 6th, 2012

saint_Georgios-killing-the-dragon-in-cave
Saint George is one of the most venerated Orthodox Christian saints in the Eastern Orthodox Church. My interest in saint George is cause of the reason, I myself bear the name Georgi (the Bulgarian equivalent of George). Saint George is mostly venerated in the Slavonic Christian-dome.In almost all Church icons depicting st. George in Orthodox and Roman Catholic christiandome saint George is piercing killing a dragon.
One of the reasons, st. George is depicted piercing the dragon is a reference of st. George victory over satan, through his martyrdom.

The Beast (Dragon) on the iconi is a straight reference to the Holy Bible; Chapter Revelation also known under the name Apocalypse.

In revelation, we read humanity and our saviour Jesus Christ will finally once and for all will kill the "ancient beast" = (satan)

In same logic, as Saint Martyr George has been victorious over Satan by his unshakable confession of faith in Jesus Christ in early 5th century A.D. , we believe in the Orthodox Church he is given the crown of (eternal) life as a prize for bearing un-human tortures in the name of the of Christ.

To illustrate visually the victory of saint George over Satan through his immesurable faith confession with which he become, there is a an early tradition in iconography in the Church to depict st. George killing a dragon.

The other reason why saint George is depicted to kill a Dragon is due to a Lebanon / Palestinian ancient story saying; There was a huge Dragon living somewhere in nowdays Lebanon / Palestinian lands.
The beast created a huge havoc killing many people and systematically torturing people in the area.

As the Eastern Orthodox Christian tradition continues …. the Dragon is said to have inhabited one of the caves near some village.
Interesting, the story tells these very same dragon was the last Dragon crawling the earth before the final disappearance of dragons.

Many brave local people tried to kill the beast but many died as the beast was unbeatable.
Being unable to beat-up the dragon with a physical (human) force the local population turnted to God for help – saying continously prayers to Saint George to help them defeat their dragon mischief.

Soon after, Saint George appeared on a white horse and pierced the "old dragon / snake". The dragon liberation miracle is said to be evidenced by local people and according to Orthodox monk books is one of the many great miracles occuring in past times.
The report of the miracle has quickly spread around all Lebanon / Palestinian lands and soon, being confirmed as real spread along all Russia as well as the rest of the Slavonic and Orthodox Christian world (Bulgaria, Serbia), Greece, Egypt (Alexandria) etc..
To illustrate saint George's appearance miracle, monastic iconographers started depicting saint George as we see him until this very day – Riding a horse and slaughtering a monstrous beast.

Below are seven 12-th century early icons of saint Saint Great-Martyr George killing the dragon;;
I've collected the icons from various website online. Hope this collection will be blessing for all Christ brother and sisters and generally anyone reading this post:

12-th century mosaic icon of st. George the Great Martyr Xenophontos Monastery

12-th century mosaic icon of st. George the Great Martyr Xenophontos Monastery

Orthodox Christian icon saint George dated to 1130 - 1150 A.D.

Orthodox Christian icon saint George dated to 1130 – 1150 A.D.

Saint Georgius the Dragon Slayer icon XII century orth icon

Saint Georgius the Dragon Slayer icon XII century orth icon

St. George Enamel icon Georgia 12th century

St. George Enamel icon Georgia 12th century

saint George Christian icon Yuriev Monastery Novgorod 12th century

saint George Christian icon Yuriev Monastery Novgorod 12th century

st. George Staraya Ladoga Orthodox Christian icon

st. George Staraya Ladoga Orthodox Christian icon

sv. Georgius 12th century Aios

sv. Georgius 12th century Aios

Nowdays saint George Holy Relics particles are kept for veneration in many Orthodox Christian countries monasteries. Here in Bulgaria saint George Holy Relics are kept in a Monastery nearby the seacoast in Pomorie. Any Christian visiting Bulgaria have the opportunity to venerate the Holy in (Pomorie's Monastery – St. Great Martyr Georgi.