Posts Tagged ‘howto’

Copy Paste Virtualbox enable between Linux Host and Guest Virtual Machine

Thursday, September 6th, 2018

enable-copy-paste-between-linux-host-and-guest-OS-virtual-machine-virtualbox-vbox-logo

Copy / Pasting has become a vital part of our digital lifes, not having it in our days is insane, most of our System Administration jobs / Programmer or Office (Secretary) stuff daily without Copy / Paste is a unthinkable.

Lately I have been playing with Virtual Machines as I need to test some Dev Ops related stuff I install Jenkins write and test scripts and tools inside a VM, for that to happen I needed a working VM and because I am a Free Software supporter my VM of choice is usually Virtualbox. Even though Virtualbox is not the best and most performance efficient Virtual Machine out there for a small tasks and home usage dev / testing it does a great job, I have faced a problem with Copy / Pasting not working in VBox between the VM -> Guest OS, that's why I decided to write this step by step guide to help people who face the same issue.

For people who are starting with Oracle VirtualBox and you just have Created a New Virtual Machine and installed GNU / Linux or FreeBSD one common set back problem you will experience is the the Copy / Paste functionality between the VM Host Machine and the Guest won't be working out of the box. That's pretty much annoying thing and since usually one installs different Virtual Machines with different Operating Systems as a test bed for Software installs on top of various versions of OSes the lack of Copy, Paste functionality which is not there by default makes copy / pasting programming code / commands etc. between your local Desktop notebook or remote  server Machine and the VBox Virtualized Guest mostly unusuable …

Besides that integration (sharing resources / improved VM performance) between the Host (which is for example your Desktop notebook or PC) and the Virtualized Operating system be it some kind of UNIX (FreeBSD) etc. is not optimal until you enable an extra integration between VirtualBox and your (Host OS – that in my case is Debian 9 GNU / Linux but it can be Microsoft Windows XX as well or any other *nix like OS).In order for this Integration between your Host OS and Guest OS and Copy / Paste features between the two to work you need to Enable Guest Additions CD image (Software) that is part of VirtualBox installation on the Host OS and once enabled to mount (Attach the Vbox provided Virtual CD) from within the Guest OS (that in my case is another Debian 9 Stretch Linux that is installed inside the VM) and run a script that will install the necessery VirtualBox software inside the Guest OS Linux.
 

This is done in 3 easy steps:

STEP 1: Enable Vbox (Guest Additions CD Image)


virtualbox-VM-enable-insert-guest-additions-CD-image-menu-screenshot-debian-linux


Devices -> Insert Guest Additions CD image


2. Enable Shared Clipboard and Drag and Drop from the Virtual Machine

virtualbox-VM-enable-devices-shared-slipboard-bidirectional-menu-screenshot-debian-linux
 

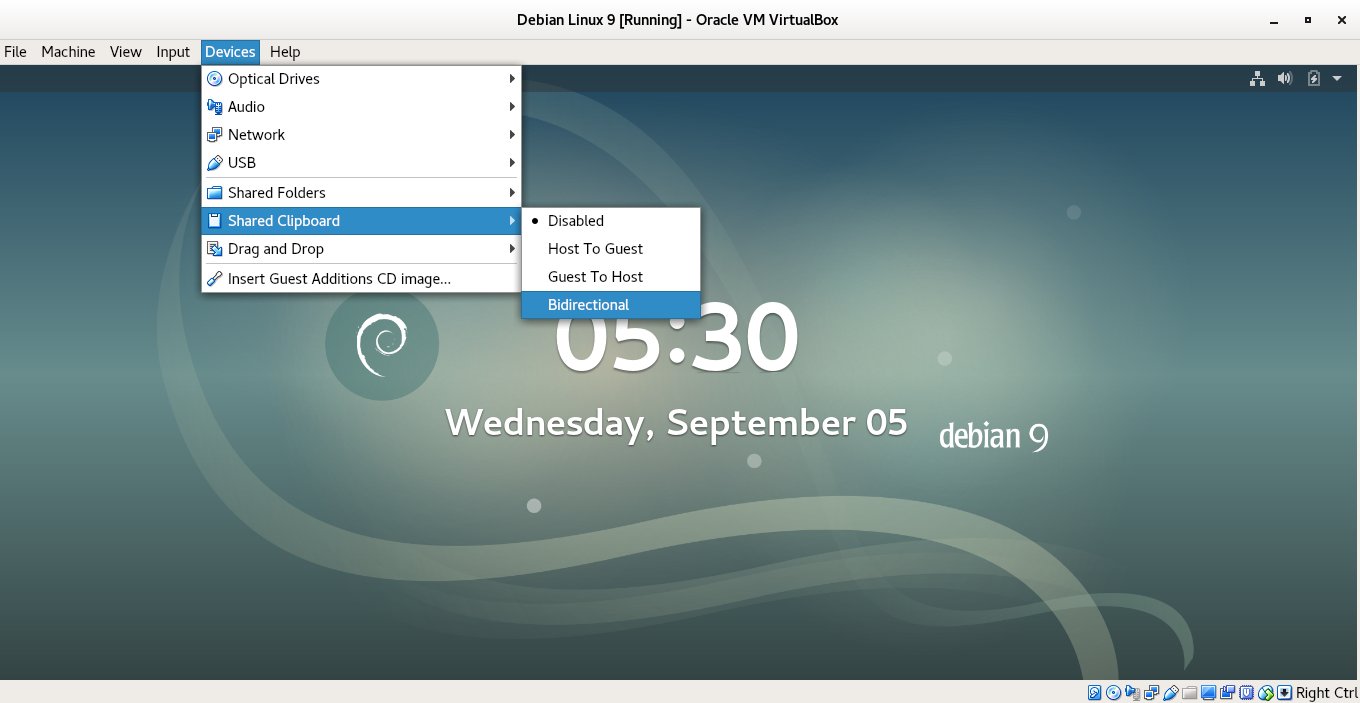
Devices -> Shared Clipboard -> Bidirectional


virtualbox-VM-enable-devices-drag-and-drop-bidirectional-menu-screenshot-debian-linux
 

Devices -> Drag and Drop -> Bidirectional


3. Install development packages that are required by VBoxLinuxAdditions.run script

a) First thing is to use Virtual Box program interface menu and enable Insert Guest Additions CD Image option (assuming that you have the Linux Guest OS running).

virtualbox-VM-enable-insert-guest-additions-CD-image-menu-screenshot-debian-linux
 

Devices -> Insert Guest Additions CD image


https://www.pc-freak.net/images/virtualbox-virtual-machine-guest-os-settings

You can do it also from main VirtualBox interface (without having a Virtual machine running) by clicking over the desired Guest OS or pressting CTRL + S key combination

b) Next step is to mount the Virtual CD Guest Additions inside the Guest OS VM

To mount the Virtual content provided by the just ticked VBOX "Insert Guest Additions CD" menu, inside the Guest OS Linux, you have to run simple mount command:


root@debian:~# mount /media/cdrom1
mount: /dev/sr1 is write-protected, mounting read-only


c) Install necessery packages that VBoxLinuxAdditions.run will use

Further on VBoxLinuxAdditions.run (additions script) that adds the integration between the Host operating system and the Guest OS depends on some essential tools necessery for building (compiling) / developing software on Linux, this are:

1.) build-essential – a meta package that will install the following set of packages:


dpkg-dev fakeroot g++ g++-6 libalgorithm-diff-perl libalgorithm-diff-xs-perl libalgorithm-merge-perl libdpkg-perl libfakeroot libfile-fcntllock-perl libstdc++-6-dev


which are necessery for creation .deb packages, compiling code and other various activitions. a) build-essential is a very important Debian based distro package and if you happen to be new to Linux or just starting learning how to develop programs on Linux, you will soon realize you will need it installed across almost all Linux OS hosts you maintain or develop on …

VirtualBox-VBoxLinuxAdditions-run-script-missing-headers-gcc-perl-how-to-fix


root@debian:~# apt-get install –yes build-essential linux-headers-$(uname -r) gcc perl make


2.) The linux-headers package in my case that it is is linux-headers-4.9.0-7-amd64 is important as it provides kernel header files that are necessery when compiling and integrating kernel modules VBoxLinuxAdditions.run script depends on it as it builds a kernel module that adds the integration (that enables Copy / Paste and performance inprovements) between the Host VM machine and Guest OS

3.) gcc perl packages this two provides the C compiler and perl scripting programming language interpreter which are also used by VBoxLinuxAdditions.run script.


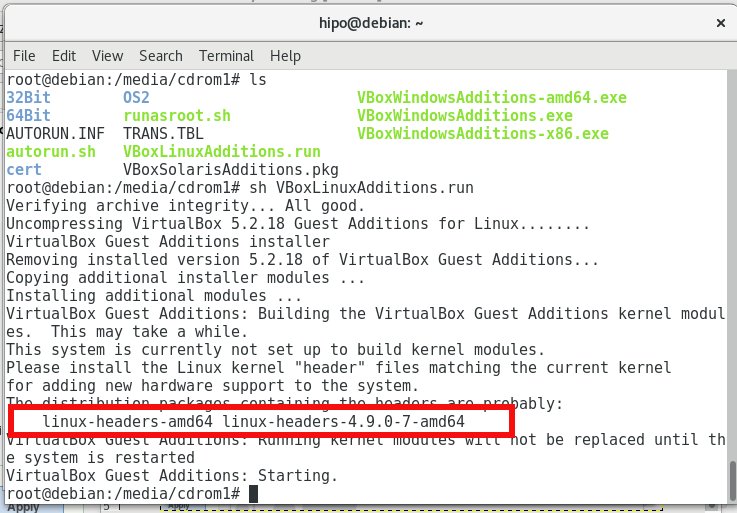
Now run VBoxLinuxAdditions.run:

As you see in above screenshot the

root@debian:~#
root@debian:/media/cdrom1# sh VBoxLinuxAdditions.run
Verifying archive integrity… All good.
Uncompressing VirtualBox 5.2.18 Guest Additions for Linux……..
VirtualBox Guest Additions installer
Removing installed version 5.2.18 of VirtualBox Guest Additions…
Copying additional installer modules …
Installing additional modules …
VirtualBox Guest Additions: Building the VirtualBox Guest Additions kernel modules.  This may take a while.
VirtualBox Guest Additions: Running kernel modules will not be replaced until the system is restarted
VirtualBox Guest Additions: Starting.


If everything is fine you should get command output like above.

Above are the steps given to follow on current latest Debian Linux 9.5 (Stretch) as a Guest OS (this tutorial should be working also on Ubuntu / Mint and other deb package based distributions for RPM package based Linuxes Fedora / CentOS check out my previous toturial how to enable Linux Guest Virtualbox Addition on Redhat based distos.)

P. S.

What about Mac OS X since it is based on FreeBSD and it includes a lot of GNU licensing programs?

If you wonder whether on Mac OS X you don't need to run guest additions script such as (VBoxLinuxAdditions.run) on Mac Host -> Guest OS integration is done only by enabling the feature from VBox GUI interface via:
 

Devices -> Insert Guest Additions CD Image

What about enabling Copy / Paste on Linux Host VirtualBox hosting a Windows Guest OS?


Enabling Copy / Paste on a Windows Virtual Machine (I wrote about it earlier here), follows the same steps as in this tutorial.
The only difference is instead of running the VBoxLinuxAdditions.sh you have to navigate to the CD from Windows Explorer and run the appropriate .exe file depending on your architecture (X86 or 64 bit), the files to run on the virtual CDROM are one of the 3:

1. VBoxWindowsAdditions-amd64.exe
2. VBoxWindowsAdditions.exe
3. VBoxWindowsAdditions-x86.exe

virtualbox-vm-guest-additions-autoplay-web-on-windows-os

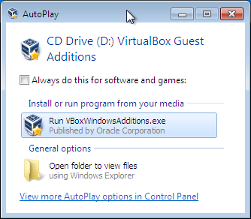
Follow the click through interface and you will have the Copy / Paste between your Linux -> Windows OS working.

Happy Copy / Pasting ! 🙂

Resize a VirtualBox guest Linux VDI Disk under Linux Host

Tuesday, September 4th, 2018


https://www.pc-freak.net/images/virtualbox-virtual-machine-guest-Windows-10-Linux-Debian-9-screenshot

I am using Oracle VirtualBox virtual machine to experiment with things before I deploy them on my servers. Recently I installed Debian 9 in a hurry (without much taking attention on the configuration options during VM machine creation) and the negative results of my lack of attention came quickly as my Linux Virtualbox guest OS just ran of space a little time after I have installed a Debian Stretch 9 OS into the virtual machine ..

I didn't realized immediately the "No free disk space" error was there because, after installing a few sets of Debian packages (Exim MTA – exim4-damon-heavy .. related etc.) immediately, shutdown the Virtual Machine running (even of this very moment) on my Thinkpad T420 notebook and went to bed.

This morning I switched on the PC booted my notebook and launched the VM to do another set of experiments inside it, however it seemed it failed to load all services printed in text on Linux boot and the GDM3 Greater never appearead on screen- for those who don't know GDM3 is Linux Graphical environment Authentication / Login program.

gdm3-debian-9-login-errors-low-disk-space-no-free-space-on-disk

I have tried a VirtualBox VM Restart,  hoping that the cause of my problems might be VMachine bug (as I'm running the latest stable version of VirtualBox (Virtualbox 5.2) taken from VBox Linux download page . On Next boot weirdly the OS booted until the GDM greater but inputting the password did not load into GNOME but kept repeatedly asking for password.

After another VM restart (shutdown + re-boot), I could eventually login but I got a Low disk space error like in below screenshot

www.pc-freak.net/images/debian-linux-9-running-inside-virtual-machine-low-disk-space-stroke-selection

So how to fix the Virtual Debian Install Low Disk Space?

As of today September 4 2018 the way to extend the hard disk, that was prepared originally for the Virtual Machine install you need to give a check inside your Linux home (~/) directory under Virtualbox VMs find the folder that is equivallent to the Virtual Machine (whose Hard Disk Drive) you would like to extend, do a ls command check to identify the exact name of the VDI – [Virtual Desktop Infrastructure] file (in my case, that's is Debian 9.vdi) and use VboxManage modifyhd options command like shown below to resize VM HDD to more gigabytes

1. Resize the Virtualbox VM .VDI file using command line

root@jericho:/home/hipo/VirtualBox VMs/Debian 9# VBoxManage modifyhd 'Debian 9.vdi' –resize 40000
0%…10%…20%…30%…40%…50%…60%…70%…80%…90%…100%

As you see I am resizing my Hard Drive for this Virtual Machine to 40000 = (40 Gigabytes), if you have need / more disk space you might want to set something like 100000 (100GB).


2. Resizing .VDI file (Virtual Machine) using VirtualBox GUI

Click on Global Tools button (located leftside upper side on the screen

virtualbox-resize-debian-linux-harddrive-global-tools-screenshot

Drag the bar Size: to the Hard Drive partition size you want it to be …
 

So far so good, now the image file is resized but the GNU / Linux partition is still being small, so we need to also do repartitioning, once booted into the VM in order to stretch the HDD size to 40 Gigas.

Next install and use gparted Linux tool to add the free space to your root partition, use the gparted

Inside the VM instal the tool with:
 

Inside virtualmachine's in gnome-terminal / xterm etc. depending on the graphical environment used do install with apt-get:


debian:# apt-get install –yes gparted


debian~:# gparted


Notice that gparted has to be ran as a root superuser.


Run GParted and create new EXT3 filesystem that is 10GB (the size of the new created partition).

If you have installed Debian to place all partitions under / (root directory /dev/sda1) then the fresh new partition to create should be
/dev/sda3, anyways just look closely in EXT3 and in your case if the partiition is named differently create according to proper partition /dev/ naming.

I'll not run into details on how to create the partition with GParted as the program interface is very self-explanatory, the only thing is to apply the update to create partition and the ext3 filesystem, that's being done
with a green tick:


Next step is to check with fdisk whether, we have ext3 properly created  filesystem as we've done already with GPARTED:

Once we have the partition created with EXT3 filesystem, we're ready to move /usr temporary to other folder, I use usually /root for the move but you can create anywhere a new folder for that and move to there.

To move to /root directory run again in terminal:


debian:~# mv /usr /root
debian:~# mkdir /usr


Note that during the move operations, your Desktop icons will become without (with broken) pictures and the default Debian background picture is to disappear, that's because the GUI environment will soon realize /usr/ libraries that're periodically reloaded in memory are missing and will be unable to reload them as it does in a cycle.

That should take a few minutes, so grab a coffee or if you're a smoker (hope not as smoking kills 🙂 ), in 5 / 10 minutes time depending on your computer / server configuration, it will be over, so we're ready to create new /usr dir and mount the  new partition:


debian:~# mount /dev/sda3 /usr


howto-extend-root-filesystem-disk-space-linux-move-usr-folder-to-root-temporary-debian-gnu-linux1


Now we check with mount command whether mount is fine:


check-if-filesystem-is-properly-mounted-linux-debian-screenshot


Now  /dev/sda3 is mounted under /usr  and we have to move back /root/usr directory content back to the newly mounted /usr so we run command:
 

debian:~#  mv /root/usr/* /usr/*


Finally we need to create proper records for the new partition inside /etc/fstab (fstab –FileSystem Tab file – the file which describes instructs the Linux OS what partition to boot where, what)


Nginx increase security by putting websites into Linux jails howto

Monday, August 27th, 2018

linux-jail-nginx-webserver-increase-security-by-putting-it-and-its-data-into-jail-environment

If you're sysadmining a large numbers of shared hosted websites which use Nginx Webserver to interpret PHP scripts and serve HTML, Javascript, CSS … whatever data.

You realize the high amount of risk that comes with a possible successful security breach / hack into a server by a malicious cracker. Compromising Nginx Webserver by an intruder automatically would mean that not only all users web data will get compromised, but the attacker would get an immediate access to other data such as Email or SQL (if the server is running multiple services).

Nowadays it is not so common thing to have a multiple shared websites on the same server together with other services, but historically there are many legacy servers / webservers left which host some 50 or 100+ websites.

Of course the best thing to do is to isolate each and every website into a separate Virtual Container however as this is a lot of work and small and mid-sized companies refuse to spend money on mostly anything this might be not an option for you.

Considering that this might be your case and you're running Nginx either as a Load Balancing, Reverse Proxy server etc. , even though Nginx is considered to be among the most secure webservers out there, there is absolutely no gurantee it would not get hacked and the server wouldn't get rooted by a script kiddie freak that just got in darknet some 0day exploit.

To minimize the impact of a possible Webserver hack it is a good idea to place all websites into Linux Jails.

linux-jail-simple-explained-diagram-chroot-jail

For those who hear about Linux Jail for a first time,
chroot() jail is a way to isolate a process / processes and its forked children from the rest of the *nix system. It should / could be used only for UNIX processes that aren't running as root (administrator user), because of the fact the superuser could break out (escape) the jail pretty easily.

Jailing processes is a concept that is pretty old that was first time introduced in UNIX version 7 back in the distant year 1979, and it was first implemented into BSD Operating System ver. 4.2 by Bill Joy (a notorious computer scientist and co-founder of Sun Microsystems). Its original use for the creation of so called HoneyPot – a computer security mechanism set to detect, deflect, or, in some manner, counteract attempts at unauthorized use of information systems that appears completely legimit service or part of website whose only goal is to track, isolate, and monitor intruders, a very similar to police string operations (baiting) of the suspect. It is pretty much like а bait set to collect the fish (which in this  case is the possible cracker).

linux-chroot-jail-environment-explained-jailing-hackers-and-intruders-unix

BSD Jails nowadays became very popular as iPhones environment where applications are deployed are inside a customly created chroot jail, the principle is exactly the same as in Linux.

But anyways enough talk, let's create a new jail and deploy set of system binaries for our Nginx installation, here is the things you will need:

1. You need to have set a directory where a copy of /bin/ls /bin/bash /bin/,  /bin/cat … /usr/bin binaries /lib and other base system Linux system binaries copy will reside.


server:~# mkdir -p /usr/local/chroot/nginx


2. You need to create the isolated environment backbone structure /etc/ , /dev, /var/, /usr/, /lib64/ (in case if deploying on 64 bit architecture Operating System).


server:~# export DIR_N=/usr/local/chroot/nginx;
server:~# mkdir -p $DIR_N/etc
server:~# mkdir -p $DIR_N/dev
server:~# mkdir -p $DIR_N/var
server:~# mkdir -p $DIR_N/usr
server:~# mkdir -p $DIR_N/usr/local/nginx
server:~# mkdir -p $DIR_N/tmp
server:~# chmod 1777 $DIR_N/tmp
server:~# mkdir -p $DIR_N/var/tmp
server:~# chmod 1777 $DIR_N/var/tmp
server:~# mkdir -p $DIR_N/lib64
server:~# mkdir -p $DIR_N/usr/local/


3. Create required device files for the new chroot environment


server:~# /bin/mknod -m 0666 $D/dev/null c 1 3
server:~# /bin/mknod -m 0666 $D/dev/random c 1 8
server:~# /bin/mknod -m 0444 $D/dev/urandom c 1 9


mknod COMMAND is used instead of the usual /bin/touch command to create block or character special files.

Once create the permissions of /usr/local/chroot/nginx/{dev/null, dev/random, dev/urandom} have to be look like so:


server:~# ls -l /usr/local/chroot/nginx/dev/{null,random,urandom}
crw-rw-rw- 1 root root 1, 3 Aug 17 09:13 /dev/null
crw-rw-rw- 1 root root 1, 8 Aug 17 09:13 /dev/random
crw-rw-rw- 1 root root 1, 9 Aug 17 09:13 /dev/urandom


4. Install nginx files into the chroot directory (copy all files of current nginx installation into the jail)
 

If your NGINX webserver installation was installed from source to keep it latest
and is installed in lets say, directory location /usr/local/nginx you have to copy /usr/local/nginx to /usr/local/chroot/nginx/usr/local/nginx, i.e:


server:~# /bin/cp -varf /usr/local/nginx/* /usr/local/chroot/nginx/usr/local/nginx


5. Copy necessery Linux system libraries to newly created jail
 

NGINX webserver is compiled to depend on various libraries from Linux system root e.g. /lib/* and /lib64/* therefore in order to the server work inside the chroot-ed environment you need to transfer this libraries to the jail folder /usr/local/chroot/nginx

If you are curious to find out which libraries exactly is nginx binary dependent on run:

server:~# ldd /usr/local/nginx/usr/local/nginx/sbin/nginx

        linux-vdso.so.1 (0x00007ffe3e952000)
        libpthread.so.0 => /lib/x86_64-linux-gnu/libpthread.so.0 (0x00007f2b4762c000)
        libcrypt.so.1 => /lib/x86_64-linux-gnu/libcrypt.so.1 (0x00007f2b473f4000)
        libpcre.so.3 => /lib/x86_64-linux-gnu/libpcre.so.3 (0x00007f2b47181000)
        libcrypto.so.0.9.8 => /usr/local/lib/libcrypto.so.0.9.8 (0x00007f2b46ddf000)
        libz.so.1 => /lib/x86_64-linux-gnu/libz.so.1 (0x00007f2b46bc5000)
        libc.so.6 => /lib/x86_64-linux-gnu/libc.so.6 (0x00007f2b46826000)
        /lib64/ld-linux-x86-64.so.2 (0x00007f2b47849000)
        libdl.so.2 => /lib/x86_64-linux-gnu/libdl.so.2 (0x00007f2b46622000)


The best way is to copy only the libraries in the list from ldd command for best security, like so:


server: ~# cp -rpf /lib/x86_64-linux-gnu/libthread.so.0 /usr/local/chroot/nginx/lib/*
server: ~# cp -rpf library chroot_location

etc.


However if you're in a hurry (not a recommended practice) and you don't care for maximum security anyways (you don't worry the jail could be exploited from some of the many lib files not used by nginx and you don't  about HDD space), you can also copy whole /lib into the jail, like so:


server: ~# cp -rpf /lib/ /usr/local/chroot/nginx/usr/local/nginx/lib


NOTE! Once again copy whole /lib directory is a very bad practice but for a time pushing activities sometimes you can do it …


6. Copy /etc/ some base files and ld.so.conf.d , prelink.conf.d directories to jail environment


server:~# cp -rfv /etc/{group,prelink.cache,services,adjtime,shells,gshadow,shadow,hosts.deny,localtime,nsswitch.conf,nscd.conf,prelink.conf,protocols,hosts,passwd,ld.so.cache,ld.so.conf,resolv.conf,host.conf}  \
/usr/local/chroot/nginx/usr/local/nginx/etc


server:~# cp -avr /etc/{ld.so.conf.d,prelink.conf.d} /usr/local/chroot/nginx/nginx/etc


7. Copy HTML, CSS, Javascript websites data from the root directory to the chrooted nginx environment


server:~# nice -n 10 cp -rpf /usr/local/websites/ /usr/local/chroot/nginx/usr/local/


This could be really long if the websites are multiple gigabytes and million of files, but anyways the nice command should reduce a little bit the load on the server it is best practice to set some kind of temporary server maintenance page to show on the websites index in order to prevent the accessing server clients to not have interrupts (that's especially the case on older 7200 / 7400 RPM non-SSD HDDs.)


8. Stop old Nginx server outside of Chroot environment and start the new one inside the jail


a) Stop old nginx server

Either stop the old nginx using it start / stop / restart script inside /etc/init.d/nginx (if you have such installed) or directly kill the running webserver with:


server:~# killall -9 nginx


b) Test the chrooted nginx installation is correct and ready to run inside the chroot environment


server:~# /usr/sbin/chroot /usr/local/chroot/nginx /usr/local/nginx/nginx/sbin/nginx -t
server:~# /usr/sbin/chroot /usr/local/chroot/nginx /usr/local/nginx/nginx/sbin/nginx


c) Restart the chrooted nginx webserver – when necessery later


server:~# /usr/sbin/chroot /nginx /usr/local/chroot/nginx/sbin/nginx -s reload


d) Edit the chrooted nginx conf

If you need to edit nginx configuration, be aware that the chrooted NGINX will read its configuration from /usr/local/chroot/nginx/nginx/etc/conf/nginx.conf (i'm saying that if you by mistake forget and try to edit the old config that is usually under /usr/local/nginx/conf/nginx.conf


How to mount LVM partition volume on Linux

Wednesday, August 22nd, 2018

lvm-logical-volume-logical-volume-groups

(LVM) = Logical Volume Manager is a device mapper offering logical volume management for the Linux kernel. Virtually all modern GNU / Linux distributions has support for it and using LVM is used among almost all Hosting Providers on (dedicated) backend physical and Virtual XEN / VMWare etc. servers because it provides the ability to merge a number of disks into virtual volumes (for example you have a number of SSD Hard Drives on a server that are under a separate /dev/sda1 /dev/sda2 /dev/sdb3 /dev/sdb4 etc. and you want all the HDDs to appear as a single file system this is managed by Linux LVM.

Logical-volume-manager-linux-explained-diagram.svg

Picture sources Wikipedia

The use of LVM is somewhat similar to RAID 0 disk arrays, where the good about it it allows the removal and addition of hard disks in real time (broken hard disks) on servers to be replaced without service downtime as well as dynamic HDD volume resizal is possible. LVM allows also relatively easy encryption of multiple HDD volumes
with single password.

Discs can be organized in volume groups (so lets say 2 of the server Attached conventional Hard Disks, SCSI or SSDs can be attached to LVM1 and another 3 Hard Drives could be attached to LVM2 group etc.

LVM has been an integral part of Linux kernel since 1998.

lvm is available for install via apt, yum, dhf etc. under a package called lvm2, so to install it on Debian / Ubuntu Fedora Linux (if it is not already installed on the servers with).


– Install LVM2 On Debian / Ubuntu
 

debian:~# apt-get install –yes lvm2


– Install LVM2 on Fedora / CentOS (Redhat RPM based distros)


[root@centos ~]:# yum install -y lvm2


or

[root@fedora ~]:#  dhf install -y lvm2


I. Mounting LVM2 on Linux server after broken DISK change part of a LVM Volume

For example the HDD faileddue to bad sectors and physical HDD head damage damage  – the easiest way to figure that out if the server is running smartd or via a simple HDD test check from BIOS  ( as the ROOT partition is on a LVM it fails to boot properly. You have changed the broken HDD with a brand new and you need to remount the LVM either physically on the server console or remotely via some kind of BIOS KVM interface).

In my experience working for Santrex this was a common sysadmin job, as many of the Virtual Client servers as well as others irons situated in various DataCenters, were occasionally failing to boot and the monitoring system was reporting about the issues and we had to promptly react and bring the servers up.

Here is shortly how we managed to re-mount the LVM after the SSDs / HDDS were substituted:

    1.1. Execute fdisk, vgscan / lvdisplay command

fdisk-lvm-screenshot

lvdisplay-screenshot

vgscan scans all supported LVM block devices in the system for VGs (Virtual Groups)

vgscan-vgchange-screenshot-lvm

    1.2. Next issue vgchange command to activate volume
 

vgchange -ay


    1.3. Type lvs command to get information about logical volumes


lvs


    1.4. Create a mount point using the mkdir command

      That's because we wanted to check the LVM will get properly mounted on next server reboot).
   
     1.5. Mount an LVM volume using
 

server:~# mount /dev/mapper/DEVICE /path/to/mount_point


     1.6. To check the size of the LVM (mount points, mounted LVM /dev/names sizes and the amount of free space on each of them use)
 

server:~# df -T

MySQL crashes after upgrade from MySQL to MariaDB and how to fix it

Tuesday, August 21st, 2018

how-to-fix-crashing-mysql-after-upgrade-to-mariadb-database-mariadb-logo.png

If you have recently upgraded your Debian / Ubuntu / CentOS Linux Server to the latest RPM / DEB packages as part of the upgrade you might have noticed the upgrade of MySQL Community Server  (which was bought by Oracle Corporation few years ago) is automatically upgraded to MariaDB (which is a MySQL fork made by the original developers of MySQL and guaranteed to stay open source. Just to name some of the Notable users include Wikipedia, WordPress.com and Google.).

You might have noticed MariaDB's restart script which is still under /etc/init.d/mysql  won't start and a quick check in /var/log/mysql.err | /var/log/mysql.log
shows errors of /usr/bin/mysqld crashing with errors like:

140502 14:13:05 [Note] Plugin 'FEDERATED' is disabled.
InnoDB: Log scan progressed past the checkpoint lsn 108 1057948207
140502 14:13:06  InnoDB: Database was not shut down normally!
InnoDB: Starting crash recovery.
InnoDB: Reading tablespace information from the .ibd files…
InnoDB: Restoring possible half-written data pages from the doublewrite
InnoDB: buffer…
InnoDB: Doing recovery: scanned up to log sequence number 108 1058059648
InnoDB: 1 transaction(s) which must be rolled back or cleaned up
InnoDB: in total 15 row operations to undo
InnoDB: Trx id counter is 0 562485504
140502 14:13:06  InnoDB: Starting an apply batch of log records to the database…
InnoDB: Progress in percents: 4 5 6 7 8 9 10 11 12 13 14 15 16 17 18 19 20 21 22 23 24 25 26 27 28 29 30 31 32 33 34 35 36 37 38 39 40 41 42 43 44 45 46 47 48 49 50 51 52 53 54 55 56 57 58 59 60 61 62 63 64 65 66 67 68 69 70 71 72 73 74 75 76 77 78 79 80 81 82 83 84 85 86 87 88 89 90 91 92 93 94 95 96 97 98 99
InnoDB: Apply batch completed
InnoDB: Starting in background the rollback of uncommitted transactions
140502 14:13:06  InnoDB: Rolling back trx with id 0 562485192, 15 rows to undo
140502 14:13:06  InnoDB: Started; log sequence number 108 1058059648
140502 14:13:06  InnoDB: Assertion failure in thread 1873206128 in file ../../../storage/innobase/fsp/fsp0fsp.c line 1593
InnoDB: Failing assertion: frag_n_used > 0
InnoDB: We intentionally generate a memory trap.
InnoDB: Submit a detailed bug report to http://bugs.mysql.com.
InnoDB: If you get repeated assertion failures or crashes, even
InnoDB: immediately after the mysqld startup, there may be
InnoDB: corruption in the InnoDB tablespace. Please refer to
InnoDB: http://dev.mysql.com/doc/refman/5.1/en/forcing-recovery.html
InnoDB: about forcing recovery.
140502 14:13:06 – mysqld got signal 6 ;
This could be because you hit a bug. It is also possible that this binary
or one of the libraries it was linked against is corrupt, improperly built,
or misconfigured. This error can also be caused by malfunctioning hardware.
We will try our best to scrape up some info that will hopefully help diagnose
the problem, but since we have already crashed, something is definitely wrong
and this may fail.

key_buffer_size=16777216
read_buffer_size=131072
max_used_connections=0
max_threads=151
threads_connected=0
It is possible that mysqld could use up to
key_buffer_size + (read_buffer_size + sort_buffer_size)*max_threads = 345919 K
bytes of memory
Hope that's ok; if not, decrease some variables in the equation.

thd: 0x0
Attempting backtrace. You can use the following information to find out
where mysqld died. If you see no messages after this, something went
terribly wrong…
stack_bottom = (nil) thread_stack 0x30000
140502 14:13:06 [Note] Event Scheduler: Loaded 0 events
140502 14:13:06 [Note] /usr/sbin/mysqld: ready for connections.
Version: '5.1.41-3ubuntu12.10'  socket: '/var/run/mysqld/mysqld.sock'  port: 3306  (Ubuntu)
/usr/sbin/mysqld(my_print_stacktrace+0x2d) [0xb7579cbd]
/usr/sbin/mysqld(handle_segfault+0x494) [0xb7245854]
[0xb6fc0400]
/lib/tls/i686/cmov/libc.so.6(abort+0x182) [0xb6cc5a82]
/usr/sbin/mysqld(+0x4867e9) [0xb74647e9]
/usr/sbin/mysqld(btr_page_free_low+0x122) [0xb74f1622]
/usr/sbin/mysqld(btr_compress+0x684) [0xb74f4ca4]
/usr/sbin/mysqld(btr_cur_compress_if_useful+0xe7) [0xb74284e7]
/usr/sbin/mysqld(btr_cur_pessimistic_delete+0x332) [0xb7429e72]
/usr/sbin/mysqld(btr_node_ptr_delete+0x82) [0xb74f4012]
/usr/sbin/mysqld(btr_discard_page+0x175) [0xb74f41e5]
/usr/sbin/mysqld(btr_cur_pessimistic_delete+0x3e8) [0xb7429f28]
/usr/sbin/mysqld(+0x526197) [0xb7504197]
/usr/sbin/mysqld(row_undo_ins+0x1b1) [0xb7504771]
/usr/sbin/mysqld(row_undo_step+0x25f) [0xb74c210f]
/usr/sbin/mysqld(que_run_threads+0x58a) [0xb74a31da]

/usr/sbin/mysqld(trx_rollback_or_clean_all_without_sess+0x3e3) [0xb74ded43]
/lib/tls/i686/cmov/libpthread.so.0(+0x596e) [0xb6f9f96e]
/lib/tls/i686/cmov/libc.so.6(clone+0x5e) [0xb6d65a4e]
The manual page at http://dev.mysql.com/doc/mysql/en/crashing.html contains
information that should help you find out what is causing the crash.

Any recommendations?
mysql

I hoped to solve the /usr/bin/mysqld segfault error with server reboot as I though the problem is caused by the fact libc library was updated, but even a reboot did not solve it.

I've investigated online for a solution and found following MySQL corruption and recovery article.

The solution outlined there is very simple and comes to adding the line:
 

innodb_force_recovery = 1


to /etc/mysql/my.cnf

Assuming the mysql server is not running before restarting mariadb server.

1. Make a backup (Dump) of all MySQL tables

mysql:~# mysqldump -A > dump.sql

2. Drop all databases which need recovery.
You can do that from mysql cli or phpmyadmin

3. Stop mysqld.

mysql:~# /etc/init.d/mysql restart

4.  Remove /var/lib/mysql/ib*

mysql:~# rm -rf /var/lib/mysql/ib*

5. Comment out innodb_force_recovery in /etc/mysql/my.cnf

6. Restart mysqld. Look at mysql error log.
If everything is fine and you have problems with broken or missing databases the best thing next is to stop again mariadb and

7. Restore databases from the dump

mysql:~# mysql < dump.sql


* How to stop unattended upgrades on Debian / Ubuntu and other deb based Linux

Saturday, July 21st, 2018

If you wondered how to stop the annoying automatic upgrades that push unknown software in background loading the computer while you browse or work and Why here is how:

* 1. Stop Annoying Unattended Upgrades on Debian and Ubuntu Linux

As root you have to execute following command
linux:~# apt-get remove –yes unattended-upgrades

And TA DA DAAA DAA DAaM !!!
 

* From now if you like to upgrade to latest in order to upgrade you can do it manually with these 3 commands:

linux:~# apt-get update && apt-get upgrade && apt-get dist-upgrade dist-upgrade

Your thanks to me are very welcome

How to configure Joystick ( Gamepad ) on Debian, Ubuntu, Mint GNU / Linux easily

Thursday, November 2nd, 2017

linux-joystick-howto-configure-easily-joypad-joystick-genius-maxfire

"All work and no fun makes Jack a dull boy …."

If you own a PC joystick and you're a gamer who just migrated to GNU / Linux and you enter the wonderful world of Linux gaming (haha what wonderful world its nightmare :), perhaps you will want an easy way to make your Joystick work on GNU / Linux.

In this article I'll try my best to explain how you can relavitely easy make your Linux joystick (joy stick 🙂 ), bring you the happiness of playing old arcades in an old school joystick way.
 

1. Install necessery packages for joystick under Linux
 

gamelinux:~# apt-get install –yes joystick jstest-gtk joy2key gjoypad xserver-xorg-input-joystick \
xserver-xorg-input-joystick-dev kodi-peripherals


2. Test wherher joystick is properly detected by kernel


gamelinux:~# cat /dev/input/js0


test-whether-joystick-works-on-linux-screenshot-cat-command


If above cat command returns a bunch of weird signs in your terminal, that means the joystick was successfully detected and should be working.
 

3. Load Joystick necessery Linux modules if your Gamepad is not properly detected


Note that I assume you're super user most of below commands are preferrably to be run as root:

If you're Gamepad is not detected, you'll have to manually create /dev/input/js0

gamelinux:~# cd /dev/input
gamelinux;~# MAKEDEV js0


Further on you'll need to perhaps load at least the following 3 modules which gives support for a number of JoySticks / Gamepad devices

gamelinux:~# modprobe joydev
gamelinux:~# modprobe ns558
gamelinux:~# modprobe sidewinder
gamelinux:~# modprobe gameport

Just in case if you're planning to play old Arcade games I recommend you load also following bunch of modules:

gamelinux:~# modprobe snd-seq
gamelinux:~# modprobe 3c59x
gamelinux:~# modprobe snd-emu10k1
gamelinux:~# modprobe snd-pcm-oss
gamelinux:~# modprobe snd-mixer-oss
gamelinux:~# modprobe snd-seq-oss

If you get an error message and don't suceed to calibrate your gamepad, you need to look under to know the modules that fit your Joystick model.


For a MS Sidewinder gamepad

gamelinux:~# modprobe joydev
gamelinux:~# modprobe ns558
gamelinux:~# modprobe sidewinder
gamelinux:~# modprobe analog
## This one work only for analog pad, like joysticks


For a Logitech WingMan digital gamepad
 

gamelinux:~# modprobe joydev
gamelinux:~# modprobe ns558
gamelinux:~# modprobe adi
## Specific driver for Logitech gamepads

For a Logitech WingMan gamepad (analog)

gamelinux:~# modprobe joydev
gamelinux:~# modprobe ns558
gamelinux:~# modprobe analog
## Module for analog gamepads
gamelinux:~# modprobe pcigame
## Module for PCI card (??)
gamelinux:~# modprobe adi
## Module for Logitech pads


For a MS SideWinder ForceFeedBack Pro
 

gamelinux:~# modprobe joydev
gamelinux:~# modprobe ns558
gamelinux:~# modprobe analog
gamelinux:~# modprobe sidewinder
gamelinux:~# modprobe iforce
## Force Feedback driver
gamelinux:~# modprobe evdev


For a Guillemot dual analog gamepad (gameport, non-USB)

gamelinux:~# modprobe joydev
gamelinux:~# modprobe ns558
gamelinux:~# modprobe guillemot
gamelinux:~# modprobe analog
## to check
gamelinux:~# modprobe iforce
## to check


If auto-detect of joystick doesn't work (hopefully not your case)


gamelinux:~# modprobe usbhid
gamelinux:~# modprobe joydev


– Enable Joystick for KDE Users
 

Luckily though historically the kcontrol package was required but nowadays, KDE users could usually calibrate joystick via KDE K Control Centrer


To make joystick configuration permanent on Linux you need to add the modules that worked with your Joystick device to /etc/modules,

for eample I own

JOYSTICK GENIUS MAXFIRE G-08XU

And my

/etc/modules file

looks like so:


gamelinux:~# cat /etc/modules

# /etc/modules: kernel modules to load at boot time.
#
# This file contains the names of kernel modules that should be loaded
# at boot time, one per line. Lines beginning with "#" are ignored.
snd-seq
3c59x
snd-emu10k1
snd-pcm-oss
snd-mixer-oss
snd-seq-oss
joydev


In case of some problems with SoundCard conflicting joystick or the other way around you might also want to add into /etc/modprobe.d/options something similar to


gamelinux:~# vim /etc/modprobe.d/options

gamelinux:~# options snd_ens1371 joystick_port=1


4. Calibrate your joystick either using jstest / jscal commands or GNOME's jstest-gtk
 

To calibrate joystick in text mode use below commands


jscal /dev/input/js0
jstest /dev/input/js0


For the lazy ones you can calibrate your joystick via GNOME's graphical tool jstest-gtk
 

jstest-gtk

jstest-gtk-linux-screenshot-how-to-configure-joystick-linux

This article is just a basic explanation on how to make your joystick work, for thoroughful advanced explanation on JoySticks and Gamepads I recommend ArchLinux Wiki explanation on how to configure Gamepads
 

5. Create missing Symlinks from /dev/input/js0 to /dev/js0
 

I've personally experienced a problem with Xmame / Xmess (Multimedia Arcade Emulator) and other old arcade Virtual Machine Emulators that are supposed to recognize the joystick, but because it is common that the joystick is trying to be invoked via /dev/js0 /dev/js1 (depending on its model), but somehow this links are missing, thus I had to manually create the links with ln command, like so:

– For /dev/input/js0 to link /dev/js0


cd /dev; ln -sf /dev/input/js0;


– For /dev/input/js1 to link /dev/js1


cd /dev; ln -sf /dev/input/js1;


Install TeamViewer on latest Debian, Ubuntu, Fedora, CentOS Linux quick how to

Tuesday, October 31st, 2017

teamviewer-howto-install-on-gnu-linux-teamviewer-and-tux-penguin-logo

If you're a sysadmin who uses GNU / Linux as a Desktop as me you will certainly need to have TeamViewer installed and ready for use on your Linux desktop.

Even though TeamViewer is a proprietary application and I prefer not to use it I'm forced to have it installed because of every now and then a friend or customer would require you to login remotely to his Windows server and clean up the system either from spyware or viruses or just deploy some new software.

Nowdays most of people are running 64 bit ( amd64 ) built operating system and the problem with TeamViewer on Linux 64bit is that it doesn't have an actual full featured 64 port of the application but only have a 32 bits install, besides that big part of components of TeamViewer are running using wine windows emulation and hencing making it work on Linux is sometimes not so trivial as we might have desired.

Because TeamViewer is a 32 bit application, it has a number of dependency libraries that are 32 bit in Linux that's the so called (i386) built libraries (packages).

Hence to make TeamViewer work on modern GNU / Linux operating systems such as Debian / Ubuntu / Mint Linux / Fedora / CentOS etc. it is necessery to have some i386 libraries and other 32 bit things pre-installed and only then you can have a working copy of teamviewer on your Linux.

1. Installing i386 applications required for TeamViewer operation

– On Debian / Ubuntu / Kubuntu / Xubuntu Linux run below commands:

First we need to add the i386 architecture to be supported by Linux


dpkg –add-architecture i386
apt update


Then on Debian and other deb based Linux we need to install following libraries
 

# apt install libjpeg62-turbo:i386 wget gdebi-core


2. Download latest teamviewer version from TeamViewer website

– On Debian, Ubuntu and other deb based Linux distros.

Download latest teamviewer version and install it:


# wget https://download.teamviewer.com/download/teamviewer_i386.deb


On CentOS, Fedora, OpenSuSE other RPM based distros:

Download the Teamviewer package and package signature using wget


# wget https://download.teamviewer.com/download/linux/signature/TeamViewer2017.asc
# wget https://download.teamviewer.com/download/teamviewer.i686.rpm


3. Insteall teamviewer with gdebi (Simple Tool to install deb files)


# gdebi teamviewer_i386.deb


Remote control and meeting solution.
 TeamViewer provides easy, fast and secure remote access and meeting solutions
 to Linux, Windows PCs, Apple PCs and various other platforms,
 including Android and iPhone.
 .
 TeamViewer is free for personal use.
 You can use TeamViewer completely free of charge to access your private
 computers or to help your friends with their computer problems.
 .
 To buy a license for commercial use, please visit http://www.teamviewer.com
 .
 This package contains Free Software components.
 For details, see /opt/teamviewer/doc/license_foss.txt
Do you want to install the software package? [y/N]:y


On Fedora, CentOS, SuSE RPM based ones:


# rpm –import TeamViewer_Linux_PubKey.asc


# rpm -i teamviewer_12.0.xxxxx.i686.rpm


or if you face some failed dependencies you better use zypper that will download any missing teamviewer dependencies.


# zypper install teamviewer_12.0.xxxxx.i686.rpm


4. Start Teamviewer


teamviewer-running-on-linux-screenshot


linux:~$ teamviewer
Init…
CheckCPU: SSE2 support: yes
XRandRWait: No value set. Using default.
XRandRWait: Started by user.
Checking setup…
wine: configuration in '/home/hipo/.local/share/teamviewer12' has been updated.
Launching TeamViewer …
Launching TeamViewer GUI …


How to Downgrade WordPress install to a prior release to Fix problems with wordpress after upgrade

Friday, October 27th, 2017

howto-downgrade-wordpress-to-a-prior-previous-version-easily-with-wp-downgrade-plugin-step-by-step-guide

Are you a wordpress website or blog owner? Did you recently upgraded to the latest WordPress release as you wanted to always keep ahead with security and latest wordpress functionalities ?

but out of a sudden components of WordPress stopped working after the upgrade …

I'm one of this and recently I've upgraded WordPress to 4.8.2, hopeing that this would make my blog even better with the fresh new wordpress but suddenly my Widgets stopped working, e.g.


Appearance -> Widgets


Show me strange blank page, when I tried to debug that in browser, with browser console in Google Chrome and Firefox ESR / Opera with Inspect elements, I could see some partially generated webpage, so I investigated further to see what in reality is creating my WordPress Widget troubles, I tried adding WordPress Debugging in wp-config.php for those who don't know how to do it to do so, you need to add the following line of code to wp-config.php
 

# vim /var/www/blog/wp-config.php

define( 'WP_DEBUG', true );
define( 'WP_DEBUG_LOG', true );


If everything is fine with your wordpress installation (e.g. directory / file permissions are reporting the fine), The log file should be situated under
 

wp-includes/debug.log


But if you enabled debugging like me and nothing was visible neither in WordPress WP generated page, neither in that log or even worse, the file is not being written, that might be an indicator of either a seriously messed wordpress installation, or bugs occuring due to combination of WordPress release with the PHP installed on the server in my case the WordPress was 4.82 and PHP is standard Debian package PHP 5.6.30


The next place I checked logically is HTTPD (Apache) both access and error logs and there I found the widgets.php once called is returning 500 (Internal Server Errors), so I was forced to do something to make my appearance work again.

I tried my best to make Appearance -> Widgets and Appearance -> Customize WP Dashboard menus to work but without success so I finally got pissed off and decided to downgrade WordPress to the previous version where everything was running fine.

A quick investigation in Google led to find that there is an easy to use WordPress plugin that is capable of upgrading / downgrading wordpress to virtually all official WordPress releases.

Below is shortly what I had to do to Downgrade my WP 4.8.2 to WP 4.7.3


1. Download WP Downgrade Specific Core Version wordpress plugin
 

 The plugin “WP Downgrade” forces the WordPress update routine to perform the installation of a specified WordPress release. The Core Release you specify is then downloaded from wordpress.org and installed as would any regular update. You can permanently stay on a previous version of your choice or update selected.

To download the plugin click here, save it to your computer and then transfer to server or directly use wget or curl commands with the exact plugin location and unzip it standardly

#  cd /var/www/blog/wp-content/plugins
#  wget https://downloads.wordpress.org/plugin/wp-downgrade.zip
#  unzip wp-downgrade.zip

N.B. ! On a shared hosting or CPanel, you might have to upload the plugin with FTP.


2. Enable WP Downgrade Specific Core Version wordpress plugin
 

Plugins -> WP Downgrade Specific Core Version enable


Below is a quote from the plugin website describing more about WP Downgrade plugin:

"WP Downgrade | Specific Core Version has the potential for becoming one of the best-loved plugins among those, who simply cannot update to the latest WP release.

In the past the latest WP release was the only offering for WP’s Automatic Update routine. This left all those behind, who have to wait with Core updates, until their plugins become compatible with newer WP releases. When this finally happens, more often than not there has already been yet another Core update. In the end a dreaded, cumbersome, time-consuming and error-prone Manual Update used to be the only way to go.

With WP Downgrade | Specific Core Version this is now a thing of the past. Anyone who lags behind the latest WP release is now able to use Automatic Updates even to lower WP versions. What WP Downgrade does simply is to make WP believe that the version you want to update to actually is the latest version. Because of this, there is no difference to updating to the latest version."


3. Configure WP Downgrade Specific Core Version plugin


Navigate to:

Settings -> WP-Downgrade

how-to-downgrade-wordpress-easily-to-a-previous-prior-release-wp-downgrade-screenshot


4. Install (Downgrade) WordPress to the previous release


Next you will have to press the re-install button to install the desired WordPress release, if you're unsure which was the exact previous version you used you can check the list of All WordPress official released versions here choose any version that was released few months before the latest that was creating troubles for you and do re-install with it, if you face issues with it, you plenty of other versions that are close to it with which you can try, after all one of them should be working.
 

downgrade-wordpress-howto-wordpress-re-install-button-screenshot
 

Assuming that your directory structure of the current installed WordPress is not having any permission issues, the respective version of wordpress would be downloaded and untarred over the actual latest release you're having, so soon you'll have your WP reverted to the OLD release.

Once downgrading in my case immediately my Appearance -> Widgets started working again. Hooray!

Note: that if you face some permission errors during download or install of the downgradable version of wordpress you will be notified, to fix that just take few minutes with chown command and so something like:


chown -R www-data /var/www/blog/


that should fix permissions for you so then you can happily again, re-run the re-Install button to finalize WP Downgrade.

Now you can enjoy your life as everytihng will be working as expected, no broken more strange plugins behavior (which is another additional effect showing incompitability between WordPress release and a Plugin, no nothing), you can sleep calmly again.

Enjoy! 🙂

FreeBSD post install configuration steps to make on fresh FreeBSD install to make ready for server and Desktop use

Saturday, October 28th, 2017

freebsd-post-install-configuration-steps-to-make-on-fresh-install-to-make-ready-for-server-freebsd-logo


1. Update binary packages

First thing to do just like on any new operating system install is to update / patch the server
 

# freebsd-update fetch
# freebsd-update install


2. Update FreeBSD port packages

As a FreeBSD administrator you will need ports every now and then so make sure you have them at their latest release for your FBSD release


# pkg update
# pkg upgrade


3. Install editors and bash


# pkg install nano vim joe bash bash_completion


4. Install sudo

To be able to run commands without becoming superuser root just like on any Linux you will probably want to have sudo package installed

# pkg install sudo


Sudo config file is under /usr/local/etc/sudoers

To edit it with syntax check enabled use visudo


# visudo

# sudo pkg update


If you want a regular account to have root superuser edit / modify and do things permissions


# pw groupmod wheel -M your_user_name


Then to make the wheel permissions work add to sudoers:


%wheel    ALL=(ALL=ALL)    ALL

5. FreeBSD modify personal information for account


# chpass your_user_name

To change your account and others to use bash instead of default freebsd csh


# csh -s /bin/bash your_user_name


7. Set a Static IP address for a FreeBSD server and configure DNS

Edit /etc/rc.local to look something like so


#ifconfig_em0="DHCP"
ifconfig_em0="inet 192.168.1.100 netmask 255.255.255.0"
# default gateway
defaultrouter="192.168.1.1"


/etc/rc.conf is also the file where you can easily enable / disable freebsd startup scripts

To restart network interafaces just like Debian Linux's /etc/init.d/networking restart type


# service netif restart
# service routing restart


To set Google DNS in FreeBSD just like in Linux add the IPs with nameserver prefix to /etc/resolv.conf


# echo 'nameserver 8.8.8.8' >> /etc/resolv.conf
# echo 'search your-domain-name' >> /etc/resolv.conf


– If you need to change the hostname of the FreeBSD server change in /etc/rc.conf

hostname="your-freebsdhostname"

– To add multiple IP addresses to a network interface on FBSD add line like below to /etc/rc.conf

ifconfig_em0_alias0="192.168.1.5 netmask 255.255.255.255"
ifconfig_em0_alias1="192.168.1.6 netmask 255.255.255.255"

To apply changes and bring up the newly set multiple IPs

# service netif restart


8. Setting up proper timezone

If for some reason the Time zone is improperly set during FreeBSD install, you can later set that with

# tzsetup

9. Set up ntp time server synchronization daemon

# vim /etc/rc.conf

ntpd_enable="YES"
ntpd_sync_on_start="YES"

First command will bring up NTP server at start up and second make it synchroniza with Internet NTP servers, to restart ntp so it set proper time
immediately

# service ntpd start


10. Add additional SWAP space to FreeBSD server after install

– First we need to create the swap file with command and then set up proper permissions for it

# truncate -S 3G /swapf
# chmod 0600 /swapf

– Then to make the swapf being used on boot we need to add it to /etc/fstab

# echo "md99 none swap sw,file=/swapf,late 0 0" >> /etc/fstab

To immediately apply the new added swap to be used by the system run:

# swapon -aqL

To check various things on how swap is configured use

# swapinfo -g


11. Configure Firewall in FreeBSD

# vim /etc/rc.conf

firewall_enable="YES"
firewall_script="/usr/local/etc/ipfw.rules"

A very basic firewall to add to ipfw.rules file would be something like so:
 

    $IPF 70 allow all from any to any out keep-state
    $IPF 80 allow icmp from any to any
    # open port ftp

    $IPF 110 allow tcp from any to any 21 in
    $IPF 120 allow tcp from any to any 21 out

    # 22 for ssh
    $IPF 130 allow tcp from any to any 22 in
    $IPF 140 allow tcp from any to any 22 out

    # mail port 25

    $IPF 150 allow tcp from any to any 25 in
    $IPF 160 allow tcp from any to any 25 out

    # dns (53) udp and tcp in
    $IPF 170 allow udp from any to any 53 in
    $IPF 175 allow tcp from any to any 53 in

    # dns (53) udp and tcp out
    $IPF 180 allow udp from any to any 53 out
    $IPF 185 allow tcp from any to any 53 out

    # http (80),
    $IPF 200 allow tcp from any to any 80 in
    $IPF 210 allow tcp from any to any 80 out
    # deny and log everything
    $IPF 500 deny log all from any to any

To launch the firewall
 

# service ipfw start


To list current FreeBSD Firewall rules use

# ipfw list

Finally if you need to check your connections to the server just like Linux's netstat you might consider using sockstat comand
 

# sockstat -4 -6

– 4 -6 will list you network connections for ipv4 and ipv6 both tcp and udp