Posts Tagged ‘config’

How to add Bulgarian language to GCompris Kids education software on Debian 12 GNU / Linux installing gcompris via flatpak next generation package distribution tool

Monday, January 26th, 2026

https://www.pc-freak.net/images/install-gcompris-on-linux-via-flatpak-package-distribution-sandboxed-framework.png

As I have a small currently 5.5 years old Kid Dimitar at home and i'm doing my best to make him learn new things and advance in different areas of life and knowledge.

Today Decided to introduce him to Linux4Kids gcompris a KDE educational set of games for small children.
Once installed with simple

# apt install gcompris-qt


It works fine and default version installable from default Debian distribution is fine, except it does not support Bulgarian.

That is again not a nice suprise, as even some pseudo languages like Belarusian are there to set but Bulgarian missing on the default installable pack:

# dpkg -l |grep -i gcompris
ii gcompris-qt 3.1-2 amd64 educational games for small children
ii gcompris-qt-data 3.1-2 all data files for gcompris-qt

After some tampering and unable to find a native .deb port of the latest release and my undesire to move from debian 12 (bookworm) Desktop Linux laptop at the moment to Debian 13 Trixie, i've finally found a way to install it via flatpak:

For those who never used snap package ecosystem or flatpak, here is a shortly synthesis on it:

Flatpak is an open-source, next-generation framework for building, distributing, and running sandboxed desktop applications on Linux.
It enables developers to package apps once and run them on any Linux distribution by including all necessary dependencies.
Flatpak improves security by isolating applications from the host system. 

Flatpaks are containerized applications. They require more space because the bring along their own versions of their dependencies instead of relying on system versions.

While a single application will have greater space requirements, the base images [and potentially overlays] will get shared between them and each successive flatpak will potentially require less overhead.

The pros to using them is that flatpaks are often more current than their distribution packaged versions and they are somewhat isolated from the base system. The cons are that they're not managed with the rest of your system packages, can have slower start times, occasionally have permissions issues, and take up more space.

In some cases, flatpak is a better choice. Sometimes, it's not, and there's no way we can really determine that for you.

Tried up to my best to install the newest version of gcompris which as of time of writting this blog post is gcompris 25.1

 # apt info flatpak|grep -i 'descr' -A8 -B8

WARNING: apt does not have a stable CLI interface. Use with caution in scripts.

Recommends: ca-certificates, default-dbus-system-bus | dbus-system-bus, desktop-file-utils, hicolor-icon-theme, gtk-update-icon-cache, libpam-systemd, p11-kit, polkitd | policykit-1, shared-mime-info, xdg-desktop-portal (>= 1.6), xdg-desktop-portal-gtk (>= 1.6) | xdg-desktop-portal-backend, xdg-user-dirs
Suggests: avahi-daemon, malcontent-gui
Conflicts: xdg-app
Replaces: xdg-app
Homepage: https://flatpak.org/
Download-Size: 1,400 kB
APT-Manual-Installed: yes
APT-Sources: http://ftp.debian.org/debian bookworm/main amd64 Packages
Description: Application deployment framework for desktop apps
 Flatpak installs, manages and runs sandboxed desktop application bundles.
 Application bundles run partially isolated from the wider system, using
 containerization techniques such as namespaces to prevent direct access
 to system resources. Resources from outside the sandbox can be accessed
 via "portal" services, which are responsible for access control; for
 example, the Documents portal displays an "Open" dialog outside the
 sandbox, then allows the application to access only the selected file.


# apt install flatpak

# flatpak remote-add –if-not-exists flathub https://flathub.org/repo/flathub.flatpakrepo
# flatpak install flathub org.kde.gcompris
# flatpak run org.kde.gcompris


If you have sound glitches of gcompris on Older laptops install all necessery for pipewire run it like that:

# apt install pipewire pipewire-audio-client-libraries pipewire-pulse
 

Try to run it manually with:


# env PULSE_LATENCY_MSEC=60 ; flatpak run org.kde.gcompris

If still sound glithches are present a workaround is to tune PipeWire buffer/quantum size:

PipeWire buffer/quantum size too aggressive?
 

Many crackling issues come from too small quantum. Create ~/.config/pipewire/pipewire.conf.d/99-custom.conf

# vim ~/.config/pipewire/pipewire.conf.d/99-custom.conf
and add:textcontext.properties = {
    default.clock.rate = 48000
    default.clock.quantum = 1024
    default.clock.min-quantum = 512
    default.clock.max-quantum = 2048
}

#systemctl –user restart pipewire pipewire-pulse
 

Create a new wrapper script to run you gcompris easily
 

# vim /usr/local/bin/gcompris.sh

#!/bin/bash
# little hack script to make music streamed via pulseaudio to not have severe glitches when running gcompris latest release on debian 12
# through flatpak
# if not working run cmd
# systemctl –user restart pipewire
LANG=bg_BG.UTF-8
SDL_AUDIODRIVER=pulseaudio
#flatpak run –device=all –socket=pulseaudio org.kde.gcompris
flatpak override –user –env=SDL_AUDIODRIVER=pulseaudio org.kde.gcompris
flatpak override –user –filesystem=~/.config/pipewire:ro org.kde.gcompris
LANG=bg_BG.UTF-8 flatpak run –socket=pulseaudio org.kde.gcompris

# chmod +x /usr/local/bin/gcompris.sh


Hence I run the wrapper script and let the kid enjoy the nice educational stuff while I enjoyed the nice kiddish peaceful music !

# /usr/local/bin/gcompris.sh


install-gcompris-on-linux-via-flatpak-package-distribution-sandboxed-framework

P.S. ! If you get issues with pipewire (if you're using one instead of pulseaudio as I do with my Mate desktop environment you can restart it and relaunch the gcompris nice addition to  tux4kids (see my previous article Tux for Kids (Tux Math, Tux Paint, Tux Typing) 3 games to develop your children Intellect):

# systemctl –user restart pipewire

Enjoy Gcompris !
 

Using GeoIP on Linux: Country-Based Filtering, Logging, and Traffic Control

Friday, January 16th, 2026

geoip-on-linux-country-based-filtering-logging-traffic-control-logo

GeoIP is one of those technologies that quietly sits in the background of many systems, yet it can be extremely powerful when used correctly. Whether you want to block traffic from specific countries, analyze access logs, or add geographic context to security events, GeoIP can be a valuable addition to your Linux toolbox.

In this article, we’ll go deeper and look at real GeoIP usage examples for:

  • Log analysis
  • Firewalls
  • Apache HTTP Server
  • HAProxy

All examples are based on typical GNU/Linux server environments.

What Is GeoIP? 

GeoIP maps an IP address to geographic data such as:

  • Country
  • City
  • ASN / ISP (depending on database)

Most modern systems use MaxMind GeoLite2 databases (

.mmdb

format).

Keep in Mind ! :
GeoIP data is approximate. VPNs, proxies, mobile networks, and CGNAT reduce accuracy. GeoIP should be treated as a heuristic, not a guarantee.

1. Installing GeoIP Databases on Linux deb based distro

On Debian / Ubuntu:

#

apt install geoipupdate

Configure

/etc/GeoIP.conf

with your MaxMind license key and run:  

# geoipupdate

Databases are usually stored in:

/usr/share/GeoIP/

2. GeoIP for Log Analysis (to get idea of where does your traffic origins from)

GeoIP with Apache HTTP Server

Apache can use GeoIP in two main ways:

  1. To do IP origin Logging 

  2. Do Access control based on IP origin

An altenartive GeoIP common use is to post-processing logs to find out attempts to breach your security.

Lets say you want to

Find top attacking countries against your SSHd service.

# grep "Failed password" /var/log/auth.log | \
awk '{print $(NF-3)}' | \
while read ip; do geoiplookup $ip; done |
\ sort | uniq -c | sort -nr


This command will provide you a visibility on attack sources georaphical Country origin

3. Installing Apache GeoIP Module

For legacy GeoIP (older systems):

# apt install libapache2-mod-geoip

For modern systems, GeoIP2 is preferred:

# apt install libapache2-mod-geoip2

Enable the module:

# a2enmod geoip2
# systemctl reload apache2

4. Configure GeoIP Logging in Apache (basic config)

Add country code to access logs:

LogFormat "%h %l %u %t \"%r\" %>s %b %{GEOIP_COUNTRY_CODE}e" geoip
CustomLog /var/log/apache2/access.log geoip

This allows you to analyze traffic by country later without blocking users.

5. Country-Based Filter Blocking in Apache based on IP origin

Example: allow only selected countries:

<IfModule mod_geoip2.c>
SetEnvIf GEOIP_COUNTRY_CODE ^(BG|DE)$ AllowCountry
Deny from all
Allow from env=AllowCountry
</IfModule>

Use this carefully. Blocking at the web server layer is better than firewall-level blocking, but still risky if you have global users.

6. Apply GeoIP to Apache Virtual Host

You can apply GeoIP rules per site:

<VirtualHost *:80>
ServerName example.com
<IfModule mod_geoip2.c>
SetEnvIf GEOIP_COUNTRY_CODE CN BlockCountry >
Deny from env=BlockCountry
</IfModule>
</VirtualHost>

This is useful when only specific applications need filtering.

Firewall vs Application Layer GeoIP (Pros and Cons)

Layer

Pros

Cons

Firewall

Early blocking

Hard to debug

Apache

Flexible per-site rules

App overhead

HAProxy

Centralized control

Requires careful config

Logs only

Safest

No blocking

7. Apply GeoIP to HAProxy

HAProxy is an excellent place to apply GeoIP logic because:

  • It sits in front of applications
  • ​Rules are fast and explicit
  • Logging is centralized

a. Preparing GeoIP Filtering to HAProxy service

HAProxy supports GeoIP2 via Lua or native ACLs using

.mmdb

Example directory:

/usr/share/GeoIP/GeoLite2-Country.mmdb

b. GeoIP-Based Access Control Lists ( ACLs ) in HAProxy

Basic country-based blocking:

frontend http_in
bind *:80

acl from_china src -m geoip CN
acl from_russia src -m geoip RU

http-request deny if from_china
http-request deny if from_russia

default_backend web_servers

This blocks traffic early, before it hits Apache or nginx.

c. GeoIP-Based Routing across different haproxy backends

Instead of blocking, you can route traffic differently:


acl eu_users src -m geoip DE FR NL
use_backend eu_backend if eu_users
default_backend global_backend

This is useful for:

  • Geo-based load balancing
  • Regional content
  • Legal compliance separation

d. GeoIP Logging config for HAProxy

Add country code to logs:

log-format "%ci:%cp [%t] %ft %b %s %TR/%Tw/%Tc/%Tr/%Ta %ST %B %CC"

(%CC = country code)

This makes traffic analysis extremely efficient.

Keep in Mind !

Use HAProxy or web server level for enforcement, and firewall GeoIP only when absolutely necessary.

8. Fail2ban + GeoIP: Smarter Bans, Better Context

Fail2ban is excellent at reacting to abusive behavior, but by default it only sees IP addresses, not where they come from. Adding GeoIP allows you to:

  • Tag bans with country information
  • Apply different ban policies per region
  • Detect unusual behavior patterns

a. GeoIP-Enriched Fail2ban Logs

Fail2ban itself doesn’t natively evaluate GeoIP rules, but you can enrich logs post-ban.

Example action script (

/etc/fail2ban/action.d/geoip-notify.conf

):


[Definition]
actionban = echo "Banned from $(geoiplookup | cut -d: -f2)" >> /var/log/fail2ban-geoip.log
Enable it in a jail:
[sshd]
enabled = true
action = iptables[name=SSH] geoip-notify

Enable it in a jail:

[sshd]

enabled = true action = iptables[name=SSH] geoip-notify

Resulting log entry:

Banned 185.220.101.1 from Germany

This provides visibility without changing ban logic — a safe first step.


b. Use GeoIP-Aware Ban Policies 

You can also adjust ban times based on country.

Example strategy:

  • Short ban for local country
  • Longer ban for known high-noise regions

This is usually implemented via multiple jails and post-processing scripts rather than direct GeoIP matching inside Fail2ban.

Best practice:
Let Fail2ban do behavior detection — let GeoIP provide context, not decisions.

9. GeoIP with nftables (Linux Modern Firewall Layer)

iptables +

xt_geoip

is considered legacy. On modern systems, nftables is the preferred approach.

a. Using GeoIP Sets in nftables

nftables does not natively include GeoIP, but you can integrate GeoIP via generated IP sets.

Workflow:

  1. Convert GeoIP country IP ranges into nftables sets

  2. Load them dynamically

Example set definition:


table inet filter {
set geo_block {
type ipv4_addr
flags interval
}
}

Populate the set using a script:

nft add element inet filter geo_block { 1.2.3.0/24, 5.6.0.0/16 }

Then apply it:


chain input {
type filter hook input priority 0;
ip saddr @geo_block drop
}

b. Automating GeoIP ->  nftables

Typical automation pipeline:

GeoLite2 → country CSV → IP ranges → nftables set

Run this daily via cron.

Warning:

  • Large country sets = memory usage
  • Firewall reloads must be atomic
  • Test on non-production systems first

10. GeoIP Dashboard: Turning Logs into Insight

Blocking is optional — insight is mandatory.

a. Simple GeoIP Log Dashboard (CLI-Based)

Apache example:

# awk '{print $NF}' /var/log/apache2/access.log | \
sort | uniq -c | sort -nr

Where $NF contains country code.

Sample Result:

1243 US

987 DE

422 FR

310 CN

This already tells a story.

b. Visual Dashboard with ELK / Grafana

For larger environments:

HAProxy / Apache -> JSON logs Enrich logs with GeoIP

Send to:

  • ELK Stack
  • Loki + Grafana
  • Graylog

Metrics you want:

  • Requests per country
  • Errors per country
  • Bans per country
  • Login failures per country

This helps distinguish:

  • Marketing traffic
  • Legit users
  • Background Internet noise

11.  Create a Layered GeoIP Strategy

A sane, production-ready model using GeoIP would include something like:

  1. Logging first
    Apache / HAProxy logs with country codes

  2. Behavior detection
    Fail2ban reacts to abuse

  3. Traffic shaping
    HAProxy routes or rate-limits

  4. Firewall last
    nftables drops only obvious garbage

GeoIP is strongest when it supports decisions, not when it makes them alone.

12. Best Practices to consider

  • Prefer visibility over blocking
  • Avoid blanket country bans
  • Always log before denying

Combine GeoIP with:

  • Fail2ban
  • Rate limits
  • CAPTCHA or MFA
  • Keep GeoIP databases (regularly) updated
  • Test rules with real IPs before deploying

13. Common Mistakes to Avoid

Blocking entire continents Using GeoIP as authentication Applying firewall GeoIP without logs Forgetting database updates Assuming GeoIP accuracy

Close up

GeoIP is not a silver bullet against vampire attacks – but when used thoughtfully, it becomes a powerful signal enhancer and can give you a much broader understanding on what is going on inside your network traffic.

Whether you’re using it to filter out segment of evil intruders based on logs, routing traffic intelligently, or filtering obvious abusea, GeoIP fits naturally into a layered security model and is used across corporations and middle and even small sized businesses nowadays.

Used conservatively, GeoIP follows the classic Unix philosophy:

Small datasets, Simple rules, Real-world effectiveness, combined with rest of tools it gives info and ways to protect better your networks and server infra.

Optimizing Linux Server Performance Through Digital Minimalism and Running Services and System Cleanup

Friday, October 3rd, 2025

linux-logo-optimizing-linux-server-performance-digital-minimalism-software-cleanup

In today’s landscape of bloated software stacks, automated dependency chains, and background services that consume memory and CPU without notice, Linux system administrators and enthusiasts alike benefit greatly from embracing digital minimalism of what is setup on the server and to reduce it to the absolute minimum.

Digital minimalism in the context of Linux servers means removing what you don't need, disabling what you don't use, and optimizing what remains — all with the goal of increasing performance, improving security, and simplifying further maintenance.
In this article, we’ll walk through practical steps to declutter your Linux server, optimize resources, and regain control over what’s running and why.

1. Identify and Remove Unnecessary Packages

Over time, many systems accumulate unused packages — either from experiments, dependency installations, or unnecessary defaults.

On Debian/Ubuntu

Find orphaned packages:
 

# apt autoremove --dry-run


Remove unnecessary packages:
 

# apt autoremove
# apt purge <package-name>


List large installed packages:

# dpkg-query -Wf '${Installed-Size}\t${Package}\n' | sort -n | tail -n 20


On RHEL/CentOS/AlmaLinux:

Find orphaned packages:

# dnf autoremove

List packages sorted by size:

# rpm -qia --qf '%{SIZE}\t%{NAME}\n' | sort -n | tail -n 20


2. Audit and Disable Unused Services
 

Every running service consumes memory, CPU cycles, and opens potential attack surfaces.

List enabled services:
 

# systemctl list-unit-files --type=service --state=enabled

See currently running services:

# systemctl --type=service –state=running

Put some good effort to review and disable all unnecesssery


Disable unneeded services :

# systemctl disable --now bluetooth.service
# systemctl disable --now cups.service
# systemctl disable --now ModemManager.service

And so on

Useful services to disable (if unused):
 

Service

Purpose

When to Disable

cups.service

Printer daemon

On headless servers

bluetooth.service

Bluetooth stack

On servers without Bluetooth

avahi-daemon

mDNS/Zeroconf

Not needed on most servers

ModemManager

Modem management

If not using 3G/4G cards

NetworkManager

Dynamic net config

Prefer systemd-networkd for static setups


Simple Shell Script to List & Review Services
 

#!/bin/bash
echo "Enabled services:"
systemctl list-unit-files --state=enabled | grep service
echo ""
echo "Running services:"
systemctl --type=service --state=running

3. Optimize Startup and Boot Time

Analyze system boot performance:

# systemd-analyze

View which services take the longest:

# systemd-analyze blame
min 25.852s certbot.service
5min 20.466s logrotate.service
1min 29.748s plocate-updatedb.service
54.595s php5.6-fpm.service
43.445s systemd-logind.service
42.837s e2scrub_reap.service
37.915s apt-daily.service
35.604s mariadb.service
31.509s man-db.service
27.405s systemd-journal-flush.service
18.357s ifupdown-pre.service
14.672s dev-xvda2.device
13.523s rc-local.service
11.024s dpkg-db-backup.service
9.871s systemd-sysusers.service
...


Disable or mask long-running services that are not essential.


Why services masking is important?


Simply because after some of consequential updates, some unwanted service daemon might start up with the system boot.

Example:
 

# systemctl mask lvm2-monitor.service


4. Reduce Memory Usage (Especially on Low-RAM VPS)
 

Monitor memory usage:

# free -h
# top
# htop

Use lightweight alternatives:

Service

Heavy

Lightweight Alternative

Web server

Apache

Nginx / Caddy / Lighttpd

Database

MySQL

MariaDB / SQLite (if local)

Syslog

rsyslog

busybox syslog / systemd journal

Shell

bash

dash / ash

File manager

GNOME Files

mc / ranger (CLI)


5. Configure Swap (Only If Needed)
 

Having too much or too little swap can affect performance.


Check if swap is active:

# swapon --show


Create swap file (if needed):

# fallocate -l 1G /swapfile
# chmod 600 /swapfile
# mkswap /swapfile
# swapon /swapfile

Add to /etc/fstab for persistence:

/swapfile none swap sw 0 0

6. Clean Up Cron Jobs and Timers

Old scheduled tasks can silently run in the background and consume resources.

List user cron jobs:

crontab -l

Check system-wide cron jobs:

# ls /etc/cron.*
# ls -al /var/spool/cron/*


List systemd timers:

# systemctl list-timers


Disable any unneeded timers or outdated cron entries.

7. Optimize Logging and Log Rotation

Logs are essential but can grow large and fill up disk space quickly.

Check log size:

# du -sh /var/log/*

Force logrotate:
 

# logrotate -f /etc/logrotate.conf

Edit /etc/logrotate.conf or specific files in /etc/logrotate.d/* to reduce retention if needed.

8. Check for Zombie Processes and Old Users

Old users and zombie processes can indicate neglected cleanup or the server is (cracked) hacked.

List users:
 

cat /etc/passwd | cut -d: -f1

Remove unused accounts:
 

# userdel -r username


Check for zombie processes:
 

# ps aux | awk '{ if ($8 == "Z") print $0; }'

9. Disable IPv6 (if not used)

IPv6 can add unnecessary complexity and attack surface if you’re not using it.

To disable IPv6 temporarily:

# sysctl -w net.ipv6.conf.all.disable_ipv6=1
# sysctl -w net.ipv6.conf.default.disable_ipv6=1

To disable permanently, add to /etc/sysctl.conf:

net.ipv6.conf.all.disable_ipv6 = 1
net.ipv6.conf.default.disable_ipv6 = 1


10. Final Thoughts: Less Is More

Digital minimalism is not just a personal tech trend — it's a philosophy of clarity, performance, and security. Every running process is a potential vulnerability. Every megabyte of RAM consumed by a useless service is wasted capacity. Every package installed increases the system’s complexity.

By regularly auditing, pruning, and simplifying your Linux server, you not only improve its performance and reliability, but you also reduce future maintenance headaches.

Minimalism = Maintainability.

Install specific zabbix-agent version / Downgrade Zabbix Agent client to exact preferred old RPM version on CentOS / Fedora / RHEL Linux from repo

Wednesday, June 7th, 2023

zabbix-update-downgrade-on-centos-rhel-fedora-and-other-rpm-based-linux-zabbix-logo


In below article, I'll give you the short Update zabbix procedure to specific version release, if you need to have it running in tandem with rest of zabbix infra, as well as expain shortly how to downgrade zabbix version to a specific release number
to match your central zabbix-serveror central zabbix proxies.

The article is based on personal experience how to install / downgrade the specific zabbuix-agent  release on RPM based distros.
I know this is pretty trivial stuff but still, hope this might be useful to some sysadmin out there thus I decided to quickly blog it.


1. Prepare backup of zabbix_agentd.conf
 

cp -rpf /etc/zabbix/zabbix_agentd.conf /home/your-user/zabbix_agentd.conf.bak.$(date +"%b-%d-%Y")


2. Create zabbix repo source file in yum.repos.d directory

cd /etc/yum.repos.d/
vim zabbix.repo 


[zabbix-5.0]

name=Zabbix 5.0 repo

baseurl=http://zabixx-rpm-mirrors-site.com/centos/external/zabbix-5.0/8/x86_64/

enabled=1

gpgcheck=0


3. Update zabbix-agent to a specific defined version

yum search zabbix-agent –enablerepo zabbix-5.0

To update zabbix-agent for RHEL 7.*

# yum install zabbix-agent-5.0.34-1.el7.x86_64


For RHEL 8.*

# yum install zabbix-agent-5.0.34-1.el8.x86_64


4. Restart zabbix-agentd and check its status to make sure it works correctly
 

systemctl status zabbix-agentd
systemctl restart zabbix-agentd
# systemctl status zabbix-agentd


Go to zabbix-server WEB GUI interface and check that data is delivered as normally in Latest Data for the host fom recent time, to make sure host monitoring is continuing flawlessly as before change.

NB !: If yum use something like versionlock is enabled remove the versionlock for package and update then, otherwise it will (weirldly look) look like the package is missing.
I'm saying that because I've hit this issue and was wondering why i cannot install the zabbix-agent even though the version is listed, available and downloadable from the repository.


5. Downgrade agent-client to specific version (Install old version of Zabbix from Repo)
 

Sometimes by mistake you might have raised the Zabbix-agent version to be higher release than the zabbix-server's version and thus breach out the Zabbix documentation official recommendation to keep
up the zabbix-proxy, zabbix-server and zabbix-agent at the exactly same version major and minor version releases. 

If so, then you would want to decrease / downgrade the version, to match your Zabbix overall infrastructure exact version for each of Zabbix server -> Zabbix Proxy server -> Agent clients.

To downgrade the version, I prefer to create some backups, just in case for all /etc/zabbix/ configurations and userparameter scripts (from experience this is useful as sometimes some RPM binary update packages might cause /etc/zabbix/zabbix_agentd.conf file to get overwritten. To prevent from restoring zabbix_agentd.conf from your most recent backup hence, I prefer to just crease the zabbix config backups manually.
 

# cd /root

# mkdir -p /root/backup/zabbix-agent 

# tar -czvf zabbix_agent.tar.gz /etc/zabbix/

# tar -xzvf zabbix_agent.tar.gz 


Then list the available installable zabbix-agent versions
 

[root@sysadminshelp:~]# yum –showduplicates list zabbix-agent
Заредени плъгини: fastestmirror
Determining fastest mirrors
 * base: centos.uni-sofia.bg
 * epel: fedora.ipacct.com
 * extras: centos.uni-sofia.bg
 * remi: mirrors.uni-ruse.bg
 * remi-php74: mirrors.uni-ruse.bg
 * remi-safe: mirrors.uni-ruse.bg
 * updates: centos.uni-sofia.bg
Инсталирани пакети
zabbix-agent.x86_64                                                     5.0.30-1.el7                                                     @zabbix
Налични пакети
zabbix-agent.x86_64                                                     5.0.0-1.el7                                                      zabbix
zabbix-agent.x86_64                                                     5.0.1-1.el7                                                      zabbix
zabbix-agent.x86_64                                                     5.0.2-1.el7                                                      zabbix
zabbix-agent.x86_64                                                     5.0.3-1.el7                                                      zabbix
zabbix-agent.x86_64                                                     5.0.4-1.el7                                                      zabbix
zabbix-agent.x86_64                                                     5.0.5-1.el7                                                      zabbix
zabbix-agent.x86_64                                                     5.0.6-1.el7                                                      zabbix
zabbix-agent.x86_64                                                     5.0.7-1.el7                                                      zabbix
zabbix-agent.x86_64                                                     5.0.8-1.el7                                                      zabbix
zabbix-agent.x86_64                                                     5.0.9-1.el7                                                      zabbix
zabbix-agent.x86_64                                                     5.0.10-1.el7                                                     zabbix
zabbix-agent.x86_64                                                     5.0.11-1.el7                                                     zabbix
zabbix-agent.x86_64                                                     5.0.12-1.el7                                                     zabbix
zabbix-agent.x86_64                                                     5.0.13-1.el7                                                     zabbix
zabbix-agent.x86_64                                                     5.0.14-1.el7                                                     zabbix
zabbix-agent.x86_64                                                     5.0.15-1.el7                                                     zabbix
zabbix-agent.x86_64                                                     5.0.16-1.el7                                                     zabbix
zabbix-agent.x86_64                                                     5.0.17-1.el7                                                     zabbix
zabbix-agent.x86_64                                                     5.0.18-1.el7                                                     zabbix
zabbix-agent.x86_64                                                     5.0.19-1.el7                                                     zabbix
zabbix-agent.x86_64                                                     5.0.20-1.el7                                                     zabbix
zabbix-agent.x86_64                                                     5.0.21-1.el7                                                     zabbix
zabbix-agent.x86_64                                                     5.0.22-1.el7                                                     zabbix
zabbix-agent.x86_64                                                     5.0.23-1.el7                                                     zabbix
zabbix-agent.x86_64                                                     5.0.24-1.el7                                                     zabbix
zabbix-agent.x86_64                                                     5.0.25-1.el7                                                     zabbix
zabbix-agent.x86_64                                                     5.0.26-1.el7                                                     zabbix
zabbix-agent.x86_64                                                     5.0.27-1.el7                                                     zabbix
zabbix-agent.x86_64                                                     5.0.28-1.el7                                                     zabbix
zabbix-agent.x86_64                                                     5.0.29-1.el7                                                     zabbix
zabbix-agent.x86_64                                                     5.0.30-1.el7                                                     zabbix
zabbix-agent.x86_64                                                     5.0.31-1.el7                                                     zabbix
zabbix-agent.x86_64                                                     5.0.32-1.el7                                                     zabbix
zabbix-agent.x86_64                                                     5.0.33-1.el7                                                     zabbix
zabbix-agent.x86_64                                                     5.0.34-1.el7                                                     zabbix


Next lets install the most recent zabbix-versoin from the CentOS repo, which for me as of time of writting this article is 5.0.34.

# yum downgrade -y zabbix-agent-5.0.34-1.el7

# cp -rpf /root/backup/zabbix-agent/etc/zabbix/zabbix_agentd.conf /etc/zabbix/

# systemctl start zabbix-agent.service

# systemctl enable  zabbix-agent.service
 

# zabbix_agentd -V
zabbix_agentd (daemon) (Zabbix) 5.0.30
Revision 2c96c38fb4b 28 November 2022, compilation time: Nov 28 2022 11:27:43

Copyright (C) 2022 Zabbix SIA
License GPLv2+: GNU GPL version 2 or later <https://www.gnu.org/licenses/>.
This is free software: you are free to change and redistribute it according to
the license. There is NO WARRANTY, to the extent permitted by law.

This product includes software developed by the OpenSSL Project
for use in the OpenSSL Toolkit (http://www.openssl.org/).

Compiled with OpenSSL 1.0.1e-fips 11 Feb 2013
Running with OpenSSL 1.0.1e-fips 11 Feb 2013


That's all folks you should be at your custom selected preferred version of zabbix-agent.
Enjoy ! 🙂

Log rsyslog script incoming tagged string message to separate external file to prevent /var/log/message from string flood

Wednesday, December 22nd, 2021

rsyslog_logo-log-external-tag-scripped-messages-to-external-file-linux-howto

If you're using some external bash script to log messages via rsyslogd to some of the multiple rsyslog understood data tubes (called in rsyslog language facility levels) and you want Rsyslog to move message string to external log file, then you had the same task as me few days ago.

For example you have a bash shell script that is writting a message to rsyslog daemon to some of the predefined facility levels be it:
 

kern,user,cron, auth etc. or some local

and your logged script data ends under the wrong file location /var/log/messages , /var/log/secure , var/log/cron etc. However  you need to log everything coming from that service to a separate file based on the localX (fac. level) the usual way to do it is via some config like, as you would usually do it with rsyslog variables as:
 

local1.info                                            /var/log/custom-log.log

# Don't log private authentication messages!
*.info;mail.none;authpriv.none;cron.none;local0.none;local1.none        /var/log/messages


Note the local1.none is instructing the rsyslog not to log anything from local1 facility towards /var/log/message. 
But what if this due to some weirdness in configuration of rsyslog on the server or even due to some weird misconfiguration in

/etc/systemd/journald.conf such as:

[Journal]
Storage=persistent
RateLimitInterval=0s
RateLimitBurst=0
SystemMaxUse=128M
SystemMaxFileSize=32M
MaxRetentionSec=1month
MaxFileSec=1week
ForwardToSyslog=yes
SplitFiles=none

Due to that config and especially the FowardToSyslog=yes, the messages sent via the logger tool to local1 still end up inside /var/log/messages, not nice huh ..

The result out of that is anything being sent with a predefined TAGGED string via the whatever.sh script which uses the logger command  (if you never use it check man logger) to enter message into rsyslog with cmd like:
 

# logger -p local1.info -t TAG_STRING

# logger -p local2.warn test
# tail -2 /var/log/messages
Dec 22 18:58:23 pcfreak rsyslogd: — MARK —
Dec 22 19:07:12 pcfreak hipo: test


was nevertheless logged to /var/log/message.
Of course /var/log/message becomes so overfilled with "junk" shell script data not related to real basic Operating system adminsitration, so this prevented any critical or important messages that usually should come under /var/log/message / /var/log/syslog to be lost among the big quantities of other tagged tata reaching the log.

After many attempts to resolve the issue by modifying /etc/rsyslog.conf as well as the messed /etc/systemd/journald.conf (which by the way was generated with this strange values with an OS install time automation ansible stuff). It took me a while until I found the solution on how to tell rsyslog to log the tagged message strings into an external separate file. From my 20 minutes of research online I have seen multitudes of people in different Linux OS versions to experience the same or similar issues due to whatever, thus this triggered me to write this small article on the solution to rsyslog.

The solution turned to be pretty easy but requires some further digging into rsyslog, Redhat's basic configuration on rsyslog documentation is a very nice reading for starters, in my case I've used one of the Propery-based compare-operations variable contains used to select my tagged message string.
 

1. Add msg contains compare-operations to output log file and discard the messages

[root@centos bin]# vi /etc/rsyslog.conf

# config to log everything logged to rsyslog to a separate file
:msg, contains, "tag_string:/"         /var/log/custom-script-log.log
:msg, contains, "tag_string:/"    ~

Substitute quoted tag_string:/ to whatever your tag is and mind that it is better this config is better to be placed somewhere near the beginning of /etc/rsyslog.conf and touch the file /var/log/custom-script-log.log and give it some decent permissions such as 755, i.e.
 

1.1 Discarding a message


The tilda sign –  

as placed to the end of the msg, contains is the actual one to tell the string to be discarded so it did not end in /var/log/messages.

Alternative rsyslog config to do discard the unwanted message once you have it logged is with the
rawmsg variable, like so:


# config to log everything logged to rsyslog to a separate file
:msg, contains, "tag_string:/"         /var/log/custom-script-log.log
:rawmsg, isequal, "tag_string:/" stop

Other way to stop logging immediately after log is written to custom file across some older versions of rsyslog is via the &stop

:msg, contains, "tag_string:/"         /var/log/custom-script-log.log
& stop

I don't know about other versions but Unfortunately the &stop does not work on RHEL 7.9 with installed rpm package rsyslog-8.24.0-57.el7_9.1.x86_64.

1.2 More with property based filters basic exclusion of string 

Property based filters can do much more, you can for example, do regular expression based matches of strings coming to rsyslog and forward to somewhere.

To select syslog messages which do not contain any mention of the words fatal and error with any or no text between them (for example, fatal lib error), type:

:msg, !regex, "fatal .* error"


2. Create file where tagged data should be logged and set proper permissions
 

[root@centos bin]# touch /var/log/custom-script-log.log
[root@centos bin]# chmod 755 /var/log/custom-script-log.log


3. Test rsyslogd configuration for errors and reload rsyslog

[root@centos ]# rsyslogd -N1
rsyslogd: version 8.24.0-57.el7_9.1, config validation run (level 1), master config /etc/rsyslog.conf
rsyslogd: End of config validation run. Bye.

[root@centos ]# systemctl restart rsyslog
[root@centos ]#  systemctl status rsyslog 
● rsyslog.service – System Logging Service
   Loaded: loaded (/usr/lib/systemd/system/rsyslog.service; enabled; vendor preset: enabled)
   Active: active (running) since Wed 2021-12-22 13:40:11 CET; 3h 5min ago
     Docs: man:rsyslogd(8)
           http://www.rsyslog.com/doc/
 Main PID: 108600 (rsyslogd)
   CGroup: /system.slice/rsyslog.service
           └─108600 /usr/sbin/rsyslogd -n


4. Property-based compare-operations supported by rsyslog table
 

Compare-operation Description
contains Checks whether the provided string matches any part of the text provided by the property. To perform case-insensitive comparisons, use  contains_i .
isequal Compares the provided string against all of the text provided by the property. These two values must be exactly equal to match.
startswith Checks whether the provided string is found exactly at the beginning of the text provided by the property. To perform case-insensitive comparisons, use  startswith_i .
regex Compares the provided POSIX BRE (Basic Regular Expression) against the text provided by the property.
ereregex Compares the provided POSIX ERE (Extended Regular Expression) regular expression against the text provided by the property.
isempty Checks if the property is empty. The value is discarded. This is especially useful when working with normalized data, where some fields may be populated based on normalization result.


5. Rsyslog understanding Facility levels

Here is a list of facility levels that can be used.

Note: The mapping between Facility Number and Keyword is not uniform over different operating systems and different syslog implementations, so among separate Linuxes there might be diference in the naming and numbering.

Facility Number Keyword Facility Description
0 kern kernel messages
1 user user-level messages
2 mail mail system
3 daemon system daemons
4 auth security/authorization messages
5 syslog messages generated internally by syslogd
6 lpr line printer subsystem
7 news network news subsystem
8 uucp UUCP subsystem
9   clock daemon
10 authpriv security/authorization messages
11 ftp FTP daemon
12 NTP subsystem
13 log audit
14 log alert
15 cron clock daemon
16 local0 local use 0 (local0)
17 local1 local use 1 (local1)
18 local2 local use 2 (local2)
19 local3 local use 3 (local3)
20 local4 local use 4 (local4)
21 local5 local use 5 (local5)
22 local6 local use 6 (local6)
23 local7 local use 7 (local7)


6. rsyslog Severity levels (sublevels) accepted by facility level

As defined in RFC 5424, there are eight severity levels as of year 2021:

Code Severity Keyword Description General Description
0 Emergency emerg (panic) System is unusable. A "panic" condition usually affecting multiple apps/servers/sites. At this level it would usually notify all tech staff on call.
1 Alert alert Action must be taken immediately. Should be corrected immediately, therefore notify staff who can fix the problem. An example would be the loss of a primary ISP connection.
2 Critical crit Critical conditions. Should be corrected immediately, but indicates failure in a primary system, an example is a loss of a backup ISP connection.
3 Error err (error) Error conditions. Non-urgent failures, these should be relayed to developers or admins; each item must be resolved within a given time.
4 Warning warning (warn) Warning conditions. Warning messages, not an error, but indication that an error will occur if action is not taken, e.g. file system 85% full – each item must be resolved within a given time.
5 Notice notice Normal but significant condition. Events that are unusual but not error conditions – might be summarized in an email to developers or admins to spot potential problems – no immediate action required.
6 Informational info Informational messages. Normal operational messages – may be harvested for reporting, measuring throughput, etc. – no action required.
7 Debug debug Debug-level messages. Info useful to developers for debugging the application, not useful during operations.


7. Sample well tuned configuration using severity and facility levels and immark, imuxsock, impstats
 

Below is sample config using severity and facility levels
 

# Don't log private authentication messages!
*.info;mail.none;authpriv.none;cron.none;local0.none;local1.none        /var/log/messages


Note the local0.none; local1.none tells rsyslog to not log from that facility level to /var/log/messages.

If you need a complete set of rsyslog configuration fine tuned to have a proper logging with increased queues and included configuration for loggint to remote log aggegator service as well as other measures to prevent the system disk from being filled in case if something goes wild with a logging service leading to a repeatedly messages you might always contact me and I can help 🙂
 Other from that sysadmins might benefit from a sample set of configuration prepared with the Automated rsyslog config builder  or use some fine tuned config  for rsyslog-8.24.0-57.el7_9.1.x86_64 on Redhat 7.9 (Maipo)   rsyslog_config_redhat-2021.tar.gz.

To sum it up rsyslog though looks simple and not an important thing to pre

CentOS disable SELinux permanently or one time on grub Linux kernel boot time

Saturday, July 24th, 2021

selinux-artistic-penguin-logo-protect-data


1. Office 365 cloud connected computer and a VirtualBox hosted machine with SELINUX preventing it to boot

At my job we're in process of migrating my old Lenovo Laptop Thinkpad model L560 Laptop to Dell Latitude 5510 wiith Intel Core i5 vPro CPU and 256 Gb SSD Hard Drive.  The new laptops are generally fiine though they're not even a middle class computers and generally I prefer thinkpads. The sad thing out of this is our employee decided to migrate to Office 365 (again perhaps another stupid managerial decision out of an excel sheet wtih a balance to save some money … 

As you can imagine Office 365 is not really PCI Standards compliant and not secure since our data is stored in Microsoft cloud and theoretically Microsoft has and owns our data or could wipe loose the data if they want to. The other obvious security downside I've noticed with the new "Secure PCI complaint laptop" is the initial PC login screen which by default offers fingerprint authentication or the even worse  and even less secure face recognition, but obviosly everyhing becomes more and more crazy and people become less and less cautious for security if that would save money or centralize the data … In the name of security we completely waste security that is very dubious paradox I don't really understand but anyways, enough rant back to the main topic of this article is how to and I had to disable selinux?

As part of Migration I've used Microsoft OneDrive to copy old files from the Thinkpad to the Latitude (as on the old machine USB's are forbidden and I cannot copy over wiith a siimple USB driive, as well as II have no right to open the laptop and copy data from the Hard driive, and even if we had this right without breaking up some crazy company policy that will not be possible as the hard drive data on old laptop is encrypted, the funny thing is that the new laptop data comes encrypted and there is no something out of the box as BitDefender or McAffee incryption (once again, obviously our data security is a victim of some managarial decisions) …
 

2. OneDrive copy problems unable to sync some of the copied files to Onedrive


Anyways as the Old Laptop's security is quite paranoid and we're like Fort Nox, only port 80 and port 443 connections to the internet can be initiated to get around this harsh restrictions it was as simple to use a Virtualbox Virtual Machine. So on old laptop I've installed a CentOS 7 image which I used so far and I used one drive to copy my vbox .vdi image on the new laptop work machine.

The first head buml was the .vdi which seems to be prohibited to be copied to OneDrive, so to work around this I had to rename the origianl CentOS7.vdi to CentOS7.vdi-renamed on old laptop and once the data is in one drive copy my Vitualbox VM/ directory from one drive to the Dell Latitude machine and rename the .vdi-named towards .vdi as well as import it from the latest installed VirtualBox on the new machine.
 

3. Disable SELINUX from initial grub boot


So far so good but as usual happens with miigrations I've struck towards another blocker, the VM image once initiated to boot from Virtualbox badly crashed with some complains that selinux cannot be loaded.
Realizing CentOS 7 has the more or less meaningless Selinux, I've took the opportunity to disable SeLinux.

To do so I've booted the Kernel with Selinux disabled from GRUB2 loader prompt before Kernel and OS Userland boots.


I thought I need to type the information on the source in grub. What I did is very simple, on the Linux GRUB boot screen I've pressed

'e' keyboard letter

that brought the grub boot loader into edit mode.

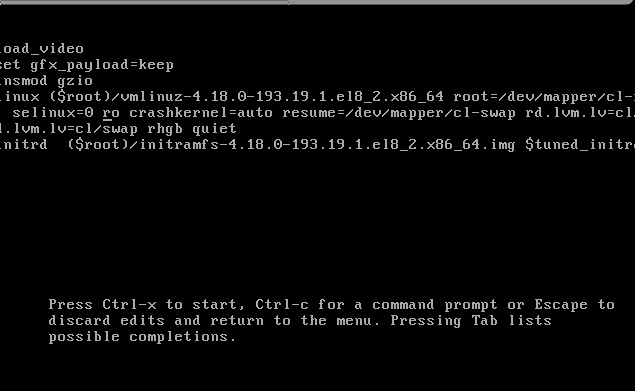
Then I had to add selinux=0 on the edited selected kernel version, as shown in below screenshot:

selinux-disable-from-grub.png

Next to boot the Linux VM without Selinux enabled one time,  just had to press together

Ctrl+X then add selinux=0 on the edited selected kernel version, that should be added as shown in the screenshot somewhere after the line of
root=/dev/mapper/….

4. Permanently Disable Selinux on CentOS 7


Once I managed to boot Virtual Machine properly with Oracle Virtualbox, to permanently disabled selinux I had to:


Once booted into CentOS, to check the status of selinux run:


# sestatus
Copy
SELinux status:                 enabled
SELinuxfs mount:                /sys/fs/selinux
SELinux root directory:         /etc/selinux
Loaded policy name:             targeted
Current mode:                   enforcing
Mode from config file:          enforcing
Policy MLS status:              enabled
Policy deny_unknown status:     allowed
Max kernel policy version:      31


5. Disable SELinux one time with setenforce command


You can temporarily change the SELinux mode from targeted to permissive with the following command:


# setenforce 0


Next o permanently disable SELinux on your CentOS 7 next time the system boots, Open the /etc/selinux/config file and set the SELINUX mod parameter to disabled.

On CentOS 7 you can  edit the kernel parameters in /etc/default/grub (in the GRUB_CMDLINE_LINUX= key) and set selinux=0 so on next VM / PC boot we boot with a SELINUX disabled for example add   RUB_CMDLINE_LINUX=selinux=0 to the file then you have to regenerate your Grub config like this:
 

# grub2-mkconfig -o /etc/grub2.cfg
# grub2-mkconfig -o /etc/grub2-efi.cfg


Further on to disable SeLinux on OS level edit /etc/selinux
 

Default /etc/selinux/config with selinux enabled should look like so:

# This file controls the state of SELinux on the system.
# SELINUX= can take one of these three values:
#       enforcing – SELinux security policy is enforced.
#       permissive – SELinux prints warnings instead of enforcing.
#       disabled – No SELinux policy is loaded.
SELINUX=enforcing
# SELINUXTYPE= can take one of these two values:
#       targeted – Targeted processes are protected,
#       mls – Multi Level Security protection.
SELINUXTYPE=targeted


To disable SeLinux modify the file to be something like:

# This file controls the state of SELinux on the system.
# SELINUX= can take one of these three values:
#       enforcing – SELinux security policy is enforced.
#       permissive – SELinux prints warnings instead of enforcing.
#       disabled – No SELinux policy is loaded.
SELINUX=disabled
# SELINUXTYPE= can take one of these two values:
#       targeted – Targeted processes are protected,
#       mls – Multi Level Security protection.
SELINUXTYPE=targeted

6. Check SELINUX status is disabled

# sestatus

SELinux status:                 disabled

So in this article shottly was explained shortly the fake security adopted by using Microsoft Cloud environment Offiice 365, my faced OneDrive copy issues (which prevented even my old laptop Virtual Machine to boot properly and the handy trick to rename the file that is unwilling to get copied from old PC towards m$ OneDrive as well as the grub trick to disable Selinux permanently from grub2.