Archive for the ‘Networking’ Category

Creating Dynamic SSH Tunnel on Windows with Plink – Scriptable SSH Tunnels on Windows

Friday, July 4th, 2014

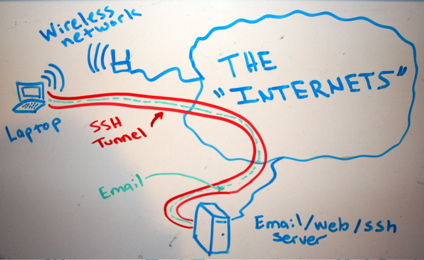
creating-ssh-tunnel-on-windows-with-plink-ssh-tunnel-diagram-tunnel-email-traffic

In my earlier articles I've explained about Creating SSH Tunnels on Linux and BSD and how to create SSH Tunnels with Putty Terminal client on Windows.

Creating SSH Tunnels is a precious knowledge every advanced computer user, a system administrator or security expert should be well aware of.

Probably still there are plenty of people for which the SSH Tunnelling is something never heard of or even if heard it is a mythical term covered by ancient shadows 🙂

So What is an SSH Tunnel? – SSH Tunnels shortly explained.

A SSH tunnel consists of an encrypted tunnel created through a SSH protocol
connection
.

An SSH tunnel can be used to transfer unencrypted traffic over a
network through an encrypted channel
between two hosts (host A and Host B) usually using remote and local port.

Requirements for SSH tunnel

Where Host B has to be running a version of OpenSSH server on some reachable port from Host B, (lets say 22).
Host B OpenSSH server has to be with (enabled X11Forwarding X11Forwarding yes in /etc/ssh/sshd_config) and Host A needs to have some SSH client supporting port forwarding (ssh command on Linux – part of (openssh-client package) and on Windows – Putty / Plink or any other of the many available ssh tunneling clients).

Probably most common SSH Tunnel use is to bypass firewalls that prohibits or filter certain internet services.
In other words SSH Tunnels can be used to get around firewall filtering. If you never heard of Bypassing firewalls with port forwarding I recommend to check this article

We can use a ssh tunnel to securely transfer files between a FTP server and a client even though the FTP
protocol itself is not encrypted
, Tnnel traffic to an SQL server, Tunnel traffic from your Desktop PC to a Proxy
SSH tunnels can be used to tunnel outbound E-mail traffic back to your work PC to avoid having to change SMTP servers etc.

A very common SSH Tunnel use is by office workers who don't want their Custom Web browsing habbits and Web history be tracked,

For people who has to travel a lot tunneling SSH traffic from notebook to your home based SMTP is mandatory, otherwise your e-mail passwords, might end up captured by someone who manages the Free WI-FI used by you somewhere on the road or cafeteria. Another good case use of SSH Tunnel is to tunnel VNC traffic.

SSH Tunneling was historically very famous in days where IRC (Internet Relay Chat) and used to be common way (for people who want to prevent their real IP address from publicly visible) on the Internet.
SSH Tunneling is great way to maintain high communication security, however because it requires some basic technical knowledge most people neglect it or never heard of it, so I hope this article will give at least basic ideas to people new to tunneling.

How to create SSH Tunnels on Microsoft Windows

SSH Tunneling has been originally invented on UNIX / Linux platform, luckily nowdays it is easily possible to create SSH tunnels on almost any moden OS (including Mac OS X and M$ Windows).

Using Plink it is possible to create easily (batch) scriptable SSH tunnels on Windows

Generally here is example of basic plink use syntax:
 

plink.exe {remote-host} -P 22 -C -D 10080 -l username -pw password
 

To make a Tunnel with Plink to remote SSH Server (remote-ssh-server.com) listening for connections on port 22 on localhost 10022

"C:Program Files (x86)PuTTYplink.exe" -ssh remote-username@tunnel-to-ssh-server-host.com -pw PASSWORD123 -C -T -D 127.0.0.1:10022 -N

-D – option instructs Plink to make "Dynamic SOCKS-based port forwarding"
Dynamic Socks-based port forwarding will make your ssh client a simple socks server which listen to port 10022 for incoming connections.
-Ttells plink not to open interactive shell on remote server (disable pty allocation)
-Cenables traffic compression

Using the -D option you can prepare tunnel to traffic all your outgoing server traffic via the SSH tunneling host.

E. g. -D allows you to use the remote ssh server as a proxy server with no need for remote server to run anything except SSH service and have Internet connection.

-N – stands for "don't start shell/command SSH-2 only"

On success of SSH Tunnel establishing you will get a pop-up window similar to below screenshot (note that some of the messages in cmd line are from a batch script – if no batch script is used you wil only get a window with "Using Username":
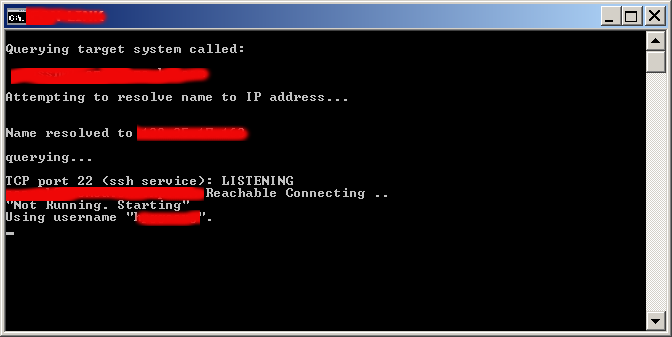
plink_establishing_ssh_tunnel-on-microsoft-windows-screenshot

Note: That if you're about to be using Plink command frequently add it to your Windows SYSTEM PATH (check my previous article – how to add Putty to System PATH) to enable it invokable without writting the full command path location.

Once this Window is open if you still have doubt, where the tunnel is established, the quickest way to test whether tunnel is working is to open telnet to localhost port 10022.

In Windows command prompt type:
 

C:> telnet localhost 10022


You will get a remote server SSH version printed, like on below shot:
windows-testing-whether-ssh-tunnel-is-working-with-telnet-screenshot-black-screen

Now lets say now you would like to access the internet via just created SSH tunnel.
You can do it by simply setting Socks Proxy in your Firefox / Opera (or whatever browser you use).

Whether you want to run the SSH Tunnel permanent and periodically check whether tunnel is allve and respawn it in case plink quit, you can use a very simple batch script like one below:
 

@ECHO OFF
tasklist /FI "IMAGENAME eq plink.exe" 2>NUL | find /I /N "plink.exe">NUL

if "%ERRORLEVEL%"=="0"  ( echo Programm is running exiting
exit
)
echo "Not Running"
start /b "C:Program Files (x86)PuTTYplink.exe" -ssh remote-username@tunnel-to-ssh-server-host.com -pw Password123 -T -C -D 127.0.0.1:10022 -N"


If you're a Linux guy and you don't want to mess around with Plink but still want to create your SSH tunnels following SSH client UNIX command line syntax, setup the Cygwin port of OpenSSH for Windows.

Or if you're unsure whether remote server is always reachable (you're moving with your notebook from (Country) network to network), you can use also portqry – windows port scanner to check whether remote ssh server port is opened:
 

@ECHO OFF
tasklist /FI "IMAGENAME eq plink.exe" 2>NUL | find /I /N "plink.exe">NUL
if "%ERRORLEVEL%"=="0"  ( echo Programm is running exiting
pause
exit
)
portqry -n tunnel-to-ssh-server-host.com -p tcp -e 22
if %ERRORLEVEL%==0 echo tunnel-to-ssh-server-host.com Reachable Connecting ..
if NOT %ERRORLEVEL%==0 (echo tunnel-to-ssh-server-host.com.com Unreachable
exit)
echo "Not Running. Starting"
"C:Program Files (x86)PuTTYplink.exe" -ssh remote-username@tunnel-to-ssh-server-host.com -pw Password123 -T -C -D 127.0.0.1:10080 –N


Here is another sample use of Plink to create tunnel via SSH host tunnel-to-ssh-server-host.com  to listen for connections on localhost port 1234 and forward all incoming traffic to squid proxy server on 192.168.1.5 on port 3128.
 

C:Usersgeorgi>plink.exe -v -x -a -T -C -noagent -ssh -L 127.0.0.1:1234:192.168.1.5:3128 remote-username@tunnel-to-ssh-server-host.com

Setting then 127.0.0.1:1234 in  Firefox Proxy browser settings will make all traffic from your browser to flow securily to your own proxy server (letting you hide your "custom traffic" from company Web sniffers (Proxying) and Web filtering.
A remark to make here is 192.168.1.5 is (a internal server with Squid Proxy, configured to pass traffic to the internet ).

Here is a way to make tunnel between your remote SSH server and local Desktop PC to make Google queries without being logged by your ISP or company where you're working:

plink.exe "-v -x -a -T -C -noagent -ssh -L 127.
0.0.1:1234:95.158.130.242:443 -pw SecretPassword123 -l hipo www.pc-freak.net"

95.158.130.242 – is one of the IPs www.google.com resolves to
www.pc-freak.net – is name of my home router.

To make tunneled queries to Google then open in browser https://127.0.0.1:1234

using_localhost_ssh_tunnel_to_anonymously-search-in-google-plink-tunnel-for-security


If you're a lazy windows user and don't want to bother to make your tunnels from command line and you want need nice gui way to manage multiple tunnels – check out putty-tunnel-manager.

I myself am not a SSH Tunnel expert and thus Iwould be happy to learn further from people for some interesting cases and custom ways to do  SSH Tunnels. If you know of better advantageous ways to tunnel traffic, please share.

Happy tunneling ! 🙂

Linux: How to see / change supported network bandwidth of NIC interface and get various eth network statistics with ethtool

Monday, January 19th, 2015

linux-how-to-see-change-supported-network-bandwidth-of-NIC-interface-and-view-network-statistics
If you're a novice Linux sysadmin and inherited some dedicated servers without any documentation and hence on of the first things you have to do to start a new server documentation is to check the supported TCP/IP network speed of servers Network (ethernet) Interfaces. On Linux this is very easy task to verify the speed of LAN card supported Local / Internet traffic install ethtool (if not already preseont on the servers) – assuming you're dealing with Debian / Ubuntu Linux servers.

1. Install ethtool on Deb and RPM based distros

dedi-server1:~# apt-cache show ethtool|grep -i desc -A 3
Description: display or change Ethernet device settings
 ethtool can be used to query and change settings such as speed, auto-
 negotiation and checksum offload on many network devices, especially
 Ethernet devices.

dedi-server1:~# apt-get install –yes ethtool
..

ethtool should be installed by default on CentOS / Fedora / RHEL and  syntax is same like on Debs. If you happen to miss ethtool on any (SuSE) / RedHat / RPM based distro install it with yum

[root@centos:~] # yum -y install ethtool


2. Get ethernet configurations

To check the current eth0 / eth1 / ethX network (Speed / Duplex) and other network related configuration configuration:
 

dedi-server5:~# ethtool eth0

Settings for eth0:
        Supported ports: [ TP ]
        Supported link modes:   10baseT/Half 10baseT/Full
                                100baseT/Half 100baseT/Full
                                1000baseT/Full
        Supports auto-negotiation: Yes
        Advertised link modes:  10baseT/Half 10baseT/Full
                                100baseT/Half 100baseT/Full
                                1000baseT/Full

        Advertised pause frame use: No
        Advertised auto-negotiation: Yes
        Speed: 1000Mb/s
        Duplex: Full
        Port: Twisted Pair
        PHYAD: 1
        Transceiver: internal
        Auto-negotiation: on
        MDI-X: off
        Supports Wake-on: pumbag
        Wake-on: g
        Current message level: 0x00000001 (1)
        Link detected: yes

Having a NIC configured to act as Duplex is very important as Duplex communication enables LAN card to communicate both sides (Sent / Receive) packets simultaneously.

full-duplex-half-duplex-explained-picture

Probably most interesting parameters for most admins are the ones that are telling whether the NIC UpLink is 10megabyte / 100 megabyte or 1Gigabyte as well as supported Receive / Send ( Transfer ) speeds of LAN, a common useful ethtool admin use to just show current LAN ethernet interface speed:

server-admin1:~# ethtool eth0 |grep -i speed
        Speed: 1000Mb/s


To get info about NIC (kernel module / driver) used with ethtool:

dedi-server3:~# ethtool -i eth0 driver: e1000e
version: 1.2.20-k2
firmware-version: 1.8-0
bus-info: 0000:06:00.0

3. Make LAN Card blink to recognize eth is mapped to which Physical LAN

Besides that ethtool has many other useful use cases, for example if you have a server with 5 lan or more LAN cards, but you're not sure to which of all different EthX interfaces correspond, a very useful thing is to make eth0, eth1, eth2, eth3, etc. blink for 5 seconds in order to identify which static IP is binded physically to which NIC , here is how:

ethtool -p eth0 5


Then you can follow the procedure for any interface on the server and map them with a sticker 🙂

Ethtool is also useful for getting "deep" (thorough) statistics on Server LAN cards, this could be useful to identify sometimes hard to determine broadcast flood attacks:
 

4. Get network statistics with ethtool for interfaces
 

dedi-server5:~# ethtool -S eth0|grep -vw 0
NIC statistics:
     rx_packets: 6196644448
     tx_packets: 7197385158
     rx_bytes: 2038559235701
     tx_bytes: 8281206569250
     rx_broadcast: 357508947
     tx_broadcast: 172
     rx_multicast: 34731963
     tx_multicast: 20
     rx_errors: 115
     multicast: 34731963
     rx_length_errors: 115
     rx_no_buffer_count: 26391
     rx_missed_errors: 10059
     tx_timeout_count: 3
     tx_restart_queue: 2590
     rx_short_length_errors: 115
     tx_tcp_seg_good: 964136993
     rx_long_byte_count: 2038559235701
     rx_csum_offload_good: 5824813965
     rx_csum_offload_errors: 42186
     rx_smbus: 383640020

5. Turn on Auto Negotiation and change NIC set speed to 10 / 100 / 1000 Mb/s

Auto-negotiation is important as an ethernet procedure by which two communication devices (2 network cards) choose common transmission parameters such as speed, duplex mode, and flow control in order to achieve maximum transmission speed over the network. On 1000BASE-T basednetworks the standard is a mandatory. There is also backward compatability for older 10BASE-T Networks.

a) To raise up NIC to use 1000 Mb/s in case if the bandwidth was raised to 1Gb/s but NIC settings were not changed:

dedi-server1:~# ethtool -s eth0 speed 1000 duplex half autoneg off


b) In case if LAN speed has to be reduced for some weird reason to 10 / 100Mb/s


dedi-server1:~# ethtool -s eth0 speed 10 duplex half autoneg off

dedi-server1:~# ethtool -s eth0 speed 100 duplex half autoneg off

c) To enable disable NIC Autonegotiation:

dedi-server1:~# ethtool -s eth0 autoneg on


6. Change Speed / Duplex settings to load on boot

a) Set Network to Duplex on Fedora / CentOS etc.

Quickest way to do it is of course to use /etc/rc.local. If you want to do it following distribution logic on CentOS / RHEL Linux:

Add to /etc/sysconfig/network-scripts/ifcfg-eth0

vim /etc/sysconfig/network/-scripts/ifcfg-eth0

ETHTOOL_OPTS="speed 1000 duplex full autoneg off"

To load the new settings restart networking (be careful to have physical access to server if something goes wrong 🙂 )

service network restart

b) Change network speed / duplex setting on Debian / Ubuntu Linux

Add at the end of /etc/network/interfaces

vim /etc/network/interfaces

post-up ethtool -s eth0 speed 100 duplex full autoneg off

7. Tune NIC ring buffers

dedi-server1:~# ethtool -g eth0

Ring parameters for eth0:
Pre-set maximums:
RX:             4096
RX Mini:        0
RX Jumbo:       0
TX:             4096
Current hardware settings:
RX:             256
RX Mini:        0
RX Jumbo:       0
TX:             256

As you can see the default setting of RX (receive) buffer size is low 256 and on busy servers with high traffic loads, depending on the hardware NIC vendor this RX buffer size varies.
Through increasing the Rx/Tx ring buffer size , you can decrease the probability of discarding packets in the NIC during a scheduling delay.
A change in rx buffer ring requires NIC restart so (be careful not to loose connection to remote server), be sure to have iLO access to it.

Here is how to raise Rx ring buffer size 4 times from default value:

ethtool -G eth0 rx 4096 tx 4069

Linux: Add routing from different class network A (192.168.1.x) to network B (192.168.10.x) with ip route command

Friday, July 12th, 2013

adding routing from one network to other linux with ip route

I had a Linux router which does NAT for a local network located behind a CISCO router receiving internet via its WAN interface routing traffic  to Linux with IP 192.168.1.235. The Linux router has few network interfaces and routes traffic for networks; 192.168.1.0/24 and 192.168.10.0/24. Another Linux with IP 192.168.1.8 had to talk to 192.168.10.0/24 (because it was necessary to be able access  ISCO's router web interface accessible via a local network interface with IP (192.168.10.1). Access to 192.168.10.1 wasn't possible from 192.168.1.8 because routing on NAT-ting Linux (192.168.1.235) to 192.168.10.0/24 network was missing. To make 192.168.1.8 Linux communicate with 192.168.10.1,  had to add following routing rules with ip command on both the Linux with IP 192.168.1.235 and Linux host behind NAT (192.168.1.8).

1. On Server (192.168.1.235) run in root shell and add to /etc/rc.local

# /sbin/ip r add 192.168.10.0/24 via 192.168.1.235
And then copy paste same line before exit 0 in /etc/rc.local

Its good idea always to check routing, after adding anything new, here is mine:
 

# ip r show

192.168.5.0/24 dev eth0  proto kernel  scope link  src 192.168.5.1
192.168.4.0/24 dev eth0  proto kernel  scope link  src 192.168.4.1
192.168.3.0/24 dev eth0  proto kernel  scope link  src 192.168.3.1
192.168.2.0/24 dev eth0  proto kernel  scope link  src 192.168.2.1
192.168.1.0/24 dev eth0  proto kernel  scope link  src 192.168.1.235
192.168.0.0/24 dev eth0  proto kernel  scope link  src 192.168.0.1
192.168.10.0/24 dev eth1  proto kernel  scope link  src 192.168.10.2
default via 192.168.10.1 dev eth1 
 

2. And also on Second Linux host (192.168.1.8) 

# /sbin/ip r add 192.168.10.0/24 via 192.168.1.235
To make routing permanent again paste in /etc/rc.local before exit 0

After above rules, I can normally ping and access hosts on class C network 192.168.10.1-255  from 192.168.1.8.