Posts Tagged ‘Debian Ubuntu Linux’

Set proxy only for apt, apt-get, aptitude package manager on Debian / Ubuntu Linux

Wednesday, December 22nd, 2021

debian-package-manager-run-via-a-proxy


Intro

Main console package install apt-get / apt and / aptitude did not use the HTTP Proxy environment variables by default as there is no default proxy set on Debian / Ubuntu / Mint and other deb based distros after OS Install. Under some circunstances for DMZ placed or firewall secured servers, direct access to internet address or even Package repository is only allowed via a proxy and hence the package manager needs to have a proxy host set.
 Setting a global wide proxy on Linux is easily possible by setting http_proxy="http://yourhost.com:8080" and https_proxy or if FTP connection via ftp_proxy somewhere in /etc/profile , /etc/bashrc or via /etc/environment but as using this Shell variables set it global wide for all applications lynx / links / wget / curl, sometimes it is useful to set the Proxy host only for deb package management tools.

Note that if you want to set a proxy host for deb operations this can be done during initial OS install installation, the Apt configuration file would have been automatically updated then. 

Creating  an Apt Proxy Conf File

Apt loads all configuration files under /etc/apt/apt.conf.d. We can create a configuration specifically for our proxy there, keeping it separate from all other configurations.

  1. Create a new configuration file named proxy.conf.


    # touch /etc/apt/apt.conf.d/proxy.conf
    
  2. Open the proxy.conf file in a text editor.


    # vi /etc/apt/apt.conf.d/proxy.conf
    
  3. Add the following line to set your HTTP proxy for apt.


    Acquire::http::Proxy "http://username:password@proxy.server:port/";
    
  4. Add the following line to set your HTTPS proxy.


    Acquire::https::Proxy "http://username:passw0rd@proxy.server:port/";
    
  5. Save your changes and exit the text editor.
     

Your proxy settings will be applied the next time you run Apt.

Simplifying the Configuration

As mentioned by a user in the comments below, there is an alternative way for defining the proxy settings. While similar, it removes some redundancy.

Just like in the first example, create a new file under the /etc/apt/apt.conf.d directory for example /etc/apt/apt.conf.d/proxies, and then add the lines as.

Acquire {
HTTP::proxy "http://127.0.0.1:8080";
HTTPS::proxy "http://127.0.0.1:8080";
}


How to Recover deleted /var/lib/dpkg directory on Debian / Ubuntu Linux server

Wednesday, October 6th, 2021

how-to-recover-accidently-deleted-var-lib-dpkg-directory-on-debian-gnu-linux

Sometimes you might do something stupid, in the hurry like running the wrong rm  command and ending up deleting /var/lib/dpkg on your Debian / Ubuntu system.

by either wrongly issuing the rm to a directory or mistyping rm -r /var/lib/dpkg.
I know this is pretty dumb but sometimes we're all dumb, if you do so and you try to do the regular

root@debian:/ # apt update && apt upgrade

or try to install some random package onwards you will end up with error message:

E: Could not open lock file /var/lib/dpkg/lock – open (2: No such file or directory)

Ending up with this error, does totally blocks your further system administration activities with both apt / aptitude / apt-get as well as with dpkg package management tool.


1. The /var/backups recovery directory

Thankfully, by Gods mercy some of Debian Linux system architects has foreseen such issues might occur and have integrated into it the automatic periodic creation of some important files into directory /var/backups/

Hence the next step is to check what kind of backups are available, there:

root@debian:/ # ls -al /var/backups/
total 19892
drwxr-xr-x  7 root root      4096 Sep 24 06:25 ./
drwxr-xr-x 22 root root      4096 Dec 21  2020 ../
-rw-r–r–  1 root root    245760 Aug 20 06:25 alternatives.tar.0
-rw-r–r–  1 root root     15910 Aug 14 06:25 alternatives.tar.1.gz
-rw-r–r–  1 root root     15914 May 29 06:25 alternatives.tar.2.gz
-rw-r–r–  1 root root     15783 Jan 29  2021 alternatives.tar.3.gz
-rw-r–r–  1 root root     15825 Nov 20  2020 alternatives.tar.4.gz
-rw-r–r–  1 root root     15778 Jul 16  2020 alternatives.tar.5.gz
-rw-r–r–  1 root root     15799 Jul  4  2020 alternatives.tar.6.gz
-rw-r–r–  1 root root     80417 Aug 19 14:48 apt.extended_states.0
-rw-r–r–  1 root root      8693 Apr 27 22:40 apt.extended_states.1.gz
-rw-r–r–  1 root root      8658 Apr 17 19:45 apt.extended_states.2.gz
-rw-r–r–  1 root root      8601 Apr 15 00:52 apt.extended_states.3.gz
-rw-r–r–  1 root root      8599 Apr  9 00:26 apt.extended_states.4.gz
-rw-r–r–  1 root root      8542 Mar 18  2021 apt.extended_states.5.gz
-rw-r–r–  1 root root      8549 Mar 18  2021 apt.extended_states.6.gz
-rw-r–r–  1 root root   9030483 Jul  4  2020 aptitude.pkgstates.0
-rw-r–r–  1 root root    628958 May  7  2019 aptitude.pkgstates.1.gz
-rw-r–r–  1 root root    534758 Oct 21  2017 aptitude.pkgstates.2.gz
-rw-r–r–  1 root root    503877 Oct 19  2017 aptitude.pkgstates.3.gz
-rw-r–r–  1 root root    423277 Oct 15  2017 aptitude.pkgstates.4.gz
-rw-r–r–  1 root root    420899 Oct 14  2017 aptitude.pkgstates.5.gz
-rw-r–r–  1 root root    229508 May  5  2015 aptitude.pkgstates.6.gz
-rw-r–r–  1 root root        11 Oct 14  2017 dpkg.arch.0
-rw-r–r–  1 root root        43 Oct 14  2017 dpkg.arch.1.gz
-rw-r–r–  1 root root        43 Oct 14  2017 dpkg.arch.2.gz
-rw-r–r–  1 root root        43 Oct 14  2017 dpkg.arch.3.gz
-rw-r–r–  1 root root        43 Oct 14  2017 dpkg.arch.4.gz
-rw-r–r–  1 root root        43 Oct 14  2017 dpkg.arch.5.gz
-rw-r–r–  1 root root        43 Oct 14  2017 dpkg.arch.6.gz
-rw-r–r–  1 root root      1319 Apr 27 22:28 dpkg.diversions.0
-rw-r–r–  1 root root       387 Apr 27 22:28 dpkg.diversions.1.gz
-rw-r–r–  1 root root       387 Apr 27 22:28 dpkg.diversions.2.gz
-rw-r–r–  1 root root       387 Apr 27 22:28 dpkg.diversions.3.gz
-rw-r–r–  1 root root       387 Apr 27 22:28 dpkg.diversions.4.gz
-rw-r–r–  1 root root       387 Apr 27 22:28 dpkg.diversions.5.gz
-rw-r–r–  1 root root       387 Apr 27 22:28 dpkg.diversions.6.gz
-rw-r–r–  1 root root       375 Aug 23  2018 dpkg.statoverride.0
-rw-r–r–  1 root root       247 Aug 23  2018 dpkg.statoverride.1.gz
-rw-r–r–  1 root root       247 Aug 23  2018 dpkg.statoverride.2.gz
-rw-r–r–  1 root root       247 Aug 23  2018 dpkg.statoverride.3.gz
-rw-r–r–  1 root root       247 Aug 23  2018 dpkg.statoverride.4.gz
-rw-r–r–  1 root root       247 Aug 23  2018 dpkg.statoverride.5.gz
-rw-r–r–  1 root root       247 Aug 23  2018 dpkg.statoverride.6.gz
-rw-r–r–  1 root root   3363749 Sep 23 14:32 dpkg.status.0
-rw-r–r–  1 root root    763524 Aug 19 14:48 dpkg.status.1.gz
-rw-r–r–  1 root root    760198 Aug 17 19:41 dpkg.status.2.gz
-rw-r–r–  1 root root    760176 Aug 13 12:48 dpkg.status.3.gz
-rw-r–r–  1 root root    760105 Jul 16 15:25 dpkg.status.4.gz
-rw-r–r–  1 root root    759807 Jun 28 15:18 dpkg.status.5.gz
-rw-r–r–  1 root root    759554 May 28 16:22 dpkg.status.6.gz

drwx——  2 root root      4096 Oct 15  2017 ejabberd-2017-10-15T00:22:30.p1e5J8/
drwx——  2 root root      4096 Oct 15  2017 ejabberd-2017-10-15T00:24:02.dAUgDs/
drwx——  2 root root      4096 Oct 15  2017 ejabberd-2017-10-15T12:29:51.FX27WJ/
drwx——  2 root root      4096 Oct 15  2017 ejabberd-2017-10-15T21:18:26.bPQWlW/
drwx——  2 root root      4096 Jul 16  2019 ejabberd-2019-07-16T00:49:52.Gy3sus/
-rw——-  1 root root      2512 Oct 20  2020 group.bak
-rw——-  1 root shadow    1415 Oct 20  2020 gshadow.bak
-rw——-  1 root root      7395 May 11 22:56 passwd.bak
-rw——-  1 root shadow    7476 May 11 22:56 shadow.bak

Considering the situation the important files for us that could, help us restore our previous list of packages, we had installed on the Debian are files under /var/backups/dpkg.status*

Luckily debian based systems keeps backups of its important files that can be used later on for system recovery activities.
Below is a common structure of /var/lib/dpkg on a deb based system.

hipo@debian:/home/hipo$ ls -l /var/lib/dpkg/
total 11504
drwxr-xr-x 2 root root    4096 Aug 19 14:33 alternatives/
-rw-r–r– 1 root root      11 Oct 14  2017 arch
-rw-r–r– 1 root root 2199402 Oct 19  2017 available
-rw-r–r– 1 root root 2197483 Oct 19  2017 available-old
-rw-r–r– 1 root root       8 Sep  6  2012 cmethopt
-rw-r–r– 1 root root    1319 Apr 27 22:28 diversions
-rw-r–r– 1 root root    1266 Nov 18  2020 diversions-old
drwxr-xr-x 2 root root  606208 Sep 23 14:32 info/
-rw-r—– 1 root root       0 Sep 23 14:32 lock
-rw-r—– 1 root root       0 Mar 18  2021 lock-frontend
drwxr-xr-x 2 root root    4096 Sep 17  2012 parts/
-rw-r–r– 1 root root     375 Aug 23  2018 statoverride
-rw-r–r– 1 root root     337 Aug 13  2018 statoverride-old
-rw-r–r– 1 root root 3363749 Sep 23 14:32 status
-rw-r–r– 1 root root 3363788 Sep 23 14:32 status-old
drwxr-xr-x 2 root root    4096 Aug 19 14:48 triggers/
drwxr-xr-x 2 root root    4096 Sep 23 14:32 updates/


2. Recreate basic /var/lib/dpkg directory and files structures

As you can see, there are 5 directories and the status file and some other files. 
Hence the first step is to restore the lost directory structure.

hipo@debian: ~$ sudo mkdir -p /var/lib/dpkg/{alternatives,info,parts,triggers,updates}


3. Recover /var/lib/dpkg/status file

Further on recover the dpkg status file from backup

hipo@debian: ~$  sudo cp /var/backups/dpkg.status.0 /var/lib/dpkg/status


4. Check dpkg package installation works again and reinstall base-files

Next check if dpkg – debian package manager is now working, by simply trying to download dpkg*.deb reinstalling it.

root@debian:/root # apt-get download dpkg
# sudo dpkg -i dpkg*.deb

If you get no errors next step is to reinstall base-files which is important package on which dpkg depends.

root@debian:/root # apt-get download base-files

root@debian:/root # sudo dpkg -i base-files*.deb


5. Update deb system package list and db consistency

Onwards try to update system package list and check dpkg / apt database consistency.

root@debian:/root # dpkg –audit

root@debian:/root # sudo apt-get update

root@debian:/root # sudo apt-get check


The result should be more of the files in /var/lib/dpkg should appear, thus list the directory again and compare to the earlier given list of it, they should be similar.

root@debian:/root # ls -l /var/lib/dpkg

6. Reinstall completely from source code dpkg, if nothing else works
 

If some files are missing they should get created with a normal daily sysadmin package management tasks so no worries.

In case if after attempting to upgrade the system or install a package with apt, you get some nasty error like:
 

'/usr/local/var/lib/dpkg/status' for reading: No such file or directory


Then the next and final thing to try as a recovery is to download compile from a new and reinstall dpkg from source code!


root@debian:/ # wget https://launchpad.net/ubuntu/+archive/primary/+files/dpkg_1.16.1.2ubuntu7.2.tar.bz2
root@debian:/ # tar -xvf dpkg_1.16*

root@debian:/ # cd dpkg-1.16*

root@debian:/ # ./configure

root@debian:/ # make

root@debian:/ # make install


Hopefully you'll have gcc and development tools provided by build-essential .deb package otherwise you have to download and compile this ones as well 🙂
If this doesn't bring you back the installed packages you had priorly (hopefully not), then waste no more time and do a backup of the main things on the server, and reinstall it completely.

The moral out of this incident is always to implement always to your system a good back up system and regularly create backups of /var/lib/dpkg , /etc/ , /usr/local* and other important files on a remote backup server, to be able to easily recover if you do by mistake something whacky.
 

Hope that helped anyone. Cheers 🙂

Install and enable Sysstats IO / DIsk / CPU / Network monitoring console suite on Redhat 8.3, Few sar useful command examples

Tuesday, September 28th, 2021

linux-sysstat-monitoring-logo


Why to monitoring CPU, Memory, Hard Disk, Network usage etc. with sysstats tools?
 

Using system monitoring tools such as Zabbix, Nagios Monit is a good approach, however sometimes due to zabbix server interruptions you might not be able to track certain aspects of system performance on time. Thus it is always a good idea to 
Gain more insights on system peroformance from command line. Of course there is cmd tools such as iostat and top, free, vnstat that provides plenty of useful info on system performance issues or bottlenecks. However from my experience to have a better historical data that is systimized and all the time accessible from console it is a great thing to have sysstat package at place. Since many years mostly on every server I administer, I've been using sysstats to monitor what is going on servers over a short time frames and I'm quite happy with it. In current company we're using Redhats and CentOS-es and I had to install sysstats on Redhat 8.3. I've earlier done it multiple times on Debian / Ubuntu Linux and while I've faced on some .deb distributions complications of making sysstat collect statistics I've come with an article on Howto fix sysstat Cannot open /var/log/sysstat/sa no such file or directory” on Debian / Ubuntu Linux
 

Sysstat contains the following tools related to collecting I/O and CPU statistics:
iostat
Displays an overview of CPU utilization, along with I/O statistics for one or more disk drives.
mpstat
Displays more in-depth CPU statistics.
Sysstat also contains tools that collect system resource utilization data and create daily reports based on that data. These tools are:
sadc
Known as the system activity data collector, sadc collects system resource utilization information and writes it to a file.
sar
Producing reports from the files created by sadc, sar reports can be generated interactively or written to a file for more intensive analysis.

My experience with CentOS 7 and Fedora to install sysstat it was pretty straight forward, I just had to install it via yum install sysstat wait for some time and use sar (System Activity Reporter) tool to report collected system activity info stats over time.
Unfortunately it seems on RedHat 8.3 as well as on CentOS 8.XX instaling sysstats does not work out of the box.

To complete a successful installation of it on RHEL 8.3, I had to:

[root@server ~]# yum install -y sysstat


To make sysstat enabled on the system and make it run, I've enabled it in sysstat

[root@server ~]# systemctl enable sysstat


Running immediately sar command, I've faced the shitty error:


Cannot open /var/log/sysstat/sa18:
No such file or directory. Please check if data collecting is enabled”


Once installed I've waited for about 5 minutes hoping, that somehow automatically sysstat would manage it but it didn't.

To solve it, I've had to create additionally file /etc/cron.d/sysstat (weirdly RPM's post install instructions does not tell it to automatically create it)

[root@server ~]# vim /etc/cron.d/sysstat

# run system activity accounting tool every 10 minutes
0 * * * * root /usr/lib64/sa/sa1 60 59 &
# generate a daily summary of process accounting at 23:53
53 23 * * * root /usr/lib64/sa/sa2 -A &


  • /usr/local/lib/sa1 is a shell script that we can use for scheduling cron which will create daily binary log file.
  • /usr/local/lib/sa2 is a shell script will change binary log file to human-readable form.


[root@server ~]# chmod 600 /etc/cron.d/sysstat

[root@server ~]# systemctl restart sysstat


In a while if sysstat is working correctly you should get produced its data history logs inside /var/log/sa

[root@server ~]# ls -al /var/log/sa 


Note that the standard sysstat history files on Debian and other modern .deb based distros such as Debian 10 (in  y.2021) is stored under /var/log/sysstat

Here is few useful uses of sysstat cmds


1. Check with sysstat machine history SWAP and RAM Memory use


To lets say check last 10 minutes SWAP memory use:

[hipo@server yum.repos.d] $ sar -W  |last -n 10
 

Linux 4.18.0-240.el8.x86_64 (server)       09/28/2021      _x86_64_        (8 CPU)

12:00:00 AM  pswpin/s pswpout/s
12:00:01 AM      0.00      0.00
12:01:01 AM      0.00      0.00
12:02:01 AM      0.00      0.00
12:03:01 AM      0.00      0.00
12:04:01 AM      0.00      0.00
12:05:01 AM      0.00      0.00
12:06:01 AM      0.00      0.00

[root@ccnrlb01 ~]# sar -r | tail -n 10
14:00:01        93008   1788832     95.06         0   1357700    725740      9.02    795168    683484        32
14:10:01        78756   1803084     95.81         0   1358780    725740      9.02    827660    652248        16
14:20:01        92844   1788996     95.07         0   1344332    725740      9.02    813912    651620        28
14:30:01        92408   1789432     95.09         0   1344612    725740      9.02    816392    649544        24
14:40:01        91740   1790100     95.12         0   1344876    725740      9.02    816948    649436        36
14:50:01        91688   1790152     95.13         0   1345144    725740      9.02    817136    649448        36
15:00:02        91544   1790296     95.14         0   1345448    725740      9.02    817472    649448        36
15:10:01        91108   1790732     95.16         0   1345724    725740      9.02    817732    649340        36
15:20:01        90844   1790996     95.17         0   1346000    725740      9.02    818016    649332        28
Average:        93473   1788367     95.03         0   1369583    725074      9.02    800965    671266        29


2. Check system load? Are my processes waiting too long to run on the CPU?

[root@server ~ ]# sar -q |head -n 10
Linux 4.18.0-240.el8.x86_64 (server)       09/28/2021      _x86_64_        (8 CPU)

12:00:00 AM   runq-sz  plist-sz   ldavg-1   ldavg-5  ldavg-15   blocked
12:00:01 AM         0       272      0.00      0.02      0.00         0
12:01:01 AM         1       271      0.00      0.02      0.00         0
12:02:01 AM         0       268      0.00      0.01      0.00         0
12:03:01 AM         0       268      0.00      0.00      0.00         0
12:04:01 AM         1       271      0.00      0.00      0.00         0
12:05:01 AM         1       271      0.00      0.00      0.00         0
12:06:01 AM         1       265      0.00      0.00      0.00         0


3. Show various CPU statistics per CPU use
 

On a multiprocessor, multi core server sometimes for scripting it is useful to fetch processor per use historic data, 
this can be attained with:


[hipo@server ~ ] $ mpstat -P ALL
Linux 4.18.0-240.el8.x86_64 (server)       09/28/2021      _x86_64_        (8 CPU)

06:08:38 PM  CPU    %usr   %nice    %sys %iowait    %irq   %soft  %steal  %guest  %gnice   %idle
06:08:38 PM  all    0.17    0.02    0.25    0.00    0.05    0.02    0.00    0.00    0.00   99.49
06:08:38 PM    0    0.22    0.02    0.28    0.00    0.06    0.03    0.00    0.00    0.00   99.39
06:08:38 PM    1    0.28    0.02    0.36    0.00    0.08    0.02    0.00    0.00    0.00   99.23
06:08:38 PM    2    0.27    0.02    0.31    0.00    0.06    0.01    0.00    0.00    0.00   99.33
06:08:38 PM    3    0.15    0.02    0.22    0.00    0.03    0.01    0.00    0.00    0.00   99.57
06:08:38 PM    4    0.13    0.02    0.20    0.01    0.03    0.01    0.00    0.00    0.00   99.60
06:08:38 PM    5    0.14    0.02    0.27    0.00    0.04    0.06    0.01    0.00    0.00   99.47
06:08:38 PM    6    0.10    0.02    0.17    0.00    0.04    0.02    0.00    0.00    0.00   99.65
06:08:38 PM    7    0.09    0.02    0.15    0.00    0.02    0.01    0.00    0.00    0.00   99.70


sar-sysstat-cpu-statistics-screenshot

Monitor processes and threads currently being managed by the Linux kernel.

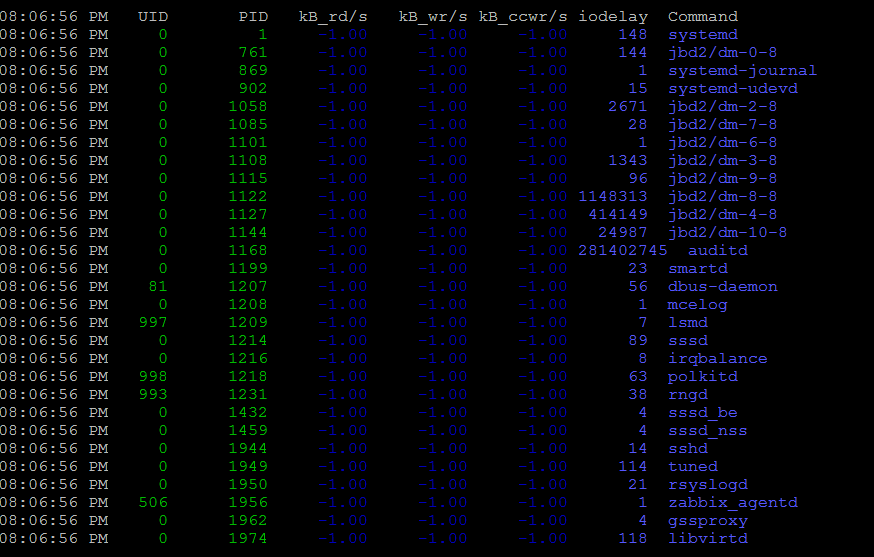
[hipo@server ~ ] $ pidstat

pidstat-various-random-process-statistics

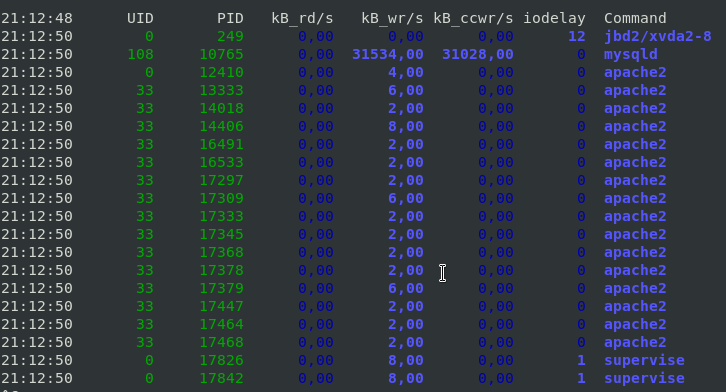
[hipo@server ~ ] $ pidstat -d 2


pidstat-show-processes-with-most-io-activities-linux-screenshot

This report tells us that there is few processes with heave I/O use Filesystem system journalling daemon jbd2, apache, mysqld and supervise, in 3rd column you see their respective PID IDs.

To show threads used inside a process (like if you press SHIFT + H) inside Linux top command:

[hipo@server ~ ] $ pidstat -t -p 10765 1 3

Linux 4.19.0-14-amd64 (server)     28.09.2021     _x86_64_    (10 CPU)

21:41:22      UID      TGID       TID    %usr %system  %guest   %wait    %CPU   CPU  Command
21:41:23      108     10765         –    1,98    0,99    0,00    0,00    2,97     1  mysqld
21:41:23      108         –     10765    0,00    0,00    0,00    0,00    0,00     1  |__mysqld
21:41:23      108         –     10768    0,00    0,00    0,00    0,00    0,00     0  |__mysqld
21:41:23      108         –     10771    0,00    0,00    0,00    0,00    0,00     5  |__mysqld
21:41:23      108         –     10784    0,00    0,00    0,00    0,00    0,00     7  |__mysqld
21:41:23      108         –     10785    0,00    0,00    0,00    0,00    0,00     6  |__mysqld
21:41:23      108         –     10786    0,00    0,00    0,00    0,00    0,00     2  |__mysqld

10765 – is the Process ID whose threads you would like to list

With pidstat, you can further monitor processes for memory leaks with:

[hipo@server ~ ] $ pidstat -r 2


4. Report paging statistics for some old period


[root@server ~ ]# sar -B -f /var/log/sa/sa27 |head -n 10
Linux 4.18.0-240.el8.x86_64 (server)       09/27/2021      _x86_64_        (8 CPU)

15:42:26     LINUX RESTART      (8 CPU)

15:55:30     LINUX RESTART      (8 CPU)

04:00:01 PM  pgpgin/s pgpgout/s   fault/s  majflt/s  pgfree/s pgscank/s pgscand/s pgsteal/s    %vmeff
04:01:01 PM      0.00     14.47    629.17      0.00    502.53      0.00      0.00      0.00      0.00
04:02:01 PM      0.00     13.07    553.75      0.00    419.98      0.00      0.00      0.00      0.00
04:03:01 PM      0.00     11.67    548.13      0.00    411.80      0.00      0.00      0.00      0.00


5.  Monitor Received RX and Transmitted TX network traffic perl Network interface real time
 

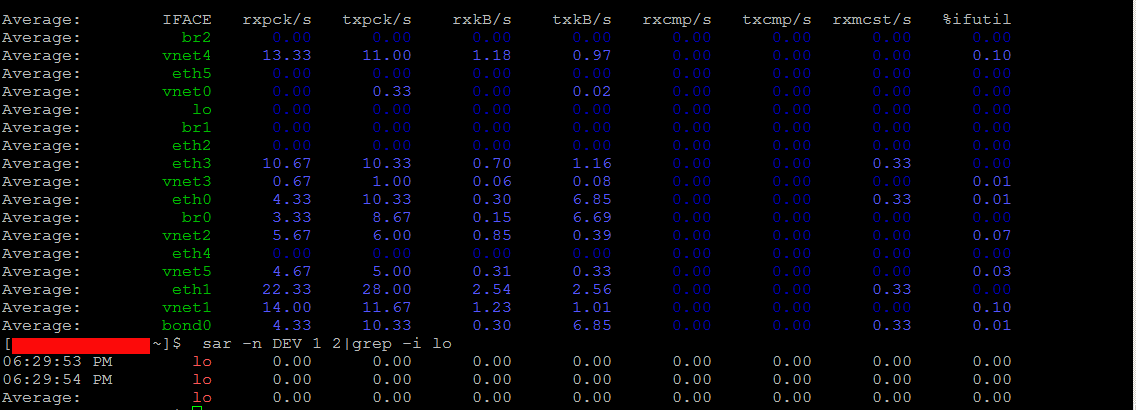
To print out Received and Send traffic per network interface 4 times in a raw

sar-sysstats-network-traffic-statistics-screenshot
 

[hipo@server ~ ] $ sar -n DEV 1 4


To continusly monitor all network interfaces I/O traffic

[hipo@server ~ ] $ sar -n DEV 1


To only monitor a certain network interface lets say loopback interface (127.0.0.1) received / transmitted bytes

[hipo@server yum.repos.d] $  sar -n DEV 1 2|grep -i lo
06:29:53 PM        lo      0.00      0.00      0.00      0.00      0.00      0.00      0.00      0.00
06:29:54 PM        lo      0.00      0.00      0.00      0.00      0.00      0.00      0.00      0.00
Average:           lo      0.00      0.00      0.00      0.00      0.00      0.00      0.00      0.00


6. Monitor block devices use
 

To check block devices use 3 times in a raw
 

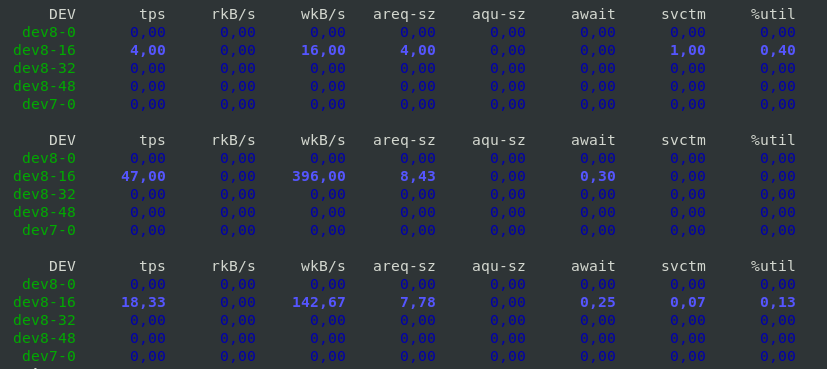
[hipo@server yum.repos.d] $ sar -d 1 3


sar-sysstats-blockdevice-statistics-screenshot
 

7. Output server monitoring data in CSV database structured format


For preparing a nice graphs with Excel from CSV strucuted file format, you can dump the collected data as so:

 [root@server yum.repos.d]# sadf -d /var/log/sa/sa27 — -n DEV | grep -v lo|head -n 10
server-name-fqdn;-1;2021-09-27 13:42:26 UTC;LINUX-RESTART    (8 CPU)
# hostname;interval;timestamp;IFACE;rxpck/s;txpck/s;rxkB/s;txkB/s;rxcmp/s;txcmp/s;rxmcst/s;%ifutil
server-name-fqdn;-1;2021-09-27 13:55:30 UTC;LINUX-RESTART    (8 CPU)
# hostname;interval;timestamp;IFACE;rxpck/s;txpck/s;rxkB/s;txkB/s;rxcmp/s;txcmp/s;rxmcst/s;%ifutil
server-name-fqdn;60;2021-09-27 14:01:01 UTC;eth1;19.42;16.12;1.94;1.68;0.00;0.00;0.00;0.00
server-name-fqdn;60;2021-09-27 14:01:01 UTC;eth0;7.18;9.65;0.55;0.78;0.00;0.00;0.00;0.00
server-name-fqdn;60;2021-09-27 14:01:01 UTC;eth2;5.65;5.13;0.42;0.39;0.00;0.00;0.00;0.00
server-name-fqdn;60;2021-09-27 14:02:01 UTC;eth1;18.90;15.55;1.89;1.60;0.00;0.00;0.00;0.00
server-name-fqdn;60;2021-09-27 14:02:01 UTC;eth0;7.15;9.63;0.55;0.74;0.00;0.00;0.00;0.00
server-name-fqdn;60;2021-09-27 14:02:01 UTC;eth2;5.67;5.15;0.42;0.39;0.00;0.00;0.00;0.00

To graph the output data you can use Excel / LibreOffice's Excel equivalent Calc or if you need to dump a CSV sar output and generate it on the fly from a script  use gnuplot 


What we've learned?


How to install and enable on cron sysstats on Redhat and CentOS 8 Linux ? 
How to continuously monitor CPU / Disk and Network, block devices, paging use and processes and threads used by the kernel per process ?  
As well as how to export previously collected data to CSV to import to database or for later use inrder to generate graphic presentation of data.
Cheers ! 🙂


How to enable Control Alt Backspace to Kill X server on Debian / Ubuntu Linux

Thursday, September 28th, 2017

kill-X-server-switch-revert-back-to-ctrl-alt-backspace-howto
Being a long time GNU / Linux user, I've been quite dissatisfied for the fact that in latest Debian and Ubuntu Linux, the default Key combination to Kill X (CTRL + ALT + BACKSPACE) is no longer working.

Though nowdays Xorg (XServer) is pretty stable it still happens from time to time for some application to overload the PC badly and make Gnome or KDE environment little or no responsive at all and here comes the goody CTRL + ALT + BACKSPACE it is pretty much  like  (CTRL + ALT + DEL) did restarted the computer in DOS and earlier Windows OS-es once the environment became unusable with the only difference that just Xorg server is restarted and the other using programs that are in background work just like they used to. 

CTRL + ALT + Backspace is a great thing to use especially if you're running some homebrew server and you use it both as a Server with some few little websites and as a Desktop environment to browse the net and do basic stuff.

So here comes the question how to make the CTRL + ALT + BACKSPACE keyboard combination be killing Xserver like in the good old days?

The easiest way to do it interactively in ncurses interface is by  running:


root@noah:~# dpkg-reconfigure keyboard-configuration


If somehow on the machine you don't have dpkg-reconfigure or you prefer to do set CTRL + ALT + BACKSPACE Kill Switch manually edit /etc/default/keyboard 

inside change value of


XKBOPTIONS="terminate:ctrl_alt_bksp" 


like shown below file:

root@noah:/home/hipo# cat  /etc/default/keyboard

# KEYBOARD CONFIGURATION FILE

# Consult the keyboard(5) manual page.

XKBMODEL="pc105"
XKBLAYOUT="us"
XKBVARIANT=""
XKBOPTIONS="terminate:ctrl_alt_bksp"

BACKSPACE="guess"

The configuration should be working across Debian 7, 8, 9 as well as Ubuntu 12 ..14 .. 16 and hopefully in future releases too, just as many other Linux distributions like Mint etc. the Xserver Kill Switch setting should be located in same file.

Finally if even after that change the Control Alt BackSpace Kill Switch sequence refuses to work in GNOME Desktop environment, it might be due to a local setting typical for GNOME and this should be fixed via the good known gnome-tweak-tool

So GNOME users should run it from command line and check the setting there, e.g.:


$ gnome-tweak-tool


You should check:


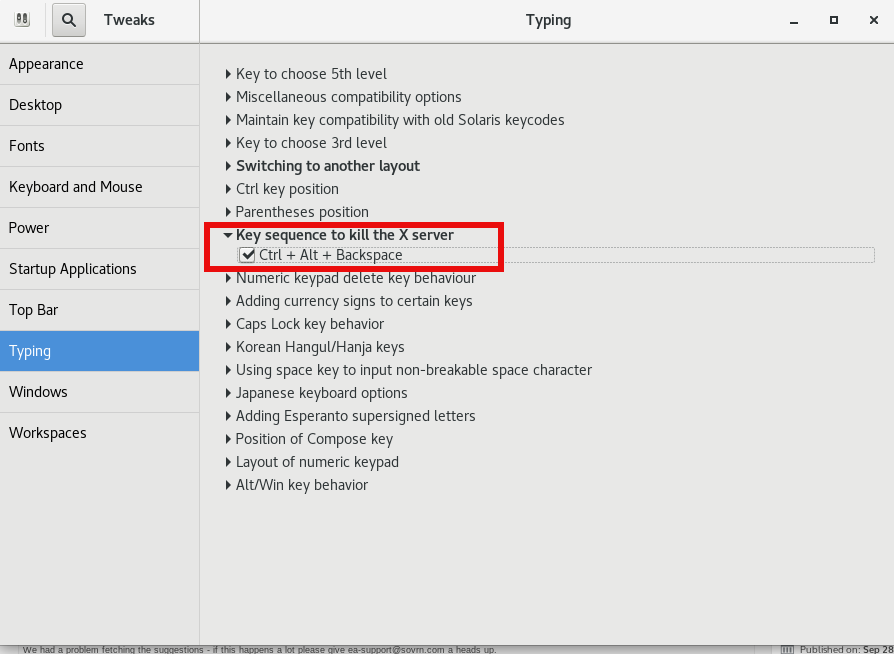
Typing -> Kill Sequence to Kill the X Server


it should look like shown in below screenshot:

how-to-set-X-server-kill-switch-in-GNOME-gnak-tool-screenshot-debian-stretch


Howto Fix “sysstat Cannot open /var/log/sysstat/sa no such file or directory” on Debian / Ubuntu Linux

Monday, February 15th, 2016

sysstast-no-such-file-or-directory-fix-Debian-Ubuntu-Linux-howto
I really love sysstat and as a console maniac I tend to install it on every server however by default there is some <b>sysstat</b> tuning once installed to make it work, for those unfamiliar with <i>sysstat</i> I warmly recommend to check, it here is in short the package description:<br /><br />
 

server:~# apt-cache show sysstat|grep -i desc -A 15
Description: system performance tools for Linux
 The sysstat package contains the following system performance tools:
  – sar: collects and reports system activity information;
  – iostat: reports CPU utilization and disk I/O statistics;
  – mpstat: reports global and per-processor statistics;
  – pidstat: reports statistics for Linux tasks (processes);
  – sadf: displays data collected by sar in various formats;
  – nfsiostat: reports I/O statistics for network filesystems;
  – cifsiostat: reports I/O statistics for CIFS filesystems.
 .
 The statistics reported by sar deal with I/O transfer rates,
 paging activity, process-related activities, interrupts,
 network activity, memory and swap space utilization, CPU
 utilization, kernel activities and TTY statistics, among
 others. Both UP and SMP machines are fully supported.
Homepage: http://pagesperso-orange.fr/sebastien.godard/


If you happen to install sysstat on a Debian / Ubuntu server with:

server:~# apt-get install –yes sysstat


, and you try to get some statistics with sar command but you get some ugly error output from:


server:~# sar Cannot open /var/log/sysstat/sa20: No such file or directory


And you wonder how to resolve it and to be able to have the server log in text databases periodically the nice sar stats load avarages – %idle, %iowait, %system, %nice, %user, then to FIX that Cannot open /var/log/sysstat/sa20: No such file or directory

You need to:

server:~# vim /etc/default/sysstat


By Default value you will find out sysstat stats it is disabled, e.g.:

ENABLED="false"

Switch the value to "true"

ENABLED="true"


Then restart sysstat init script with:

server:~# /etc/init.d/sysstat restart

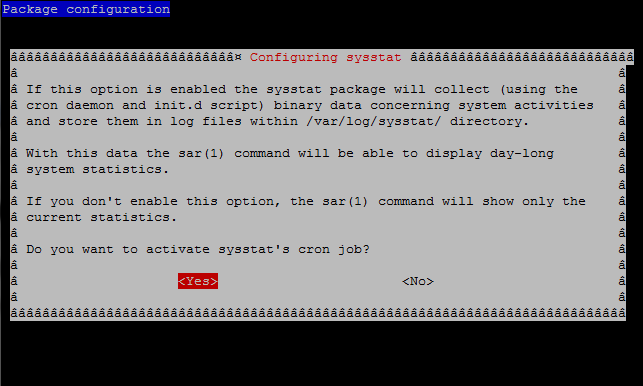
However for those who prefer to do things from menu Ncurses interfaces and are not familiar with Vi Improved, the easiest way is to run dpkg reconfigure of the sysstat:

server:~# dpkg –reconfigure


sysstat-reconfigure-on-gnu-linux


root@server:/# sar
Linux 2.6.32-5-amd64 (pcfreak) 15.02.2016 _x86_64_ (2 CPU)

0,00,01 CPU %user %nice %system %iowait %steal %idle
0,15,01 all 24,32 0,54 3,10 0,62 0,00 71,42
1,15,01 all 18,69 0,53 2,10 0,48 0,00 78,20
10,05,01 all 22,13 0,54 2,81 0,51 0,00 74,01
10,15,01 all 17,14 0,53 2,44 0,40 0,00 79,49
10,25,01 all 24,03 0,63 2,93 0,45 0,00 71,97
10,35,01 all 18,88 0,54 2,44 1,08 0,00 77,07
10,45,01 all 25,60 0,54 3,33 0,74 0,00 69,79
10,55,01 all 36,78 0,78 4,44 0,89 0,00 57,10
16,05,01 all 27,10 0,54 3,43 1,14 0,00 67,79


Well that's it now sysstat error resolved, text reporting stats data works again, Hooray! 🙂

Install TorrentFlux Bit Torrent Web management interface on Debian / Ubuntu Linux

Tuesday, July 15th, 2014

torrent flux logo
Torrentflux
is web based, feature-rich BitTorrent download manager.
Torrentflux is a must have installed server software for anyone who does regular torrent downloads and want to access the downloads from anywhere on the internet.

TorrentFlux is a PHP based BitTorrent controller that runs on a web
 server. It can manage all of your BitTorrent downloads from anywhere
 through a convenient and easy-to-use web interface.
 .
 TorrentFlux uses a MySQL database to manage the downloads.

 TorrentFlux enables you to run BitTorrent downloads unattended on a monitor-less or remote server 24 hours a day, while still maintaining complete control from any web browser. Now you can control your  downloading on your firewall, or keep up with downloads while on  vacation. It uses the BitTornado client to download files, and also  requires a web server with PHP.
 
 Some of the Torrentflux features:

   * Upload Torrents via URL or File Upload
   * Start, Stop, and Delete Torrents with ease
   * Advanced Torrent start options (ports, speeds, etc.)
   * Multi-user interface
   * RSS Feeds, download Torrents files with a click
   * Run several torrents at once
   * View Download Progress of all torrents at a glance
   * View drive space at a glance
   * View Torrent file meta information
   * Built-in User management and Security
   * Private Messaging
   * Themes (selectable per user)
   * Upload History


Before installing Bittorrent you will need to have a running version of Debian, Ubuntu or any other debian derivative (though it can easily be run on any Linux distro). To install AMP (Apache MySQL Server, PHP) you can follow first part of my previous article Installing Usual PHP Apache MySQL for new Debian GNU / Linux installs.

So what for is TorrentFlux Useful?
Torrenflux is precious and must have if you have to access filtered torrent from outside of your homecountry and you have a running server already in your home country in that I was using TorrentFlux to access Bulgarian Zamunda.Net Torrent Tracker from Holland and was downloading first movies from the Bulgarian Torrent Tracker to my Fluxbox installed on my Dobrich home router and then used FTP to transfer movies to the Netherlands. Talking about many people choose to also install VSFTP and use it together with Torrentflux …

1. Install TorrentFlux and its dependencies (BitTornado, Bittorrent, Zip, Unzip, Bzip etc.) the "Debian Way"


On my Debian 7 Wheezy home machine  I run

apt-get install –yes bzip2 php5-gd php5-cli unrar-free grep python net-tools mawk wget unzip cksfv vlc-nox uudeview python-crypto libxml-simple-perl libxml-dom-perl libdbd-mysql-perl bittorrent bittornado


a) Install TorrentFlux the Debian Way

apt-get install –yes torrentflux


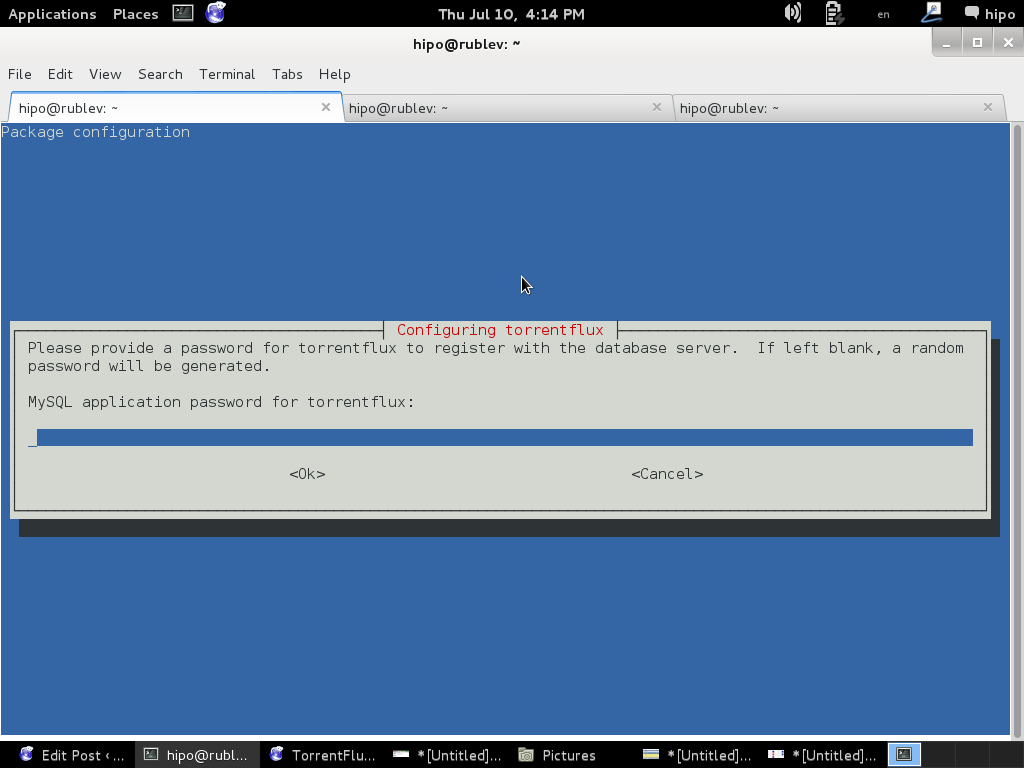
You will be prompted with a coule of screens, to set a new MySQL database user and password and SQL database, as well as offered to restart Apache to make Torrentflux accessible like as on below screenshots.
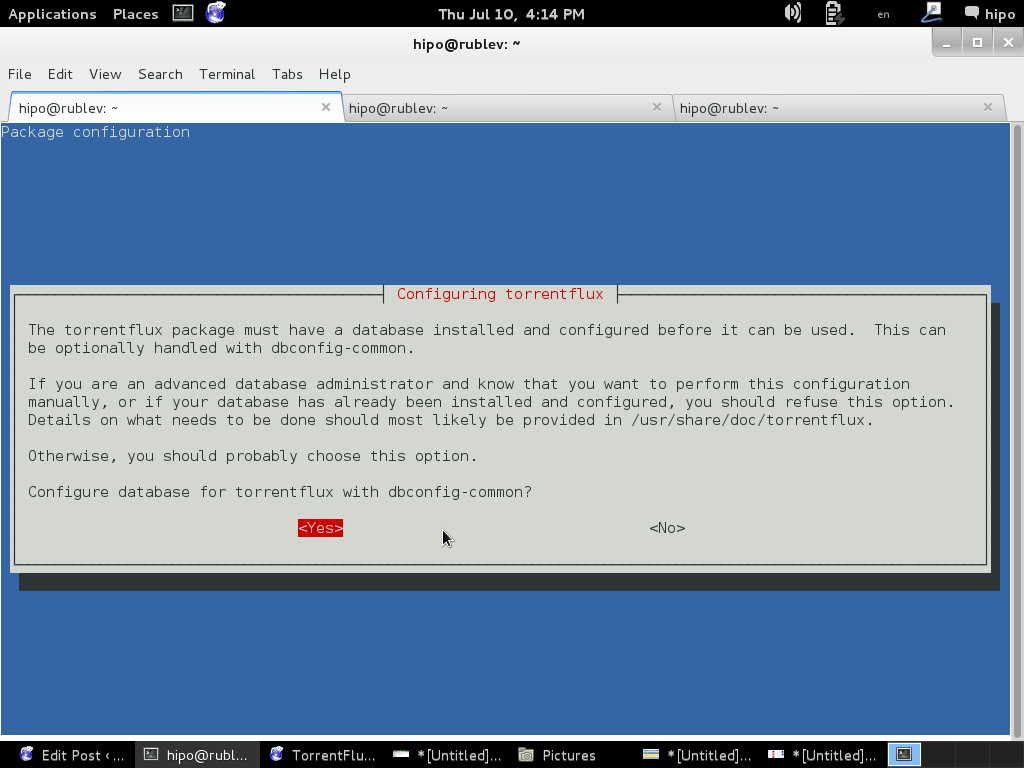
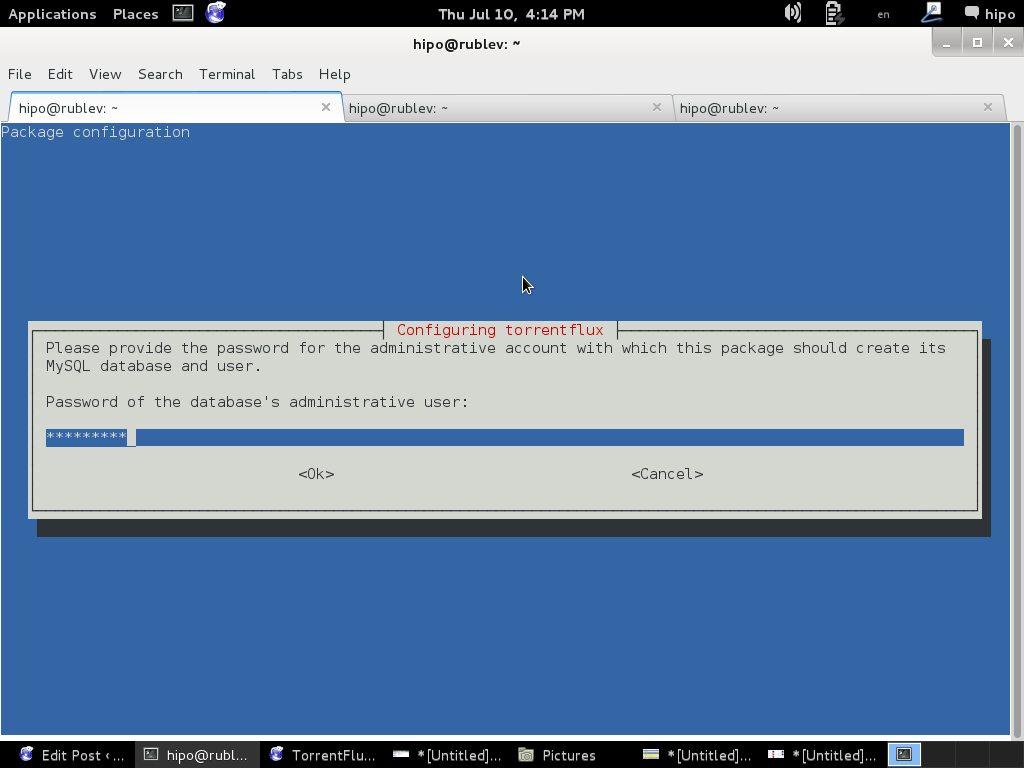
configuring-torrentflux-debian-linux-screenshot-2


configuring-torrentflux-debian-linux-screenshot 3

configuring-torrentflux-debian-linux-screenshot-4

To make new installed torrentflux accessible from web you will either have to configure it via some new Apache VirtualHost or make a symbolic link to /usr/share/torrentflux/www :
 

cd /var/www/
ln -sf /usr/share/torrentflux/www/ torrentflux


That's all you're all done to access torrentflux either access it via your default configured webserver domain name or via localhost if you're logged in to same pc where installing.

http://www.your-domain.com/torrentflux

or

http://127.0.0.1/torrentflux
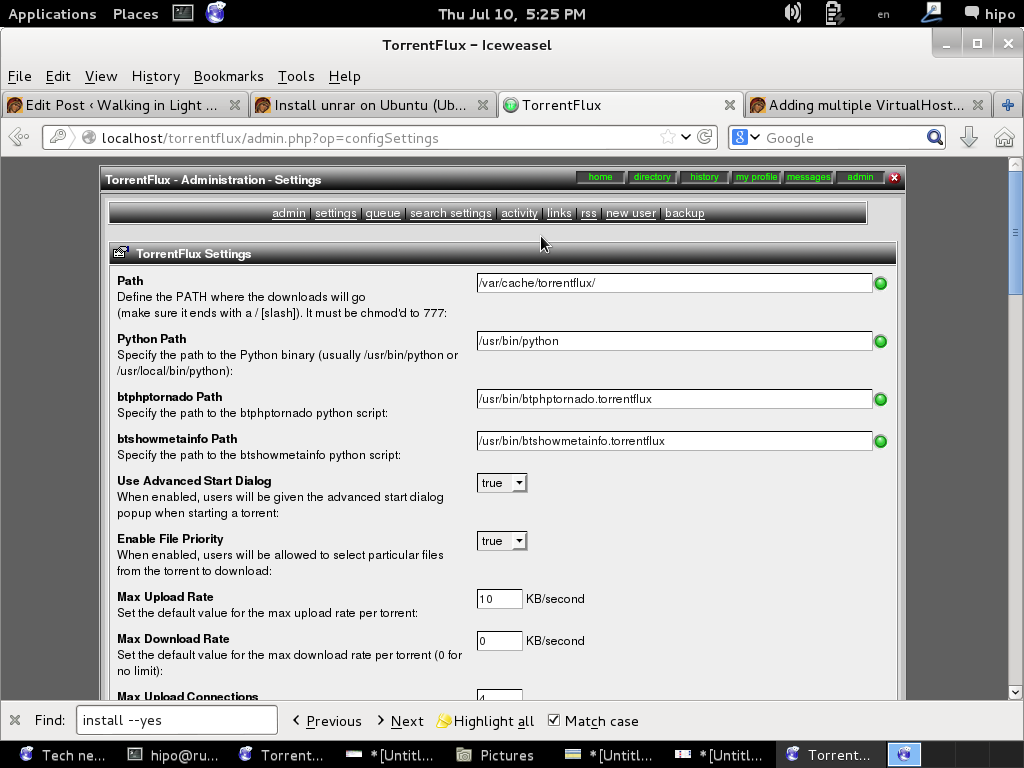
configuring-torrentflux-after-first-login-in-web-debian-linux

2. Install latest Torrentflux version from source

Alternatively if you want to have the latest version (because the Debian version is part of the stable distribution is a little bit outdated you will have to fetch Torrentflux-b4rt and unarchive it:

cd /tmp/
wget http://download.berlios.de/tf-b4rt/torrentflux-b4rt_1.0-beta2.tar.bz2

tar -xjf torrentflux-b4rt_1.0-beta2.tar.bz2

mv torrentflux-b4rt_1.0-beta2 /opt/torrentflux

Then to make torrentflux visible from web server I had to create a symbolic link to installation directory:
 

ln -sf /opt/torrentflux/html /var/www/torrentflux

For further initial configuration its necessery to make Torrentflux config writtable by www-data (the user with which Apache is running on Debian).


chown -R www-data:www-data /var/www/torrentflux/inc/config/


Next it its required to create somewhere download folder where TorrentFlux will keep downloaded Torrents

mkdir /var/lib/torrentflux


Apache HTTP server will have to have write ther:

chown -R www-data:www-data /var/lib/torrentflux


If you already haven't restarted Apache earlier in installing TorrentFlux pre-requirements, you will have to do it now:


/etc/init.d/apache2 restart


As TorrentFlux depends on its MySQL backend, we need to also create manually TorrentFlux database username and a password
 

export SQL_DB='torrentflux';
TFLUXSQL_USERNAME='torrentflux';
TFLUX_SQL_PWD='any-secret-password';

echo "CREATE DATABASE IF NOT EXISTS $SQL_DB DEFAULT CHARACTER SET utf8 DEFAULT COLLATE utf8_unicode_ci"
| mysql –user=root –password

echo "GRANT ALL PRIVILEGES ON $SQL_DB.*
TO $TFLUXSQL_USERNAME@localhost
IDENTIFIED BY $TFLUX_SQL_PWD;" | mysql –user=root –password


Substitute with your Database, Username and Password above shell variables – $SQL_DB, $TFLUX_USERNAME, $TFLUX_SQL_PWD

To configure TorrentFlux access it in browser:

http://your-domain.com/torrentflux
 

By accessing it for a first time, you will redirected to setup.php, in case something goes wrong and yuo're not redirected (probably some mod_rewrite issues add setup.php to url – e.g., acess –

http://your-domain.com/torrentflux/setup.php

I will not enter details, about Web config, because everything there is pretty clear.

Just in short – you will have to now choose:

Choose Database
Choose Database Information of database (put in the exact name of TorrentFlux databse previously created)
Uncheck the box for "Create new database"
Choose as a download location upper created directory – /var/lib/torrentflux

If you get an error on software dependencies screen for missing unrar – just install it
VLC may show an error as well, that's not a problem because VLC is probably not to be used.
Finally after completion of all, you will get an error that setup.php cannot be deleted.
 

To prevent, someone to re-configure it through http://your-domain/torrentflux/setup.php URL remove setup.php


rm /var/www/torrentflux/setup.php

To prevent someone rewrite anything in config file from web we have to revert back config/ folder not to be writable by Apache


chown -R root:root /var/www/torrentflux/inc/config/

Now in browser to access torrentflux type:


http://ipofyourbox/torrentflux

/torrentflux should redirect you to login.php if for some reason it doesn't type it manually in URL.

First account you will login is the super user account, you can allow multiple users to use it by adding multiple accounts.
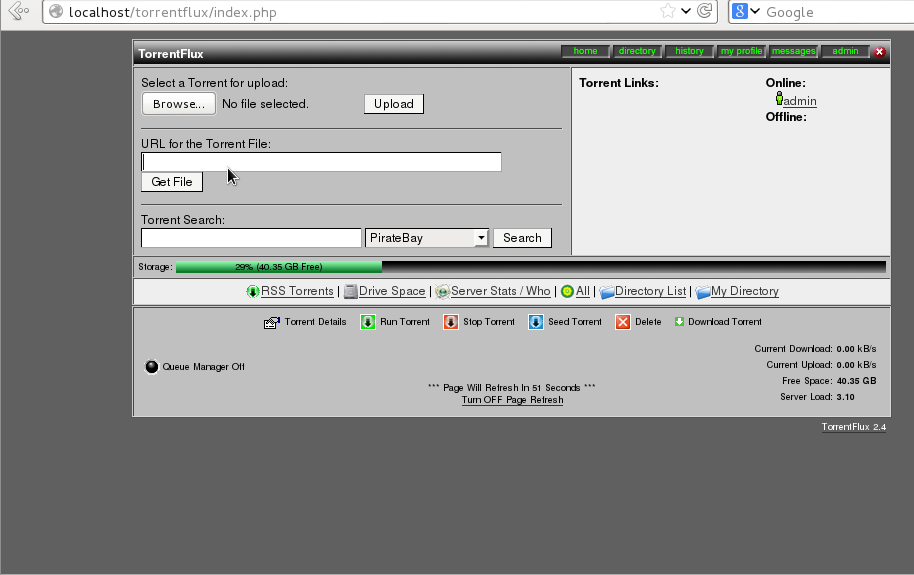
torrentflux-install-on-debian-ubuntu-gnu-linux-web-management-torrent-interface

As you will see there is plety of configuration options to play with.

You will definitely want to look in Server Page, some very important page to look is the Transfer Page – from there you can adjust the bandwidth of your connection on 100Mbit network this would be 12500 – to use the maximum possible connection provided by your ISP set the max bandwidth to 0. You have the option to also set a default bittorrent client, by default this will be bittornado.


If you have troubles downloading from TorrentTrackers make sure your router is configured to forward port 49160 to 49300

Now if you have a lot of storage create accounts also for your friends and enjoy torrentflux 🙂


Run native Internet Explorer 6 on latest Debian / Ubuntu Linux with IEs4Linux

Thursday, July 24th, 2014

Install-internet-explorer-on-debian-linux-IEs4Linux_logo.svg
If you're a GNU / Linux Desktop user like me and you have to administrate hybrid server environments running mixture of MS Windows with Microsoft IIS webserver running active server pages (.ASP) developed application or UNIX / GNU Linux servers web applications using Mono as a server-side language, often you need to have browser which properly supports  Internet Explorer Trident web (layout) renderer (also famous as MSHTML).

Having Internet Explorer on your Linux is very useful for web developers who want to test how their website works under IE.

Of course you can always install Windows in Virtualbox VM and do your testing in the Virtual Machine but this takes time to install and also puts a useless load to a PC ….

IES4 Linux is a Linux free (open source) shell script that lets you run Internet Explorer on your Linux desktop.

ies4linux scripts collection uses emulation with WINE (Wine is Not Emulator) emulator to run the native  Windows Internet Explorer thus before use it you have to install Wine.

There are plenty of tutorials online about ies4Linux, problem is as it is not updated and developed most tutorials doesn't work on Debian Wheezy / Ubuntu and rest of deb based linux distros.
This is why I decided to write just another ies4linux tutorial that actually works!

On Debian / Ubuntu / Mint Linux install via apt-get:

apt-get –yes install wine

Then with a non-root user download ies4linux-latest.tar.gz. Just in case ies4linux-latest.tar.gz disappears in future I've created also a ies4linux-latest.tar.gz mirror for download here

and unarchive tar archive:

wget http://www.tatanka.com.br/ies4linux/downloads/ies4linux-latest.tar.gz
tar -zxvf ies4linux-latest.tar.gz
cd ies4linux-*
./ies4linux

You will get:
 

IEs4Linux 2 is developed to be used with recent Wine versions (0.9.x). It seems that you are using an old version. It's recommended that you update your wine to the latest version (Go to: winehq.com).

You need to install cabextract first!
Download it here: http://www.kyz.uklinux.net/cabextract.php

To fulfill this requirement you will need to also cabetract package which is luckily part of Debian:
 

apt-get install –yes cabextract

On wine version 1.0 and onwards winprefixcreate has been changed to winecfg binary.
To prevent missing wineprefixcreate, errors during ies4linux installer run  its necessery to symlink as a workaround:
 

ln -sv /usr/bin/winecfg /usr/bin/wineprefixcreate


To continue with Internet Explorer ies4Linux installater run again:

./ies4linux

images/internet-explorer-for-linux-debian-gnu-linux-screenshot

/images/internet-explorer-4-linux-installer-debian-gnu-linu-screenshot

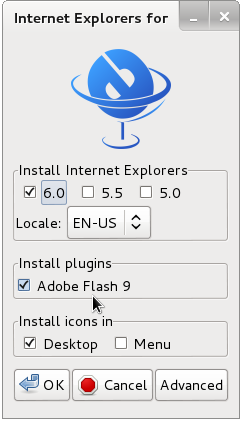
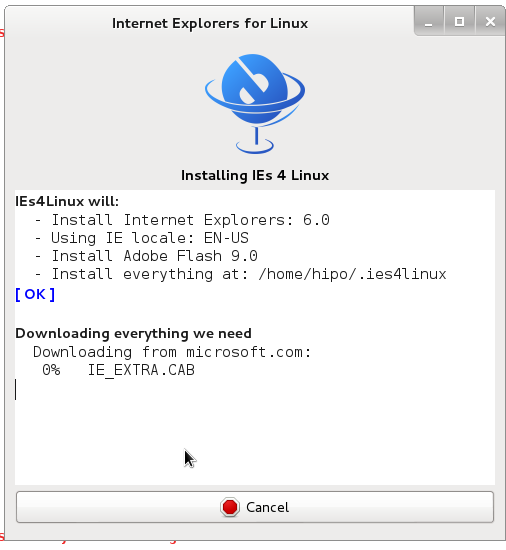
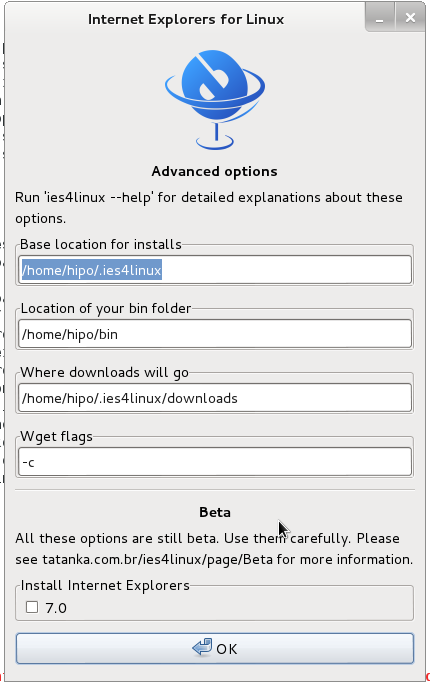
You will get the installer GUI window with selection option which Internet Explorer version you want. Choose between IE 5.0, IE 5.5 and IE 6. It is also possible to install IE 7 which is still considered beta version and is less tested and unstable, will probably lead to crashes. If you want to install also IE 7 check it as an option from Advanced menu.

/images/ies4linux-internet-explorer-installer-debian-gnu-linux-screenshot

If you get permission errors after running ies4Linux gui installer to solve that chown recursively directory to the user with which you will be running it:
 

chown -R hipo:hipo ies4linux-2.99.0.1


Internet Explorer for Linux downloader, will connect Microsoft.com website and download DCOM, MCF and various IE required .CAB files.

If you get some ies4linux GUI installer unexpected crashes you can try to download all required IE binaries, surrounding files and flash player using no-gui installer with cmd:
 

./ies4linux –no-gui –install-corefonts

IEs4Linux 2 is developed to be used with recent Wine versions (0.9.x). It seems that you are using an old version. It's recommended that you update your wine to the latest version (Go to: winehq.com).

IEs4Linux will:
  – Install Internet Explorers: 6.0
  – Using IE locale: EN-US
  – Install Adobe Flash 9.0
  – Install MS Core Fonts
  – Install everything at: /home/hipo/.ies4linux
[ OK ]

Downloading everything we need
  Downloading from microsoft.com:
   DCOM98.EXE
   mfc42.cab
   249973USA8.exe
   ADVAUTH.CAB
   CRLUPD.CAB
   HHUPD.CAB
   IEDOM.CAB
   IE_EXTRA.CAB
   IE_S1.CAB
   IE_S2.CAB
   IE_S5.CAB
   IE_S4.CAB
   IE_S3.CAB
   IE_S6.CAB
   SETUPW95.CAB
   FONTCORE.CAB
   FONTSUP.CAB
   VGX.CAB
   SCR56EN.CAB

  Downloading from macromedia.com:
   100% swflash.cab

  Downloading from sourceforge.net
   0%   webdin32.exe[ OK ]bdin32.exe

Installing IE 6
  Initializing
  Creating Wine Prefix
Your wine does not have wineprefixcreate installed. Maybe you are running an old Wine version. Try to update it to the latest version.

To fix the error:

Your wine does not have wineprefixcreate installed. Maybe you are running an old Wine version. Try to update it to the latest version.

vim lib/functiions.sh

Go to line 36 (Type :36 in vim)

Line:

wine –version 2>&1 | grep -q "0.9." || warning $MSG_WARNING_OLDWINE

Has to be changed to:

wine –version 2>&1 | egrep -q "0.9.|-1." || warning $MSG_WARNING_OLDWINE


Also you need to substitute wineprefixcreate to wineboot (if you haven't already symlinked wineprefixcreate to winecfg – as pointed earlier in article.

To do so make following substitution in lib/install.sh and in lib/functions.sh

cp -rpf lib/install.sh lib/install.sh.bak; cat lib/install.sh |sed -e 's#wineprefixcreate#wineboot#g' > lib/install_new.sh; mv lib/install_new.sh lib/install.sh

cp -rpf lib/install.sh lib/functions.sh.bak; cat lib/functions.sh |sed -e 's#wineprefixcreate#wineboot#g' > lib/functions_new.sh; mv lib/functions_new.sh lib/functions.sh


Also it is necessery to change default corefonts download url which points to sourceforge but is failing. I've made mirror of corefonts files here
 

cp -rpf lib/install.sh lib/install.sh.bak; cat lib/install.sh |sed -e 's#http://internap.dl.sourceforge.net/sourceforge/corefonts/#www.pc-freak.net/files/corefonts/#g' > lib/install_new.sh; mv lib/install_new.sh lib/install.sh

Re-run the ies4linux console installer:
 

 ./ies4linux –no-gui –install-corefonts

….
Es4Linux installations finished!

On installation success you should get output like this
Hopefully you will see no errors like in my case, if you get the corefonts download error again re-run the installer and it should succesully download the files.

To then run ies4linux:

~/bin/ie6


internet-explorer-ies4linx-running-on-debian-gnu-linux-screenshot
Though Ies 4 Linux is good for basic testing it is not psosible to use the browser for normal browsing because its a bit buggy and slow.

By default Internet Explorer 6 behavior is to prompt security alert on various actions, though this might be useful for debugging it is really annoying so I personally disabled those by decreasing from:

Tools -> Internet Options -> Security -> (Security Level)
I've decreased it from Medium to Medium-Low

ies4Linux was not developed since 2008 and as of time of writting ies4linux official project website seems abandoned.


How to password encrypt / decrypt files on Linux to keep and pass your data private

Thursday, August 7th, 2014

how-to-password-protect-encrypt-decrypt-files-linux-tux-logo.png
If you have a sensitive data like a scan copy of your ID card, Driving License, Birth Certificate, Marriage Certificate or some revolutionary business / idea or technology and you want to transfer that over some kind of network lets say Internet vie some public unencrypted e-mail service like (Gmail.com / Yahoo Mail / Mail.com / (Bulgarian Mail Abv.bg)) etc. you will certainly want to transfer the file in encrypted form to prevent, someone sniffing your Network or someone having administrative permissions to servers of free mail where your mail data is stored.

Transferring your files in encrypted form become very important these days especially after recent Edward Snowden disclosures about American Mass Surveilance program PRISM – for those who didn't yet hear of PRISM (this is a American of America's NSA – National Security Agency aiming to sniff and log everyone's information transferred in digital form via the Internet and even Mobile Phone conversations)…

First step to mitigate surveilance is to use fully free software (100% free software) OS distribution like Trisquel GNU / Linux.
Second is to encrypt to use encryption –  the process of transforming information (referred to as plaintext) using an algorithm (called cipher) to make it unreadable to anyone except those possessing special knowledge, usually referred to as a key.
There are many ways to encrypt your data on Linux and to later decrpyt it, I've earlier blogged about encryping files with GPG and OpenSSL on Linux, however encryption with GPG and OpenSSL is newer as concept than the old-school way to encrypt files on UNIX with crypt command which in Linux is replaced by mcrypt command.

mcrypt is provided by mcrypt package by default on most if not all Linux distributions, however mcrypt is not installed by default so to start using it you have to install it first.

1. Install mcrypt on Debian / Ubuntu / Mint (deb based) Linux

apt-get install –yes mcrypt


2. Install mcrypt on Fedora / CentOS rest of RPM bases Linux

yum -y install libmcrypt


3. Encrypting file with mcrypt

To get a list with all supported algorithms by mcrypt:
 

mcrypt –list
cast-128 (16): cbc cfb ctr ecb ncfb nofb ofb
gost (32): cbc cfb ctr ecb ncfb nofb ofb
rijndael-128 (32): cbc cfb ctr ecb ncfb nofb ofb
twofish (32): cbc cfb ctr ecb ncfb nofb ofb
arcfour (256): stream
cast-256 (32): cbc cfb ctr ecb ncfb nofb ofb
loki97 (32): cbc cfb ctr ecb ncfb nofb ofb
rijndael-192 (32): cbc cfb ctr ecb ncfb nofb ofb
saferplus (32): cbc cfb ctr ecb ncfb nofb ofb
wake (32): stream
blowfish-compat (56): cbc cfb ctr ecb ncfb nofb ofb
des (8): cbc cfb ctr ecb ncfb nofb ofb
rijndael-256 (32): cbc cfb ctr ecb ncfb nofb ofb
serpent (32): cbc cfb ctr ecb ncfb nofb ofb
xtea (16): cbc cfb ctr ecb ncfb nofb ofb
blowfish (56): cbc cfb ctr ecb ncfb nofb ofb
enigma (13): stream
rc2 (128): cbc cfb ctr ecb ncfb nofb ofb
tripledes (24): cbc cfb ctr ecb ncfb nofb ofb


mcrypt < File-To-Crypt.PDF > File-To-Crypt.PDF.cpy


Enter the passphrase (maximum of 512 characters)
Please use a combination of upper and lower case letters and numbers.
Enter passphrase:
Enter passphrase:


If crypt is invoked to create the encrypted file without OS redirects (< >), i.e.:
 

mcrypt -a blowfish File-To-Crypt.PDF

Please use a combination of upper and lower case letters and numbers.
Enter passphrase:
Enter passphrase:

File File-To-Crypt was encrypted.


mcrypt outputs encrypted file in .nc extension and the new file and file default mode of 0600 (read write only for root user) are set, while new file keeps the modification date of the original.


4. Decrypting file with mcrypt

Decryption of files is done mdecrypt

mdecrypt File-To-Crypt.PDF.cpy
 

Enter passphrase:
File File-To-Crypt.PDF.cpy was decrypted.

To make mcrypt behave in a certain way when invoked modify ~/.mcryptrd

mcrypt is also available as a module for php5 (php5-mcrypt).

Linux: How to see / change supported network bandwidth of NIC interface and get various eth network statistics with ethtool

Monday, January 19th, 2015

linux-how-to-see-change-supported-network-bandwidth-of-NIC-interface-and-view-network-statistics
If you're a novice Linux sysadmin and inherited some dedicated servers without any documentation and hence on of the first things you have to do to start a new server documentation is to check the supported TCP/IP network speed of servers Network (ethernet) Interfaces. On Linux this is very easy task to verify the speed of LAN card supported Local / Internet traffic install ethtool (if not already preseont on the servers) – assuming you're dealing with Debian / Ubuntu Linux servers.

1. Install ethtool on Deb and RPM based distros

dedi-server1:~# apt-cache show ethtool|grep -i desc -A 3
Description: display or change Ethernet device settings
 ethtool can be used to query and change settings such as speed, auto-
 negotiation and checksum offload on many network devices, especially
 Ethernet devices.

dedi-server1:~# apt-get install –yes ethtool
..

ethtool should be installed by default on CentOS / Fedora / RHEL and  syntax is same like on Debs. If you happen to miss ethtool on any (SuSE) / RedHat / RPM based distro install it with yum

[root@centos:~] # yum -y install ethtool


2. Get ethernet configurations

To check the current eth0 / eth1 / ethX network (Speed / Duplex) and other network related configuration configuration:
 

dedi-server5:~# ethtool eth0

Settings for eth0:
        Supported ports: [ TP ]
        Supported link modes:   10baseT/Half 10baseT/Full
                                100baseT/Half 100baseT/Full
                                1000baseT/Full
        Supports auto-negotiation: Yes
        Advertised link modes:  10baseT/Half 10baseT/Full
                                100baseT/Half 100baseT/Full
                                1000baseT/Full

        Advertised pause frame use: No
        Advertised auto-negotiation: Yes
        Speed: 1000Mb/s
        Duplex: Full
        Port: Twisted Pair
        PHYAD: 1
        Transceiver: internal
        Auto-negotiation: on
        MDI-X: off
        Supports Wake-on: pumbag
        Wake-on: g
        Current message level: 0x00000001 (1)
        Link detected: yes

Having a NIC configured to act as Duplex is very important as Duplex communication enables LAN card to communicate both sides (Sent / Receive) packets simultaneously.

full-duplex-half-duplex-explained-picture

Probably most interesting parameters for most admins are the ones that are telling whether the NIC UpLink is 10megabyte / 100 megabyte or 1Gigabyte as well as supported Receive / Send ( Transfer ) speeds of LAN, a common useful ethtool admin use to just show current LAN ethernet interface speed:

server-admin1:~# ethtool eth0 |grep -i speed
        Speed: 1000Mb/s


To get info about NIC (kernel module / driver) used with ethtool:

dedi-server3:~# ethtool -i eth0 driver: e1000e
version: 1.2.20-k2
firmware-version: 1.8-0
bus-info: 0000:06:00.0

3. Make LAN Card blink to recognize eth is mapped to which Physical LAN

Besides that ethtool has many other useful use cases, for example if you have a server with 5 lan or more LAN cards, but you're not sure to which of all different EthX interfaces correspond, a very useful thing is to make eth0, eth1, eth2, eth3, etc. blink for 5 seconds in order to identify which static IP is binded physically to which NIC , here is how:

ethtool -p eth0 5


Then you can follow the procedure for any interface on the server and map them with a sticker 🙂

Ethtool is also useful for getting "deep" (thorough) statistics on Server LAN cards, this could be useful to identify sometimes hard to determine broadcast flood attacks:
 

4. Get network statistics with ethtool for interfaces
 

dedi-server5:~# ethtool -S eth0|grep -vw 0
NIC statistics:
     rx_packets: 6196644448
     tx_packets: 7197385158
     rx_bytes: 2038559235701
     tx_bytes: 8281206569250
     rx_broadcast: 357508947
     tx_broadcast: 172
     rx_multicast: 34731963
     tx_multicast: 20
     rx_errors: 115
     multicast: 34731963
     rx_length_errors: 115
     rx_no_buffer_count: 26391
     rx_missed_errors: 10059
     tx_timeout_count: 3
     tx_restart_queue: 2590
     rx_short_length_errors: 115
     tx_tcp_seg_good: 964136993
     rx_long_byte_count: 2038559235701
     rx_csum_offload_good: 5824813965
     rx_csum_offload_errors: 42186
     rx_smbus: 383640020

5. Turn on Auto Negotiation and change NIC set speed to 10 / 100 / 1000 Mb/s

Auto-negotiation is important as an ethernet procedure by which two communication devices (2 network cards) choose common transmission parameters such as speed, duplex mode, and flow control in order to achieve maximum transmission speed over the network. On 1000BASE-T basednetworks the standard is a mandatory. There is also backward compatability for older 10BASE-T Networks.

a) To raise up NIC to use 1000 Mb/s in case if the bandwidth was raised to 1Gb/s but NIC settings were not changed:

dedi-server1:~# ethtool -s eth0 speed 1000 duplex half autoneg off


b) In case if LAN speed has to be reduced for some weird reason to 10 / 100Mb/s


dedi-server1:~# ethtool -s eth0 speed 10 duplex half autoneg off

dedi-server1:~# ethtool -s eth0 speed 100 duplex half autoneg off

c) To enable disable NIC Autonegotiation:

dedi-server1:~# ethtool -s eth0 autoneg on


6. Change Speed / Duplex settings to load on boot

a) Set Network to Duplex on Fedora / CentOS etc.

Quickest way to do it is of course to use /etc/rc.local. If you want to do it following distribution logic on CentOS / RHEL Linux:

Add to /etc/sysconfig/network-scripts/ifcfg-eth0

vim /etc/sysconfig/network/-scripts/ifcfg-eth0

ETHTOOL_OPTS="speed 1000 duplex full autoneg off"

To load the new settings restart networking (be careful to have physical access to server if something goes wrong 🙂 )

service network restart

b) Change network speed / duplex setting on Debian / Ubuntu Linux

Add at the end of /etc/network/interfaces

vim /etc/network/interfaces

post-up ethtool -s eth0 speed 100 duplex full autoneg off

7. Tune NIC ring buffers

dedi-server1:~# ethtool -g eth0

Ring parameters for eth0:
Pre-set maximums:
RX:             4096
RX Mini:        0
RX Jumbo:       0
TX:             4096
Current hardware settings:
RX:             256
RX Mini:        0
RX Jumbo:       0
TX:             256

As you can see the default setting of RX (receive) buffer size is low 256 and on busy servers with high traffic loads, depending on the hardware NIC vendor this RX buffer size varies.
Through increasing the Rx/Tx ring buffer size , you can decrease the probability of discarding packets in the NIC during a scheduling delay.
A change in rx buffer ring requires NIC restart so (be careful not to loose connection to remote server), be sure to have iLO access to it.

Here is how to raise Rx ring buffer size 4 times from default value:

ethtool -G eth0 rx 4096 tx 4069