Posts Tagged ‘server performance’

Linux: basic system CPU, Disk and Network resource monitoring via phpsysinfo lightweight script

Wednesday, June 18th, 2014

phpsysinfo-logo-simple-way-to-web-monitor-windows-linux-server-cpu-disk-network-resources

There are plenty of GNU / Linux softwares to monitor server performance (hard disk space, network and CPU load) and general hardware health both text based for SSH console) and from web.

Just to name a few for console precious tools, such are:

And for web based Linux / Windows server monitoring my favourite tools are:

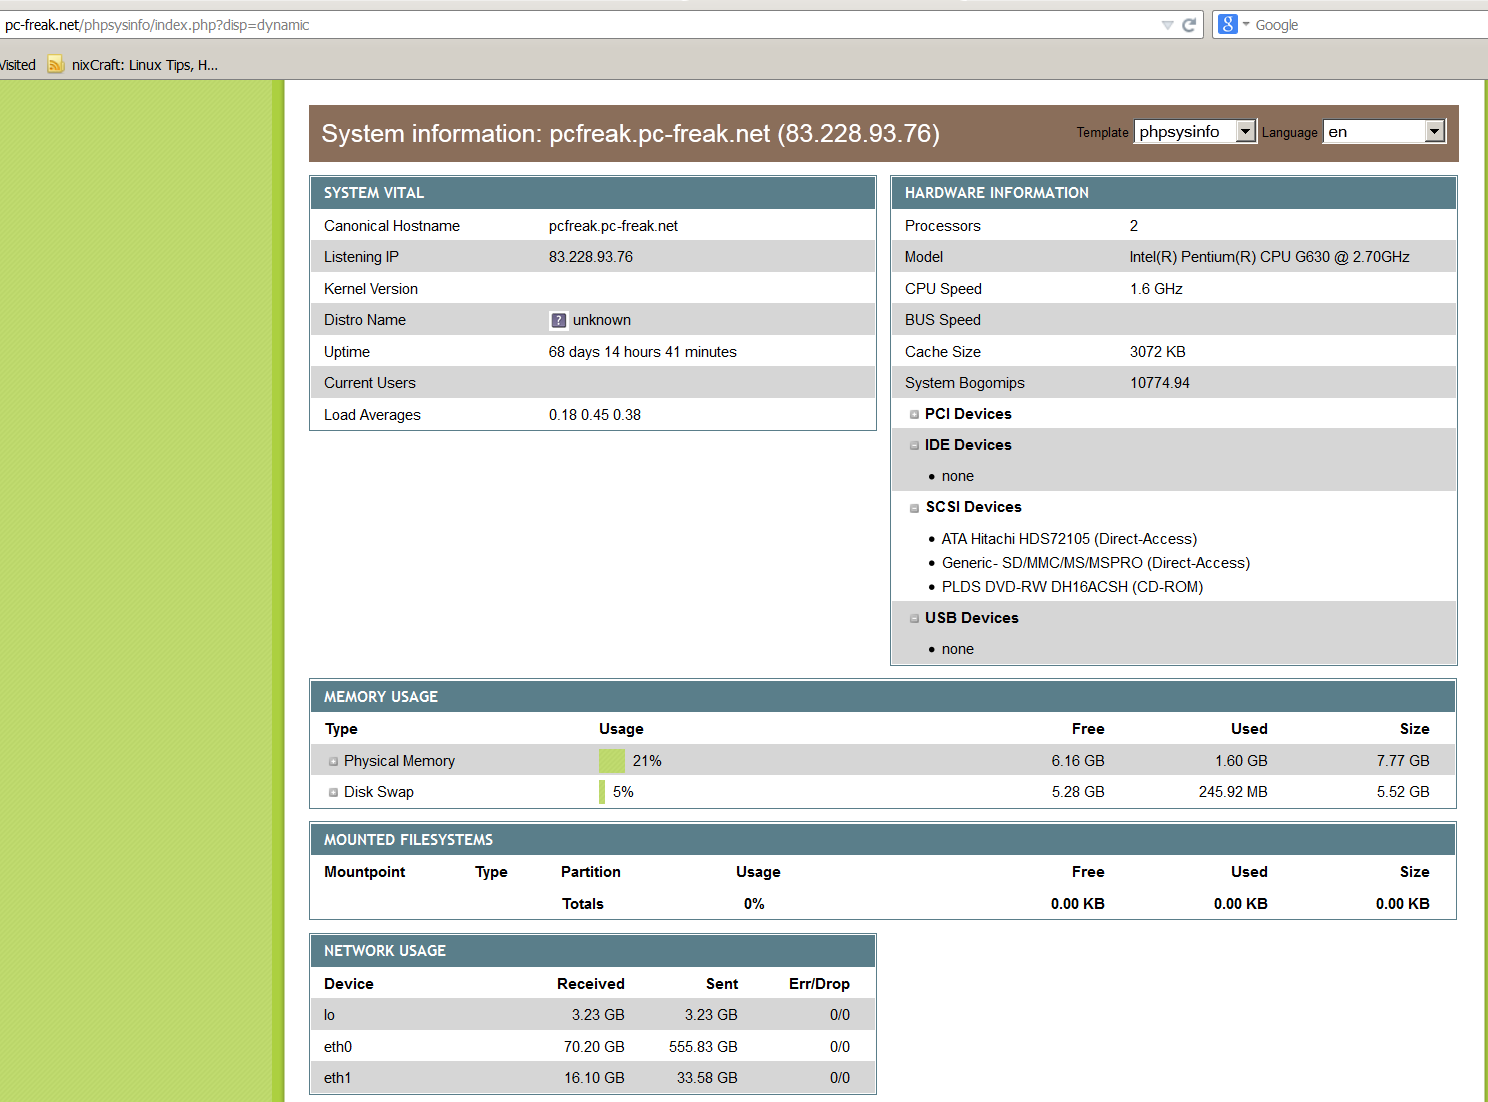
phpsysinfo is yet another web based Linux monitoring software for small companies or home router use it is perfect for people who don't want to spend time learning how to configure complicated and robust multiple server monitoring software like Nagios or Icanga.

phpsysinfo is quick and dirty way to monitor system uptime, network, disk and memory usage, get information on CPU model, attached IDEs, SCSI devices and PCIs from the web and is perfect for Linux servers already running Apache and PHP.

1. Installing PHPSysInfo on Debian, Ubuntu and deb derivative Linux-es

PHPSysInfo is very convenient and could be prefered instead of above tools for the reason it is available by default in Debian and Ubuntu package repositories and installable via apt-get and it doesn't require any further configuration, to roll it you install you place a config and you forget it.
 

 # apt-cache show phpsysinfo |grep -i desc -A 2

Description: PHP based host information
 phpSysInfo is a PHP script that displays information about the
 host being accessed.


Installation is a piece of cake:

# apt-get install --yes phpsysinfo

Add phpsysinfo directives to /etc/apache2/conf.d/phpsysinfo.conf to make it accessible via default set Apache vhost domain under /phpsysinfo

Paste in root console:
 

cat > /etc/apache2/conf.d/phpsysinfo.conf <<-EOF
Alias /phpsysinfo /usr/share/phpsysinfo
<Location /phpsysinfo>
 Options None
 Order deny,allow
 Deny from all
 #Allow from localhost
 #Allow from 192.168.56.2
 Allow from all
</Location>
EOF


Above config will allow access to /phpsysinfo from any IP on the Internet, this could be a security hole, thus it is always better to either protect it with access .htaccess password login or allow it only from certain IPs, from which you will access it with something like:

Allow from 192.168.2.100

Then restart Apache server:

# /etc/init.d/apache2 restart


To access phpsysinfo monitoring gathered statistics, access it in a browser http://defaultdomain.com/phpsysinfo/

phpsysinfo_on_debian_ubuntu_linux-screenshot-quick-and-dirty-web-monitoring-for-windows-and-linux-os

2. Installing PHPSysinfo on CentOS, Fedora and RHEL Linux
 

Download and untar

# cd /var/www/html
# wget https://github.com/phpsysinfo/phpsysinfo/archive/v3.1.13.tar.gz
# tar -zxvf phpsysinfo-3.1.13.tar.gz
# ln -sf phpsysinfo-3.1.13 phpsysinfo
# mv phpsysinfo.ini.new phpsysinfo.ini


Install php php-xml and php-mbstring RPM packages
 

yum -y install php php-xml php-mbstring
...

Start Apache web service

[root@ephraim html]# /etc/init.d/httpd restart

[root@ephraim html]# ps ax |grep -i http
 8816 ?        Ss     0:00 /usr/sbin/httpd
 8819 ?        S      0:00 /usr/sbin/httpd

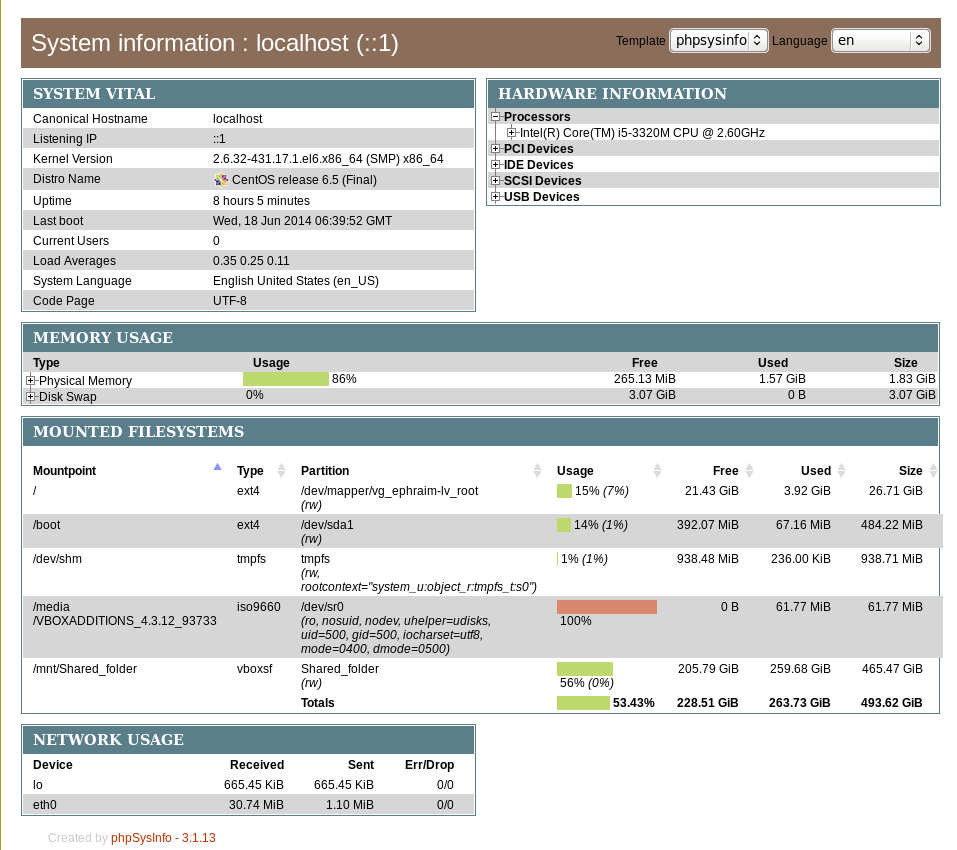
phpsysinfo-install-on-centos-rhel-fedora-linux-simple-monitoring

As PhpSysInfo is written in PHP it is also possible to install phpsysinfo on Windows.

phpsysinfo is not the only available simple monitoring server performance remotely tool, if you're looking for a little bit extended information and a better visualization interface alternative to phpsysinfo take a look at linux-dash.

In context of web monitoring other 2 web PHP script tools useful in remote server monitoring are:

OpenStatus – A simple and effective resource and status monitoring script for multiple servers.
LookingGlass – User-friendly PHP Looking Glass (Web interface to use Host (Nslookup), Ping, Mtr – Matt Traceroute)

Speed up Apache webserver by including htaccess mod_rewrite rules in VirtualHosts / httpd.conf

Wednesday, November 12th, 2014

speed-up-apache-through-include-htaccess-from-config
There are plenty of Apache Performance Optimization things to do on a new server. However many sysadmins miss  .htaccess mod_rewrite rules whole optimization often leads to a dramatic performance benefits and low webserver responce time, making website much more attractive for both Search Engine Crawlers and End User experience.

Normally most Apache + PHP CMS systems, websites, blogs etc. are configured to use various goodies of .htaccess files (mostly mod_rewrite rules, directory htpasswd authentication  and allow forbid directives). All most popular open-source Content management systems  like Drupal, Joomla, WordPress, TYPO3, Symphony CMS are configured to get use  .htaccess file usually living in the DocumentRoot of a virtualhost ( website/s )httpd.conf , apache2.conf /etc/apache2/sites-enabled/customvhost.com or whichever config the Vhost resides…

It is also not uncommon practice to enable .htaccess files to make programmers life easier (allowing the coder to add and remove URL rewrite rules that makes URL pretty and SEO friendly, handle website redirection or gives live to the framework like it is the case with Zend PHP Framework).

However though having the possibility to get the advantages of dynamically using .htaccess inside site DocRoot or site's subdirectories is great for developers it is not a very good idea to have the .htaccess turned on Production server environment.

Having

AllowOverride All

switched on for a directory in order to have .htaccess enabled, makes the webserver lookup for .htaccess file and re-read its content dynamically on each client request.
This has a negative influence on overall server performance and makes Apache preforked childs or workers (in case of mpm-worker engine used) to waste time parsing .htaccess file leading to slower request processing.

Normally a Virtualhost with enabled .htaccess looks like so:

<VirtualHost 192.168.0.5:80>
ServerName your-website.com:80 …
DocumentRoot /var/www/website
<Directory /var/www/website>
AllowOverride All …
</Directory> …
</VirtualHost>

And VirtualHost configured to keep permanently loaded mod_rewrite .htaccess rules in memory on Apache server start-up.
 

<VirtualHost 192.168.0.5:80>
ServerName your-website.com:80 …
DocumentRoot /var/www/website
<Directory /var/www/website>
AllowOverride None
Include /var/www/website/.htaccess …
</Directory> …
</VirtualHost>

Now CMS uses the previous .htaccess rules just as before, however to put more rewrite rules into the file you will need to restart webserver which is a downside of using rewrite rules through the Include directive. Using the Include directive instead of AllowOverride leads to 7 to 10% faster individual page loads.

I have to mention Include directive though faster has a security downside because .htaccess files loaded with Include option (uses mod_include) via httpd.conf doesn't recognize <Directory> … </Directory> set security rules. Also including .htaccess from configuration on Main Website directory, could make any other sub-directories .htaccess Deny / Allow access rules invalid and this could expose site to  security risk. Another security downside is because Include variable allows loading a full subset of Apache directives (including) loading other Apache configuration files (for example you can even override Virtualsthost pre-set directives such as ErrorLog, ScriptAlias etc.) and not only .htaccess standard directives allowed by AllowOverride All. This gives a potential website attacker who gains write permissions over the included /var/www/website/.htaccess access to this full set of VirtualHost directives and not only .htaccess standard allowed.

Because of the increased security risk most people recommend not to use Include .htaccess rules, however for those who want to get the few percentage page load acceleration of using static Include from Apache config, just set your Included .htaccess file to be owned by user/group root, e.g.:

chown root:root /var/www/website/.htaccess

Improve Websites SEO: Optimize images to Increase website loading performance on Linux server – Image Compress tools

Friday, December 5th, 2014

Optimize-website-images-pictures-to-Increase-website-loading-performance-on-Linux-server_Image_Compress_tools-Improve-Websites_SEO
Part of our daily life as Web hosting system adminstrators is to constantly strive to better utilize our Linux / Windows hosting servers hardware.
Therefore it is our constant task to look for new better ways to optimize our Apache Sites and Webservers in order to return served application content light fast to keep the Boss and customers happy 🙂

There are things to tune up for better server performance and better CPU / memory utilization on both server Application server side as well as the website programming code backend, html and pictures / images

Thus it is critically important to not only keep the Webserver / PHP engine optimized but keep hosted sites  stored images and source code clean and efficient.

We as admins usually couldn't directly interfere with clearning the source code and often we have to host a crappy written sites with picture upload forms with un-optimized Image files that was  produced on old Photo Cameras, "Ancient" Mobile Mobiles, Win XP MS Paint, various versions Photoshop, Gimp etc.).

It is a well known fact that a big part from a Website User Experience is how fast the user loads a page, thus if HTML / CSS loaded images loads slow has a negative impact on user look & feel about website

Therefore by optimizing the size of hosted sites Images, you Save Network bandwidth and in some cases when Large Gallery sites HDD disk space.

On Linux, there are already a many command line tools to inspect and optimize (compress) the size of PNG, JPEG, GIF, BMP, PNM, Tiff Images, most famous ones are:

  • optipng – PNG optimizer that recompresses image files to a smaller size, without losing any information.
  • jpegoptim –   lossless JPEG optimization (based on optimizing the Huffman tables) and "lossy" optimization based on setting a maximum quality factor.
  • pngcrush – Recommended tool to use by Stoyan Stefanov (Yahoo Yslow Developer)
  • jpegtran – Recommended to use by Google 
  • gifsicle –  command-line tool for creating, editing, and getting information about GIF images and animations. 

It is hence useful to first run manually availale Linux image optimization tools (to get an idea what they do) and later automate them to run as scripts to optimize server stored images size and make pictures load faster on websites and thus improve End Users Experience and speed up Image content delivery to GoogleBot / YahooBot / Bing Crawlers which will make Search Engines to position server hosted sites better (more SEO Friendly).


  • How much percents of  space (Mega / Gigabytes ) Pictures compress can save you?

If you run it on 500MB image directory, you can probably save about 20 to 50MB of size, so don't expect extraordinary file reduce, however 5% to 10% reduce in size is not bad too. If you host 100 sites each with half gigas of data this would mean saving of 5GB of data and some 5GB from backups 🙂 At extraordinary cases you can expect 20% to 30% of storage reduce. For even better image compression you can try out GIMP's – Save for Web option.
 

  • Installing jpegtran, optpng, jpegoptim, pngcrush gifsicle on Debian / Ubuntu (deb based) Linux
     

apt-get install –yes libjpeg-progs optipng jpegoptim pngcrush gifsicle


  • Installing  jpegtran, optpng, jpegoptim, pngcrush, gifsicle on Fedora / CentOS / RHEL (RPM based distros)
     

yum -y install pngcrush libjpeg-turbo-utils opt-jpg opt-png opt-gif


gifsicle is not availale by default on Redhacks 🙂 but there is a RPM package for fedora from http://pkgs.repoforge.org/gifsicle/


Some examples of running image compression on GNU / Linux

  • optipng and jpegoptim optimize for all files in directory
     

cd /home/sites/

find . -iname '*.png' -print0 | xargs -0 optipng -o7 -preserve
find . -iname '*.jpg' -print0 |
 xargs -0 jpegoptim –max=90 –strip-all –preserve –totals


In jpegoptim command, the option –strip-all will strip any metadata including Exif data from images. For websites JPEG metadata is usually not needed, so usually its ok to strip them.

Above jpegoptim example will decrease slightly JPEG image quality to 90%. quality level of 90 is still high enough and website visitors are unlikely to spot any visible quality reduction / defects in the image.


  • pngcrush all files in a directory example
     

cd /home/sites/

for png in `find $IMG_DIR -iname "*.png"`; do
    echo "crushing $png …"
        pngcrush -rem alla -reduce -brute "$png" temp.png


    # preserve original on error
    if [ $? = 0 ]; then
        mv -f temp.png $png
        else
        rm temp.png
        fi
done

  • Run jpegtran on sites directory
     

find /home/sites -name "*.jpg" -type f -exec jpegtran -copy none -optimize -outfile {} {} ;


  • Set a script to compress / reduce size of Sites Images


Here is a basic optimize_images.sh which I used earlier before and was reducing the overall images size just 5 to 10%, then I found the much improved version of optimize images shell script  (useful to  clear up EXIF picture data / And Comments from JPG / PNG files). The script execution could take very long time on large image directories and thus could cause a high HDD disk I/O, however if ran once a week at night time its not such a big deal. 

To set it to run on your server as a cronjob:
 

cd /usr/sbin/
wget -q https://www.pc-freak.net/bshscr/optimize_images2.sh
crontab -u root -e 


Sample cron job to run once a month on 10th and 27th in 3 o'clock AM:
 

 00 3 10,27 * * /usr/sbin/optimize_images2.sh 2>&1 >/dev/null


Also if you need to further optimize million of tiny sized PNG files Yahoo Smush.it service could be helpful. For compression maniacs its worthy to check out also TinyPNG Service (however be awre that this service compresses files with significant quality loss) making picture quality visibly deteriorated.

Besides optimizing server stored Pictures, here are some other stuff that helps in increasing server utilization / lower webpages loading time.

Starting up with the installation (when site is to use Apache + PHP) for its backend, the first thing to on the freshlyinstalled Linux server is to implement the following list of Apache common Timeout variables that help better scale the webserver for the CMS-es hosted, enable Webserver caching with (mod_deflate), enable eAccelerator tune PHP common php variable etc.

Other thing  I sometimes use to speed-up performance of Apache child responce time up to 20-30  is to Include into Virtualhost / httpd.conf Apache configuration any htacces mod_rewrite rules.

On too heavily loaded sites On-line stores / Large Company website portals with more than 60 000 – 100 000 unique IP visitors a day it is useful tip to disable completely Apache logging in access.log / error.log.

Often when old architecture websites are moved from older Linux OS version to a newer one with newer versions of Apache / PHP often sites are working without major code rework, but use many functions which are already obsolete and thus many WARNING messages crap is logged into php_error.log / error.log. Thus to save disk space and decrease hard disk I/O operations it is good to Disable PHP Notices and Warnings messages
 

How to disable ACPI (power saving) support in FreeBSD / Disable acpi on BSD kernel boot time

Tuesday, May 15th, 2012

FreeBSD disable ACPI how ACPI Basic works basic diagram

On FreeBSD the default kernel is compiled to support ACPI. Most of the modern PCs has already embedded support for ACPI power saving instructions.
Therefore a default installed FreeBSD is trying to take advantage of this at cases and is trying to save energy.
This is not too useful on servers, because saving energy could have at times a bad impact on server performance if the server is heavy loaded at times and not so loaded at other times of the day.

Besides that on servers saving energy shouldn't be the main motivator but server stability and productivity is. Therefore in my personal view on FreeBSD used on servers it is better to disable complete the ACPI in order to disable CPU fan control to change rotation speeds all the time from low to high rotation cycles and vice versa at times of low / high server load.

Another benefit of removing the ACPI support on a server is this would probably increase the CPU fan life span and possibly prevent the CPU to be severely heated at times.

Moreover, some piece of hardware might have troubles in properly supporting ACPI specifications and thus ACPI could be a reason for unexpected machine hang ups.

With all said I would recommend to anyone willing to use BSD for a server to disable the ACPI (Advanced Configuration and Power Interface), just like I did.

Here is how;

1. Quick review on how ACPI is handled on FreeBSD

acpi support is being handled on FreeBSD by a number of loadable kernel modules, here is a complete list of all the kernel modules dealins with acpi:

freebsd# cd /boot
freebsd# find . -iname '*acpi*.ko'
./kernel/acpi.ko
./kernel/acpi_aiboost.ko
./kernel/acpi_asus.ko
./kernel/acpi_fujitsu.ko
./kernel/acpi_ibm.ko
./kernel/acpi_panasonic.ko
./kernel/acpi_sony.ko
./kernel/acpi_toshiba.ko
./kernel/acpi_video.ko
./kernel/acpi_dock.ko

By default on FreeBSD, if hardware has some support for ACPI the acpi gets activated by acpi.ko kernel module. The specific type of vendors specific ACPI like IBM, ASUS, Fujitsu are controlled by the respective kernel module from the list …

Hence, to control if ACPI is loaded or not on a FreeBSD system with no need to reboot one can use kldload, kldunload module management BSD cmds.

a) Check if acpi is loaded on a BSD

freebsd# kldstatkldstat | grep -i acpi
9 1 0xc9260000 57000 acpi.ko

b) unload kernel enabled ACPI support

freebsd# kldunload acpi

c) Load acpi support (not the case with me but someone might need it, if for instance BSD is running on laptop)

freebsd# kldload acpi

2. Disabling ACPI to load on bootup on BSD

a) In /boot/loader.conf add the following variables:

hint.acpi.0.disabled="1"
hint.p4tcc.0.disabled=1
hint.acpi_throttle.0.disabled=1


b) in /boot/device.hints add:

hint.acpi.0.disabled="1"

c) in /boot/defaults/loader.conf make sure:

##############################################################
### ACPI settings ##########################################
##############################################################
acpi_dsdt_load="NO" # DSDT Overriding
acpi_dsdt_type="acpi_dsdt" # Don't change this
acpi_dsdt_name="/boot/acpi_dsdt.aml"
# Override DSDT in BIOS by this file
acpi_video_load="NO" # Load the ACPI video extension driver

d) disable ACPI thermal monitoring

It is generally a good idea to disable the ACPI thermal monitoring, as many machines hardware does not support it.

To do so in /boot/loader.conf add

debug.acpi.disabled="thermal"

If you want to learn more on on how ACPI is being handled on BDSs check out:

freebsd# man acpi

Other alternative method to permanently wipe out ACPI support is by not compiling ACPI support in the kernel.
If that's the case in /usr/obj/usr/src/sys/GENERIC make sure device acpi is commented, e.g.:

##device acpi


How to disable nginx static requests access.log logging

Monday, March 5th, 2012

NGINX logo Static Content Serving Stop logging

One of the companies, where I'm employed runs nginx as a CDN (Content Delivery Network) server.
Actually nginx, today has become like a standard for delivering tremendous amounts of static content to clients.
The nginx, server load has recently increased with the number of requests, we have much more site visitors now.
Just recently I've noticed the log files are growing to enormous sizes and in reality this log files are not used at all.
As I've used disabling of web server logging as a way to improve Apache server performance in past time, I thought of implying the same little "trick" to improve the hardware utilization on the nginx server as well.

To disable logging, I proceeded and edit the /usr/local/nginx/conf/nginx.conf file, commenting inside every occurance of:

access_log /usr/local/nginx/logs/access.log main;

to

#access_log /usr/local/nginx/logs/access.log main;

Next, to load the new nginx.conf settings I did a restart:

nginx:~# killall -9 nginx; sleep 1; /etc/init.d/nginx start

I expected, this should be enough to disable completely access.log, browser request logins. Unfortunately /usr/local/nginx/logs/access.log was still displaying growing with:

nginx:~# tail -f /usr/local/nginx/logs/access.log

After a bit thorough reading of nginx.conf config rules, I've noticed there is a config directive:

access_log off;

Therefore to succesfully disable logging I had to edit config occurance of:

access_log /usr/local/nginx/logs/access.log main

to

After a bit thorough reading of nginx.conf config rules, I've noticed there is a config directive:

access_log off;

Therefore to succesfully disable logging I had to edit config occurance of:

access_log /usr/local/nginx/logs/access.log main

to

access_log /usr/local/nginx/logs/access.log main
access_log off;

Finally to load the new settings, which thanksfully this time worked, I did nginx restart:

nginx:~# killall -9 nginx; sleep 1; /etc/init.d/nginx start

And hooray! Thanks God, now nginx logging is disabled!

As a result, as expected the load avarage on the server reduced a bit 🙂

How to find out which processes are causing a hard disk I/O overhead in GNU/Linux

Wednesday, September 28th, 2011

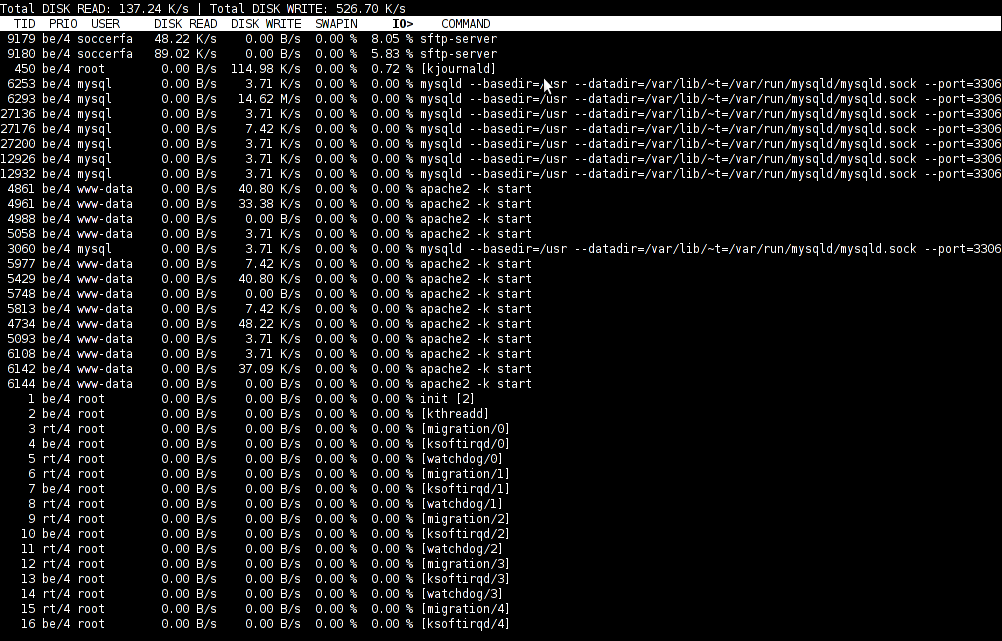
iotop monitor hard disk io bottlenecks linux
To find out which programs are causing the most read/write overhead on a Linux server one can use iotop

Here is the description of iotop – simple top-like I/O monitor, taken from its manpage.

iotop does precisely the same as the classic linux top but for hard disk IN/OUT operations.

To check the overhead caused by some daemon on the system or some random processes launching iotop without any arguments is enough;

debian:~# iotop

The main overview of iostat statistics, are the:

Total DISK READ: xx.xx MB/s | Total DISK WRITE: xx.xx K/s
If launching iotop, shows a huge numbers and the server is facing performance drop downs, its a symptom for hdd i/o overheads.
iotop is available for Debian and Ubuntu as a standard package part of the distros repositories. On RHEL based Linuxes unfortunately, its not available as RPM.

While talking about keeping an eye on hard disk utilization and disk i/o’s as bottleneck and a possible pitfall to cause a server performance down, it’s worthy to mention about another really great tool, which I use on every single server I administrate. For all those unfamiliar I’m talking about dstat

dstat is a – versatile tool for generating system resource statistics as the description on top of the manual states. dstat is great for people who want to have iostat, vmstat and ifstat in one single program.
dstat is nowdays available on most Linux distributions ready to be installed from the respective distro package manager. I’ve used it and I can confirm tt is installable via a deb/rpm package on Fedora, CentOS, Debian and Ubuntu linuces.

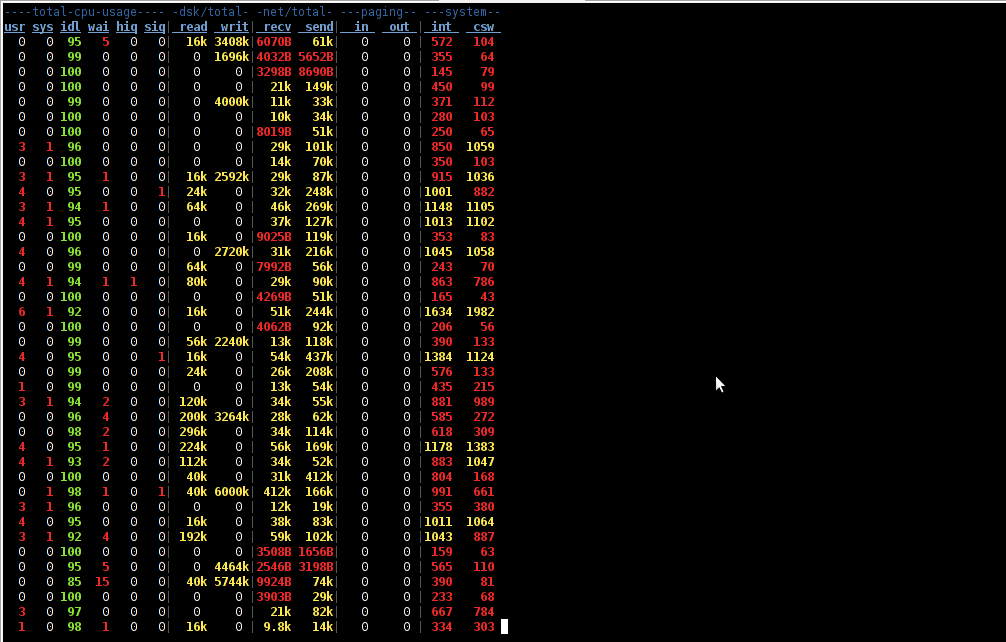
Here is how the tool in action looks like:

dstat Linux hdd load stats screenshot

The most interesting things from all the dstat cmd output are read, writ and recv, send , they give a good general overview on hard drive performance and if tracked can reveal if the hdd disk/writes are a bottleneck to create server performance issues.
Another handy tool in tracking hdd i/o problems is iostat its a tool however more suitable for the hard core admins as the tool statistics output is not easily readable.

In case if you need to periodically grasp data about disks read/write operations you will definitely want to look at collectl i/o benchmarking tool .Unfortunately collect is not included as a packaget for most linux distributions except in Fedora. Besides its capabilities to report on servers disk usage, collect is also capable to show brief stats on cpu, network.

Collectl looks really promosing and even seems to be in active development the latest tool release is from May 2011. It even supports NVidia’s GPU monitoring 😉 In short what collectl does is very similar to sysstat which by the way also has some possibilities to track disk reads in time.  collectl’s website praises the tool, much and says that in most machines the extra load the tool would add to a system to generate reports on cpu, disk and disk io is < 0.1%.  I couldn’t find any data online on how much sysstat (sar) extra loads a system. It will be interesting if some of someone concluded some testing and can tell which of the two puts less load on a system.

Few nginx.conf configuration options for Nginx to improve webserver performance

Tuesday, April 12th, 2011

Nginx server main logo with russian star
From my previous two articles How to install nginx webserver from source on Debian Linux / Install Latest Nginx on Debian and How to enable output compression (gzipfile content compression) in nginx webserver , I have explained how the Nginx server can be installed and configured easily.

As I’m continuing my nginx adventures this days, by trying to take the best out of the installed nginx server, I’ve found few configuration options, which does improve nginx’s server performance and thought it might be nice to share it here in hope that some other nginx novice might benefit out if them.
To setup and start using the options you will have of course to place the conf directives in /usr/local/nginx/conf/nginx.conf or wherever your nginx.conf is located.

The configuration options should be placed in nginx’s conf section which starts up with:

http {

Here are the configuration options useful in hastening my nginx’s performance:

1. General options nginx settings

## General Options
ignore_invalid_headers on;
keepalive_requests 2000;
recursive_error_pages on;
server_name_in_redirect off;
server_tokens off;

2. Connection timeout nginx settings

## Timeouts
client_body_timeout 60;
client_header_timeout 60;
keepalive_timeout 60 60;
send_timeout 60;
expires 24h;

3. server options for better nginx tcp/ip performance

## TCP options
tcp_nodelay on;
tcp_nopush on;

4. Increase the number of nginx worker processes

Somewhere near the beginning of nginx.conf file you should have the directive option:

worker_processes 1;

Make sure you change this option to:

worker_processes 4;

This will increase the number of spawned nginx worker processes in a way that more spawned threaded servers will await for client connections:

Being done with all the above settings, as a next step you have to restart the nginx server, in my case via the init script:

debian:~# /etc/init.d/nginx restart
Restarting nginx: nginx.

Now to check everything is fine with nginx and more specific that the worker_processes 4 options has taken place issue the command:

debian:~# ps axu |grep -i nginx|grep -v grep
root 20456 0.0 0.0 25280 816 ? Ss 10:35 0:00 nginx: master process /usr/local/nginx/sbin/nginx
nobody 20457 0.0 0.0 25844 1820 ? S 10:35 0:00 nginx: worker process
nobody 20458 0.0 0.0 25624 1376 ? S 10:35 0:00 nginx: worker process
nobody 20459 0.0 0.0 25624 1376 ? S 10:35 0:00 nginx: worker process
nobody 20460 0.0 0.0 25624 1368 ? S 10:35 0:00 nginx: worker process

Above you notice the 4 nginx processes running with user nobody, they’re the same configured worker_processes I just pointed out above.