Posts Tagged ‘default’

Debugging routing and network issues on Linux common approaches. A step by step guide to find out why routing or network service fails

Thursday, November 30th, 2023

For system administrators having a Network issue is among the Hell-ish stuff that can happen every now and then. That is especially true in Heterogenous / Hybrid and complicated Network topologies (with missing well crafted documentation), that were build without an initial overview "on the fly".
Such a networking connectivity or routing issues are faced by every novice, mid or even expert system administrators as the Company's Network IT environments are becoming more and more complicated day by day.

When the "Disaster" of being unable to connect two servers or at times  home laptops / PCs to see each other even though on the Physical layer / Transport Layer (Hardware such as external Switches / Routers / Repeaters / Cabling etc.) is Present machines are connected and everything on the 1 Physical Layer from OSI layears is present happens, then it is time to Debug it with some software tools and methods.

To each operating system the tools and methods to test networking connection and routings is a bit different but generally speaking most concepts are pretty much the same across different types of operating systems (Linux ditros / OpenBSD / FreeBSD / Mac OS / Android / iOS / HP-UX / IBM AIX / DOS / Windows etc.).

Debugging network issues across separate operating systems has its variations but in this specific (ideas) are much close to this article. As the goal at that guide will be to point out how to debug network issues on Linux, in future if I have the time or need to debug other OS-es from Linux, I'll try to put an article on how to debug Network issues on Windows when have some time to do it.

Consider to look for the issue following the basic TCP / IP OSI Level model, every system administrator should have idea about it already, it is part of most basic networking courses such as Cisco's CCNA
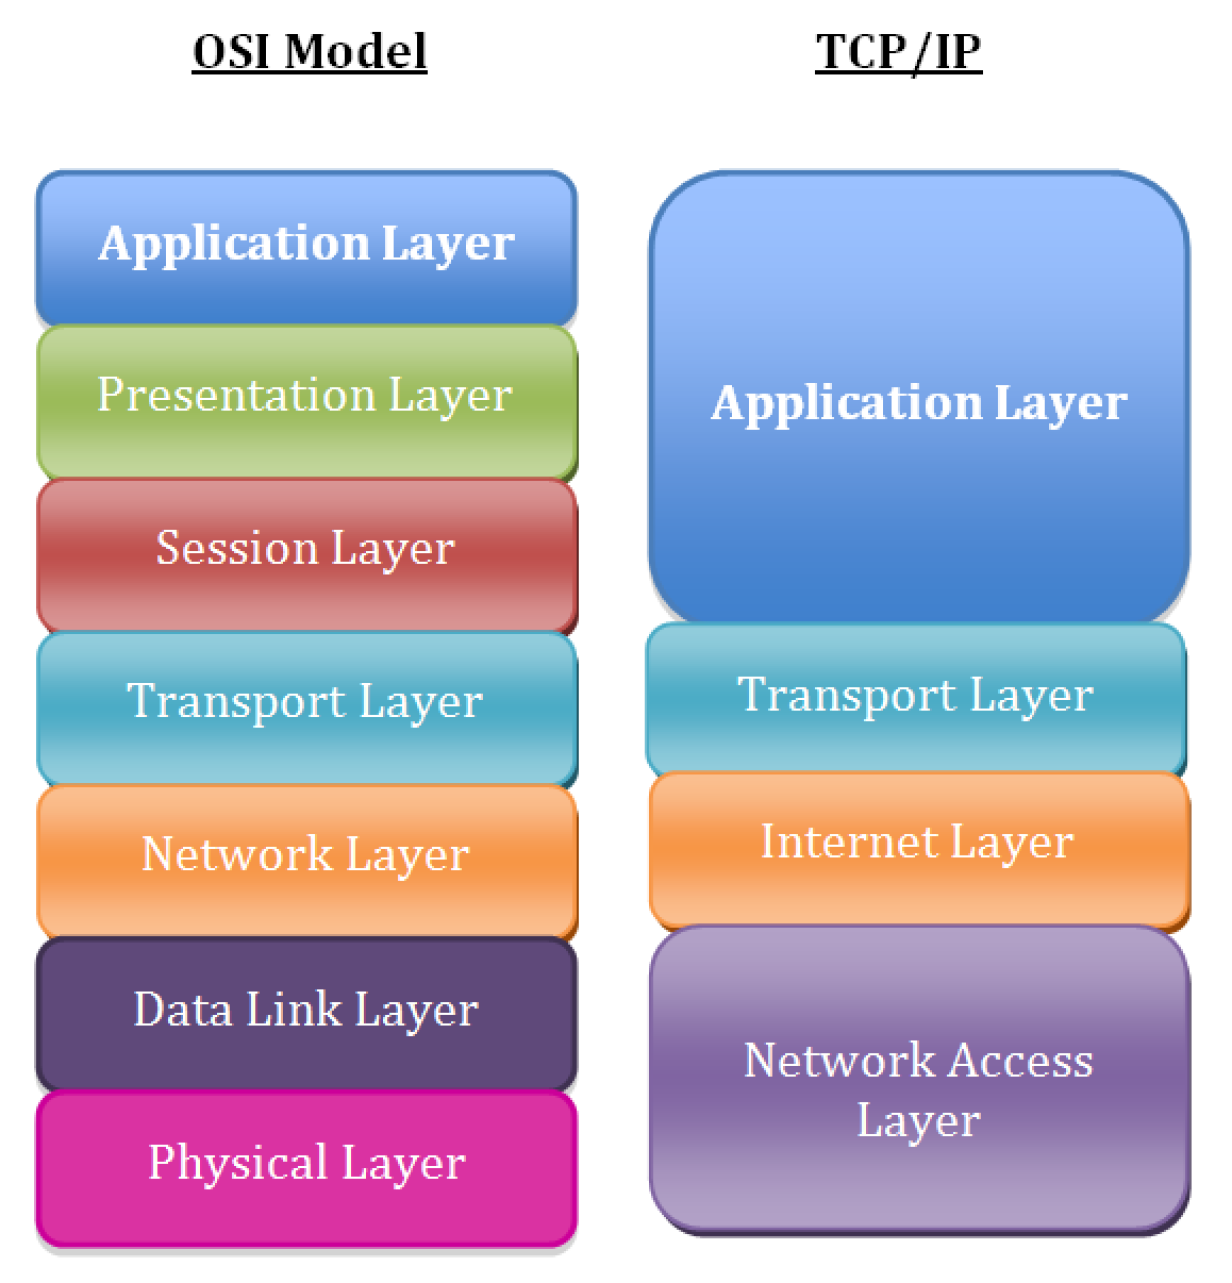
TCPIP_OSI_model-networking-levels

1. Check what is the Link status of the Interface with ethtool
 

root@freak:~# ethtool eno1
Settings for eno1:
    Supported ports: [ TP ]
    Supported link modes:   10baseT/Half 10baseT/Full
                            100baseT/Half 100baseT/Full
                            1000baseT/Full
    Supported pause frame use: Symmetric
    Supports auto-negotiation: Yes
    Supported FEC modes: Not reported
    Advertised link modes:  10baseT/Half 10baseT/Full
                            100baseT/Half 100baseT/Full
                            1000baseT/Full
    Advertised pause frame use: Symmetric
    Advertised auto-negotiation: Yes
    Advertised FEC modes: Not reported
    Speed: 100Mb/s
    Duplex: Full
    Auto-negotiation: on
    Port: Twisted Pair
    PHYAD: 1
    Transceiver: internal
    MDI-X: on (auto)
    Supports Wake-on: pumbg
    Wake-on: g
        Current message level: 0x00000007 (7)
                               drv probe link
    Link detected: yes


root@freak:~# ethtool eno2
Settings for eno2:
    Supported ports: [ TP ]
    Supported link modes:   10baseT/Half 10baseT/Full
                            100baseT/Half 100baseT/Full
                            1000baseT/Full
    Supported pause frame use: Symmetric
    Supports auto-negotiation: Yes
    Supported FEC modes: Not reported
    Advertised link modes:  10baseT/Half 10baseT/Full
                            100baseT/Half 100baseT/Full
                            1000baseT/Full
    Advertised pause frame use: Symmetric
    Advertised auto-negotiation: Yes
    Advertised FEC modes: Not reported
    Speed: 1000Mb/s
    Duplex: Full
    Auto-negotiation: on
    Port: Twisted Pair
    PHYAD: 1
    Transceiver: internal
    MDI-X: on (auto)
    Supports Wake-on: pumbg
    Wake-on: g
        Current message level: 0x00000007 (7)
                               drv probe link
    Link detected: yes


For example lets check only if Cable of Network card is plugged in and detected to have a network connection to remote node or switch and show the connection speed on which the 'autoneg on' (autonegiation option) of the LAN card has detected the network exat maximum speed:

root@pcfreak:~# ethtool eth0|grep -i 'link detected'; ethtool eth0 |grep 'Speed: '
    Link detected: yes
    Speed: 100Mb/s


1. Check ip command network configuration output

root@freak:~# ip addr show
1: lo: <LOOPBACK,UP,LOWER_UP> mtu 65536 qdisc noqueue state UNKNOWN group default qlen 1000
    link/loopback 00:00:00:00:00:00 brd 00:00:00:00:00:00
    inet 127.0.0.1/8 scope host lo
       valid_lft forever preferred_lft forever
2: eno1: <BROADCAST,MULTICAST,UP,LOWER_UP> mtu 1500 qdisc mq master xenbr0 state UP group default qlen 1000
    link/ether 70:e2:84:13:44:15 brd ff:ff:ff:ff:ff:ff
    altname enp7s0
3: eno2: <BROADCAST,MULTICAST,UP,LOWER_UP> mtu 1500 qdisc mq master xenbr1 state UP group default qlen 1000
    link/ether 70:e2:84:13:44:17 brd ff:ff:ff:ff:ff:ff
    altname enp8s0
4: xenbr0: <BROADCAST,MULTICAST,UP,LOWER_UP> mtu 1500 qdisc noqueue state UP group default qlen 1000
    link/ether 70:e2:84:13:44:13 brd ff:ff:ff:ff:ff:ff
    inet 192.168.1.7/24 brd 192.168.1.255 scope global dynamic xenbr0
       valid_lft 7361188sec preferred_lft 7361188sec
5: xenbr1: <BROADCAST,MULTICAST,UP,LOWER_UP> mtu 1500 qdisc noqueue state UP group default qlen 1000
    link/ether 70:e2:84:13:44:15 brd ff:ff:ff:ff:ff:ff
    inet 192.168.0.5/24 brd 192.168.0.255 scope global dynamic xenbr1
       valid_lft 536138sec preferred_lft 536138sec
10: vif2.0: <BROADCAST,MULTICAST,UP,LOWER_UP> mtu 1500 qdisc mq master xenbr0 state UP group default qlen 2000
    link/ether fe:ff:ff:ff:ff:ff brd ff:ff:ff:ff:ff:ff
11: vif2.1: <BROADCAST,MULTICAST,UP,LOWER_UP> mtu 1500 qdisc mq master xenbr1 state UP group default qlen 2000
    link/ether fe:ff:ff:ff:ff:ff brd ff:ff:ff:ff:ff:ff
12: vif3.0: <BROADCAST,MULTICAST,UP,LOWER_UP> mtu 1500 qdisc mq master xenbr0 state UP group default qlen 2000
    link/ether fe:ff:ff:ff:ff:ff brd ff:ff:ff:ff:ff:ff
13: vif3.1: <BROADCAST,MULTICAST,UP,LOWER_UP> mtu 1500 qdisc mq master xenbr1 state UP group default qlen 2000
    link/ether fe:ff:ff:ff:ff:ff brd ff:ff:ff:ff:ff:ff
14: vif4.0: <BROADCAST,MULTICAST,UP,LOWER_UP> mtu 1500 qdisc mq master xenbr0 state UP group default qlen 2000
    link/ether fe:ff:ff:ff:ff:ff brd ff:ff:ff:ff:ff:ff
15: vif4.1: <BROADCAST,MULTICAST,UP,LOWER_UP> mtu 1500 qdisc mq master xenbr1 state UP group default qlen 2000
    link/ether fe:ff:ff:ff:ff:ff brd ff:ff:ff:ff:ff:ff
16: vif5.0: <BROADCAST,MULTICAST,UP,LOWER_UP> mtu 1500 qdisc mq master xenbr0 state UP group default qlen 2000
    link/ether fe:ff:ff:ff:ff:ff brd ff:ff:ff:ff:ff:ff
17: vif5.1: <BROADCAST,MULTICAST,UP,LOWER_UP> mtu 1500 qdisc mq master xenbr1 state UP group default qlen 2000
    link/ether fe:ff:ff:ff:ff:ff brd ff:ff:ff:ff:ff:ff
18: vif6.0: <BROADCAST,MULTICAST,UP,LOWER_UP> mtu 1500 qdisc mq master xenbr0 state UP group default qlen 2000
    link/ether fe:ff:ff:ff:ff:ff brd ff:ff:ff:ff:ff:ff
19: vif6.1: <BROADCAST,MULTICAST,UP,LOWER_UP> mtu 1500 qdisc mq master xenbr0 state UP group default qlen 2000
    link/ether fe:ff:ff:ff:ff:ff brd ff:ff:ff:ff:ff:ff
30: vif17.0: <BROADCAST,MULTICAST,UP,LOWER_UP> mtu 1500 qdisc mq master xenbr0 state UP group default qlen 2000
    link/ether fe:ff:ff:ff:ff:ff brd ff:ff:ff:ff:ff:ff
31: vif17.1: <BROADCAST,MULTICAST,UP,LOWER_UP> mtu 1500 qdisc mq master xenbr1 state UP group default qlen 2000
    link/ether fe:ff:ff:ff:ff:ff brd ff:ff:ff:ff:ff:ff
34: vif21.0: <BROADCAST,MULTICAST,UP,LOWER_UP> mtu 1500 qdisc mq master xenbr0 state UP group default qlen 2000
    link/ether fe:ff:ff:ff:ff:ff brd ff:ff:ff:ff:ff:ff
35: vif21.1: <BROADCAST,MULTICAST,UP,LOWER_UP> mtu 1500 qdisc mq master xenbr1 state UP group default qlen 2000
    link/ether fe:ff:ff:ff:ff:ff brd ff:ff:ff:ff:ff:ff
48: vif25.0-emu: <BROADCAST,MULTICAST,UP,LOWER_UP> mtu 1500 qdisc pfifo_fast master xenbr0 state UNKNOWN group default qlen 1000
    link/ether fe:ff:ff:ff:ff:ff brd ff:ff:ff:ff:ff:ff
49: vif25.1-emu: <BROADCAST,MULTICAST,UP,LOWER_UP> mtu 1500 qdisc pfifo_fast master xenbr1 state UNKNOWN group default qlen 1000
    link/ether fe:ff:ff:ff:ff:ff brd ff:ff:ff:ff:ff:ff
50: vif25.0: <NO-CARRIER,BROADCAST,MULTICAST,UP> mtu 1500 qdisc mq master xenbr0 state DOWN group default qlen 2000
    link/ether fe:ff:ff:ff:ff:ff brd ff:ff:ff:ff:ff:ff
51: vif25.1: <NO-CARRIER,BROADCAST,MULTICAST,UP> mtu 1500 qdisc mq master xenbr1 state DOWN group default qlen 2000
    link/ether fe:ff:ff:ff:ff:ff brd ff:ff:ff:ff:ff:ff
118: vif47.0-emu: <BROADCAST,MULTICAST,UP,LOWER_UP> mtu 1500 qdisc pfifo_fast master xenbr0 state UNKNOWN group default qlen 1000
    link/ether fe:ff:ff:ff:ff:ff brd ff:ff:ff:ff:ff:ff
119: vif47.1-emu: <BROADCAST,MULTICAST,UP,LOWER_UP> mtu 1500 qdisc pfifo_fast master xenbr1 state UNKNOWN group default qlen 1000
    link/ether fe:ff:ff:ff:ff:ff brd ff:ff:ff:ff:ff:ff
120: vif47.0: <NO-CARRIER,BROADCAST,MULTICAST,UP> mtu 1500 qdisc mq master xenbr0 state DOWN group default qlen 2000
    link/ether fe:ff:ff:ff:ff:ff brd ff:ff:ff:ff:ff:ff
121: vif47.1: <NO-CARRIER,BROADCAST,MULTICAST,UP> mtu 1500 qdisc mq master xenbr1 state DOWN group default qlen 2000
    link/ether fe:ff:ff:ff:ff:ff brd ff:ff:ff:ff:ff:ff
root@freak:~# 

ip a s (is a also a shortcut command alias) you can enjoy if you have to deal with ip command frequently.

2. Check the status of the interfaces

Old fashioned way is to just do:

/sbin/ifconfig


root@freak:~# ifconfig 
eno1: flags=4163<UP,BROADCAST,RUNNING,MULTICAST>  mtu 1500
        ether 70:e2:84:13:44:15  txqueuelen 1000  (Ethernet)
        RX packets 52366502  bytes 10622469320 (9.8 GiB)
        RX errors 0  dropped 0  overruns 0  frame 0
        TX packets 242622195  bytes 274688121244 (255.8 GiB)
        TX errors 0  dropped 0 overruns 0  carrier 0  collisions 0
        device memory 0xfb200000-fb27ffff  

eno2: flags=4163<UP,BROADCAST,RUNNING,MULTICAST>  mtu 1500
        ether 70:e2:84:13:44:17  txqueuelen 1000  (Ethernet)
        RX packets 220995454  bytes 269698276095 (251.1 GiB)
        RX errors 0  dropped 7  overruns 0  frame 0
        TX packets 192319925  bytes 166233773782 (154.8 GiB)
        TX errors 0  dropped 0 overruns 0  carrier 0  collisions 0
        device memory 0xfb100000-fb17ffff  

lo: flags=73<UP,LOOPBACK,RUNNING>  mtu 65536
        inet 127.0.0.1  netmask 255.0.0.0
        loop  txqueuelen 1000  (Local Loopback)
        RX packets 2553  bytes 147410 (143.9 KiB)
        RX errors 0  dropped 0  overruns 0  frame 0
        TX packets 2553  bytes 147410 (143.9 KiB)
        TX errors 0  dropped 0 overruns 0  carrier 0  collisions 0

vif17.0: flags=4163<UP,BROADCAST,RUNNING,MULTICAST>  mtu 1500
        ether fe:ff:ff:ff:ff:ff  txqueuelen 2000  (Ethernet)
        RX packets 14517375  bytes 133226551792 (124.0 GiB)
        RX errors 0  dropped 0  overruns 0  frame 0
        TX packets 139688950  bytes 145111993017 (135.1 GiB)
        TX errors 0  dropped 0 overruns 0  carrier 0  collisions 0

vif17.1: flags=4163<UP,BROADCAST,RUNNING,MULTICAST>  mtu 1500
        ether fe:ff:ff:ff:ff:ff  txqueuelen 2000  (Ethernet)
        RX packets 86113294  bytes 156944058681 (146.1 GiB)
        RX errors 0  dropped 0  overruns 0  frame 0
        TX packets 181513904  bytes 267892940821 (249.4 GiB)
        TX errors 0  dropped 0 overruns 0  carrier 0  collisions 0

vif2.0: flags=4163<UP,BROADCAST,RUNNING,MULTICAST>  mtu 1500
        ether fe:ff:ff:ff:ff:ff  txqueuelen 2000  (Ethernet)
        RX packets 1521875  bytes 88282472 (84.1 MiB)
        RX errors 0  dropped 0  overruns 0  frame 0
        TX packets 152691174  bytes 278372314505 (259.2 GiB)
        TX errors 0  dropped 3 overruns 0  carrier 0  collisions 0

vif2.1: flags=4163<UP,BROADCAST,RUNNING,MULTICAST>  mtu 1500
        ether fe:ff:ff:ff:ff:ff  txqueuelen 2000  (Ethernet)
        RX packets 454915  bytes 81069760 (77.3 MiB)
        RX errors 0  dropped 0  overruns 0  frame 0
        TX packets 266953989  bytes 425692364876 (396.4 GiB)
        TX errors 0  dropped 26 overruns 0  carrier 0  collisions 0

vif21.0: flags=4163<UP,BROADCAST,RUNNING,MULTICAST>  mtu 1500
        ether fe:ff:ff:ff:ff:ff  txqueuelen 2000  (Ethernet)
        RX packets 20043711  bytes 1283926794 (1.1 GiB)
        RX errors 0  dropped 0  overruns 0  frame 0
        TX packets 141580485  bytes 277396881113 (258.3 GiB)
        TX errors 0  dropped 3 overruns 0  carrier 0  collisions 0

vif21.1: flags=4163<UP,BROADCAST,RUNNING,MULTICAST>  mtu 1500
        ether fe:ff:ff:ff:ff:ff  txqueuelen 2000  (Ethernet)
        RX packets 73004  bytes 3802174 (3.6 MiB)
        RX errors 0  dropped 0  overruns 0  frame 0
        TX packets 267151006  bytes 425621892663 (396.3 GiB)
        TX errors 0  dropped 14 overruns 0  carrier 0  collisions 0

vif25.0: flags=4099<UP,BROADCAST,MULTICAST>  mtu 1500
        ether fe:ff:ff:ff:ff:ff  txqueuelen 2000  (Ethernet)
        RX packets 0  bytes 0 (0.0 B)
        RX errors 0  dropped 0  overruns 0  frame 0
        TX packets 0  bytes 0 (0.0 B)
        TX errors 0  dropped 0 overruns 0  carrier 0  collisions 0

vif25.1: flags=4099<UP,BROADCAST,MULTICAST>  mtu 1500
        ether fe:ff:ff:ff:ff:ff  txqueuelen 2000  (Ethernet)
        RX packets 0  bytes 0 (0.0 B)
        RX errors 0  dropped 0  overruns 0  frame 0
        TX packets 0  bytes 0 (0.0 B)
        TX errors 0  dropped 0 overruns 0  carrier 0  collisions 0

vif25.0-emu: flags=4163<UP,BROADCAST,RUNNING,MULTICAST>  mtu 1500
        ether fe:ff:ff:ff:ff:ff  txqueuelen 1000  (Ethernet)
        RX packets 2736348  bytes 295661367 (281.9 MiB)
        RX errors 0  dropped 0  overruns 0  frame 0
        TX packets 260385509  bytes 265751226663 (247.5 GiB)
        TX errors 0  dropped 200 overruns 0  carrier 0  collisions 0

vif25.1-emu: flags=4163<UP,BROADCAST,RUNNING,MULTICAST>  mtu 1500
        ether fe:ff:ff:ff:ff:ff  txqueuelen 1000  (Ethernet)
        RX packets 145387  bytes 36011655 (34.3 MiB)
        RX errors 0  dropped 0  overruns 0  frame 0
        TX packets 370314760  bytes 394725961081 (367.6 GiB)
        TX errors 0  dropped 0 overruns 0  carrier 0  collisions 0

vif3.0: flags=4163<UP,BROADCAST,RUNNING,MULTICAST>  mtu 1500
        ether fe:ff:ff:ff:ff:ff  txqueuelen 2000  (Ethernet)
        RX packets 55382861  bytes 130042280927 (121.1 GiB)
        RX errors 0  dropped 0  overruns 0  frame 0
        TX packets 99040097  bytes 147929196318 (137.7 GiB)
        TX errors 0  dropped 1 overruns 0  carrier 0  collisions 0

vif3.1: flags=4163<UP,BROADCAST,RUNNING,MULTICAST>  mtu 1500
        ether fe:ff:ff:ff:ff:ff  txqueuelen 2000  (Ethernet)
        RX packets 5132631  bytes 295493762 (281.8 MiB)
        RX errors 0  dropped 0  overruns 0  frame 0
        TX packets 262314199  bytes 425416945203 (396.2 GiB)
        TX errors 0  dropped 16 overruns 0  carrier 0  collisions 0

vif4.0: flags=4163<UP,BROADCAST,RUNNING,MULTICAST>  mtu 1500
        ether fe:ff:ff:ff:ff:ff  txqueuelen 2000  (Ethernet)
        RX packets 4902015  bytes 615387539 (586.8 MiB)
        RX errors 0  dropped 0  overruns 0  frame 0
        TX packets 149342891  bytes 277802504143 (258.7 GiB)
        TX errors 0  dropped 1 overruns 0  carrier 0  collisions 0

vif4.1: flags=4163<UP,BROADCAST,RUNNING,MULTICAST>  mtu 1500
        ether fe:ff:ff:ff:ff:ff  txqueuelen 2000  (Ethernet)
        RX packets 276927  bytes 30720101 (29.2 MiB)
        RX errors 0  dropped 0  overruns 0  frame 0
        TX packets 267132395  bytes 425745668273 (396.5 GiB)
        TX errors 0  dropped 14 overruns 0  carrier 0  collisions 0

vif47.0: flags=4099<UP,BROADCAST,MULTICAST>  mtu 1500
        ether fe:ff:ff:ff:ff:ff  txqueuelen 2000  (Ethernet)
        RX packets 0  bytes 0 (0.0 B)
        RX errors 0  dropped 0  overruns 0  frame 0
        TX packets 0  bytes 0 (0.0 B)
        TX errors 0  dropped 0 overruns 0  carrier 0  collisions 0

vif47.1: flags=4099<UP,BROADCAST,MULTICAST>  mtu 1500
        ether fe:ff:ff:ff:ff:ff  txqueuelen 2000  (Ethernet)
        RX packets 0  bytes 0 (0.0 B)
        RX errors 0  dropped 0  overruns 0  frame 0
        TX packets 0  bytes 0 (0.0 B)
        TX errors 0  dropped 0 overruns 0  carrier 0  collisions 0

vif47.0-emu: flags=4163<UP,BROADCAST,RUNNING,MULTICAST>  mtu 1500
        ether fe:ff:ff:ff:ff:ff  txqueuelen 1000  (Ethernet)
        RX packets 208745  bytes 20096596 (19.1 MiB)
        RX errors 0  dropped 0  overruns 0  frame 0
        TX packets 110905731  bytes 110723486135 (103.1 GiB)
        TX errors 0  dropped 0 overruns 0  carrier 0  collisions 0

vif47.1-emu: flags=4163<UP,BROADCAST,RUNNING,MULTICAST>  mtu 1500
        ether fe:ff:ff:ff:ff:ff  txqueuelen 1000  (Ethernet)
        RX packets 140517  bytes 14596061 (13.9 MiB)
        RX errors 0  dropped 0  overruns 0  frame 0
        TX packets 150831959  bytes 162931572456 (151.7 GiB)
        TX errors 0  dropped 0 overruns 0  carrier 0  collisions 0

vif5.0: flags=4163<UP,BROADCAST,RUNNING,MULTICAST>  mtu 1500
        ether fe:ff:ff:ff:ff:ff  txqueuelen 2000  (Ethernet)
        RX packets 2030528  bytes 363988589 (347.1 MiB)
        RX errors 0  dropped 0  overruns 0  frame 0
        TX packets 152264264  bytes 278131541781 (259.0 GiB)
        TX errors 0  dropped 1 overruns 0  carrier 0  collisions 0

vif5.1: flags=4163<UP,BROADCAST,RUNNING,MULTICAST>  mtu 1500
        ether fe:ff:ff:ff:ff:ff  txqueuelen 2000  (Ethernet)
        RX packets 4169244  bytes 1045889687 (997.4 MiB)
        RX errors 0  dropped 0  overruns 0  frame 0
        TX packets 263561100  bytes 424894400987 (395.7 GiB)
        TX errors 0  dropped 7 overruns 0  carrier 0  collisions 0

vif6.0: flags=4163<UP,BROADCAST,RUNNING,MULTICAST>  mtu 1500
        ether fe:ff:ff:ff:ff:ff  txqueuelen 2000  (Ethernet)
        RX packets 300242  bytes 16210963 (15.4 MiB)
        RX errors 0  dropped 0  overruns 0  frame 0
        TX packets 153909576  bytes 278461295620 (259.3 GiB)
        TX errors 0  dropped 2 overruns 0  carrier 0  collisions 0

vif6.1: flags=4163<UP,BROADCAST,RUNNING,MULTICAST>  mtu 1500
        ether fe:ff:ff:ff:ff:ff  txqueuelen 2000  (Ethernet)
        RX packets 43  bytes 1932 (1.8 KiB)
        RX errors 0  dropped 0  overruns 0  frame 0
        TX packets 154205631  bytes 278481298141 (259.3 GiB)
        TX errors 0  dropped 2 overruns 0  carrier 0  collisions 0

xenbr0: flags=4163<UP,BROADCAST,RUNNING,MULTICAST>  mtu 1500
        inet 192.168.1.8  netmask 255.255.255.0  broadcast 192.168.1.255
        ether 70:e2:84:13:44:11  txqueuelen 1000  (Ethernet)
        RX packets 13689902  bytes 923464162 (880.6 MiB)
        RX errors 0  dropped 0  overruns 0  frame 0
        TX packets 12072932  bytes 1307055530 (1.2 GiB)
        TX errors 0  dropped 0 overruns 0  carrier 0  collisions 0

xenbr1: flags=4163<UP,BROADCAST,RUNNING,MULTICAST>  mtu 1500
        inet 192.168.0.3  netmask 255.255.255.0  broadcast 192.168.0.255
        ether 70:e2:84:13:44:12  txqueuelen 1000  (Ethernet)
        RX packets 626995  bytes 180026901 (171.6 MiB)
        RX errors 0  dropped 0  overruns 0  frame 0
        TX packets 12815  bytes 942092 (920.0 KiB)
        TX errors 0  dropped 0 overruns 0  carrier 0  collisions 0


root@freak:~# ifconfig        
eno1: flags=4163<UP,BROADCAST,RUNNING,MULTICAST>  mtu 1500
        ether 70:e2:84:13:44:11  txqueuelen 1000  (Ethernet)
        RX packets 52373358  bytes 10623034427 (9.8 GiB)
        RX errors 0  dropped 0  overruns 0  frame 0
        TX packets 242660000  bytes 274734018669 (255.8 GiB)
        TX errors 0  dropped 0 overruns 0  carrier 0  collisions 0
        device memory 0xfb200000-fb27ffff  

eno2: flags=4163<UP,BROADCAST,RUNNING,MULTICAST>  mtu 1500
        ether 70:e2:84:13:44:12  txqueuelen 1000  (Ethernet)
        RX packets 221197892  bytes 269978137472 (251.4 GiB)
        RX errors 0  dropped 7  overruns 0  frame 0
        TX packets 192573206  bytes 166491370299 (155.0 GiB)
        TX errors 0  dropped 0 overruns 0  carrier 0  collisions 0
        device memory 0xfb100000-fb17ffff  

lo: flags=73<UP,LOOPBACK,RUNNING>  mtu 65536
        inet 127.0.0.1  netmask 255.0.0.0
        loop  txqueuelen 1000  (Local Loopback)
        RX packets 2553  bytes 147410 (143.9 KiB)
        RX errors 0  dropped 0  overruns 0  frame 0
        TX packets 2553  bytes 147410 (143.9 KiB)
        TX errors 0  dropped 0 overruns 0  carrier 0  collisions 0

vif17.0: flags=4163<UP,BROADCAST,RUNNING,MULTICAST>  mtu 1500
        ether fe:ff:ff:ff:ff:ff  txqueuelen 2000  (Ethernet)
        RX packets 14519247  bytes 133248290251 (124.0 GiB)
        RX errors 0  dropped 0  overruns 0  frame 0
        TX packets 139708738  bytes 145135168676 (135.1 GiB)
        TX errors 0  dropped 0 overruns 0  carrier 0  collisions 0

vif17.1: flags=4163<UP,BROADCAST,RUNNING,MULTICAST>  mtu 1500
        ether fe:ff:ff:ff:ff:ff  txqueuelen 2000  (Ethernet)
        RX packets 86206104  bytes 157189755115 (146.3 GiB)
        RX errors 0  dropped 0  overruns 0  frame 0
        TX packets 181685983  bytes 268170806613 (249.7 GiB)
        TX errors 0  dropped 0 overruns 0  carrier 0  collisions 0

vif2.0: flags=4163<UP,BROADCAST,RUNNING,MULTICAST>  mtu 1500
        ether fe:ff:ff:ff:ff:ff  txqueuelen 2000  (Ethernet)
        RX packets 1522072  bytes 88293701 (84.2 MiB)
        RX errors 0  dropped 0  overruns 0  frame 0
        TX packets 152712638  bytes 278417240910 (259.2 GiB)
        TX errors 0  dropped 3 overruns 0  carrier 0  collisions 0

vif2.1: flags=4163<UP,BROADCAST,RUNNING,MULTICAST>  mtu 1500
        ether fe:ff:ff:ff:ff:ff  txqueuelen 2000  (Ethernet)
        RX packets 454933  bytes 81071616 (77.3 MiB)
        RX errors 0  dropped 0  overruns 0  frame 0
        TX packets 267218860  bytes 426217224334 (396.9 GiB)
        TX errors 0  dropped 26 overruns 0  carrier 0  collisions 0

vif21.0: flags=4163<UP,BROADCAST,RUNNING,MULTICAST>  mtu 1500
        ether fe:ff:ff:ff:ff:ff  txqueuelen 2000  (Ethernet)
        RX packets 20045530  bytes 1284038375 (1.1 GiB)
        RX errors 0  dropped 0  overruns 0  frame 0
        TX packets 141601066  bytes 277441739746 (258.3 GiB)
        TX errors 0  dropped 3 overruns 0  carrier 0  collisions 0

vif21.1: flags=4163<UP,BROADCAST,RUNNING,MULTICAST>  mtu 1500
        ether fe:ff:ff:ff:ff:ff  txqueuelen 2000  (Ethernet)
        RX packets 73010  bytes 3802474 (3.6 MiB)
        RX errors 0  dropped 0  overruns 0  frame 0
        TX packets 267415889  bytes 426146753845 (396.8 GiB)
        TX errors 0  dropped 14 overruns 0  carrier 0  collisions 0

vif25.0: flags=4099<UP,BROADCAST,MULTICAST>  mtu 1500
        ether fe:ff:ff:ff:ff:ff  txqueuelen 2000  (Ethernet)
        RX packets 0  bytes 0 (0.0 B)
        RX errors 0  dropped 0  overruns 0  frame 0
        TX packets 0  bytes 0 (0.0 B)
        TX errors 0  dropped 0 overruns 0  carrier 0  collisions 0

vif25.1: flags=4099<UP,BROADCAST,MULTICAST>  mtu 1500
        ether fe:ff:ff:ff:ff:ff  txqueuelen 2000  (Ethernet)
        RX packets 0  bytes 0 (0.0 B)
        RX errors 0  dropped 0  overruns 0  frame 0
        TX packets 0  bytes 0 (0.0 B)
        TX errors 0  dropped 0 overruns 0  carrier 0  collisions 0

vif25.0-emu: flags=4163<UP,BROADCAST,RUNNING,MULTICAST>  mtu 1500
        ether fe:ff:ff:ff:ff:ff  txqueuelen 1000  (Ethernet)
        RX packets 2736576  bytes 295678097 (281.9 MiB)
        RX errors 0  dropped 0  overruns 0  frame 0
        TX packets 260429831  bytes 265797660906 (247.5 GiB)
        TX errors 0  dropped 200 overruns 0  carrier 0  collisions 0

vif25.1-emu: flags=4163<UP,BROADCAST,RUNNING,MULTICAST>  mtu 1500
        ether fe:ff:ff:ff:ff:ff  txqueuelen 1000  (Ethernet)
        RX packets 145425  bytes 36018716 (34.3 MiB)
        RX errors 0  dropped 0  overruns 0  frame 0
        TX packets 370770440  bytes 395263409640 (368.1 GiB)
        TX errors 0  dropped 0 overruns 0  carrier 0  collisions 0

vif3.0: flags=4163<UP,BROADCAST,RUNNING,MULTICAST>  mtu 1500
        ether fe:ff:ff:ff:ff:ff  txqueuelen 2000  (Ethernet)
        RX packets 55392503  bytes 130064444520 (121.1 GiB)
        RX errors 0  dropped 0  overruns 0  frame 0
        TX packets 99052116  bytes 147951838129 (137.7 GiB)
        TX errors 0  dropped 1 overruns 0  carrier 0  collisions 0

vif3.1: flags=4163<UP,BROADCAST,RUNNING,MULTICAST>  mtu 1500
        ether fe:ff:ff:ff:ff:ff  txqueuelen 2000  (Ethernet)
        RX packets 5133054  bytes 295517366 (281.8 MiB)
        RX errors 0  dropped 0  overruns 0  frame 0
        TX packets 262578665  bytes 425941777243 (396.6 GiB)
        TX errors 0  dropped 16 overruns 0  carrier 0  collisions 0

vif4.0: flags=4163<UP,BROADCAST,RUNNING,MULTICAST>  mtu 1500
        ether fe:ff:ff:ff:ff:ff  txqueuelen 2000  (Ethernet)
        RX packets 4902949  bytes 615496460 (586.9 MiB)
        RX errors 0  dropped 0  overruns 0  frame 0
        TX packets 149363618  bytes 277847322538 (258.7 GiB)
        TX errors 0  dropped 1 overruns 0  carrier 0  collisions 0

vif4.1: flags=4163<UP,BROADCAST,RUNNING,MULTICAST>  mtu 1500
        ether fe:ff:ff:ff:ff:ff  txqueuelen 2000  (Ethernet)
        RX packets 276943  bytes 30721141 (29.2 MiB)
        RX errors 0  dropped 0  overruns 0  frame 0
        TX packets 267397268  bytes 426270528575 (396.9 GiB)
        TX errors 0  dropped 14 overruns 0  carrier 0  collisions 0

vif47.0: flags=4099<UP,BROADCAST,MULTICAST>  mtu 1500
        ether fe:ff:ff:ff:ff:ff  txqueuelen 2000  (Ethernet)
        RX packets 0  bytes 0 (0.0 B)
        RX errors 0  dropped 0  overruns 0  frame 0
        TX packets 0  bytes 0 (0.0 B)
        TX errors 0  dropped 0 overruns 0  carrier 0  collisions 0

vif47.1: flags=4099<UP,BROADCAST,MULTICAST>  mtu 1500
        ether fe:ff:ff:ff:ff:ff  txqueuelen 2000  (Ethernet)
        RX packets 0  bytes 0 (0.0 B)
        RX errors 0  dropped 0  overruns 0  frame 0
        TX packets 0  bytes 0 (0.0 B)
        TX errors 0  dropped 0 overruns 0  carrier 0  collisions 0

vif47.0-emu: flags=4163<UP,BROADCAST,RUNNING,MULTICAST>  mtu 1500
        ether fe:ff:ff:ff:ff:ff  txqueuelen 1000  (Ethernet)
        RX packets 208790  bytes 20100733 (19.1 MiB)
        RX errors 0  dropped 0  overruns 0  frame 0
        TX packets 110950236  bytes 110769932971 (103.1 GiB)
        TX errors 0  dropped 0 overruns 0  carrier 0  collisions 0

vif47.1-emu: flags=4163<UP,BROADCAST,RUNNING,MULTICAST>  mtu 1500
        ether fe:ff:ff:ff:ff:ff  txqueuelen 1000  (Ethernet)
        RX packets 140551  bytes 14599509 (13.9 MiB)
        RX errors 0  dropped 0  overruns 0  frame 0
        TX packets 151287643  bytes 163469024604 (152.2 GiB)
        TX errors 0  dropped 0 overruns 0  carrier 0  collisions 0

vif5.0: flags=4163<UP,BROADCAST,RUNNING,MULTICAST>  mtu 1500
        ether fe:ff:ff:ff:ff:ff  txqueuelen 2000  (Ethernet)
        RX packets 2030676  bytes 363997181 (347.1 MiB)
        RX errors 0  dropped 0  overruns 0  frame 0
        TX packets 152285777  bytes 278176471509 (259.0 GiB)
        TX errors 0  dropped 1 overruns 0  carrier 0  collisions 0

vif5.1: flags=4163<UP,BROADCAST,RUNNING,MULTICAST>  mtu 1500
        ether fe:ff:ff:ff:ff:ff  txqueuelen 2000  (Ethernet)
        RX packets 4169387  bytes 1045898303 (997.4 MiB)
        RX errors 0  dropped 0  overruns 0  frame 0
        TX packets 263825846  bytes 425419251935 (396.2 GiB)
        TX errors 0  dropped 7 overruns 0  carrier 0  collisions 0

vif6.0: flags=4163<UP,BROADCAST,RUNNING,MULTICAST>  mtu 1500
        ether fe:ff:ff:ff:ff:ff  txqueuelen 2000  (Ethernet)
        RX packets 300266  bytes 16212271 (15.4 MiB)
        RX errors 0  dropped 0  overruns 0  frame 0
        TX packets 153931212  bytes 278506234302 (259.3 GiB)
        TX errors 0  dropped 2 overruns 0  carrier 0  collisions 0

vif6.1: flags=4163<UP,BROADCAST,RUNNING,MULTICAST>  mtu 1500
        ether fe:ff:ff:ff:ff:ff  txqueuelen 2000  (Ethernet)
        RX packets 43  bytes 1932 (1.8 KiB)
        RX errors 0  dropped 0  overruns 0  frame 0
        TX packets 154227291  bytes 278526238467 (259.3 GiB)
        TX errors 0  dropped 2 overruns 0  carrier 0  collisions 0

xenbr0: flags=4163<UP,BROADCAST,RUNNING,MULTICAST>  mtu 1500
        inet 192.168.1.8  netmask 255.255.255.0  broadcast 192.168.1.255
        ether 70:e2:84:13:44:11  txqueuelen 1000  (Ethernet)
        RX packets 13690768  bytes 923520126 (880.7 MiB)
        RX errors 0  dropped 0  overruns 0  frame 0
        TX packets 12073667  bytes 1307127765 (1.2 GiB)
        TX errors 0  dropped 0 overruns 0  carrier 0  collisions 0

xenbr1: flags=4163<UP,BROADCAST,RUNNING,MULTICAST>  mtu 1500
        inet 192.168.0.3  netmask 255.255.255.0  broadcast 192.168.0.255
        ether 70:e2:84:13:44:12  txqueuelen 1000  (Ethernet)
        RX packets 627010  bytes 180028847 (171.6 MiB)
        RX errors 0  dropped 0  overruns 0  frame 0
        TX packets 12815  bytes 942092 (920.0 KiB)
        TX errors 0  dropped 0 overruns 0  carrier 0  collisions 0


To see ethernet interfaces that seem up and then do a ifconfig -a to check whether some interfaces are down (e.g. not shown in the simple ifconfig list).
/sbin/ifconfig -a

! Please note that some virtual IP configurations might not appear and noly be visible in an (ip addr show) command.


3. Check iproute2 for special rt_tables (Routing Tables) rules
 

By default Linux distributions does not have any additional rules in /etc/iproute2/rt_tables however some Linux router machines, needs to have a multiple Gateways. Perhaps the most elegant way to do multiple routings with Linux is to use iproute2's routing tables rt_tables.

Here is example of an OpenXEN system that has 2 Internet providers attached and routes different traffic via


root@freak:~# cat /etc/iproute2/rt_tables
#
# reserved values
#
255    local
254    main
253    default

100    INET1
200     INET2
0    unspec
#
# local
#
#1    inr.ruhep


root@freak:~# ip rule list
0:    from all lookup local
32762:    from all to 192.168.1.8 lookup INET2
32763:    from 192.168.1.8 lookup INET2
32764:    from all to 192.168.0.3 lookup INET1
32765:    from 192.168.0.3 lookup INET1
32766:    from all lookup main
32767:    from all lookup default
root@freak:~# 
 

4. Using ip route get to find out traffic route (path)

root@freak:~# ip route get 192.168.0.1
192.168.0.1 via 192.168.0.1 dev xenbr1 src 192.168.0.3 uid 0 
    cache 


root@freak:~# /sbin/route -n
Kernel IP routing table
Destination     Gateway         Genmask         Flags Metric Ref    Use Iface
0.0.0.0         192.168.1.1     0.0.0.0         UG    0      0        0 xenbr0
192.168.0.0     192.168.0.1     255.255.255.0   UG    0      0        0 xenbr1
192.168.0.0     0.0.0.0         255.255.255.0   U     0      0        0 xenbr1
192.168.1.0     0.0.0.0         255.255.255.0   U     0      0        0 xenbr0
root@freak:~# 

root@freak:~# ip route show
default via 192.168.1.1 dev xenbr0 
192.168.0.0/24 via 192.168.0.1 dev xenbr1 
192.168.0.0/24 dev xenbr1 proto kernel scope link src 192.168.0.3 
192.168.1.0/24 dev xenbr0 proto kernel scope link src 192.168.1.8 


If you find that gateway is missing you might want to add it with:

root@freak:~#  ip route add default via 192.168.5.1

If you need to add a speicic network IP range via separate gateways, you can use commands like:

To add routing for 192.168.0.1/24 / 192.168.1.1/24 via 192.168.0.1 and 192.168.1.1

# /sbin/route add -net 192.168.1.0 netmask 255.255.255.0 gw 192.168.1.1 dev eth1
# /sbin/route add -net 192.168.0.0 netmask 255.255.255.0 gw 192.168.0.1 dev eth1


If you need to delete a configured wrong route with ip command

# ip route del 192.168.1.0/24 via 0.0.0.0 dev eth1
# ip route del 192.168.0.0/24 via 0.0.0.0 dev eth1

5. Use ping (ICMP protocol) the Destionation IP
 

root@freak:~# ping -c 3 192.168.0.1
PING 192.168.0.1 (192.168.0.1) 56(84) bytes of data.
64 bytes from 192.168.0.1: icmp_seq=1 ttl=64 time=0.219 ms
64 bytes from 192.168.0.1: icmp_seq=2 ttl=64 time=0.295 ms
64 bytes from 192.168.0.1: icmp_seq=3 ttl=64 time=0.270 ms

— 192.168.0.1 ping statistics —
3 packets transmitted, 3 received, 0% packet loss, time 2048ms
rtt min/avg/max/mdev = 0.219/0.261/0.295/0.031 ms
root@freak:~# ping -c 3 192.168.0.39
PING 192.168.0.39 (192.168.0.39) 56(84) bytes of data.
From 192.168.1.80: icmp_seq=2 Redirect Host(New nexthop: 192.168.0.39)
From 192.168.1.80: icmp_seq=3 Redirect Host(New nexthop: 192.168.0.39)
From 192.168.1.80 icmp_seq=1 Destination Host Unreachable


— 192.168.0.39 ping statistics —
3 packets transmitted, 0 received, +1 errors, 100% packet loss, time 2039ms
pipe 3


Note that sometimes you might get 100% traffic loss but still have connection to the destionation in case if the ICMP protocol is filtered for security.

However if you get something like Network is unreachable that is usually an indicator of some routing problem or wrongly configured network netmask.

root@freak:~# ping 192.168.0.5
ping: connect: Network is unreachable

Test network with different packet size. To send 8972 bytes of payload in a Ethernet frame without fragmentation, the following command can be used:

root@pcfreak:~# ping -s 8972 -M do -c 4 freak
PING xen (192.168.1.8) 8972(9000) bytes of data.
ping: local error: message too long, mtu=1500
^C
— xen ping statistics —
3 packets transmitted, 0 received, +3 errors, 100% packet loss, time 2037ms

root@pcfreak:~# 


 -M pmtudisc_opt
           Select Path MTU Discovery strategy.  pmtudisc_option may be either do (prohibit fragmentation, even local one), want (do PMTU discovery, fragment locally when packet size is
           large), or dont (do not set DF flag).


root@pcfreak:~# ping -s 8972 -M want -c 4 freak
PING xen (192.168.1.8) 8972(9000) bytes of data.
8980 bytes from xen (192.168.1.5): icmp_seq=1 ttl=64 time=2.18 ms
8980 bytes from xen (192.168.1.5): icmp_seq=2 ttl=64 time=1.90 ms
8980 bytes from xen (192.168.1.5): icmp_seq=3 ttl=64 time=2.10 ms
^C
— xen ping statistics —
3 packets transmitted, 3 received, 0% packet loss, time 2002ms
rtt min/avg/max/mdev = 1.901/2.059/2.178/0.116 ms

root@pcfreak:~# 

  • -M do: prohibit fragmentation
  • -s 8972 8972 bytes of data
  • ICMP header: 8 bytes
  • IP header: 20 bytes (usually, it can be higher)
  • 8980 bytes of bytes is the IP payload
     

These commands can be used to capture for MTU (maximum transmition units) related issues between hosts that are preventing for hosts to properly send traffic between themselves.
A common issue for Linux hosts to be unable to see each other on the same network is caused by Jumbo Frames (MTU 9000) packets enabled on one of the sides and MTU of 1500 on the other side.
Thus it is always a good idea to thoroughully look up all configured MTUs for all LAN Devices on each server.

6. Check traceroute path to host

If there is no PING but ip route get shows routing is properly configured and the routes existing in the Linux machine routing tables, next step is to check the output of traceroute / tracepath / mtr


raceroute to 192.168.0.1 (192.168.0.1), 30 hops max, 60 byte packets
 1  pcfreak (192.168.0.1)  0.263 ms  0.166 ms  0.119 ms
root@freak:~# tracepath 192.168.1.1
 1?: [LOCALHOST]                      pmtu 1500
 1:  vivacom-gigabit-router                                0.925ms reached
 1:  vivacom-gigabit-router                                0.835ms reached
     Resume: pmtu 1500 hops 1 back 1 


It might be useful to get a frequent output of the command (especially on Linux hosts) where mtr command is not installed with:


root@freak:~# watch -n 0.1 traceroute 192.168.0.1


root@freak:~# traceroute -4 google.com
traceroute to google.com (172.217.17.110), 30 hops max, 60 byte packets
 1  vivacom-gigabit-router (192.168.1.1)  0.657 ms  1.280 ms  1.647 ms
 2  213.91.190.130 (213.91.190.130)  7.983 ms  8.168 ms  8.097 ms
 3  * * *
 4  * * *
 5  212-39-66-222.ip.btc-net.bg (212.39.66.222)  16.613 ms  16.336 ms  17.151 ms
 6  * * *
 7  142.251.92.65 (142.251.92.65)  18.808 ms  13.246 ms 209.85.254.242 (209.85.254.242)  15.541 ms
 8  142.251.92.3 (142.251.92.3)  14.223 ms 142.251.227.251 (142.251.227.251)  14.507 ms 142.251.92.3 (142.251.92.3)  15.328 ms
 9  ams15s29-in-f14.1e100.net (172.217.17.110)  14.097 ms  14.909 ms 142.251.242.230 (142.251.242.230)  13.481 ms
root@freak:~# 

If you have MTR then you can get plenty of useful additional information such as the Network HOP name or the Country location of the HOP.


To get HOP name:


root@freak:~# mtr -z google.com


To get info on where (which Country) exactly network HOP is located physically:

root@freak:~# mtr -y 2 google.com


7. Check iptables INPUT / FORWARD / OUTPUT rules are messing with something
 

# iptables -L -n 

# iptables -t nat -L -n


Ideally you would not have any firewall

# iptables -L -n 

Chain INPUT (policy ACCEPT)
target     prot opt source               destination         

Chain FORWARD (policy ACCEPT)
target     prot opt source               destination         

Chain OUTPUT (policy ACCEPT)
target     prot opt source               destination         

# iptables -t nat -L -n
Chain PREROUTING (policy ACCEPT)
target     prot opt source               destination         

Chain INPUT (policy ACCEPT)
target     prot opt source               destination         

Chain OUTPUT (policy ACCEPT)
target     prot opt source               destination         

Chain POSTROUTING (policy ACCEPT)
target     prot opt source               destination         


In case if something like firewalld is enabled as a default serviceto provide some modern Linux firewall as Ubuntu and Redhat / CentOS / Fedoras has it often turned on as a service stop and disable the service

# systemctl stop firewalld

# systemctl disable firewalld


8. Debug for any possible MAC address duplicates
 

root@pcfrxen:~# arp -an
? (192.168.1.33) at 00:16:3e:59:96:9e [ether] on eth0
? (192.168.1.1) at 18:45:93:c6:d8:00 [ether] on eth1
? (192.168.0.1) at 8c:89:a5:f2:e8:d9 [ether] on eth1
? (192.168.1.1) at 18:45:93:c6:d8:00 [ether] on eth0
? (192.168.1.11) at 7c:0a:3f:89:b6:fa [ether] on eth1
? (192.168.1.17) at <incomplete> on eth0
? (192.168.1.37) at 00:16:3e:ea:05:ce [ether] on eth0
? (192.168.1.80) at 8c:89:a5:f2:e7:d8 [ether] on eth0
? (192.168.1.11) at 7c:0a:3f:89:a5:fa [ether] on eth0
? (192.168.1.30) at 00:16:3e:bb:46:45 [ether] on eth1
? (192.168.0.210) at 00:16:3e:68:d9:55 [ether] on eth1
? (192.168.1.30) at 00:16:3e:bb:46:45 [ether] on eth0
? (192.168.1.18) at 00:16:3e:0d:40:05 [ether] on eth1
? (192.168.0.211) at 00:16:3e:4d:41:05 [ether] on eth1
? (192.168.1.35) at 00:16:3e:d1:8f:77 [ether] on eth0
? (192.168.1.18) at 00:16:3e:0d:43:05 [ether] on eth0
? (192.168.1.28) at 00:16:3e:04:12:1c [ether] on eth1
? (192.168.0.3) at 70:e2:84:13:43:12 [ether] on eth1
? (192.168.0.208) at 00:16:3e:51:de:9c [ether] on eth1
? (192.168.0.241) at 00:16:3e:0d:48:06 [ether] on eth1
? (192.168.1.28) at 00:16:3e:04:12:1c [ether] on eth0
? (192.168.1.33) at 00:16:3e:59:97:8e [ether] on eth1
? (192.168.0.241) at 00:16:3e:0d:45:06 [ether] on eth0
? (192.168.0.209) at 00:16:3e:5c:df:96 [ether] on eth1

root@pcfrxen:~# ip neigh show
192.168.1.33 dev eth0 lladdr 00:16:3e:59:96:9e REACHABLE
192.168.1.1 dev eth1 lladdr 18:45:93:c6:d8:00 STALE
192.168.0.1 dev eth1 lladdr 8c:89:a5:f2:e8:d9 REACHABLE
192.168.1.1 dev eth0 lladdr 18:45:93:c6:d9:01 REACHABLE
192.168.1.11 dev eth1 lladdr 7c:0a:3f:89:a6:fb STALE
192.168.1.17 dev eth0  FAILED
192.168.1.37 dev eth0 lladdr 00:16:3e:ea:06:ce STALE
192.168.1.80 dev eth0 lladdr 8c:89:a5:f2:e8:d9 REACHABLE
192.168.1.11 dev eth0 lladdr 7c:0a:3f:89:a7:fa STALE
192.168.1.30 dev eth1 lladdr 00:16:3e:bb:45:46 STALE
192.168.0.210 dev eth1 lladdr 00:16:3e:68:d8:56 REACHABLE
192.168.1.30 dev eth0 lladdr 00:16:3e:bb:45:46 STALE
192.168.1.18 dev eth1 lladdr 00:16:3e:0d:48:04 STALE
192.168.0.211 dev eth1 lladdr 00:16:3e:4d:40:04 STALE
192.168.1.35 dev eth0 lladdr 00:16:3e:d2:8f:76 STALE
192.168.1.18 dev eth0 lladdr 00:16:3e:0d:48:06 STALE
192.168.1.28 dev eth1 lladdr 00:16:3e:04:11:2c STALE
192.168.0.3 dev eth1 lladdr 70:e2:84:13:44:13 STALE
192.168.0.208 dev eth1 lladdr 00:16:3e:51:de:9c REACHABLE
192.168.0.241 dev eth1 lladdr 00:16:3e:0d:48:07 STALE
192.168.1.28 dev eth0 lladdr 00:16:3e:04:12:1c REACHABLE
192.168.1.33 dev eth1 lladdr 00:16:3e:59:96:9e STALE
192.168.0.241 dev eth0 lladdr 00:16:3e:0d:49:06 STALE
192.168.0.209 dev eth1 lladdr 00:16:3e:5c:dd:97 STALE
root@pcfrxen:~# 


9. Check out with netstat / ss for any irregularities such as high amount of error of faulty ICMP / TCP / UDP network packs


For example check out the netstat network stack output

# netstat -s


root@pcfrxen:~# netstat -s
Ip:
    Forwarding: 2
    440044929 total packets received
    1032 with invalid addresses
    0 forwarded
    0 incoming packets discarded
    439988902 incoming packets delivered
    396161852 requests sent out
    3 outgoing packets dropped
    100 dropped because of missing route
Icmp:
    1025 ICMP messages received
    540 input ICMP message failed
    ICMP input histogram:
        destination unreachable: 1014
        timeout in transit: 11
    519 ICMP messages sent
    0 ICMP messages failed
    ICMP output histogram:
        destination unreachable: 519
IcmpMsg:
        InType3: 1014
        InType11: 11
        OutType3: 519
Tcp:
    1077237 active connection openings
    1070510 passive connection openings
    1398236 failed connection attempts
    111345 connection resets received
    83 connections established
    438293250 segments received
    508143650 segments sent out
    42567 segments retransmitted
    546 bad segments received
    329039 resets sent
Udp:
    1661295 packets received
    278 packets to unknown port received
    0 packet receive errors
    1545720 packets sent
    0 receive buffer errors
    0 send buffer errors
    IgnoredMulti: 33046
UdpLite:
TcpExt:
    1 invalid SYN cookies received
    1398196 resets received for embryonic SYN_RECV sockets
    1737473 packets pruned from receive queue because of socket buffer overrun
    1118775 TCP sockets finished time wait in fast timer
    638 time wait sockets recycled by time stamp
    656 packetes rejected in established connections because of timestamp
    2218959 delayed acks sent
    2330 delayed acks further delayed because of locked socket
    Quick ack mode was activated 7172 times
    271799723 packet headers predicted
    14917420 acknowledgments not containing data payload received
    171078735 predicted acknowledgments
    52 times recovered from packet loss due to fast retransmit
    TCPSackRecovery: 337
    Detected reordering 1551 times using SACK
    Detected reordering 1501 times using reno fast retransmit
    Detected reordering 61 times using time stamp
    9 congestion windows fully recovered without slow start
    38 congestion windows partially recovered using Hoe heuristic
    TCPDSACKUndo: 241
    104 congestion windows recovered without slow start after partial ack
    TCPLostRetransmit: 11550
    1 timeouts after reno fast retransmit
    TCPSackFailures: 13
    3772 fast retransmits
    2 retransmits in slow start
    TCPTimeouts: 24104
    TCPLossProbes: 101748
    TCPLossProbeRecovery: 134
    TCPSackRecoveryFail: 3
    128989224 packets collapsed in receive queue due to low socket buffer
    TCPBacklogCoalesce: 715034
    TCPDSACKOldSent: 7168
    TCPDSACKOfoSent: 341
    TCPDSACKRecv: 16612
    150689 connections reset due to unexpected data
    27063 connections reset due to early user close
    17 connections aborted due to timeout
    TCPDSACKIgnoredOld: 158
    TCPDSACKIgnoredNoUndo: 13514
    TCPSpuriousRTOs: 9
    TCPSackMerged: 1191
    TCPSackShiftFallback: 1011
    TCPDeferAcceptDrop: 699473
    TCPRcvCoalesce: 3311764
    TCPOFOQueue: 14289375
    TCPOFOMerge: 356
    TCPChallengeACK: 621
    TCPSYNChallenge: 621
    TCPSpuriousRtxHostQueues: 4
    TCPAutoCorking: 1605205
    TCPFromZeroWindowAdv: 132380
    TCPToZeroWindowAdv: 132441
    TCPWantZeroWindowAdv: 1445495
    TCPSynRetrans: 23652
    TCPOrigDataSent: 388992604
    TCPHystartTrainDetect: 69089
    TCPHystartTrainCwnd: 3264904
    TCPHystartDelayDetect: 4
    TCPHystartDelayCwnd: 128
    TCPACKSkippedPAWS: 3
    TCPACKSkippedSeq: 2001
    TCPACKSkippedChallenge: 2
    TCPWinProbe: 123043
    TCPKeepAlive: 4389
    TCPDelivered: 389507445
    TCPAckCompressed: 7343781
    TcpTimeoutRehash: 23311
    TcpDuplicateDataRehash: 8
    TCPDSACKRecvSegs: 17335
IpExt:
    InMcastPkts: 145100
    OutMcastPkts: 9429
    InBcastPkts: 18226
    InOctets: 722933727848
    OutOctets: 759502627470
    InMcastOctets: 58227095
    OutMcastOctets: 3284379
    InBcastOctets: 1756918
    InNoECTPkts: 440286946
    InECT0Pkts: 936


  • List all listening established connections to host

# netstat -ltne

  • List all UDP / TCP connections

# netstat -ltua

or if you prefer to do it with the newer and more comprehensive tool ss:
 

  • List all listening TCP connections 

# ss -lt

  • List all listening UDP connections 

# ss -ua

  • Display statistics about recent connections

root@pcfrxen:~# ss -s
Total: 329
TCP:   896 (estab 70, closed 769, orphaned 0, timewait 767)

Transport Total     IP        IPv6
RAW      0         0         0        
UDP      40        36        4        
TCP      127       118       9        
INET      167       154       13       
FRAG      0         0         0 

  • If you need to debug some specific sport or dport filter out the connection you need by port number

# ss -at '( dport = :22 or sport = :22 )'


Debug for any possible issues with ICMP unreachable but ports reachable with NMAP / telnet / Netcat
 

# nc 192.168.0.1 -vz

root@pcfrxen:/ # nc 192.168.0.1 80 -vz
pcfreak [192.168.0.1] 80 (http) open


root@pcfrxen:/ # nc 192.168.0.1 5555 -vz
pcfreak [192.168.0.1] 5555 (?) : Connection refused


root@pcfrxen:/# telnet 192.168.0.1 3128
Trying 192.168.0.1…
Connected to 192.168.0.1.
Escape character is '^]'.
^]
telnet> quit
Connection closed.


root@pcfrxen:/# nmap -sS -P0 192.168.0.1 -p 443 -O
Starting Nmap 7.80 ( https://nmap.org ) at 2023-11-27 19:51 EET
Nmap scan report for pcfreak (192.168.0.1)
Host is up (0.00036s latency).

PORT    STATE SERVICE
443/tcp open  https
MAC Address: 8C:89:A5:F2:E8:D8 (Micro-Star INT'L)
Warning: OSScan results may be unreliable because we could not find at least 1 open and 1 closed port
Aggressive OS guesses: Linux 3.11 (96%), Linux 3.1 (95%), Linux 3.2 (95%), AXIS 210A or 211 Network Camera (Linux 2.6.17) (94%), Linux 2.6.32 (94%), Linux 3.10 (94%), Linux 2.6.18 (93%), Linux 3.2 – 4.9 (93%), ASUS RT-N56U WAP (Linux 3.4) (93%), Linux 3.16 (93%)
No exact OS matches for host (test conditions non-ideal).
Network Distance: 1 hop

OS detection performed. Please report any incorrect results at https://nmap.org/submit/ .
Nmap done: 1 IP address (1 host up) scanned in 6.24 seconds
root@pcfrxen:/# 

10. Add static MAC address to Ethernet Interface (if you find a MAC address being wrongly assigned to interface)

Sometimes problems with network unrechability between hosts is caused by wrongly defined MAC addresses on a Switch that did not correspond correctly to the ones assigned on the Linux host.
The easiest resolution here if you don't have access to Switch in work environment is to reassign the default MAC addresses of interfaces to proper MAC addresses, expected by remote router.


root@pcfrxen:/#  ​/sbin/ifconfig eth2 hw ether 8c:89:a5:f2:e8:d6

root@pcfrxen:/#  /sbin/ifconfig eth1 hw ether 8c:89:a5:f2:e8:d5


root@pcfrxen:/#  ifconfig eth0|grep -i ether
        ether 8c:89:a5:f2:e8:d6 txqueuelen 1000  (Ethernet)


11. Check for Network Address Translation (NAT) misconfigurations

If you do use some NAT-ing between Linux host and the remote Network Device you cannot reach, make sure IP Forwarding is enabled (i.e. /etc/sysctl.conf was not mistakenly overwritten by a script or admin for whatever reason).
 

root@server:~# sysctl net.ipv4.ip_forward
net.ipv4.ip_forward = 1
root@server:~# sysctl net.ipv4.conf.all.forwarding
net.ipv4.conf.all.forwarding = 1

root@server:~# sysctl net.ipv6.conf.all.forwarding
net.ipv6.conf.all.forwarding = 0

12. Check for Resolving DNS irregularities with /etc/resolv.conf


If network connectivity is okay on TCP / IP , UDP Level but problems with DNS of course, check what you have configured inside /etc/resolv.conf

And if use newer Linux distributions and have resolving managed by systemd check status of resolvectl
 

root@server:~# cat /etc/resolv.conf
# Dynamic resolv.conf(5) file for glibc resolver(3) generated by resolvconf(8)
#     DO NOT EDIT THIS FILE BY HAND — YOUR CHANGES WILL BE OVERWRITTEN
# 127.0.0.53 is the systemd-resolved stub resolver.
# run "resolvectl status" to see details about the actual nameservers.

nameserver 127.0.0.1
search pc-freak.net
domain pc-freak.net
nameserver 8.8.8.8
nameserver 8.8.4.4
nameserver 109.104.195.2
nameserver 109.104.195.1
nameserver 208.67.222.222
nameserver 208.67.220.220
options timeout:2 rotate

root@pcfreak:~# 


root@server:~# resolvectl status
Global
       Protocols: -LLMNR -mDNS -DNSOverTLS DNSSEC=no/unsupported
resolv.conf mode: stub

Link 2 (ens3)
    Current Scopes: DNS
         Protocols: +DefaultRoute +LLMNR -mDNS -DNSOverTLS DNSSEC=no/unsupported
Current DNS Server: 192.168.5.1
       DNS Servers: 192.168.5.1


  As seen see, the systemd-resolved service is used to provide domain names resolution and we can modify its configuration file /etc/systemd/resolved.conf to add the DNS server – the following line is set (two DNS servers’ addresses are added):

For example …

DNS=8.8.8.8 

13. Fix problems with wrongly configured Network Speed between hosts

It is not uncommon to have a Switch between two Linux hosts that is set to communicate on a certain maximum amount of Speed but a Linux host is set to communicate or lesser or more of Speed, this might create network issues so in such cases make sure either you use the Auto Negitionation network feature
or set both sides to be communicating on the same amount of network speed.

To turn on auto negotiation for ether interface 

# ethtool -s eth1 speed 1000 duplex full autoneg on


For example to set a Linux network interface to communicate on 1 Gigabit speed and switch off autonegotiation off.

# ethtool -s eth1 speed 1000 duplex full autoneg off

14. Check arp and icmp traffic with tcpdump

On both sides where the IPs can't see each other we can run a tcpdump to check the ARP and ICMP traffic flowing between the hosts.
 

# tcpdump -i eth1 arp or icmp

cpdump: verbose output suppressed, use -v[v]… for full protocol decode
listening on eth1, link-type EN10MB (Ethernet), snapshot length 262144 bytes
15:29:07.001841 IP freak-eth1 > pcfr_hware_local_ip: ICMP echo request, id 13348, seq 65, length 64
15:29:07.001887 IP pcfr_hware_local_ip > freak-eth1: ICMP echo reply, id 13348, seq 65, length 64
15:29:07.598413 ARP, Request who-has pcfr_hware_local_ip tell zabbix-server, length 46
15:29:07.598425 ARP, Reply pcfr_hware_local_ip is-at 8c:89:a5:f2:e8:d8 (oui Unknown), length 28
15:29:07.633055 ARP, Request who-has freak_vivacom_auto_assigned_dhcp_ip tell 192.168.1.1, length 46
15:29:08.025824 IP freak-eth1 > pcfr_hware_local_ip: ICMP echo request, id 13348, seq 66, length 64
15:29:08.025864 IP pcfr_hware_local_ip > freak-eth1: ICMP echo reply, id 13348, seq 66, length 64


# tcpdump -i eth1 -vvv


If you want to sniff for TCP protocol and specific port and look up for DATA transfered for SMTP you can use something like:


# tcpdump -nNxXi eth0 -s 0 proto TCP and port 25​


If you need a bit more thorough explanation on what it would do check out my previous article How to catch / track mail server traffic abusers with tcpdump
 

15. Debugging network bridge issues

Having bridge network interface is another brink where things could go totally wrong.
If you have network bridges configured, check out what is the status of the bridge.
 

root@freak:/etc/network# brctl show
bridge name    bridge id        STP enabled    interfaces
xenbr0        8000.70e284134411    yes        eno1
                            vif1.0
                            vif10.0
                            vif16.0
                            vif16.0-emu
                            vif2.0
                            vif3.0
                            vif4.0
                            vif5.0
                            vif6.0
                            vif9.0
                            vif9.0-emu
xenbr1        8000.70e284134412    yes        eno2
                            vif1.1
                            vif10.1
                            vif16.1
                            vif16.1-emu
                            vif2.1
                            vif3.1
                            vif4.1
                            vif5.1
                            vif6.1
                            vif9.1
                            vif9.1-emu


Check out any configurations such as /etc/sysconfig/network-scripts/ifcfg-* are not misconfigured if on Redhat / CentOS / Fedora.
Or if on Debian / Ubuntu and other deb based Linuxes look up for /etc/network/interfaces config problems that might be causing the bridge to misbehave.

For example one bridge network issue, I've experienced recently is related to bridge_ports variable configured as bridge_ports all.
This was causing the second bridge xenbr1 to be unable to see another local network that was directly connected with a cable to it.

The fix was bridge_ports none. Finding out this trivial issue caused by a restored network config from old backup took me days to debug.
As everything seemed on a network level to be perfect just like in Physical layer, same way and on Software level, routings were okay.

Checked everything multiple times and did not see anything irregular. ping was missing and hosts cannot see each other even though having the right netmask and
network configuration in place.

Below is my /etc/network/interfaces configuration with the correct bridge_ports none changed.

root@freak:/etc/network# cat /etc/network/interfaces
auto lo
iface lo inet loopback
 

auto eno1
allow-hotplug eno1
iface eno1 inet manual
dns-nameservers 127.0.0.1 8.8.8.8 8.8.4.4 207.67.222.222 208.67.220.220
auto eno2
allow-hotplug eno2
iface eno2 inet manual
dns-nameservers 127.0.0.1 8.8.8.8 8.8.4.4 207.67.222.222 208.67.220.220

auto xenbr0
allow-hotplug xenbr0
 # Bridge setup
# fetching dhcp ip from 192.168.1.20 (vivacom fiber optics router) routing traffic via 1Gigabit network
 iface xenbr0 inet dhcp
    hwaddress ether 70:e2:84:13:44:11
#    address 192.168.1.5/22
    address 192.168.1.5
    netmask 255.255.252.0
    # address 192.168.1.8 if dhcp takes from vivacom dhcpd
    bridge_ports eno1
    gateway 192.168.1.20
    bridge_stp on
    bridge_waitport 0
    bridge_fd 0
    bridge_ports none
    dns-nameservers 8.8.8.8 8.8.4.4

auto xenbr1
# fetching dhcp ip from pc-freak.net (192.168.0.1) bergon.net routing traffic through it
allow-hotplug xenbr1
 iface xenbr1 inet dhcp
    hwaddress ether 70:e2:84:13:44:11
##    address 192.168.0.3/22
    address 192.168.0.8
    netmask 255.255.252.0
   # address 192.168.0.8 if dhcp takes from vivacom dhcpd (currently mac deleted from vivacom router)
   # address 192.168.0.9 if dhcp takes from pc-freak.net hware host
#    hwaddress ether 70:e2:84:13:44:13
    gateway 192.168.0.1
    bridge_ports eno2
    bridge_stp on
    bridge_waitport 0
    bridge_fd 0
    bridge_ports none
    dns-nameservers 8.8.8.8 8.8.4.4
root@freak:/etc/network# 


root@freak:/etc/network# brctl showstp xenbr0
xenbr0
 bridge id        8000.70e284134411
 designated root    8000.70e284134411
 root port           0            path cost           0
 max age          20.00            bridge max age          20.00
 hello time           2.00            bridge hello time       2.00
 forward delay          15.00            bridge forward delay      15.00
 ageing time           0.00
 hello timer           1.31            tcn timer           0.00
 topology change timer       0.00            gc timer           0.00
 flags            


eno1 (1)
 port id        8001            state             forwarding
 designated root    8000.70e284134411    path cost          19
 designated bridge    8000.70e284134411    message age timer       0.00
 designated port    8001            forward delay timer       0.00
 designated cost       0            hold timer           0.31
 flags            

vif1.0 (2)
 port id        8002            state             forwarding
 designated root    8000.70e284134411    path cost         100
 designated bridge    8000.70e284134411    message age timer       0.00
 designated port    8002            forward delay timer       0.00
 designated cost       0            hold timer           0.31
 flags            

vif10.0 (12)
 port id        800c            state             forwarding
 designated root    8000.70e284134411    path cost         100
 designated bridge    8000.70e284134411    message age timer       0.00
 designated port    800c            forward delay timer       0.00
 designated cost       0            hold timer           0.31
 flags            

vif16.0 (13)
 port id        800d            state               disabled
 designated root    8000.70e284134411    path cost         100
 designated bridge    8000.70e284134411    message age timer       0.00
 designated port    800d            forward delay timer       0.00
 designated cost       0            hold timer           0.00
 flags            

vif16.0-emu (14)
 port id        800e            state             forwarding
 designated root    8000.70e284134411    path cost         100
 designated bridge    8000.70e284134411    message age timer       0.00
 designated port    800e            forward delay timer       0.00
 designated cost       0            hold timer           0.31
 flags            

vif2.0 (4)
 port id        8004            state             forwarding
 designated root    8000.70e284134411    path cost         100
 designated bridge    8000.70e284134411    message age timer       0.00
 designated port    8004            forward delay timer       0.00
 designated cost       0            hold timer           0.31
 flags            

vif3.0 (5)
 port id        8005            state             forwarding
 designated root    8000.70e284134411    path cost         100
 designated bridge    8000.70e284134411    message age timer       0.00
 designated port    8005            forward delay timer       0.00
 designated cost       0            hold timer           0.31
 flags            

vif4.0 (3)
 port id        8003            state             forwarding
 designated root    8000.70e284134411    path cost         100
 designated bridge    8000.70e284134411    message age timer       0.00
 designated port    8003            forward delay timer       0.00
 designated cost       0            hold timer           0.31
 flags            

vif5.0 (6)
 port id        8006            state             forwarding
 designated root    8000.70e284134411    path cost         100
 designated bridge    8000.70e284134411    message age timer       0.00
 designated port    8006            forward delay timer       0.00
 designated cost       0            hold timer           0.31
 flags            

vif6.0 (7)
 port id        8007            state             forwarding
 designated root    8000.70e284134411    path cost         100
 designated bridge    8000.70e284134411    message age timer       0.00
 designated port    8007            forward delay timer       0.00
 designated cost       0            hold timer           0.31
 flags            

vif9.0 (10)
 port id        800a            state               disabled
 designated root    8000.70e284134411    path cost         100
 designated bridge    8000.70e284134411    message age timer       0.00
 designated port    800a            forward delay timer       0.00
 designated cost       0            hold timer           0.00
 flags            

vif9.0-emu (11)
 port id        800b            state             forwarding
 designated root    8000.70e284134411    path cost         100
 designated bridge    8000.70e284134411    message age timer       0.00
 designated port    800b            forward delay timer       0.00
 designated cost       0            hold timer           0.31
 flags            

root@freak:/etc/network# 


Sum it up

We have learned how to debug various routing issues, how to add and remote default gateways, check network reachability with ICMP protocol with ping, traceroute as well check for DNS issues and given some hints how to resolve DNS misconfigurations.
We also learned how to check the configured Network interfaces certain settings and resolve issues caused by Network sides max Speed misconfigurations as well how to track and resolve communication issues caused by wrongly configured MAC addresses.
Further more learned on how to do a basic port and protocol debugging of state of Network packets with netstat and nc and check problems related to iptables Firewall and IP Forwarding misconfigurations.
Finally we learned some basic usage of tcpdump on how to track arp and MAC traffic and look up for a specific TCP / UDP protocol  and its contained data.
There is certainly things this article is missing as the topic of debugging network connectivity issues on Linux is a whole ocean, especially as the complexity of Linux has grown dramatically these days.
I gues it is worthy to mention that unable to see remote network could be caused by wrong VLAN configurations on Linux or even buggy switches and router devices, due to hardware or software,
but I hope this article at least covers the very basics of network debugging and Linux. 

Enjojy 🙂

Linux extending life time for a damaged hard drive server tricks on a live server. Force fcsk on next reboot.Read-only file system error solutions

Friday, February 17th, 2023

linux-extending-life-time-for-a-damaged-hard-drive-server-tricks-can-not-read-superblock-linux-force-fsck-on-next-reboot

In our daily work as system administrators we have some very old Legacy systems running Clustered High Availability proxies using CRM (Cluster Resource Manager) and some legacy systems still using Heartbeat to manage the cluster instead of the newer and modern Corosync variant.

The HA cluster is only 2 nodes Linux machine and running the obscure already long time unsupported version of Redhat 5.11 (Ootpa) who was officially became stable distant year 1998 (yeath the years were good) and whose EOL (End of Life) has been reached long time ago and the OS is no longer supported, however for about 14 years the machines has been running perfectly fine until one of the Cluster nodes managed by ocf::heartbeat:IPAddr2 , that is  /etc/ha.d/resource.d/IPAddr2 shell script. Yeah for the newbies Heartbeat Application Cluster in Linux does work like that it uses a number of extendable pair of shell scripts written for different kind of Network / Web / Mail / SQL or whatever services HA management.

The first node configured however, started failing due to some errors like:
 

EXT3-fs error (device dm-1): ext3_journal_start_sb: Detected aborted journal
sd 0:2:0:0: rejecting I/O to offline device
Aborting journal on device sda1.
sd 0:2:0:0: rejecting I/O to offline device
printk: 159 messages suppressed.
Buffer I/O error on device sda1, logical block 526
lost page write due to I/O error on sda1
sd 0:2:0:0: rejecting I/O to offline device
ext3_abort called.
EXT3-fs error (device sda1): ext3_journal_start_sb: Detected aborted journal
Remounting filesystem read-only
sd 0:2:0:0: rejecting I/O to offline device
megaraid_sas: FW was restarted successfully, initiating next stage…
megaraid_sas: HBA recovery state machine, state 2 starting…
megasas: Waiting for FW to come to ready state
megasas: FW in FAULT state!!
FW state [-268435456] hasn't changed in 180 secs
megaraid_sas: out: controller is not in ready state
megasas: waiting_for_outstanding: after issue OCR. 
megasas: waiting_for_outstanding: before issue OCR. FW state = f0000000
megaraid_sas: pending commands remain even after reset handling. megasas[0]: Dumping Frame Phys Address of all pending cmds in FW
megasas[0]: Total OS Pending cmds : 0 megasas[0]: 64 bit SGLs were sent to FW
megasas[0]: Pending OS cmds in FW :

The result out of that was a frequently the filesystem of the machine got re-mounted as Read Only and of course that is
quite bad if you have a running processess of haproxy that should be able to be living their and take up some Web traffic
for high availability and you run all the traffic only on the 2nd pair of machine.

This of course was a clear sign for a failing disks or some hit bad blocks regions or as the messages indicates, some
problem with system hardware or Raid SAS Array.

The physical raid on the system, just like rest of the hardware is very old stuff as well.

[root@haproxy_lb_node1 ~]# lspci |grep -i RAI
01:00.0 RAID bus controller: LSI Logic / Symbios Logic MegaRAID SAS 2108 [Liberator] (rev 05)

The produced errors not only made the machine to auto-mount its root / filesystem in Read-Only mode but besides has most
likely made the machine to automatically reboot every few days or few times every day in a raw.

The second Load Balancer node2 did operated perfectly, and we thought that we might just keep the broken machine in that half running
and inconsistent state for few weeks until we have built the new machines with Pre-Installed new haproxy cluster with modern
RedHat Linux 8.6 distribution, but since we have to follow SLAs (Service Line Agreements) with Customers and the end services behind the
High Availability (HA) Haproxy cluster were at danger … 

We as sysadmins had the task to make our best to try to stabilize the unstable node with disk errors for the system to servive
and be able to normally serve traffic (if node2 that is in a separate Data center fails due to a hardware or electricity issues etc.)
.

Here is few steps we took, that has hopefully improved the situation.

1. Make backups of most important files of high importance

Always before doing anything with a broken system, prepare backup of the most important files, if that is a cluster that should be a backup of the cluster configurations (if you don't have already ones) backup of /etc/hosts / backup of any important services configs /etc/haproxy/haproxy.cfg /etc/postfix/postfix.cfg (like it was my case), preferrably backup of whole /etc/  any important files from /root/ or /home/users* directories backup of at leasts latest logs from /var/log etc.
 

2. Clear up all unnecessery services scripts from the server

Any additional Softwares / Services and integrity checking tools (daemons) / scripts and cron jobs, were immediately stopped and wheter unused removed.

E.g. we had moved through /etc/cron* to check what's there,

# ls -ld /etc/cron.*
drwx—— 2 root root 4096 Feb  7 18:13 /etc/cron.d
drwxr-xr-x 2 root root 4096 Feb  7 17:59 /etc/cron.daily
-rw-r–r– 1 root root    0 Jul 20  2010 /etc/cron.deny
drwxr-xr-x 2 root root 4096 Jan  9  2013 /etc/cron.hourly
drwxr-xr-x 2 root root 4096 Jan  9  2013 /etc/cron.monthly
drwxr-xr-x 2 root root 4096 Aug 26  2015 /etc/cron.weekly


And like well professional butchers removed everything unnecessery that could trigger any extra unnecessery disk read / writes to HDD.

E.g. just create

# mkdir -p /root/etc_old/{/etc/cron.d,\
/etc/cron.daily,/etc/cron.hourly,/etc/cron.monthly\
,/etc/cron.weekly}


And moved all unnecessery cron job scripts like:

1. nmon (old school network / memory / hard disk console tool for monitoring and tuning server parameters)
2. clamscan / freshclam crons
3. mlocate (the script that is taking care for periodic run of updatedb command to keep the locate command to easily search
for files inside the DB to put less read operations on disk in case if you need to find file (e.g. prevent yourself to everytime
run cmd like: find / . -iname '*whatever_you_look_for*'
4. cups cron jobs
5. logwatch cron
6. rkhunter stuff
7. logrotate (yes we stopped even logrotation trigger job as we found the server was crashing sometimes at the same time when
the lograte job to rotate logs inside /var/log/* was running perhaps leading to a hit of the I/O read error (bad blocks).


Also inspected the Administrator user root cron job for any unwated scripts and stopped two report bash scripts that were part of the PCI tightened Security procedures.
Therein found script responsible to periodically report the list of installed packages and if they have not changed, as well a script to periodically report via email the list of
/etc/{passwd,/etc/shadow} created users, used to historically keep an eye on the list of users and easily see if someone
has created new users on the machine. Those were enabled via /var/spool/cron/root cron jobs, in other cases, on other machines if it happens for you
it is a good idea to check out all the existing user cron jobs and stop anything that might be putting Read / Write extra heat pressure on machine attached the Hard drives.

# ls -al /var/spool/cron/
total 20
drwx——  2 root root 4096 Nov 13  2015 .
drwxr-xr-x 12 root root 4096 May 11  2011 ..
-rw——-  1 root root  133 Nov 13  2015 root


3. Clear up old log files and any files unnecessery

Under /var/log and /home /var/tmp /var/spool/tmp immediately try to clear up the old log files.
From my past experience this has many times made the FS file inodes that are storing on a unbroken part (good blocks) of the hard drive and
ready to be reused by newly written rsyslog / syslogd services spitted files.

!!! Note that during the removal of some files you might hit a files stored on a bad blocks that might lead to a unexpected system reboot.

But that's okay, don't worry most likely after a hard reset by a technician in the Datacenter the machine will boot again and you can enjoy
removing remaining still files to send them to the heaven for old files.


4. Trigger an automatic system file system check with fsck on next boot

The standard way to force a Linux to aumatically recheck its Root filesystem is to simply create the /forcefsck to root partition or any other secondary disk partition you would like to check.

# touch /forcefsck

# reboot


However at some occasions you might be unable to do it because, the / (root fs) has been remounted in ReadOnly mode, yackes …

Luckily old Linux distibutions like this RHEL 5.1, has a way to force a filesystem check after reboot fsck and identify any
unknown bad-blocks and hopefully succceed in isolating them, so you don't hit into the same auto-reboots if the hard drive or Software / Hardware RAID
is not in terrible state
, you can use an option built in in /sbin/shutdown command the '-F'

   -F     Force fsck on reboot.


Hence to make the machine reboot and trigger immediately fsck:

# shutdown -rF now


Just In case you wonder why to reboot before check the Filesystem. Well simply because you need to have them unmounted before you check.

In that specific case this produced so far a good result and the machine booted just fine and we crossed the fingers and prayed that the machine would work flawlessly in the coming few weeks, before we finalize the configuration of the substitute machines, where this old infrastructure will be migrated to a new built cluster with new Haproxy and Corosync / Pacemaker Cluster on a brand new RHEL.

NB! On newer machines this won't work however as shutdown command has been stripped off this option because no SystemV (SystemInit) or Upstart and not on SystemD newer services architecture.
 

5. Hints on checking the hard drives with fsck

If you happen to be able to have physical access to the remote Hardare machine via a TTY[1-9] Console, that's even better and is the standard way to do it but with this specific case we had no easy way to get access to the Physical server console.

It is even better to go there and via either via connected Monitor (Display) or KVM Switch (Those who hear KVM switch first time this is a great device in server rooms to connect multiple monitors to same Monitor Display), it is better to use a some of the multitude of options to choose from for USB Distro Linux recovery OS versions or a CDROM / DVD on older machines like this with the Redhat's recovery mode rolled on.
After mounting the partition simply check each of the disks
e.g. :

# fsck -y /dev/sdb
# fsck -y /dev/sdc

Or if you want to not waste time and look for each hard drive but directly check all the ones that are attached and known by Linux distro via /etc/fstab definition run:

# fsck -AR

If necessery and you have a mixture of filesystems for example EXT3 , EXT4 , REISERFS you can tell it to omit some filesystem, for example ext3, like that:

# fsck -AR -t noext3 -y


To skip fsck on mounted partitions with fsck:

# fsck -M /dev/sdb


One remark to make here on fsck is usually fsck to complete its job on various filesystem it uses other external component binaries usually stored in /sbin/fsck*

ls -al /sbin/fsck*
-rwxr-xr-x 1 root root  55576 20 яну 2022 /sbin/fsck*
-rwxr-xr-x 1 root root  43272 20 яну 2022 /sbin/fsck.cramfs*
lrwxrwxrwx 1 root root      9  4 юли 2020 /sbin/fsck.exfat -> exfatfsck*
lrwxrwxrwx 1 root root      6  7 юни 2021 /sbin/fsck.ext2 -> e2fsck*
lrwxrwxrwx 1 root root      6  7 юни 2021 /sbin/fsck.ext3 -> e2fsck*
lrwxrwxrwx 1 root root      6  7 юни 2021 /sbin/fsck.ext4 -> e2fsck*
-rwxr-xr-x 1 root root  84208  8 фев 2021 /sbin/fsck.fat*
-rwxr-xr-x 2 root root 393040 30 ное 2009 /sbin/fsck.jfs*
-rwxr-xr-x 1 root root 125184 20 яну 2022 /sbin/fsck.minix*
lrwxrwxrwx 1 root root      8  8 фев 2021 /sbin/fsck.msdos -> fsck.fat*
-rwxr-xr-x 1 root root    333 16 дек 2021 /sbin/fsck.nfs*
lrwxrwxrwx 1 root root      8  8 фев 2021 /sbin/fsck.vfat -> fsck.fat*


6. Using tune2fs to  adjust tunable filesystem parameters on ext2/ext3/ext4 filesystems (few examples)

a) To check whether really the filesystem was checked on boot time or check a random filesystem on the server for its last check up date with fsck:

#  tune2fs -l /dev/sda1 | grep checked
Last checked:             Wed Apr 17 11:04:44 2019

On some distributions like old Debian and Ubuntu, it is even possible to enable fsck to log its operations during check on reboot via changing the verbosity from NO to YES:

# sed -i "s/#VERBOSE=no/VERBOSE=yes/" /etc/default/rcS


If you're having the issues on old Debian Linuxes  and not on RHEL  it is possible to;

b) Enable all fsck repairs automatic on boot

by running via:
 

# sed -i "s/FSCKFIX=no/FSCKFIX=yes/" /etc/default/rcS


c) Forcing fcsk check on for server attached Hard Drive Partitions with tune2fs

# tune2fs -c 1 /dev/sdXY

Note that:
tune2fs can force a fsck on each reboot for EXT4, EXT3 and EXT2 filesystems only.

tune2fs can trigger a forced fsck on every reboot using the -c (max-mount-counts) option.
This option sets the number of mounts after which the filesystem will be checked, so setting it to 1 will run fsck each time the computer boots.
Setting it to -1 or 0 resets this (the number of times the filesystem is mounted will be disregarded by e2fsck and the kernel).


 For example you could:

d) Set fsck to run a filesystem check every 30 boots, by using -c 30 
 

# tune2fs -c 30 /dev/sdXY


e) Checking whether a Hard Drive has been really checked on the boot


#  tune2fs -l /dev/sda1 | grep checked
Last checked:             Wed Apr 17 11:04:44 2019


e) Check when was the last time the file system /dev/sdX was checked:
 

# tune2fs -l /dev/sdX | grep Last\ c
Last checked:             Thu Jan 12 20:28:34 2017


f) Check how many times our /dev/sdX filesystem was mounted

# tune2fs -l /dev/sdX | grep Mount
Mount count:              157

g) Check how many mounts are allowed to pass before filesystem check is forced
 

# tune2fs -l /dev/sdX | grep Max
Maximum mount count:      -1


7. Repairing disk / partitions via GRUB fsck.mode and fsck.repair kernel module options

It is also possible to force a fsck.repair on boot via GRUB, but that usually is not an option someone would like as the machine might fail too boot if it hards to repair hardly, however in difficult situations with failing disks temporary enabling it is good idea.

This can be done by including for grub initial config

GRUB_CMDLINE_LINUX_DEFAULT="quiet splash fsck.mode=force fsck.repair=yes"

fsck.mode=force – will force a fsck each time a system boot and keeping that value enabled for a long time inside GRUB is stupid for servers as

sometimes booting could be severely prolonged because of the checks especially with servers with many or slow old hard drives.

fsck.repair=yes – will make the fsck try to repair if it finds bad blocks when checking (be absolutely sure you know, what you're doing if passing this options)

The options can be also set via editing the GRUB boot screen, if you have physical access to the server and don't want to reload the grub loader and possibly make the machine unbootable on next boot.
 

8. Few more details on how /etc/fstab disk fsck check parameters values for Systemd Linux machines works

The "proper" way on systemd (if we can talk about proper way on Linux) to runs fsck for each filesystem that has a fsck is to pass number greater than 0 set in
/etc/fstab (last column in /etc/fstab), so make sure you edit your /etc/fstab if that's not the case.

The root partition should be set to 1 (first to be checked), while other partitions you want to be checked should be set to 2.

Example /etc/fstab:
 

# /etc/fstab: static file system information.

/dev/sda1  /      ext4  errors=remount-ro  0  1
/dev/sda5  /home  ext4  defaults           0  2

The values you can put here as a second number meaning is as follows:
0 – disabled, that is do not check filesystem
1 – partition with this PASS value has a higher priority and is checked first. This value is usually set to the root / partition
2 – partitions with this PASS value will be checked last

a) Check the produced log out of fsck

Unfortunately on the older versions of Linux distros with SystemV fsck log output might be not generated except on the physical console so if you have a kind of duplicator device physical tty on the display port of the server, you might capture some bad block reports or fixed errors messages, but if you don't you might just cross the fingers and hope that anything found FS irregularities was recovered.

On systemd Linux machines the fsck log should be produced either in /run/initramfs/fsck.log or some other location depending on the Linux distro and you should be able to see something from fsck inside /var/log/* logs:

# grep -rli fsck /var/log/*


Close it up

Having a system with failing disk is a really one of the worst sysadmin nightmares to get. The good news is that most of the cases we're prepared with some working backup or some work around stuff like the few steps explained to mitigate the amount of Read / Writes to hard disks on the failing machine HDDs. If the failing disk is a primary Linux filesystem all becomes even worse as every next reboot, you have no guarantee, whether the kernel / initrd or some of the other system components required to run the Core Linux system won't break up the normal boot. Thus one side changes on the hard drives is a risky business on ther other side, if you're in a situation where you have a mirror system or the failing system is just a Linux server installed without a Cluster pair, then this is not a big deal as you can guarantee at least one of the nodes still up, unning and serving. Still doing too much of operations with HDD is always a danger so the steps described, though in most cases leading to improvement on how the system behaves, the system should be considered totally unreliable and closely monitored not only by some monitoring stuff like Zabbix / Prometheus whatever but regularly check the systems state via normal SSH logins. It is important if you have some important datas or logs on the system that are not synchronized to a system node to copy them before doing any of the described operations. After all minimal is backuped, proceed to clear up everything that might be cleared up and still the machine to continue providing most of its functionalities, trigger fsck automatic HDD check on next reboot, reboot, check what is going on and monitor the machine from there on.

Hopefully the few described steps, has helped some sysadmin. There is plenty of things which I've described that might go wrong, even following the described steps, might not help if the machines Storage Drives / SAS / SSD has too much of a damage. But as said in most cases following this few steps would improve the machine state.

Wish you the best of luck!


How to start Syslog ( Syslog-ng ) on IBM AIX

Thursday, October 20th, 2022

how-to-enable-syslog-ng-on-ibm-aix-unix-know-AIX-logo.svg

Syslog-ng is a system logging application, which can be a replacement of the default syslog. With syslog-ng, the log messages can be sent in an ecrypted/secure channel to a remote server. If the central log server or the network connection becomes unavailable syslog-ng will store messages on the local hard disk.

The syslog-ng application automatically sends the stored messages to the server when the connection is reestablished, in the same order the messages were received. The disk buffer is persistent – no messages are lost even if syslog-ng is restarted. (Another possibility to send those messages to a secondary server.)

syslog-ng can filter log messages and select only the ones matching certain criteria, but it cannot interpret and analyze the meaning behind the messages. It can receive messages from files, remote hosts, and other sources, and these are sent to one or more destinations (files, remote hosts..),

It has a server – client model, here only syslog-ng client informations will be described (syslog-ng server has not been tested, only client, which were sending messages to a remote server (qradar).)

One missing feature of syslog-ng, that it cannot rotate logs by itself. For log rotation an external tool like logrotate needs to be used.


1. Install / Uninstall syslog-ng on AIX


1.1. Install syslog-ng on AIX
 

After downloading the syslog-ng installer package, we have 2 options
– run ./syslog-ng-<edition>-<version>-<OS>-<platform>.run script, or
– install as an rpm package: rpm -i syslog-ng-premium-edition-<version>-<OS>-<arch>.rpm

During install, the default syslogd will be replaced automatically by syslog-ng (no parallel operation is possible).


1.2. Uninstall syslog-ng on AIX
 

If the .run installer has been used: /opt/syslog-ng/bin/uninstall.sh (The uninstall script will automatically restore the syslog daemon used before installing syslog-ng.)
If the .rpm package has been used: rpm -e syslog-ng-premium-edition (with rpm, it does not restore the syslog daemon used before syslog-ng).


AIX is a custom and non-free OS if you had to deal with it you might might ponder how to stop / start syslog-ng.
The paths to binaries on AIX
The configuration is not universal, but represents the GEK server.

2. Set Automatic start of syslog-ng on AIX

Enable Start from /etc/tcpip:

start /opt/freeware/sbin/syslog-ng "$src_running"


3. Check syslog-ng configuration is correct
 

Configuration could be under separate locations but the most likely ones for  syslog-ng.conf and license.txt files are located in the
/opt/syslog-ng/etc/ directory or /etc/syslog-ng depending on how it was configured on install time.


After changing tuning the configuration, it can be checked for errors:

# /opt/freeware/sbin/syslog-ng –syntax-only

How to filter dhcp traffic between two networks running separate DHCP servers to prevent IP assignment issues and MAC duplicate addresses

Tuesday, February 8th, 2022

how-to-filter-dhcp-traffic-2-networks-running-2-separate-dhcpd-servers-to-prevent-ip-assignment-conflicts-linux
Tracking the Problem of MAC duplicates on Linux routers
 

If you have two networks that see each other and they're not separated in VLANs but see each other sharing a common netmask lets say 255.255.254.0 or 255.255.252.0, it might happend that there are 2 dhcp servers for example (isc-dhcp-server running on 192.168.1.1 and dhcpd running on 192.168.0.1 can broadcast their services to both LANs 192.168.1.0.1/24 (netmask 255.255.255.0) and Local Net LAN 192.168.1.1/24. The result out of this is that some devices might pick up their IP address via DHCP from the wrong dhcp server.

Normally if you have a fully controlled little or middle class home or office network (10 – 15 electronic devices nodes) connecting to the LAN in a mixed moth some are connected via one of the Networks via connected Wifi to 192.168.1.0/22 others are LANned and using static IP adddresses and traffic is routed among two ISPs and each network can see the other network, there is always a possibility of things to go wrong. This is what happened to me so this is how this post was born.

The best practice from my experience so far is to define each and every computer / phone / laptop host joining the network and hence later easily monitor what is going on the network with something like iptraf-ng / nethogs  / iperf – described in prior  how to check internet spepeed from console and in check server internet connectivity speed with speedtest-cliiftop / nload or for more complex stuff wireshark or even a simple tcpdump. No matter the tools network monitoring is only part on solving network issues. A very must have thing in a controlled network infrastructure is defining every machine part of it to easily monitor later with the monitoring tools. Defining each and every host on the Hybrid computer networks makes administering the network much easier task and  tracking irregularities on time is much more likely. 

Since I have such a hybrid network here hosting a couple of XEN virtual machines with Linux, Windows 7 and Windows 10, together with Mac OS X laptops as well as MacBook Air notebooks, I have followed this route and tried to define each and every host based on its MAC address to pick it up from the correct DHCP1 server  192.168.1.1 (that is distributing IPs for Internet Provider 1 (ISP 1), that is mostly few computers attached UTP LAN cables via LiteWave LS105G Gigabit Switch as well from DHCP2 – used only to assigns IPs to servers and a a single Wi-Fi Access point configured to route incoming clients via 192.168.0.1 Linux NAT gateway server.

To filter out the unwanted IPs from the DHCPD not to propagate I've so far used a little trick to  Deny DHCP MAC Address for unwanted clients and not send IP offer for them.

To give you more understanding,  I have to clear it up I don't want to have automatic IP assignments from DHCP2 / LAN2 to DHCP1 / LAN1 because (i don't want machines on DHCP1 to end up with IP like 192.168.0.50 or DHCP2 (to have 192.168.1.80), as such a wrong IP delegation could potentially lead to MAC duplicates IP conflicts. MAC Duplicate IP wrong assignments for those older or who have been part of administrating large ISP network infrastructures  makes the network communication unstable for no apparent reason and nodes partially unreachable at times or full time …

However it seems in the 21-st century which is the century of strangeness / computer madness in the 2022, technology advanced so much that it has massively started to break up some good old well known sysadmin standards well documented in the RFCs I know of my youth, such as that every electronic equipment manufactured Vendor should have a Vendor Assigned Hardware MAC Address binded to it that will never change (after all that was the idea of MAC addresses wasn't it !). 
Many mobile devices nowadays however, in the developers attempts to make more sophisticated software and Increase Anonimity on the Net and Security, use a technique called  MAC Address randomization (mostly used by hackers / script kiddies of the early days of computers) for their Wi-Fi Net Adapter OS / driver controlled interfaces for the sake of increased security (the so called Private WiFi Addresses). If a sysadmin 10-15 years ago has seen that he might probably resign his profession and turn to farming or agriculture plant growing, but in the age of digitalization and "cloud computing", this break up of common developed network standards starts to become the 'new normal' standard.

I did not suspected there might be a MAC address oddities, since I spare very little time on administering the the network. This was so till recently when I accidently checked the arp table with:

Hypervisor:~# arp -an
192.168.1.99     5c:89:b5:f2:e8:d8      (Unknown)
192.168.1.99    00:15:3e:d3:8f:76       (Unknown)

..


and consequently did a network MAC Address ARP Scan with arp-scan (if you never used this little nifty hacker tool I warmly recommend it !!!)
If you don't have it installed it is available in debian based linuces from default repos to install

Hypervisor:~# apt-get install –yes arp-scan


It is also available on CentOS / Fedora / Redhat and other RPM distros via:

Hypervisor:~# yum install -y arp-scan


Hypervisor:~# arp-scan –interface=eth1 192.168.1.0/24

192.168.1.19    00:16:3e:0f:48:05       Xensource, Inc.
192.168.1.22    00:16:3e:04:11:1c       Xensource, Inc.
192.168.1.31    00:15:3e:bb:45:45       Xensource, Inc.
192.168.1.38    00:15:3e:59:96:8e       Xensource, Inc.
192.168.1.34    00:15:3e:d3:8f:77       Xensource, Inc.
192.168.1.60    8c:89:b5:f2:e8:d8       Micro-Star INT'L CO., LTD
192.168.1.99     5c:89:b5:f2:e8:d8      (Unknown)
192.168.1.99    00:15:3e:d3:8f:76       (Unknown)

192.168.x.91     02:a0:xx:xx:d6:64        (Unknown)
192.168.x.91     02:a0:xx:xx:d6:64        (Unknown)  (DUP: 2)

N.B. !. I found it helpful to check all available interfaces on my Linux NAT router host.

As you see the scan revealed, a whole bunch of MAC address mess duplicated MAC hanging around, destroying my network topology every now and then 
So far so good, the MAC duplicates and strangely hanging around MAC addresses issue, was solved relatively easily with enabling below set of systctl kernel variables.
 

1. Fixing Linux ARP common well known Problems through disabling arp_announce / arp_ignore / send_redirects kernel variables disablement


Linux answers ARP requests on wrong and unassociated interfaces per default. This leads to the following two problems:

ARP requests for the loopback alias address are answered on the HW interfaces (even if NOARP on lo0:1 is set). Since loopback aliases are required for DSR (Direct Server Return) setups this problem is very common (but easy to fix fortunately).

If the machine is connected twice to the same switch (e.g. with eth0 and eth1) eth2 may answer ARP requests for the address on eth1 and vice versa in a race condition manner (confusing almost everything).

This can be prevented by specific arp kernel settings. Take a look here for additional information about the nature of the problem (and other solutions): ARP flux.

To fix that generally (and reboot safe) we  include the following lines into


Hypervisor:~# cp -rpf /etc/sysctl.conf /etc/sysctl.conf_bak_07-feb-2022
Hypervisor:~# cat >> /etc/sysctl.conf

# LVS tuning
net.ipv4.conf.lo.arp_ignore=1
net.ipv4.conf.lo.arp_announce=2
net.ipv4.conf.all.arp_ignore=1
net.ipv4.conf.all.arp_announce=2

net.ipv4.conf.all.send_redirects=0
net.ipv4.conf.eth0.send_redirects=0
net.ipv4.conf.eth1.send_redirects=0
net.ipv4.conf.default.send_redirects=0

Press CTRL + D simultaneusly to Write out up-pasted vars.


To read more on Load Balancer using direct routing and on LVS and the arp problem here


2. Digging further the IP conflict / dulicate MAC Problems

Even after this arp tunings (because I do have my Hypervisor 2 LAN interfaces connected to 1 switch) did not resolved the issues and still my Wireless Connected devices via network 192.168.1.1/24 (ISP2) were randomly assigned the wrong range IPs 192.168.0.XXX/24 as well as the wrong gateway 192.168.0.1 (ISP1).
After thinking thoroughfully for hours and checking the network status with various tools and thanks to the fact that my wife has a MacBook Air that was always complaining that the IP it tried to assign from the DHCP was already taken, i"ve realized, something is wrong with DHCP assignment.
Since she owns a IPhone 10 with iOS and this two devices are from the same vendor e.g. Apple Inc. And Apple's products have been having strange DHCP assignment issues from my experience for quite some time, I've thought initially problems are caused by software on Apple's devices.
I turned to be partially right after expecting the logs of DHCP server on the Linux host (ISP1) finding that the phone of my wife takes IP in 192.168.0.XXX, insetad of IP from 192.168.1.1 (which has is a combined Nokia Router with 2.4Ghz and 5Ghz Wi-Fi and LAN router provided by ISP2 in that case Vivacom). That was really puzzling since for me it was completely logical thta the iDevices must check for DHCP address directly on the Network of the router to whom, they're connecting. Guess my suprise when I realized that instead of that the iDevices does listen to the network on a wide network range scan for any DHCPs reachable baesd on the advertised (i assume via broadcast) address traffic and try to connect and take the IP to the IP of the DHCP which responds faster !!!! Of course the Vivacom Chineese produced Nokia router responded DHCP requests and advertised much slower, than my Linux NAT gateway on ISP1 and because of that the Iphone and iOS and even freshest versions of Android devices do take the IP from the DHCP that responds faster, even if that router is not on a C class network (that's invasive isn't it??). What was even more puzzling was the automatic MAC Randomization of Wifi devices trying to connect to my ISP1 configured DHCPD and this of course trespassed any static MAC addresses filtering, I already had established there.

Anyways there was also a good think out of tthat intermixed exercise 🙂 While playing around with the Gigabit network router of vivacom I found a cozy feature SCHEDULEDING TURNING OFF and ON the WIFI ACCESS POINT  – a very useful feature to adopt, to stop wasting extra energy and lower a bit of radiation is to set a swtich off WIFI AP from 12:30 – 06:30 which are the common sleeping hours or something like that.
 

3. What is MAC Randomization and where and how it is configured across different main operating systems as of year 2022?

Depending on the operating system of your device, MAC randomization will be available either by default on most modern mobile OSes or with possibility to have it switched on:

  • Android Q: Enabled by default 
  • Android P: Available as a developer option, disabled by default
  • iOS 14: Available as a user option, disabled by default
  • Windows 10: Available as an option in two ways – random for all networks or random for a specific network

Lately I don't have much time to play around with mobile devices, and I do not my own a luxury mobile phone so, the fact this ne Androids have this MAC randomization was unknown to me just until I ended a small mess, based on my poor configured networks due to my tight time constrains nowadays.

Finding out about the new security feature of MAC Randomization, on all Android based phones (my mother's Nokia smartphone and my dad's phone, disabled the feature ASAP:


4. Disable MAC Wi-Fi Ethernet device Randomization on Android

MAC Randomization creates a random MAC address when joining a Wi-Fi network for the first time or after “forgetting” and rejoining a Wi-Fi network. It Generates a new random MAC address after 24 hours of last connection.

Disabling MAC Randomization on your devices. It is done on a per SSID basis so you can turn off the randomization, but allow it to function for hotspots outside of your home.

  1. Open the Settings app
  2. Select Network and Internet
  3. Select WiFi
  4. Connect to your home wireless network
  5. Tap the gear icon next to the current WiFi connection
  6. Select Advanced
  7. Select Privacy
  8. Select "Use device MAC"
     

5. Disabling MAC Randomization on MAC iOS, iPhone, iPad, iPod

To Disable MAC Randomization on iOS Devices:

Open the Settings on your iPhone, iPad, or iPod, then tap Wi-Fi or WLAN


  1. Tap the information button next to your network
  2. Turn off Private Address
  3. Re-join the network


Of course next I've collected their phone Wi-Fi adapters and made sure the included dhcp MAC deny rules in /etc/dhcp/dhcpd.conf are at place.

The effect of the MAC Randomization for my Network was terrible constant and strange issues with my routings and networks, which I always thought are caused by the openxen hypervisor Virtualization VM bugs etc.

That continued for some months now, and the weird thing was the issues always started when I tried to update my Operating system to the latest packetset, do a reboot to load up the new piece of software / libraries etc. and plus it happened very occasionally and their was no obvious reason for it.


6. How to completely filter dhcp traffic between two network router hosts
IP 192.168.0.1 / 192.168.1.1 to stop 2 or more configured DHCP servers
on separate networks see each other

To prevent IP mess at DHCP2 server side (which btw is ISC DHCP server, taking care for IP assignment only for the Servers on the network running on Debian 11 Linux), further on I had to filter out any DHCP UDP traffic with iptables completely.
To prevent incorrect route assignments assuming that you have 2 networks and 2 routers that are configurred to do Network Address Translation (NAT)-ing Router 1: 192.168.0.1, Router 2: 192.168.1.1.

You have to filter out UDP Protocol data on Port 67 and 68 from the respective source and destination addresses.

In firewall rules configuration files on your Linux you need to have some rules as:

# filter outgoing dhcp traffic from 192.168.1.1 to 192.168.0.1
-A INPUT -p udp -m udp –dport 67:68 -s 192.168.1.1 -d 192.168.0.1 -j DROP
-A OUTPUT -p udp -m udp –dport 67:68 -s 192.168.1.1 -d 192.168.0.1 -j DROP
-A FORWARD -p udp -m udp –dport 67:68 -s 192.168.1.1 -d 192.168.0.1 -j DROP

-A INPUT -p udp -m udp –dport 67:68 -s 192.168.0.1 -d 192.168.1.1 -j DROP
-A OUTPUT -p udp -m udp –dport 67:68 -s 192.168.0.1 -d 192.168.1.1 -j DROP
-A FORWARD -p udp -m udp –dport 67:68 -s 192.168.0.1 -d 192.168.1.1 -j DROP

-A INPUT -p udp -m udp –sport 67:68 -s 192.168.1.1 -d 192.168.0.1 -j DROP
-A OUTPUT -p udp -m udp –sport 67:68 -s 192.168.1.1 -d 192.168.0.1 -j DROP
-A FORWARD -p udp -m udp –sport 67:68 -s 192.168.1.1 -d 192.168.0.1 -j DROP


You can download also filter_dhcp_traffic.sh with above rules from here


Applying this rules, any traffic of DHCP between 2 routers is prohibited and devices from Net: 192.168.1.1-255 will no longer wrongly get assinged IP addresses from Network range: 192.168.0.1-255 as it happened to me.


7. Filter out DHCP traffic based on MAC completely on Linux with arptables

If even after disabling MAC randomization on all devices on the network, and you know physically all the connecting devices on the Network, if you still see some weird MAC addresses, originating from a wrongly configured ISP traffic router host or whatever, then it is time to just filter them out with arptables.

## drop traffic prevent mac duplicates due to vivacom and bergon placed in same network – 255.255.255.252
dchp1-server:~# arptables -A INPUT –source-mac 70:e2:83:12:44:11 -j DROP


To list arptables configured on Linux host

dchp1-server:~# arptables –list -n


If you want to be paranoid sysadmin you can implement a MAC address protection with arptables by only allowing a single set of MAC Addr / IPs and dropping the rest.

dchp1-server:~# arptables -A INPUT –source-mac 70:e2:84:13:45:11 -j ACCEPT
dchp1-server:~# arptables -A INPUT  –source-mac 70:e2:84:13:45:12 -j ACCEPT


dchp1-server:~# arptables -L –line-numbers
Chain INPUT (policy ACCEPT)
1 -j DROP –src-mac 70:e2:84:13:45:11
2 -j DROP –src-mac 70:e2:84:13:45:12

Once MACs you like are accepted you can set the INPUT chain policy to DROP as so:

dchp1-server:~# arptables -P INPUT DROP


If you later need to temporary, clean up the rules inside arptables on any filtered hosts flush all rules inside INPUT chain, like that
 

dchp1-server:~#  arptables -t INPUT -F

How to test RAM Memory for errors in Linux / UNIX OS servers. Find broken memory RAM banks

Friday, December 3rd, 2021

test-ram-memory-for-errors-linux-unix-find-broken-memory-logo


1. Testing the memory with motherboard integrated tools
 

Memory testing has been integral part of Computers for the last 50 years. In the dawn of computers those older perhaps remember memory testing was part of the computer initialization boot. And this memory testing was delaying the boot with some seconds and the user could see the memory numbers being counted up to the amount of memory. With the increased memory modern computers started to have and the annoyance to wait for a memory check program to check the computer hardware memory on modern computers this check has been mitigated or completely removed on some hardware.
Thus under some circumstances sysadmins or advanced computer users might need to check the memory, especially if there is some suspicion for memory damages or if for example a home PC starts crashing with Blue screens of Death on Windows without reason or simply the PC or some old arcane Linux / UNIX servers gets restarted every now and then for now apparent reason. When such circumstances occur it is an idea to start debugging the hardware issue with a simple memory check.

There are multiple ways to test installed memory banks on a server laptop or local home PC both integrated and using external programs.
On servers that is usually easily done from ILO or IPMI or IDRAC access (usually web) interface of the vendor, on laptops and home usage from BIOS or UEFI (Unified Extensible Firmware Interface) acces interface on system boot that is possible as well.

memtest-hp
HP BIOS Setup

An old but gold TIP, more younger people might not know is the


Prolonged SHIFT key press which once held with the user instructs the machine to initiate a memory test before the computer starts reading what is written in the boot loader.

So before anything else from below article it might be a good idea to just try HOLD SHIFT for 15-20 seconds after a complete Shut and ON from the POWER button.

If this test does not triggered or it is triggered and you end up with some corrupted memory but you're not sure which exact Memory bank is really crashing and want to know more on what memory Bank and segments are breaking up you might want to do a more thorough testing. In below article I'll try to explain shortly how this can be done.


2. Test the memory using a boot USB Flash Drive / DVD / CD 
 

Say hello to memtest86+. It is a Linux GRUB boot loader bootable utility that tests physical memory by writing various patterns to it and reading them back. Since memtest86+ runs directly off the hardware it does not require any operating system support for execution. Perhaps it is important to mention that memtest86 (is PassMark memtest86)and memtest86+ (An Advanced Memory diagnostic tool) are different tools, the first is freeware and second one is FOSS software.

To use it all you'll need is some version of Linux. If you don't already have some burned in somewhere at your closet, you might want to burn one.
For Linux / Mac users this is as downloading a Linux distribution ISO file and burning it with

# dd if=/path/to/iso of=/dev/sdbX bs=80M status=progress


Windows users can burn a Live USB with whatever Linux distro or download and burn the latest versionof memtest86+ from https://www.memtest.org/  on Windows Desktop with some proggie like lets say UnetBootIn.
 

2.1. Run memtest86+ on Ubuntu

Many Linux distributions such as Ubuntu 20.0 comes together with memtest86+, which can be easily invoked from GRUB / GRUB2 Kernel boot loader.
Ubuntu has a separate menu pointer for a Memtest.

ubuntu-grub-2-04-boot-loader-memtest86-menu-screenshot

Other distributions RPM based distributions such as CentOS, Fedora Linux, Redhat things differ.

2.2. memtest86+ on Fedora


Fedora used to have the memtest86+ menu at the GRUB boot selection prompt, but for some reason removed it and in newest Fedora releases as of time such as Fedora 35 memtest86+ is preinstalled and available but not visible, to start on  already and to start a memtest memory test tool:

  •   Boot a Fedora installation or Rescue CD / USB. At the prompt, type "memtest86".

boot: memtest86

2.3 memtest86+ on RHEL Linux

The memtest86+tool is available as an RPM package from Red Hat Network (RHN) as well as a boot option from the Red Hat Enterprise Linux rescue disk.
And nowadays Red Hat Enterprise Linux ships by default with the tool.

Prior redhat (now legacy) releases such as on RHEL 5.0 it has to be installed and configure it with below 3 commands.

[root@rhel ~]# yum install memtest86+
[root@rhel ~]# memtest-setup
[root@rhel ~]# grub2-mkconfig -o /boot/grub2/grub.cfg


    Again as with CentOS to boot memtest86+ from the rescue disk, you will need to boot your system from CD 1 of the Red Hat Enterprise Linux installation media, and type the following at the boot prompt (before the Linux kernel is started):

boot: memtest86

memtestx86-8gigabytes-of-memory-boot-screenshot
memtest86+ testing 5 memory slots

As you see all on above screenshot the Memory banks are listed as Slots. There are a number of Tests to be completed until
it can be said for sure memory does not have any faulty cells. 
The

Pass: 0
Errors: 0 

Indicates no errors, so in the end if memtest86 does not find anything this values should stay at zero.
memtest86+ is also usable to detecting issues with temperature of CPU. Just recently I've tested a PC thinking that some memory has defects but it turned out the issue on the Computer was at the CPU's temperature which was topping up at 80 – 82 Celsius.

If you're unfortunate and happen to get some corrupted memory segments you will get some red fields with the memory addresses found to have corrupted on Read / Write test operations:

memtest86-returning-memory-address-errors-screenshot


2.4. Install and use memtest and memtest86+ on Debian / Mint Linux

You can install either memtest86+ or just for the fun put both of them and play around with both of them as they have a .deb package provided out of debian non-free /etc/apt/sources.list repositories.


root@jeremiah:/home/hipo# apt-cache show memtest86 memtest86+
Package: memtest86
Version: 4.3.7-3
Installed-Size: 302
Maintainer: Yann Dirson <dirson@debian.org>
Architecture: amd64
Depends: debconf (>= 0.5) | debconf-2.0
Recommends: memtest86+
Suggests: hwtools, memtester, kernel-patch-badram, grub2 (>= 1.96+20090523-1) | grub (>= 0.95+cvs20040624), mtools
Description-en: thorough real-mode memory tester
 Memtest86 scans your RAM for errors.
 .
 This tester runs independently of any OS – it is run at computer
 boot-up, so that it can test *all* of your memory.  You may want to
 look at `memtester', which allows testing your memory within Linux,
 but this one won't be able to test your whole RAM.
 .
 It can output a list of bad RAM regions usable by the BadRAM kernel
 patch, so that you can still use you old RAM with one or two bad bits.
 .
 This is the last DFSG-compliant version of this software, upstream
 has opted for a proprietary development model starting with 5.0.  You
 may want to consider using memtest86+, which has been forked from an
 earlier version of memtest86, and provides a different set of
 features.  It is available in the memtest86+ package.
 .
 A convenience script is also provided to make a grub-legacy-based
 floppy or image.

Description-md5: 0ad381a54d59a7d7f012972f613d7759
Homepage: http://www.memtest86.com/
Section: misc
Priority: optional
Filename: pool/main/m/memtest86/memtest86_4.3.7-3_amd64.deb
Size: 45470
MD5sum: 8dd2a4c52910498d711fbf6b5753bca9
SHA256: 09178eca21f8fd562806ccaa759d0261a2d3bb23190aaebc8cd99071d431aeb6

Package: memtest86+
Version: 5.01-3
Installed-Size: 2391
Maintainer: Yann Dirson <dirson@debian.org>
Architecture: amd64
Depends: debconf (>= 0.5) | debconf-2.0
Suggests: hwtools, memtester, kernel-patch-badram, memtest86, grub-pc | grub-legacy, mtools
Description-en: thorough real-mode memory tester
 Memtest86+ scans your RAM for errors.
 .
 This tester runs independently of any OS – it is run at computer
 boot-up, so that it can test *all* of your memory.  You may want to
 look at `memtester', which allows to test your memory within Linux,
 but this one won't be able to test your whole RAM.
 .
 It can output a list of bad RAM regions usable by the BadRAM kernel
 patch, so that you can still use your old RAM with one or two bad bits.
 .
 Memtest86+ is based on memtest86 3.0, and adds support for recent
 hardware, as well as a number of general-purpose improvements,
 including many patches to memtest86 available from various sources.
 .
 Both memtest86 and memtest86+ are being worked on in parallel.
Description-md5: aa685f84801773ef97fdaba8eb26436a
Homepage: http://www.memtest.org/

Tag: admin::benchmarking, admin::boot, hardware::storage:floppy,
 interface::text-mode, role::program, scope::utility, use::checking
Section: misc
Priority: optional
Filename: pool/main/m/memtest86+/memtest86+_5.01-3_amd64.deb
Size: 75142
MD5sum: 4f06523532ddfca0222ba6c55a80c433
SHA256: ad42816e0b17e882713cc6f699b988e73e580e38876cebe975891f5904828005


root@jeremiah:/home/hipo# apt-get install –yes memtest86+

root@jeremiah:/home/hipo# apt-get install –yes memtest86

Reading package lists… Done
Building dependency tree       
Reading state information… Done
Suggested packages:
  hwtools kernel-patch-badram grub2 | grub
The following NEW packages will be installed:
  memtest86
0 upgraded, 1 newly installed, 0 to remove and 21 not upgraded.
Need to get 45.5 kB of archives.
After this operation, 309 kB of additional disk space will be used.
Get:1 http://ftp.de.debian.org/debian buster/main amd64 memtest86 amd64 4.3.7-3 [45.5 kB]
Fetched 45.5 kB in 0s (181 kB/s)     
Preconfiguring packages …
Selecting previously unselected package memtest86.
(Reading database … 519985 files and directories currently installed.)
Preparing to unpack …/memtest86_4.3.7-3_amd64.deb …
Unpacking memtest86 (4.3.7-3) …
Setting up memtest86 (4.3.7-3) …
Generating grub configuration file …
Found background image: saint-John-of-Rila-grub.jpg
Found linux image: /boot/vmlinuz-4.19.0-18-amd64
Found initrd image: /boot/initrd.img-4.19.0-18-amd64
Found linux image: /boot/vmlinuz-4.19.0-17-amd64
Found initrd image: /boot/initrd.img-4.19.0-17-amd64
Found linux image: /boot/vmlinuz-4.19.0-8-amd64
Found initrd image: /boot/initrd.img-4.19.0-8-amd64
Found linux image: /boot/vmlinuz-4.19.0-6-amd64
Found initrd image: /boot/initrd.img-4.19.0-6-amd64
Found linux image: /boot/vmlinuz-4.19.0-5-amd64
Found initrd image: /boot/initrd.img-4.19.0-5-amd64
Found linux image: /boot/vmlinuz-4.9.0-8-amd64
Found initrd image: /boot/initrd.img-4.9.0-8-amd64
Found memtest86 image: /boot/memtest86.bin
Found memtest86+ image: /boot/memtest86+.bin
Found memtest86+ multiboot image: /boot/memtest86+_multiboot.bin
File descriptor 3 (pipe:[66049]) leaked on lvs invocation. Parent PID 22581: /bin/sh
done
Processing triggers for man-db (2.8.5-2) …


After this both memory testers memtest86+ and memtest86 will appear next to the option of booting a different version kernels and the Advanced recovery kernels, that you usually get in the GRUB boot prompt.

2.5. Use memtest embedded tool on any Linux by adding a kernel variable

Edit-Grub-Parameters-add-memtest-4-to-kernel-boot

2.4.1. Reboot your computer

# reboot

2.4.2. At the GRUB boot screen (with UEFI, press Esc).

2.4.3 For 4 passes add temporarily the memtest=4 kernel parameter.
 

memtest=        [KNL,X86,ARM,PPC,RISCV] Enable memtest
                Format: <integer>
                default : 0 <disable>
                Specifies the number of memtest passes to be
                performed. Each pass selects another test
                pattern from a given set of patterns. Memtest
                fills the memory with this pattern, validates
                memory contents and reserves bad memory
                regions that are detected.


3. Install and use memtester Linux tool
 

At some condition, memory is the one of the suspcious part, or you just want have a quick test. memtester  is an effective userspace tester for stress-testing the memory subsystem.  It is very effective at finding intermittent and non-deterministic faults.

The advantage of memtester "live system check tool is", you can check your system for errors while it's still running. No need for a restart, just run that application, the downside is that some segments of memory cannot be thoroughfully tested as you already have much preloaded data in it to have the Operating Sytstem running, thus always when possible try to stick to rule to test the memory using memtest86+  from OS Boot Loader, after a clean Machine restart in order to clean up whole memory heap.

Anyhow for a general memory test on a Critical Legacy Server  (if you lets say don't have access to Remote Console Board, or don't trust the ILO / IPMI Hardware reported integrity statistics), running memtester from already booted is still a good idea.


3.1. Install memtester on any Linux distribution from source

wget http://pyropus.ca/software/memtester/old-versions/memtester-4.2.2.tar.gz
# tar zxvf memtester-4.2.2.tar.gz
# cd memtester-4.2.2
# make && make install

3.2 Install on RPM based distros


On Fedora memtester is available from repositories however on many other RPM based distros it is not so you have to install it from source.

[root@fedora ]# yum install -y memtester


3.3. Install memtester on Deb based Linux distributions from source
 

To install it on Debian / Ubuntu / Mint etc. , open a terminal and type:
 

root@linux:/ #  apt install –yes memtester

The general run syntax is:

memtester [-p PHYSADDR] [ITERATIONS]


You can hence use it like so:

hipo@linux:/ $ sudo memtester 1024 5

This should allocate 1024MB of memory, and repeat the test 5 times. The more repeats you run the better, but as a memtester run places a great overall load on the system you either don't increment the runs too much or at least run it with  lowered process importance e.g. by nicing the PID:

hipo@linux:/ $ nice -n 15 sudo memtester 1024 5


  • If you have more RAM like 4GB or 8GB, it is upto you how much memory you want to allocate for testing.
  • As your operating system, current running process might take some amount of RAM, Please check available Free RAM and assign that too memtester.
  • If you are using a 32 Bit System, you cant test more than 4 GB even though you have more RAM( 32 bit systems doesnt support more than 3.5 GB RAM as you all know).
  • If your system is very busy and you still assigned higher than available amount of RAM, then the test might get your system into a deadlock, leads to system to halt, be aware of this.
  • Run the memtester as root user, so that memtester process can malloc the memory, once its gets hold on that memory it will try to apply lock. if specified memory is not available, it will try to reduce required RAM automatically and try to lock it with mlock.
  • if you run it as a regular user, it cant auto reduce the required amount of RAM, so it cant lock it, so it tries to get hold on that specified memory and starts exhausting all system resources.


If you have 8 Gigas of RAM plugged into the PC motherboard you have to multiple 1024*8 this is easily done with bc (An arbitrary precision calculator language) tool:

root@linux:/ # bc -l
bc 1.07.1
Copyright 1991-1994, 1997, 1998, 2000, 2004, 2006, 2008, 2012-2017 Free Software Foundation, Inc.
This is free software with ABSOLUTELY NO WARRANTY.
For details type `warranty'. 
8*1024
8192


 for example you should run:

root@linux:/ # memtester 8192 5

memtester version 4.3.0 (64-bit)
Copyright (C) 2001-2012 Charles Cazabon.
Licensed under the GNU General Public License version 2 (only).

pagesize is 4096
pagesizemask is 0xfffffffffffff000
want 8192MB (2083520512 bytes)
got  8192MB (2083520512 bytes), trying mlock …Loop 1/1:
  Stuck Address       : ok        
  Random Value        : ok
  Compare XOR         : ok
  Compare SUB         : ok
  Compare MUL         : ok
  Compare DIV         : ok
  Compare OR          : ok
  Compare AND         : ok
  Sequential Increment: ok
  Solid Bits          : ok        
  Block Sequential    : ok        
  Checkerboard        : ok        
  Bit Spread          : ok        
  Bit Flip            : ok        
  Walking Ones        : ok        
  Walking Zeroes      : ok        
  8-bit Writes        : ok
  16-bit Writes       : ok

Done.


4. Shell Script to test server memory for corruptions
 

If for some reason the machine you want to run a memory test doesn't have connection to the external network such as the internet and therefore you cannot configure a package repository server and install memtester, the other approach is to use a simple memory test script such as memtestlinux.sh
 

#!/bin/bash
# Downloaded from https://www.srv24x7.com/memtest-linux/
echo "ByteOnSite Memory Test"
cpus=`cat /proc/cpuinfo | grep processor | wc -l`
if [ $cpus -lt 6 ]; then
threads=2
else
threads=$(($cpus / 2))
fi
echo "Detected $cpus CPUs, using $threads threads.."
memory=`free | grep 'Mem:' | awk {'print $2'}`
memoryper=$(($memory / $threads))
echo "Detected ${memory}K of RAM ($memoryper per thread).."
freespace=`df -B1024 . | tail -n1 | awk {'print $4'}`
if [ $freespace -le $memory ]; then
echo You do not have enough free space on the current partition. Minimum: $memory bytes
exit 1
fi
echo "Clearing RAM Cache.."
sync; echo 3 > /proc/sys/vm/drop_cachesfile
echo > dump.memtest.img
echo "Writing to dump file (dump.memtest.img).."
for i in `seq 1 $threads`;
do
# 1044 is used in place of 1024 to ensure full RAM usage (2% over allocation)
dd if=/dev/urandom bs=$memoryper count=1044 >> dump.memtest.img 2>/dev/null &
pids[$i]=$!
echo $i
done
for pid in "${pids[@]}"
do
wait $pid
done

echo "Reading and analyzing dump file…"
echo "Pass 1.."
md51=`md5sum dump.memtest.img | awk {'print $1'}`
echo "Pass 2.."
md52=`md5sum dump.memtest.img | awk {'print $1'}`
echo "Pass 3.."
md53=`md5sum dump.memtest.img | awk {'print $1'}`
if [ “$md51” != “$md52” ]; then
fail=1
elif [ “$md51” != “$md53” ]; then
fail=1
elif [ “$md52” != “$md53” ]; then
fail=1
else
fail=0
fi
if [ $fail -eq 0 ]; then
echo "Memory test PASSED."
else
echo "Memory test FAILED. Bad memory detected."
fi
rm -f dump.memtest.img
exit $fail

Nota Bene !: Again consider the restults might not always be 100% trustable if possible restart the server and test with memtest86+

Consider also its important to make sure prior to script run,  you''ll have enough disk space to produce the dump.memtest.img file – file is created as a test bed for the memory tests and if not scaled properly you might end up with a full ( / ) root directory!


4.1 Other memory test script with dd and md5sum checksum

I found this solution on the well known sysadmin site nixCraft cyberciti.biz, I think it makes sense and quicker.

First find out memory site using free command.
 

# free
             total       used       free     shared    buffers     cached
Mem:      32867436   32574160     293276          0      16652   31194340
-/+ buffers/cache:    1363168   31504268
Swap:            0          0          0


It shows that this server has 32GB memory,
 

# dd if=/dev/urandom bs=32867436 count=1050 of=/home/memtest


free reports by k and use 1050 is to make sure file memtest is bigger than physical memory.  To get better performance, use proper bs size, for example 2048 or 4096, depends on your local disk i/o,  the rule is to make bs * count > 32 GB.
run

# md5sum /home/memtest; md5sum /home/memtest; md5sum /home/memtest


If you see md5sum mismatch in different run, you have faulty memory guaranteed.
The theory is simple, the file /home/memtest will cache data in memory by filling up all available memory during read operation. Using md5sum command you are reading same data from memory.


5. Other ways to test memory / do a machine stress test

Other good tools you might want to check for memory testing is mprime – ftp://mersenne.org/gimps/ 
(https://www.mersenne.org/ftp_root/gimps/)

  •  (mprime can also be used to stress test your CPU)

Alternatively, use the package stress-ng to run all kind of stress tests (including memory test) on your machine.
Perhaps there are other interesting tools for a diagnosis of memory if you know other ones I miss, let me know in the comment section.

Install and configure rkhunter for improved security on a PCI DSS Linux / BSD servers with no access to Internet

Wednesday, November 10th, 2021

install-and-configure-rkhunter-with-tightened-security-variables-rkhunter-logo

rkhunter or Rootkit Hunter scans systems for known and unknown rootkits. The tool is not new and most system administrators that has to mantain some good security servers perhaps already use it in their daily sysadmin tasks.

It does this by comparing SHA-1 Hashes of important files with known good ones in online databases, searching for default directories (of rootkits), wrong permissions, hidden files, suspicious strings in kernel modules, commmon backdoors, sniffers and exploits as well as other special tests mostly for Linux and FreeBSD though a ports for other UNIX operating systems like Solaris etc. are perhaps available. rkhunter is notable due to its inclusion in popular mainstream FOSS operating systems (CentOS, Fedora,Debian, Ubuntu etc.).

Even though rkhunter is not rapidly improved over the last 3 years (its last Official version release was on 20th of Febuary 2018), it is a good tool that helps to strengthen even further security and it is often a requirement for Unix servers systems that should follow the PCI DSS Standards (Payment Card Industry Data Security Standards).

Configuring rkhunter is a pretty straight forward if you don't have too much requirements but I decided to write this article for the reason there are fwe interesting options that you might want to adopt in configuration to whitelist any files that are reported as Warnings, as well as how to set a configuration that sets a stricter security checks than the installation defaults. 

1. Install rkhunter .deb / .rpm package depending on the Linux distro or BSD

  • If you have to place it on a Redhat based distro CentOS / Redhat / Fedora

[root@Centos ~]# yum install -y rkhunter


  • On Debian distros the package name is equevallent to install there exec usual:

root@debian:~# apt install –yes rkhunter

  • On FreeBSD / NetBSD or other BSD forks you can install it from the BSD "World" ports system or install it from a precompiled binary.

freebsd# pkg install rkhunter

One important note to make here is to have a fully functional Alarming from rkhunter, you will have to have a fully functional configured postfix / exim / qmail whatever mail server to relay via official SMTP so you the Warning Alarm emails be able to reach your preferred Alarm email address. If you haven't installed postfix for example and configure it you might do.

– On Deb based distros 

[root@Centos ~]#yum install postfix


– On RPM based distros

root@debian:~# apt-get install –yes postfix


and as minimum, further on configure some functional Email Relay server within /etc/postfix/main.cf
 

# vi /etc/postfix/main.cf
relayhost = [relay.smtp-server.com]

2. Prepare rkhunter.conf initial configuration


Depending on what kind of files are present on the filesystem it could be for some reasons some standard package binaries has to be excluded for verification, because they possess unusual permissions because of manual sys admin monification this is done with the rkhunter variable PKGMGR_NO_VRFY.

If remote logging is configured on the system via something like rsyslog you will want to specificly tell it to rkhunter so this check as a possible security issue is skipped via ALLOW_SYSLOG_REMOTE_LOGGING=1. 

In case if remote root login via SSH protocol is disabled via /etc/ssh/sshd_config
PermitRootLogin no variable, the variable to include is ALLOW_SSH_ROOT_USER=no

It is useful to also increase the hashing check algorithm for security default one SHA256 you might want to change to SHA512, this is done via rkhunter.conf var HASH_CMD=SHA512

Triggering new email Warnings has to be configured so you receive, new mails at a preconfigured mailbox of your choice via variable
MAIL-ON-WARNING=SetMailAddress


# vi /etc/rkhunter.conf

PKGMGR_NO_VRFY=/usr/bin/su

PKGMGR_NO_VRFY=/usr/bin/passwd

ALLOW_SYSLOG_REMOTE_LOGGING=1

# Needed for corosync/pacemaker since update 19.11.2020

ALLOWDEVFILE=/dev/shm/qb-*/qb-*

# enabled ssh root access skip

ALLOW_SSH_ROOT_USER=no

HASH_CMD=SHA512

# Email address to sent alert in case of Warnings

MAIL-ON-WARNING=Your-Customer@Your-Email-Server-Destination-Address.com

MAIL-ON-WARNING=Your-Second-Peronsl-Email-Address@SMTP-Server.com

DISABLE_TESTS=os_specific


Optionally if you're using something specific such as corosync / pacemaker High Availability cluster or some specific software that is creating /dev/ files identified as potential Risks you might want to add more rkhunter.conf options like:
 

# Allow PCS/Pacemaker/Corosync
ALLOWDEVFILE=/dev/shm/qb-attrd-*
ALLOWDEVFILE=/dev/shm/qb-cfg-*
ALLOWDEVFILE=/dev/shm/qb-cib_rw-*
ALLOWDEVFILE=/dev/shm/qb-cib_shm-*
ALLOWDEVFILE=/dev/shm/qb-corosync-*
ALLOWDEVFILE=/dev/shm/qb-cpg-*
ALLOWDEVFILE=/dev/shm/qb-lrmd-*
ALLOWDEVFILE=/dev/shm/qb-pengine-*
ALLOWDEVFILE=/dev/shm/qb-quorum-*
ALLOWDEVFILE=/dev/shm/qb-stonith-*
ALLOWDEVFILE=/dev/shm/pulse-shm-*
ALLOWDEVFILE=/dev/md/md-device-map
# Needed for corosync/pacemaker since update 19.11.2020
ALLOWDEVFILE=/dev/shm/qb-*/qb-*

# tomboy creates this one
ALLOWDEVFILE="/dev/shm/mono.*"
# created by libv4l
ALLOWDEVFILE="/dev/shm/libv4l-*"
# created by spice video
ALLOWDEVFILE="/dev/shm/spice.*"
# created by mdadm
ALLOWDEVFILE="/dev/md/autorebuild.pid"
# 389 Directory Server
ALLOWDEVFILE=/dev/shm/sem.slapd-*.stats
# squid proxy
ALLOWDEVFILE=/dev/shm/squid-cf*
# squid ssl cache
ALLOWDEVFILE=/dev/shm/squid-ssl_session_cache.shm
# Allow podman
ALLOWDEVFILE=/dev/shm/libpod*lock*


3. Set the proper mirror database URL location to internal network repository


Usually  file /var/lib/rkhunter/db/mirrors.dat does contain Internet server address where latest version of mirrors.dat could be fetched, below is how it looks by default on Debian 10 Linux.

root@debian:/var/lib/rkhunter/db# cat mirrors.dat 
Version:2007060601
mirror=http://rkhunter.sourceforge.net

As you can guess a machine that doesn't have access to the Internet neither directly, neither via some kind of secure proxy because it is in a Paranoic Demilitarized Zone (DMZ) Network with many firewalls. What you can do then is setup another Mirror server (Apache / Nginx) within the local PCI secured LAN that gets regularly the database from official database on http://rkhunter.sourceforge.net/ (by installing and running rkhunter –update command on the Mirror WebServer and copying data under some directory structure on the remote local LAN accessible server, to keep the DB uptodate you might want to setup a cron to periodically copy latest available rkhunter database towards the http://mirror-url/path-folder/)

# vi /var/lib/rkhunter/db/mirrors.dat

local=http://rkhunter-url-mirror-server-url.com/rkhunter/1.4/


A mirror copy of entire db files from Debian 10.8 ( Buster ) ready for download are here.

Update entire file property db and check for rkhunter db updates


# rkhunter –update && rkhunter –propupdate

[ Rootkit Hunter version 1.4.6 ]

Checking rkhunter data files…
  Checking file mirrors.dat                                  [ Skipped ]
  Checking file programs_bad.dat                             [ No update ]
  Checking file backdoorports.dat                            [ No update ]
  Checking file suspscan.dat                                 [ No update ]
  Checking file i18n/cn                                      [ No update ]
  Checking file i18n/de                                      [ No update ]
  Checking file i18n/en                                      [ No update ]
  Checking file i18n/tr                                      [ No update ]
  Checking file i18n/tr.utf8                                 [ No update ]
  Checking file i18n/zh                                      [ No update ]
  Checking file i18n/zh.utf8                                 [ No update ]
  Checking file i18n/ja                                      [ No update ]


rkhunter-update-propupdate-screenshot-centos-linux


4. Initiate a first time check and see whether something is not triggering Warnings

# rkhunter –check

rkhunter-checking-for-rootkits-linux-screenshot

As you might have to run the rkhunter multiple times, there is annoying Press Enter prompt, between checks. The idea of it is that you're able to inspect what went on but since usually, inspecting /var/log/rkhunter/rkhunter.log is much more easier, I prefer to skip this with –skip-keypress option.

# rkhunter –check  –skip-keypress


5. Whitelist additional files and dev triggering false warnings alerts


You have to keep in mind many files which are considered to not be officially PCI compatible and potentially dangerous such as lynx browser curl, telnet etc. might trigger Warning, after checking them thoroughfully with some AntiVirus software such as Clamav and checking the MD5 checksum compared to a clean installed .deb / .rpm package on another RootKit, Virus, Spyware etc. Clean system (be it virtual machine or a Testing / Staging) machine you might want to simply whitelist the files which are incorrectly detected as dangerous for the system security.

Again this can be achieved with

PKGMGR_NO_VRFY=

Some Cluster softwares that are preparing their own /dev/ temporary files such as Pacemaker / Corosync might also trigger alarms, so you might want to suppress this as well with ALLOWDEVFILE

ALLOWDEVFILE=/dev/shm/qb-*/qb-*


If Warnings are found check what is the issue and if necessery white list files due to incorrect permissions in /etc/rkhunter.conf .

rkhunter-warnings-found-screenshot

Re-run the check until all appears clean as in below screenshot.

rkhunter-clean-report-linux-screenshot

Fixing Checking for a system logging configuration file [ Warning ]

If you happen to get some message like, message appears when rkhunter -C is done on legacy CentOS release 6.10 (Final) servers:

[13:45:29] Checking for a system logging configuration file [ Warning ]
[13:45:29] Warning: The 'systemd-journald' daemon is running, but no configuration file can be found.
[13:45:29] Checking if syslog remote logging is allowed [ Allowed ]

To fix it, you will have to disable SYSLOG_CONFIG_FILE at all.
 

SYSLOG_CONFIG_FILE=NONE

Change Windows 10 default lock screen image via win registry LockScreenImage key change

Tuesday, September 21st, 2021

fix-lock-screen-missing-change-option-on-windows-10-windows-registry-icon

If you do work for a corporation on a Windows machine that is part of Windows Active Directory domain or a Microsoft 365 environment and your Domain admimistrator after some of the scheduled updates. Has enforced a Windows lock screen image change.
You  might be surprised to have some annoying corporation logo picture shown as a default Lock Screen image on your computer on next reoboot. Perhaps for some people it doesn't matter but for as a person who seriously like customizations, and a valuer of
freedom having an enforced picture logo each time I press CTRL + L (To lock my computer) is really annoying.

The logical question hence was how to reverse my desired image as  a default lock screen to enkoy. Some would enjoy some relaxing picture of a Woods, Cave or whatever Natural place landscape. I personally prefer simplicity so I simply use a simple purely black
background.

To do it you'll have anyways to have some kind of superuser access to the computer. At the company I'm epmloyeed, it is possible to temporary request Administrator access this is done via a software installed on the machine. So once I request it I become
Administratof of machine for 20 minutes. In that time I do used a 'Run as Administartor' command prompt cmd.exe and inside Windows registry do the following Registry change.

The first logical thing to do is to try to manually set the picture via:
 

Settings ->  Lock Screen

But unfortunately as you can see in below screenshot, there was no way to change the LockScreen background image.

Windows-settings-lockscreen-screenshot

In Windows Registry Editor

I had to go to registry path


[HKEY_LOCAL_MACHINE\SOFTWARE\Policies\Microsoft\Windows\.]

And from there in create a new "String Value" key
 

"LockScreenImage"


so full registry key path should be equal to:


[HKEY_LOCAL_MACHINE\SOFTWARE\Policies\Microsoft\Windows\Personalization\LockScreenImage]"

The value to set is:

C:\Users\a768839\Desktop\var-stuff\background\Desired-background-picture.jpg

windows-registry-change-lock-screen-background-picture-from-registry-screenshot

If you want to set a black background picture for LockScreen like me you can download my black background picture from here.

That's all press CTRL + L  key combination and the black screen background lock screen picture will appear !

Hopefully the Domain admin, would not soon enforce some policty to update the registry keys or return your old registry database from backup if something crashs out with something strange to break just set configuration.

To test whether the setting will stay permanent after the next scheduled Windows PC update of policies enforced by the Active Directory (AD) sysadmin, run manually from CMD.EXE

C:\> gpupdate /force


The command will download latest policies from Windows Domain, try to lock the screen once again with Control + L, if the background picture is still there most likely the Picture change would stay for a long.
If you get again the corporation preset domain background instead,  you're out of luck and will have to follow the same steps every, now and then after a domani policy update.

Enjoy your new smooth LockScreen Image 🙂


Disable NetworkManager automatic Ethernet Interface Management on Redhat Linux , CentOS 6 / 7 / 8

Friday, February 5th, 2021

rhel-centos-fedora-network-manager-disable-automatic-lan-interface-management

Most of Linux distributions had introduced the NetworkManager service and are slowly trying to push out the old ways and use entirely it to manage network configs. Though at times this is very helpful stuff especially if you have Linux running on Laptop on servers is a guarantee for troubles.

If you are a system administrator like me and you need that needs to configure a New server with lets say 8 (Ethernet interface) LAN cards each to be configured with different IPs and you have a mixture of configuration where some eth1,eth2 etc. (4 of the interface IPs has to be static IPs and others has to be taken from a DHCP lease. NetworkManager is not something that you will want as usually you don't expect soon a network IP topology change. Below is example from a Living Hypervisor server machine that has 8 Network Interfaces configured together with few Virtual Interfaces used by the running KVM Virtual Machines.
 

[root@redhat :~ ]# ip address show |grep ": <"
1: lo: <LOOPBACK,UP,LOWER_UP> mtu 65536 qdisc noqueue state UNKNOWN group default qlen 1000
2: ens1f0: <BROADCAST,MULTICAST,UP,LOWER_UP> mtu 1500 qdisc mq master team0 state UP group default qlen 1000
3: eno1: <BROADCAST,MULTICAST,UP,LOWER_UP> mtu 1500 qdisc mq master team0 state UP group default qlen 1000
4: ens1f1: <BROADCAST,MULTICAST,UP,LOWER_UP> mtu 1500 qdisc mq master br2 state UP group default qlen 1000
5: ens1f2: <BROADCAST,MULTICAST> mtu 1500 qdisc noop state DOWN group default qlen 1000
6: eno2: <BROADCAST,MULTICAST,UP,LOWER_UP> mtu 1500 qdisc mq master br1 state UP group default qlen 1000
7: ens1f3: <BROADCAST,MULTICAST> mtu 1500 qdisc noop state DOWN group default qlen 1000
8: eno3: <BROADCAST,MULTICAST> mtu 1500 qdisc noop state DOWN group default qlen 1000
9: eno4: <BROADCAST,MULTICAST> mtu 1500 qdisc noop state DOWN group default qlen 1000
10: venet0: <BROADCAST,POINTOPOINT,NOARP,UP,LOWER_UP> mtu 1500 qdisc noqueue state UNKNOWN group default
11: br1: <BROADCAST,MULTICAST,UP,LOWER_UP> mtu 1500 qdisc noqueue state UP group default qlen 1000
12: br2: <BROADCAST,MULTICAST,UP,LOWER_UP> mtu 1500 qdisc noqueue state UP group default qlen 1000
13: team0: <BROADCAST,MULTICAST,UP,LOWER_UP> mtu 1500 qdisc noqueue master br0 state UP group default qlen 1000
14: br0: <BROADCAST,MULTICAST,UP,LOWER_UP> mtu 1500 qdisc noqueue state UP group default qlen 1000
15: host-routed: <BROADCAST,MULTICAST> mtu 1500 qdisc noop state DOWN group default qlen 1000
16: virbr0: <NO-CARRIER,BROADCAST,MULTICAST,UP> mtu 1500 qdisc noqueue state DOWN group default qlen 1000
17: virbr0-nic: <BROADCAST,MULTICAST> mtu 1500 qdisc pfifo_fast master virbr0 state DOWN group default qlen 1000
18: virbr1: <NO-CARRIER,BROADCAST,MULTICAST,UP> mtu 1500 qdisc noqueue state DOWN group default qlen 1000
19: virbr1-nic: <BROADCAST,MULTICAST> mtu 1500 qdisc pfifo_fast master virbr1 state DOWN group default qlen 1000
26: vme52540019e701: <BROADCAST,MULTICAST,UP,LOWER_UP> mtu 1500 qdisc pfifo_fast master br0 state UNKNOWN group default qlen 1000
27: vme52540081868b: <BROADCAST,MULTICAST,UP,LOWER_UP> mtu 1500 qdisc pfifo_fast master br1 state UNKNOWN group default qlen 1000
28: vme525400a13f03: <BROADCAST,MULTICAST,UP,LOWER_UP> mtu 1500 qdisc pfifo_fast master br2 state UNKNOWN group default qlen 1000


Having a NM managing so many LAN connected Ethernets can create you A LOT of surprises even if your servers are in a Highly Secured data center where chance of sudden IP change or network misbehaves are minimal. Even minimal some in Housing might do something wrong on the Rack mixing up with another server or switch andyour server might end up easily with unexplainable Network problems because of this NM service which is trying 'to balance' any network issues according to some algorithms …

Thus to save yourlself the troubles and completely disable NetworkManager (NM) Ethernets handling.

As a hint some of the troubles you might get especially if the System Hardware has issues with the Integrated Motherboard LAN Controllers such as of Dell PowerEdge R640 Rack Server.
I've recently observed one such Dell Rack mounted machine I had to configure from scratch which has out of the box 
NM preinstalled by a colleague and was doing strange stuff with the routings causing it to become remotely inacessible after reboot.
Even though I have started configuring the IPs and have double and triple check the configuration and machine had proper set of /etc/sysconfig/network-scripts/ifcfg-* configuration it still failed to boot with a network properly brought up and become unreachable via remote SSH connection immediately after sending machine to init 6 with /usr/sbin/init 6 (alias for shutdown -r now or reboot -f now :)

On Redhat 8 / CentOS 8 to Disabling permanently NM you have to disable NM systemd services permanently and add NM_CONTROLLED=no to each of the Ethernet configurations listed in network-scripts/ifcfg-eno3 eno4 eno1np0 etc. ifaces.

1. Disable completely Network Manager service and mask it

[root@redhat :~ ]# systemctl mask NetworkManager.service
[root@redhat :~ ]# systemctl stop NetworkManager.service
[root@redhat :~ ]# systemctl disable NetworkManager.service

2. Check if all systemd networkmanager components scripts are really disabled

# systemctl list-unit-files | grep NetworkManager

NetworkManager-dispatcher.service disabled
NetworkManager-wait-online.service enabled
NetworkManager.service disabled


NetworkManager-wait-online.service seems to be also enabled so we have to disable it.

[root@redhat :~ ]#  systemctl mask NetworkManager-wait-online.service
[root@redhat :~ ]#  systemctl disable NetworkManager-wait-online.service

Double check NM services

[root@redhat :~ ]#  systemctl list-unit-files | grep NetworkManager
  …

3. Install / Enable old (legacy) network-scripts 


network-scripts is disabled by default due to it doesn't play well with NM.
Install the rpm package to enable it back
 

[root@redhat :~ ]#  yum install -y network-scripts 

4. Test if network-scripts is really enabled


Use Redhat's nmcli command for controlling network manager if it reports NM not running then you're fine

[root@redhat :~ ]#  nmcli device
Error: NetworkManager is not running.

5. Disable legacy use network-scripts print outs


Bring down some interface with ifdown Redhat script frontend to ifconfig and bring it up with ifup iface-name
 

# ifup eno4
WARN      : [ifup] You are using 'ifup' script provided by 'network-scripts', which are now deprecated.
WARN      : [ifup] 'network-scripts' will be removed in one of the next major releases of RHEL.
WARN      : [ifup] It is advised to switch to 'NetworkManager' instead – it provides 'ifup/ifdown' scripts as well.


Notice the warnings they're harmless and safe to ignore however it is pretty annoying to see them, to disable them:

[root@redhat :~ ]#  touch /etc/sysconfig/disable-deprecation-warnings

6. Use network.service old-fashioned systemd service


From now on you can start using the good old well known and properly working network.service

[root@redhat :~ ]#  systemctl status network


To enable the network service to start after boot:

[root@redhat :~ ]#  systemctl enable network

7. Disable NetworkManager use from Network configuration scripts ifcfg-* for all server available configured ethernet cards


Open with text editor every network script and append NM_CONTROLLED="no" to the end of the file.
 

[root@redhat :~ ]#  vi /etc/sysconfig/network-scripts/ifcfg-ethernetX
NM_CONTROLLED="no"

To save yourself the time if you want to disable NetworkManager use for all /etc/sysconfig/network-scripts/ifcfg-* use a simple shell loop:
 

[root@redhat :~ ]# cd /etc/sysconfig/network-scripts/
[root@redhat :/etc/sysconfig/network-scripts ]# for i in *ifcfg*; do echo NM_CONTROLLED="no" >> $i; done


To load the new network settings do another network reload / restart
 

[root@redhat :~ ]# systemctl restart network


To disable NetworkManager on older CentOS 6 / Redhat 6 / SuSE / Fedora Linux where the OS still not systemd enabled instead of using systemctl you can straight do it with old and well known chkconfig redhat script.
 

[root@centos6 :~ ]# service NetworkManager stop
[root@centos6 :~ ]# chkconfig NetworkManager off

How to Avoid the 7 Most Frequent Mistakes in Python Programming

Monday, September 9th, 2019

python-programming-language-logo

Python is very appealing for Rapid Application Development for many reasons, including high-level built in data structures, dynamic typing and binding, or to use as glue to connect different components. It’s simple and easy to learn but new Python developers can fall in the trap of missing certain subtleties.

Here are 7 common mistakes that are harder to catch but that even more experienced Python developers have fallen for.


1. The misuse of expressions as function argument defaults

Python allows developers to indicate optional function arguments by giving them default values. In most cases, this is a great feature of Python, but it can create some confusion when the default value is mutable. In fact, the common mistake is thinking that the optional argument is set to whatever default value you’ve set every time the function argument is presented without a value. It can seem a bit complicated, but the answer is that the default value for this function argument is only evaluated at the time you’ve defined the function, one time only.  

how-to-avoid-the-7-most-frequent-mistakes-in-python-programming-3


2. Incorrect use of class variables

Python handles class variables internally as dictionaries and they will follow the Method Resolution Order (MRO). If an attribute is not found in one class it will be looked up in base classes so references to one part of the code are actually references to another part, and that can be quite difficult to handle well in Python. For class attributes, I recommend reading up on this aspect of Python independently to be able to handle them.

how-to-avoid-the-7-most-frequent-mistakes-in-python-programming-2


3. Incorrect specifications of parameters for exception blocks

There is a common problem in Python when except statements are provided but they don’t take a list of the exceptions specified. The syntax except Exception is used to bind these exception blocks to optional parameters so that there can be further inspections. What happens, however, is that certain exceptions are then not being caught by the except statement, but the exception becomes bound to parameters. The way to get block exceptions in one except statement has to be done by specifying the first parameter as a tuple to contain all the exceptions that you want to catch.

how-to-avoid-the-7-most-frequent-mistakes-in-python-programming-1
 

4. Failure to understand the scope rules

The scope resolution on Python is built on the LEGB rule as it’s commonly known, which means Local, Enclosing, Global, Built-in. Although at first glance this seems simple, there are some subtleties about the way it actually works in Python, which creates a more complex Python problem. If you make an assignment to a variable in a scope, Python will assume that variable is local to the scope and will shadow a variable that’s similarly named in other scopes. This is a particular problem especially when using lists.


5. Modifying lists during iterations over it


When a developer deletes an item from a list or array while iterating, they stumble upon a well known Python problem that’s easy to fall into. To address this, Python has incorporated many programming paradigms which can really simplify and streamline code when they’re used properly. Simple code is less likely to fall into the trap of deleting a list item while iterating over it. You can also use list comprehensions to avoid this problem.

how-to-avoid-the-7-most-frequent-mistakes-in-python-programming-8


6. Name clash with Python standard library


Python has so many library modules which is a bonus of the language, but the problem is that you can inadvertently have a name clash between your module and a module in the standard library. The problem here is that you can accidentally import another library which will import the wrong version. To avoid this, it’s important to be aware of the names in the standard library modules and stay away from using them.

how-to-avoid-the-7-most-frequent-mistakes-in-python-programming-5


7. Problems with binding variables in closures


Python has a late binding behavior which looks up the values of variables in closure only when the inner function is called. To address this, you may have to take advantage of default arguments to create anonymous functions that will give you the desired behavior – it’s either elegant or a hack depending on how you look at it, but it’s important to know.


how-to-avoid-the-7-most-frequent-mistakes-in-python-programming-6

Python is very powerful and flexible and it’s a great language for developers, but it’s important to be familiar with the nuances of it to optimize it and avoid these errors.

Ellie Coverdale, a technical writer at Essay roo and UK Writings, is involved in tech research and projects to find new advances and share her insights. She shares what she has learned with her readers on the Boom Essays blog.

How to change default Text editor in Linux

Saturday, August 31st, 2019

This is a very trivial question but, as I thought someone that is starting with Linux basics Operating might be interested I will shortly explain in this small article how to change default text editor on Linux.

Changing default text editor is especially helpful if you have to administer a newly purchased dedicated servers, that comes with default Operating System preinstalled.

By default many Linux distributions versions such as Debian / Ubuntu comes with nano comes with a default text editor nano (ANOther enhanced free Pico editor clone) many people as me are irritated and prefer to use instead vim (Vi Improved), mcedit (the Midnight Commander), joe or emacs as a default.
 

1. Changing default console text editor on Debian based Linux


On Debian / Ubuntu / Mint and other deb based distributions the easiest way to change text editor is with update-alternatives cmd.
 

update-alternatives –config editor


changing-default-text-editor-in-linux

Using Debian update-alternatives is useful as it makes the change OS global wide and the default mc viewer program mcview will also understand the change in the default text editor, which makes it the preferrable way to do it on deb based OS family.

An alternative way to set the default programs for the OS system wide is to create the respective symbolic link in /etc/alternatives actually what update-alternatives wrapper script does is exactly this it creates the required symlink.

2. Changing default text editor on any Linux


To change the text editor for only a single system existing user in /etc/passwd you need to edit $HOME/.bashrc, e.g. ~/.bashrc on Debian based Linux or on Fedora / RHEL / CentOS by adding to ~/.bash_profile
 

vim ~/.bashrc


And add

alias editor=vim

or

export EDITOR='/path/to/text-editor/program'
export VISUAL='/path/to/text-editor/program'

To change to mcedit for example when opening in any program that triggers to run default text editor

export EDITOR='/usr/bin/mcedit'
export VISUAL='/usr/bin/mcedit'


To make the change system wide on any Linux distribution you have to add the export EDITOR / export VISUAL at the end of /etc/bash.bashrc

To load the newly included .bashrc* instructions use source command
 

source ~/.bashrc


3. Changing the default text editor for mcview if all else fails


Once mc is running, use following menu keys order (also visible from Midnight Commander) menus:
 

    F9 Activates the top menu.
    o Selects the Option menu.
    c Opens the configuration dialog.
    i Toggles the use internal edit option.
    s Saves your preferences.

mcview-how-to-change-default-text-editor-screenshot

That's all folks Enjoy !